MuseScore with LinuxSampler
Using MuseScore with LinuxSampler
MuseScore ships with an internal synthesizer that relies on General Midi (GM) soundbanks for audio output. Far and away, one of the best banks is FluidGM, available from Ubuntu as fluid-soundfont-gm. However, not even FluidGM is completely satisfactory. Discerning ears may like the flute but quail at the oboe, or love the solo violin but hate the string section.
Choosing exactly the right soundfont for an instrument can make all the difference between an adequate sonic representation of your score and one that really shines.
This tutorial shows how to connect MuseScore to a sampler, which lets you choose your own soundfont for each individual instrument in a score. The instructions are for Ubuntu GNU/Linux systems, but may be useful to those running MuseScore under Windows or Mac OSX. Ubuntu users are expected to be familiar with the basics of installing software packages and launching applications, as well as with MuseScore itself.
Overview and software
The audio chain we will be setting up is very simple.
MuseScore => sampler => audio output
MuseScore's midi ports are connected to a sampler, which converts MuseScore's midi events to instrument sounds. The sampler is then connected to the system's audio output.
The specific software we'll be using is:
MuseScore, version 1.3
LinuxSampler, java interface
JACK audio connection kit, qjackctl interface
Gathering the software
Step 1 - Add the kx-studio ppa to your apt sources list
kx-studios specializes in Linux audio. They provide software packages (.debs) that are often more up-to-date than the .debs in the official Ubuntu repository. A few of their packages are unavailable elsewhere.
From the command line, do
    sudo apt-add-repository ppa:kxstudio-team/ppa

    sudo apt-get update
Step 2 - Install the software
From the command line, do
sudo apt-get install musescore jsampler jack2 qjackctl pulse-jack
This pulls all the necessary dependencies along with the packages themselves.
Collecting soundfonts
In order to use LinuxSampler, you need a library of soundfonts. Conceptually, soundfonts are the “instruments” you load into the sampler.
LinuxSampler can load soundfonts in .sf2, .sfz, or .gig format. Different format types can be loaded at the same time, for example an .sf2 flute, an .sfz oboe, and a .gig clarinet. Furthermore, you can load an entire soundbank, like FluidGM, and select just one instrument from it. Merlin Gold strings with an otherwise FluidGM orchestra? No problem.
Building a soundfont library can be frustrating process. There's no dearth of soundfonts on the Web, but wading through them requires patience. Everyone's tastes and needs being different, I can offer no advice. A good site with an extensive collection is Sf2Midi.com, but be forewarned: their free downloads come in at a snail's pace.
Many other sites exist. Google is your friend.
Note: Stay away from soundfonts that have been compressed with the utility, sfark. A dodgy bit of software in the first place, it has never been successfully ported to the GNU/Linux platform.
Starting and configuring JACK
With the necessary programs installed and a library of soundfonts, we can begin setting up MuseScore to work with LinuxSampler.
First, we need to get JACK, our audio connection kit, up and running. It is assumed you're running a Ubuntu system, and therefore likely that audio is managed by the PulseAudio sound server.
JACK and PulseAudio
At the command line, type
pidof pulseaudio
If it returns a number, PulseAudio is running, in which case, type
pulse-jack
pulse-jack will inform you that it's stopping the running PulseAudio server. Wait briefly, and it will say “Initiated PulseAudio successfully!”
If pidof pulseaudio doesn't return a number, PulseAudio is not active, and you may skip invoking pulse-jack.
Next, fire up qjackctl, which presents you with this window:

Click Setup... and select the Settings tab.
The Setup window contains a lot of configurable options which, if you're not a JACK wizard, appear intimidating. It is well beyond the scope of this tutorial to delve into the guts of JACK. Should you need to do so, see http://jackaudio.org/documentation.
Not to worry. The default settings will likely be satisfactorily. The ones you may need to adjust are highlighted below.

Realtime:
Needs to be checked, otherwise audio playback will be choppy.
Priority:
Tells JACK how much priority it has over other system activity, which is important for smooth audio playback. It can go as high as “90”; on most systems, you can leave it at “(default)”.
Frames/Period:
For the best audio performance, lower values are preferable. “1024” is good starting point.
Sample Rate:
Higher sample rates put more of a strain on the system. Start off with “44100”, which is the sample rate used on audio CDs. It is more than adequate for all but the highest of high-end audio.
Period/Buffer:
The higher the number, the less likely you are to experience audio overruns (“xruns”), which show up as pops, clicks, or choppiness during audio playback. “3” is a good place to start.
Suggestion: There's a certain amount of black magic involved with getting the Frames/Period, Sample Rate, and Period Buffer settings perfect. Start with the default settings, or the conservative suggestions made here. Don't make the mistake of getting hung up on perfection at this stage. JACK settings should be tweaked after you've got MuseScore and LinuxSampler working together, when you can hear if there are problems.
Next, select the Misc tab.

D-bus support:
If you're running PulseAudio and invoked pulse-jack prior to firing up qjackctl, you must enable D-bus support.
How you configure the other Misc options is up to you, depending on your needs.
Once you're done, click OK. Quit qjackctl, then launch it again in order to make the new settings effective.
Leave qjackctl running.
Configuring MuseScore
Fire up MuseScore and click on Edit->Preferences. Select the I/O tab.

Check “Use JACK MIDI output”.
Ports: Each midi port can carry up to 16 instrument channels, so unless you're composing something along the lines of Mahler's Symphony of a Thousand, a conservative value in the range of 2 - 4 is usually enough.
Left-Port / Right-Port: These should say “system:playback_1” and “system:playback_2”. If they do not, click on the dropdown bars and select them. If they aren't in the list, leave the ports at their default setting; you'll be disconnecting MuseScore from audio output at a later stage anyway.
Sample Rate, Fragments, Period Size: These should match the equivalent values you entered in the qjackctl Setup dialogue.
Click OK, then quit and restart MuseScore to make the new settings effective.
Leave MuseScore running.
Configuring LinuxSampler
Fire up jsampler, which will present you with the Fantasia front-end to LinuxSampler.

Click on Edit->Preferences.

Select the View tab. For best performance, you'll most likely want these settings:

Next, select the Defaults tab, which you may have to click the right-arrow at the end of the tab bar to find.
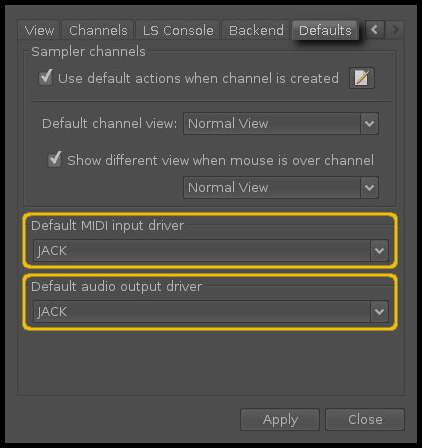
Set the Default MIDI input driver and the Default audio output driver both to JACK.
Click the Apply button, and the window will close itself.
Leave LinuxSampler running.
LinuxSampler - creating devices
The first step in using LinuxSampler is creating MIDI and audio devices that JACK, our audio connection kit, will recognize.
MIDI Devices
Click the power button at the left under MIDI Devices.

This causes a dropdown dialogue to appear.
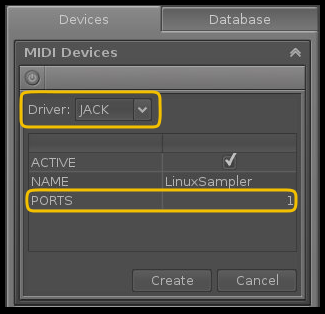
From the dropdown list beside Driver:, choose JACK.
Double-click in the field beside PORTS, where you see the number “1”. Change “1” to the number of MIDI ports you set up in MuseScore (in this tutorial, “2”).
Click Create. Your MIDI Devices now looks like this:

Audio Devices
Click the Audio Devices power button. Select JACK as the driver, and make sure the SAMPLERATE matches the sample rate configured in qjackctl.
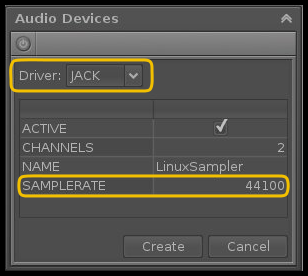
Click Create. Your Devices tab now looks like this:

Important: Notice that the power buttons have turned orange. This indicates their function has changed. Hereon after, clicking on them will remove the devices entirely, so be careful.
Connecting MuseScore, LinuxSampler, and audio playback
Before we can play MuseScore files, MuseScore and LinuxSampler have to be connected, via qjackctl, and the output directed to your soundcard.
Connect LinuxSampler to audio playback
Raise the qjackctl main window and click Connect. This raises the Connections window. Select the Audio tab if it is not already selected.
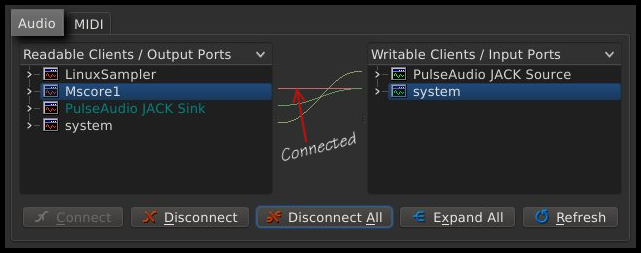
As you can see, MuseScore (Mscore1) is connected to the system playback port. Note that if you are not running PulseAudio (ie did not invoke 'pulse-jack' prior to starting qjackctl), “PulseAudio JACK Sink” and “PulseAudio JACK Source” will not be present.
Click on Mscore1 in the left panel and system in the right panel. The Connect button becomes inactive (greyed-out), and the Disconnect button becomes active.
Click Disconnect.
MuseScore's internal synthesizer is now disconnected from system playback.

Note: Mscore1 in the left panel might be connected to some other port in the right panel than “system”. If so, disconnect it. You do not want MuseScore's internal synthesizer connected to a playback port when using LinuxSampler.
Now click on LinuxSampler in the left pane and system in the right.
Click Connect.
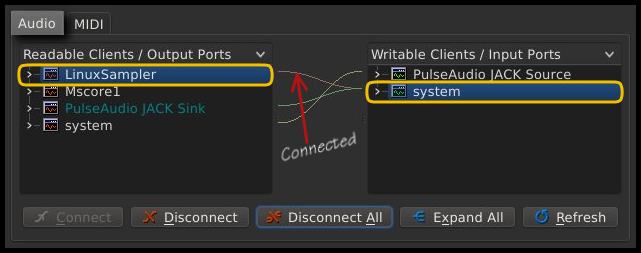
Output from LinuxSampler is now going to your soundcard.
Connect MuseScore to LinuxSampler
Select the MIDI tab.
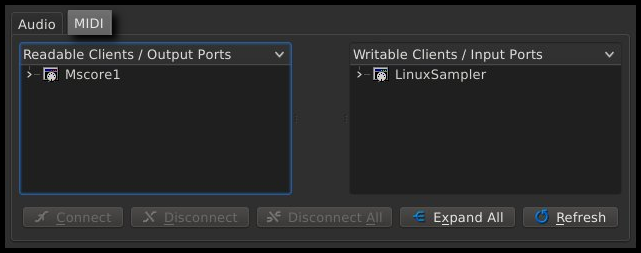
As you can see, MuseScore (Mscore1) is connected to nothing.
Click on the arrows beside Mscore1 and LinuxSampler, which will reveal the available MuseScore and LinuxSampler midi ports.
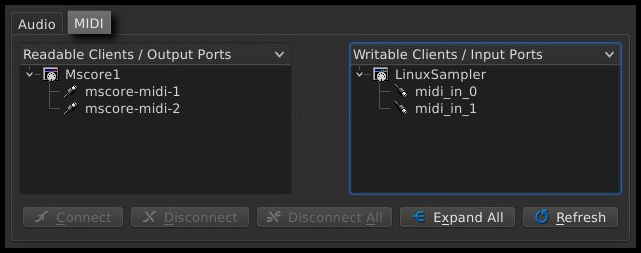
Click on mscore-midi-1 in the left panel and midi_in_0 in the right.
Click Connect.
Click on mscore-midi-2 in the left panel and midi_in_1 in the right.
Click Connect.
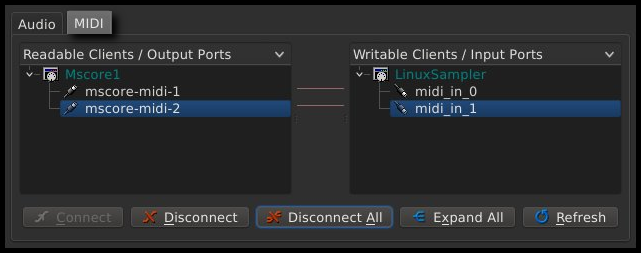
Our connections are now complete. MuseScore's midi ports are attached to LinuxSampler, and LinuxSampler is sending its output to your soundcard.
Loading instruments in LinuxSampler
Loading a single instrument soundfont
Raise the LinuxSampler (Fantasia) window. Click the greyed-out power button at the left of the middle panel.

Position the cursor over the orange [GIG/SF2/SFZ] engine label (the cursor changes from an arrow to a pointing finger). Click and select the kind of soundfont to be loaded—sf2, sfz, or gig—from the dropdown.
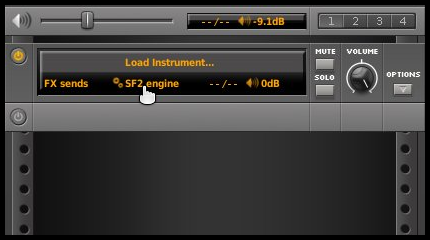
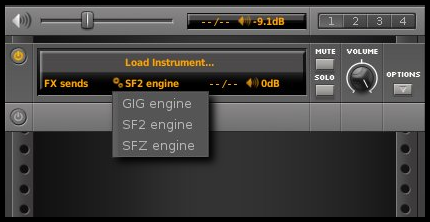
Next, position the cursor over Load Instrument and click. A Choose Instrument dialogue appears.
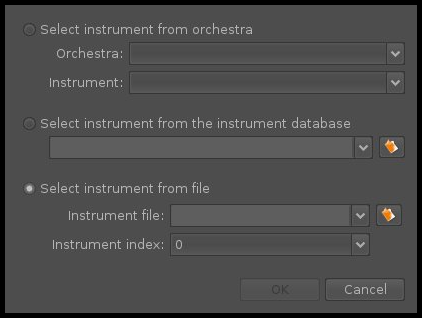
We will be focusing exclusively on the lower half of the dialogue, Select instrument from file. The other selection options are uniquely for gig files. Databases and orchestras can only be set up for gig files. If you're interested in this functionality, see the documentation at linuxsampler.org.
Click the folder icon at the far right of Instrument file.
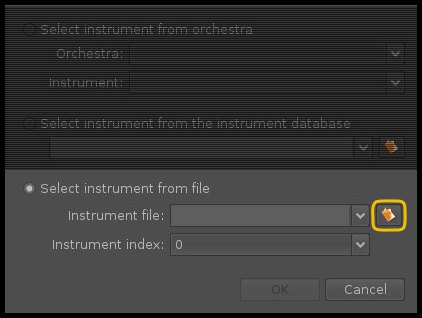
Select the soundfont you want from the file chooser and click Open.

This returns you to the Choose Instrument dialogue, which now displays the name of the selected file, “Oboe.sf2”, and the instrument index, “0 - Oboe”.
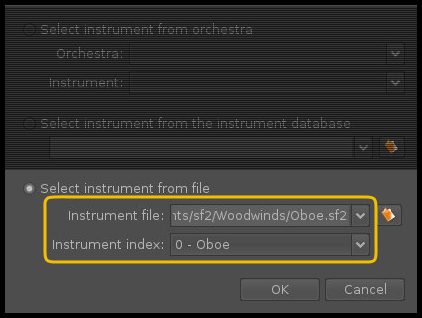
We'll look at the use of the instrument index when we load our next instrument.
Click OK, which returns you to the main interface. In the example, you can see that we've loaded an oboe.
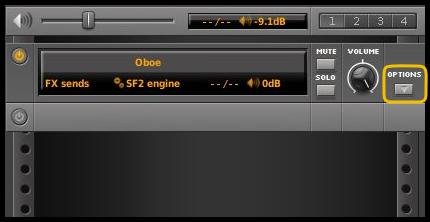
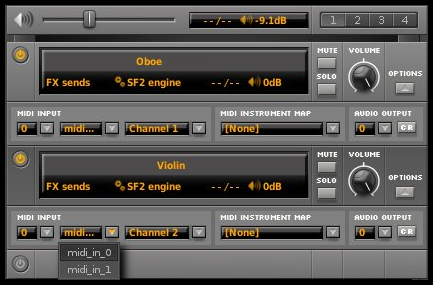
Click the OPTIONS button. The resulting dropdown shows that the Oboe is receiving its MIDI INPUT from device “0”, which corresponds to “MIDI DEVICE 0 (JACK)” in the right-hand panel.

If you click the orange midi... button or the arrow beside it, you'll see that the active port is midi_in_0, in other words MuseScore's mscore-midi-1 port, which we connected in qjackctl. The diagram illustrates.
Lastly, we see that the Oboe is loaded on Channel 1.
The port (midi_in_0) and Channel number become significant when mapping MuseScore instruments to LinuxSampler instruments. We'll be returning to the subject later.
Loading an instrument from a soundbank
Soundbanks are .sf2, .sfz, or .gig files that contain more than one instrument. They may be quite small, just three or four instruments, like the Florestan String Quartet, or large collections, for example the FluidGM soundbank or the Sonatina Symphony Orchestra.
Loading an instrument from a soundbank follows the same procedure as loading a single instrument soundfont, with one additional step. In the following instructions, we'll be loading a violin from the Florestan String Quartet soundbank.
Click the power button of the next available instrument slot. In our example, it's immediately below “Oboe”. Select the correct engine, then click on Load instrument...
As above, in the Choose Instrument dialogue, click on the folder icon at the right of Instrument file: and browse to the file you want.

Double-click on the icon to select the file.
The Choose Instrument dialogue now shows that we've loaded the Florestan String Quartet soundbank, but the Instrument index: shows “0 - Viola” and we want a violin.

Click on “0 - Viola” to reveal the instrument index dropdown. Select “1 - Violin”. Click OK.

Our violin from the Florestan String Quartet soundbank is now loaded. Clicking on the OPTIONS button reveals that the violin is on Channel 2, receiving its input from midi_in_0 (MuseScore's midi-in-1).
Note: The larger the soundbank, the longer it takes to to load, even when you're only after a single instrument. A full General Midi soundbank like FluidGM with 127 instruments and sounds can take a minute or more, depending on the speed of your system. If you save your LinuxSampler setups (which topic is covered further on), re-loading them, curiously, only takes a few seconds, even if some of the instruments are from very large soundbanks.
Mapping MuseScore instruments to LinuxSampler slots
Raise the MuseScore main window and press F8 to call up the Mixer window. In this example, we see the winds and brass of a standard orchestral score. Note that the yellow numbers are not present in the Mixer window; they are added here for convenience.

At this stage, confusion can arise owing to the fact that MuseScore instruments, as they show up in the Mixer, actually refer to midi channels, while the instrument slots in LinuxSampler are also called channels. To keep things simple, we'll call the MuseScore channels “instruments” and LinuxSampler channels “slots”.
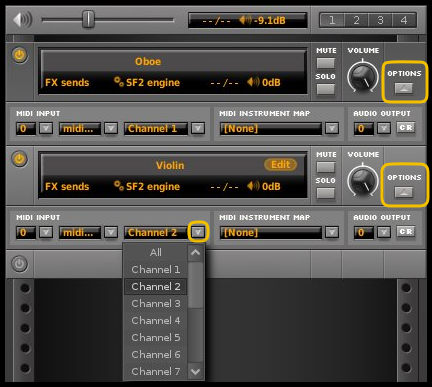
Mapping MuseScore instruments to LinuxSampler slots is simply a matter of ensuring that the Channel <n> in each slot matches the corresponding number of the MuseScore instrument. In LinuxSampler, channel numbers are found by clicking the OPTIONS button in the instrument slots, and changed by clicking the orange Channel <n> button.
Gotcha!
By default, LinuxSampler assigns channel numbers incrementally: in our example of an oboe and a violin, the oboe was automatically assigned Channel 1 and the violin Channel 2. Normally this means that if you load instruments in LinuxSampler in the same order they appear in MuseScore's Mixer window, the Channel numbers of the slots will be correct.
Some MuseScore instruments, however, are allotted more than one channel, for example, strings or trumpets. Strings automatically get three channels: normal, pizzicato, tremolo. The trumpet gets two: normal and muted. It's very easy to forget this when loading instruments in LinuxSampler. If the trumpet needs only the “normal” channel, MuseScore still allots it one more. Thus, in LinuxSampler, if the Channel number of the slot for the trumpet is 7, a trombone underneath it would have to be assigned Channel 9.
If playback of your score sounds like a gamelan instead of a symphony orchestra, you've probably overlooked this important detail.
Here's how the top a typical orchestral score appears in MuseScore's Mixer along with a corresponding LinuxSampler setup. Notice how the trumpet is on channel 7 in LinuxSampler, the muted trumpet has no corresponding LinuxSampler slot, and trombone I. is on channel 9.

More than sixteen instruments
For every staff in a score, MuseScore creates an instrument that appears in the Mixer. Though not actually shown in the Mixer, each instrument has a channel number derived from its position in the list: 1st = 1; 2nd = 2; etc. There is no restriction on the number of channels.
LinuxSampler's Channel dropdown, on the other hand, only goes up to “16”, which is LinuxSampler's per-port channel limit.
When the number of instruments in a score exceeds the per-port channel limit, click the midi... button and select the next port from the dropdown list.
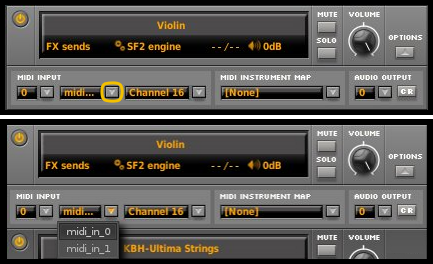
In the above, after clicking the midi... button, we see a Violin on Channel 16 of midi port midi_in_0. (Remember that midi_in_0 is connected to MuseScore's midi-in-1; see here.) We have just reached LinuxSampler's per-port limit (16), so any instruments loaded afterwards will need to be on midi_in_1.
The following demonstrates:
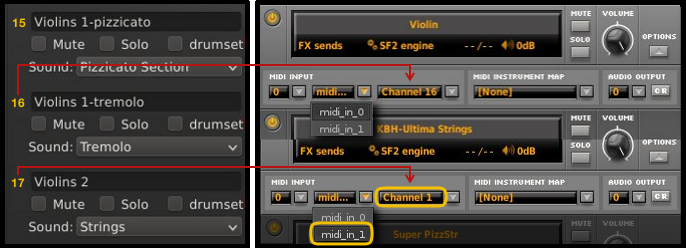
In the MuseScore Mixer, “Violins 1-tremolo” is instrument number 16, which corresponds to Channel 16 on midi_in_0 in LinuxSampler. (The actual instrument loaded in the LinuxSampler slot is a solo violin, not tremolo violins.)
“Violins 2”, however, is instrument number 17, one number higher than LinuxSampler's per-port channel limit. We therefore switch to the next available port, midi_in_1, and select Channel 1.
Hereon after, the Channel number will be the instrument number in MuseScore's Mixer minus sixteen. Instrument “18” will be Channel 2, instrument “19” Channel 3, and so on.
If the number of MuseScore instruments runs to more than 32, switch to midi_in_2 and calculate the LinuxSampler Channel number by subtracting thirty-two from the instrument's number in MuseScore's Mixer.
Saving and recalling a LinuxSampler setup
Once your LinuxSampler setup is complete, with all the slots correctly mapped to MuseScore instruments, save your setup.
Click on Actions->Export->Sampler Configuration, enter a filename in the Chooser, and click Save. LinuxSampler will append the correct file extension. All the details of your setup will be saved, including Midi and Audio devices.

To recall a setup, click Actions->Run Script..., select the setup you want from the file chooser, and click Open. In a few seconds, the entire setup will be loaded, and all you have to do is connect things with qjackctl.

Helpful tips
Acquiring and testing soundfonts is the longest part of working with MuseScore and LinuxSampler. LinuxSampler has a built-in keyboard, which helps with testing. Click on the keyboard icon in the toolbar, or go to the View menu and check MIDI Keyboard.
As mentioned, large GM soundbanks take forever to load when you're in the testing phase of a setup. Once the setup is tweaked to your liking and saved, recalling it does not exhibit the same snail-on-heroin loading speed, hence it's really worthwhile to save your setups.
Getting the levels right in both MuseScore's Mixer and LinuxSampler should be approached methodically. Either leave the Mixer settings at their defaults and adjust the levels in LinuxSampler, or leave the levels in LinuxSampler at their default and adjust them in the MuseScore Mixer.
I use the second method. First, I create a testing section at the end of my scores, where it's easy to get rid of when no longer needed. The testing section is a series of slow-moving measures, each containing a single whole-note, one per staff.
I then play the testing section repeatedly, adjusting the Mixer levels until every instrument has a uniform mezzo-forte volume. Once this is done, it's much easier to apply dynamics (note velocities) to your score and have them behave similarly between instruments.
Owing to a bug in MuseScore 1.3 and earlier, you must “touch” the Volume of every instrument in the Mixer whenever you load a saved score. Touching involves bumping the volume up or down one notch, then returning it to the former value. Failure to do so results in MuseScore not respecting your saved settings, and your levels will be incorrect.
Lastly, since disconnecting MuseScore's internal synthesizer diables Reverb, you may want to connect LinuxSampler to a reverb application, or an effects rack. You might also want to apply some equalization.
A good standalone reverb application is zita-rev1. JACK has an excellent effects rack, jack-rack, which can be loaded with all kinds of effects, including several styles of reverb. The best equalizer out there for Ubuntu GNU/Linux systems is jamin. All three are JACK-friendly, and can easily be connected with qjackctl.
To get all three,
sudo apt-get install zita-rev1 jack-rack jamin
Note that jack-rack requires the installation of LADSPA plugins. Type
apt-cache search --full | grep LADSPA | less
and consult the output for the ones you want.
