Pokročilá témata
Album
Správce alba umožňuje připravit seznam notových zápisů. Tento seznam je potom možné uložit jako soubor s albem ("*.album").
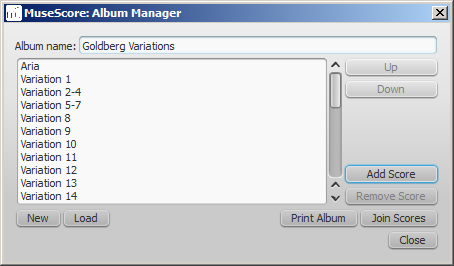
Tisk alba
Notové zápisy jsou vytištěny ve zvoleném pořadí se správnými čísly stran. Hodnoty posunu v čísle strany jsou potlačeny v Rozvržení → Nastavení strany.... Album je tištěno v jedné tiskové úloze, takže i dvoustranný tisk (duplexní tisknutí) pracuje dle očekávání.
Spojení notových zápisů
Notové zápisy jsou ve vybraném pořadí spojeny do jediného notového zápisu.
Pokud již nejsou přítomna, jsou do posledního taktu nebo rámečku každého notového zápisu přidána zalomení notových systémů a zalomení hudebních oddílů.
Požaduje se, aby měly všechny notové zápisy stejný nebo menší počet partů a notových osnov, než má první notový zápis. Každý part nebo notová osnova, jež nejsou v prvním notovém zápisu, budou ve spojeném notovém zápisu ztraceny.
Tyto mají představovat týž nástroj v tomtéž pořadí, v opačném případě přepíší nástroje v prvním notovém zápisu nástroje v následujících notových zápisech.
Funkce pro starou hudbu
MuseScore 2.0 nabízí několik nových funkcí na tvoření grafických listů staré hudby (obzvláště pro středověkou a renesanční) podobných komerčním vydáním z 20. století a dále.
Notový zápis bez barré
Protože většina renesanční hudby byla psána bez taktů (to jest nerozdělená do taktů), dlouhé noty rozdělené a vázané nad taktovými čarami podstatně mění vzhled notového zápisu. Rozpoznávání rozsáhlých melodických linek a opakovaných motivů se může stát obtížnějším. Z toho důvodu MuseScore poskytuje pokusnou zobrazovací metodu, při níž zůstávají hodnoty not nedotčeny. Tento způsob lze zapnout zaškrtnutím okénka v části Noty dialogu pro styl, který se nachází v Styl → Obecné...
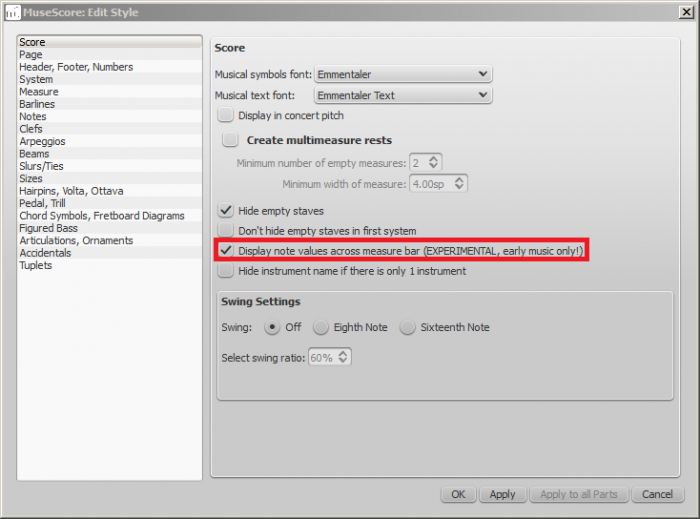
Použijte a zobrazení je okamžitě přizpůsobeno.

Původní notace (De Profundis Clamavi pro 4 hlasy od Nicolase Championa)

Před změnou stylu

Po změně stylu
Uvědomte si, že se tato funkce stále zkouší a může obsahovat chyby. Nejdelší podporovanou notovou hodnotou je longa (tečkovaná longa is still broken up and tied over).
Abyste se zbavili taktových čar, prostě zrušte zaškrtnutí u okénka “Ukázat taktové čáry” v dialogu s vlastnostmi notové osnovy. Nicméně je tu ještě jiná možnost.
Mensurstrich
Since a complete lack of barlines could make performing the music more difficult for current musicians, many modern engravers settled on a compromise called Mensurstrich, where barlines are drawn between, but not across, staves. This is also possible now: double click a barline, drag the lower end to the top of the staff below it, and drag the upper end to the bottom of the current staff. Do this in precision mode (hold down Shift). Then deselect the barline and the changes should be applied to the entire staff.

It may be easier to use the Inspector to change the numbers manually. To open the Inspector, press F8 and select a barline. The correct values are:
| Default | Mensurstrich | |
|---|---|---|
| Spanned staves | 1 | 2 |
| Span from | 0 | 8 |
| Span to | 8 | 0 |
You may want to set the barlines back to the default values at the end of the score or a section, but remember to hold down Ctrl, or else the entire staff will be reset.
Ambitus
Before there was the concept of an absolute pitch, performers were required to transpose vocal music to a singable range for their ensemble on the fly. To aid them, an ambitus was sometimes included, marking the entire range of a voice at the beginning of the piece. The ambitus is located in the palette at the bottom of the Lines section, from there drag it onto a clef. It will automatically detect the range.

The ambitus will consider all measures of music up until the next section break, beyond which a new ambitus may be applied. It can be adjusted manually or automatically in the Inspector. First select the ambitus to adjust. For manual adjustments edit the top and bottom note values. For automatic adjustment click the Update Range button in the inspector.
Mensural time signatures
In the mensural notation system, time signatures did not define the length of a measure, but the length of breves and semibreves. MuseScore supports mensural time symbols as a display method in the Time signature properties dialog rather than as symbols, but they are just for show, as the proportion of e.g. half notes per whole notes cannot be modified.
One way to make use of these symbols is to replicate when composers of the renaissance had multiple voices in different time signatures simultaneously without using tuplets. Edit the time signature on a per-staff basis, as long as the beginning and end of a measure in all staves match up. If they do not, then consider increasing the size of the measures to the lowest common denominator.
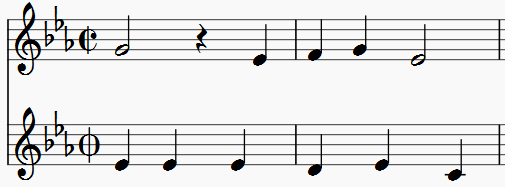
De Profundis Clamavi for 5 voices by Josquin Des Prez
See also
Hlavní paleta
Hlavní paleta umožňuje přistupovat ke všem možným prvkům, jež se dají přidat do vlastních palet, a v případě taktových označení a předznamenání si udělat své vlastní.
Jděte do Pohled → Hlavní paleta... nebo použijte klávesovou zkratku Shift+F9 (Mac: fn+Shift+F9).
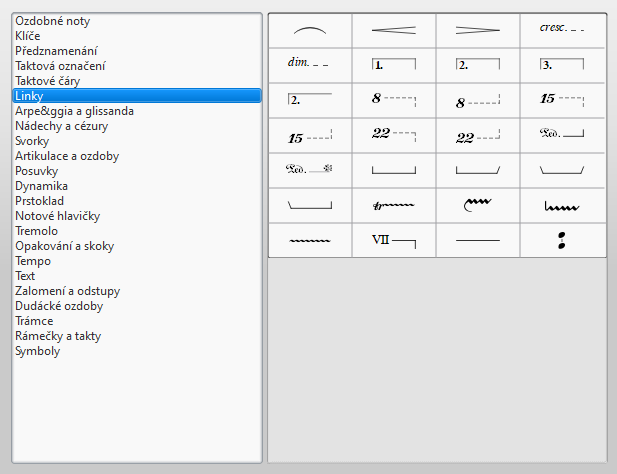
Přejetí nad položkou ukazovátkem myši ukáže nástrojovou radu (stručné vymezení černým písmemna žlutém pozadí).
Podívejte se také na
- Paleta
- Vlastní paleta
- Nonexistant node nid: 39841
Informace o notovém zápisu
Several meta tags are generated automatically on creation of a score, and more may be created later. These may be used in the Footer / Header of your score.
File → Info shows the values of the existing meta tags (some may be empty).
NOT FOUND: Score_information.png
Preexisting meta tags
Every score has the following meta tags. Some are automatically filled in on score creation, as the following list details:
- MuseScore Version: The version of MuseScore the score was last saved with.
- Revision: The revision of MuseScore the score was last saved with.
- API-Level: The file format version.
- arranger: (empty)
- composer: As entered in the New Score Wizard (which is also used to fill the composer text in the top vertical frame—be aware that later changes to one are not reflected in the other).
- copyright: As entered in the New Score Wizard. Copyright info appears as seemingly uneditable text at the bottom of every page of a score, but it can be edited or removed by changing the value here.
- creationDate: Date of the score creation. This could be empty, if the score was saved in test mode (see Command line options).
- lyricist: As entered in the New Score Wizard (which is also used to fill the corresponding lyricist text in the top vertical frame—be aware that later changes to one are not reflected in the other).
- movementNumber: (empty)
- movementTitle: (empty)
- platform: The platform the score was created on: "Microsoft Windows", "Apple Macintosh", "Linux" or "Unknown". Might be empty, when the score got saved in test mode
- poet: (empty)
- source: (empty)
- translator: (empty)
- workNumber: (empty)
- workTitle: As entered in the New Score Wizard (which is also used to fill the corresponding title text in the top vertical frame—be aware that later changes to one are not reflected in the other).
Every part has the following meta tags, generated and partly filled on part creation:
- MuseScore Version: (empty for linked parts, otherwise same as for score above)
- Revision: (same as for score above)
- API-Level: (same as for score above)
- partName: Name of the part as given on part creation (which is also used to fill the corresponding part name text in the top vertical frame—be aware that later changes to one are not reflected in the other).
The first three meta tags in the above lists cannot be used in the Header or Footer.
Modify a meta tag
To modify a meta tag of a score with linked parts, make sure the score is in the active tab. To modify a meta tag for an individual part, that part needs to be the active tab.
Go to File → Info and change the current text or fill in the empty field for any of the tags listed.
Add a new meta tag
To add a meta tag to a score with linked parts, make sure the score is in the active tab. To add a meta tag to an individual part, that part needs to be the active tab.
Go to File → Info → New
Fill in the name of your new meta tag and click OK (or Cancel). The meta tag will be added to your tag list. You can then fill in the content of the tag.
Header/Footer
You can show the content of meta tags in a header or footer for your score. To create a header or footer for a score with linked parts, make sure the score is in the active tab. To create a header or footer for an individual part, that part needs to be the active tab.
Go to Style → General... to open the Edit Style window and choose Header, Footer, Numbers from the sidebar on the left.
If you hover with your mouse over the Header or Footer text region, a list of macros will appear, showing their meaning, as well as the existing meta tags and their content.
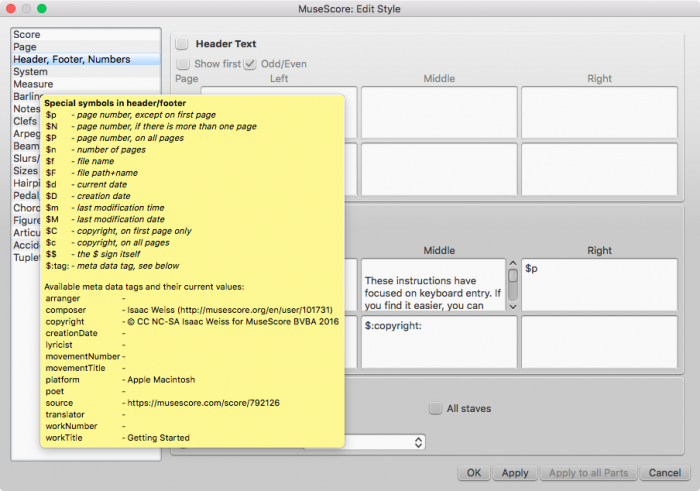
You can use the tags with $:NameOfTheTag: in the appropriate boxes to create headers or footers.
Click Apply to see how the header or footer looks in the score. Click OK to assign the header or footer to the score or the active part. If a part is in the active tab, you can also click Apply to all parts if you want that and then OK to leave the dialog. Cancel allows you to exit without applying the changes.
See also
Nastavení
V MuseScore můžete vytvořit přes přednastavení pracovní plochu s osobním stylem a/nebo přednastavenými složkami.
Klepněte na Úpravy → Nastavení... (Mac: MuseScore → Nastavení...):
Objeví se následující okno s různými kartami, kterými se budete pohybovat:

Některé změny mohou k tomu, aby začaly účinkovat, vyžadovat opětovné spuštění (ukončení a opětovné otevření) MuseScore. Poví vám to oznamovací okno, když klepnete buď na Použít nebo na OK.
Vrácení všech nastavení na výchozí hodnoty vrátí MuseScore zpět do stavu, jaký mělo, když jste je čerstvě nainstaloval.
Zrušit vrátí zpět všechny právě provedené změny.
Obecné
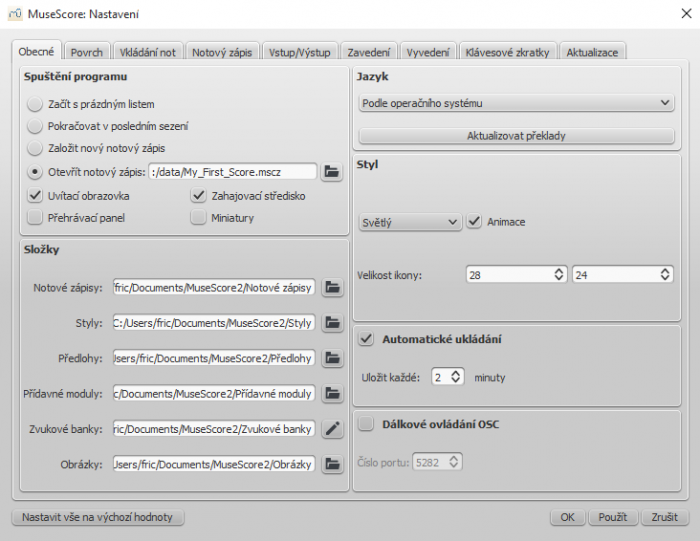
Zde můžete nastavit:
- Váš počáteční notový zápis
- Výchozí složku, ve které se budou hledat notové zápisy, zvukové banky, předlohy a tak dále
- Načasování automatického ukládání
- Jazyk pro MuseScore (překlady mohou být odtud aktualizovány také)
- Styl oken MuseScore a velikost ikon
- Okna, která se objeví při spuštění (přehrávací panel, pohyb v notách, spojení MuseScore).
Aktualizace překladů jazyků lze také dělat přes Nápověda → Správce zdrojů
Povrch
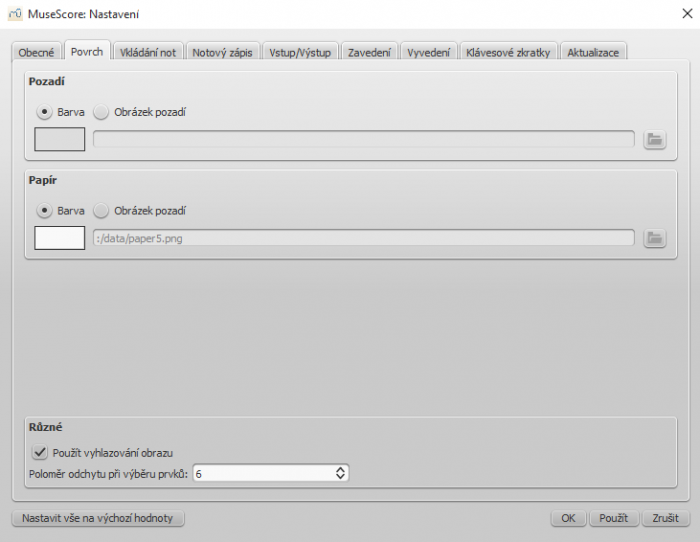
Použijte povrch k nastavení vámi upřednostňované barvy a složení povrchu pozadí a papíru.
Pod Různé se stará vyhlazování obrazu (ve výchozím nastavení zapnuto) o to, aby úhlopříčné čáry a okraje tvarů vypadaly hladčeji (méně roztřepené). Poloměr odchytu při výběr prvků řídí odstup, který může mít myš od předmětu, a tento pořád ještě odpovídá na činnosti myši. Menší hodnoty vyžadují větší přesnost a dělají obtížnějším klepnutí na malé předměty. Vyšší hodnoty jsou méně přesné, je přitom ale těžší, když předměty leží blízko sebe, zasáhnout požadovaný bod a neklepnout nezáměrně na jiný předmět. Vyberte hodnotu, která vám bude při práci vyhovovat.
Vkládání not
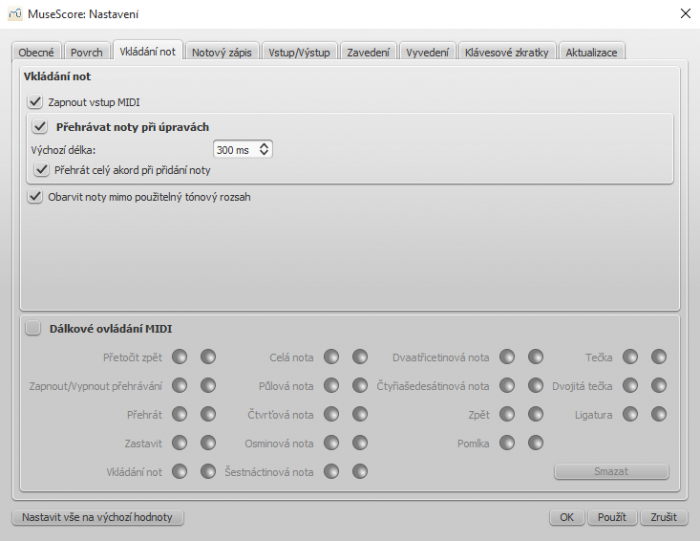
Na této kartě je možné nastavit způsob vkládání not a vzdálené ovládání MIDI. Jsou tu následující možnosti nastavení:
- Zadávání not přes MIDI
- Povolení přehrávání při zadávání not
- Doba trvání přehrávání
- Barvení not mimo použitelný rozsah tónů
- Nastavení vzdáleného ovládání MIDI
Noty
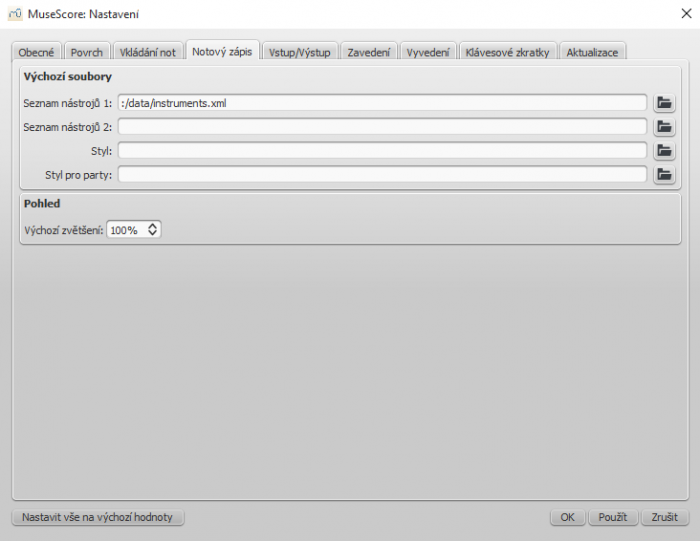
Nastavení notového zápisu zahrnuje
- Výchozí soubory se seznamy nástrojů (dva mohou být vybrány)
- Výchozí styl pro notový zápis a výtahy hlasů
- Výchozí zvětšení
Vstup/Výstup
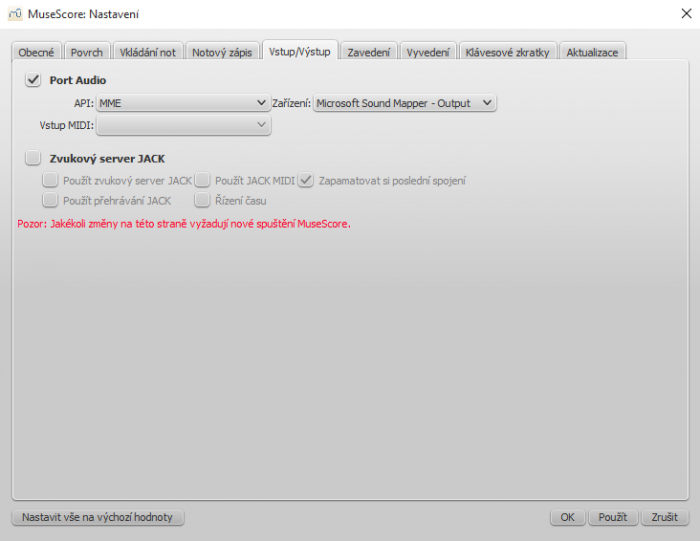
Vstup/Výstup (I/O). Zde můžete nastavit přípojku zvuku, přes kterou MuseScore směřuje přehrávání zvuku, případně přijímá signály MIDI.
Zavedení
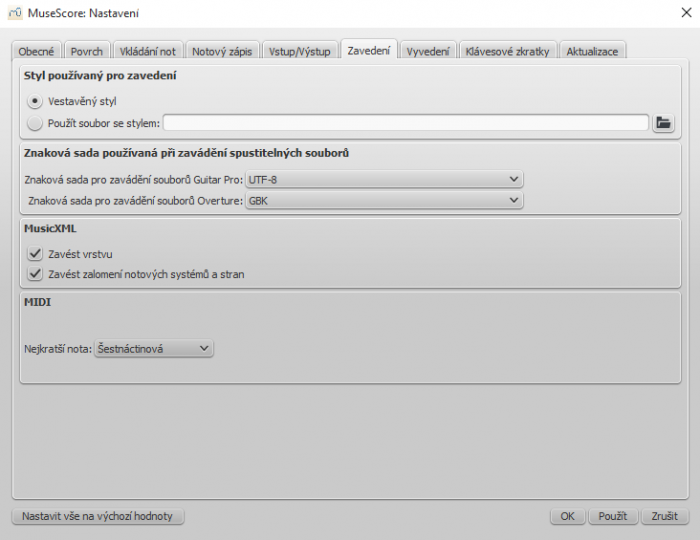
Tato nastavení určují, jak jsou zaváděny soubory z jiných zdrojů:
- Vestavěný styl MuseScore nebo jiný styl dle vaší volby
- Znakové sady Guitar Pro a Overture
- Volby rozložení MusicXML
- Nejkratší nota v souborech MIDI
Vyvedení
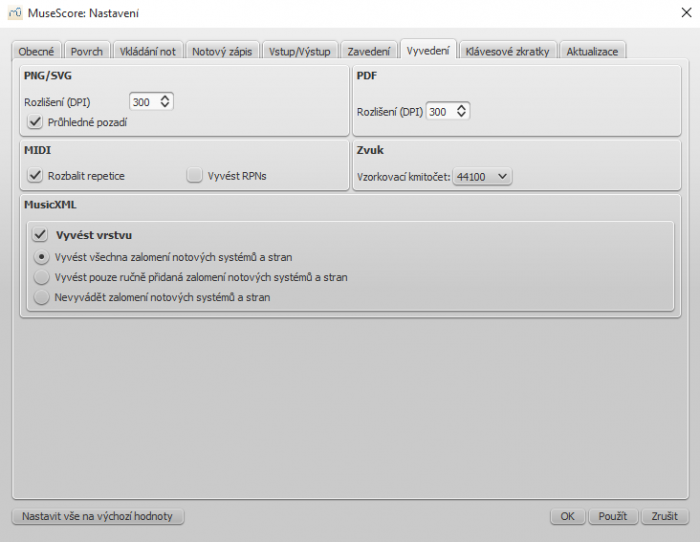
Tato nastavení určují, jak jsou soubory MuseScore vyváděny:
- Rozlišení obrázků PNG/SVG (v DPI) a zda se má použít průhledné pozadí
- Zda se mají rozvést opakování v souborech MIDI k vyvedení
- Vzorkovací kmitočet digitálního zvuku
- Zda se má vyvést rozvržení a jak do MusicXML vyvést zalomení osnovy a stran
Zkratky
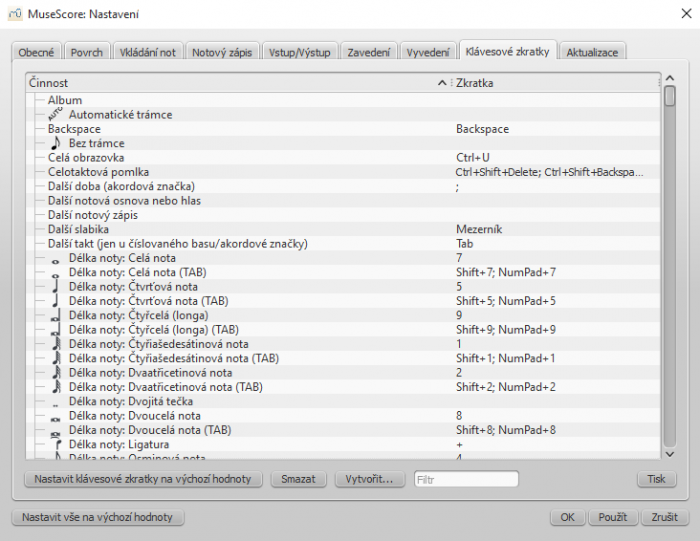
Je zde uvedena každá činnost proveditelná s MuseScore společně s příslušnou klávesovou zkratkou, pokud tato existuje. Pomocí tlačítka Stanovit... můžete určit novou klávesovou zkratku pro novou činnost. Ke stanovení zkratky můžete použít až čtyři klávesy.
Také můžete vše vrátit znovu do výchozího stavu, nebo odstranit všechny přednastavené či jen smazat vybranou zkratku.
(Upozornění: Některé klávesové zkratky včetně některých výchozích, nepracují se všemi klávesnicemi. Jednoduše je vyzkoušejte.)
Aktualizace
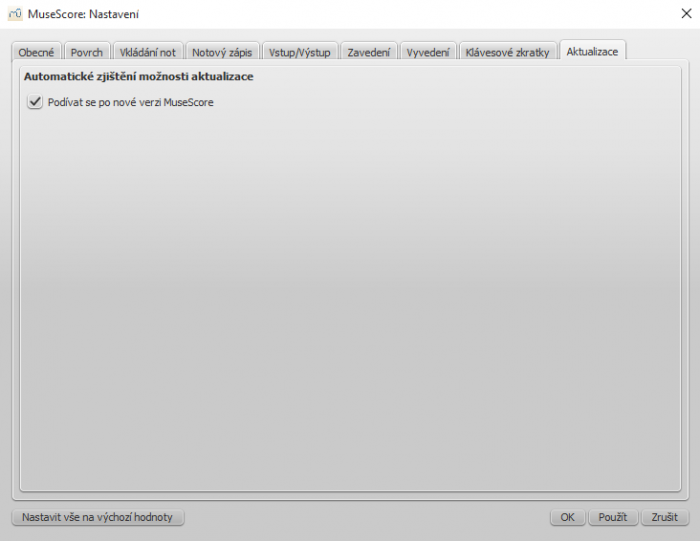
Zde se nastavuje, zda má MuseScore při spuštění automaticky pátrat po aktualizacích.
Aktualizace je také možné hledat ručně pod Nápověda → Získat aktualizace
Podívejte se také na
Notové hlavičky
A range of alternative noteheads – in addition to the "normal" – can be found in the Note Heads palette of the advanced workspace and via the Inspector (see Change notehead group, below).
Note: The design of the notehead may vary depending on the music font selected (Emmentaler, Gonville or Bravura). Those in the palette are displayed as half notes in Bravura font.
Notové hlavičky
MuseScore supports a number of notehead styles:
- Normal: A standard notehead.
- Crosshead (Ghost note): Used in percussion notation to represent cymbals. It also indicates muted and/or percussive effects in stringed instruments such as the guitar.
- Diamond: Used to indicate harmonic notes in instruments such as the guitar, violin etc.
- Slash: Used to notate rhythmic values.
- Triangle: Used in percussion notation.
- Shape notes: Do, Re, Mi, Fa, Sol, La, Ti.
- Circle cross: Used in percussion notation.
- Alternative Brevis: Used in early music notation.
- Brackets (Parentheses): When applied, these go round the existing note (or accidental).
Change notehead group
To change the shape of one or more noteheads in the score, use one of the following:
- Select one or more notes and double click a notehead in a palette
- Drag a notehead from a palette onto a note in the score.
- Select one or more notes and change the notehead in the Inspector, using the drop-down list under Note → Head group (not supported for drum staves).
Change notehead type
Occasionally you may need to change the apparent duration of a notehead—i.e., notehead type—without altering its actual, underlying duration:
- Select one or more notes.
- Chose one of the following options from the Inspector under Note → Head type:
- Auto: Automatic, i.e, apparent duration = actual duration.
- Whole: Whole notehead, regardless of actual duration.
- Half: Half notehead, regardless of actual duration.
- Quarter: Quarter notehead, regardless of actual duration.
- Breve: Breve notehead, regardless of actual duration.
Shared noteheads
When two notes of the same written pitch fall on the same beat, they are either offset – arranged side by side – or allowed to share the same notehead (the latter is particularly common in classical and fingerstyle guitar music).
Note: The rules governing the default behavior of such unison notes are as follows:
- Unison notes in the same voice do not share noteheads.
- Notes with stems in the same direction do not share noteheads.
- Dotted notes do not share noteheads with undotted notes.
- Black notes do not share noteheads with white notes.
- Whole notes never share noteheads.
Change offset noteheads to shared
Offset noteheads can be turned into shared noteheads in one of two ways:
- Make the smaller-value notehead invisible by selecting it and using the keyboard shortcut V (or unchecking the "Visible" option in the Inspector).
- Alter the notehead type of the shorter-duration note to match the longer one by switching "Head type" in the "Note" section of the Inspector.
Remove duplicate fret marks
In certain cases, a shared notehead, when pasted to a tablature staff, may result in two separate fret marks on adjacent strings. To correct this, make any extraneous tablature notes invisible by selecting them and using the keyboard shortcut V (or by unchecking the "visible" option in the Inspector).
Examples of notehead sharing
-
In the first example below, the notes of voices 1 and 2 share noteheads by default, because they are all black, undotted notes:
-
By contrast, in the next example, white notes cannot share noteheads with black notes, so are offset to the right:
To create a shared notehead, make the black eighth note invisible or change its head type to match that of the white note (as explained above):
External links
Shape Notes at Wikipedia.
Ghost notes at Wikipedia.
Nákresy hmatů
Přidání nákresu hmatu, s barré
- Táhněte a upusťte nákres hmatu v paletě s těmito značkami na notový zápis (v rozšířené pracovní ploše)
- Klepněte pravým tlačítkem myši na nákres → Vlastnosti nákresu hmatu...
-
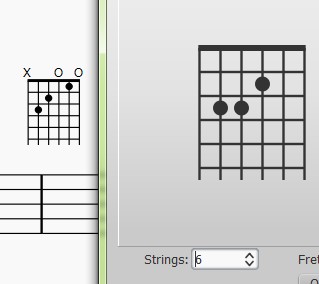
Abyste například dostal akord F dur, nejprve nastavte toto nastavení (můžete vidět číslo 6 pro struny v zadávacím poli v dolní části tohoto okna)
-
Stiskněte Shift, potom klepněte na první pražec 6. struny, jak to vidíte zde:
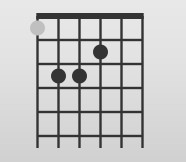
První výsledek:
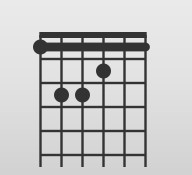
Konečný výsledek v notovém zápisu pro akord F dur:
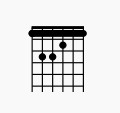
Můžete změnit šířku čáry barré, aby vám to vyhovovalo. Jděte do Styl → Obecné... → Akordové značky → Tloušťka čáry barré
Všimněte si, že podstata je stejná, když chcete čtyřstrunné barré (nebo jiné). V tomto případě jde o akord A7: Stiskněte Shift, potom klepněte na 4. strunu, druhý pražec. Výsledkem pak je:
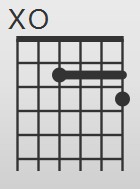
Obnovené soubory
If MuseScore or your computer should crash, or if power is lost, a pop-up message upon restarting MuseScore will ask if you wish to restore the previous session.
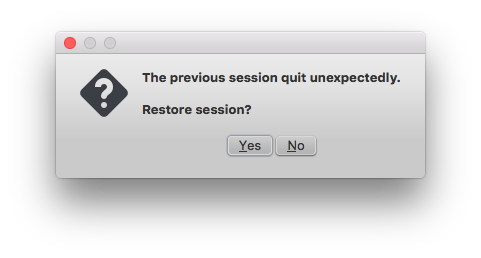
If you click No, any work from your previous session will be lost. If you click Yes, MuseScore will attempt to recover the files that were open.
Behavior of saving after session recovery
When MuseScore recovers files after a crash, it renames them with the full path name added in front of the original file name. This very long name will appear in the tab(s) above the active score window. On some operating systems, when a user saves any of these recovered files, it will be saved in the folder in which the program itself is running. This is not necessarily the same directory in which the scores were saved when they were created. You may not be able to locate the revised file in the usual folder.
To avoid this, do not use "Save" the first time you save a recovered file. Use the "Save As..." menu item before making any revisions to the score, to save each recovered file under either its original name or a new name. This will open a window to allow you to navigate to the correct folder and directory. This is important in order to ensure that the file is saved to the folder in which you expect to find it later.
Finding recovered files
In the event that "Save" is used instead of "Save As..." with a recovered file, you will have to find the files in your computer. The actual location of those files will vary, depending on your operating system, and in which directory MuseScore is installed.
For Windows 7, with a default installation of MuseScore to the x86 program files directory, recovered files are auto-saved to C:\Program Files (x86)\MuseScore2\bin.
For Windows 10, look in C:\Users\[User Name]\AppData\Local\VirtualStore\Program Files (x86)\MuseScore 2\bin
You may need to run a system-wide search in order to find files saved directly after a session recovery. Use keywords from the original file name as well as wildcards, and specify the date modified.
See also
External links
Pomůcky
Byly vyvinuty některé nástroje. Nalézají se v Úpravy → Pomůcky
Přidat/Odstranit zalomení notových systémů
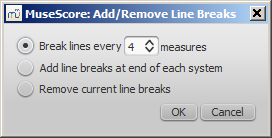
Tento nástroj automaticky přidá nebo odstraní zalomení notových systémů:
- Přidat zalomení notových systémů
- každých X taktů
- přímo na konci každého nynějšího notového systému
- Odstranit
- všechna nynější zalomení notových systémů
Tento příkaz pracuje s vybranými takty, nebo s celým notovým zápisem (ve výchozím nastavení, není-li nic vybráno).
- Volitelně vybrat takty, na něž se má použít
-
Úpravy → Pomůcky → Přidat/Odstranit zalomení notových systémů
-
Stisknout OK.
Rozdělit hlasy/Sloučit hlasy
Tyto příkazy vám umožňují rozdělení obsahu notové osnovy obsahující řady akordů do samostatných melodických linek na navazujících osnovách, nebo sloučit notové osnovy obsahující samostatné melodické linky do řad akordů v jedné notové osnově.
Rozdělit hlasy
Vyberte ve zdrojové notové osnově rozsah obsahijící akordy s více notami. Nechte provést Úpravy → Pomůcky → Rozdělit hlasy. Akordy budou "rozděleny" do cílových notových osnov níže (jedna nota na osnovu). Pokud začnete výběrem rozsahu pouze v jedné osnově, MuseScore použije tolik cílových osnov, kolik je potřeba - pokud má největší akord čtyři noty, použijí se čtyři notové osnovy. Pokud však začnete rozsah vybírat ve více osnovách, MuseScore zastaví s naposledy vybranou osnovou.
Sloučit hlasy
Vyberte rozsah taktů napříč osnovami, jež mají v zásadě stejný rytmus. Nechte provést Úpravy → Pomůcky → Sloučit hlasy. MuseScore sloučí obsah osnov do akordů v horní osnově - opak rozdělení. Zvláštní případ představuje výběr jen jedné osnovy - MuseScore udělá v podstatě to samé, ale spojí obsah více hlasů v té osnově do akordů v hlase 1.
Vyplnit lomítky
Tento příkaz vyplní výběr lomítky, jedno na každou dobu. Lomítka budou vystředěna na prostřední lince notové osnovy a jsou nastavena tak, že se netransponují ani nepřehrávají.

Zapnout/Vypnout rytmickou notaci
This command converts selected notes into rhythmic slash notation: notes with slash heads, set to not transpose or playback. For notes in voices one or two, the notes are fixed to the middle staff line.

For notes in voices three or four, the notes are fixed above or below the staff and are also marked small (also known as "accent" notation). You may find it helpful to use the selection filter to exclude voices one and two from your selection before running this command, so only the notes in voices three and four are affected.

Seřadit orientační značky
Tento příkaz seřadí orientační značky ve vybraném rozsahu:
- Přidat orientační značky
- Vybrat rozsah
- Úpravy → Pomůcky → Seřadit orientační značky
MuseScore automatically detects the sequence based on the first rehearsal mark in the selection - all rehearsal marks in the selection are then altered accordingly.
Pořadí může být:
- a, b, c,
- A, B, C,
- jednoduchá posloupnost čísel - 1, 2, 3,
- posloupnost číselně odpovídající číslům taktů
Podívejte se také na
Přídavné moduly
Plugins are small pieces of code that add a particular feature to MuseScore. By adding a plugin, a new menu will be appended to the Plugins menu in MuseScore to accomplish a given action on the score or a part of it. Plugins are a way to let users with minimal programming skills add features to the software.
Some plugins are already delivered with MuseScore, see →below. You can find more plugins in the plugin repository. Some plugins there work with MuseScore 2; others will only work with older versions of MuseScore.
Installation
Note that some plugins may require the installation of other components (fonts, e.g.) to work. Check the plugin's documentation for more information.
Most plugins are provided as ZIP archives, so download the plugin's .zip file and uncompress it to one of the directories mentioned below.
Some may be provided directly as a .qml file, download and place into one of these directories.
Windows
MuseScore looks for plugins in %ProgramFiles%\MuseScore 2\Plugins (or %ProgramFiles(x86)%\MuseScore 2\Plugins for the 64-bit versions) and in %LOCALAPPDATA%\MuseScore\MuseScore 2\plugins on Vista and Seven or C:\Documents and Settings\USERNAME\Local Settings\Application Data\MuseScore\MuseScore 2\plugins (adjusted to your language version) on XP.
Mac OS X
On Mac OS X, MuseScore looks for plugins in the MuseScore bundle in /Applications/MuseScore 2.app/Contents/Resources/plugins and in ~/Library/Application Support/MuseScore/MuseScore 2/plugins. To be able to move files in the app bundle, right click (Control-click) on MuseScore.app and choose "Show package contents" to reveal the Contents directory. Be careful to use Contents/Resources/plugins and not Contents/plugins.
Linux
In Linux, MuseScore looks for plugins in /usr/share/mscore-2.0/plugins and in ~/.local/share/data/MuseScore/MuseScore 2/plugins.
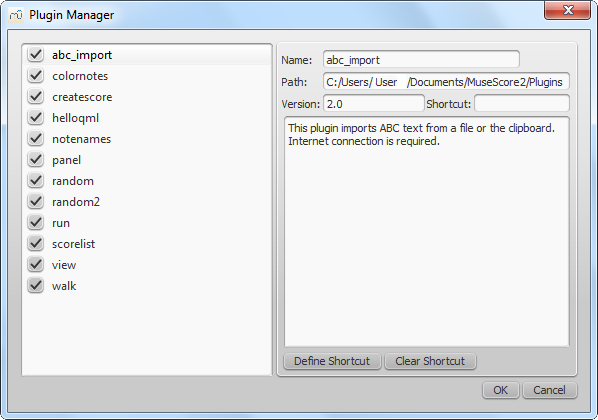
Enable/disable plugins
To be able to access the installed plugins from the Plugins menu, they need to be enabled in the Plugin Manager:
Create/edit/run plugins
It is possible to create new or edit existing plugins and run them via the Plugin Creator:
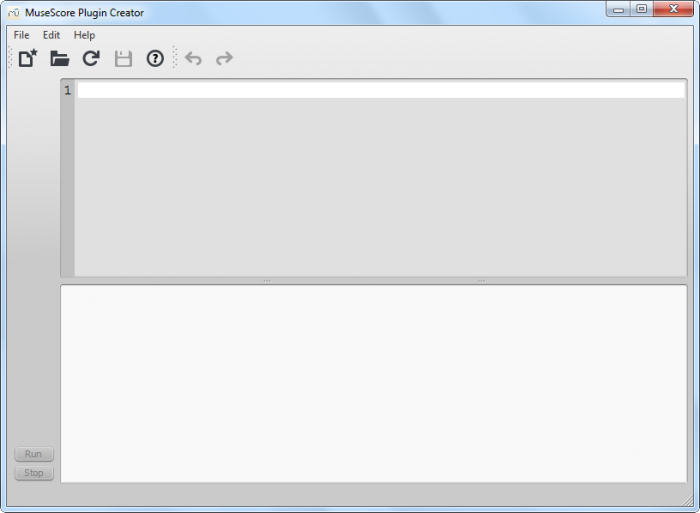
Here also the documentation of all available elements can be found
Plugins installed by default
Some plugins come pre-installed with MuseScore, but they are not enabled by default. See →above to enable plugins.
ABC Import
This plugin imports ABC text from a file or the clipboard. Internet connection is required, because it uses an external web-service for the conversion, which uses abc2xml and gets send the ABC data, returns MusicXML and imports that into MuseScore.
Break Every X Measures
This plugin enters line breaks in the interval you select on the selected measures or, if no measures are selected, the entire score. It is no longer being distributed and has been replaced by Edit → Tools → Add/Remove Line Breaks. If you ever used an early beta version of MuseScore 2, though, you may still see the plugin left over.
Notes → Color Notes
This demo plugin colors notes in the selection depending on pitch. It colors the note head of all notes in all staves and voices according to the BoomWhackers convention. Each pitch has a different color. C and C♯ have a different color. C♯ and D♭ have the same color.
To color all the notes in black, just run that plugin again (on the same selection). You could also use the 'Remove Notes Color' plugin for this.
Create Score
This demo plugin creates a new score. It creates a new piano score with 4 quarters C D E F. It's a good start to learn how to make a new score and add notes from a plugin.
helloQml
This demo plugin shows some basic tasks.
Notes → Note Names
This plugin names notes. It displays the English names of the notes (as a staff text), for voice 1 and 3 above, for voice 2 and 4 below the staff, chords in a comma separated list, starting with the top note.
A translated version, which uses note names as per your language settings, is available from the plugin repository.
panel
This demo plugin creates a GUI panel.
random
Creates a random score.
random2
Creates a random score too
run
This demo plugin runs an external command. Probably this will only work on Linux.
scorelist
This test plugin iterates through the score list.
ScoreView
Demo plugin to demonstrate the use of a ScoreView
Walk
This test plugin walks through all elements in a score
Tools
Some tools act as plugin as they "automate" some things, see Tools, actually some of those mentioned there used to be plugins.
Režimy vkládání not
From version 2.1, you can enter notation using one of several new note input modes—in addition to the pre-existing V krocích a Změna výšky tónu modes. These are accessed by clicking a small dropdown arrow next to the note entry button on the note input toolbar.
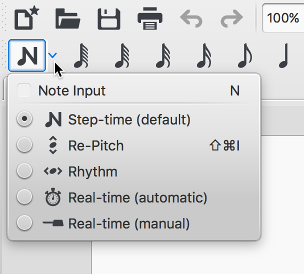
V krocích
This is the method of note entry that MuseScore has had from the beginning. You enter notes in Step-time mode by choosing a duration using the mouse or keyboard, and then choosing a pitch using the mouse, keyboard, MIDI keyboard or virtual piano.
For details see Basic note entry.
Změna výšky tónu
Režim změny výšky tónu umožňuje opravit výšky tónů řady not, zatímco jsou jejich doby trvání ponechány nezměněny (neplést s Posuvka: Zkontrolovat posuvky).
- Vyberte notu jako výchozí bod
- Pokud používáte verzi programu pre-2.1, stiskněte N pro vstoupení do režimu vkládání not. Tento krok je od verze 2.1 dál volitelný.
- Vyberte volbu Změna výšky tónu ve vysouvací nabídce Vkládání not ( nebo pro verze pre-2.1 v nástrojovém panelu pro vkládání not); nebo použijte klávesovou zkratku Ctrl+Shift+I (Mac: Shift+Cmd+I).
- Nyní pomocí klávesnice, klávesnice MIDI nebo klávesnice virtuálního klavíru zadejte výšky tónů.
Funkci Změna výšky tónu také můžete použít na vytvoření nového úryvku ze stávajícího téže řady dob trvání — zkopírování a vložením posledně uvedeného, potom použitím Změna výšky tónu.
Rytmus
Rhythm mode allows you to enter durations with a single keypress. Combining Rhythm and Re-pitch modes makes for a very efficient method of note entry.
- Select your starting point in the score and enter Rhythm mode.
- Select a duration from the note input toolbar, or press a duration shortcut (numbers 1-9) on your computer keyboard. A note will be added to the score with the selected duration. In contrast to Basic note entry, pressing the . key will toggle dotting or not dotting all subsequent durations. All following rhythms will be dotted until the . key is pressed again. Unlike Basic note entry, the dot is to be pressed prior to entering the rhythm.
- Entering rests is similar to adding dotted notes. Press the 0 key to toggle entering rests. All rhythms entered will be rests until the 0 key is pressed again. This can be used concurrently with dotted notes.
- Continue pressing duration keys to enter notes with the chosen durations.
- Now use Re-pitch mode to set the pitches of the notes you just added.
Ve skutečném čase (automaticky)
The Real-time modes basically allow you to perform the piece on a MIDI keyboard (or MuseScore's virtual piano keyboard) and have the notation added for you. However, you should be aware of the following limitations which currently apply:
- It is not possible to use a computer keyboard for Real-time input
- You cannot enter tuplets or notes shorter than the selected duration
- You cannot enter notes into more than one voice at a time
However, these restrictions mean that MuseScore has very little guessing to do when working out how your input should be notated, which helps to keep the Real-time modes accurate.
In the automatic version of Real-time input, you play at a fixed tempo indicated by a metronome click. You can adjust the tempo by changing the delay between clicks via Edit → Preferences...→ Note Input (Mac: MuseScore → Preferences...→ Note Input).
- Select your starting position in the score and enter Real-time (automatic) mode.
- Select a duration from the note input toolbar.
- Press and hold a MIDI key or virtual piano key (a note will be added to the score).
- Listen for the metronome clicks. With each click the note grows by the selected duration.
- Release the key when the note has reached the desired length.
The score stops advancing as soon as you release the key. If you want the score to continue advancing (e.g. to allow you to enter rests) then you can use the Real-time Advance shortcut to start the metronome.
Ve skutečném čase (ručně)
In the manual version of Real-time input, you have to indicate your input tempo by tapping on a key or pedal, but you can play at any speed you like and it doesn't have to be constant. The default key for setting the tempo (called "Real-time Advance") is Enter on the numeric keypad (Mac: fn+Return, but it is highly recommended that you change this to a MIDI key or MIDI pedal (see below).
- Select your starting position in the score and enter Real-time (automatic) mode.
- Select a duration from the note input toolbar.
- Press and hold a MIDI key or virtual piano key (a note will be added to the score).
- Press the Real-time Advance key. With each press the note grows by the selected duration.
- Release the note when it has reached the desired length.
Zkratka pro postup ve skutečném čase
Zkratka pro Postup ve skutečném čase is used to tap beats in manual Real-time mode, or to start the metronome clicks in automatic Real-time mode. It is called "Real-time Advance" because it causes the input position to more forward, or "advance", through the score.
The default key for Real-time Advance is Enter on the numeric keypad (Mac: fn+Return, but it is highly recommended that you assign this to a MIDI key or MIDI pedal via MuseScore's MIDI remote control. The MIDI remote control is available via Preferences > Note Input.
Alternatively, if you have a USB footswitch or computer pedal which can simulate keyboard keys, you could set it to simulate Enter on the numeric keypad.
Podívejte se také na
Vnější odkazy
- Obraz: Semi-Realtime MIDI Demo Part 1: New note entry modes (available as of MuseScore 2.1)
- Introduction to the new Repitch Mode (YouTube)
Souborové formáty
MuseScore podporuje hodně souborových formátů, které vám dovolují sdílet a zveřejňovat noty ve formátu, který nejlépe vyhovuje vašim potřebám.
Soubory zavedete přes nabídku Soubor → Otevřít... a vyvedete přes nabídku Soubor → Vyvést....
Při použití níže uvedených formátů můžete své notové zápisy uložit a sdílet na internetu na MuseScore.com přes Soubor → Uložit na internet.... Podívejte se na Sdílení not po internetu.
Vlastní formát MuseScore
Tyto formáty MuseScore vytváří
* přes nabídku Soubor → Uložit
* po klepnutí na tlačítko pro uložení 
* klávesovou zkratkou (Ctrl+S)
* pomocí dialogu Soubor → Uložit jako....
Formát MuseScore (*.mscz)
MSCZ je standardní souborový formát MuseScore a doporučuje se při většině užití.
Notový zápis uložený v tomto formátu zabírá velmi málo prostoru na disku, ale uchovává všechny nezbytné informace. Formát je ZIPem zabalenou verzí souborového formátu .mscx a zahrnuje obrázky.
Nezabalený formát MuseScore (*.mscx)
MSCX je nekomprimovanou verzí souborového formátu MuseScore.
Notový zápis uložený v tomto formátu neztratí žádnou informaci kromě obrázků a doporučuje se, pokud potřebujete formát souboru upravit ručně v textovém editoru.
Předchozí verze MuseScore používaly souborový formát s příponou *.msc. Přípona *.msc však stojí ve střetu se souborovou příponou používanou Microsoft Windows a je blokována některými poskytovateli elektronické pošty. Nová souborová přípona MSCX nahrazuje starou souborovou příponu MSC kvůli potížím, jež byly nastíněny výše.
Formáty MSCZ a MSCX MuseScore 2.0 nemohou být přečteny verzí MuseScore 1.3 a staršími. Rada: Nejprve vyveďte soubory uložené v těchto starších verzích do formátu →XML nebo →MXL, který potom zase načtěte v MuseScore 2.0.
Poznámka k písmům: MuseScore nevkládá písma do souboru, kromě rodin písem FreeSerif, FreeSerifBold, FreeSerifItalic, FreeSerifBoldItalic a FreeSans. Pokud chcete soubor MuseScore sdílet s dalšími stranami, zvolte pro svůj text písmo, jež mají ostatní nainstalováno. Když počítač písmo stanovené v souboru nemá, MuseScore namísto něj použije záložní písmo. Záložní písmo bude samozřejmě vypadat jinak.
Záložní soubory MuseScore
Záložní soubor MuseScore (*.mscz, nebo *.mscx,)
Záložní soubory jsou vytvářeny automaticky a jsou ukládány v téže souborové složce jako váš normální soubor MuseScore. Záložní soubor přidává na začátek názvu souboru tečku (.) a čárku (,) na konec (má-li například váš normální soubor název "bez názvu.mscz", potom je záložní kopie pojmenována ".bez názvu.mscz,").
Záložní kopie obsahuje předchozí uloženou verzi souboru MuseScore a může se stát důležitou v případě, že se vaše normální kopie poškodí, nebo se potřebujete podívat na o něco starší verzi vašeho notového zápisu.
Pro otevření záložní souboru MuseScore je potřeba soubor přejmenovat odstraněním tečky a čárky. Protože je uložen v téže souborové složce jako váš normální soubor MuseScore, je rovněž potřeba dát mu jedinečný souborový název (můžete například změnit souborový název ".bez názvu.mscz," na "bez názvu-záloha1.mscz").
Abyste záložní soubory MuseScore viděli, bude potřeba systémové nastavení změnit na "Ukázat skryté soubory". Podívejte se také na How to recover a backup copy of a score (MuseScore 2.x).
Připomenutí uživatelům Windows: Po přejmenování takového záložního souboru byste souboru měli znovu nastavit vlastnost Skrytý.
Tisk a čtení (pouze vyvedení)
PDF (*.pdf)
Portable Document Format (PDF) je ideální pro sdílení vašich not s ostatními, kteří je nepotřebují upravovat. Většina uživatelů počítačů již ve svém počítači má prohlížeč souborů PDF, takže nebudou k tomu, aby uviděli váš notový zápis, potřebovat instalovat nějaký další program navíc.
PNG (*.png)
Portable Network Graphics (PNG) je bitmapový obrázkový formát široce podporovaný programy běžícími ve Windows, Mac OS a Linuxu.
Tento obrázkový formát je velmi oblíbený na internetových stránkách. MuseScore ukládá vícestránkové notové zápisy do souborů PNG pro každou stranu. MuseScore vytváří obrázky tak, jak by byly vidět jako výsledek tisku. Na kartě pro vyvedení pod Úpravy → Nastavení... (Mac: MuseScore → Nastavení...) můžete nastavit rozlišení a zda se má použít průhledné pozadí.
Pokud chcete vytvořit obrázky, které ukazují jen část notového zápisu, s nebo bez prvků, které jsou vidět jen na obrazovce (například rámečky, neviditelné noty a obarvení not mimo tónový rozsah), použijte, prosím, funkci pro snímek obrazovky
SVG (*.svg)
Scalable Vector Graphics (SVG) dokáže otevřít většina prohlížečů internetových stránek (kromě prohlížeče Internet Explorer před verzí 9) a většina programu na práci s vektorovou grafikou. Většina programů pro práci s SVG však nepodporuje vložená písma, takže se kvůli správnému zobrazení těchto souborů musí nainstalovat odpovídající písma MuseScore.
Poslech (pouze vyvedení)
WAV audio (*.wav)
WAV (Waveform Audio Format) je nekomprimovaný zvukový formát.
Byl vyvinut firmami Microsoft a IBM, široce jej ale podporují programy pro Windows, Mac OS a Linux. Je to ideální formát pro tvorbu CD, protože během ukládání souboru není ztracena zvuková kvalita. Velké velikosti souborů však ztěžují sdílení pomocí elektronické pošty nebo přes internet.
FLAC audio (*.flac)
Free Lossless Audio Codec (FLAC) je komprimovaný zvukový formát.
Soubory FLAC jsou oproti nestlačenému zvuku zhruba poloviční a mají stejně tak dobrou jakost. Windows a Mac OS pro FLAC vestavěnou podporu nemají, ale programy jako VLC media player umí soubory FLAC přehrát na jakémkoli operačním systému.
Ogg Vorbis (*.ogg)
Ogg Vorbis je zamýšlen jako patentově svobodná náhrada za oblíbený zvukový formát MP3.
Tak jako soubory MP3, jsou soubory Ogg Vorbis poměrně malé (často desetina nestlačeného zvuku), ale nějaká zvuková kvalita je přece jen ztracena. Windows a Mac OS pro Ogg Vorbis vestavěnou podporu nemají, ale programy jako VLC media player a Firefox umí soubory Ogg Vorbis přehrát na jakémkoli operačním systému.
MP3 (*.mp3)
Soubory MP3 jsou poměrně malé (často desetina nestlačeného zvuku), ale nějaká zvuková kvalita je přece jen ztracena.
Aby bylo možné vytvářet soubory MP3, je potřeba, aby byla nainstalována dodatečná knihovna, lame_enc.dll (Windows) nebo libmp3lame.dylib (Mac) a umístění knihovny bylo sděleno MuseScore. Dostanete ji na http://lame.buanzo.org/.
Někteří uživatelé OS X se mohou setkat s tím, že MuseScore při nahrávání knihovny MP3 narazí na chybu. Potíž může spočívat v tom, že se jedná o knihovnu 32-bitovou. Sestavená 64-bitová verze, která pracuje s MuseScore je dostupná na http://www.thalictrum.com/en/products/lame.html (všimněte si, že soubor je, aby jej MuseScore rozpoznalo, potřeba přejmenovat na libmp3lame.dylib).
Sdílení s dalšími hudebními programy
MusicXML (*.xml)
MusicXML je obecný standard pro vytahování not.
Je podporován většinou z dnes dostupných notačních programů, jako jsou Sibelius, Finale a dalších více než 100. Je to doporučený formát pro výměnu notových zápisů mezi různými programy na sazbu not.
Komprimovaný MusicXML (*.mxl)
Komprimovaný MusicXML vytváří menší soubory než běžný formát MusicXML.
Je to novější standard a není tolik rozšířen jako nekomprimovaná verze.
MIDI (*.mid, *.midi, *.kar)
Musical Instrument Digital Interface (MIDI) je formát široce podporovaný sekvencery a programy na sazbu not.
Soubory MIDI byly nicméně v první řadě vyvinuty pro čtení a přehrávání not ne pro jejich sazbu, a proto neobsahují údaje o formátování, volbě posuvek pro výšku tónů, rozdělení hlasů, ozdobách, artikulacích, opakováních nebo předznamenáních. Když chcete soubory sdílet mezi různými notačními programy, použijte MusicXML. Pokud je vše, co vás zajímá, přehrávání, použijte MIDI.
MuseData (*.md) (pouze zavedení)
MuseData je formát vyvíjený Walterem B. Hewlettem od roku 1983 jako raný prostředek sdílení hudební notace mezi programy.
Od té doby byl zastíněn formátem MusicXML, ale na internetu je stále ještě dostupných několik tisíc notových zápisů v tomto formátu.
Capella (*.cap, *.capx) (pouze zavedení)
Soubory CAP a CAPX jsou vytvářeny notačním programem "Capella".
MuseScore zavádí verzi 2000 (3.0) nebo novější docela přesně (2.x nepracuje, a formát *.all z verze 1.x není podporován vůbec).
Bagpipe Music Writer (*.bww) (pouze zavedení)
Soubory BWW jsou vytvářeny specializovaným notačním programem "Bagpipe Music Writer".
BB (*.mgu, *.sgu) (pouze zavedení)
Soubory BB jsou vytvářeny programem pro aranžování hudby "Band-in-a-Box".
MuseScore obsahuje pokusnou podporu pro zavedení BB.
Overture (*.ove) (pouze zavedení)
Soubory OVE vytváří notační program "Overture".
Tento formát je oblíbený zejména v čínském prostředí (Čína, Hong Kong a Tchaiwan).
MuseScore nyní obsahuje pokusnou podporu pro zavedení OVE.
Guitar Pro (*.GTP, *.GP3, *.GP4, *.GP5, *.GPX) (pouze zavedení)
Podívejte se také na
Trámce přes osnovy
V notách pro klavír je pro zápis hudební fráze běžné používat obě osnovy (basový a houslový klíč).
Toto se v MuseScore dá zadat takto:
Zadejte všechny noty do jedné osnovy:
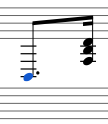
Ctrl+Shift+↓ přesune vybranou notu nebo akord na další osnovu (Mac: ⌘+Shift+↓.)
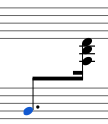
Pokud chcete trámec posunout, klepněte na něj dvakrát, až se ukážou úchopy. Táhněte úchopy a upravte rozvržení.
Podívejte se také na
- kapitolu o taktových čarách, kde jsou vysvětleny taktové čáry jdoucí přes osnovy (to jest velká osnova).
Vlastnosti notových osnov
Background
In MuseScore, each instrument’s staff has a number of properties which can be modified. Each staff belongs to one of 3 groups:
- Standard (the classic, ‘regular’, kind of staff)
- Tablature
- Percussion
Some of the properties of a staff depends on the group it belongs to. The general properties can be examined and modified with the Edit Staff/Part Properties dialog box; this dialog box allows to review and modify the group-specific properties.
The staff groups to which an instrument staff can belong depend on the instrument: any staff can be a standard staff, but only staves of percussion instruments can be (or be turned into) percussion staves and only staves of stringed instrument can be (or be turned into) tablature staves.
Each score is initially created with 17 built-in staff templates - one standard, three percussion and 13 tablature templates. Each template addresses a specific need, common enough or standardized enough to deserve a specific template; each template can be modified (independently for each score staff) and new templates can be created to accommodate specialized needs.
How to get there
This dialog box is accessed by right-clicking on an empty spot of a staff, selecting Staff Properties...
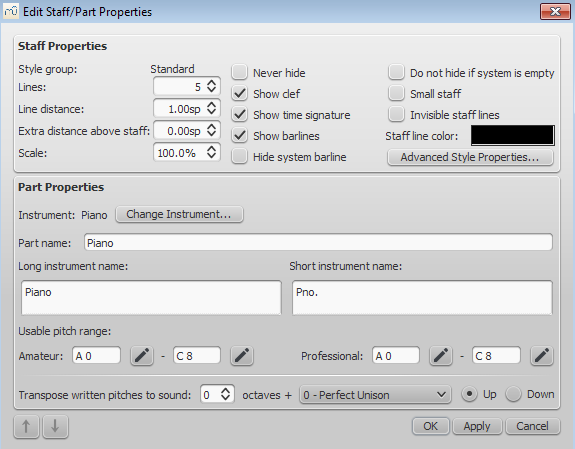
and then pressing the Advanced Style Properties... button, which for a normal staff looks like this:
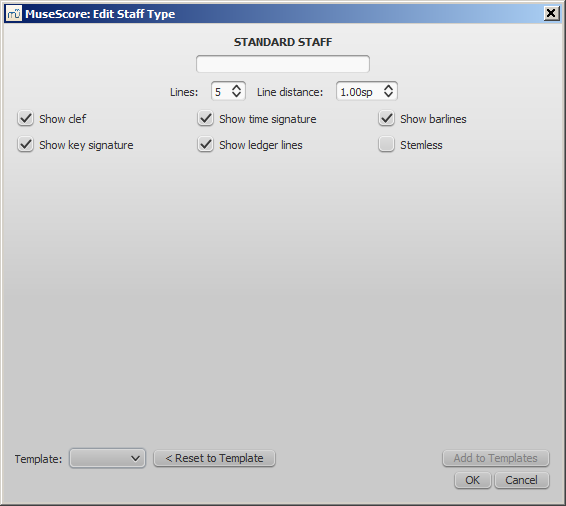
For a percussion staff it looks like this:
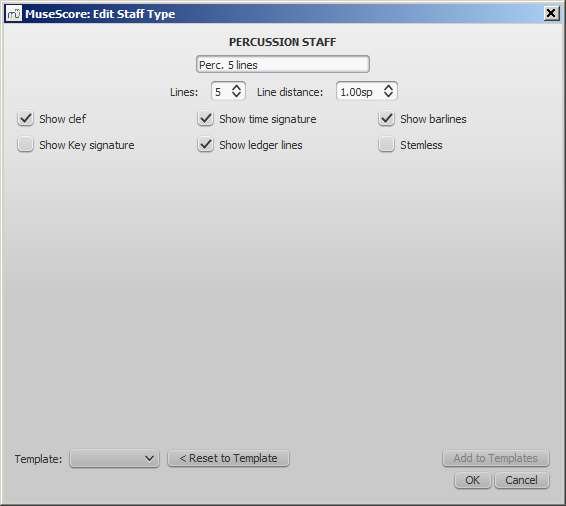
For a tablature staff it looks like this
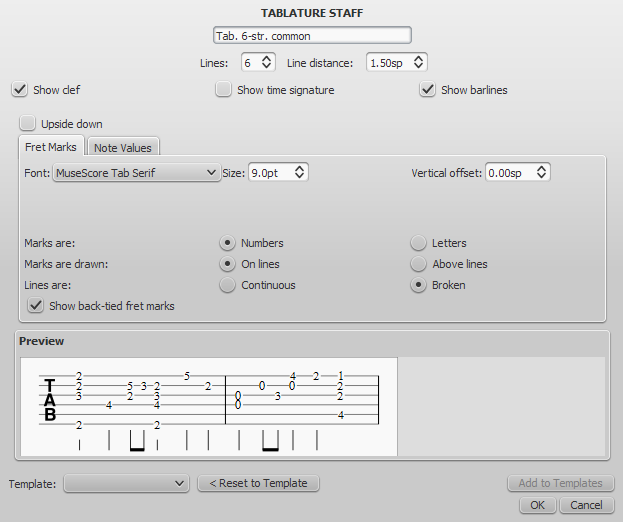
and this
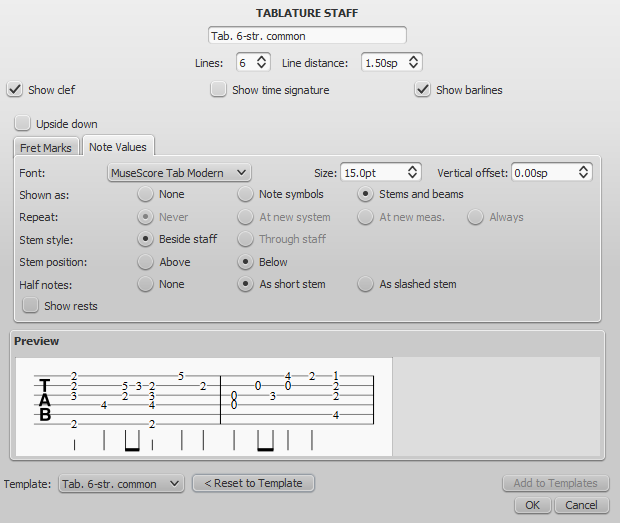
Common items
The dialog box shows different items depending on the group of the selected staff type: standard, tablature or percussion.
Some dialog items, however, are common to all types:
- Name
- A human-readable name
- Lines
- The number of lines making up the staff
- Line Distance
- The distance between two staff lines, expressed in spaces (abbr.: sp), i.e. the default distance between two staff lines; 1.0 is (rather obviously) the default, a higher value will generate lines spaced more widely apart, a lower value generates then more tightly spaced. It is not recommended to change this value for the standard group (although it is possible); other groups may have different default values, for instance tablatures usually have a line distance of 1.5 sp.
- Show clef
- Whether the staff clef will be shown.
- Show time signature
- Whether the staff time signature(s) will be shown or not.
- Show barlines
- Whether the staff bar lines will be shown.
There are also some buttons:
- Template
-
Displays the list of all the staff templates available in the score and which can be applied to the current staff.
- < Reset to Template
-
Resets all the staff properties to the properties of the selected template.
- Add to Templates
-
Adds the current property set to the score as a new template (not yet implemented).
- OK
-
Closes the dialog box, accepting the changes.
- Cancel
-
Closes the dialog box, rejecting the changes.
Standard and Percussion staff specific items
- Show key signature
- Whether the staff key signature will be shown.
- Show ledger lines
- Whether the staff ledger lines will be shown.
- Stemless
- If checked, staff notes will have no stem, hook or beam.
Tablature staff specific items
- Upside down
- If not checked, the top tablature line will refer to the highest string and the bottom tablature line will refer to the lowest string (most common case). If checked, the top tablature line will refer to the lowest string and the bottom tablature line will refer to the highest line (used in Italian style lute tablatures).
Fret marks
This group of properties defines the appearance of fret marks.
- Font
- The font used to draw the marks. Currently 4 fonts are provided supporting all the necessary symbols in 4 different styles (modern serif, modern sans, Renaissance, Late Renaissance). More fonts (or the possibility to use custom fonts) may be available in the future.
- Size
- The font size to use, in typographic points. Built-in fonts look usually good at a size of 9-10pt.
- Vertical offset
- MuseScore tries to place symbols in a sensible way and this value is usually not needed (set to 0) for built-in fonts. If the font has symbols not aligned on the base line (or in some other way MuseScore does not expect), this value allows to move mark symbols up (negative offsets) or down (positive offsets) for better vertical positioning. Values are in sp.
- Numbers / Letters
- Whether to use numbers (‘1’, ‘2’...) or letters (‘a’, ‘b’...) as fret marks. When letters are used, ‘j’ is skipped and ‘k’ is used for the 9th fret.
- On lines / Above lines
- Whether marks should be placed on the string lines or above them.
- Continuous / Broken
-
Whether string lines should pass ‘through’ fret marks or should stop at them.
Example of numbers on broken lines: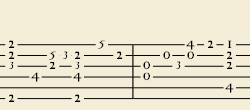
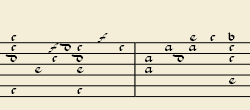
Example of letters above continuous lines:
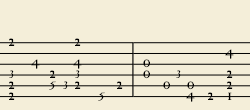
Example of 'upside down' tablature (same contents as number example above):
Note values
This group of properties defines the appearance of the symbols indicating note values.
- Font
- The font used to draw the value symbols. Currently 3 fonts are provided supporting all the necessary symbols in 3 different styles (modern, Italian tablature, French tablature). More fonts (or the possibility to use custom fonts) may be available in the future. Used only with the Note symbols option.
- Size
- The font size to use, in typographic points. Built-in fonts look usually good at a size of 15pt. Used only with the Note symbols option.
- Vertical offset
- As for Fret Marks above, but referring to value symbols instead. Used only with the Note symbols option.
- Shown as: None
- No note value will be drawn (as in the examples above)
- Shown as: Note symbols
-
Symbols in the shape of notes will be drawn above the staff. When this option is selected, symbols are drawn only when the note value changes, without being repeated (by default) for a sequence of notes all of the same value.
Example of values indicated by note symbols: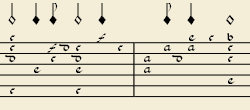
- Shown as: Stems and beams
-
Note stems and beams (or hooks) will be drawn. Values are indicated for each note, using the same typographic devices as for a regular staff; all commands of the standard Beam Palette can be applied to these beams too.
Example of values indicated by note stems: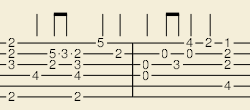
- Repeat: Never / At new system / At new measure / Always
- Whether and when to repeat the same note symbol, if several notes in sequence have the same value (only available with the Note symbols option).
- Beside staff / Through staff
- Whether stems are drawn as fixed height lines above/below the staff or run through the staff to reach the fret marks each refers to (only available with the Stems and Beams option).
- Above / Below staff
- Whether stems and beams are drawn above or below the staff (only available with the Stems and Beams option / Beside staff sub-option).
- None / As short stems / As slashed stems
- To select three different styles to draw stems for half notes (only available with the Stems and Beams option / Beside staff sub-option).
- Show rests
- Whether note symbols should be used to indicate also the rests; when used for rests, note symbols are drawn at a slightly lower position. Used only with the Note symbols option.
Preview
Displays a short score in tablature format with all the current parameters applied.
Vytažení partů
Pokud jste napsal celý orchestrální notový zápis, MuseScore může vytvořit noty ukazující pouze jednotlivé party pro každého hudebníka v orchestru.
Zřízení partů
Party můžete vytvořit kdykoli po vytvoření notového zápisu. Party je pro každý notový zápis potřeba stanovit jen jenou, ale v případě potřeby je možné udělat změny. Následující pokyny jako příklad využívají smyčcový kvartet, ale stejné zásady se používají na jakékoli jiné hudební těleso.
-
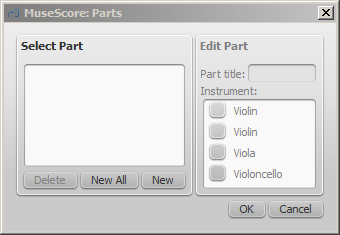
V hlavní nabídce vyberte Soubor → Party...
-
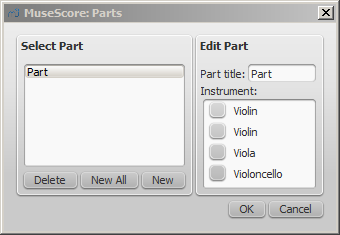
V okně s party klepněte na Nový, abyste vytvořil "vymezení partu"
-
V pravém panelu napište slova, která chcete použít pro Název partu (toto rovněž slouží při vyvedení i pro odpovídající part v názvu souboru)
-
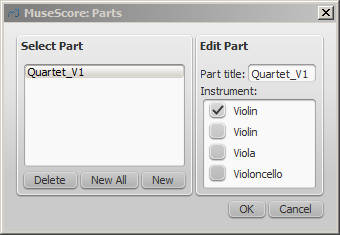
Zvolte nástroj, který se má objevit v partu, označením příslušného okénka v panelu na pravé straně. Obyčejně chcete jen jeden nástroj na part, ale někdy je potřeba mít part, který zahrnuje více než jeden nástroj (takovým jsou notové osnovy s několika bicími). MuseScore umožňuje označení tolika nástrojů na part, kolik je potřeba
-
Podle potřeby opakujte kroky dva až čtyři (výše) pro každý part
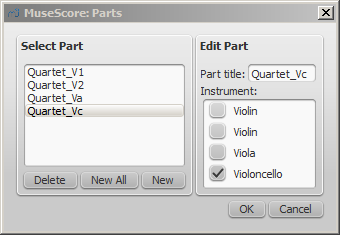
-
Jakmile budete hotov, stiskněte OK pro zavření okna s party
Dokončil jste zřízení partů. Nemusíte to dělat znovu, dokud do celého notového zápisu nepřidáte anebo z něj neodeberete nějaký nástroj. V nynější verzi MuseScore není možné rozdělení jedné notové osnovy (která obsahuje dva nebo více hlasů) do samostatných partů. Takže každý nástroj, z něhož chcete vytisknout samostatný part, také potřebuje mít svoji vlastní notovou osnovu v úplném notovém zápisu.
Zřízení všech partů najednou
Pokud máte souborový notový zápis, z něhož se mají vytáhnout všechny nástroje, můžete party vytvořit daleko snadněji:
-
Jděte do Soubor → Party...
-
Stiskněte tlačítko Vše nové (party jsou pojmenovány pomocí názvu nástroje, a v případě potřeby je připojeno "-<number>")
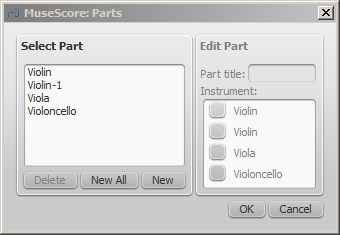
-
Stiskněte OK
Nyní pro každý part v notovém zápisu uvidíte kartu.
Vyvedení partů
-
Jděte do Soubor → Vyvést party...
-
Projděte souborovým systémem na místo, kam je chcete vyvést, a vyberte souborový formát (výchozím je PDF)
-
jako název souboru jednoduše zadejte jakoukoli předponu užitečnou pro všechny party, nebo ponechejte výchozí (název souboru notového zápisu)
-
Stiskněte OK
Tímto budou vytvořeny soubory s názvy "<předpona>" + "-" + "<název part u>.<přípona>". Dodatečně, při vyvádění do PDF, bude tímto vytvořen i "<předpona>" + "-Partitura_a_party.pdf".
Uložení
Party a notový zápis jsou "spojeny", což znamená, že jakákoli změna obsahu jednoho ovlivní druhého, ale změny v rozvržení ne. Když jste vytvořil party, jsou uloženy společně s notovým zápisem (pokud otevřete notový zápis, máte karty pro notový zápis a každý vytvořený part).
Každý part však můžete uložit jednotlivě vybráním jeho karty a použitím Soubor → Uložit jako...
Zavedení MIDI
Zavádění MIDI se dá doladit přes panel pro zavádění MIDI, který se objeví pokaždé, když jsou v MuseScore otevřeny soubory .mid/.midi/.kar. S tímto panelem uživatel získává citlivější řízení zpracování výběrem stop a použitím činností na ně (např. kvantizace, použití teček/ligatur atd.). Tlačítkem Použít (nahoře) se všechny změny odešlou, s okamžitým účinkem. Tlačítkem Zrušit se všechny neuložené změny okamžitě zruší.
Použijte Shift+kolečko myši nebo Ctrl+kolečko myši k vodorovnému projíždění voleb pro stopu; bez těchto modifikátorů projíždíte stopy svisle.
Výsledkem má být lepší jakost rozmnoženiny notového zápisu ze souboru.
Panel pro zavádění MIDI ukazuje seznam stop (jsou ukázány pouze stopy s událostmi not) a pro každou stopu dostupné činnosti.
Pokud je stop více, potom je na začátek seznamu přidána jedna další stopa pro vybrání všech stop zároveň.

V panelu lze vybrat stopy k zavedení a přeuspořádat je. Jsou zde zobrazeny také popisné informace (zvuk, název notové osnovy a text písně - je-li jaký). Přítomnost sloupce se slovy písně je známkou toho, že soubor obsahuje stopu s textem písně - přiřaditelnou k různým stopám přes rozbalovací seznam, který je dostupný po klepnutí.
Činnosti (napravo) jsou přítomny ve dvojicích: název - hodnota. Na každou hodnotu se dá klepnout a změnit ji. Může to být vysouvací seznam nebo zaškrtávací okénko (seznam dostupných voleb). Soubor dostupných voleb se může měnit skladbu od skladby, v závislosti na jejím typu (stopa s notami, které představují výšku tónu, nebo stopa bicích).
Panel pro zavádění MIDI obnovuje náležité údaje každého znázorněného souboru, pokud jich má uživatel otevřeno několik. Pokud není panel pro zavádění MIDI nadále potřebný, je možné jej zavřít klepnutím na zavírací tlačítko v levém horním rohu. Panel se znovu objeví po klepnutí na tlačítko Ukázat panel pro zavedení MIDI, které se objeví hned po zavření panelu.
Dostupné činnosti
- Nástroj MuseScore
- Přiřadit nástroj MuseScore (uvedený v instruments.xml nebo v zadaném vlastním souboru xml v Nastavení), který vymezuje název osnovy, klíč, transpozici, artikulace atd.
- Kvantizace
-
Kvantizovat noty MIDI podle pravidelné mřížky. NEJVĚTŠÍ rozlišení mřížky lze nastavit přes vysouvací nabídku:
- Hodnota z nastavení (výchozí) - Hodnota kvantizace je vzata z hlavního dialogu Nastavení MuseScore (na kartě Zavedení)
- Čtvrtina, osmina, šestnáctina, dvaatřicetina, čtyřiašedesátina, stoosmadvacetina - uživatelem stanovené hodnoty
Skutečná velikost mřížky kvantizace je přizpůsobující se a zmenšuje, když je délka noty malá.
- Nejvíce hlasů
- Nastaví největší počet v notách dovolených hlasů.
- Hledat rytmické notové skupiny
- Když je povolena, pokusí se tato volba o zjištění rytmických notových skupin a použije odpovídající mřížku kvantizace na akordy rytmických notových skupin.
- Je lidské provedení
- Je-li povolena, tato volba zmenšuje přesnost převedení MIDI do notového zápisu conversion ve prospěch čitelnosti. Je to užitečné pro nezarovnané soubory MIDI, když není poskytnuta žádná pravidelná mřížka kvantizace. Na takové soubory se používá automatický algoritmus pro sledování rytmu, který se pokouší o zjištění poloh taktů v celé skladbě.
- 2x menší počet taktů
- Volba je činná pro nezarovnané soubory MIDI (když "Je lidské provedení" je zaškrtnuto ve výchozím nastavení). Zkrátí na polovinu počet taktů obdržený při vnitřní operaci sledování rytmu. Může to být vhodné, když dává sledování rytmu 2 krát častěji rozdělení na takty, než je nutné.
- Taktové označení
- Volba je činná pro nezarovnané soubory MIDI. Uživatel může zvolit vhodné taktové označení pro celou skladbu, pokud je výchozí zjištěná hodnota nesprávná. Volba je užitečná, protože si správně poradí se zavedenými rytmickými notovými skupinami na rozdíl od přímého nastavení taktového označení z palety.
- Rozdělit notovou osnovu
- Tato volba se hodí hlavně na klavírní stopy - k přiřazení not levé a pravé ruce účinkujícího. Používá rozdělení stálých výšek tónů (uživatel může výšku tónu vybrat prostřednictvím podvoleb) nebo rozdělení pohyblivých výšek tónů (závisí na šířce ruky - tak trochu dohad z hlediska programu).
U stop bubnů (Zvuk bicích v seznamu stop) rozdělí notovou osnovu na více notových osnov, přičemž každá dostane jen jednu výšku tónu bicích (to jest zvuk bubnu). Je tu i podvolba, která programu povolí/zakáže hranaté závorky pro nově vytvořený soubor stop bubnů. - Změny klíče
- Malé klíče mohou být vloženy uvnitř notové osnovy, aby akordy držely blíže k pěti linkám osnovy. Změny klíče závisí na průměrné výšce tónu akordu. Svázané skupiny not nejsou vložením klíče porušeny (pokud se to stane, lze nahlásit chybu v algoritmu v
importmidi_clef.cpp). Tato volba je dostupná jen pro stopy, které nejsou bicí. - Zjednodušit doby trvání
- Zmenší počet pomlk kvůli utvoření jednodušších dob trvání not. U stop bicích může tato volba odstranit pomlky a také prodloužit noty.
- Ukázat staccato
- Volba na ukázání/skrytí značek pro staccato v notovém zápisu.
- Tečkované noty
- Řídí, zda bude MuseScore používat tečkované noty nebo ligatury.
- Ukázat text tempa
- Ukáže/Skryje v notovém zápisu textové označení tempa.
- Ukázat značky akordů
- Ukáže/Skryje v notovém zápisu značky akordů, jsou-li, pro souborový formát MIDI XF.
- Rozpoznat předtaktí
- Když je povolena, tato volba nemění taktové označení prvního taktu, který je kratší než druhý takt. Tomuto se anglicky říká anacrusis. Tato volba je použitelná jen současně na všechny stopy.
- Zjistit swing
- MuseScore zkouší zjistit swing - nahradit triolu [4th + 8th] dvěma běžnými osminami (pro obvyklý swing, 2:1) nebo tečkovanou osminu + šestnáctinu také dvěma běžnými osminami (pro zamíchání, 3:1). Také na začátku osnovy se swingowanými notami zobrazuje text Swing nebo Zamíchání.
Zpřístupnění
MuseScore comes with support for the free and open source NVDA screen reader for Windows. There is no support at the moment for other screen readers such as Jaws for Windows, or VoiceOver for Mac OS X.
Introduction
This document is written for blind and visually impaired users of MuseScore 2.0. It is not intended to provide a full description of all of the features of MuseScore; you should read this in conjunction with the regular MuseScore documentation. However, it should be noted that MuseScore 2.0 is not yet released, so documentation is still very incomplete.
This document applies to any recent nightly builds (since November 1, 2014). The accessibility features were introduced with the Beta 1 release from August 2014, but there have been a large number of fixes and improvements since then, both in accessibility and core functionality. The features in this document have been tested on Windows with NVDA. Other screen readers and other operating systems may work differently, or not at all.
At this point in time, MuseScore 2.0 is mostly accessible as a score reader, not so much as a score editor. This document will focus on the score reading features, with only a brief description of score editing.
Initial setup
When you run MuseScore for the first time, you may want to permanently disable the Start Center window. To do so, go close the Start Center window first, then the Edit menu (Alt+E), choose Preferences, and in there, uncheck Show Start Center. Save and close the preferences window.
Finding your way around
The user interface in MuseScore works much like other notation programs, or other document-oriented programs in general. It has a single main document window in which you can work with a score. MuseScore supports multiple document tabs within this window. It also supports a split-screen view to let you work with two documents at once, and you can have multiple tabs in each window.
In addition to the score window, MuseScore has a menu bar that you can access via the shortcuts for the individual menus:
- File: Alt+F
- Edit: Alt+E
- View: Alt+V
- Add: Alt+A
- Notes: Alt+N
- Layout: Alt+L
- Style: Alt+S
- Plugins: Alt+P
- Help: Alt+H
Of these, only the File menu is of much interest when using MuseScore as a score reader. Once opening a menu, it may take several presses of the Up or Down keys before everything is read properly.
There are also a number of toolbars, palettes, and subwindows within MuseScore, and you can cycle through the controls in these using Tab (or Shift+Tab to move backwards through this same cycle). When you first start MuseScore, or load a score, focus should be in the main score window. Pressing Tab takes you to a toolbar containing a series of buttons for operations like New, Open, Play, and so forth. Tab will skip any buttons that aren't currently active. The names and shortcuts (where applicable) for these buttons should be read by your screen reader.
Once you have cycled through the buttons on the toolbar, the next window Tab will visit is the Palette. This would be used to add various elements to a score, but it is not currently accessible except for two buttons that are visited by Tab: a drop down to select between different workspaces (a saved arrangement of palettes), and a button to create a new workspace.
If you have opened one of the optional windows, such as the Inspector, or the Selection Filter, the Tab key will also visit these. You can close windows you do not need by going to the View menu and making sure none of the first set of checkboxes are selected (the windows that appear before the Zoom settings). By default, only the Palette, Navigator and MuseScore Connect should be selected, and the latter two are not included in the Tab order.
To return focus to the score window after visiting the toolbar, or a subwindow, press Esc. This also clears any selection you may have made in the score window.
The score window
When you first start MuseScore 2.0, an empty example score entitled “My First Score” is loaded by default. If you wish to experiment with editing features, this would be a good place to begin. Otherwise, you will probably want to start by loading a score. MuseScore uses the standard shortcuts to access system commands like Ctrl+O (Mac: Cmd+O) to open a file, Ctrl+S (Mac: Cmd+S) to save, Ctrl+W (Mac: Cmd+W) to close, etc.
If you press Ctrl+O (Mac: Cmd+O) to load a score, you are presented with a fairly standard file dialog (actually provided by Qt). MuseScore can open scores in its own format (MSCZ or MSCX) as well as import scores in the standard MusicXML format, in MIDI format, or from a few other programs such as Guitar Pro, Capella, and Band-in-a-Box. Once you have loaded a score, it is displayed in a new tab within the score window. You can move between the tabs in the score window using Ctrl+Tab (does not apply for Mac).
There are a few interesting things you can do with a loaded score besides reading it note by note. You can press Space to have MuseScore play the score for you. You can use File / Export to convert to another format, including PDF, PNG, WAV, MP3, MIDI, MusicXML, etc. And of course, you can print it via File / Print or Ctrl+P (Mac: Cmd+P).
If a score contains multiple instruments, it may already have linked parts generated. Linked parts are presented as part tabs within score tabs, but currently, there is no way to navigate these part tabs using the keyboard. The parts would not normally contain information different from the score; they would just be displayed differently (each part on its own page). If a score does not already have parts generated, you can do so through File / Parts, and that dialog is accessible. If you wish to print the parts, you can work around the inability of accessing part tabs individually by using the File / Export Parts dialog, which automatically exports PDF’s (or other formats) for all parts in one step.
Score reading
When you first load a score, the score window has the keyboard focus, but there will be nothing selected. The first step to reading a score is to select something, and the most natural place to begin is with the first element of the score. Ctrl+Home (Mac: Cmd+Home) will do this. You will probably also want to use this, should you ever clear your selection by pressing Esc.
As you navigate between elements, your screen reader should give the name of the selected element (most likely the clef at the beginning of the top staff of your score). You will hear it read the name of the element (for example, “Treble clef”) and also give position information (for example, “Measure 1; Beat 1; Staff 1”). The amount of information read is not currently customizable, but we tried to place the most important first so you can quickly move on to the next element before it has finished reading, or just ignore the rest of what is read. Pressing Shift currently interrupts the reading, which might also be useful.
Most navigation in MuseScore is centered around notes and rests only – it will skip clefs, key signatures, time signatures, barlines, and other elements. So if you just use the standard Right and Left keys to move through your score, you will only hear about notes and rests (and the elements attached to them). However, there are two special navigation commands that you will find useful to gain a more complete summarization of the score:
- Next element: Ctrl+Alt+Shift+Right (Mac: Cmd+Option+Shift+Right)
- Previous element: Ctrl+Alt+Shift+Left (Mac: Cmd+Option+Shift+Left
These commands include clefs and other elements that the other navigation commands skip, and also navigate through all voices within the current staff, whereas other navigation commands such as Right and Left only navigate through the currently selected voice until you explicitly change voices. For instance, if you are on a quarter note on beat 1 of measure 1, and there are two voices in that measure, then pressing Right will move on to the next note of voice 1—which will be on beat 2—whereas pressing Ctrl+Alt+Shift+Right (Mac: Cmd+Option+Shift+Right) will stay on beat 1 but move to the note on voice 2. Only once you have moved through all notes on the current beat on the current staff will the shortcut move you on to the next beat. The intent is that this shortcut should be useful for navigating through a score if you don’t already know what the contents are.
When you navigate to an element, your screen reader should read information about it. For notes and rests, it will also read information about elements attached to them, such as lyrics, articulations, chord symbols, etc. For the time being, there is no way to navigate directly to these elements.
One important note: Up and Down by themselves, with Shift, or with Ctrl / Cmd are not useful shortcuts for navigation! Instead, they change the pitch of the currently selected note or notes. Be careful not to inadvertently edit a score you are trying to read. Up and Down should only be used with Alt/Option if your intent is navigation only. See the list of navigation shortcuts below.
Moving forwards or backwards in time
The following shortcuts are useful for moving “horizontally” through a score:
- Next element: Ctrl+Alt+Shift+Right
- Previous element: Ctrl+Alt+Shift+Left
- Next chord or rest: Right
- Previous chord or rest: Left
- Next measure: Ctrl+Right
- Previous measure: Ctrl+Left
- Go to measure: Ctrl+F
- First element: Ctrl+Home
- Last element: Ctrl+End
Moving between notes at a given point in time
-
The following shortcuts are useful for moving “vertically” through a score:
-
Next element: Ctrl+Alt+Shift+Right
- Previous element: Ctrl+Alt+Shift+Left
- Next higher note in voice, previous voice, or staff above: Alt+Up
- Next lower note in voice, next voice, or staff below: Alt+Down
- Top note in chord: Ctrl+Alt+Up
- Bottom note in chord: Ctrl+Alt+Down
The Alt+Up and Alt+Down commands are similar to the Ctrl+Alt+Shift+Right and Ctrl+Alt+Shift+Left commands in that they are designed to help you discover the content of a score. You do not need to know how many notes are in a chord, how many voices are in a staff, or how many staves are in a score in order to move vertically through the score using these commands.
Filtering score reading
Excluding certain elements like lyrics, or chord names while reading the score is possible by using the Selection filter (F6). Uncheck those elements you don't want to read.
Score playback
The Space bar serves both to start and stop playback. Playback will start with the currently selected note if one is selected; where playback was last stopped if no note is selected; or at the beginning of the score on first playback.
MuseScore supports looped playback so you can repeat a section of a piece for practice purposes. To set the “in” and “out” points for the loop playback via the Play Panel (F11):
- First select the note in the score window where the loop should start
- Go to the Play Panel and press the Set loop In position toggle button
- Back to the score window, navigate to the note where you want the loop to end
- Switch again to Play Panel, and press the Set loop Out position toggle button
- To enable or disable the loop, press the Loop Playback toggle button
You can also control the loop playback and control other playback parameters, such as overriding the basic tempo of a score, using the View / Play Panel (F11).
Score editing
Score editing is currently not very accessible – too many score elements require intervention of the mouse in order to place objects onto a score. Additionally, visual reference and manual adjustment of the position of various elements is sometimes necessary due to MuseScore's limited support for conflict avoidance of elements.
In contrast, MuseScore does often provide ample default, and a platform to experiment with the basics of note input.
To enter note input mode, first navigate to the measure in which you would like to enter notes, then press “N”. Almost everything about note input is designed to be keyboard accessible, and the standard documentation should be good to help you through the process. Bear in mind that MuseScore can either be in note input or normal mode, and it won’t always be clear which mode of these you are in. When in doubt, press Esc. If you were in note input mode, this will take you out. If you were in normal mode, you will stay there, although you will also lose your selection.
Customization
You can customize the keyboard shortcuts using Edit / Preferences / Shortcuts. At some point, we may provide a set of special accessibility-optimized shortcuts and/or a way of saving and loading sets of shortcut definitions.
Číslovaný bas
Přidání označení nového číslovaného basu
- Vyberte notu, na kterou se použije číslovaný bas
- Stiskněte klávesovou zkratku pro číslovaný bas (výchozí Ctrl+G; lze změnit v Nastavení)
- Podle potřeby v editoru zadejte text (viz níže)
- Stiskněte mezerník pro posunutí na další notu připravenou na další označení číslovaného basu (nebo klepněte mimo okénko editoru pro jeho opuštění)
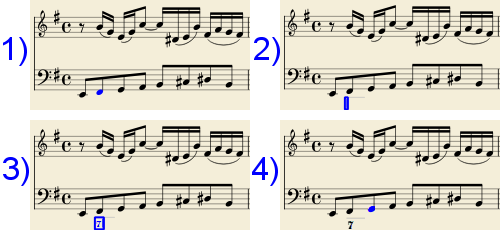
Použitím mezerníku editor postoupí k další notě nebo pomlce notové osnovy, k níž je číslovaný bas přidáván. jak postoupit do bodu mezi značkami not nebo jak rozšířit skupinu číslovaného basu na delší dobu trvání se podívejte níže na dobu trvání skupiny.
Klávesa tabulátoru rozšíří okénko úprav po začátek dalšího taktu.
Klávesová zkratka Shift+mezerník posune okénko úprav na předcházející notu nebo pomlku v notové osnově.
Klávesová zkratka Shift+Tab mezerník posune okénko úprav na začátek předchozího taktu.
Formát textu
Číslice
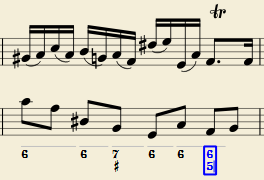
Číslice se zadávají přímo. Skupiny několika číslic naskládaných jedna na druhé se rovněž zadávají přímo v jednom textu. Rovnají se na sebe pomocí klávesy Enter:
Posuvky
Posuvky lze vkládat pomocí běžných kláves:
| K vložení: | pište: |
|---|---|
| dvojité bé | bb |
| bé | b |
| odrážka | h |
| křížek | # |
| dvojitý křížek | ## |
Tyto znaky budou při opuštění editoru automaticky přeměněny na správné značky. Posuvky je možné vložit před, nebo za číslici (a samozřejmě v místě číslice, pro pozměněné tercie), podle požadovaného stylu; oba styly jsou náležitě zarovnány, s posuvkou 'zavěšenou' nalevo nebo napravo.
Combined shapes
Slashed digits or digits with a cross can be entered by adding \, / or + after the digit (combining suffixes); the proper combined shape will be substituted when leaving the editor:
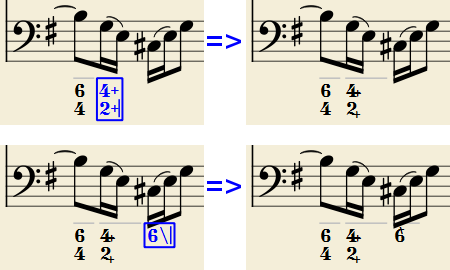
The built-in font can manage combination equivalence, favoring the more common substitution:
1+, 2+, 3+, 4+ result in  (or
(or  )
)
and 5\, 6\, 7\, 8\, 9\ result in  (or
(or  )
)
Please remember that / can only by combined with 5; any other 'slashed' figure is rendered with a question mark.
+ can also be used before a digit; in this case it is not combined, but it is properly aligned ('+' hanging at the left side).
Parentheses
Open and closed parentheses, both round: '(', ')' and square: '[', ']', can be inserted before and after accidentals, before and after a digit, before and after a continuation line; added parentheses will not disturb the proper alignment of the main character.
Notes:
- The editor does not check that parentheses, open and closed, round or square, are properly balanced.
- Several parentheses in a row are non-syntactical and prevent proper recognition of the entered text.
- A parenthesis between a digit and a combining suffix ('+', '\', '/') is accepted, but prevents shape combination.
Continuation lines
Continuation lines are input by adding an '_' (underscore) at the end of the line. Each digit of a group can have its own continuation line:

Continuation lines are drawn for the whole duration of the figured bass group (but currently are not continued on following systems, the same as for lyric continuation lines).
'Extended' continuation lines
Occasionally, a continuation line has to connect with the continuation line of a following group, when a chord degree has to be kept across two groups. Examples (both from J. Boismortier, Pièces de viole, op. 31, Paris 1730):

In the first case, each group has its own continuation line; in the second, the continuation line of the first group is carried 'into' the second.
This can be obtained by entering several (two or more) underscores "__" at the end of the text line of the first group.
Duration
Each figured bass group has a duration, which is indicated by a light gray line above it (of course, this line is for information only and it is not printed or exported to PDF).
Initially, a group has the same duration of the note to which it is attached. A different duration may be required to fit several groups under a single note or to extend a group to span several notes.
To achieve this, the key combinations listed below can be used; each of them
- advances the editing box by the indicated duration
AND - sets the duration of the previous group up to the new editing box position.
Pressing several of them in sequence without entering any figured bass text repeatedly extends the previous group.
| Type: | to get: |
|---|---|
| Ctrl+1 | 1/64 |
| Ctrl+2 | 1/32 |
| Ctrl+3 | 1/16 |
| Ctrl+4 | 1/8 (quaver) |
| Ctrl+5 | 1/4 (crochet) |
| Ctrl+6 | half note (minim) |
| Ctrl+7 | whole note (semibreve) |
| Ctrl+8 | 2 whole notes (breve) |
(The digits are the same as are used to set the note durations)
Setting the exact figured bass group duration is only mandatory in two cases:
- When several groups are fit under a single staff note (there is no other way).
- When continuation lines are used, as line length depends on the group duration.
However, it is a good practice to always set the duration to the intended value for the purposes of plugins and MusicXML.
Editing existing figured basses
To edit a figured bass indication already entered:
- Select it, or the note it belongs to and press the same Figured Bass shortcut used to create a new one
or - Double-click it
The usual text editor box will open with the text converted back to plain characters ('b', '#' and 'h' for accidentals, separate combining suffixes, underscores, etc.) for simpler editing.
Once done, press Space to move to a next note, or click outside the editor box to exit it, as for newly created figured basses.
Style
The Style → General... menu command allows to configure how figured bass is rendered. Select "Figured Bass" in the list on the left side to display the following dialogue box:
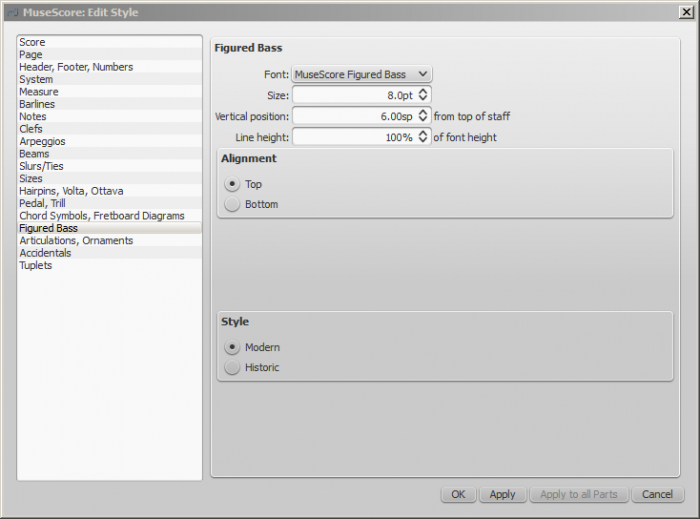
The Font drop list contains all the fonts which have been configured for figured bass. A standard installation contains only one font, "MuseScore Figured Bass", which is also the default font.
The Size is the size of the font (in points). It is linked to the spatium value: for the default spatium, the entered value is used; for smaller or larger spatium values, a size value proportionally smaller or larger is used.
Vertical Position is the distance (in spatia) from the top of the staff to the top margin of the figured bass text. Negative values go up (figured bass above the staff) and positive values go down (figured bass below the staff: a value greater than 4 is needed to step over the staff itself).
Line Height is the distance between the base line of each figured bass line; it is expressed in percent of the font size.
The following picture visualizes each numeric parameter:
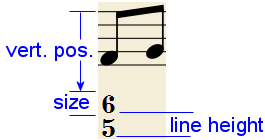
The Top / Bottom radio buttons select the vertical alignment: with Top, the top line of each group is aligned with the main vertical position and the group 'hangs' from it (this is normally used with figured bass notation and is the default); with Bottom, the bottom line is aligned with the main vertical position and the group 'sits' on it (this is sometimes used in some kinds of harmonic analysis notations):
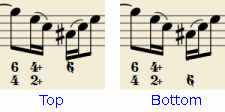
The Modern / Historic radio buttons select the typographic style of the combined shapes. The difference between the two styles is shown below:
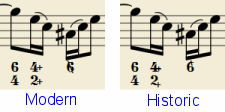
Proper syntax
For the relevant substitutions and shape combinations to take effect and for proper alignment, the figured bass mechanism expects input texts to follow some rules (which are in any case, the rules for a syntactical figured bass indication):
- There can be only one accidental (before or after), or only one combining suffix per figure;
- There cannot be both an accidental and a combining suffix;
- There can be an accidental without a digit (altered third), but not a combining suffix without a digit.
- Any other character not listed above is not expected.
If a text entered does not follow these rules, it will not be processed: it will be stored and displayed as it is, without any layout.
Summary of keys
| Type: | to get: |
|---|---|
| Ctrl+G | Adds a new figured bass group to the selected note. |
| Space | Advances the editing box to the next note. |
| Shift+Space | Moves the editing box to the previous note. |
| Tab | Advances the editing box to the next measure. |
| Shift+Tab | Moves the editing box to the previous measure. |
| Ctrl+1 | Advances the editing box by 1/64, setting the duration of the previous group. |
| Ctrl+2 | Advances the editing box by 1/32, setting the duration of the previous group. |
| Ctrl+3 | Advances the editing box by 1/16, setting the duration of the previous group. |
| Ctrl+4 | Advances the editing box by 1/8 (quaver), setting the duration of the previous group. |
| Ctrl+5 | Advances the editing box by 1/4 (crochet), setting the duration of the previous group. |
| Ctrl+6 | Advances the editing box by a half note (minim), setting the duration of the previous group. |
| Ctrl+7 | Advances the editing box by a whole note (semibreve), setting the duration of the previous group. |
| Ctrl+8 | Advances the editing box by two whole notes (breve), setting the duration of the previous group. |
| B B | Enters a double flat. |
| B | Enters a flat. |
| H | Enters a natural. |
| # | Enters a sharp. |
| # # | Enters a double sharp. |
| _ | Enters a continuation line. |
| _ _ | Enters an extended continuation line. |