Notation: Rhythm, meter, and measures
Taktarten
Übersicht
Taktarten werden über die Palette "Taktarten" auf die Partitur angewendet.
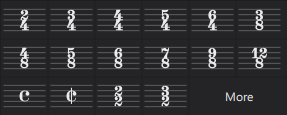
Festlegen der Anfangstaktart für Ihre Partitur
Dies geschieht auf der zweiten Seite des Dialogs bei der Erstellung einer neuen Partitur.
Hinzufügen eines Taktartwechsels zu Ihrer Partitur
Verwenden Sie eine der folgenden Möglichkeiten:
- Wählen Sie eine vorhandene Taktart, einen Takt, eine Note oder eine Pause in der Partitur aus, und klicken Sie auf eine Taktart in der Palette.
- Ziehen Sie eine Taktart aus der Palette auf eine Lücke in einem Takt oder auf eine vorhandene Taktart.
Löschen einer Taktart
- Um eine Taktart in der Partitur zu löschen, wählen Sie sie aus und drücken Sie Entf.
Sichtbarkeit von Taktarten bestimmen
So blenden Sie die Taktart in einem bestimmten Notensystem aus/ein:
- Klicken Sie mit der rechten Maustaste auf das Notensystem.
- Wählen Sie "Eigenschaften Notenzeile/Instrument";
- Deaktivieren/aktivieren Sie "Taktart anzeigen".
So deaktivieren/aktivieren Sie alle Taktartwechselankündigungen (am Ende von Notensystemen):
- Wählen Sie in der Menüleiste Formatierung→Stil→Seite.
- Deaktivieren/aktivieren Sie "Taktartwechselankündigungen erstellen".
So blenden Sie eine einzelne Taktartwechselankündigungen aus oder ein:
- Wählen Sie die übergeordnete Taktart aus;
- Deaktivieren/aktivieren Sie im Abschnitt Taktart vom Eigenschaftsfenster "Taktartwechselankündigung in vorigem System anzeigen".
Erstellen einer eigenen Taktart
- Klicken Sie in der Palette Taktarten auf Mehr.
- In der erscheinenden Zusatzpalette klicken Sie auf die Schaltfläche "Taktart erstellen".
- Unter Wert geben Sie Zähler, Nenner und Text ein, der hierfür erscheinen soll (letzteres ist optional, wenn die anzuzeigende Taktart von der eingstellten abweichen soll)
- Passen Sie die Balkenauswahl im Abschnitt Balkengruppen an (siehe Balkengruppen (unten))
- Drücken Sie Hinzufügen, um die neu erstellte Taktart in die Palette Taktarten zu übernehmen.
Sie können dasselbe auch über die Gesamtpalette durchführen (Umschalt+F9).
Hinzufügen einer Taktart für ein einzelnes Notensystem
In bestimmten Fällen kann eine Partitur Notensysteme mit unterschiedlichen Taktarten aufweisen, die gleichzeitig laufen. So zum Beispiel im Folgenden (J. S. Bachs Goldberg-Variation Nr. 26):

Die übergreifende Taktart ist 3/4, aber die Taktart des oberen Notensystems wurde separat auf 18/16 gesetzt.
So stellen Sie eine Taktart für nur ein Notensystem ein:
- Halten Sie Strg (Mac: Cmd) gedrückt und ziehen Sie eine Taktart aus einer Palette auf einen leeren Takt.
Anpassen der Taktartgröße
- Wählen Sie die Taktart aus.
- Passen Sie im Abschnitt Taktart des Eigenschaftsfensters die horizontalen und vertikalen Skalenwerte unter Maßstab an.
Taktarteigenschaften
Um das Dialogfeld Eigenschaften Taktart zu öffnen, verwenden Sie eine der folgenden Möglichkeiten
- Klicken Sie mit der rechten Maustaste auf eine Taktart und wählen Sie aus dem Kontextmenü "Eigenschaften Taktart".
- Wählen Sie eine Taktart aus und klicken Sie dann auf Eigenschaften Taktart im Abschnitt "Taktart" des Eigenschaftenfensters.
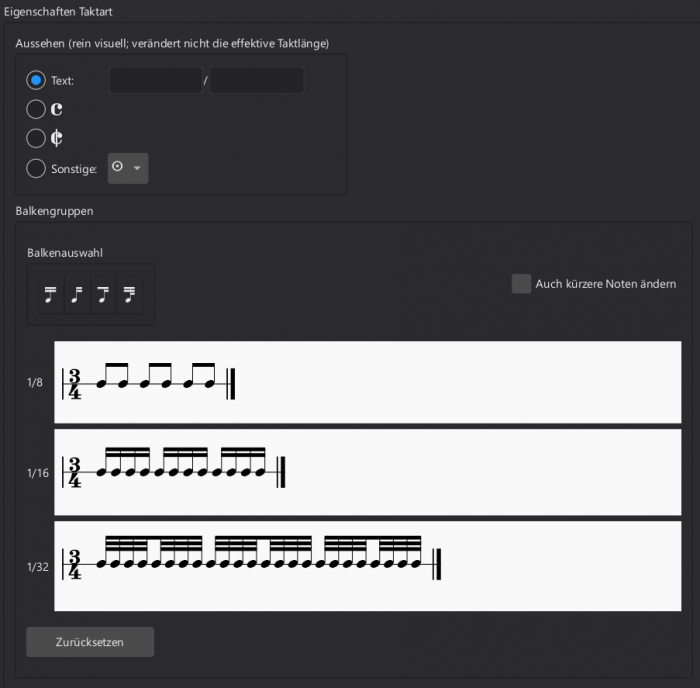
Aussehen
In diesem Teil des Dialogs können Sie das nominale Erscheinungsbild der Signatur anpassen, ohne den zugrunde liegenden rhythmischen Wert zu beeinflussen.
- Text: Fügen Sie den Zähler und den Nenner ein, der auf der Partitur erscheinen soll.
Alternativ können Sie auch aus einer Reihe von Taktartsymbolen wählen, die nachstehend aufgeführt sind.
Balkengruppen
In diesem Bereich können Sie die Balkenmuster der Noten einstellen, die in dem von der Taktart gesteuerten Abschnitt vorkommen.
- Klicken Sie auf eine Note, um den Balken vor dieser Note zu unterbrechen. Klicken Sie erneut, um den Balken wiederherzustellen.
- Alternativ können Sie auch ein "Balkenauswahl"-Symbol auf die Note hinter dem Balken ziehen, den Sie erzeugen oder unterbrechen möchten.
- Klicken Sie auf Zurücksetzen, um alle Änderungen zu verwerfen, die seit dem Öffnen dieses Fensters vorgenommen wurden, und zu den zuletzt verwendeten Einstellungen zurückzukehren. Diese Schaltfläche setzt die Einstellungen nicht auf den Stand zurück, den sie beim Hinzufügen der Taktart aus der Palette hatten. Ersetzen Sie dazu dieses Taktartobjekt durch ein neues.
Aktivieren Sie das Kontrollkästchen "Auch kürzere Noten ändern", wenn Sie möchten, dass die Änderungen auch für die Balkengruppen darunter gelten.
Weitere Informationen über Balken finden Sie unter Balken.
Taktartstil
Es gibt einige globale Stileigenschaften für Taktarten (siehe Formatierung→Stil).
- Taktartwechselankündigung erstellen: Diese Eigenschaft befindet sich im Abschnitt Schlüssel, Ton- & Taktarten. Aktivieren oder deaktivieren Sie die Option.
- Schlüssel zu Taktart / Tonart zu Taktart / Taktstrich zu Taktart / Taktart zu Taktstrich / Taktart zu erster Note: Im Abschnitt Takte. Hier können Sie die Abstände für verschiedene Arten der Taktartgestaltung festlegen.
Stems and flags
Stem direction
Default stem direction
MuseScore aligns the stems of voice 1 notes according to the conventions of music theory. By contrast, voice 2 and voice 4 stems point downwards by default, while voice 3 stems point upwards. Voice 1 stems automatically flip upwards in the presence of voice 2 or 4 notes.
Flipping stem direction
- Select either the notehead, stem or attached beam (if any)
- Use any of the following methods:
- Press X
- Click on the "Flip direction" icon in the Note input toolbar
- Select a stem direction from the Stem tab in the Properties panel
This action will flip any attached beam as well.
Changing stem length
- Select the stem
- Use one of the following methods:
- Press ↑/↓ to extend or shorten the stem
- Change Length in the Properties panel
Creating stemless notes
To hide the stems of individual notes:
- Select one or more noteheads
- Go to the Properties panel
- Select the Stem tab
- Select the checkbox next to Stemless
To hide all stems in an instrument part:
- Right-click on the staff and select Staff/Part properties
- Click on Advanced style properties
- Select the checkbox next to Stemless
Stem and flag properties
Properties specific to stems and flags can be edited from the Stem tab in the Note section of the Properties panel:
- Stemless removes the stem (and associated beams) from the selected note(s)
- Stem direction:
- Auto determines the direction of the stem according to the voice of the selected note(s)
- Up and Down override the default stem direction
- Flag style sets the appearance of flags for the entire score to either traditional (default) or straight
- Thickness determines the stem's width
- Length determines the stem's length
- Stem offset can be used to move the stem in a horizontal and/or vertical direction
Stem and flag style
Global settings for Stem thickness and Flag style may also be set in Format→Style→Notes.
See also
Beams
Overview
A beam is a line connecting consecutive notes to indicate rhythmic grouping of eighth or shorter notes (Wikipedia). You can change control the presence or absence of beams between notes as well as their appearance.
Controlling which notes are beamed
The default beaming of notes is determined by properties of the time signature. You can edit those defaults and thus affect the beaming of all notes within that time signature, and you can also override the beaming of individual notes to differ from the time signature defaults.
Setting the default beaming for a time signature
See the main chapter Time signatures
Each time signature has a set of beaming defaults that control the beaming of all notes in that time signature. Since you will normally want the beaming consistent throughout the score, this is usually the place to start when altering the beaming. To edit the defaults for a given time signature, use the Time signature properties dialog.
Accessing Time signature properties
- Select a time signature within the score
- Click the Time signature properties button in the Properties panel
- Edit the Beam Groups section as explained below
You can also access this dialog by right-clicking a time signature.
Note: the settings made in this dialog are per score and also per staff. To apply changes to other staves within the same score, you can Ctrl+Shift+drag the time signature to another staff, which acts similarly to adding it from the palette. To make a customized time signature available to other scores, Ctrl+Shift+drag it back to the palette.
Beam groups
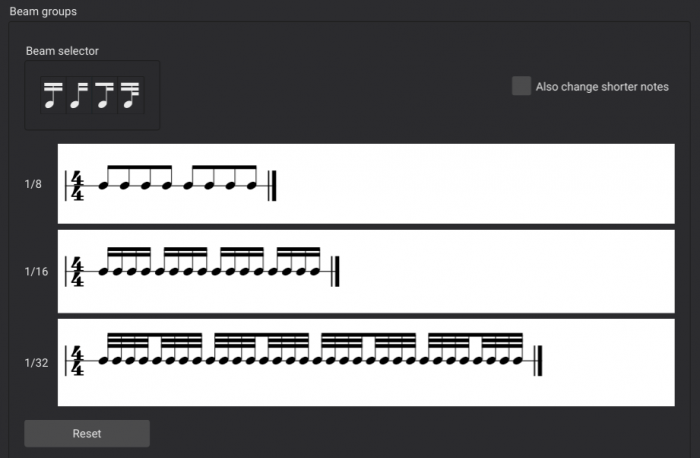
To change the beaming of a note of a given duration on a given beat, click the corresponding note in the Beam groups section to toggle the beam into that note on or off. That is, if you click a note that is currently beamed to the previous note, that will break the beam, and if you click a note that is not currently beamed to the previous note, that will join them. You can also drag one of the Beam selector icons to any given note to set its beaming as explained further below.
If you select the Also change shorter notes option, then changes made to any given note will affect notes on the same beat of shorter durations as well.
Click Reset to remove all changes made since this dialog was opened. Note that this button does not reset settings back to the original defaults from the palette. To revert all changes made since the time signature was added, use the palette to replace the time signature.
Overriding the default beaming for a specific note
The time signature properties control the default beaming for notes in your score, but you can override those defaults on a note-by-note basis, such as to have one measure beamed differently from another. This can be useful when writing certain rhythms that might be more readable beamed in a non-standard manner, or in cases where the options available in Time signature properties are insufficient to create the defaults you want. It is also the only way to create beams over rests.
Beam properties are set on the notes themselves. To change the beam between two notes, you will normally start by selecting the second of the two notes, as most of the beam properties control the beam into a note. Note that these properties can be set from the Properties panel or the Beam properties palette, but this discussion will focus on the Properties panel.
To change the beaming of a given note:
- Select the note
- Select the Beam tab in the Note section of the Properties panel
-
Select one of the icons to set the appropriate property

From left to right, the available properties are:
- Auto: resets the beaming of the note to the time signature default behavior
- No beam: breaks any beams into or out of the selected note
- Break beam left: breaks any beam into the selected note
- Break inner beams (8th): breaks all but one beam into the selected note (for notes that would otherwise have two or more beams)
- Break inner beams (16th): breaks all but two beams into the selected note (for notes that would otherwise have three or more beams)
- Join beams: joins a beam from the previous note into the selected note (unless the previous note is set to No beam)
Beaming over rests

To extend a beam over a rest:
- Select the rest
- Apply the Join beams or Break beam left property
Beaming over barlines

To extend a beam across a barline:
- Select the first note or rest after the barline
- Apply the Join beams property
Controlling the appearance of beams
While breaking and joining beams is a function of the individual notes, the actual appearance of the beam can be controlled by selecting either the beam itself or any of the notes it joins. Thus, to set these properties, you can either:
- Select a note that is currently beamed
- Select the Beam tab within the Note section of the Properties panel
or
- Select the beam itself
Either way, at that point, you will see the options to control the appearance of the beam.
Feathered beams

The buttons in the Feather beams section of the Properties panel can be used to indicate gradual slowing down or speeding up of the joined notes (note this is not supported in playback). These options only apply to 16th and shorter durations using multiple beams.

- None: reset the beam to standard (non-feathered) appearance
- Decelarate: feather the beams to fan inward to indicate a gradual slowing down
- Accelerate: feather the beams to fan outward to indicate a gradual speeding up
Beam angle
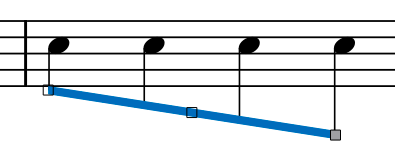
The angle of a beam can be edited directly by selecting it and moving the handles by dragging or using the cursor keys. But you can also use the settings in the Properties panel. You may need to click the More button first to display this section.

The two settings here correspond to the left and right handles on the beam and allow you to set the height of either side of the beam independently.
You can also force a beam to be horizontal by enabling the Force horizontal property.
Beam style
A few global properties of beams can be set from Format→Style→Beams:
- Beam distance: Set the vertical distance from one beam to the next.
- Beam thickness: Set the thickness of all beams.
- Broken beam minimum length : Set the minimum length of broken beams such as those used in dotted rhythms.
- Flatten all beams: Check to make all note beams horizontal, regardless of context.
See also
Regroup rhythms
Overview
Standard music notation normally follows a set of conventions designed to facilitate the reading of rhythm. The basic idea is to group notes in ways that clarify which notes belong to which beat. Rules include:
- sixteenth notes should be beamed in a way that clarifies each beat
- eighth notes should be beamed in a way that clarifies each group of two beats
- longer notes that start off the beat should be broken up with ties to clarify each beat or group of two beats
A full discussion of this topic is beyond the scope of this Handbook, but for more information, see this handout.
Here is an example of a rhythm written incorrectly and then correctly:

MuseScore can correct many of these cases automatically.
Regrouping rhythms
To regroup rhythms according to the common conventions of standard music notation:
- Select the passage you wish to regroup.
- From the main menu, select Tools→Regroup rhythms.
The rhythm itself is not changed—only the notation of it.
See also
Tuplets
Creating tuplets
A tuplet is any group of notes that divide the beat in a way other than what is normally permitted by the time signature. Triplets consisting of three eighth notes in one beat are the most familiar type of tuplet.
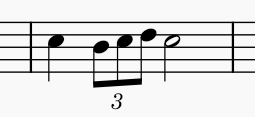
Simple tuplets
A simple tuplet such as the triplet shown above can be entered in note input mode or in normal mode.
In note input mode
- Navigate to the note/rest (or blank measure) where you want the tuplet to start.
- Select a final duration for the whole tuplet group (e.g. for an eighth note triplet, this will be a quarter note—keyboard shortcut 5).
- Use one of the following commands:
- Press the keyboard shortcut for the required tuplet: i.e. Ctrl+3 for a triplet; Ctrl+4 for quadruplet … and so on, up to Ctrl+9 for a nonuplet. (Mac: Cmd+3 … Cmd+9);
- From the menu, choose Add→Tuplets…, then select the required tuplet.
- From the note input toolbar, click on the Tuplet icon and select from the dropdown.
The note or rest is automatically divided for you and an appropriate annotation is applied.
- Enter the desired series of notes/rests.
In normal mode
- Select a note or rest that specifies the full duration of the desired tuplet group. You may need to create this in the score beforehand. Thus, if you want an eighth note triplet you need to select a quarter note/rest.
- Use one of the following commands:
- Press the keyboard shortcut for the required tuplet: i.e. Ctrl+3 for a triplet; Ctrl+4for quadruplet … and so on, up to Ctrl+9 for a nonuplet. (Mac: Cmd+3 … Cmd+9).
- From the menu, choose Add→Tuplets…, then select the required tuplet.
- From the note input toolbar, click on the Tuplet icon, and select from the dropdown.
The note or rest is automatically divided for you and an appropriate annotation is applied.
- Enter the desired series of notes/rests.
Consecutive tuplets
If you need to input a series of tuplets, and don't want to continually repeat the tuplet command, you can select the notes of the first tuplet and press R (Repeat) as many times as needed; then move subsequent notes into position using keyboard arrows, retyping or re-pitch mode.
Custom tuplets
More complex tuplets can be created as follows:
- In note input mode, select a note duration equaling the total duration of the tuplet; or, if in normal mode, select a note or rest of the desired overall duration.
- Open the Create Tuplet dialog from either the menu (Add→Tuplets…→ Other…), or by clicking on the tuplet icon (note input toolbar).
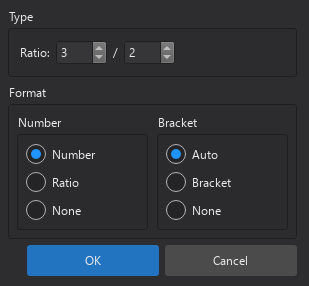
- In the Ratio field, specify the desired number ratio of the tuplet.
- Set Number and Bracket to get the required tuplet display.
- Press OK to close the dialog.
- Enter the desired series of notes and rests.
Nested tuplets
Tuplets can be nested within other tuplets.
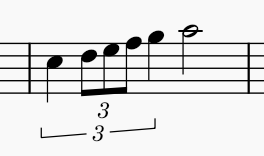
To create a nested tuplet:
- Create the outer tuplet as described above.
- While entering the individual notes, create inner tuplets in the same way (select the total notated duration for the inner tuplet, then use one of the tuplet commands to divide it appropriately).
Changing the display of tuplets
You can choose to display or hide a tuplet number or bracket, change its orientation, or adjust line thickness. See Tuplet properties (below) for details.
Tuplet properties
The display of selected tuplets can be changed in the Tuplet section of the Properties panel.
Direction: Whether the tuplet indication appears above or below the staff. Available settings are "Auto", "above" (↑) or "below" (↓).
Number type: Affects the numerical display. Choice of "Number", "Ratio" or "None".
Bracket type: Sets bracket display. Settings are "Auto", "bracket", or "no bracket".
Line thickness: The thickness of the tuplet bracket, if displayed.
Tuplet style
Values of the "Style for tuplets" can be edited in Format→Style→Tuplets.
Values of the "Style for text inside tuplets" can be edited in Format→Style→Text styles→Tuplet
"Style for tuplets" contains
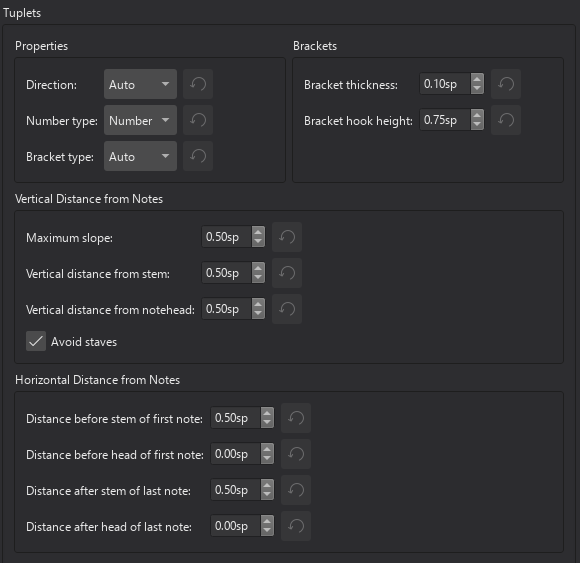
The settings include:
- Properties
- Direction
- Number type
- Bracket type
- Brackets
- Bracket thickness
- Bracket hook height
- Vertical distance from notes
- Maximum slope
- Vertical distance from stem
- Vertical distance from notehead
- Avoid staves
- Horizontal distance from notes
- Distance before stem of first note
- Distance before head of first note
- Distance after stem of last note
- Distance after head of last note
Barlines
A full range of common barlines is contained in the Barlines palette.
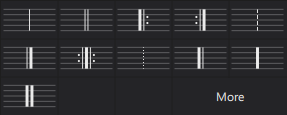
Adding double and other special barlines
Changing barline type for all staves
- Select one or more barlines in a staff ;
- Click on the desired barline in the palette.
Alternatively, you can drag a barline from the palette onto a barline in the score.
Changes are applied automatically to all barlines at the same point in the score.
Changing barline type for a single staff
- Select one or more barlines in the score;
- Hold Ctrl then click on the desired barline in the palette.
Alternatively, you can hold Ctrl and drag a barline from the palette onto a barline in the score.
Only barlines in the one staff are affected.
Adding mid-measure barlines
- Select one or more notes.
- Click on a barline in the palette.
This will add a "barline" in front of each selected note. The barline is for visual purposes and does not factor into any measure operations.
If you wish to divide a measure, inserting a real barline in the process, see Splitting a measure.
Changing barline length
Here we are concerned with the vertical extension of barlines in order to link staves together, or their reduction to create partial barlines.
Extending all barlines in a staff
- Select a barline on the "start" staff;
- Use either of the following:
- Drag the end handle downwards until it meets the destination staff. This method is the best for extending barlines through multiple staves.
- Select the edit handle and press ↓.
- Check the "Span to next staff" in the Barlines section of the Properties panel; then click Set as staff default
- Repeat if required for subsequent staves.
The barline snaps into place, and all other barlines in that staff follow.

Extending selected barlines in a staff
- Select one or more barlines (and their counterparts in the staves below if there are more than two staffs to join).
- Check the "Span to next staff" in the Barlines section of the Properties panel.
Creating partial barlines
Partial barlines can be easily created by adjusting "Span from" and "Span to" in the Barlines section of the Properties panel.
Creating barlines between staves only (Mensurstrich)
See Working with Mensurstrich.
Barline properties
You can edit properties specific to barlines in the Barlines section of the Properties panel:
Style: Used to change selected barlines to one in the dropdown list.
Span to next staff: Check this to make selected barlines extend to the staff beneath.
Span from/to: used to set the vertical start and end points of one or more selected barlines.
Set as staff default: Applies the changes made in Span to next staff and Span from/to to all barlines in the staff.
Span presets: Applies the selected preset to one or more selected barlines in the score.
Barline style
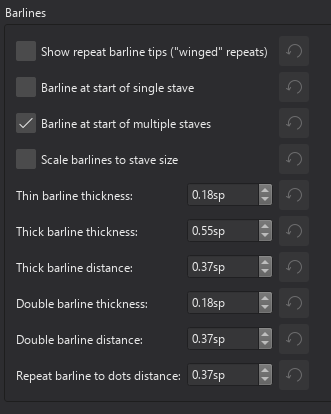
Selected properties for all barlines in the score can be changed in Format→Style→Barlines:
See also
- Fixed Measure Widths for a workaround to ensure barlines are aligned vertically between systems.
- Repeat signs
Measure numbering
Showing and hiding measure numbers
Showing measure numbers automatically
By default, MuseScore shows measure numbers at the start of each system except the first one in a section. Numbering starts at the first complete measure in a section.
if you wish to change measure numbering:
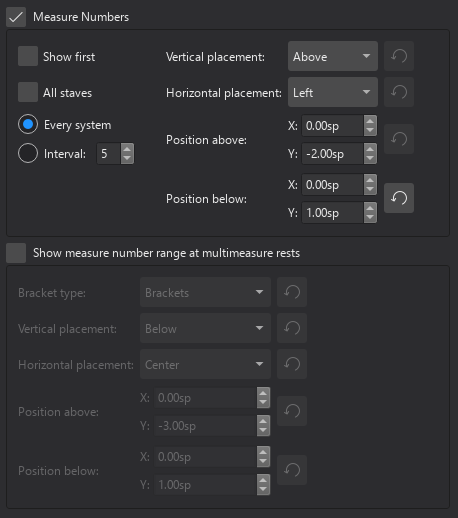
- From the menu bar, select Format→Style→Measure numbers.
- Edit the following properties as required:
- Measure numbers: This is ON by default. Uncheck to turn off measure numbering.
- Show first: Check to show measure number on the first system of a section.
- All staves: Check to show measure numbers on every staff.
- Every system / Interval: If "Every system" is selected, measure numbers are shown at the start of each system. If "Interval" is selected, you can choose a measure interval at which to display measures.
- Make changes to positioning using the controls on the right.
- Edit the display of multimeasure numbers in the section below:
- Show measure number range at multimeasure rests. If checked, you can also customize the appearance and position of the numbering. Unchecked (the default setting), only the count of multimeasure rests is displayed.
Showing measure numbers manually
To always show the number of a particular measure, regardless of style settings, open Measure properties and select "Always show" from the Measure number mode dropdown.
Hiding measure numbers
To hide all measure numbers, uncheck "Measure numbers" in Format→Style→Measure numbers.
To hide the number of a particular measure, regardless of style settings, open Measure properties and select "Always hide" from the Measure number mode dropdown.
Changing the measure number sequence
Excluding a measure from the count
In Measure properties, check "Exclude from measure count" (in the Other pane).
Altering the numbering of a measure
In Measure properties, edit "Add to measure number". Both positive and negative numbers are accepted.
Resetting measure numbering for a new section
By default, numbering of measures always restarts at the beginning of a new section. To prevent this, and make numbering continuous, select the break and in the Properties panel uncheck "Reset measure numbers for new section".
Changing the position of measure numbers
To adjust the position of all measure numbers, edit the X and Y offsets of "Position above" and "Position below" in Format→Style→Measure numbers.
Measure number properties
Note that any changes made to a measure number in the Properties panel may be lost if the layout changes.
Measure number style
Values of the "Style for Measure number" can be edited in Format→Style→Measure number.
Values of the "Style for text inside Measure number" can be edited in Format→Style→Text styles→Measure number.
See also
Other measure-related pages:
Measure rests and multimeasure rests
Measure rest
A measure rest looks like a whole rest, but is centered within a measure and indicates that the entire measure (or a voice within it) is silent:

It is commonly used in all meters (except 4/2 and 8/4).
To create one or more full measure rests
Use the following method if all selected measures are "standard"—i.e. with no custom durations:
1 Select a measure, or range of measures.
2. Press Del (Mac: Backspace).
If one or more of the measures contains a custom duration, use the following method instead:
To create a full measure rest in a particular voice
- In the appropriate voice, enter a rest that extends for the full measure.
- Make sure the rest is selected, then press Ctrl+Shift+Del (Mac: Cmd+Shift+Backspace).
If the voice contains only rests you can select the first rest and invoke the conversion keystroke.
Multimeasure rest
A multimeasure rest is used to indicate a run of empty measures, the number of measures being shown by a figure above/below the staff.

Enabling and disabling multimeasure rests
Multimeasure rests can be turned on/off with the shortcut M (prior to 4.4), Ctrl+ShiftM (as of 4.4, Mac: Cmd+Shift+M), or by checking "Multimeasure Rests" in Format→Style…→Rests.
By default, if multimeasure rests are enabled, any sequence of two or more empty measures is automatically converted to multimeasure rests.
To change the minimum number of empty measures needed to trigger multimeasure rests:
- From the menu, choose Format→Style…→Rests.
- Check "Multimeasure rests" (if the option is not already enabled).
- Edit "Minimum number of empty measures".
Multimeasure rests can be turned on/off independently in the score and instrument parts.
Breaking multimeasure rests
Multimeasure rests are automatically broken at important points, such as double barlines, rehearsal marks, key signature or time signature changes, section breaks etc.
However, you can opt to break a multimeasure rest elsewhere as follows.
- Disable multimeasure rests;
- Right-click on the measure at which you want the multimeasure rest to break, and select Measure properties.
- In the dialog, check "Break multimeasure rest".
- Click OK.
- Re-enable multimeasure rests.
Multimeasure rest properties
You can edit properties specific to multimeasure rests in the Multimeasure rest section of the Properties panel:
Show number: This box is checked by default. Uncheck it to hide the multimeasure number.
Number position: Adjust the vertical position of the multimeasure number, above or below the rest.
Multimeasure rest style
Values of the "Style for text inside Multimeasure rest range" can be edited in Format→Style→Text styles→Multimeasure rest range .
Values of the "Style for Measure numbers" can be set in Format→Style…→Measure numbers:
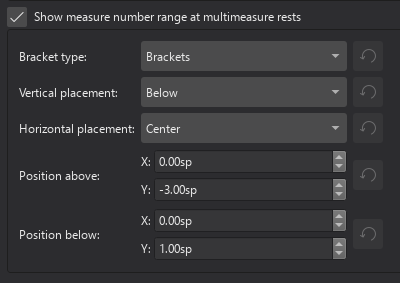
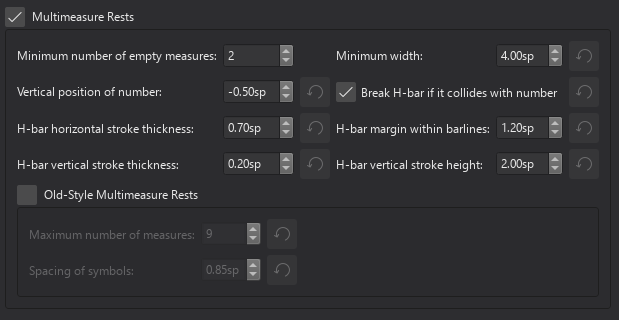
Others from Format→Style…→Rests:
See also
Other measure-related pages:
Pickup and non-metered measures
Creating a pickup measure
A pickup measure, also known as an upbeat or anacrusis, is a partial, or incomplete, measure at the beginning of a score or section.
Note: By convention, measure numbering starts at the first complete measure.
Specifying the pickup duration during score creation
- Click on Measures in the "Additional score information" page (page 2) of the New Score dialog;
- Check "Create pickup measure";
- Choose an underlying time signature using the spin controls below.
Converting a measure into a pickup
- Right-click on the measure and choose Measure properties;
- In the Measure duration section, next to "Actual", choose an underlying "time signature";
- Click OK; or click Apply and then ← or → if you want to configure an adjacent partial measure.
It is accepted musical practice to omit the same duration as the pickup from the final measure of the piece or of the same repeat section. The same method of shortening the measure applies here.
Creating non-metered measures
A non-metered measure is one which is less or greater in duration than the indicated time signature.
A measures of less duration than the indicated signature may be created in exactly the same way as a pickup measure (see above).
Other ways of creating non-metered measures are described below:
Inserting notes and rests
Extra notes/rests can be inserted in a measure with the help of either a keyboard shortcut, or by using a special mode of entry called Insert mode:
Using a keyboard shortcut
- Select the note or rest in the score before which you want to insert notes/rests;
- Enter note-input mode;
- Select a duration;
- Press Ctrl+Shift (Mac: Cmd+Shift) while adding the note/rest from the keyboard or mouse.
Using Insert mode
- Make sure you have the element selected where you want to start inserting notes/rests;
- Click and hold the Note input icon, and select Insert (or if Insert is the current default, just press N);
- Enter a note or rest as you would in step-time mode. Each note is inserted before the current cursor position;
- Move the cursor forward and backward if required (using the arrow keys), to change the insertion point.
If, at any time, the total duration of the notes and rests within the measure does not match the time signature, a small + or - sign will be shown above the measure.
Joining measures
This command joins selected measures into one measure.
Method A. To join two measures only:
- Select the barline between the two measures;
- Press Ctrl+Del; or select Tools→Remove selected range.
Method B. To join any number of measures:
- Select the measures you want to join;
- From the menu bar, select Tools→Measures→Join selected measures.
Notes: (1) If you select measures on only one staff in a score with multiple staves, the same measures will be joined in each staff of the system. (2) Beaming may be automatically modified.
Splitting a measure
This command inserts a barline before a selected note, splitting the measure into two.
Use one of the following methods:
- Select a note; then hold Ctrl and click a barline in a palette.
- Hold Ctrl and drag a barline (from a palette) to a note.
- Select a note; then, from the menu bar, select Tools→Measures→Split Measure Before Selected Note/Rest.
See also
Other measure-related pages:
Measure properties
Opening and using the dialog
The Measure properties dialog allows you to adjust various properties of an individual measure—such as visibility, duration, numbering and width ("Stretch"). To change all measures on the score, use Format → Style window : Score, Page, Measure numbers, and Measure categories. To change all measures of one staff on the whole score, change the staff Staff / Part properties.
-
To open Measure properties, right-click on a measure and select "Measure properties".
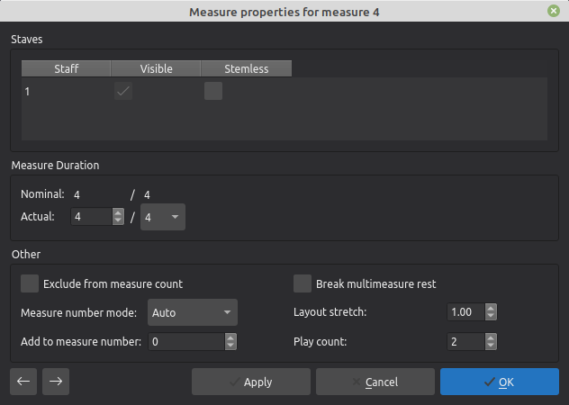
If you only want to adjust one measure, click OK to make the changes permanent. However, if you also want to adjust adjacent measures there is no need to close the dialog; simply click Apply, then use the arrows on the bottom left of the window to move the dialog to the new measure. The new measure number appears both at the top of the dialog and in the status bar.
Staves
Visible : Uncheck/check the boxes to hide/show the selected measure.
Stemless: Check/uncheck the box to hide/show stems.
Measure duration
Nominal: This is the time signature set in the score.
Actual: Adjust these figures to increase or decrease the duration of a measure.
Other
Exclude from measure count: Check to make the count skip the selected measure.
Break multimeasure rest: See Breaking multimeasure rest.
Measure number mode: Allows you to display/hide measure number for the selected measure irrespective of style settings.
Add to measure number: Changes numbering from this measure onwards in the score.
Layout stretch: This property is normally adjusted first with a shortcut (see Stretch); use "Measure properties" for fine adjustment.
Play count: This only appears if the measure is before an end repeat barline. It indicates the number of times the repeat section is played.
The play count of the measure with the end repeat barline must be set one higher than the number of times you want the measure to play (this is usually equal to the number of entries in that volta repeat list + 1).
Take the following score:

Measure 4 should have play count set to 4
Measure 6 should have play count set to 3
See also
- Fixed Measure Widths for a workaround to ensure barlines are aligned vertically between systems.
Other measure-related pages: