Notation
This page is an administration page intended for the editing community only. Click this link to go to the handbook front page intended for public viewing.
Barlines
A range of barline symbols for most ordinary purposes can be found in the Barlines palette (Basic workspace); repeat barlines, only, are also available in the Repeats & Jumps palette (Basic and Advanced). Additional symbols can be found in the Barlines palette of the Advanced workspace. It is also possible to create your own custom barlines (see below).

Change barline type
To change an existing barline, use one of the following:
- Select a barline, or measure, in the score, then click an icon in the Barlines palette (double-click in versions prior to 3.4).
- Drag an icon from the Barlines palette onto a barline, or measure, in the score.
- Select an existing barline in the score, then adjust "Style" in the "Barline" section of the Inspector.
To change a non-single to a single barline:
- Select the barline and press Del.
To hide a barline:
- Select the line and press V, or uncheck Visible in the Inspector.
Insert barline
To insert a new barline between existing ones, either:
- Drag an icon from the Barlines palette onto a note or rest.
- Select a note or rest, then click an icon in the Barlines palette (double-click in versions prior to 3.4).
Split a measure
You can insert a barline in order split a measure into two separate ones. Use one of the following methods:
- Press Ctrl (Mac Cmd) and drag the line from the Barline palette to the first note of the new measure.
- Select the first note of the new measure and press Ctrl (Mac Cmd) while you click a barline in the Barline palette (double-click in versions prior to 3.4).
- If the first two methods cause crashes in Musescore 3.6.2 on Windows, select the first note of the new measure and press Alt while you double-click a barline in the Barline.
Note: As of version 3.1 (or earlier), all barlines entered this way are entered as Normal Barlines. See also Split a measure.
Custom barlines
It is possible to create custom barlines by selecting one or more barlines, and adjusting the properties in the "Barlines" section of the Inspector:
- Style: Choose from a range of preset barlines.
- Span to next staff: joins the selected barline to the barline in the staff below.
- Span from: Sets the position of the top of the barline. "0" is the top staff line. Positive numbers start lower down the staff, negative numbers above.
- Span to: Sets the position of the bottom of the barline (see "Span from").
- Span presets: Use the buttons to apply preset customized barlines.
See also Mensurstrich.
Changes to color and horizontal/vertical offset can also be made in the Inspector.
Connect barlines
Barlines may extend over multiple staves, as in the grand staff of a piano, or in an orchestral score to join instruments in the same section. To join barlines:
-
Enter Edit mode on a barline.

-
Click on the lower blue handle and drag it down to the staff you wish to connect to. The handle snaps into position so there is no need to position it exactly.
-
Press Esc to exit edit mode. This will update all other relevant barlines as well.

Vertical alignment
Vertical alignment is absent because barlines are layout automatically according to content. A workaround for vertical alignment is to insert invisible short rests of same length at another voice, or Anchors for Dynamics and Hairpins plugin to automate the process.
See also
- Measure operations (Measure Properties dialog)
- Measure (Layout and formatting style)
- Repeats and jumps for information on repeat barlines
- Add fermata to barline
Clefs
Commonly used Clefs (Treble, Bass, Alto, Tenor) can be found in the Clefs palette in the Basic workspace. For a more complete range, see the Clefs palette in the Advanced workspace (see image below).
")
Add a clef
Add/change clef at the beginning of a measure
- Select a measure or an existing clef and click a clef symbol in the palette (double-click in versions prior to 3.4).
- Drag a clef from the palette onto a measure or an existing clef.
Add/change a mid-measure clef
- Select a note or rest, then click a clef in the palette (double-click in versions prior to 3.4).
- Drag a clef from the palette onto a note or rest
- If a mid-measure clef is already present you can also:
- Select the clef and click a clef in the palette (double-click in versions prior to 3.4).
- Drag a new clef from the palette onto the clef.
Note: "Mid-staff" clefs are always smaller than the main system clef.
Example: In the following image, the top staff starts with a treble clef and switches immediately to bass clef, then after a note and a rest, changes back to treble clef.

Note: Changing a clef does not change the pitch of any note. Instead, the notes move to preserve pitch. If you want, you can use Transposition in conjunction with a clef change.
Remove a clef
- Select a clef and press Del.
Courtesy clefs
When a clef change occurs at the beginning of a system, a courtesy clef will be generated at the end of the previous system.
To show or hide all courtesy clefs:
- From the menu, select Format→Style...→Page;
- Check/uncheck "Create courtesy clefs."
It is also possible to show/hide courtesy clefs on a case-by-case basis:
- "Create courtesy clefs" should already be ticked in the "General" menu (see above);
- Select a clef and tick/untick "Show courtesy" in the Inspector.
Hide clefs
Display clef only in the first measure (for all staves)
- From the menu, select Format→Style...→ Page;
- Uncheck "Create clef for all systems."
Display clef only in the first measure (for a particular staff)
- Right-click on the staff (Mac: Ctrl-click) , select Staff properties... and uncheck "Show clef;"
- Open the master palette and select the "Symbols" section;
- Drag and drop a clef from the master palette onto the first measure of the staff; OR select the first note and click a clef in the master palette (double-click in versions prior to 3.4).
Note: This option may be useful to TAB users who do not want the clef to repeat on every subsequent line.
Hide all clefs in a particular staff
- Right-click on the staff (Mac: Ctrl-click) , and select Staff properties...;
- Uncheck "Show clef."
Key signatures
Standard key signatures are available in the Key Signatures palette in the Basic or Advanced workspaces. It is also possible to create custom key signatures (below).
")
Note that key signatures are always defined relative to concert pitch. If you are adding a key signature to a staff for a transposing instrument you should add the relevant concert pitch key signature. The correctly transposed key signature will show on the staff (unless you are viewing in concert pitch mode).
Add a new key signature
Add new key signature to all staves
Use any of the following methods:
- Select a measure and click a key signature in the palette (double-click in versions prior to 3.4).
- Select a note or rest and click a key signature in a palette (double-click in versions prior to 3.4).
- Drag a key signature from the palette onto an empty part of a measure or a note or rest.
Add new key signature to one staff only
If you wish to change the key signature of only one staff line, leaving others unchanged:
- Press Ctrl (Mac: Cmd) and hold while you drag a key signature from a palette onto a measure.
Replace an existing key signature
Replace key signature for all staves
Use any of the following methods:
- Select the key signature to be replaced, and click a new key signature in a palette (double-click in versions prior to 3.4).
- Drag a key signature from the palette onto the key signature to be replaced (or onto the measure containing the key signature).
Replace key signature for one staff only
If you wish to replace the key signature of only one staff, leaving others unchanged:
- Press Ctrl (Mac: Cmd) and hold while you drag a key signature from a palette onto the key signature to be replaced (or onto the measure containing the key signature).
Remove a key signature
Use any of the following methods:
- Click on an existing key signature and press Del.
- Drag the empty key signature ("open/atonal") from the palette (in the advanced workspace) onto the measure.
Naturals on key signature changes
By default, MuseScore only shows cancelling naturals when the key signature changes to that of C Major/A minor (no sharps or flats). In all other cases, it simply shows the new key signature without cancellations:

However, you can opt to display cancelling naturals for all key signature changes:
-
From the menu, select Format → Style... → Accidentals. You'll see the options:

-
Select one of the three options.
- If you are in a part and want the new option to apply to all parts, click on Apply to all parts.
- Click OK to exit.
For example, selecting the option "Before key signature if changing to fewer ♯ or ♭" gives:

And the option "After key signature if changing to fewer ♯ or ♭. Before if changing between ♯ and ♭" gives:

Key signature changes and multimeasure rests
Multimeasure rests are interrupted if there is change of key signature:

Courtesy key signatures
To turn off the display of a particular courtesy key signature:
- Select the relevant key signature and untick "Show courtesy" in the "Key Signature" section of the Inspector.
To turn off the display of all courtesy key signatures:
- From the menu, select Format → Style... → Page, and untick "Create courtesy key signatures."
Note: Courtesy key signatures are not displayed at section breaks.
Custom key signatures
To create a custom key signature:
-
Press Shift+K to display the Key signatures section of the Master palette.

-
In the Create Key signature panel, drag accidentals from the palette onto the staff above to create the desired key signature. Note: The treble clef is only decorative—custom key signatures for any type of staff can be created here.
- Use the Clear button, if required, to remove all accidentals from the "staff."
- To move the new key signature into the library (center panel), press Add. To delete a key signature from the library, right-click it (Mac: Ctrl-click) and, in the drop-down menu, select Delete.
Note: A limitation of custom key signatures is that they cannot be transposed in the usual way. If a transposition is needed, or where there is a clef change, you will need to create a new custom key signature.
To move a key signature from the Master palette to a custom palette:
- Drag and drop the key signature onto a palette.
To apply a key signature to the score directly from the Master palette, use one of the following methods:
- Select a measure and click a key signature in the Master palette (double-click in versions prior to 3.4).
- Drag a key signature from the Master palette onto a measure; alternatively, to apply to one staff only, hold Ctrl (Mac: Cmd) while dragging.
External links
- How to change enharmonic key signatures for transposing instruments (MuseScore HowTo, video)
Accidentals
An accidental is a sign appearing in front of a note that raises or lowers its pitch. Musescore creates playback for common accidentals only, they includes 7 accidentals: b (flat), ♮ (natural), # (sharp), x (double sharp), bb (double flat), #x (triple sharp), bbb (triple flat). To create microtonal accidentals such as quarter tone, see Tuning systems, microtonal notation system, and playback Chapter.
Accidentals affect all notes on the same staff position only for the remainder of the measure in which they occur, but they can be canceled by another accidental. In notes tied across a barline, the accidental continues across the barline to the tied note, but not to later untied notes on the same staff position in that measure.
")
Add or remove an accidental and brackets
Accidentals are automatically added, replaced or removed when note's pitch changes:
- Change note pitch:
- ↑: Increase the pitch of a note by one semitone (favors sharps).
- ↓: Decrease the pitch of a note by one semitone (favors flats)
- And then change the enharmonic spelling
To add directly either (i) a bb double flat or x double sharp, (ii) a courtesy (also known as cautionary or reminder) accidental, or (iii) a non-standard accidental, use one of the following options:
- Select a note and click on an accidental in the Toolbar above the score, or
- Use the Accidentals Palettes, either
- Select a note and click an accidental (double-click in versions prior to 3.4), or
- Drag an accidental on to a note; or
-
Add from Accidentals category of the Master palette using the select and click or drag and drop method. Do not add from Symbols category, they are non-functional visual symbols, see Notation types.

In the above diagram, the second accidental is added from Symbols category of the Master palette, it does not use automatic layout and the note pitch does not change (C instead of C#).
To add brackets (only available for courtesy/cautionary/reminder accidental), use one of the following:
- Select the accidental in the score and click the parentheses symbol in the Accidentals palette (double-click in versions prior to 3.4), or
- Drag the parentheses symbol from the palette onto the accidental, or
- Select the accidental and choose from the Bracket type dropdown in the Inspector.
Delete an accidental directly by selecting it and pressing Del, note pitch corrects automatically.
Change enharmonic spelling
To change the enharmonic spelling of a note, or notes, in both written and concert pitch views:
- Select a note, or group of notes;
- Press J;
- Continue pressing J to cycle through the enharmonic equivalents.
To change the enharmonic spelling in the written pitch view, without affecting the concert pitch view, or vice versa:
- Select a note, or group of notes;
- Press Ctrl+J (Mac: Cmd+J);
- Continue pressing the same combination of keys to cycle through the enharmonic equivalents.
Note: If the pitches of selected notes are not all the same, the effect may be unpredictable.
Respell pitches
- From the menu, select Tools→Respell Pitches.
See also
External links
- Accidental at Wikipedia
- Enharmonic at Wikipedia
Time signatures
Time signatures can be found in a Palette of the same name in both the Basic and Advanced workspaces.

Note: Whether or not a time signature is actually shown depends on the staff properties, by default it is not shown for tablature.
Add or replace a time signature
Use any of the following methods:
- Select a time signature, measure, note or rest, and click a time signature in a palette (double-click in versions prior to 3.4).
- Drag and drop a time signature from a palette onto a space in a measure, or onto an existing time signature.
Delete a time signature
- To delete a time signature in the score, select it and press Del.
Create a time signature
If the time signature you require is not available in any of the existing palettes, it can be created using one of the following methods:
From the Time Signatures palette
Available as of version 3.3.
- In the Time Signatures palette, click on "More", then, in the supplementary palette, click on the "Create Time Signature" button;
- In the top line, enter the Numerator, Denominator, and Text (the latter is optional where you need the display to be different from the actual time signature).
- Adjust the note beaming in the Note Groups section.
- Press the "Add" button to transfer the newly-created time signature to the Time Signatures palette.
From the Master palette
- Press Shift+T to display the Time signatures section of the Master Palette;
- Select a time signature to edit in the center panel;
- In the top line of the Create Time Signature panel, enter the Numerator, Denominator, and Text (the latter is optional where you need the display to be different from the actual time signature).
- Adjust the note beaming in the "Note group" section".
- Press Add to add the newly-created time signature to the center panel. To delete a time signature from the center panel, right-click (Mac: Ctrl-click) on it and select Clear.
- Drag and drop the time signature from the Master Palette to the Time Signatures palette. You can also drag the time signature direct to the score, if desired.
Fractional time signatures
Starting in version 3.5.1 there is limited support for fractional time signatures. Only ½ and ¼ are supported at this time. If your keyboard does not have the characters on them you can enter them using Alt+0189 for ½ and Alt+0188 for ¼ on some operating systems. You can also copy/paste from here.
Time signature properties
To edit properties of particular time signature object(s) on a score, use the Time Signature Properties dialog. Do either one of the following:
- Select the time signature, then click on "Properties" in the "Time Signature" section of the Inspector, or
- Right-click (Mac: Ctrl-click) on a time signature and select Time Signature Properties….

- Global value: Shows the data used by Musescore to create metronome tick audio, see Tempo chapter. Not modifiable. It is also shown in the status bar.
- Actual value: Shows the data used by Musescore to create local time signature, see "Local time signatures" section. Not modifiable.
- Appearance: Specify a displayed text for engraving purpose, it does not affect the score. See "Additive meters" section.
- Note Groups: Controls beaming of notes. See Beams chapter.
Additive (composite) meters
Additive (or composite) time signatures are sometimes used to clarify the division of beats within a measure. To use an additive time signature:
- Create a new custom time signature, see above, or
- Modify an existing time signature on the score:
- Right-click (Mac: Ctrl-click) on a time signature in the score and select Time Signature properties…;
- In the Appearance section, adjust the "Text" property as required;
- Adjust note beaming in the Note Groups section if required.
Local time signatures
In certain cases a score may show staves with different time signatures running at the same time. For example, in Bach's 26. Goldberg Variation:

In the above example, the global time signature is 3/4, but the time signature of the upper staff has been set independently to 18/16.
To set a local time signature for just one staff:
- Hold down Ctrl (Mac: Cmd) and drag and drop a time signature from a palette onto an empty measure.
Resize time signature
- Select one or more time signatures and, in the "Time Signature" section of the Inspector, adjust the "Scale X" (width) and "Scale Y" (height) values.
Pickup measures and cadenzas
Occasionally you will need to decrease or increase the duration of a measure without changing the time signature—for example, in a pickup measure (anacrusis) or in a cadenza etc. See Measure operations: Measure duration.
Time signature changes and breaks
Multimeasure rests are interrupted when a time signature change occurs. Also, a section break will prevent a courtesy time signature being shown at the end of the previous measure.
See also
External links
- How To Using Polyrhythm, mixed meters and local time signatures in MuseScore (MuseScore HowTo)
- Additive meters at Wikipedia.
Arpeggios and glissandi
Arpeggio, strum arrow, glissando (slide), portamento (glide), brass or wind instrument articulation (Fall, Doit, Plop and Scoop) and guitar slide in or slide out symbols are usually added from the "Arpeggios & Glissandi" palette.

Add symbol
To add to the score, use one of the following methods:
- Select one or more notes, then click a symbol in a palette (double-click in versions prior to 3.4).
- Drag a symbol from a palette onto a note.
Adjust dimensions
To adjust the length and height of a symbol:
- Enter Edit mode for the symbol, and adjust the handles using keyboard shortcuts.
Change appearance and playback
After selecting a symbol, various useful properties can be adjusted in the "Glissando" or "Arpeggio" section of the Inspector.
Inspector:Glissando section
- Type: Choose between a straight or wavy line;
- Show text: Tick this box if you want the symbol to display text. Then set the wording, font-face, font-size and font-style underneath. Note: If there isn't enough room between notes, the text is not displayed;
- Play: Check/uncheck the box to turn playback on or off.
- Play style: Choose how the glissando plays back. There are five options: Chromatic, White keys, Black keys, Diatonic, Portamento (this option creates a portamento between two notes, see portamento);
Inspector:Arpeggio section
- Stretch: Increase this to lengthen the duration of the arpeggio.
- Play: Untick if you don't want the symbol to affect playback.
If needed for future use, you can save the result in a custom palette.
Arpeggios and strum arrows
When an arpeggio or strum arrow is added to the score, it initially spans only one voice. To change the height, see Adjust dimensions (above). Playback of the symbol can be turned on or off in the Inspector.
Adjust vertical range of an arpeggio
Add the arpeggio to the top staff, select it and use Shift+↓ to extend it downwards to the next stave without it affecting distance between those staves.

Note: For this to work the notes in the 2 staves need to be in the same voice. And it won't affect playback.
Portamento
To add a slide or "portamento" between two notes, add a glissando symbol and change its appearance and playback.
To add a slide or portamento before or after a note before a note (a string instrument or guitar technique), add either one of the four wind instrument articulation symbols (Fall, Doit, Plop and Scoop) or a slide in/slide out. Alternative wavy symbols are found in the Symbols category in Master palette window. All of these do not affect playback, but you can mimic to an extent with a hidden Bends (found in Articulations Palette).
To control piano and vocal portamento playback, try Articulations and ornaments and Piano Roll Editor.
Glissandi or "portamento" between two notes
A Glissando or slide may be wavy or straight, and be with or without text. E.g.:


Adjust start and end points
To move an end handle vertically or horizontally, from one note to the next:
- Enter edit mode on the symbol;
- Click on the start or end handle:
- Use Shift+↑↓ to move the handle up or down, from note to note.
- Use Shift+←→ moves the handle horizontally, from note to note.
This method change length and anchors together.
Simultaneous glissandi between chords and Cross-staff glissando
Use adjustment method (repeatedly) to create one.
Brass or wind instrument articulations
Fall, Doit, Plop and Scoop symbols are provided. To change the length and curvature, select the symbol, enter edit mode and adjust the handles as described in Slurs: method 1. Do not affect playback.
Slide in/out
Slide in and Slide out lines for guitar. To edit the length and angle of a line, double-click on it and drag the handle (or use the Inspector or keyboard arrows for finer adjustment). Do not affect playback.
External links
Articulations and ornaments
A comprehensive set of symbols can be found in the Articulations palette in the Advanced workspace:

and the Ornaments palette (Advanced workspace):

There is also an abbreviated version of Articulations palette in the Basic workspace.

To add verbal articulation objects available in the Text palette (pizz. , arco etc) to a score, see Staff Text and System Text chapter. Guitar bend is covered in Bends chapter. Brass or woodwind articulation (Fall, Doit, Plop, Scoop) is covered in Arpeggios and glissandi.
Articulations
Articulations are the symbols added to the score to show how a note or chord is to be played. The principal symbols in this group are:
- Fermatas
- Accents (>)
- Staccato and variations—including mezzo-staccato (portato), staccatissimo.
- Tenuto
- Marcato (^)
Specialist articulations are also included for bowed and plucked strings, wind instruments etc.
Ornaments
Ornaments include:
- Mordents, Inverted Mordents, Pralltrills
- Trills
- Turns
- Bends
Note: Appoggiaturas and acciaccaturas can be found in the Grace Notes palette.
Add articulation/ornament
Use either of the following methods:
- Select a note or a range of notes, then click a symbol in a palette (double-click in versions prior to 3.4).
- Drag a symbol from a palette onto a notehead.
Add accidental to an ornament
To apply an accidental to an existing ornament, such as a trill:
- Select the note to which the ornament is attached;
- Open the Symbols section of the Master palette;
- Search for and apply the desired accidental to the score (small accidentals can be found using the search term "figured bass");
- Drag the accidental into position (or reposition using keyboard shortcuts or the Inspector).
Add fermata to a barline
Use one of the following methods:
- Select a barline, then click a fermata symbol in a palette (double-click in versions prior to 3.4).
- Drag a fermata symbol from a palette onto a barline in the score.
Note: This does not affect playback.
Keyboard shortcuts
- Toggle Staccato: Shift+S
- Toggle Tenuto(─): Shift+N
- Toggle Accent(>): Shift+V
- Toggle Marcato(^): Shift+O
- Add Acciaccatura (grace note): /
Keyboard shortcuts can be customized in MuseScore's Preferences.
Adjust position
Immediately after adding an articulation or ornament from a palette, the symbol is automatically selected: It can then be moved up or down from the keyboard as follows:
- Press up/down arrow keys for fine positioning (0.1 sp at a time);
- Press Ctrl+↑ or Ctrl+↓ (Mac: Cmd+↑ or Cmd+↓) for larger vertical adjustments (1 sp at a time).
- To flip a symbol to the other side of the note (where applicable), select it and press X.
To enable adjustments in all directions from the keyboard:
- Enter Edit mode on the symbol;
- Press arrow keys for fine positioning (0.1 sp at a time); or press Ctrl+Arrow (Mac: Cmd+Arrow) for larger adjustments (1 sp at a time).
You can also change the horizontal and vertical offset values in the Inspector. To position more than one symbol at a time, select the desired symbols and adjust the offset values in the Inspector.
Note: The symbol can also be repositioned by clicking and dragging, but for more precise control, use the methods above.
Articulation and ornament properties
Fermata is covered in Tempo chapter.
Edit selected object(s)' properties on a score with the Inspector. Under the Articulation heading:
- Placement: Above or below the staff.
- Direction: Auto / Up / Down.
- Anchor: Adjust the vertical placement of the symbol.
- Time stretch: Obsolete. Use Fermatas section of Inspector instead
- Ornament style: Default or Baroque.
- Play: Turn playback on or off.
Edit global style settings in Format→Style→Articulations, Ornaments, see Layout and formatting chapter.
Playback
Playback of note affected by articulation symbols varies among instruments, the general effect:
- Staccato : shorter
- Tenuto(─): longer (no effect on Strings eg violins)
- Marcato (^) : louder and shorter
- Accent (>) : louder (louder than using a Marcato) and longer (no duration extension effect on Strings eg violins)
To find out the effect of each instrument, save your score as .mscx, open it as plaintext, find <Articulation> and its <velocity> and <gateTime> values. see <Articulation name="sforzato"> for accent (>) symbol
To achieve your desired playback, either:
- inside Musescore: add multiple symbols, toggle their Play and Visible properties. You can also set the note itself's Velocity and Velocity type properties, or
- edit per instrument settings in your saved file: save your score as .mscx, open it as plaintext and edit the instrument articulation definitions. These modifications do not affect new instruments added later, or
- edit default settings in instrument.xml affecting new instruments.
See this battle between jazz and classical musicians on the forum for more details.
See also
- Grace notes
- Fermatas in Tempo
- Dynamics (sfz symbol)
External links
- How to create trills and ornaments with accidentals (and playback) (MuseScore HowTo)
- Ornaments at Wikipedia
Bends
Bends, of various kinds, can be created with the Bend Tool  . You can find this in the Articulations palette of the Advanced workspace. Any bend applied to the score can be customized in the Bend section of the Inspector.
Apply a bend
To apply one or more bends to the score, use one of the following options:
- Select one or more notes and double-click a bend symbol in the palette.
- Drag a bend symbol from the palette on to a note.
Edit bend
Text and line properties
- Select the bend.
- Adjust the following properties in the Bend section of the Inspector:
- Line thickness.
- Font, Size, Style: Properties of the text.
- Play (checkbox): Whether the bend affects playback or not.
Global text and line properties for all bends in the score can be edited in Format→Style...→Bend.
Bend shape and width
Versions 3.4 and above:
- Make sure that the bend is selected.
- In the "Bend" section of the Inspector use the Bend type dropdown to choose from a range of presets. "Bend" is the default option.
- Make adjustments, as required, to the graphical display of the bend in the Inspector: see Edit graphical display (below).
Versions prior to 3.4:
- Select the bend and click on Properties in the Inspector; Alternatively, right-click on the bend and select "Bend Properties".

- Choose from a range of presets under Bend type. "Bend" is the default option.
- Make adjustments, as required, to the graphical display of the bend: see Edit graphical display (below).
Edit graphical display
The bend is represented by a graph consisting of gray lines connected by square, blue nodes (see image above). The slope of the line indicates the type of bend:
- Up-slope = Up-bend
- Down-slope = Down-bend
- Horizontal line = Hold
The vertical axis of the graph represents the amount by which the pitch is bent up or down: one unit equals a quarter-tone: 2 units a semitone, 4 units a whole-tone, and so on. The horizontal axis of the graph indicates the length of the bend: each gray line segment extends for 1 space (sp) in the score.
A bend is modified by adding or deleting nodes in the graph:
- To add a node, click on an empty intersection.
- To delete a node, click on it.
Adding a node lengthens the bend by 1 sp; deleting a node shortens the bend by 1 sp. The Start and End points of the bend can be moved up and down only.
Adjust height
The height of the bend symbol is automatically adjusted so that the text appears just above the staff. This height can be adjusted, if necessary, with a workaround:
- Create another note vertically above the note (shortening the line) or below the note (extending the line) at which you want the bend to start.
- Apply the bend to the created note.
- To adjust the height of the bend move this created note vertically so that the bend symbol gets the desired height.
- Drag the bend symbol to the correct position (to the original note).
- Mark the created note invisible and silent (using the Inspector).
Adjust position
To adjust position use one of the following:
- Drag the bend symbol with a mouse.
- Click on the symbol and adjust the horizontal and vertical offsets in the Inspector.
- Double-click on the symbol; or click on it and press Ctrl+E (Mac: Cmd+E); or right-click on the symbol and select "Edit element." Then use the arrow keys for fine positioning (0.1 sp at a time); or Ctrl+Arrow (Mac: Cmd+Arrow) for larger adjustments (1 sp at a time).
Custom bends
After a bend has been created in the score it can be saved for future use by dragging and dropping the symbol to a palette while holding down Ctrl+Shift (Mac: Cmd+Shift). See Custom Workspace.
External links
- Bending at Wikipedia
Beams
Overview
A beam is a line connecting consecutive notes to indicate rhythmic grouping of eighth or shorter notes (Wikipedia). You can change control the presence or absence of beams between notes as well as their appearance.
Controlling which notes are beamed
The default beaming of notes is determined by properties of the time signature. You can edit those defaults and thus affect the beaming of all notes within that time signature, and you can also override the beaming of individual notes to differ from the time signature defaults.
Setting the default beaming for a time signature
See the main chapter Time signatures.
Each time signature has a set of beaming defaults that control the beaming of all notes in that time signature. Since you will normally want the beaming consistent throughout the score, this is usually the place to start when altering the beaming. To edit the defaults for a given time signature, use the Time signature properties dialog.
Accessing Time signature properties
- Select a time signature within the score
- Click the Time signature properties button in the Inspector
- Edit the Note Groups section as explained below
You can also access this dialog by right-clicking a time signature.
Note: the settings made in this dialog are per score and also per staff. To apply changes to other staves within the same score, you can Ctrl+Shift+drag the time signature to another staff, which acts similarly to adding it from the palette. To make a customized time signature available to other scores, Ctrl+Shift+drag it back to the palette.
Note Groups

To change the beaming of a note of a given duration on a given beat, click the corresponding note in the Note Groups section to toggle the beam into that note on or off. That is, if you click a note that is currently beamed to the previous note, that will break the beam, and if you click a note that is not currently beamed to the previous note, that will join them. You can also drag one of the Beam selector icons to any given note to set its beaming as explained further below.
If you select the Also change shorter notes option, then changes made to any given note will affect notes on the same beat of shorter durations as well.
Click Reset to remove all changes made since this dialog was opened. Note that this button does not reset settings back to the original defaults from the palette. To revert all changes made since the time signature was added, use the palette to replace the time signature.
Overriding the default beaming for a specific note
The time signature properties control the default beaming for notes in your score, but you can override those defaults on a note-by-note basis, such as to have one measure beamed differently from another. This can be useful when writing certain rhythms that might be more readable beamed in a non-standard manner, or in cases where the options available in Time signature properties are insufficient to create the defaults you want. It is also the only way to create beams over rests.
Beam properties are set on the notes themselves. To change the beam between two notes, you will normally start by selecting the second of the two notes, as most of the beam properties control the beam into a note. Note that some of these properties are available in both the Time signature properties window and the Beam properties palette, but this discussion will focus on the latter.
To change the beaming of a given note, either
- Select note(s) or rest symbol(s) and click an item in the palette (double-click in Musescore versions 3.4 and below); or
-
Drag and drop an item from the palette onto a note or rest.

From left to right, the available properties are:
- Auto: resets the beaming of the note to the time signature default behavior
- No beam: breaks any beams into or out of the selected note
- Beam start: breaks any beam into the selected note
- Beam 16th sub: breaks all but one beam into the selected note (for notes that would otherwise have two or more beams)
- Beam 32nd sub: breaks all but two beams into the selected note (for notes that would otherwise have three or more beams)
- Beam middle: joins a beam from the previous note into the selected note (unless the previous note is set to No beam)
To restore to default beaming of time signature:
- Select the section of the score you want to reset. If nothing is selected, the operation will apply to the whole score;
- Select Format→Reset Beams.
Beaming over rests

To extend a beam over a rest:
- Select the rest
- Apply the Beam middle or Beam start property
Beaming over barlines

To extend a beam across a barline:
- Select the first note or rest after the barline
- Apply the Beam middle property
Controlling the appearance of beams
While breaking and joining beams is a function of the individual notes, the actual appearance of the beam can be controlled by selecting either the beam itself (but not any notes).
Feathered beams

There are two items under the Beam properties palette that can be applied to a beam to indicate gradual slowing down or speeding up of the joined notes (note this is not supported in playback). These options only apply to 16th and shorter durations using multiple beams.

- Feathered beam, slower: feather the beams to fan inward to indicate a gradual slowing down
- Feathered beam, faster: feather the beams to fan outward to indicate a gradual speeding up
To remove feathered beam, reset Grow left and Grow right properties.
Beam angle

The angle of a beam can be edited directly by selecting it and moving the handles by dragging or using the cursor keys, user can also make fine adjustments in the Inspector. To switch handle selection, use Shift+Tab key. In Musescore version 3.4 and below, it is required to select the left handle before making adjustment using mouse cursor dragging.
- Position X and Position Y correspond to the left and right handles on the beam and allow you to set the height of either side of the beam independently.
- Grow left and Grow right correspond to the height of the subbeams on the either side, they are designed for adjusting feathered beams.
- Enabling the Force horizontal property force a beam to be horizontal. It is only available when Custom position is disabled. There is also a global setting available, see the Layout and formatting : Beams chapter.
Flip note beam
To reposition a beam to the other side of the notes:
- Select any note and then press the X key; or
- Select beam(s) and then
- Press the X key;
- Press the "Flip direction" icon,
 , in the toolbar; or
 - Edit the Inspector : Direction option (under the "Beam" section).
Using independent note spacing on a staff with Local relayout
MuseScore spaces and aligns notes within the same system (a layout concept, see Layout and formatting chapter), which may result in undesirable irregular spacing. To specify that notes of one particular staff should use independent note spacing,
- Select beam(s),
- Tick Inspector : Local relayout checkbox (under the "Beam" section).
Shown below is the distribution improvement before and after applying local relayout to the top staff.


Beam style
Global properties of beams can be set from Format→Style→Beams. See the Layout and formatting : Beams chapter.
See also
External links
- How beams work (MuseScore Tutorial)
- How to add a beam over a rest (MuseScore HowTo)
- How to place a beam between notes (MuseScore HowTo)
- Traditional Vocal Beaming (MuseScore Plugin)
- ReBeamer (MuseScore Plugin)
- French Beams (MuseScore Plugin)
Brackets
MuseScore provides brackets and a curly brace in the Brackets palette (Advanced workspace).

When a new score is created using a template, MuseScore automatically sets the correct brackets.
Add
To add a bracket or brace to systems, use one of two methods:
- Select a measure on the staff where you want the bracket/brace to start, and click the desired icon in a palette (double-click in versions prior to 3.4).
- Drag a bracket/brace icon from a palette on to the staff where you want the bracket/brace to start.
Delete
- Select the bracket and press Del.
Change
- Drag the desired icon from a palette onto an existing bracket/brace in the score.
Edit
When you first apply a bracket it only spans one staff. To extend to other staves:
- Enter Edit mode.
- Drag the handle downwards to span the required staves. The handle snaps into position, so exact placement is not required.
Style
The default thickness and distance from the system of brackets and braces can be adjusted in Format→ Style... → System.

In the System Brackets section, you can set the properties for the brackets in the two boxes on the left, and the properties for the braces in the two boxes on the right.
Notation types
Musescore handle score items differently based on their types. Type of a single selected score item is displayed on the status bar.

Basics
Beginners can make better decision on choosing the correct type by skiming through the handbook, reading the contents or handbook main page online and the Text types and the Musescore line chapters.
Different types serve distinct purposes. For example, a Musescore Text cannot change a note's pitch. That is, if changing a note's pitch is the purpose, it is wrong to add a Staff Text (a subtype of Musescore Text) and manually enter a sharp or hash (#) symbol into it.
Different types anchor differently, which may have impact on program features such as playback or Musescore Part.
A score item's type cannot be changed after it is added onto a score.
Advanced
Advanced users may benefit from knowing that there are two distinct groups,
Functional text and symbols are created when the user performs actions such as pressing a keyboard shortcuts, clicking a toolbar button, or adding an item from the palette. They affect the score semantically in a way that is most useful or makes most sense (check out github and discord discussions). The Synthesizer creates playback for them. Appropiate layout and formatting are automatically applied. They are also replaced whenever appropiate, for example adding an accidental sharp # removes the existing flat b .
Non-functional ones are found under the Symbols category in the Master palette. Most features of functional ones listed above are not applicable to them. They are not removed from the score unless the user deliberately do so.
There are non-functional versions of most functional items.
Some notation are non-functional by design because there is no consensus on musical interpretation yet. Also, the task of implementating every notations' function inside Musescore is impractical due to the fact that some digital resource are not created or maintained by Musescore dev team. This includes historical clefs in the Bravura font by Steinberg (Github) and the SMuFL codepoint - glyph definitions (wikipedia) etc.
External links
Breaths and pauses
Breath and pause markings are available in the Breaths & Pauses palette (Advanced workspace).

Add symbol
To add a breath, or pause (aka caesura / "tram lines" / "railroad tracks") to the score, use one of the following options:
- Select a note or rest and click a breath or pause symbol in a palette (double-click in versions prior to 3.4).
- Drag a breath or pause symbol from a palette onto a note or rest in the score.
The symbol is placed after the note. Its position can be adjusted by editing the X and Y offsets in the Inspector, or, in edit mode, using the arrow keys.
Adjust pause length
You can adjust the pause length (in seconds) of the added symbol in the Inspector.
Grace notes
A grace note is a type of musical ornament, usually printed smaller than regular notes. The Short grace note, or Acciaccatura, appears as a small note with a stroke through the stem. The Long grace note, or Appoggiatura, has no stroke.
Create grace notes
Grace notes can be found in the "Grace notes" palette in the Basic or Advanced workspace.
")
Add a grace note
Use one of the following methods:
- Select a regular note and click a grace note in a palette (double-click in versions prior to 3.4).
- Drag a grace note symbol from a palette onto a regular note.
- Select a note and press / to create an acciaccatura only.
This will add a grace note of the same pitch as the regular note. To add a sequence of grace notes to a regular note, simply repeat the above actions as many times as required. See also, Change pitch (below).
Note: When a grace note is added to the score, a slur is not automatically created with it, so the latter needs to be added separately. See Slurs.
Add a chord of grace notes
Grace note chords are built up just like regular chords:
- Enter the first note of the chord as shown above
- Select this first grace note and enter subsequent notes as you would for any other regular chord (i.e. Shift+A...G).
You can also create a grace note chord by using the add interval shortcut in step 2: Alt+1...9 for intervals from a unison to a ninth above.
Change pitch
The pitch of a grace note can be adjusted just like a regular one:
- Select one or more grace notes
- Adjust pitch using the keyboard arrow commands, namely:
- ↑ or ↓ to increase or decrease the pitch by a semitone;
- Alt+Shift+↑ or Alt+Shift+↓ to increase or decrease the pitch one step at a time, according to the key signature.
Change duration
- Select the grace note and either click a duration icon on the toolbar, or apply the duration with the appropriate keyboard shortcut: i.e. 1...9 (see Note input).
Manual adjustment
Horizontal position
To adjust the horizontal space between a grace note and its regular parent note, use one of the following:
- Go into edit mode on the grace note, then use the left/right arrow keys to reposition as desired.
- Select the grace note and change the X-offset value in the Chord section of the Inspector.
Other adjustments
Various other properties of the grace note can be adjusted in the Inspector (see "Element," "Chord", and "Note" sections)—such as vertical position, size, stem properties etc. The exception is "Leading space" which only applies to standard notes.
External links
- Grace note at Wikipedia
- Appoggiatura at Wikipedia
- Acciaccatura at Wikipedia
Hairpins
Hairpins are symbols used to indicate gradual changes in volume in the score. There are two kinds: crescendo (getting louder) and decrescendo (getting quieter).

Add a hairpin
- Select a range of notes or measures;
- Use one of the following shortcuts:
- <: to create a crescendo hairpin.
- >: to create a diminuendo hairpin (decrescendo).
Alternatively, use one of the following options:
- Select a range of notes or measures, and click a hairpin in a palette (double-click in versions prior to 3.4).
- Drag and drop a hairpin from a palette onto a staff line.
NOTE: Placing hairpins on different voices of the same staff at the same time does not create desired playback, it is a limitation of Musescore, because the minimal area of effect on playback loudness (Dynamic Range property) is staff, not voice. If playback is priority, try splitting voices into individual instruments.
Adjust length and height
A hairpins is a type of Line with playback properties, and its length is adjusted similarly:
-
Enter edit mode on the hairpin. Then click on the end handle that you want to move:

-
Use one of the following shortcuts:
- Shift+→ to move the end handle, and its anchor, right by one note or rest.
- Shift+← to move the end handle, and its anchor, left by one note or rest;
- and then Tab once to select the start handle, then Shift+→ and Shift+← to adjust it.
This method of extending or shortening the hairpin maintains playback integrity and allows it to cross line breaks:

-
To fine-tune the horizontal position of an end-handle (without changing playback), use the following shortcuts:
- → to move the handle right by 0.1 sp.
- ← to move the handle left 0.1 sp.
- Ctrl+→ (Mac: Cmd+→) to move the handle right one sp.
- Ctrl+← (Mac: Cmd+→) to move the handle left one sp.
To change the height of a hairpin:
- Adjust Height property, or
- Adjust the lower handle at the mouth of the hairpin (e.g. the blue square below):

Cresc. and dim. lines
In addition to hairpins, there are cresc. _ _ _ and dim. _ _ _ lines with the same function in the Lines palette. Edit the text in the Text Line Details property.
To turn a hairpin into its equivalent text line:
Pick an option in the Type property.
Copy hairpins
From version 3.1, a hairpin can be cut, copied and pasted just like a text element: see Summary of cut / copy / paste commands.
For versions prior to 3.1, you can only duplicate a hairpin: see Copying lines.
Edit hairpin properties
Properties of the hairpin can be edited in the Inspector:
- Under Element Section: Edit the Y offset to change the height of the hairpin above or below the staff.
- Under Line Section: Edit line properties such as color, line style and thickness.
- Under Text Line Details Section: Add text and set text properties.
- Under Hairpin Section:
- Type: 4 options of hairpins (Arrow symbol, or expression text with a dashed line).
- Circled tip: Additional circle symbol at the narrower end.
- Height: The width at the wider end.
- Continue height: The width of the hairpin at the end of a system on a page, before it continues to the next system.
- Placement: Position on page, above or below staff. Press X to flip.
- Dynamic range: Area of effect of the symbol:
- System: Every instrument in the score.
- Part: One instrument (all of its staffs), default.
- Staff: One staff (eg one hand in piano) regardless of voices. As of MuseScore 3.6.2, this option is incompatible with the Staff / Part properties: single note dynamics playback mechanism, see forum discussion.
- Velocity change:
- 0 to 127. Magnitude of change in playback loudness across the span of the hairpin.
- Choose an appropiate Type for desired direction of change.
- The end MIDI velocity calculated by adding this value to (or subtracting this value from) the starting note's MIDI velocity (see Dynamics (symbol): loudness of a note), without any other mathematical conversion (it is not a percentage change).
- For examples, a crescendo of Velocity change = 15 placed on a phrase with a starting note of MIDI velocity = 49 affects playback loudness of the phrase by assigning MIDI velocity from 49 up to 64 to the phrase across its timespan.
- Use single note dynamics: (Version 3.1 and above) Enable playback loudness variation across the timespan of each of the note itself. Affects instrument supporting Single Note Dynamics only.
- Dynamic Mode: (Version 3.1 and above) Rate of transition: Linear (default), Ease-in and out, Ease-in, Ease-out, or Exponential.
Playback of hairpins
MuseScore development focuses on engraving support, rather than playback support. Using hairpins without dynamics symbols are perfectly acceptable in real life scoring, but do not create desired playback inside Musescore.
To create playback loudness variation across a hairpin, either:
- create a note loudness difference (see "To create desired loudness" below) between the two ends of the hairpin, and make sure the difference does not contradict with the meaning of the hairpin, or
- use a non-zero "Velocity change" value, see above.
To create desired loudness:
- One popular way is to place Dynamics symbols and, optionally, make them invisible in the Inspector. eg p crescendos f .
- Note loudness is mainly determined by MIDI velocity, which is most commonly assigned by Dynamics symbols placed onto a score, a dynamics symbol affects playback from the parent note onward until the next dynamics symbol. Final barlines or rests do not reset the loudness to default. Notes which do not have loudness affected by any dynamics symbol can be considered to be in mf (mezzoforte), and has MIDI velocity 80.
To create desired timing, create anchor points for hairpin to adjust its length upon:
- Split a note and add a tie, or
- Add short rests to an unused voice and make them invisible in the Inspector, or
- Use the Anchors for Dynamics and Hairpins plugin to automate this process.
Complex notations are handled this way:
- Only the first hairpin affects playback loudness in case of redundant hairpins, such as two crescendos between p and f.
- Only the last placed hairpin affects playback loudness in case of redundant hairpins affecting the same note (overlapped Dynamic range settings).
Incorrect hairpins do not affect playback: eg f crescendo p.
For all instruments, each individual note under a hairpin can have its playback loudness affected by presence of hairpins at the moment of note start.
MuseScore 3.1 and above
For instruments supporting Single Note Dynamics (e.g. strings, brass etc.), loudness variation can also occur across the span of the note, and across a series of tied notes . This can be switched off individually with the Use single note dynamics checkbox property.
See also
Lines
Overview
This chapter focuses on Musescore Lines, a type of objects capable of attaching (anchoring) to a horizontal continuous range of more than two notes or rests, or vertical collection of notes (chord). A Musescore Line object contains a length of string or arc, and optionally a text. These objects can functionally affect the score, and share similar configurable properties.
Musescore Line objects include these subtypes, follow the hyperlink on text to read their dedicated main chapters, or "jump to section" on this chapter:
- Line (a simple general purpose, straight line) (jump to section)
- Slurs
- Staff text lines and System text lines (jump to section)
- Hairpins and crescendo, decrescendo lines
- Volta brackets (repeat section brackets on top)
- Octave lines (ottava, 8ve etc)
- Pedal markings (jump to section)
- (Long) Trill lines and upprall, downprall, prallprall are interchangeable by adjusting properties. They affect playback. Accidentals (not affecting playback) can be added.
- Arpeggios
- Glissandi (slides) and portamento between two notes
- Guitar Barre line (jump to section)
- "let ring" line, affects playback
- vibrato line, affects playback
- vibrato sawtooth, tremolo sawtooth, affects playback
- P.M. --- (guitar palm mute), does not affect playback
- Early music features: Ambitus
These markings contain length of string or arc, but do not belong to Musescore Line objects because they cannot attach (anchor) to a continuous range:
- Bends (brass or guitar articulation)
- Ties
- Tremolo
- Single note Articulations and ornaments such as turns, (short) trills and mordent
- (Staff) Brackets
- Barlines
- Staff line (To change global staff line thickness, see Measure and horizontal spacing chapter. Other related settings see Staff / Part properties chapter.)
Standard lines
Standard line or plain line is a simple general purpose, straight line. It can be adjusted to be diagonal or vertical.
Text lines
A text line has text embedded. Examples of this subtype are Staff text lines, ornament lines, pedal, Volta, Octave lines etc.
When you apply a text line to the score from a palette, the line properties always remain unchanged, but the text properties may, under certain circumstances, assume those of the current style for text lines. For details, see Behavior of applied text and lines.
Staff text lines and System text lines
General purpose text-lines. Staff text lines, when attached to a single staff will appear in Parts that feature that staff or tablature. System text lines, appearing in all Parts.
Adding accidentals to an ornament line
To add an accidental to an ornament line (e.g. a trill line) and pralls, select the line and click on a symbol in the Accidentals palette (double-click in versions prior to 3.4), toolbar buttons will not work. Does not affect playback.
Guitar barre line
To add a guitar barre line, use either:
- a Staff text line or System text line, or
- a barre object existed in previous Musescore versions but was since removed, they are the same.
Piano Pedal
This section focuses on the types of piano pedal engraving available, for knowledge of various piano pedals see wikipedia article.
Types of pedal markings
In terms of visual representation
Supported engravings including:
- Line at either or both ends, have no hook or hooks at angles of either 45 or 90 degrees, or "T" end;
- Ped. followed by such a line, or a rosette symbol (*) : The line from the built-in Ped. * palette item is invisible and non-printing. Adjust on-screen display with View menu > Show > Show invisible setting accordingly, see Viewing and navigation: visibility options. To convert the line to visible in printing, or style it as dashed, change properties.;

- Sost. (sostenuto pedal) marking and other related symbols and pictogram can be found under Symbols category in Master palette window.

- Create custom sim. or pedal ad lib marking with Staff text.
- Full pedal is implied for playback, embed images to add pedal strength symbols for engraving need.
In terms of function inside Musescore
There are three different subtypes:
Type 1 includes:

- Line with 45 degree angled End hook or no End hook, with or without Ped. beginning text.
- Ped. followed by a rosette symbol (*)
Visually, the line or symbol only extends horizontally to the notehead attached to the end anchor.
Functionally, if that note is attached to another marking's start anchor, the following marking will automatically connect and make a shape resembling "-^-", which is indicative of the piano technique "pedal released and pressed again without releasing this note".

shown above is the auto connect, their playback are also in line with the piano technique
Sustain (MIDI CC 64) is created by the synthesizer. When consecutive type 1 markings create a "-^-", playback matches the piano technique, the first marking is interpreted by synthesizer as released at the note attached to the end anchor. Single or trailing type 1 markings creates playback like type 2: sustain until the note attached to the end anchor ends.

The last two type 1 markings shown above are single or trailing, they create the same playback as type 2
Type 2 includes:

- Line other than described in Type 1, with or without Ped. beginning text.
Visually, the line extends horizontally to an aprpopiate length spanning the full duration of note attached to the end anchor.
Functionally, sustain (MIDI CC 64) is created by the synthesizer. Type 2 always sustain until the note attached to the end anchor ends.
Type 1 and 2 are interchangable by adjusting properties.
Type 3 includes marking added from Symbols category in Master palette window such as sostenuto pedal marking, custom Staff Text markings, and embedded images, they are for engraving purpose only and are non-functional.
Adding pedal markings to your score

shown above a type 2 marking on score
Add pedal markings from Lines palette, see "Applying lines to the score" (jump to). If you add marking to a single note, end anchor is attached to end of its measure.
Adjust with Shift+←/→, switch handle with Tab, see "Line anchors and playback properties" (jump to).
Unfortunately, you might need to make compromise with engraving style or not notate at all if you must create a desired playback, because of the functional limitation of Type 1 and Type 2 explained. Musescore 3 pedal marking always create sustain playback only (cannot be turned off), making it impossible to use "add redundant symbol, make it invisible" trick.
To create shape resembling "-^-" with consecutive Type 1 markings, make sure the end anchor is attached correctly, which is usually to the first note of the next measure instead of the last note of the previous measure. This big picture shows the correct end anchor result.

MuseScore does not offer keyboard shortcut bindings to palette items, but you can configure a shortcut to apply the same (last used) times consecutively to improve efficiency, see Palettes: Apply the last selected item
Pedal properties
Per symbol settings see "Inspector properties of Lines" (jump to). Global settings see Layout and formatting: Pedal, and Layout and formatting: Text-line .
Applying lines to the score
The commonest way to add a new Musescore Line is to use either:
- a predefined keyboard shortcut, for example S to add slurs (see the respective chapter above),
- the Lines palette (see screenshot below), or
- assign and use the keyboard shortcut "Apply current palette element" (jump to section).

A Line, except Slurs, Volta brackets and Ambitus, can be applied from a palette in the following ways:
To apply a line to just one note
- Click on a note, then Ctrl+Click on the next note;
- In a palette, click on a line (double-click in versions prior to 3.4).
To apply a line across a range of notes
To apply a line from a note to the end of that measure
Use any of the following methods:
- Click on a note, then, in a palette, click on a line (double-click the latter in versions prior to 3.4).
- Drag and drop a line onto the score.
To apply a line across a range of measures
- Select one or more measures;
- In a palette, click on a line (double-click in versions prior to 3.4).
To repeatedly apply the same line
To efficiently apply the same item again, such as adding end to end pedal marks to a piano phrase, setup and use a keyboard shortcut, see Palettes.
Inspector properties of Lines
Any line in the score can be customized by adjusting its properties in the Inspector, as follows:
- Select the line;
- If line hooks are needed, make a selection from Begin hook, End hook and Height (in the Text Line Core section);
- To add text, tick Begin Text, Continue Text or End Text, then type in the "Text" box:
- Begin: Text added here appears at the beginning of the line;
- Continue: Text added here appears at the beginning of the next system if any;
- End: Text added here appears at the end of the line;
- Edit text properties and alignment as required;
- Edit Placement: "Above" or "Below" sets the text so that it is on the line. "Left" places the text to the left of the line;
- Toggle line printing and exporting visibility with "Line visible" checkbox in the Line section.
- Make adjustments to the line color, thickness and style (solid, dashed etc.) in the Line section. The Diagonal option allows you to create a diagonal line by dragging the end handles;
- To save the result for future use, see Custom palettes.
Adjust vertical position
In Normal mode, apply one of the following methods:
- Click on one or more lines and change the vertical offset in the Inspector;
- Click on a line, press and hold Shift and drag it up/down with a mouse.
Note: You can also adjust the vertical position in Edit mode.
Line anchors and playback properties
Some lines, such as Hairpins, Voltas, Ottavas etc. affect playback. The start handle and end handle are connected by a pink dotted line to their respective anchors on the staff, which are visible in Edit mode only. These anchors indicate the extent of the playback effect.
Change length and anchors together
Note: The following two methods adjust the length of the line engraving and the anchors affecting playback together. This ensures that correct playback of the score is maintained (if applicable), and that the line can be extended between systems if required.
Using keyboard shortcuts
- Enter Edit mode, the end handle is automatically selected, if not, click to select it;
- Apply one of the following shortcuts:
- Shift+→ to move the end handle, and its anchor, to the right by one note (or, in the case of Voltas, one measure)
- Shift+← to move the end handle, and its anchor, to the left by one note (or, in the case of Voltas, one measure);
- If you wish to adjust the starting anchor position, Tab once to select the start handle, then Shift+→ and Shift+← to adjust it.
By dragging (as of version 3.5)
- Click on a handle of a line and drag it with the mouse.
Fine adjustment
To make fine adjustments to the position of the line end (without changing the position of the anchor):
- Enter Edit mode and click on an end handle;
- Apply one of the following shortcuts:
- → to move the handle right by 0.1 sp (1 sp = one staff space = the distance between two staff lines).
- ← to move the handle left 0.1 sp.
- Ctrl+→ (Mac: Cmd+→) to move the handle right one sp.
- Ctrl+← (Mac: Cmd+→) to move the handle left one sp.
Copying lines
Once applied to the score, lines cannot be copied using the usual copy and paste procedures. However, you can duplicate lines within a score:
- Press and hold Ctrl+Shift (Mac: Cmd+Shift), click on the line and drag it to the desired location.
External links
- Piano pedal marks at Wikipedia
- Guitar Barre at Wikipedia
Measure rests
Full measure rest
A whole rest, centered within a measure (shown below), is used to indicate that an entire measure (or a voice within a measure) is silent, regardless of time signature.

To create one or more full measure rests
Use the following method if all selected measures are "standard"—i.e. with no custom durations:
1 Select a measure, or range of measures.
2. Press Del (Mac: Backspace).
If one or more of the measures contains a custom duration, use the following method instead:
To create a full measure rest in a particular voice
- In the appropriate voice, enter a rest that extends for the full measure.
- Make sure the rest is selected, then press Ctrl+Shift+Del (Mac: Cmd+Shift+Backspace).
If the voice contains only rests you can select the first rest and invoke the conversion keystroke.
Multimeasure rest
A Multimeasure rest indicates a period of silence for an instrument: the number of measures is shown by the number above the staff.

Multimeasure rests are automatically interrupted at important points, such as double barlines, rehearsal marks, key- or time signature changes, section breaks etc. and also at measures that are set to break multimeasure rests.
To display multimeasure rests
To turn multimeasure rests on or off:
- Press M on your keyboard.
Alternatively:
- From the menu, choose Format→Style….
- Click on the "Score" tab, if it is not already selected;
- Tick/untick "Create multimeasure rests". Here you can also set the minimum of empty measures to combine into a multimeasure rest (see also Layout and formatting: Score).
Note: It is recommended that you enter all notes in the score first before enabling multimeasure rests.
Break multimeasure rest
You may want to have a multimeasure rest divided into two multimeasure rests:
- Ensure that the option to display multimeasure rests in the score is off (see above).
- Right-click on the measure where you want the second multimeasure rest to start;
- From the menu, choose Measure Properties and tick "Break multimeasure rest."
- Enable multimeasure rests again
See also: Measure operations: Break multimeasure rest.
Octave lines
Octave (Ottava) lines are used to indicate that a section of music is to be played one or more octaves above or below written pitch: The line may be dotted or solid. Ottavas are available in the Lines palette of the Basic and Advanced workspaces.
8─────┐or 8va─────┐: Play one octave above written pitch
8─────┘or 8va─────┘: Play one octave below written pitch
8va alta/bassa lines are particularly common in piano scores, though they are sometimes used in other instrumental music.1 15ma alta (2 octaves above) and 15ma bassa (2 octaves below) are also occasionally used.

MuseScore automatically adjusts playback of the score under the ottava to the correct pitch.
Apply an octave line
See Applying lines to the score.
And to adjust the vertical position, see Lines: Adjust vertical position.
Change length
See Lines: Change length.
Custom lines
Ottavas can be customized just like any other line. See Custom lines and line properties.
Properties unique to Octave lines can be adjusted in the Ottava section of the Inspector:
- Type: Change the Ottava line text.
- Placement: Set to "Above" or "Below" the staff.
- Numbers only: Untick for both number and text (e.g. "8va"). Tick for a number only (e.g. "8").
External links
- Octave at Wikipedia
-
Gerou/Lusk. Essential Dictionary of Music Notation (Internet Archive). ↩︎
Slurs
A slur is a curved line between two or more notes indicating that they are to be played legato—smoothly and without separation. Not to be confused with Ties, which join two notes of the same pitch.
There are a number of ways to add a slur to a score, and all may be useful depending on the context (adding a slur from the lines palette is also possible but not recommended).
Add slur in note-input mode
- While in Note input mode, type in the first note in the slurred section;
- Press S to begin the slurred section;
- Type in the remaining notes in the slurred section;
- Press S again to end the slurred section.
Add slur in Normal mode
Method 1
- Make sure you are in Normal mode;
-
Select the note where you want the slur to start:

-
Press S to add a slur extending to the next note:

-
(Optional) Hold Shift and press → (right arrow key) to extend the slur to the next note. Repeat as required:

-
(Optional) Press X to flip the slur direction:

-
Press Esc to exit edit mode:

Method 2
- Make sure you are in Normal mode;
- Select the note where you want the slur to start;
- Choose one of the following options:
- To add a slur to one voice only: Hold down Ctrl (Mac: Cmd) and select the last note that you want the slur to cover.
- To add slurs to all voices: Hold down Shift (Mac: Cmd) and select the last note that you want the slurs to cover.
- Press S.
Adjust slur
If you only want to adjust the position of a slur:
- Select the slur;
- Use any of the following methods:
- Drag the slur.
- Adjust the horizontal and vertical offset values in the Inspector.
To adjust all the properties of a slur (length, shape and position):
- Make sure you are not in note input mode;
- Go into Edit mode on the slur;
- Click on a handle to select it, or use Tab to cycle through the handles;
- To move the left and right handles from note to note, use the following shortcuts:
- Shift+→: Move to next note.
- Shift+←: Move to previous note.
- Shift+↑: Move to lower voice (voice 2 to voice 1 etc.).
- Shift+↓: Move to higher voice (voice 1 to voice 2 etc.).
- To adjust the position of any handle, use any of the following methods:
- Press Esc to exit edit mode.
Note: The two outer handles adjust the start and end of the slur, whilst the three handles on the curve adjust the contour. The middle handle on the straight line is used to move the whole slur up/down/left/right.
Extended slurs
A slur can span several systems and pages. The start and end of a slur is anchored to a note/chord or rest. If the notes are repositioned due to changes in the layout, stretch or style, the slur also moves and adjusts in size.
This example shows a slur spanning from the bass to the treble clef. Using the mouse, select the first note of the slur, hold down Ctrl (Mac: Cmd) and select the last note for the slur, and press S to add the slur.

X flips the direction of a selected slur.
Dotted/dashed slurs
Dotted slurs are sometimes used in songs where the presence of a slur varies between stanzas. Dotted slurs are also used to indicate an editor's suggestion (as opposed to the composer's original markings). To change an existing slur into a dotted or dashed slur, select it and then in Inspector (F8) change Line type from Continuous to Dotted or Dashed.
See also
Ties
A tie is a curved line between two notes of the same pitch, indicating that they are to be played as one combined note (see external links below). Ties are normally created between adjacent notes in the same voice, but MuseScore also supports ties between non-adjacent notes and between notes in different voices.
In note-input mode, if you specify a tie immediately after entering a note or chord, the program automatically generates the correct destination notes to go with the ties. Or, you can simply create ties "after the fact," between existing notes.
Note: Ties, which join notes of the same pitch, should not be confused with slurs, which join notes of different pitches and indicate legato articulation.
Add ties in Note Input mode
The following command adds an identical tied chord to the selected chord.
- Ensure that a note is selected (i.e. highlighted). This can be a single note on its own or part of a chord.
- Select a new note duration for the following note(s), if required (but see "Note" below).
- Press + or the tie button,
 .
.
Note: This shortcut works, as described above, only if there is no chord following the selected note. If there is, then the duration is ignored and the tied note is added instead to the following chord.
Add ties in Normal mode
Method 1
-
Select one or more noteheads in the "start" chord.

-
Press +, or the toolbar tie button,
: .
.
Ties will be created between the selected note(s) and the next available note(s) of the same pitch.
To remove ties, as of MuseScore 3.3.3, use the same command (toggle)
Method 2
This method ties all notes in the "start" chord (where possible):
- Select the stem of the "start" chord;
- Press +, or click on the toolbar tie button .
Ties will be created between all the notes in the selected chord and the following notes of the same pitches.
To remove ties, as of MuseScore 3.3.3, use the same command (toggle).
Add extra tied notes to a previously tied chord
Occasionally you may need to return to an existing tied chord in order to add one or more extra tied notes. In this case a different command is used. For example:

- Add the extra notes to the first chord. e.g.

- In Note input mode, and with any of the notes in the first chord selected, press Alt++. Corresponding notes are added to the following chord and the extra notes are tied:

Add ties to unison notes
A workaround is required to create ties between unison notes:
- Create the first note as usual;
- Any additional unison notes should be added at an interval other than unison: e.g. 2nd, 3rd, 4th etc.
- Create a tied chord (as shown above): e.g.

- Move the unison note(s) into position: e.g.

Flip a tie
X flips the direction of a selected tie, from above the note to below the note, or vice-versa.
See also
External links
- How to create ties leading into a 2nd ending (MuseScore HowTo)
- Ties (music) at Wikipedia
Tremolo
Tremolo is the rapid repetition of one note or chord, or a rapid alternation between two notes or chords. One-note and two-note tremolo symbols can be found in the Tremolo palette in the advanced workspace, trem. text marking see Articulation Text (Mid-staff sound change)

A one-note or one-chord tremolo is indicated by strokes through the stem of the note or chord (or above/below if a whole note). E.g.

In a two-note or two-chord tremolo, bars are drawn between the notes. E.g.

Tremolo symbols are also used to notate drum rolls.
Add a Tremolo
Single note/chord tremolo
- If a single note, select that note; if a chord, select any note in the chord;
- Click the desired symbol in the Tremolo palette (double-click in versions prior to 3.4).
Alternatively, you can drag the tremolo symbol onto the applicable note.
Two note/chord tremolo
- Input the notes at half the desired final duration;
- If a single note, select the first note of the pair; if a chord, select any note from the first chord;
- Click the desired symbol in the Tremolo palette (double-click in versions prior to 3.4).
Alternatively, you can drag the tremolo symbol onto the applicable note.
Example: To enter a two-note tremolo with the duration of a half note (minim), enter two normal quarter notes (crotchets). After applying a tremolo symbol to the first note, the note values automatically double to half notes.
External links
- Tremolo (Wikipedia)
- How to create 'old style' and other special tremolos? (MuseScore HowTo)
Repeats and jumps
Simple repeats
You can create a simple repeat by placing a start and an end repeat barline at the beginning and end of a passage. These can be applied from the Barlines or Repeats & Jumps palette.

Note: If the start of a repeat coincides with the beginning of a piece or section, the start repeat barline can be omitted if desired. Similarly, an end repeat barline can be omitted at the end of a score or section.

1st and 2nd endings
First create a simple repeat (as shown above), then apply the first and second time endings—see Voltas.
Playback
Turn repeat playback on/off
- Toggle the "Play Repeats"
 button on the toolbar.
Adjust repeat section playback
Simple repeats, such as the ones illustrated above, or "1, 2" volta sections, usually play back correctly first time. More complex repeats may need further adjustment as follows:
- Ensure that the start and end barlines are correctly positioned. For a volta section, ensure that each volta, except the last one, terminates with an end repeat barline.
- In the case of a simple repeat, where more than one repeat is needed, right-click on the measure containing the end repeat barline and select Measure properties. Adjust Play count so that it is equal to the number of times you want the section to play back.
- In the case of a complex volta section, such as the following:

Make sure that the volta "Repeat list" is set up correctly—see Volta properties. Right-click on the measure containing the end repeat barline and select Measure properties. Adjust Play count so that it is one greater than the number of measures listed in the Volta "Repeat list." In this case, since 5 measures are listed, the "Play count" needs to be set to 6.
Repeat symbols and text
Text and symbols related to repeats are located in the "Repeats & Jumps" palette (in the Basic and Advanced workspaces). This palette contains:
- Symbols for measure repeat, Segno, Segno Variation (Serpent), Coda, and Coda Variation (Codetta)
- D.S., D.C., al Coda, al Fine, To Coda, and Fine text
- Repeat barlines

To add a repeat symbol to the score use either of the following:
- Select a measure, then click the desired repeat symbol in the palette (double-click in versions prior to 3.4).
- Drag and drop a repeat symbol from the palette onto (not above!) the desired measure (so the measure changes color).
Jumps
Jumps are symbols in the score which tell the musician to skip to a named marker (see below). Jumps include the various kinds of D.C. (Da Capo) and D.S. (Dal Segno) text.
To set correct playback of jumps:
- Make sure that the "Play Repeats" button on the toolbar is selected. This is a toggle, so you can turn off playback by clicking the same button.
-
After the jump, and following established convention, only the last round of any simple repeat section is played back. If you want playback to take these repeats in full:
- Select the applicable jump symbol;
- In the "Jump" section of the Inspector, check "Play Repeats".
Note: Jumps are taken only after all simple repeats in the section are played through.
If you click on a jump, some text boxes and a checkbox are displayed in the Jump section of the Inspector. These have the following effects on playback:
- Jump to: Playback jumps to the marker whose "Label" is the same as the "Jump to" tag.
- Play until: Playback continues until it reaches a marker whose "Label" is the same as the "Play until" tag.
- Continue at: Playback jumps to the next marker whose "Label" is the same as the "Continue" tag.
-
Play repeats: Ticking this box tells MuseScore to play repeats after D.C. (Da Capo) or D.S. (Dal Segno) jumps. If this option is not ticked then simple Repeats are not taken after jumps and playback works as if it were the last repeat.
Note: The tags start and end, referring to the beginning and end of a score or section, are implicit and don't need to be added by the user.
Markers
Markers are the places referred to by the jumps. A list of markers (in addition to the implicit "start" and "end") follows:
 : Segno (tag: segno)
 : Segno Variation (tag: varsegno)
 : Coda (tag: codab)
 : Coda Variation (tag: varcoda)
- Fine: (tag: fine)
- To Coda: (tag: coda)
If you click on a marker, the following properties appears in the Marker section of the Inspector:
- Marker type: This can be changed from the dropdown list, if required.
- Label: This is the (identifier) tag associated with the marker. See also, Jumps (above).
Examples of jumps
- Da Capo (D.C.): At the "D.C." sign, playback jumps to the start (i.e. to the implicit start tag) and plays the entire score or section again (i.e. up to the implicit end tag).
- Da Capo (D.C.) al Fine: At the "D.C. al Fine" sign, playback jumps to the start (i.e. to the implicit start tag) and plays the score up to the Fine (i.e. the fine tag).
- Dal Segno (D.S.) al Fine: At the "D.S. al Fine" sign, playback jumps to the Segno symbol (i.e. the segno tag) and then plays up to the Fine (i.e. the fine tag)
- Dal Segno (D.S.) al Coda: At the "D.S. al Coda" sign, playback jumps to the Segno symbol (i.e. the segno tag) and then plays up to the To Coda (i.e. the coda tag). Playback then continues at the Coda symbol (i.e. the codab tag).
Note: The properties (i.e. the tag names) of jumps and markers can be set via the Inspector.

You need to modify them if using multiple jumps and markers.
See also
External links
- MuseScore in Minutes: Repeats and Endings, part 2 (video tutorial)
- How to separate a coda from the rest of the score (MuseScore HowTo)
- How to create a 2-measure repeat sign with playback (MuseScore HowTo)
- How to use Jumps and Repeats (MuseScore HowTo with examples)
Tuplets
Tuplets are used to write rhythms beyond the beat divisions usually permitted by the time signature. For example, a triplet consists of three notes in the time of two:

And a duplet consists of two notes in the time of three:

Create a tuplet
The exact method of tuplet entry depends on whether you are starting off in Note input mode or Normal mode. We'll start off with a simple example: the creation of an eighth note triplet.
Create a triplet in normal mode
-
Select a note or rest that specifies the full duration of the desired triplet group. In the case of an eighth note triplet, you will need to select a quarter note or rest—as in the example below:

-
Press the keyboard shortcut for a triplet, Ctrl+3 (Mac: Cmd+3); alternatively use the menu, Add→Tuplets→Triplet. This will give the following result:

-
The program automatically changes to note-input mode and selects the most appropriate duration—in this example an eighth note. Now enter the desired series of notes/rests. For example:

Alternatively, use the Duration Editor to switch between tuplet and non-tuplet.
Create a triplet in note input mode
- Ensure you are in note input mode (press N).
- Navigate to the note/rest (or blank measure) where you want the triplet to start (use the left/right arrow keys as required).
- Select a final duration for the whole triplet group. In the case of an eighth note triplet, click on the quarter note in the note input toolbar (or press 5 on the keyboard).
- Press the keyboard shortcut for a tuplet, Ctrl+3 (Mac: Cmd+3); alternatively, use the menu, Add→Tuplets→Triplet. This creates a triplet number/bracket and appropriately divides the original note/rest (see image above).
- The program automatically selects the most appropriate duration—in this example an eighth note—allowing you to immediately start entering the desired series of notes/rests.
Create other tuplets
To create other tuplets substitute one of the following commands at the relevant step above:
- Press Ctrl+2–9 (Mac: Cmd+2–9). 2 for a duplet, 3 for a triplet etc.
- From the menu, select Add→Tuplets, then click on the desired option.
For more complex cases, see below.
Custom tuplets
To create other tuplets than the default options (e.g. 13 sixteenth notes in the space of one quarter note):
- In Note input mode, select a note duration equaling the total duration of the tuplet; or, if in Normal mode, select a note or rest of the desired overall duration;
- Open the Create Tuplet dialog from the menu: Add→Tuplets→Other...;
-
Select the desired number ratio (e.g. 13/4 for thirteen sixteenth notes in the space of a quarter note) under "Relation" in the "Type" section. Specify "Number" and "Bracket" using the radio buttons in the "Format" section;

-
Click OK to close the dialog:

-
Enter the desired series of notes/rests.
Triplet examples

Delete a tuplet
Use either of the following:
- Select the number or bracket and press Del.
- Select any element of the tuplet, then in the Note section of the Inspector press the "Tuplet" button (bottom right), and press Del.
- Select the entire tuplet, using the shift + click method, then press Del.
- Use the Duration Editor to switch between tuplet and non-tuplet.
Change display of tuplets
Using the Inspector
To change the display properties of tuplets in the score, select the tuplet numbers/brackets, and adjust the desired properties in the "Tuplet" section of the Inspector:

- Direction: 'Auto' places the bracket/number in the default position. 'Up' always places the bracket above the note heads; 'Down' always places the bracket below the note heads.
- Number type: Choice of 'Number', 'Ratio', or 'Nothing'.
- Bracket type: 'Automatic' hides the bracket for beamed notes and shows the bracket if the tuplet includes unbeamed notes or rests. 'Bracket' displays the bracket. 'None' hides the bracket.
Using the Tuplets Style dialog
To make fine adjustments to the way that all tuplets in the score are displayed: from the menu, select Format → Style...→Tuplets.
The legend below illustrates some of the properties that can be adjusted in the Tuplets style dialog:

(2) Vertical distance from stem.
(3) Vertical distance from note head.
(5) Distance before stem of first note.
(6) Distance after stem of last note.
External links
- How to create triplets and other tuplets (MuseScore HowTo)
- How to create nonstandard tuplets (MuseScore HowTo)
- How To create triplets and other tuplets across measures (MuseScore HowTo)
- Tuplet at Wikipedia
- The User Guide to Tuplets in MuseScore [video]
Voltas
Volta brackets, or first and second ending brackets, are lines used to mark different endings for a simple repeat. Score playback automatically follows the repeat indications.

To add a volta to the score
Use one of the following methods:
- Select a measure, or range of measures and click a Volta icon in the Lines palette (double-click in versions prior to 3.4).
- Drag-and-drop a volta from the Lines palette, then adjust the length as required (see below).
To change the number of measures that a volta covers
- Go into Edit mode on the volta. The end handle is automatically selected.
- Press Shift+→ to move the end handle forward one measure. Press Shift+← to move the handle backward one measure. Repeat as required.
Note: When you select a start or end handle, a dashed line appears connecting it to an anchor point on the staff (see diagram, below). This anchor shows the position of the playback start/end points of the Volta. The Shift commands change the anchor point so playback always remains in sync with the visual start/end points. To make fine adjustments to the visual start or end points, without affecting playback, use other keyboard arrow commands, or drag the handles with a mouse.

Volta properties
To make changes to Volta text:
-
Select the volta, and edit the properties in the Text Line Core section of the Inspector.

To specify the order of repeats:
- Select the volta, and in "Repeat list" (Volta section of the Inspector) type in a number, or sequence of numbers separated by commas, to indicate the repeat(s) in which the volta is to be played.

For example, a first ending shows the number "1"; a second ending, the number "2" and so on. More complex repeats are also possible: e.g. a "Repeat list" displaying "1, 2, 4, 5, 7" indicates that the volta is to be played during repeats 1, 2, 4, 5, and 7, and so on.
Note: Each volta section, except the final one, should end with an end repeat barline.
Note: Keep in mind that the repeat is always referenced in comparison to it's starting point (either the most recent start repeat barline or the start of the current section).
Playback
Sometimes a repeat plays more than two times. If you want to change the number of times MuseScore plays a repeat, go to the measure containing the end repeat barline and change its "Play count". See Measure operations: Other properties and the note on playback for voltas in Repeats and jumps.
Play count
The play count of the measure with the end repeat barline must be set (at least) one higher than the number of times you want the measure to play (this is usually equal to the number of entries in that volta repeat list + 1).
Take the following score:
 m3 | m4 :| (volta 2,5) m5 | m6 :| (volta 6) m7 | m8 | m9 ||")
Measure 4 should have play count set to 4
Measure 6 should have play count set to 3
External links
- MuseScore in Minutes, Lesson 8: Repeats and Endings, Part 1 (Video tutorial for MuseScore 2)
- How to create ties leading into a 2nd ending (MuseScore HowTo)
Transposition
Transposition is the act of raising or lowering the pitch of a selection of notes by the same interval. You can choose to transpose notes either manually or by using the Transpose dialog.
Manual transposition
- Select the notes that you wish to transpose;
- Use any of the following options:
- To transpose chromatically (i.e. one semitone at a time): Press ↑ or ↓. Repeat as required.
- To transpose diatonically (i.e. one scale degree at a time): Press Alt+Shift+↑ or ↓. Repeat as required.
- To transpose by an octave: Press Ctrl+↑ or ↓ (Mac: Cmd+↑ or ↓).
Automatic transposition
MuseScore's Transpose dialog gives you more options for transposing notes.

Note: By default this dialog opens from the Tools menu, but you can also choose to open it using a keyboard shortcut (see Preferences).
Transpose Chromatically
To Key
To transpose notes up or down to the desired key:
- Select the notes you want to transpose; no selection equals "select all.".
- From the menu bar, choose Tools → Transpose….
- Tick "Transpose Chromatically" and "To key".
- Tick/untick "Transpose key signature" and "Transpose chord symbols" if required
- Tick one of "Closest", "Up" or "Down" and select a destination key signature from the drop-down menu.
- Click OK.
By Interval
To transpose selected notes up or down in semitone increments:
- Select the notes you want to transpose; no selection equals "select all".
- From the menu bar, choose Tools → Transpose….
- Tick "Transpose Chromatically" and "By Interval".
- Tick/untick "Transpose key signature" and "Transpose chord symbols" if required.
- Tick "Up" or "Down"; and select a transposition interval from the drop-down menu.
- Click OK.
Transpose Diatonically
To transpose selected notes up or down by a diatonic interval:
- Select the notes you want to transpose; no selection equals "select all".
- From the menu bar, choose Tools → Transpose….
- Tick "Transpose Diatonically".
- Tick/untick "Keep degree alteration" and "Transpose chord symbols" if required.
- Tick "Up" or "Down;" and select a transposition interval from the drop-down menu.
- Click OK.
Options
Two options are available for both Chromatic and Diatonic transposition mode in the options area:
- Transpose chord symbols, if required.
- And the choice of Use Double ♯ and ♭ or Single ♯ and ♭ Only
Transposing instruments
Transposing instruments, such as the B-flat trumpet or E-flat alto sax, sound lower, or higher than their written pitch. MuseScore has a number of features to facilitate the scoring of these instruments.
Concert pitch
MuseScore's default viewing mode shows the musical notation in written pitch, but you can choose to display the score in concert pitch instead. In the latter mode, the musical notation of all instruments matches the actual pitches that you hear on playback.
- To change the view to concert pitch: Press the Concert Pitch button to highlight it.
You should ensure that the Concert pitch button is OFF before printing the main score or any parts.
Change staff transposition
Instrument transpositions are already set up in MuseScore. However, if you want a rare instrument or transposition that is not available in MuseScore, you may need to edit the instrument transposition manually.
- Right-click an empty part of the instrument staff and select Staff/Part Properties….
- At the bottom of the window, select the interval of transposition, any octave shifts, and whether the interval is "Up" (sounds higher than written) or "Down" (sounds lower than written).
You can also use the Change Instrument… button in the Staff/Part Properties window to automatically change the transposition to that of a different standard instrument.
External links
- How to transpose (MuseScore How-To)
- Concert pitch or not? (forum discussion)
- How to change enharmonic key signatures for transposing instruments (MuseScore How-To)
Entering and editing percussion notation
Check out percussion input overhaul in Musescore 4.5
Overview

This chapter is applicable to percussion notation staff only.
Adding new staff is covered in Instruments, staff setup and templates. Instrument that use this notation are under "Percussion - Unpitched", "Percussion - Marching", and "Percussion - Body" groups. Note that some under "Percussion - Pitched" contain "Drums" in their name use standard notation: "Steel Drums", "Soprano Steel Drums", "Alto Steel Drums", "Guitar Steel Drums", "Tenor Steel Drums", "Cello Steel Drums", "Bass Steel Drums".
Changing staff template (percussion staff types, eg. 5-line, 3-line, or 1-line staff) is covered in Staff / Part properties.
Knowing why and how to use Musescore Voices before entering notes saves time. Notating concurrent rhythms and opposing stem directions on one staff are dependent on it. Note input method used affects new note's Voice. See also External links: Stem direction, staff space, note shape.
The free MuseScore Drumline (MDL) extension offers even more options to write percussion notation. To download and install it, see the Language, translations, and extensions chapter.
Real world instruments (sound samples) in a Musescore Instrument
A percussion Musescore Instrument contains real world instrument(s) (sound samples),
- "Drumset" under "Percussion - Unpitched". This is a single item that contains "Snare", "Bass Drum", "Ride Cymbal" etc sounds. There is no seperate MuseScore Instrument for each of these. Its default notation is covered under the "Note staff space" section.
- "Concert Bass Drum" under "Percussion - Unpitched" contains several sounds, it is not the "Drumset" 's "Bass Drum", and
- "Bass Drum" under "Percussion - Marching" contains several sounds, it is not the "Drumset"'s "Bass Drum".
Some are accessible with Mixer,
- "Drumset" "Standard 1" and variations, (same for "Room", "Power", "Jazz" and theirs), use them by changing Mixer: Sound.
- "Drumset" "Brush" and variations, use them by changing Mixer: Sound. Short brush is incorrectly titled "Electric Snare" in drum input palette.
- etc
Consider sound sample playback desired before note entry. Musescore does not have intuitive sound sample switching for existing notes, eg play "Ride Cymbal" sound sample with "Hi-hat" notes already entered, because internal references are added onto notes (MIDI pitch data). Switching the whole Musescore Instrument might damage note playback because the referencing method is Instrument specific. "Drumset" Musescore Instrument sound sample data cannot be added, removed, or edited inside Musescore.
Note input
User essentially enter notes and rests onto either,
- input cursor (see Note input mode chapter), or
- available time position, which is
- any existing note or rest (to create more, break down existing rest by adding new, shorter rest (right click or 0 (zero) as explained below), or
- the first beat of a measure.
Mouse entry using the Drum input palette
To add a note at input cursor,
- Select a measure, note or rest.
- Enter note input mode (shortcut N). The Drum input palette now appears at the bottom of the screen (see "Drum input palette" section). The Voice of the note to be added is indicated by note color in Drum input palette : blue for Voice 1, green for Voice 2. Top Toolbar Voice selection is ignored.
- Select note value at the top Toolbar.
- Double-click an item in the Drum input palette. Existing notes and rests are overwritten.
- The note input cursor position proceeds forward.
To add a note or rest at any available time position,
- Select the staff.
- Enter note input mode (shortcut N). The Drum input palette now appears at the bottom of the screen (see "Drum input palette" section). The Voice of the note to be added is indicated by note color in Drum input palette : blue for Voice 1, green for Voice 2. Top Toolbar Voice selection is ignored.
- Depending on the result desired, select an appropiate note value at the top Toolbar and item in the Drum input palette:
- Rests are always overwritten by notes.
- Any existing notes are retained if note value matches. A notation similar to a chord is created.
- Otherwise the new note overwrites (or truncates) the existing note.
- Notes and rests of different Voice do not affect each other.
- Left click on a desired time position on the score to add a note. Right click to add a rest.
Using keyboard shortcuts
To add a note or rest at input cursor,
- Select a measure, note or rest.
- Enter note input mode (shortcut N). The Drum Input palette now appears at the bottom of the screen.
- Select note value at the top Toolbar.
- Enter note with A–G displayed in the Drum Input palette (
shortcut assignment see "Drum input palette" section). Enter rest with 0 (zero). The new note uses the Voice indicated by note color in Drum input palette : blue for Voice 1, green for Voice 2 (Top Toolbar Voice selection is ignored). If there is no note on the Voice, input cursor repositions itself to beat 1 of measure. Existing notes and rests are overwritten. - (Optional) Add another note to an existing one with Shift+[A–G]. This note uses the Voice the last note is using, but not the setting indicated on Drum input palette.
- The note input cursor position proceeds forward.
MIDI controller
To add a note at input cursor,
- Configure the MIDI controller. See Preferences.
- Select a measure, note or rest.
- Enter note input mode (shortcut N).
- Select a Voice and note value at the top Toolbar. Drum input palette Voice and Stem direction settings are ignored.
- Press a MIDI controller key.
- (Optional) To add another note to an existing one, keep the first key held down while pressing the second key.
Virtual piano keyboard
To add a note at input cursor,
- View → Piano keyboard (P) to show the virtual piano keyboard.
- Select a measure, note or rest.
- Enter note input mode (shortcut N).
- Select a Voice and note value at the top Toolbar. Drum input palette Voice and Stem direction settings are ignored.
- Click a key on the virtual piano.
- (Optional) Add another note to an existing one with Shift + click another key.
To adjust virtual piano keyboard panel's position, drag and drop its title bar
- on to the center of Drum input palette panel. Both panels can then be accessed by Tabs; or
- to either side of Drum input palette panel.
Drum input palette

Drum input palette is displayed at the bottom of the screen when,
- a percussion staff is selected, and
- it is currently in note input mode (shortcut N).
Palette items (button with note symbol) are used to enter new notes with mouse or keyboard shortcuts. Each represents a sound sample. Position the mouse pointer over any to view its name. Text (A to G) shown are keyboard shortcuts. They do not refer to note pitches.
The Edit Drumset window

Do not be confused by the wording "Edit Drumset". User cannot edit Musescore Instrument data inside Musescore. See "sound samples" section.
Use "Edit Drumset" window to edit
- existing notes of the selected staff (Notehead group and its related settings, and Staff line), and
- "Drum input palette" items, which are used to enter new notes with mouse or keyboard shortcuts (all settings).
To open,
- Click Edit Drumset button on the left of the Drum input palette; or
- Right-click a staff and select Edit Drumset....
Use the left pane to select a sound sample,
- No.: the MIDI pitch data utilized internally, reference of sound sample used to create audio.
- Note: the MIDI pitch data utilized internally, reference of sound sample used to create audio.
- Shortcut: see below.
- Name: see below.
Use the right pane to edit how notes using selected sound sample is displayed on the score.
- Name: For display on Drum input palette only. Leave empty to remove from Drum input palette.
- Notehead group, Edit Noteheads and sub-settings: See the "Notehead shape" section. Affects existing notes of selected staff.
- Default voice: Voice assigned to new note entered with mouse or keyboard shortcut only. See "Voice" section.
- Staff line: The staff line / space on which the note is displayed. Value 0 means that the note is displayed on the top line of the 5-line staff. Enter negative values to move upwards. Affects existing notes of selected staff. See also "Staff space" section.
- Shortcut: Keyboard shortcut.
- Stem Direction: Stem direction note property assigned to chord of new note entered with mouse or keyboard shortcut only. See also "Stem direction" section.
Use Save As... and Load... to save and load "Edit Drumset" window settings to external .drm file. See also files under External links.
Drum map and Test out sound samples
Refer to a General MIDI Level 2 (GM2) percussion key map (drum map) for each sound sample's corresponding key (pitch). TO demo sound sample on MIDI controller or vitual piano keyboard, use normal mode (ESC).

Voice
See also the main chapter Voices.
Notating concurrent rhythms and opposing stem directions on one staff are dependent on using Voices. Automatic stem direction assignment of any chord can be overridden.
The Voice assigned to new note depends on input method used, which is either
- the "Drum input palette" item Default voice property in case of mouse or keyboard shortcut note entry; or
- the Toolbar button selected otherwise.
Stem direction
Stem direction is automatically assigned according to Voice, and can be manually overridden with Stem direction note property.
Edit Drumset window : Stem direction property is assigned to new note entered with mouse or keyboard shortcut. It is completely ignored in note entry using MIDI controller and virtual piano keyboard.
Staff space

drumsetdefaultdef3.mscz
Shown above "Drumset" default definition.
Change staff line / space / vertical position of all notes on the currently selected staff with Staff line explained in "Edit Drumset" section. Advanced users can override with Fix to line note property (an absolute position).
Notehead shape
Use "cross", "ghost note" or "dead note", by editing Notehead group and Edit Noteheads as explained in "Edit Drumset" section. No individual note overriding option available.
Brackets (parentheses, dead note or ghost note) and "open circle" (additional symbol) can be added to individual notes from palettes. They do not affect playback. Add brackets from Noteheads and "open circle" from Articulation.
Other notations
Sticking
To enter sticking symbols (R, L):
- Select a start note;
- From the menu, select Add→Text→Sticking. Alternatively, set up a keyboard shortcut to do the same thing in Preferences;
- Input the symbol just as you would normal text. To move forward or backwards to the next note, use the same keyboard shortcuts as for chord symbols.
- To exit, press Esc, or click on a blank section of the score.
Add drum roll
To create a drum roll, use a Tremolo.
External links
- How to create jazz drum notation [MuseScore How-To]
- Video tutorial: MuseScore in Minutes: Lesson 7 - Tablature and Drum Notation
- Drum Parts [video]
- Editing the Drum Palette in MuseScore 1.1 [video]
- Saving Drumset Changes in MuseScore 1.1 [video]
- Notation standards
- Drum magazine reference chart (June 2007) http://musescore.org/sites/musescore.org/files/Drum_Notation_Chart.jpg
- Sibelius http://musescore.org/sites/musescore.org/files/notation_drumset_en.png , based on the recommendations of the Percussive Arts Society found in Norman Weinberg’s Guide To Standardized Drumset Notation (2002, ISBN 0-9664928-1-1)
- A french drumset, Nicolas http://musescore.com/nicolas/scores/35344 , based on discussion http://musescore.org/fr/node/14340#comment-49750 and loosy based on the Dante-Agostini method https://musescore.org/sites/musescore.org/files/Image%2010.png
- Guide to Drum and Percussion Notation
- Stem direction, staff space, note shape
- stem direction
- "hands up, feet down" and others in Better drumset notation (with focus on stem direction) forum discussion,
- "pulse and rhythm" rule https://www.onlinedrummer.com/blogs/drum-lessons/introduction-to-voicin….
- staff line / space / vertical position denotes the instrument (sound sample). Programatically, "MIDI pitch" stores sound sample reference in Musescore 3.6.2 - open and closed hi-hat on different space.
- note shape usually denotes pitch (or pitchless) in music sense.
- stem direction
- Drm files
- https://musescore.org/fr/node/14340
- https://musescore.org/en/node/81636
- Weinberg's Standardized Drumset Notation in Musescore, @RunasSudo, Apache Licence 2.0. https://yingtongli.me/blog/2020/06/24/weinberg-musescore.html
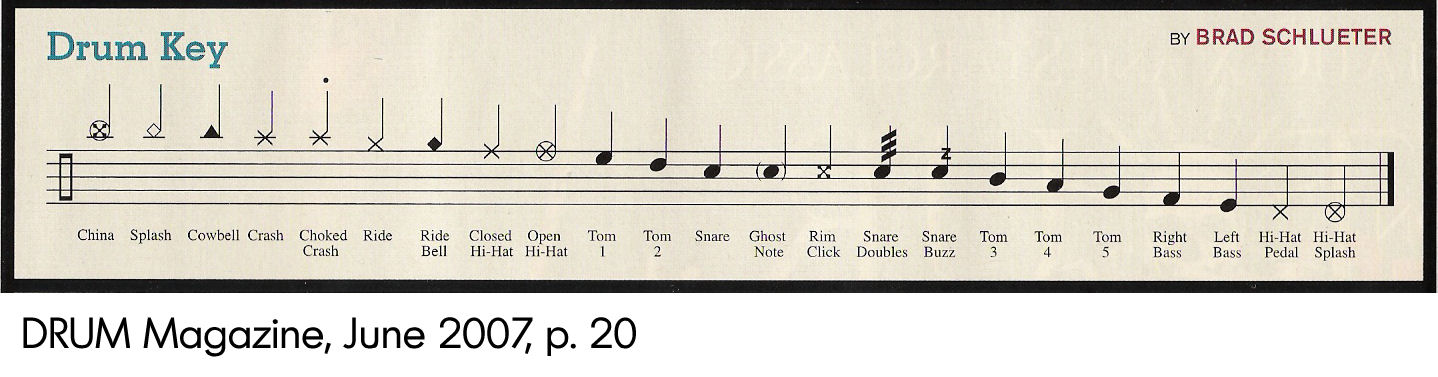
Tablature
Music for fretted, stringed instruments is commonly notated using tablature, also known as tab, which provides a visual representation of the strings and fret numbers:

Tablature can also be combined with traditional staff notation:

Create a new tablature staff
If you wish to create tablature as part of a new score, use the New Score Wizard. If you want to add tablature to an existing score, use the Instruments dialog. Or, alternatively, you can convert an existing standard staff. See below for details.
With the New Score wizard
To create tablature in a new score (for combined staff/tablature systems see → below):
- Open the New Score wizard.
- Enter the score details (optional). Click Next.
- On the Choose template file page, click on Choose Instruments under "General".
- On the Instruments page, select the desired tablature in the "Strings – plucked" category, in the left-hand column. Then click Add.
- Complete the rest of the New Score Wizard.
Note: If the desired tablature is not available in the Choose Instrument list, add a tablature staff anyway at step 4 (above). Then edit the tablature to your exact requirements using the Staff/Part properties dialog.
With the Instruments dialog
To add a single tablature staff to an existing score (for combined staff/tab system see below):
- Open the instruments dialog (press I; or from the menu bar, select Edit → Instruments…).
- Click on the staff to which you want to add another (linked or not).
- Add the tab staff as described in Add instruments ("Create a new score").
By changing staff type
To convert an existing standard staff to tablature, or tablature to a standard staff:
- Right-click into an empty spot of the staff and select Staff/Part Properties…. If "Instrument" is already set to a plucked-strings type, then go to step 3.
- If "Instrument" is not a plucked-strings type, click on Change instrument and select an appropriate instrument from "Strings – Plucked."
- Click on Advanced Style properties, select the appropriate tablature option from "Template", then press < Reset to Template. You can fine tune the display if necessary using the "Fret Marks" and "Note Values" tabs.
- Click OK twice to exit.
Edit string data
Change tuning
Note: If you only want to view (rather than change) the instrument tuning, follow steps 1 and 2 only.
-
Right-click on the staff and select Staff/Part Properties….

-
Press the Edit String Data… button at the bottom of the dialog box. The String Data dialog opens:

-
Click on a string pitch and select Edit String…. Or, alternatively, just double-click the string pitch.
- Select a new pitch in the Note Selection box and click OK. Or, alternatively, just double-click the new pitch.
- Click OK to close the "String Data" dialog box. Then click OK to close the "Staff/Part Properties" dialog.
Notes: (1) If tuning is changed when the tablature for that instrument already contains some notes, fret marks will be adjusted automatically (if possible); (2) Any change of tuning to a particular instrument applies only to the score at hand, and does not change any program default settings.
Add a string
- Right-click on the staff, select Staff/Part Properties…, then press Edit String Data.
- Click on a string pitch and select New String....
- Select the new pitch and press OK—or, alternatively, just double-click the new pitch. The new string is inserted below the selected string.
Note: After adding a tablature string you will need to adjust the number of lines in the Staff/Part properties dialog.
Delete a string
- Right-click on the staff, select Staff/Part Properties…, then press Edit String Data.
- Click on a string pitch and select Delete String.
Note: After deleting a tablature string you will need to adjust the number of lines in the Staff/Part properties dialog.
Mark unfretted string "open"
This feature is used to mark a (bass) course as unstopped (i.e. like a harp string, only played in the open position): as on a Baroque lute or Theorbo etc. This means that only "0" (zero) or "a" is accepted as a fret mark: any other fret mark will be converted to 0/a.
- Right-click on the staff, select Staff/Part Properties…, then press Edit String Data.
- Check one or more boxes in the "Open" column.
Change number of instrument frets
This property defines the maximum fret number which can be entered on a tablature staff.
- Right-click on the staff, select Staff/Part Properties…, then press Edit String Data.
- Select or enter a new number in the "Number of frets" spin box.
Change tablature display
From Staff / Part Properties
To access the full range of tablature display options, use the Staff / Parts Properties dialog:
- Right-click on the staff and select Staff/Part Properties….
- Click on the Advanced Style Properties… button.
From the Instruments dialog
Some basic tablature display options are available from the Instruments dialogue:
- Press the keyboard shortcut I; or from the menu bar, select Edit → Instruments….
- Select a tablature type from the drop-down list under "Staff Type" in the right-hand pane:
- Simple: Displays fretmarks only. Best for staff/tablature systems.
- Common: Displays fretmarks, note stems and beams.
- Full: Displays fretmarks, enhanced note stems, beams, and rests.
- Italian/French: Historical tablature options for the lute.
The same options are available from the Choose Instruments page of the New Score Wizard.
Combine pitched staff with tablature
Plucked-string instruments—such as the guitar—are commonly notated using both a music staff and tablature (TAB) together. MuseScore gives you the option of having the two staves either unlinked or linked:
-
Unlinked Staves: The advantage of using this option is that each staff can be edited independently. To transfer music notation from one staff to the other, select the desired range and copy and paste it onto the other staff.
-
Linked Staves: The staves are "mutually updating": i.e. any change you make to the notation in one staff is immediately applied to the other staff as well.
A note on fret mark conflicts: When the same note is entered in two different voices, MuseScore tries to ensure that the fret marks do not overlap on the same string. Any overlaps which do occur are marked with red squares: these appear only in the document window and not on any printed copy. In almost all cases (e.g. frets 0 to 4 on the 6th string), overlapping is the desired result and no further adjustment is required. You can hide the red marks by selecting "View" and unticking "Show Unprintable."
Create a new staff/tablature pair with the New Score Wizard
- Open the New Score wizard.
- Enter the score details (optional). Click Next.
- On the Choose template file page, click on Choose Instruments under "General".
- Select a music staff (not tab) in the "Strings – Plucked" section of the left-hand column. Then click Add.
- In the right-hand column, click on the newly-created line, labelled "Staff 1". This reveals the "Add Staff/Linked Staff" options in the centre column:
- Click Add Staff to create an unlinked staff/tab pair.
- Click Add Linked Staff to create a linked staff/tab pair.
- In the Staff type column, click on the dropdown list for the newly-created staff and select a tablature option (this can be modified later, if required, on the score page—see Staff/Part Properties).
- Change the staff order using the ↑ button if needed.
- Complete the rest of the New Score Wizard, or click Finish.
Note: To create unlinked staves with separate mixer channels, instead of step "5" (above), select a Tablature staff in the left-hand column and click Add. Then continue with steps 6 and 7.
Create a new staff/tablature pair in an existing score
- Open the Instruments editor (press I, or from the menu bar, select Edit → Instruments…).
- Then follow steps 4–8 above.
Create a staff/tablature pair from an existing staff
To add tablature to a plucked-string staff in the score (or vice versa):
- Open the Instruments editor (press I, or from the menu bar, select Edit → Instruments…).
- In the right-hand column, select the staff you want to create the staff/tab pair from, then follow one of the options shown in step 5 above.
- Continue with steps 6–8 above.
Enter notes in tablature
Using a computer keyboard
- In Normal mode, select the measure or existing note from which you want to begin note entry.
- Switch to note input mode (N): a short 'blue rectangle' appears around one tablature string: this is the current string.
- Select the duration of the note or rest that you wish to enter (see below).
- Press the up/down arrow keys to move the cursor to the desired string. Use the left/right arrow keys to navigate through the score.
-
Press 0 to 9 to enter a fret mark from 0 to 9 on the current string; to enter numbers with several digits press each digit in sequence. Keys A to H and K can also be used: convenient when working in French tablature. For L , M, N, use the alphanumeric keyboard and type respectively 10, 11, 12... (Note: You cannot enter a number higher than the "Number of frets" value set in the Edit String Data dialog).
Press ; (semicolon) to enter a rest of the selected duration.
-
You can enter notes in different voices if required—just as you would in a standard staff.
See also, Edit notes (below).
Historical tablature
Period notation for bass strings (lutes and sim.) is supported:
-
French tablature: letters with prefixed slash-like strokes right under the tab body: i.e. 7th string: "a", 8th string: "/a", 9th string: "//a" and so on, all in the first position below the tab body.
-
Italian tablature: numbers with 'ledger line'- like segment of string above the tab body: i.e. 7th string: "0" one position above the tab body with one 'ledger line'; 8th string: "0" two positions above the tab body with two 'ledger lines' and so on.
Input of fretmarks is via computer keyboard only: by moving the note entry cursor below (French) or above (Italian) the tab body, 'shadow' slashes or ledger lines will indicate the target string to which the fret mark will be applied; pressing one of the fret keys, will enter (and lay out) the note on that string.
Using a mouse
To enter notes into tablature with a mouse:
- Enter note input mode and select the note or rest duration (see below).
- Click on a string to create a note there. Notes are initially created on fret 0 (or a for French tablatures): to correct, type in the right number from the keyboard.
- You can also increase/decrease the fret mark using Alt+Shift+↑ or Alt+Shift+↓.
- You can enter notes in different voices if required—just as you would in a standard staff.
See also, Edit notes (below).
Select note duration
In note input mode, you can use any of the following methods to set note duration in tablature:
- Press Shift+1 to Shift+9: Sets duration from a 128th to a longa (availability of these shortcuts may depend on the platform and/or keyboard layout);
- Press NumPad1 to NumPad9: Sets duration from a 128th to a longa (if a numeric keypad exists and NumLock is on);
- Click on a note duration icon in the Note Input toolbar above the document window;
- Press Q to decrease the selected duration and W to increase it.
Edit notes
Change fret number
In Note input mode:
- Position the cursor above the fret mark and retype the desired number.
- Increment or decrement the fret mark using Alt+Shift+↑ or Alt+Shift+↓ (The fret mark automatically changes strings, if necessary, to achieve the lowest possible fret position).
In Normal mode:
- Select one or more fret marks.
- Use any of the following commands:
- To increment or decrement, without changing the string: Press ↑/↓.
- To increment or decrement, changing strings, when possible, to minimize the fret number: Press Alt+Shift+↑/↓
Note: The fret mark cannot be higher than the "Number of frets" value set in the Edit String Data dialog.
Change string number
To move the fret mark to an adjacent string without changing the pitch (if the string is free and can produce that note):
In Note input mode:
- Position the cursor over a fret mark, and press Ctrl+↑/↓ (Mac: Cmd+↑/↓).
In Normal mode:
- Select one or more fret marks, and press Ctrl+↑/↓ (Mac: Cmd+↑/↓).
- Drag a fret mark up or down to an adjacent string.
Crosshead notes
To change a fret mark to a crosshead note:
- Select one or more fret marks (in non-note-input mode).
- Press Shift+X to toggles ghost noteheads on/off.
Summary of keyboard commands
Note input mode
| Type: | to get: |
|---|---|
| ↑ | Select above string as current. |
| ↓ | Select below string as current. |
| Shift+1 to Shift+9 | Select a duration (128th to a longa) |
| NumPad1 to NumPad9 | Select a duration (128th to a longa) |
| Q | Decrease current input duration. |
| W | Increase current input duration. |
| 0 to 9 | Enter a fret digit / letter. |
| A to H, K | Enter a fret letter / digit. |
| Alt+Shift+↑ | Increase current fret mark. |
| Alt+Shift+↓ | Decrease current fret mark. |
| ; (semicolon) | Enter a rest |
Normal mode
| Type: | to get: |
|---|---|
| 0 | Change note to rest |
| 1 to 9 | Change duration of selected note or rest (128th to longa) |
| Alt+Shift+↑ | Increase the pitch of the selected note (MuseScore chooses the string). |
| ↑ | Increase the pitch without changing string. |
| Alt+Shift+↓ | Decrease the pitch of the selected note (MuseScore chooses the string). |
| ↓ | Decrease the pitch without changing string. |
| Ctrl+↑ (Mac: Cmd+↑) | Move note to above string, keeping the pitch. |
| Ctrl+↓ (Mac: Cmd+↓) | Move note to below string, keeping the pitch. |
| Shift+X | Toggle the ghost notehead on/off. |
External links
| Συνημμένο | Μέγεθος |
|---|---|
| freight_train_tab.png | 10.3 KB |
| Note selection_en.png | 68.4 KB |
| LAS MUJERES LO BAILAN BIEN BANDA - Trumpet in Bb 2_240923_181258.pdf | 69.8 KB |
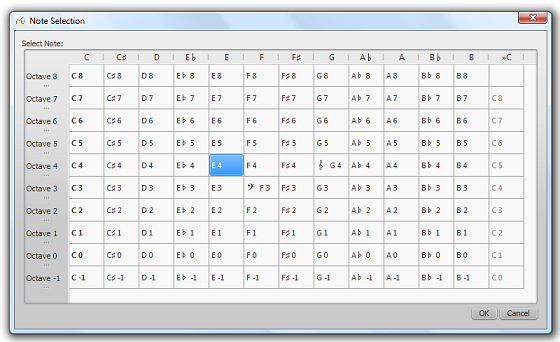