Notation: Expressive markings
Articulations
This chapter discusses articulation symbols available in the Articulations palette (accents, staccato, vibrato markings etc).
To add verbal articulation objects available in the Text palette (legato, pizz. , arco, tremolo etc) to a score, see Entering and editing text chapter. Guitar articulation is covered in chapters under Idiomatic notation: Guitar. Brass or woodwind articulation (Fall, Doit, Plop, Scoop) is covered in Arpeggios and glissandi.
Adding articulations to a score
Keyboard shortcuts
To add an articulation with a keyboard shortcut:
- Select one or more notes;
- Apply the relevant shortcut from the list below:
- Marcato: Shift+O
- Accent: Shift+V
- Tenuto: Shift+N
- Staccato: Shift+S
Toolbar

Certain articulations (accent, marcato, staccato, and tenuto) can be added from the note input toolbar (above the document pane).
- Select one or more notes;
- Click on the desired icon in the articulations toolbar area.
Articulations palette

To add an item to a score:
- Select one or more notes;
- Click on the desired articulation in the Articulations palette;
Alternatively, drag and drop an articulation symbol from the palette to a notehead.
Articulations playback
Certain articulations affect note playback—such as staccato, staccatissimo, louré (tenuto + staccato), and accents. This is handled automatically by the program.
Articulation properties
Editable properties of selected articulation(s) on the score are shown in the Properties Panel.

- Placement: This alters the position of the symbol above or below the note.
Articulation style
See the main chapter Templates and styles
- Values of the "Style for Articulations & Ornaments" can be edited in Format → Style → Articulations & Ornaments.
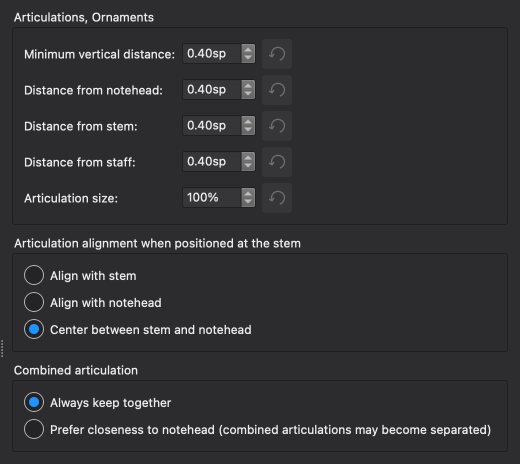
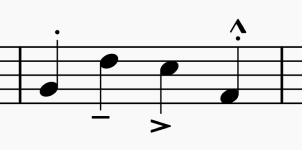
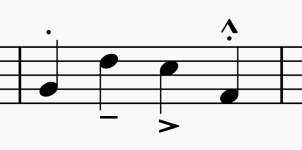
Shown below are the result of some options on the score.
Alignment options
-
Align with stem
-
Align with notehead
-
Center between stem and notehead
Combined articulation options
-
Always keep together

-
Prefer closeness to notehead (combined articulations may become separated)

Dynamics
Adding dynamics to your score

All dynamics symbol objects are in the Dynamics palette. To add a dynamics symbol to the score:
- Select one or more notes, and then click an item in the Dynamics palette; or
- Drag an item from the Dynamics palette onto a note.
Dynamics properties
Dynamics can be edited in Properties panel. The following options are available:
- Scale: Size of dynamics symbols
- Avoid barlines: Toggles whether dynamics markings avoid collisions with barlines.
- Voice assignment: Choose to which voice the selected dynamic is assigned. Affects both the dynamic's position and playback.
- Position: Choose whether the selected dynamic sits above or below the stave.
- Center between staves: On instruments with more than one stave, choose whether the selected dynamic sits vertically centered between two staves. Can be used in combination with Position.
- Alignment with notehead (under Show more) : For dynamics symbols with expression text added, the combined element can be justified to the right of the notehead, or aligned to the center of the notehead.
- Frame (under Show more): Add a square or circular frame to the dynamic marking and customize its styling
To edit the score-wide settings, see the Dynamics style section.
Dynamics and playback
In MuseScore 4.4 onwards, dynamics symbols (including hairpins) can apply independently to individual voices and staves. A dynamic affects its assigned voice(s) from the point at which it appears until playback reaches another dynamic in the same voice or a dynamic that affects all voices.
See the dynamics playback compatibility section to learn how this feature works with different sound technologies.
Assigning voices to dynamics
Watch our video on dynamics and voices
In MuseScore Studio 4.4, dynamics and hairpins can be assigned to either All voices or a specific voice from 1–4 using the Voice assignment property. By default, dynamics are assigned to all voices on the instrument.

For instruments with multiple staves, selecting All displays distinct options for
- All voices on this instrument (i.e. applying to all staves) and
- All voices on this staff only (i.e. applying to all voices on the staff to which it is attached only)

To assign a dynamic directly to a specific voice when you add it:
- Select a note or rest in the score
- Click on a dynamic in the palette while holding Ctrl (Mac: Cmd)
- The dynamic will be assigned to the voice of the selected note or rest
To change the voice assignment of an existing dynamic, select it and then either:
- Click one of the buttons in Properties → Voice assignment
- Click one of the voice buttons in the Note input toolbar
- Use the keyboard shortcuts
- For voice 1–4:
Ctrl+Alt+1–4 (Mac: Cmd+Opt+1–4) - For All (or All voices on instrument*):
Ctrl+Alt+0 (Mac: Cmd+Opt+0) - For All voices on this staff only*:
Ctrl+Alt+- (Mac: Cmd+Opt+-)
- For voice 1–4:
*For instruments with multiple staves
Control whether dynamics are assigned to all voices or individual voices by default in Preferences → Note input → Voice assignment.
Positioning dynamics
There are three options available in Format → Style → Dynamics & hairpins → Default positions of dynamics and hairpins which control general dynamics positioning:

- Position determines whether dynamics should be positioned according to their voice assignment ('Based on voice', the default), or should all go 'Above' or 'Below'
- Place above the staff on vocal instruments specifies whether dynamics should go above the stave on vocal staves (on by default)
- Center on grand staff instruments automatically will center dynamics vertically between the staves of multi-stave instruments automatically (on by default)
Voice-based positioning
If the Based on voice position is chosen, voice assignment will affect position of dynamics as follows:
- Voice 1 dynamics go below the stave if there is only one voice at that rhythmic position, and otherwise go above
- Voice 3 dynamics go above the stave
- Voice 2 and 4 dynamics go below the stave
- Dynamics assigned all voices go below the stave
The position of any dynamic can be explicitly overridden via Properties → Position.
Centering dynamics between staves
Dynamics on grand staff instruments (e.g. keyboards, keyboard percussion, harp) can be centered vertically between the staves.
By default, dynamics are automatically centered when:
- There is a stave on the same instrument above or below the dynamic (according to its position relative to the stave to which it is attached) against which it can be centered
- Properties → Voice assignment is set to All voices on instrument
- Properties → Center between staves is set to Auto
- In Format → Style → Dynamics & hairpins, the Center on grand staff instruments automatically option is on
- No manual Y-offset has been applied to the dynamic
You can also manually center dynamics by setting Center between staves to On and configuring Position based on whether the stave to which you want to center is above or below.
Combining dynamics and text
To add a dynamics instruction that combines a dynamics symbol with text, for example poco f:
- Add an appropriate dynamics symbol to your score using the above steps (For poco f, add an f dynamics symbol)
- From the Text palette, add an expression text element to the same note.
- The dynamics symbol and expression text will snap together, allowing you to reposition them as a single unit.
- Double-click the expression text to edit it (For poco f, replace the text with the word poco)
Alternatively, you can double-click a dynamic symbol and type additional text on either side of it.
When an expression text is combined with a dynamic, the size of the expression text can be independently scaled using the Size property in Properties > Text.
Dynamics style
See the main chapter Templates and styles
Format → Style → Dynamics & hairpins contains options for the default positioning, spacing, and size of dynamics and hairpins.
Editing the dynamics font
You can select the font used for dynamics in Format → Style → Score → Musical symbols font. The default font is Leland. You can also change the font for dynamics without changing the font used for other musical symbols in Format → Style → Dynamics & hairpins → Override score font.
Editing expression text style
You can edit expression text style in Format → Style → Text styles → Expression. You can toggle whether expression text automatically snaps to dynamics in Format → Style → Expression text.
Dynamics playback compatibility
Support for voice-specific dynamics varies depending on the sound technology chosen (e.g. SoundFont, VST, or Muse Sounds) and whether the instrument is a single-note-dynamic instrument (i.e. an instrument capable of changing its dynamic on a single note, such as the violin or flute) or a non-single-note-dynamic instrument (e.g. the piano or percussion instruments, where the instrument's dynamic properties begin to recede after a note's initial attack).
In the below table, single-note-dynamic instruments are referred to as SND instruments, while non-single-note-dynamic instruments are referred to as non-SND instruments.
| Sound technnology | Support for individual voices/staves |
|---|---|
| Muse Sounds | Full support for per-voice and per-stave dynamics. |
| SoundFont (MS Basic) | Both SND and non-SND instruments will support dynamics on individual voices. Only non-SND instruments will support dynamics on individual staves. |
| VST | Only non-SND instruments support per-voice and per-stave dynamics. |
Hairpins
Types of hairpin
Hairpins are symbols used to indicate gradual changes of volume in the score. There are two kinds: crescendo (getting louder) and decrescendo (getting quieter).

There are also crescendo and diminuendo lines which do the same thing:

All can be found in the Lines or Dynamics palettes.
Adding a hairpin to your score
Lines palette
To enter a hairpin from a palette use one of the following options:
- Select a range of notes or measures, then click on a hairpin in the palette.
- Drag and drop a hairpin onto a notehead. The hairpin will extend to the end of the measure.
Keyboard shortcuts
To enter a hairpin using a keyboard shortcut:
- Select a range of notes or measures;
- Use one of the following options:
- For a crescendo hairpin press < ("less than" sign).
- For a diminuendo hairpin press > ("greater than" sign).
Changing appearance of hairpins
Range
To extend or contract the range of a hairpin, see Changing range of a line.
Height
To change the height, select the height adjustment handle (shaded in the image below) …

… then use keyboard arrows, offsets (Properties panel), or dragging, to move the handle into the desired position. (See Basics: Adjusting elements directly.)
Alternatively you can adjust the "Height" in the Hairpin: Style section of the Properties panel.
Set at angle
To allow the hairpin to slope at a diagonal, check the "Allow diagonal" box in Hairpin: Style in the Properties panel. Then move the start/end adjustment handles to get the desired slope.
Other adjustments
See Hairpin properties.
Changing playback of hairpins
Hairpin properties
You can edit properties specific to hairpins in the Hairpins section of the Properties panel.
Style tab
Niente circle: Places a small circle at the point of the hairpin.
Allow diagonal: Allows the hairpin to be set at an angle; see Changing appearance of hairpins (above).
Line style: Choose solid, dashed or dotted lines.
Thickness / Height:
Height (new system): Specify the height of subsequent hairpins if the first one spans a system.
Position: Above or Below.
Text tab
Properties here allow you to specify beginning, end, and continuation texts and their vertical offsets.
Hairpin style
See Templates and styles and Dynamics style
Slurs
A slur is a curved line between notes of different pitches indicating legato phrasing; exact interpretation depends on the instrument.
Slurs should not be confused with (note) ties which connect notes of the same pitch and extend the duration of the first note to encompass the connected notes.
Adding a slur to your score
After selecting a note, a slur can be created using any of the following:
- A keyboard shortcut, S. This option is both convenient and fast.
- The menu option, Add→Line→Slur
- A slur from the lines palette.
The exact method of applications depends on whether you are in note input or normal modes of operation. The keyboard shortcut method will be used as an example.
Adding slurs in normal mode
Method 1
- Select the note where you want the slur to start:

- Press S to add a slur extending to the next note:

- To extend the slur to the next note, hold Shift and press → (right arrow). Repeat as required:

- To flip the slur direction, press X:

- Press Esc to exit edit mode:

Method 2
- Select the note where you want the slur to start;
- Choose one of the following options:
- To add a single slur: Hold down Ctrl (Mac: Cmd) and select the last note that you want the slur to cover.
- To add slurs to all voices: Hold down Shift and select the last note that you want the slurs to cover.
- Press S.
Adding slurs in note input mode
- Enter the first note in the slurred section;
- Press S to begin the slurred section;
- Type in the remaining notes in the slurred section;
- Press S again to end the slurred section.
Multi-voice and cross-staff slurs
Using method 2 (above) you can create a slur between notes in the same or different voices. Cross staff slurs can be created in exactly the same way. e.g.

You can also adjust the start/end handles of an existing slur to move the start or end to a note of a different voice:
- Click on the start/end handle of the slur.;
- Press Shift+↑/↓ to move the start/end between voices, and from staff to staff.
Changing appearance of slurs
To adjust the shape of a slur or its range, see Adjusting elements directly.
Slur properties
The following properties specific to slurs can be adjusted in the Properties panel.
Style: Solid, dashed or dotted line.
Position: Above or below.
Slur style
Some default properties for all slurs in the score can be adjusted in Format→Style→Slurs/Ties:

Breaths and pauses
Breaths and pause symbols may be found in the Breaths & pauses palette.

These symbols also have an adjustable playback effect.
Types of pauses
Fermata
A fermata, or pause appears above/below a note, and extends its written duration, indicating a pause in the music.

It may also be written above a rest, or a barline, indicating the end of a piece or section of music.

Breath mark
A breath mark is placed just above the staff, and tells a wind instrument performer or singer to take a breath here, or other instruments to pause slightly. It may occur between two notes or at the end of a measure.
Caesura
The caesura also indicates a pause, slightly longer than a breath mark but less so than a fermata. It may occur between two notes or at the end of a measure.
Adding a pause to your score
To add a fermata:
- Select a note, rest or barline;
- Click on a fermata symbol in the Breaths & pauses palette
Alternatively drag a fermata symbol onto a note.
To add a breath mark or caesura:
- Select a note;
- Click on a breath mark/pause symbol in the Breaths & pauses palette.
Alternatively drag a breath mark/caesura symbol onto a note.
MuseScore automatically places the breath mark/caesura in the correct position, just above the staff and after the selected note.
Changing pause playback
Pause symbols have a playback effect in the score. To adjust the pause length, click on Playback in the Properties panel and adjust "Time stretch".
Pause properties
The position of selected pauses can be altered by clicking on Appearance in the Properties panel and adjusting the offsets. Alternatively you can drag a symbol, or enter Edit mode and use the keyboard arrows to move it.
In addition you can position a fermata above or below the staff by selecting the desired option in "Placement on staff" in the Fermata section of the Properties panel.
Pause style
You can specify default positional properties for all fermatas in Format→Style→Fermatas.

Ornaments
Ornaments and ornament lines can be applied from the Ornaments palette.
If the it is not already displayed in the palettes area, see Adding more palettes. Available ornaments include turns, (short) trills, and mordents, are discussed here. See Other lines for ornament lines available including (long) trill lines, upprall, downprall, prallprall.

Adding an ornament to your score
Add an ornament
To add an ornament to the score:
- Select one or more notes;
- Click on the desired ornament in the Ornaments palette;
For a trill only, it is possible to use a custom shortcut instead at step 2.
Add an ornament line
See main chapter of ornament lines Other lines.
The procedure for applying ornament lines is just like any other line, i.e.
- Select a start note;
- Press Shift and click on an end note;
- Click on an ornament line in the Ornaments palette
If you subsequently need to adjust the ornament's length, see Changing the range of a line.
Changing ornament intervals (adding accidentals)
Ornaments are aware of the key signature and of other accidentals in the bar. By default, trills, turns, mordents and other ornaments will display and play diatonic intervals. Use the Properties panel to change the interval, displaying the appropriate accidentals in the score and changing playback.
To change the interval of an ornament:
- Select an ornament
- Open the Properties panel
- Use the interval selectors to choose the desired interval. The score will display the appropriate accidentals for the chosen interval.
Trills can be customized by quality (major, minor, augmented, etc.) and interval number from unison to octave. The appropriate accidental or upper auxiliary note will display in the score above or below the ornament. For intervals larger than a second, consider using a tremolo.

Both the upper and lower interval can be set for turns.
Short trill and mordent intervals can be set to the minor or major second.

Any accidentals introduced only by an ornament must be confirmed or cancelled later in the measure for clarity, meaning it is not possible to delete accidentals where the note:
- is after AND in the same measure as an ornament with accidentals
- as the same pitch class as a note with an accidental specified by the ornament (excluding the base note)
For example, in a measure starting with a chromatic turn on A as seen below, all Gs and Bs later in the measure will have an accidental, even if it is the same as what appears in the ornament.

While these accidentals cannot be deleted, their visibility can be turned off. To do so:
- Select the accidental
- Open the Properties panel
- Uncheck Visible
Ornament properties
The following properties of selected ornaments can be edited from the Ornament section of the Properties panel:
Accidental visibility
- Default only shows accidentals that have not shown up yet in the measure.
- Show any alteration shows accidentals again even if they appear earlier in the measure.
- Always display an accidental shows accidentals even for diatonic notes.
Placement
Use the placement controls to either let MuseScore automatically choose the standard placement, or manually select above or below.
Accidental properties
When selected, accidentals, including those linked to ornaments, have the following options in the Properties panel:
- Add parentheses or brackets
- Toggle small accidental
Ornament style
Default sizing and spacing properties for ornaments can be edited in Format→Style…→Articulations, Ornaments.

Ornaments can be individually repositioned by clicking and dragging in the score or via the Appearance dialog in the Properties panel.
Arpeggios and glissandi
Arpeggios, strum arrows, glissandi (slide), portamento (glide), brass or woodwind instrument bends and Guitar techniques: Slide in and slide out can be applied from the Arpeggios & Glissandi palette:

Many have an adjustable playback effect (see below).
Arpeggios
Adding an arpeggio/strum to your score
To add an arpeggio/strum to a score:
- Click on any note in a chord (multiple selection is possible)';
- Click on an arpeggio/strum symbol in the palette.
Alternatively you can drag an arpeggio/strum symbol from a palette onto a notehead.
Adjusting the height of an arpeggio/strum
Click on an arpeggio and two adjustment handles will appear at the top and bottom of the symbol. You can move either up or down by dragging, or by selecting a handle and using the up/down keyboard arrows.
Creating multi-voice or cross-staff arpeggios
Arpeggios only span the voice to which they are input initially, but then can then be adjusted to span multiple voices in the same instrument, even across multiple staves.
To adjust an arpeggio to span multiple voices:
- Select either the top or bottom handle of the arpeggio
- Press Shift+↑ or Shift+↓ to move the handle up or down to the next adjacent voice
The handle will jump to the next voice above or below that has any notes at that point. This includes voices on staves above or below, in the case of multi-staff instruments.
The arpeggio is considered to 'belong' to the uppermost voice that it spans, and will be coloured accordingly.
(Prior to MuseScore 4.2, only the bottom handle could be used, to extend an arpeggio to a voice of the same numberr in the stave(s) below. Any other adjustments had to be made manually.)
Changing playback of arpeggios
To change the speed of a selected arpeggio, press Playback in the Properties panel, and adjust "Spread delay".
If you want to turn off playback altogether, untick the "Play" box in the General section of the Properties panel.
Arpeggio style
Default properties for all arpeggios in the score can be adjusted from the style menu at Format→Style→Arpeggios:

Portamento
To add a slide or "portamento" between two notes, add a glissando symbol and change its appearance and playback setting.
To add a slide or portamento before or after a note before a note (a string instrument or guitar technique), add either one of the four brass or woodwind instrument bends or a Guitar techniques: Slide in and slide out, see also Guitar techniques. Alternative wavy symbols are found in the Symbols category in Master palette, those do not affect playback.
Glissandi
Note: Guitar slides are covered in Guitar techniques.
Adding a glissando to your score
- Select one or more start notes;
- Click on the desired glissando icon in the palette. A glissando is created extending to the next note in the same voice:

Alternatively you can drag a glissando symbol from the palette onto a notehead.
Glissandi can cross staves if needs be:

Editing range of a glissando
If required, you can change the start or end position of a glissando as follows:
- Select the edit handle whose position you want to change;
- Press Shift+↑/↓/←/→, to move the handle in the specified direction, one note at a time.
This method can also be used to move the edit handle between voices and across staves.
Changing appearance of glissandi
The line type of a selected glissando—whether straight or wavy—and any text associated with it, can be changed in the Glissando section of the Properties panel. You can also turn off text by unchecking the "Show text" box.
Changing playback of glissandi
To change the playback effect, click on Playback and select an option from the dropdown list: chromatic, white keys, black keys, diatonic, portamento (this option for glissando symbol creates a portamento between two notes, to add other types see portamento).
You can also choose to turn off the playback effect by unchecking "Play" in the General section of the Properties panel.
Glissando properties
The following properties are available in the Glissando section of the Properties panel.
Glissando line: Choose from "Straight" or "wavy".
Show text: Uncheck/Check this box to turn off/on the display of the glissando text.
Text: Specify any text to appear with the glissando.
The default style of all glissando text is determined by the settings of "Glissando" in Format→Style→Text styles.
Bends
Not to be confused with Guitar techniques: Bends.
The Arpeggios & glissandi palette also contains bend symbols for brass or woodwind instruments:

These have a playback effect on the score.
Types of bends
Fall:
Doit:
Plop:
Scoop:
if you are not sure what's what, mousing over the palette icon will display the name of the symbol in a tooltip.
Adding a bend to your score
- Select a notehead;
- Click on the desired bend symbol in the palette.
Alternatively, drag a bend symbol onto a notehead in the score;
Changing appearance of bends
To change the shape of the bend, click on it and four adjustment handles become visible. Drag the handles, or click on them and press the keyboard arrows, until you get the shape you want.
Grace notes
Grace notes can be applied to the score from the Grace notes palette.

For bagpipe players there is a comprehensive range of grace notes in the Bagpipe embellishments palette.
Types of grace notes
Grace notes are small (cue-size) notes which ornament a previous or following note. They take their value from this parent note but do not themselves count towards the measure duration.
There are several kinds:
-
Acciaccatura:
 Usually written with an oblique stroke through the note flag, or through the beam, if there is a beamed series.
 -
Appoggiatura:
 A stressed note which takes half the value from the parent note.
 -
Grace note after (trill endings):
Adding a grace note to your score
Note: For standard staves and tablature, the following instructions for adding grace notes work in both note input and normal modes.
Add grace note with keyboard shortcut
- Ensure that the "parent" note is selected (multiple selection is possible in normal mode).
- To apply an acciaccatura, press / (slash). For other grace notes use a custom shortcut (see Preferences: Shortcuts).
Add grace note from palette
- Ensure that the "parent" note is selected (multiple selection is possible in normal mode).
- Click on the desired symbol in the Grace notes palette.
Alternatively, you can drag and drop a grace note from the palette onto a note in the score.
Multiple grace notes
Sequential grace notes
You can add a run of grace notes to a selected note by repeatedly applying any of the following:
- pressing the relevant keyboard shortcut (see above).
- clicking on a grace note icon in a palette.
- dragging and dropping a grace note from a palette onto a note.
Grace note chords
To apply a chord of grace notes:
- Add a single grace note (as described above).
- For standard staves use one of the following methods:
- Press Shift and a note letter, A to G. This will add the corresponding note above.
- Press Alt+1–9; or from the menu bar, select Add→Intervals and choose an interval from the list. This will add a note at the indicated interval above the selected note.
- You can add intervals below in the same way, but using a custom shortcut (see Preferences: Shortcuts).
- For tablature, select the grace note in normal mode, then add further chord notes using the method of adding intervals in step 2.
Editing grace notes
Change duration
To edit the visual duration, click on the grace note in normal mode, and select a duration from the note input toolbar or by using a keyboard shortcut (see Selecting duration).
Change pitch
Standard staves. To change the pitch of grace notes, use one of the methods described in Editing notes and rests.
Tablature. To change the pitch of grace notes, use one of the methods described in Changing the pitch in normal mode (tablature).
Changing playback of grace notes
[To be added?]
Grace note style
You can adjust the default size for all grace notes in Format→Styles→Sizes.
Tremolo and rolls
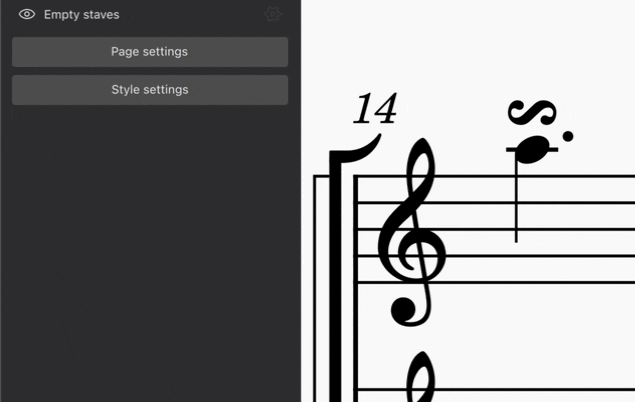
Types of tremolo and rolls
A Tremolo is the rapid repetition of one note or chord, or a rapid alternation between two notes or chords. The placement of tremolos is handled automatically by the program.
Single note tremolo
For stemmed notes, the rhythmic value of the tremolo is indicated by the number of diagonal strokes through the stem. One stroke indicates that the original note is divided into eighth notes. e.g.

Two strokes divides the note into sixteenth notes, and three strokes into thirty-second notes. On whole notes the tremolo symbol is placed above the note.
Tremolo between notes
In traditional two-note or two-chord tremolos, incomplete beams are drawn between the notes to indicate the rhythmic value of the tremolo (to change the style see below). One beam indicates eight notes, two beams sixteenth notes, and three beams thirty-second notes. e.g.

Buzz roll
A buzz roll symbol is also available from the Tremolos palette. However, it is notational only and currently has no playback properties.
Adding a tremolo to a single note
- Click on a notehead in the score.
- Click on the desired tremolo symbol in the Tremolos palette.
Adding a tremolo between notes/chords
- Enter the notes at half the desired final duration of the tremolo.
- Select a note in the first chord.
- Click on the desired tremolo symbol in the Tremolos palette (it has to be one of the tremolo symbols without a stem).
Tremolo beams appear between the notes/chords and the appearance of the noteheads is adjusted accordingly.
Example: To enter a two-note tremolo with the duration of a half note (minim), enter two normal quarter notes (crotchets). After applying a tremolo symbol to the first note, the note values automatically double to half notes.
Changing appearance of tremolos
Three styles of tremolos between notes/chords are supported in MuseScore. To change the style:
- Click on the (between notes) tremolo symbol.
- In the Tremolos section of the Properties panel, click on the desired style icon under “Style (between notes)”.
Other lines
Overview
Musescore Line is a type of object capable of attaching (anchoring) to a horizontal continuous range of more than two notes or rests, or vertical collection of notes (chord). A Musescore Line object contains a length of string or arc, and optionally a text. These objects can functionally affect the score, and share similar configurable line properties, text properties, and styles.
Musescore Line objects include these subtypes, follow the hyperlink on text to read their dedicated main chapters, or "jump to section" on this chapter:
- Standard line or Plain line (a simple general purpose, straight line) (jump to section)
- Slurs
- Staff text lines and System text lines (jump to section)
- Hairpins and crescendo, decrescendo lines
- Tempo lines such as rit --- (jump to section)
- Voltas (repeat section brackets on top)
- Idiomatic notation: Keyboard: Pedal markings
- Octave lines (8ve etc)
- (Long) Trill lines (jump to section)
- Arpeggios
- Glissandi (slides) and portamento between two notes
- Upprall, Downprall, Prallprall, affects playback
- Guitar-related lines (jump to section): including Barre line, "let ring" line, P.M. --- (palm mute), Vibrato line, and the custom Fingering/String number-line.
- vibrato sawtooth, tremolo sawtooth, does not affect playback
- Ambitus (an early music feature)
These markings contain length of string or arc, but do not belong to Musescore Line objects because they cannot attach (anchor) to a continuous range:
- Bends (brass or guitar articulations)
- Ties
- Tremolo and rolls
- Single note Ornaments such as turns, (short) trills and mordents
- (Staff) Brackets and curly braces
- Barlines
- Staff line (To change global staff line thickness, see Page layout concepts: Staff. Other related settings see Staff/Part properties chapter.)
Note: The following description of actions and general behaviors applies to Line objects discussed here (those do not have a dedicated handbook chapter), for Line objects having dedicated handbook chapters, refer to those chapters for more accurate info.
Adding a line to your score
The commonest way to add a new Musescore Line is to use either:
- a predefined keyboard shortcut, for example S to add slurs (see the respective chapter above), or
- the Lines palette and the Guitar palette
To apply a line to a selected range:
- Select a range of notes,
- Click on a line in a palette;
Or
- Drag a line from a palette to the starting note,
- Adjust the end handle to extend the range (see Changing range of a line).
To apply a line to a single note:
- Select a note and click on the desired palette line.
- Drag a palette line to the desired start note.
Adjusting a line
To adjust the range of a line, see Changing range of a line.
Types of lines
Standard lines
Plain lines are applied from the Lines palette. They can be purposed to anything you like such as to create guitar fingering/string number lines. They can be adjusted to be diagonal or vertical.
Staff and System Text lines
A staff text line, like staff text, is affixed to one staff in a system, and is indicative only for that staff. It appears only in the part featuring that staff.
A system text line, like system text, is affixed to one staff but is indicative for all the staffs in the system. It appears in all instrument parts.
Tempo lines
Tempo markings such as rit --- are new in Musescore 4, they affect playback tempo.
Guitar-related lines
- Barre lines in Guitar palette: Used to indicate fret positions, see Guitar techniques: Adding a barre line to your score.
- To create a Fingering/String number-line:
- add a Fingering from Fingerings palette,
- add a Standard lines from Lines palette,
- adjust the length as required.
- Vibrato in the Guitar palette. You can change the shape of the line in the Vibrato section of the Properties panel.
- Palm mute in the Guitar palette: Changes playback sound to that of a clean muted electric guitar.
- Let ring in the Guitar palette: Affect playback, acts like the sustain pedal on a keyboard.
Trill lines
Not to be confused with (short) trills Ornaments.
Trill lines are upgraded in Musescore 4, their have lots of new engraving settings such as showing a bracketed small note and accidentals to notate trill note pitch, these settings are explained in Ornaments.
They still create playback with SoundFonts instruments like in previous Musescore versions. If the instrument use Muse Sounds and the sound sample exists, a trill line will utilize the beautifully recorded trill audio for playback, for example in case of a perfect fifth trill line.

Line properties
The Properties panel allows you to view and edit General, Appearance, and Playback settings.
The name of the section below varies depending on the type of line. But it will have two tabs marked Style and Text:
Style tab
Clicking on the Style tab allows you to set the properties of the line itself:
Line type: A choice of straight, hooked, angle-hooked, or double-hooked.
Thickness / Hook height:
Style: Choice of solid, dashed or dotted line.
Dash / Gap: Adjust the appearance if "Dashed" is selected.
Text tab
Clicking on the Text tab allows you to apply and position any text associated with the line:
Beginning text: Enter the text, if any, to appear at the beginning of the line.
Vertical offset: Allows you to move the text vertically in relation to the line (in sp.).
Text when continuing to a new system: If the line spans a system, this is the text that will appear before the line in the next system.
Vertical offset: As above.
Line style
Values of the "Style for Text line" can be edited in Format→Style→Text line.
Values of the "Style for System text line" can be edited in Format→Style→System text line.
Values of the "Style for text inside Text line" can be edited in Format→Style→Text styles→Text line

Other symbols
The Symbols palette is a category within the Master palette and houses all symbols and text from all built-in music fonts.

Unlike other categories in the Master palette, items in the Symbols palette are non-functional: they are for display purposes only and have no other effect on the score.
You should find most symbols and text items you need for scoring in the Palettes panel—use of the Symbols palette should be reserved for specialist items not available in the small palettes, or on those occasions when you really do need a non-functional element.
The Symbols palette
View
To view the Symbols palette, select View→Master Palette, or use the shortcut Shift+F9.
Selecting “Symbols” in the list of headings reveals all symbols under all subcategories. Selecting one subcategory to focus on a specific set.

Search
You can search for a symbol by entering a term in the Search box at the top of the Symbols section. Specify the musical font you want in the dropdown at the bottom right.
Adding symbols to your score
Symbols added from the Symbols palette scale in line with the score (see Staff size), but their font-size is fixed.
If you need a symbol with an adjustable font-size, you should consider adding it instead from the Special characters palette as staff text.
Add a symbol
Use one of the following methods:
- Select one or more score elements (notes, rests, barlines) then click on the desired symbol in the Symbols palette.
- Drag the desired symbol from the Symbols palette onto a score element (note, rest, barline).
Add to other symbols
After adding a symbol, you can, if required, add an additional symbol to the existing one. Use one of the following:
- Select a symbol (previously added to the score from the Symbols palette), then click on the desired symbol in the Symbols palette.
- Drag the desired symbol onto the existing symbol in the score.
Reposition symbols
To reposition, you can drag the symbol, or edit the offsets in the Apprearance section of the Properties panel. You can also move the symbol using the keyboard arrows—after selecting it and entering edit mode by pressing Alt+Shift+E or F2.
If two symbols have been joined together (see Add to other symbols, above), moving the first-added symbol moves both. However you can still move the second symbol in relation to the first.
See also
- Using the palettes for information about how to search for and apply palette items to the score.
- Working with images for how to apply images to your score.