Lyrics
Enter a lyrics line
First line
- Enter the notes of the melody line;
- Select the note where you want to start entering lyrics;
- To enter lyrics mode, type Ctrl+L (Mac: ⌘+L); or from the main menu, select Add→Text→Lyrics;
- Type a syllable;
- Use the following options to continue entering lyrics:
- Go to the next syllable: Press Space (or Ctrl+→) at the end of a syllable.
- Hyphen (to connect syllables): Press - at the end of a syllable.
- Go to the previous syllable: Press Shift+Space (or Ctrl+←).
- Move left: Press ← (left arrow). If the cursor is at the beginning of a syllable, it will jump to the previous one.
- Move right: Press → (right arrow). If the cursor is at the end of a syllable, it will jump to the next one.
- Move to the syllable below: Press ↓ (down arrow).
- Move to the syllable above: Press ↑ (up arrow).
- Start new lyrics line: Press ↵ (Return) at the end of an existing lyrics syllable (Note: Don't use the Enter key from the numeric keypad!).
- To exit lyrics mode, press Esc.
Subsequent lines
If you want to add another lyrics line to an existing one (e.g. a 2nd or 3rd verse etc.):
- Chose one of the following options:
- Select the note where you want to start the new lyrics line. Enter lyrics mode as shown in step 3 (above). The cursor moves to a new (blank) line.
- Enter text edit mode on an existing syllable, go to the end of the syllable and press ↵ (Return). The cursor moves to the next line.
- Continue entering lyrics from step 4 (above).
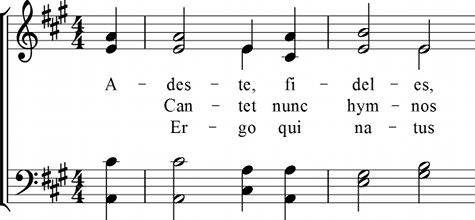
Example:

Special characters
In most cases, lyrics can be edited just like normal text. However, special keyboard shortcuts are required to enter the following characters:
-
Character space: Ctrl+Space (Mac: ⌥+Space).
-
- (hyphen): Ctrl+- (Mac: ⌥+-) or AltGr+-.
-
Line feed: Ctrl+↵ (Mac: ⌥+Return) or Enter (from the numeric keypad).
Melisma
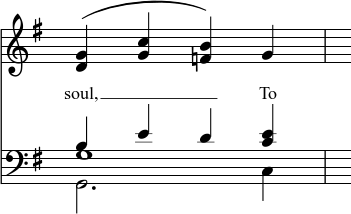
A melisma is a syllable or word that extends over two or more notes. It is indicated by an underline extending from the base of a syllable to the last note of the melisma. The underline is created by positioning the cursor at the end of a syllable and pressing Shift+_: once for each note in the melisma. See the image below:

The above lyric was created in the following manner:
- Type the letters, soul,.
- At the end of the word, press Shift+___.
- Type the letters To, then press Esc.
For non-last syllables to extend, just use additional dashes -, usually only one of them will show (more when the distance between the syllables is large enough), and the syllable will right-align to the first note, similar to last syllables that got notated with a melisma, see above.
Elision (Lyric) slur / Synalepha
Two syllables under a note can be joined with an elision slur, also known as a "lyric slur" or "synalepha". For example:

To create the example lyric text, starting with the syllable text "te":
- Type te;
- Click on the keyboard icon
 , or press F2 to open the Special Characters palette;
 -
Use one of the following options:
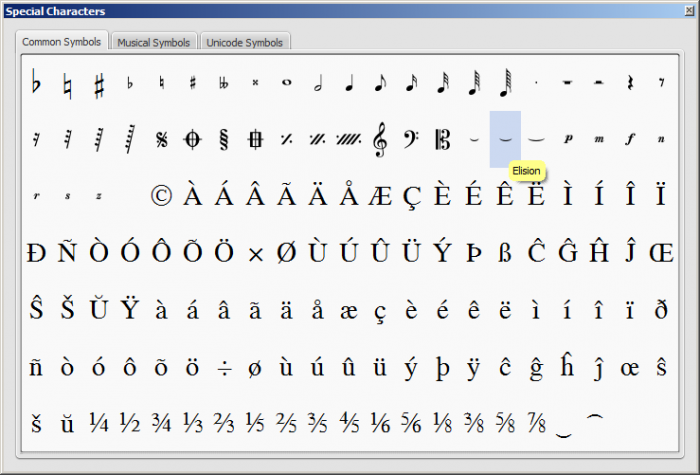
- Double-click one of the three elision slurs in the "Common Symbols" tab: "Narrow elision", "Elision", or "Wide elision" (these can be found between the "C Clef" and the "p" dynamic—see image below):

- Double-click the elision slur found after the 7/8 fraction in the "Common Symbols" tab (next to last character in the image above). Depending on the font, add one or more spaces before/after the slur using Ctrl+Space (Mac: ⌥+Space).
Note: Not all fonts include the "undertie" character (U+203F ‿ "undertie", present in "Special Characters" mainly for compatibility with MuseScore 1.x scores). To find out which fonts on your computer support it, see "fontlist" (look for any font that shows a tie between "te" and "A" instead of a blank rectangle).
- Double-click one of the three elision slurs in the "Common Symbols" tab: "Narrow elision", "Elision", or "Wide elision" (these can be found between the "C Clef" and the "p" dynamic—see image below):
-
Type A.
Edit Lyrics
- Enter text edit mode on an existing syllable;
- Use standard text editing commands to make changes;
- Continue entering lyrics (see above); or exit lyrics mode by pressing Esc.
Adjust position of lyrics
The top and bottom margins and the line height of all lyric lines can be set globally:
- From the menu, select Style→General...→Page;
- Adjust the properties marked "Lyrics top margin," "Lyrics bottom margin" and "Lyrics line height" (see General: Page: Lyrics Margins).
To adjust the position of a particular lyrics line:
- Select the lyrics line: i.e. right click on a word in the line, and (from the menu) chose Select→More...; then check the relevant options, which should include "Same system";
- Adjust the Horizontal and Vertical offsets in the Inspector.
Copy lyrics to clipboard
To copy all lyrics to the clipboard (as of version 2.0.3):
- From the menu bar, select Edit→Tools→Copy Lyrics to Clipboard.
Paste lyrics from clipboard
To copy and paste lyrics from a text file (say) into a score:
- Enter the notes in the score to which the lyrics will be attached.
- Set up your lyrics in a text file, with appropriate spaces, hyphens, line-breaks etc.
- Copy the lyrics from the text-file into the clipboard.
- Select the start note in MuseScore, and press Ctrl+L (Mac: Cmd+L) (step 3 under Enter lyrics in a score).
- Repeatedly applying paste will enter successive words of the lyrics. You may need to enter melismas and make other corrections as you go along.