Mixer
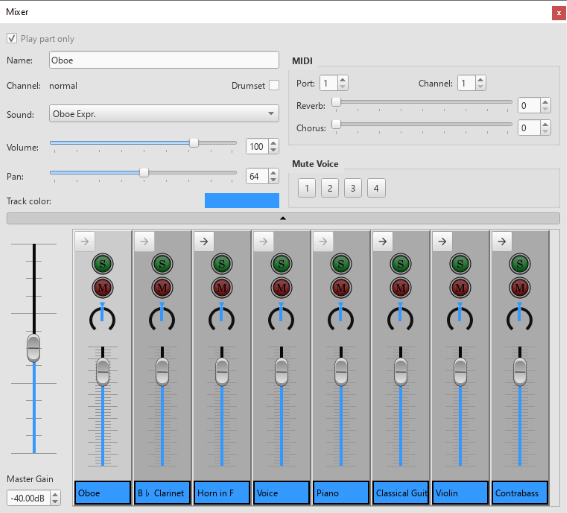
The Mixer contains controls for adjustments of in-app playback (sound, volume and panning), and MIDI out settings. It contains the Details Area on the top and the Control strips Area below. In between the two is a wide button with a tiny triangle. Clicking on it toggles the visibility of the details area. It uses the Preferences > Score > "Show MIDI controls in the Mixer" as default setting.
Opening the Mixer
To display/hide the mixer, use one of the following:
- Press F10 (Mac: Fn+F10).
- From the main menu, select View→Mixer.
Control strips Area
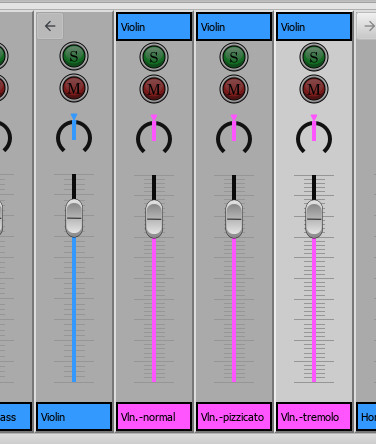
Expanded parent control, showing child controls in pink.
Displays the Master Gain on the left, and columns of controls on the right. It is important to know the difference between channel and sound track (Musescore Voice):
- Every staff on a score belongs to its MuseScore Instrument. For example when a piano is added to a score, the two staffs created, the treble clef staff and the bass clef staff, belong to the same piano instrument.
Each instrument has one or more channel depending on its playback capability inside Musescore. A channel represents a specific type of sound, similar to the concept of playing technique (e.g. a violin which can play in arco, tremolo or pizzicato, legato, vibrato), or articulation sample in commercial sound libraries. Each control strip in the Mixer represents one channel of the score.
When an instrument on a score contains more than one channel. A parent control strip is shown in the Mixer, it has an arrow button on the top left corner. Click the arrow to show or hide all channels. Parent control shadows the first child control, modifying values on parent control modifies all children values. - For each staff (that can contain a clef symbol) in a score, MuseScore creates exactly four sound tracks. They correspond to the four Musescore Voices. To instruct individual sound track (Voice) to use a channel (sound), use a Staff Text as explained below. Contrary to the concept of sound track and mixer in popular DAWs, Musescore 3 Mixer has nothing to do with sound tracks (Voices) except the ability to mute (jump to).
Note: (a) In Musescore 3.6.2, the Mixer does not response to selection on the score screen area, a control in the Mixer must be selected with a mouse click first, before any adjustment is made. (b) It is not possible to add or remove channel inside a instrument on a score inside Musescore. To add or remove a channel, or set default values, a custom instrument must be created utilizing a instruments.xml. The topic is covered in the developers' handbook. (c) Parent control strip is formerly referred to as "part track".
Master Gain
The Master Gain controls the overall output volume. To adjust it, click and drag the slider handle or enter a value in the box underneath.
Channel display arrow
When an instrument on a score contains more than one channel. A parent control strip is shown in the Mixer, it has an arrow button on the top left corner. Click the arrow to show or hide all channels. Parent control shadows the first child control, modifying values on parent control modifies all children values.
Mute and Solo
At the top a green S Solo button and a red M Mute button: click to toggle on and off. If any Solo button is checked, unSolo channels are muted regardless of their Mute status. These modify a channel, not voices.. To mute a voice, jump to Mute Voice
Pan
The dial below the mute button controls panning left and right. You can click and drag. Note that value 64, not 50, is center pan.
Volume
The slider controls the playback volume. This is a final post process output volume. The data size 127 is an arbitrary number not related to MIDI velocity, default 100 value is 90% sound sample volume, more info.
Control strip name
Not to be confused with Long instrument name and Short instrument name in Staff / Part properties.
Display Instrument name or Channel name. Does not affect score visually.
Details Area
The details area displays and provides finer control of the currently selected channel.

Play part only
Playback option to be used with Musescore Parts feature.
Name
Not to be confused with Long instrument name and Short instrument name in Staff / Part properties.
Text for display within Mixer only, also known as Part name in Staff / Part properties. Does not affect score visually. Does not affect sound.
Channel
Channel name cannot be modified inside Musescore, use custom instruments.xml instead, more info
Drumset
Affects the whole instrument:
- notation settings. Must be checked to use Drum notation and Drum input palette.
- interpretation of soundfont data. Check or uncheck this box base on the layout of the sound.
Changing without understanding will mess up your score audio.
Sound
Understand difference of channel and voice first, you may not want to edit this field. Consider these alternatives first:
- To add a new instrument to a score and manage instruments setup, use Instruments dialog instead. You should use Instruments dialog if you are not sure, it is the preferred way to setup a score. Doing this ensures written symbols affect sound correctly eg violin tremolo text symbol, bass guitar pizz symbol.
- To switch an instrument and change its staffs everywhere on a score, use Staff / Part properties instead. Doing this also ensures written symbols affect sound correctly.
- To switch the instrument used by one staff at a chosen point in the score, use 'Change Instrument' Text instead. Use this to instruct your musician to dump an instrument and pick up another mid stream.
- To switch to another sound sample (switch channel) (e.g. pizz.) inside an instrument, jump to Mid-staff sound(channel) change or use a custom Staff Text instead. Similar to keyswitches / articulation-switching in commercial sound libraries. You can do this to each voice separately.
If none of the above options fit, read on to edit sound.
The sound option is the sound data that an instrument channel use for playback. The data reference method depends on the order of soundfonts in the Synthesizer, pay attention to Synthesizer setting before you close and restart Musescore.
Correct audio won't be produced unless you setup Drumset correctly, you must understand the sound's layout.
The drop-down menu lists every sound from SoundFont loaded in the Synthesizer. They are ordered as the order of soundfont files in the Synthesizer: SF2/SF3 by MIDI Bank first, then SFZs. It is not an alphabetical order. To jump to the sound you desire quickly, while the list is open press on your keyboard (once or more) the first letter of the name.
Sound is formerly named Patch.
Volume
Same as volume slider on control strip
Pan
Same as panning slider on control strip
Track (Control strip) color
Color for display in Mixer only, does not affect score visually. Affects whole instrument. To change, click the colored rectangle to pick from the color palette.
MIDI controls
Port and Channel
The output MIDI port and MIDI channel. As of Musescore 3.6.2, MIDI output driver of the program only use 1 port and 16 channels on the operation system.
Reverb and Chorus
The reverb and chorus value sent to MIDI out. Sent to MIDI devices only. Does not affect MuseScore's built in audio playback.
Mute Voice
Mute individual Voice. Each row represents one staff of the instrument. So pressing '2' on the top row will mute the second voice of the first staff of the instrument. This field is different from all others as it affects voice instead of channel.
Mid-staff sound (channel) change (pizz., con sordino, etc.)
Understand the concept of channels. You can also do these instead:
- To add a new instrument to a score and manage instruments setup, use Instruments dialog instead.
- To switch an instrument and change its staffs everywhere on a score, use Staff / Part properties instead.
- To switch the instrument used by one staff at a chosen point in the score, use 'Change Instrument' Text instead.
Some instruments come with multiple channels that you can switch audio playback to and from. For example, the build-in string instrument (violin, viola, cello etc.) has three channels: "arco" (or "normal"), "pizzicato" and "tremolo." The build-in trumpet has two channels "open" (or "normal") and "mute".
To switch channel, add a pre-configured Staff Text or add a plain one and edit it, as explained below. All subsequent notes of affected Voice(s) will switch to play the sound assigned to that channel, unless instructed to do otherwise with another Staff Text object. For example, all notes after a 'pizz.' Staff Text use the "pizzicato" channel, to return to arco (use sound of "normal" channel), a new 'arco' text must be added.
Pre-defined Staff Text
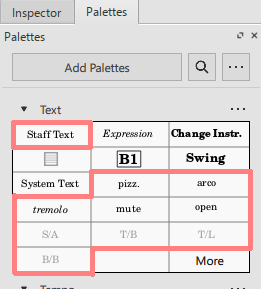
The 5 build-in pre-configured Staff Text in the Text palette (pizz., arco, tremolo, mute, open) instruct all four Voices of a staff to use respective channel. They affect one particular staff, but not the other staffs of the same instrument.
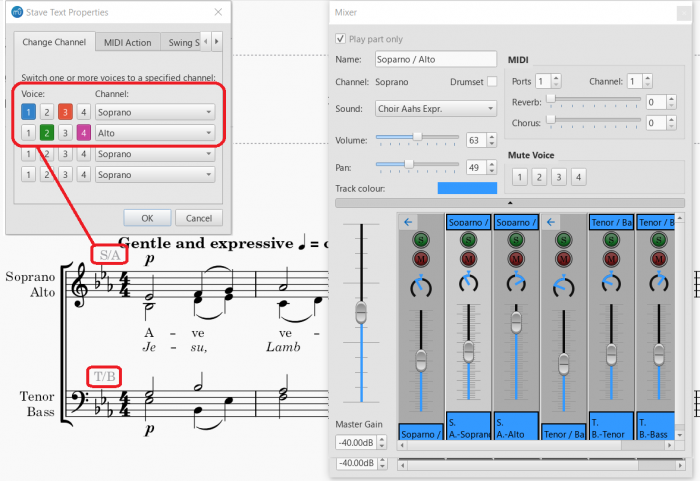
The 4 build-in pre-configured Staff Text in the Text palette (S/A, T/B, T/L, B/B). They only work on:
- any of these Musescore Instruments:
- Men
- Women
- or a score created with any of these templates:
- SATB Closed Score
- SATB Closed Score + Organ
- SATB Closed Score + Piano
- Barbershop Quartet (Men)
- Barbershop Quartet (Women)
They affect one particular staff, but not the other staffs of the same instrument.
- the S/A object: instructs Voice 1 and Voice 3 notes to use the Soprano channel, Voice 2 and Voice 4 notes to use the Alto channel
- the T/B object: instructs Voice 1 and Voice 3 notes to use the Tenor channel, Voice 2 and Voice 4 notes to use the Bass channel
- the T/L object: instructs Voice 1 and Voice 3 notes to use the Tenor channel, Voice 2 and Voice 4 notes to use the Lead channel
- the B/B object: instructs Voice 1 and Voice 3 notes to use the Baritone channel, Voice 2 and Voice 4 notes to use the Bass channel
Custom Staff Text
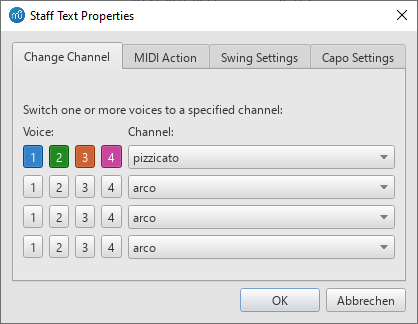
To use a custom Staff Text :
- Select a note;
- From the main menu, choose Add→Text→Staff Text or use the shortcut Ctrl+T;
- Enter the text. it does not affect playback;
- Right-click on the applied staff text and select Staff Text Properties…;
- Open the "Change Channel" tab of the "Staff Text Properties" dialog. Each row represents one instruction.
- Under "Voices:" subheading on the left, select Voice(s) by pressing on buttons. When a Voice button appears dented and colorized, it indicates that it has been selected.
- Under "Channel" subheading" on the right, select the channel that the selected Voice(s) should use from here after.
- A row that has no Voice selected does not affect the score.
See also
External links
- Mute, unmute and solo actions: Setup keyboard shortcut keys.
- Mixer Minimalistic Style: Vertical minimalistic mixer similar to the Track Control Panel in a DAW.
- How to change instrument sound (e.g. pizz., con sordino) midway through score (MuseScore HowTo, same instruction as above)