Create a new score
To create a new score, open the New Score Wizard (see Create new score below): this can also be accessed via the Start Center.
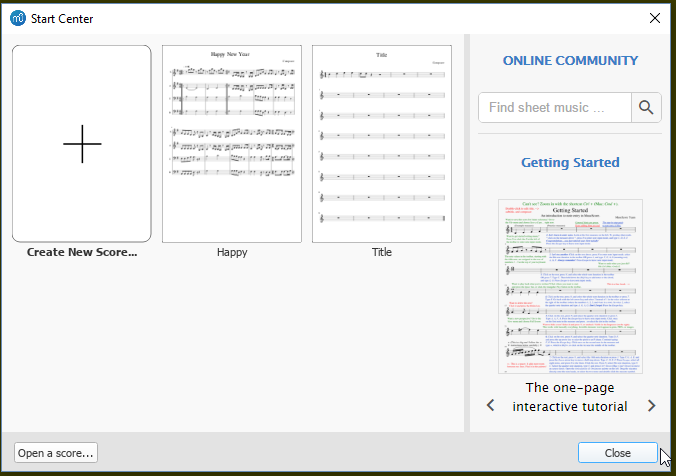
Start Center
This is the window that is displayed when you open MuseScore for the very first time:

To open the Start Center (if not already visible), use any of the following options:
- Press F4.
- From the menu bar, select File→Start Center...
To stop the Start Center from showing up when you open MuseScore:
- From the menu bar, select Edit→Preferences... (Mac: MuseScore→Preferences...) and uncheck "Show start center" in the Program Start section of the General tab.
From the Start Center you can:
- Create a new score (by clicking on the icon with the plus sign).
- View thumbnails of previously-opened scores: click on a thumbnail to open it.
- Open a score from your computer's file system: click on Open a score ...
- Open the "Getting Started" tutorial score. Use the arrow buttons in the right-hand pane to access the link.
- Search sheet music on musecore.com.
- Access various other facilities (see right-hand pane).
Create new score
To open the New Score Wizard when the Start Center is not open, use one of the following options:
- Click on the New Score icon in the toolbar on the top left of the window;
- Use keyboard shortcut Ctrl+N (Mac: Cmd+N);
- From the menu, select File→New....
This opens a step-by-step wizard:
- Enter score information
- Choose template file
- Choose instruments (or voice parts)
- Choose key signature (and tempo)
- Choose time signature, tempo, pickup measure, and number of measures
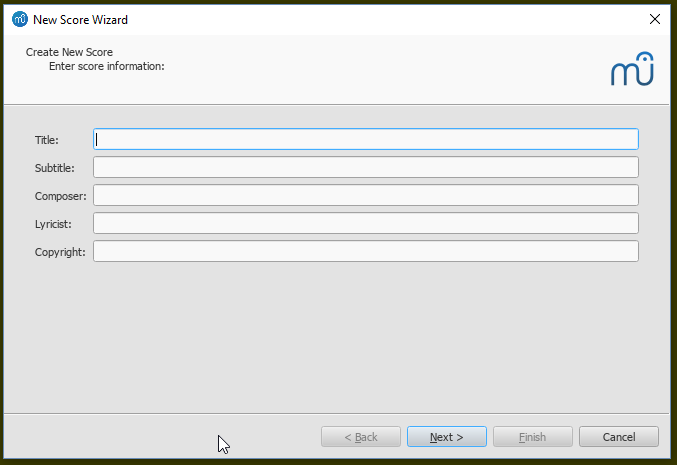
Enter score information

Step 1: Enter score information.
Enter the title, composer or any other information as shown above, then click on Next >. This step is optional: you can also add this information after the score has been created (see Vertical frame).
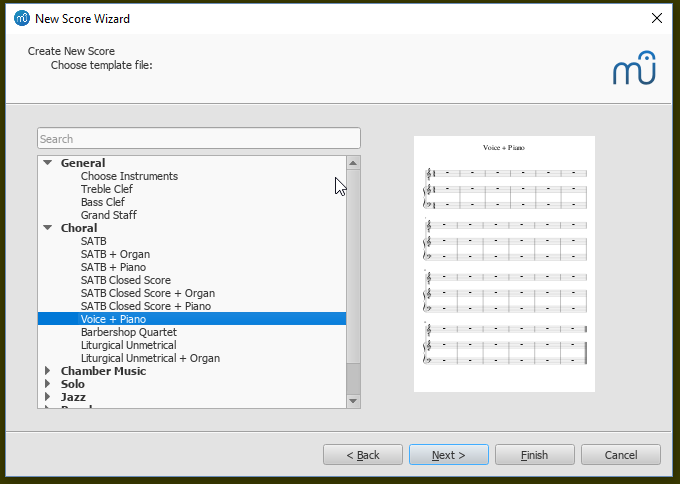
Choose template file

Step 2: Choose template file.
In the left column is a list of pre-defined solo, ensemble and orchestral templates, divided into categories according to musical styles, and custom template.
To choose a pre-defined score template:
1 Browse or use the Search bar (top left) to find specific templates.
2 Click a score template name to select it.
3 Click either: Next > (or just double-click the score template name in the previous step), or Finish.
To choose a custom score template:
- Choose an option under the "Custom Templates" category. This category is hidden if there is no custom templates on this machine. In Musescore 3, the preview window shows what the template file looks like when opened as a score, it is not the preview of what a new score looks like when created from this template.
To add individual staffs (Musescore instruments):
- On the left, select "Choose Instruments" option under the "General" category, then click Next >; or just double-click the option
- Follow instructions in Instruments, staff setup and templates chapter.
Choose instruments (or voice parts)
- In the "Choose template file" window, on the left, select "Choose Instruments" option under the "General" category, then click Next >; or just double-click the option
- Follow instructions in Instruments, staff setup and templates chapter.
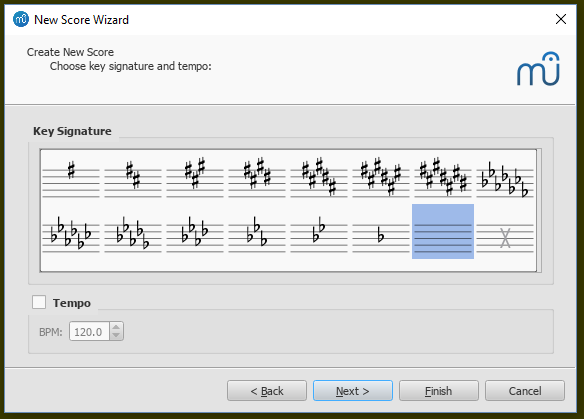
Choose key signature (and tempo)

Step 3: Choose key signature (and tempo).
- Select the desired key signature, then click Next > to continue. Prior to version 3.5, you can also set the tempo here.
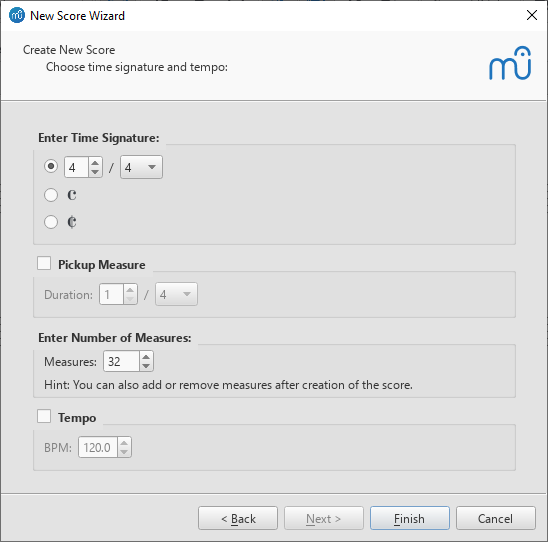
Choose time signature, tempo, pickup measure, and number of measures

Step 4: Choose time signature etc.
Here, you can set:
- The initial time signature.
- A pickup measure (anacrusis or upbeat measure), and its duration.
- The initial number of measures in the score (the default is 32, but you can add/remove measures from the score edit window).
- Tempo (prior to version 3.5, this is set on the Choose key signature (and tempo) page instead).
Click Finish to end the wizard and create your new score.
Adjustments to score after creation
All settings you have made when you create a new score can be changed afterwards, browse the handbook, some relevant chapters:
- Score properties
- Create a pickup measure.
- Insert, Append, Delete measures.
- Key signature
- Time signature
- Clef
- Tempo
- Add text.
- Edit text.
Change instrument and staff setup
Adjust score layout and formatting
| 첨부 파일 | 파일 크기 |
|---|---|
| Create_new_score-Title_en_1.png | 17.41 KB |
| Create_new_score-Select_template_en.png | 44.82 KB |
| Create_new_score-Key_signature_en_2.png | 24.84 KB |
| Create_new_score-Time_signature_en.png | 28.72 KB |
| Start_center_en_1.png | 71.27 KB |
| 59fbab11df15aba3ff5c34b0c63bb1e0.jpg | 177.31 KB |
| 59fbab11df15aba3ff5c34b0c63bb1e0.jpg | 177.31 KB |