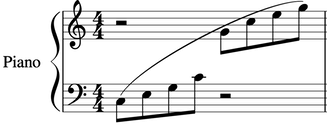
Slurs
A slur is a curved line between two or more notes indicating that they are to be played legato—smoothly and without separation. Not to be confused with Ties, which join two notes of the same pitch.
There are a number of ways to add a slur to a score, and all may be useful depending on the context (adding a slur from the lines palette is also possible but not recommended).
Add slur in note-input mode
- While in Note input mode, type in the first note in the slurred section;
- Press S to begin the slurred section;
- Type in the remaining notes in the slurred section;
- Press S again to end the slurred section.
Add slur in Normal mode
Method 1
- Make sure you are in Normal mode;
-
Select the note where you want the slur to start:
-
Press S to add a slur extending to the next note:
-
(Optional) Hold Shift and press → (right arrow key) to extend the slur to the next note. Repeat as required:
-
(Optional) Press X to flip the slur direction:
-
Press Esc to exit edit mode:
Method 2
- Make sure you are in Normal mode;
- Select the note where you want the slur to start;
- Choose one of the following options:
- To add a slur to one voice only: Hold down Ctrl (Mac: Cmd) and select the last note that you want the slur to cover.
- To add slurs to all voices: Hold down Shift (Mac: Cmd) and select the last note that you want the slurs to cover.
- Press S.
Adjust slur
If you only want to adjust the position of a slur:
- Select the slur;
- Use any of the following methods:
- Drag the slur.
- Adjust the horizontal and vertical offset values in the Inspector.
To adjust all the properties of a slur (length, shape and position):
- Make sure you are not in note input mode;
- Go into Edit mode on the slur;
- Click on a handle to select it, or use Tab to cycle through the handles;
- To move the left and right handles from note to note, use the following shortcuts:
- Shift+→: Move to next note.
- Shift+←: Move to previous note.
- Shift+↑: Move to lower voice (voice 2 to voice 1 etc.).
- Shift+↓: Move to higher voice (voice 1 to voice 2 etc.).
- To adjust the position of any handle, use any of the following methods:
- Press Esc to exit edit mode.
Note: The two outer handles adjust the start and end of the slur, whilst the three handles on the curve adjust the contour. The middle handle on the straight line is used to move the whole slur up/down/left/right.
Extended slurs
A slur can span several systems and pages. The start and end of a slur is anchored to a note/chord or rest. If the notes are repositioned due to changes in the layout, stretch or style, the slur also moves and adjusts in size.
This example shows a slur spanning from the bass to the treble clef. Using the mouse, select the first note of the slur, hold down Ctrl (Mac: Cmd) and select the last note for the slur, and press S to add the slur.

X flips the direction of a selected slur.
Dotted/dashed slurs
Dotted slurs are sometimes used in songs where the presence of a slur varies between stanzas. Dotted slurs are also used to indicate an editor's suggestion (as opposed to the composer's original markings). To change an existing slur into a dotted or dashed slur, select it and then in Inspector (F8) change Line type from Continuous to Dotted or Dashed.


