Sound and playback
MuseScore has "Sound and playback" capabilities built-in. This chapter covers the playback controls and ways to extend the instrument sounds.
Mid-staff instrument changes
When a musician is required to double on a different instrument for a section of a piece, the instruction to switch instruments is generally placed above the staff at the beginning of that section. A return to the primary instrument is handled in the same manner.
MuseScore enables users to insert a special class of text called Change Instrument text for this purpose. This class of text is different from either Staff or System text in that it links the text to the playback and changes the sound to the new instrument.
Instrument changes as of version 2.1
Version 2.1 introduces a greatly improved mid-staff instrument change over previous versions. There are still some limitations that need to be considered prior to using it.
-
Mid-staff instrument changes are limited to the same type of staff. For example, you cannot change between a percussion staff and a pitched instrument staff or vice versa.
-
The instrument name is not changed in the mixer. It will still be listed under the instrument in the original definition of the staff.
-
The key signature is not automatically updated at the instrument change. You must manually change the Key signature if needed.
-
You can now enter the notes a musician would play once the instrument is changed and the correct key signature is entered if necessary.
-
Unless you are changing the type of staff, you will always use the Change Instrument text.
Instrument changes in version 2.0
There are several limitations to this in version 2.0 which should be understood before attempting to use it.
-
Automatic transposition from concert pitch to the appropriate key for the transposing brass and woodwind instruments is not currently supported. For changes to instruments notated in a different key (C flute to E♭ flute; Oboe to English Horn, etc.), the use of ordinary Staff Text to indicate the change is preferable, and the transposition must be done after the music is entered (using Notes→Transpose from the main menu). To avoid discord on playback, the instrument assigned to that staff should be muted in the F10 Mixer.
-
If it is necessary to hear the new instrument sound on playback, the Change Instrument text function must be used. However, after a mid-staff instrument change where the two instruments on the staff are not notated in the same key, no attempt should be made to enter new music directly from the keyboard. Instead, the music must be (a) pasted in, or (b) entered before the instrument change is affected. New input into measures following an instrument change is subject to two known program bugs, which cannot be resolved in the current 2.0.x versions without adversely affecting backwards compatibility. (This has been fixed in version 2.1) In addition, the score must remain notated in concert pitch, or discord will result from the transposition. As a convenience to the players, a copy of the part may be saved as a separate file and the required sections transposed to the appropriate key before the part is printed. (Note that transposing a linked part will affect the score as well.)
-
When changing from one concert-pitch instrument to another, or from one transposing instrument to another in the same key (Bb trumpet to Bb cornet or Flugelhorn, etc.), the Change Instrument Text may be used to ensure that the playback sound is altered to the new instrument. Input may be done in the usual manner, and is not affected by the bugs mentioned above.
Incompatibilities
There are some incompatibilities between the two versions.
-
Instrument changes created with version 2.0 and opened in version 2.1 or above will continue to either display the notes wrong or play the notes wrongs as in version 2.0. Deleting and reentering the instrument change will fix most incompatibility issues with only minor changes being needed.
-
Instrument changes created with version 2.1 or above and opened in version 2.0 will generally playback correctly but continue to display the wrong notes.
Add an instrument change
- Select the start point of the change by clicking on a note or rest.
- Open the main palette by typing F9 (or by using the View menu), and click on Text to open the text sub-palette.
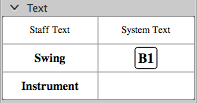
- Double-click on Instrument
- The word "Instrument" will appear above the anchor note or rest.
- Double-click the word "Instrument", then type Ctrl+A to select all of it.
- Type the actual text you wish to appear in the score, then click outside the box to exit text edit mode.
-
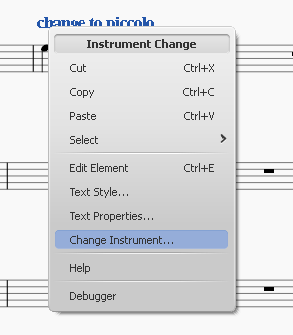
Right-click the text and choose "Change Instrument…"
-
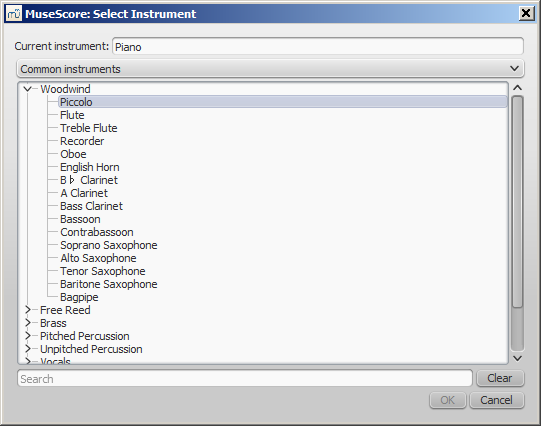
Choose the instrument, then click OK
See also
External links
Mixer
The Mixer allows you to change instrument sounds and adjust the volume and panning for each staff.
To display/hide the mixer, use one of the following:
- Press F10 (Mac: fn+F10).
- From the main menu, select View→Mixer.
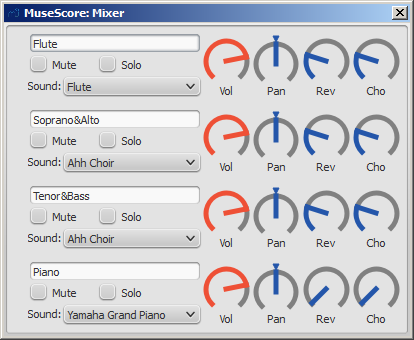
Note: Separate reverb and chorus effects for each channel are not yet implemented; use the synthesizer effects unit instead.
The name of each mixer channel is the same as the Part name in the Staff properties dialog.
Mute and Solo
- To silence a selected staff, tick its "Mute" checkbox. Repeat as required.
- To solo a selected staff, tick the "Solo" checkbox for that staff.
Dials
To turn a dial clockwise, click and drag upwards. To turn a dial counter-clockwise, click and drag downwards. You can also hover the mouse pointer over the dial and then move the mouse wheel. Double-clicking on any dial restores it to its default position.
Sound
The "Sound" drop-down menu lists every instrument supported by your current SoundFont. If you have multiple SoundFonts loaded in the Synthesizer, all the patches from all the SoundFonts (and/or SFZ files) will appear in a single long list—in the order previously set in the Synthesizer.
Tip: To find an instrument, click on the "Sound" list and type the first letter of the instrument name. Repeat as required.
Mid-staff sound change (pizz., con sordino, etc.)
Some instruments come with multiple channels in the Mixer that can be used to change sounds midway through a score. For example, a staff for a stringed instrument (violin, viola, cello etc.) is allocated three channels: one for "arco" (or "normal"), another for "pizzicato" and another for "tremolo." A trumpet staff will have one channel for "normal" and another reserved for "mute," and so on.
The following instructions use pizzicato strings as an example, but the same principle can be applied to any other instrument staff that allows sound changes.
- Select the first note of the section you want to be pizzicato;
- From the main menu, choose Add→Text→Staff Text;
- Type "pizz." This text is for visual reference only and does not affect playback;
- Right-click on the applied staff text and select Staff Text Properties…;
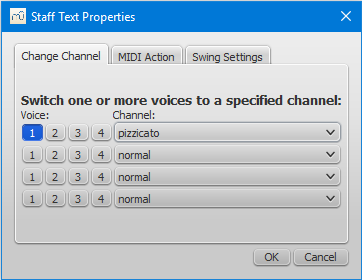
- In the "Change Channel" tab of the "Staff Text Properties" dialog, select one or more voices on the left;
-
From the dropdown menu, select pizzicato;
-
Click OK to return to the score.
Every note after the staff text you added now sounds pizzicato. To return to a normal strings sound later in the piece, follow the same guidelines as above except type "arco" in step 3 and select normal in step 6.
See also
External links
Play mode
Basic playback functions are accessed from the Play toolbar located above the document window:

From left to right, the icons are:
- Rewind to start position: Playback returns to the beginning of the score, or to the start of the loop (if one is set).
- Start or stop playback: See Start/stop playback.
- Toggle loop playback: See Loop playback.
- Play repeats: Turn off if you want playback to ignore repeats.
- Pan score during playback: Turn off if you want the score to remain stationary.
- Play metronome: See Metronome playback.
Playback commands
Start/stop playback
To start playback:
- Click on a note, rest or the blank part of a measure to establish the starting point. Note: If no selection is made, playback returns to the place it left off—or, if no previous playback, to the start of the score.
- Press the play button
 button; or press Space.
During playback you can jump to a specific note or rest in the score by simply clicking on it.
To stop playback:
- Press the Playback button; or press Space.
During playback
Once playback has started, the following commands are available:
- Go back to previous chord: ←
- Advance to next chord: →
- Go back to start of previous measure: Ctrl+← (Mac: Cmd+←)
- Advance to start of next measure: Ctrl+→ (Mac: Cmd+→)
- Rewind to start of score: Home (Mac: ⌘+Home); or press the Rewind button (playback toolbar).
During playback you can still use keyboard shortcuts to open and close panels, such as Play, Synthesizer, Mixer etc.
Play panel
To open the Play Panel use one of the following options:
- Press F11 (Mac: Fn+F11).
- From the menu bar, select View → Play Panel.
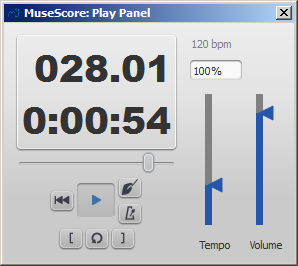
The Play Panel offers temporary controls over playback, including playback speed (labelled 'tempo'), loop playback (with specified starting and ending positions), and general volume.
Note: Changes to the parameters in the Play Panel are not saved with the score: they only affect playback in the current session. Permanent changes to tempo should be made using tempo text. To change the default playback volume of the score, see Synthesizer.
Count in
You can switch on and off a count-in to be played each time the playback starts. The count-in plays beats for a full measure (according to nominal time signature at playback starting point); if the starting point is mid-measure or at a 'short' measure (anacrusis), it also plays enough beats to fill that measure. The conductor icon in the play panel enables, or disables count-in.
Metronome playback
You can also switch on/off the accompanying metronome as the score is played (see the metronome icon on the play panel).
Loop playback
You can loop playback of a selected passage in the score using either the Play toolbar (see image above) or the play panel.
To loop from the Play toolbar:
- Playback should be off, and the "Loop playback button" on.
- Select the desired region of the score for loop playback.
- Press the playback button.
Playback will now cycle within the region marked by the blue flags.
- Use the "Loop playback" button to toggle the loop on or off.
To loop from the Play Panel:
- Select the note from which you want playback to start and click on the "Set loop in position" button. The "Loop Playback" button becomes active.
- Select the last note of the desired playback region and click on the "Set loop out position" button.
- Press the play button.
Playback will now cycle within the region marked by the blue flags.
- You can use the "Loop playback" button to toggle the loop on or off.
SoundFonts e arquivos SFZ
A reprodução de áudio do MuseScore é fornecida por instrumentos virtuais (ou softwares), que podem ser um dos dois formatos:
- SoundFont (extensão do arquivo sf2/sf3). Um único arquivo contendo um ou mais instrumentos virtuais.
- SFZ (extensão do arquivo sfz). Uma coleção de arquivos de áudio e definições contendo um ou mais instrumentos virtuais.
SF2 SoundFonts
Um SoundFont é um tipo especial de arquivo (extensão sf2 ou, se comprimido, sf3) contendo amostras de som de um ou mais instrumentos musicais. O MuseScore 2 vem com o soundfont "FluidR3Mono_GM.sf3" já instalado. Isto é um General MIDI (GM), uma biblioteca de amostras de 128 instrumentos musicais e conjuntos de bateria adequados para uma variedade de estilos musicais — clássico, jazz, pop, etc. (Versões anteriores do MuseScore (0.9.6–1.3) usavam um soundfont diferente, o "TimGM6mb.sf2")
Uma vez que sua partitura esteja configurada para executar corretamente o FluidR3, ele deve ser capaz de incorporar instrumentos similares de qualquer outra fonte de som GM. Isso torna possível compartilhar partituras, mesmo como um usuários não registrado, por exportá-las como arquivos MusicXML ou MIDI (veja Exportar).
Muitos soundfonts diferentes estão disponíveis na Internet, gratuitos e comerciais. SoundFonts maiores geralmente soam melhor, mas talvez seja muito grande para ser executado no seu computador. Se você perceber o MuseScore lento depois de instalar um SoundFont grande, ou o seu computador não pode continuar durante a reprodução, então procure um SoundFont menor.
Uma vez que um SoundFont foi instalado, você pode usá-lo para reprodução no MuseScore (e controlar outros aspectos da saída de som) com o Sintetizador. Para exibir o Sintetizador, vá em Vizualizar → Sintetizador.
Instalar um Soundfont
Depois de encontrar e descomprimir um SoundFont (veja → abaixo), dê um duplo clique para abri-lo. Na maioria dos casos, o tipo de arquivo SoundFont já estará associado ao MuseScore e o MuseScore irá iniciar. Uma caixa de diálogo aparecerá perguntando se você deseja instalar o SoundFont. Ocasionalmente um aplicativo diferente do MuseScore será associado ao tipo de arquivo SoundFont. Se esse for o caso, você precisará clicar com o botão direito no arquivo, para exibir um menu a partir do qual você pode optar por abrir o arquivo no MuseScore. Em ambos os casos, quando a caixa de diálogo aparecer perguntando se você deseja instalar o SoundFont, clique em "Sim" para colocar uma cópia do arquivo SoundFont no diretório SoundFonts do MuseScore. Este diretório pode ser visualizado ou alterado nas Preferências do MuseScore, mas a localização padrão é:
-
Windows:
%HOMEPATH%\Documents\MuseScore2\Soundfonts -
macOS and Linux:
~/Documents/MuseScore2/Soundfonts
Em contraste com o SoundFont adicionado pelo usuário, o SoundFont padrão inicialmente instalado com o MuseScore está localizado em um diretório do sistema, destinado apenas para esse fim, o qual não deve ser modificado. Este diretório e seu arquivo SoundFont padrão são:
- Windows (32-bits):
%ProgramFiles%\MuseScore 2\sound\FluidR3Mono_GM.sf3 -
Windows (64-bits):
%ProgramFiles(x86)%\MuseScore 2\sound\FluidR3Mono_GM.sf3 -
macOS:
/Applications/MuseScore 2.app/Contents/Resources/sound/FluidR3Mono_GM.sf3 -
Linux (Ubuntu):
/usr/share/mscore-xxx/sounds/FluidR3Mono_GM.sf3(o qualxxxdeve ser a versão do MuseScore)
Desinstalação
Para desinstalar um SoundFont, basta abrir a pasta onde o arquivo está instalado e excluí-lo.
SFZ
Um SFZ consiste em um monte de arquivos e diretórios, um arquivo SFZ e um monte de arquivos de som reais no formato WAV ou FLAC, sendo o arquivo SFZ um arquivo de texto que basicamente descreve qual arquivo de som está localizado, qual instrumento o está usando e qual o tom do mesmo.
Nota: Para um completo suporte ao SFZ, o MuseScore 2.1 ou posterior é necessário. Versões anteriores tinham apenas suporte limitado, nomeadamente para o piano Salamandra.
Instalar um SFZ
Depois de encontrar um SFZ (veja → abaixo), você precisará extrair manualmente todos os arquivos pertencentes ao SZF (o arquivo SFZ em si, todos os subdiretórios e os arquivos de som reais) no diretório listado abaixo.
Desinstalar
Para desinstalar um SFZ, basta abrir a pasta onde seus arquivos estão instalados (veja abaixo) e deletar todos eles.
Sintetizador
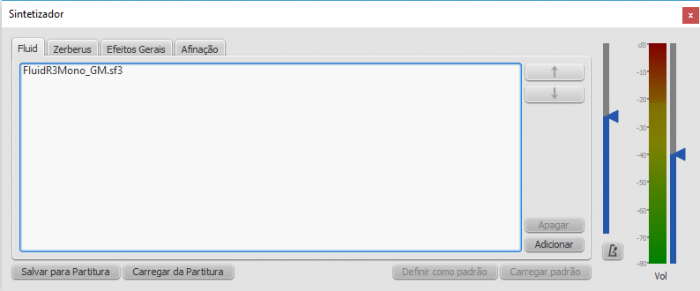
O Sintetizador é o painel de controle central do MuseScore para a saída de som. Uma vez que um SoundFont foi instalado, ele precisa ser carregado no sintetizador para que o MuseScore o use para reprodução. Para tornar um SoundFont diferente o padrão, carregue-o no sintetizador e clique em Definir como padrão.
Para exibir o Sintetizador, vá para Vizualizar → Sintetizador. Para mais detalhes, veja Sintetizador.
Lista de soundfonts baixáveis
GM SoundFonts
As seguintes bibliotecas de som estão em conformidade com o padrão Geral MIDI (GM2). Esta especificação oferece um conjunto de som de 128 instrumentos virtuais, além de kits de percussão.
- GeneralUser GS (29.8 MB descomprimido)
Cortesia da S. Christian Collins - Magic Sound Font, versão2.0 (67.8 MB descomprimido)
- Arachno SoundFont, versão1.0 (148MB descomprimido)
Cortesia da Maxime Abbey - MuseScore 1 vem com TimGM6mb (5.7 MB descomprimido)
Licença: GNU GPL, versão 2
Cortesia de Tim Brechbill - MuseScore 2 vem com
FluidR3Mono_GM.sf3(13.8 MB).
Licensa: disponibilizado sob licença MIT - Timbres of Heaven, versão 3.2 (369 MB descomprimido)
Cortesia de Don Allen
Soundfont de orquestra
- Sonatina Symphonic Orchestra (503 MB descomprimido)
Downloads: SoundFont | formato SFZ
Licença: Creative Commons Sampling Plus 1.0
Soundfonts para piano
SF2 Pianos
- Piano de cauda acústico, disponível desde 2016-08-04
Descrição: Yamaha Disklavier Pro Grand Piano, formato sf2, 36MiB comprimido, 113MiB descomprimido, 121 modelos, 5 camadas de velocidade
Mais informações: http://freepats.zenvoid.org/ incluindo outros soundfonts.
Licença: Creative Commons Attribution 3.0
Cortesia de Roberto Gordo Saez
SFZ Pianos
- Piano de cauda Salamander
Downloads: versão 2 | versão3
Descrição: Yamaha C5, 48kHz, 24bit, 16 camadas de velocidade, entre 80 MB e 1.9 GB descomprimido
Licença: Creative Commons Attribution 3.0
Cortesia de Alexander Holm - Detuned Piano (244 MB descomprimido)
Licença: Creative Commons Attribution-ShareAlike 3.0 - Cordas de piano arrancadas
Descrição: 44.1kHz, 16bit, estéreo, 168 MB descomprimido
Licença: Creative Commons Attribution-ShareAlike 3.0 - City Piano
Descrição: Baldwin Baby Grand, 4 camadas de velocidade, 696 MB descomprimido
Licença: Domínio público
Cortesia de Big Cat Instruments - Kawai Upright Piano, lançado em 28-01-2017
Descrição: 68 modelos, 44KHz, 24bit, estéreo, 2 camadas de velocidade, 58MiB descomprimido
Licença: GNU General Public License versão 3 ou superior, com uma exceção especial
Cortesia de Gonzalo e Roberto
Extrair arquivos de sons baixados
Uma vez que os arquivos de som são grandes, eles geralmente são compactados (comprimidos) em uma variedade de formatos, incluindo .zip, .sfArk e .tar.gz. Você precisa descompactar (descomprimir) esses arquivos antes que eles possam ser usados.
-
ZIP é um formato de compactação padrão suportado pela maioria dos sistemas operacionais.
-
sfArk é um formato de compressão projetado especialmente para comprimir arquivos SoundFont. Use o software sfArk para descompactá-lo ou use este serviço on-line: https://cloudconvert.com/sfark-to-sf2
-
.tar.gz é um formato de compressão popular para Linux. Usuários do Windows podem usar o 7-Zip; Os usuários de Mac podem usar The Unarchiver, ou o utilitário de arquivo incorporado do macOS. Note que, se estiver usando 7-Zip, você precisará descomprimir duas vezes — uma vez para GZip e uma vez para TAR.
Solução de problemas
Se o painel de reprodução da barra de ferramentas estiver acinzentado, ou não estiver visível, siga as instruções abaixo para que o som volte a funcionar.
- Clique com o botão direito na barra de menus e verifique se há uma marca de seleção ao lado do item Controle de reprodução. Você pode adicionar ou remover a marca de seleção clicando no item de menu correspondente. Se esta etapa não resolver o problema, continue abaixo.
- Se o painel de reprodução desaparecer depois de alterar o SoundFont, vá para Editar → Preferências... → aba E/S e clique "OK" sem fazer nenhuma mudança. Depois de reiniciar o MuseScore, o painel de reprodução deve reaparecer.
Se você estiver configurando um SoundFont pela primeira vez, use um dos SoundFonts recomendados listados acima.
Se a reprodução gaguejar, o seu computador não é capaz de lidar com o SoundFont que está sendo usado. Duas soluções:
- Reduza a quantidade de RAM (memória) usado pelo MuseScore usando um SoundFont menor. Veja a lista acima para obter sugestões.
- Aumente a quantidade de RAM disponível para o MuseScore fechando todos os aplicativos, exceto o MuseScore. Se você ainda tiver problemas e um SoundFont grande é importante para você, considere incrementar a memória RAM no seu computador.
Veja também
Links externos
- Como mudar o Soundfont ou usar outro diferente
- O Formato SFZ (para detalhes sobre a especificação sfz)
Swing
MuseScore's swing feature allows you to change the playback of your score from a straight to a swing rhythm. Swing can be applied globally or only to a section of the score, and is fully variable.
Apply swing to a score section
- Click on the note where you want swing to start;
-
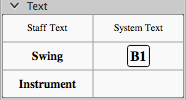
Double-click Swing in the Text palette (shown below);
-
Edit the Swing text as required;
- If you need to vary swing from the default setting, right click the Swing text and select System text properties... Click on the "Swing Settings" tab and adjust note duration and "Swing ratio" as required.
Swing text can be edited just like any other text element: you can change it, style it, make it invisible etc.
Triplet in tempo marking
Often this notation is used to indicate swing:

MuseScore does not have a way to include a triplet in text as a tempo marking, but there is an easy workaround:
- Add Swing text as described above and make it invisible (shortcut V, or untick "Visible" in the Inspector);
- Add an appropriate Image of the required tempo marking to the score. This can be downloaded from the bottom of the "How To" page: How to create a visual swing marking.
- Resize and reposition the image as required.
Return to straight rhythm
If you want playback to return to straight time after a swing section:
- Add Swing text to the first note or rest of the "straight" section (see above).
- Edit the text to indicate a return to straight time: e.g. "Straight."
- Right-click on the text and select System Text Properties…. Click on the "Swing Settings" tab and set "Swing to "Off."
Apply swing globally
If you wish to apply swing to the whole score, you can do so from the menu:
- Select Style → General... → Score.
- In the "Swing Settings" section, set the desired note value and "swing ratio."
External links
Synthesizer
Overview
To display the Synthesizer: from the menu, select View→Synthesizer.
The Synthesizer controls MuseScore's sound output and allows you to:
- Load and organize different sound sample libraries to play back the music
- Apply effects such as reverb and compression
- Adjust overall tuning
- Alter the output volume of both music and the (optional) metronome.
The Synthesizer window is divided into four sections/tabs:
- Fluid: A software synthesizer that plays SF2/SF3 SoundFont sample libraries.
- Zerberus: A software synthesizer that plays SFZ format sample libraries.
- Master Effects: Used to apply multi-effects to the score.
- Tuning: Used to adjust overall playback tuning.
Save/Load Synthesizer settings
The buttons at the bottom of the Synthesizer window have the following functions:
| Button | Function |
|---|---|
| Set as Default | Saves all current synthesizer settings as the default settings. These are automatically applied to the Synthesizer when you open MuseScore. |
| Load Default | Loads the last saved default settings to the Synthesizer. |
| Save to Score | Saves all current synthesizer settings to the current score only. |
| Load from Score | Loads the settings from the current score to the synthesizer. |
Notes: (1) "Synthesizer settings" include the order of Soundfonts and SFX files, the effects configuration, master tuning and volume. (2) Only one set of Synthesizer settings can be in effect at a time—i.e. if multiple scores are open at once, it is not possible to make changes to the Synthesizer in one score and leave other scores' settings untouched. (3) Changes to synthesizer settings will not be heard in exported audio files unless saved to the score first (see table, above). See also Tuning (below).
Fluid
Click on the Fluid tab to access the control panel for SF2/SF3 SoundFont sample libraries. By default, the SoundFont FluidR3Mono_GM.sf3 should already be loaded.
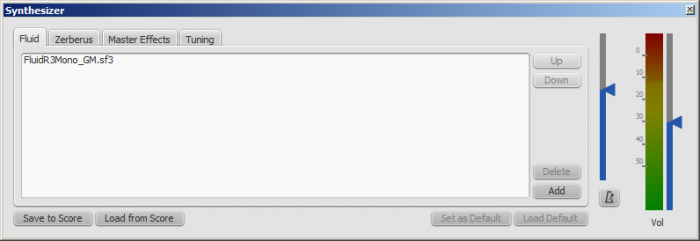
You can load, rearrange and delete soundfonts as required. Playback can be shared between any combination of different soundfonts (and/or SFZ files). The order of soundfonts in Fluid is reflected in the default order of instruments in the mixer.
To load a soundfont
- Click on the Add button
- Click on a soundfont in the list.
To be able to load the soundfont, it first needs to be installed in your Soundfonts folder. This will ensure that it appears in the list in step 2 (above).
To reorder the soundfonts
- Click on a soundfont
- Use the up/down arrows (on the right-hand side) to adjust the order.
- Repeat with other soundfonts in the list if required.
If you have not changed any sounds in the Mixer, then the SoundFont at the top of the list is the one that will be used for playback. However, if you are using the Mixer to play different instruments with sounds from different SoundFonts, playback will only work correctly if you have the same SoundFonts loaded in the same order in the Synthesizer. Therefore, if you are using multiple SoundFonts, it is advised to click the Save to Score button in the Synthesizer, so that the next time you open that score you can recall the list of SoundFonts loaded (and other Synthesizer settings) with the Load from Score button.
To remove a soundfont
- Click on the name of the soundfont
- Click on the Delete button.
This removes the soundfont from the synthesizer but does not uninstall it from the Soundfonts folder: it will still be available if you wish to reload it later.
Zerberus
Click on the Zerberus tab to access the control panel for SFZ sound sample libraries. You can add or delete files in a similar way to the Fluid tab. Note that, as with Fluid, the the SFZ files must first be installed in your soundfonts folder before they can be loaded into the synthesizer.
Volume
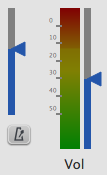
At the right in the Synthesizer are two sliders. One controls the playback volume, the other controls the volume of the optional built-in metronome. You can turn the metronome on or off by clicking the button underneath its volume slider. As with all the rest of the Synthesizer controls, any changes made here are temporary unless saved to the score or set as the new default.
Effects
The Master Effects tab of the Synthesizer allows you to adjust the degree of reverb and, as of version 2.0.3, compression applied to your score.
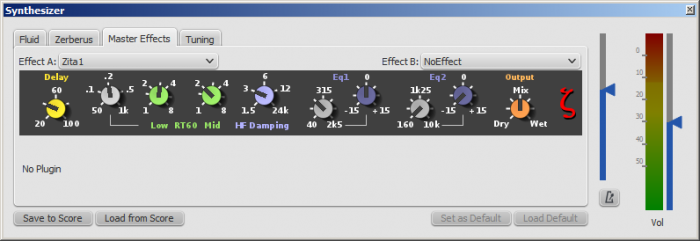
To turn an effect on or off:
- Select an option from the drop-down list next to Effect A or Effect B (the effects are applied in series, A → B).
To store and load effects configurations, use the buttons at the bottom of the Synthesizer window. See Synthesizer settings (above) for details.
Zita 1 reverb
The Zita 1 stereo reverb module allows you to simulate the ambience of anything from a small room to a large hall. The pre-delay, reverb time and tone of the reverb can be finely tuned using the controls provided:
- Delay: Set a pre-delay for the reverb from 20-100 ms.
- Low RT60 (Low frequency reverb time): Use the grey control to adjust the center frequency (50–1000 Hz) of the low frequency band which you want to affect: the green control adjusts the reverb time (1–8 secs) of this frequency band.
- Mid RT60 (Mid-range reverb time): Adjust the reverb time (1–8 secs) of the mid-range frequency band.
- HF Damping: Adjusts the high frequency component of the reverb. Increasing this value increases the frequency of the cut-off point and makes the reverb appear brighter and longer.
- EQ1: Allows you to cut or boost (-15 to +15) a frequency band (center = 40 Hz - 2 KHz) in the lower part of the spectrum.
- EQ2: Allows you to cut or boost (-15 to +15) a frequency band (center = 160 Hz - 10 KHz) in the higher part of the spectrum.
- Output: Controls the amount of effect applied. "Dry" is no effect. "Wet" indicates 100% reverb. "Mix" is a 50/50 balance of wet/dry signal.
Note: EQ1 and EQ2 affect the tone of the reverb only, not the dry (unprocessed) signal.
To quickly set up an effects patch, set "Output" to "Mix" and adjust the "Mid RT60" control to the desired reverb time. Then fine tune the effect as explained above.
SC4 compressor
The SC4 stereo compressor (available as of version 2.0.3) gives you fine control over the playback's dynamic range, reducing the volume variation between loud and soft sounds. It offers the following controls:
- RMS: Adjusts the balance between RMS (0) and Peak (1) compression. In the former, the compressor responds to averaged-out levels in the signal; in Peak mode, the compressor responds to peak levels.
- Attack: (1.5–400 ms) The length of time it takes for compression to engage fully after the signal exceeds the threshold level.
- Release: (2–800 ms) The time it takes for compression to return to zero after the signal falls below the threshold level.
- Threshold: (in dB) The signal level above which compression starts to take effect. Lowering the threshold increases the amount of signal that is compressed.
- Ratio: The amount of compression applied to the signal above the threshold. The higher the ratio, the greater the compression. Varies between 1:1 to 20:1.
- Knee: Allows you to select a range between "soft knee" and "hard knee". The softer the knee, the more gradual the transition between uncompressed and compressed signal.
- Gain: Compression tends to lower the volume, so use this control to boost the signal as required.
To quickly set-up, try setting RMS = 1, Threshold = -20 db, Ratio = 6. Increase Gain to restore the lost volume. Then fine-tune as explained above.
Tuning
The Tuning tab is where you can adjust the program's master tuning. For Concert Pitch instruments, A4 = 440 Hz by default.
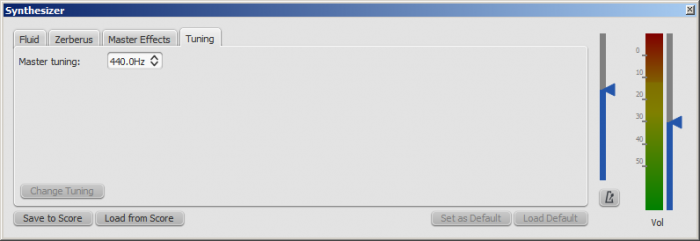
To change the Master tuning:
- Enter a new value in the Master tuning field, then press Change Tuning.
Notes: (1) This tuning applies to all scores in the current session only. To make this the program default or to store it to a particular score, see Save/Load Synthesizer settings. (2) To apply the new tuning to exported audio files (WAV, MP3, OGG), press Save to Score before exporting.
See also
Tempo
Tempo markings can be found in the Tempo palette of the Basic and Advanced workspaces. They are supplied as metronome marks, but can be subsequently edited to display any tempo or expression you want. Playback tempo can be varied throughout the score by using multiple tempo markings, visible or invisible.
Add a tempo marking
Use any of the following methods:
- Select a note or rest and press the keyboard shortcut Alt+T.
- Select a note or rest, and from the menu bar chose Add→Text...→Tempo Marking.
- Select a note or rest and double-click an appropriate metronome mark in the Tempo palette;
- Drag-and-drop a metronome mark from the Tempo palette directly onto a note or rest.
Note: If a tempo marking is applied from the menu or using a keyboard shortcut, the beat note automatically follows the time signature. The advantage of applying from a palette is that you can chose which beat note to use.
Edit tempo
To change the tempo of an existing metronome mark in the score:
- Enter Edit mode for the tempo mark in question;
- Edit the metronome number and/or the beat note as required;
- Exit Edit mode.
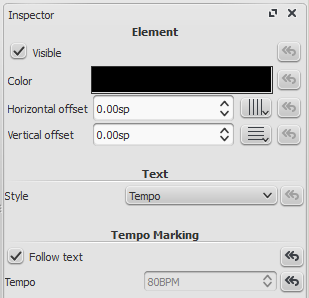
You can also override the tempo of an existing metronome mark from the Inspector:
- Select the tempo mark;
-
Untick "Follow text" in the "Tempo Marking" section of the Inspector;
-
Set the desired playback tempo in the "Tempo" field underneath.
Note: Playback may be faster or slower if the tempo setting in the play panel is at a percentage other than 100%.
Edit tempo text
Tempo marks can be edited and formatted just like any other text object. To set text properties or text style, see Text styles and properties.
The tempo indicated by a metronome mark usually persists even if overwritten by an expression—such as Andante, Moderato etc. You can also add further text to a plain metronome mark. e.g.

Overriding the tempo marking
You can temporarily override the indicated tempo, and play the score back at any tempo you like using the play panel:
-
Display the play panel: View→Play Panel or F11 (Mac: fn+F11):

-
Move the tempo slider up or down as required. The tempo is shown both as an absolute value and as a percentage of the currently indicated tempo mark. Double-click the tempo slider to reset it.
Note: BPM is always measured and displayed in quarter note beats per minute, regardless of the (denominator of the) time signature in effect.
Ritardando and accelerando playback
You can simulate ritardando ("rit.") and accelerando ("accel.") playback by adding hidden tempo markings to the score. The printed indication to the musician should be added as staff/system text in addition.
In the example illustrated below, the tempo was originally 110 BPM (beats per minute). At the ritardando, the tempo decreases by 10 BPM on the first note of each measure. Each tempo change is made invisible by unchecking the Visible checkbox in the Inspector, so that only the ritardando shows on the printed score:

A plugin has been developed to automate this process: TempoChanges
Fermatas
Fermatas, available in the Articulations and Ornaments palette, have a Time stretch property that can be set via the Inspector. By default, this property is set to 1.00. To have MuseScore play back a fermata for twice its normal duration, click on the fermata and set "Time stretch" to 2.00. This of course does not work for fermatas applied to barlines, as barlines don't have a duration to stretch.
See also
Dynamics
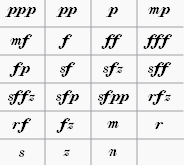
Dynamics are symbols indicating the loudness of a note or phrase of music. Symbols can be found in the Dynamics palette in either the Basic or Advanced workspace:
Note: Overall playback volume of the score can be changed using the volume slider in the Play Panel or Synthesizer.
Add a dynamic
To apply a dynamic to the score, use one of the following methods:
- Select a note and double-click a dynamic symbol in a palette.
- Drag a dynamic symbol from a palette onto a note.
For additional dynamics use the Master Palette (Shift+F9). You can also create a custom palette for future use.
To create a crescendo or decrescendo sign, see Hairpin.
Adjusting playback volume for a dynamic
Click on the dynamic to select it, and adjust its Velocity in the Inspector—higher for louder, lower for softer.
Adjusting range for a dynamic
Via the Inspector you can set the staves affected by a dynamic. The "Dynamic range" is by default set to "part," which means all staves for an instrument will be affected. Changing this to "staff" will limit the dynamic to the staff it is entered on only. Changing this to "System" will cause all instruments to play this dynamic.
List of dynamics in palettes
In the Basic workspace, there are 8 options in the Dynamics palette: ppp, pp, p, mp, mf, f, ff, fff.
In the Advanced workspace, there are all of the above plus 15 additional options in the Dynamics palette: fp, sf, sfz, sff, sffz, sfp, sfpp, rfz, rf, fz, m, r, s, z, n.
In the Dynamics section of the Master Palette, there are all of the above plus 6 additional options: pppppp, ppppp, pppp, ffff, fffff, ffffff.
Edit a dynamic
Any dynamic can be edited after being added to the score, just like standard text. See Text editing.