Sound and playback
Playback controls
Overview

Basic playback functions are accessed from the Play toolbar at the top right of the program window, the icons from left to right, the icons are:
- Rewind to start position: Playback returns to the beginning of the score, or to the start of the loop (if one is set).
- Start or stop playback: See Start/stop playback.
- Toggle loop playback: See Loop playback.
- Play metronome: Toggles metronome tick sound playback ON and OFF.
- Playback settings: Opens the playback settings dialog (see below).
- Time elapsed from the start of score to the cursor position.
- Bar number and beat at the cursor position.
- Monitoring tempo, see "Playback position and monitoring tempo" section.
Undock the toolbar to reveal the Playback Panel for additional controls. See "Playback position and monitoring tempo" section.
Playback commands
Start/stop
To play back all the instrument parts
- Click on a note or rest to establish the starting point.
- Press the Play button, or press Space.
To play back selected instrument parts only
- Select a measure that you want to start from (by clicking on a blank space within that measure);
- To play back more than one instrument part, extend the selection up or down as required.
- Press the Play button, or press Space.
Notes: (1) If no selection is made before activating Play, playback returns to the place it stopped at previously; or, if no previous playback, to the start of the score. (2) The Play button changes to a "stop" icon while music is playing.
To stop playback
- Press the Play button; or press Space.
Rewind
To rewind playback click on the Rewind icon on the Play toolbar. Rewind returns the playback to the beginning of the score or, if a loop is set, to the beginning of the loop.
Loop
To loop playback over a section of music:
- Stop playback (if it is on);
- Ensure that the loop playback button is "off" (i.e. not colored blue);
- Select a range in the score, encompassing the instrument staves you want to play back;
- Click on the loop playback button in the Play toolbar. Flags will appear around the selection and the button change color.
- Click on the Play button.
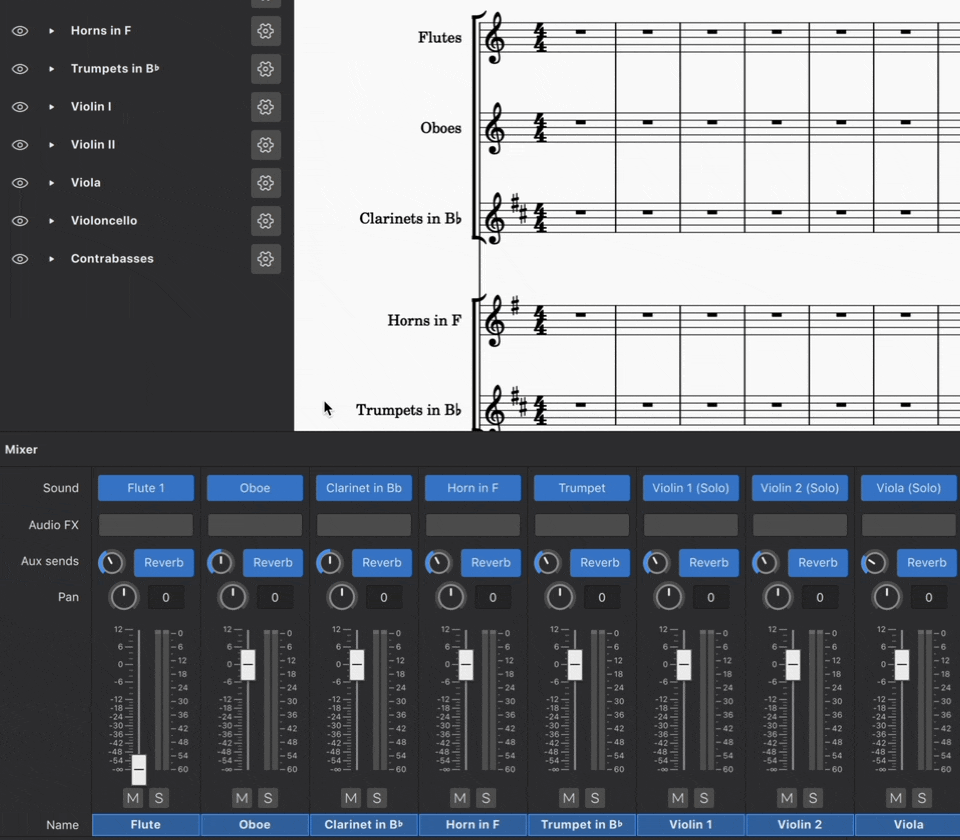
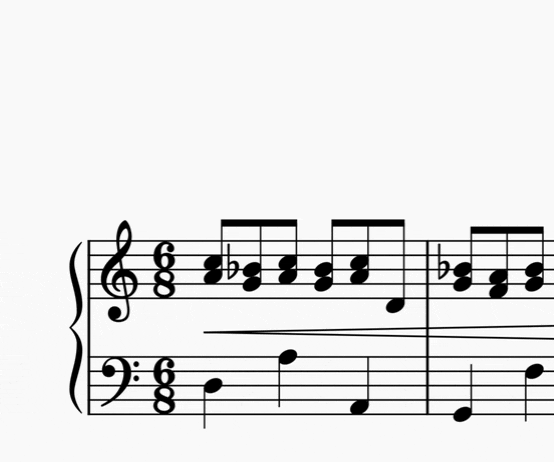
In the example below, playback will cycle over the selected two bars of Violin 2 and Viola, the region marked by the blue flags. Use the "Loop playback" button to toggle the loop on or off.

Metronome
To automatically add metronome ticks sound to playback, use the metronome button.
The number of ticks added onto each measure is determined by
- the beat. Number of beats per measure is dictated by the time signature only, it does not depend on the beaming style, or the note value (duration) used on metronome markings. Both crotchet ♩ = 60 and quaver ♪ = 120 markings create identical result; and
- the written tempo on the score; and
- the current slider setting of Monitoring tempo, see "Playback position and monitoring tempo" section.
The following logic is used,
- For simple meters, the top number of the time signature is the number of beats in each measure. 2 = duple, 3 = triple, 4 = quadruple. A tick is added to each beat.
-
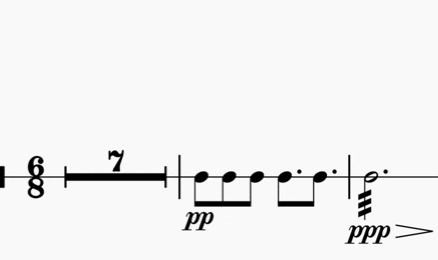
For compound meters (6/8, 9/8, etc), the top number of the time signature divided by three, is the number of beats in each measure. 6 = duple, 9 = triple, 12 = quadruple. A tick is added to each beat. Two additional ticks per beat are added to passages where the resultant Monitoring tempo of the measure is below 60 beats per minute. The 60 is not referring to Play Toolbar / Play Panel's top right corner metronome symbol.

Shown above is a demo of compound meters metronome handling, the demo score file is available under the External links section. To a measure using 9/8 where there is a written tempo marking dotted crotchet ♩ . = 59, and the monitoring tempo slider is at 100%, nine ticks are added. Using a quaver ♪ = 179 marking creates identical result. Whereas, to a measure using 9/8 where there is a written tempo marking dotted crotchet ♩ . = 60, and the monitoring tempo slider is at 100%, three ticks are added. Using a quaver ♪ = 180 marking creates identical result. Lowering the monitoring tempo slider to 90% creates nine ticks in that measure.
The default Metronome uses MS Basic. It has two tick sound clips, a high pitched ticks (T1) and a low pitched ticks (T2). T1 is used on the very first tick of each measure, T2 is used on all other places. Alternative sound source can be selected in the Mixer, T1 play note E5, and T2 play note F5.
These ticks are added to any exported audio files. For more control of the ticks in the audio file, or during playback, try these:
- Add a percussion staff, fill the first measure with the desired rhythm and the rest with measure repeats, then hide that staff, source,
- Metronome SoundFont (CC0) provided by mirabilos,
- Add metronome part plugin by sal.vador.
Playback position and monitoring tempo
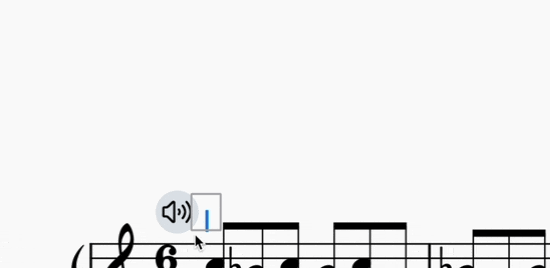
The current playback position is shown by two counters to the right of the playback controls. One shows the position in terms of time elapsed, the other in measures and beats (see image in overview). To jump to a timestamp or measure or beat manually, click a counter and enter a number.
The item at the very right end is monitoring tempo. It shows the tempo would have been in the unit of crotchet (quarter notes) within one minute at the current cursor position. It is not exact mirror appearance of any particular written tempo marking on the score. Its crotchet is not related to the musical beat of the score.
To reveal additional controls, undock the toolbar. Click and hold down the "6 dots", then drag away from the top right of the MuseScore screen and release, see Toolbars and windows:Docking and undocking panels chapter. Undocked toolbar automatically expands into a small Playback Panel that has two sliders. The slider on top shows the current playback position . the slider below shows monitoring tempo . Monitoring tempo overrides score tempo temporarily, the setting of each written tempo markings on the score remains unchanged. Returning the slider to default position, 100%, restores tempo to that as written on score.

In the example screen capture shown above. The knob on the top current playback position slider is at one third from the left, suggesting it is currently about one third of the way through the score. The knob on the lower monitoring tempo slider is adjusted slightly to the right of the default position. It reads 130%, suggesting the tempo of playback is currently speeded up to 130% of written tempo. The written tempo is crotchet = 60, it is designated by a Tempo marking not shown in the picture. The top right corner metronome symbol shows crotchet = 78, meaning there would have been 78 crotchet (quarter notes) within one minute at the current cursor position.
To change the playback tempo temporarily, either:
- Left click, hold and drag the monitoring tempo slider left or right. This will adjust the playback tempo in 5% increments; or
- Left click on the Playback tempo percentage number. This will highlight the number
-
Edit the Playback tempo. It can be adjusted in 1% increments. In the image below the tempo will playback at 96% of the current metronome speed

Other commands
Click the settings button (cogged gear) on the Play toolbar to show the following controls:

You can uncheck or check these options as desired.
Enable MIDI input
Enable MIDI input to write music to your score with a linked MIDI device (such as a keyboard or drum machine) during playback. See Working with Midi for details.
Play repeats
Uncheck this option if you want playback to ignore any repeat indications in the score.
Play chord symbols
Uncheck this option if you want playback to ignore chord symbols in the score.
Pan score automatically
When checked, this option pans the score during playback; uncheck if you want the view to remain stationary.
External links
Metronome tick demo score file https://musescore.org/en/node/357722#comment-1220561
Mixer
Overview
The mixer allows you to
- change instrument sounds (without affecting the staff notation).
- load virtual instruments and effects.
-
adjust volume and panning, and make other adjustments to the playback for each stave.

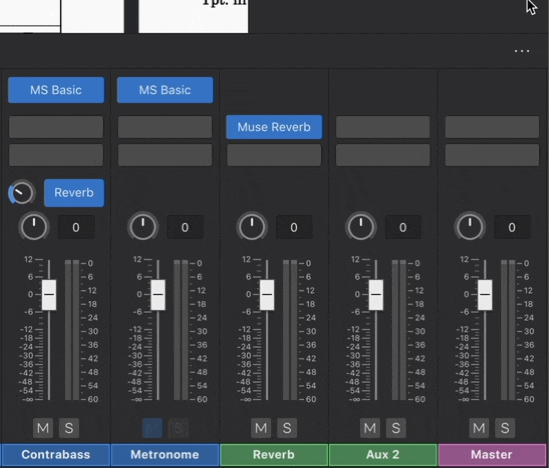
The mixer is divided into a number of color-coded channel strips:
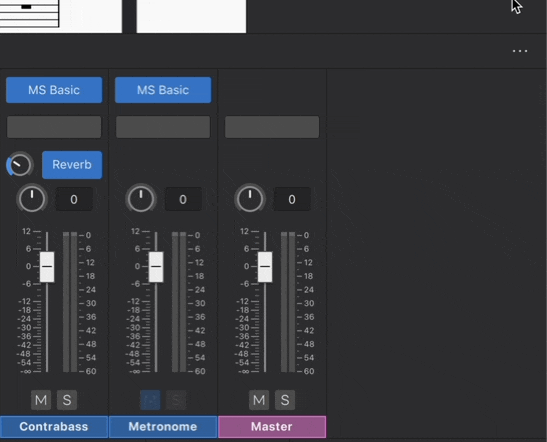
- Instrument: Each staff instrument in the score has its own channel, with the name of the instrument, labelled blue, at the bottom. An instrument channel is also created for each mid-score instrument change applied to a staff.
- Metronome: This channel, also labelled blue, allows control of metronome volume and panning.
- Aux 1/Aux 2: These are the auxiliary channels, labelled green, and may be used to house VST effects units. Aux 1 by default contains Muse Reverb (see below).
- Master: The master fader, labelled red.
Opening the mixer
You can display/hide the mixer by:
- Clicking on the Mixer button in the Note input toolbar.
- Clicking View→Mixer.
- Using the shortcut F10.
Note: If the instrument channel strips are not in the same order as the instruments in the score, try closing and reopening the Mixer again.
Mixer controls
A channel strip contains the following controls (from top to bottom):

- Sound: See below.
- Audio FX: See below.
- Aux sends: See below.
- Pan: Click and drag on the Pan knob to move the audio track to the left or right in the stereo sound field. Double click on the knob to return Pan to the center position.
- Volume: Click and drag the fader to increase or decrease playback volume. Double click on the fader to return it to the default level, 0 dB.
- Mute and Solo: Click on the Mute button to silence the track; click again to unmute it—and so on. The Solo button silences all other tracks allowing you to hear only the soloed track. Multiple selection of Solo and Mute buttons is possible, allowing you to conveniently isolate any combination of instruments.
- Name: Note that this name is not affected by any changes made to the instrument name in the score.
Click the three dot icon in the upper right corner of the Mixer panel to show / hide a control. For example, you can hide the Volume faders to save up vertical screen space for score viewing.
Sound
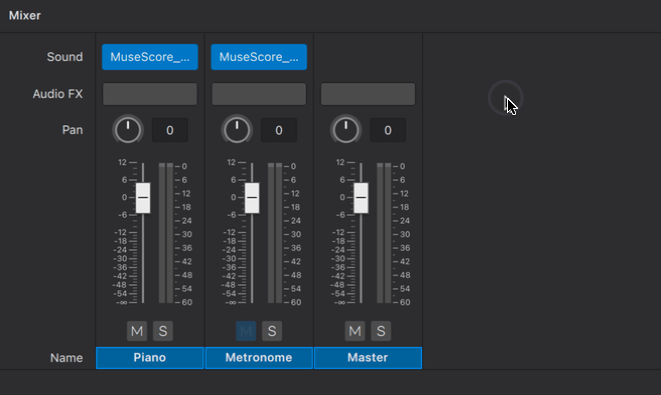
The row labelled Sound shows the virtual instrument set used in each track. This can be either a SoundFont (.sf2,.sf3) such as MS Basic, a VST instruments (VSTi), or a Muse Sound. If you have selected a particular sound from within that instrument set then the sound's name will be displayed instead of the set's name.
To change an instrument's sound
- Mouse over the name of the virtual instrument set (in the row marked “Sound”)
- Click the dropdown button that appears
- Locate and click on an item from the dropdown menu.
Note: This changes the instrument's sound, but has no effect on instrument's notation. If you want the staff to be updated as well, say, with correct transposition and clef changes, see Choose instruments.
Starting with MuseScore 4.2, it is now possible to use this method to choose individual sound from within a SoundFont. If you're using an older version of MuseScore 4, use the workaround detailed in SoundFonts.
SFZ files are supported but only by using a VST sampler; see SoundFonts.
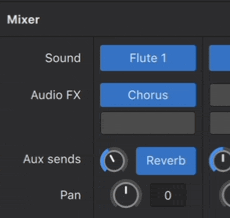
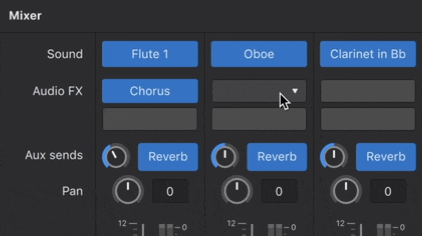
Audio FX
Each row (slot) under the Audio FX allows you to add an extra VST effect or Muse Reverb (a native effect). Audio is processed through the Audio FX from top to bottom.
- Find VSTi inside Sound drop-downs, and find VST effects inside Audio FX drop-downs.
- To apply Audio FX(s) to one instrument, add Audio FX to the corresponding instrument strip.
- To easily apply the same Audio FX(s) to multiple instruments, use Aux sends.
To add an Audio FX plugin
- Hover over an empty Audio FX slot
- Click the dropdown button that appears
- Locate and click on a plugin from the dropdown menu .
- The plugin will load as a separate window on top of the Musescore window.
- When you add one effect, a new empty row (slot) is created automatically to allow adding further effect. Repeat these steps to add more effect.
To disable an Audio FX plugin
- Hover over an Audio FX slot
- Click on the power icon that appears.
This deactivates the plugin without removing it from the mixer.
To remove an Audio FX plugin
- Hover over an Audio FX slot
- Click the dropdown button that appears
- Click No effect.
Muse Reverb
Muse Reverb is MuseScore’s native reverb unit. A fixed amount of reverb is added by default to each instrument—you can adjust the amount for each channel using the Aux send knobs next to the blue buttons labelled "Reverb". The effect can be toggled on/off for each channel by clicking on the same buttons. You can also adjust the Muse Reverb output volume using the Aux 1 fader.
Aux sends
Each row (slot) under the Aux sends adjusts how much of a corresponding Aux channel effect(s) is added to the audio created for an instrument.
There are two Aux sends, corresponding to the two aux channels:
- The first row adjusts how much of Aux channel 1 Aux 1 is added onto the current instrument, it is shown as Reverb by default, because Aux 1 contains Muse Reverb by default.
- The second row adjusts how much of Aux channel 2 Aux 2 is added onto the current instrument, Aux 2 does not contain any Audio FX by default.
- Both of the two aux sends are enabled by default for each instrument, and can be disabled individually. Audio is processed with Aux 1 then Aux 2.
- You can also apply audio effect(s) to one instrument only by adding Audio FX.
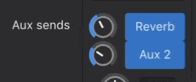
To show/hide an Aux send row (slot)
- Click the three dot icon in the upper right corner of the Mixer panel
- Hover over View
- Click Aux send 1 and/or Aux send 2.
To disable an Aux send row (slot)
- Make sure the Aux send is visible
- Click Reverb to turn off Aux send 1 OR Click Aux 2 to turn off Aux send 2.

Aux channels
Aux channels are special channels to simplify audio FX application. You can set up audio FX(s) in one Aux channel and then apply them to multiple instruments.
There are up to two Aux channels in each score:
- Aux 1: contains the Muse Reverb by default, but you can remove this and replace it with any Audio FX(s) you like.
- Aux 2: is empty by default.
To show/hide Aux channels
By default, aux channels are hidden. To show/hide a aux channel:
- Click the three dot icon in the upper right corner of the Mixer panel
- Hover over View
- Click Aux channel 1 and/or Aux channel 2.
To add Audio FX to an Aux channel
The process is the same as adding Audio FX(s) to an instrument channel, see To add an Audio FX.
If there is only one Audio FXin an Aux Channel, the channel strip and its corresponding aux send are labelled by the name of the Audio FX. If there is more than one, they are labelled Aux 1 and Aux 2. You may need to save and reopen the score to see the labels update.
To adjust an Aux channel's level
Aux channel strips have volume faders. This changes the volume of the effect across all channel strips with the corresponding aux send turned on. Think of this as setting the maximum volume of the effect(s) that an instrument channel can receive.
To apply the effect(s) of an Aux channel to an instrument
To adjust how much effect of an Aux channel come through on each instrument, use the knob in the corresponding Aux sends row (slot) on that instrument channel strip, see Aux Sends.
See also
SoundFonts
MuseScore uses virtual instruments to create audio for playback. SoundFont files (.sf2, .sf3) are one of the supported formats . An sf2 or sf3 file contains all the audio data for one or more virtual instruments.
MuseScore comes packaged with its own native SoundFont, MS Basic, which contains most of the instrument sounds you need for score playback.
You can also add and use custom SoundFonts—many are available free online. See also the list in SoundFonts and SFZ files (MS3 handbook).
Install a SoundFont
Once you’ve downloaded a SoundFont to your computer, there are two ways to install a SoundFont in MuseScore 4:
- Drag and drop the SoundFont file into MuseScore 4.
- Place the SoundFont file in the MS4 user directory named "SoundFonts".
Drag and drop installation
- Open MuseScore
- Open your OS file manager (Windows: File Explorer, macOS: Finder)
- Locate the SoundFont file
- Left-click and hold on the SoundFont file in the file manager window
- Drag the file over to MuseScore's window
- If MuseScore's window isn't visible, drag the file over MuseScore's icon in the system bar to reveal MuseScore's window
- Release the mouse button to "drop" the file on MuseScore
A dialog should appear offering to install the SoundFont file to the correct location.
File directory installation
It's also possible to manually install SoundFont files to the correct location. By default, this location is ~/Documents/MuseScore4/SoundFonts, where ~ (tilde) represents your home directory. The full path to this location is:
- Windows:
C:\Users\USERNAME\Documents\MuseScore4\SoundFonts - macOS:
/Users/USERNAME/Documents/MuseScore4/SoundFonts - Linux:
/home/USERNAME/Documents/MuseScore4/SoundFonts
SoundFont files placed in this folder will automatically become available for use in MuseScore.
Add or change SoundFont directory
It's also possible to specify alternate location(s) to store SoundFont files instead of—or in addition to—the default location mentioned above. SoundFont files placed at any specified location will be available in MuseScore.
To specify an alternate SoundFont location:
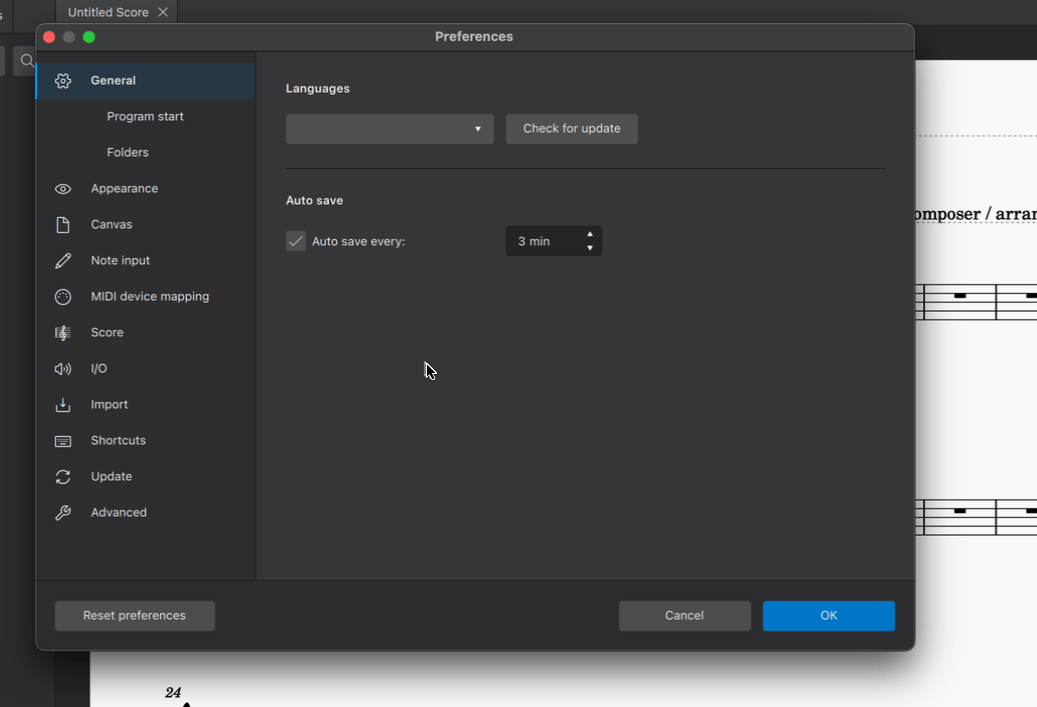
- Open Preferences (Mac: MuseScore > Preferences or shortcut Cmd+;. Windows: Edit > Preferences)
- Select Folders (prior to MuseScore 4.2 this was under the General category)
- Click the SoundFonts folder icon
- Click Add directory in the dialog that appears
- Choose and Open the folder location where you want MuseScore to look for SoundFont files
- Repeat steps 1-5 to add further directories (optional)
- Click OK to finish. The specified directory (or directories) will appear in the SoundFonts text field.
- Click OK in the Preferences dialog to confirm your selection.
Using sounds from a SoundFont
Once a SoundFont is installed, here's how to use it in MuseScore:
- Open the Mixer (shortcut: F10)
- Locate the column for the instrument that you want to change the sound of
- Mouse over this instrument's plugin slot in the row marked Sound (screen reader users: tab until you hear "sound menu")
- Click the dropdown arrow that appears
- Hover over SoundFonts
- Select the SoundFont you wish to assign to that particular instrument
As of MuseScore 4.2, it possible to choose a specific sound within the SoundFont. The default setting Choose automatically instructs MuseScore to use sound(s) that matches the instrument in the score.
On some instruments (such as Violin) using MS Basic, verbal articulation text items (such as legato, pizz. arco) create proper playback only if Choose automatically is selected, see musescore at github. Therefore it is preferable to change the Musescore Instrument, see Setting up your score : Changing instruments after score creation chapter. Choose automatically only works with SoundFonts that obey the General MIDI standard, see Musescore 3 handbook SoundFonts and SFZ files: soundfonts chapter.
Shown below is soundfont selection in MuseScore 4.1.1.
Selecting individual sounds
As mentioned above, MuseScore 4.2 reintroduced the ability to choose individual sounds within a SoundFont.
Prior to MuseScore 4.2, you had to make do with the automatic choice, or employ a workaround where each individual sound was packaged into a separate SoundFont file. A special version of MS Basic was created for this purpose. For other SoundFonts, you could split them into individual sound files using a free tool such as sf2-split or SF2 Splitter. For VSTs you could use a VST sampler such as Sforzando, FluidSynthVST, or juicysfplugin.
Editing Soundfonts
This is possible using 3rd party software such as Polyphone. For more information, see also Soundfont, MIDI velocity and instruments.xml (Developer’s Handbook).
Uninstall a SoundFont
To uninstall a SoundFont, simply open the folder where its file is installed and delete it.
A note on the Zerberus player and SFZs
Users of MuseScore 3.6 and earlier may be accustomed to using the Zerberus player, which supports the .sfz file format. In building a new system that now supports VST instruments, changes were required that necessitated the removal of the Zerberus player, as well as the Synthesizer found in previous versions of MuseScore. Consequently, some functionality has been lost in this process, including the ability to map specific instrument sounds like pizzicato and tremolo to specific MIDI channels. Our highest priority in future releases of MuseScore 4 is to again support this functionality for VST, SoundFont and the Muse Sounds libraries. Users who rely extensively on mapping .sfz sounds to specific performance directions are advised to continue using earlier versions of MuseScore until we re-enable this capability in MuseScore 4. It is worth mentioning that the new systems we are planning will be much more flexible, easy to use and powerful than those found in MuseScore 3.
For those who wish to still use SFZ sounds in MuseScore 4, good alternatives for Windows and macOs would be the open source VST samplers Sfizz or Sforzando, both of which support SFZ playback. Currently, the use of SFZ is not possible in MuseScore4 for Linux.
See also
- SoundFonts and SFZ files (MS3 handbook)
Alternatives to soundfonts:
Installing Muse Sounds
Muse Sounds is a library of sophisticated plugins that provide realistic playback for MuseScore Studio.
Installation
Muse Hub (Windows and macOS)
On Windows and macOS, Muse Sounds are installed via the Muse Hub utility, which can also be used to install MuseScore Studio. If you don't have Muse Hub yet you can download it for free from musehub.com.
Once installed, Muse Hub is found in the Windows system tray (shortcut Win+B to focus), or the macOS menu bar (press VO+M twice to focus while VoiceOver is running).
When Muse Hub is open, click Get under any sound you’d like to have in your library, and it will begin downloading and installing right away.
Muse Hub also contains a range of effects plugins. Download and install these from the Effects tab.
Once a plugin is fully downloaded, it will appear in the Mixer the next time you launch MuseScore Studio.
Muse Sounds Manager (Linux only)
On Linux, Muse Sounds are installed via Muse Sounds Manager, which you can download from musescore.org as a DEB or RPM package for 64-bit Intel/AMD architectures (not ARM currently).
When Muse Sounds Manager is open, click Get under any sound you’d like to have in your library, and it will begin downloading and installing right away.
Once a plugin is fully downloaded, it will appear in the Mixer the next time you launch MuseScore Studio.
Using Muse Sounds in MuseScore Studio
Any Muse Sounds plugins you’ve downloaded will be automatically assigned to the appropriate instruments in your score.
You can tell MuseScore Studio to always use available Muse Sounds plugins via the Playback Setup dialog.
- Go to view → Playback setup
- Select Muse Sounds in the Profiles section
- Leave Set as default for new scores checked if you want all future scores to also use Muse Sounds
- Click OK
The Muse Sounds playback profile will ensure that all Muse Sounds plugins will be assigned to every available instrument in your score. You can also manually assign a Muse Sounds plugin to a single instrument via the Mixer. This can be helpful for scores with more than one instrument, where you may wish to combine Muse Sounds plugins with other VSTs or Soundfonts.
- Go to View → Mixer to show the Mixer (Shortcut: F10)
- Hover over a plugin slot next to Sound
- Click the dropdown button that appears
- Navigate to Muse Sounds and select a sound from the desired library
Available sounds in Muse Sounds
Muse Sounds currently supports the following instruments:
Brass
- Bass Trombone
- Cimbasso
- Horn in F
- Horns a6
- Trombone
- Trombones a3
- Trumpet
- Trumpets a4
- Tuba
Choir
- Altos
- Basses
- Full Choir
- Men
- Sopranos
- Tenors
- Women
Drumline
Guitars Vol. 1
- Acoustic Nylon
- Acoustic Steel Picked
- Acoustic Steel Plucked
- Electric Bass
- Electric LP - Clean
- Electric LP - Heavy
- Electric LP - Lead
- Electric SC - Clean
- Electric SC - Heavy
- Electric SC - Lead
Harp
- Harp
Keys
- Celesta
- Dream Piano
- Grand Piano
- Hammond Organ
- Harpsichord
- Soft Piano
- Suitcase Piano
- Upright Piano
- Wurly 200A
Percussion
- Bass Drum
- Bell Tree
- Bongos
- Cabasa
- Castanets
- Claves
- Cowbell
- Crotales
- Drum Kit
- Field Drum
- Glockenspiel
- Gong
- Marimba
- Mark Tree
- Metronome
- Piatti
- Shaker
- Sleigh Bells
- Snare Drum
- Sus.Cymbal
- Taikos
- Tam-tam
- Tambourine
- Timbales
- Timpani
- Toms
- Triangle
- Tubular Bells
- Vibraphone
- Wood Blocks
- Xylophone
Strings
- Contrabasses
- Viola (Solo)
- Violas
- Violin 1 (Solo)
- Violin 2 (Solo)
- Violins 1
- Violins 2
- Violoncello (Solo)
- Violoncellos
Woodwinds
- Alto Flute
- Alto Sax
- Baritone Sax
- Bass Clarinet
- Bass Flute
- Bassoon
- Clarinet in Bb
- Clarinet in Eb
- Contrabass Flute
- Contrabassoon
- English Horn
- Flute 1
- Flute 2
- Oboe
- Piccolo
- Soprano Sax
- Tenor Sax
Any instruments not supported by Muse Sounds will remain assigned to MS Basic by default.
Sound flags
Sound flags are available starting in MuseScore Studio 4.3
Overview
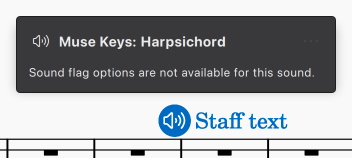
Sound flags can be added to staff text to access additional sounds and playing techniques on Muse Sounds instruments. You can download all the free Muse Sounds instruments (and soon, more sounds from the world’s best audio developers) via the Muse Hub.
When you add a sound flag (pictured below), it affects playback on the entire instrument from that point forward in the score until it reaches another sound flag.

Using sound flags, you can:
- Set string playing techniques like espressivo, sul ponticello, and bartok pizzicato
- Turn the snare on or off on the Muse Sounds Snare drum
- Choose from different choral phonemes, like ooh, ahh, and mmm
Sound flag buttons that appear in the score will never be visible when exporting, printing, or publishing your score to MuseScore.com.
To add a sound flag
- Make sure a Muse Sounds instrument is selected in the mixer
- Add Staff text from the Text palette or using Ctrl+T (Mac: Cmd+T) to the Muse Sounds instrument's staff
- Click the sound flag button next to the text field
- Select any of the options to apply it to your score
- Play the score to preview the new sound
To use a sound flag without showing text in the score
Sound flags must always be attached to a staff text element. If you wish to hide the text:
- Select the staff text
- In the Properties panel under General, uncheck Visible
To remove a sound flag
Selecting the sound flag button and pressing Del will remove it and leave the staff text in place.
Deleting the staff text will also remove the associated sound flag.
To hide sound flags in the score
- With nothing in the score selected, open the Properties panel
- Under General, click the eye icon next to Sound flags
The sound flag buttons will be hidden. They can still be edited by clicking the associated staff text to reveal its sound flag button.
Additional options
To reset a sound flag
The first options in the Modify sound and/or Playing techniques sections of the sound flag popup are the default sounds. If you wish to quickly reset a sound flag to these sounds:
- Select a sound flag button
- Click the three-dot button in the top right and select Reset to default sound
To select multiple sounds on one sound flag
You may wish to combine more than one sound option to play at the same time. If a sound flag has the Modify sound section, you can do the following:
- Select a sound flag button
- Click the three-dot button in the top right and select Allow multiple selection
- Then, select more than one sound flag button to hear the sounds together in playback
To change which staves a sound flag affects
By default, sound flags affect all staves on an instrument, but this can be changed.
- Select a sound flag button
- Click the three-dot button in the top right and uncheck Apply selection to all staves
- Repeat for sound flags on other staves
Sounds without sound flags
Not all Muse Sounds instruments have sound flag options. If we haven’t included any sound flag options yet, you’ll see this in the sound flag popup:
Keyboard navigation
To add a sound flag using the keyboard
- Select a note or rest
- Press Ctrl+T (Mac: Cmd+T) to add Staff text
- Type anything in
- Press Esc to select the text
- Press Alt+Left (Mac: Opt+Left) to open the popup
- Use Tab and arrow keys to navigate within the popup and Space to select
See also
Capo playback (MS 4.0.2 and before)
This page shows you how to apply Capo markings in MuseScore versions prior to MuseScore 4.1. See Applying capos for the new method of applying capos in MuseScore 4.1 and above.
Adding a capo marking to your score (before MuseScore 4.1)
MuseScore allows you to transpose the playback of a staff without changing the music notation (written pitch). This simulates the effect of a capo on a guitar (or other stringed instrument).
Adding a capo to a single staff
- Add staff text to the note/rest from which you want capo playback to start;
- Open the Staff text properties dialog.
- Click on the Capo Settings tab;
- Check the “Capo Settings” checkbox, and set "Capo fret" to the fret number you wish to apply the capo at (each fret increases the pitch by a semitone);
- Click OK to apply your changes;
- Edit the wording of the text as desired.
Adding a capo to a staff / tablature pair
Use one of the following:
- If linked, add the capo to the standard staff—not the tablature.
- If unlinked, add the capo to both staves.
Note: Any capo playback settings apply until overridden by a subsequent Staff text with “Capo Settings” enabled.
See also
Swing playback
Overview
Music in “straight” time is performed strictly as written in the score. By contrast, music in swing time interpets straight eigth and sixteenth notes as triplet pairs, with the first of the pair being roughly twice as long as the second. This gives the rhythm a characteristic bouncy feel—often asssociated with Jazz music. e.g.
Swung eighths:

Swung sixteenths:

Rather than notate swung music exactly as performed, it is accepted convention to write it in straight time and simply provide the written indications “Swing and “Straight” at appropriate points in the score.
Swing markings have a playback effect on the score. The default swing ratio is 60% (3:2) but you can vary this to suit the feel of the piece if required.
Adding a swing or straight marking to your score
To add a swing marking
- Click on the destination note or rest
- Click on the Swing text in the Tempo palette.
Alternatively, you can drag and drop the Swing text from the palette onto the note or rest in question.
You can, if desired, add a visual swing marking as well.
To add a straight marking
- Click on the destination note or rest
- Click on the Straight text in the Tempo palette.
Note that the above markings are a form of System text and therefore the playback effect is applied to all staves in the system. If you want swing to apply to only one staff you can use Staff text instead: see below.
Changing swing playback
Adjust the type and degree of swing
- Right-click on the Swing text in the score and select System text properties.
-
In the Swing settings tab edit the “Swing” and “Swing ratio” as required.

Note: Swing settings are found in both system and staff text.
Apply swing to one staff only
If you want swing to apply to only one staff in the system, use staff text instead:
- Select the destination note or rest.
- Click on the Staff text indication in the Text palette.
- Edit the text to create the desired performance indication
- Right-click on the text and select Staff text properties. Alternatively select the text object and in the Properties panel, click on the Staff text properties button.
- In the Swing settings tab edit the “Swing” and “Swing ratio” as required.
Working with MIDI
This section needs to be organized / written by someone with an understanding of how to use MIDI input/output in MuseScore 4. If JACK is still supported, it could be discussed here too, or in a new page.
Working with VST and VSTi
Introduction to VST
Virtual Studio Technology (VST) is an audio plug-in software interface licensed under Steinberg that integrates software synthesizers and effects units into digital audio workstations. Most VST plugins are either instruments (VSTi) or effects (VSTfx); VSTi includes software simulation emulations of well-known hardware synthesizers and samplers.
Installing VSTs
In MuseScore 4, any compatible VST plugins installed on a Windows or MacOS computer will automatically be made available in the Mixer, where you can easily configure playback settings for all instruments in a score. Note that Linux is not yet supported (but see Linux VST3).
After installing new VSTs on your computer, you may have to restart Musescore 4 to make them visible in the mixer. If this doesn't work, you can force a re-scan of VSTs by deleting previous cache settings before restarting. On Windows 10 the relevant file can be found at
C:\Users\ [your user] \AppData\Local\MuseScore\MuseScore4\known_audio_plugins.json
MuseScore 4 directly supports VST3 plugins only (not VST1 or VST2) because of licensing restrictions. If you are using VST1 or VST2, see How to use older, non-VST3 plugins in MuseScore 4.
Note: Sound settings in the Mixer are saved with the score, but not to the program.
Enabling, disabling, removing and replacing VST plugins
See Mixer: Sounds and Audio FX.
See also
Alternatives to VST instruments: