Customization
Language
Overview
MuseScore works with your "System" language (the one used for most programs, and generally depending on your country and the language settings of the PC, or account).
Change language
- From the menu, select Edit→Preferences... (Mac: MuseScore→Preferences...);
-
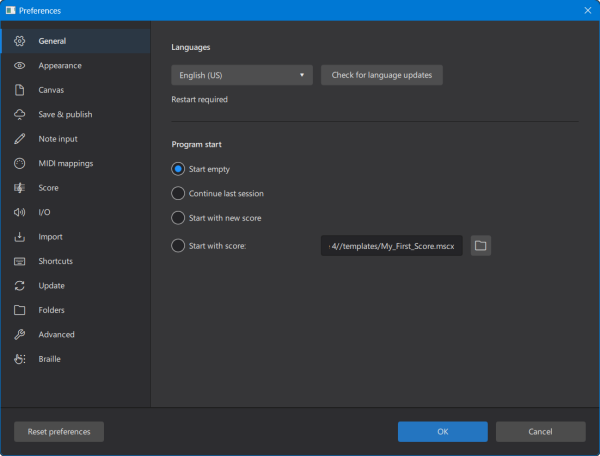
In the General tab, select the desired language from the drop-down list in the Language section:
Update translations
To update translation(s):
- From the menu, select Edit→Preferences... (Mac: MuseScore→Preferences...);
- In the General tab, click on the Check for language updates button;
A message which displayed if the version of your language is already up to date, if not then the update will be downloaded.
To complete this step, a restart of the application is required.
See also
Appearance
Overview
To change the appearance of MuseScore
- From the menu, select Edit→Preferences... (Mac: MuseScore→Preferences...);
-
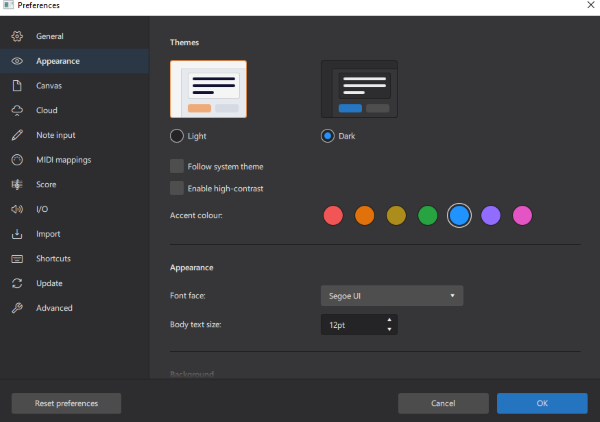
In the Appearance tab, select the desired option described below.
Theme and Colors
The following options are available to change the colors of MuseScore. The display changes immediately so options can be tested without closing the dialog. The changes apply to all open instances of MuseScore (see Windows)
- Light or Dark Theme
- Select "Follow system theme" if you want MuseScore to change themes from light to dark, or dark to light, when the system theme changes
- Enable high-contrast
- Accent color options
- Background - the color behind the score (not the color of palettes and other program items) can be changed to a solid color or a Wallpaper image.
- Paper - the color of the score itself can be changed to a solid color or a Wallpaper image.
- Invert Score - swaps the color of score elements with the Paper color
Fonts
To change the font face and text size for Menu and Palette elements:
- From the menu, select Edit→Preferences... (Mac: MuseScore→Preferences...);
- In the Appearance tab, select the font options.
This does not affect and text elements in the score.
Toolbars and windows
Overview
Windows, toolbars and panels within MuseScore can be repositioned, and you can choose which elements you want to see displayed in them.
The default appearance of MuseScore is shown below:
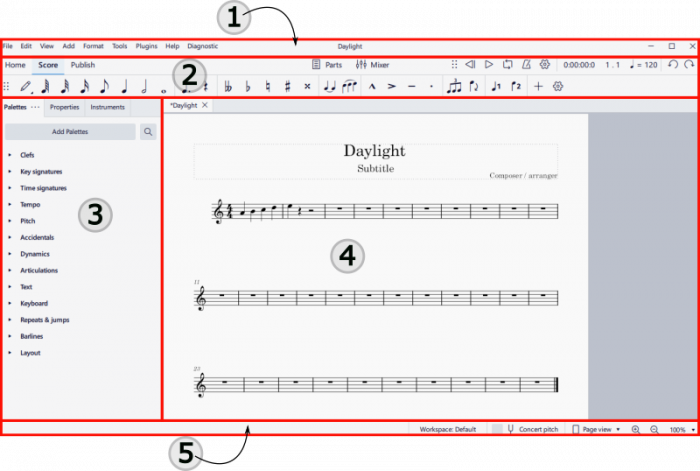
- The Menu bar
- Toolbars
- Palette, Property and Instrument Panels
- The Score Window
- The Status Bar
Toolbars
Showing and hiding toolbars
To show or hide the playback controls, note input toolbar, or the status bar:
- Select View→Toolbars... and check/uncheck the applicable element.
Rearranging toolbars
To change the position of either the note input or playback toolbars, click on and hold the six dots at the left of the toolbar, then drag and drop it to the desired location. The toolbar can be left free floating, but in the case of the note input toolbar, you can also drag and drop it either to the left or the bottom edge of the program window—a blue rectange then appears to show you that you can drop the toolbar at that location to redock it. The playback toolbar can only be redocked in its default position.
Customizing contents of toolbars
To select the icons that you want on view in the note input or playback toolbars, click on the gear icon to the right of the toolbar:
![]()
In the case of the note input toolbar, this reveals a dropdown list from which you can hide or display the various icons by clicking on the eye symbol to the left of each one (closed=hidden, open=displayed).
In the case of the playback toolbar, uncheck or check the various options in the gear menu to hide or display the corresponding elements.
Windows and Panels
Docking and undocking panels
To undock and move one of the side panels (Palette, Instruments, Properties, or Selection filter), click on the three dots on the tab, select the Undock option, then drag the undocked panel to the desired position.
You can leave the panel free-standing but there are also dock positions at the top and right hand edges of the document window—a blue rectangle appears to show that you can drop the panel to redock it at that location.
In a similar way, you can redock the free panel back to the sidebar:
- To display half-length at the top of the sidebar, drag and drop the free panel to the top left of the sidebar.
- To display half-length at the bottom of the sidebar, drag and drop the free panel to the bottom left of the sidebar.
- To display full-length in the sidebar, drag and drop the free panel to the center left of the side.
You can also redock the free panel in its original position by clicking on the three dots on the tab, and selecting Dock.
Panels such as the Mixer or virtual Piano can be undocked if desired, by dragging them into position or clicking on the three dots icon and selecting Undock. To redock, click on the three dots icon and select Dock.
The undocked mixer can be resized by dragging the edges inwards or outwards.
Customizing contents of panels
To choose which elements to display within the mixer or the virtual Piano, click on the three dots, select View and uncheck or check the applicable options.
To customize the palettes area, see Customization: Palettes.
Templates and styles
This chapter contains incomplete information and does not reflect the current status of Musescore 4. Please consult third party professionals listed on Getting help instead.
useful info for editing:
- structure proposed for this page https://musescore.org/en/node/330540/revisions/510458/view , see changes and reason below,
- changes of structure and reason: Concept and usage of template and style are quite different. To avoid confusion, the overview focuses on what style is, as it is not explained inside handbook yet. Explanation of template is moved to the Template section.
- ms3 layout overview, style, format>style https://musescore.org/en/handbook/3/layout-and-formatting
- ms3 template https://musescore.org/en/handbook/3/instruments-staff-setup-and-templat…
- ms3 .mss save load https://musescore.org/en/handbook/3/layout-and-formatting#save-and-load…
- ms3 Edit > Preferences > Score https://musescore.org/en/handbook/3/preferences#default-files
- ms4 Edit > Preferences > Score https://musescore.org/en/handbook/4/preferences
- ms4 related chapters https://musescore.org/en/handbook/4/formatting
TODO testing
- example score file B
- Part B1 (the full score)
- format > page settings
- format > style
- view > show >show invisible, concert pitch etc
- individual item properties
- Part B2 (built-in part, user clicked the part button, add)
- format > page settings
- format > style
- view > show >show invisible, concert pitch etc
- individual item properties
- Part B3 (newly-created part, user clicked the part button, add)
- format > page settings
- format > style
- view > show >show invisible, concert pitch etc
- individual item properties
- Part B1 (the full score)
- move B.mscz to the custom template folder, then create score C with the template
- create C1, C2 using B1, B2 CONFIRMED
- create C3 using B3 (to be tested)
- C1 (full score)
- format > page settings (to be tested)
- format > style (to be tested)
- view > show > show invisible, concert pitch etc (to be tested)
- individual item properties : ALL ITEMS for example staff text ARE REMOVED
- a new title text and frame is added "Untitled" MS4 NEW
- C2 (Part)
- format > page settings (to be tested)
- format > style (to be tested)
- view > show > show invisible, concert pitch etc (to be tested)
- individual item properties: ALL ITEMS EXCEPT STAFF ARE REMOVED title text and frame , staff text
- C3 (Part)
- format > page settings (to be tested)
- format > style (to be tested)
- view > show > show invisible, concert pitch etc (to be tested)
- individual item properties (to be tested)
Overview
Style
Styles in Musescore are profiles that contains settings, rather than being the settings themselves. The visual setting for text and musical symbol in musescore some users mistaken for style is called Font.
All styles are built-in, they contain visual and functional settings default values. Each object type, eg Chord Symbol object, Accidental object, has a corresponding style of the same name built-in: "Style for Chord Symbols", "Style for Accidentals". Each Text object, eg Chord Symbol object, Lyrics object, also has one or more corresponding style(s) built-in: "Style for text inside Chord Symbols", "Style for text inside Chord Symbols (Alternative)", "Style for text inside Lyrics Even Lines", "Style for text inside Lyrics Odd Lines". Style is not the object type.
You cannot create a new style, but you can edit the settings values in each style. Use the "Style" window: Format → Style , or Properties panel: 'three dots' button : Save as default style for this score.
After you created an object, you cannot change its object type. The same is almost true for style: an accidental object on a score must use values in "Style for Accidentals", it cannot use values in "Style for Staff Text" or "Style for Chord Symbols". You cannot change which style (the named profile) an object on a score uses unless the object is a Text object or it contains a Text object within. A Lyrics object on a score, if desired, can use the compatible values in "Style for text inside Chord symbols" or "Style for text inside Staff Text" rather than the values in "Style for text inside Lyrics Odd Lines" or "Style for text inside Lyrics Even Lines", for more see Formatting text chapter.
Read on to see the final visual and function of objects are determined.
Layout and formatting in Musescore
Layout and formatting in Musescore consists of two main levels, Text objects and objects containing them have more levels, see Formatting text. The final visual and function of most object in a score file is determined by:
- Level 1: Properties of each individual object in a score file, such as note, text, or symbol on a score file. By default, objects do not have any specific properties. When properties are assigned in Properties panel, they will always be used.
- Level 2: Includes
- the layout and formatting settings related to whole page,
- which corresponds to the items around the top of the left pane of the "Style" window: Format → Style → Score, Page, Size, System, Measure etc, and
- the settings in Format → Page settings (see Score size and spacing).
- Additionally, it includes all the styles. Settings values in styles have less priority than properties mentioned above. Styles includes:
- "style for certain type of object": such as "Style for Chord symbols", "Style for Dynamics symbols", which correspond to the items in the left pane of the "Style" window, and
- "style for text inside certain type of object", such as "Style for text inside Chord symbols", "Style text inside Lyrics Odd Lines" etc, which correspond to items inside the "Style" window: left pane item "Text Style", see Formatting text
- the layout and formatting settings related to whole page,
Every score file has a "Full Score" layout. It also contains "Parts" when you use Musescore Part feature to generate different versions of the same score. Each "Part" and the "Full Score" has their own separate complete set of layout and formatting information.
Reusing Layout and formatting information
- When create a new score file using a template,... [This bullet point is a work in progress, please add missing info, see TODO above, and https://musescore.org/en/handbook/3/layout-and-formatting#concept3]
- "Level 2 information" of the "Part" (but not the "Full Score") you are currently editing can be easily applied to all other "Parts" with the Format → Style → Apply to all parts button.
- "Level 2 information" of the "Part" or "Full Score" you are currently editing can be saved as a separate .mss file (also known as a style file) and re-used on the another score (its "Full Score" or any "Part"). Reusing on a "Full Score" does not affect Parts.
- Default "level 2 information" for new score file and Musescore Part see below.
Visit https://musescore.org/en/node/355981 for .mss files shared by other musicians.
Style files
The concepts and layout logic are explained in the overview. .mss file contains "level 2 information" and can be stored in any folder, Musescore does not automatically use any specific folder. The default folder for easier file management can be set-up in Edit → Preferences.
Saving settings of all styles of "Full score" or "Part" you are currently editing to a separate .mss file
- Open the 'Full score' or 'Part' desired.
- Select Format → Save style, save it to any folder you like.
Loading from .mss file into "Full score" or "Part" you are currently editing
- Load or create a score, open the 'Full score' or 'Part' desired.
- Select Format → Load style.
Default "level 2 information" for new score file and Musescore Part
Open Preferences → Score tab
- Style: Browse and set the .mss file Musescore uses as "level 2 information" when creating a new score file. When creating a new score file from a template, the information present in the template is used instead.
- Style for part: Similar to the above but for new Musescore Part.
Templates
Not to be confused with Staff/Part properties: staff type template.
Usage of template is covered in chapters Create your first score, and Setting up your score. Score template can be used to quickly set up a new score. A template contains:
[This item list is a work in progress, please add missing info, see TODO above, and
https://musescore.org/en/handbook/3/instruments-staff-setup-and-templat…
- itemX
- itemY
- itemZ
]
A template file is a score file under certain directory that Musescore uses. You can create a score from scratch and save it as template, or copy any existing .mscz file to that directory to use it as template. There are two kinds of templates:
- Pre-defined System templates shipped with MuseScore, sorted into categories in New Score: Create from Template tab, see Create your first score.
- Custom templates: Custom templates must be stored inside the templates folder "Documents/MuseScore4/Templates" (can be set-up in Edit → Preferences) . When you create a new score, they are in New Score: Create from template tab: My Templates category, see set up a new score.
Save a score as a custom template
Click File → Save as and save the score file as .mscz format into the template directory Musescore uses. Content of the last added Title text is used as the template name (not the content of File → Project Properties → Work Title field; also not the file name as Musescore 3).
Creating a score from a custom template
- Make sure the custom template file is in the correct folder.
- Click File → New to open the New Score dialog
- Choose a template in Create from template tab: My Templates category. In Musescore 4.1.1, the preview window shows what the template file looks like when opened as a score, it is not the preview of what a new score looks like when created from this template.
- Complete the rest of the New Score dialog and exit.
Palettes
This chapter shows you how to customize the palettes and their contents; the application of palette items is already covered in Using the palettes (Basics).
Adding palettes
To add a preset or a custom palette, see Using the palettes: Adding more palettes.
Hiding and deleting palettes
To hide a preset palette, right click on it and select Hide palette. The palette is returned to the Add Palettes list (see above). Note that preset palettes cannot be deleted.
To hide or delete a custom palette you have created earlier, right click on it and select Hide/Delete palette. Then follow the instructions in the dialog.
Changing the order of palettes
To change the order of a palette simply drag it up or down and drop it onto the desired position in the palettes list.
Customizing palette contents
Palettes can be populated with items from the Master Palette (Shift+F9 or View→Master palette), or from an opened score.
Score items, when added to a palette, are saved with their custom properties.
To enable/disable editing for a particular palette:
- Right-click on the palette name; or click on the ellipsis symbol (three dots) to the right of the palette name
- Check/uncheck Enable editing.
Adding elements from the Master Palette window
To add a symbol from the Master Palette to a palette in the Palettes panel:
- Open the desired palette, make sure editing is enabled (see Customizing palette contents).
- Open the Master Palette (Shift+F9 or View→Master palette)
- Drag and drop symbols from the relevant section(s) of the Master palette to the ordinary palette as required.
If you have created a custom palette, there is another way to access the Master Palette:
- Open the custom palette
- Click on the More button
- Use the arrow buttons to navigate through the various sections of the Master Palette window
- Select on a symbol
- Press Add to my custom to add it to the custom palette
- To exit the dialog, click once more on the More button, or press Escape, or click outside the More section.
Adding elements from the score
To add score elements to a palette:
- Open the desired palette
- Press Ctrl+Shift (Mac: Cmd+Shift), then drag and drop the score element to the open palette.
Moving elements between palettes
Symbols can be moved from one open palette to another simply by dragging and dropping them.
Deleting elements from palettes
To delete an element in a palette, right-click on it and select Delete. In the case of preset palettes, the element will be moved to the More section. For custom palettes you are offered a choice of Hide (send element to the More section) or Delete permanently.
Resetting a palette
To reset a palette to its default state, right-click on the palette name, or click on the ellipsis symbol (three dots) to the right of the palette name; then select Reset palette.
Note: A custom palette will be reset to an empty palette when this function is applied.
Saving and loading palettes
To save a palette, right-click on the palette name, or click on the ellipsis symbol (three dots) to the right of the palette name; then select Save palette.
To load a previously-saved palette, right-click on a palette name, or click on the ellipsis symbol (three dots) to the right of the palette name; then select Load palette and navigate to the desired palette, select it and click Open.
Palettes menu
To access display options for the palettes area, click on the ellipsis symbol (three dots) to the right of the Palettes title at the top of the palettes area.
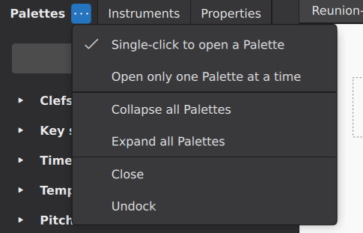
- Single-click to open a Palette: Uncheck this if you want to open a palette by double-clicking.
- Open only one Palette at a time: if this option is checked, when you open a palette other palettes automatically close.
- Collapse all Palettes: Closes all open palettes.
- Expand all Palettes: Opens all palettes.
- Close: Palettes panel closes.
- Undock: Undocks the palettes panel. See also Windows and panels.
Palette properties
To access Palette properties for individual palettes, right-click on the palette name, or click on the ellipsis symbol (three dots) to the right of the palette name; then select Palette properties.
This allows you to rename the palette, create a visible grid to separate elements, adjust width and height of cells, and change the scale and offset of the symbols.
See also
- Using the palettes for info about how to apply palette items.
- Other symbols for more info about the Symbols palette.
Workspaces
Overview
Workspace is the visual settings, also known as graphical user interface (GUI), of the Musescore program itself. An analogy to the position of the pen, ruler etc on a composer's desk. It includes the content, docked/undocked status and positions of palettes, toolbars and assorted open panels. Changes made to the current workspace are automatically saved, no further action is required. You can create custom workspaces to quickly change all these settings with a mouse click.
Note that the following settings do not count as workspace. View→Show→ Show visible, Show Invisible, Show formatting, Show Frames, Show Page Margins, Mark irregular measures, and status bar's Concert Pitch, Zoom level, and Page View/Continuous View option. These settings, covered in The user interface chapter, are score data. They are saved to and loaded from each score file. Templates contain these settings and will be used when you create a new score from a template, see Setting up your score.
Creating a new workspace
To create a new workspace:
- Click on the current workspace name in the status bar below the document window. Alternatively, select View→Workspaces→Configure workspace
- Click on Create new workspace
- Fill in the name of the workspace, choose the options it contains so that only these options are loaded and saved when the workspace is used.
- Click Select to close the dialog.
To customize the palettes display and contents, see palettes.
To customize the display of toolbars and panels, see Toolbars and panels.
Deleting a workspace
- Click on the current workspace name in the status bar below the document window. Alternatively, select View→Workspaces→Configure workspace
- Select the workspace to be deleted
- Click on the trash icon at the top of the dialog.
Switching between workspaces
- Click on the current workspace name in the status bar below the document window.
- In the resulting dialog box, click on the desired workspace
- Press Select.
Alternatively
- Select View→Workspaces→Configure workspace
- Click on the desired workspace in the menu.
Keyboard shortcuts
Overview
MuseScore commands can be accessed via the main menus, toolbars, Properties panel or context menus, or by using keyboard shortcuts.
Pre-existing keyboard shortcut are shown alongside the commands in the main menus or context (right-click) menus, or by hovering the mouse pointer over an icon in a toolbar.
Alternatively, you can view a list of commands and their shortcuts in Edit→Preferences→Shortcuts. This is also the place where you can create a shortcut or change an existing one. To locate a command in the list either scroll down the alphabetical order, or enter an appropriate keyword in the “Search shortcut” box.
Defining a shortcut
To define a new shortcut, or change an existing one:
- From the menu bar, select Edit→Preferences→Shortcuts
- Find the relevant command in the alphabetical list; use the Search box if needed.
- Either double-click the relevant entry, or select the entry and click Define…
- With the Enter shortcut sequence dialog open, press and hold the sequence of keys on your keyboard to use as the new shortcut.
- Press Save (or Cancel to exit the dialog without changing anything).
Resetting and clearing shortcuts
To reset a shortcut to its default:
- From the menu bar, select Edit→Preferences→Shortcuts
- Find the relevant command in the alphabetical list; use the Search box if needed.
- Select the entry and press Reset to default.
To clear (i.e. delete) a shortcut:
- From the menu bar, select Edit→Preferences→Shortcuts
- Find the relevant command in the alphabetical list; use the Search box if needed.
- Select the entry and press Clear.
Note: You can select more than one shortcut if needed. Press the Shift key to establish a continuous range, or the Ctrl key for a list.
Importing and exporting shortcuts
To save the existing shortcuts or import a list of your own:
- From the menu bar, select Edit→Preferences→Shortcuts
- Press Export to save the list; or Import to load a new shortcut list.
Preferences
To edit Preferences (the appearance and general behavior of MuseScore), go to Edit→Preferences.
These are divided logically into sections (see below); notice also the three buttons at the bottom of the window:
- Reset preferences: Click on this to reset all preferences to their default values.
- Cancel: Exit preferences without changing anything.
- OK: Exit preferences and apply any user changes.
General
You can specify your language, and autosave interval in “General”. See also Language.
“Program start” allow you to choose what, if any, score you want displayed in the edit window after launching.
“Folders” allows you to customize locations for any user folders (though it’s a good idea to leave them at default to start with if you are a new user).
Appearance
Choose between light and dark options, and specify the accent color; there is also a high contrast option for visually impaired users.
The system font is also the default for the MuseScore UI, but you can alter this if desired—and the font-size.
You can set the score paper/color option and the background. For visually impaired there is an “Invert score” option which inverts the score colors (white to black and vice versa)
Canvas
Specify the default zoom level of the score, and the mouse zoom precision. Also how you want your score pages to scroll, and the degree of precision of mouse selection.
Save & publish
Specify the autosave duration and options relating to generating and publishing audio on musescore.com and audio.com.
Note input
Here you can specify whether to advance to the next note on key release (in MIDI input), whether to color notes outside of an instrument's usable range, whether to play notes when editing (and for how long), and customise how voice assignment for dynamics works.
Score
Customize the default order of instruments for new scores, and default styles for scores and parts.
Audio & MIDI
Specify audio device, buffer size and sample rate, MIDI input and output devices, and customize mixer behaviour.
MIDI mappings
Here you can map certain keys of your external MIDI keyboard to certain actions, for example to start or stop score playback, set note-entry duration, and so on.
Import
Here you can specify a custom style file to use for imported files (MIDI and MusicXML), set the character set for imported binary files, customise MusicXML import, set the shortest note value to use in imported MIDI files, and choose whether to import the layout in MEI files.
For details of the MusicXML options, see Working with MusicXML files.
Shortcuts
See Keyboard shortcuts for more information.
Update
By default MuseScore automatically checks for updates when online. You can turn this off by unchecking the box.
Folders
Specify the default folders for scores, style files, templates, plugins and soundfonts.
Advanced
A number of specialized options can be accessed here, such as voice color, and palette behavior.
Braille
Enable or disable the braille panel, and customize its behavior.
Plugins
Not to be confused with VST and VSTi.
Overview
A MuseScore plugin is a small piece of software that adds extra functionality to the program. A plugin need to be enabled first, and then executed by using the Plugins menu. Some plugins come pre-installed, they are disabled by default. There are also plugins created and shared by other musicians, anyone can download and use them.
Managing plugins
Installing a new plugin
- Search for available plugins at, for example:
- https://musescore.org/plugins [musescore.org→Download→Plugins]
Warning: Plugins can potentially contain bad or malicious code, which compromise the machine and damage the scores. All plugins shared on musescore.org's plugin repository are unvetted. No warranty of any kind is provided. Users should download from a trusted author or double-check the code themselves. Seek advice on the Plugins forum. - https://github.com/topics/musescore-plugin
- https://github.com/topics/musescore-plugins
- https://musescore.org/plugins [musescore.org→Download→Plugins]
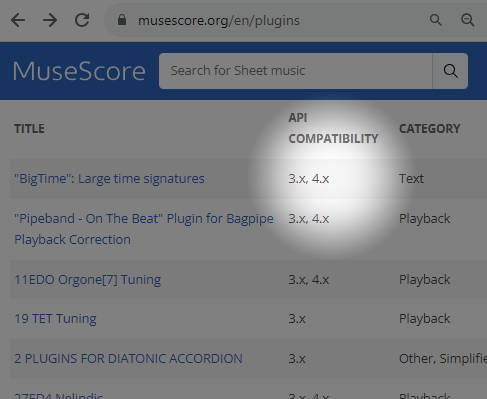
- Make sure it is compatible with Musescore version.
- Download the file:
- for musescore.org hosted .qml files, sometimes a web browser open it as plain text and refuses to download it as file. In that case, right click on a link and select Save link as...
- for github.com unpackaged code, download the project as a zip file by clicking Code: Download ZIP
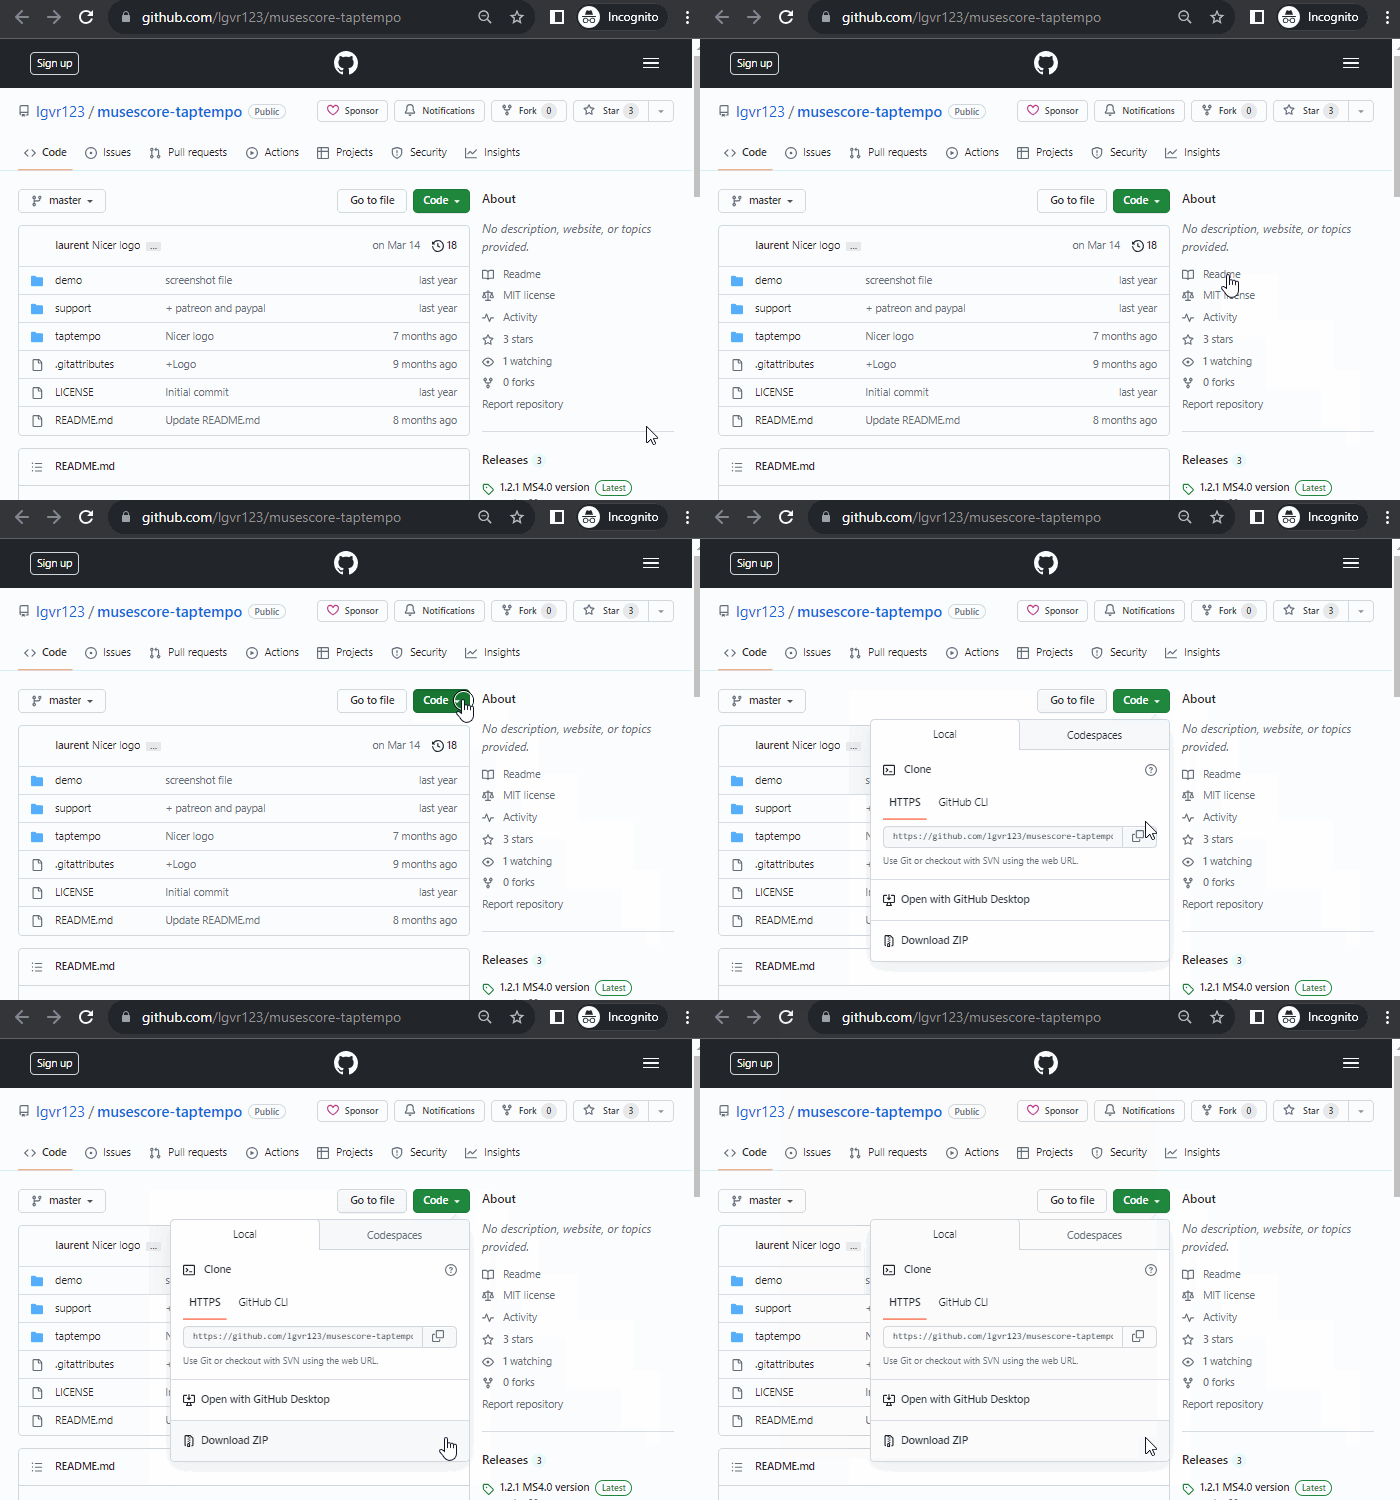
- for github.com packaged release, click on an appropriate item under Assets
- (If it is a zip file) Extract it using an archive extraction software.
- Move the files to MuseScore's plugins folder, configurable at Preferences:General:Folders. The default directories are
- Windows: C:\Users\[Your User Name]\Documents\MuseScore4\Plugins\
- macOS: ~/Documents/MuseScore4/Plugins/
- Linux: ~/Documents/MuseScore4/Plugins
Updating an existing plugins
Updating works the same way as installing, but remember to remove the files from the previous version to avoid duplicate plugins!
Enabling and disabling plugins
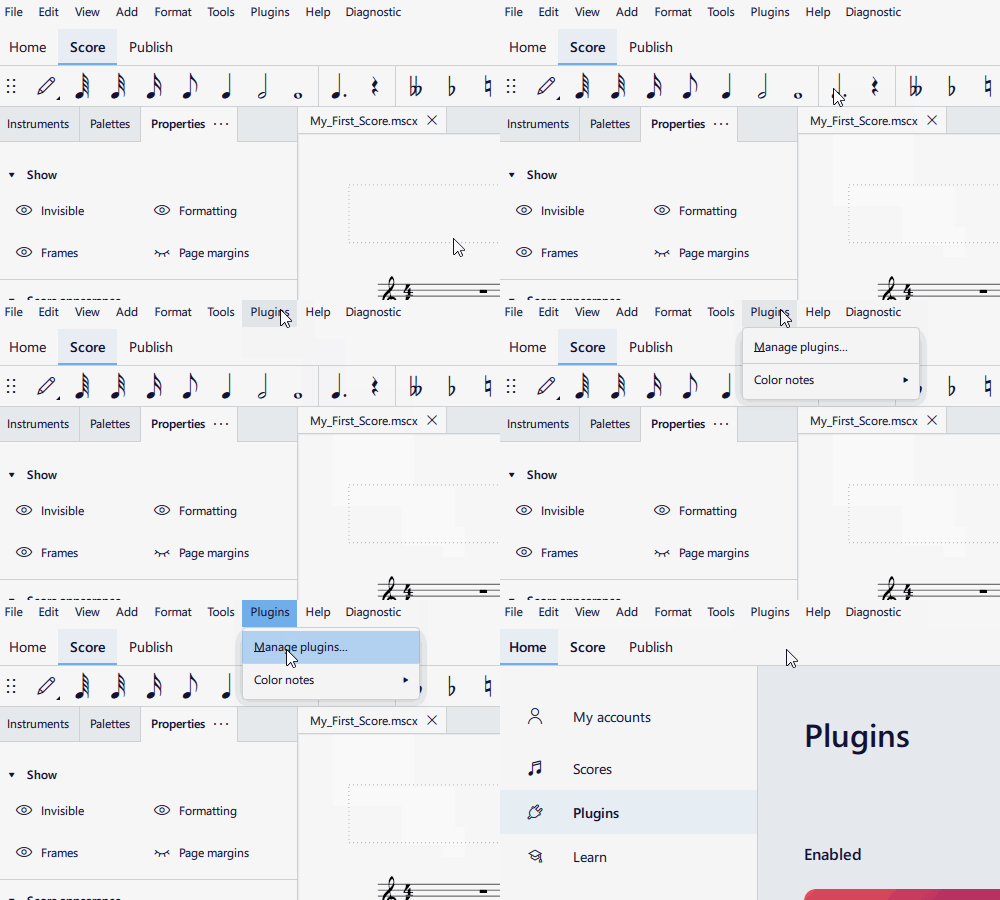
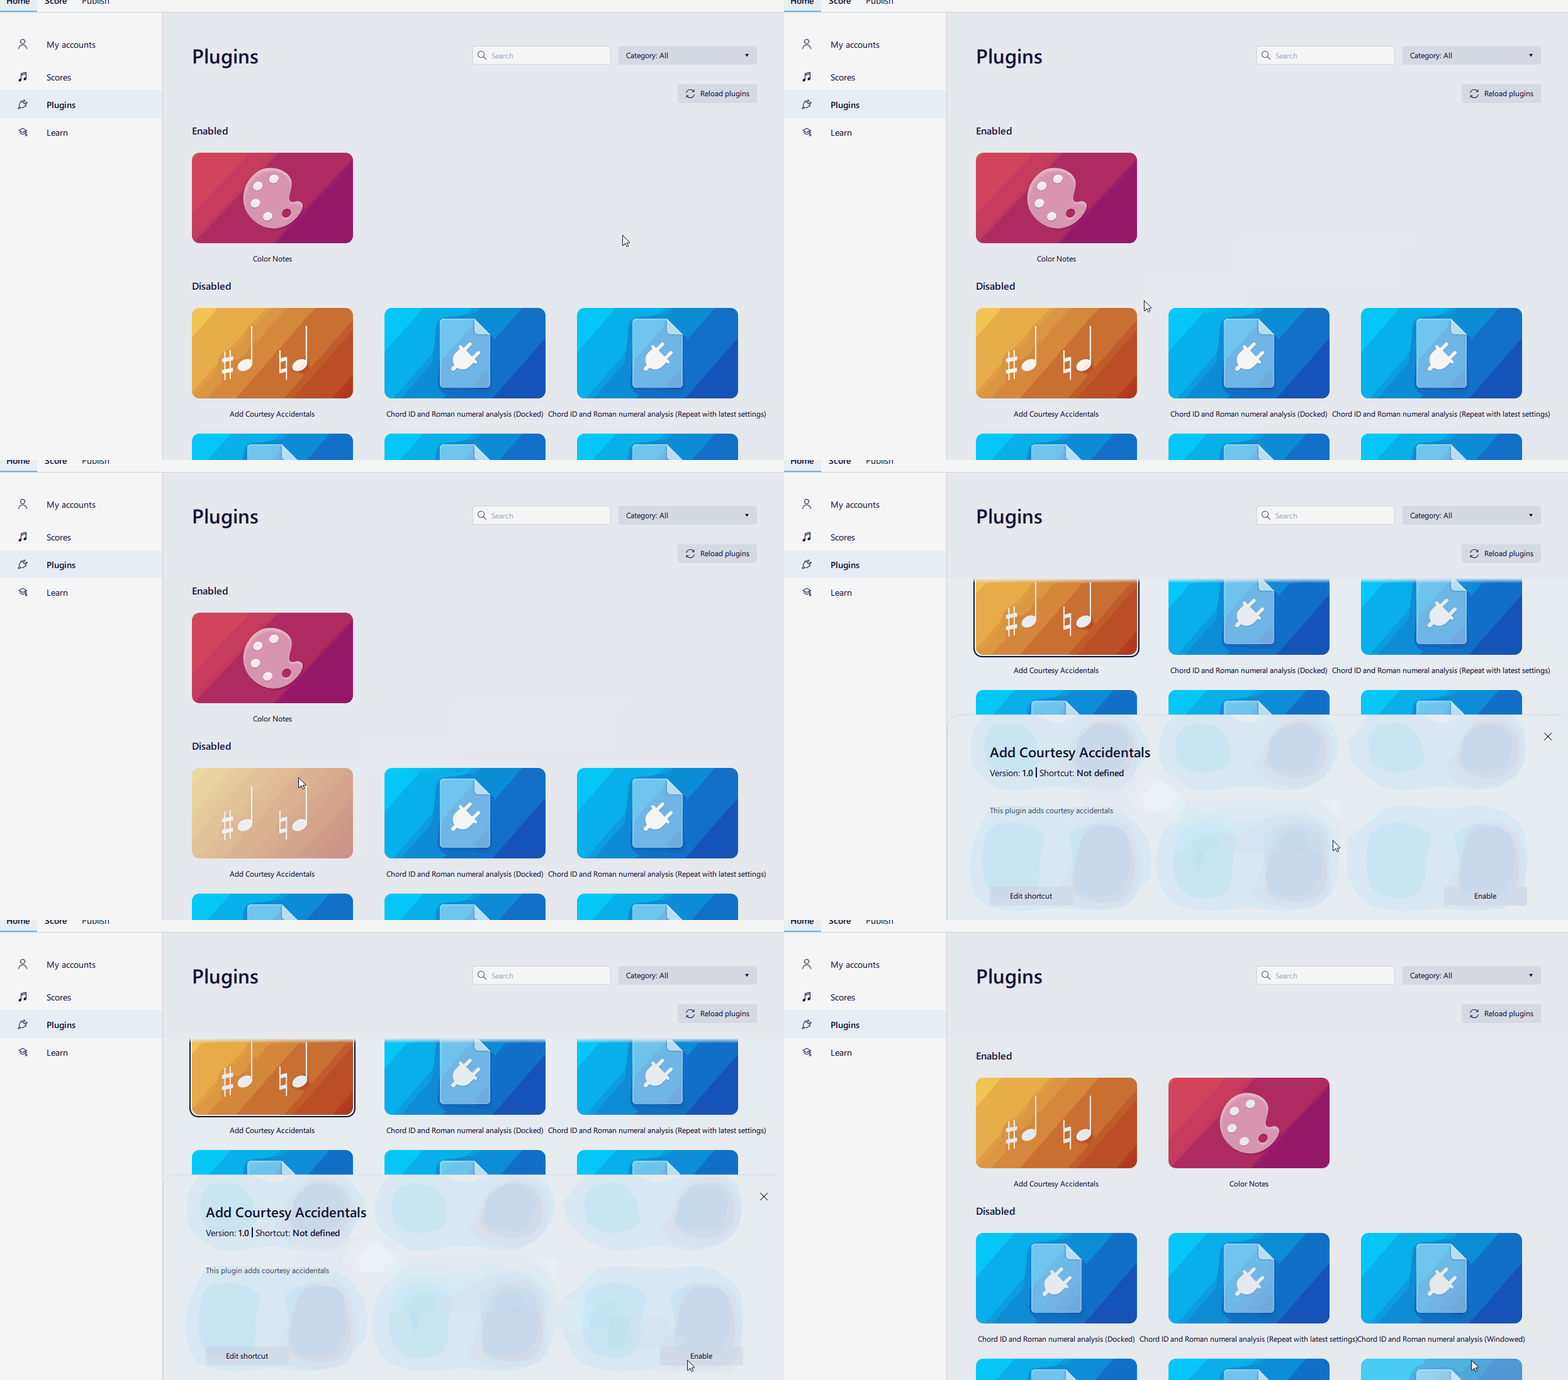
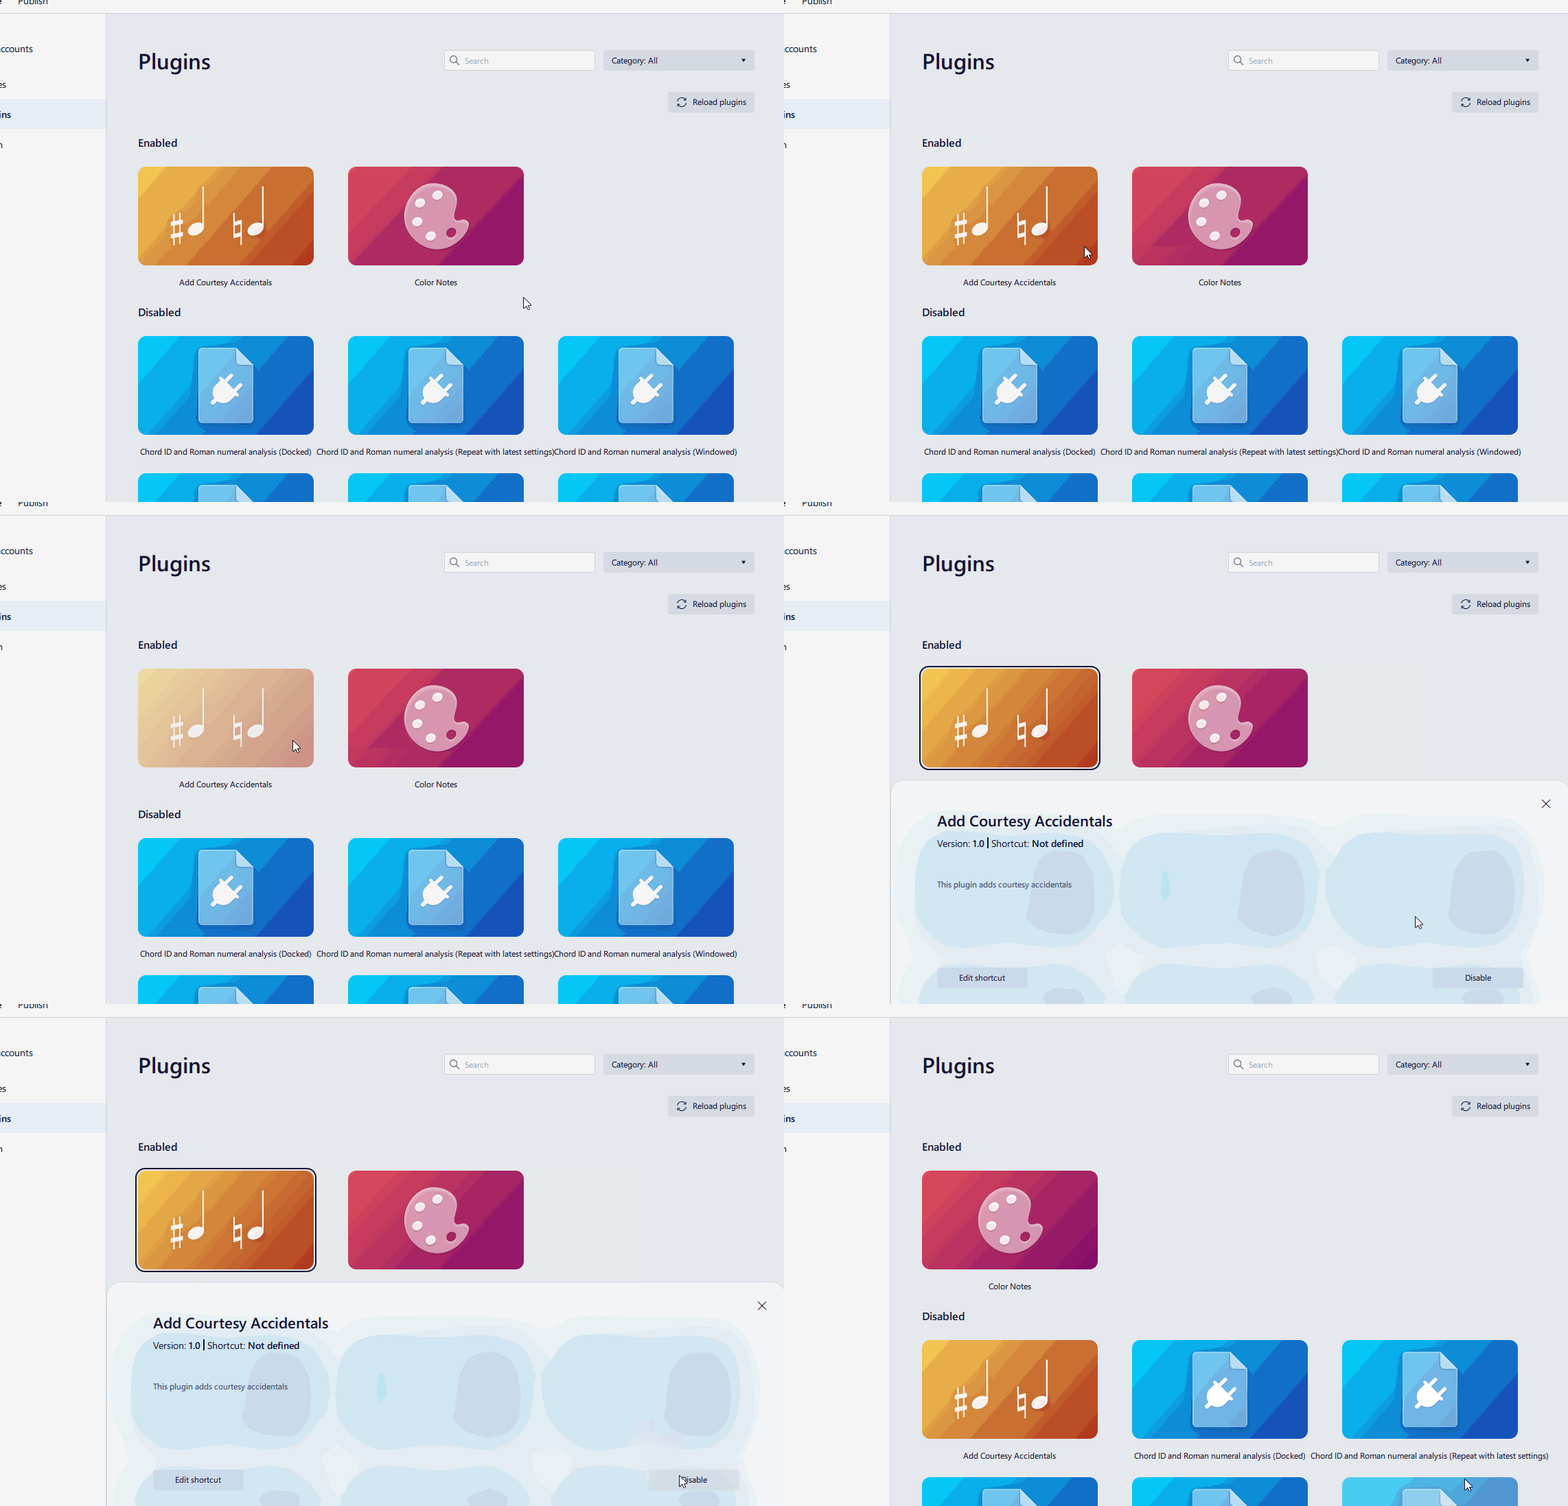
- Click Home: Plugins or Plugins: Manage plugins...
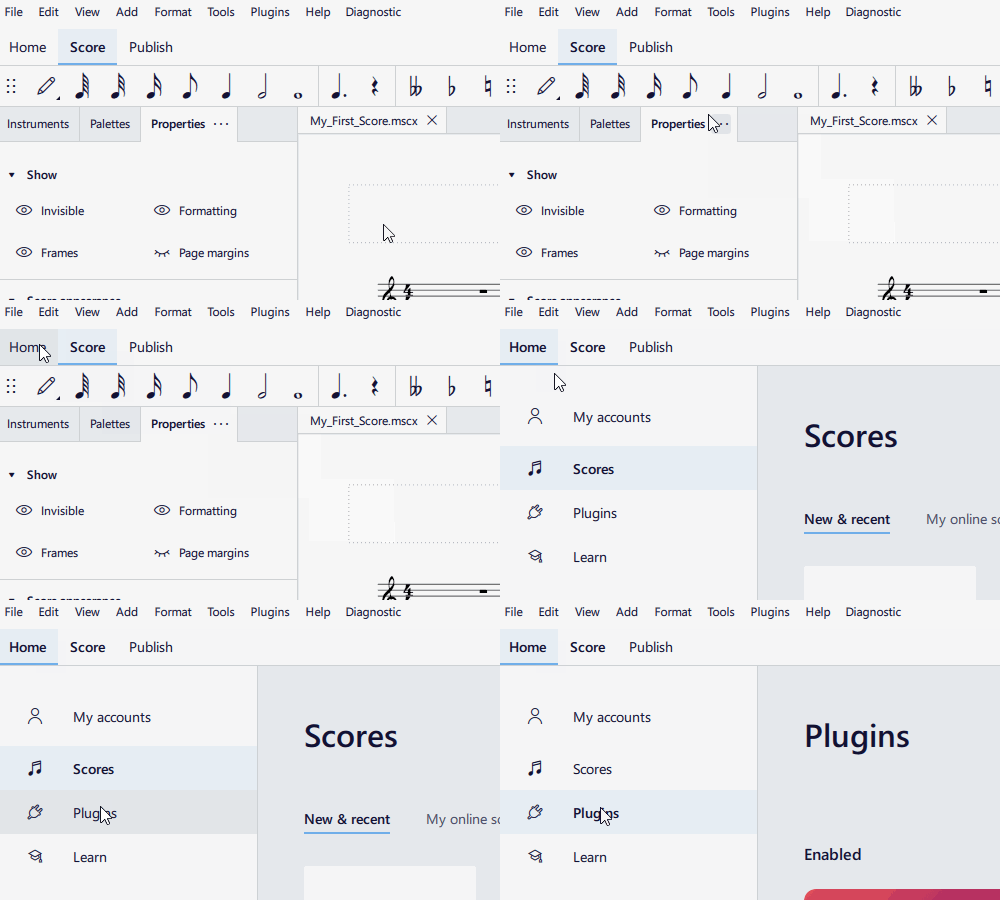
- Select a plugin and click Enable or Disable
Running a plugin
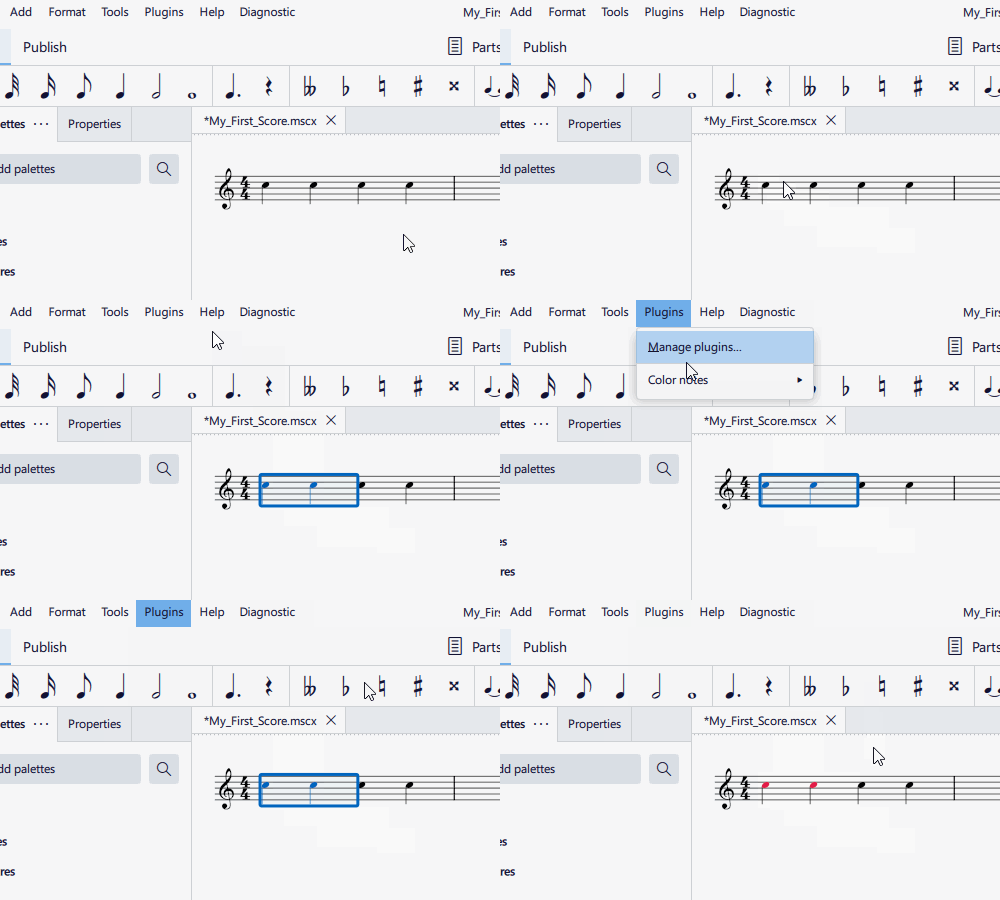
- Make sure the Score tab is currently opened.
- Select Plugins → [The plugin name]
To assign a keyboard shortcut a plugin, use Home: Plugins or Plugins: Manage plugins....
Pre-installed plugins
[work in progress, please provide missing info, write brief info on each]
See https://github.com/musescore/MuseScore/tree/master/share/plugins
- Add Courtesy Accidentals
- Color Notes
- Lilypond Lyrics
- Mirror Intervals
- Modal Temperaments
- Modal Tuning
- New Retrograde
- Note Names
- Remove Courtesy Accidentals
- Tuning
Create a plugin
The plugin system of Musescore 4 is currently being redesigned and reimplemented.
As of October 2023, Musescore 4.1.1 plugin system is mostly a somewhat restricted version of the Musescore 3 plugin system. Visit Developers' Handbook Plugins for 3.x Chapter for fundamentals, and Plugins for 4.x Chapter for info on the new parameters and porting a Musescore 3 plugin to MuseScore 4.