Tablature
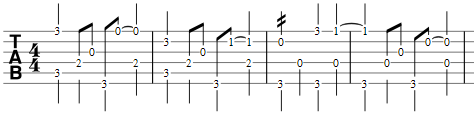
Music for fretted, stringed instruments is commonly notated using tablature, also known as tab, which provides a visual representation of the strings and fret numbers:

Tablature can also be combined with traditional staff notation:

Create a new tablature staff
If you wish to create tablature as part of a new score, use the New Score Wizard. If you want to add tablature to an existing score, use the Instruments dialog. Or, alternatively, you can convert an existing standard staff. See below for details.
With the New Score wizard
To create tablature in a new score (for combined staff/tablature systems see → below):
- Open the New Score wizard.
- Enter the score details (optional). Click Next.
- On the Choose template file page, click on Choose Instruments under "General".
- On the Instruments page, select the desired tablature in the "Strings – plucked" category, in the left-hand column. Then click Add.
- Complete the rest of the New Score Wizard.
Note: If the desired tablature is not available in the Choose Instrument list, add a tablature staff anyway at step 4 (above). Then edit the tablature to your exact requirements using the Staff/Part properties dialog.
With the Instruments dialog
To add a single tablature staff to an existing score (for combined staff/tab system see below):
- Open the instruments dialog (press I; or from the menu bar, select Edit → Instruments…).
- Click on the staff to which you want to add another (linked or not).
- Add the tab staff as described in Add instruments ("Create a new score").
By changing staff type
To convert an existing standard staff to tablature, or tablature to a standard staff:
- Right-click into an empty spot of the staff and select Staff/Part Properties…. If "Instrument" is already set to a plucked-strings type, then go to step 3.
- If "Instrument" is not a plucked-strings type, click on Change instrument and select an appropriate instrument from "Strings – Plucked."
- Click on Advanced Style properties, select the appropriate tablature option from "Template", then press < Reset to Template. You can fine tune the display if necessary using the "Fret Marks" and "Note Values" tabs.
- Click OK twice to exit.
Edit string data
Change tuning
Note: If you only want to view (rather than change) the instrument tuning, follow steps 1 and 2 only.
-
Right-click on the staff and select Staff/Part Properties….
-
Press the Edit String Data… button at the bottom of the dialog box. The String Data dialog opens:
-
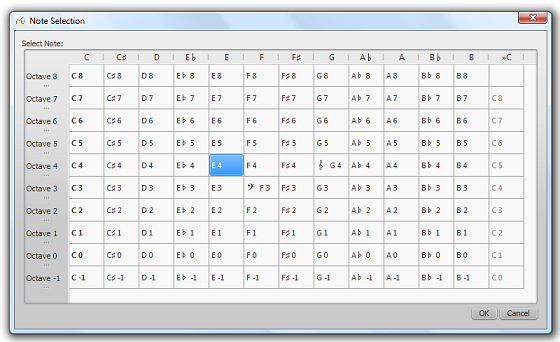
Click on a string pitch and select Edit String…. Or, alternatively, just double-click the string pitch.
- Select a new pitch in the Note Selection box and click OK. Or, alternatively, just double-click the new pitch.
- Click OK to close the "String Data" dialog box. Then click OK to close the "Staff/Part Properties" dialog.


Notes: (1) If tuning is changed when the tablature for that instrument already contains some notes, fret marks will be adjusted automatically (if possible); (2) Any change of tuning to a particular instrument applies only to the score at hand, and does not change any program default settings.
Add a string
- Right-click on the staff, select Staff/Part Properties…, then press Edit String Data.
- Click on a string pitch and select New String....
- Select the new pitch and press OK—or, alternatively, just double-click the new pitch. The new string is inserted below the selected string.
Note: After adding a tablature string you will need to adjust the number of lines in the Staff/Part properties dialog.
Delete a string
- Right-click on the staff, select Staff/Part Properties…, then press Edit String Data.
- Click on a string pitch and select Delete String.
Note: After deleting a tablature string you will need to adjust the number of lines in the Staff/Part properties dialog.
Mark unfretted string "open"
This feature is used to mark a (bass) course as unstopped (i.e. like a harp string, only played in the open position): as on a Baroque lute or Theorbo etc. This means that only "0" (zero) or "a" is accepted as a fret mark: any other fret mark will be converted to 0/a.
- Right-click on the staff, select Staff/Part Properties…, then press Edit String Data.
- Check one or more boxes in the "Open" column.
Change number of instrument frets
This property defines the maximum fret number which can be entered on a tablature staff.
- Right-click on the staff, select Staff/Part Properties…, then press Edit String Data.
- Select or enter a new number in the "Number of frets" spin box.
Change tablature display
From Staff / Part Properties
To access the full range of tablature display options, use the Staff / Parts Properties dialog:
- Right-click on the staff and select Staff/Part Properties….
- Click on the Advanced Style Properties… button.
From the Instruments dialog
Some basic tablature display options are available from the Instruments dialogue:
- Press the keyboard shortcut I; or from the menu bar, select Edit → Instruments….
- Select a tablature type from the drop-down list under "Staff Type" in the right-hand pane:
- Simple: Displays fretmarks only. Best for staff/tablature systems.
- Common: Displays fretmarks, note stems and beams.
- Full: Displays fretmarks, enhanced note stems, beams, and rests.
- Italian/French: Historical tablature options for the lute.
The same options are available from the Choose Instruments page of the New Score Wizard.
Combine pitched staff with tablature
Plucked-string instruments—such as the guitar—are commonly notated using both a music staff and tablature (TAB) together. MuseScore gives you the option of having the two staves either unlinked or linked:
-
Unlinked Staves: The advantage of using this option is that each staff can be edited independently. To transfer music notation from one staff to the other, select the desired range and copy and paste it onto the other staff.
-
Linked Staves: The staves are "mutually updating": i.e. any change you make to the notation in one staff is immediately applied to the other staff as well.
A note on fret mark conflicts: When the same note is entered in two different voices, MuseScore tries to ensure that the fret marks do not overlap on the same string. Any overlaps which do occur are marked with red squares: these appear only in the document window and not on any printed copy. In almost all cases (e.g. frets 0 to 4 on the 6th string), overlapping is the desired result and no further adjustment is required. You can hide the red marks by selecting "View" and unticking "Show Unprintable."
Create a new staff/tablature pair with the New Score Wizard
- Open the New Score wizard.
- Enter the score details (optional). Click Next.
- On the Choose template file page, click on Choose Instruments under "General".
- Select a music staff (not tab) in the "Strings – Plucked" section of the left-hand column. Then click Add.
- In the right-hand column, click on the newly-created line, labelled "Staff 1". This reveals the "Add Staff/Linked Staff" options in the centre column:
- Click Add Staff to create an unlinked staff/tab pair.
- Click Add Linked Staff to create a linked staff/tab pair.
- In the Staff type column, click on the dropdown list for the newly-created staff and select a tablature option (this can be modified later, if required, on the score page—see Staff/Part Properties).
- Change the staff order using the ↑ button if needed.
- Complete the rest of the New Score Wizard, or click Finish.
Note: To create unlinked staves with separate mixer channels, instead of step "5" (above), select a Tablature staff in the left-hand column and click Add. Then continue with steps 6 and 7.
Create a new staff/tablature pair in an existing score
- Open the Instruments editor (press I, or from the menu bar, select Edit → Instruments…).
- Then follow steps 4–8 above.
Create a staff/tablature pair from an existing staff
To add tablature to a plucked-string staff in the score (or vice versa):
- Open the Instruments editor (press I, or from the menu bar, select Edit → Instruments…).
- In the right-hand column, select the staff you want to create the staff/tab pair from, then follow one of the options shown in step 5 above.
- Continue with steps 6–8 above.
Enter notes in tablature
Using a computer keyboard
- In Normal mode, select the measure or existing note from which you want to begin note entry.
- Switch to note input mode (N): a short 'blue rectangle' appears around one tablature string: this is the current string.
- Select the duration of the note or rest that you wish to enter (see below).
- Press the up/down arrow keys to move the cursor to the desired string. Use the left/right arrow keys to navigate through the score.
-
Press 0 to 9 to enter a fret mark from 0 to 9 on the current string; to enter numbers with several digits press each digit in sequence. Keys A to H and K can also be used: convenient when working in French tablature. For L , M, N, use the alphanumeric keyboard and type respectively 10, 11, 12... (Note: You cannot enter a number higher than the "Number of frets" value set in the Edit String Data dialog).
Press ; (semicolon) to enter a rest of the selected duration.
-
You can enter notes in different voices if required—just as you would in a standard staff.
See also, Edit notes (below).
Historical tablature
Period notation for bass strings (lutes and sim.) is supported:
-
French tablature: letters with prefixed slash-like strokes right under the tab body: i.e. 7th string: "a", 8th string: "/a", 9th string: "//a" and so on, all in the first position below the tab body.
-
Italian tablature: numbers with 'ledger line'- like segment of string above the tab body: i.e. 7th string: "0" one position above the tab body with one 'ledger line'; 8th string: "0" two positions above the tab body with two 'ledger lines' and so on.
Input of fretmarks is via computer keyboard only: by moving the note entry cursor below (French) or above (Italian) the tab body, 'shadow' slashes or ledger lines will indicate the target string to which the fret mark will be applied; pressing one of the fret keys, will enter (and lay out) the note on that string.
Using a mouse
To enter notes into tablature with a mouse:
- Enter note input mode and select the note or rest duration (see below).
- Click on a string to create a note there. Notes are initially created on fret 0 (or a for French tablatures): to correct, type in the right number from the keyboard.
- You can also increase/decrease the fret mark using Alt+Shift+↑ or Alt+Shift+↓.
- You can enter notes in different voices if required—just as you would in a standard staff.
See also, Edit notes (below).
Select note duration
In note input mode, you can use any of the following methods to set note duration in tablature:
- Press Shift+1 to Shift+9: Sets duration from a 128th to a longa (availability of these shortcuts may depend on the platform and/or keyboard layout);
- Press NumPad1 to NumPad9: Sets duration from a 128th to a longa (if a numeric keypad exists and NumLock is on);
- Click on a note duration icon in the Note Input toolbar above the document window;
- Press Q to decrease the selected duration and W to increase it.
Edit notes
Change fret number
In Note input mode:
- Position the cursor above the fret mark and retype the desired number.
- Increment or decrement the fret mark using Alt+Shift+↑ or Alt+Shift+↓ (The fret mark automatically changes strings, if necessary, to achieve the lowest possible fret position).
In Normal mode:
- Select one or more fret marks.
- Use any of the following commands:
- To increment or decrement, without changing the string: Press ↑/↓.
- To increment or decrement, changing strings, when possible, to minimize the fret number: Press Alt+Shift+↑/↓
Note: The fret mark cannot be higher than the "Number of frets" value set in the Edit String Data dialog.
Change string number
To move the fret mark to an adjacent string without changing the pitch (if the string is free and can produce that note):
In Note input mode:
- Position the cursor over a fret mark, and press Ctrl+↑/↓ (Mac: Cmd+↑/↓).
In Normal mode:
- Select one or more fret marks, and press Ctrl+↑/↓ (Mac: Cmd+↑/↓).
- Drag a fret mark up or down to an adjacent string.
Crosshead notes
To change a fret mark to a crosshead note:
- Select one or more fret marks (in non-note-input mode).
- Press Shift+X to toggles ghost noteheads on/off.
Summary of keyboard commands
Note input mode
| Type: | to get: |
|---|---|
| ↑ | Select above string as current. |
| ↓ | Select below string as current. |
| Shift+1 to Shift+9 | Select a duration (128th to a longa) |
| NumPad1 to NumPad9 | Select a duration (128th to a longa) |
| Q | Decrease current input duration. |
| W | Increase current input duration. |
| 0 to 9 | Enter a fret digit / letter. |
| A to H, K | Enter a fret letter / digit. |
| Alt+Shift+↑ | Increase current fret mark. |
| Alt+Shift+↓ | Decrease current fret mark. |
| ; (semicolon) | Enter a rest |
Normal mode
| Type: | to get: |
|---|---|
| 0 | Change note to rest |
| 1 to 9 | Change duration of selected note or rest (128th to longa) |
| Alt+Shift+↑ | Increase the pitch of the selected note (MuseScore chooses the string). |
| ↑ | Increase the pitch without changing string. |
| Alt+Shift+↓ | Decrease the pitch of the selected note (MuseScore chooses the string). |
| ↓ | Decrease the pitch without changing string. |
| Ctrl+↑ (Mac: Cmd+↑) | Move note to above string, keeping the pitch. |
| Ctrl+↓ (Mac: Cmd+↓) | Move note to below string, keeping the pitch. |
| Shift+X | Toggle the ghost notehead on/off. |
External links
| Прикрепленный файл | Размер |
|---|---|
| freight_train_tab.png | 10.3 KB |
| Note selection_en.png | 68.4 KB |
| LAS MUJERES LO BAILAN BIEN BANDA - Trumpet in Bb 2_240923_181258.pdf | 69.8 KB |