About the handbook
MuseScore versions covered
This handbook is valid for MuseScore version 4.0 and above.
If you're using a different version of the program, please consult the appropriate handbook for your version:
Exploring the handbook
Browsing chapters
Use the chapter links on the main page to explore content in each chapter of the handbook.
There is also a single-page view of the entire handbook, which can be used with your browser's find-in-page facility (shortcut: Ctrl+F, or Cmd+F on macOS).
Searching the handbook
To search the handbook, use the dedicated search field in the top right of each handbook page.

If you're not sure what to search for, try browsing the Glossary. It has pictures to help you to find things that you are unable to name.
You can also try a web search using this special syntax to only include results from MuseScore.org:
site:musescore.org your topic here
This works with most search engines. For example, perform a Google search for "site:musescore.org tempo markings".
If you still can't find the information you need, please ask for help in the Support Forum.
Reading in a different language
The handbook is translated into several languages, although translations are not always up-to-date with the English version. Pages are translated individually, so not every page is available in every language.
To read the handbook in a different language, use the languages dropdown displayed in the top right of each handbook page, directly below the Search field. If a particular language isn't available in the dropdown this means the page hasn't been translated into that language yet.

In case of doubt, please consult the English version of the handbook, or ask for help in one of the forums. Use the Support and bug reports forum if posting in English, otherwise use the appropriate forum for your language.
Downloading the handbook
To save a copy of the handbook to your computer for offline viewing:
- Visit the single-page view of the entire handbook.
- Open your browser's Print facility (shortcut: Ctrl+P, or Cmd+P on macOS).
- Choose the option labelled Print to PDF, Save to PDF, or similar.
- Make sure you are saving a file rather than printing a physical copy.
If you require a physical copy, it's best to follow the above steps to create a PDF, then check the PDF is formatted correctly before you proceed to print it with a real printer. The handbook is quite long, so please don't print a physical copy unless you really need to.
Contributing to the handbook
The handbook is maintained and translated by the MuseScore community. If you'd like to help write content, please read Editing the handbook.
If you want to translate pages, please read How to translate the handbook.
Editing the Handbook
Guidelines for writing articles
So you'd like to contribute to the MuseScore 4 handbook – great! We're so happy you're here.
This page contains brief guidelines to get you started with writing articles. Please read this page carefully before editing anything in our handbook. This information is intended to help, but if you're in doubt about anything or have any questions, please join the discussion on the Documentation forum.
Structure - General principles
Each page should explain a single topic more or less completely. If a page feels like it is getting too long, try splitting it into separate pages.
Not every page is identical, but keeping the following in mind can help you structure your page content in a way that's easy to understand for the reader:
Start with an overview
Starting your page with an overview can help introduce a topic before launching into details. Overviews don't usually need a section heading.
Establish a hierarchy
Think about what most users will be trying to achieve, and why they might be coming to the handbook to look for information. Put solutions for the most common tasks towards the top of the page; less commonly needed information can go towards the bottom.
Group information logically
Related concepts should be discussed together. This may sometimes require less-commonly-used features to be discussed alongside more-commonly used ones, but that's okay.
Focus on user tasks, not just UI components
For instance, a section about "Creating custom key signatures" is better than a section called "Using the master palette".
Create a table of contents
Please be sure to enable the "Generate a table of contents" option for all Handbook pages.
Headings
In an effort to ensure consistency of style for community-written pages, we have already provided headings on many pages. Please organize your content within this structure. For pages that lack headings, feel free to create your own in a style similar to that used elsewhere.
For accessibility reasons, headings should never be formatted in regular bold text. All headings need to be formatted as tags with semantic meaning.
All pages start by default with a Heading 1. The first section heading you will enter will therefore always be a Heading 2. Please also don’t skip heading levels (By, for example, adding a heading 4 after a heading 2).
| Heading level | Usage and MarkDown syntax |
|---|---|
| Heading 1 | Default for all page headings (Not editable by contributors) |
| Heading 2 | Use for the start of every section. MarkDown syntax: ## Heading name |
| Heading 3 | Use for the start of every sub-section, and to introduce single-step instructions (I.e. where a list is not necessary). MarkDown syntax: ### Heading name |
| Heading 4 | Use sparingly if additional sub-sections are required. MarkDown syntax: #### Heading name |
Lastly, try to always start your headings with a verb. E.g. "Adding time signatures", rather than "Time signatures"
Content
The MuseScore handbook broadly contains two main types of information: descriptive material, and goal-oriented instructions.
Descriptive material
This is used to explain different areas of the program. For example,
A Palette is a folder containing musical symbols which can be applied to the score. MuseScore's default palettes contain collections of related symbols, but you can customize palettes to display almost any kind of symbol, line or text.
Descriptive material tends to be longer and more “fleshed out” than goal-oriented instructions, but we still ask that you use simple, plain language wherever you can.
Goal-oriented instructions
These explain how to perform a specific task. The instructions should be as short and direct as possible, generally taking the form of a numbered list. For example,
To create a new palette
- Open the palettes tab
- Click Add palettes
- Click Create custom palette
- Name your new palette and click Create
Notice that we use bold text for named components of the user interface, including menus. Keyboard shortcuts, such as Ctrl+S, are rendered with <kbd> tags (see Syntax).
When writing goal-oriented instructions, please:
- Use only numbered lists (no dot points)
- Begin each numbered instruction with a verb
- Write only one task/direction per numbered item
For example, instead of writing this:
- Open the palettes tab and click Add palettes
Please write this:
- Open the palettes tab
- Click Add palettes
Please be sure to include keyboard options for goal-oriented instructions, where such options exist. This is especially important for improving the program's accessibility.
Use of non-written media
The use of non-written media is encouraged as a supplement to written descriptions. This includes:
- Animated GIFs
- Screenshots of relevant parts of the user interface
Creating animated GIFs
Animated GIFs offer many advantages over screenshots and videos in that they expose in the shortest amount of time the sequence of actions required to achieve a particular task. There are lots of tools available for creating GIFs, however we recommend the following workflow to ensure crisp and clear image quality while maintaining as small as possible file size (ideally <2MB per GIF).
- Use only the MuseScore 4 interface, and set its appearance to dark mode with blue highlights (to achieve consistency across the entire handbook)
- Plan and rehearse the mouse clicks and keyboard shortcuts you will use, aiming to demonstrate the required steps in as short as possible time (ideally <10s)
- Use a free tool like gifcap to record the contents of your screen
- Use a free tool like KeyCastr to record keystrokes (where required)
- Only show the amount of UI required demonstrate a particular task
Linking to other pages
It's really helpful to link to other pages in the handbook. You might do this wherever you mention a different part of the user interface, or even when referring back to previous versions of the handbook.
There is a specific process for adding links to other handbook pages, which will allow accurate redirects regardless of the language version being read.
Use the right syntax
[node:######,title="Name of the page you want to link to"]
or, to link to a specific heading within the page:
[node:######,fragment="heading-slug",title="Name of the page you want to link to"]
Link to the page's node number, not the page's URL
To find a page's node number:
- Open the desired page in your browser
- Click the "three dots" icon in the top-right of the page
- Click Edit in the context menu that appears
- Click on your browser's search bar to read the URL
You will find the page's node number in the URL address visible in this edit screen (yes, it only appears in the edit screen). It will look something like this:

Use a bookmarklet to autogenerate links
You can use the following code snippet and add it as a bookmarklet to your bookmarks. To do this,
- Select the code snippet
- Drag it to your browser's bookmark bar
Alternatively, you can add a new bookmark to your browser and replace the bookmark's URL with the code snippet. If you are on a page within the handbook that you want to link to, click on the bookmarklet in your bookmarks and copy the displayed link.
javascript:void function(){prompt("",`[node:${drupalSettings.path.currentPath.replace("node/","")}${document.querySelector("meta[property=\"og:title\"]").content?`,title="${document.querySelector("meta[property=\"og:title\"]").content}"`:""}${window.location.hash?`,fragment="${decodeURIComponent(window.location.hash).replace("#","")}"`:""}]`)}();
Taken from node,title,fragment bookmarklet.
Syntax
The handbook is written in MarkDown with a few permitted HTML tags.
If you're not familiar with MarkDown, it doesn't take long to learn. Get started by reading this page first (a MuseScore account is required to properly view the content on that page, also note that you cannot use Filtered HTML anymore).
Examples for stuff beyond MarkDown
- Keys
<kbd><kbd>A</kbd></kbd>, looks like A. (See Writing keyboard shortcuts below.)- Key combinations
<kbd><kbd>Shift</kbd>+<kbd>A</kbd></kbd>, looks like Shift+A. (See Writing keyboard shortcuts below.)- Buttons
<kbd><samp class="button">Advanced Style Properties…</samp></kbd>, looks like Advanced Style Properties…, but this particular form is not used in the MuseScore 4 handbook (instead use bold for text that appears in the program).- Menu entries
__File→Open__, looks like File→Open- Images
<img src="image URL" alt="File name description" width="500px"/>, can be a useful alternative to inline images, where the image width needs to be specified
Writing keyboard shortcuts
Use the <kbd> syntax described above and follow these guidelines:
-
For accessibility reasons, always use words instead of symbols for the names of all whitespace keys, arrow keys, and modifier keys.
-
Good: Cmd+Space; Win+Return; Shift+Tab
-
Bad: ⌘+ ; ⊞+⏎; ⇧+↹
-
-
For keys that represent printable characters, the appropriate character should be used (e.g. write $ not Dollar).
-
Use common abbreviations like Ctrl, Cmd, Esc, Del, PgDn. Don't abbreviate key names that are not normally abbreviated.
-
Except where it matters, prefer Return instead of Enter, and Del instead of Backspace.
-
For combinations, write modifier keys in this order: Win+Ctrl+Alt+Shift+Fn+… (Mac: Ctrl+Cmd+Option+Shift+Fn+…).
When in doubt, consult Default keyboard shortcuts for the canonical way to write key names and combinations.
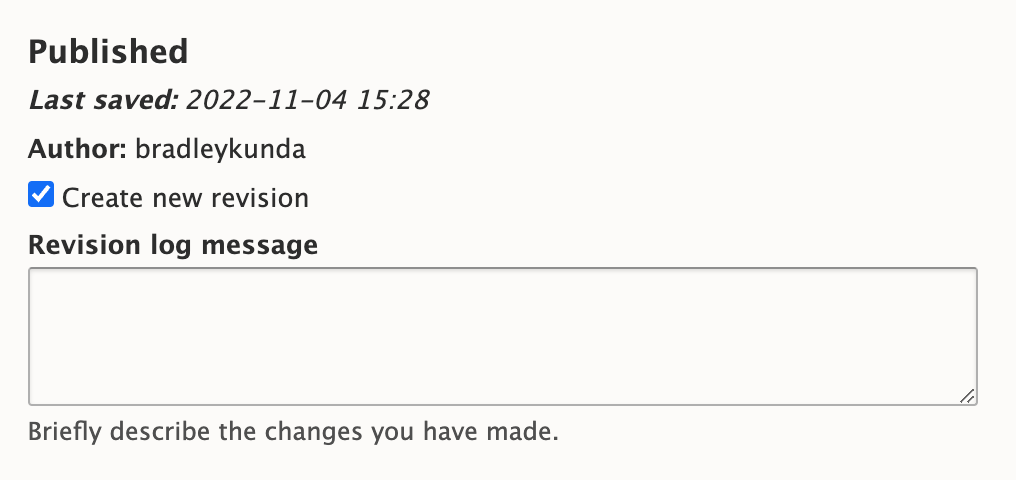
Leaving a revision log message
Finally, whenever you make a change to a page (however big or small!), please leave a concise message that briefly describes the changes you made. For example,
- Added content about xxx
- Added images
- Corrected content
- Added keyboard tags
Leave this information in the Revision log message text field in the right panel of the Edit view for each page: