Temas avanzados
Accesibilidad
Introducción
Este documento fue escrito para usuarios no videntes o con dificultades de MuseScore 2.x. No busca dar una descripción completa de todas las funciones de MuseScore; debe leer esto en conjunto con la documentación común de MuseScore.
MuseScore tiene soporte para el NVDA screen reader de código libre y abierto para Windows. Las funciones en este documento fueros probadas en Windows con NVDA. Por el momento otros lectores de pantalla como el Jaws para Windows, o VoiceOver para macOS no están soportados, podrían funcionar de una manera distinta o no funcionar del todo.
En este momento, MuseScore 2.x es usable mas que nada como un lector de partituras, no tanto como un editor. Este documento se concentrara en las funciones para leer partituras, con una breve descripción de edición de partituras.
Configuración inicial
Cuando ejecute MuseScore por primera vez, es posible que desee desactivar permanentemente la ventana del Centro de Inicio. Para ello, ir a cerrar el Centro de Inicio de la ventana en primer lugar, a continuación, en el menú Edición (Alt+E), elija Preferencias, y allí, desactive la opción Mostrar el Centro de Inicio. Guarde y cierre la ventana de preferencias.
Encontrar tu camino
La interfaz de usuario en MuseScore funciona muy parecido a otros programas de notacion musical, y otros programas orientados a documentos en general. Tiene una ventana de documento principal en la que se puede trabajar con una partitura. MuseScore soporta múltiples pestañas de documentos dentro de esta ventana. También soporta una vista de pantalla dividida para permitirle trabajar con dos documentos a la vez, y puede tener varias pestañas en cada ventana.
Además de la ventana de la partitura, MuseScore tiene una barra de menú a la que se puede acceder a través de los accesos rápidos para los Menús individuales:
- Archivo: Alt+F
- Editar: Alt+E
- Ver: Alt+V
- Agregar: Alt+A
- Notas: Alt+N
- Formato: Alt+L
- Estilo: Alt+S
- Plugins: Alt+P
- Ayuda: Alt+H
De estos, sólo el menú Archivo es de mucho interés cuando se utiliza MuseScore como lector de partitura. Una vez abierto un menú, puede tomar apretar varias veces la tecla Arriba o Abajo antes de que todo se lea correctamente.
También hay una serie de barras de herramientas, paletas, y subventanas dentro de MuseScore, y puede desplazarse a través de los controles en estas usando Tabulador (o Shift+Tabulador para desplazarse hacia atrás a través de este mismo ciclo). Cuando se inicia por primera vez MuseScore, o al cargar una partitura, el enfoque debe estar en la ventana principal de Partitura. Pulsar Tab le lleva a una barra de herramientas que contiene una serie de botones para operaciones como Nuevo, Abrir, Reproducir, etc. La pestaña saltará los botones que no estén activos actualmente. Los nombres y accesos directos (en su caso) para estos botones deben ser leídos por su lector de pantalla.
Una vez que haya atravesado los botones de la barra de herramientas, la siguiente Ventana visitará la paleta. Esto se usaría para añadir varios elementos a una partitura, pero actualmente no es accesible excepto para dos botones que son visitados por Tab: un desplegable para seleccionar entre diferentes espacios de trabajo (un arreglo guardado de paletas), y un botón para crear un nuevo espacio de trabajo.
Si ha abierto una de las ventanas opcionales, como el Inspector, o el Filtro de Selección, la tecla de Tabulación también las visitará. Puede cerrar las ventanas que no necesita yendo al menú Ver y asegurándose de que no se selecciona ninguno de los primeros conjuntos de casillas (las ventanas que aparecen antes de la configuración del Zoom). Por defecto, sólo se debe seleccionar el centro de Inicio, Paletas e Inspector. Consulte Configuración de inicio para obtener instrucciones para deshabilitar el centro de Inicio. F9 puede ser utilizado para cambiar las Paletas mientras que F8 cambiará el Inspector.
Para volver a enfocar la ventana de partitura después de visitar la barra de herramientas, o una subventana, pulse Esc. Esto también borra cualquier selección que hayas hecho en la ventana de Partitura.
Ventana de partitura
Cuando empiece por primera vez MuseScore 2.x, una partitura de ejemplo llamada "My First Score” se carga por defecto. Si desea experimentar con las características de edición, este sería un buen lugar para comenzar. De otra manera, es probable que desee comenzar por la carga de una partitura. MuseScore utiliza el estándar de accesos directos para acceder a los comandos del sistema como Ctrl+O (Mac: Cmd+O) para abrir un archivo, Ctrl+S (Mac: Cmd+S) para guardar, Ctrl+W (Mac: Cmd+W) para cerrar, etc.
Si pulsa Ctrl+O (Mac: Cmd+O) para cargar una partitura, se mostrara un un cuadro de diálogo de archivo bastante estándar. MuseScore puede abrir partituras en su propio formato (MSCZ o MSCX) así como importar partituras en el formato MusicXML estándar, en formato MIDI, o de algunos otros programas como Guitar Pro, Capella, y Band-in-a-Box. Una vez que ha cargado un resultado, se muestra en una nueva pestaña dentro de la ventana de resultados. Puede moverse entre las pestañas en la ventana de partitura usando Ctrl+Tabulador (no aplica para Mac).
Hay algunas cosas interesantes que puedes hacer con una partitura cargada además de leerla nota por nota. Puedes pulsar Espacio para que MuseScore toque la partitura. Puede utilizar Archivo / Exportar para convertir a otro formato, incluyendo PDF, PNG, WAV, MP3, MIDI, MusicXML, etc. Y, por supuesto, usted puede imprimir a través de Archivo / Imprimir o Ctrl+P (Mac: Cmd+P).
Si una partitura contiene varios instrumentos, es posible que ya tenga partes enlazadas generadas. Las partes enlazadas se presentan como pestañas de parte dentro de las pestañas de partitura, pero actualmente, no hay forma de navegar por estas pestañas de parte usando el teclado. Las partes normalmente no contendrían información diferente de la partitura; simplemente se mostrarían de manera diferente (cada parte en su propia página). Si una partitura no tiene partes generadas, puede hacerlo a través de archivo / Partes, y ese diálogo es accesible. Si desea imprimir las partes, puede solucionar la imposibilidad de acceder a las pestañas de las partes de forma individual mediante el diálogo Archivo / Exportar Partes, que automáticamente exporta PDF (u otros formatos) para todas las partes en un solo paso.
Leer partituras
Cuando cargue una partitura por primera vez, la ventana de partitura tendra el foco en el teclado, pero no habrá nada seleccionado. El primer paso para leer una partitura es seleccionar algo, y el lugar más natural para comenzar es con el primer elemento de la partitura. Ctrl+Inicio (Mac: Cmd+Inicio) selecciona el primer elemento en la partitura. Probablemente también querrá usar esto, en caso de que alguna vez despeje su selección pulsando Esc.
A medida que navega entre los elementos, su lector de pantalla debe dar el nombre del elemento seleccionado (muy probablemente la clave al principio del pentagrama superior de su partitura). Lo oirás leer el nombre del elemento (por ejemplo, "clave de sol") y también dar información de posición (por ejemplo, "Compás 1; Pulso 1; Pentagrama 1"). La cantidad de información leída no es actualmente personalizable, pero hemos tratado de colocar lo más importante en primer lugar para que pueda pasar rápidamente al siguiente elemento antes de que haya terminado de leer, o simplemente la ignore el resto de lo que se lee. Pulsar Shift actualmente interrumpe la lectura, lo que también podría ser útil.
La mayor parte de la navegación en MuseScore se centra sólo en las notas y los silencios: saltará las claves, las armaduras de clave, las indicaciones de compás, las líneas divisorias y otros elementos. Así que si usted sólo tiene que utilizar las teclas estándar Derecha y Izquierda para moverse a través de su partitura, sólo escuchara acerca de las notas y silencios (y los elementos vinculados a ellos). Sin embargo, hay dos comandos especiales de navegación que usted encontrará útil para obtener un resumen más completo de la partitura:
- Elemento siguiente: Ctrl+Alt+Shift+Derecha (Mac: Cmd+Option+Shift+Derecha)
- Elemento anterior: Ctrl+Alt+Shift+Izquierda (Mac: Cmd+Option+Shift+Izquierda
Estos comandos incluyen claves y otros elementos que los otros comandos de navegación se saltan, y también navegar a través de todas las voces dentro del pentagrama actual, mientras que otros comandos de navegación, tales como Derecha y Izquierda sólo navegan a través de la voz actualmente seleccionada hasta que haga explícitamente el cambio de voces. Por ejemplo, si usted está en una negra en el pulso 1 del compas 1, y hay dos voces, en ese compas, a continuación, pulsar el botón Derecha y pasará a la siguiente nota de voz 1—que será pulso 2—mientras que pulsando Ctrl+Alt+Shift+Derecha (Mac: Cmd+Opción+Shift+Derecho) va a permanecer en el pulso 1 sino que se mueve a la nota de la voz 2. Sólo una vez que se haya movido a través de todas las notas en el ritmo actual en el pentagrama actual, el atajo le llevará al siguiente compás. La intención es que este atajo sea útil para navegar a través de una partitura si no se sabe ya cuál es el contenido.
Cuando usted navega hacia un elemento, su lector de pantalla debe leer la información sobre él. Para notas y silencios, también se leerá información sobre elementos unidos a ellos, como letras, articulaciones, símbolos de acordes, etc. Por el momento, no hay manera de navegar directamente a estos elementos.
Una nota importante: Arriba y Abajo por sí mismos, con Shift o con Ctrl / Cmd no son accesos directos útiles para la navegación! En su lugar, cambian el tono de la nota o notas seleccionadas. Tenga cuidado de no editar inadvertidamente una partitura que está tratando de leerla. Arriba y Abajo sólo se debe usar con Alt/Option si su intención es sólo la navegación. Consulte la lista de accesos rápidos de navegación a continuación.
Avanzar o retroceder en el tiempo
Los siguientes accesos rápidos son útiles para moverse "horizontalmente" a través de una partitura:
- Elemento siguiente: Ctrl+Alt+Shift+Derecha
- Elemento anterior: Ctrl+Alt+Shift+Izquierda
- Próximo acorde o silencio: Derecha
- Acorde o silencio anterior: Izquierda
- Próximo compás: Ctrl+Derecha
- Compás anterior: Ctrl+Izquierda
- Ir a compas: Ctrl+F
- Primer elemento: Ctrl+Inicio
- Ultimo elemento: Ctrl+Fin
Moverse entre notas en un momento dado
-
Los siguientes atajos son útiles para mover "verticalmente" a través de una partitura:
-
Próximo elemento: Ctrl+Alt+Shift+Derecha
- Elemento anterior: Ctrl+Alt+Shift+Izquierda
- Proxima nota mas aguda en la voz actual, voz anterior, o pentagrama encima: Alt+Arriba
- Proxima nota mas grave en voz actual, proxima voz, o pentagrama inferior: Alt+Abajo
- Nota mas aguda en el acorde: Ctrl+Alt+Arriba
- Nota mas grave del acorde: Ctrl+Alt+Abajo
Los comandos Alt+ y Alt+Abajo son similares a los Ctrl+Alt+Shift+Derecha y Ctrl+Alt+Shift+Izquierda los comandos que están diseñados para ayudarle a descubrir el contenido de una partitura. No necesitas saber cuántas notas hay en un acorde, cuántas voces hay en un pentagrama, o cuántas pentagramas hay en una partitura para moverse verticalmente a través de la partitura usando estas órdenes.
Filtrar elementos en la lectura de partitura
Es posible excluir ciertos elementos como las letras o nombres de acordes durante la lectura de la partitura mediante el filtro de Selección (F6). Desmarque los elementos que no quiere leer.
Reproducir partitura
El Barra espaciadora sirve tanto para iniciar como para detener la reproducción. La reproducción comenzará con la nota seleccionada si está seleccionada; donde se detuvo la reproducción por ultima vez si no se selecciona ninguna nota; o al principio de la partitura de la primera reproducción.
MuseScore es compatible con la reproducción en bucle para que pueda repetir una sección de una pieza con fines de estudio. Para establecer los puntos " in " y " out " para la reproducción en bucle a través del Panel de reproducción (término kbd>término kbd>F11 término/kbd>término/kbd>):
- Primero seleccione la nota en la ventana de partitura donde debe comenzar el bucle
- Vaya al Panel de reproducción y pulse el botón establecer lazo en la posición
- Volver a la ventana de partitura, vaya a la nota donde desea que termine el bucle
- Vuelva a cambiar al Panel de reproducción, y presione el botón de alternar la posición del bucle establecido
- Para activar o desactivar el bucle, presione el botón de alternar la Reproducción del Bucle
También puede controlar la reproducción de bucle y el control de otros parámetros de reproducción, tales como reemplazar el tempo básico de una partitura, usando el panel de Ver / Reproducir (F11).
Editar partituras
Editar partituras no es actualmente del todo accesible – demasiados elementos de partitura requieren la intervención del ratón para colocar objetos en una partitura. Además, la referencia visual y el ajuste manual de la posición de varios elementos es a veces necesaria debido al limitado apoyo de MuseScore para evitar conflictos.
En contraste, MuseScore a menudo proporciona un amplio margen, y una plataforma para experimentar con los elementos básicos de la entrada de notas.
Para entrar en modo de entrada de notas, primero vaya al compas en la que desea introducir notas, luego pulse "n". Casi todo lo relacionado con la entrada de notas está diseñado para ser accesible al teclado, y la documentación estándar debe ser buena para ayudarle a través del proceso. Tenga en cuenta que MuseScore puede estar en la entrada de la nota o en modo normal, y no siempre estará claro en qué modo de estos se encuentra. En caso de duda, pulse Esc. Si estabas en modo de entrada de notas, esto te sacará. Si usted estaba en modo normal, usted permanecerá allí, aunque también perderá su selección.
Personalizar
Puede personalizar los accesos rápidos de teclado usando editar / Preferencias / accesos Rápidos. En algún momento, podemos ofrecer un conjunto de accesos rápidos de accesibilidad especial y/o una forma de guardar y cargar conjuntos de definiciones de accesos rápidos.
Enlaces externos
Albums
Overview
Warning: The Album feature has been disabled in 3.x. It may come back in 5.x.
The Album Manager allows you to prepare a list of multiple scores and save the list as an album file ("*.album"), print all the scores as one long print job with consistent page numbers, or even join the scores into a single new MSCZ score. This is ideal for preparing an exercise book or combining multiple movements of an orchestration.
To open the Album Manager, go to File → Album...

Create album
- To create a new album, click the New button. Fill in a title in the "Album Name:" box at the top.
- To add scores to the album, click Add Score. A file selection dialog will appear and let you choose one or multiple scores from your file system. Click OK.
- The scores you add will appear in a list in the Album Manager. You can rearrange their order by selecting a score and clicking the Up or Down button.
Load album
If you have previously created an album, you can open it through the Album Manager by clicking the Load button. A file selection dialog will appear to let you load the .album file from your file system.
Print album
To print an album as if it were a single document, click Print Album. The scores loaded into the Album Manager are printed in the order they are listed in with the correct page numbers, ignoring the page number offset values in Layout → Page Settings... → First page number for all but the first score. As the album is printed in one print job, double-sided printing (duplex printing) also works as expected.
Join scores
To combine multiple scores into a single .mscz file, click Join Scores. The scores are combined in the selected order into one single score. If not already present, line- and section breaks are added to the last measure or frame of each score in the combined file.
All style settings are taken from the first score; different style settings from subsequent scores are ignored.
All the scores should have the same number of parts and staves for this to work correctly, ideally with the same instruments in the same order. If the scores have the same total number of instruments but not the same ones, or not in the same order, then the instrument names from the first score will overwrite ones from subsequent scores. If some of the scores have fewer instruments than the first score, then empty staves will be created for those sections. Any part or staff that is not present in the first score will be lost in the joined score.
Save album
Upon clicking the Close button, you will be prompted to save your album as a .album file. This file is not the same as a joined score; it simply consists of the list of scores. Album files can be loaded into the Album Manager as described above.
| Adjunto | Tamaño |
|---|---|
| Album_en.png | 13.64 KB |
Bajo cifrado
Añadir una nueva indicación de bajo cifrado
- Seleccione la nota a la que desea aplicar el bajo cifrado
- Pulse el atajo para el Bajo cifrado (por defecto Ctrl+G; puede ser modificado en Preferencias)
- Introduzca el texto requerido en la 'caja azul' del editor (ver abajo)
- Pulse Espacio para pasar a la siguiente nota en la que introducir otra indicación de bajo cifrado (o haga click fuera de la caja del editor para abandonar éste)

Pulsando Espacio, el editor avanza hasta la nota o el silencio siguiente del pentagrama al que se le está añadiendo el bajo cifrado. Para desplazarse a un punto intermedio, o para extender la duración de un bajo cifrado, ver más abajo Duración.
Tab avanza la caja de edición al comienzo del compás siguiente.
Mayús+Espacio retrocede la caja de edición a la nota o silencio anterior.
Mayús+Tab retrocede la caja de edición al principio del compás anterior.
Formato de texto
Números
Los números se escriben de forma directa. Para apilar en vertical varios números, basta con utilizar Intro dentro de la caja de edición:

Alteraciones
Las alteraciones pueden ser introducidas mediante el teclado normal:
| Para obtener: | escriba: |
|---|---|
| doble bemol | bb |
| bemol | b |
| becuadro | h |
| sostenido | # |
| doble sostenido | ## |
Los caracteres se convertirán en el símbolo correspondiente al abandonar la edición. Las alteraciones pueden escribirse antes o después de un número (y, por supuesto, en lugar del número, cuando se trata de terceras alteradas), según el estilo requerido; en cualquiera de los casos, quedarán alineadas correctamente.
Formas combinadas
Los números barrados o con una cruz pueden ser introducidos añadiendo \, / o + tras escribir el número; el símbolo correspondiente aparecerá al abandonar la edición:

El tipo de letra incluido en MuseScore gestionará la combinación de signos, favoreciendo la equivalencia más habitual:
1+, 2+, 3+, 4+ se convertirán en  (o
(o  )
)
y 5\, 6\, 7\, 8\, 9\ se convertirán en  (o
(o  )
)
Recuerde que la / sólo puede ser combinada con el 5; cualquier otro símbolo 'barrado' dará lugar a una interrogación.
El signo + puede ser también usado antes de un número; en este caso no se combina con éste, sino que queda alineado como corresponda.
Paréntesis
Los paréntesis de apertura o cierre, tanto los redondos '(', ')' como los cuadrados '[', ']', pueden ser insertados antes o después de las alteraciones, antes o después de un número y antes o después de una línea de prolongación; los paréntesis no afectan a la alineación del carácter principal.
Notas:
- El editor no verifica si los paréntesis de apertura y cierre están correctamente equilibrados.
- Agregar varios paréntesis en una misma línea se considera incorrecto e impide que MuseScore reconozca adecuadamente el texto introducido.
- Un paréntesis ubicado entre un número y un sufijo ('+', '\', '/') es aceptable, pero impide que ambos símbolos se combinen.
Líneas de prolongación
Las líneas de prolongación se introducen añadiendo un '_' (guión bajo) al final de la línea. Cada número de un grupo puede tener su propia línea de prolongación:

Las líneas de prolongación abarcarán la duración total del grupo de bajo cifrado.
Líneas de prolongación 'extendidas'
Ocasionalmente, una línea de prolongación debe conectar con la línea de prolongación del grupo siguiente, debido a que los dos acordes comparten una de las notas. Ejemplos (pertenecientes a J. Boismortier, Pièces de viole, op. 31, Paris 1730):

En el primer caso, cada grupo tiene su propia línea de prolongación; en el segundo, la línea de prolongación del primer grupo es 'insertada' en el siguiente.
El esquema se puede obtener escribiendo uno o varios guiones bajos "__" al final de la línea de texto del primer grupo.
Duración
Cada grupo de bajo cifrado posee una duración, indicada por una línea gris por encima de él. Por supuesto, esta línea es meramente informativa y no se imprime ni se exporta al generar un PDF .
En principio, un grupo tiene la misma duración que la nota a la que está vinculado. En ocasiones, puede ser necesario que varios grupos aparezcan bajo una misma nota o que un único grupo se extienda a varias notas.
Para lograrlo, puede utilizar las combinaciones de teclas enumeradas más abajo:
- para hacer avanzar la caja de edición la duración indicada
Y - para añadir esa duración al grupo anterior.
Pulsando varias combinaciones en secuencia, sin teclear un nuevo bajo cifrado, extenderá el grupo anterior el valor acumulado.
| Pulse: | para obtener: |
|---|---|
| Ctrl+1 | una semifusa |
| Ctrl+2 | una fusa |
| Ctrl+3 | una semicorchea |
| Ctrl+4 | una corchea (quaver) |
| Ctrl+5 | una negra (crochet) |
| Ctrl+6 | una blanca (minim) |
| Ctrl+7 | una redonda (semibreve) |
| Ctrl+8 | una cuadrada (breve) |
(Los números son los mismos que se usan para establecer la duración de una nota)
Establecer la duración exacta de un bajo cifrado sólo es obligatorio en dos casos:
- Cuando bajo una única nota del pentagrama deben aparecer varios cifrados (no hay otro modo de hacerlo).
- Cuando se usan líneas de prolongación, ya que la longitud de éstas depende de la duración del grupo.
No obstante, es buena práctica establecer siempre la duración, a efectos de los plugins y del formato MusicXML.
Editar bajos cifrados existentes
Para editar una indicación de bajo cifrado ya existente:
- Selecciónela, o seleccione la nota a la que pertenece, y pulse el atajo de teclado usado para crear un Bajo cifrado
o - Haga doble click sobre dicha indicación
Se abrirá la caja de edición habitual, con el texto convertido en caracteres simples ('b', '#' y 'h' para las alteraciones, sufijos separados, guiones bajos, etc.), con el fin de facilitar la edición.
Una vez editada la indicación, pulse Espacio para avanzar hasta la nota siguiente o haga click fuera de la caja de edición para abandonar ésta.
Estilo
Para configurar el modo de presentación del bajo cifrado, en el menú, seleccione Formato → Estilo.… → Bajo cifrado.

- Tipografía: La lista desplegable contiene todos los tipos de letra disponibles para el bajo cifrado. La instalación estándar contiene un único tipo, "MuseScore Figured Bass," que es también el tipo de letra por defecto.
- Tamaño: Seleccione el tamaño de la letra en puntos. Nota: Este valor se ve afectado por los cambios que se hagan en Escalado (Formato → Ajustes de página...), o en Escala ("Propiedades de Pentagrama/Parte").
- Posición vertical: La distancia (medida en espacios) desde la parte superior del pentagrama al margen superior del texto del bajo cifrado. Los valores negativos van hacia arriba (el bajo cifrado se coloca por encima del pentagrama) y los positivos, hacia abajo (el bajo cifrado se coloca por debajo del pentagrama). Se requiere un valor superior a 4 para superar la altura del propio pentagrama.
-
Altura de la línea: La distancia entre líneas de texto del bajo cifrado, expresada como porcentaje del tamaño de letra.
En la imagen siguiente se describen los distintos parámetros numéricos:

-
Alineamiento: Con Parte superior, es la línea de arriba de los bajos cifrados la que queda alineada; el resto de las posibles líneas 'cuelgan' de ella (esta es la manera habitual de mostrar el bajo cifrado y la adoptada por defecto en MuseScore). Con Parte inferior, es la línea de abajo de los bajos cifrados la que queda alineada; el resto de las líneas 'se apilan' sobre ella (esta disposición se utiliza a veces en anotaciones de análisis armónico):

-
Estilo: Elija entre "Moderno" e "Histórico." En la figura de abajo se puede apreciar la diferencia entre ambos:

Sintaxis correcta
Para que las sustituciones o combinaciones de símbolos tengan lugar y el alineamiento de éstos sea el correcto, es necesario respetar ciertas reglas a la hora de introducir el texto (unas reglas, en cualquier caso, que son las estándar para la escritura de bajos cifrados):
- Sólo puede haber una única alteración (colocada antes o después), o un único sufijo por cifra.
- No puede haber a la vez una alteraciónl y un sufijo.
- Se puede escribir una alteración sin número (tercera alterada), pero no un sufijo sin número asociado.
- Cualquier carácter fuera de los enumerados más arriba dará lugar a una indicación de error.
Un texto que no respete las reglas sintácticas no será procesado: aparecerá tal cual en la partitura.
Resumen de teclas
| Teclee: | para: |
|---|---|
| Ctrl+G | Añadir un nuevo bajo cifrado a la nota seleccionada. |
| Espacio | Avanzar la caja de edición a la nota siguiente. |
| Mayús+Espacio | Retroceder la caja de edición a la nota anterior. |
| Tab | Avanzar la caja de edición al compás siguiente. |
| Mayús+Tab | Retroceder la caja de edición al compás anterior. |
| Ctrl+1 | Avanzar la caja de edición una semifusa, incrementando la duración del cifrado anterior. |
| Ctrl+2 | Avanzar la caja de edición una fusa, incrementando la duración del cifrado anterior. |
| Ctrl+3 | Avanzar la caja de edición una semicorchea, incrementando la duración del cifrado anterior. |
| Ctrl+4 | Avanzar la caja de edición una corchea, incrementando la duración del cifrado anterior. |
| Ctrl+5 | Avanzar la caja de edición una negra, incrementando la duración del cifrado anterior. |
| Ctrl+6 | Avanzar la caja de edición una blanca, incrementando la duración del cifrado anterior. |
| Ctrl+7 | Avanzar la caja de edición una redonda, incrementando la duración del cifrado anterior. |
| Ctrl+8 | Avanzar la caja de edición una cuadrada, incrementando la duración del cifrado anterior. |
| Ctrl+Espacio | Escribir un espacio; resulta útil cuando la cifra aparece "en la segunda línea" (ej. 5 4 -> 3). |
| BB | Escribir un doble bemol. |
| B | Escribir un bemol. |
| H | Escribir un becuadro. |
| # | Escribir un sostenido. |
| ## | Escribir un doble sostenido. |
| _ | Introducir una línea de prolongación. |
| __ | Introducir una línea de prolongación extendida. |
Diagramas de acorde
Nota: _ Esta página se aplica únicamente a MuseScore 3.1 y posteriores. Los usuarios de versiones anteriores a 3.1 deben dirigirse a diagramas de acorde (anterior a la versión 3.1)._
Diagramas de acorde generalidades
MuseScore permite el uso y la creación de diagramas de trastiera trastiera (o acordes) . Por lo general aparecen por encima del pentagrama en partituras de cifrado de acorde y partituras de piano. Se utilizan comúnmente para los acordes de guitarra, pero MuseScore permite la creación de diagramas para cualquier instrumento.
A continuación se muestra un ejemplo sencillo de uso de Diagramas de trastes.

(Nota: los Diagramas de trastes son una alternativa y muy diferente de Tablatura, que es una notación especializada que es preferida por algunos instrumentistas de cuerda.)
El mecanismo de Diagrama de acorde se puede utilizar de distintas maneras.
-
Acordes estándar. Un conjunto de 21 diagramas de acordes comunes para la guitarra se encuentran en los Diagramas de trastes paleta en el espacio de trabajo Avanzado. Estos consisten en un solo ejemplo de un acorde mayor, menor, y séptima para cada tono de la escala diatónica (CDEFGAB). Estos 21 acordes son adecuados para muchas partituras simples de música pop o folk. Vea la vista general de esta paleta abajo.
-
Acordes modificados. En muchos casos, los acordes estándar de la paleta Diagramas de acordes se utilizan como punto de partida para crear diagramas de acordes modificados, a través del Inspector. Esta técnica permite extensiones de acordes, alteraciones, diferentes vocaciones, diferentes posiciones, etc. se aplicará a los 21 diagramas normalizados. Hay descargas de miles de acordes de guitarra en el uso general, haciendo una paleta completa o un diccionario poco practico. Ver cómo usar Diagramas de trastas para acordes personalizados/complejos para ejemplos.
-
Acordes de "mano libre". Los guitarristas más avanzados a menudo prefieren comenzar desde una rejilla de cuerda en blanco, y luego dibujar los tonos de cuerda específicos deseados. Ver cómo usar Diagramas de trastes para acordes personalizados/complejos para ejemplos.
Nota: Muchos aspectos de la música culminaron siguiendo estándares de notación musical bien establecidos. Los diagramas de acordes de guitarra son una excepción. El uso ha variado ampliamente de año en año, de editor en editor, de maestro en maestro, y de arreglador en arreglador. Muchas prácticas inconsistentes persisten hoy en día, y diferentes estilos de diagramas de acordes son preferidos en diferentes géneros musicales y regiones. Por esta razón, la interfaz de diagrama de diagrama MuseScore soporta diagramas de varios tipos. Los usuarios son libres de elegir sus preferencias.
Vista general de la paleta de acordes de guitarra estándar
Los Diagramas de traste paleta en el Espacio de trabajo Avanzado proporcionan 21 diagramas, que comprenden un solo acorde mayor, menor y séptima para cada tono diatónico de escala (CDEFGAB). El nombre de cada diagrama aparece cuando el cursor se cierne sobre la entrada.

Note: esta gama de diagramas de acordes, o de hecho cualquier selección de 21 acordes, normalmente no sería suficiente para propósitos de publicación. Los arregladores deben considerar muchas otras cualidades de voz, posición y acorde. Esta paleta es también un ejemplo de los diversos formatos de diagrama en uso, como se discutió anteriormente. Estos 21 acordes suelen incorporar indicaciones de al aire/tapas indicadores de cuerda _ (los símbolos de X y O por encima de los diagramas). Aunque esos símbolos suelen a menudo aparecer en partituras publicadas, su uso varía según el contexto. Por ejemplo, los arreglos de jazz generalmente omiten indicadores de cuerda tapada, a menos que sean contextualmente importantes, y rara vez usan al aire.
Se espera que en el futuro se disponga de paletas adicionales que contengan una gama más amplia de acordes estándar. Estos tratarían de satisfacer las necesidades de géneros musicales y situaciones específicas.
Visión general de la creación de acordes modificados o personalizados
Los Diagramas de trastes modificados se crean mediante agregar y luego [editando] (#edit-fretboard-diagram) un diagrama existente de la paleta. Mediante la modificación de los acordes estándar, es posible crear Diagramas de trastes para cualquier acorde reproducible, y para reflejar la digitación en cualquier instrumento de cuerda con trastes occidentales, sin tener en cuenta la afinación, el número de cuerdas, o el número de trastes. La mayor parte del material a continuación trata sobre el proceso de modificar diagramas y crear diagramas nuevos.
Los diagramas personalizados se pueden guardar en un paleta personalizada si se desea para uso futuro. Los diagramas modificados pueden por supuesto ser copiados / pegados dentro de una partitura de las maneras usuales.
Para añadir un Diagrama de acorde
Para añadir un Diagrama de acorde a la partitura, utilice uno de los siguientes métodos::
- Seleccione una nota en la voz 1 y haga doble clic en un Diagrama de acorde desde el Paletas.
- Apriete y suelte un Diagrama acorde de una paleta a la posición deseada en la partitura.
A medida que el cursor se desplaza sobre el diagrama elegido dentro de la paleta, su nombre aparecerá como una indicación emergente (vea el ejemplo en vista general).
Simbolo de acorde anclado a diagrama de acorde
Cuando se añade un diagrama de acorde a una partitura,también se crea automáticamente un símbolo de acorde. El símbolo del acorde se coloca normalmente sobre el diagrama, y usa el nombre del acorde de la celda de la paleta del acorde. La colocación automática y el formato de un símbolo de acorde de diagramas se controla mediante ajustes de estilo (ver ajustes de estilo) (#fretboard-diagram-style).

Un símbolo de acorde generado por diagrama de acorde puede ser seleccionado, movido y modificado como cualquier otro elemento de texto. Se comporta generalmente como los símbolos de acorde comunes que se agregan utilizando Añadir→Texto→Símbolo de Acorde o el acceso directo Ctrl+K.

Note 1: A field on the Chord Symbols style page (Style submenu: select Format→Style…→Chord symbols) – rather than on the Fretboard Diagrams style page – controls the chord symbol's "Distance to Fretboard Diagram". This value interacts with the Element "Minimum distance" field, within the Inspector, to control automatic placement of the chord symbol relative to the diagram. Note also that the Fretboard Diagram's "top edge" includes the blank space where open/mute string indicators would appear, even if that area is empty. This may leave a larger gap than is desired. As usual, manual placement can be used to override the automatic settings.
Note 2: los símbolos de acordes automáticos generados para diagramas de acorde no están completamente integrados con Símbolos de Acordes normales que pueden estar directamente asociados con las notas del pentagrama. Específicamente, la seleccion no fluye del símbolo del acorde de un Diagrama de acorde de regreso a la secuencia de otros símbolos en la página cuando se usa Barra espaciadora para moverse a través de los símbolos del acorde. Esta pequeña cuestión se abordará en una futura actualización.)
Uso de Cifrados con el Diagrama de Acorde
- Agregue un Cifrado de acorde automáticamente con solo añadir un Diagrama de Acorde como se describe anteriormente.
- Borrar el cifrado de un Diagrama de Acorde seleccionando el cifrado y borrandolo como haria con cualquier objeto.
- Agregue un nuevo cifrado a un diagrama que no lo tenga seleccionando el Diagrama de acorde y usando Agregar→Texto→Cifrado de acorde o el atajo Ctrl+K.
To adjust a Fretboard Diagram's element properties (position, color, stacking order...)
The position of a Fretboard Diagram can be adjusted using the keyboard arrows in Edit mode; or with the X- and Y-offsets in the "Element" section at the top of the Inspector.
Visibility, Color and Stacking order can also be adjusted in the "Element" section: see the diagram under editing.
To adjust global/default Fretboard Diagram style properties
Certain default and global properties of Fretboard Diagrams (see diagram below) can be adjusted from the Style submenu: select Format→Style…→Fretboard Diagrams. Some of these properties are subject to override via the Inspector; but most affect all Fretboard Diagrams in the score.

- Default vertical position specifies the default placement of the diagram relative to the staff. (Subject to override via Inspector).
- Scale specifies the default scale (i.e. diagram size). (Subject to override via Inspector).
- Fret number font size and ...position control placement of fret numbers on all diagrams. (Global).
- Barre line thickness controls how large a line is used to represent a barre on all diagrams. By default, this is the same thickness as the solid dots. A smaller line will allow dots to be visible under the barre, for situations where that is desirable. (Global).
- Relative dot size controls the size of dots on all diagrams, relative to the size of the scaled grid. (Global).
- String spacing controls the spacing between strings, and thus the total width of all diagrams. (Global).
- Fret spacing controls the spacing between frets, and thus the total height of all diagrams relative to the number of frets they each display. (Global).
Most Fretboard Diagram properties exposed by the Inspector offer "reset to style default" and "save as style default" buttons. These values do not typically appear on the style page, but are manipulated via the Inspector.
To edit a Fretboard Diagram
When a Fretboard Diagram is selected, it can be edited in the Inspector as follows:
The Inspector displays three sections related to the Fretboard Diagram:
- An Element section that controls the Fretboard Diagram's visibility, placement, color, and other aspects that are used in common with other MuseScore elements; see adjust element properties and the Inspector for details.
- A Fretboard Diagram section, with control fields and buttons that define the appearance of this diagram.
- A magnified version of the Fretboard Diagram, showing its details and allowing editing.
Below is an example of the Inspector with a Fretboard Diagram selected.

Editing Fretboard Diagram properties
(See Inspector properties above in the editing example.)
- To adjust the scale (size) of the diagram: Use Scale.
- To adjust the diagram's placement relative to the staff: Use Placement.
- To adjust the number of instrument strings: Use Strings. Strings are added/removed from the left side of the diagram.
- To adjust how many frets to display (i.e. the height of the diagram): Use Frets. Frets are added/removed from the bottom of the diagram.
- To adjust the first fret position: Use Fret number. A digit is shown next to the first visible fret.
- To specify thickening of the nut (a heavy line above the first fret): Use Show nut.
- Place the finger dots as described below.
Finger dot editing (basic use)
(See Inspector properties above in the editing example.)
- To remove all current dots, use the "Clear" button above the diagram. (Note: you could save a blank grid in a custom palette, as a starting point for custom diagrams.)
- To create a dot, click on a fret in the diagram at the bottom of the inspector; click again to remove the dot.
- To move a dot, clear its current position by clicking on it; then create the desired dot.
- To create a barre or partial barre: Click the "Barre" button above the diagram; then click at the leftmost position desired for the barre. The barre will extend to the right edge of the fretboard. Keyboard shortcut: Holding the Shift key, click on the string where you want a barre to begin.
- To end a barre before the rightmost string: Click the "Barre" button above the diagram; then click at the rightmost position desired on an existing barre. The barre will end at that string. Keyboard shortcut: Holding the Shift key, click on the string where you want a barre to end.
- To delete a barre: Click the "Barre" button above the diagram; then click at the leftmost position of the barre. It will be removed. Keyboard shortcut: Holding the Shift key, click on the leftmost position of the barre.
- To create multiple barres: Use the above steps to create one than one barre, e.g. to show the third finger covering two strings.
- To adjust the barre thickness: Use the Style options (Format->Style->Fretboard Diagrams) to adjust the barre line thickness relative to the dots. This will allow dots to be visible on the barre, for cases where that is desired.
- To Indicate open and mute strings (optional). Click just above the diagram to toggle a string between:
- Open (o)
- Mute/unplayed (x)
- No indication
Finger dot editing (advanced use)
Some arrangers and educators use a more advanced form of Fretboard Diagram that a) incorporates multiple types of "dot", and that b) allows multiple dots per string.
This technique is particularly associated with the many books and arrangements published by Ted Greene and his successors. (Note: No other notation software currently supports this diagram style.)
-
Multi-dot notation style. With this approach, the round dots are played first. Then, on successive beats, the notes represented by the other dots are then played in order. This allows a single diagram to represent several beats of music. (The usual sequence is: dot→X→square→delta. Usage varies however.) Here are two examples of multi-dot diagrams.


-
Optional-note notation style. Another use of multiple dots per string allows other symbols to show optional notes, rather than delayed notes. Typically, a related chord voicing is shown, such as an optional extension or an optional rootless chord version. Here is an example of an optional extension.

MuseScore Fretboard Diagrams allow the creation of these and other types of multi-symbol diagrams. A chord is first created and edited using the basic steps described above. Then, the multiple dot buttons above the diagram are used to add secondary notes.

- To begin adding multiple dots (i.e. symbols) to a diagram, click "Multiple dots".
- To add another dot to a string, click above or below an existing symbol. The next symbol in sequence will be placed at that position, e.g. if there is already a dot, an X will appear next.
- To remove any symbol from a diagram, click on it.
- To enter a particular symbol out of sequence, click on the button with that symbol before adding the dot; e.g. to enter an X on a string with no current dots, because that note should be played after the rest of the chord, click on the X and then place it as desired.
(Note: Experienced users of Ted Greene style diagrams will find that several secondary features from Ted's diagrams are not yet supported in MuseScore. These include: a. Displaying the fret number on a higher fret than the first visible fret. b. Allowing the note symbols to include digits, not just the four dot styles currently supported. c. Allowing the creation of annotation on and between diagrams, such as circling a particular note, or drawing lines linking notes in adjacent diagrams. However, MuseScore does provide many tools for drawing and annotation that can serve in place of these techniques.)
(Note: Because multi-note symbols are not standardized, even within the Ted Greene community, users must be careful to indicate how they are being used within a given score.)
External links
Fretboard diagrams (prior to version 3.1)
Note: This page applies to versions of MuseScore prior to 3.1 only. Users of MuseScore 3.1 and above should go to Fretboard diagrams.
A range of fretboard (or chord) diagrams for the guitar are provided in the Fretboard Diagrams palette in the Advanced Workspace.

You can create a chord diagram for any fretted, stringed instrument by editing an existing one. It can be saved to a custom palette for future use if required.
Add a fretboard diagram
To add a fretboard diagram to the score, use one of the following methods:
- Select a note in voice 1 and double-click a fretboard diagram from a palette.
- Drag and drop a fretboard diagram from a palette to the desired position in the score.
As the cursor hovers over the chosen diagram within the palette, its name will appear as a pop-up hint.
Edit a fretboard diagram
When a fretboard diagram is selected, it can be edited in the Inspector as follows:
- To adjust the number of instrument strings: Use Strings.
- To adjust the fret position number: Use Offset.
- To adjust how many frets to display (height-wise): Use Frets.
- To place the finger dots: Click on a fret to establish a dot; click again to remove the dot.
- To create a barre or partial barre: First make sure that the desired fret position is clear of black dots (click on a dot to remove it). Then, holding the Shift key, click on the string where you want the barre to begin. (Note: Only one barre can be applied per diagram; a partial barre must end on the first string).
- To delete a barre: Click on the black dot where the barre begins.
- To Indicate open and mute strings (if applicable): Click just above the diagram to toggle a string between:
- Open (o)
- Mute/unplayed (x)
- No indication.
- To adjust the size: Use the Scale property.
To adjust a diagram's element properties
The position of a Fretboard Diagram can be adjusted using the keyboard arrows in Edit mode; or with the X- and Y-offsets in the "Element" section at the top of the Inspector.
Visibility, Color and Stacking order can also be adjusted from the "Element" section.
To adjust a diagram's style properties
Certain default and global properties of Fretboard Diagrams (e.g. barre thickness, vertical position, scale, fret-number font-size and position) can be adjusted from the Style submenu: select Format→Style…→Fretboard Diagrams. Some of these properties are subject to override via the Inspector; but most affect all Fretboard Diagrams in the score.
File formats
MuseScore can import and export a wide variety of file formats, allowing you to share and publish scores in the format that best meets your needs.
MuseScore native format
See also Native format compatibility.
MuseScore saves files in the following native formats:
- *.mscz: The default MuseScore file format. Being compressed it takes up relatively little disk space.
- *.mscx: An uncompressed MuseScore file format, mainly used for debugging or storing in a versioning system
- .*.mscz, / .*.mscx,: These are backup files. Notice the point (full stop) added before the file name, and the comma added to the file extension.
A note about fonts: MuseScore does not embed text fonts in saved or exported native format files. If you want your MuseScore file to be viewed by other MuseScore users, make sure you are using the built-in Edwin (since version 3.6), FreeSerif, or FreeSans font families for your text, or a font that the other parties have installed too. If a system does not have the fonts specified in your original file, MuseScore will use a fallback option, which may cause your score to appear differently. For more see Fonts.
MuseScore format (*.mscz)
MSCZ is the standard MuseScore file format and recommended for most uses. A score saved in this format takes up very little disk space, but preserves all the necessary information. The format is a ZIP-compressed version of .mscx files and includes any images the score may contain and a thumbnail.
Note: An .mscz file can be unzipped using a ZIP software utility to extract an uncompressed .mscx file. (Note that changing the file extension from .mscz to .zip may be required to unzip the .mscz file, depending on the software utility used.)
Uncompressed MuseScore format (*.mscx)
MSCX is the uncompressed version of the MuseScore file format. A score saved in this format will retain all information, except images. It can be opened with a text editor, allowing the user access to the file's source code.
MuseScore backup file (.*.mscz,) or (.*.mscx,)
Backup files are created automatically and saved in the same folder as your normal MuseScore file. The backup copy contains the previously saved version of the MuseScore file and can be important if your normal copy becomes corrupted, or for looking at an older version of the score.
The backup file adds a period to the beginning of the file name (.) and a comma (,) to the end (e.g. if your normal file is called "untitled.mscz", the backup copy will be ".untitled.mscz,"), and the period and comma need to be removed from the name in order to open the backup file in MuseScore. As it is stored in the same folder as your normal MuseScore file, you may also need to give it a unique name (e.g. changing ".untitled.mscz," to "untitled-backup1.mscz").
Note: In order to see the MuseScore backup files, you may need to change your system settings to "Show hidden files". See also How to recover a backup copy of a score.
Graphic files (export only)
MuseScore can export a score as a graphic file in either PDF, PNG or SVG format.
PDF (*.pdf)
PDF (Portable Document Format) files are ideal for sharing your sheet music with others who do not need to edit the content. This is a very widely-used format and most users will have a PDF viewer of some kind on their computers.
To set the resolution of exported PDFs:
- From the menu bar, choose Edit→Preferences... (Mac: MuseScore→Preferences...), and select the "Export" tab;
- Set the resolution in the "PDF" section.
PNG (*.png)
PNG (Portable Network Graphics) files are based on a bitmap image format, widely supported by software on Windows, Mac OS, and Linux, and very popular on the web. MuseScore creates PNG images as they would appear if printed, one image per page.
To set the resolution of exported PNG images:
- From the menu bar, choose Edit→Preferences... (Mac: MuseScore→Preferences...), and select the "Export" tab;
- Set the resolution and transparency in the PNG/SVG section.
Note: If you want to create images that show only parts of the score (with or without screen-only items such as frame boxes, invisible notes, and out-of-range note colors), use Image capture instead.
SVG (*.svg)
SVG (Scalable Vector Graphics) files can be opened by most web browsers (except Internet Explorer before version 9) and most vector graphics software. However, most SVG software does not support embedded fonts, so the appropriate MuseScore fonts must be installed to view these files correctly. SVG is the current format for all scores saved on MuseScore.com.
To set resolution and transparency of exported SVG files, see the instructions under PNG (above). Note that MuseScore does not (yet) support gradients on export (although it does for images in a score).
Audio files (export only)
MuseScore can create normalized, stereo audio of the score in any of the following formats: WAV, MP3, OGG VORBIS, FLAC. To export an audio file:
- From the menu, select File → Export...;
- Choose the desired format from the dropdown menu, then press Save.
You can adjust the sample rate of all audio formats as follows:
- From the menu bar, select Edit→Preferences... (Mac: MuseScore→Preferences...), and click on the Export tab;
- Set "Sample rate" in the "Audio" section.
WAV audio (*.wav)
WAV (Waveform Audio Format) is an uncompressed sound format. This was developed by Microsoft and IBM, and is widely supported by software for Windows, OS X, and Linux. It is an ideal format for use when creating CDs, as full sound quality is preserved. For sharing via email or the internet, use a compressed alternative such as MP3.
MP3 (*.mp3)
MP3 is a very widely-used compressed audio format. MP3 files are ideal for sharing and downloading over the internet due to their relatively small size.
To set the MP3 bitrate:
- From the menu bar, choose Edit→Preferences... (Mac: MuseScore→Preferences...), and select the "Export" tab;
- Set the MP3 bitrate in the "Audio" section.
FLAC audio (*.flac)
Free Lossless Audio Codec (FLAC) is compressed audio format. FLAC files are approximately half the size of uncompressed audio and just as good quality. Windows and OS X do not have built-in support for FLAC, but software such as the free and open source VLC media player can play FLAC files on any operating system.
Ogg Vorbis (*.ogg)
Ogg Vorbis is intended as a patent-free replacement for the popular MP3 audio format (which MuseScore also supports—see above). Like MP3, Ogg Vorbis files are relatively small (often a tenth of uncompressed audio), but some sound quality is lost. Windows and OS X do not have built-in support for Ogg Vorbis. However, software such as VLC media player and Firefox can play Ogg files on any operating system.
Share with other music software
MuseScore can import and export MusicXML and MIDI files; it is also able to import a variety of native format files from other music notation programs.
MusicXML (*.musicxml, *.xml)
MusicXML is the universal standard format for sharing sheet music between different scorewriters—including MuseScore, Sibelius, Finale, and more than 100 others. MuseScore supports both export and import.
Compressed MusicXML (*.mxl)
Compressed MusicXML creates smaller files than regular MusicXML. This is a newer standard and isn't as widely supported by older scorewriters, but MuseScore has full import and export support.
MIDI (*.mid, *.midi, *.kar)
MIDI (Musical Instrument Digital Interface) is a format widely supported by sequencers and music notation software. For details of the protocol see the MIDI Association website.
MIDI files are very useful for playback purposes but contain little in the way of score layout information (formatting, pitch spelling, voicing, ornaments, articulations, repeats, key signatures etc.). To share files between different music notation software, MusicXML is recommended instead.
For details about how to import MIDI files see MIDI import.
MuseData (*.md) (import only)
MuseData is a format developed by Walter B. Hewlett beginning in 1983 as an early means of sharing music notation between software. It has since been eclipsed by MusicXML, but several thousand scores in this format are still available online.
Capella (*.cap, *.capx) (import only)
CAP and CAPX files are created by the score writer, Capella. MuseScore imports version 2000 (3.0) or later fairly accurately.
Bagpipe Music Writer (*.bww) (import only)
BWW files are created by the niche score writer, Bagpipe Music Writer.
BB (*.mgu, *.sgu) (import only)
BB files are created by the music arranging software, Band-in-a-Box. MuseScore's support is currently experimental.
Overture / Score Writer (*.ove, *.scw) (import only)
OVE files are created by the score writer Overture 4 or older. This format is mainly popular in Chinese-language environments, such as Mainland China, Hong Kong, and Taiwan. Overture 5, the current version of Overture, uses the extension .ovex, which MuseScore can't read.
SCW files are created by Score Writer, they are identical to OVE files, only differences is the extension.
MuseScore's support is currently experimental and seems to support Overture / Score Writer 3 and 4 only.
Guitar Pro (various—import only)
MuseScore can open Guitar Pro files with the following extensions: *.gtp, *.gp3, *.gp4, *.gp5, *.gpx, and, as of version 3.5, *.gp.
Power Tab Editor (*.ptb) (import only)
PTB files are created by Power Tab Editor. MuseScore's support is currently experimental.
See also
External links
- How to recover a backup copy of a score (MuseScore HowTo)
Fonts
To change the appearance of Musescore user interface, see Preferences instead.
To edit sound samples, see SoundFonts and SFZ files instead.
Overview
A computer font (font family, font face, typeface) is a digital data file containing a set of characters or symbols. This chapter discusses score object's font assignment method and option and others. Usage of font data depends on,
- object type (see "Text" and "Non-Text" sections, and Notation types and Text types chapters); and
- character type (see "Text" section).
Font file cannot be embedded into a score file.
Formatting of Text
Musescore Text object contains individual characters that can be entered and removed by using (typing on) a computer keyboard. Some subtypes have specialized automatic formatting feature eg chord symbol rendering style and Roman Numeral Analysis auto formatting.
Characters in a Text object are either plain or special characters.
Plain characters
Plain characters, entered using a computer keyboard.
Special characters
Musical text and symbols (special characters, professional glyphs) that are not on computer keyboard should be added from Symbols and special characters → Common Symbols and Musical Symbols tabs in Text editing mode, or using Keyboard shortcuts. eg Segno, Coda, ottavas, dynamics etc among other pre-configured Palette items. They are not unicode characters. Special internal encodings such as <sym> are used to provide
- musically coherent impact eg the special augmentation dot is required to use Tempo marking's "Follow text" function; and
- global "Musical text" font switching.
Advanced users can add plain characters that look like special characters but do not have these program features. They are under unicode Private Use Area (PUA) and can be added from Symbols and special characters →Unicode tab in Text editing mode, and under Master palette → Symbol category.
Formatting of Non-Text
Score objects are not Musescore Text if they cannot be edited using (typing on) a computer keyboard.
Font assignment and option
Plain characters inside Text
Font assignment in Inspector (musescore 3), Properties panel (musescore 4), Format → Style → [item] and Format → Style → Text Styles → [item]. See the Layout and formatting and Text styles and properties chapters.
Font options can use
- fonts already built into Musescore program, and
- fonts installed on the operating system(OS).
Special characters inside Text; Non-Text
Fonts designed specifically for musical notation are required to display them.
Font assignments of Text's special characters portions and Non-Text are a global setting. Special characters ignore inspector fontface assignment.
- Under Format → Style,
- Musical symbol font: used by notes, rest symbols, accidentals etc. Font compatible often does not have wording "...Text" in its name, eg "MuseJazz". (6 options in musescore 3; 8 options in musescore 4)
- Musical text font: used by special characters. Font compatible often has wording "...Text" in its name, eg "MuseJazzText". (6 options in musescore 3; 8 options in musescore 4)
- For Tablature, under Staff / Part properties : Advanced Style Properties: settings for tablature staff,
- "Fret Marks" tab: used by fret marks. (8 options) .
- "Note Values" tab: used by "Note symbols" (5 options) .
- Figured bass (1 option, the MuseScore Figured Bass).
Font options can use
- fonts already built into Musescore program, and
- a more updated version of those files installed on the OS (sharing the same file name. See below),
- but not new fonts installed on the OS directly.
Using updated font version is covered in https://johngrren007.blogspot.com/2018/04/musejazz-customised-font.html, and https://musescore.org/en/node/299448#comment-1171159. Score files (*.mscz) using them may render poorly on other machines, because the modified font files are not embedded into the score file. To install a new font file onto an OS, refer to the instructions written for that OS.
Valid for Musescore 3.6.2 only. How can I add third party SMuFL Fonts? covers how to use a 3.7 fork to use fonts installed on the OS directly.
Default font
- Default Chord symbols font is Edwin, except on score created with any of the Jazz templates (eg Jazz Lead Sheet) where the default is MuseJazzText instead.
- Default Roman Numeral Analysis font is Campania . Musescore relies on OpenType formatting functionailty provided by Campania for correct RNA foramtting.
- Default "Musical symbol font" is Leland (musescore 3.6.2)
- Default "Musical text font" is Leland Text
Fonts shipped with Musescore
Musescore create in-app user interface, and musical symbols and notation on score, with data content from font files. Some fonts are invented by Musescore project development team for Musescore and maintained by the team. Some fonts are from other companies, the team does not edit their content at all. Read the readme file https://github.com/musescore/MuseScore/blob/master/fonts/README.md . Musescore software development focuses on engraving creation, based on real world notation popularity and significance, it does not aim to create support for every symbols included in any one particular font.
Musescore program is shipped with a limited set of font due to licensing reason.
Emmentaler has been renamed as "mscore" after musescore 3.6.2
Standard Music Font Layout (SMuFL)
Standard Music Font Layout (SMuFL) is a standard way of mapping the thousands of musical symbols required by conventional music notation, to the code-points of Private Use Area (PUA, wikipedia) in Unicode's Basic Multilingual Plane. It improves font format independence. The SMuFL standard itself is not managed by the Musescore project development team.
"Musical text" is a component of Musescore's implementation, the internal encoding schema does not conform to any standard, research the musescore 3.6.2 archived source code
Other useful methods to create desired engraving
- Noteheads and notehead schemes
- Staff / Part properties for Tablature elements
- Plugins that analyze notes and add musical symbols such as fingering diagrams are available at https://musescore.org/plugins .
- The MuseScore Drumline extension also contains extra pictograms, to download see Language, translations, and extensions.
See also
- Instruments, staff setup and templates
- Layout and formatting : styles and reuse
- Master palette
- How can I add third party SMuFL Fonts?
- https://github.com/fp22june/MuseScoreTag362/tree/master/fonts
- The numeric glyphs used on multimeasure rests (see Measure rests chapter) when Format > Style > Musical symbol font set to "MuseJazz" is not used on numbers (0-9) entered into Musescore Text objects with Font family set to "MuseJazz Text", see workaround by worldwideweary using "Lily Jazz" font on Font Question
Funcionalidades para música antigua
MuseScore ofrece diversas funciones especializadas para crear partituras de música antigua (en particular, medieval y renacentista) similares a las ediciones comerciales realizadas desde el siglo XX en adelante.
Notación sin compás
En MuseScore, las notas cuya duración excede la del compás aparecen normalmente fraccionadas y ligadas entre compases. Sin embargo, MuseScore dispone de una funcionalidad que permite que esas notas aparezcan tal cual, sin fraccionamientos ni ligaduras. Ello permite escribir música sin barras de compás (es decir, no dividida en compases), como se hacía en el Renacimiento:
- En el menú, seleccionar Formato→Estilo...→Partitura.
- Active la casilla "Mostrar figuras que atraviesan la barra de compás"

- Pulse "Aceptar" or "Aplicar." La partitura existente se actualizará de inmediato.
Ejemplo
- El ejemplo de abajo muestra un fragmento de la partitura original de "De Profundis Clamavi", para 4 voces, de Champion:

- El mismo fragmento, en MuseScore:

- Idem, tras activar la casilla "Mostrar figuras que atraviesan la barra de compás"

- Para ocultar las barras de compás, desactive simplemente la casilla “Mostrar barras de compás” en la ventana de Propiedades de Pentagrama/Parte. Ver también Mensurstrich (más abajo).
Nota: Esta funcionalidad está todavía en desarrollo y puede presentar errores. La duración de nota más larga soportada es la longa (una longa con puntillo será fraccionada y ligada entre dos compases).
Mensurstrich
Como la total ausencia de barras de compás puede hacer que la interpretación resulte más dificultosa para los músicos actuales, muchos grabadores modernos han adoptado una variante, denominada Mensurstrich, en la que las barras de compás aparecen entre los pentagramas, pero sin cruzar éstos:

Para colocar barras de compás entre pentagramas:
- En el pentagrama por debajo del Mensurstrich deseado, deseleccione la casilla "Mostrar barras de compás" en la pantalla Propiedades de Pentagrama/Parte;
- En el pentagrama por encima del Mensurstrich deseado, haga click con el botón derecho del ratón sobre una barra de compás y elija Seleccionar→Todos los elementos similares en el mismo pentagrama;
- En la sección Barra de compás del Inspector, active la casilla "Extender al pentagrama siguiente";
- En la sección Barra de compás del Inspector, ajuste el valor del parámetro "Abarcar desde" de manera que el extremo superior de las barras de compás toque la línea inferior del pentagrama;
- Repita la operación para otros pentagramas, según se requiera.
Ámbito
Antes de que existiera el concepto de afinación absoluta, los intérpretes debían transportar "sobre la marcha" la música vocal a una tesitura ejecutable por parte de sus conjuntos. Para ayudarles en esta tarea, a veces se incluía al principio de la pieza una indicación de ámbito, en la que aparecen las notas extremas que demanda el pentagrama para la voz correspondiente.
Para incluir un ámbito en un pentagrama puede hacer uso de uno de estos métodos:
- Arrastre el símbolo de ámbito desde la paleta Líneas del espacio de trabajo Avanzado y suéltelo sobre la clave del pentagrama.
- Seleccione una clave y, a continuación, haga doble click sobre el símbolo de ámbito (en la paleta Líneas del espacio de trabajo Avanzado).

El ámbito mostrará automáticamente la gama de notas que abarca el pentagrama en el que aparece. En el caso de que exista un salto de sección, sólo mostrará la gama de notas de esa sección. Si se desea mostrar el ámbito de las secciones sucesivas, tendrá que repetir la operación para ellas.
La gama de notas de un ámbito puede ser ajustada manualmente. Para ello, selecciónelo y cambie los valores de "Nota superior" y "Nota inferior" mediante el Inspector. Para un ajuste automático, pulse Actualizar rango en el inspector.
Indicaciones mensurales de compás
En el sistema de notación mensural, las indicaciones de compás no definían la duración de un compás, sino la de la breve (la cuadrada) o la semibreve (la actual redonda). MuseScore soporta símbolos de notación mensural como "Apariencia" en la pantalla de Propiedades de la indicación de compás, pero la proporción entre, por ejemplo, blancas y redondas no puede ser modificada.
Una forma de utilizar esos símbolos es imitar a los compositores renacentistas que hacían uso de varias voces con distintas indicaciones de compás, sin recurrir a grupos irregulares. Edite la indicación de compás de cada pentagrama, asegurándose de que el principio y el final de compás de todos los pentagramas coincide. En caso necesario, aumente la duración del compás al mínimo común múltiplo.

De Profundis Clamavi para 5 voces, de Josquin Des Prez
Ver también
Layer (experimental)
This feature is still experimental and only visible if MuseScore is started using the '-e' option, see Command line options
For the Open-Goldberg project, the ability to create different versions of the score was needed. One version is the "Urtext", a score which is close to the original version of Bach. A second version could be a Czerny variation, which in addition to the Urtext, contains fingerings.
The layer feature allows creating different versions out of one score file. If you want to add fingerings, you have to create a layer and tag the fingering elements with the layer name.
First, create layers:

Second, create a score variant:

Add the visible layer to the score variant, then select all fingerings and tag them with the name of the score variant:

Default layer:

Czerny layer:

See also
MIDI import
MuseScore can import MIDI files (.mid/.midi/.kar) and convert them into music notation.
- To import a MIDI file, use the standard Open command. This converts the MIDI file into a MuseScore file (.mscz) and applies the default quantization settings.
The MIDI Import Panel appears at the bottom of the screen: you can expand this by dragging the interface with the document window upwards. The panel shows all the tracks in the file (only those with note events are shown) and allows you to adjust parameters affecting the conversion process. If there are multiple tracks, then one more track is added at the top of the list to select all tracks at once.

-
To accept the default conversion: Simply press the "X" symbol on the top-left of the Import Panel to close it. The panel can be re-opened at any time during the session by pressing "Show MIDI import panel" at the bottom of the document window.
-
To reimport the file: Adjust the desired parameters in the Import Panel (see below) and press Apply. If you have made changes to the Import Panel but wish to UNDO them, press Cancel. To close the Import Panel, press the "X" symbol at the top-left of the panel.
If you reimport the file after making changes to the temporary generated result score, MuseScore will prompt you what should happen with that modified score: Save it somewhere, Discard it or Cancel. The Save option will save the modified score as a Musescore file in your \bin directory without modifying the original MIDI file. It will then reimport the original MIDI file and apply the import panel settings. The import panel settings are NOT applied to the saved file. The Discard option will UNDO your changes to the Musecore file, then reimport the original MIDI file and apply the new settings. The Cancel option will reimport the original MIDI file in the first tab and apply any import panel setting then create a new tab with your modified score but without applying any import panel settings. The second tab is the same as hitting SAVE, then opening the saved file. Therefore, you cannot apply import panel settings to a user modified score. You must first apply the import panel settings, make any changes to the score, then save the score using the standard Save command.
Mouse wheel scrolling (MIDI Import Panel): Vertical scrolling is the default. For horizontal scrolling, press Shift or Ctrl while using the wheel.
Available operations
- MuseScore instrument
- Assign a MuseScore instrument (listed in instruments.xml or in specified custom xml file in Preferences) that defines staff name, clef, transposition, articulations, etc.
- Quantization
-
Quantize MIDI notes by some regular grid. The grid MAX resolution can be set via the drop-down menu:
- Value from preferences (default) - quantization value is taken from the main Preferences dialog of MuseScore (in the “Import” tab)
- Quarter, Eighth, 16th, 32nd, 64th, 128th - user-defined values
-
However, the actual quantization grid size is adaptive and reduces when the note length is small, so for each note the quantization value is different. But there is an upper limit for the quantization value, and that value can be set by the user as "max. quantization".
For example, if some note is long - say, half note, and the max. quantization is set to 8th, then the note will be quantized with the 8th-note grid, not the half- or quarter-note grid as it supposed to be by the algorithm.
Such quantization scheme allows to quantize all notes in the score (with different lengths!) adequately. - Max. voices
- Sets maximum count of allowed musical voices.
- Search tuplets
- When enabled, this option attempts to detect tuplets and applies the corresponding quantization grid to the tuplet chords.
- Is human performance
- If enabled, this option reduces the accuracy of MIDI-to-score conversion in favor of readability. It is useful for unaligned MIDI files, when no regular quantization grid is provided. For such files the automatic beat tracking algorithm is used which tries to detect the bar positions throughout the piece.
- 2x less measure count
- The option is active for unaligned MIDI files (when "Is human performance" is checked by default). It halves measure count obtained in the internal beat tracking operation. It may be convenient when the beat tracking gives 2x more frequent bar subdivision than necessary.
- Time signature
- The option is active for unaligned MIDI files. The user can choose an appropriate time signature for the whole piece if the default detected value is wrong. The option is useful because it handles imported tuplets correctly unlike the direct time signature setting from the palette.
- Split staff
- This option is suited mainly for piano tracks - to assign notes to the left or right hand of the performer. It uses constant pitch separation (the user may choose the pitch via sub-options) or floating pitch separation (depending on the hand width - sort of a guess from the program point of view).
For drum tracks (“Percussion” sound in the track list) it splits the staff into multiple staves, each of which gets only one drum pitch (i.e. drum sound). There is also a sub-option to allow/disallow the application of the square bracket for the newly created set of drum tracks. - Clef changes
- Small clefs can be inserted within a staff to keep chords closer to the 5 staff lines. Clef changes depend on the average pitch of the chord. Tied groups of notes are not broken by the clef insertion (if it occurs, one can report a bug for algorithm in
importmidi_clef.cpp). This option is available for non-drum tracks only. - Simplify durations
- Reduces number of rests to form more "simple" note durations. For drum tracks this option can remove rests and lengthen notes as well.
- Show staccato
- Option to show/hide staccato markings in the score.
- Dotted notes
- Controls whether MuseScore will use dotted notes or ties.
- Show tempo text
- Shows/hides tempo text markings in the score.
- Show chord names
- Shows/hides chord names in the score, if any, for XF MIDI file format.
- Recognize pickup measure
- When enabled, this option doesn't change the time signature of the first bar that is shorter than the second bar. It is also called anacrusis. This option is only available for all tracks at once.
- Detect swing
- MuseScore tries to detect swing, and automatically replace a pattern of 4th + 8th notes in triplets (for the most common swing feel, 2:1), or a dotted 8th + 16th pattern (for shuffle, 3:1), with two straight 8ths and a “Swing” or “Shuffle” text at the beginning.
External links
Master palette
Overview
The Master Palette window can be used to,
- Edit and compose custom Palettes,
- Create new Time Signatures or Key Signatures, and
- Add (rare) text and symbol to a score directly.
To open this window, either,
- Press Shift+F9 (Mac: fn+Shift+F9), or
- From the menu, select View → Master Palette.
To open the Symbols category directly, press Z, which is the "Show symbol palette" keyboard shortcut.
Editing and composing custom palette
Not to be confused with editing toolbar . See Viewing and navigation: Toolbars chapter.
See the Palettes : Customize palettes chapter.
Creating new Time Signatures or Key Signatures
See the Time Signatures and the Key Signatures chapters.
Adding an item to the score directly

Notation items inside the Master Palette under Symbols category can be added to the score freely, either as a new Symbol type item, or as a new character inside an existing score Text. To search for a specific symbol, use the font drop down list on the bottom right of the box to specify Emmentaler-, Gonville- or Bravura-specific symbols. Then enter keywords in the search box at the top.
Those under other categories must be added onto a compatible score item. For example, items under Tremolo category cannot be added onto a rest.
Position the mouse cursor over any item on the right pane to show a descriptive popup tooltip.
Add from categories other than Symbols
- Drag a Master Palette item and drop on score/frame/measure/staff/note/rest, or
- Select a score item and click a Master Palette item.
Add Symbols category item as Symbol type
- Drag a Master Palette item and drop on any score item, or
- Select a score item and click a Master Palette item.
The new Symbol type item has a pre-determined, unadjustable size but scales with the score master scaling. See the Layout and formatting chapter.
Add Symbols category item as character
- Double click a Text on the score to enter Text editing mode.
- Click a Master Palette item.
- Optionally assign custom font size and other font settings.
Alternatively, use the Special Characters window.
Connecting multiple Symbol type to move together
Items can be connected to each other,
- Add a symbol to the score.
- Add a second symbol onto the first symbol. Adjust position of the second one as required.
- Adjusting the position of the first element now moves the second attached element.
See also
- Notation types
- Fonts
- Palettes
- Workspaces
- Symbols and special characters (add musical symbols to text objects)
External links
Notación de pentagrama cruzado
En las partituras para piano es frecuente escribir frases musicales que se extienden a los dos pentagramas. En MuseScore se hace de esta manera:
-
Introduzca las notas en uno de los pentagramas, por ejemplo:

-
Seleccione una nota y pulse Ctrl+Mayús + ↓/↑ (Mac: ⌘+Mayús + ↓/↑). Las notas pertenecientes a esa voz se moverán al otro pentagrama. Por ejemplo:

Nota : Si sólo desea mover determinadas notas de un acorde, deberá asegurarse previamente de que pertenecen a voces distintas.
-
Para ajustar la barra de unión, haga doble click sobre ella para que se muestren los puntos de ajuste. Use las flechas del teclado o arrastre dichos puntos con el ratón para cambiar el ángulo o la posición de la barra:

Ver también
- Conectar barras de compás: Cómo extender las barras de compás a varios pentagramas.
Enlaces externos
- Cómo extender un acorde o una plica a dos pentagramas (MuseScore "Howto")
Note input modes
MuseScore allows you to choose from any of several note input modes. Step-time (see below) is the default, but others can be accessed by clicking the small dropdown arrow next to the note entry button on the note input toolbar.

Step-time
This is the default method of note input and involves entering notes one at a time: first by selecting a note duration using the mouse or computer keyboard, then choosing a pitch using the mouse, computer keyboard, MIDI keyboard or virtual piano keyboard.
For details see Basic note entry.
Re-pitch
Re-pitch mode allows you to correct the pitches of a sequence of notes while leaving their durations unchanged (not to be confused with Accidental: Respell pitches).
- Select a note as your starting point;
- Select the Re-Pitch option from the Note input drop-down menu; or use the keyboard shortcut, Ctrl+Shift+I (Mac: Cmd+Shift+I).
- Now enter pitches using the computer keyboard, MIDI keyboard or virtual piano keyboard. Note: you cannot use the mouse to input notes in the Re-pitch method.
You can also use the Re-pitch function to create a new passage from an existing one of the same sequence of durations—by copying and pasting the latter, then applying Re-pitch.
Rhythm
Rhythm mode allows you to enter durations with a single keypress. Combining Rhythm and Re-pitch modes makes for a very efficient method of note entry.
- Select your starting point in the score and enter Rhythm mode.
- Select a duration from the note input toolbar, or press a duration shortcut (numbers 1-9) on your computer keyboard. A note will be added to the score with the selected duration. In contrast to Basic note entry, pressing the . key will toggle dotting or not dotting all subsequent durations. All following rhythms will be dotted until the . key is pressed again. Unlike Basic note entry, the dot is to be pressed prior to entering the rhythm.
- Entering rests is similar to adding dotted notes. Press the 0 key to toggle entering rests. All rhythms entered will be rests until the 0 key is pressed again. This can be used concurrently with dotted notes.
- Continue pressing duration keys to enter notes with the chosen durations.
- Now use Re-pitch mode to set the pitches of the notes you just added.
Real-time (automatic)
The Real-time modes basically allow you to perform the piece on a MIDI keyboard (or MuseScore's virtual piano keyboard) and have the notation added for you. However, you should be aware of the following limitations which currently apply:
- It is not possible to use a computer keyboard for Real-time input
- You cannot enter tuplets or notes shorter than the selected duration
- You cannot enter notes into more than one voice at a time
However, these restrictions mean that MuseScore has very little guessing to do when working out how your input should be notated, which helps to keep the Real-time modes accurate.
In the automatic version of Real-time input, you play at a fixed tempo indicated by a metronome click. You can adjust the tempo by changing the delay between clicks from the menu: Edit → Preferences... → Note Input (Mac: MuseScore → Preferences... → Note Input).
- Select your starting position in the score and enter Real-time (automatic) mode.
- Select a duration from the note input toolbar.
- Press and hold a MIDI key or virtual piano key (a note will be added to the score).
- Listen for the metronome clicks. With each click the note grows by the selected duration.
- Release the key when the note has reached the desired length.
The score stops advancing as soon as you release the key. If you want the score to continue advancing (e.g. to allow you to enter rests) then you can use the Real-time Advance shortcut to start the metronome.
Real-time (manual)
In the manual version of Real-time input, you have to indicate your input tempo by tapping on a key or pedal, but you can play at any speed you like and it doesn't have to be constant. The default key for setting the tempo (called "Real-time Advance") is Enter on the numeric keypad (Mac: Fn+Return), but it is highly recommended that you change this to a MIDI key or MIDI pedal (see below).
- Select your starting position in the score and enter Real-time (manual) mode.
- Select a duration from the note input toolbar.
- Press and hold a MIDI key or virtual piano key (a note will be added to the score).
- Press the Real-time Advance key. With each press the note grows by the selected duration.
- Release the note when it has reached the desired length.
Real-time Advance shortcut
The Real-time Advance shortcut is used to tap beats in manual Real-time mode, or to start the metronome clicks in automatic Real-time mode. It is called "Real-time Advance" because it causes the input position to move forward, or "advance", through the score.
The default key for Real-time Advance is Enter on the numeric keypad (Mac: Fn+Return), but it is highly recommended that you assign this to a MIDI key or MIDI pedal via MuseScore's MIDI remote control. The MIDI remote control is available from the menu: Edit → Preferences... → Note Input (Mac: MuseScore → Preferences... → Note Input).
Alternatively, if you have a USB footswitch or computer pedal which can simulate keyboard keys, you could set it to simulate Enter on the numeric keypad.
When the notes are entered they will be placed just before the selected starting element, which will be highlighted with a square blue marker. The start element and any subsequent notes or rests within the same measure will be shifted forward. You can move the insertion point forward and backward using the arrow keys → or ←, and the new insertion point will then be highlighted.
Insert
Insert Input mode (called Timewise in versions prior to 3.0.2) allows you to insert and delete notes and rests within measures, automatically shifting subsequent music forwards or backwards. Measure duration is automatically updated as you go.
- Make sure you are in Note input mode, and that you have the element selected where you want to start inserting notes/rests;
- Click on the arrow next to the Note input icon, and select Insert (or if Insert is the current default, just press N);
- Enter a note or rest as you would in Step-Time mode. Each note is inserted before the current cursor position;
- Move the cursor forward and backward if required (using the arrow keys), to change the insertion point.
Alternatively, if you have only one or two notes to insert, you may prefer to use a shortcut:
- Press Ctrl+Shift (Mac: Cmd+Shift) while adding the note by Mouse-click or keyboard shortcut (A-G).
If, at any time, the total duration of the notes and rests within the measure does not match the time signature, a small + or - sign will be shown above the measure.

See also: Remove selected range (Tools).
Normal mode
To leave Note Input mode, click on the Note Input tool button, press N, or press Esc. This puts you in Normal mode, in which you can change durations and delete notes or rests as follows:
- If you select a note and press Del the note will be replaced by a rest of the same duration.
- If you select a note or rest and press Ctrl+Del the note/rest will be deleted, and subsequent notes moved backward (see Remove selected range).
- If you reduce the duration of a note or rest the remaining duration will be filled with rests.
- If you increase the duration of a note or rest it will subtract duration from the subsequent notes/rests to make up the duration. If this is done on the last note/rest in the measure, a note or rest with the required duration will be inserted in the start of the following measure, and the two will be tied together.
See also
External links
Parts
MuseScore allows you to not only create and print a full score but also to generate individual player's parts from it.
A part can be created from a specific instrument staff in the main score or even from a specific voice within a staff. This allows you to display multiple parts (e.g. Flute 1 & 2) on a single staff in the score but to extract them as separate parts.
Part Playback
Musescore "solos" the Part you're viewing during playback—i.e. no other Parts sound. This is because the Mixer’s “Play Part Only” box is checked by default.
Simply uncheck the “Play Part Only” checkbox if you want hear all play enabled tracks while viewing a Part. Additionally you can use the Mixer's mute and solo buttons to achieve various partial mixes of all available tracks. This can prove quite helpful because it allows you to proofread, arrange and compose within any Part while hearing other tracks for context.
Create all parts
The most straightforward method is to create all parts at once. Parts are generated on a one-to-one basis from the corresponding Instruments in the score:
- From the menu, select File → Parts….
- Click All Parts (MuseScore 3.2-3.3.4: Generate; prior to MuseScore 3.2: New All) (parts are named with the instrument name, and a number added to differentiate parts that have the same label in the main score).

- Click OK.
The parts can now be accessed by clicking on tabs above the document window.
Create specific parts
This method allows you to generate specific parts for only selected instruments (rather than all-at-once):
- In the Parts window click Single Part (prior to MuseScore 3.4 New) to create a part;
- In the center pane, type the words you want to use for the "Part title" (this also serves for the corresponding part of the filename when exporting);
- Pick the instrument that you want to appear in your part from the "Instruments in Score" pane, and press + to add it to the "Instruments in Part" pane.
If you wish to create more parts, repeat steps 1 through 3 (above) for each part.
- Click OK to save the parts.
You have now finished setting up the parts. You do not need to do this again, unless you add or remove an instrument from your full score.
Customize parts
Once you have generated a part (or all parts), you can select any part at the top and use the controls at the bottom to control not only what instrument is in the part, but also which staves and voices within the instrument are included.

Add instruments to a part
To add instruments to an existing part:
- Select the part in the "Parts" pane.
- Select the instrument from the "Instruments in Score" pane.
- Press + to add it to the "Instruments in Part" pane.
Remove instruments from a part
To remove instruments from an existing part:
- Select the part in the "Parts" pane.
- Select the instrument from the "Instruments in Part" pane.
- Press - to remove the instrument.
Select staves for an instrument
To select the staves of an instrument to include in the part:
- Select the part in the "Parts" pane.
- Click the arrow next to the instrument in "Instruments in Part" to expand the listing to show all staves and voices of the instrument.
- Select the staff to be removed.
- Press - to remove it from the instrument.
Select voices for an instrument
- Select the part in the "Parts" pane.
- Click the arrow next to the instrument in "Instruments in Part" to expand the listing to show all staves and voices of the instrument.
- Uncheck the voices to be removed.
Note: If you select only voice 1 for a given staff, then only the content in voice 1 for that staff will be included in the part. Thus, in order to share flute 1 & 2 on the same staff, you will need to enter all notes onto both voices, even in passages where they share content. You also cannot enter the two parts as chords in the passages where they share rhythms.
Delete a Part
- Open the Parts dialog (File → Parts…);
- Select the relevant Part in the "Parts" pane;
- Press Delete.
Export parts
In order to be able to export parts, those need to have been created first, see above
- From the menu, select File → Export Parts…;
- Navigate to the place you want them to be exported to and select the file format (PDF is the default);
- For filename just enter whatever prefix is useful for all parts, or leave the default (the filename of your score);
- Click OK.
This will generate files with the names "<title>" + "-" + "<part name>.<extension>". In addition, when exporting as PDF, this will also generate "<title>" + "-Score_And_Parts.pdf".
Save parts
Parts and score are "linked", which means that any change to the content in one will affect the other, but changes to the layout will not. When you have the parts created, they are saved along with the score (if you open the score you have tabs for the score and every part you created).
However, if you wish to save a part individually:
- Make sure the part is "active." Select its tab if not;
- From the menu, select File → Save As….
Print a part
- Make sure the part is "active." Select its tab if not;
- From the menu, select File → Print to open the print dialog.
| Adjunto | Tamaño |
|---|---|
| Part_Creation5_en.png | 10.48 KB |
| Part_Creation4_en.png | 11.28 KB |
| Part_Creation3_en.png | 11.06 KB |
| Part_Creation2_en.png | 10.36 KB |
| Part_Creation1_en.png | 10.01 KB |
| Parts-create-all_en.png | 18.89 KB |
| Parts-create-voices_en.png | 19.64 KB |
| Parts_create_All_Parts_en.png | 48.29 KB |
| Parts_create_Single_Part_en.png | 51.83 KB |
Plugins
Not to be confused with VST and VSTi. VST support is added in Musescore 4, Musescore 3 does not support VST.
Visit Developers' Handbook Plugins for 3.x Chapter for step by step guide to write a new plugin or edit a current one.
Overview
A MuseScore plugin is a small piece of software that adds extra functionality to the program. A plugin need to be enabled first, and then executed by using the Plugins menu. Some plugins come pre-installed, they are disabled by default. There are also plugins created and shared by other musicians, anyone can download and use them.
Installing a new plugin
- Search for available plugins at, for example:
- https://musescore.org/en/plugins?category=All&compatibility=432 [musescore.org→Download→Plugins]
Warning: Plugins can potentially contain bad or malicious codes, which damage scores and compromise the machine. All plugins shared on musescore.org's plugin repository are unvetted. No warranty of any kind is provided. Users should download from a trusted author or double-check the code themselves. Seek advice on the Plugins forum. - https://github.com/topics/musescore-plugin
- https://github.com/topics/musescore-plugins
- https://musescore.org/en/plugins?category=All&compatibility=432 [musescore.org→Download→Plugins]
- Make sure it is compatible with version of Musescore used.
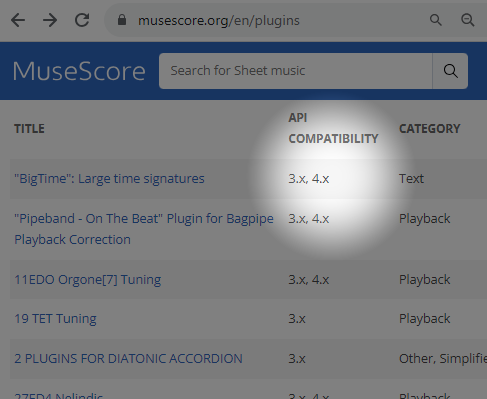
- Download the file:
- for musescore.org hosted .qml files, sometimes a web browser open it as plain text and refuses to download it as file. In this case, right click on a link and select Save link as...
- for github.com unpackaged code, download the project as a zip file by clicking Code: Download ZIP

- for github.com packaged release, click on an appropriate item under Assets
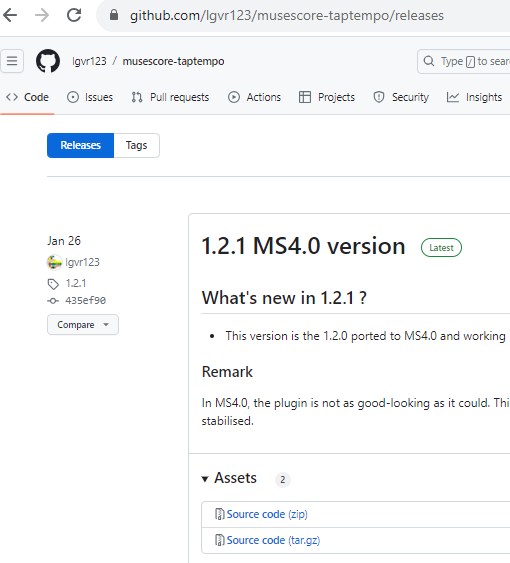
- (If it is a zip file) Extract it using an archive extraction software.
- Move the files to MuseScore's plugins folder, configurable at Edit → Preferences:General tab window, see Preferences chapter. The default directories are
- Windows:
%HOMEPATH%\Documents\MuseScore3\Plugins - macOS:
~/Documents/MuseScore3/Plugins - Linux:
~/Documents/MuseScore3/Plugins
- Windows:
Note: (1) The folder name "Plugins" is translated according to Musescore's language setting, see Preferences:General chapter. (2) Some plugins require installing other components such as a specialized Font file.
Enabling and disabling plugins
- Click Plugins: Plugin Manager
-
Tick a plugin to enable it.

Running a plugin
Select Plugins → [The plugin name]
To assign a keyboard shortcut to a plugin, use the Plugin Manager.
Creating a plugin
One way to create and edit a plugin is using Musescore's Plugin Creator window, but see the developers' handbook Plugin documentation chapter. That chapter contains coding tutorials and code boilerplates.
- Click Plugins → Plugin Creator.

Pre-installed plugins
Some plugins come pre-installed with MuseScore. They are not enabled by default, see "Enabling and disabling plugins" section. They are available at MuseScore repository https://github.com/fp22june/MuseScoreTag362/tree/master/share/plugins.
- ABC Import :
This plugin imports ABC text from a file or the clipboard and converts it to MusicXML with Wim Vree's abc2xml Python script. Internet connection is required, because it uses an external web-service at https://abc2xml.appspot.com/ for the conversion. As of June 2023, the pre-installed ABC Import plugin does not work anymore due to expiration of web domain. Working alternatives:- ABC Import/Export plugin: Works offline, need to download and install python, abc2xml and xml2abc. Depending on python version, editing out the incompatible hash symbol (python comment token) at LINE 1 may be needed.
- ABC Import and ABC Export plugin: Connects to https://musescore.jeetee.net/abc/
- Color Notes: Notes → Color Notes .
Colors notes in the selected range (or the entire score), depending on their pitch. It colors the note head of all notes in all staves and voices according to the Boomwhackers convention. Each pitch has a different color. C and C♯ have a different color. C♯ and D♭ have the same color.
To color all the notes in black, just run that plugin again (on the same selection), or use Remove Notes Color plugin. - Create Score :Creates a new score. It creates a new piano score with 4 quarter notes: C, D, E, F. It's a good start to learn how to make a new score and add notes from a plugin.
- helloQml : Demonstrates some basic tasks.
- Note Names : Notes → Note Names. This plugin names notes in a selected range or for the entire score. It displays the names of the notes (as staff text) according to MuseScore's language settings: voices 1 and 3 notes above the staff; voices 2 and 4 notes below the staff; and chord notes in a comma separated list, starting with the top note.
- Panel : This demo plugin creates a GUI panel.
- random/random2 : Creates a random score.
- run : This demo plugin runs an external command. Probably this will only work on Linux.
- scorelist : This test plugin iterates through the score list.
- ScoreView : Demo plugin to demonstrate the use of a ScoreView
- Walk : This test plugin walks through all elements in a score
Pre-installed plugins are in the folder:
- Windows:
%ProgramFiles%\MuseScore 3\Plugins(or%ProgramFiles(x86)%\MuseScore 3\Pluginsfor the 32-bit versions) and in%LOCALAPPDATA%\MuseScore\MuseScore 3\pluginson Windows 7 and later - macOS:
/Applications/MuseScore 3.app/Contents/Resources/plugins(to reveal files in the app bundle, right-click onMuseScore 3.appand choose "Show package contents"), and in~/Library/Application Support/MuseScore/MuseScore 3/plugins. - Linux:
/usr/share/mscore-3.x/pluginsand in~/.local/share/data/MuseScore/MuseScore3/plugins. These folders should not be modified. The directory names might be different depending on language setting of the operating system.
See also
External links
- Developers' Handbook Plugins for 3.x
Posicionamiento automático
Inicialmente, MuseScore coloca los distintos elementos en la partitura según las propiedades por defecto que se hayan establecido en el Estilo. Si dichos elementos tienen activado el posicionamiento automático, MuseScore trata de evitar colisiones entre ellos, desplazándolos ligeramente si es necesario.
Posición por defecto
La posición por defecto de la mayoría de los elementos viene establecida por sus ajustes de estilo. Las propiedades específicas que puede alterar el usuario dependen del tipo de elemento, pero entre ellas están:
- Ubicación: Define si el elemento aparece encima o debajo del pentagrama.
- Desplazamiento: Para elementos sin la propiedad de "Ubicación encima o debajo", este parámetro especifica la posición por defecto. Ver Desplazamiento X/Y.
- Distancia mínima de autocolocación: Distancia mínima respecto a otros elementos cuando el posicionamiento automático está activado.
Para detalles acerca de los ajustes disponibles para cada tipo de elemento, ver Diseño y formato: Estilo.
Para cambiar la posición por defecto:
Use uno de estos métodos:
- En el menú, seleccione Formato→Estilo...; elija un tipo de elemento y ajuste los valores de posición o colocación.
- Seleccione un elemento de la partitura y ajuste los valores de posición o colocación mediante el Inspector; a continuación, pulse el botón Establecer como estilo (S), que aparece a la derecha del parámetro. De este modo, se actualiza el ajuste de Estilo correspondiente.
Ajustes manuales
Una vez un elemento se ha posicionado automáticamente, su posición puede ser alterada de forma manual mediante uno de estos métodos:
- Seleccione el elemento y ajuste su Desplazamiento X/Y con el Inspector.
- Arrastre el elemento por medio del ratón.
- Acceda al modo edición y mueva el elemento mediante las teclas de flecha.
Si el elemento puede ir colocado tanto encima como debajo del pentagrama, puede cambiar su ubicación de una de estas maneras:
- Cambiando su "Ubicación" con el Inspector
- Tecleando X para alternar entre arriba y abajo
Nota: Cuando un elemento tiene activado el posicionamiento automático, no es posible colocarlo en un lugar que provoque su colisión con otros elementos.
Deshabilitar el posicionamiento automático
- Seleccione el elemento y deje sin marcar la casilla "Posicionamiento automático" en el Inspector.
El elemento retorna a su posición por defecto. Puede ser reubicado a voluntad y los demás elementos no evitarán colisionar con él cuando se coloquen.
Orden de superposición
Para cambiar el valor del Orden de superposición:
- Seleccione el elemento y cambie el valor asignado a su "Orden de superposición" mediante el Inspector.
En los casos en los que los elementos puedan superponerse, el Orden de superposición determina el orden en el que irán colocados uno sobre otro. El elemento con el valor más bajo será colocado detrás.
Preferences
You can customize many of MuseScore's default behaviors via the menu: Edit→Preferences... (Mac: MuseScore→Preferences...).
The Preferences dialog has multiple tabs:

Reset All Preferences to Default will reset all preferences to the ones MuseScore had when you installed it. Ok will save the settings and close the dialog. Cancel will close the dialog without applying changes. Apply will make changes take effect without closing the dialog.
General

Here you can define:
- Program Start: Specify whether to start the session empty or to display a score. The options are one of the following: Start empty (no score) / Continue last session / Start with new score (i.e. New Score Wizard automatically opens) / Start with score (the program default, or one of your own choosing).
You can also choose which panels to display. This can be any combination of: Splash screen, Play Panel, Navigator, or Start Center. Also select if Tours will be active. - Folders: Specify the default folders for score files, style files, custom score templates, plugins, additional SoundFonts, images, and extensions.
- Language: Choose the language used by the program. Translations may be updated from here too. Note that language translation updates can also be done via the menu: Help→Resource Manager.
- Telemetry: Tick/untick to authorize MuseScore to collect usage data. The type of data collected is listed, and updated as needed, in telemetry.
- Appearance: Specify a dark or light theme, and the width and height of icons. Set display "Font face" and "Font size".
- Auto Save: How frequently the program autosaves.
- OSC Remote Control: See https://musescore.org/en/node/373721 and https://musescore.org/en/node/328653
Canvas

Use Canvas to set your preferred color and wallpaper for the score background and paper. The default "Background" is dark blue (RGB 20, 36, 51; Alpha 255) and the default "Paper," white.
- Background: Use this to set the color or background around the score pages. Select "Color" then click on the bar to the right and make a choice from the color picker; or select "Wallpaper," click on the file icon and set a background image.
- Paper: Sets the color or background of the score pages. Controls identical to "Background" (above). You can also tick/untick "Use the same color in palettes".
- Zoom: This defines the Default zoom level and keyboard/mouse zoom precion.
- Scroll Pages: This defines the way that the pages are laid out in the score. Choose "Horizontally" for a row layout, or "Vertically" for a column layout. To limit scrolling, tick "Limit scroll area to page borders".
- Miscellaneous: "Draw antialiased" (the default option) makes diagonal lines and edges of shapes look smoother. "Proximity for selecting elements" controls the distance the mouse may be from an object and still act on it. Smaller numbers require more precision, making it harder to click on small objects. Larger numbers are less precise, making it harder not to click on nearby objects unintentionally. Choose a comfortable working value.
Note input

On this tab there are note input and MIDI remote control preferences. Here the following can be set:
Note Input
- Enable MIDI Input: Leave checked to allow MIDI input of notes.
- Color notes outside of usable pitch range: For details, see Coloring of notes outside an instrument's range and Usable pitch range (Staff properties: all staves).
- Delay between notes in automatic real-time mode: See Real-time (automatic).
- Play notes when editing: When ticked, MuseScore sounds the note when it is entered or selected. Tick "Play whole chord when adding note," if you want to hear all the notes of a chord when it is added to. You can also edit the "Default duration".
MIDI Remote Control
Midi Remote Control allows you to use certain keys on your MIDI keyboard to enter notes and rests and to select note durations, without involving the computer mouse or (computer) keyboard. The default setting is off.
To assign a command to a MIDI key:
- Ensure that "MIDI Remote Control" is checked (your MIDI keyboard should be connected before opening the program).
- Click the red button next to the option you wish to assign a MIDI key to: the red button now lights up.
- Press a MIDI keyboard key. The red button becomes unlit and the green button lights up instead. The MIDI key has now been assigned to the desired option.
- Repeat "2" and "3" to assign other keys.
Once you have defined your key settings you can use the MIDI keyboard to control note input operations. You can verify your key settings by observing the MuseScore Note Input toolbar while pressing the MIDI keys.
To temporarily deactivate Midi Remote Control: uncheck "Midi Remote Control": all MIDI input key action buttons are now greyed out. Note: Your key assignments are always saved between MuseScore sessions and are not affected by deactivation.
Notes: (1) The "Clear" option turns off all the green buttons for the current MuseScore session but all the user-recorded MIDI key settings are retained and will be reloaded on the next session. (2) A MIDI key setting that is activated cannot afterwards be turned off, and the green button will always remain lit: however it can be overwritten with a different MIDI key by using the red button again. (3) If the same MIDI key is accidentally assigned to more than one option, then all the associated green buttons remain lit although only one will work. To fix, see "(2)".
Score

Score preferences include:
Default Files
- Instrument list 1: Default instrument list file one, see Soundfont, MIDI velocity and instruments.xml.
- Instrument list 2: Default instrument list file two
- Score order list 1: Default score order list file one (used for instrument ordering)
- Score order list 2: Default score order list file two
- Style and Style for part: Default style for new score file and Musescore Parts, covered in Layout and formatting : Default style chapter. See also Layout and formatting concepts.
View
- Show MIDI controls in mixer: Enable this option to show MIDI controls by default in the mixer.
I/O

PortAudio
A known bug of musescore 3.6.2: After changing settings inside this box, you must press Restart Audio and MIDI Devices to apply the change, using Apply or OKbutton alone will not apply the change.
API and Device:
- For output of analog audio generated by musescore, select your built-in speakers/headphones, USB headset, wireless, etc.
- Common API options available on windows:
- MME: widely supported by softwares because it was released in 1991.
- WASAPI: aim to provide lower latency than MME, preferred for recording.
- DirectSound: a DirectX-related Interface of WASAPI.
- To delegate the musescore's audio output routing to the Windows "Control Panel" > "App volume and device preferences" > "Musescore Output" option, select "DirectSound" as API and then select "Primary sound Driver" as Device.
- If you need low latency, try 3rd party drivers such as ASIO4ALL.
MIDI Input, MIDI Output and MIDI Output Latency :
- For input and output of MIDI data, also see Mixer.
- To simultaneously input notes and receive audio generated by musescore with your MIDI device, you need to select the correct MIDI Input and MIDI Output options (on Windows MIDI Output might be "MMS<device name>") and close and reopen musescore to apply the settings.
Jack Audio Server
Check these options as required if using the JACK Audio Connection Kit.
Audio Engine
In case of lost communication between your audio device or your MIDI keyboard and MuseScore (no sound output or MIDI action), click on Restart Audio and MIDI Devices to restore them.
Import

These settings determine how files from other sources are imported:
- Style Used for Import: Use either the built in MuseScore style or a style you choose (see Load/Save Style)
- MusicXML: Set the MusicXML import options
- Character Set Used When Importing Binary Files: Character Set used for Binary Files (Guitar Pro and Overture character sets)
- MIDI: Define the shortest note when importing MIDI files
- When opening scores from older MuserScore versions: When enabled, you will be prompted if you want to apply the new default engraving and style settings or not when opening a score created with a version before 3.6.
Export

These settings determine how various files are exported from MuseScore:
- PNG: PNG/SVG image resolution (in DPI) and whether to use transparent background.
- MIDI: Whether to expand repeats in exported MIDI files.
- PDF: PDF resolution (in DPI).
- Audio: Set audio sample rate, MP3 bitrate, and whether to "normalize" exported audio.
- MusicXML: Whether to export the layout and how to export system and page breaks to MusicXML.
Shortcuts

This tab lists all the commands in MuseScore and any keyboard shortcuts associated with them. Shortcuts listed in preferences also appear next to their associated commands in the menus.
Note: Some shortcuts, including default ones, may not work with some keyboards.
-
To search for a particular command: Enter its action name in the "Search" box near the bottom of the window.
-
To create a new shortcut for a command:
- Find the relevant command by doing either:
a. Use the Search box near the bottom of the window, or
b. Clear out the Search box, and then browse through the list. - Click to select it and then click Define...; or double-click it.
- Enter the new shortcut using up to four keys. Press Clear if you need to re-enter the shortcut.
- Either press Replace to change the existing shortcut; or press Add to keep the old shortcut and add the new one.
- Find the relevant command by doing either:
-
To reset a shortcut to its system default: Select a command in the list and press Reset Shortcut to Default.
-
To save the shortcuts list: Press Save and save to a file name of your choice.
-
To load a saved shortcut list: Press Load etc.
-
To clear all shortcuts for an entry: Select the entry and press Clear.
-
To print out the shortcuts list (incl. export to pdf): Press Print etc.
Update

This sets whether MuseScore will check for updates and extensions at startup.
Updates may be checked manually in Help→Check for updates.
Advanced

Allows you to control specific settings for "application, "export", "i/o" and "user interface", as well as color settings.
See also
Recovered files
If MuseScore or your computer should crash, or if power is lost, a pop-up message upon restarting MuseScore will ask if you wish to restore the previous session:

Click Yes, to initiate attempted recovery of files from the interrupted session. Or click No to ignore message.
Saving after session recovery
When MuseScore recovers files after a crash, it renames them with the full path name added in front of the original file name. This very long name will appear in the tab(s) above the active score window.
To ensure that the file is saved in its original location. You should immediately save the restored file using the "Save As..." option: this will open a window to allow you to navigate to the correct folder and directory. If you use the "Save" command instead, the file will be saved in its current location which is unlikely to be the original one.
Finding recovered files
In the event that "Save" is used instead of "Save As..." with a recovered file, you will have to find the files in your computer. The actual location of those files will vary, depending on your operating system, and in which directory MuseScore is installed.
For Windows 7, with a default installation of MuseScore to the program files directory, recovered files are auto-saved to C:\Program Files\MuseScore 3\bin (actually %ProgramFiles%\MuseScore 3\bin).
For Windows 10, look in C:\Users\[User Name]\AppData\Local\VirtualStore\Program Files\MuseScore 3\bin (actually %LOCALAPPDATA%\VirtualStore\%ProgramFiles:~3%\MuseScore 3\bin).
or in C:\Users\[User Name]\AppData\Local\MuseScore\MuseScore3\ (actually %LOCALAPPDATA%\MuseScore\MuseScore3\).
You may need to run a system-wide search in order to find files saved directly after a session recovery. Use keywords from the original file name as well as wildcards, and specify the date modified.
See also
External links
How to recover a backup copy of a score (MuseScore HowTo)
Score Comparison
The Score Comparison Tool allows you to compare two versions of a score to find the differences between them.
Introduction
To open the Score Comparison Tool:
-
From the menu, select View→Score Comparison Tool.

The dialog opens below the document window and consists of three sections (left to right):
- Choose scores to compare: Select the scores you want to compare.
- Diff mode: Select how to view the comparison.
- Comparison: A line by line comparison of the scores is displayed.
Select score
The first step is to select the score. Use the combo box next to "Score 1" to choose between the currently open scores, or click on the Browse button to open the File Explorer and select a score from disk. Secondly, use the next combo box on the right to choose whether the first score should be the current version, or the last saved version. Score 2 is set to the same score you selected for Score 1, but you may choose another of the open scores.
When you have selected the scores and versions press Compare to do the comparison.
Choose view
"Intelligent comparison" is the default option in Diff mode: this displays the differences between the scores in a human-readable format (e.g. "Measure 1: Note: property pitch changed from B4 to C5"). Change the Diff Mode selection to "Raw" if you prefer to see the results displayed in XML code.
View comparison
When you press Compare a list of differences will be displayed to the right, and the score view will automatically change to Documents Stacked. In the Comparison section, double-click on a difference from the list and both score views will automatically pan to show you the changed element, which will also be highlighted.
Leave comparison
To exit the Score Comparison tool, turn off the two options "Score Comparison Tool" and "Documents Stacked" in the View menu.
Example
Below you will see two small scores with a few differences between them.
Last saved:

Current:

The result of the comparison will look like this:

Score properties
Overview
This page describes
- the Score Properties dialog; and
- the Header and Footer feature that automatically add text to the top and the bottom area of each page respectively. To add text to certain page(s) only, use frame and text block. See Frames chapter.
Score Properties window

The Score Properties dialog contains metadata tags, editable descriptive digital data of the file. To open it,
- Open the "Full Score" or a Musescore Part. See Parts chapter;
- Open File → Score Properties.
Every score created with Musescore 3 contains the following predefined metadata tags. Some of them are empty initially, some are automatically assigned with information provided in the New Score dialog. See Create a new score chapter.
NOTE: Score created from a template may generate a top vertical frame with text inside on the first page. These frame text are also automatically assigned with information provided, but they are not linked to and thus not automatically updated with changes made to metadata tags. See Frames chapter.
- File Path: The score file's location on user's computer.
- MuseScore Version: The version of MuseScore the score was last saved with.
- Revision: The revision of MuseScore the score was last saved with.
- API-Level: The file format version.
- arranger: (empty)
- composer: This is initially set to the same text as "Composer" on the first page of the New Score Wizard.
- copyright: This is initially set to the same text as "Copyright" on the first page of the New Score Wizard (if you need a copyright symbols, copy/paste this: ©).
- creationDate: Date of the score creation. This could be empty, if the score was saved in test mode (see Command line options).
- lyricist: This is initially set to the same text as "Lyricist" on the first page of the New Score Wizard.
- originalFormat: This tag exists only if the score is imported (see file formats).
- platform: The computing platform the score was created on. This might be empty if the score was saved in test mode.
- poet: (empty)
- source: May contain a URL if the score was downloaded from or saved to MuseScore.com.
- translator: (empty)
- workNumber is the number of the larger work (e.g. 8—for "The Four Seasons," Op. 8, by Vivaldi). Not automatically filled in on a new score.
- workTitle is the title of the larger work (e.g "The Four Seasons,"). Automatically filled with the "Title" entered in the New Score dialog. Some users may find it more appropriate to input the "Title" into movementTitle instead.
- movementNumber is the number of the movement in the larger work (e.g. 3 for Autumn). Not automatically filled in on a new score.
- movementTitle is the title of the movement in the larger work (e.g.“Autumn”). Not automatically filled in on a new score.
Each Musescore Part, but not the "Full Score" (See Part chapter) has an additional tag,
- partName: The name of the part as given on part creation (which is also used to fill the corresponding part name text in the top vertical frame—be aware that later changes to one are not reflected in the other).
Editing metadata tags
- Open the "Full Score" or a Musescore Part. See Parts chapter;
- Open File → Score Properties;
- Edit the text of the various metadata tags as required.
There is no way to enter line breaks directly when editing metadata tag inside Musescore 3. To display multiline text in a header or footer (as a result of using metadata tags), use an external text editor program (e.g. Notepad for Windows, TextEdit for Mac, Nano for Linux) to create a desired text and copy it into MuseScore. An example of multiline text (feel free to copy and modify).
 Words: © 2000 The Archbishops' Council. Used with permission.

Music: © 2006, 2021 The Royal School of Church Music. All Rights Reserved.
Adding new metadata tags

- Open the "Full Score" or a Musescore Part. See Parts chapter;
- Open File → Score Properties;
- Press New button, enter name and text;
- Press OK;
Accessing metadata tags in a score
The only place to add score properties (metadata tags) on to a score is by referring them in header or footer, see Header and footer section below.
Header/Footer

Use Header and Footer feature to automatically add text to the top and the bottom area of each page respectively. To add text to certain page(s) only, use frame and text block. See Frames chapter.
Adding a header or footer
- Open the "Full Score" or a Musescore Part. See Parts chapter;
- Open Format → Style → Header, Footer;
- Check the Header Text and Footer Text boxes as required.
Entering information
Open Format → Style → Header, Footer,
- The area on the top is for headers, area below it is for footers.
- Both of them are divided into two rows, labelled Odd, and Even, for content on odd and even pages respectively.
- They are also divided into three columns, labelled Left, Middle, and Right, representing the corresponding areas.
There are three kinds of valid input,
- plain text,
- placeholder text, or special symbols, that converts into information automatically, they include
- read-only information such as the current page number, and
- editable metadata, see "Using metadata" section.
Placeholder text or special symbols are case-sensitive, they must be entered letter-for-letter with the correct case. For example,
- $d converts into current date
- $D converts into creation date
- $:movementNumber: converts into "Moverment number" metadata
- $:movementnumber: is invalid because of the wrong lower case 'n'
Musescore version and revision last saved $v and $r are only available in MuseScore 3.6 and after.
The part name placeholder text, $I, $i, or $:partName: , is only available in a Musescore Part, but not the "Full Score" (See Part chapter).
To see a list of available placeholder text or special symbols, hover the mouse cursor over any text input area and wait for a popup box to appear. Shown below is the list for Musescore 3.

Using metadata
Metadata are digital information, or tags, assigned in File→Score properties, use $:[metadata tag]: syntax to add them to header and footer. See the example in "Entering information" section, and the Score Properties section above.
Editing text formatting
Format the header or footer item itself with Format → Style → Text Styles → Header and Footer. Format individual characters with workaround on the Text styles and properties chapter.
See also
Staff / Part properties
The Staff / Part Properties dialog allows you to make change display properties of one staff and the properties of the of the instrument it belongs to. To open:
- Right-click onto either an empty area in a staff, or the instrument name, and select Staff/Part Properties....
Clicking on Navigation arrows ↑ and ↓ buttons at the bottom left will cancel any unsaved changes and switch to edit the previous or next staff.

Staff Types
There are four different types of staff:
1a. Standard staff I. A pitched staff used for most instruments except fretted, plucked-string ones.
1b. Standard staff II. A pitched staff containing a fretted, plucked-string instrument, with options to set the number of instrument strings and tuning.
2. Tablature staff. A staff containing a fretted, plucked-string instrument, which displays music as a series of fret-marks on strings. Also contains options to set the number of instrument strings and tuning.
3. Percussion staff. A pitched staff for percussion instruments.

Four instruments shown above are examples of the four staff types respectively. Download this testing score file.
For each type, there are pre-defined Template to choose from in the Advanced Style Properties (Edit Staff Type) window
Replacing an instrument also changes staff types but may create unreasonable result and wrong playback. For example, replacing Piano (a standard staff, type 1a) with Drumset (percussion staff, type 3).
Staff / Part Properties: common to all four staff types
Inside "Staff properties" box on upper part:
First column:
- Style group
Display the staff Types. Type 1a and type 1b as Standard , type 2 as Tablature , type 3 as Percussion. - Lines
The number of lines making up the staff. For tablature, this number usually matches the number of strings in the Change string tuning dialog (exceptions being the Baroque Lute, Theorbo etc. which have more strings than lines). - Line Distance
The distance between two staff lines of current staff. Changes rarely needed. See how to change the scaling of all staffs in Layout and formatting chapter. - Extra distance above staff
Increases or decreases the distance between the selected staff and the one above in all systems. Note: This setting does not apply to the top staff of a system, which is controlled by the minimum/maximum system distance (see Layout and formatting: Format → Style … → Page). Notes: To alter the spacing above just one staff line in a particular system, see Breaks and Spacers. - Scale
Changes the size of of current staff and all associated elements. Using a value greater than 100% may results in unwanted layout. Changes rarely needed. See how to change the scaling of all staffs in Layout and formatting chapter.

shown above last chord in the 130% scaled Tenor staff is misaligned
Second column:
- Hide when empty dropdown list
Staff level setting for empty staff hiding along one system, see musescore 4 handbook Showing staves only where needed chapter. - Show clef
Whether the staff's clef will be shown. - Show time signature
Whether the staff's time signature(s) will be shown or not. - Show barlines
Whether the staff's barlines will be shown. - Hide system barline
Show/hide barline at left-hand edge of the staff. - Merge matching rests (as of version 3.5)
Collapse rests of the same duration, at the same position but different voices, into just one.
Third column:
- Do not hide if system is empty
Designate as the staff to show when all staffs in a system are empty, see musescore 4 handbook Showing staves only where needed chapter. - Small staff
Create a reduced-size staff. You can set the default from the menu in Format → Style ... → Sizes. - Invisible staff lines
Make staff lines invisible. - Staff line color
Use a color picker to change the color of the staff lines. - Cutaway
Setting for hiding empty measures, see musescore 4 handbook Showing staves only where needed : Hiding empty measure chapter.
Inside "Part properties" box on lower part:
- Instrument
The instrument the current staff belongs to. Replace it by pressing the Change Instrument ... button. Manage score instrument setup by pressing keyboard shortcut (I). Note: The properties below (i.e. Part Name, Long Instrument Name etc.) are set to the default values defined in the MuseScore instruments.xml file. - Part name
The name displayed in Parts window, the Mixer and the Instruments dialog (I). Note: The Part name is defined by the value of the trackName element in the instruments.xml file. If trackName has not been defined, the value of longName (i.e. "Long instrument name"—see below) is used instead. - Long instrument name and Short instrument name
Long instrument name is displayed to the left of the staff in the first system of the score. The long instrument name may also be edited directly as a text object (see Text editing).
Short instrument name is displayed to the left of the staff in subsequent systems of the score. The short instrument name may also be edited directly as a text object (see Text editing). Editing affects all occurrences in the score. - Usable pitch range
- Amateur: Notes outside this range will be colored olive green/dark yellow in the score.
- Professional: Notes outside this range will be colored red in the score.
To disable out-of-range coloration of notes: From the menu, select Edit→Preferences... (Mac: MuseScore→Preferences...), click on the "Note Input" tab, and uncheck "Color notes outside of usable pitch range."
See also, Coloring of notes outside an instrument's range.
- Transposing instrument options
This option ensures that the staves of transposing instruments display music at the correct written pitch. Set the transpose in term of a musical interval (plus octave if required) up or down.
For transposing instruments an additional option is shown: "Prefer sharps or flats for transposed key signatures". There are three options:- Default: Let Musescore decide
- Flats: Prefer flats
- Sharps: Prefer sharps
- Use single note dynamics checkbox (Musescore 3.1 or later)
Untick to use MIDI Velocity for playback, see Dynamics: Loudness of a note.
Tick to switch to the alternative playback mechanism that utilize the MIDI Continuous Controller / Control Change (MIDI CC) Messages (wikipedia), see Synthesizer: Dynamics.
For either option, you must use a compatible sound, sound is defined by SoundFont creator and cannot be edited within MuseScore, see Soundfont, MIDI velocity and instruments.xml.
Override staff settings by using the per score master control at Synthesizer: Dynamics.
A bug exists in staffs with "single note dynamics" ticked: Dynamics and Hairpins symbols, when assigned Dynamic range properties > Staff option, do not create correct playback, see forum discussion.
Staff / Part Properties: settings for plucked strings only (Type 1b and type 2)
In addition to those listed above, staves of fretted, plucked-string instruments (Type 1b and type 2) have a few extra options at the bottom part of the window,
- Number of strings
Displays the number of instrument strings. - Edit String Data…
This button opens a dialog box which allows you to set the number and tuning of strings. See Change string tuning.
Advanced Style Properties

Clicking the Advanced Style Properties... button opens the Edit Staff Type window, the properties available vary depending on staff type.
Advanced Style Properties: common to all four staff types
First row: Lines, Line Distance: duplicated UI for the exact same property as above
Second row: Show clef, Show time signature, Show barlines: duplicated UI for the exact same property as above
At the bottom of the window:
- Template dropbox
Assigning a template changes the number of lines (type 3 percussion staff) or switch staff types altogether (type 1a, type 1b and type 2). To apply a template:-
- Make a selection from the drop-down list labelled "Template";
-
- Press < Reset to Template;
-
- Press OK to accept the changes and exit the dialog (or Cancel to cancel the operation).
-
Advanced Style Properties: settings for standard and percussion staff (Type 1a, type 1b and type 3)
Third row:
- Show key signature, Show ledger lines
Option to turn the display of these elements ON or OFF. - Stemless
If checked, staff notes will have no stem, hook or beam.
Advanced Style Properties: settings for standard staff (Type 1a, type 1b)
- Notehead scheme
See Notehead scheme.
Advanced Style Properties for tablature staff (Type 2)

The preview window at the bottom displays a short score in tablature format with all the current parameters applied.
Properties includes:
- Upside down
If not checked, the top tablature line will refer to the highest string, and the bottom tablature line to the lowest string (this is the most common option). If checked, the top tablature line refers to the lowest string, and the bottom tablature line to the highest line (e.g. Italian-style lute tablatures). For example:

'Upside down' tablature.

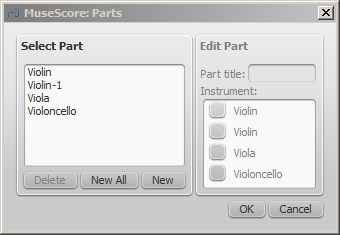
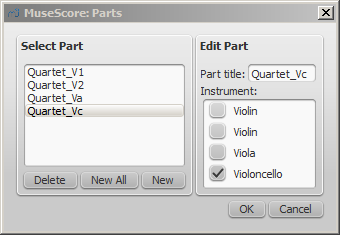
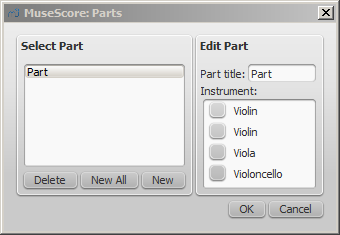
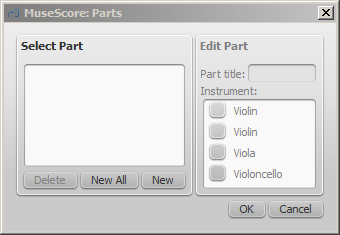
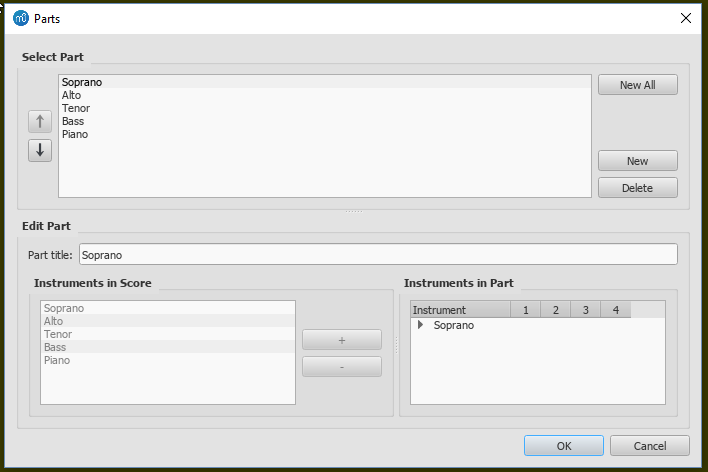
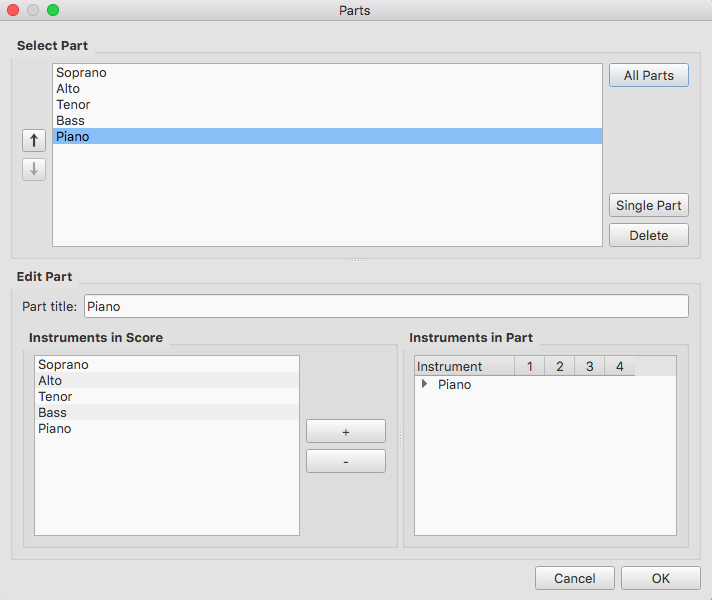
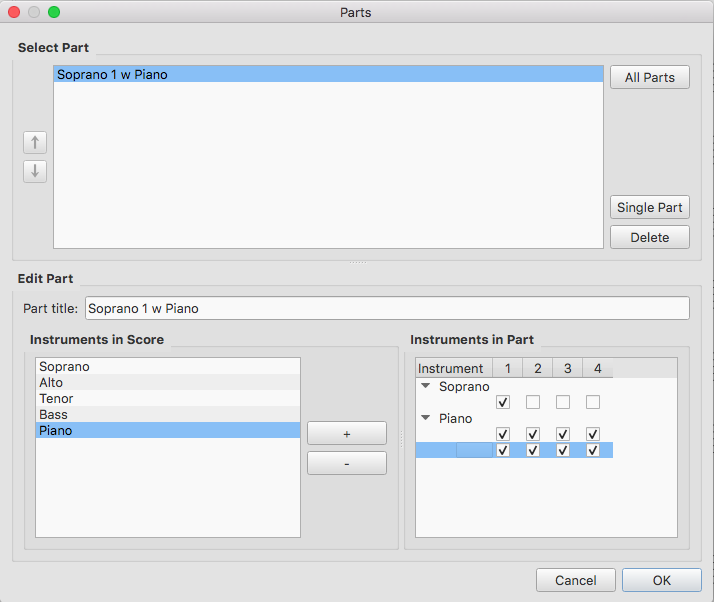
- Fret marks are the numbers or letters used to indicate the location of notes on the fingerboard. The following group of properties define the appearance of fret marks:
- Font
The font used to draw fret marks. 8 fonts are provided supporting all the necessary symbols in 8 different styles (modern Serif, modern Sans, Renaissance, Phalèse, Bonneuil-de Visée, Bonneuil-Gaultier, Dowland, Lute Didactic). - Size
Font size of fret marks in typographic points. Built-in fonts usually look good at a size of 9-10pt. - Vertical offset
MuseScore tries to place symbols in a sensible way and you do not usually need to alter this value (set to 0) for built-in fonts. If the font has symbols not aligned on the base line (or in some other way MuseScore does not expect), this property allows you to move fret-marks up (negative offsets) or down (positive offsets) for better vertical positioning. Values are in sp. - Marks are
Choice of Numbers (‘1’, ‘2’...) or Letters (‘a’, ‘b’...) as fret marks. When letters are used, ‘j’ is skipped and ‘k’ is used for the 9th fret. - Marks are drawn
Choice of placing fretmarks On lines or Above lines. For example:

Fretmark letters placed above line. - Lines are
Choice of Continuous (lines pass through fret marks) or Broken (a small space appears in the line where the fretmark is displayed). For example:

Tablature with lines broken. - Show back-tied fret marks
If unticked, only the first note in a series of tied notes is displayed. If ticked, all notes in the tied series are displayed. - Show fingering in tablature
Tick to allow the display of fingering symbols applied from a palette.
Under Note Values tab: properties define the appearance of the symbols indicating note values

- Font
The font used to draw the value symbols. Currently 5 fonts are provided supporting all the necessary symbols in 5 different styles (modern, Italian tablature, French tablature, French baroque (headless), French baroque). Used only with the Note symbols option. - Size
Font size, in typographic points. Built-in fonts usually look good at a size of 15pt. Used only with the Note symbols option. - Vertical offset
Applies only when Note symbols is selected (see below). Use negative offset values to raise the note value symbols, positive values to lower them. - Shown as:
- None: No note value will be drawn (as in the examples above)
- Note symbols: Symbols in the shape of notes will be drawn above the staff. When this option is selected, symbols are drawn only when the note value changes, without being repeated (by default) for a sequence of notes all of the same value. E.g.

- Stems and beams: Note stems and beams (or hooks) will be drawn. Values are indicated for each note, using the same typographic mechanics as for a regular staff; all commands of the standard Beam Palette can be applied to these beams too. E.g.

- Repeat: (only available if "Shown as: Note symbols" is selected)
If several notes in sequence have the same duration, you can specify if and where to repeat the same note symbol: available options are Never, At new system, At new measure, Always - Stem style: (only available when "Shown as: Stems and Beams" is selected)
- Beside staff: Stems are drawn as fixed height lines above/below the staff.
- Through staff: Stems run through the staff to reach the fret marks.
- Stem position: (only available when "Shown as: Stems and Beams" and "Stem style: Beside staff" is selected)
- Above: Stems and beams are drawn above the staff.
- Below: Stems and beams are drawn below the staff.
- Half notes: (only available when "Shown as: Stems and Beams and "Stem style: Beside staff" is selected)
Available options are None, As short stems, As slashed stems - Show rests
Whether note symbols should be used to indicate also the rests; when used for rests, note symbols are drawn at a slightly lower position. Used only with the Note symbols option.
Change instrument
Not to be confused with Mid-staff instrument change.
This replaces the instrument that this staff belongs to, and change all of its staffs everywhere on a score. It changes playback, staff name, and staff transposition etc. The Staff Type change may be unreasonable and create wrong playback.
- Right-click on an empty part of any measure OR on the instrument name and choose Staff Properties...;
- Click on Change Instrument... (under "Part Properties");
- Choose your new instrument and click OK to return to the Staff Properties dialog;
- Click OK again to return to the score.
External links
- How to create an ossia with another staff and using image capture (for MuseScore 2, still works for MuseScore 3, but here the Cutaway option might be the better choice)
- Musescore 4 handbook Showing staves only where needed chapter.
Staff Type Change
You can change the appearance of a staff mid-score by adding a Staff type change element to a measure, and adjusting its properties in the Inspector.
Add a Staff Type Change
- Select a measure in the score and, in the "Text" palette, click (double-click prior to version 3.4) the "Staff type change" symbol,
 ; alternatively, drag the "Staff type change" icon onto a measure;
 - Select the symbol, and adjust its properties (see below) in the Inspector as required.
Staff type change properties
When you alter a Staff type change property in the Inspector, the new value takes precedence over the value shown in the global Staff properties dialog. Only those property values in "Staff Properties" that cannot be changed in the "Staff type change" dialog will be valid throughout the score.
The properties that can be altered in the Staff type change dialog in the Inspector are:
Offset
How far the changed staff shall be moved up or down: measured in spaces (abbr.: sp) .
Small
Tick the box to create a reduced-size staff.
Scale
Changes the size of the staff and all associated elements, as a percentage.
Lines
The number of lines making up the staff.
Line distance
The distance between two staff lines, measured in spaces (abbr.: sp).
Step offset
How many steps up or down the notes in the staff are offset.
Show barlines
Whether the staff barlines will be shown.
Show ledger lines
Whether ledger lines will be shown for notes above/below the staff lines.
Slash style
Whether the notes shall be shown in standard or slash style.
Notehead scheme
Allows selection of how noteheads are displayed.
Generate clefs
Whether the staff clef will be shown.
Generate time signatures
Whether the staff time signature(s) will be shown or not.
Generate key signatures
Whether the staff key signatures will be shown or not.
Example
To illustrate the use of Staff type change, the staff shown below was created using the following steps:
- Add a Staff type change to measure 2.
- Set size to "Small".
- Set "Lines" to 4.
- Add a second Staff Type Change to measure 3.
-
Change "Lines" to 7,

Afterwards the global Staff Properties are changed using Staff properties:
1 Set "Lines" to 2.
2. Change "Staff Line Color".

As can be seen, the change in "Lines" is only effective up to the first staff type change, whereas the change to "Staff Line Color" is effective throughout the score.
Supported notehead schemes

Download this testing score file ms3_noteheadschemes.mscz
Notehead schemes are used by musicians to designate notehead shape meaning, see the main chapter Noteheads. In Musescore 3, scheme option for all notes on a staff is named "Notehead Scheme", scheme option for individual note is named "Head scheme". Specific Notehead shape can also be assigned to individual note directly, when a note has specific notehead shape assigned, it does not use pitch information to determine notehead shape.
Musescore supports nine schemes. Five of them are directly fully supported, notes written create correct playback. Four "shape note notations" are supported in terms of notehead engraving, users need to take advantage of 'Transposing instruments' feature to create desired playback, see Noteheads. To create custom "shape note notations" using a scheme other than the four, see Noteheads: adding pitch info.
The nine supported by Musescore are:
- Normal: The default scheme used by vast majority of musicians.
4 solfege related notations:
- Pitch name: Noteheads automatically and dynamically change to include the English pitch name in the notehead.
- German pitch name: similar to Pitch name but B replaced with H, and B♭ with B.
- Solfège Movable Do (also called Tonic Solfa): Noteheads with solfege literally written. It uses Ti and not Si.
- Solfège Fixed Do: Noteheads with solfege literally written. Used in France, Italy, Spain, etc. It uses Si and not Ti.
4 shape note notations, need further config if you wish to create desired playback:
- 4 Shape (Walker): used in books such as William Walker’s Southern Harmony (1835).
- 7 Shape (Aikin): used in books such as Jesse B. Aikin’s The Christian Minstrel (1846), and books by the Ruebush & Kieffer Publishing Company. It's the most used 7-shape system.
- 7 Shape (Funk): used in books such as Joseph Funk’s Harmonia Sacra (1851).
- 7 Shape (Walker): used in books such as William Walker’s Christian Harmony (1867).
External links
- Solfège on Wikipedia.org
- The Music Notation Project Wiki > Shape Note Notation
- IMSLP.org Wiki > 4-shape notation
- IMSLP.org Wiki > 7-shape notation
- staff/part properties preview window score https://github.com/musescore/MuseScore/tree/master/src/notation/view/re…
- shape note SMuFL specification
Noteheads
Overview
This chapter discusses the appearance of notehead in Musescore.
Notehead schemes
One aspect of music notation systems is notehead scheme. A scheme is a set of rules used to decide notehead shape's meaning, some of them are supported in Musescore. Supported schemes relate notehead meaning to a note's:
- duration: as in the most widely used scheme.
- pitch (using movable-do or absolute pitch solfege): literally written on it, and
- pitch (relative pitch using shape note solfege): as in "shape note notation" (see reference under External links).
The most widely used scheme is very likely the only one known to many musicians. It is referred to as "Normal" in Musescore and is the default settings for new staff. Details of the nine schemes available in Musescore are covered in Notehead schemes.
Understanding relative pitch notations (shape note solfege, shape note notation) can enhance the reader's comprehension of this chapter. Most of the time, a notehead shape conveys one specific meaning, and that meaning is only associated with one notehead shape. Shape note solfege is like a variant of movable-do solfege that belongs to the exceptions. For example, in one type of "shape note notation", a triangle must be used to notate a relatively pitched "C4", but triangles are also read as relatively pitched "C"s or "F"s only, and triangles must sing "Fa" or a syllable agree upon by singers on-site. The loosely related shape note solfege notates interval perception much better than the "Normal" setting.
Notehead shape

Shown above diamond notehead can be used for harmonic notes in guitar, violin etc; and slash notehead for guitar strums etc.
Final display of notehead shape in Musescore is determined by three factors: the notehead type factor, the pitch factor, and the duration factor (or note-value, rhythm).
Pitch factor
Note pitch may affect affect notehead shape, depending on the scheme, but it only happens on notes that do not use an overriding Head group property. See "Notehead type factor" section.
Duration factor
The duration factor is determined by note's duration, to edit duration see Entering notes and rests and Editing notes and rests chapters. It also can be visually overridden for individual note, while keeping the real value and playback intact.
Notehead type factor
Options available for notehead type factor depends on staff type:
- On Standard staffs (type 1a, type 1b), the final result is determined in Musescore using three level:
- Level 1 Notehead scheme of a staff (option named "Notehead Scheme" in Musescore 3): Default is "Normal".
- Level 2 Notehead scheme of a note (option named "Head scheme" in Musescore 3):
- The default option "Auto" means "ignore this level".
- Other options: scheme to use on this note, overrides Level 1.
- Level 3 Head group property of a note. Affects notehead shape if and only if the result scheme of Level 1 and Level 2 is "Normal".
- Tablature (type 2) do not use notes, but you can toggle fret mark / crosshead ghost note with Shift+X,
- On percussion staffs (type 3), instrument (like snare or hi-hat, not the "drumset" Musescore Instrument) determines the notehead type factor. See Entering and editing percussion notation: Notehead shape chapter.
Notehead scheme determines the notehead shape for every note on a staff, unless overridden by individual note's Head group property. When Notehead scheme is not overridden, notes' pitch may affect notehead shape, depending on the scheme. "Normal" Notehead scheme does not use pitch to determine notehead shape. When a note uses an overriding Head group property, a note's pitch does not affect notehead shape at all.
Changing notehead shape
Notehead type factor
- (Valid on standard staffs only) To change level 1 notehead scheme of a single staff, affecting all notes:
- Right click on an empty part of the desired staff and select Staff/Part properties.
- Click on the Advanced style properties button (opens Edit Staff Type window).
- Select an option in Notehead scheme dropdown.
- (Valid on standard staffs only) To change level 2 notehead scheme of note(s):
- Select note(s) on a score.
- In the Inspector Note section, select an option from the Head scheme dropdown: the default "Auto" means "ignore this level".
- (Valid on standard staffs only) To change level 3 Head group property:
- Tablature do not use notes, but you can toggle fret mark / crosshead ghost note with Shift+X.
- To change noteheads on percussion staffs, see Entering and editing percussion notation: Notehead shape chapter. Only some items in Noteheads palette work on percussion staffs.
Duration factor
- To change note duration, see Note input.
- To change the apparent duration without altering real value so that playback is not affected:
- Select note(s) on a score.
- In the Inspector Note section, select an option from the Head type dropdown: the default "Auto" means "no override"
Adding pitch information to notes
There are six methods to change "pitch".
Most of the time, a note's pitch only affects its staff space / vertical position, to change it:
- Change note pitch, see Note input.
- Modify the playback pitch of note(s) on score without altering notation:In the Inspector Note section, edit Tuning. This is useful for reasons explained in Tuning systems, microtonal notation system, and playback.
Tablature, percussion notation, and some notehead scheme (see Overview) use notehead shape to convey pitch information:
- The brackets (parentheses, dead note or ghost note) item in Noteheads palette can be added to a note or accidental.
- Toggle Tablature fret mark / crosshead (ghost note or dead note) with Shift+X
- To use custom notehead shape for visual pitch representation:
- Change level 1 setting as required for the staff.
- Use an level 2 overriding setting on selected note(s):
- Select note(s) on a score.
- In the Inspector Note section, select "Normal" from the Head scheme dropdown.
- Assign level 3 Head group property. Use either one of the following:
- These note(s) will be always use this item, regardless of any future pitch change by user unlike other notes on this staff.
- Change duration factor as required.
- To loosen the relationship between note vertical position and pitch so that all notes on a staff create desired playback, take advantage of 'Transposing instruments' feature
Changing notehead direction

To move notehead(s) horizontally to the other side of stem, use one of the following:
- Press Shift+X, or
- in Inspector Note section, select an option in Mirror head drop-down.
(Note: Contrast this command with X which moves the stem and the beam horizontally and vertically to other side of the notehead)
Notehead properties
Other properties for notehead, see Inspector: Note
Notehead style and font
There are 6 font options for notehead set in Format→Style→Score. Notehead does not use style profiles (Layout and formatting).
Noteheads palette are displayed with Bravura font.
Shared noteheads
When two notes in different voices, but of the same written pitch, fall on the same beat, one of two things may happen:
- The notes may share the same notehead.
- The notes may be offset: i.e. arranged side by side.
MuseScore uses the following rules:
- Notes with stems in the same direction do not share noteheads.
- Dotted notes do not share noteheads with undotted notes.
- Black notes do not share noteheads with white notes.
- Whole notes never share noteheads.
Note: If two unison notes occur in the same voice they are always offset.
Change offset noteheads to shared
To turn offset noteheads in opposite voices into shared noteheads :
- Make the smaller-value notehead invisible by selecting it and using the keyboard shortcut V (or unchecking the "Visible" option in the Inspector).
In a small minority of cases (where the smaller value note is dotted) this workaround is not applicable, so use the following alternative:
- Select the smaller value notehead and, in the "Note" section of the Inspector, change "Head type" to match that of the larger value note in the opposite voice.
Examples of notehead sharing
- In the first example below, the notes of voices 1 and 2 share noteheads by default, because they are all black, undotted notes:

-
By contrast, in the next example, white notes cannot share noteheads with black notes, so are offset to the right:

To create a shared notehead, change the black eighth note's head type to match that of the white note or, pre-3.5, make it invisible (as explained above):

Remove duplicate fret marks
In certain cases, a shared notehead, when pasted to a tablature staff, may result in two separate fret marks on adjacent strings. To correct this, make any extraneous tablature notes invisible by selecting them and using the keyboard shortcut V (or by unchecking the "visible" option in the Inspector).
See also
External links
Timeline
Introduction
The timeline was developed as part of the Google Summer of Code 2017, and is included for the first time in MuseScore 3.0.
Overview
The timeline is a navigation tool that displays an abstraction of the score to the order of measure numbers and instrument names. There are four parts to the timeline:
Meta labels
This is found in the top left corner of the timeline. These are the names of the meta rows.
Instrument labels
This is found in the bottom left corner of the timeline. These are the names of the rows in the main grid.
Meta rows
This is found in the top right corner of the timeline. These hold the meta values of the score.
Main grid
This is found in the bottom right corner of the timeline. This holds multiple 'cells' (a specific measure and staff in the score represented as a square)
Meta
Meta are elements found on the score that are not notes, but are still important to the score (key signature, time signature, tempo, rehearsal marks, bar lines, and jumps and markers).

Basic interaction
Select a measure
To select a measure in the timeline, press the mouse button on the cell. A blue box will appear around the selected cell and the respective measure in the score will be selected. The score view will place the selected measure in view.
Select multiple measures
Drag selection
Holding Shift and holding the left mouse button and dragging the mouse over the main grid will create a selection box. Upon releasing the mouse button, all the cells underneath the selection box will be selected, as well as all the measures in the score.
[Shift] selection
If a cell is already selected, holding Shift and selecting another cell in the timeline will stretch the selection to that new cell, similar to how the score does
[Ctrl] selection
If no cells are currently selected, holding Ctrl and selecting a cell will select the entire measure
Clearing selection
To clear selection, holding Ctrl and clicking anywhere on the grid or the meta rows will clear any current selection.
Meta values selection
Selecting the meta values on the timeline will attempt to select the respective meta values in the score.
Scrolling
Standard scrolling
Scrolling the mouse wheel up or down will move the grid and instrument labels down or up respectively. The meta labels and rows do not move.
[Shift] scrolling
Holding Shift and scrolling the mouse wheel up or down will move the grid and meta rows left or right respectively. The meta labels and instrument labels do not move.
[Alt] scrolling
Holding Alt and scrolling the mouse wheel up or down will move the grid and meta rows left or right respectively, faster than Shift scrolling. The meta labels and instrument labels do not move.
Dragging
To drag the contents of the timeline, hold the left mouse button and move it around.
Labels interaction
Rearranging meta labels
All meta labels besides the measures meta may be rearranged in any way. By moving the mouse cursor onto one of the meta labels, small up and down arrows will appear. Click the left mouse button on the up arrow to swap the meta label with the one above it. Click the left mouse button on the down arrow to swap the meta label with the one below it.
Collapsing the meta labels
In order to hide all the meta labels while keeping all the meta information on the timeline, there is an arrow that appears on the measures meta when the mouse is over it. Click the left mouse button on the large up arrow to collapse all the currently visible meta rows into one row, where the meta values are staggered in that row. Click the left mouse button on the large down arrow to expand the meta rows again.

Hiding instruments
All instruments--hidden or not--will be displayed on the timeline. To start this interaction, the mouse cursor is moved over an instrument label. A small eye will appear on the right side of the label that is open if the instrument is visible on the score, and closed if the instrument is hidden. Click the left mouse button on the eye to toggle between the two options.

Zooming
To zoom in or out of the score, hold Ctrl and scroll the mouse wheel up or down respectively (Mac: Cmd + scroll).
Context menus
To bring up a context menu, right-click on the timeline. There are three context menus found in these locations: meta labels, instrument labels, and meta rows.
Meta labels context menu
Upon clicking the right mouse button on the meta labels, a context menu appears that displays all possible meta labels as well as two options: "Hide all" and "Show all." Next to each meta label in the menu, there is a check box that shows if the meta label is currently being shown on the timeline. To show or hide one of the meta labels, select the box of the meta label in the context menu. Selecting "Hide all" will hide all meta labels except for the measures meta. Selecting "Show all" will display all meta labels.
Meta rows context menu
Clicking the right mouse button on the meta rows will display the same context menu as the meta labels.
Instrument context menu
Clicking the right mouse button on the instrument labels will display a context menu with the option to "Edit Instruments." Selecting this will bring you to the same dialog as Edit > Instruments... or pressing I for the shortcut.
Tools
A number of useful commands can be found in the Tools menu.
Transpose
This opens the Transpose dialog with various options for transposing passages of music.
Explode
The explode command allows you to select a passage of music in a single staff and split (explode) the chords into their constituent notes or voices.
Implode
The Implode command works in the way opposite to explode.
Voices
This allows you to swap the voices of a selected measure-range of notes. See Exchange voices.
Measure
Join or split measures. See Measure operations: Split and join.
Remove selected range
Removes the currently selected segment of time and all score items associated. Affects all staffs. Default keyboard shortcut is Ctrl+Del (Mac: Cmd+Del). Do not apply this command only on a barline.
Fill with slashes
This command fills the selection with slashes, one per beat:
- Select one or more measures;
- From the menu, select Tools→Fill With Slashes.
If a measure is empty the slashes are added to voice 1, full-sized and centered on the middle line of the staff:

Notes: (1) If there are already notes in a measure in the selection, the command will put the slashes into the first available empty voice. (2) Voice 2 slashes are full-sized and centered on the middle line of the staff; voices 3 slashes appear small and above the staff; voice 4 slashes are small and below the staff. (3) If a measure contains notes in all 4 voices, voice 1 will be overwritten. (4) All slashes are set to not transpose or playback.
Toggle rhythmic slash notation
This command toggles selected notes between normal notes and rhythmic slash notation:
- Select a range of notes or measures (Note: use the selection filter if you need to exclude certain voices);
- From the menu, select Tools→Toggle Rhythmic Slash Notation.
The selected noteheads are changed to slash noteheads which do not transpose or playback.

Slash-notehead notes in voices one or two are fixed to the middle staff line; those in voices three or four are small ("accent" notation) and fixed above or below the staff:

In percussion staves, notes in voices 3 and 4 are not converted to small slashes but to small notes above or below the staff.

Respell pitches
Corrects accidentals to fit in with the current key signature. See Accidentals: Respell pitches.
Regroup Rhythms
This option corrects note ties, durations and beaming so that they are grouped according to standard music notation practice. For example:
Before:

After:

Any notes that are tied and are the same length as a dotted note will be changed to the dotted note with two limitations. (i) Only the last note of a group of tied notes will have a single dot. Notes with more than one dot are not produced using this option. (ii) Dotted notes will not span from one group of beamed notes to another unless their duration is the same as all of the beam groups it covers. Any notes with more than one dot will be regrouped according to the above rules.
To apply:
- Select the section of the score you want to reset. If nothing is selected, the operation will apply to the whole score;
- Select Tools→Regroup Rhythms.
Note: This is an experimental feature and there are known bugs. Articulations and ornaments are deleted and some pitches respelled. Ties across barlines may be lost on UNDO.
Resequence rehearsal marks
The Resequence Rehearsal Marks command allows you to re-order the numbering/lettering of rehearsal marks if, for any reason, they have got out of sequence. For details see Automatically resequence rehearsal marks.
Unroll Repeats (version 3.1 and above)
This command creates a copy of the score (in a new tab), eliminates the repeat barlines and notates the repeat sections in full instead.
Copy lyrics to clipboard
This command copies all the lyrics of the score to the clipboard:
- From the menu, select Tools→Copy Lyrics to Clipboard.
Image capture
Take a snapshot of a selected part of the document window. PNG, PDF and SVG formats are supported. See Image capture.
Remove empty trailing measures
This automatically removes any blank measures at the end of the score.
See also
External links
- How to merge/combine/implode two staves into one with two voices (MuseScore HowTo)
谱表的合并与拆分
拆分谱表
拆分谱表命令允许您选中单个谱表中的乐句并且将和弦按照如下方式拆分(split; explode)成其组成音符或者声部:
- 如果乐句全部在声部 1 中,和弦的最高音符留在顶部谱表上,而较低音符移到后续线谱。
- 如果乐句包含多个Voces,声部 1 的音符留在顶部谱表上,而其他声部移到后续线谱。所有拆出声部现在在声部 1 中。
欲拆分乐谱的一部分:
- 确保,来源谱表下方有足以接收拆出音符的线谱。如有必要,使用乐器对话框以创建额外线谱。
- 二选一:
- 点击 工具 → 拆分谱表 。
注意:
- 若选区全部在声部 1 中,MuseScore 将会丢弃任何所含音符多于该部分中线谱数目的和弦的最低(诸)音符。
- 如果选区全部在声部 1 中,并且如果给定和弦具有的音符少于目标线谱数目,那么音符将会根据需要复制,以至于每一线谱都接收到一个音符。
- 目标线谱中任何现存音乐都将被覆写。
- 如果您选中部分小节,
拆分谱表命令将会自动扩张至完整小节。
合并谱表
合并谱表命令工作的方式与拆分谱表相反:
- 选中一个谱表之时,声部 1~4 中所有音符合并到声部 1 中。
- 选中多个线谱之时,第二谱表中的音符拷贝到顶部谱表中第一可用声部,第三谱表中的音符拷贝到顶部谱表中下一可用声部,依此类推。
将合并命令应用到单个谱表
- 选中所需谱表中的一系列小节。
- 点击 工具 → 合并谱表 。
该谱表中所有所选音符现在显示在声部 1 中。
将合并命令应用到多个线谱
- 确保,每一谱表中只有一个声部。
- 选中目标谱表中一系列小节并且将此选区扩展向下以包括其余待合并线谱。
- 点击 工具 → 合并谱表 。
Tuning systems, microtonal notation system, and playback
To setup a transposing instrument, visit Staff / Part properties instead.
Musical tuning systems and notation systems
Default tuning
The default tuning is equal temperament (12-EDO/12-TET), and the default concert pitch setting is A4 = 440Hz. Concert pitch is configurable in synthesizer.
Other tuning systems
MuseScore supports tuning systems such as Just intonation, Pythagorean tuning, and Scordatura etc. indirectly, see create desired playback below.
Default notation
Default notation uses 7 accidentals: ♭ (flat), ♮ (natural), ♯ (sharp), 𝄪 (double sharp), 𝄫 (double flat), ♯𝄪 (triple sharp), ♭𝄫 (triple flat), see source code.
You can add these 7 accidentals using any of the following:
- Shortcut keys: e.g. keyboard up/down keys ( these can be assigned in Preferences: Shortcuts: "Pitch up", "Pitch down", "Diatonic pitch up", "Diatonic pitch down", "Change enharmonic spelling"), or
- Toolbar buttons, or
- Palette : Accidentals section (a sidebar), or
- Master palette : Accidentals category (a popup window). Do not add from Symbols category, they are non-functional visual symbols, see Notation types.
See the main chapter Accidentals for more information.
Microtonal notation systems
MuseScore supports microtonal notation systems such as Helmstolk Ellis notation, Johnston notation etc., so that tuning systems such as Just intonation, Pythagorean tuning etc can be notated precisely. MuseScore development focuses on engraving support, rather than playback support, see create desired playback below.
Professional glyphs of some SMuFL (Wikipedia) symbols are shipped with Musescore, add them by using any of the following:
- Palette : inside the More button of the Accidental section (a sidebar), or
- Master palette : Accidentals category and Symbols category (a popup window), or
- A Plugin.
Note: Adding symbols other than the 7 accidentals used in the default notation system may damage compatibility with plugins such as Chord Identifier (Pop Jazz), because of the implicit change explained in microtonal playback below.
Creating the desired playback
To create desired playback for a custom tuning or notation system, use one of the following methods:
With default notation
With some tweaking, you can create desired playback on a whole score or a phrase to:
- emulate a performer's decision to play different pitches: for example, on the same sheet music, a violinist plays Pythagorean, a pianist plays Equal Temperament, or
- emulate an instrument tuned to a custom tuning system.
To create the desired playback, use:
- Cent adjustment of notes with the Tuning property in Inspector: Note. To get a sensible result, you need to work out tables of cent values based on the tuning system and fundamental frequency beforehand, and may need to apply different tables to different sections; or
- A plugin that automates this process, such as:
- Tunings and Temperaments (as of Jan 2023, this plugin does not differentiate between enharmonic notes, i.e. Ab=G#), the workaround is to manually select and use separate values.)
- Scordatura
With microtonal notation systems
Direct playback of microtonal notation is not supported, create desired playback by using:
- Cent adjustment of notes with the Tuning property in Inspector, pay attention to points listed below.
- A plugin that automates this process such as one of these suggested in a forum discussion.
Points to consider when adjusting Tuning property.
- Many SMuFL symbols provide visual / engraving purpose only and do not affect playback.
- When applying some symbols to an existing accidental-marked note, Musescore automatically and implicitly change the note's internal / playback pitch to its "accidental-less" version, see Nominal-accidental chain—Xenharmonic WIKI, this discussion, and source code. Purpose of this design is to allow implementation of different tuning systems.
- For example, adding a quarter-tone sharp symbol (small upward arrow with sharp sign, 𝄲) to F# changes its playback to F in pitch inside Musescore, and the quarter-tonesSharp symbol itself does not affect playback inside Musescore.
Alternatively, use a software in microtonal composition and playback such as Mus2, see a list on Xenharmonic Wiki.
Keywords for search engine
Tuning, Temperament, Intonation, Notation, EDO (Equal Division of the Octave), TET (Tone Equal Temperament), HEJI (Helmholtz-Ellis Just Intonation), HEWM (Helmholtz-Ellis-Wolf-Monzo), Sagittal notation system, Stein, Dicot, Porcupine, Meantone, Superpyth, Well-tempered.
See also
- About the 7 accidentals: Source code accidental.cpp at github