How to create an ossia using image capture
-
Insert the note and the ornament on the desired measure:
-
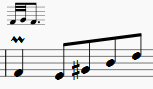
In another measure, insert the notes to be used as the "explanation" in the ossia:
-
Toggle image capture mode (the camera icon);
-
Draw a selection rectangle around the ornament explanation:
-
Right-click on the selection and, from the menu, chose "Save As (screenshot mode)"; For best results and same resolution as the normal score, use 360 DPI.
-
From where the file is saved, drag and drop to just above the relevant measure;
-
Double-click the added image to edit it to the desired size (see Save snapshot):
If desired, the image can be saved to a user workspace: hold Ctrl + Shift, and drag-and-drop the image from the score to the correct custom palette:


