记谱:乐器、谱表与总谱
设置乐器
概览
读者应该已经了解 Musescore 乐器的概念,以及 创建乐谱 章中解释的添加或删除乐器窗口的用法。本章将讨论 MuseScore 4 中新增的乐器面板功能,该功能可管理
- 乐谱文件的乐器设置(添加或删除乐器窗口也提供此功能);
- 乐谱文件的五线谱设置,例如添加和配置新的高音五线谱;
- 对当前打开的 “总谱 ”或 “声部 ”中的每个乐器(其所有的五线谱)进行可见性和重放设置;以及
- 当前打开的 “总谱”或 “声部” 中每个谱表的可见性。
有关 “总谱” 和 “声部” 的更多信息,请参阅 Parts 章节。
添加和排列乐器
访问乐器面板
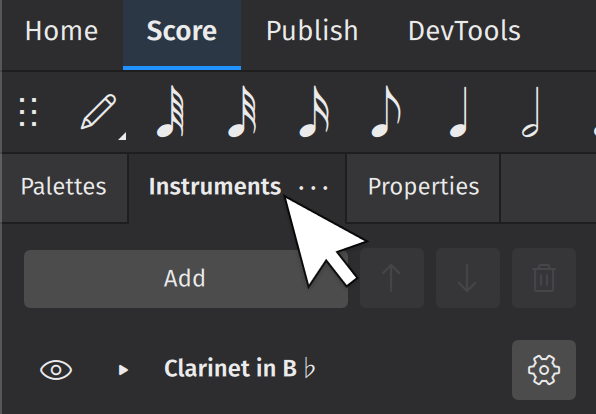
点击屏幕左侧的乐器选项卡,打开乐器面板:
添加乐器
点击 添加(或直接按 i)。这将打开乐器对话框(更多信息请参阅 创建乐谱)。
删除乐器
要从乐谱中删除乐器,请选择该乐器并单击垃圾桶图标,或按 删除。
更改乐器顺序
选择任何乐器并使用 ↑ 或 ↓ 按钮更改其在乐谱中的位置。或者,您也可以用鼠标将乐器向上/向下拖动。

乐器设置
隐藏/显示乐器

切换一个乐器(其所有谱表)的可见性
- 打开 “总谱”或 “声部”,参见 Parts 章节。
- 点击乐器标签旁边的 眼睛 图标。
隐藏不是删除。 隐藏乐器会禁用其所有五线谱的重放。 该功能可与 Musescore 的声部功能结合使用,详见 Parts 章节。例如,这允许为不同的演奏者创建替代乐器或不同的印刷版本;或在不删除任何内容的情况下,将大乐谱中的管弦乐部分分离出来。
重命名乐器
- 点击齿轮图标
- 编辑名称,这与编辑 Staff/Part properties 中的 长乐器名称相同。如有需要,请留空。

替换乐器
要替换乐器面板中的乐器:
- 点击仪器名称右侧的齿轮图标
- 在弹出的窗口中,点击 更换仪器
- 在弹出的对话框中选择所需的替换仪器
- 点击确定
添加和配置谱表
还可以使用乐器面板为现有乐器添加谱表,并配置它们的一些基本属性。
要为现有乐器添加谱表
-
- 如果在乐器标签下看不到谱表,点击标签左侧的黑色小三角以显示谱表
- 点击 添加谱表
- 点击新添加的五线谱的齿轮图标,并根据需要调整 “五线谱类型”。有关五线谱类型的更多信息,请参阅 Staff/Part properties 章节中的 五线谱类型模板。
添加的谱表共享同一乐器,但其记谱可以独立编辑。除其他外,它们可用于为弦乐器演奏者(如吉他、班卓琴、尤克里里琴等)创建五线谱/谱表。
在现有乐器上添加一个链接五线谱
如果一个谱表上的某些记谱对象被链接在一起,它们就会自动出现在其他谱表上。链接谱表可用于为弦乐器演奏者(吉他、班卓琴、尤克里里琴等)创建谱表。
创建链接五线谱
- 如果乐器标签下看不到谱表,请单击标签旁边的三角形 “显示更多 ”图标
- 点击五线谱标签旁的齿轮图标(如 “高音谱号”)
- 单击创建链接五线谱
- 单击新添加的五线谱的齿轮图标,然后单击 “创建链接五线谱**”。

配置一个谱表
- 点击谱表标签(如 “高音谱号”)旁边的齿轮图标
- 根据需要更改:
** 谱表类型: 参见 Staff/Part properties 章节中的谱表类型模板。
**小谱表: 缩小谱表尺寸。在 格式→样式...→尺寸中调整尺寸设置。
* 隐藏不包含记号的小节**: 请参阅 Showing staves only where needed 章节中的剖面图。

了解 Staff/Part properties 中有关谱表自定义的更多信息。
隐藏一个谱表但保留其回放
- (必须)点击谱表标签(如 “高音谱号”),但*不点击其乐器。
- 点击其眼睛图标。
隐藏不是删除。
另请参阅“隐藏/显示乐器” 章节,其中解释了如何隐藏乐器,隐藏乐器会禁用其所有谱表的重放。
删除乐器和谱表
注意___: 在使用 Musescore Parts 功能的乐谱中,删除一个谱表会在 “总谱 ”和所有包含该谱表的 “声部 ”中删除该谱表。**另请参阅“隐藏/显示乐器”和“隐藏谱表但保留其重放”章节中的 “隐藏 ”命令**。
删除一个乐器及其所有谱表:
- 点击乐器标签
- 点击乐器面板顶部的垃圾桶图标,或按删除键。
删除乐器中的一个谱表
- 如果乐器标签下看不到谱表,则单击标签左侧的黑色小三角以显示谱表
2.点击谱表标签
3.单击乐器面板顶部的垃圾桶图标,或按删除键。

Showing staves only where needed
By default, a score will show all measures of all staves on all pages throughout the score, whether they contain notes or not. However, you may wish to have certain staves appear only on systems where they are needed. You may even wish to have a staff appear or disappear mid-system. MuseScore provides a number of controls for this purpose, this chapter explains them.
To hide certain instrument everywhere on a score, use Choose instruments dialog (shortcut key i), Instruments panel on the left (a new feature in MuseScore 4), and the Parts toolbar button on the top instead.
Hiding empty staff along one system (all its measures along that system)
Omission of empty staves is a common practice found in printed ensemble scores. When a staff along one system (the page layout concept) contains no notations, the staff (all its bars along that system) are hidden.
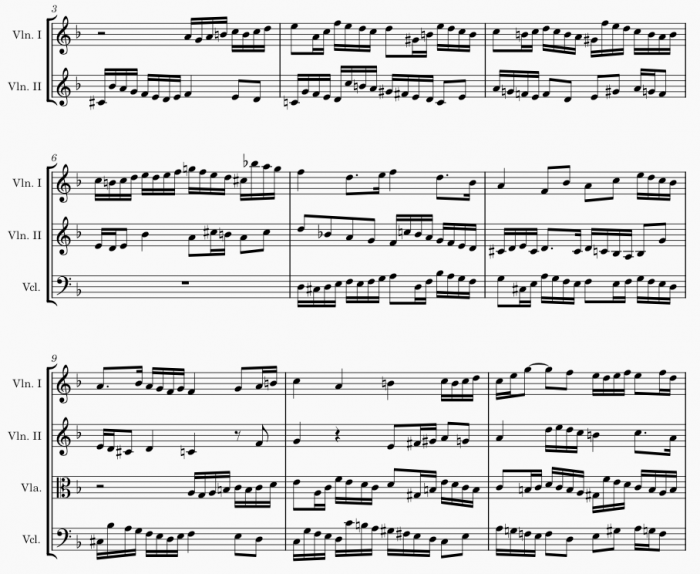
Hiding all empty staves
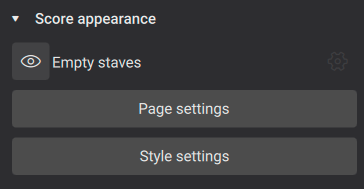
To configure the current score to automatically hide any of its staves on systems where the staff is empty:
- Ensure that nothing in your score is selected (press Esc if necessary).
- Go to the Properties panel.
- Click the icon next to Empty staves.
Alternatively, you can enable the Hide empty staves within systems option in Format→Style→Score.
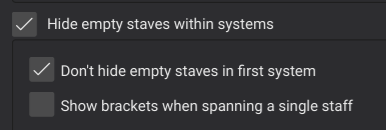
MuseScore will normally continue to show all staves on the first system, in accordance with common convention. If you would like to force MuseScore to hide empty staves on the first system as well, disable the Don't hide empty staves in first system option in the dialog. You can also control whether or not brackets are shown if, for example, only a single instrument from a section is playing, via the Show brackets when spanning a single staff option.
Excluding specific staves from being hidden
The score-wide setting explained above affects all staffs on a score. There is also an individual setting for each staff (that contains a clef) that overrides the score-wide setting:
- Right-click a staff.
- Click Staff/Part properties.
- In the resulting dialog, set Hide when empty option
In a score where score-wide setting Hide empty staves within systems option is enabled,
- To specify that one staff should not be hidden when empty, set its Hide when empty option to Never.
- The default hiding behavior treat each staff independently. For instruments that use two or more staves (like piano, organ, and harp), you may wish to specify that a staff should be shown even if it is empty. For example, in a piano concerto score's piano solo passage where only the piano treble clef staff has notes, it is common to show the bass clef staff even if it is empty. To do this, set the Hide when empty option to Instrument for each of the staves. For the above example, set the option of the bass clef staff.
- To remove individual staff setting and revert to use score-wide setting, set its Hide when empty option to Auto.
Temporary staves
The score-wide setting explained above affects all staffs on a score. There is also an individual setting for each staff (that contains a clef) that overrides the score-wide setting:
- Right-click a staff.
- Click Staff/Part properties.
- In the resulting dialog, set Hide when empty option
In a score where all staffs are shown everywhere (score-wide setting Hide empty staves within systems option is disabled), there may nonetheless be one or two special staves that you wish to only show where needed. For example, this might be a solo part in an ensemble score, or a bass staff in a lead sheet. To set one staff to hide when empty without assigning a score-wide staff hiding setting, set its Hide when empty option to Always.
Choosing the staff to show when all staffs in a system are empty
In a score that contains a system where all staffs of all visible instruments are completely empty, the top staff is shown by default. To specify the staff to display:
- Right-click a staff.
- Click Staff/Part properties.
- In the resulting dialog, enable the "Do not hide if system is empty" option.
This setting may be useful when using Musescore Parts function. This setting is unrelated to all other staff hiding settings covered in this chapter.
Hiding empty measure
Cutaway staves
Film scores and other contemporary scores often use a style of notation where individual measures are hidden when empty. These are sometimes called cutaway scores.

To use this style on one staff in MuseScore:
- Right-click a staff.
- Select Staff/Part properties.
- In the resulting dialog, set Hide when empty to Always.
- Enable the Cutaway option.
The Cutaway option alone does not change vertical layout, the staff's vertical space is reserved in all systems as if invisible.
If you wish all staves to be displayed in cutaway score style, you can replace step 3 with score-wide setting explained above. However, you still need to set the Cutaway option for each staff individually. You can speed up this process by using the arrow buttons in the Staff/Part Properties dialog:
- Set the Cutaway option for the top staff.
- Press the Apply button.
- Press the ↓ button to move to the next staff.
- Repeat steps 1-3 until you have gone through all staves.
Ossia
An ossia is a special type of cutaway staff in which a given musical passage is notated using a small staff above the normal staff, such as to show an alternate interpretation.
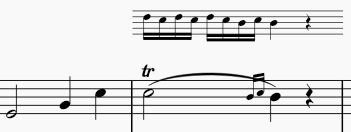
These can be created in MuseScore using a combination of features:
- Add a staff as described in Adding and configuring staves.
- Select and delete or otherwise adjust any automatically added bracket.
- Enter the desired notation.
- Right-click the staff.
- Select Staff/Part properties.
- In the resulting dialog, set Hide when empty to Always.
- Enable the Cutaway and Small options.
- Press OK.
If you wish to hear the ossia playback instead of the normal staff, select the corresponding measures on the normal staff and uncheck the Play setting on the Properties panel. Do the same for the ossia staff if you would rather hear the normal staff playback.
Depending on the look you desire, you might also want to hide the initial or final barline for the passage. To do this, select the barline and press V or uncheck the Visible option in the Properties panel.
You may also wish to decrease the distance between the ossia and the normal staff. To do this, use a Staff spacer fixed down from the Layout palette.
Other invisible measures
MuseScore also allows you to make individual measures invisible on any given staff, whether empty or not.
To set a measure to be invisible on a given staff:
- Right-click the measure.
- Select Measure properties.
- Disable the Visible checkbox for the staff or staves in which you wish the measure to be set invisible.
Note: you cannot make a measure invisible on all staves—it must remain visible on at least one.
Implode and explode
Implode
The Implode command allows you to do either of the following:
- Combine the notation of several voices in the same staff into one voice
- Combine notation from several staves into separate voices in one staff.
Combine notes from multiple voices in a single staff into one voice
- Select a range of measures in a single staff.
- From the menu bar, select Tools→Implode.
All selected notes in the staff are now displayed in voice 1.
Combine notes from multiple staves into multiple voices on a single staff
- Ensure that there is only one voice in each staff to be imploded;
- Select a range of measures in the top staff and extend this selection downwards to include up to 4 staffs.
- From the menu bar, select Tools→Implode.
The notation initially in the upper staff will now be in voice 1, that from the staff below in voice 2, and so on.
Explode
Explode allows you to do either of the following:
- Copy a passage of single notes, in a single staff, into one or more staves below.
- Transform the chords of a selected passage of music, in a single staff, into their constituent notes on one or more staves below.
Copy passage of single notes to multiple staves
- Ensure that the passage is in voice 1 (there should be no notes or rests in other voices).
- Select the desired range of measures
- Extend the selection downwards through as many staves as you wish to copy to.
- From the menu bar, select Tools→Explode.
The passage in the top staff is copied to each of the selected staves below.
Separate a passage of chords into its constituent notes
In this case the chords in a selected passage of music are separated into their constituent notes as follows:
- If the passage is all in voice 1, the top note of the chord is retained on the top staff, while the lower notes are moved to subsequent staves.
- If the passage contains multiple voices, voice 1 notes are retained on the top staff, while other voices are moved to subsequent staves.
- All exploded notes end up in voice 1.
- Ensure that there are enough empty staves underneath the source staff to receive the exploded notes. Create extra staves if necessary using the Instruments panel.
- Choose one of two options:
- Select a range of measures in the source staff: this allows all notes to be exploded if there are enough staves available.
- Select a range of measures that includes both the source staff and also extends downwards to include one or more destination staves: This limits the number of exploded notes/voices to the number of selected staves.
- From the menu bar, select Tools→Explode.
Notes: (1) If the selection is all in voice 1, MuseScore will discard the lowest note(s) of any chord that contains more notes than the number of staves in the selection. (2) If the selection is all in voice 1, and If a given chord has fewer notes than the number of destination staves, then notes will be duplicated as needed so that every staff receives a note. (3) Any existing music in the destination staves is overwritten. (4) If you select a partial measure, the explode command will automatically expand it to a full measure.
Mid-score instrument changes
Adding an instrument change
When a musician is required to double on a different instrument for a section of a piece, the instruction to switch instruments is generally placed above the staff at the beginning of that section. A return to the primary instrument is handled in the same manner.
In MuseScore, the instruction to change to a different instrument is handled by the Change Instrument text element, which is found in the Text Palette. This text element is different from Staff Text, System Text and Expression Text in that it is linked to playback, allowing for a change in sound to the new instrument.
To add an instrument change:
- Click on a note or rest to select the start point for the change
- Click on the Change instr. palette item in the Text Palette
- Choose which instrument you wish to change to in the Select instrument dialog that appears
- Click OK
The instruction to change to the new instrument will appear above the selected insertion point in the score.
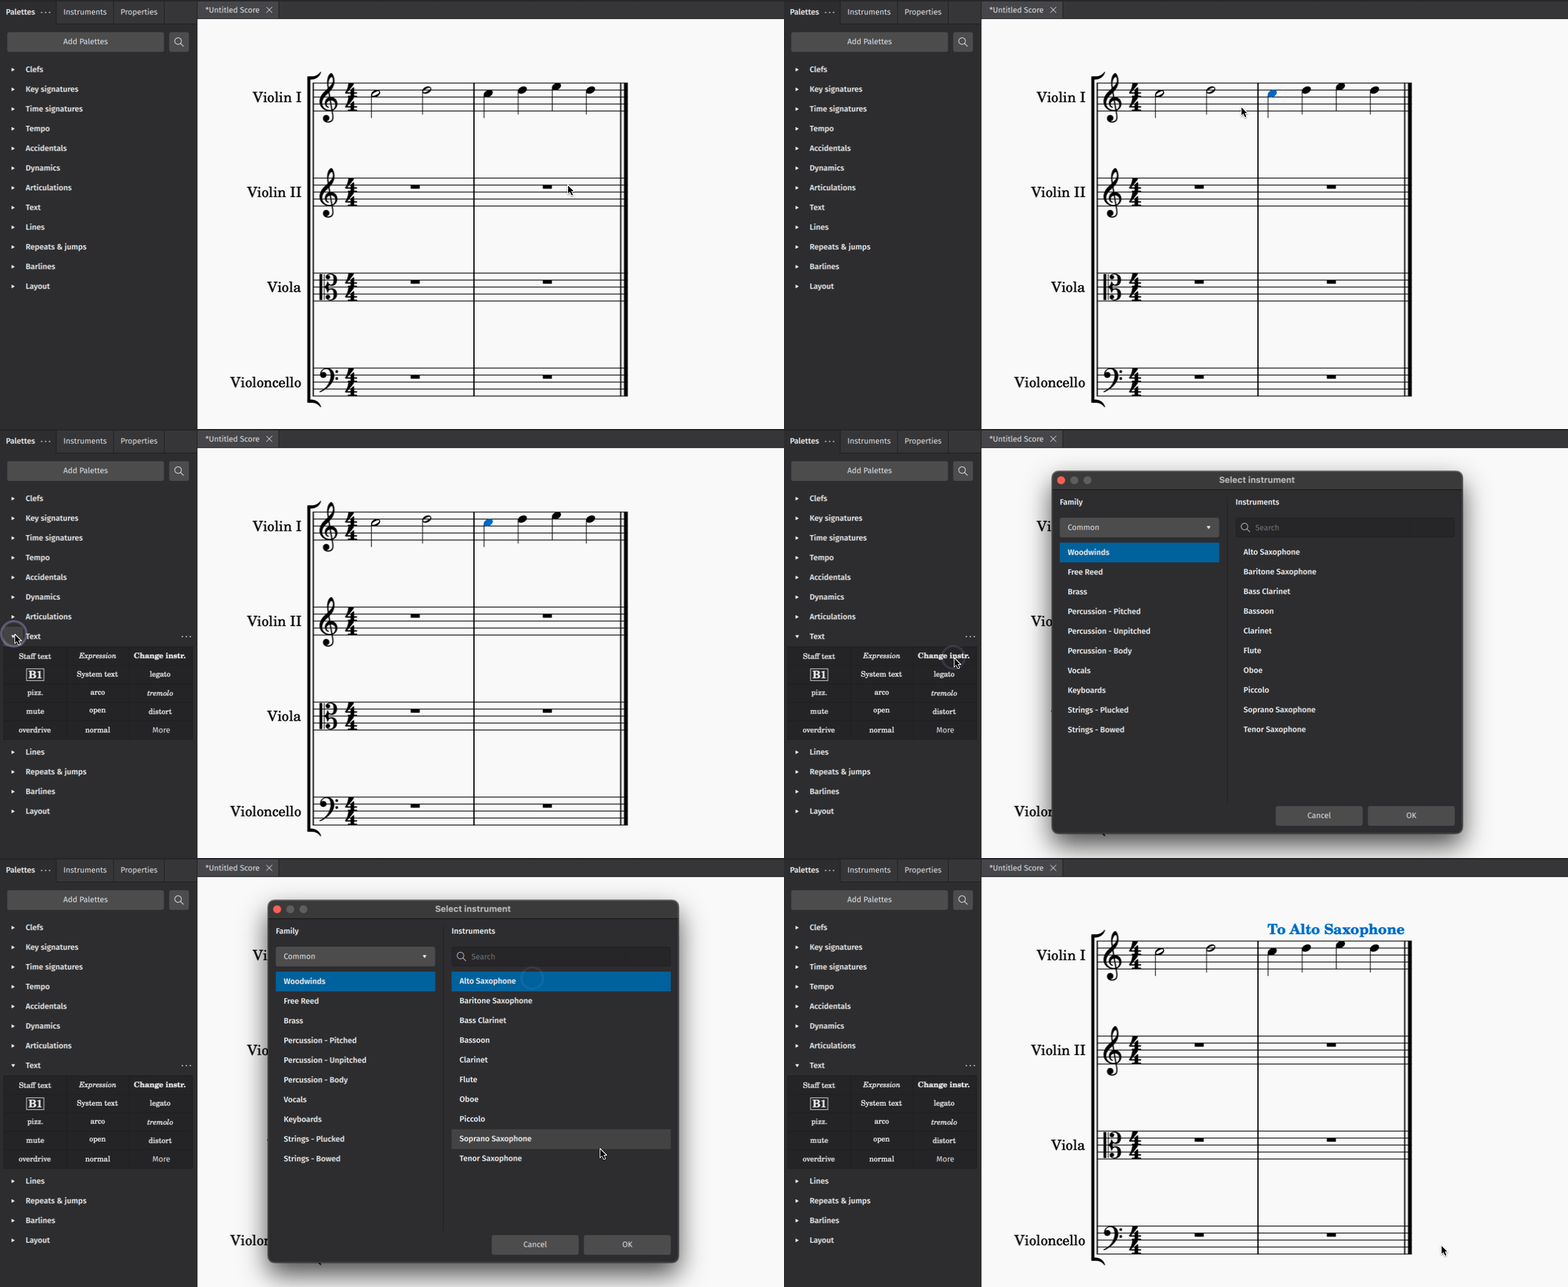
Working with instrument changes
Removing an instrument change
To remove an instrument change, click once on a Change instrument text element to select it, and press either Del or Backspace.
Re-labelling an instrument change
You can re-label any Change instrument text element in the score by double-clicking on it and entering new text. This will not affect the playback sound of the new instrument.
Instrument changes in the mixer
Playback sounds for instrument changes are reflected in the Mixer as separate channel strips stacked to the right of the primary instrument channel strip. These instruments are labelled in parentheses. You can change the assigned playback library, apply effects, adjust the volume, and mute, solo, and pan these channel strips just as you would any other instrument channel strip. For more information, see the Mixer.
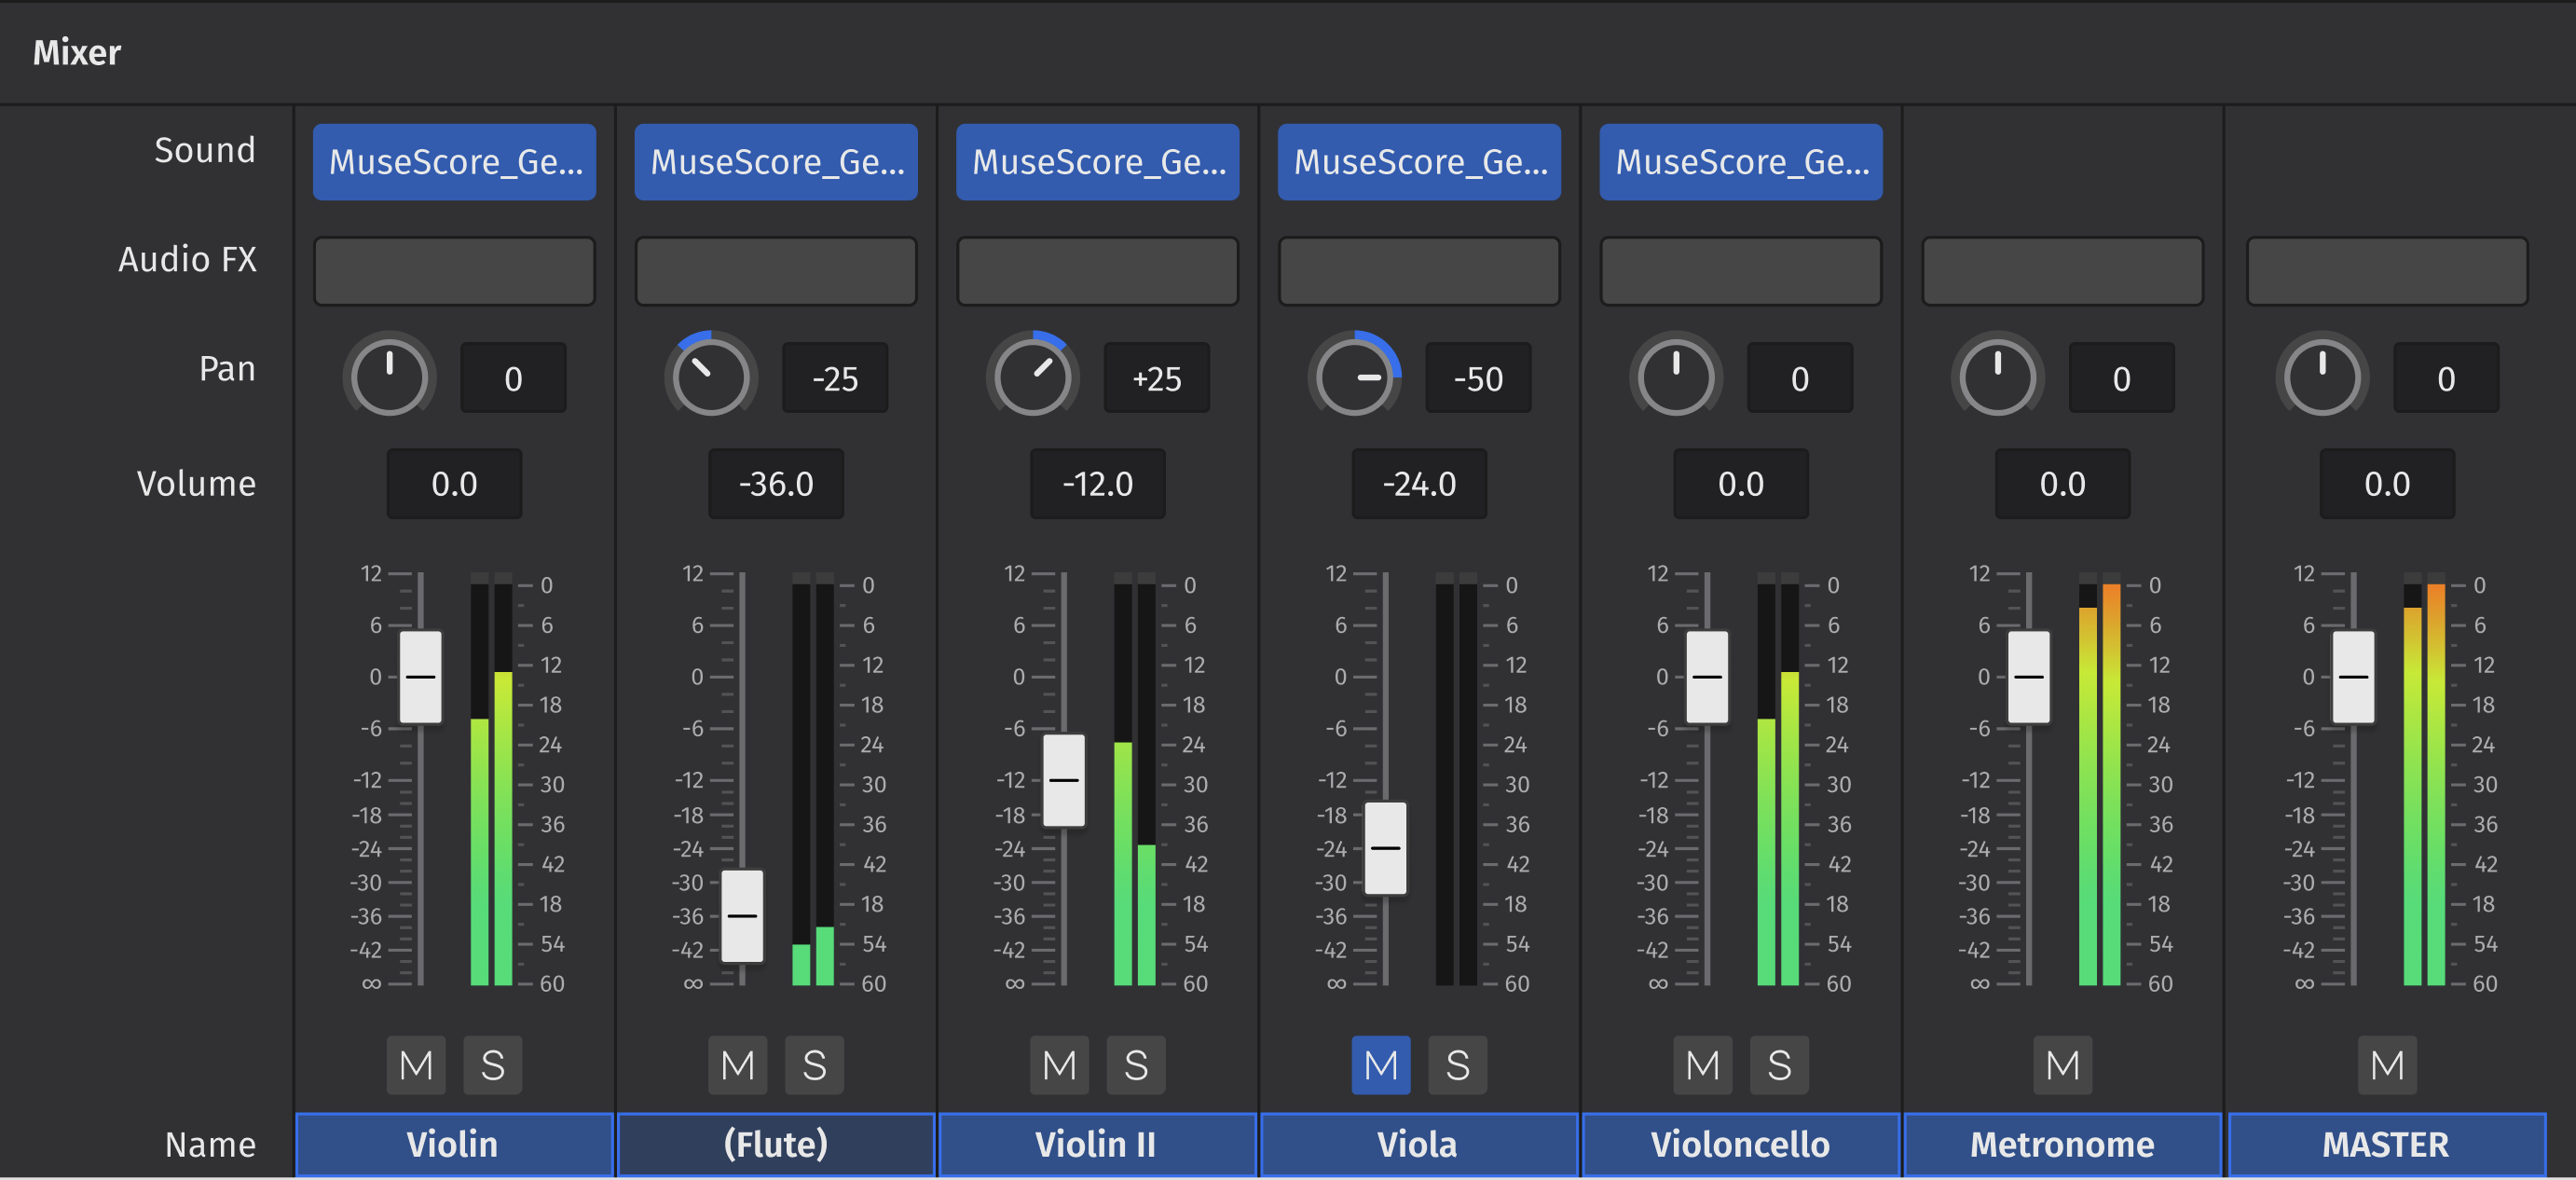
Changing staff type
Changing to a different instrument may necessitate the use of different key signatures, clefs, and even staff type. Learn more about changing staff type in Staff type change.
Staff type change
To change one staff everywhere on a score change Staff type or template instead. Staff types and templates supported by Musescore are covered in Staff/Part properties chapter.
You can change the appearance of a staff starting from certain point on a score by adding a "Staff type change" element to a measure, and adjusting its properties in the Properties panel. This can be used when changing between pitched and unpitched staves or for various experimental notation effects.

Adding a staff type change
- Select a measure in the score and, in the Layout palette
- Click the "Staff type change" symbol to add it to your score

Alternatively, you can drag the symbol from the palette to a measure in your score.
Setting staff properties
When you alter a "Staff type change" property in the Properties panel, the new value takes precedence over the value shown in the global Staff/Part properties dialog. Only those property values in Staff/Part properties that cannot be changed for the "Staff type change" will be valid throughout the score.
The properties that can be altered for the "Staff type change" in the Properties panel are:
Cue size
Use the Small staff size that is defined for the score
Offset
Displace the staff vertically
Scale
Change the size of the staff using a custom percentage
Number of lines
Change the number of lines making up the staff
Line distance
Change the distance between two staff lines
Step offset
Offset the notes on the staff relative
Invisible staff lines
Toggle visibility of the staff lines
Staff line color
Set the color of the staff lines
Notehead scheme
Specify alternate noteheads such as pitch names or shape note
Stemless
Toggle display of note stems
Show barlines
Toggle display of barlines
Show ledger lines
Toggle display of ledger lines
Generate clefs
Toggle display of clefs
Generate time signatures
Toggle display of time signatures
Generate key signatures
Toggle display of key signatures
Staff/Part properties
Overview
Warning: the word "Part" mentioned in this chapter and the window heading is is currently a wrong use of wording in Musescore 4 due to be updated (a outdated data from Musescore 3). Inside this chapter, the word means Musescore Instrument, but note that everywhere else inside this handbook and Musescore 4, it means Parts (the feature to create different versions of the same score)
The Staff / Part Properties dialog allows you to change display properties of one Staff and the properties of the Musescore Instrument it belongs to. To open the dialog:
- Right-click onto either an empty area in a staff, or the instrument name, and select Staff / Part Properties….
Clicking on Navigation arrows ↑ and ↓ buttons at the bottom left will cancel any unsaved changes and switch to edit the previous or next staff.
There are four different types of staff:
1a. Standard staff I. A pitched staff used for most instruments except fretted, plucked-string ones.
1b. Standard staff II. A pitched staff containing a fretted, plucked-string instrument, with options to set the number of instrument strings and tuning.
2. Tablature staff. A staff containing a fretted, plucked-string instrument, which displays music as a series of fret-marks on strings. Also contains options to set the number of instrument strings and tuning.
3. Percussion staff. A pitched staff for percussion instruments.
four instruments shown above are examples of the four staff types respectively. Download this testing score file MS4-1-1 Staffstypes.mscz
For each type, there are pre-defined Template to choose from in the Advanced Style Properties (Edit Staff Type) window
Replacing an instrument also changes staff types but may create unreasonable result and wrong playback. For example, replacing Piano (a standard staff, type 1a) with Drumset (percussion staff, type 3).
Staff properties
The top section of the dialog allows you to adjust many aspects of the appearance of an individual staff. The following options are common to all types of staves:
First column:
- Style group: Display the staff Types. Type 1a and type 1b as Standard , type 2 as Tablature , type 3 as Percussion.
- Lines: The number of lines making up the staff. For tablature, this number usually matches the number of strings in the String Data dialog (exceptions being the Baroque Lute, Theorbo etc. which have more strings than lines).
- Line Distance: The distance between two staff lines of the current staff. Changes rarely needed. See how to change the scaling of all staffs in Page layout concepts chapter.
- Extra distance above staff: Increases or decreases the distance between the selected staff and the one above in all systems.
Note: (1) This setting does not apply to the top staff of a system, which is controlled by the minimum/maximum system distance (see Formatting). (2) To adjust the spacing above just one staff line in a particular system, see Fitting systems on a page: Spacers. - Scale: Changes the size of the current staff and all associated elements as a percentage. See how to change the scaling of all staffs in Page layout concepts chapter.
Second column:
- Hide when empty: Staff level setting for empty staff hiding along one system, see Showing staves only where needed chapter.
- Show clef: Whether the staff clef will be shown.
- Show time signature: Whether the staff time signature(s) will be shown or not.
- Show barlines: Whether the staff barlines will be shown.
- Hide system barline: Show/hide barline at left-hand edge of the staff.
- Merge matching rests: Check if you want matching rests in different voices to be merged rather than separate.
Third column:
- Do not hide if system is empty: Designate as the staff to show when all staffs in a system are empty, see Showing staves only where needed : Choosing the staff to show when all staffs in a system are empty chapter.
- Small staff: Create a reduced-size staff. You can set the default from the menu in Format→Style…→Sizes.
- Invisible staff lines: Make staff lines invisible.
- Staff line color: Use a color picker to change the color of the staff lines.
- Cutaway: Setting for hiding empty measures, see Showing staves only where needed : Hiding empty measure chapter.
- Advanced style properties: (see below)
Advanced style properties
Clicking on Advanced Style Properties… opens the Edit Staff Type window, the properties available vary depending on staff type.
Advanced Style Properties: common to all four staff types
First row: Lines, Line Distance: duplicated UI for the exact same property as above
Second row: Show clef, Show time signature, Show barlines: duplicated UI for the exact same property as above
At the bottom of the window:
- Template dropbox
Assigning a template changes the number of lines (type 3 percussion staff) or switch staff types altogether (type 1a, type 1b and type 2). To apply a template:
1. Make a selection from the drop-down list labeled “Template”;
2. Press < Reset to Template;
3. Press OK to accept the changes and exit the dialog (or Cancel to cancel the operation).
Advanced Style Properties: settings for standard and percussion staff (Type 1a, type 1b and type 3)
Third row:
- Show key signature, Show ledger lines: Option to turn the display of these elements ON or OFF.
- Stemless: If checked, staff notes will have no stem, hook or beam.
Advanced Style Properties: settings for standard staff (Type 1a, type 1b)
- Notehead scheme: See Notehead scheme.
Advanced Style Properties: settings for tablature staff (Type 2)
- Upside down: If not checked, the top tablature line will refer to the highest string, and the bottom tablature line to the lowest string (this is the most common option). If checked, the top tablature line refers to the lowest string, and the bottom tablature line to the highest line (e.g. Italian-style lute tablatures).
- Preview: A window at the bottom displays a short section of a specimen score as it would look with the current properties applied.
Under Fret Marks tab:
Fret marks are the numbers or letters used to indicate the location of notes on the fingerboard. The following group of properties define the appearance of fret marks:
- Font: The font used to draw fret marks. A selection of eight fonts are provided supporting all the necessary symbols in 8 different styles—both modern and historic..
- Size: Font size of fret marks in typographic points. Built-in fonts usually look good at a size of 9-10pt.
- Vertical offset: MuseScore tries to place symbols in a sensible way and you do not usually need to alter this value (set to 0) for built-in fonts. If the font has symbols not aligned on the base line (or in some other way MuseScore does not expect), this property allows you to move fret-marks up (negative offsets) or down (positive offsets) for better vertical positioning. Values are in sp.
- Marks are: Select from using Numbers (“1”, “2”…) or Letters (“a”, “b”…) as fret marks. When letters are used, the letter “j” is skipped and “k” is used for the 9th fret.
- Marks are drawn: Choice of placing fretmarks On lines or Above lines.
- Lines are: Choice of Continuous (lines pass through fret marks) or Broken (a small space appears in the line where the fretmark is displayed).
- Show back-tied fret marks: If unchecked, only the first note in a series of tied notes is displayed. If ticked, all notes in the tied series are displayed.
- Show fingering in tablature: Check to allow the display of fingering symbols applied from a palette.
Under Note Values tab: properties define the appearance of the symbols indicating note values
- Font: The font used to draw the value symbols. Currently 5 fonts are provided supporting all the necessary symbols in 5 different styles (modern, Italian tablature, French tablature, French baroque (headless), French baroque). Used only with the Note symbols option.
- Size: Font size, in typographic points. Built-in fonts usually look good at a size of 15pt. Used only with the Note symbols option.
- Vertical offset: Applies only when Note symbols is selected (see below). Use negative offset values to raise the note value symbols, positive values to lower them.
- Shown as:
- None: No note value will be drawn (as in the examples above)
- Note symbols: Symbols in the shape of notes will be drawn above the staff. When this option is selected, symbols are drawn only when the note value changes, without being repeated (by default) for a sequence of notes all of the same value.
- Stems and beams: Note stems and beams (or hooks) will be drawn. Values are indicated for each note, using the same typographic mechanics as for a regular staff; all commands of the standard Beam Palette can be applied to these beams too.
- Repeat: If several notes in sequence have the same duration, you can specify if and where to repeat the same note symbol. i.e. Never / At new system / At new measure /Always.
Note: This option is only available if “Shown as: Note symbols” is selected (see above). - Stem style:
- Beside staff: Stems are drawn as fixed height lines above/below the staff.
- Through staff: Stems run through the staff to reach the fret marks.
Note: This option is only available when “Shown as: Stems and Beams” is selected (see above).
- Stem position:
- Above: Stems and beams are drawn above the staff.
- Below: Stems and beams are drawn below the staff.
Note: This option is only available when “Shown as: Stems and Beams” and “Stem style: Beside staff” is selected (see above).
- Half notes: None / As short stems / As slashed stems.
Note: This option is only available when “Shown as: Stems and Beams and “Stem style: Beside staff” is selected (see above). - Show rests; Whether note symbols should be used to indicate also the rests; when used for rests, note symbols are drawn at a slightly lower position. Used only with the Note symbols option.
Part properties
Warning: The wording "Part" used in the heading is a misnomer as of Musescore 4.1.1
Instrument
The name of the instrument is shown here. To change the instrument,
- Click on Replace instrument and make a choice from the "Select Instrument" dialog. This replaces the instrument that this staff belongs to and changes all staffs this instrument has. It changes playback, staff name, and staff transposition etc. The Staff Type change may be unreasonable and create wrong playback.
Names
- Long instrument name: Name displayed to the left of the staff in the first system of the score or section.
- Short instrument name: Name displayed to the left of the staff in subsequent systems of the score.
Usable pitch range
- Amateur: Notes outside the amateur range are colored olive green / dark yellow in the score.
- Professional: Notes outside the professional range are colored red in the score.
Note: To disable out-of-range coloration of notes, from the menu, select Edit→Preferences… (Mac: MuseScore→Preferences…), click on the “Note Input” tab, and uncheck “Color notes outside of usable pitch range.”
Transposition
Set the octave, and up/down interval to ensure that transposing instruments are notated correctly. This is automatically done by the program for most instruments.
For transposing instruments an additional option is shown: "Prefer sharps or flats for transposed key signatures". There are three options:
- Default: Let MuseScore decide
- Flats: Prefer flats
- Sharps: Prefer sharps
Part Properties: settings for plucked strings only (Type 1b and type 2)
In addition to those listed above, staves of fretted, plucked-string instruments (Type 1b and type 2) have a few extra options at the bottom part of the window,
- Number of strings: Displays the number of instrument strings.
- Edit String Data…: This button opens a dialog box which allows you to set the number and tuning of strings. See Change tuning.
Brackets
Brackets/braces are used to connect multiple staves of one instrument (e.g. a piano's grand staff) or of a group of instruments (e.g. 2 x violins, viola and cello in string section) within a system. See Page layout concepts : system chapter.
Brackets/braces are automatically applied when a score is created in the New Score dialog. You can easily change them if the default is not what you want (see below).
To add brackets and curly braces, use Brackets palette.
Adding brackets
To add a bracket or brace to all systems:
- Click on the first measure of the staff where you want the bracket/brace to start, hold Shift and click on the measure where you want the bracket/brace to end.
- Click the desired bracket icon in the "Brackets" palette.
Alternatively:
- Select the start measure, and click the bracket into place from the "Brackets" palette.
- Select the bracket, click on the adjustment handle and drag it down to the desired position. It will snap into place.
Nested brackets can also be applied using these methods, applying the innermost first and ending with the outermost. The order can be edited subsequently using the "Column" property (see below)
Editing brackets
If you select a bracket/brace, you can edit its properties in the Properties panel (sidebar).
- Column: Moves the bracket inwards/outwards.
- Span: Extends or retracts the end of the bracket/brace.
Changing bracket type
- Select the bracket/brace in the score to be changed, then click on a new bracket/brace from the "Brackets" palette.
Changing bracket span
Use one of the following methods:
- Select the bracket, click on the adjustment handle, and drag it to the desired position.
- Select the bracket, click on the adjustment handle, and press Shift+↑/↓ to move it from staff to staff.
- Alter "Span" in the Properties panel.
Deleting brackets
- To delete a bracket/brace, select it and press Del.
Customizing bracket appearance
Brackets/Braces also have a few global properties which can be adjusted from the Style menu:
- Adjust thickness and distance from the staff in Format→Style→System.
- Adjust distance above/below in Format→Style→Page→Enable vertical justification of staves.
