基礎
本章向您展示了如何使用MuseScore嚮導設置一個新的樂譜、如何輸入和編輯基本的樂譜符號、程式視窗的不同部分包括描述工具列、檢查器、調色板等和查看和導航選項。
Note input
This chapter explains music creation on standard staves only, see also tablature and drum notation chapters.
Overview
Musescore supports inputting music via any of four input devices: computer keyboard, mouse, MIDI keyboard, or virtual piano keyboard.
Basic note entry
This chapter explains the default input mode, step-time, where notes and rests are entered one at a time. It is based on the logic that, when a new note or rest is added by the user, the subsequent notes and rests adjust their duration ( note value or length ) automatically without affecting the total number of beats in any measures. See also Note input modes chapter.
After exiting the New Score Wizard, your new score will consist of a series of measures filled with measure rests:

As you enter notes in a measure, the measure rests are changed to appropriate rests to fill the remainder of the measure:

Notes of different durations on the same beat are entered by using voices:

Step 1. Select a starting position
Select a starting position for note input by clicking on a note or rest, or selecting a measure, with the mouse. If you don't select a starting point, the cursor automatically defaults to the beginning of the score when you enter Note Input mode ("Step 2" below).
Step 2. Enter Note Input mode
To enter Note Input mode, use either of the following options:
- Click on the "N" icon (on the extreme left of the Note Input toolbar).
- Press N on your computer keyboard.
To exit Note Input mode, use any of the following options:
- Press N.
- Press Esc.
- Click on the toolbar "N" button.
Step 3. Select a duration
Still in Note Input mode, select a note duration using either of the following:
- Click on a corresponding note icon in the Note Input toolbar (directly above the document window):

- Enter the keyboard shortcut for that duration (see below).
Step 4. Enter the note or rest
- To enter a note pitch from A–G, simply press the corresponding letter on your computer keyboard or place it using your mouse/touchpad (and a 'normal' left-click).
- To enter a rest, press 0 (zero) or right-click your mouse.
This method of entry also works if you are not in Note Input mode—as long as you have a note/rest selected, or the score is newly-created (in which case note entry will default to the beginning).
Select a note/rest duration
The following keyboard shortcuts are used to select note/rest duration in Note Input mode:
- 64th (hemidemisemiquaver): 1
- 32nd (demisemiquaver): 2
- 16th (semiquaver): 3
- Eighth (quaver): 4
- Quarter (crotchet): 5
- Half (minim): 6
- Whole (semibreve): 7
- Double whole (breve): 8
- Longa: 9
- Dot: . (toggles the selection to and from a dotted note/rest)
- "Increase active duration": In note input mode, this shortcut changes the selected duration to the next value above the current one. Set the shortcut in Preferences: Shortcuts.
- "Decrease active duration": In note input mode, this shortcut changes the selected duration to the next value below the current one. .
See also: Tuplets.
Additional durations
- Double, triple and quadruple dots: Apply from the note input toolbar in the advanced workspace or via a custom shortcut.
- 128th note: Ditto.
- 256th, 512th or 1024th durations: First enter a 128th note (or longer), then half it as many times as needed using the shortcut Q or, as of 3.5, via a custom shortcut, or via the corresponding entries on the note input toolbar in a custom workspace.
Input devices
Music notation can be entered by:
- Computer keyboard.
- Mouse.
- MIDI keyboard.
- Virtual Piano Keyboard.
- Any combination of the above.
Computer keyboard
This section expands on "Basic note entry" (see above) and introduces you to the full range of commands available for entering notes or rests from the computer keyboard.
Summary of commands
Here is a list of useful editing shortcuts available in Note input mode:
- 1–9 and . (dot): Set note input duration (as described above).
- A–G: Enter note A to G respectively.
- 0: Enter a rest.
- R: Repeat the last entered note.
- Backspace: Undo last entered note
- ↑ (Up): Raise the pitch of a note by a semitone (uses ♯).
- ↓ (Down): Lower the pitch of a note by a semitone (uses ♭).
- Alt+Shift+↑: Raise the pitch of a note by scale degrees using key signature (assumes Major).
- Alt+Shift+↓: Lower the pitch of a note by a scale degree using key signature (assumes Major).
- J: Change a note up or down to its enharmonic equivalent (e.g. D♯ to E♭). This alters the spelling in both concert pitch and transposed modes. See Accidentals.
- Ctrl+J (Mac Cmd+J): Change a note up or down to its enharmonic equivalent. This alters the spelling only in the current mode. See Accidentals.
- X: Flip direction of note stem (can be reset to Auto position in Inspector)
- Shift+X: Move note head to opposite side of stem (can be reset to Auto position in Inspector)
- Ctrl+Alt+1-4: Switch to corresponding voice
- Q: Halve the duration of the last entered note, and use that duration for future input. This is the default key for "Half Duration" shortcut command. Also see tips below.
- W: Double the duration of the last entered note, and use that duration for future input. This is the default key for "Double Duration" shortcut command. Also see tips below.
- Shift+Q: Decrease duration of the last entered note by a dot (for example, a dotted quarter note/crotchet becomes a quarter note/crotchet and a quarter note/crotchet becomes a dotted eighth note/quaver), and use that duration for the future input. This is the default key for "Decrease duration dotted" shortcut command. Also see tips below.
- Shift+W: Increase duration of the last entered note by a dot (for example an eighth note/quaver becomes a dotted eighth note/quaver and a dotted eighth note/quaver becomes a quarter note/crotchet), and use that duration for the future input. This is the default key for "Increase duration dotted" shortcut command. Also see tips below.
- Ctrl+↑ (Mac: Cmd+↑): Raise the pitch of the last entered note by an octave
- Ctrl+↓ (Mac: Cmd+↓): Lower the pitch of the last entered note by an octave
- Shift+←: Exchange last entered note with the note before it (repeat to keep moving note earlier)
- Shift+→: Exchange note moved with Shift+← with the note that follows it
- Alt+1-9: Add interval (unison to ninth) above current note.
- Shift+A-G: Add note A to G above current note respectively.
Note : (1) Q and W change the duration of the last entered note. The similar shortcuts "Increase active duration" and "Decrease active duration" do not change the last entered note, they are configurable in Preferences window. (2) Shift+Q and Shift+W change the duration of the last entered note by dot. Pressing . (dot) while in Note input mode does not change the last entered note.
Enter notes/rests
You can enter a note by typing the corresponding letter on your keyboard. After entering Note Input mode, type 5 C D E F G A B C to get the following result:

Note: When you enter a note using the keyboard, MuseScore places it closest to the previous note entered (above or below).
To enter a rest, type "0" (zero). To get the following, type 5 C D 0 E after entering Note Input mode.

Note: The duration selected in the toolbar applies to both notes and rests.
If you want to enter a dotted note, press . (period/full stop) after selecting the duration.
For example, after entering Note Input mode, type: 5 . C 4 D E F G A.

If you want to enter a tuplet (such as a triplet): see Tuplets.
If you want to write music with two or more simultaneous lines of independent melody on the same staff, see Voices.
Move notes up/down
To move a note up or down by a semitone:
- Press the ↑ or ↓ arrow.
To move a note up or down diatonically:
- Press Alt+Shift+↑ or Alt+Shift+↓.
To move a note up or down by one octave:
- Press Ctrl+↑ (Mac: Cmd+↑) or Ctrl+↓ (Mac: Cmd+↓).
Add accidentals
When a note is moved up or down with an arrow key (see above), any accidental required is automatically generated by the program. Accidentals can also be added manually—see Accidentals.
Chords
If you want to add a chord note to your previous entry:
- Press and hold Shift, then enter a note from AtoG.
Thus, typing C, D, Shift+F, Shift+A, E, F results in:

To add a note at a specific interval above or below one or more notes:
- Ensure that one or more notes are selected;
- Use one of the following options:
- From the menu, select Add→Intervals and choose an interval from the list;
- Press Alt+1-9 for intervals above (intervals below are also possible by adding relevant shortcuts to the list in Preferences).
Note: To create chords with notes of different durations, you will need to use more than one Voice.
Insert notes
Normally, when you enter music in MuseScore, any existing notes or rests are overwritten. There are, however, several ways to insert notes:
- Insert extra measures into the score.
- Cut and paste a section of the score forward, then enter music into the gap.
- To insert a note, press Ctrl+Shift (Mac: Cmd+Shift) + the note name (AtoG). This will insert a note of the selected duration and move the rest of the notes to the right in the same measure. If the measure exceeds the duration of the time signature, the blue plus will appear above the measure as in Insert Mode.
Delete notes
To delete a single note:
- Select the note and press Del (Mac: Backspace).
To delete a chord:
- Press Esc to ensure that you are in Normal mode.
- Press Shift and click on a note to select the chord.
- Press Del (Mac: Backspace).
The delete command can also be applied to a range of notes/chords.
Mouse
It's easy to enter notes with the mouse, but it is not the fastest way to enter lots of notes.
- Click on the desired note duration symbol in the Note input toolbar.
- Click on the score to add a pitch of the selected duration.
- To add more notes to an existing chord, simply repeat step 2.
- To replace an existing chord (rather than adding to it), press Shift before clicking.
- To add a rest, right-click.
Note: If you hover the cursor over the score in Note Input Mode it will show you a preview of the note or rest you are about to add.
MIDI keyboard
You can also insert pitches using a MIDI keyboard.
- Connect your MIDI keyboard to the computer and switch the former on
- Start MuseScore (this must be done after the keyboard is switched on)
- Create a new score
- Click the rest (selecting it) in measure 1 to indicate where you want note input to begin
- Press N to enter
note input mode - Select a note duration such as 5 for quarter notes (crotchets), as described above
- Press a note on your MIDI keyboard.
The pitch should be added to your score. If the pitch does not appear, either use the toolbar and click 'Toggle MIDI Input' or follow these steps:
- From the menu, select Edit→Preferences... (Mac: MuseScore→Preferences...).
- Click on the Note Input tab and check "Enable MIDI Input".
- Click OK to exit. You will need to restart MuseScore to apply the change.
Note: The default method of entry, Step-time allows you to enter one note at a time. Other note input modes are also available: see Note input modes.
If you have multiple MIDI devices connected to your computer, you may need to inform MuseScore which is the MIDI keyboard:
- From the menu, select Edit→Preferences... (Mac: MuseScore→Preferences...).
- Click on the I/O tab and select your device under the section labeled "MIDI input".
- Click OK to exit. You will need to restart MuseScore to apply the change.
Virtual Piano Keyboard
You can also input notes using the on-screen piano keyboard.
- To toggle the display on and off: Press P (or select View→Piano).
- To resize the keyboard: Position the mouse pointer over the piano keys, hold down Ctrl (Mac: Cmd) and move the mouse scroll wheel up (larger) or down (smaller).
The method of note entry is similar to that for a midi keyboard:
- Ensure that you are in Note Input mode.
- To enter a:
- Single note: Click on the appropriate piano key.
- Chord: Select the note you wish to add to, press and hold Shift, then click on a piano key (in versions before 2.1, use Ctrl (Mac: Cmd). Repeat as required.
Note input modes
See Note Input modes main chapter.
MuseScore offers a variety of note input modes in addition to Step-time. All can be accessed by clicking the small arrow next to the "N" button on the left of the Note Input toolbar:

- Step-time (default): The default mode of note entry. See Basic note entry (above).
- Repitch: Replace pitches without changing rhythms.
- Rhythm: Enter durations with a single click or keypress.
- Real-time (automatic): Perform the piece at a fixed tempo indicated by a metronome beat.
- Real-time (manual): Perform the piece while tapping a key or pedal to set the beat.
- Insert: (Called "Timewise" until version 3.0.2) Insert and delete notes and rests within measures, automatically shifting subsequent music forwards or backwards.
Coloring of notes outside an instrument's range
Depending on the skill of the musician, certain notes are considered beyond the range of a particular instrument. For informational purposes, MuseScore optionally colors notes red if they are outside the range of a "professional" player, and olive green/dark yellow if outside the range of an "early amateur." The colors appear on the computer screen, but not on printed copies.

To enable/disable note coloration and to set "professional" and "amateur" ranges, see Usable pitch range (Staff properties: all staves).
Small notes/small noteheads
- Select the note(s) you want in small size.
- Check the "Small" checkbox in the Inspector. The one in the
Notesection is used to only change the size of the individual notehead; the one in theChordsection will change the note head, stem, beam, and flag sizes all together.
By default, the small size is 70% of the normal size. You can change that setting in Format → Style…→Sizes.
Change notes or rests already entered
Change duration, overwriting subsequent phrases or adding spaces
Version 3.3.3 and above
- Make sure you are in Normal mode (press Esc to exit from Note input modes).
- Select one or more notes/rests, or note-stems/hooks. Apply the desired duration shortcut (listed above), or click on the equivalent duration icon in the toolbar.
Prior to version 3.3.3
- Make sure you are in Normal mode (press Esc to exit from Note input modes).
- Click on a note or rest. Apply the desired duration shortcut (listed above), or click on the equivalent duration icon in the toolbar.
For example, to change three sixteenth rests into a single dotted eighth rest:
- Click on the first sixteenth rest.
- Hit 4 to turn it into an eighth rest.
- Hit . to turn it into a dotted eighth rest.
- As the duration increases, it overwrites the other two sixteenth rests following it.
Note that increasing duration overwrites the notes or rests that follow the selected phrase; decreasing duration adds rests between it and the notes or rests following.
See also Paste half/double duration
Change duration, expanding or shrinking the current measure
- Use the Duration Editor plugin that allows "Melody first, rhythm second" notes entry, or
- (insert only) insert notes or measure as described above.
Change duration of notes in selection only, overwriting rests only
Use the Note duration actions plugin to batch adjust notes length while keeping starting positions intact.
Change pitch
To change the pitch of a single note:
- Make sure that you're not in note input mode and that you have no other notes selected.
- Select the desired note and use any of the following methods:
- Drag the notehead up or down with the mouse;
- Press the keyboard arrows: ↑ (Up) or ↓ (down);
- Type a new note letter name (A…G). Use Ctrl+↓ or Ctrl+↑ to correct the octave, if necessary (Mac: Cmd+↓ or Cmd+↑). This will automatically turn on note input mode.
To change the enharmonic spelling of a note, select it and use the J command. For more information, see Accidentals.
To change the pitches of a passage of music by a constant interval, you can use Transposition.
To change the pitches of a passage of music to a different melody, while keeping the rhythm unchanged, use Re-pitch mode.
If your score contains a lot of misspelled accidentals, you might try the Respell Pitches command (see Accidentals: Respell pitches).
Change voice
To change one or more notes to a different voice, see Voices.
Change rest to note and vice versa
To change a rest to a note of the same duration:
- Make sure you are not in note input mode (press Esc to exit).
- Select the rest.
- Enter the desired pitch by entering a note letter, AtoG.
To change a note to a rest of the same duration:
- Make sure you are not in note input mode (press Esc to exit).
- Select the note.
- Press 0 (Zero).
Note properties
- To adjust the horizontal position of a note/chord: see Offset notes.
- To edit note properties in general (spacing, offset, size, color, notehead direction, playback etc.): see Inspector and object properties.
- To adjust the layout of all notes in the score: see Layout and formatting, especially the sections about notes, accidentals and tuplets.
See also
- Note input modes
- Drum notation
- Tablature
- Tuplet
- Voices
- Shared noteheads
- Preferences (Configure keyboard shortcuts)
External links
- How to enter a chord (MuseScore HowTo)
- How to enter a rest (MuseScore HowTo)
- How to span a stem over two staves (MuseScore HowTo)
- How to add cue notes (MuseScore HowTo)
- Video tutorial: MuseScore in Minutes: Lesson 3 - Note input
- Video tutorial: MuseScore in Minutes: Lesson 4 - MIDI Keyboard Input
- Video tutorial: MuseScore in Minutes: Lesson 5 - More Input Ideas
- Video: Semi-Realtime MIDI Demo Part 1: New note entry modes
- Video tutorial: Musescore Quicktips: Note Entry
新建樂譜
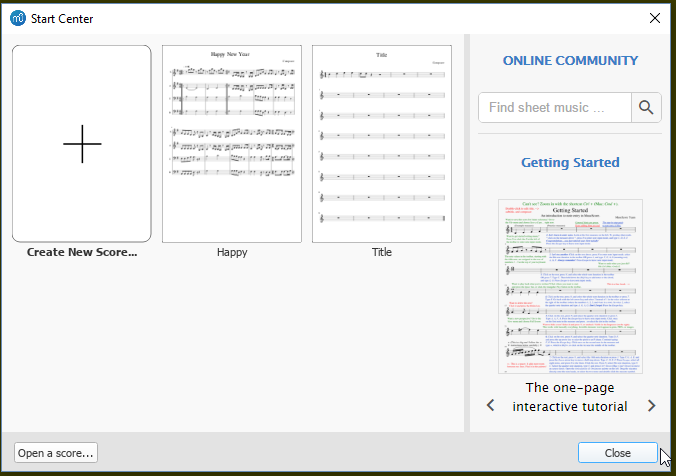
要新建樂譜,打開創建樂譜嚮導(參閱新建樂譜):也可以通過啟動中心訪問。
啟動中心
當您初次打開MuseScore時,會顯示這個視窗:
NOT FOUND: Start_center_en.png
如果視窗沒有顯示,您可以使用下列任意方式來開啟:
- 按下 F4 。
- 從頂部功能表列,選擇 檔案→啟動中心...
要在MuseScore啟動時停止顯示啟動中心:
- 在頂部功能表中,選擇編輯→偏好設置... (Mac:MuseScore→偏好設置...)然後在通用標籤頁下的程式啟動部分取消勾選“顯示啟動中心”。
在啟動中心裡,您可以:
- 新建樂譜(按一下有加號的圖示)
- 流覽先前打開過的樂譜的縮略圖,點擊縮略圖可以打開樂譜
- 打開電腦內的樂譜樂譜:點擊 打開樂譜...
- 打開 "新手入門"教程譜。使用右邊欄的箭頭按鈕來訪問連結。
- 搜索musescore.com上的樂譜
- 訪問各種其他功能(查看右側欄)
新建樂譜
在啟動中心沒有打開時,要打開創建樂譜嚮導,請使用下列方法之一:
- 點擊位於視窗左上角工具列中的新樂譜圖示;
- 使用快速鍵 Ctrl+N (Mac:Cmd+N);
- 從頂部功能表中,選擇 檔案→新建... 。
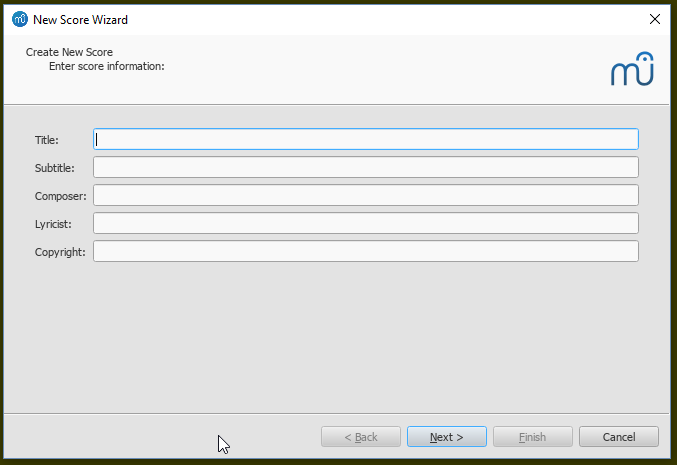
輸入樂譜資訊
NOT FOUND: Create_new_score-Title_en.png
第1步:輸入樂譜資訊
輸入標題、曲作者或其他資訊,然後點擊 繼續 > 。您也可以選擇創建樂譜之後再添加樂譜資訊(參見垂直占位框)。
選擇模版檔

第2步:選擇模版檔
左側是一個範本清單,涵蓋獨奏、重奏、樂隊,根據音樂風格被分成了若干類。如果您之前在您的用戶模版資料夾存儲了任何自訂範本,它們會出現在“自訂模版”之下。您也可以使用左上方的搜索工具查找特定範本。
要選擇一個模版譜:
- 點擊範本的名稱來選擇它,隨後點擊 下一步 > ;或者按兩下範本名稱。這會自動帶您進入嚮導的下一頁(參見下面的選擇調號與速度)。
- 如果您要從頭開始創建樂譜範本,點擊在“常規”下方的"選擇樂器",隨後點擊下一步 > ;或者按兩下“選擇樂器”。
選擇樂器(分譜)
NOT FOUND: Create_new_score-Add-instruments_en.png
樂器選擇視窗分為兩欄:
- 左欄包含了可選的樂器或聲部列表。該列表將各個樂器歸入不同類。 按一下每個類別將顯示每個類別的完整清單。
雖然默認入口是“常用樂器”,但您可以選擇其他樂器,包括“爵士樂”以及“早起音樂”。樂器視窗底部有一個搜索框,在其中輸入樂器名即可在“所有樂器”中進行搜索。
- 右欄最初是空的,但之後會有一系列的樂譜中用到的樂器樂器按順序顯示於此。
添加樂器
要往樂譜內添加樂器,請使用以下任意方式:
- 從左欄選中一個或多個樂器然後按一下 添加 。
- 按兩下左欄中的樂器名稱。
樂器名稱及其所屬譜表現顯示於樂器清單的右欄。您可以按需添加更多的樂器或者分譜。每個按此方法添加 的樂器都被分配至其自己的混音器通道。
提示:若您想要讓譜表共用相同的樂器,請使用添加譜表或添加關聯譜表來替代(見下文)。
添加譜表/關聯譜表
若要在已有樂器中添加譜表:
- 在右側的列表中選中一行譜表(圖例:參見下圖的“Staff 1”)。按一下 添加譜表或者添加關聯譜表。
-
如果可以,請調整譜表類型。
NOT FOUND: Create_new_score_Add_staff_en.png
命令一覽:
| 命令 | 所添加譜表 | 是否獨立? | 共用混音器通道? | 例子 |
|---|---|---|---|---|
| 添加譜表 | 獨立譜 | 是 | 是 | 吉他譜/指法譜, 鋼琴大譜表 |
| 添加關聯譜表 | 關聯譜 | 否,一變皆變 | 是 | 吉他譜/指法譜 |
請參閱合併音高譜和指法譜。
更改樂器順序
要調換樂曲中的樂器 (或譜表組) :
- 首先按一下位於右側欄的任一樂器名或單個譜表,接著使用箭頭按鈕來上/下移。
刪除樂器
欲從樂譜中刪除一件樂器或者譜表行
* 首先在右側欄中選擇一件樂器或一個譜表行,然後點擊移除。
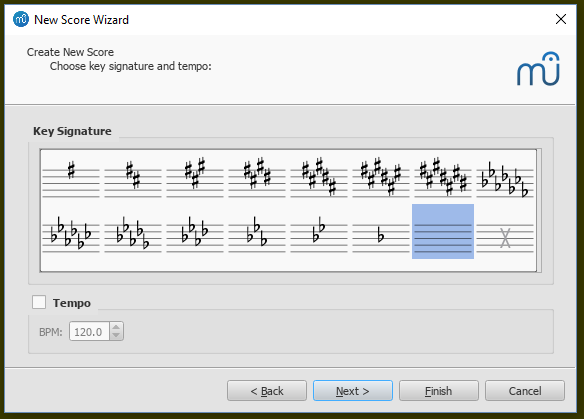
選擇調號與速度
NOT FOUND: Create_new_score-Key_signature_en.png
第3步:選擇調號與速度。
嚮導會要求您提供樂譜的初始調號和速度。請選擇任意調號,然後按一下Next >以繼續。初始速度也能在這裡設置。
選擇拍號、弱起小節以及小節數

第4步: 選擇拍號,設置速度
您可以在此設定最初的 拍號。如果樂譜由弱起小節(不完全小節)開始,則勾選弱起小節並調整其"時值"。
小節數默認為32個,您可以在此更改其數量,或者稍後在樂譜中增/減小節。
按一下完成來創建您的新樂譜。
創建樂譜後的調整
任何您在新譜嚮導中所進行的設置在之後是可以更改的:
增/刪/調整小節
添加/編輯文本
更換樂器設置
要添加、刪除或更改樂器順序:
參見更換樂器(譜表屬性)。
隱藏譜表
調整排版與版式
要調整譜表與譜表組的間距、設置頁邊距等,參見排版與格式.
模版
模版僅僅是一個存儲於兩個“template”資料夾之一的、標準的MuseScore檔:其中任何的檔都會自動出現于新譜嚮導的"選擇模版資料夾"頁面。 兩個“template”資料夾是默認創建的:
譜表組模版資料夾
此資料夾包含MuseScore 自帶、不可修改的模版。可在以下路徑尋得:
Windows:通常位於C:\Program Files\MuseScore 3\templates
Linux:如您通過安裝包管理器(package manager)安裝,檔位於/usr/share/mscore-xxx若您在Linux上自行編譯了MuseScore,則位於/usr/local/share/mscore-xxx(xxx指代您當前的版本號)。
MacOS:位於 /Applications/MuseScore 3.app/Contents/Resources/templates
用戶模版資料夾
所有您為今後使用所創建的模版應當存儲於此。只要這些模版檔存儲在使用者的"templates"資料夾下, 就將自動出現在新譜嚮導的"選擇模版檔"頁面——位於標題“自訂模版”下方。
模版預設路徑如下:
Windows:%HOMEPATH%\Documents\MuseScore3\Templates
MacOS與Linux:~/Documents/MuseScore3/Templates
- 要設定您的您的個人模版資料夾路徑,請在頂部功能表中選擇編輯→偏好設置...→常規.
參閱
外鏈
| 附加檔案 | 大小 |
|---|---|
| Create_new_score-Title_en_1.png | 17.41 KB |
| Create_new_score-Select_template_en.png | 44.82 KB |
| Create_new_score-Key_signature_en_2.png | 24.84 KB |
| Create_new_score-Time_signature_en.png | 28.72 KB |
| Start_center_en_1.png | 71.27 KB |
| 59fbab11df15aba3ff5c34b0c63bb1e0.jpg | 177.31 KB |
| 59fbab11df15aba3ff5c34b0c63bb1e0.jpg | 177.31 KB |
Edit mode
Edit mode allows you to perform a wide range of editing operations on individual score elements, such as:
- Adjust the length and shape of slurs, lines, barlines etc.
- Add, delete and format text in text objects.
- Adjust the position of most score elements (but not text).
Enter edit mode
MuseScore versions 3.4 and above
For lines, hairpins, slurs, note-stems, note-beams, and barlines, use one of the following methods:
- Click on an element.
- Right-click on an element and, from the menu, select Edit Element.
For other elements, use one of the following methods:
- Double-click an element.
- Click on an object already selected (text-based objects only).
- Right-click on an element and, from the menu, select Edit Element.
- Click on an element and press Alt+Shift+E.
MuseScore versions prior to 3.4
Use one of the following methods:
- Double-click an element.
- Right-click on an element and, from the menu, select Edit Element.
- Click on an element and press Alt+Shift+E.
Exit edit mode
To exit Edit mode use any of the following:
- Press Esc.
- Click on a blank area of the document window.
Text
For text edit mode, see Text editing.
Lines
See Lines: Change length, and Adjust slur.
Notes
Offset notes
Sometimes it is necessary to shift a note to the right or left—to avoid a collision with another element or to override automatic notehead sharing for example:
- Enter Edit mode on the desired note;
- Press the arrow key in the direction (left or right) that you wish to nudge the note (or use Ctrl+← or Ctrl+→ for larger adjustments);
- Press the Esc key. This will allow the note stem to be redrawn.
Alternatively, you can select the notehead and change the "Horizontal offset" (under "Chord") in the Inspector.
Adjust note stem length
- Enter Edit mode on the desired note stem;
- Use keyboard shortcuts (below) to extend or shorten the stem;
- Exit edit mode.
Alternatively, you can select the stem and change the "Length Offset" (under "Stem") in the Inspector.
To reposition a note stem, you should select it and adjust the "X" or "Y" setting for the "Offset" under "Automatic placement" in the "Element" section of the Inspector.
Keyboard shortcuts
In Edit mode the following keyboard commands can be used to change the position of either (1) a score element (e.g. ornament, accidental etc.) or (2) an adjustment handle (e.g. slur, line etc.):
- ←: Move left 0.1 staff space.
- →: Move right 0.1 staff space
- ↑: Move up 0.1 staff space
- ↓: Move down 0.1 staff space
- Ctrl+← (Mac: Cmd+←): Move left one staff space
- Ctrl+→ (Mac: Cmd+→): Move right one staff space
- Ctrl+↑ (Mac: Cmd+↑): Move up one staff space
- Ctrl+↓ (Mac: Cmd+↓): Moves down one staff space
- Alt+←: Move left 0.01 staff space
- Alt+→: Move right 0.01 staff space
- Alt+↑: Move up 0.01 staff space
- Alt+↓: Move down 0.01 staff space
The following commands only apply to adjustment handles:
- Shift+←: Move end handle's anchor left by one note/rest.
- Shift+→: Move end handle's anchor right by one note/rest.
- Tab: Go to next handle.
To undo all edits, ensure you are not in edit mode and press Ctrl+R.
See also
Palettes

Overview
Using the Palettes Area is the recommended way to apply musical symbols and text to your score, second to keyboard shortcut.
MuseScore is shipped with predefined palettes that organize items by nature, click on hyperlink to jump to their main chapter.
- Visible by default in the built-in MuseScore 3.6.2 Basic workspace profile: Clefs, Key Signatures, Time Signatures, Accidentals, Articulations , Grace Notes, Lines , Barlines, Text, Tempo, Dynamics, Repeats & Jumps, Breaks & Spacers, Beam Properties.
- Visible by default in the built-in MuseScore 3.6.2 Advanced workspace profile, in addition to all of the above palettes: Brackets, Ornaments, Breaths & Pauses, Noteheads, Arpeggios & glissandi, Tremolos, Fingering, Fretboard Diagrams, Frames & Measures.
- Not yet visible in any build-in workspace profile by default: Accordion (see How-to: Accordion notation and playback), Bagpipe Embellishments.
All palettes can be unhide in any workspace (see below (jump to).) The current visibility setting and expand/collapse status palettes are automatically saved to the current in-use workspace profile. No further action is needed.
Palette contents can be edited, you can also create an empty custom palette and populate it, see below (jump to). Visit https://musescore.org/en/node/355834 for palettes shared by other musicians.
Alternative ways to apply musical symbols and text:
- Use Keyboard shortcuts, see also Note input
- Use Toolbar buttons
- Use the Master palette, or
- Use Images.
View / hide the Palette Area
The default position of the Palette Area is to the left of the document window. To view or hide it:
- From the menu, select View → Palettes, or use the keyboard shortcut F9.
To undock the Palette area:
- Click the double-chevron symbol (circled in the image above), or double-click the top bar of the panel.
To re-attach the panel, double-click on the top bar again. See Side panels for more information.
Using palette items
Apply symbols from a palette
Versions 3.4 or above
- Select one or more score elements, then click the desired palette symbol. Or, drag and drop the symbol onto the desired score element in the staff.
Versions prior to 3.4
- Select one or more score elements, then double-click the desired palette symbol. Or, drag and drop the symbol onto the desired score element in the staff.
If you are dragging a symbol to the score and decide you don't want to apply it, press Esc.
Tip: To prevent accidental rearrangement of contents during use, right-click a palette name and uncheck Enable Editing.
Apply the last selected item
MuseScore does not offer keyboard shortcut bindings to palette items, but you can configure a shortcut to apply the same symbol multiple times consecutively to improve efficiency. Some users find this method handy when applying piano pedal marks. (N.B. piano pedal mark symbol is under Lines palette)
- Assign a keyboard shortcut key to "Apply current palette element" in Preferences: Shortcuts.
- Select some score elements.
- Click on a palette item to apply it to the score once.
- Select other elements. TIPS: Use Shift selection Shift+←/→.
- Press the "Apply current palette element" shortcut to apply the same (last applied) item.
- Repeat as required.
See also Dynamics actions, a MuseScore plugin that you can assign keyboard shortcut to add individual dynamics symbol.
Search for symbols
Search by symbol name to locate a symbol without visually searching through palettes. All symbols are searched regardless of palettes' visible / hidden status and expand / collapse status.
Use the Search box at the top of the Palette Area. As you type, symbols and/or palettes with names matching your keystrokes are displayed below, updating continuously as your typed input changes.
To show all palettes, some of which may be temporarily hidden because it does not match the search string, click X in the search box.
Items added to the score can be copied, pasted, and duplicated: see Copy and paste.
Behavior of applied text and lines
If the symbol you are adding to the score from a palette contains or belongs to a Text element (e.g. staff text, dynamic, fingering, volta etc.), then properties such as font type, font size, text color and alignment will adapt according to the following rules:
- Text properties which have not been altered by the user will adopt the relevant text styles.
- Custom text properties—those changed by the user before saving the symbol to a custom palette—remain as customized.
By contrast, the line properties of Lines applied from a palette as is.
Customize the Palette Area
Expand / Collapse a palette
- Either click on the arrow next to the palette name, or double-click the palette name (in versions prior to MuseScore 3.3, click once on either the arrow or the palette name).
Single Palette mode
- To enable automatic collapsing of all other palettes when you expand one palette, click the ... button at the top of the Palettes Area and check the Open only one Palette at a time box.
Reveal a hidden palette
- Click Add Palettes at the top of the palette list and click Add beside the palette name.
Create a new custom palette
- At the top of the Palette Area, click Add Palettes→Create custom palette. Or, right-click any palette and click Insert New Palette.
- Type the name of the new palette in the Create Palette dialog.
- To add symbols, see Customize palettes below (jump to).
Hide a palette
To hide a predefined palette:
- Right-click the name of the palette you want to hide and click Hide Palette.
To hide a custom palette you created:
- Right-click the name of the palette you want to hide, click Hide/Delete Palette, then click Hide in the dialog.
Delete a palette
Only custom palettes can be deleted, you can hide all palettes though.
- Right-click the name of the palette you want to delete, click Hide/Delete Palette, then click Delete permanently in the dialog.
Change the order of palettes
- Drag the name of a palette up or down to any desired position.
Customize palette contents
Symbols may be added or deleted and layouts can be rearranged. (in version prior to 3.3, only new workspace is capable of customizations).
Before customizing a palette:
- Right-click on the palette name and make sure that Enable Editing is checked. It is automatically checked for new palettes you create yourself.
- Make sure the palette is expanded.
Add from an opened score
Score items, when added to a palette, are saved with their custom properties.
- Press and hold Ctrl+Shift (Mac: Cmd+Shift), then drag the score element from the score onto a palette. The score element could be a symbol, line, text, dynamic, fretboard diagram, imported image etc.
Add from the Master Palette
- If the Master Palette is not visible, select View → Master Palette from the menu, or use the keyboard shortcut Shift+F9 (Mac: fn+Shift+F9).
- Drag the symbol from the Master Palette window onto a palette.
Rearrange symbol order
- Drag the symbol to the cell in which you wish to display it. Nearby symbols will automatically move to make space available.
Change the position and size of a symbol in a palette cell
- Right-click the cell and click Properties. The following dialog is displayed:

- Name: Used in search function, also shown as tooltip that appears when you mouse over the cell.
- Content offset X, Y: Adjusts the position of the symbol in the cell.
- Content scale: Makes the symbol appear larger or smaller in the cell.
- Draw staff: Draws the five lines of a musical staff behind the symbol.
Note: Changing these values only affects the appearance of symbols within the palette. It does not change their sizes or offsets on the score page.
Remove a symbol from a palette
- Right-click the symbol and click Delete. Or, select the symbol and click the trash icon to the right of the palette name.
Items removed from predefined palettes are moved under More.
In custom palettes, the More button offers browsing predefined palettes ( Use < and > ) and adding their items ( Use drag-and-drop, or selecting and clicking Add to)
Palette menu
The following menu options may appear either by right-clicking the name of a palette or by clicking the ... to the right of the name:
- Hide Palette: Hide predefined palette into under Add Palettes.
- Hide/Delete Palette: Allows you to either hide or permanently delete a custom palette.
- Insert New Palette: Creates a new empty palette. Identical to Add Palettes→Create custom palette.
- Enable Editing: Allows you to modify the contents and layout of the palette.
- Reset Palette: Discards any customizations made to a palette and restore its default contents and layout. Custom palettes will be emptied.
- Save Palette...: Saves the current palette as an .mpal file.
- Load Palette...: Loads a palette from an .mpal file and reveal it, does not replace current palette, nor any existing palettes.
- Palette Properties...: Displays the following dialog, where you can adjust the appearance of a palette:

- Name: The name of the current palette.
- Cell Size: Width, Height: The dimensions of each individual cell in the palette.
- Element Offset: Adjusts the vertical offset of all symbols in the palette.
- Scale: Makes all symbols in the palette appear larger or smaller.
- Show grid: Draws a border around each palette cell.
See also
External
- https://musescore.org/en/node/355834 custom palettes shared by other musicians.
Workspaces
Workspace is the visual settings, also known as graphical user interface (GUI), of the Musescore program itself. An analogy to the position of the pen, ruler etc on a composer's desk. It includes:
- the toolbars and buttons at the top of the window,
- the side panels, or sidebars, to the left of the window, such as Palette, Inspector, Timeline etc,
- their configuration settings and position information, and
- theme and canvas settings, see Preferences.
Note that the followings do not count as workspace:
- View→ Documents Side by Side, Documents Stacked, Full screen, covered in Viewing and navigation chapter.
- View→ Show visible, Show Invisible, Show Unprintable, Show Frames, Show Page Margins, Mark irregular measures, and toolbar's Concert pitch, Zoom level and Page View/Continuous View/Single Page options : these settings are covered in Viewing and navigation chapter. They are score data. They are saved to and loaded from each score file. Templates contain these settings and will be used when you create a new score from a template, see Instruments, staff setup and templates.
Workspace presets are setting profiles for workspace, user can choose the options a preset contains so that only those options are loaded and saved when the preset is applied. There are two default presets: Basic and Advanced, you can create your own custom workspaces.
Apply a preset
Use either one of the following methods:
- Select a new preset from the drop-down menu to the right of the Note Input Toolbar (in versions prior to 3.3. this is located at the bottom of the workspace panel), or
- From the menu, select View→Workspaces, and click on one of the options.
Create a new preset
To create a new preset:
- Select an existing preset, see Apply a preset,
- Either
- Click the + button next to the dropdown list, or
- Click View→Workspace→New,
- The following dialog is shown:

- Enter a name for the new preset,
- Choose what the preset saves and loads, namely:
- Toolbars: Information about toolbars and toolbar buttons and their order.
- Menu bar: No function, as this is not implemented in MuseScore 3.
- GUI Components: Information about the position of the GUI components and whether they are open or not.
- GUI Preferences: Settings in Preferences such as Theme and Canvas settings.
- Press Save
Edit what settings a preset contains
To change what settings a preset contains, select View→Workspace→Edit. In versions prior to MuseScore 3.3, you must create a new preset and then edit it, you cannot edit the Basic preset or the Advanced preset, see Create new workspace preset.
Changes made to the current workspace are automatically saved to the current preset, no further action is required, see Edit the workspace below.
Edit the workspace
Any changes you make to the current workspace are automatically saved to the current preset, no further action is required.
See the main chapter Viewing and navigation, these are some popular ways:
- To choose which toolbar is displayed, toggle them under View→Toolbars menu.
- To edit toolbar buttons, select View→Toolbars→Customize toolbars, see Viewing and navigation : Toolbars. You cannot add items to a toolbar from the Master palette.
- To choose which sidebar is displayed, toggle them under View menu.
- To dock or undock sidebars, see Viewing and navigation : Side panels.
- To setup different sidebars, refer to their relevant chapters. For example, to set up palette see Palettes and Master palette.
Preset directory
Each preset is saved as a separate file under:
- Windows:
C:\Users\[USERNAME]\AppData\Local\MuseScore\MuseScore3\(actually%LOCALAPPDATA%\MuseScore\MuseScore3) - MacOS:
~/Library/Application\ Support/MuseScore/MuseScore3/. - Linux:
${XDG_DATA_HOME:-~/.local/share}/MuseScore/MuseScore3/.
See also
- Viewing and navigation for setting up toolbar and buttons.
- Palettes
- Master palette
Inspector
Overview
The Inspector shows layout and playback properties of the selected objects.
When the current selection of objects consist of several different object types, the Inspector shows and allows adjustment of color, visibility, and automatic placement, see "Element" section. Press any of Notes, Grace Notes, Rests buttons at the bottom to to narrow to that object type only, as shown in image below. See also "Select all similar" and "Selection Filter" sections in the Selection modes chapter.
When multiple objects are selected, if a single property has diverse values for each object, that particular property is displayed in the color blue.

Displaying the Inspector
The Inspector appears by default on the right. To show or hide it:
- Press shortcut F8 (Mac: fn+F8), or
- From the menu, select View and check or uncheck Inspector.
Docking/undocking the Inspector

Click the double-chevron symbol or double-click the top bar of the panel. To re-attach the panel double-click on the top bar again. See also: Side panels.
"Reset to style default" and "Set to style" buttons
Two buttons may be displayed to the right of a property:
- Reset to style default: removes the specific property, in effect resets the property to the default value.
- Save as style : Does these:
- Assigns the property value to the coresponding one in the style profile used by this object currently, found under Format→Style. See Layout and formatting chapter.
- And then clears the property value specific to this object.
- The result is that this object does not have the specific property anymore, but it uses the value in the style profile, which is the same value, because it is being assigned just now. All objects using that style profile across the score is affected.
Shown below is the Reset to style default button, it looks like an unclosed circular loop with a letter x inside

Shown below is the Set as style button, it looks like a bold capitalized S

Inspector categories
Properties are conveniently listed under bold categories in the Inspector. For example, when barline(s) are selected, the following is displayed at the top:

For details of the various categories and their properties, see below:
Element
All score elements—except frames, breaks and spacers—display this category in the Inspector when selected. The options are as follows:
- Visible: Uncheck this box to make selected elements invisible; alternatively, use the shortcut V (toggle). Invisible elements do not appear in the music when printed out or exported as a PDF or image. If you still want them to remain on display in the document window, make sure that the "Show Invisible" option is selected in View → Show Invisible. Invisible elements will then be colored light gray.
- Color: Click on the rectangle to open a "Color Select" dialog. Adjust the color and opacity of selected elements.
- Automatic placement: See Automatic placement.
- Minimum distance: Minimum distance from other elements when automatic placement is enabled.
- Offset X/Y: Allows you to position selected elements exactly (in terms of space units). A positive number moves the elements right or down; a negative number moves the elements left or up. Snap to grid buttons are also provided.
- Stacking order (Z): See Automatic placement: Stacking order
Element Group
This category is displayed only when you have selected a mixture of different types of elements, and allows editing of color, visibility, and automatic placement only.
Segment
- Leading Space: Use this to increase or decrease the space before an element. This also affects any associated lyric syllables.
Chord

- Offset X/Y: This changes the positon of every note in the same voice as the selected note(s). If you want to make changes to the position of just one note, use the Element category instead).
- Small: Make noteheads and stem small.
- Stemless: Make chord stemless.
- Stem direction: Choice of Auto, Up, or Down.
Note
This category allows you to make changes to selected notes (but for note position—see Element). It contains the following properties:
- Small: Make notehead smaller (you can specify the relative size of all small notes from the menu: Format → Style… → Sizes…).
- Head group: See Notehead groups.
- Head type: See Notehead types.
- Mirror head: Position notehead to the left or right of the stem (default is "Auto").
- Fix to line: When ticked, the note is fixed to the top line of the standard 5-line staff.
- Line: A positive number moves the "fixed" note down; a negative number moves it upwards.
- Play: Unticking this box silences the note.
- Tuning: Adjust tuning of note to the nearest cent.
- Velocity type: Sets the MIDI velocity of notes directly. Choose one of two options:
- Offset: Make the value shown in "Velocity" relative to the previous dynamic marking. The value is taken as a percent offset, i.e. the note’s real MIDI velocity would be ((100 + Velocity) / 100) times what it would have been without this adjustment. Enter negative values to lower the velocity accordingly.
- User: Make the value shown in "Velocity" absolute (i.e. the MIDI velocity is unaffected by dynamic markings).
- Velocity: Set the MIDI velocity according to the option displayed in "Velocity type."
Dynamic
See Dynamics
Text
See Text basics
Tempo text
See Tempo
Fermata
Select
This category appears differently according to the selection you have made:
- If you select a notehead, the "Select" category displays buttons which allow you to easily switch the selection to the stem, beam, hook, duration dot (or dots) or tuplet number associated with the notehead (see image below).

- If you select a range of measures, the "Select" category allows you to select either all notes, grace notes, or rests.
Beam
This section is displayed in the Inspector when you select one or more note beams, and allows you to make fine adjustments to beam position and angle, and also change the spacing of beamed notes.
Clef
This section appears when you select a clef: the tick box allows you to turn on/off the display of a preceding courtesy clef.

Articulation
This category appears when you select an articulation or ornament. The following options are available:
- Direction: Whether the symbol points up or down: only applicable to certain symbols.
- Anchor: The vertical placement of the symbol:
- Play: Turn on/off playback effect.
- Time stretch: Obsolete. Jump to Fermata instead.
- Ornament style: A choice of default or Baroque playback.
Fretboard diagram
See Fretboard diagrams.
Line
This category is displayed when a line is selected. Here, you can set various general properties.
- Visible: Hide or display just the line: any text remains visible.
- Allow diagonal: The default is horizontal (unticked). Tick if you want to edit the line to create a slope.
- Line color/thickness/style: Set various properties of the line.
Text Line Details
This category is displayed when a line is selected. It allows you to set the wording of a line, edit text properties, set line hooks, and align the text in relation to the line.
- Begin hook / Height: At the beginning of the line, specify None, 90° (vertical), 45° (angled), or 90° centered; set hook length.
- End hook / Height: Ditto for the very end of the line.
- Begin Text / Continue Text / End Text: Refers to text at the very beginning of the line; at the beginning of any continuation line; or at the end of the very last line. All have the same properties, as follows:
- Text: Create or edit the text associated with the line.
- Font face / Size / Style: Set the text properties, and/or edit the text style of the line.
- Align: Set the horizontal and vertical alignment of the text in relation to the line.
- Placement: Place the text on (Above/Below), or to the left of the line.
- Offset X / Y: Adjust the x and y offsets for exact positioning.
Properties dialogs
Some object types have additional properties. These are accessed by right-clicking on the object and choosing a "... properties" option from the context menu. The settings available in these dialogs are explained in the description of the object type in Notation or Advanced topics.
See:
- Articulations and ornaments
- Time signatures
- Staff and system text
- Measure operations
- Staff/Part properties
See also
Instruments
This chapter discusses real-world instruments and vocals, MuseScore instruments, score instrument setup, and template files.
Instruments
An instrument in MuseScore is an abstraction that contains,
- Tablature(s) or staff(s). See also Layout and formatting;
- Settings related to playback audio created by the MuseScore synthesizer. When setting up sound, start by changing the instrument setup.
- Notation styles such as clefs, noteheads, and
- Other musical behaviors include transposition and playable range.
A MuseScore instrument contains staff(s) that can represent a single or multiple real-world instrument(s), for example, in Beethoven's Symphony No.3, Op.55 First edition published by Cianchettini & Sperati, n.d.[1809] London, the third staff Corni 1 & 2 in Eb represents two French horn players:

To transcribe this, add one MuseScore instrument "Horn in Eb". Optionally rename it. Playback is not affected by naming.

The detailed relationship between MuseScore Instrument and real world instrument (staff or tablature), instrument section, vocals, and choir:
- A Musescore Instrument using the same name, such as "Piano", "Acoustic Guitar", "Acoustic Guitar (Tablature)", "Violin", "Violins", "Strings", "Soprano", "Voice", "Women" and some percussions such as "Timpani", "Concert Bass Drum", "Cymbal" (concert). Similar items might have different playback.
- "Drumset" MuseScore instrument "Standard" (the option "Drumset"), a single item containing "Snare", "Bass Drum", "Ride Cymbal", etc. There are no separate MuseScore instruments for these.
- "Drumset" MuseScore instrument "Standard 1" and other variations, (same for "Room", "Power", "Jazz" and theirs), use them by changing Mixer: Sound dropbox. They are different in playback only.
- "Drumset" MuseScore instrument "Brush" and vary them by changing Mixer: Sound dropbox. The brush snare is the "Electric Snare" item in Drum notation, only creates short brush playback. There is no separate MuseScore Instrument for brush snare.
Instruments supported by Musescore 3.6.2 (archived https://musescore.org/en/instruments page December 2022). To suggest adding a missing instrument, see https://musescore.org/en/contribute
Choose instruments

Two ways to open this window to manage the setup:
- File New Score Wizard window: Choose Instruments when user create a new score, or
- In a score, use the keyboard shortcut I; or select from the menu Edit→Instruments....
This window contains the following items:
- The search box at the top left filters items to be shown underneath. Clear it out to show all available instruments.
- The type filtering dropdown box under the search box filters items to be shown in the space underneath. "Common" is selected by default, which filters out some uncommon instruments or voice parts. Select "All instruments" to show all available instruments.
- The left column space shows a list of instruments or voice parts that can be added. They are grouped by the instrument families they belong to. Click on a family name subheading to expand or collapse that group.
- The Ordering dropdown box at the top right shows the current automatic vertical arrangement (ordering) of staff. 'Orchestral' is the default preset. The user can always rearrange staff manually. The user cannot edit or create new presets inside MuseScore. To utilize templates for custom default ordering on new scores, see the template section.
- The right column space shows the current score setup, whose vertical order represents the real instrument vertical order on the score. An empty column means the score contains no staff.
The result of actions available in this window is explained in the following list; steps to do each are shown under; corresponding section headings later.
- Add a new instrument to the score: The essential and most common action. Adds a new instrument and staff(s)
- Add a staff to an existing instrument: Inserts an extra editable staff to an existing instrument (on the right column space) and creates a custom instrument. For example, to create a piano that uses three staves rather than two staves. Rarely used because of its limitation on playback - staff under the same instrument cannot be configured to use different sounds, nor can they be muted individually. It is advisable to utilize multiple instruments.
- Add a linked staff to an existing instrument: Inserts an non-editable, ready-only staff to an existing instrument (on the right column space). A linked staff automatically mirrors content. Use case includes displaying two staves for a guitar (a standard staff + a linked tablature) where the user enters notes onto the standard staff and the same music is automatically reflected in the tablature.
- Make an existing instrument soloist:
-
- Reorders an existing instrument on the score (all its staves) to the soloist position. The soloist position is defined in the instrument ordering setting chosen in the Ordering dropdown box. For example, in an 'Orchestral' ordering preset, soloists are above the strings.
-
- Adds "solo" and a number to its name. Non-soloists do not affect the numbering.
- The soloist designation is a score layout feature only and has no impact on playback. A score can contain multiple "soloist" instruments.
-
Add instrument
To manage instruments of "Drumset" MuseScore instrument, see Drum notation.
To add a new MuseScore instrument to the score, use any of the following options:
- Select one or more instruments in the left column, and then click Add to score in the middle of the window, or
- Double-click an instrument in the left column.
The instrument names and their associated staff lines now appear in the list of instruments in the right column.
Add Staff
To add an editable staff to an existing instrument in the score:
- Select a staff of the instrument in the score list on the right-hand side
- Click Add Staff at the top.
- Adjust the Staff type, if applicable.
Add Linked Staff
To add a non-editable, read-only staff to an existing instrument in the score:
- Select a staff to be linked in the score list on the right-hand side.
- Click Add Linked Staff at the top.
- Adjust the Staff type, if applicable.
See also, Combine pitched staff with tablature.
Make / undo soloist
To make an existing instrument soloist, or to undo it:
- Select an instrument name subheading in the score list on the right-hand side.
- Click Make soloist or Undo soloist at the top.
Change order of instruments or staffs on a score
- Click either an instrument name or a staff in the right-hand column, and click the arrow buttons.
Delete an instrument or staff
- Select an instrument (all of its staffs) or a staff in the right-hand column and click Remove from score in the middle.
Change instrument and staff setup
- To change instrument setup of a score: In a score, use the keyboard shortcut I; or select from the menu Edit→Instruments... to open the Instruments window.
- To change instrument setup of a Musescore Part: See Parts.
- To change instrument setup of a the "drumset" Musescore Instrument: See Drum notation: edit drumset.
- To change the MuseScore Instrument used by staff on score: See Staff / Part properties: Change instrument.
- To change staff size: It is recommended to use Page settings to change all staffs everywhere on a score , before changing each staff's Staff / Part properties.
- To change staff layout:
- To change staff type and staff layout everywhere on a score (change number of lines, hide, etc): See Staff / Part properties, and Tablature
- To hide a staff under certain conditions : See Style window: Score settings.
- To create ossia: See Staff / Part properties: external links
- See also other global style settings in Layout and formatting.
Hiding and unhiding staff
Edit Format→Style→Score (Style window: Score settings) and Staff / Part properties. Handbook 4 Showing staves only where needed chapter summaries different methods with use cases, the workflow in MuseScore 3 is similar.
Templates
Use a score template to quickly set up a new score with staff and tablatures. Musescore detects score files located in a specific directory and present them as avaiable template - save custom template score files in the custom templates folder. When creating a new score, apply any
- Pre-defined template that are shipped with MuseScore, under Choose template file window : [its respective category] or,
- Custom template under Choose template file window : Custom Templates.
As of MuseScore 3.6.2, a template contains the following information,
- instrument setup (staffs and tablatures),
- these items of the 'Full score' only,
- Staff / Part properties of all instruments;
- settings under Format→Style and Format → Page Settings. See Layout and formatting chapter;
- the View → Show visible, Show Invisible, Show Unprintable, Show Frames, Show Page Margins, Mark irregular measures, and toolbar's Concert pitch, Zoom level and Page View/Continuous View/Single Page options. See also Viewing and navigation chapter; and
- the setup (only) of every Musescore Part.
Check out the Score from Template plugin by parking, which improves the template function.
Save a score as a custom template
Click File > Save as and save the score file as .mscz format into the template directory Musescore uses. The file name is used as the template name.
Creating a score from a custom template
- Make sure the custom template file is in the correct folder.
- Choose a custom template when you create a new score. In MuseScore 3, the preview shows what the template file looks like when opened as a score, it is not the preview of what a new score looks like when created from this template.
System templates folder
Not recommended to use this folder for custom templates
This folder contains the pre-defined templates. It can be found in the following directory:
- Windows: Usually at
C:\Program Files\MuseScore 3\templatesorC:\Program Files (x86)\MuseScore 3\templates(Actually%ProgramFiles%\MuseScore 3\templatesor%ProgramFiles(x86)%\MuseScore 3\templates, respectively). - Linux: Under
/usr/share/mscore-xxxif you installed from the package manager. If you compiled MuseScore on Linux yourself, then look under/usr/local/share/mscore-xxx(withxxxbeing the version you are using). - MacOS: Under
/Applications/MuseScore 3.app/Contents/Resources/templates.
Custom templates folder
Custom template files must be stored here. The default directory of the custom templates folder is as follows (The folder name "Templates" varies with the language version of MuseScore installed):
- Windows:
%HOMEPATH%\Documents\MuseScore3\Templates. - MacOS and Linux:
~/Documents/MuseScore3/Templates.
To configure the directory of custom templates folder: From the menu, select Edit→Preferences...→General.
External links
- Instruments supported by Musescore 3.6.2 (archived https://musescore.org/en/instruments page December 2022)
- Instruments supported by the latest MuseScore
Measure operations
This chapter covers adding, removing, splitting and joining measures etc, in addition to the Measure properties dialog which is used to adjust individual measure—such as visibility, duration, numbering and width ("Stretch"). The Measure chapter outline related formattings.
Adding and removing measures in effect insert or remove segment of time, affecting all instruments and staffs. Score items associated with that segment are removed along with it, while rest symbols are added automatically whereever necessary. To ensure that inserted or appended measures display correctly, multimeasure rests should be set to off (toggle M).
Select
Single measure
- To select a single measure, click on a space within the measure.
Range of measures
- To select a continuous range of measures, see Shift + click selection and Shift selection.
Insert
Insert an empty measure into the score
- Select a measure or a frame, then press Ins (Mac: Shift+I); or
- Select a measure or a frame, then choose from the menu: Add→Measures→Insert Measure.
Insert multiple measures
- Select a measure or a frame, then press Ctrl+Ins (Mac: Shift+Del+I); fill in the "Number of measures to insert" field and press OK; or
- Select a measure or a frame, then choose from the menu: Add→Measures→Insert Measures...; fill in the "Number of measures to insert" field and press OK.
Append
Append an empty measure to the end of a score
Use one of the following options:
- Press Ctrl+B (Mac: Cmd+B).
- Select from the menu: Add→Measures→Append One Measure.
Append multiple measures to the end of a score
Use one of the following options:
- Press Alt+Shift+B; fill in the "Number of measures to append" field and press OK.
- Select from the menu: Add→Measures→Append Measures...; fill in the "Number of measures to append" field and press OK.
Remove
Remove a single measure
- Select the measure
- Press Ctrl+Del (Mac: Cmd+Del).
Remove a range of measures
- Select a range of measures;
- Press Ctrl+Del (Mac: Cmd+Del).
Remove empty trailing measures
To automatically remove any blank measures from the end of the score:
- From the menu, select Tools→Remove empty trailing measures.
Delete measure contents
To delete only the measure contents (and not the measure itself):
- Select one or more measures;
- Press Del.
The "Measure Properties" window

To open this window, right-click an empty part of the measure and select Measure Properties.... Modification are not applied until the user presses the Apply button. Use the left and right arrow buttons at the bottom left to navigate to a neighbouring measure.
Under Staves,
- Visible: Show staff lines.
- Stemless: Hide all note stems.
Under Measure duration,
- Nominal The Time signatures displayed when appropiate.
- Actual The real timespan allowed to accomodate notes and rests.
Under Other,
- Exclude from measure count: Exclude from counting. Used in e.g. a pickup measure.
- Break multimeasure rests: Prevent a multimeasure rest at the start of the selected measure. Edit this property prior to turning on Format → Style → Score → Create multimeasure rests if needed.
- Measure number mode: Whether and how measure numbers are displayed. See also the Layout and format : Measure Numbers chapter.
- Auto: Follows the setting in Format → Style → Measure Numbers.
- Always Show: Forces display of number.
- Always Hide: Hides number.
- Layout stretch: Controls the amount of horizontal space between score elements (notes, rests, etc.): See Increase/Decrease Stretch ({ and }).
- Add to measure number": Enter a positive or negative number to change the number of the selected measure, and subsequent meaures. A value of "-1" has the same effect as marking a measure to be excluded from measure count.
- Play count: If a measure precedes an end repeat barline, this value controls the number of times that the entire repeat section plays back. See the Repeats and jumps chapter.
Creating a pickup measure or anacrusis
Adjust Nominal and Actual settings to create pickup measure (also known as anacrusis or upbeat), cadenza, ad lib section etc.
In the image below, the quarter note pickup measure has a nominal time signature of 4/4, but an actual time sig. of 1/4. The measures in the middle are in normal 4/4 time. The complementary measure at the end of the staff, with a dotted half note, has an actual time sig. of 3/4.

A small - or + sign above the measure indicates its duration is different than indicated by the time signature (see image below). They can be turned off with View menu &arr; Mark Irregular Measures. The markers do not appear in printed copies.

Vertical alignment
See Barlines:Vertical alignment
Numbering
See the Layout and format : Measure Numbers chapter.
Split and join
Functions under Tools → Measure are disabled if the score contains Musescore Parts.
Split measures and join measures commands change Actual properties to adjust measure duration. They do not affect Time signature on the score, but beam grouping setting may be reset.
Join measures
- Select measure(s) on the score;
- Select Tools → Measure → Join Selected Measures.
Alternatively, join two neighbouring measures by selecting the barline in between and either (1) press Ctrl+Del (Mac: Cmd+Del) ; or (2) press V to make the barline invisible in printed copies (the barline still takes space).
Split a measure
Choose one of the following methods:
- Select a note; then hold Ctrl and click a barline in a palette (double-click in versions prior to 3.4);
- Hold Ctrl and drag a barline (from a palette) to the note that starts the next measure; or
- Select a note and press Tools → Measure → Split Measure Before Selected Note/Rest.
See also
- Barlines
- Measure (Layout and formatting style)
- Layout and formatting
- Breaks and spacers
External links
- How to span a measure over multiple systems (MuseScore HowTo, 1.x)
- How to split a measure (MuseScore HowTo, 1.x)
- How to delete measures (MuseScore HowTo)
- How to get scores without time signature (and clef) (MuseScore HowTo)
Working with multiple voices
Not to be confused with human vocal Musescore Instrument, four-part SATB open score creation, or MuseScore Parts feature.
Overview
Musescore Voices is the software feature that is also known as "layers" in other notation software. Each staff (a piano grand staff has two staffs) has exactly four Voices. It has nothing to do with pitch range. See also Glossary: Part chapter. Selected score items are highlighted with respect to their Voices: Voice 1 blue, Voice 2 green, Voice 3 orange and Voice 4 purple. Voice of single selected item is also displayed on the bottom left status bar. This article indicates
- MuseScore Voice with captial letter V: Voices 1, Voice 2, Voice 3, Voice 4, and
- four-part harmony with S (Soprano), A (Alto), T (Tenor), B (Bass).


Reasons to use Voices
- To create concurrent rhythms on one staff. eg a chord composed of notes of varying duration, as shown above.
- To create chord with stems pointing in opposite directions, ie having Glossary: Shared note head.
- To create multiple mutable musical lines that use different sound samples for playback on one staff, as shown below. This feature is not implemented in MuseScore 4, but see its new Sound flags feature.
- To use automatic stem direction feature on polyphony. However, if the score is technically monophonic eg single line cantus firmus, it is preferable to only use Voice 1 and manually assign Inspector: Chord: Stem direction property or global setting.
- To create a SATB open score convertible to and from short score.
- To create a full score that can be extracted into individual scores using explode or MuseScore Parts: select voice function.
- To use plugins such as Check for parallel fifths and octaves.

Shown above Staff 1 Voice 1 instructed to use channel "Soprano", which is assigned Oboe sound; and Staff 1 Voice 2 instructed to use channel "Alto", which is muted. Score is O Come, O Come, Emmanuel. Translated John Mason Neale, arranged Thomas Helmore, transcribed Jojo-Schmitz.
Limitations of Voices
- Dynamics symbols cannot selectively affect Voice, but see update in Musescore 4.4.
- Cannot adjust individual Voice volume. Voices can be muted separately though.
Keyboard shortcut navigation
To select a note in a higher-numbered Voice than the current one:
- Use Alt + ↓, to move the selection to the bottommost note in the current Voice;
- Press Alt + ↓, to move to the higher-numbered Voice;
- Repeat any of the above steps, as necessary, until the desired note is selected.
To select a note in a lower-numbered Voice than the current one:
- Use Alt + ↑, to move the selection to the topmost note in the current Voice;
- Press Alt + ↑, to move to the lower-numbered Voice.
- Repeat any of the above steps, as necessary, until the desired note is selected.
Entering notes and rests
To notate a passage of music using Voice 1 and Voice 2,
-
Enter Voice 1 notes first: Make sure the app is in note input mode : the Voice 1 button becomes highlighted in blue in the toolbar.
 Always enter lower numbered Voice first, in this example Voice 1. On inputting, some notes may have down-stems, but these will flip automatically when the Voice 2 is added.
The following excerpt shows a treble staff with just the Voice 1 notes entered:

-
Move cursor back to start of section: Upon finishing Voice 1 note entry, press the ← key repeatedly to move the cursor, note-by-note, back to the first note of the section; or alternatively use Ctrl+← (Mac:Cmd+←) to move the cursor back one measure at a time. Alternatively exit note input mode (press Esc) and click the first note.
-
Enter Voice 2 notes: Make sure the app is in note input mode and that the Voice 1 note at the beginning of the section is selected. Click on the "Voice 2" button
 (on the right of the toolbar), or use the shortcut Ctrl+Alt+2 (Mac: Cmd+Alt+2). Enter all the lower Voice notes (down-stem).
The following image shows the above example after the addition of Voice 2 notes:

Editing notes and rests
Automatic stem direction and override

- Notes in Voice 1 and Voice 3 have upward stem ; Voice 2 and Voice 4 have downward stem. This feature makes it easier to engrave polyphony.
- This feature will not activate in any measure where only Voice 1 is occupied but Voice 2, 3, 4 are missing. eg Beginner's error: for a Close/Closed score SATB, beginners often use Voice 1 for B (bass), this will not activate the automatic stem direction function, jump to tips.
- Assign overriding stem direction with Inspector: Chord: Stem direction.
Hiding or deleting rests
Rests are automatically added to unoccupied lower-number Voices. To avoid,
- Use lowest Voice number possible in each staff. eg Beginner's error: for a Close/Closed score SATB, beginners often use Voice 3 for T (tenor) or Voice 4 for B (bass), this will create unwanted rest symbols. jump to tips.
- Hide rest(s) on a score to make them invisible in printing.
See also the Remove selected range command which removes time segment.
Advanced users can also delete rests in Voices 2, 3 or 4 (but not Voice 1) by selecting them and pressing Delete. Deleting them may entangle future editing workflow as note entry overwrites at least one starting note/rest. The easiest way to restore deleted rests is to exchange that Voice with Voice 1 twice, which is commonly performed on file imported from XML or MIDI.
Exchanging Voices
To swap notes of two Voices,
- Select score items.
- Select Tools → Voices → [voice pair].
Works on measure - all notes and rests of measures within or touching the selected range (the blue rectangle).
Moving notes to another Voice (change notes' Voice but not swap)
To move without swapping,
- Ensure the app is in note input mode.
- Select note(s).
- Select a toolbar Voice button or press Ctrl+Alt+1–4 (Mac: Cmd+Alt+1-4).
Notes merge into chords if their note value match and they are not tied, content overwritten otherwise. See also plugin Merge Voices : 4 into 1 by yonah_ag which automates note value adjustment.
Merge four Voices
Merging notes of four Voices, where rhythm matches, into one is covered in the Tools: Implode chapter.
Separate chords into Voices
- Either:
- Manually select a continuous range of notes or a discontinuous list of notes, or
- Select notes using the Chord Level Selector plugin.
- Select a toolbar Voice button or press Ctrl+Alt+1–4 (Mac: Cmd+Alt+1-4).
To further separate into staffs, see Tools: Explode
Assigning sound
Sound in Musescore 3 is instrument channel based. Use Mid-staff sound (channel) change to assign a sound to a Voice.
Tips for writing SATB scores
- In Open score SATB (where four staves are used for the four voices separately), use Voice 1 in each staff.
- In Close/Closed score SATB (where two staves are used for the four voices, e.g., as in hymnals),
- use Voice 1 and Voice 2 only, for both upper and lower staves: in the upper staff use Voice 1 for S (soprano) and Voice 2 for A (alto) ; in the lower staff use Voice 1 for T (tenor) Voice 2 for B (bass)
- Beginner's error: use Voice 3 for T (tenor) or Voice 4 for B (bass), this will create unwanted rest symbols, jump to automatic rests.
- Beginner's error: use Voice 1 for B (bass), this will not activate the automatic stem direction function.
- There is usually no need to use Voice 3 and Voice 4
See also
- Keyboard shortcuts: Voices
- Tools (Implode, Explode)
- Glossary: Shared note head
- Noteheads: Shared noteheads
External links
- How to merge/combine/implode two staves in one with two voices (MuseScore HowTo)
- How to input multiple notes on a staff with different durations (MuseScore HowTo)
Selecting elements
Not to be confused with the note input cursor (caret) explained in Note input chapter.
Selected score items are highlighted with repect to their Voice, otherwise black or grey (if invisible) by default. The current selection status is shown on the bottom left status bar. There are four in total,
- "nothing is selected" status. The status bar is blank;
- "single item selection" status. The status bar shows the its type;
- List Selection status when multiple objects are selected;
- Range Selection status when a time segment across a given set of staves is selected. A blue rectangle is visible. Requirement of common operations such as Copy and Paste and repeat selection.
Shown below are single Voice 1 note selection (top); and "Range Selection" and status bar (bottom).


De-selecting
- Press Esc to reset to Normal mode.
- Press Esc again, or click empty page margin to deselect.
Clicking score item
- In Normal mode, click to select single score item except chord and measure. This repositions playback cursor.
- In Note edit mode, doing so repositions note input cursor.
Clicking chord notes

- Click notehead to select a note.
- Shift+click either one notehead to create a Range selection that encompasses the chord as shown above. The phrase "select a chord" refers to this command.
- Ctrl (Mac: Cmd) + click chord notes one by one to create a List Selection of multiple notes. Less commonly used.
Clicking a measure
- Click any blank space within measure to create a Range selection that encompasses it. The phrase "select measure(s)" refers to this command.
Selecting a single element
- Mouse click works as explained.
- Click notehead to select a note.
- Stem, flag, dot, accidental are selectable separately.
- In Normal mode, Left and Right navigate through notes (one note per chord) and rests.
- In Normal mode, Alt+Left and Alt+Right navigate through notes (every note of chord), rests, articulation, dynamics etc. See also the Viewing and navigation chapter.
- The phrases "select a chord" and "select a measure" refer to Range selection.
Selecting one in a group of overlapping items
- Ctrl+click to switch-select when items fully overlap each other eg notes in different Voices sharing the same pitch.
- In Normal mode, Alt+Left, Right navigate through every note of chord.
Selecting a note to copy its pitch only
- To copy every aspects of a note including duration, create a Range Selection containing it.
- To copy note pitch information only, which can be pasted onto note or rest, select the notehead. Removed in Musescore 4.
Creating a List Selection

To select multiple score items other than notes or rests, Shift+click any blank space outside of staff lines and drag to create a selection box enclosing them.
To add or remove from the current selection, Ctrl (Mac: Cmd) + click (requires Musescore 3.5 version or later). This converts the selection to a List Selection.
To select a certain type of elements across the staff or the score,
- Right-click a score item.
- Select → All Similar Elements or All Similar Elements in Same Staff
To select by type within a virtual Range selection enclosed by those two item (requires Musescore 3.5 version or later),
- Select the first and top item.
- Shift+click the last and bottom element, or vice versa.
To select by type across a Range selection (works on all Musescore 3 versions),
- Create a Range selection
- Right-click an item inside
- Click Select→All Similar Elements in Range Selection
To create a more complex selection,
- Either,
- Create a Range selection, and right-click an item inside, or
- Right-click a score item,
- Click Select→More.
- Check required options (option availability varies with the right-clicked item),

Options available when the right-clicked item is a note are,
- Same notehead: see the Noteheads chapter.
- Same pitch: notes with the same pitch name, accidental, and octave.
- Same string: notes with the on the same string (tablature only).
- Same type: notes of the same type (normal, acciaccatura, appoggiatura).
- Same note type: notes of the same duration, not considering presence of dots or tuplets.
- Same duration: notes of the same actual duration.
- Same note name: notes with the same pitch name and accidental, not considering octave.
- Same staff: notes in the same staff.
- Same voice: see the Voice chapter.
- Same beat: based on time signature only, not beaming.
- In selection: from currently selected. Useful when the current is List Selection or Range selection.
- Same system: notes in the same system (layout concept. See Layout and formatting).
- Same measure: notes in the same measure.
Choose one out of four if required,
- Replace selection: deselect current selection.
- Add to selection: add to current selection. Converts to List Selection.
- Search in selection: filter currently selected items.
- Subtract from selection: removes from current selection.
Creating a Range Selection
To select notes and rests, Shift+click any blank space outside of staff lines and drag to create a selection box enclosing them.
To create a Range Selection enclosing a starting and an end note or rest,
- Select a note or rest.
- Optionally reposition the score.
- Shift+click another note or rest.
To create and resize a Range Selection,
- Select a note or rest.
- Hold Shift and resize
- by one chord with Shift+Left and Shift+Right,
- by one measure with Shift+Ctrl+Left and Shift+Ctrl+Right (Mac: use Cmd instead of Ctrl),
- by one staff with Shift+Up and Shift+Down,
- to the closest system (layout concept. See Layout and formatting) with Shift+Home and Shift+End, and
- to the beginning or the end of the score with Shift+Ctrl+Home and Shift+Ctrl+End (Mac: use Cmd instead of Ctrl)
- Release Shift.
For example, to select a chord (Range selection),
- Esc to reset to Normal mode.
- Left, Right to navigate to any chord note.
- Shift+Right
- Shift+Left
Special Range Selection commands
- Edit→Select all or Ctrl+A (Mac: Cmd+A) to select the entire score.
- Edit→Select section to select everything between two section breaks enclosing the current selection.
Excluding elements from a Range Selection


To remove items from (the current and any future) Range selection, uncheck options under Selection Filter window. For example, use this to leave out lyrics when duplicating notes and rests.
- View→Selection filter or F6 (Mac: Fn+F6).
- Uncheck options. eg. To copy content of measures 1 and 2 to 3 and 4 as shown in Example 1 above, uncheck Articulations & Ornaments and Slurs options.
- Create a Range selection.
- Execute command eg. Copy (Ctrl+C).
- Re-check options to restore selectability. See example 2.
- Select destination score item.
- Execute command eg. Paste (Ctrl+V).
Example 2: To copy Voice 2 items onto Voice 1,
- Uncheck Voice 1 option.
- Create a Range selection.
- Copy (Ctrl+C).
- Re-check Voice 1 option.
- Select destination Voice 1 item.
- Paste (Ctrl+V).
Undo and redo
MuseScore remembers an unlimited number of undo/redo actions.
The standard shortcuts are:
| Action | Windows & Linux | Mac |
|---|---|---|
| Undo | Ctrl+Z | Cmd+Z |
| Redo | Ctrl+Shift+Z or Ctrl+Y | Cmd+Shift+Z |
Or use the toolbar buttons: 
Viewing and navigation
This chapter describes the options available in the View Menu, and in the Zoom and Page View/Continuous View menus (located in the toolbar above the score). It also details the various navigation commands and functions.
View menu
Show sidebars/panels
- Palettes: F9
- Master palette: Shift+F9 (Mac: Fn+Shift+F9)
- Inspector: F8 (Mac: Fn+F8)
- Play Panel: F11 (Mac: Fn+F11)
- Navigator
- Timeline: F12
- Mixer: F10 (Mac: Fn+F10)
- Synthesizer
- Selection filter: F6 (Mac: Fn+F6)
- Piano keyboard: P
- Score comparison tool
Zoom in/out
There are several ways to zoom the score in or out:
-
Keyboard shortcut:
- Zoom In: Ctrl++ (Mac: Cmd ++)
- Zoom Out: Ctrl +- (Mac: Cmd +-).
-
View menu:
- Zoom In: View→Zoom In
- Zoom Out: View→Zoom Out.
-
Mouse
- Zoom In: Scroll up with the mouse wheel while holding down Ctrl (Mac: Cmd)
- Zoom Out: Scroll down with the mouse wheel while holding down Ctrl (Mac: Cmd).
-
Drop-down menu: To set a specific zoom, use the dropdown menu in the standard toolbar to set the view magnification of the score (25–1600 %) or display it using the options "Page Width", "Whole Page", or "Two Pages".

You may type a custom zoom % into the dropdown field if your desired zoom level isn't available by default. -
To return to 100% zoom: Use the shortcut Ctrl+0 (Mac: Cmd+0).
Toolbars
The Toolbar area is located between the Menu bar and the document window.

It contains the following toolbars:
- File Operations: New score, Load score, Save, Print, Undo, Redo.
- Zoom/Page View.
- Playback controls: Enable MIDI, Rewind, Play/Stop, Loop, Play Repeats, Metronome.
- Concert Pitch: Displays score in written or concert (sounding) pitch.
- Image Capture: Allows you to take a snapshot of part of the score.
- Note Input: Note entry mode, Duration, Tie, Rest, Accidentals, Flip stem direction, Voice (1, 2, 3, 4).
Show/hide toolbars
To show or hide certain toolbars:
- Select View→Toolbars, and tick/untick the options as required.
- Alternatively, right-click on an empty space in the toolbar area, or the title bar of the Inspector, and, from the menu, check or uncheck the required options.
Note: This option also allows you to show or hide the Timeline, Score Comparison Tool, Script Recorder, Piano Keyboard, Selection Filter, and Drumset Tools.
Customize toolbar area
-
Select View→Toolbars, and click on "Customize Toolbars…"

The dialog shows the toolbars that can be customized on the left, the current tool buttons for the selected toolbar in the middle, and the buttons that can be added on the right. When you have selected a toolbar in the left panel, you can do any of the following actions:
- Remove a toolbutton: Select the button in the middle panel, and press →.
- Add a toolbutton: Select the button in the right panel, and press ←.
- Move a toolbutton: Select the button in the middle panel, and move it up or down using ↑ or ↓.
Note: The toolbar cannot be customized unless a custom workspace is selected (see below).
Workspaces
Select this option to create a custom workspace or to edit an existing workspace.
Show Status bar
The Status bar, at the bottom of the screen, gives information about selected score elements. Tick/untick this option to display or hide.
Split display
It is possible to split the document display so as to view two documents at once, or to view two different parts of the same document. Tabs allow you to choose which document to display in each view. You can drag the barrier separating the two scores to adjust the amount of space in the window devoted to each:
- Documents Side by Side: Divides the window vertically into two score views.
- Documents Stacked: Divides the window horizontally into two score views, one above the other.

Visibility options
This section allows you to display or hide various non-printing elements:
- Show Invisible: View/hide elements that have been made invisible for printing and export. If this option is ticked, invisible elements are shown in the score window as light gray.
- Show Unprintable: View/hide breaks and spacer symbols.
- Show Frames: View/hide the dotted outlines of frames.
- Show Page Margins: View/hide Page Margins.
Mark irregular measures
A plus sign or minus sign at the top right of a measure indicates that its duration differs from that set by the time signature.

Full screen
Full Screen mode expands MuseScore to fill your screen so more content is visible.
Page/Continuous View
You can switch between different views of the score using the drop-down list in the toolbar area:

To scroll the score:
- Vertically: Move the mouse wheel up or down.
- Horizontally: Press Shift and move the mouse wheel up or down.
Page View
In Page View, the score is formatted as it will appear when printed or exported as a PDF or image file: that is, page by page, with margins. MuseScore applies system (line) and page breaks automatically, according to the settings made in Page settings and Style…. In addition, you can apply your own system (line), page or section breaks.
To choose between horizontal or vertical page scrolling, see Preferences: Canvas (Scroll pages).
Continuous View
In Continuous View, the score is shown as one unbroken system. Even if the starting point is not in view, measure numbers, instrument names, clefs, time and key signatures will always be displayed on the left of the window.
Note: Because the layout is simpler, MuseScore may perform faster in Continuous View than Page View.
Single Page View
In Single Page View the score is shown as a single page with a header but no margins, and with an infinite page height. System (line) breaks are added automatically, according to the settings made in Page settings and Style…. In addition, you can apply your own system (line) or section breaks.
Side panels
The workspaces, Inspector and Selection filter are conveniently displayed as side panels to the left and right of the score window. To undock a side panel use one of the following methods:
- Drag the panel;
- Click on the double chevron at the top of the panel;
- Double-click in the title area at the top of the panel.
To dock a panel use one of the following procedures:
- Drag the panel to the top/bottom of an existing side panel and it will stack vertically above/below that panel.
- Drag the panel to the middle of an existing side panel and it will overlay that panel. Both panels can then be accessed by tabs.
Alternatively, double-clicking the title bar of the panel will restore it to its previously docked position.
Navigation
Commands
Various commands are available to help you navigate more easily through the score. These are listed under Keyboard shortcuts: Navigation.
Navigator
The Navigator is an optional panel which displays page thumbnails of the score at the bottom or to the right of the document window.
- To view or hide the Navigator, select View→Navigator; or use a customized shortcut.

The Navigator appears at the bottom of the document window if scrolling pages horizontally; or on the right if scrolling pages vertically (see Preferences: Canvas).
The blue box represents the area of the score that is currently visible in the document window: drag the box, or click directly on the navigator panel to bring another part of the score into view. You can also drag the scrollbar.
Timeline
The Timeline panel provides a detailed overview of the score, with expanded possibilities for navigation and interaction.
- To display the Timeline, press F12; or select View→Timeline.
For details, see Timeline.
Find / Go to
The Find / Go to function allows you to speedily navigate to a specific measure, rehearsal mark or page number in the score:
- Press Ctrl+F (Mac: Cmd+F), or select Edit→Find. This opens the Find (or Go to) bar at the bottom of the workspace.
-
Use one of the following options:
- To go to a numbered measure: enter the measure number (counting every measure, starting with 1, irrespective of pickup measures, section breaks or manual changes to measure number offsets).
- To go to a numbered page: enter the page number using the format pXX (where XX is the page number).
- To go to a numerical rehearsal mark: enter the number using the format rXX (where XX is the name of the rehearsal mark).
- To go to a rehearsal mark starting with a letter: enter the name of the rehearsal mark (the search is case insensitive).
N.B.: It is best to avoid naming rehearsal marks with the single letters "R", "r", "P", "p", or one of these letters with an integer (e.g. "R1" or "p3"), as this can confuse the search algorithm.
Note: The "Pan score automatically" toolbar button must be enabled for the Find command to be able to reposition the score view to the correct location.
See also
Concert pitch
You can choose to display the score in either written or concert (sounding) pitch. Written pitch displays the score as it should look when printed for musicians to read. However, during preparation you may prefer the convenience of seeing the transposing instruments notated as they sound, without transposition. In this case you should select the "Concert pitch" option.
To toggle the score display between written or concert pitch:
- Press the Concert Pitch button (located in the top right of the toolbar area). When this button is highlighted the score is in concert pitch.
Before printing the score, exporting it to PDF or saving it online, you should ensure that the Concert Pitch button is off, and that the individual parts are correctly transposed.
See also
External links
- Concert pitch (Wikipedia article)
- Transposing Instrument (Wikipedia article)
- Concert pitch or not? (MuseScore forum discussion)
Copy and paste
The cut, copy, and paste commands can be used to reproduce entire passages of music, to move music earlier or later, to copy text or other markings between staves, to exchange the content in different measures, and more.
Accessing the commands
In all cases, the first step is to create a selection of element(s), see Selecting elements chapter.
As with other programs that support cut, copy, and paste, you can access these commands from the Edit menu, from a context menu that appears upon right-click or related gesture (e.g., Ctrl+click, or two-finger tap), or via the standard keyboard shortcuts.
| Command | Shortcut (Windows) | Shortcut (Mac) | Context menu | Main menu |
|---|---|---|---|---|
| Cut | Ctrl+X | Cmd+X | Cut | Edit→Cut |
| Copy | Ctrl+C | Cmd+C | Copy | Edit→Copy |
| Paste | Ctrl+V | Cmd+V | Paste | Edit→Paste |
| Swap with clipboard | Ctrl+Shift+X | Cmd+Shift+X | Swap with Clipboard | Edit→Swap with clipboard |
| Paste half duration | Ctrl+Shift+Q | Cmd+Shift+Q | N/A | Edit→Paste half duration |
| Paste double duration | Ctrl+Shift+W | Cmd+Shift+W | N/A | Edit→Paste double duration |
Note: (1) When using the context menu, take care to always right-click on a selected item; if you right-click on an empty space by mistake your selection will be lost! (2) Paste half/double duration requires Musescore 3.1 version or later.
Copying a Range Selection
As explained in the Selecting Elements chapter, in a Range selection, Musescore automatically selects useful elements between given beginning and ending time positions across a given set of staves. These elements includes all of the notes, rests, Musescore Texts such as dynamics symbols, Musescore Lines such as pedal etc. System-wide elements such as Tempo, Time signatures, Repeats, Layout breaks are not included in the automatic selection, thus are not copied.
Upon pasting onto a destination time position, the copied music replaces all of its existing content, except for its original measure rhythm structure and system-wide elements.
- Create a Range Selection.
- (Optional) Use the Selection Filter to exclude other elements of a given type.
- Use the Copy command from the menu or press Ctrl+C (Mac: Cmd+C)
- Select the first note or rest of the destination
- Use the Paste command from the menu or press Ctrl+V (Mac: Cmd+V)
Copying a single element or a List Selection
(Copying a List Selection requires Musescore 3.5 version or later)
MuseScore also allows copying a single element, or a List Selection of multiple lyrics, chord symbols, dynamics, articulation, or other markings from one place to another, while keeping the content such as notes in the destination intact.
If a single note selected by notehead, upon copying only the pitch is copyed into the destination note. To copy and paste everything, including duration etc, create a Range Selection of the note first, see Selecting Elements chapter. Pitch only feature is removed in Musescore 4.
Multiple notes List Selection cannot be copied.
MuseScore preserves the relative time positions of the markings based on literal note value distance if possible, measure rhythm is not taken into account. This includes case of copying chord symbols and dynamics. Valid note or rest anchors are required at the destination music when pasting lyrics and articulations.
- Select a single element (except Measure), or create a List Selection , see Selecting Elements chapter.
- Use the Copy command from the menu or press Ctrl+C (Mac: Cmd+C)
- Select the first note or rest of the destination
- Use the Paste command from the menu or press Ctrl+V (Mac: Cmd+V)
Moving elements
Cut and paste commands can be used to
- move a passage to another staff, such as music on flute to clarinet, or
- shift a passage earlier or later. This method is especially useful as a way to insert or delete a note or rest and also shifts existing notes and rests to create or trim silence.
Measures (their rhythmic structure) cannot be moved, but see Measure operations and Time signatures chapters. When moving List Selection, its elements' relative positions are preserved if possible, see "Copying a List Selection" section.
To move a selection:
- Select what you want to move
- Use the Cut command from the menu or press Ctrl+X (Mac: Cmd+X)
- Select the first note or rest of the destination
- Use the Paste command from the menu or press Ctrl+V (Mac: Cmd+V)
Swapping a selection with the clipboard
The swap with clipboard command combines two operations into one: (1) First it overwrites a selected part of the score with the contents of the clipboard, just like the paste command; (2) Second, it transfers the overwritten part of the score back to the clipboard, just like the copy command.
It can be used, for example, to swap two equal-length sections of a score, A and B:
- Select section A
- Apply the cut command
- Select section B
- Apply the swap with clipboard command to paste A over the contents of B while moving the contents of B to the clipboard
- Select section A again (or just the first note, rest, or measure)
- Apply the paste command
Like the other commands discussed here, you can access the swap with clipboard command from the menu or via a keyboard shortcut—in this case, it is Ctrl+Shift+X (Mac: Cmd+Shift+X).
Repeating a selection
A common use for copy and paste is to duplicate a given passage (including notes, chords etc) immediately after the original. Use the special repeat selection command to simplify this process.
- Select a single element on the score, or create a Range Selection, see Selecting Elements chapter.
- Press R
This does not work on List Selection. It works on a single chord, either on a Range Selection of it, and when exactly one note of that chord is selected. See Selecting Elements chapter. In note input mode, this command repeats the entire chord that contains the current note. This is useful for creating a series of repeated chords.
Copying a Range Selection to multiple staves
If you wish to copy a passage to multiple staves—for instance, to double music of flute with oboes and clarinets&mdash:
- Select the passage you wish to copy
- Extend the selection to include the staves below (e.g., by pressing Shift+↓)
- Use Tools→Explode
This copies the original selection, assuming it contains only single notes—no chords and no multiple voices. If there are chords or multiple voices, then these are distributed among the remaining staves. For more on Explode command, see Tools chapter.
Paste half/double duration
Requires Musescore 3.1 version or later.
If you have entered a passage using mostly eighth notes but wish to halve the entire passage to using mostly sixteenth notes, or double it to quarter notes, MuseScore provides a pair of special commands to accomplish this. You can either modify the durations of a selection in place or create a separate copy of the passage with the modified durations. To halve or double the duration of a passage:
- Create a Range Selection
- Use the copy command
- If you wish to create a separate copy of the passage with the modified durations, select the destination
- Use the paste half duration or paste double duration command Ctrl+Shift+Q/W ( Cmd+Shift+Q/W)
Duplicating individual elements
Individual elements—even those that are not selected automatically in a Range Selection, like time signatures or voltas—can be selected and then duplicated using a mouse.
- While pressing Ctrl+Shift (Mac: Cmd+Shift), and click and hold on an element
- Drag it anywhere in the score
- When you release the mouse button, the selected element is copied to the new location
See also
- To change notes without altering the rhythm, use Note input mode, select Re-pitch mode, then use copy and paste commands. See Note input modes chapter.
Share scores online
Musescore.com allows you to:
- View and listen to scores from a large repository created by the MuseScore community.
- Download any score in a variety of formats—MuseScore, MusicXML, PDF, MIDI, MP3.
- Upload your own scores: control whether to share them publicly or privately (via a secret link).
- Synchronize your score with a YouTube video ("Videoscores").
Note: A MuseScore Pro account is required for all scores not marked as PD (Public Domain) or "Original" work, the latter must also have the approval of the score owner.
Create an account
- Visit MuseScore.com and click on "Create new account". Pick a username and enter a valid email and press "Create New Account".
- Wait a few minutes for an email from MuseScore.com support. If no email arrives, check your spam folder.
- Click the link in the email and visit your user profile to change your password.
Share a score directly from MuseScore
To save a score online:
- Make sure that the Concert Pitch button is off, and that the individual parts are correctly transposed.
-
From the menu, select File→Save Online.... The "Log in to MuseScore" dialog will appear:

-
Enter your email address or MuseScore username, and password, then click OK. Note: If you don't have a MuseScore account yet, create one first by clicking on the "Create an account" link. That will open your browser app and bring you to musescore.com/user/register.
-
Upon successfully logging in and if the score already exists online, it will be updated automatically. Uncheck Update the existing score to save online as a new score.

-
If you are using a different SoundFont than the default one and if you are able to export MP3 files (may not be the case on some Linux versions), a checkbox Upload score audio will be visible:

If the checkbox is checked, MuseScore will render the audio of the score using the current synthesizer settings and upload the audio to MuseScore.com. -
Now you'll be able to enter your score information.

- Make the score private: If selected, the score can only be viewed via a private link. If set to public, the score is visible to all.
- Ensemble type: A list of possible values
- Genre: A list of possible values
- Title: The title of the score.
- Description: The descriptive text that will appear next to it.
- Copyright and download settings: Choose an appropriate copyright license from the drop-down list.
Note: Creative Commons license, allows people to use your scores under certain restrictions.
Here you also can restrict the ability of others to download your score (requires a Pro membership on MuseScore.com).
Upload a score on MuseScore.com
You can also upload a score on MuseScore.com directly:
- Click the Upload link on MuseScore.com.
- You have the same options as with the Save Online menu, except for uploading score audio.
Edit a score on MuseScore.com
If you want to make changes to one of your scores on MuseScore.com, edit the MuseScore file on your own computer, save it, and then do the following:
- If you originally shared the score directly from within MuseScore, simply go to File→Save Online... again to update the online score.
- If you originally uploaded the score via the Upload page on MuseScore.com, then you must follow these steps to update the online score:
- Go to the score page on MuseScore.com.
- Click the three dots menu ⋮ on the right and choose "Update this score".
- In the form, you can upload a replacement score file as well as change the accompanying information and privacy settings.
Switch to the direct method of updating an online score
It is much more convenient to update online scores from directly within MuseScore than by updating the score manually from the score page. Follow these steps if you originally uploaded the score via the Upload page and now want to switch to the direct method:
- Go to the score page on MuseScore.com and copy the URL.
- Open the score file on your computer with MuseScore.
- From the menu, select File→Score Properties... and paste the URL into the "Source" field.
Now whenever you want to update the online score simply go to File→Save Online....
Note: The URL should be follow the format of https://musescore.com/XXXXXXXX/scores/XXXXXXXX and should not contain 'Nice Link's.
External links
打開/保存/匯出/列印
在 檔 功能表裡你可以選擇打開/保存/匯出/列印樂譜:

打開
除了 MuseScore關聯的檔案格式 (*.mscz 和 *.mscx),MuseScore還可以打開 MusicXML、壓縮後的MusicXML、MIDI文件和其他各種檔案格式。
打開任何支持的檔的方法:
- 從以下方式選擇其一:
- 按Ctrl+O。
- 點擊工具列區域左側的“載入樂譜”圖示。
- 從功能表列中選擇 檔→打開...。
- 選擇一個檔並且按一下 打開;或者是簡單地按兩下一個檔。
您可以選擇 最近的檔 打開最近曾經打開的樂譜。
保存
保存, 另存為…, 保存副本… 和 保存選區… 允許你保存樂譜為MuseScore的檔案格式(.mscz and .mscx)。
- 保存: 將樂譜保存到當前的文件。
- 另存為...: 將樂譜保存到新的檔。
- 保存副本...: 將樂譜保存到新的檔,但是仍然編輯原來的檔。
- 保存選區...: 將選擇的部分保存到新的檔。
- 保存至線上空間...: 在 [MuseScore.com] 上保存和分享你的樂譜。(http://musescore.com?utm_source=handbook). 有關詳細資訊,請參見在網上分享樂譜。
匯出
匯出... 和 匯出分譜... 允許你將樂譜儲存為與MuseScore無關的格式,例如PDF、MusicXML、MIDI和 各種音樂和圖像格式。在匯出的對話方塊裡,你可以選擇你想要匯出的格式。
- 匯出... : 匯出當前的樂譜到你選擇的格式。
- 匯出分譜... : 以你的選擇匯出當前的樂譜和所有的分譜到單獨的檔案格式。
注 : 如果沒有分譜,“匯出分譜”則是被禁用(灰色顯示)的。
MuseScore會記住您上次選擇的格式,並將其作為下次的默認格式。
列印
列印... 允許你直接地從印表機列印MuseScore檔。由於你的印表機不同,你將會有不同的選擇,但通常來說你可以定義頁範圍、列印份數和順序。
如果你安裝了虛擬印表機,你也可以使用它將其“匯出”為PDF,但通常最好使用 匯出 裡的匯出為PDF選項,以獲得更準確的轉換。注意:要在Adobe PDF中正常工作,請確保在印表機屬性中取消選中“僅依賴系統字體,不使用文檔字體”。