Text
Entering and editing text
Overview
Musescore has different text editing functionalities. This chapter and other chapters under handbook Text section focus on the Musescore Text objects, individual objects that can be placed on a score, and objects containing it. There are also score settings that add text onto pages automatically.
Types of text
Musescore Text object
A Musescore Text object is an object on a score that contains individual characters that can be entered and removed by using (typing on) a computer keyboard. It is usually attached to a note or a rest, some of them attach to another object.
- Staff Text can be attached to a staff;
- Jumps and Markers are attached to measures;
- Some types (Title, Subtitle etc.) must be attached to a frame, see Frame, and Text blocks chapters.
Different types of Text object are not interchangeable. They have distinct property fields that affect how Musescore functions. For example, a Staff Text object styled as a metronome mark can never be configured to change playback tempo inside Musescore. The Tempo object should be used to change playback tempo inside Musescore.
To check the object type, select an object on a score, its type is displayed on the status bar.
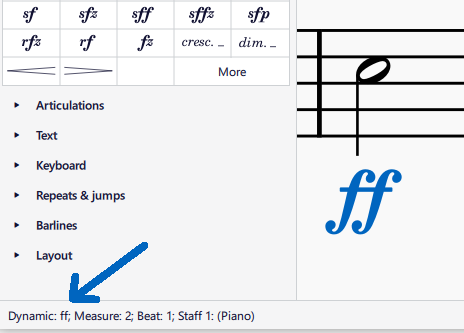
| Text object type | Uses |
|---|---|
| Staff Text | General purpose text for one MuseScore instrument. Can be configured to apply swing playback or sound flags. See Setting up your score and Staff Text, System Text and Expression Text chapter. |
| System Text | Similar to Staff Text, but for all instruments in the system (page layout concept). See Page layout concepts and Staff Text, System Text and Expression Text chapter. |
| Expression Text | The expression item in the Text Palette. A new type introduced in Musescore 4. Does not affect Musescore playback as of Musescore 4.2. See Staff Text, System Text and Expression Text chapter. |
| Instrument change | The Change instr. item in the Text Palette. Change the Musescore Instrument after the anchored note or rest. See Setting up your score and Mid-score instrument changes chapters. |
| Dynamic | Such as p and mf, are Text that affects Musescore playback dynamics. See Dynamics chapter. |
| Hairpin | Such as crese. and dim., are Text line that affects Musescore playback dynamics. See Hairpins chapter. |
| Playing technique annotation | The legato. pizz. etc items in the Text Palette. [This info is a work in progress, the software function is under active dev, pls see and update Staff Text, System Text and Expression Text, and Dynamics, and Mixer, and Glossary and Articulations chapters] |
| Tempo | Numerical metronome mark, verbal direction. A Text type that specifies Musescore playback tempo. See Tempo marks chapter. |
| Gradual Tempo Change | Such as accel.. A new Text line type introduced in Musescore 4 that affects Musescore playback tempo. See Tempo marks chapter. |
| Swing and Straight item in the Tempo Palette | A pre-configured System Text. See Swing playback and Staff Text, System Text and Expression Text chapters. |
| Lyrics | Ctrl+V keyboard shortcut breaks up words stored in clipboard, paste and then jump to next anchor conveniently. See Lyrics chapter. |
| Jump | Such as "D.C."(Da Capo), "D.S. al Coda" etc found in the Repeats & Jumps Palette. See Jumps and markers chapter. |
| Marker | The Capo symbol, Segno symbol, "Fine", "To Coda" etc found in the Repeats & Jumps Palette. See Jumps and markers chapter. |
| Rehearsal mark | The boxed B1 item in the Text Palette. Facilitate rehearsals, divide score into sections, bookmark passages etc. See Rehearsal marks chapter. |
| Chord symbol | Has playback, notes automatically decided. See Chord symbol chapter. |
| Nashville number | Has playback, similar to Chord symbol. See Chord symbol:NNS chapter. |
| Roman Numeral | No playback. See Chord symbol:RNA chapter. |
| Figured bass | A period keyboard notation. No playback. See Figured bass chapter. |
| Sticking | Letters (L and R) attached to (drum) notes showing which hand or foot to use. See Sticking chapter. |
| Fingering | Numbers or letters attached to notes showing which fingers to use. See Fingering chapter. |
| Title, Subtitle, Composer, Lyricist, and Text (text block type) | They are Text types designed to be added into a frame. See Text blocks and Frame chapters. They are not the placeholder text used in the header and footer, see "Score setting" section. |
| Text line, including Volta, Pedal etc types | Volta etc found in Repeats & Jumps Palette. Pedal found in Keyboard Palette. Ottava (8--, 8ve, 8va, 15--) etc found in Pitch Palette. Guitar Barre lines etc. See Other lines chapter. |
Score settings
Long and short name of Musescore Instrument (see Setting up your score chapter) is automatically added to the left of staff in each system (page layout concept, see Page layout concepts chapter). Names can be changed direcly on a score using text edit mode, or using Staff/Part property window, see Staff/Part properties chapter. They are, by default, only added when there are more than one instrument. To change this default behavior, change the setting under Format → Style → Score.
Measure numbers can be added automatically. Configure it at Format → Style → Measure nubmers, see Measure numbering chapter.
Musescore's header and footer functionality adds text to every pages automatically. Configure it at Format → Style → Header & footer. Placeholder text (special symbols) can be used to add information like the current page number, copyright claim etc. Placeholder text is also used to add metadata tags, the digital data of a score file, onto the score dynamically. See Header and footer chapter.
Adding text object to a score
Different types of Text object are not interchangeable, decide on the suitable object type before adding it. Use the chart under "Musescore Text object" section. For general engraving or visual display purpose, it is recommended to use a Staff text or System text.
The following explains how to add text to a note or a rest or a valid anchor outside frames. Adding text to a frame is covered in the Text blocks chapter.
From a palette
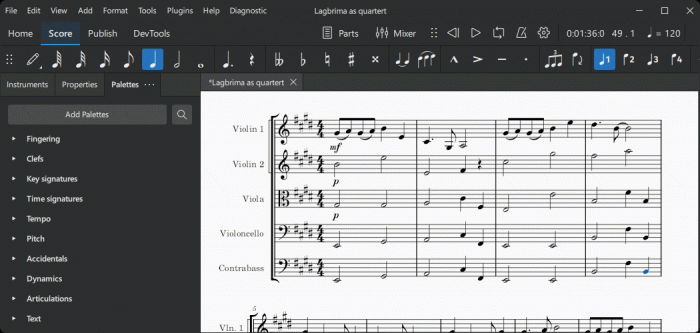
To add a text element to your score from a Palette, either select one or more notes/rests and click on the desired palette item; or drag the text from the palette onto a note/rest. e.g.

From the menu
If the text object is associated with a staff you can add it by selecting a note, then choosing a text option from Add→Text.
Using a keyboard shortcut
Many text types can be entered using keyboard shortcuts. Shortcuts are shown to the right of items in Add→Text.
To create a text object, select a note, then enter the required shortcut.
Deleting text object on a score
To edit *text automatically added by score settings*, see "Score setting" section.
To delete object(s) on a score, select the objects then press Delete.
Editing text object content
To edit *text automatically added by score settings*, see "Score setting" section.
Text and text line objects are edited with two different methods, depending on the object type:
- edit directly in text edit mode, as explained below; or
- edit properties in the Properties panel, see the text object's specific chapter.
To enter text edit mode use one of the following methods:
- Double click on the text object, or
- Select the text object and press Return, or
- Select the text object and press F2 or Alt+Shift+E, or
- Right-click on the text object and select "Edit element."
To leave text edit mode either press Escape or click on a part of the score outside the edit area.
Keyboard shortcuts available inside text edit mode
The following keyboard shortcuts are available in text edit mode:
| Function | Windows & Linux | Mac |
|---|---|---|
| Bold (toggle) | Ctrl+B | Cmd+B |
| Italic (toggle) | Ctrl+I | Cmd+I |
| Underline (toggle) | Ctrl+U | Cmd+U |
| Move cursor | Home, End, ←, →, ↑, ↓ | (Alt+) ←, →, ↑, ↓ |
| Remove character to the left of the cursor | Backspace | Delete |
| Remove character to the right of the cursor | Del | → Delete or Fn+Del |
| Start new line | ↵ | return |
| Insert special characters (see below) | Shift+F2 | Fn+F2 |
Special characters
Characters not available from the standard keyboard may be accessed using the Special Characters window.
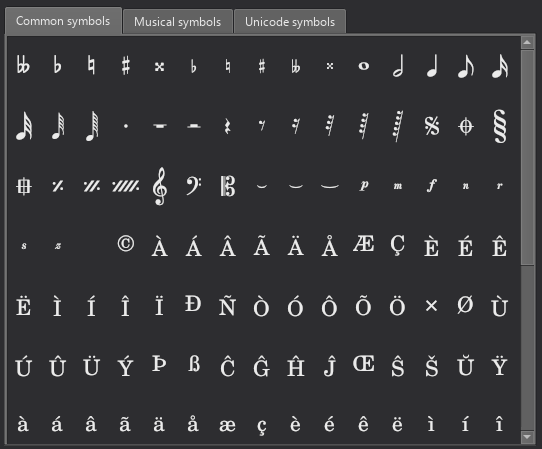
To open Special Characters, in text edit mode (see "Editing text object content" section), press Shift+F2; or click on Insert special characters in the Text section of the Properties panel.
The dialog is divided into 3 tabs: Common symbols, musical symbols and unicode symbols. The musical and unicode tabs are further subdivided into alphabetically-arranged categories. It is preferable to use items in Common symbols tab as they are functional, see Musescore 3 handbook Fonts chapter.
Clicking an item in the Special Characters dialog immediately adds it to the text where the cursor is positioned. Multiple items can be applied without closing the dialog box, and the user can even continue to type normally, delete characters, enter numerical character codes etc., with it open.
In text edit mode, the following keyboard shortcuts add a functional version of special characters (whenever possible) into the current Text object, see Musescore 3 handbook Fonts chapter.
| Character | Windows & Linux | Mac | Note |
|---|---|---|---|
| Sharp ♯ | Ctrl+Shift+# | Cmd+Shift+# | May not work on some keyboard layouts |
| Flat ♭ | Ctrl+Shift+B | Cmd+Shift+B | |
| Natural ♮ | Ctrl+Shift+H | Cmd+Shift+H | |
| Piano p | Ctrl+Shift+P | Cmd+Shift+P | |
| Forte f | Ctrl+Shift+F | Cmd+Shift+F | |
| Mezzo m | Ctrl+Shift+M | Cmd+Shift+M | |
| Rinforzando r | Ctrl+Shift+R | Cmd+Shift+R | |
| Sforzando s | Ctrl+Shift+S | Cmd+Shift+S | |
| Niente n | Ctrl+Shift+N | Cmd+Shift+N | |
| Z z | Ctrl+Shift+Z | Cmd+Shift+Z | |
| Elision ‿ | Ctrl+Alt+- | Cmd+Alt+- |
Formatting text
Overview
Levels of formatting
Layout and formatting in Musescore has 2 main levels, read Templates and styles first. Text objects have finer levels:
- Level 1: Properties of each individual text object in a score file:
- Formatting of individual characters within a text object;
- Formatting of the object that contains all the characters.
- Level 2
- "style for certain type of object": you can change their values in 'Style' window: left pane
- "style for text inside certain type of object": you can change their values inside items under 'Style' window: left pane 'Text style'
Appearance and function of Text objects
The final visual and function of most object in a score file is determined by:
- Characters do not have any specific formatting. When formatting are added to them, they will always be used. See Changing characters below.
- Text objects do not have any specific properties. When properties are Properties panel, they will always be used except for characters that already have their own formatting. see details in "Text properties" below.
- functional settings: all object on a score uses values in "style for certain type of object", this behavior cannot be changed, but you can edit values in them.
- visual settings:
- an object on a score uses values in appropriate "style for text inside certain type of object", such as "Style for text inside Chord symbols", "Style for text inside Lyrics Odd Lines" automatically. This behavior can be changed with the More... > Text Style property in Properties panel. You can also utilize the 12 custom style.
- "Style for text inside Staff Text" is special. Every Text-related object on a score uses its values unless overridden, this behavior cannot be changed, but you can edit values inside.
- A subset of characters always use font settings in 'Style' window > Score : "Musical symbol font" (8 options): musical glyphs such as Segno, Coda, ottavas, dynamics glyphs such as mf and some Special characters. See Musescore 3 handbook Fonts (mostly the same as in musescore 4.1.1 but upgraded and added 2 options).
Options in Properties panel behave differently depending on the current selection.
"Font", "Style", "Size", "Subscript and superscript" are both object properties, and individual character formatting options. When you change an object using the Properties panel, incompatible formatting on individual characters are removed.
"Alignment", "Frame", "Text style" are object properties. When you select individual characters and change these options in the Properties panel, the object properties are changed instead.
Changing formatting of characters
To edit text content, see Entering and editing text instead.
Use the Properties panel to change formatting of individual characters. Musescore 4 updated the Inspector present in Musescore 2 and Musescore 3 and integrated the function of Text Toolbar (Text editing) into the Properties panel.
- enter text edit mode using one of the following methods:
- Double-click on the text object.
- Select the object and press F2 or Alt+Shift+E
- Right-click on the element and select Edit element
- highlighted characters
- apply formatting in Text section of the Properties panel, and/or use keyboard shortcuts (see Editing text).
Changing formatting of a text object
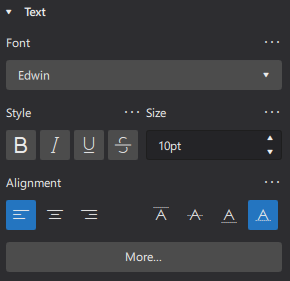
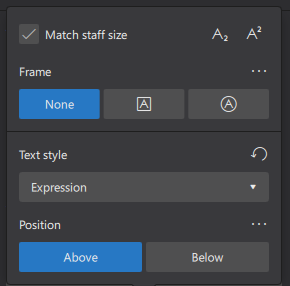
Click More to see:
To edit text content, see Entering and editing text instead.
Use the Properties panel to change formatting of the Text object, which may change all of the characters inside:
- Select text object(s) on a score
- Edit settings in the Text section of the Properties panel.
Options are self-explanatory, these special settings are shown after clicking More:
Match staff size: whether text size changes proportionally, see Page layout concepts.
Text style : Changes which style a text object on a score uses, see below
Position : Above or below the staff, see below
Changing which style a text object on a score uses
In the Properties panel, use Text style property under More. Concept of formatting is explained in the overview. Only the "style for text inside certain type of object" a text object on a score uses can be changed, they includes the "User-1" ... "User-12", see below. See Templates and styles.
Position
The Properties panel is used for assigning formatting to the Text object(s). When a Text object is changed, all of the characters inside it may change. The Properties panel also is used for assigning formatting to individual characters inside a Text object, when characters are selected.
It is important to know that, even when characters inside a Text object are selected, some properties shown on the Properties panel are still the Text object's setting, but not the character property. They includes the Position property.
In the Properties panel, Use Position property under More to change layout of the Text object. If a overriding option exists for this type of object, is in "style for certain type of object", but not in "style for text inside certain type of object", see "Changing the values inside a style" section below. See also the main chapter Templates and styles.
Changing the values inside a style
Concept of formatting is explained in the overview.
Understand Templates and styles first. To change values inside a style, use the "Style" window: Format→Style.
- "style for certain type of object": you can change their values in 'Style' window: left pane"
- "style for text inside certain type of object": you can change their values inside items under 'Style' window: left pane 'Text style', or
- Use the more efficient way from the Properties panel:
- Select a score object that use the style;
- Edit a property;
- Click on the ellipsis (…) above the property and select "Save as default style for this score".
- Repeat for other properties as required.
- Use the more efficient way from the Properties panel:
Changing the values inside a User-1 to User-12 style
To assign visual settings values to a custom style: "User-1" to "User-12", use the "Style" window: Format→Style > Text Style > User-1 ... User-12
Staff Text, System Text and Expression Text
Overview
Staff Text objects and System Text objects are for indicative purposes listed right below. They can optionally affect Musescore playback, only the section after the attached note or rest is affected.
- Applying swing and straight time (Staff Text and System Text).
- Applying score and movement titles.
- Capo playback for guitarists (Staff Text, for Musescore 4.0.2 and below only. For Musescore 4.1.0 and above use the new Applying capos chapter instead.)
- Other general purpose not covered by other text types only. Different types of text-based objects are not interchangeable, see Text types.
Expression text objects indicate musical expressions and performance indications. They do not affect Musescore playback. To indicate dynamics and create playback at the same time, use Dynamics symbol object. To indicate and affect tempo at the same time, use Tempo markings.
Similarity and difference between Staff Text and System Text
Staff Text and System Text are similar in behavior and function.
- Both of them attaches to a note or rest.
- Both of them can be set-up to have effect on audio created by Musescore's Synthesizer, a Staff Text only affects the Musescore Instrument that that note belongs to, a System Text affects all Musescore Instruments on a score.
- Staff Texts are hidden along with "Hide empty staves within systems" option (and the sub-option "Don't hide empty staves in first system") under "Style" window : "Score", see Templates and styles.
- A Staff Text only appears in the Musescore Part(s) that features the Musescore Instrument. A System Text appears on all Musescore Parts.
- New System Text is positioned above the top staff of each system (layout concept).
Adding Staff Text to your score
- Select a note
- Use one of the following methods:
- Press Ctrl+T.
- From the menu, select Add→Text→Staff Text.
- Click on the "Staff Text" icon in the Text palette
- Enter the desired text in the bounding box.
Alternatively, drag the "Staff Text" icon onto a note in the score before entering the desired text.
Adding expression text to your score
- Select a note
- Use one of the following methods:
- Press Ctrl+E.
- From the menu, select Add→Text→Expression text.
- Click on the "Expression text" icon in the Text palette
- Enter the desired text in the bounding box.
Alternatively, drag the "Expression text" icon onto a note in the score before entering the desired text.
Adding System Text to your score
- Select a note
- Use one of the following methods:
- Press Ctrl+Shift+T.
- From the menu, select Add→Text→System Text.
- Click on the "System Text" icon in the Text palette
- Enter the desired text in the bounding box.
Alternatively, drag the "System Text" icon onto a note in the score before entering the desired text.
Repeating System Text on other staves
New System Text is positioned above the top staff of each system (layout concept). If you need a similar indication on a lower staff, add it to that staff using Staff Text.
Some templates have an additional feature. When you create a System Text, it is automatically duplicated and shown just above another lower staff. If either instance of the object is edited the content of both is updated. If either one is removed, both are removed. These templates includes:
- Symphony Orchestra : duplicated and shown above violin.
- Classical Orchestra : duplicated and shown above violin.
- SATB + Piano : duplicated and shown above piano.
- SATB + Organ : duplicated and shown above organ.
- SATB Closed Score + Piano : duplicated and shown above piano.
- SATB Closed Score + Organ : duplicated and shown above organ.
Properties
Edit properties of selected Staff Text, System Text, and Expression Text object(s) in the Properties panel. Text related settings are covered in Formatting text chapter.
Staff Text and System Text can optionally affect playback. Playback related settings are edited in "Staff Text properties" and "System Text properties" window. When a Staff Text or System Text is duplicated, or reused through customized palette, the playback settings are reused.
An Expression Text can be added to a note that already has a Dynamics symbol attached. Doing so snaps it to the dynamics symbols, this behavior and the Properties : Expression: Snap to dynamic property is explained in Dynamics chapter.
"Staff Text properties" window
Staff Text properties, for swing and capo settings, can be accessed as follows:
- Right-click on the text object
- Select Staff Text properties
- Choose one of the following tabs:
- Swing settings
- Capo settings : for Musescore 4.0.2 and below only. For Musescore 4.1.0 and above use the new Applying capos chapter instead.
"System Text properties" window
"System Text properties" window only has one tab, the Swing settings.
Style
See main chapter Templates and styles.
"Style for text inside Staff Text" is special, see Formatting text.
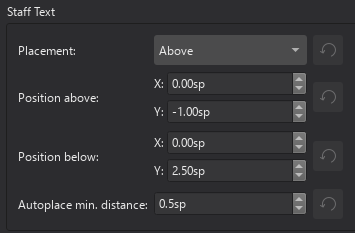
- Values of the "Style for Staff Text" can be edited in Format→Style→Staff Text.
- Values of the "Style for Expression text" can be edited in Format→Style→Expression text
- Values of the "Style for text inside Staff Text" can be edited in Format→Style→Text styles→Staff
- Values of the "Style for text inside System Text" can be edited in Format→Style→Text styles→System
-
Values of the "Style for text inside Expression" can be edited in Format→Style→Text styles→Expression
Tempo markings
Overview
The musical terminology tempo means the speed or pace of a composition. Musicians use tempo markings/marks to indicate tempo. Supported tempo markings include:
- Metronome marks: Consists of a note, an equals sign, and a whole number.
 indicates 80 minims (half note) per minute.
  indicates 80 quarter notes (crotchets) per minute.
 - Verbal tempo indications: Andante, Allegro, "a tempo", "tempo primo" etc.
- Tempo change lines: Consists of a text and a dashed line. Includes "accel.", "allarg.", "rall.", and "rit.".
- Metric modulations:

Musescore's synthesizer paces based on two settings:
- The real, written tempo of score. It is only determined by tempo markings on the score. Section breaks and barlines do not reset anything. If no tempo marking is present on a score, it plays as if ♩ = 120 is used (120 crotchets or quarter notes in one minute).
- The control slider that change pace temporarily, intended for monitoring purpose. See Playback panel chapter.
Musicians use tempo markings to indicate the value of one beat, but Musescore does not use the beat information inside tempo markings. Beat information is obtained from Time signatures only.
Tempo markings are Musescore Text, except tempo change lines are Musescore Line that contains Text, see Text and Other lines chapter.
The Properties palette and Playback panel use a special unit "BPM". "BPM" is the amount of quarter notes would have been within one minute in decimal number. It is not related to the musical beat. It is not the whole number used in metronome marks conventionally, or on the score.
Using Metronome marks and Metric modulations
Playback follows written content by default only when note and augmentation dot professional glyphs are used. User can also use an overriding setting.
Using Tempo change lines
The tempo changes along the object's anchored range, see Other lines chapter.
Musescore does not understand the written content. These items have pre-defined tempo setting. In Musescore 4.2 beta's Tempo palette, by default:
- accel.: Gradually speeds up to 133% of the original tempo
- allarg.: Gradually slows down to 75% of the original tempo. The italian allargando means widen.
- rall.: Gradually slows down to 75% of the original tempo
- rit.: Gradually slows down to 75% of the original tempo
The setting is changable, see "Changing playback" section.
Using Verbal tempo indications
Musescore does not understand the written content. In Musescore 4.2 beta's Tempo palette, by default:
- "a tempo" item: Changes tempo back the latest tempo before any change by tempo change lines.
- tempo primo item: Changes tempo back to that indicated by the first valid marking.
- Other verbal tempo indication items have pre-defined tempo setting.
All of these settings are changable, see "Changing playback" section.
Adding tempo marks to your score
All markings are found in the Tempo palette, see Using the palettes chapter.
Tempo markings affect playback of all staffs on a score.
New Tempo change line is positioned on top of a staff, like Staff Text does. It only appears in the "FullScore" and the "Part" that features the staff. All other new tempo markings are positioned on top of system, like System Text does. System is a layout term, see Page layout concepts chapter).
To add a Metronome mark, Verbal tempo indication, or Metric modulation onto the score, use one of the following methods:
- Select a note/rest and click an item in a palette.
- Drag the item from a palette onto a note/rest.
- From the menu bar, select Add→Text, and click on Tempo marking.
- See also External links for alternative method utilizing a 3rd-party font.
To add a Metronome mark that use a suitable note value by using the beat information from the time signature:
- Select a note/rest and press the keyboard shortcut Alt+Shift+T.
To add a Tempo change line, use the methods explained in the Other lines: apply line chapter. One common method is to add it to a selected range:
- Either
- Select a note or rest, for creation of Tempo object with "Staff Text Line" behavior, or
- Select a measure for creation of Tempo object with "System Text Line" behavior;
- Shift+Click the last.
- Click an item in the palette.
Changing appearance
Playback can be configured to follow written content of Metronome mark and Metric modulation. Musescore only understand note and augmentation dot professional glyphs. Do not copy or use unicode characters from other programs or the internet. The augmentation dot is not a "Full stop / period" on the computer keyboard.
Other characters and numbers are plain characters, entered using (typing on) a computer keyboard. They have different formatting behaviors, for example changing the Properties panel:Font does not affect glyphs, see musescore 3 handbook Fonts chapter. See also Entering and editing text chapter.
Adding plain characters
- Select an object.
- Enter edit mode (double click)
- Type text.
Adding professional glyphs
- Select an object.
- Enter edit mode (double click).
- Use Special characters window: Common symbols tab, one way to open the window is Shift+F2
Tempo change lines
Tempo change lines are Musescore Line. To change appearence of the dashed line, see Other lines: line properties and Adjusting elements directly: Changing the range of a line chapters.
Changing playback
Metronome mark, Metric modulation, and Verbal tempo indication
To change the predefined tempo setting:
- Select object(s)
- Open the Properties palette
- Under Tempo section
- Enter a value in Override written tempo, this value use the special BPM unit, see Overview.
To assign a manual / overriding tempo setting:
- Select object(s)
- Open the Properties palette
- Under Tempo or A Tempo or Tempo primo section, click to change:
- Follow written tempo : uncheck to ignore written content on the score
- Set specific tempo : check to ignore written content on the score
- Enter a value in Override written tempo, this value use the special BPM unit, see Overview.
Tempo change line
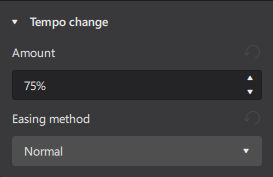
To change the manual tempo setting:
- Select object(s)
- Open the Properties palette
- Click Playback, change any if required:
- Amount: Target tempo as a percentage of original tempo. 100% means no change.
- Easing Methods: Rate of tempo change, options are
- Normal : a linear transition effect with the same rate of change from start to end
- Ease in : a transition effect with a slow change rate at the start but a quicker change rate at the end
- Ease out : a transition effect with a quick change rate at the start but a slow change rate at the end
Tempo change lines are Musescore Line. The tempo changes along the object's anchored range. To change the range, see Other lines: line properties and Adjusting elements directly: Changing the range of a line chapters.
Repeating tempo markings on other staves
A tempo marking's layout and default positioning depends on how it is added, see "Adding tempo marks to your score" section.
For tempo markings that behave like "System Text" or "System Text Line", there is a special method to mirror the object, see Staff Text, System Text and Expression Text: Repeating System Text on other staves chapter.
Tempo properties
Selected tempo markings(s) on a score can be edited with Properties panel, settings are already covered in other sections of this chapter. The Properties panel: Font property affects plain characters, but not the professional glyphs. Professional glyphs use "Musical symbols font", see "Tempo style" section. Text related settings are covered in Formatting text chapter. Line related settings are covered in Other lines chapter.
To edit the score-wide settings, see "Tempo style" section.
Tempo style
See main chapter Templates and styles
- Values of the "Musical symbols font" can be edited in Format→Style→Score.
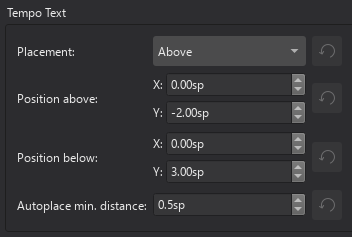
- Values of the "Style for Tempo text" can be edited in Format→Style→Tempo text.
- Values of the "Style for text inside Tempo" can be edited in Format→Style→Text styles→Tempo
- Values of the "Style for text inside Gradual Tempo Change" can be edited in Format→Style→Text styles→Gradual Tempo Change
-
Values of the "Style for text Metronome" can be edited in Format→Style→Text styles→Metronome. No object uses this profile by default, its purpose is for styling Tempo markings which have both a verbal indication part and a metronome mark part. Often the metronome mark part is non-bold and a little smaller. Source: https://github.com/musescore/MuseScore/issues/13377#issuecomment-147399…
External links
- github "a tempo" https://github.com/musescore/MuseScore/pull/15563
- create advanced metric modulation text with "Metrico" font by Florian Kretlow, PSA: If you want to write complex metric modulations, check out this awesome font Florian Kretlow made!
Lyrics
Overview
Lyrics are a form of text associated with melody lines on staves. e.g.

As you can see in the example above, lyrics are entered syllable by syllable, those within words being connected by hyphens. Underscore lines or hyphens (depending on the context) are used to indicate melismas, where a syllable extends over several notes (see below).
Lyrics are organized into verses, with verse 1 at the top and subsequent verses in order below.

Adding lyrics to your score
In order to enter new lyrics, or to edit/format existing ones, you need to be in lyrics mode.
There are two ways to enter lyrics mode:
- Start from a selected note—see Entering syllables (below).
- Start from an existing lyric syllable—see Editing existing lyrics.
Entering syllables
- Select the desired start note, and enter lyrics mode by pressing the keyboard shortcut Ctrl+L (Mac & Linux: Cmd+L). This will create a bounding box ready for text input.
- Type the syllable;
- To enter a connected syllable, press - (hyphen), then enter the new syllable.
- To move forward to a new word (from any point in a syllable), press Space, Alternatively, and only if you are at the end of a word, press → (right arrow).
- To enter a non-breaking space, type Ctrl+Space.
- To enter a melisma, see below.
- To move forward or backwards one character at a time, jumping between syllables, press →/← (right/left arrows).
- To move backwards one syllable, press Shift+Space.
Entering a melisma
A melisma is a syllable that extends over more than one note.

If the melisma is at the end of a word it should be notated by an underscore line:
- Starting from the end of the previous syllable, press _ (underscore) for as many notes as the melisma extends.
If a melisma occurs in the middle of a word it may be notated by hyphens instead:
- Starting from the end of the previous syllable press - (hyphen) for as many notes as the melisma extends.
- For long melismata, instead of repeated typing of hyphens, select the last note in the melisma and press - (hyphen). The intermediate hyphens will automatically be inserted between the previous typed syllable and that final note.
Entering multiple verses
To enter subsequent verses, simply repeat the steps shown under Entering syllables. Lyrics entry automatically starts in the space beneath the last entered verse.
In lyrics mode you can move up and down between verses using the keyboard arrows, ↑ and ↓.
Entering lyrics onto rests
By default, the cursor skips over rests in lyrics mode. However, It is possible to enter a syllable on a rest by selecting the rest, (re-)entering lyrics mode and typing the syllable. Then you can continue entering lyrics as above.
Special characters within lyrics
Characters not available from the computer keyboard may be entered in lyrics mode using the Special characters palette. A special case is highlighted below:
Elision slur
An Elision slur (lyric slur or synalepha) is a symbol used to join two syllables together under one note.
For example, to create the lyrics text below, starting with the syllable text "te":

- Type te;
- Open the Special Characters palette;
- Click one of the elision slurs in the "Common Symbols" tab
- Type A.
Entering reserved characters
For the most part, lyrics can be edited like normal text. However, as noted above, keys like - (hyphen) and _ (underscore) have a special meaning during lyrics entry. If you want to enter one of these characters as itself then an escape modifier (i.e. a shortcut) must be pressed to avoid triggering the special meaning.
| Character | Windows/Linux | macOS |
|---|---|---|
| Space ( ) | Ctrl+Space | Alt+Space |
| Hyphen (-) | Ctrl+- | Alt+- |
| Underscore (_) | Ctrl+Shift+_ | Alt+Shift+_ |
| Line feed (↵) | Ctrl+Return (or Enter on the numeric keypad) | Alt+Return (or Enter on the numeric keypad) |
Editing existing lyrics
To make additions or changes to existing lyrics, click on a syllable and use a text edit mode shortcut to enter lyrics mode.
Delete lyrics
Lyrics are automatically deleted with their parent notes. You can also delete lyrics while leaving the notes intact, by selecting the lyrics and pressing Delete.
Entering lyrics above the staff
If you wish to position all lyrics above, instead of below, the staff:
- From the menu bar, select Format→Style→Lyrics;
- Set Placement to "Above".
You can of course do the same thing by selecting all lyrics in the score and changing Position to "Above" in the text section of the Properties panel.
Changing verse number of lyrics
Each verse attached to the staff is allocated a verse number—with the lowest positioned at the top and highest at the bottom. (You can of course prepend a number to the beginning of each verse, but this is a visual indication only.)
To change the verse number, select the verse and adjust "Set to verse" in the Lyrics section of the Properties panel.
Copying lyrics
Copying lyrics within MuseScore
Lyrics are automatically copied with their parent notes, but you can also copy lyrics on their own without the notes.
Copy to the same verse
- Select a range or list of lyrics syllables;
- Apply cut/copy;
- Select a destination note in the same verse
- Paste the lyrics.
Note that the destination range should be clear of existing lyrics, otherwise the clipboard contents will be pasted on top of them.
Copy to a different verse
- Copy the entire lyrics to a text editor (e.g. Notepad in Windows). Remember to insert hyphens as well as spaces.
- Copy the entire lyrics into the clipboard.
- Position the cursor on the first lyric of the previous verse and press Enter. This will move the cursor ready for input at the start of the next verse.
- Using Ctrl+V repeatedly, paste in the lyrics syllable by syllable.
Copying lyrics to other programs
All lyrics attached to staves can be copied to the clipboard from the menu using Tools→Copy lyrics to clipboard.
Lyrics properties
See Changing verse number of lyrics.
Lyrics style
Values of the "Style for Lyrics" can be edited in Format→Style→Lyrics.
Values of the "Style for text inside Lyrics odd lines" can be edited in Format→Style→Text styles→Lyrics odd lines
Values of the "Style for text inside Lyrics even lines" can be edited in Format→Style→Text styles→Lyrics even lines
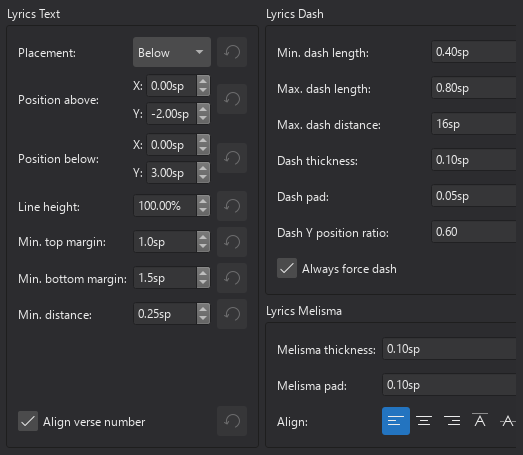
Lyrics text
- Placement / Position above / Position below: Sets the default positioning of lyrics in relation to the music staff.
- Line height: The space between verse lines.
- Min top/bottom margin: The distance above and below the lyrics block to the staves above and below.
Min. distance: The minimum distance allowed between syllables. Increase this if the lyrics are too squashed. - Align verse number:
Lyrics dash
Here you will find a number pf properties which allow you to control how hyphens between syllables are displayed:
- Min./Max. dash length: Sets the minimum and maximum length of inter-syllable dashes.
- Max. dash distance: Maximum distance allowed between dashes. Reducing this value allows more dashes to form between syllables where possible—and vice versa.
- Dash thickness: The (vertical) thickness of the dash.
- Dash pad: The distance between the - and the syllable
- Dash Y position ratio: Affects the vertical placement of the dash.
- Always force dash: Tick to ensure that a dash is always visible between syllables.
Lyrics melisma
- Melisma thickness: The (vertical) thickness of the melisma.
- Melisma pad: The distance between the melisma and the syllable
- Align:
Fingering
Types of fingering
Fingering symbols for various instruments are found in the Fingerings palette; some of these are duplicated in the Guitar palette.
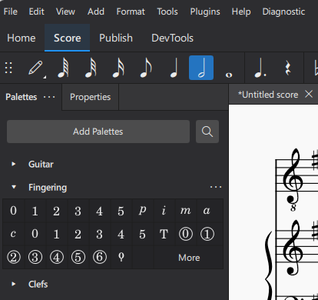
Mouse over the palette icons to reveal the names of the symbols.
The different types of fingerings are as follows:
- Fingering; In keyboard notation, used to indicate left and right hand fingering. Also used in guitar music for left hand fingering.
- LH guitar fingering: In guitar notation, 1–4, indicates the left-hand fingers. 0 (zero), an open string. T, the left hand thumb. Can also be used in keyboard music.
- RH guitar fingering: In guitar notation, used to indicate the right hand fingers, namely: p = thumb, i = index, m = middle, a = ring/annular, c = little.
- String number (circled): In guitar notation, used to indicate the strings (1–6, top to bottom). 0 (zero) is used for the open string.
- Other fingering: Lute fingerings may be found by clicking "More" in the Fingerings palette.
Adding fingering to your score
Note: If you want fingering to be displayed in tablature, right-click on the TAB, and select Staff/Part Properties…→Advanced Style Properties; then check the box labelled "Show fingering in tablature"
Adding fingering from a palette
To add fingering to a selection of notes:
- Select one or more notes;
- Click on the desired fingering symbol in a palette.
Alternatively, you can drag and drop a fingering symbol from a palette onto a single note.
When fingering is added to a note, the focus immediately shifts to the symbol, so you can adjust it right away.
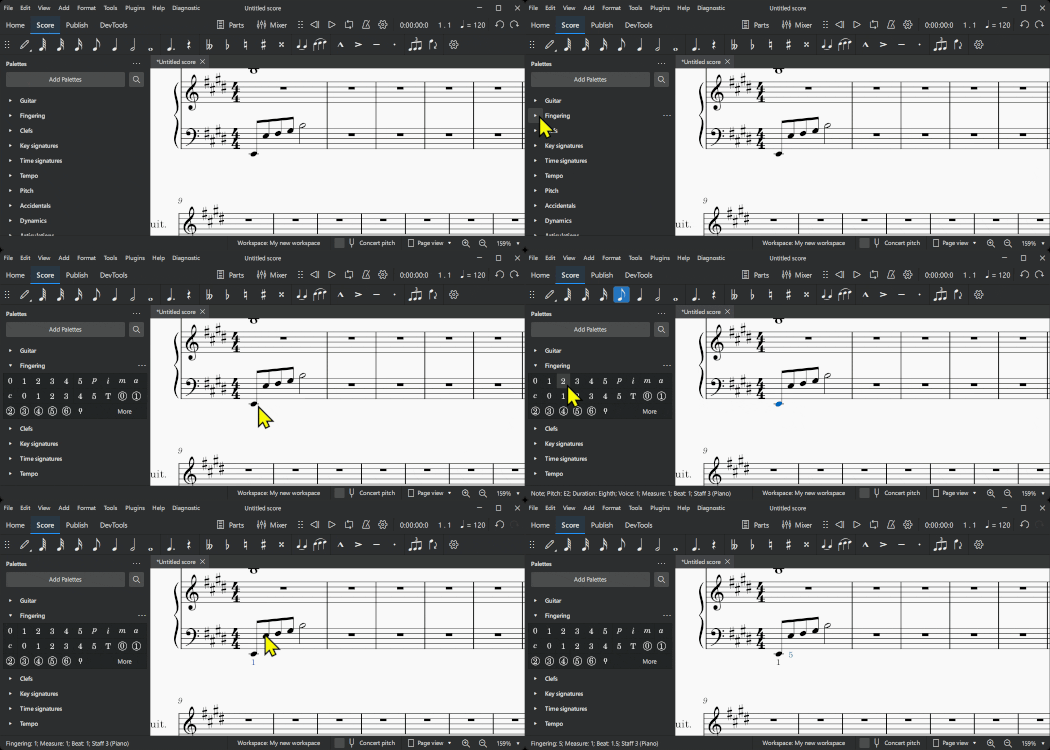
Adding fingering using a keyboard shortcut
- Select a start note;
- Choose one of the following options:
- (for any fingering) Add the desired fingering symbol from a palette (as shown above);
- (for Fingering only) Enter the custom keyboard shortcut for "Add Fingering," then type the desired number.
(Note: you can create this shortcut from the menu Edit→Preferences→Shortcuts
- Choose one of the following options:
- To move the cursor to the next note: Press Space, or Alt+→;
- To move the cursor to the previous note: Shift+Space, or Alt+←;
- Type the desired number; a fingering is added of the same type as the initial one .
- Repeat steps 3 and 4 as required;
- Press Esc, or click on an empty space in the document window, to exit.
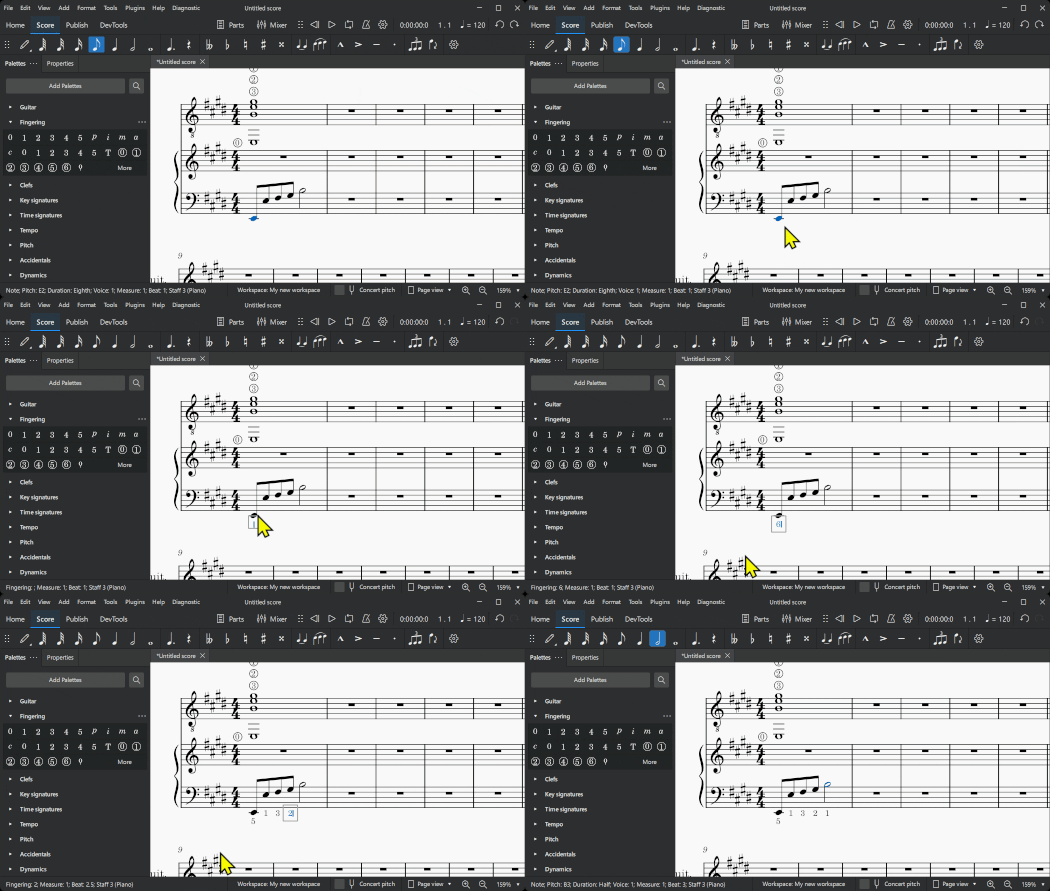
Adding fingering using the menu
- Select the start note;
- From the menu bar, select Add→Text→Fingering;
- Type the fingering number of the first note;
- Press space to move to the next note; and so on.
Adjusting position
To edit fingering position, see Changing position of elements.
Some fingerings can be flipped to the other side of the staff using the X shortcut, or the Flip direction icon on the note input toolbar.
Changing the appearance of fingering
The text formatting of fingering elements can be adjusted in the Text section of the Properties panel. See Formatting text for details.
Fingering properties
General and text properties for fingering can be edited from the Properties panel.
For General properties see General settings.
For Text properties, see Formatting text.
Fingering style
Each of the different classes of fingering have their own text style. These can be viewed and edited from the menu: Format→Style→Text styles.
See also
Chord symbols
Overview
A chord symbol is an abbreviated way of representing a musical chord and its harmony.
MuseScore supports the following notations:
- Chord symbol: Alphabetical chord name plus chord quality. e.g.
Am, - Nashville Number System (NNS): Arabic numeral plus chord quality. e.g.
6m, - Roman Numeral Analysis (RNA): Roman numeral plus chord quality. e.g.
vi.
Adding chord symbols to a score
Entering a chord symbol
- Select a start note, note slash, or rest;
- Press Ctrl+K (Mac: Cmd+K). The cursor is now positioned above the staff ready for input.
- Enter the chord symbol using the following characters:
- Root note: a, b, c, d, e, f, g. (the lower case will automatically change to upper-case when you exit the chord symbol)
- Sharp: # (hash).
- Flat: b (small letter "b").
- Double sharp: x (small letter "x") or ## (two hash symbols).
- Double flat: bb (small letter "b" twice).
- Natural: Ctrl+Shift+H (Mac:Cmd+Shift+H). However, this won't playback, the entire chord's playback decays to its root note.
- Space: Ctrl+Space (Mac: Alt+Space);
- For other symbols, see Chord symbol syntax (below).
- To move the cursor forward to the next chord/rest/beat, press Space. For other ways of moving the cursor, see navigation commands (below);
- Exit chord symbol mode by pressing Esc.
Chord names, accidentals and formatting
After you exit Edit Mode, any characters entered are automatically converted to the correct format. A root note typed in lower case turns into upper case (for alternative options, see Automatic Capitalization). And characters entered for accidentals are automatically converted into professional glyphs. For example, a "#" (hash character) automatically becomes a sharp sign (♯). Don't input, or copy and paste, unicode characters, such as U+266F (sharp sign, ♯), or U+266D (flat sign, ♭) etc, as MuseScore will not render them correctly in chord notation.
Navigation commands
The following is a summary of keyboard shortcuts used to move the cursor in chord symbol entry mode:
| Action | Command (Windows) | Command (macOS) |
|---|---|---|
| Move cursor to next note, rest, or beat | Space | Space |
| Move cursor to next beat | ; (semicolon) | ; |
| Move cursor to previous note, rest, or beat | Shift+Space | |
| Move cursor to previous beat | : (colon) | : |
| Move cursor to next measure | Ctrl+→ | Cmd+→ |
| Move cursor to previous measure | Ctrl+← | Cmd+← |
| Move cursor by duration number | Ctrl+1-9 | Cmd+1-9 |
| Exit chord symbol entry | Esc | Esc |
Chord symbol syntax
MuseScore understands most of the abbreviations used in chord symbols:
- Major: M, Ma, Maj, ma, maj, Δ (type t or ˆ for the triangle, the latter doesn't seem to work on Windows though)
- Minor: m, mi, min, -
- Diminished: dim, ° (entered with lowercase letter o, shows as ° if using the Jazz style, as o, the Greek omicron, otherwise)
- Half-diminished: ø (entered with 0, number zero, shows as ø if using the Jazz style, as 0 (zero) otherwise). Alternatively, you can, of course, choose abbreviations such as mi7b5 etc. Note: to get Dø, type "D0", not "Dm70" or "Dm0"
- Augmented: aug, +
- The following abbreviations are also valid: extensions and alterations like b9 or #5, sus, alt, and no3; inversions and slash chords, such as C7/E; commas; parentheses, which can enclose part, or even all, of a chord symbol.
Editing a chord symbol
Chord symbols are Text. Double-click on a chord symbol to enter Edit Mode, see Text editing. Use methods described above to create special characters. After you exit Edit Mode, they are automatically converted to the correct formatting.
Entering Roman numeral analysis
Not to be confused with Figured bass.
- Select a start note;
- From the menu, select Add→Text→Roman Numeral Analysis. Alternatively, set up a keyboard shortcut to do the same thing in Preferences;
- Input the RNA symbols for the chord just like normal text, as follows;
- Major chord: Upper case roman numerals
- Minor chord: Lower case roman numerals
- Diminished chord: o (lower case)
- Half-diminished chord: 0 (zero)
- Augmented chord: +
- Chord inversions: Enter up to 3 single-digit numbers, top note first
- Accidentals: enter # for a sharp, b for a flat or h for natural. These turn into a proper (and superscripted) ♯ , ♭ or ♮ right away, see entering accidentals above.
- To prevent any character from being interpreted or superscripted, prefix the character with a backslash, "\". This could be used, for example, to add a literal letter "b", "h", a hash symbol "#", or a non-superscripted number etc.
- Inversion notation using alphabet a,b,c,d can be created with the method described above.
- Inversion notation using vertically aligned arabic numerals without accidentals such as 64 can be created with the method described below.
- Inversion notation using vertically aligned arabic numerals with accidentals such as 6#3, ie altered chord, is unsupported, workaround : create Figured bass text instead; or create separate text objects and manually nudge them into place.
- For other symbols, see the images below.
- Move the cursor forward or backwards to continue entering or editing symbols for other chords;
- When RNA is completed, exit by pressing Esc, or by clicking on a blank section of the score.
RNA input offers the same keyboard shortcuts for navigation as in chord symbols (see above ).
RNA accidentals and formatting
Upon each computer keyboard input, characters are automatically converted to the correct format. MuseScore uses a specialist font, Campania, to provide the correct formatting for RNA.
Examples of RNA
Type this:

To get:

Entering a Nashville number
The Nashville Number System (NNS), is a shorthand way of representing chords based on scale degrees rather than chord letters. This allows an accompaniment to be played in any key from the same chord chart.
To start entering Nashville notation:
- Select a start note;
- From the menu, select Add→Text→Nashville Number.
Just as with standard chord symbols, you can type Nashville notation normally and MuseScore will do its best to recognize and format the symbols appropriately. The same shortcuts used for navigation when entering standard chord symbols (e.g. Space, see above) are available for Nashville notation as well.

Appearance and function overview
See also the main chapter Templates and styles.
The final visual and function of a chord symbol, Nashville Number, or Roman Numeral Analysis in a score file is determined by:
- Properties of each individual symbol on a score, By default, objects do not have any specific properties. When properties are assigned in the Properties panel, they will always be used; and
- The global profiles (per each Musescore Part and the "Full Score").
- Chord symbols, NNS, RNA use corresponding compatible values in "Style for Chord symbols" defined in Format → Style → Chord Symbols, this behavior cannot be changed. For example, Chord symbols and NNS (but not RNA) are affected by Jazz rendering style.
- Chord symbols, NNS, RNA use their respective "Style for text inside certain type" by default.Format → Style → Text Styles → Chord Symbol, Roman numeral analysis, Nashville number. This behavior can be changed in each individual object's Properties panel: More... button → Text Style dropbox option. For example, Chord symbols use "Style for text inside Chord symbol", you can switch to use the profile "Style for text inside Chord symbol (Alternate)", or any other profile. This allows two separate sets of formatting for easier editing in a reharmonization scores.
Aligning chord symbols
See main chapter Formatting text, also "Appearance and function" section above.
Using the Style menu
"Style for Chord Symbols"
The default vertical alignment of all Chord Symbols, NNS and RNA are defined in "Style for Chord symbols" Format→ Style→Chord Symbol: Positioning.
- Distance to fretboard diagram: Affects the distance between fretboard diagrams and any chord symbols above.
- Minimum chord spacing: The minimum distance allowed between chords.
- Maximum barline distance:
- Maximum shift above/below: This is used to line up chord symbols whose vertical alignment is irregular. Experiment until you get the apperance you want.
"Style for text inside certain object"
The default alignment of objects also depends on the profile used, see "Chord symbol style" section. Effect of values in style profiles are cumulative.
Using the Properties panel
To align object(s):
- Select object(s), see Selecting elements chapter.
- In Properties panel
- Under Text section, change Text style, see "Style for text inside certain object" section. Adjust Alignment, Position.
- Press Appearance button, adjust Offset. Effects are cumulative.
Transposition of chord symbols
Transposing instruments
Upon switching "concert pitch" score viewing mode, chord symbols of transposing instrument adjust themselves automatically. When chord symbols are copied and pasted, they are transposed accordingly. See also Transposition chapter.
Chords associated with guitar fretboard diagrams are not transposed automatically, see Fretboard diagrams chapter.
Transpose dialog
The Transpose dialog transposes all selected objects except NNS and RNA, see Transposition: Using Transpose dialog chapter. To disable transposing selected chord symbols, uncheck Transpose chord symbols.
Enabling automatic creation of extra chord symbols (not NNS or RNA) with capo
Musescore can be configured to create an extra bracketed chord symbol with capo next to each chord symbol (not NNS or RNA) on the score automatically. The bracketed symbol, when played using that capo, sounds identical to the unbracketed one. To enable this feature:
- In Format → Style → Chord Symbols: Capo fret position.
- Assign the capo position for the appended extra chord symbol. Default value 0 does not create extra chord symbols.
Changing Spelling of Chord Symbols (not NNS or RNA)
For chord symbols only (not NNS or RNA).
MuseScore uses letter names (A-G) by default, but you can switch the spelling system. MuseScore also automatically capitalizes, regardless of whether you entered them in upper or lower case, you can change this behavior.
Chord Spelling Systems
From the main menu, choose Format→ Style→Chord symbols. Then choose one of the following radio buttons in the spelling section:
- Standard: A, B♭, B, C, C♯,…
- German: A, B♭, H, C, C♯,…
- Full German: A, B, H, C, Cis,…
- Solfeggio: Do, Do♯, Re♭, Re,…
- French: Do, Do♯, Ré♭, Ré,...
Automatic Capitalization
From the main menu, choose Format→ Style→Chord symbols. Then choose from of the following options:
- Lower case minor chords: c, cm, cm7,...
- Lower case bass notes: C/e,...
- All caps note names: DO, RE, MI,...
You can also turn off the automatic capitalization completely, in which case note names are simply rendered the way you type them.
Changing appearance
Shown below are results of different Font face and Rendering style settings. In the third exmaple, individual objects' Font property are ignored because the Jazz rendering style is used.
Font
Font (font face, typeface, or font family) is not to be confused with Rendering style. See also Fonts.
To assign font and formatting to individual symbol on a score, use Properties panel. To assign default font, use global style profiles "style for text inside certain type". For chord symbols and NNS (but not RNA), individual object's Font property is ignored when the Jazz rendering style is used.
Rendering style of chord symbols and NNS (but not RNA)
Rendering style is not to be confused with Font option.
Rendering style is the MuseScore feature that uses extra formatting to improve engraving. It is defined in the global style profile "Style for Chord Symbol" in Format → Style → Chord Symbols . All Chord symbols are affected by the chosen rendering style, there is no individual property option. An appropriate default setting is used automatically, based on the template selected to create the score. For Jazz templates the Jazz rendering style is used, for other templates the Standard rendering style is used. The three options available are:
- Standard rendering style: chords are rendered simply with the font, no extra formatting is used.
- Jazz rendering style: MuseJazz font is used for a handwritten look, with distinctive superscript and other formatting characteristics.
- Custom rendering style: allows you to customize the look of chord symbols (and also ensures compatibility with older scores) with a Chord symbols style file (*.xml) . These files are found under installation's "styles" folder. In Windows 10, that would be C:\Program Files\MuseScore 4\styles\ . Documentation can be found in the same folder. This is for advanced users only, see external links below.
Musescore uses the following terminology:

Extension part and modifier part can use extra formatting:
- Extension scaling and Modifier scaling: This affects the size of the chord extension or of the modifier.
- Extension vertical offset and Modified vertical offset: This affects the vertical position of the chord symbol extension or of the modifier.
Changing Playback of Chord Symbols
Enabling and disabling playback
Only chord symbols and NNS create playback, RNA does not create playback.
To disable/enable playback of these objects of the Musescore program:
- Click the cog icon to the right of the playback controls
- Deselect/select Play chord symbols.
To disable/enable playback of selected object(s) on score:
- Uncheck/check Properties panel: General section : Play checkbox .
Customizing playback
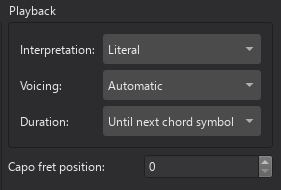
To edit selected chord symbols edit settings under Properties panel: Chord symbol section. To edit the global settings for all chord symbols and NNS (but not RNA) in a score, edit settings under Format→ Style→Chord symbols : Playback section.
- Interpretation: Literal or Jazz.
- Voicing: Automatic, Root Only, Close, Drop two, Six note, Four note, three note. See details on musescore 3 handbook Playback: Chord symbols / Nashville numbers chapter.
- Duration: Until next chord symbol, Until end of measure, Chord/rest duration
Note: The triangle symbol Δ in Musescore creates a Major triad only.
Generating chord voicings onto a staff
MuseScore allows you to generate notes from selected chord symbols and NNS (but not RNA) . The voicing depends on the playback settings explained.
To realize a selection of chord symbols:
- Make a selection of chord symbols;
- Right click on any chord in the selection;
- Click Realize chord symbols;
- Optional. Check "Override with custom options" and set the options as required;
- Click OK.
Note: The triangle symbol Δ in Musescore creates a Major triad only. To change chord quality afterwards, see "External links" section.
Chord symbol properties
Chord symbol(s) on a score can be edited with Properties panel. Text related settings are covered in Text. Playback related settings are covered in Changing Playback of Chord Symbols section above.
Chord symbol style
See main chapter Templates and styles, and Appearance and function section above.
Values of the "Style for chord symbols" can be edited in Format→Style→Chord symbols.
Values of the "Style for text inside Chord Symbol" can be edited in Format→Style→Text styles→Chord Symbol
Values of the "Style for text inside Chord Symbol (Alternate)" can be edited in Format→Style→Text styles→Chord Symbol (Alternate).
Values of the "Style for text inside Nashville Number" can be edited in Format→Style→Text styles→Nashville Number
Values of the "Style for text inside Roman Numeral Analysis" can be edited in Format→Style→Text styles→Roman Numeral Analysis
External links
To change chord quality after Generating chord voicings onto a staff, use a plugin such as:
- Chord Level Selector
- Next inversion: replaces all chord(s) in (keyboard) selection with their next inversion
To identify harmony or chord, use a plugin such as:
- Chord Identifier (Pop & Jazz) for music that features harmonic chromaticism heavily, as the RNA created has jazz influence.
- Chord ID and Roman numeral analysis for music that features stable tonality, as conventional RNA are created.
Chord symbols style file (*.xml):
- chords.xml with sub/superscript and stacked chord alterations shared by RunasSudo
- github issue Support for chords with stacked extensions #16241 workaround by MarcSabatella
Figured bass
Overview
Figured bass is a shorthand notation for representing chords on a continuo instrument (such as a keyboard), using a series of numbers and other symbols written underneath the notes of the bass line.
Adding figured bass to your score
Entering a figure
- Select the note to which the figured bass applies;
- Press the Figured Bass shortcut. The default is Ctrl+G (Mac: Cmd+G); this can be changed in Preferences: Shortcuts if desired;
- Enter the text in the "edit box" which appears.
Text format
For the relevant substitutions and shape combinations to take effect and for proper alignment, the figured bass mechanism expects input texts to follow some rules (which are in any case, the rules for a syntactical figured bass indication):
- There can be only one accidental (before or after), or only one combining suffix per figure;
- There cannot be both an accidental and a combining suffix;
- There can be an accidental without a digit (altered third), but not a combining suffix without a digit.
- Any other character not listed above is not expected.
If a text entered does not follow these rules, it will not be processed: it will be stored and displayed as it is, without any layout.
Digits
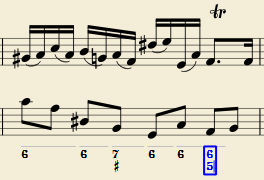
Digits are entered directly. Groups of several digits stacked one above the other are also entered directly in a single text, stacking them with Enter:
Accidentals
Accidentals can be entered using regular keys:
| To enter: | type: |
|---|---|
| double flat | bb |
| flat | b |
| natural | h |
| sharp | # |
| double sharp | ## |
These characters will automatically turn into the proper signs when you leave the editor. Accidentals can be entered before, or after a digit (and of course, in place of a digit, for altered thirds), according to the required style; both styles are properly aligned, with the accidental 'hanging' at the left, or the right.
Combined shapes
Slashed digits or digits with a cross can be entered by adding \, / or + after the digit (combining suffixes); the proper combined shape will be substituted when leaving the editor:
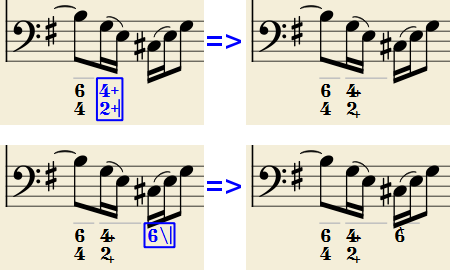
The built-in font can manage combination equivalence, favoring the more common substitution:
1+, 2+, 3+, 4+ result in  (or
(or  )
)
and 5\, 6\, 7\, 8\, 9\ result in  (or
(or  )
)
Please remember that / can only by combined with 5; any other 'slashed' figure is rendered with a question mark.
+ can also be used before a digit; in this case it is not combined, but it is properly aligned ('+' hanging at the left side).
Parentheses
Open and closed parentheses, both round: '(', ')' and square: '[', ']', can be inserted before and after accidentals, before and after a digit, before and after a continuation line; added parentheses will not disturb the proper alignment of the main character.
Notes: (1) The editor does not check that parentheses, open and closed, round or square, are properly balanced. (2) Several parentheses in a row are non-syntactical and prevent proper recognition of the entered text. (3) A parenthesis between a digit and a combining suffix ('+', '\', '/') is accepted, but prevents shape combination.
Editing existing figured basses
To edit a figured bass indication already entered use one of the following options:
- Select it, or the note it belongs to and press the same Figured Bass shortcut used to create a new one.
- Double-click it.
The usual text editor box will open with the text converted back to plain characters ('b', '#' and 'h' for accidentals, separate combining suffixes, underscores, etc.) for simpler editing.
Once done, press Space to move to a next note, or click outside the editor box to exit it, as for newly created figured basses.
Navigating by note, beat, or measure
The duration of a Figured Bass indication often lasts until the next bass note or the end of a bar. Such Figured Bass can be entered consecutively using the keyboard. (To move to a point in between, or to extend a figured bass group for a longer duration, see Duration).
- Press Space to move to the next note ready for another figured bass indication (or click outside the editor box to exit it). The editor advances to the next note, or to the rest of the staff to which figured bass is being added.
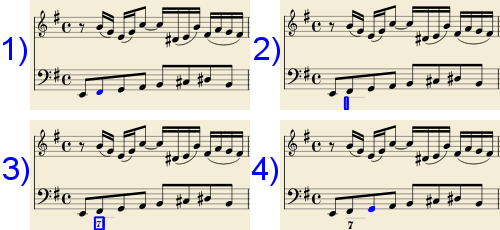
- Shift+Space moves the editing box to the previous staff note or rest.
- Tab advances the editing box to the beginning of the next measure.
- Shift+Tab moves the editing box to the beginning of the previous measure.
Duration
Each figured bass group has a duration, which is indicated by a light gray line above it (of course, this line is for information only and it is not printed or exported to PDF).
Initially, a group has the same duration of the note to which it is attached. A different duration may be required to fit several groups under a single note or to extend a group to span several notes.
To achieve this, each key combination in the table below can be used to (1) advance the editing box by the indicated duration, and (2) set the duration of the previous group up to the new editing box position.
Pressing several of them in sequence without entering any figured bass text repeatedly extends the previous group.
| Type: | to get: |
|---|---|
| Ctrl+1 | 1/64 |
| Ctrl+2 | 1/32 |
| Ctrl+3 | 1/16 |
| Ctrl+4 | 1/8 (quaver) |
| Ctrl+5 | 1/4 (crochet) |
| Ctrl+6 | half note (minim) |
| Ctrl+7 | whole note (semibreve) |
| Ctrl+8 | 2 whole notes (breve) |
(The digits are the same as are used to set the note durations)
Setting the exact figured bass group duration is only mandatory in two cases:
- When several groups are fit under a single staff note (there is no other way).
- When continuation lines are used, as line length depends on the group duration.
However, it is a good practice to always set the duration to the intended value for the purposes of plugins and MusicXML.
Entering continuation lines
Continuation lines are input by adding an '_' (underscore) at the end of the line, then pressing the keyboard combination for the required duration of the continuation line to exit the editing box. Each digit of a group can have its own continuation line. To write the continuation lines in the following example:
- Select the note to which the figured bass applies;
- Press the Figured Bass shortcut Ctrl+G (Mac: Cmd+G) to enter the editing box;
- Type 6_Enter;
- Type 4_Enter;
- Type Ctrl+6 to edit the editing box and advance the cursor.

Continuation lines are drawn for the whole duration of the figured bass group.
'Extended' continuation lines
Occasionally, a continuation line has to connect with the continuation line of a following group, when a chord degree has to be kept across two groups. Examples (both from J. Boismortier, Pièces de viole, op. 31, Paris 1730):

In the# first case, each group has its own continuation line; in the second, the continuation line of the first group is carried 'into' the second.
This can be obtained by entering several (two or more) underscores "__" at the end of the text line of the first group.
Figured bass properties
The text formatting of figured bass symbols is handled automatically by the program, based on style settings (see below). Only General and Appearance properties can be adjusted from the Properties panel..
Figured bass style
Properties of all figured bass symbols in the score can be set from Format→Style…→Figured Bass.
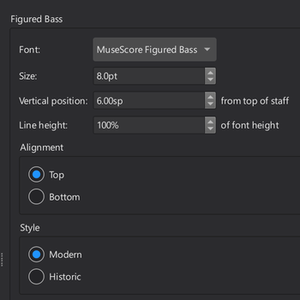
- Font: This is the preset "MuseScore Figured Bass," which is specially designed to realize figured bass notation.
- Size: Select a font-size in points.
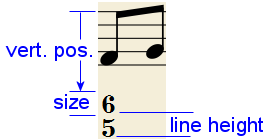
- Vertical Position: The distance (in spaces) from the top of the staff to the top margin of the figured bass text. Negative values go up (figured bass above the staff) and positive values go down (figured bass below the staff: a value greater than 4 is needed to step over the staff itself).
-
Line Height: The distance between the base line of each figured bass line, as a percentage of font size.
The following picture visualizes each numeric parameter:
-
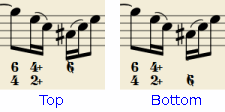
Alignment: Select the vertical alignment: with Top, the top line of each group is aligned with the main vertical position and the group 'hangs' from it (this is normally used with figured bass notation and is the default); with Bottom, the bottom line is aligned with the main vertical position and the group 'sits' on it (this is sometimes used in some kinds of harmonic analysis notations):
-
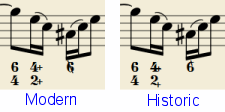
Style: Choose between "Modern" or "Historic." The difference between the two styles is shown below:
Figured bass keyboard shortcuts
| Type: | to get: |
|---|---|
| Ctrl+G | Adds a new figured bass group to the selected note. |
| Space | Advances the editing box to the next note. |
| Shift+Space | Moves the editing box to the previous note. |
| Tab | Advances the editing box to the next measure. |
| Shift+Tab | Moves the editing box to the previous measure. |
| Ctrl+1 | Advances the editing box by 1/64, setting the duration of the previous group. |
| Ctrl+2 | Advances the editing box by 1/32, setting the duration of the previous group. |
| Ctrl+3 | Advances the editing box by 1/16, setting the duration of the previous group. |
| Ctrl+4 | Advances the editing box by 1/8 (quaver), setting the duration of the previous group. |
| Ctrl+5 | Advances the editing box by 1/4 (crochet), setting the duration of the previous group. |
| Ctrl+6 | Advances the editing box by a half note (minim), setting the duration of the previous group. |
| Ctrl+7 | Advances the editing box by a whole note (semibreve), setting the duration of the previous group. |
| Ctrl+8 | Advances the editing box by two whole notes (breve), setting the duration of the previous group. |
| Ctrl+Space | Enters an actual space; useful when figure appears "on the second line" (e.g., 5 4 -> 3). |
| BB | Enters a double flat. |
| B | Enters a flat. |
| H | Enters a natural. |
| # | Enters a sharp. |
| ## | Enters a double sharp. |
| _ | Enters a continuation line. |
| __ | Enters an extended continuation line. |
Note: For Mac commands, Ctrl is replaced with Cmd.
Rehearsal marks
Overview
Rehearsal marks (sometimes called Rehearsal Letters) can be used in a number of ways. e.g.
- To identify specific points in a score to facilitate rehearsing.
- As bookmarks in the score to which you can instantly navigate—using the Find/Search command.
- To mark the various sections in the score.
Rehearsal marks are a type of system text. In a full score they show only above the top staff of a system, but appear in all instrument parts.
Rehearsal marks can be added to the score in two ways: (1) manually, allowing you to name them as you wish, or (2) automatically, which ensures that they are named in sequence
Adding a rehearsal mark to your score
Manual placement and naming
To create a rehearsal mark manually and give it a name of your own choosing:
- Click on a note (or rest) at the desired location;
- Select one of the following options:
- Press Ctrl+M (Mac: Cmd+M);
- From the menu, choose Add→Text →Rehearsal Mark;
- Enter the desired text.
Automatic placement and naming
MuseScore can name the Rehearsal Marks automatically. Do either:
- Click on a note (or rest) at the desired location, then click the [B1] rehearsal mark icon in the "Text" palette
- Drag and drop the rehearsal mark from the "Text" palette onto the score.
Notes: (1) By default, marks are added in the sequence, A, B, C etc. (2) To change the format of subsequently-added marks (to lower case letters, or numbers), edit the previous rehearsal mark accordingly. (3) Marks added between existing rehearsal marks append a number or letter to the previous mark: it is a good idea to apply the Resequence command afterwards (see below).
Using measure numbers in rehearsal marks
If you want the rehearsal marks to be displayed as measure numbers:
- Add the first rehearsal mark, then edit it to read the same as the number of the measure it is attached to;
- Add subsequent marks as shown in Automatic placement and naming (above). They will automatically adopt the measure-number format.
Resequencing rehearsal marks
MuseScore allows the user to automatically re-order a series of rehearsal marks if they have got out of sequence for any reason. Use the following method:
- Before making a selection, you can, if desired, establish a new format for the rehearsal marks (lower/upper case, number, or measure number) by manually altering the first mark in the range accordingly.
- Select the range of measures you wish to apply the Resequence command to (if there is no selection then the program assumes you wish to resequence all measures).
- From the menu, select Tools→Resequence Rehearsal Marks.
MuseScore automatically detects the sequence based on the first rehearsal mark in the selection—all rehearsal marks in the selection are then altered accordingly. The following sequences are possible:
- A, B, C etc.
- a, b, c etc.
- Numerical: 1, 2, 3 etc.
- Numerical: according to measure numbers.
Finding rehearsal marks
See Find / Go to (Navigating your score).
Repeating rehearsal marks on other staves
In most full scores any Rehearsal marks are shown only above the topmost staff of a system, but appear in all the generated instrument parts. If duplicate marks are required on lower staves they should be added as staff text.
Some templates have an additional feature, e.g. Symphony Orchestra or Classical Orchestra, see the list of templates in Staff Text and System Text chapter. On a new score created using either of the two templates listed abve, when you create a rehearsal mark above the top staff, an identical one is automatically added just above the string section. If either instance of the mark is edited the content of both is updated. If either one is removed, both are removed.
Changing appearance of rehearsal marks
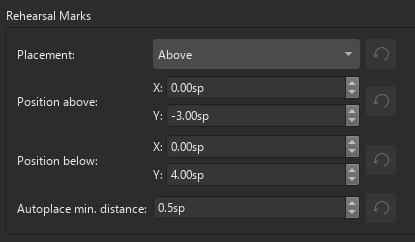
By default, rehearsal marks appear in a large bold font, enclosed in frames, and aligned to the center of the start barline of the measure. You can edit the default text properties from Format→Style→Text style.
Rehearsal mark properties
The properties of selected rehearsal marks can be changed in the Properties Panel.
Rehearsal mark style
See Templates and styles.
Values of the "Style for Rehearsal marks" can be edited in Format→Style→Rehearsal marks.
Values of the "Style for text inside Rehearsal mark" can be edited in Format→Style→Text styles→Rehearsal mark
External links
- Rehearsal letter (Wikipedia article)
Header and footer
Not to be confused with the top vertical frame and text added to the first page, when a new score is created from certain templates, see Create your first score and Using frames for additional content chapters.
Overview
The header and footer are text automatically added to the top and the bottom area of each page respectively. To add text to certain page(s) only, use frame and Musescore Text objects instead, see Entering and editing text chapter.
Adding a header or footer to your score
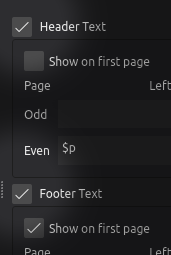
- From the main menu, select Format→Style→Header & Footer.
- Check the "Header Text" and "Footer Text" boxes as required.
Note: To create a header or footer for a Part, open and view that Part first.
Entering information
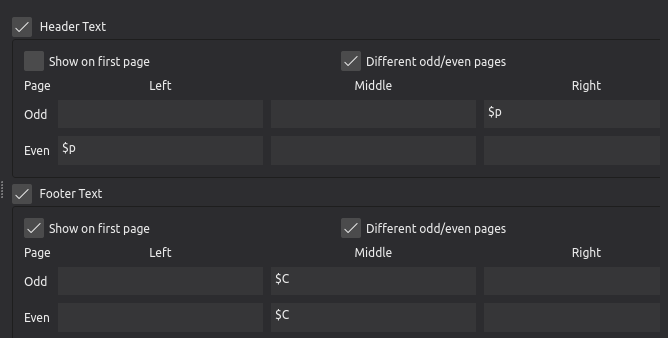
- From the main menu, select Format→Style→Header & Footer:
- The area on the top is for headers, area below it is for footers.
- Both of them are divided into two rows, labelled Odd, and Even, for content on odd and even pages respectively.
- They are also divided into three columns, labelled Left, Middle, and Right, representing the corresponding areas.
- There are three kinds of valid input:
- plain text,
- placeholder text, or special symbols, that converts into information automatically, they include
- read-only information such as the current page number, and
- editable metadata, see "Using metadata" section.
- To see a list of available placeholder text or special symbols, hover the mouse cursor over any text input area and wait for a popup box to appear. Shown below is the list for Musescore 4.2.
- Placeholder text or special symbols are case-sensitive, they must be entered letter-for-letter with the correct case. For example
- $d converts into current date
- $D converts into creation date
- $:movementNumber: converts into "Moverment number" metadata
- $:movementnumber: is invalid because of the wrong lower case 'n'
-
Part name placeholder text is only available in a Part, but not the "Full Score". Its placeholder text is $I, $i, or $:partName: . To rename a Part's name, see Parts: Renaming chapter.
Using metadata
Metadata are digital information, or tags, assigned in File→Project properties, use $:[metadata tag]: syntax to add them to header and footer. See the example in "Entering information" section, and the main chapter Project properties.
Changing the appearance of headers and footers

- From the main menu, select Format→Style→Header & Footer:
- Show on first page
- Different odd/even pages: Use different content on odd pages and even pages.
Header and footer respect page margins configured in Format→Page Settings (see the main chapter Score size and spacing). Page margins are always left blank, Musescore resizes the staffs area to show content of header and footer. Additional margin can be achieved by adjusting the Offset in style profiles, font options are also available there, see "Header and footer Style" section.
Header and footer Properties
Header and footer are not Musescore Text objects, it is not possible to select and use Properties panel to change properties of a header or footer on a particular page separately. To settings for all headers and footers, change values in the style profiles, see "Header and footer Style" section below.
To add text to certain page(s) only, use frame and Musescore Text objects instead, see Entering and editing text chapter.
Header and footer Style
See the main chapter Templates and styles
- Page numbers, only when referenced using the
$por$Psymbols, will use the Page number text style, which can be edited in Format→Style→Text styles→Page numbers - Copyright text, only when referenced using the
$cor$Csymbols, will use the Copyright text style, which can be edited in Format→Style→Text styles→Copyright - All other text in the header fields will use the Header style, which can be edited in Format→Style→Text styles→Header
-
All other text in the footer fields will use the Footer style, which can be edited in Format→Style→Text styles→Footer
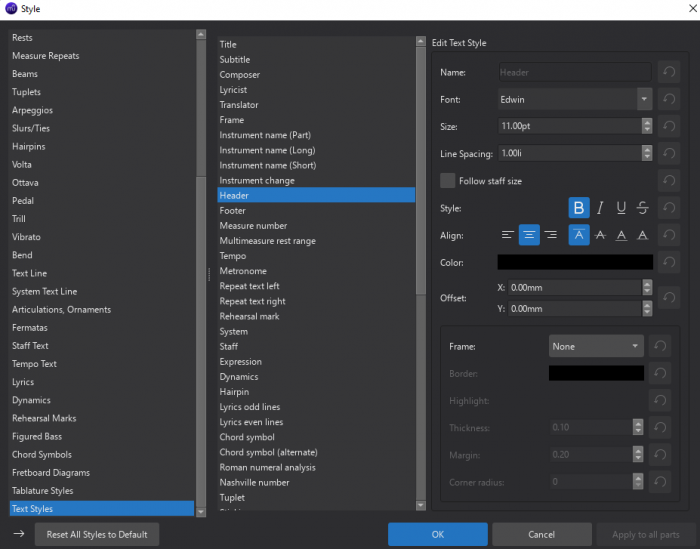
See also
- Specify a custom starting page in Format→Page Settings : First page number. See also the main chapter Score size and spacing.
Text blocks
Not to be confused with header, see Header and footer chapter.
Overview
A text block is a Text object in frame. Used together with a vertical frame that spans whole width of a page, they are designed to elegantly:
- Display the title, subtitle composer, arranger, lyricist etc at the beginning of a score.
- Display details of individual pieces within a suite.
- Display lyrics at the end of a song/hymn.
Score created from certain template contains a top vertical frame with Text objects on the first page. They are automatically assigned with information provided by user in the New Score dialog, see Setting up score : Additional score information . They are not header, header is the functionality to add text to every pages, see Header and footer chapter.
Adding text blocks to your score
Add an appropriate frame first if there is none, see Using frames for additional content.
To add a text block to a frame, either:
- Right-click on the frame and select Add , then select Text, Title, Subtitle, Composer, Lyricist, or Part name, or
- Select the frame, then from the menu bar select Add→Text → Title, Subtitle, Composer, Lyricist, or Part name . This method does not have Text option.
Every option explained above adds a blank object, regardless of information provided in New Score dialog or metadata tags (see Project properties chapter. Content entered into the said object also does not change the metadata tags. The main difference between these options is the default alignment positioning and font size, see "Text block text style" section.
Changing the appearance of text blocks
- Select a Text object.
- In the Properties panel, edit the desired property. Some useful properties are:
- Alignment under Text section.
- Offset in the window appeared after clicking on Appearance button, see also Adjusting elements directly chapter.
- Match staff size checkbox under Text section. It is collapsed inside Show more button. See Score size and spacing : Page Settings window chapter.
To save settings into a style profile, click on the ellipsis (three dots) icon to the right of a property and select “”Save as default style for this score”, see Templates and styles chapter.
Text block text Properties
The text properties of a selected text block can be changed in the Text section of the Properties panel.
Alternatively you may wish to choose a different text style altogether from the dropdown list under “Text style” (in Properties: Text→More)
Text block text Style
See the main chapter Templates and styles
- Values of the "Style for text inside Part name" can be edited in Format→Style→Text Style→Instrument Name (Part).
- Values of the "Style for text inside Text (text object type)" can be edited in Format→Style→Text Style→Frame.
- Values of the "Style for text inside Title" can be edited in Format→Style→Text Style→Title.
- Values of the "Style for text inside Subtitle" can be edited in Format→Style→Text Style→Subtitle.
- Values of the "Style for text inside Composer" can be edited in Format→Style→Text Style→Composer.
- Values of the "Style for text inside Lyricist" can be edited in Format→Style→Text Style→Lyricist.