Published on MuseScore.org

Käsikirja

This handbook is for MuseScore version 2.0 and above. It is maintained by the MuseScore community. Find out how you can help.

Aloittaminen

Tämä luku auttaa sinut asentamaan MuseScoren ja käynnistämään sen ensimmäistä kertaa. Luku näyttää myös, miten uusi partituuri luodaan.

Asennus

MuseScore toimii moninaisilla eri käyttöjärjestelmillä kuten Windowsilla, macOS:llä sekä monilla Linux-jakelupaketeilla ja useilla BSD-jälkeläisillä.

Asenna Windowsille

    Asenna

    Löydät Windows asennusohjelman MuseScoren verkkosivujen lataussivulta. Klikkaa linkkiä aloittaaksesi latauksen. Internet-selaimesi vahvistaa, että haluat ladata tiedoston. Klikkaa Tallenna tiedosto.

    Kun lataus on valmis tiedoston kaksoisklikkaaminen aloittaa asennuksen. Windows saattaa avata turvallisuusikkunan ja pyytää teitä vahvistamaan ohjelman käynnistämisen. Valitse Suorita jatkaaksesi, Näet silloin lyhyesti

    Asennuksen valmistelu

    jota seuraa

    Tilan tarpeiden laskeminen

    Jos et näe asennusohjelman ikkunaa vaan jotain muuta, on mahdollista, että msi. laajennus ei ole liitetty msiexec.exe:een. Voit joko korjatan liittämisen tai sen sijaan ladata ja ottaa käyttöön MuseScoren kannettavan version.

    Jatkaessa näet

    Tervetuloa MuseScore 2:een asennusavustaja

    Jos klikkaat Cancel, tässä tai myöhemmin, näet:

    MuseScore 2 asennusavustaja keskeytettiin

    Sen sijaan jos klikkaat Next jatkaaksesi, asennusavustaja näyttää ilmaisen ohjelmistolisenssin ehdot.

    Loppukäyttäjän lisenssisopimus

    Lue ohjelmistolisenssin ehdot, varmista, että laatikko on ruksattu kohdasta "I accept the terms in the License Agreement", ja klikkaa Next jatkaaksesi. Seuraavaksi asentaja pyytää sinua vahvistamaan MuseScoren asennussijainnin.

    Kohdekansio

    Jos olet asentamassa uudemman version MuseScoresta, mutta haluat silti pitää vanhan version tietokoneessasi, sinun pitää silloin vaihtaa kansiota (huomioi, että MuseScore 2 voi olla yhtä aikaa olemassa MuseScore 1:n kanssa ilman mitään muutoksia). Muulloin, klikkaa Next jatkaaksesi.

    Valmis asentamaan MuseScore 2

    Klikkaa Install jatkaaksesi.

    Anna asennusavustajalle aikaa asentaakseen tarvittavat tiedostot ja kokoonpanot. Näet

    Asennetaan MuseScore 2, edistyminen

    ja lopulta

    MuseScore 2 Asennusavustaja valmistunut

    KlikkaaFinish poistuaksesi asentajasta. Voit nyt poistaa lataamasi asennustiedoston.

    Käynnistä MuseScore

    Käynnistääksesi MuseScoren päävalikosta, valitse Start→Kaikki ohjelmat→MuseScore 2→MuseScore 2.

    Asennuksen poisto

    Voit poistaa MuseScoren asennuksen päävalikosta valitsemalla Käynnistä→Kaikki ohjelmat→MuseScore 2→Poista MuseScore; tai Windowsin ohjauspaneelista. Huomioi, että tämä ei poista sinun partituurejasi tai MuseScore-asetuksiasi.

    Vianmääritys

    Windows XP:ssä ja Vistassa järjestelmä saattaa estää asentajan. Jos et voi suorittaa MuseScoren asennusta, klikkaa hiiren kakkospaiikkeella lataustiedostoa ja klikkaa ominaisuudet. Jos näet viestin "This file came from another computer and might be blocked to help protect this computer", klikkaa "Unblock", "OK" ja tuplaklikkaa lataustiedostoa uudestaan.

    Ulkoiset linkit

    • How to install MuseScore on Windows without administrator rights
    • How to run MuseScore as Administrator on Windows
    • How to change the language in MuseScore

    Asenna macOS:lle

      Asennus

      Löydät Macin DMG-tiedoston (disk image) MuseScoren lataa-sivulta. Käynnistä lataus klikkaamalla macOS-linkkiä. Kun lataus on suoritettu, tuplaklikkaa DMG-tiedostoa asentaaksesi näköistiedoston.

      Install Mac

      Drag and drop the MuseScore icon to the Applications folder icon.

      Jos et ole kirjautunut ylläpitäjänä, macOS saattaa kysyä salasanaa: klikkaa Authenticate ja syötä salasanasi jatkaaksesi.

      Copying

      When the application has finished copying, eject the disk image. You can now launch MuseScore from the Applications folder, Spotlight, or Launchpad.

      Poista asennus

      Poista MuseScore Sovellukset-kansiosta, ei muuta.

      Asenna Apple Remote Desktopilla

      You can deploy MuseScore to multiple computers with the "Copy" feature of ARD. Since MuseScore is a self-contained application you can simply copy the application to the '/Application' folder on the target machines. It is also possible to install multiple versions of the application as long as their names differ.

      Ulkoiset linkit

      • How to run MuseScore 2.x on Mac OS X 10.6
      • How to change the language in MuseScore

      Asenna Linuxille

        As of MuseScore 2.0.3 you can, for the first time, get hold of a copy for Linux straight from the download page, just like Windows and Mac users. This is possible thanks to the AppImage packaging format, which runs on pretty much all Linux distributions. If you prefer, there is still the option to get it the traditional way via your distribution's package manager (but you may have to wait for it to get packaged by the relevant maintainer). Of course, you can always build from source.

        AppImage

        The AppImage format is a new way of packaging Linux applications. AppImages are portable - they don't have to be installed - and they run on pretty much any Linux distribution. Dependencies are included in the one AppImage file.

        Step 1 - Download

        Before you download an AppImage, you need to know your processor's architecture. These terminal commands will show it:

            arch

        or

            uname -m

        The output will be something like "i686", "x86_64" or "armv7":

        • i686 (or similar) - 32-bit Intel/AMD processor (found on older machines).
        • x86_64 (or similar) - 64-bit Intel/AMD processor (modern laptop and desktop computers, most Chromebooks).
        • armv7 (or later) - ARM processor (phones & tablets, Raspberry Pi 2/3 running Ubuntu Mate, some Chromebooks, usually 32-bit at present).

        Now you can head over to the download page and find the AppImage that best matches your architecture. Once downloaded, the file will be named "MuseScore-X.Y.Z-$(arch).AppImage".

        Step 2 - Give execute permission

        Before you can use the AppImage you need to give permission for it to be run as a program.

        From the Terminal:

        This command gives the user (u) permission to execute (x) the AppImage. It works on all Linux systems.

            cd ~/Downloads
            chmod u+x MuseScore*.AppImage

        Note: Use the "cd" command to change directory to wherever you saved the AppImage.

        From a File Manager:

        If you prefer to avoid the command line, there is usually a way give execute permission from inside a File Manager.

        In GNOME Files (Nautilus), simply:

        1. Right-click on the AppImage and select "Properties".
        2. Open the "Permissions" tab.
        3. Enable the option labelled "Allow executing file as a program".

        The process may be slightly different in other file managers.

        Step 3 - Run it!

        Now you should be able to run the program simply by double-clicking on it!

        When you downloaded the AppImage it was probably saved in your Downloads folder, but you can move somewhere else it at any time (e.g. you could put it on your desktop for easy access). If you ever want to remove it then simply delete it.

        Installing the AppImage (optional)

        You can run the AppImage without installing it, but you must install it if you want it to be completely integrated with your desktop environment. This has the following benefits:

        • Adds the AppImage to your Applications Menu or Launcher
        • Sets the correct icons for MuseScore's files (MSCZ, MSCX) and for MusicXML files (MXL, XML)
        • Makes the AppImage available via your File Manager's right-click "Open with..." menu

        To install it, run the AppImage from the Terminal with the "install" option (see immediately below). This copies a desktop file and various icons to your computer. If you want to remove them you will need to run the "remove" option before you delete the AppImage. This does not affect any scores created with any version of MuseScore.

        Using command line options

        Running the AppImage from the Terminal allows you to use various command line options. The AppImage has some special options in addition to MuseScore's normal command line options.

        You will need to change directory (cd) to wherever the AppImage is saved your system, for example:

            cd ~/Desktop
            ./MuseScore*.AppImage [option...]

        Or give the path to the AppImage:

            ~/desktop/MuseScore*.AppImage [option...]

        Use the "--help" and "man" options to get more information about the available command line options:

            ./MuseScore*.AppImage --help   # displays a complete list of command line options
            ./MuseScore*.AppImage man      # displays the manual page (explains what the options do)

        Distribution Packages

        Fedora

        1. Import the GPG key:

          su
          rpm --import http://prereleases.musescore.org/linux/Fedora/RPM-GPG-KEY-Seve
           
        2. Go to the download page of the MuseScore website. Click on the link for the stable Fedora download and choose the correct rpm package for your architecture.

        3. Depending on your architecture, use one of the two sets of commands to install MuseScore

          • for arch i386
              su
              yum localinstall musescore-X.Y-1.fc10.i386.rpm
           
          • for arch x86_64
              su
              yum localinstall musescore-X.Y-1.fc10.x86_64.rpm
           

        If you have difficulty with sound, see Fedora 11 and sound.
        See also the hints for the various distributions on the download page.

        External links

        • How to run the MuseScore AppImage on Linux - video
        • How to change the language in MuseScore

        Asenna Chromebookille

        Työpöytäsovellus

        MuseScoren työpöytäsovellus ei toimi luonnostaan Chrome OS -käyttöjärjestelmässä, mutta siihen on olemassa joitakin hätäratkaisuja:

        1. Via Crouton: Involves installing a Linux based operating system which runs in parallel with Chrome OS, and then installing MuseScore on Linux.
        2. Via software-on-demand service such as rollApp: By just visiting this website, you can run MuseScore in the browser, but you can only start scores from scratch and only save them to your online MuseScore account through the menu File→Save Online..., and sound and playback does not work.

        Android app (playback only)

        Alternatively, it is possible to install MuseScore's Android app on recent Chromebooks. You will need to update to the latest version of Chrome OS first. See the Chromebook support documentation for help installing Android apps on Chromebooks, and a list of supported devices. The app only supports playback of existing scores, not score editing or creation, but you can sign-in to your MuseScore account for easy access to all your scores on MuseScore.com.

        Ulkoiset linkit

        • How to run MuseScore on a Chromebook
        • Check the installation procedure from the comments in this thread
        • How to change the language in MuseScore

        Kieliasetukset ja käännösten päivitykset

          MuseScore asennetaan ja toimii "järjestelmän" kielellä (joka on käytössä suurimmalla osalla ohjelmista, ja tavallisesti riippuen maastasi ja tietokoneesi kieliasetuksista tai käyttäjätilistä).

          Vaihda kieltä

          1. Valitse päävalikosta Muokkaa→Asetukset... (Mac: MuseScore→Asetukset...);
          2. Välilehdestä Yleinen, valitse haluttu kieli pudotusvalikosta kohdasta Kieli:

            Asetukset-Yleinen_fi.PNG

          3. Päivttääksesi käännöksiä, napauta Päivitä kielten käännökset. Napauta sitten Päivitä-painikkeita kielistä, joita haluat päivittää (katso vaihtoehtoinen menetelmä alhaalta).

          Sinun täytyy sulkea ja avata uudelleen MuseScore, jotta muutokset ja päivitykset astuvat voimaan.

          Päivitä kielten käännökset

          Voit päivittää käännökset ylläolevan esimerkin mukaan asetuksien kautta, mutta on olemassa myös toinenkin tapa:

          1. Valitse päävalikosta Ohje→Resurssienhallinta;
          2. Napauta Päivitä-painiketta kielille, joita haluat päivittää.

            Resurssienhallinta-Resurssit_fi.PNG

            Tässäkin tapauksessa sinun täytyy sulkea MuseScore ja avata se uudelleen, jotta muutokset ja päivitykset astuvat voimaan.

          Katso myös

          • Auta kehittämään käännöksiä

          Ulkoiset linkit

          • How to change the language in MuseScore

          Päivitysten tarkistaminen

            Päivitysten tarkistamiseen on kaksi tapaa.

            Automatisoitu päivitysten tarkastaminen

            1. Valitse päävalikosta Muokkaa→Asetukset... (Mac: MuseScore→Asetukset...);
            2. Valitse Päivitys-välilehti:
              Dialog: Muokkaa / Asetukset... / Päivitys
            3. Ruksaa laatikko, jonka vieressä lukee "Tarkista uusin MuseScoren versio."

            Nyt MuseScore tarkistaa päivitykset jokaisen käynnistyksen yhteydessä ja ilmoittaa sinulle tarvittaessa.

            Tarkista päivitykset

            1. Valitse päävalikosta Ohje→Tarkista päivitykset:
              Päävalikko: Ohje / Tarkista päivitykset
            2. Ilmestyy päivityksen tilaa ilmaiseva valintaikkuna: joko "Ei päivityksiä saatavilla" tai "päivitys MuseScorelle on saatavilla", jota seuraa päivityksen asennukseen ohjaava linkki.

            Huomioi: Nämä vaihtoehdot ovat saatavissa vain MuseScoren Mac- ja Windows-versioille (poikkeuksena Windows Storen versio), koska vain ne voidaan päivittää suoraan sivustolta MuseScore.org. Linuxin jakelupaketeilla (ja Windows Storella) on eri mekanismeja päivitysten saatavuudelle.

            Katso myös

            • Preferences: Updates

            Perusteet

            Edellinen luku "Aloittaminen" opastaa sinut läpi asennuksen ja uuden partituurin luomisen. Luku "Perusteet" esittää MuseScoren yleiskatsauksen ja kuvaa partituurin käsittelyn yleiset toimintatavat.

            Muokkaustila

              Muokkaustilassa voit suorittaa laajan valikoiman muokkaustoimintoja yksilöllisissä parituurin elementeissä, kuten:

              • säätää kaarien, viivojen, tahtiviivojen ym. pituutta ja muotoa.
              • lisätä, poistaa ja muotoilla tekstiä tekstikappaleissa.
              • säätää useimman partituurielementin asentoa (muttei tekstin).

              Mene/poistu muokkaustilasta

              Päästääksesi Muokkaustilaan, käytä mitä tahansa seuraavia menetelmiä:

              • Tuplaklikkaa elementtiä.
              • Klikkaa oikealla hiiren näppäimellä elementtiä, ja valitse valikosta Muokkaa elementtiä.
              • Klikkaa elementtiä ja paina Ctrl+E (Mac: Cmd+E).

              Poistuaksesi Muokkaustilasta, tee mitä tahansa seuraavista:

              • Paina Esc.
              • Klikkaa tyhjää aluetta asiakirjan ikkunasta.

              Teksti

              Tekstin muokkaustilaan, katso Tekstin muokkaaminen.

              Viivat

              Viivoja—kuten yhdyskaarta, sidekaarta, kiiloja, maaleja jne.—reunustaa neliömäiset säätöpainikkeet eli "kahvat" Muokkaustilassa: valittaessa nämä muuttuvat siniseksi. Esimerkiksi sidekaari näyttää tältä:

              Esimerkkikaari Muokkaustilassa

              Loppupäiden kahvoja käytetään viivan pituuden säätämiseen. Keskimmäisiä kahvoja käytetään viivan pystyasennon säätämiseen. Side- ja yhdyskaarien tapauksessa on myös kolme muuta kahvaa kaarevuuden säätämiseksi (katso kuva yllä).

              Jotta voit muuttaa kahvan paikkaa, klikkaa sitä ja käytä pikanäppäintä (kts. alla). Voit vaihtoehtoisesti raahata kahvaa hiirellä.

              Jokainen äärikahva on liitetty pistekatkoviivalla ankkuriin viivastossa. Loppu- ja alkupään ankkurit ilmaisevat partituurin alueen rajat viivan valvonnan alaisena. Oletuksena äärikahva on sijoitettu pystysuoraan ankkurinsa ylle.

              • Siirtääksesi sekä loppukahvaa että siihen kiinnitettyä ankkuria: Klikkaa kahvaa ja käytä Shift+→ tai Shift+←.
              • Siirtääksesi loppukahvaa liikuttamatta sen ankkuria: Klikkaa kahvaa ja käytä joko vasenta/oikeaa nuolinäppäintä tai vastaavanlaista Ctrl (Mac: ⌘) komentoa. Katso pikanäppäimet alla.

              Nuotit

              Nuottien tasoittaminen

              Joskus on tarpeen siirtää nuottia oikealle tai vasemmalle, jotta saadaan vältettyä yhteentörmäys toiseen elementtiin tai ohitettua automaattinen nuotinpäiden jakaminen, kuten:

              1. Mene Muokkaustilaan halutussa nuotissa;
              2. Paina nuolinäppäintä suuntaan (vasempaan tai oikeaan), johon haluat työntää nuottia (tai käytä Ctrl+← or Ctrl+→ suuremmille säädöille);
              3. Paina Esc key. Tämä sallii nuotin varren uudelleenkirjoittamisen.

              Voit vaihtoehtoisesti valita nuotinpään ja muuttaa "Vaakasuuntaista poikkeamaa" ("Soinnun" alla) kohdassa Tarkastaja.

              Säädä nuotin varren pituutta

              1. Mene Muokkaustilaan halutussa nuotissa;
              2. Hyödynnä pikanäppäimiä (alla) laajentaaksesi tai lyhentääksesi vartta;
              3. Poistu muokkaustilasta.

              Huom: liikuttaaksesi uudelleen nuotin vartta, sinun pitää valita se ja säätää "Vaakasuuntaista poikkeamaa" Tarkastajassa.

              Pikanäppäimet

              In Edit mode the following keyboard commands can be used to change the position of either (1) a score element (e.g. ornament, accidental etc.) or (2) an adjustment handle (e.g. slur, line etc.):

              • ←: Move left 0.1 staff space.
              • →: Move right 0.1 staff space
              • ↑: Move up 0.1 staff space
              • ↓: Move down 0.1 staff space
              • Ctrl+← (Mac: ⌘+←): Move left one staff space
              • Ctrl+→ (Mac: ⌘+→): Move right one staff space
              • Ctrl+↑ (Mac: ⌘+↑): Move up one staff space
              • Ctrl+↓ (Mac: ⌘+↓): Moves down one staff space
              • Alt+←: Move left 0.01 staff space
              • Alt+→: Move right 0.01 staff space
              • Alt+↑: Move up 0.01 staff space
              • Alt+↓: Move down 0.01 staff space

              The following commands only apply to adjustment handles:

              • Shift+←: Move end handle's anchor left by one note/rest.
              • Shift+→: Move end handle's anchor right by one note/rest.
              • Tab: Go to next handle.

              See also

              • Text editing
              • Slur
              • Bracket
              • Line
              • Beam
              • Hairpin

              Paletit ja työtilat

                Nuottipohjan vasemmalla puolella on Työtila. Työtilan voit ottaa näkyviin ja piilottaa hyödyntämällä valikkokomentoa Näytä → Paletit tai pikanäppäintä F9 (Mac: fn+F9).

                Työtila vuorostaan sisältää lukuisia paletteja. Kukin paletti on kansio, joka sisältää joukon musiikkiin liittyviä symboleita.

                Työtilat

                MuseScore tarjoaa kaksi esiasetettua työtilaa: Perus (oletusasetus) ja Edistynyt (tila, jossa on enemmän paletteja ja symboleita). Voit vaihdella näiden kahden välillä käyttämällä työtilapaneelin pohjassa sijaitsevaa pudotusvalikkoa. Palettien nimet työtilan sisällä on lueteltu selkeästi paletit-otsikon alla.

                animated gif showing how to switch between basic and advanced palette

                Huom: Esiasetettujen työtilojen paletteja tai niiden sisältöä ei voida muokata. Tehdäksesi niin, sinun täytyy ensin luoda mukautettu työtila (alla).

                Yksittäinen palettitila

                Jos haluat sallia vain yhden paletin avautumisen kerrallaan, klikkaa oikella hiiren painikkeella työtilaa ja merkkaa "Yksittäinen paletti"-laatikko.

                Telakointi/telakoinnin irroittaminen

                Telakoidaksesi tai irroittaaksesi työtilan, kts. Sivupaneelit.

                Mukautettu työtila

                Luodaksesi muokattavan työtilan:

                1. Valitse olemassaoleva työtila. Hyödynnä tarvittaessa työtilan alapuolella sijaitsevaa pudotusvalikkoa.
                2. Klikkaa + -painiketta, syötä nimi uudelle työtilalle ja paina Tallenna. Uusi työtila on lisätty paneeliin.

                Vaihtoehtoisesti voit hyödyntää valikon vaihtoehtoa:

                1. Valitse Muokkaa → Työtilat ja valitse työtila.
                2. Valitse Uusi. Täytä työtilan nimi ja klikkaa OK.

                Kunnes mukautettu työtila on luotu, voit vapaasti sijoittaa, poistaa, nimetä ja järjestää uudelleen paletit sen sisällä: uusia symboleita voi lisätä ja olemassa olevia poistaa jne. Lisätietoja, kts. Mukautetut paletit ja Palettivalikko (alla).

                Paletit

                Avaa/sulje paletti

                • Klikkaa kerran paletin nimeä tai sen vierellä olevaa nuolen kärkeä.

                Käytä palettisymboleja

                Palettisymbolin voi asettaa partituuriin käyttämällä jotakin seuraavista tavoista:

                • Valitse yksi tai useampi partituurin elementti ja tuplaklikkaa palettisymbolia.
                • Raahaa ja pudota symboli haluamaasi partituurin elementtiin viivastossa.

                Esimerkiksi tenuto-merkin (—) lisääminen valittuihin nuotteihin:

                1. Valitse haluamasi nuotit.
                2. Artikulaatiot & Korukuviot paletista, tuplaklikkaa tenuto-symbolia.

                Objekteja voi kopioida, liittää ja monistaa, kunnes ne on lisätty partituuriin—kts. Kopioi ja liitä.

                Esiasetetut paletit (Edistynyt työtila)

                Toiminnoiltaan monipuolisempi Edistynyt työtila sisältää seuraavat paletit:

                • Korusävelet
                • Nuottiavaimet
                • Sävellajimerkinnät
                • Tahtiosoitukset
                • Tahtiviivat
                • Viivat
                • Arpeggiot ja glissandot
                • Hengitykset ja tauot
                • Hakasulkeet
                • Artikulaatiot ja korukuviot
                • Etumerkit
                • Dynamiikka
                • Sormitus
                • Nuotinpäät
                • Tremolo
                • Kertaukset ja hypyt
                • Tempo
                • Teksti
                • Vaihdot ja välistäjät
                • Säkkipillin koristekuviot
                • Palkin ominaisuudet
                • Kehykset ja Tahdit
                • Otelautakuvat

                Custom palettes

                Once you have created a custom workspace (see above), and providing editing is enabled (see Palette menu below), you can customize the palettes within it to your own requirements.

                To add an existing score element (such as a line, text, dynamic, fretboard diagram etc.) to a custom palette, press and hold Ctrl+Shift, then drag the symbol onto the palette. Symbols from the Master palette can also be added to a custom palette.

                Palette menu

                Right-clicking on the name of a palette in a custom workspace brings up a menu with a range of options:

                • Palette Properties...: This allows you to make adjustments to the appearance of the open palette:

                  Paletin ominaisuudet

                  • Name
                  • Cell Size: Width, Height
                  • Element Offset: Adjusts the vertical offset of all elements in the palette.
                  • Scale: Makes all palette elements appear larger or smaller.
                  • Show grid: Tick this box to visually divide the palette into cells, one for each element.
                  • Show ‘More Elements…’: Tick this box to create a cell which opens the Master Palette.
                • Insert New Palette: Creates a new empty palette.
                • Move Palette Up / Move Palette Down: Allows you to reorder the palettes.
                • Enable Editing: Tick this option if you want to be able to edit a palette.
                • Save Palette: Save as an .mpal file.
                • Load Palette: Load an .mpal file.
                • Delete Palette

                Right-clicking on an element within a palette (if editing of the palette is enabled) brings up a menu with the following options:

                • Clear: Removes the element from the palette
                • Properties...: Opens the Palette Cell Properties dialogue:
                  • Name: The tooltip that appears when you mouse over the element.
                  • Content offset (X, Y): Adjust the position of the element in the palette.
                  • Content scale: Make the element appear larger or smaller in the palette.
                  • Draw staff: Draws the five lines of a musical staff behind the palette element.
                • More Elements: Opens the relevant Master Palette section.

                Note: Changing values in "Palette Cell Properties" only affects the appearance of elements in the palette. It does not change their sizes or offsets on the score page.

                Master palette

                Music symbols not part of the palettes in the Advanced workspace can be found in the Master palette by pressing Z or Shift+F9 (Mac: fn+Shift+F9).

                Behavior of applied text and lines

                If the symbol you are adding to the score from a palette contains a text element (e.g. staff text, dynamic, fingering, volta etc.), then properties such as font-type, font-size, text color, and alignment will adapt according to the following rules:

                1. Text properties which have not been altered by the user will adopt the relevant, prevailing text styles.

                2. Custom text-properties—i.e. those changed by the user before saving the symbol to a custom palette—remain as customized.

                When adding a line, line properties always remain unchanged (i.e. as set by the user before saving to a custom workspace, or as predefined in the Basic/Advanced workspaces).

                See also

                • Master palette

                Tarkastaja ja kappaleen ominaisuudet

                  Most score elements have properties that can be edited in one of two ways:

                  • Click on any element, and many of its properties can be viewed and changed from the Inspector panel on the right-hand side of your screen.

                  • Right-click on an element and select an option with the word Properties in it. This option opens a dialog with advanced properties, only available for certain types of elements.
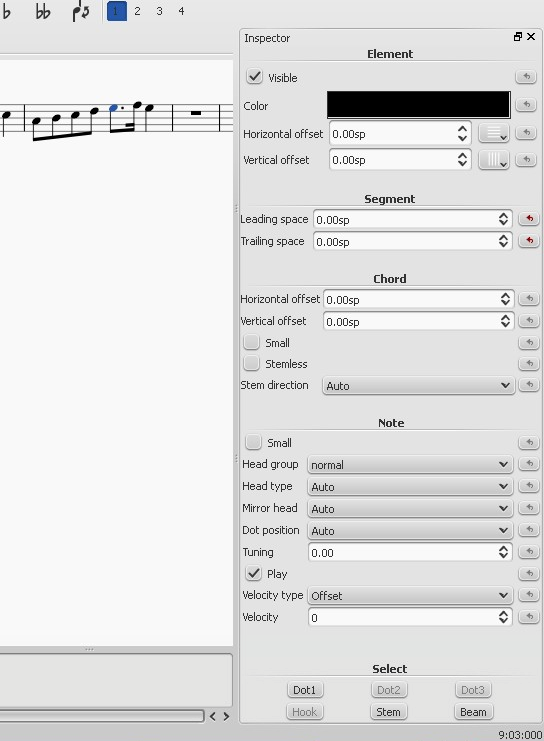
                  Inspector

                  The Inspector is shown by default on the right of your screen. It can be displayed or hidden from the menu: select View and check/uncheck Inspector, or use the shortcut F8 (Mac: fn+F8).

                  In the Inspector, the properties of any selected object are displayed and can be edited. This applies to virtually every single element in the score window—notes, text, barlines, articulations etc. Multiple elements can also be selected and edited simultaneously, as long as they are of the same type. However, if the selected objects are of different types, then the Inspector restricts you to editing color and visibility only.

                  The Inspector panel can be un-docked to become a floating panel by clicking the double-chevron symbol or double-clicking the top bar of the panel.

                  Inspector top bar

                  To re-attach the panel double-click on the top bar again. See also: Side panels.

                  Inspector categories

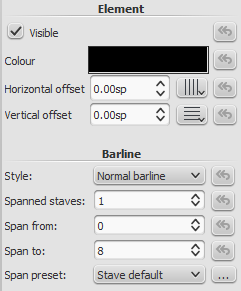
                  When you select one or more elements of a specific type, the properties which can be edited are conveniently divided into categories in the Inspector. Categories can be identified by their bold, centered lettering. For example, if you select a barline, you will see the following displayed at the top of the Inspector:

                  Tahtiviivan tarkastaja

                  For details about how to adjust the properties of various score elements, refer to the relevant sections in the handbook. However, a few general points will be covered here:

                  Element

                  All score elements, except frames, display this category in the Inspector when selected. The various options are as follows:

                  • Visible: Uncheck this box to make selected elements invisible: alternatively, use the shortcut V (toggle). Invisible elements do not appear in the music when printed out or exported as a PDF or image. If you still want them to remain on display in the document window, make sure that the "Show Invisible" option is selected in View → Show Invisible. Invisible elements will then be colored light gray.

                  • Color: Click on the rectangle to open a "Color Select" dialog. Adjust the color and opacity of selected elements.

                  • Horizontal offset / Vertical offset: Allows you to position selected elements exactly (in terms of space units). A positive number moves the elements right or down; a negative number moves the elements left or up. Snap to grid buttons are also provided.

                  Element Group

                  This category is displayed only when you have selected a mixture of different types of elements, and allows editing of color and visibility only.

                  Segment

                  This category is used to increase or decrease the space before/after an element in a music staff. Adjusting leading/trailing space here also affects any associated lyric syllables.

                  Chord

                  This category is displayed only if notes are selected. Any change to a notehead property under Chord affects the whole chord (i.e. all the notes in one voice) at that location—and not just the selected note. If you want to make changes to the position of just one note in a chord, then use the Element category (above).

                  Note

                  This category allows you to make changes to selected notes (but for note position—see Element). It contains the following properties:

                  • Small: Make notehead smaller (you can specify the relative size of all small notes from the menu: Style → General… → Sizes…).
                  • Head group: See Notehead groups.
                  • Head type: See Notehead types.
                  • Mirror head: Position notehead to the left or right of the stem (default is "Auto").
                  • Tuning: Adjust tuning of note to the nearest cent.
                  • Play: Unticking this box silences the note.
                  • Velocity type: Sets the MIDI velocity of notes directly. Chose one of two options:
                    • Offset: Make the value shown in "Velocity" relative to the previous dynamic marking.
                    • User: Make the value shown in "Velocity" absolute (i.e. the MIDI velocity is unaffected by dynamic markings).
                  • Velocity: Set the MIDI velocity according to the option displayed in "Velocity type."
                  • Fix to line: When ticked, the note is fixed to the top line of the standard 5-line staff.
                  • Line: A positive number moves the "fixed" note down; a negative number moves it upwards.

                  Select

                  This category appears differently according to the selection you have made:

                  • If you select a notehead, the "Select" category displays buttons which allow you to easily switch the selection to the stem, beam, hook, duration dot (or dots) or tuplet number associated with the notehead (see image below).

                  Inspector: Select category

                  • If you select a range of measures, the "Select" category allows you to select either all notes, grace notes (from version 2.1) or rests.

                  Beam

                  This section is displayed in the Inspector when you select one or more note beams, and allows you to make fine adjustments to beam position and angle, and also change the spacing of beamed notes. See Adjust beam with the inspector.

                  Clef

                  This section appears when you select a clef: the tick box allows you to turn on/off the display of a preceding courtesy clef.

                  clef_inspector.png

                  Properties dialogs

                  Properties of some objects are accessed by right-clicking on the object and choosing a "Properties" option from the context menu: these are in addition to the object's properties displayed in the Inspector.

                  (Note: Properties should not be confused with Styles. Changes to properties only affect the single element selected; all style controls apply to the entire score.)

                  Articulation properties

                  Right-click on an articulation and select Articulation Properties... See Articulations and ornaments.

                  Fretboard diagram properties

                  Right-click on a fretboard diagram and select Fretboard Diagram Properties... Allows you to create custom fretboard diagrams. See Edit fretboard diagram.

                  Line properties

                  Right-click on a line and select Line Properties... There are settings for the beginning, end, or continuation of the line. You can add or remove text, adjust the text's placement, and set the length and angle of optional hooks. Click the ... button to access text properties for text included in the line. See Custom lines and line properties.
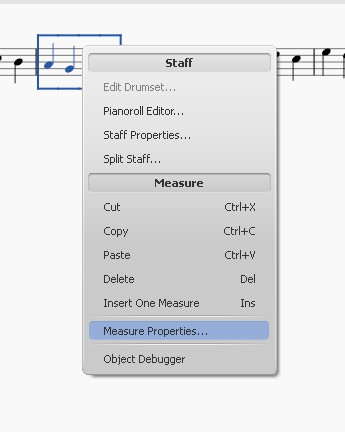
                  Measure properties

                  Right-click on an empty part of the measure and select Measure Properties... Adjust visibility, bar duration, repeats, stretch and numbering. See Measure properties.
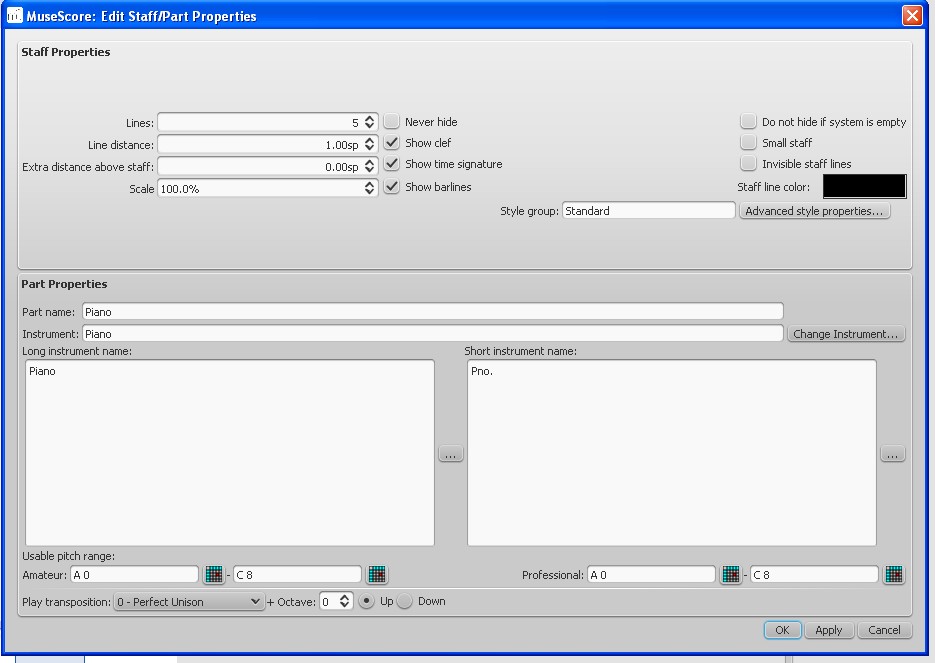
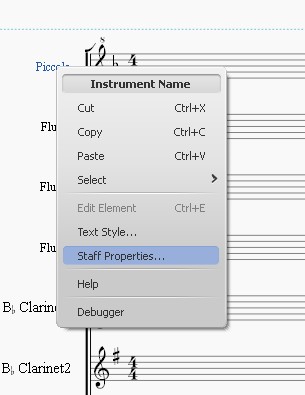
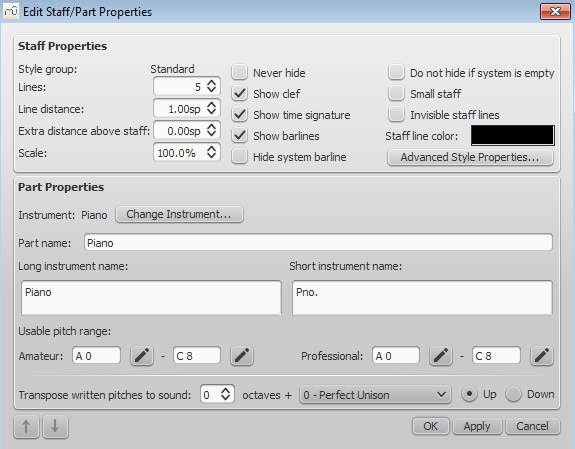
                  Staff properties

                  Right-click either an empty part of a measure or the name of an instrument and select Staff Properties... This dialog allows you to adjust attributes of both the single staff and the instrument it is a part of. See Staff properties.

                  Text properties

                  Right click on a text-based element and select Text Properties... See Text styles and properties. If the element is a line with text in it, see → above.

                  Time signature properties

                  Right-click on a time signature and select Time Signature Properties... Used to adjust appearance of time sig. and beam properties of notes. See Time signatures.

                  See also

                  • Measure operations
                  • Note input
                  • Layout and formatting
                  • Staff properties
                  • Part extraction
                  upload
                  Liite Koko
                  Note inspector.jpg 67.14 KB
                  Staffproperties.jpg 91.41 KB
                  Buttonstaffproperties.jpg 1.03 KB
                  Staffproperties2ndaccess.jpg 22.51 KB
                  View_en.png 25.03 KB
                  Note inspector.png 133.85 KB
                  Measure Properties 1.png 53.21 KB
                  notes.png 2.65 KB
                  inspector_select.png 3.25 KB
                  Barline inspector.png 10.85 KB
                  Measure Properties 2.png 60.54 KB
                  inspector-top-bar.jpg 3.08 KB
                  Previous_Next_Buttons.png 7.36 KB
                  Staff_Properties_en.png 30.14 KB
                  clef_inspector.png 2.09 KB

                  Tahtioperaatiot

                    Huom: Varmistaaksesi, että sijoitetut tai liitetyt tahdit näkyvät oikein, monitahtiset tauot pitäisi olla poissa päältä (paina M).

                    Valitse

                    Yksittäinen tahti

                    • valitaksesi yksittäisen tahdin, klikkaa tyhjää tilaa tahdin sisäpuolella.

                    Tahtien valikoima

                    • To select a continuous range of measures, see Shift + click selection and Shift selection.

                    Sijoita

                    Sijoita tyhjä tahti partituuriin

                    Käytä jotakin seuraavista vaihtoehdoista:

                    • Valitse tahti, sitten paina Ins (no shortcut on Mac).
                    • Select a measure then chose from the menu: Add→Measures→Insert Measure.

                    Sijoita useita tahteja

                    Käytä jotakin seuraavista vaihtoehdoista:

                    • Select a measure, then press Ctrl+Ins (no shortcut on Mac); fill in the "Number of measures to insert" field and press OK.
                    • Select a measure then chose from the menu: Add→Measures→Insert Measures...; fill in the "Number of measures to insert" field and press OK.

                    Lisää

                    Lisää tyhjä tahti partituurin loppuun

                    Käytä jotakin seuraavista vaihtoehdoista:

                    • Paina Ctrl+B (Mac: ⌘+B).
                    • Valitse valikosta: Add→Tahdit→Lisää tahti loppuun.

                    Lisää monta tahtia partituurin loppuun

                    Käytä jotakin seuraavista vaihtoehdoista:

                    • Paina Alt+Shift+B (Mac: Option+Shift+B); täytä kenttä "Lisättävien tahtien määrä" ja paina OK.
                    • Valitse valikosta: Luo→Tahdit→Lisää tahteja loppuun...; täytä kenttä "Lisättävien tahtien määrä" ja paina OK.

                    Poista

                    Poista yksittäinen tahti

                    1. Klikkaa tahtia;
                    2. Paina Ctrl+Del (Mac: Cmd+Del); tai valitse valikosta Muokkaa→Tahdit→Poista valitut tahdit.

                    Delete a range of measures

                    1. Select the range of measures to delete (see above);
                    2. Press Ctrl+Del (Mac: Cmd+Del); or from the menu, select Edit→Measures→Delete Selected Measures.

                    Notes: (1) In multi-staff scores, measure deletion also removes all corresponding measures in the other staves of the system; (2) If you wish to delete only the measure contents (and not the measure itself), use the Del command instead at step "2."

                    Properties

                    To edit the properties of a measure, right-click an empty part of the measure and select Measure Properties...:

                    Dialog: Measure Properties

                    You can use the Previous/Next buttons, at the bottom left of the dialog, to navigate to the previous or next measure.

                    Staves

                    • The visible property allows you to show/hide the notes and staff lines for the current measure.
                    • The stemless property allows you to show/hide all note stems for the current measure. Notes that normally have a stem such as half notes (minims) and quarter notes (crotchets) only show the note head when marked as stemless.

                    Measure duration

                    This feature allows you to adjust the time signature of a single measure regardless of the time signature indicated in the score. You can use it to create a pickup measure (also known as anacrusis or upbeat), cadenza, ad lib section etc.

                    measure_duration.png

                    • Nominal is the apparent time signature and cannot be edited.
                    • Actual can be set to anything you like regardless of the nominal time signature.

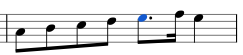
                    Example: In the image below, the quarter note pickup measure has a nominal time signature of 4/4, but an actual time sig. of 1/4. The measures in the middle are in normal 4/4 time. The complementary measure at the end of the staff, with a dotted half note, has an actual time sig. of 3/4.

                    Incomplete measures

                    Other

                    Exclude from measure count

                    Use "Exclude from measure count" for "irregular" measures, i.e. ones that should not get counted in the measure numbering. Normally, a pickup measure is marked as "Exclude from measure count".

                    Add to measure number

                    You can also use the "Add to measure number" option to influence the measure numbering. You can enter positive or negative numbers here. Please note that this affects all subsequent measures. A value of "-1" has the same effect as marking a measure to be excluded from measure count.

                    Layout stretch

                    You can increase or decrease horizontal space between score elements (notes, rests, etc.) with this option. This provides a more precise control over the exact same measure spacing property as the menu commands or keyboard shortcuts for Increase/Decrease Stretch ({ and }), which are accessed outside of the Measure Properties dialog while a measure is selected.

                    Play Count (as of version 2.1) / Repeat count (prior to version 2.1)

                    If the measure contains an end repeat barline, you can define how often it is played.

                    Break multi-measure rests

                    This property will separate a multi-measure rest at the start of the selected measure. This option should be checked before you turn on the "Create multi-measure rests" option in Style→General..., in the "Score" tab.

                    Multi-measure rests are automatically broken at important breaks, such as rehearsal marks, time signature changes, double barlines, irregular measures, etc. The default for scores is off, for parts is on.

                    Numbering

                    MuseScore automatically numbers the first measure of each System (except for the first system, actually except for a measure with the number 1), but more numbering options are possible. From the main menu, choose Style→General..., in the left pane, choose the "Header, Footer, Numbers" tab. At the bottom of the right pane is the "Measure Numbers" ("Bar Numbers") section.

                    Mark the checkbox next to the "Measure Numbers" ("Bar Numbers") to turn on automatic measure numbers.

                    Mark "Show first" if you want the first measure numbered.

                    Mark "All staves" if you want numbers on all staves. Otherwise, only the top staff of each system shows measure numbers.

                    Choose to show numbers on "Every system" which numbers the first measure of each line, or show numbers by "Interval" and specify the size of the interval. For example, an interval of 1 numbers every measure; an interval of 5 numbers every fifth measure.

                    Split and join

                    You may want have to have a longer or shorter measure without changing the time signature. You can change a measure's duration in Measure Properties, but there is now a new option to split or join measures. (Beams may be automatically modified.)

                    Join measures

                    1. Select the measures you want to join;
                    2. From the menu bar, select Edit→Measure→Join Selected Measures.

                    Note: If you select measures on only one staff in a score with multiple staves, the same measures will be joined in each staff of the system.

                    For example, the image below shows the result of applying the Join command to four measures in the top staff:

                    Example of joined measure

                    Split a measure

                    1. Select a note (or chord);
                    2. From the menu bar, select Edit→Measure→Split Measure Before Selected Note.

                    Note: If you select only one note from one staff, each staff of the system will be split at the same place.

                    External links

                    • How to delete measures
                    • How to span a measure over multiple systems
                    • How to get scores without time signature (and clef)

                    Stemmaäänet

                      Ääni on musiikillinen säe tai osa, jolla voi olla muista äänistä riippumatta oma rytmi samalla nuottiviivastolla. Ääniä kutsutaan joskus muissa nuotinnosohjelmissa "tasoiksi" (layer).

                      Jokaisella nuottiviivastolla voi olla enintään neljä ääntä. Moniäänisessä tahdissa tavallisesti ääni 1 esittää ylästemmoja ja ääni 2 alastemmoja.

                      Moniääninen tahti

                      Note: The feature called "Voices" should not be confused with "vocal staves," which can be added from the Instruments dialog (accessed by pressing I). When creating a closed SATB score, use Voices 1 and 2 for Soprano and Alto parts on the top staff, and use Voices 1 and 2 on the bottom staff for Tenor and Bass parts—do not use Voices 3 and 4 for Tenor and Bass.

                      When to use voices

                      • If you need stems pointing in opposite directions within a chord, on a single staff.
                      • If you need notes of different durations within a single staff, played simultaneously.

                      How to enter notes in different voices

                      The following instructions show you how to notate a passage of music in two voices:

                      1. Enter voice 1 notes first: Make sure you are in note input mode : the Voice 1 button becomes highlighted in blue in the toolbar. Enter the notes in the top voice first. When inputting, some notes may have down-stems, but these will flip automatically when the second voice is added.

                        The following excerpt shows a treble staff with just the voice 1 notes entered:

                        Voice 1 notes

                      2. Move cursor back to start of section: When you have finished entering a section of voice 1 notes, press the ← key repeatedly to move the cursor, note-by-note, back to the first note of the section; or alternatively use Ctrl+← (Mac:Cmd+←) to move the cursor back one measure at a time. Or else you can simply exit note input mode (press Esc) and click directly on the first note.

                      3. Enter voice 2 notes: Make sure you are in note-input mode and that the voice 1 note at the beginning of the section is selected. Click on the "Voice 2" button Voice 2 button (on the right of the toolbar), or use the shortcut Ctrl+Alt+2 (Mac: Cmd+Option+2). Enter all the lower voice notes (down-stem).

                      The following image shows the above example after the addition of voice 2 notes:

                      Voices 1 and 2

                      Deleting and hiding rests

                      While the rests of voices 2, 3, and 4 can be deleted, rests in voice 1 are permanent. However, they can be hidden, if required, by making them invisible. To hide a rest, select it and press V; or uncheck the "Visible" checkbox in the Inspector (see also Visibility options).

                      Exchange voices of notes

                      To swap the notes between any two voices:

                      1. Select a range of measures;
                      2. From the Menu bar, select Edit → Voices;
                      3. Exchange any two voices from the list.

                      Notes: (a) The selection can encompass content of any voice, but only two will be processed at once. (b) If you select a partial measure the operation will still apply to the whole measure.

                      Move notes to another voice (without swapping)

                      You can also move notes from one voice to another (without note-swapping):

                      1. Ensure you are not in note input mode.
                      2. Select one or more noteheads (in any voice).
                      3. Click on the destination voice in the Note Input toolbar or use the shortcut Ctrl+Alt+1–4 (Mac: Cmd+Option+1-4).

                      Note: For a successful move, the following conditions should be met:

                      • The chord(s) in the destination voice must be the same duration as the note(s) to be moved there.
                      • There is enough rest duration in the destination voice to accommodate the new notes.
                      • The note(s) cannot be connected by a tie.

                      See also

                      • Voices: keyboard shortcuts
                      • Shared noteheads

                      External links

                      • How to merge/combine/implode two staves in one with two voices
                      • Video tutorial: How To Write Two Parts On One Staff: Voices

                      Kopioi ja liitä

                        MuseScore tukee standardia kopiointi-, leikkaus-, liitä- ja (versio 2.1) vaihda leikepöydältä -komentoja. Näitä komentoja voidaan soveltaa:

                        • sävelalueille: esim. partituurin osan kertaukseen tai siirtää musiikkiote iskulla tai tahdilla.
                        • muihin partituurin elementteihin: esim. artikulaatiot, viivaston teksti, dynamiikat, sormitus jne.

                        Huom: Viivoja ei voida kopioida, mutta niitä voidaan jäljentää (kts. alla).

                        Kopioi-/liitä-/vaihda-/ komentoihin pääsee käsiksi kolmella eri tavalla:

                        • muokkausvalikosta (dokumentti-ikkunan yläpuolella).
                        • painamalla osoitinlaitteen kakkospainikkeella elementtiin tai elementteihin, mikä tuo esille toimintovalikon.
                        • käyttämällä yhtä tai useampaa yleistä pikanäppäintä.

                        Yhteenveto toiminnoista

                        Toiminto Näppäimet (Win) Näppäimet (Mac) Pikavalikko Päävalikko
                        Leikkaa Ctrl+X Cmd+X Leikkaa Muokkaa → Leikkaa
                        Kopioi Ctrl+C Cmd+C Kopioi Muokkaa → Kopioi
                        Liitä Ctrl+V Cmd+V Liitä Muokkaa → Liitä
                        Vaihda leikepöydältä Ctrl+Shift+X Cmd+Shift+X Vaihda leikepöydältä Muokkaa → Vaihda leikepöydältä

                        Huom: Ennen kuin suoritat kopioinnin, leikkaamisen, liittämisen tai vaihdon loppuun, sinun täytyy olla normaalitilassa. Paina Esc-näppäintä to poistuaksesi normaalitilaan.

                        Nuotit

                        Voit leikata, kopioida, liittää tai vaihtaa nuotteja seuraavasti:

                        Kopioi tai leikkaa

                        kopiomalla/leikkaamalla yksittäisen soinnun

                        1. Paina ja pidä Shift-näppäintä pohjassa ja klikkaa soinnussa olevaa säveltä.
                        2. käytä kopiointi- tai liitä- vaihtoehtoa (kts. luettelo yllä).

                        kopiomalla/leikkaamalla sarjan sointuja

                        1. Klikkaa ensimmäiseen nuottiin tai tahtiin, jonka haluat valita.
                        2. Käytä näppäinyhdistelmää Shift+Click viimeiseen nuottiin tai tahtiin, jonka haluat valita. Valitsemaasi aluetta korostaa sininen suorakulmio.
                        3. Käytä kopionti- tai liitä- vaihtoehtoa. (kts. luettelo yllä).

                        Liittäminen

                        1. Klikkaa nuottia tai tahtia, josta haluat liittämäsi valinnan alkavan.
                        2. Käytä kopionti- tai liitä- vaihtoehtoa. (kts. luettelo yllä).

                        Vaihda leikepöydältä

                        Saatavilla versiosta 2.1 ja eteenpäin, vaihda leikepöydältä -toiminto yhdistää kaksi komentoa yhdeksi: (1) Ensiksi se korvaa valitun osan partituurista leikepöydän sisältöön, aivan kuten liitä-komentokin; (2) Toiseksi, se siirtää ylikirjoitetun partituurin osan takaisin leikepöydälle, aivan kuten kopiontikomentokin.

                        Toimintoa voidaan käyttää esimerkiksi kahden samanpituisen partituurin osan, A:n ja B:n , vaihtamiseen:

                        1. Valitse valinta A, sitten käytä leikkaustoimintoa;
                        2. Poista valinta (painamalla Esc-näppäintä tai klikkaamalla dokumentti-ikkunan tyhjää aluetta);
                        3. Paina Shift ja klikkaa nuottia valinnan B alusta tai jos B alkaa tahdin alusta, voit yksinkertaisesti myös valita tahdin;
                        4. Käytä Vaihda leikepöydältä- toimintoa (kts. luettelo yllä).
                        5. Valinta B on nyt leikepöydällä. Liitä se takaisin askeleen "1" tyhjäksi jättämään partituurin alueeseen.

                        Kopioi vain yksittäisen sävelen sävelkorkeus

                        On mahdollista kopioida vain nuotin sävelkorkeus (ilman muita ominaisuuksia) klikkaamalla nuotinpäätä ja soveltamalla tavallista kopiomista ja liittämistä tai kopioimista ja leikepöydältä vaihtamista. Kohdenuotin sävelkorkeus muuttuu samaksi kuin kopioidun nuotin, mutta aika-arvo pysyy ennallaan.

                        Muut elementit

                        Muita partituurin elemettejä (kuten viivaston teksti, dynamiikka, sormitus, sointukaaviot jne.) voi leikata, kopioida ja liittää yksitellen. Artikulaatiot (sforzato, staccato jne.), taas sallivat monivalinnan.

                        Huom: Leikepöydältä vaihto -komento on tarkoitettu käytettäväksi vain musiikin osiin eikä muihin partituurin elementteihin.

                        Kopioi tai leikkaa

                        1. Valitse elementti (tai elementit).
                        2. Käytä vaihtoehtoja Kopioi tai Leikkaa (kts. taulukko yllä).

                        Liitä

                        1. Klikkaa nuottia, johon haluat valitsemasi alueen alkavan.
                        2. Käytä yhtä Liitä -vaihtoehdoista (kts. taulukko yllä).

                        Artikulaatioiden tapauksessa, liittäminen tapahtuu kohdenuotteihin tarkalleen samassa (jatkuvassa tai ajoittaisessa) järjestyksessä kuin ne olivat alkuperäisessäkin valinnassa.

                        Pikakertaus

                        Kopioidaksesi ja liittääksesi nuotin, tahdin tai kohdan nopeasti:

                        1. Valitse sointu, tahti tai kohta kuten kuvattu yllä.
                        2. Paina R .

                        MuseScore kopioi ja liittää valitun nuotinnoksen pisteeseen välittömästi viimeisen nuotin jälkeen valinnassa. Kaikki olemassa oleva musiikki kohdealueessa korvataan.

                        Jäljennä

                        Kopioidaksesi ja liittääksesi tekstielementin, viivan tai muun objektin välittömästi:

                        1. Pidä pohjassa Ctrl+Vaihtonäppäin (Mac: Cmd+Shift), klikkaa elementtiä ja raahaa mihin partituurin kohtaan tahansa.
                        2. Vapauta hiiren painike ja valittu elementti on jäljennetty uuteen sijaintiin.

                        Valintasuodin

                        Valintasuodin sallii sinun valita tarkalleen , mitkä äänet ja elementit haluat sisällyttää valintaasi.

                        • Näyttääksesi valintasuotimen, paina F6 (Mac: fn+F6); tai valitse valikosta Näytä→Valintasuodin.

                        Valintasuodin näkyy oletuksena Palettien alla. Vaihtaaksesi näkymän sijainnin, katso Tarkastelu ja navigointi: sivupaneelit.

                        Eesimerkiksi: Oletetaan, että haluat kopioida tahtien 1 ja 2 kulun seuraavasti (katso kuva) tahteihin 3 ja 4:

                        selection_filter_example.png

                        1. Varmista, että Valintasuodin näkyy (kts. yllä);
                        2. Poista ruksi kohdasta "Artikulaatiot & korukuviot" ja "Kaaret";
                        3. Kopioi ja liitä halutut tahdit (tässä esimerkissä, tahdit 1-2 tahteihin 3-4).

                        Huom: Valintasuodin toimii myös vaihda leikepöydältä -komennon kanssa.

                        Katso myös

                        Jos haluat muuttaa nuotteja niin, että et muuta niiden rytmiä, saat yhdistää transponoinnin tai sävelkorkeuden muuttamisen kopiointiin ja liittämiseen.

                        Ulkoiset linkit

                        • Video tutorial: Lyrics, copying & dynamics

                        Tarkastelu ja navigointi

                          Tämä kappale tarkastelee vaihtoehtoja, jotka ovat saatavilla Näytä valikosta, ja Suurennus ja Sivunäkymä/Jatkuva näkymä valikoissa (jotka sijaitsee työkalupalkissa partituurin yläpuolella). Se myös esittää yksityiskohtaisesti eri navigaatiokomentoja ja -toimintoja.
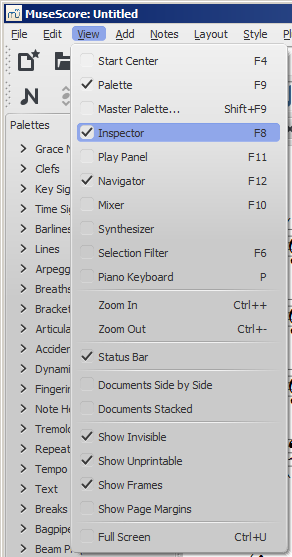
                          Näytä-valikko

                          Näytä sivupalkit/paneelit

                          • Aloituskeskus: F4
                          • Paletit: F9
                          • Pääpaletti: Shift+F9
                          • Tarkastaja: F8
                          • Toistopaneeli: F11
                          • Navigaattori: F12
                          • Mikseri: F10
                          • Syntetisaattori
                          • Valintasuodin: F6
                          • Pianokoskettimisto: P

                          Lähennä/loitonna

                          On olemassa monta tapaa lähentää tai loitontaa partituuria:

                          • Pikanäppäin:

                            • Lähennä: Ctrl++ (Mac: Cmd ++)
                            • Loitonna: Ctrl +- (Mac: Cmd +-).
                          • Näytä-valikko:

                            • Lähennä: Näytä→Suurenna
                            • Loitonna: Näytä→Pienennä.
                          • Hiiri

                            • Lähennä: Rullaa hiiren rullaa ylöspäin samalla, kun painat pohjassa näppäintä Ctrl (Mac: Cmd)
                            • Loitonna: Rullaa hiiren rullaa alaspäin samalla, kun painat pohjassa näppäintä Ctrl (Mac: Cmd).
                          • Pudotusvalikko: Säätääksesi täsmällisen zoomin, käytä hyväksi pudotusvalikkoa vakiotyökalupalkissa asettaaksesi partituurin suurennoksen (25–1600 %) tai näytä se käyttämällä vaihtoehtoja "Sivun leveys", "Koko sivu", tai "Kaksi sivua".

                            Zoom

                          • Palautaaksesi 100% zoomin: Hyödynnä pikanäppäintä Ctrl+0 (Mac: Cmd+0).

                          Työkalupalkit (display)

                          As of MuseScore 2.1, this menu option allows you to hide or display the toolbars above the document window: File Operations, Playback Controls, Concert Pitch, Image Capture, Note Input (see Toolbars below).

                          Show Status bar

                          The Status bar, at the bottom of the screen, gives information about selected score elements. Tick/untick this option to display or hide.

                          Split display

                          It is possible to split the document display so as to view two documents at once, or to view two different parts of the same document. Tabs allow you to choose which document to display in each view. You can drag the barrier separating the two scores to adjust the amount of space in the window devoted to each:

                          • Documents Side by Side: Divides the window vertically into two score views.
                          • Documents Stacked: Divides the window horizontally into two score views, one above the other.

                          split_display.png

                          Visibility options

                          This section allows you to display or hide various non-printing elements:

                          • Show Invisible: View/hide elements that have been made invisible for printing and export. If this option is ticked, invisible elements are shown in the score window as light gray.
                          • Show Unprintable: View/hide breaks and spacer symbols.
                          • Show Frames: View/hide the dotted outlines of frames.
                          • Show Page Margins: View/hide Page Margins.

                          Full screen

                          Full Screen mode expands MuseScore to fill your screen so more content is visible.

                          Page/Continuous View

                          You can switch between two different views of the score using the drop-down list in the toolbar area:

                          Viewing Modes

                          Page View

                          In Page View, the score is formatted as it will appear when printed or exported as a PDF or image file: i.e. page by page, with margins. Line and page breaks are automatically applied—where possible—so that the score fits within the space available. You are free to override the automatic layout by adding your own line, page or system breaks.

                          Continuous View

                          In Continuous View, the score is shown as one unbroken system. Even if the starting point is not in view, measure numbers, instrument names, clefs, time and key signatures will always be displayed on the left of the window.

                          Example of continuous view

                          Note: Because the layout is simpler, MuseScore may perform faster in Continuous View than Page View.

                          Työkalupalkit

                          Työkalut

                          Työkalupalkkialue sijaitsee Päävalikon ja dokumentti-ikkunan välissä. Se sisältää symboleja, jotka sallivat sinun suorittaa erinäisiä toimintoja. Se voidaan jakaa seuraaviin työkaluriviin:

                          • Tiedostotoiminnot: Uusi partituuri, Lataa partituuri, Tallenna, Tulosta, Kumoa, Tee uudelleen.
                          • Zoom/Sivunäkymä.
                          • Toistosäätimet: Ota käyttöön MIDI, Hyppää alkuun, Toista/Pysäytä, Silmukkatoisto, Soita kertaukset, Metronomi.
                          • Soiva sävelkorkeus: Näyttää partituurin kirjoitettuna tai soivana äänialana.
                          • Kuvakaappaus: Sallii sinun ottaa tilannekuvan tietystä kohtaa partituuria.
                          • Nuotinsyöttö: Nuotinsyöttötila, Kesto, Yhdyskaari, Tauko, Tilapäiset etumerkit, Käännä varren suunta, Ääni (1, 2, 3, 4).

                          To choose which toolbars to display, right-click on an empty space in the toolbar area (or on the title bar of the Inspector) and, from the menu, check or uncheck the required options. This menu also allows you to view or hide the Piano keyboard, Selection sidebar, Palettes, the Inspector, and (if already displayed) the "Drum Tools" (i.e. Drum input palette).

                          These display options can also be accessed in the View menu, and, as of 2.1, in View→Toolbars.

                          Side panels

                          The workspaces, Inspector and Selection filter are conveniently displayed as side panels to the left and right of the score window. To undock a side panel use one of the following methods:

                          • Drag the panel;
                          • Click on the double chevron at the top of the panel;
                          • Double click in the title area at the top of the panel.

                          To dock a panel use one of the following procedures:

                          • Drag the panel to the top/bottom of an existing side panel and it will stack vertically above/below that panel.
                          • Drag the panel to the middle of an existing side panel and it will overlay that panel. Both panels can then be accessed by tabs.

                          Alternatively, double-clicking the title bar of the panel will restore it to its previously docked position.

                          Navigation

                          There are various commands available to help you navigate through the score. These are listed under Keyboard shortcuts: Navigation.

                          Navigator

                          The Navigator is an optional panel which allows you to navigate a long score more easily, or go to specific pages. To view/hide, go to the View→Navigator, or use the shortcut F12 (Mac: fn+F12). It appears at the bottom of the document window if scrolling pages horizontally, or on the right-hand side of the document window if scrolling pages vertically (see Preferences: Canvas).

                          Navigator

                          The blue box represents the area of the score that is currently visible in the main window. You can drag either the blue box or the scroll bar, or click on an area to immediately go to it.

                          Find

                          The Find function allows you to speedily navigate to a specific measure, rehearsal mark or page number in the score:

                          1. Press Ctrl+F (Mac: Cmd+F), or select Edit→Find. This opens the Find (or Go to) bar at the bottom of the workspace.
                          2. Use one of the following options:
                            • To go to a measure, enter the measure number (counting every measure starting with 1, irrespective of pickup measures, section breaks or manual changes to measure number offsets).
                            • To go to a rehearsal mark, enter its name (the first character must be a letter for it to be "found", but subsequent text can be letters or numbers; the search is case insensitive).
                            • To go to a numerical rehearsal mark (esp. one that does not match the measure number), enter the number using the format rXX (where XX is the rehearsal mark. To find a rehearsal mark that starts with "R" use rrXX. To find a rehearsal mark that starts with "P" and continues with a number, use rpXX). This works starting with version 2.1.
                            • To go to a page, enter the page number using the format pXX (where XX is the page number; this also means that prior to version 2.1 you won't find a rehearsal mark that starts with "P" and continues with a number).

                          See also

                          • Save/Export/Print
                          • File format
                          • Layout and formatting

                          Valintatilat

                            Objects in the score—such as notes, measures, articulations etc.—can be selected in several ways: (1) one at a time, (2) as a continuous range, or (3) as a list.

                            Select a single object

                            Most score objects can be selected by simply clicking on them in "normal" (i.e. not note-input) mode.

                            Select a single note

                            1. Make sure you are not in note input mode;
                            2. Click on a note.

                            Note: Selecting a single note then copying and pasting it, will only copy and paste the pitch—not duration or other properties (such as stemless). To copy the entire note, including all properties, you need to hold down Shift—as for chord selection (below).

                            Select a chord

                            1. Make sure you are not in note input mode;
                            2. Press and hold Shift, then click on a note in the chord.

                            Select a single measure

                            • Click on a blank space within the measure.

                            Note: To select a range of consecutive measures, see Shift selection and Shift + click selection (below).

                            Select a continuous range of objects

                            There are several ways to select a continuous range of notes, chords or measures:

                            1. Shift selection

                            1. Make sure you are not in note entry mode;
                            2. Select the first note, chord, rest or measure in the range. You can extend the selection up or down to adjacent staves, if needed, using Shift+↑ or ↓;
                            3. Then choose one of the following options:
                              • To advance the selection one chord at a time to the right: Press Shift+→.
                              • To advance the selection one chord at a time to the left: Press Shift+←.
                              • To advance the selection one measure at a time to the right: Press Shift+Ctrl+→ (Mac: Shift+Cmd+→).
                              • To advance the selection one measure at a time to the left: Press Shift+Ctrl+← (Mac: Shift+Cmd+←).
                              • To advance the selection to the beginning of the line: Press Shift+Home (Mac: Shift+Fn+←).
                              • To advance the selection to the end of the line: Press Shift+End (Mac: Shift+Fn+→).
                              • To extend the selection to the beginning of the score: Press Shift+Ctrl+Home (Mac: Shift+Cmd+Fn+←).
                              • To extend the selection to the end of the score: Press Shift+Ctrl+End (Mac: Shift+Cmd+Fn+→).

                            2. Shift + click selection

                            To select a range of notes or rests:

                            1. Make sure you are not in note entry mode;
                            2. Click on the first note or rest in the range;
                            3. Press and hold Shift, then click on the last desired note or rest.

                            Note: The final selected element can be in the same staff or in staffs above or below the initial note/rest. All selected elements will be enclosed in a blue rectangle, including associated lines and articulations (but not voltas). You can repeat the operation to extend the selected range as required.

                            Select a range of measures
                            1. Click on a blank space in the first desired measure;
                            2. Hold down Shift, then click on a space in the last measure of the desired range.

                            Note: As with selecting notes, the range can be extended vertically as well as horizontally.

                            3. Drag selection

                            This method can be used to select notes or rests, or, independently, to select non-note symbols such as staccato dots, lyrics etc.:

                            • Press and hold Shift, then drag the cursor across the desired range.

                            4. Select All

                            This method selects the whole musical score including notes, rests and associated elements. Use one of the following options:

                            • Press Ctrl+A (Mac: Cmd+A).
                            • From the menu bar, select Edit → Select All.

                            5. Select section

                            This method is used to select a section—a region of the score starting and/or ending with a section break:

                            1. Click on an empty space in a measure in the section;
                            2. From the menu bar, select Edit → Select Section.

                            Note: See Copy and paste: Selection filter to disable certain types of elements from being selected in a range selection.

                            Select a list of objects

                            To select a list (or discontinuous range) of score elements:

                            1. Click on the first element;
                            2. Hold down Ctrl (Mac: Cmd) and successively click on the desired additional elements.

                            Note: This method cannot be used to select measures. Use single or range selection instead.

                            Select all similar

                            To select all elements of a specific type (e.g., all barlines, all text elements, all staccato markings):

                            1. Select an element;
                            2. Right click and chose Select…;
                            3. Several options are available:

                              • All Similar Elements: Selects all elements in the score similar to the chosen object.
                              • All Similar Elements in Same Staff: Selects all elements in the same staff similar to the chosen object.
                              • All Similar Elements in Range Selection: only applies if a range has been selected. Selects all elements in the range similar to the chosen object.
                              • More...: opens a dialog that lets you fine-tune more options. For example, if you have a notehead selected, the dialog will look something like this (as of version 2.1—previous versions had fewer options):

                              Dialog: Select / More...

                              Select

                              • Same notehead: In this example, only noteheads of the same group will be selected;
                              • Same pitch: Only noteheads of the same pitch will be selected;
                              • Same type: All noteheads (of any group) will be selected;
                              • Same duration: Only noteheads of same duration will be selected;
                              • Same note name: Noteheads of that name in all octaves will be selected;
                              • Same staff: Only noteheads on the same staff will be selected.

                              Action

                              • Replace selection: The default option: starts the selection from scratch;
                              • Add to selection: Keeps everything you have already selected, and adds the current selection to it;
                              • Search in selection:
                              • Subtract from selection: Keep everything you have already selected, but takes away the current selection.

                            What selections are useful for

                            • Copy and paste
                            • Edit mode
                            • Inspector and object properties
                            • Tools

                            See also

                            • Basics chapter, esp. Note input
                            • Notation chapter, esp. Accidental
                            • Text chapter, esp. Tekstin muokkaaminen and Grid-based movement of symbols and staff text

                            Kumoa ja tee uudelleen

                              MuseScoressa on rajoittamaton määrä kumoa / tee uudelleen toimintoja.

                              Vakiopikanäppäimet ovat:

                              • Kumoa Ctrl+Z (Mac: ⌘+Z)
                              • Tee uudelleen Ctrl+Shift+Z or Ctrl+Y (Mac: ⌘+Shift+Z)

                              Tai hyödynnä työkalurivin painikkeita: Kumoa/Tee uudelleen

                              Tallenna/vie/tulosta

                                MuseScoressa Tiedosto-valikon alta voi löytää vaihtoehtoja, kuten Tallenna..., Tallenna nimellä..., Tallenna kopio..., Tallenna valinta..., Tallenna verkkoon..., Vie..., Vie stemmat... ja Tulosta....

                                Valikko: tiedosto

                                Tallenna

                                Tallenna..., Tallenna nimellä..., Tallenna kopio..., ja Tallenna valinta... sallivat sinun tallentaa paikallisia MuseScore-tiedostoja (.mscz and .mscx).

                                • Tallenna...: Tallentaa nykyisen partituurin tiedostoksi.
                                • Tallenna nimellä...: Tallentaa nykyisen partituurin uudeksi tiedostoksi.
                                • Tallenna kopio...: Tallentaa nykyisen parituurin uudeksi tiedostoksi, mutta jatkaa alkuperäisen tiedoston muokkaamista.
                                • Tallenna valinta...: Tallentaa valitsemasi tahdit uudeksi tiedostoksi. Varmistaaksesi MuseScore 2.1:n aikaisemmissa versioissa, että tiedosto on tallennettu oikein, tahtiosoituksen pitää näkyä valitun kohdan ensimmäisessä tahdissa, ellei se ole 4/4.
                                • Tallenna verkkoon...: Tallentaa nykyisen partituurin sivulle MuseScore.com (kts. Partituurien jakaminen verkossa).

                                Vie

                                Vie... ja Vie stemmat... sallivat sinun luoda kolmannen osapuolen tiedostoja, kuten PDF, MusicXML, MIDI, ja eri ääni- ja kuvatiedostomuotoja.

                                Valintaikkunassa Vie, voit valita, mihin tiedostomuotoon haluat viedä:

                                Valintaikkuna: vie

                                • Vie...: Vie nykyisen partituurin haluamallesi tiedostomuotoon.
                                • Vie stemmat...: Export current score and all linked parts to separate files in format of your choice.

                                MuseScore remembers which format you picked the last time and makes that the default for the next time.
                                There is a known issue with Windows XP and Vista, where you have to manually (un)set the filename's extension when choosing a different format than the one selected the previous time.

                                Note: Uncompressed MuseScore format (MSCX) is available in both 'Save' and 'Export'.

                                Tulosta

                                Print... allows to print your MuseScore file directly to a printer from MuseScore. Depending on your printer you will have different options, but generally you can define the page range, number of copies and collation.

                                If you have a PDF printer installed, you could also "export" to PDF using that, although this is not recommended.
                                For this to work properly with Adobe PDF, make sure to uncheck Rely on system fonts only, do not use document fonts in Printer properties.

                                Katso myös

                                • File format
                                • Part extraction

                                Partituurien jakaminen verkossa

                                  Go to musescore.com/sheetmusic to view other scores from MuseScore.

                                  You can save and share your scores online at MuseScore.com. You can choose to save a score privately for personal access from any computer, or share it publicly. MuseScore.com enables the viewing and playback of scores in your web browser - an additional feature entitled VideoScores allows synchronization between the score and a YouTube video. For use outside of a web browser, you can download the score in a variety of formats (including PDF, MIDI, MP3, MusicXML, and the original MuseScore file).

                                  Create an account

                                  1. Visit MuseScore.com and click on "Create new account". Pick a username and enter a valid email and press "Create New Account".
                                  2. Wait a few minutes for an email from MuseScore.com support. If no email arrives, check your spam folder.
                                  3. Click the link in the email and visit your user profile to change your password.

                                  Share a score directly from MuseScore

                                  To save a score online:

                                  1. Make sure that the Concert Pitch button is off, and that the individual parts are correctly transposed.
                                  2. From the menu, select File→Save Online.... The "Log in to MuseScore" dialog will appear:

                                    MuseScore Save Online

                                  3. Enter your email address or MuseScore username, and password, then click OK. Note: If you don't have a MuseScore account yet, create one first by clicking on the "Create an account" link. That will open your browser app and bring you to musescore.com/user/register.

                                  4. Upon successfully logging in, you'll be able to enter your score information.

                                    Enter the score information

                                    • Title: The title of the score.
                                    • Description: The descriptive text that will appear next to it.
                                    • Make the score private: If ticked, the score can only be viewed via a private link. If unticked, the score is visble to all.
                                    • License: Chose an appropriate copyright license from the drop-down list. Note: Creative Commons license, allows people to use your scores under certain restrictions.
                                    • Tags: You can add tags to help identify scores on MuseScore.com. Use commas to separate multiple tags.
                                  5. In case you already saved the score online earlier, it will automatically update the existing one, and, as of version 2.1, you can enter some additional information in a changlog section of the dialog. Uncheck Update the existing score to save online as a new score.

                                    Check to update an existing score

                                  6. (As of version 2.1) If you are using a different SoundFont than the default one and if you are able to export MP3 files, a checkbox "Upload score audio" will be visible and enabled. If the checkbox is checked, MuseScore will render the audio of the score using the synthesizer settings and upload the audio to MuseScore.com.

                                  Upload a score on MuseScore.com

                                  You can also upload a score directly on MuseScore.com.

                                  1. Click the Upload link on MuseScore.com.
                                  2. You have the same options as with the Save Online menu.
                                  3. You have also access to more information, such as Genre.

                                  Note: Should you reach the five score upload limit, you can still upload scores directly from MuseScore, but only the last five are visible. If you wish more than this amount, upgrade to a Pro Account first.

                                  Edit a score on MuseScore.com

                                  If you want to make changes to one of your scores on MuseScore.com, edit the MuseScore file on your own computer, save it, and then do the following:

                                  • If you originally shared the score directly from within MuseScore, simply go to File→Save Online... again to update the online score.
                                  • If you originally uploaded the score via the Upload page on MuseScore.com, then you must follow these steps to update the online score:
                                    1. Go to the score page on MuseScore.com.
                                    2. Click the three dots menu ⋮ on the right and choose "Update this score".
                                    3. In the form, you can upload a replacement score file as well as change the accompanying information and privacy settings.

                                  Switch to the direct method of updating an online score

                                  It is much more convenient to update online scores from directly within MuseScore than by updating the score manually from the score page. Follow these steps if you originally uploaded the score via the Upload page and now want to switch to the direct method:

                                  1. Go to the score page on MuseScore.com and copy the URL.
                                  2. Open the score file on your computer with MuseScore.
                                  3. From the menu, select File→Score Properties... and paste the URL into the "Source" field.

                                  Now whenever you want to update the online score simply go to File→Save Online....

                                  External links

                                  • How to delete a score saved on MuseScore.com

                                  Soiva sävelkorkeus

                                  Voit halutessasi näyttää partituurin kirjoitettuna tai soivana äänialana. Kirjoitettu sävelkorkeus ilmaisee partituurin sellaisena kuin sen kuuluisi näyttää tulostettuna muusikoiden luettavaksi. Valmistelun aikana saatat kuitenkin pitää sopivampana nähdä transponoivat soittimet nuotinnettuna niin kuin ne kuulostavat ilman transponointia. Tässä tapauksessa pitäisi sinun valita "Soiva sävelkorkeus".

                                  Vaihtaaksesi partituurin näkymää kirjoitetun- ja soivan äänialan välillä, noudata yhtä seuraavista vaihtoehdoista:

                                  • Paina työkalupalkissa yläoikealla sijaitsevaa Soiva sävelkorkeus -painiketta. Kun painike on korostettu, partituuri on soivassa sävelkorkeudessa.
                                  • Valitse valikkopalkista Nuotit ja ruksaa tai poista merkintä vaihtoehdosta Soiva sävelkorkeus.

                                  Ennen partituurin tulostamista, PDF-vientiä tai tallentamista verkkoon pitäisi sinun varmistaa, että Soiva sävelkorkeus -painike ei ole valittuna ja yksittäiset osat ovat asianmukaisesti transponoitu.

                                  Katso myös

                                  • Transposition: Transposing instruments
                                  • Accidental: Respell pitches

                                  Ulkoiset linkit

                                  • Concert pitch (englanninkielinen Wikipedia-artikkeli)
                                  • Transposing Instrument (englanninkielinen Wikipedia-artikkeli)
                                  • Transponoivat soittimet (Aleatorin verkko-oppimateriaali)
                                  • Concert pitch or not?? (MuseScoren keskustelupalsta)

                                  Nuotintaminen

                                  Edellisessä luvussa "Perusteet" opettelit, kuinka voit kirjoittaa nuotteja ja olla vuorovaikutuksessa palettien kanssa. Luvussa "Nuotintaminen" kuvataan eri tyyppisiä notaatioita yksityiskohtaisemmin kuin myös kehittyneempiä musiikin merkintätapoja.

                                  Katso myös "Vaativat aiheet".

                                  Nuottiavaimet

                                    Yleisesti käytetyt Nuottiavaimet (Diskantti, Basso, Altto, Tenori) löytyy paletista Nuottiavaimet perustyötilasta. Jos haluat täydellisemmän valikoiman, katso Nuottiavaimet-paletti Edistyneestä työtilasta (katso kuva alla).

                                    Clefs palette (Advanced workspace)

                                    Note: You can tailor the display of clefs to your specific requirements using a custom palette.

                                    Add a clef

                                    Add clef to beginning of measure

                                    Method 1—add clef to beginning of a measure, whether or not it is the first measure in a system

                                    • Select a measure and double-click a clef symbol in the palette, OR
                                    • Drag a clef from the palette onto a measure.

                                    Method 2—only for changing the clef at the start of a system

                                    • Select the existing clef at the beginning of the system and double-click a new clef from the palette, OR
                                    • Drag a new clef from the palette directly onto the existing clef.

                                    Add mid-measure clef

                                    To create a mid-measure clef:

                                    • Click on a note, then double-click a clef in the palette.

                                    Note: If the clef is not the first in the system, it will be drawn smaller.

                                    In this image, the top staff starts with a treble clef and switches immediately to bass clef, then after a note and a rest, changes back to treble clef.

                                    Mid-measure clef changes

                                    Note: Changing a clef does not change the pitch of any note. Instead, the notes move to preserve pitch. If you want, you can use Transposition in conjunction with a clef change.

                                    Courtesy clefs

                                    When a clef change occurs at the beginning of a system, a courtesy clef will be generated at the end of the previous system.

                                    To show or hide all courtesy clefs:

                                    1. From the menu, select Style→General...→Page;
                                    2. Check/uncheck "Create courtesy clefs."

                                    It is also possible to show/hide courtesy clefs on a case-by-case basis:

                                    1. "Create courtesy clefs" should already be ticked in the "General" menu (see above);
                                    2. Select a clef and tick/untick "Show courtesy" in the Inspector.

                                    Remove a clef

                                    • Select a clef and press Del.

                                    Hide clefs

                                    Display clef only in the first measure (for all staves)

                                    1. From the menu, select Style→General...→ Page;
                                    2. Uncheck "Create clef for all systems."

                                    Display clef only in the first measure (for a particular staff)

                                    1. Right click on the staff, select Staff properties... and uncheck "Show clef;"
                                    2. Open the master palette and select the "Symbols" section;
                                    3. Drag and drop a clef from the master palette onto the first measure of the staff; OR select the first note and double-click a clef in the master palette.

                                    Note: This option may be useful to TAB users who do not want the clef to repeat on every subsequent line.

                                    Hide all clefs in a particular staff

                                    1. Right click on the staff, and select Staff properties...;
                                    2. Uncheck "Show clef."

                                    Sävellajimerkit

                                      Sävellajimerkinnät ovat saatavilla paletissa "Sävellajimerkinnät" perus- tai edistyneessä työtilassa. On myös mahdollista luoda mukautettuja sävellajimerkintöjä (alhaalla).

                                      Key Signatures palette (Advanced workspace)

                                      Lisää uusi sävellajimerkintä

                                      Lisää sävellajimerkintä kaikille viivastoille

                                      Use any of the following methods:

                                      • Drag a key signature from the palette onto an empty part of a measure.
                                      • Select a measure and double-click a key signature in the palette.
                                      • Select a note and double-click a key signature in a palette.

                                      Add new key signature to one staff only

                                      If you wish to change the key signature of only one staff line, leaving others unchanged:

                                      • Press Ctrl (Mac: ⌘) and hold while you drag a key signature from a palette onto a measure.

                                      Replace an existing key signature

                                      Replace key signature for all staves

                                      Use any of the following methods:

                                      • Drag a key signature from the palette onto the key signature to be replaced (or onto the measure containing the key signature).
                                      • Select the key signature to be replaced, and double-click a new key signature in a palette.

                                      Replace key signature for one staff only

                                      If you wish to replace the key signature of only one staff, leaving others unchanged:

                                      • Press Ctrl (Mac: ⌘) and hold while you drag a key signature from a palette onto the key signature to be replaced (or onto the measure containing the key signature).

                                      Remove a key signature

                                      Use any of the following methods:

                                      • Click on an existing key signature and press Del.
                                      • Drag the empty key signature from the palette (in the advanced workspace) onto the measure.

                                      Naturals on key signature changes

                                      By default, MuseScore only shows cancelling naturals when the key signature changes to that of C Major/A minor (no sharps or flats). In all other cases, it simply shows the new key signature without cancellations:

                                      Default key signature changes

                                      However, you can opt to display cancelling naturals for all key signature changes:

                                      1. From the menu, select Style → General... → Accidentals. You'll see the options:

                                        Dialog: Style / General... / Accidentals

                                      2. Select one of the three options.

                                      3. If you are in a part and want the new option to apply to all parts, click on Apply to all parts.
                                      4. Click OK to exit.

                                      For example, selecting the option "Before key signature if changing to fewer ♯ or ♭" gives:

                                      Naturals before key signature

                                      And the option "After key signature if changing to fewer ♯ or ♭. Before if changing between ♯ and ♭" gives:

                                      Naturals before and after key signature

                                      Key signature changes and multi-measure rests

                                      Multi-measure rests are interrupted if there is change of key signature:

                                      Example with multi-measure rests

                                      Courtesy key signatures

                                      To turn off the display of a particular courtesy key signature:

                                      • Select the relevant key signature and untick "Show courtesy" in the "Key Signature" section of the Inspector.

                                      To turn off the display of all courtesy key signatures:

                                      • From the menu, select Style → General... → Page, and untick "Create courtesy key signatures."

                                      Note: Courtesy key signatures are not displayed at section breaks.

                                      Custom key signatures

                                      To create a custom key signature:

                                      1. Press Shift+K to display the Key signatures section of the Master palette.

                                        Pääpaletti: sävellajimerkinnät

                                      2. In the Create Key signature panel, drag accidentals from the palette onto the "staff" above to create the desired key signature. Use the Clear button, if required, to remove all accidentals from the "staff."

                                      3. Press Add to move the new key signature into the library (center panel).

                                      Note: Playback of custom key signatures is not currently supported.

                                      To move a key signature from the Master palette to a custom palette:

                                      • Drag and drop the key signature onto a palette.

                                      To apply a key signatures to the score directly from the Master palette, use one of the following methods:

                                      • Select a measure and double-click a key signature in the Master palette.
                                      • Drag a key signature from the Master palette onto a measure.

                                      Tahtiosoitukset

                                        Tahtiosoitukset löytyy samannimisestä paletista sekä perus- että edistyneessä työtilassa.

                                        Time signature palette

                                        Add a time signature to a score

                                        To add a time signature, use any of the following methods:

                                        • Drag and drop a time signature from a palette onto a space in a measure.
                                        • Select a measure and then double-click a time signature in a palette.
                                        • Select any note or rest and double-click a time signature in a palette.

                                        The time signature will appear at the beginning of the measure in question.

                                        To replace a time signature, use any of the following methods:

                                        • Drag and drop a time signature onto an existing time signature.
                                        • Select a time signature in the score, then double-click a time signature in a Palette.

                                        Delete a time signature

                                        To delete a time signature in the score, select it and press Del.

                                        Create a time signature

                                        If the time signature you require is not available in any of the existing palettes, it can be created as follows:

                                        1. Press Shift+T to display the Time signatures section of the Master Palette.
                                        2. Select a time signature to edit in the center panel.
                                        3. In the Create Time Signature panel, edit the various parameters (numerator, denominator, text, beaming) to get the time signature and properties you want. To restore the default beaming pattern, press Reset.
                                        4. Press Add to add the newly-created time signature to the center panel. To delete a time signature from the center panel, right-click on it and select Clear.
                                        5. Drag and drop the time signature from the Master Palette to the desired score location.

                                        To move a time signature from the Master Palette to a custom palette:

                                        • Drag and drop the time signature onto a palette in a custom workspace.

                                        Time signature properties

                                        To display the Time Signature Properties dialog:

                                        • Right-click on a time signature and select Time Signature Properties….

                                        Time signature properties

                                        • Global value: Shows the global time signature and is set automatically when you add a time signature to the score. It is the reference for beats (as shown in the status bar) and tempo markings.
                                        • Actual value: Shows the time signature associated with a particular staff. This is normally the same as the global time signature, but can be set independently if required. See Local time signatures.
                                        • Note Groups; Allows you to change the default beaming of notes associated with a time signature. See Change default beaming.
                                        • Appearance: Allows you to edit the displayed text without affecting the underlying time signature. For an example, see Additive meters.

                                        Change default beaming

                                        To adjust note-beaming for a particular time signature:

                                        1. Right-click on the time signature and select, Time Signature Properties…;
                                        2. To break a note beam in the Note Groups panel, click on the note following it. To reset the beam, click in the same place. Alternatively, you can change beaming by dragging a beam icon onto a note, as follows:

                                          • Start beam at this note.
                                          • Do not end beam at this note.
                                          • 1/8th note beam to left of this note.
                                          • 1/16 note beam to left of this note.

                                          The Reset button cancels any changes made in that session.

                                          Note: As of version 2.1, checking the box for "Also change shorter notes," means that any beam changes at one level are applied automatically to shorter durations as well. In versions before 2.1 you must adjust beams for the different note durations independently.

                                        Additive (composite) meters

                                        Additive (or composite) time signatures are sometimes used to clarify the division of beats within a measure. To create an additive time signature:

                                        1. Right-click on a time signature in the score and select Time Signature properties…;
                                        2. In the Appearance section, adjust the "Text" property as required;
                                        3. Adjust note beaming in the Note Groups section if required.

                                        Note: The Time Signatures section of the Master palette also allows you to create additive time signatures (see above).

                                        Local time signatures

                                        In certain cases a score may show staves with different time signatures running at the same time. For example, in Bach's 26. Goldberg Variation:

                                        Bach's 26. Goldberg Variation

                                        In the above example, the global time signature is 3/4, but the time signature of the upper staff has been set independently to 18/16.

                                        To set a local time signature for just one staff:

                                        • Hold down Ctrl (Mac: Cmd) and drag and drop a time signature from a palette onto an empty measure.

                                        Pickup measures and cadenzas

                                        Occasionally you will need to decrease or increase the duration of a measure without changing the time signature—for example, in a pickup measure (anacrusis) or in a cadenza etc. See Measure operations: Measure duration.

                                        Time signature changes and breaks

                                        Multi-measure rests are interrupted when a time signature change occurs. Also, a section break will prevent a courtesy time signature being shown at the end of the previous measure.

                                        See also

                                        • Key signature

                                        External links

                                        • How To Using Polyrhythm, mixed meters and local time signatures in MuseScore
                                        • Additive meters at Wikipedia.

                                        Tahtiviivat

                                        Tahtiviivasymbolit ovat käytettävissä paletissa Tahtiviivat:

                                        Barline palette (Advanced)

                                        Tahtiviivatyypin vaihtaminen

                                        Vaihtaaksesi jo olemassaolevan tahtiviivan, tee jotain seuraavista:

                                        • Valitse tahtiviiva, sitten tuplaklikkaa symbolia paletissa tahtiviivat.
                                        • Raahaa symboli tahtiviivat-paletista partituurin tahtiviivaan.
                                        • Raahaa symboli tahtiviivat-paletista tahtiin.
                                        • Valitse tahti, sitten tuplaklikkaa symbolia tahtiviivat-paletista.
                                        • Valitse tahtiviiva, sitten säädä "Tyyliä" kohdassa "Tahtiviiva" Tarkastajassa.

                                        Piilottaaksesi tahtiviivan, valitse viiva ja paina V, tai poista merkintä kohdasta Näkyvä Tarkastajassa. Väriä ja vaaka- ja pystysuoraa poikkeamaa voidaan myös säätää tarkastajassa.

                                        Insert barline

                                        To insert a new barline between existing ones, either:

                                        • Drag a symbol from the Barlines palette onto a note or rest.
                                        • Select a note or rest, then double-click a symbol in the Barlines palette.

                                        Custom barlines

                                        It is possible to create custom barlines by selecting one or more barlines, and adjusting the properties in the "Barlines" section of the Inspector:

                                        • Style: Chose from a range of preset barlines.
                                        • Spanned staves: The maximum equals the number of staves in the system.
                                        • Span from: Sets the position of the top of the barline. "0" is the top staff line. Positive numbers start lower down the staff, negative numbers above.
                                        • Span to: Sets the position of the bottom of the barline (see "Span from").
                                        • Span preset: Set a span preset option.

                                        See also, Mensurstrich.

                                        Connect barlines

                                        Barlines may extend over multiple staves, as in the grand staff of a piano, or in an orchestral score to join instruments in the same section. To join barlines:

                                        1. Double-click on a barline to enter Edit mode.

                                          Barline edit mode

                                        2. Click on the lower blue handle and drag it down to the staff you wish to connect to. The handle snaps into position so there is no need to position it exactly.

                                        3. Press Esc to exit edit mode. This will update all other relevant barlines as well.

                                          Connected barlines

                                        See also

                                        • Measure operations
                                        • Add fermata to barline

                                        Arpeggiot ja glissandot

                                          Arpeggio and Glissando symbols can be found in the "Arpeggios & Glissandi" palette in the advanced workspace. This palette also includes strum arrows, an arpeggio bracket, wind instrument articulations, and slide in/slide out symbols.

                                          Arpeggios + Glissandi Palette

                                          To add a symbol to the score, use one of the following methods:

                                          • Select one or more notes, then double-click a symbol in the "Arpeggios & Glissandi" palette.
                                          • Drag a symbol from the "Arpeggios & Glissandi" palette onto a note.

                                          Any symbol can be customized by adjusting its properties in the Inspector. Edit handles are also provided in most cases to allow adjustment of length/curvature in Edit mode. If needed for future use, you can save the result in a custom palette.

                                          Arpeggios

                                          When an arpeggio or strum arrow is added to the score, it initially spans only one voice. However, you can easily adjust its height by double-clicking the symbol and dragging the handles up or down (for finer adjustment use the keyboard arrows). Playback of the symbol can be turned on or off in the Inspector.

                                          Arpeggio spanning two staves

                                          Glissandi (slides)

                                          A Glissando or, more informally, a slide, spans two consecutive notes, normally in the same voice.

                                          glissandos with straight or wiggly lines

                                          Chord glissandi are also possible.

                                          Chord slide

                                          Adjust start and end points

                                          1. Double-click the symbol to enter edit mode;
                                          2. Click on the start or end handle:
                                            • Use Shift+↑↓ to move the handle up or down, from note to note.
                                            • Use Shift+←→ moves the handle horizontally, from note to note.

                                          This method also allows you to move handles between notes in different voices or even from one staff to another—for cross-staff glissandi, for example. You can also use the keyboard arrow buttons or Ctrl + arrow to make final adjustments to the positions of the handles.

                                          Custom glissandi

                                          To customize the glissando to your requirements, select it and adjust the Inspector properties as follows :

                                          • Type: Choose between a straight or wavy line;
                                          • Text: Edit, or delete the text. Note: If there isn't enough room between notes, the text is not displayed;
                                          • Style: Chose how the glissando plays back. There are four options: Chromatic, White keys, Black keys, Diatonic;
                                          • Play: Check/uncheck the box to turn playback on or off.

                                          Wind instrument articulations

                                          Fall, Doit, Plop and Scoop symbols are provided. To change the length and curvature, select the symbol, enter edit mode and adjust the handles as described in Edit mode: Lines.

                                          Slide in/out

                                          Slide in and Slide out lines can also be found in the "Arpeggios & Glissandi" palette. To edit the length and angle of a line, double-click on it and drag the handle (or use keyboard arrows for finer adjustment).

                                          External links

                                          • Arpeggio at Wikipedia
                                          • Glissando at Wikipedia

                                          Artikulaatio ja korukuviot

                                            A comprehensive set of symbols can be found in the Articulations and Ornaments palette in the Advanced workspace:

                                            Advanced Articulations and Ornaments

                                            There is also an abbreviated version in the Basic workspace.

                                            Articulations

                                            Articulations are the symbols added to the score to show how a note or chord is to be played. The principal symbols in this group are:

                                            • Fermatas
                                            • Staccato
                                            • Mezzo-staccato / Portato
                                            • Staccatissimo
                                            • Tenuto
                                            • Sforzato
                                            • Marcato

                                            Specialist articulations are also included for bowed and plucked strings, wind instruments etc.

                                            Ornaments

                                            Ornaments include:

                                            • Mordents, Inverted Mordents, Pralltrillers
                                            • Trills
                                            • Turns
                                            • Bends

                                            Note: Appoggiaturas and acciaccaturas can be found in the Grace Notes palette.

                                            Add articulation/ornament

                                            Use either of the following methods:

                                            • Select a note or a range of notes, then double-click a symbol in a palette.
                                            • Drag a symbol from a palette onto a notehead.

                                            Add accidental to an ornament

                                            To apply an accidental to an existing ornament, such as a trill:

                                            1. Select the note to which the ornament is attached;
                                            2. Open the Symbols section of the Pääpaletti;
                                            3. Search for and apply the desired accidental to the score (small accidentals can be found using the search term "figured bass");
                                            4. Drag the accidental into position (or reposition using keyboard shortcuts or the Inspector).

                                            Add fermata to a barline

                                            A fermata can be applied directly to a barline by selecting the barline and double-clicking the fermata from a palette.

                                            Keyboard shortcuts

                                            • Toggle Staccato: Shift+S
                                            • Toggle Tenuto: Shift+N
                                            • Toggle Sforzato (accent): Shift+V
                                            • Toggle Marcato: Shift+O
                                            • Add Acciaccatura (grace note): /

                                            Keyboard shortcuts can be customized in MuseScore's Preferences.

                                            Adjust position

                                            Immediately after adding an articulation or ornament from a palette, the symbol is automatically selected: It can then be moved up or down from the keyboard as follows:

                                            • Press up/down arrow keys for fine positioning (0.1 sp at a time);
                                            • Press Ctrl+↑ or Ctrl+↓ (Mac: Cmd+↑ or Cmd+↓) for larger vertical adjustments (1 sp at a time).
                                            • To flip a symbol to the other side of the note (where applicable), select it and press X.

                                            To enable adjustments in all directions from the keyboard:

                                            1. Double click on the symbol to enter Edit mode, or click on it and press Ctrl+E (Mac: Cmd+E) , or right-click on the symbol and select "Edit element";
                                            2. Press arrow keys for fine positioning (0.1 sp at a time); or press Ctrl+Arrow (Mac: Cmd+Arrow) for larger adjustments (1 sp at a time).

                                            You can also change the horizontal and vertical offset values in the Inspector. To position more than one symbol at a time, select the desired symbols and adjust the offset values in the Inspector.

                                            Note: The symbol can also be repositioned by clicking and dragging, but for more precise control, use the methods above.

                                            Articulation properties

                                            Most properties of articulations/ornaments can be edited from the Inspector. Other properties (i.e. direction and anchor position) can also be accessed by right-clicking on the symbol and selecting Articulation Properties….

                                            You can also make global adjustments to all existing and subsequently-applied articulations by selecting Style… → General… → Articulations, Ornaments.

                                            See also

                                            • Grace notes

                                            External links

                                            • Ornaments at Wikipedia

                                            Venytykset

                                              A variety of simple and complex (multi-stage) bends can be created with the Bend Tool bend_palette_sym.png, located in the Articulations and Ornaments palette of the Advanced workspace.

                                              Apply a bend

                                              To apply one or more bends to the score, use one of the following options:

                                              • Select one or more notes and double-click a bend symbol in the palette.
                                              • Drag a bend symbol from the palette on to a note.

                                              Edit a bend

                                              To edit a bend, use one of the following:

                                              • Right click on a bend symbol in the score and select "Bend properties."
                                              • Select a bend symbol in the score and press "Properties" in the "Bend" section of the Inspector.

                                                Venytystyökalu

                                              Preset options are available, if needed, on the left hand side of the Bend properties window. The current bend is represented by a graph consisting of gray lines connected by square, blue nodes (see image above). The slope of the line indicates the type of bend:

                                              • Up-slope = Up-bend
                                              • Down-slope = Down-bend
                                              • Horizontal line = Hold

                                              The vertical axis of the graph represents the amount by which the pitch is bent up or down: one unit equals a quarter-tone: 2 units a semitone, 4 units a whole-tone, and so on. The horizontal axis of the graph indicates the length of the bend: each gray line segment extends for 1 space (sp) in the score.

                                              A bend is modified by adding or deleting nodes in the graph:

                                              • To add a node, click on an empty intersection.
                                              • To delete a node, click on it.

                                              Adding a node lengthens the bend by 1 sp; deleting a node shortens the bend by 1 sp. The Start and End points of the bend can be moved up and down only.

                                              Adjust height

                                              The height of the bend symbol is automatically adjusted so that it appears just above the staff. This height can be reduced, if necessary, with a workaround:

                                              1. Create another note on the top line (or space) of the staff, vertically above the note at which you want the bend to start.
                                              2. Apply the bend to the higher note first: this will give you a bend symbol with the lowest height.
                                              3. To increase the height of the bend move this note downward.
                                              4. Drag the bend symbol downwards to the correct position.
                                              5. Mark the top note invisible and silent (using the Inspector).

                                              Adjust position

                                              To adjust position use one of the following:

                                              • Drag the bend symbol with a mouse.
                                              • Click on the symbol and adjust the horizontal and vertical offsets in the Inspector.
                                              • Double click on the symbol; or click on it and press Ctrl+E (Mac: Cmd+E); or right-click on the symbol and select "Edit element." Then use the arrow keys for fine positioning (0.1 sp at a time); or Ctrl+Arrow (Mac: Cmd+Arrow) for larger adjustments (1 sp at a time).

                                              Custom bends

                                              After a bend has been created in the score it can be saved for future use by dragging and dropping the symbol to a palette while holding down Ctrl+Shift (Mac: Cmd+Shift). See Custom Workspace

                                              Etuhelenuotit

                                                A grace note is a type of musical ornament, usually printed smaller than regular notes. The Short grace note, or Acciaccatura, appears as a small note with a stroke through the stem. The Long grace note, or Appoggiatura, has no stroke.

                                                Grace Notes palette (Advanced workspace)

                                                Create grace notes

                                                Grace notes can be found in the "Grace notes" palette in the Basic or Advanced workspace.

                                                Add a grace note

                                                Use one of the following methods:

                                                • Select a regular note and double click a grace note in a palette;
                                                • Drag a grace note symbol from a palette onto a regular note;
                                                • Select a note and press / to create an acciaccatura only.

                                                This will add a grace note of the same pitch as the regular note. To add a sequence of grace notes to a regular note, simply repeat the above actions as many times as required. See also, Change pitch (below).

                                                Note: When a grace note is added to the score, a slur is not automatically created with it, so the latter needs to be added separately. See Slurs.

                                                Add a chord of grace notes

                                                Grace note chords are built up just like regular chords:

                                                1. Enter the first note of the chord as shown above
                                                2. Select this first grace note and enter subsequent notes as you would for any other regular chord (i.e. Shift+A...G).

                                                You can also create a grace note chord by using the add interval shortcut in step 2: Alt+1...9 for intervals from a unison to a ninth above.

                                                Change pitch

                                                The pitch of a grace note can be adjusted just like a regular one:

                                                1. Select one or more grace notes
                                                2. Adjust pitch using the keyboard arrow commands, namely:
                                                  • ↑ or ↓ to increase or decrease the pitch by a semitone;
                                                  • Alt+Shift+↑ or Alt+Shift+↓ to increase or decrease the pitch one step at a time, according to the key signature.

                                                Change duration

                                                If you want to change the duration of a previously created grace note, select it and choose a duration from the toolbar or enter with one of the keys 1...9 (see Note input).

                                                Manual adjustment

                                                The position of a grace note after a note (such as a trill termination) may have to be adjusted by selecting the note, going into edit mode and using the left/right keyboard arrows; or change the chord offset values in the Inspector.

                                                External links

                                                • Grace note at Wikipedia
                                                • Appoggiatura at Wikipedia
                                                • Acciaccatura at Wikipedia

                                                Etumerkit

                                                  Yleisimmät etumerkkityypit löytyy partituurin yläpuolelta Etumerkkien työkalupalkista ja Etumerkit-paletista perustyötilasta. Laajempi valikoima löytyy Etumerkit-paletista edistyneessä työtilassa.

                                                  Etumerkit-paletti (Perustyötila)

                                                  Lisää etumerkki

                                                  Etumerkit lisätään automaattisesti nuottiin tarvittaessa, kun korotat tai alennat sen sävelkorkeutta:

                                                  • ↑: Korottaa nuotin sävelkorkeutta puolisävelaskeleella (suosii korotusmerkkiä).
                                                  • ↓: Alentaa nuotin sävelkorkeutta puolisävelaskeleella (suosii alennusmerkkiä).

                                                  Lisääksesi joko (i) kaksoisalennuksen tai -korotuksen, (ii) muistutusetumerkin tai (iii) yleisestä poikkeavan etumerkin, käytä yhtä seuraavista vaihtoehdoista:

                                                  • Valitse nuotti ja klikkaa etumerkkiä partituurin yläpuolella sijaitsevasta työkalupalkista.
                                                  • Valitse nuotti ja tuplaklikkaa etumerkkiä Etumerkit-paletista (perus- tai edistyneessä työtilassa).
                                                  • Raahaa etumerkki Etumerkit-paletista nuottiin.

                                                  Jos haluat lisätä sulut muistutusetumerkkiin, käytä yhtä seuraavista:

                                                  • Valitse etumerkki partituurista ja tuplaklikkaa sulkusymbolia Etumerkit-paletista.
                                                  • Raahaa ja pudota sulkusymboli paletista etumerkkiin.
                                                  • Valitse etumerkki ja ruksaa "Hakasulkeen laatikkoa" Tarkastajassa (alkaen versiosta 2.1).

                                                  Jos muutat myöhemmin nuotin sävelkorkeutta nuolinäppäimillä, etumerkin manuaaliset asetukset poistetaan.

                                                  Tarvittaessa etumerkkejä voi poistaa klikkamalla niihin ja painamalla näppäintä Del.

                                                  Muuta enharmonista kirjoitusasua

                                                  Muuttaaksesi nuotin tai nuottien enharmonista kirjoitusasua kirjoitetun ja soivan sävelkorkeuden näkymässä:

                                                  1. Valitse nuotti tai joukko nuotteja;
                                                  2. Paina J;
                                                  3. Jatka näppäimen J painamista selataksesi läpi enharmoniset vastineet.

                                                  To change the enharmonic spelling in the written pitch view, without affecting the concert pitch view, or vice versa:

                                                  1. Select a note, or group of notes;
                                                  2. Press Ctrl+J (Mac: Cmd+J);
                                                  3. Continue pressing the same combination of keys to cycle through the enharmonic equivalents.

                                                  Note: If the pitches of selected notes are not all the same, the effect may be unpredictable.

                                                  Muuta sävelkorkeuksien kirjoitusasua

                                                  • Valitse valikosta Nuotit→Muuta sävelkorkeuksien kirjoitusasua.

                                                  Katso myös

                                                  • Sävellajimerkintä: muuta

                                                  Ulkoiset linkit

                                                  • Etumerkki Wikipediassa
                                                  • Enharmoniset sävelet Wikipediassa

                                                  Hengitysmerkit ja tauot

                                                    Hengitysmerkit ja tauot ovat saatavilla Hengitykset & tauot paletissa iedistyneessä työtilassa.

                                                    Breaths + Pauses Palette

                                                    Lisää symboli

                                                    Lisääksesi hengityksen tai tauon (jälkimmäistä kutsutaan myös nimellä kesuura) partituuriin, käytä yhtä seuraavista vaihtoehdoista:

                                                    • Valitse nuotti tai tauko ja tuplaklikkaa hengitys- tai taukosymbolia paletissa
                                                    • Raahaa hengitys- tai taukosymboli paletista partituuriin nuotin tai tauon päälle.

                                                    Hengityssymboli partituurissa (Emmentaler-fontti)

                                                    Symboli on sijoitettu nuotin perään.

                                                    Saatat myöhemmin haluta säätää sen asentoa menemällä muokkaustilaan (Ctrl+E, Mac: Cmd+E) ja käyttämällä nuolinäppäimiä, raahamalla, tai by muuttamalla poikkeama-arvoja Tarkastajassa.

                                                    Säädä tauon pituutta

                                                    Versiosta 2.1 eteenpäin, voit säätää lisätyn symbolin tauon pituutta (sekunteina) hyödyntämällä "Kesuura" luokkaa Tarkastajassa.

                                                    Kiilat

                                                      Add a hairpin

                                                      Hairpins are line objects. To create a hairpin:

                                                      1. Select a range of notes or measures;
                                                      2. Use one of the following shortcuts:
                                                        • <: to create a crescendo hairpin.
                                                        • >: to create a diminuendo hairpin (decrescendo).

                                                      One-measure crescendo

                                                      Alternatively, use one of the following options:

                                                      • Select a range of notes or measures, and double-click a hairpin in a palette.
                                                      • Drag and drop a hairpin from a palette onto a staff line.

                                                      Adjust length

                                                      1. Double-click on the hairpin to enter edit mode. Then click on the end handle that you want to move:

                                                        Crescendo shows handles and anchors in edit mode

                                                      2. Use one of the following shortcuts:

                                                        • Shift+→ to move the end handle, and its anchor, right by one note or rest.
                                                        • Shift+← to move the end handle, and its anchor, left by one note or rest;

                                                        This method of extending or shortening the hairpin maintains playback integrity and allows it to cross line breaks:

                                                        Crescendo anchor extends to the next note

                                                      3. To change the position of an end handle without changing the position of its anchor, use the following shortcuts:

                                                        • → to move the handle right by 0.1 sp.
                                                        • ← to move the handle left 0.1 sp.
                                                        • Ctrl+→ (Mac: Cmd+→) to move the handle right one sp.
                                                        • Ctrl+← (Mac: Cmd+→) to move the handle left one sp.

                                                        Note: The commands listed in step 3 are only used to tweak the final appearance of the hairpin (e.g. see image below): they do not change its playback extent nor do they allow it to cross line breaks. If you want the latter, use the Shift+→ or Shift+← commands instead (step 2).

                                                        Crescendo visually extends beyond anchor point

                                                        Note: The "Reset" command (Ctrl+R (Mac: Cmd+R)) will undo these small adjustments, but will not undo anchor changes.

                                                      Cresc. and dim. lines

                                                      In addition to hairpins, there are cresc.   _     _     _ and dim.   _     _     _ lines with the same function in the Lines palette. To change the text (e.g. to cresc. poco a poco, or decresc. instead of dim), right-click on the line and choose Line Properties....

                                                      To turn a hairpin into its equivalent text line:

                                                      1. Select the hairpin.
                                                      2. In the Inspector, set "Line style" to "Wide dashed."
                                                      3. In the Inspector, select the "Text line" checkbox.

                                                      Hairpin playback

                                                      Playback of crescendos and diminuendos is only effective from one note to the next; it currently is not possible to change the dynamic over the course of a single note (and tied notes count as single notes here). By default, hairpins will affect playback only if dynamics are used before and after the hairpin.

                                                      For instance, a crescendo spanning notes between p and f dynamics will cause a dynamic change on playback. However, between any two successive dynamics only the first appropriate hairpin will have effect: a diminuendo between p and f will be ignored; of two or more crescendos between p and f, all but the first will be ignored.

                                                      A hairpin may be used without dynamic marks, by adjusting "Velocity change" in the Inspector (values in the range 0 to 127).

                                                      Kokotauot

                                                        Full measure rest

                                                        A whole rest, centred within a measure (shown below), is used to indicate that an entire measure (or a voice within a measure) is silent, regardless of time signature.

                                                        Full measure rest

                                                        To create one or more full measure rests

                                                        Use the following method if all selected measures are "standard"—i.e. with no custom durations:

                                                        1 Select a measure, or range of measures.
                                                        2. Press Del.

                                                        If one or more of the measures contains a custom duration, use the following method instead:

                                                        1. Select a measure, or range of measures.
                                                        2. Press Ctrl+Shift+Del (Mac: Cmd+Shift+Del).

                                                        To create a full measure rest in a particular voice

                                                        1. In the appropriate voice, enter a rest that extends for the full measure.
                                                        2. Make sure the rest is selected, then press Ctrl+Shift+Del (Mac: Cmd+Shift+Del).

                                                        Multimeasure rest

                                                        A Multimeasure rest indicates a period of silence for an instrument: the number of measures is shown by the number above the staff.

                                                        Multi-measure rest

                                                        Multimeasure rests are automatically interrupted at important points, such as double barlines, rehearsal marks, key- or time signature changes, section breaks etc.

                                                        To display multimeasure rests

                                                        To turn multimeasure rests on or off:

                                                        • Press M on your keyboard.

                                                        Alternatively:

                                                        1. From the menu, choose Style→General...
                                                        2. Click on the "Score" tab, if it is not already selected;
                                                        3. Tick/untick "Create multi-measure rests."

                                                        Note: It is recommended that you enter all notes in the score first before enabling multi-measure rests.

                                                        Break multimeasure rest

                                                        You may want to have a multi-measure rest divided into two multi-measure rests:

                                                        1. Ensure that the option to display multimeasure rests in the score is off (see above).
                                                        2. Right-click on the measure where you want the second multi-measure rest to start;
                                                        3. From the menu, chose Measure Properties and tick "Break multi-measure rest."

                                                        See also: Measure operations: Break multimeasure rest.

                                                        Oktaavisiirtomerkinnät

                                                        Octave (Ottava) lines are used to indicate that a section of music is to be played one or more octaves above or below written pitch: The line may be dotted or solid. Ottavas are available in the Lines palette of the Basic and Advanced workspaces.

                                                        8─────┐or 8va─────┐: Play one octave above written pitch
                                                        8─────┘or 8vb─────┘: Play one octave below written pitch

                                                        8va/8vb lines are particularly common in piano scores, though they are sometimes used in other instrumental music.1 15ma (2 octaves above) and 15mb (2 octaves below) are also occasionally used.

                                                        Debussy. Études, Book II, X

                                                        Apply an octave line

                                                        Use one of the following:

                                                        • Select a range of notes, then double click an octave line from a palette.
                                                        • Select one or more measures, then double click an octave line from a palette.
                                                        • Click on a note, then double-click an octave line from the palette (extends line from selected note to end of bar).
                                                        • Drag an octave line from a palette onto a note (extends line from selected note to end of bar).

                                                        See also, Lines: Adjust vertical position.

                                                        Change length

                                                        See Lines: Change length.

                                                        Custom lines

                                                        Octaves can be customized just like any other line. See Lines: Custom lines and line properties.

                                                        External links

                                                        • Octave at Wikipedia

                                                        1. Gerou/Lusk. Essential Dictionary of Music Notation (Internet Archive). ↩︎

                                                        Palkit

                                                          Palkit muodostuvat automaattisesti tahtiosoituksen perusteella. Muuttaaksesi oletuspalkitusta, klikkaa hiiren oikealla painikkeella tahtiosoitusta ja valitse "Tahtilajin ominaisuudet". Katso Change default beaming yksityiskohtia varten.

                                                          Jos kuitenkin haluat säätää nuotin palkitusta manuaalisesti ja tapauskohtaisesti, käytä palkkisymboleita Nuotin ominaisuudet-paletista "Perus-" tai "Edistyneessä" työtilassa:

                                                          Beam Properties Palette (Advanced workspace)

                                                          Palkkisymbolit

                                                          Seuraava on lista palkkisymboleista ja niiden toiminnoista:

                                                          • Aloita palkki tästä nuotista (tai tauosta).
                                                          • Älä lopeta palkkia tähän nuottiin (tai taukoon).
                                                          • Älä palkita tätä nuottia.
                                                          • Aloita toisen tason palkki tästä nuotista.
                                                          • Aloita kolmannen tason palkki tästä nuotista.
                                                          • (takaisin) Automaattinen tila: tila, jonka MuseScore valitsee nuotinsyötössä, riippuvainen nykyisestä tahtiosoituksesta ja sen palkkiasetuksista.
                                                          • Aloita (hitaampi) viuhkamainen palkki tästä nuotista.
                                                          • Aloita (nopeampi) viuhkamainen palkki tästä nuotista.

                                                          Muuta nuotin palkitusta

                                                          To change one or more note beams (except feathered beams, below), use either of the following methods:

                                                          • Drag and drop a beam symbol from a workspace onto a note in the score.

                                                          • Select one or more notes in the score and double click the desired workspace beam symbol.

                                                          To apply feathered note beams, use either of the following methods:

                                                          • Drag and drop a feathered-beam symbol from a workspace onto a note beam in the score.

                                                          • Select one or more note beams in the score, then double click on a feathered-beam symbol in the workspace.

                                                          Notes: (1) Feathered beams may use 2 or 3 lines depending on the tempo and the desired rate of the change; (2) To create a 2-line feathered beam, you need to start with a continuous run of beamed sixteenth notes; (3) To create a 3-line feathered beam, you need to start with continuous run of beamed thirty-second notes; (4) Playback of feathered beams is not supported.

                                                          Adjust beam with the keyboard/mouse

                                                          Adjust beam angle

                                                          1. Double-click on a note beam to put it into edit mode—the right end handle is automatically selected.
                                                          2. Use the up/down arrows or drag the right end handle to change the angle of the beam.
                                                          3. Press Esc to exit edit mode.

                                                          Adjust beam height

                                                          1. Double-click on a note beam to put it into edit mode—the right end handle is automatically selected.
                                                          2. Press Shift+Tab or click the left handle to select it
                                                          3. Use the up/down arrows or drag the left end handle to change the height of the beam.
                                                          4. Press Esc to exit edit mode.

                                                          Adjust beam with the inspector

                                                          Alternatively, you can use the Inspector for all of these operations:

                                                          Adjust beam angle

                                                          1. Click on a note beam.
                                                          2. Tick the "User position" box in the "Beam" section of the Inspector.
                                                          3. Set the "Position" values to get the desired beam angle.

                                                          Adjust beam height

                                                          1. Click on a note beam.
                                                          2. Tick the "User position" box in the "Beam" section of the Inspector.
                                                          3. Set the "Position" values as desired.

                                                          Make the beam horizontal

                                                          1. Select a note beam
                                                          2. Tick the "Horizontal" box in the "Beam" section of the inspector.
                                                          3. If desired, adjust the beam height with the keyboard/mouse: see above.

                                                          If you want all note beams in the score to be horizontal there is a "Flatten all beams" option in Style→General→Beams.

                                                          Adjust feathered beams

                                                          To adjust feathered beams:

                                                          1. Select a note beam.
                                                          2. Adjust the values in the "Grow left" and "Grow right" boxes in the "Beam" section of the Inspector.

                                                          Local relayout

                                                          MuseScore (following accepted music engraving practice) spaces notes according to their time values, allowing for accidentals, lyrics etc. In systems where there is more than one staff, this may result in irregular note spacing, as in the following example:

                                                          Normal layout

                                                          Local relayout is a tickbox option in the Inspector allowing you to specify those passages in the score where you want the note spacing to be independent of other staves in the system. Applying "Local relayout" to the note beams in the top staff of the previous example results in a more even distribution of notes:

                                                          After applying

                                                          To do a local relayout:

                                                          1. Select one or more note beams.
                                                          2. Tick the option Local relayout in the "Beam" section of the Inspector.

                                                          Flip note beam

                                                          To flip a beam from above to below the notes, or vice-versa:

                                                          1. Select one or more note beams.
                                                          2. Use any of the following options:
                                                            • Press the X key;
                                                            • Press the "Flip direction" icon in the bottom right of the toolbar area.
                                                            • Select a "Direction" option (Auto, Up or Down) in the "Beam" section of the Inspector.

                                                          Reset Beam Mode

                                                          To restore beams to the mode defined in the local time signatures:

                                                          1. Select the section of the score you want to reset. If nothing is selected, the operation will apply to the whole score;
                                                          2. Select Layout→Reset Beam Mode.

                                                          See also

                                                          • Cross-staff notation
                                                          • Edit mode
                                                          • Note input

                                                          External links

                                                          • How to add a beam over a rest
                                                          • How to place a beam between notes

                                                          Poikkeusjaot

                                                            Tuplets are used to write rhythms beyond the beat divisions usually permitted by the time signature. For example, a sixteenth note triplet will divide an eighth note beat into three sixteenth notes instead of two:

                                                            16th triplet

                                                            In 6/8 time, an eighth note duplet will divide a dotted quarter note into two eighth notes instead of three:

                                                            8th triplet

                                                            Create a tuplet

                                                            The exact method of tuplet entry depends on whether you are starting off in note input mode or "normal mode" (i.e. not in note input mode). We'll start off with a simple example: the creation of an eighth note triplet.

                                                            Create a triplet in normal mode

                                                            1. Select a note or rest that specifies the full duration of the desired triplet group. In the case of an eighth note triplet, you will need to select a quarter note or rest—as in the example below:

                                                              Quarter note selected

                                                            2. From the main menu, choose Notes→Tuplets→Triplet, or press Ctrl+3 (Mac: ⌘+3). This will give the following result:

                                                              Triplet eight note followed by rests

                                                            3. The program automatically changes to note-input mode and selects the most appropriate duration—in this example an eighth note. Now enter the desired series of notes/rests. For example:

                                                              Three triplet eight notes

                                                            Create a triplet in note input mode

                                                            1. Ensure you are in note input mode (press N).
                                                            2. Navigate to the note/rest (or blank measure) where you want the triplet to start (use the left/right arrow keys as required).
                                                            3. Select a final duration for the whole triplet group. In the case of an eighth note triplet, click on the quarter note in the note input toolbar (or press 5 on the keyboard).
                                                            4. From the main menu, choose Notes→Tuplets→Triplet, or press Ctrl+3 (Mac: ⌘+3). This creates a triplet number/bracket and appropriately divides the original note/rest (see image above).
                                                            5. The program automatically selects the most appropriate duration—in this example an eighth note—allowing you to immediately start entering the desired series of notes/rests.

                                                            Create other tuplets

                                                            Most other tuplets can be entered similarly, by substituting the general create tuplet command – Ctrl+2–9 (Mac users Cmd+2–9) – in the above series of steps: this will create tuplets ranging from a duplet (2) to a nonuplet (9). For more complex cases, see below.

                                                            Custom tuplets

                                                            To create other tuplets than the default options (e.g., 13 sixteenth notes in the space of one quarter note):

                                                            1. Enter/select a note or rest equaling the total duration of the tuplet.
                                                            2. Open the Create Tuplet dialog from the menu: Notes→Tuplets→Other...
                                                            3. Select the desired number ratio (e.g. 13/4 for thirteen sixteenth notes in the space of a quarter note) under "Relation" in the "Type" section. Specify "Number" and "Bracket" using the radio buttons in the "Format" section.

                                                              Create tuplet dialog

                                                            4. Click OK to close the dialog.

                                                              Thirteen-tuplet in the space of one quarter, or four sixteenths

                                                            Delete a tuplet

                                                            To delete any tuplet, select the number/bracket and press Del.

                                                            Settings

                                                            To customize the appearance of a single tuplet, you can change its properties in the Inspector. You can also change the general style for all tuplets in a score.

                                                            Inspector

                                                            To change the display properties of a tuplet, select the tuplet number, or bracket, and use the Inspector.

                                                            Tuplet Properties in Inspector

                                                            If neither the number nor the bracket is shown, select a note from the tuplet, then use the Tuplet button in the Inspector to see the above dialog.

                                                            Select tuplet in Inspector

                                                            For Direction, choose Auto to place the bracket on the same side of the note heads as the stem, or beam. Choose Up, or Down to explicitly place the bracket above or below the note heads, respectively, regardless of the stem, or beam position.

                                                            For Number type, choose Number to show an integer, Relation to show a ratio of two integers, or Nothing to show no number at all.

                                                            Tuplet with a 5:6 ratio and auto beam

                                                            For Bracket type, choose Automatic to hide the bracket for beamed notes and show the bracket if the tuplet includes unbeamed notes or rests. Choose Bracket, or Nothing to explicitly show, or hide the bracket, respectively.

                                                            Style

                                                            Go to Style → General... and select Tuplets. It enables you to change all tuplet properties.

                                                            Dialog: Style / General... / Tuplets

                                                            Two adjustments are possible: Vertical and Horizontal

                                                            • Vertical adjustment has three options with values in space units and one (un)ticked option
                                                              • Maximum slope: default value is 0.50; range is from 0.10 to 1.00
                                                              • Vertical distance from stem (see (2) below): default value is 0.25; range is from -5.00 to 5.00
                                                              • Vertical distance from note head (see (3) below): default value is 0.50; range is from -5.00 to 5.00
                                                              • Avoid the staves: by default ticked
                                                            • Horizontal has four options with values in space units
                                                              • Distance before the stem of the first note (see (5) below): default value is 0.50; range is from -5.00 to 5.00
                                                              • Distance before the head of the first note: default value is 0.00; range is from -5.00 to 5.00
                                                              • Distance after the stem of the last note (see (6) below): default value is 0.50; range is from -5.00 to 5.00
                                                              • Distance after the head of the last note: default value is 0.00; range is from -5.00 to 5.00

                                                            Tuplet style legend

                                                            External links

                                                            • How to create triplets and other tuplets
                                                            • Tuplet at Wikipedia
                                                            • The User Guide to Tuplets in MuseScore [video]

                                                            Sidekaaret

                                                              A slur is a curved line between two or more notes indicating that they are to be played legato—smoothly and without separation. Not to be confused with Ties, which join two notes of the same pitch.

                                                              There are a number of ways to add a slur to a score, and all may be useful depending on the context (adding a slur from the lines palette is also possible but not recommended).

                                                              Add slur in note-input mode

                                                              1. While in note input mode, type in the first note in the slurred section;
                                                              2. Press S to begin the slurred section;
                                                              3. Type in the remaining notes in the slurred section;
                                                              4. Press S again to end the slurred section.

                                                              Add slur outside note-input mode

                                                              Method 1

                                                              1. Make sure you are not in note input mode and select the first note that you want the slur to cover:

                                                                First note selected

                                                              2. Press S to add a slur extending to the next note:

                                                                Slur to adjacent note

                                                              3. (Optional) Hold Shift and press → (right arrow key) to extend the slur to the next note. Repeat as required:

                                                                Three-note slur

                                                              4. (Optional) Press X to flip the slur direction:

                                                                Slur above note stems

                                                              5. Press Esc to exit edit mode:

                                                                Slur no longer in edit mode

                                                              Method 2

                                                              1. Make sure you are not in note input mode;
                                                              2. Select the note where you want the slur to start;
                                                              3. Chose one of the following options:
                                                                • To add a slur to one voice only: Hold down Ctrl (⌘ on a Mac) and select the last note that you want the slur to cover.
                                                                • To add slurs to all voices: Hold down Shift (⌘ on a Mac) and select the last note that you want the slurs to cover.
                                                              4. Press S.

                                                              Adjust slur

                                                              If you only want to adjust the position of a slur:

                                                              1. Select the slur;
                                                              2. Use any of the following methods:
                                                                • Drag the slur.
                                                                • Adjust the horizontal and vertical offset values in the Inspector.

                                                              To adjust all the properties of a slur (length, shape and position):

                                                              1. Make sure you are not in note input mode;
                                                              2. Double-click the slur to enter edit mode (or select it and press Ctrl+E; or right-click it and select "Edit Element");
                                                              3. Click on a handle to select it, or use Tab to cycle through the handles;
                                                              4. To move the left and right handles from note to note, use the following shortcuts:
                                                                • Shift+→: Move to next note.
                                                                • Shift+←: Move to previous note.
                                                                • Shift+↑: Move to lower voice (voice 2 to voice 1 etc.).
                                                                • Shift+↓: Move to higher voice (voice 1 to voice 2 etc.).
                                                              5. To adjust the position of any handle, use any of the following methods:
                                                                • Drag the handle.
                                                                • Use the arrow keys for fine adjustment (0.1 sp. at a time). For larger adjustments (1 sp. at a time) use Ctrl+Arrow.
                                                              6. Press Esc to exit edit mode.

                                                              Note: The two outer handles adjust the start and end of the slur, whilst the three handles on the curve adjust the contour. The middle handle on the straight line is used to move the whole slur up/down/left/right.

                                                              Extended slurs

                                                              A slur can span several systems and pages. The start and end of a slur is anchored to a note/chord or rest. If the notes are repositioned due to changes in the layout, stretch or style, the slur also moves and adjusts in size.

                                                              This example shows a slur spanning from the bass to the treble clef. Using the mouse, select the first note of the slur, hold down Ctrl (Mac: ⌘) and select the last note for the slur, and press S to add the slur.

                                                              Slur across staves

                                                              X flips the direction of a selected slur.

                                                              Dotted slurs

                                                              Dotted slurs are sometimes used in songs where the presence of a slur varies between stanzas. Dotted slurs are also used to indicate an editor's suggestion (as opposed to the composer's original markings). To change an existing slur into a dotted or dashed slur, select it and then in Inspector (F8) change Line type from Continuous to Dotted or Dashed.

                                                              See also

                                                              • Tie
                                                              • Edit mode
                                                              • Note input

                                                              Sidokset

                                                                A tie is a curved line between two notes of the same pitch, indicating that they are to be played as one note with a combined duration (see external links below). Ties are normally created between adjacent notes in the same voice, but MuseScore also supports ties between non-adjacent notes and between notes in different voices.

                                                                In note-input mode, if you specify a tie immediately after entering a note or chord, the program automatically generates the correct destination notes to go with the ties. Or, you can simply create ties "after the fact," between existing notes.

                                                                Note: Ties, which join notes of the same pitch, should not be confused with slurs, which join notes of different pitches and indicate legato articulation.

                                                                Tie notes together

                                                                1. Press Esc to make sure you are not in note input mode.

                                                                2. Click on a note, or use Ctrl (Mac: Cmd) + click to select more than one note.

                                                                  First note selected

                                                                3. Press + or the tie button, tie button.

                                                                  Slur to adjacent note.

                                                                Ties will be created between the selected note(s) and the following note(s) of the same pitch.

                                                                Tie chords together

                                                                To tie all the notes in a chord at once, either:

                                                                • Click on the stem of the chord, or
                                                                • Hold down Shift and click on any note in the chord.

                                                                Then press + or the tie button tie button. Ties will be created between all the notes in the selected chord and the following notes of the same pitches.

                                                                animated gif showing how to tie a chord using the mouse

                                                                Add tied notes in note input mode

                                                                To create a single note tie during note input:

                                                                1. Select a single note (one that is not part of a chord).
                                                                2. Select a new note duration for the following note, if required (but see "Note" below).
                                                                3. Press + or the tie button, tie button.

                                                                Note: This shortcut works, as described above, only if there is no chord following the selected note. If there is, then the duration is ignored and the tied note is added instead to the following chord.

                                                                Add a tied chord in note input mode

                                                                1. Make sure one note is selected in a chord.
                                                                2. Select a new note duration for the following chord, if required (but see "Note" below).
                                                                3. Press + or the tie button, tie button.

                                                                Note: This shortcut works, as described above, only if there is no chord following the selected note. If there is, then the duration is ignored and the tied notes are added instead to the following chord.

                                                                Tied unison notes

                                                                If the chords to be tied contain unison notes the best way to ensure correct notation is:

                                                                1. Assign each note of a unison pair to a separate voice.
                                                                2. Ensure that one of the unison pairs is set to "stemless" (to remove the duplicate stem and tail).
                                                                3. Apply the ties voice by voice. Make adjustments for position, length as required.

                                                                Flip a tie

                                                                X flips the direction of a selected tie, from above the note to below the note, or vice-versa.

                                                                See also

                                                                Slur

                                                                External links

                                                                • How to create ties leading into a 2nd ending
                                                                • Ties (music) at Wikipedia

                                                                Sulkeet

                                                                MuseScore provides standard brackets and a curly brace within the Brackets palette in the advanced workspace.

                                                                Brackets Palette

                                                                Add

                                                                To add a bracket or brace to systems, use one of two methods:

                                                                • Drag a bracket symbol from a palette on to an empty space in the first measure of the staff where you want the bracket to start.
                                                                • Select the first measure of the staff where you want the bracket to start and double-click a bracket symbol in a palette.

                                                                Delete

                                                                • Select the bracket and press Del.

                                                                Change

                                                                • Drag a bracket symbol from a palette onto an existing bracket in the score.

                                                                Edit

                                                                When you first apply a bracket it only spans one staff. To extend to other staves:

                                                                1. Enter Edit mode.
                                                                2. Drag the handle downwards to span the required staves. The handle snaps into position, so exact placement is not required.

                                                                Style

                                                                The default thickness and distance from the system of brackets and braces can be adjusted in Style → General... → System.

                                                                Tremolo

                                                                Tremolo is the rapid repetition of one note, or a rapid alternation between two notes or chords. It is indicated by strokes through the stems of the notes or chords. If the tremolo is between two, the bars are drawn between them. Tremolo symbols are also used to notate drum rolls.

                                                                The tremolo palette in the advanced workspace contains separate symbols for one note tremolos (shown with stems below) and for two note tremolos (shown with no stem below).

                                                                Tremolo palette

                                                                To add tremolo to a single note, select the note head and double-click the desired symbol in the tremolo palette.

                                                                In a two note tremolo, every note has the value of the whole tremolo duration. To enter a tremolo with the duration of a half note (minim), enter two normal quarter notes (crotchets), and after applying a tremolo symbol to the first note, the note values automatically double to half notes.

                                                                Viivat

                                                                  The Lines palette of the Advanced workspace includes the following types of lines:

                                                                  • Slur
                                                                  • Hairpins (crescendo and diminuendo)
                                                                  • Volta brackets (1st, 2nd, 3rd time endings etc.)
                                                                  • Octave lines (8va, 8vb, 15ma etc)
                                                                  • Keyboard pedal markings
                                                                  • Extended ornament lines (Trills etc)
                                                                  • Guitar barre line
                                                                  • Straight line
                                                                  • Ambitus (early music symbol)

                                                                  Lines palette, Advanced workspace

                                                                  Applying lines to the score

                                                                  Most lines (except Sidekaaret, Volta brackets and the Ambitus) can be applied from a palette in the following ways:

                                                                  To apply a line to just one note

                                                                  1. Click on a note, then Ctrl+Click on the next note;
                                                                  2. Double-click a line.

                                                                  To apply a line across a range of notes

                                                                  1. Select a range of notes;
                                                                  2. Double-click a line.

                                                                  To apply a line from a note to the end of that measure

                                                                  Use any of the following methods:

                                                                  • Click on a note, then double click a line.
                                                                  • Drag and drop a line onto the score.

                                                                  To apply a line across a range of measures

                                                                  1. Select one or more measures;
                                                                  2. Double click a line.

                                                                  Adjust vertical position

                                                                  To adjust the vertical position of one or more lines:

                                                                  1. Ensure you are not in note-input or edit mode.
                                                                  2. Use either of the following:
                                                                    • Click on one or more lines and change the vertical offset in the Inspector;
                                                                    • Click on a line, press and hold Shift and drag it up/down with a mouse.

                                                                  Note: You can also adjust the vertical position in Edit mode.

                                                                  Change length

                                                                  1. Ensure you are not in note input mode (press Esc to exit);

                                                                  2. Double click the line that you want to change to enter edit mode;

                                                                  3. Click on an end handle and use one of the following shortcuts:

                                                                    • Shift+→ to move the end handle, and its anchor, right by one note (or, in the case of Voltas, one measure)
                                                                    • Shift+← to move the end handle, and its anchor, left by one note (or, in the case of Voltas, one measure);
                                                                  4. To change the position of an end handle without changing the position of its anchor, use the following:

                                                                    • → to move the handle right by 0.1 sp (1 sp = one staff space = the distance between two staff lines).
                                                                    • ← to move the handle left 0.1 sp.
                                                                    • Ctrl+→ (Mac: Cmd+→) to move the handle right one sp.
                                                                    • Ctrl+← (Mac: Cmd+→) to move the handle left one sp.

                                                                    Note: You can also drag the endpoint handles with a mouse.

                                                                  Custom lines and line properties

                                                                  Lines may contain features such as embedded text or hooks at the ends (e.g. ottavas and voltas). They can be customized once they have been added to the score, and the results saved to a workspace for future use:

                                                                  1. Right-click on a line and select Line Properties…;

                                                                  2. Add any text you want to appear in the line;

                                                                    • Begin: Text added here appears at the beginning of the line.
                                                                    • Continue: Text added here appears at the beginning of a continuation line.
                                                                    • End: Text added here appears at the end of the line.

                                                                    Click on the ... buttons to adjust the Text properties at each position as required.

                                                                  3. If a hook is required, tick the appropriate "Hook" box, and adjust the hook length and angle;

                                                                  4. Select an option from "Place": "Above or "Below" positions the text so that it overlaps the line; "Left" places the text to the left of the line;

                                                                    Note: Additional placement options are available in the "Text properties" dialog (see step 2, above).

                                                                  5. Click OK to exit Line Properties;

                                                                  6. Make adjustments to Color, Thickness and Line type (solid, dashed etc.) in the "Line" section of the Inspector. Ticking "Diagonal" here allows you to create a diagonal line by dragging the end handles;

                                                                  7. If you wish to save the resulting line for future use, see Custom palettes.

                                                                  Copying lines

                                                                  Once applied to the score, lines cannot be copied using the usual copy and paste procedures. However, you can duplicate lines within a score: press and hold Ctrl+Shift (Mac: Cmd+Shift), click on the line and drag it to the desired location.

                                                                  Extended ornament lines

                                                                  To add an accidental to an extended ornament, such as a trill line, select the line and double-click a symbol from the Accidentals palette.

                                                                  External links

                                                                  • Piano pedal marks at Wikipedia
                                                                  • Guitar Barre at Wikipedia

                                                                  Kertaukset ja hypyt

                                                                    Simple repeats

                                                                    You can create a simple repeat by placing a start and an end repeat barline at the beginning and end of a passage. These barlines are applied from the Barlines palette, and, as of version 2.1, also from the Repeats & Jumps palette.

                                                                    Simple repeat

                                                                    Note: If the start of a repeat coincides with the beginning of a piece or section, the start repeat barline can be omitted if desired. Similarly, an end repeat barline can be omitted at the end of a score or section.

                                                                    Simple repeat at start

                                                                    1st and 2nd endings

                                                                    First create a simple repeat (as shown above), then apply the first and second time endings—see Voltas.

                                                                    Playback

                                                                    To hear repeats during playback, make sure the "Play Repeats"
                                                                    button on the toolbar is selected. Likewise, you can turn off repeats during playback by deselecting the button.

                                                                    To set the number of times that a repeat section plays back:

                                                                    1. Make sure the start and end repeat barlines are in place (e.g. Simple repeats above).
                                                                    2. Right-click on the last measure before the end repeat barline and select Measure properties.
                                                                    3. Adjust "Play count" ("Repeat count" prior to version 2.1) as required.

                                                                    Repeat symbols and text

                                                                    Text and symbols related to repeats are located in the "Repeats & Jumps" palette (in the Basic and Advanced workspaces). This palette contains:

                                                                    • Symbols for measure repeat, Segno, Coda, and, as of version 2.1, repeat barlines
                                                                    • D.S., D.C., To Coda, and Fine text

                                                                    Repeats palette

                                                                    To add a repeat symbol to the score use either of the following:

                                                                    • Drag and drop a repeat symbol from the palette onto (not above!) the desired measure (so the measure changes color).
                                                                    • Select a measure, then double-click the desired repeat symbol in the palette.

                                                                    Jumps

                                                                    Jumps are symbols in the score which tell the musician, and playback, to skip to a named marker (see below). Jumps include the various kinds of D.C. (Da Capo) and D.S. (Dal Segno) text.

                                                                    If you click on a jump, three tags are displayed in the "Jump" section of the Inspector, namely:

                                                                    • Jump to: Skip to a marker whose "Label" is the same as the "Jump to" tag.
                                                                    • Play until: Continue playing until you reach another marker whose "Label" is the same as the "Play until" tag.
                                                                    • Continue: Skip to the next marker whose "Label" is the same as the "Continue" tag

                                                                    Each marker has a different tag associated with it, and this can be viewed by clicking on the symbol and reading the "Label" in the "Marker" section of the Inspector.

                                                                    Note: The tags start and end, referring to the beginning and end of a score or section, are implicit and don't need to be added by the user.

                                                                    Simple Repeats are not taken after jumps and playback works as if it were the last repeat.

                                                                    Markers

                                                                    Markers are the places referred to by the jumps, in addition to the implicit 'start' and 'end' there are:

                                                                    • Segno (tag: segno)
                                                                    • Segno Variation (tag: varsegno)
                                                                    • Coda (tag: codab)
                                                                    • Coda Variation (tag: varcoda)
                                                                    • Fine (tag: fine)
                                                                    • To Coda (tag: coda)

                                                                    Examples

                                                                    At the jump instruction Da Capo the playback jumps to the start (to the implicit start tag) and plays the entire score or section again (up to the implicit end tag).

                                                                    At the jump instruction Da Capo al Fine the playback jumps to the start (to the implicit start tag) and plays the score up to the Fine (the fine tag).

                                                                    Dal Segno al Fine (or D.S. al Fine) jumps to the Segno symbol (the segno tag) and then plays up to the Fine (the fine tag)

                                                                    Dal Segno al Coda (or D.S. al Coda) jumps to the Segno symbol (the segno tag) and then plays up to the To Coda (the coda tag). Playback then continues at Coda symbol (the codab tag).

                                                                    The properties (i.e. the tag names) of jumps and markers can be set via the Inspector. You need to modify them if using multiple jumps and markers.

                                                                    See also

                                                                    • Barlines
                                                                    • Volta

                                                                    External links

                                                                    • MuseScore in Minutes: Repeats and Endings, part 2 (video tutorial)
                                                                    • How to separate a coda from the rest of the score (MuseScore HowTo)

                                                                    Maalit

                                                                      Volta brackets, or first and second ending brackets, are used to mark different endings for a repeat.

                                                                      Sample first and second endings

                                                                      To add a volta to the score

                                                                      Use one of the following methods:

                                                                      • Select a measure, or range of measures and double-click a Volta icon in the Lines palette.
                                                                      • Drag-and-drop a volta from the Lines palette, then adjust the length as required (see below).

                                                                      To change the number of measures that a volta covers

                                                                      1. Double-click the volta to enter edit mode. The end handle is automatically selected.
                                                                      2. Press Shift+→ to move the end handle forward one measure. Press Shift+← to move the handle backward one measure. Repeat as required.

                                                                      Note: Only the Shift commands will alter the playback start and end points of the volta. To make fine adjustments to the visual start or end points you can use other keyboard arrow commands, or drag the handles with a mouse, but these do not affect the playback properties.

                                                                      When you select a start or end handle, a dashed line appears connecting it to an anchor point on the staff. This anchor shows the position of the playback start or end point of the Volta.

                                                                      Second-ending volta in edit mode

                                                                      Text

                                                                      You can change the text and many other properties of a volta bracket using the line properties dialog. Right-click on a volta bracket and choose Line Properties.... The figure below shows the volta text as "1.-5."

                                                                      Line Properties dialog

                                                                      Sample first-through-fifth ending followed by sixth ending

                                                                      You can also right-click on the volta and bring up the volta properties dialog. From here, you can change both the displayed Volta text (the same from the line properties above) and the repeat list. If you want one volta to be played only on certain repeats and another volta on other repeats, enter the repeat times in a comma separated list. In the example below, this volta will be played during repeat 1, 2, 4, 5 and 7. Another volta will have the other ending, like 3, 6 and possibly other higher numbers like 8, 9, etc.

                                                                      Maalin ominaisuudet -ikkuna

                                                                      Playback

                                                                      Sometimes a repeat plays more than two times. In the figure above, the volta text indicates that it should play five times before it continues. If you want to change the number of times MuseScore plays a repeat, go to the measure containing the end repeat barline and change its Play count (Repeat Count prior to version 2.1). See Measure operations: Other properties for details.

                                                                      External links

                                                                      • MuseScore in Minutes, Lesson 8: Repeats and Endings, Part 1
                                                                      • How to create ties leading into a 2nd ending

                                                                      Transponointi

                                                                        Transposition is the act of raising or lowering the pitch of a selection of notes by the same interval. You can chose to transpose notes either manually or by using the Transpose dialog.

                                                                        Manual transposition

                                                                        1. Select the notes that you wish to transpose;
                                                                        2. Use any of the following options:
                                                                          • To transpose chromatically: Press ↑ or ↓. Repeat as required;
                                                                          • To transpose diatonically; Press Alt + Shift + ↑ or ↓. Repeat as required;
                                                                          • To transpose by an octave: Press Ctrl + ↑ or ↓ (Mac: Cmd + ↑ or ↓).

                                                                        Note: In versions prior to 2.1, F2 (Mac: fn+F2) transposes the whole score and key signature UP one semitone. Shift+F2 (Mac: Shift+fn +F2) transposes the score and key signature DOWN one semitone.

                                                                        Automatic transposition

                                                                        MuseScore's Transpose dialog gives you more options for transposing notes.

                                                                        Transpose Dialog

                                                                        Note: By default this dialog opens from the Notes menu, but you can also chose to open it using a keyboard shortcut (see Preferences).

                                                                        Transpose Chromatically

                                                                        By Key

                                                                        To transpose notes up or down to the nearest key:

                                                                        1. Select the notes you want to transpose; no selection equals "select all.";
                                                                        2. From the menu bar, choose Notes → Transpose...;
                                                                        3. Tick "Transpose Chromatically" and "By key;"
                                                                        4. Tick/untick "Transpose key signature" and "Transpose chord symbols" if required;
                                                                        5. Tick one of "Closest," "Up" or "Down;" and select a destination key signature from the drop-down menu;
                                                                        6. Click OK.
                                                                        By Interval

                                                                        To transpose selected notes up or down in semitone increments:

                                                                        1. Select the notes you want to transpose; no selection equals "select all.";
                                                                        2. From the menu bar, choose Notes → Transpose...;
                                                                        3. Tick "Transpose Chromatically" and "By Interval;"
                                                                        4. Tick/untick "Transpose key signature" and "Transpose chord symbols" if required;
                                                                        5. Tick "Up" or "Down;" and select a transposition interval from the drop-down menu;
                                                                        6. Click OK.

                                                                        Transpose Diatonically

                                                                        To transpose selected notes up or down by a diatonic interval:

                                                                        1. Select the notes you want to transpose; no selection equals "select all.";
                                                                        2. From the menu bar, choose Notes → Transpose...;
                                                                        3. Tick "Transpose Diatonically;"
                                                                        4. Tick/untick "Transpose key signature" and "Transpose chord symbols" if required;
                                                                        5. Tick "Up" or "Down;" and select a transposition interval from the drop-down menu;
                                                                        6. Click OK.

                                                                        Transposing instruments

                                                                        Transposing instruments, such as the B-flat trumpet or E-flat alto sax, sound lower, or higher than their written pitch. MuseScore has a number of features to facilitate the scoring of these instruments.

                                                                        Concert pitch

                                                                        MuseScore's default viewing mode shows the musical notation in written pitch, but you can chose to display the score in concert pitch instead. In the latter mode, the musical notation of all instruments matches the actual pitches that you hear on playback.

                                                                        To switch to concert pitch, use one of the following options:

                                                                        • Press the Concert Pitch button to highlight it.
                                                                        • From the menu bar, select Notes and tick the Concert Pitch option.

                                                                        You should ensure that the Concert pitch button is OFF before printing the main score or any parts.

                                                                        Change staff transposition

                                                                        Instrument transpositions are already set up in MuseScore. However, if you want a rare instrument or transposition that is not available in MuseScore, you may need to edit the instrument transposition manually.

                                                                        1. Right-click an empty part of the instrument staff and select Staff Properties....
                                                                        2. At the bottom of the window, select the interval of transposition, any octave shifts, and whether the interval is "Up" (sounds higher than written) or "Down" (sounds lower than written).

                                                                        You can also use the Change Instrument… button in the Staff Properties window to automatically change the transposition to that of a different standard instrument.

                                                                        External links

                                                                        • How to transpose (MuseScore How-To)
                                                                        • Concert pitch or not?? (forum discussion)

                                                                        Rumpunotaatio

                                                                          Entering percussion notation is somewhat different to entering notation for pitched instruments (such as the piano or violin). However, it is recommended that you first read the chapter on Note input for pitched instruments before proceeding.

                                                                          Percussion staff types

                                                                          When you create a percussion staff using the New Score Wizard or the Instruments dialog, MuseScore automatically choses the most appropriate staff type (1-, 3-, or 5-line) for the instrument: this can be changed, if required, using the "Staff type" column on the Chose instruments / Instruments page. Any additional changes (e.g. to a 2-line staff) can be made from the score itself (see Advanced Style Properties).

                                                                          On a 5-line percussion staff, each instrument is assigned a vertical staff position (line or space) and a notehead shape. For a drumset, one or two voices can be used. If the latter, voice 1 (the upper voice) usually contains (up-stem) notes played by the hands while voice 2 (the lower voice) usually contains (down-stem) notes played by the feet (see image below).

                                                                          Drum notation example showing the use of two voices

                                                                          Note input methods

                                                                          You can add notes to a percussion staff from any of the following:

                                                                          • External MIDI keyboard;
                                                                          • Piano keyboard (virtual);
                                                                          • Computer keyboard;
                                                                          • Mouse.

                                                                          These methods can be used in any desired combination:

                                                                          MIDI keyboard

                                                                          To add notes to a percussion staff from a MIDI keyboard:

                                                                          1. Ensure that the MIDI keyboard is connected and functioning correctly.

                                                                            Note: If you click on the percussion staff without entering note input node, you can demo the percussion instruments from the MIDI keyboard.

                                                                          2. Click on the note or rest where you want to start.

                                                                          3. Enter note input mode.
                                                                          4. Select the correct voice. For example, snares, sidesticks and all cymbals are normally added to voice 1; bass drum to voice 2.
                                                                          5. Set note duration.
                                                                          6. Press an instrument key to add a note to the score. To add another note at the same position, keep the first key held down while pressing the second key.

                                                                          Note: Refer to a GM2 drum map for details about which MIDI keyboard key corresponds to which percussion instrument. Some keyboards (e.g., Casio) display percussion symbols next to the keys as an aid to the user.

                                                                          Piano keyboard

                                                                          To add notes to a percussion staff from the virtual Piano Keyboard:

                                                                          1. Ensure that the Piano keyboard is displayed. Press P (or select it from the menu, View → Piano Keyboard).

                                                                            Note: If you click on the percussion staff without entering note input node, you can demo the percussion instruments from the Piano keyboard.

                                                                          2. Click on the note or rest where you want to start.

                                                                          3. Enter note input mode.
                                                                          4. Select the correct voice. For example, snares, sidesticks and all cymbals are normally added to voice 1; bass drum to voice 2.
                                                                          5. Set note duration.
                                                                          6. Click on a (virtual piano) key to add a note to the score.
                                                                          7. To add another note to an existing one, press Shift and hold it while pressing the new note (in versions before 2.1, use Ctrl (Mac: Cmd)).

                                                                          Note: Refer to a GM2 drum map for details about which piano key corresponds to which percussion instrument.

                                                                          By default, the piano keyboard is docked at the bottom of the screen—to the left of the Drum input palette. However you can undock it by dragging, then dock the panel in several ways:

                                                                          • Drag the panel downwards to the center and it will overlay the Drum input palette, full length. Both panels can then be accessed by Tabs.
                                                                          • Drag the panel downwards to the right/left and it will dock to the right/left of the Drum input palette.

                                                                          Computer keyboard

                                                                          To enter notes on a percussion staff using your computer keyboard:

                                                                          1. Click on the note or rest where you want to start.
                                                                          2. Enter note input mode. The Drum input palette now appears at the bottom of the screen (see below).
                                                                          3. Select the desired note duration.
                                                                          4. Press the shortcut key (A–G) for the instrument that you wish to enter—refer to the Drum input palette window.
                                                                          5. If you wish to add another note to an existing one in that voice, press Shift + [A–G].

                                                                          Note: Voice allocation is determined by the color of the note in the drum input palette: blue for voice 1, green for voice 2.

                                                                          Mouse

                                                                          To add a note to a percussion staff

                                                                          Use the following method to add a new note or to replace an existing chord.

                                                                          1. Select the note or rest where you want to start. You can also select a measure.
                                                                          2. Press N to to enter note input mode. The Drum input palette now appears at the bottom of the screen (see below).
                                                                          3. Set note duration.
                                                                          4. Chose one of the following options:
                                                                            • Double-click a note in the Drum input palette.
                                                                            • Select a note (e.g. Bass drum, or Snare) in the Drum input palette, then click a note or rest in the score.

                                                                          To add a note to an existing chord in the percussion staff

                                                                          1. Ensure you are in note input mode.
                                                                          2. Select a note duration equal to the note you are adding to.
                                                                          3. Click on the new note in the Drum input palette.
                                                                          4. Click above or below the existing note in the percussion staff.

                                                                          Note: Voice allocation is determined by the color of the note in the drum input palette: blue for voice 1, green for voice 2.

                                                                          Drum input palette

                                                                          When a percussion staff is selected and note input mode is ON, a window opens at the bottom of the screen called the Drum input palette. This window is essential for mouse input, and displays shortcuts for computer keyboard input, but can be ignored if using a MIDI keyboard or the virtual Piano Keyboard.

                                                                          Each note in the palette represents a percussion instrument: hovering the mouse pointer over the note displays the instrument name.

                                                                          Drum input palette

                                                                          The letters A–G (shown above certain notes in the palette) are designated as shortcuts for entering particular instruments (bass drum, snare, closed hi-hat etc.), rather than referring to note pitches. They can be changed or reallocated as desired in the Edit Drumset window.

                                                                          When the Drum input palette is open, double-clicking a note in the palette or entering a shortcut letter will add that instrument note to the percussion staff. The color of the note in the palette shows the voice allocated for that note—blue for voice 1, green for voice 2. This can be changed in the Edit Drumset dialog if required.

                                                                          This voice allocation applies only to keyboard and mouse entry of notes: entry via a MIDI keyboard or the virtual Piano keyboard allows any voice to be used.

                                                                          Edit Drumset

                                                                          Clicking on Edit Drumset at the left of the Drum input palette, opens the Edit Drumset dialog. Alternatively, right click on a percussion staff and chose "Edit Drumset."

                                                                          Edit Drumset dialog

                                                                          The Edit Drumset dialog displays the percussion instruments available and the MIDI notes/numbers to which they are allocated. It also determines how each instrument is displayed on the staff— its name, position, notehead type and note-stem direction. Any changes made here are automatically saved in the parent MuseScore file.

                                                                          Clicking on a row in the left-hand column allows you to edit the display properties for that note as follows:

                                                                          Name: The name you want displayed in the Drum input palette when you mouse over the note.
                                                                          Notehead: Chose a notehead for that instrument from a drop-down list of options (if set to "Invalid," the instrument will not display in the Drum input palette).
                                                                          Staff line: This number indicates the staff line/space on which the note is displayed. "0" means that the note is displayed on the top line of the 5-line staff. Negative numbers move the note upwards step by step, while positive numbers move it downwards in the same way.
                                                                          Stem Direction: Auto, Up or down.
                                                                          Default voice: Assign to one of four voices. This does not affect input from a MIDI keyboard or the virtual Piano keyboard.
                                                                          Shortcut: Assign a keyboard shortcut to enter that note.

                                                                          The customized drumset can be saved as a .drm file by pressing Save. You can also import a customized drumset using the Load button.

                                                                          Note: In MuseScore 2.1, some of the pitches in the Tenor Drums instrument do not play back; there is a DRM file designed to fix this, which you can download here, via right-click→ Save target as.

                                                                          Roll

                                                                          To create a drum roll, use Tremolo.

                                                                          External links

                                                                          • How to create jazz drum notation [MuseScore How-To]
                                                                          • Video tutorial: MuseScore in Minutes: Lesson 7 - Tablature and Drum Notation
                                                                          • Drum Parts [video]
                                                                          • Editing the Drum Palette in MuseScore 1.1 [video]
                                                                          • Saving Drumset Changes in MuseScore 1.1 [video]
                                                                          • Guide to Drum and Percussion Notation

                                                                          Tabulatuuri

                                                                            Music for fretted, stringed instruments is commonly notated using tablature, also known as tab, which provides a visual representation of the strings and fret numbers:

                                                                            Tablature

                                                                            Tablature can also be combined with traditional staff notation:

                                                                            Standard staff plus tablature

                                                                            Create a new tablature staff

                                                                            If you wish to create tablature as part of a new score, use the New Score Wizard. If you want to add tablature to an existing score, use the Instruments dialog. Or, alternatively, you can convert an existing standard staff. See below for details.

                                                                            With the New Score wizard

                                                                            To create tablature in a new score (for combined staff/tablature systems see → below):

                                                                            1. Open the New Score wizard.
                                                                            2. Enter the score details (optional). Click Next.
                                                                            3. On the Chose template file page, click on Choose Instruments.
                                                                            4. On the Instruments page, select one (or more) tablature options under "Plucked strings" in the left-hand column (see image below). Then click Add.

                                                                              Instrument list: Plucked strings

                                                                              Note: You can use the dropdown list above the Instrument list to change the category displayed. Alternately you can search for the instrument using the "Search" field below the Instrument list.

                                                                            5. Complete the rest of the New Score Wizard.

                                                                            If the desired tablature is not available in the Choose Instrument list:

                                                                            1. At step "4" (above), select an existing "Plucked strings" tablature staff.
                                                                            2. Press Add to move it to the right-hand column.
                                                                            3. Check the drop-down menu to the right of the newly-added instrument for the most suitable Tab option, if any.
                                                                            4. Complete the rest of the New Score wizard and exit.
                                                                            5. Modify the number of strings and tuning of the tablature, if needed, in the Staff properties window (see → below).
                                                                            6. Change the Instrument name in Staff Properties, if required.

                                                                            This allows you to create tablature for any chromatically-fretted instrument.

                                                                            With the Instruments dialog

                                                                            To add a single tablature staff to an existing score (for combined staff/tab system see → below):

                                                                            1. Open the instruments dialog (press I; or from the menu bar, select Edit → Instruments…).
                                                                            2. Add the tab staff as described in Add instruments ("Create a new score").

                                                                            By changing staff type

                                                                            To convert an existing standard staff to tablature, or tablature to a standard staff:

                                                                            1. Right click on the staff and select Staff Properties…. If "Instrument" is already set to a plucked-strings type, then exit staff properties and go to step 4.
                                                                            2. If "Instrument" is not a plucked-strings type, click on Change instrument and select an appropriate instrument from "Plucked strings."
                                                                            3. Click on OK twice to exit staff properties.
                                                                            4. Open the instruments dialog (press I, or from the menu bar select Edit → Instruments…).
                                                                            5. Click on the staff in the right-hand column and change the "Staff type" to the desired option.
                                                                            6. Click OK to exit the Instrument editor and return to the score page.

                                                                            Note: If you subsequently need to make further adjustments to the staff (e.g. tuning, number of lines/strings etc.), right click on the staff and select Staff Properties….

                                                                            Alternative method (using just the "Staff Properties" dialog):

                                                                            1. Right click on the staff and select Staff Properties….
                                                                            2. If the Instrument displayed is in the "Plucked strings" category, go to step 4.
                                                                            3. If the Instrument displayed is not in the "Plucked strings" category, click Change instrument and select an appropriate instrument from "Plucked strings". Click on OK.
                                                                            4. Click Advanced Style Properties..., change "Template" to the desired option and press < Reset to Template.
                                                                            5. Click OK twice to close the Staff Properties dialog box..

                                                                            Note: Other adjustments to the staff (e.g. tuning, number of lines/strings etc.), can also be made in the Staff Properties… dialog.

                                                                            Edit string data

                                                                            Change tuning

                                                                            Note: If you only want to view (rather than change) the instrument tuning, follow steps 1 and 2 only.

                                                                            1. Right-click on the staff and select Staff Properties….

                                                                              Staff properties dialog

                                                                            2. Press the Edit String Data… button at the bottom of the dialog box. The String Data dialog opens:

                                                                              String data

                                                                            3. Click on a string pitch and select Edit String…. Or, alternatively, just double-click the string pitch.

                                                                            4. Select a new pitch in the Note Selection box and click OK. Or, alternatively, just double-click the new pitch.
                                                                            5. Click OK to close the "String Data" dialog box. Then click OK to close the "Staff/Part Edit Properties" dialog box.

                                                                            Notes: (1) If tuning is changed when the tablature for that instrument already contains some notes, fret marks will be adjusted automatically (if possible); (2) Any change of tuning to a particular instrument applies only to the score at hand, and does not change any program default settings.

                                                                            Add a string

                                                                            1. Right-click on the staff, select Staff Properties…, then press Edit String Data.
                                                                            2. Click on a string pitch and select New String....
                                                                            3. Select the new pitch and press OK—or, alternatively, just double-click the new pitch. The new string is inserted below the selected string.

                                                                            Note: After adding a tablature string you will need to adjust the number of lines in the Staff properties dialog.

                                                                            Delete a string

                                                                            1. Right-click on the staff, select Staff Properties…, then press Edit String Data.
                                                                            2. Click on a string pitch and select Delete String.

                                                                            Note: After deleting a tablature string you will need to adjust the number of lines in the Staff properties dialog.

                                                                            Mark string "open"

                                                                            This feature is used to designate unfretted strings—as in the Lute:

                                                                            1. Right-click on the staff, select Staff Properties…, then press Edit String Data.
                                                                            2. Check one or more boxes in the "Open" column.

                                                                            Change number of instrument frets

                                                                            This property defines the maximum fret number which can be entered on a tablature staff.

                                                                            1. Right-click on the staff, select Staff Properties…, then press Edit String Data.
                                                                            2. Select or enter a new number in the "Number of frets" spin box.

                                                                            Change tablature display

                                                                            You can customize both the appearance of a tablature staff and the way that it displays the fret marks. To access these options:

                                                                            1. Right click on the staff and select Staff Properties….
                                                                            2. Click on the Advanced Style Properties… button.

                                                                            Combine pitched staff with tablature

                                                                            Plucked-string instruments—such as the guitar—are commonly notated using both a music staff and tablature (TAB) together. MuseScore gives you the option of having the two staves either unlinked or linked:

                                                                            1. Unlinked Staves: You can enter, delete or edit notation in one staff without affecting the other. To transfer music notation from one staff to the other, select the desired range and copy and paste it into the other staff.

                                                                            2. Linked Staves: Any changes you make in one staff are automatically applied to the other staff as well ("mutual translation").

                                                                            Note: Occasionally, you may find numbers marked red in the tablature. This means that a fret mark cannot be displayed because it clashes with an existing one. You can resolve this by moving and adjusting existing fret numbers (see Editing existing notes). However, a fret mark clash on the lowest line does not require any adjustment—this is "by design" and the red mark will not appear on any printed copy.

                                                                            Create a staff/tablature pair with the New Score wizard

                                                                            1. Open the New Score wizard.
                                                                            2. Enter the score details (optional). Click Next.
                                                                            3. On the Chose template file page, click on Choose Instruments.
                                                                            4. Select a pitched staff in the "Plucked strings" section of the left-hand column. Then click Add.
                                                                            5. Select the newly-created staff line (i.e. marked "Staff …") in the right-hand column and chose one of two options:
                                                                              • Click Add Staff to create an unlinked staff/tab pair.
                                                                              • Click Add Linked Staff to create a linked staff/tab pair.
                                                                            6. In the Staff type column, click on the dropdown list for the newly-created staff and select a tablature option (this can be modified later, if required, on the score page—see Staff Properties).
                                                                            7. Complete the rest of the New Score Wizard, or click Finish.

                                                                            Note: To create unlinked staves with separate mixer channels, instead of step "5" (above), select a Tablature staff in the left-hand column and click Add. Then continue with steps 6 and 7.

                                                                            Create a staff/tablature pair in an existing score

                                                                            1. Open the Instruments editor (press I, or from the menu bar, select Edit → Instruments…).
                                                                            2. Select a pitched staff in the "Plucked strings" section of the left-hand column. Then click Add.
                                                                            3. Select the newly-created staff line (i.e. marked "Staff …") in the right-hand column and chose one of two options:
                                                                              • Click Add Staff to create an unlinked staff/tab pair.
                                                                              • Click Add Linked Staff to create a linked staff/tab pair.
                                                                            4. In the Staff type column, click on the dropdown list for the newly-created staff and select a tablature option (this can be modified later, if required, on the score page—see Staff Properties).
                                                                            5. Change the staff order using the ↑ button if needed.
                                                                            6. Click OK to return to the score.

                                                                            Note: To create unlinked staves with separate mixer channels, instead of step "3" (above), select a Tablature staff in the left-hand column and click Add. Then continue with steps 4–6.

                                                                            Create a staff/tablature pair from an existing staff

                                                                            To add tablature to a plucked-string staff in the score (or vice versa):

                                                                            1. Open the Instruments editor (press I, or from the menu bar, select Edit → Instruments…).
                                                                            2. Select the staff line (marked "Staff 1") in the right-hand column that you want to add to.
                                                                            3. Chose one of two options:
                                                                              • Click Add Staff to create an unlinked staff/tab pair
                                                                              • Click Add Linked Staff to create a linked staff/tab pair
                                                                            4. In the Staff type column, click on the dropdown list for the newly-created staff and select an option (this can be modified later, if required, on the score page—see Staff Properties).
                                                                            5. Change the staff order using the ↑ button if needed.
                                                                            6. Click OK.

                                                                            Notes: To create unlinked staves with separate mixer channels, instead of step "3" (above), select an appropriate staff in the left-hand column and click Add. Then continue with steps 4–6.

                                                                            Enter notes in tablature

                                                                            Using a computer keyboard

                                                                            • First, ensure that you are not in note-input mode. Select the measure or existing note from which you want to begin note entry.
                                                                            • Switch to note input mode (N): a short 'blue rectangle' appears around one tablature string: this is the current string.
                                                                            • Select the duration of the note or rest that you wish to enter (see below).
                                                                            • Press the up/down arrow keys to move the cursor to the desired string. Use the left/right arrow keys to navigate through the score.
                                                                            • Press 0 to 9 to enter a fret mark from 0 to 9 on the current string; to enter numbers with several digits press each digit in sequence. Keys A to K (skipping I) can also be used: convenient when working in French tablature. For L , M, N, use the alphanumeric keyboard and type respectively 10, 11, 12...

                                                                              Note: You cannot enter a number higher than the "Number of frets" value set in the Edit String Data dialog.

                                                                            • Press ; (semicolon) to enter a rest of the selected duration.

                                                                            • You can enter notes in different voices if required—just as you would in a standard staff.

                                                                            See also, Edit notes (below).

                                                                            Historical tablature

                                                                            As of version 2.1, period notation for bass strings (lutes and sim.) is supported:

                                                                            • French tablature: letters with prefixed slash-like strokes right under the tab body: i.e. 7th string: "a", 8th string: "/a", 9th string: "//a" and so on, all in the first position below the tab body.

                                                                            • Italian tablature: numbers with 'ledger line'- like segment of string above the tab body: i.e. 7th string: "0" one position above the tab body with one 'ledger line'; 8th string: "0" two positions above the tab body with two 'ledger lines' and so on.

                                                                            Input of is via computer keyboard only: by moving the note entry cursor below (French) or above (Italian) the tab body, 'shadow' slashes or ledger lines will indicate the target string to which the fret mark will be applied; pressing one of the fret keys, will enter (and lay out) the note on that string.

                                                                            Using a mouse

                                                                            To enter notes into tablature with a mouse:

                                                                            • Enter note input mode and select the note or rest duration (see below).
                                                                            • Click on a string to create a note there. Notes are initially created on fret 0 (or a for French tablatures): to correct, type in the right number from the keyboard.
                                                                            • You can also increase/decrease the fret mark using Alt+Shift+↑ or Alt+Shift+↓.
                                                                            • You can enter notes in different voices if required—just as you would in a standard staff.

                                                                            See also, Edit notes (below).

                                                                            Select note duration

                                                                            In note input mode, you can use any of the following methods to set note duration in tablature:

                                                                            • Press Shift+1 to Shift+9: Sets duration from a 128th note to a longa (availability of these shortcuts may depend on the platform and/or keyboard layout);
                                                                            • Press NumPad 1 to Numpad 9: Sets duration from a 128th note to a longa (if a numeric keypad exists and NumLock is on);
                                                                            • Click on a note duration icon in the Note Input toolbar above the document window;
                                                                            • Press Q to decrease the selected duration and W to increase it.

                                                                            Edit notes

                                                                            Note input mode

                                                                            To edit an existing fret mark in note-input mode:

                                                                            • Position the cursor above the fret mark and simply retype the number.
                                                                            • Increment or decrement the fret mark using Alt+Shift+↑ or Alt+Shift+↓.

                                                                            Non note input mode

                                                                            To edit an existing fret mark outside note-input mode:

                                                                            1. Select one or more fret marks.
                                                                            2. Use any of the following commands:
                                                                              • To increment or decrement, without changing the string: Press ↑ / ↓.
                                                                              • To increment or decrement, changing strings, when possible, to minimize the fret number: Press Alt+Shift+↑ / ↓
                                                                              • To move to an adjacent string (if the string is free and can produce that note): Press Ctrl+↑ / ↓ .

                                                                            Note: The fret mark cannot be higher than the "Number of frets" value set in the Edit String Data dialog.

                                                                            Crosshead notes

                                                                            To change a fret mark to a crosshead note:

                                                                            1. Select one or more fret marks (in non-note-input mode).
                                                                            2. Press Shift+X to toggles ghost noteheads on/off.

                                                                            Summary of keyboard commands

                                                                            Note input mode

                                                                            Type: to get:
                                                                            ↑ Select above string as current.
                                                                            ↓ Select below string as current.
                                                                            Shift+1 to Shift+9 Select a duration (128th note to a longa)
                                                                            NumPad 1 to NumPad 9 Select a duration (128th note to a longa)
                                                                            Q Decrease current input duration.
                                                                            W Increase current input duration.
                                                                            0 to 9 Enter a fret digit / letter.
                                                                            A to K Enter a fret digit / letter (I excluded).
                                                                            Alt+Shift+↑ Increase current fret mark.
                                                                            Alt+Shift+↓ Decrease current fret mark.
                                                                            ; (semicolon) Enter a rest

                                                                            Normal mode

                                                                            Type: to get:
                                                                            0 to 9 Change duration of selected note or rest (128th note to longa)
                                                                            Alt+Shift+↑ Increase the pitch of the selected note (MuseScore chooses the string).
                                                                            ↑ Increase the pitch without changing string.
                                                                            Alt+Shift+↓ Decrease the pitch of the selected note (MuseScore chooses the string).
                                                                            ↓ Decrease the pitch without changing string.
                                                                            Ctrl+↑ Move note to above string, keeping the pitch.
                                                                            Ctrl+↓ Move note to below string, keeping the pitch.
                                                                            Shift+X Toggle the ghost notehead on/off.

                                                                            External links

                                                                            • Video tutorial: MuseScore in Minutes: Lesson 7 - Tablature and Drum Notation

                                                                            Ääni ja toisto

                                                                            MuseScoren kapasiteettina on sisäänrakennetut ääniominaisuudet. Tämä luku käsittelee toistopainikkeita ja
                                                                            tapoja laajentaa instrumentin ääniä.

                                                                            Instrumentinvaihdot kesken viivaston

                                                                              When a musician is required to double on a different instrument for a section of a piece, the instruction to switch instruments is generally placed above the staff at the beginning of that section. A return to the primary instrument is handled in the same manner.

                                                                              MuseScore enables users to insert a special class of text called Change Instrument text for this purpose. This class of text is different from either Staff or System text in that it links the text to the playback and changes the sound to the new instrument.

                                                                              Instrument changes as of version 2.1

                                                                              Version 2.1 introduces a greatly improved mid-staff instrument change over previous versions. There are still some limitations that need to be considered prior to using it.

                                                                              1. Mid-staff instrument changes are limited to the same type of staff. For example, you cannot change between a percussion staff and a pitched instrument staff or vice versa.

                                                                              2. The instrument name is not changed in the mixer. It will still be listed under the instrument in the original definition of the staff.

                                                                              3. The key signature is not automatically updated at the instrument change. You must manually change the Key signature if needed.

                                                                              4. You can now enter the notes a musician would play once the instrument is changed and the correct key signature is entered if necessary.

                                                                              5. Unless you are changing the type of staff, you will always use the Change Instrument text.

                                                                              Instrument changes in version 2.0

                                                                              There are several limitations to this in version 2.0 which should be understood before attempting to use it.

                                                                              1. Automatic transposition from concert pitch to the appropriate key for the transposing brass and woodwind instruments is not currently supported. For changes to instruments notated in a different key (C flute to E♭ flute; Oboe to English Horn, etc.), the use of ordinary Staff Text to indicate the change is preferable, and the transposition must be done after the music is entered (using Notes→Transpose from the main menu). To avoid discord on playback, the instrument assigned to that staff should be muted in the F10 Mixer.

                                                                              2. If it is necessary to hear the new instrument sound on playback, the Change Instrument text function must be used. However, after a mid-staff instrument change where the two instruments on the staff are not notated in the same key, no attempt should be made to enter new music directly from the keyboard. Instead, the music must be (a) pasted in, or (b) entered before the instrument change is affected. New input into measures following an instrument change is subject to two known program bugs, which cannot be resolved in the current 2.0.x versions without adversely affecting backwards compatibility. (This has been fixed in version 2.1) In addition, the score must remain notated in concert pitch, or discord will result from the transposition. As a convenience to the players, a copy of the part may be saved as a separate file and the required sections transposed to the appropriate key before the part is printed. (Note that transposing a linked part will affect the score as well.)

                                                                              3. When changing from one concert-pitch instrument to another, or from one transposing instrument to another in the same key (Bb trumpet to Bb cornet or Flugelhorn, etc.), the Change Instrument Text may be used to ensure that the playback sound is altered to the new instrument. Input may be done in the usual manner, and is not affected by the bugs mentioned above.

                                                                              Incompatibilities

                                                                              There are some incompatibilities between the two versions.

                                                                              1. Instrument changes created with version 2.0 and opened in version 2.1 or above will continue to either display the notes wrong or play the notes wrongs as in version 2.0. Deleting and reentering the instrument change will fix most incompatibility issues with only minor changes being needed.

                                                                              2. Instrument changes created with version 2.1 or above and opened in version 2.0 will generally playback correctly but continue to display the wrong notes.

                                                                              Add an instrument change

                                                                              1. Select the start point of the change by clicking on a note or rest.
                                                                              2. Open the main palette by typing F9 (or by using the View menu), and click on Text to open the text sub-palette.
                                                                                Text palette
                                                                              3. Double-click on Instrument
                                                                              4. The word "Instrument" will appear above the anchor note or rest.
                                                                              5. Double-click the word "Instrument", then type Ctrl+A to select all of it.
                                                                              6. Type the actual text you wish to appear in the score, then click outside the box to exit text edit mode.
                                                                              7. Right-click the text and choose "Change Instrument…"

                                                                                Menu: Instrument change

                                                                              8. Choose the instrument, then click OK

                                                                                Select instrument change

                                                                              See also

                                                                              • Change instrument
                                                                              • Mid-staff sound change

                                                                              External links

                                                                              • How to change instrument sound (e.g. pizz., con sordino) midway through score

                                                                              Mikseri

                                                                                The Mixer allows you to change instrument sounds and adjust the volume and panning for each staff.

                                                                                To display/hide the mixer, use one of the following:

                                                                                • Press F10 (Mac: fn+F10).
                                                                                • From the main menu, select View→Mixer.

                                                                                The mixer shows dials for each part

                                                                                Note: Separate reverb and chorus effects for each channel are not yet implemented; use the synthesizer effects unit instead.

                                                                                The name of each mixer channel is the same as the Part name in the Viivaston ominaisuudet dialog.

                                                                                Mute and Solo

                                                                                • To silence a selected staff, tick its "Mute" checkbox. Repeat as required.
                                                                                • To solo a selected staff, tick the "Solo" checkbox for that staff.

                                                                                Dials

                                                                                To turn a dial clockwise, click and drag upwards. To turn a dial counter-clockwise, click and drag downwards. You can also hover the mouse pointer over the dial and then move the mouse wheel. Double-clicking on any dial restores it to its default position.

                                                                                Sound

                                                                                The "Sound" drop-down menu lists every instrument supported by your current SoundFont. If you have multiple SoundFonts loaded in the Synthesizer, all the patches from all the SoundFonts (and/or SFZ files) will appear in a single long list—in the order previously set in the Synthesizer.

                                                                                Tip: To find an instrument, click on the "Sound" list and type the first letter of the instrument name. Repeat as required.

                                                                                Mid-staff sound change (pizz., con sordino, etc.)

                                                                                Some instruments come with multiple channels in the Mixer that can be used to change sounds midway through a score. For example, a staff for a stringed instrument (violin, viola, cello etc.) is allocated three channels: one for "Arco," another for "Pizzicato" and another for "Tremelo." A trumpet staff will have one channel for "Normal" and another reserved for "Mute." And so on.

                                                                                The following instructions use pizzicato strings as an example, but the same principle can be applied to any other instrument staff that allows sound changes.

                                                                                1. Select the first note of the section you want to be pizzicato;
                                                                                2. From the main menu, choose Add→Text→Staff Text;
                                                                                3. Type "Pizz." This text is for visual reference only and does not affect playback;
                                                                                4. Right-click on the applied staff text and select Staff Text Properties…;
                                                                                5. In the "Change Channel" tab of the "Staff Text Properties" dialog, select one or more voices on the left;
                                                                                6. From the dropdown menu, select pizzicato;

                                                                                  Staff text properties

                                                                                7. Click OK to return to the score.

                                                                                Every note after the staff text you added now sounds pizzicato. To return to a normal strings sound later in the piece, follow the same guidelines as above except type "Arco" in step 3 and select normal in step 6.

                                                                                See also

                                                                                • SoundFont
                                                                                • Synthesizer
                                                                                • Change instrument

                                                                                External links

                                                                                • How to change instrument sound (e.g. pizz., con sordino) midway through score

                                                                                Swing

                                                                                  MuseScore's swing feature allows you to change the playback of your score from a straight to a swing rhythm. Swing can be applied globally or only to a section of the score, and is fully variable.

                                                                                  Apply swing to a score section

                                                                                  1. Click on the note where you want swing to start;
                                                                                  2. Double-click Swing in the Text palette (shown below);

                                                                                    Swing text

                                                                                  3. Edit the Swing text as required;

                                                                                  4. If you need to vary swing from the default setting, right click the Swing text and select System text properties... Click on the "Swing Settings" tab and adjust note duration and "Swing ratio" as required.

                                                                                  Swing text can be edited just like any other text element: you can change it, style it, make it invisible etc.

                                                                                  Triplet in tempo marking

                                                                                  Often this notation is used to indicate swing:

                                                                                  swing_markings.png

                                                                                  MuseScore does not have a way to include a triplet in text as a tempo marking, but there is an easy workaround:

                                                                                  1. Add Swing text as described above and make it invisible (shortcut V, or untick "Visible" in the Inspector);
                                                                                  2. Add an appropriate Image of the required tempo marking to the score. This can be downloaded from the bottom of the "How To" page: How to create a visual swing marking.
                                                                                  3. Resize and reposition the image as required.

                                                                                  Return to straight rhythm

                                                                                  If you want playback to return to straight time after a swing section:

                                                                                  1. Add Swing text to the first note or rest of the "straight" section (see above).
                                                                                  2. Edit the text to indicate a return to straight time: e.g. "Straight."
                                                                                  3. Right-click on the text and select System Text Properties…. Click on the "Swing Settings" tab and set "Swing to "Off."

                                                                                  Apply swing globally

                                                                                  If you wish to apply swing to the whole score, you can do so from the menu:

                                                                                  1. Select Style → General... → Score.
                                                                                  2. In the "Swing Settings" section, set the desired note value and "swing ratio."

                                                                                  External links

                                                                                  • How to create a visual swing marking.
                                                                                  • Swing (jazz performance style) (Wikipedia)

                                                                                  Syntetisaattori

                                                                                    Overview

                                                                                    To display the Synthesizer: from the menu, select View→Synthesizer.

                                                                                    The Synthesizer controls MuseScore's sound output and allows you to:

                                                                                    • Load and organize different sound sample libraries to play back the music
                                                                                    • Apply effects such as reverb and compression
                                                                                    • Adjust overall tuning
                                                                                    • Alter the output volume of both music and the (optional) metronome.

                                                                                    The Synthesizer window is divided into four sections/tabs:

                                                                                    • Fluid: A software synthesizer that plays SF2/SF3 SoundFont sample libraries.
                                                                                    • Zerberus: A software synthesizer that plays SFZ format sample libraries.
                                                                                    • Master Effects: Used to apply multi-effects to the score.
                                                                                    • Tuning: Used to adjust overall playback tuning.

                                                                                    Synthesizer settings

                                                                                    Set as Default: When you open MuseScore, the Synthesizer always assumes the current default settings. If you want a new default to apply at the next session, change the settings as desired, then press the Set as Default button.

                                                                                    Save to Score / Load to Score: You can save a particular configuration of settings to an individual score by pressing the Save to Score button. When you next load the score, use the Load from Score button to transfer the stored settings to the Synthesizer.

                                                                                    Note: Only one set of Synthesizer settings can be in effect at a time—i.e. if multiple scores are open at once, it is not possible to make changes to the Synthesizer in one score and leave other scores' settings untouched.

                                                                                    Note: Changes made in the Synthesizer will not be heard in exported audio files unless the Synthesizer settings have been saved to the score with the Save to Score button. See also Tuning (below).

                                                                                    Fluid

                                                                                    Click on the Fluid tab to access the control panel for SF2/SF3 SoundFont sample libraries. By default, the SoundFont FluidR3Mono_GM.sf3 should already be loaded.

                                                                                    Fluid in Synthesizer

                                                                                    You can load, rearrange and delete soundfonts as required. Playback can be shared between any combination of different soundfonts (and/or SFZ files). The order of soundfonts in Fluid is reflected in the default order of instruments in the mixer.

                                                                                    To load a soundfont

                                                                                    1. Click on the Add button
                                                                                    2. Click on a soundfont in the list.

                                                                                    To be able to load the soundfont, it first needs to be installed in your Soundfonts folder. This will ensure that it appears in the list in step 2 (above).

                                                                                    To reorder the soundfonts

                                                                                    1. Click on a soundfont
                                                                                    2. Use the up/down arrows (on the right-hand side) to adjust the order.
                                                                                    3. Repeat with other soundfonts in the list if required.

                                                                                    If you have not changed any sounds in the Mixer, then the SoundFont at the top of the list is the one that will be used for playback. However, if you are using the Mixer to play different instruments with sounds from different SoundFonts, playback will only work correctly if you have the same SoundFonts loaded in the same order in the Synthesizer. Therefore, if you are using multiple SoundFonts, it is advised to click the Save to Score button in the Synthesizer, so that the next time you open that score you can recall the list of SoundFonts loaded (and other Synthesizer settings) with the Load from Score button.

                                                                                    To remove a soundfont

                                                                                    1. Click on the name of the soundfont
                                                                                    2. Click on the Delete button.

                                                                                    This removes the soundfont from the synthesizer but does not uninstall it from the Soundfonts folder: it will still be available if you wish to reload it later.

                                                                                    Zerberus

                                                                                    Click on the Zerberus tab to access the control panel for SFZ sound sample libraries. You can add or delete files in a similar way to the Fluid tab. Note that, as with Fluid, the the SFZ files must first be installed in your soundfonts folder before they can be loaded into the synthesizer.

                                                                                    Volume

                                                                                    At the right in the Synthesizer are two sliders. One controls the playback volume, the other controls the volume of the optional built-in metronome. You can turn the metronome on or off by clicking the button underneath its volume slider. As with all the rest of the Synthesizer controls, any changes made here are temporary unless saved to the score or set as the new default.

                                                                                    Volume slider in Synthesizer

                                                                                    Effects

                                                                                    The Master Effects tab of the Synthesizer houses the Zita 1 stereo reverb and, as of version 2.0.3, the SC4 stereo compressor modules. Two slots are provided, "Effect A" and "Effect B," both with a drop-down list of available effects – including the option to set one or both channels to "No Effect." The effects are applied in series: Effect A → Effect B.

                                                                                    Master Effects in Synthesizer

                                                                                    To store an effects configuration as the default option for the synthesizer, click the Set as Default button. If you subsequently change the effects set-up, you can restore whatever settings you made the defaults by clicking the Load Default button.

                                                                                    You can store a particular effects configuration with a score by clicking on the Save to Score button, and later load those settings from the score by clicking on Load from Score.

                                                                                    Zita 1 reverb

                                                                                    The Zita 1 stereo reverb module allows you to simulate the ambience of anything from a small room to a large hall. The pre-delay, reverb time and tone of the reverb can be finely tuned using the controls provided:

                                                                                    • Delay: Set a pre-delay for the reverb from 20-100 ms.
                                                                                    • Low RT60 (Low frequency reverb time): Use the grey control to adjust the center frequency (50–1000 Hz) of the low frequency band which you want to affect: the green control adjusts the reverb time (1–8 secs) of this frequency band.
                                                                                    • Mid RT60 (Mid-range reverb time): Adjust the reverb time (1–8 secs) of the mid-range frequency band.
                                                                                    • HF Damping: Adjusts the high frequency component of the reverb. Increasing this value increases the frequency of the cut-off point and makes the reverb appear brighter and longer.
                                                                                    • EQ1: Allows you to cut or boost (-15 to +15) a frequency band (center = 40 Hz - 2 KHz) in the lower part of the spectrum.
                                                                                    • EQ2: Allows you to cut or boost (-15 to +15) a frequency band (center = 160 Hz - 10 KHz) in the higher part of the spectrum.
                                                                                    • Output: Controls the amount of effect applied. "Dry" is no effect. "Wet" indicates 100% reverb. "Mix" is a 50/50 balance of wet/dry signal.

                                                                                    Note: EQ1 and EQ2 affect the tone of the reverb only, not the dry (unprocessed) signal.

                                                                                    To quickly set up an effects patch, set "Output" to "Mix" and adjust the "Mid RT60" control to the desired reverb time. Then fine tune the effect as explained above.

                                                                                    SC4 compressor

                                                                                    The SC4 stereo compressor (available as of version 2.0.3) gives you fine control over the playback's dynamic range, reducing the volume variation between loud and soft sounds. It offers the following controls:

                                                                                    • RMS: Adjusts the balance between RMS (0) and Peak (1) compression. In the former, the compressor responds to averaged-out levels in the signal; in Peak mode, the compressor responds to peak levels.
                                                                                    • Attack: (1.5–400 ms) The length of time it takes for compression to engage fully after the signal exceeds the threshold level.
                                                                                    • Release: (2–800 ms) The time it takes for compression to return to zero after the signal falls below the threshold level.
                                                                                    • Threshold: (in dB) The signal level above which compression starts to take effect. Lowering the threshold increases the amount of signal that is compressed.
                                                                                    • Ratio: The amount of compression applied to the signal above the threshold. The higher the ratio, the greater the compression. Varies between 1:1 to 20:1.
                                                                                    • Knee: Allows you to select a range between "soft knee" and "hard knee". The softer the knee, the more gradual the transition between uncompressed and compressed signal.
                                                                                    • Gain: Compression tends to lower the volume, so use this control to boost the signal as required.

                                                                                    To quickly set-up, try setting RMS = 1, Threshold = -20 db, Ratio = 6. Increase Gain to restore the lost volume. Then fine-tune as explained above.

                                                                                    Tuning

                                                                                    For Concert Pitch instruments, MuseScore uses the A4 = 440 Hz pitch standard by default. To change it, simply enter a new value in the Tuning tab of the Synthesizer.

                                                                                    Tuning in Synthesizer

                                                                                    Like all other Synthesizer settings, the master tuning affects playback within MuseScore but does not affect exported audio files (WAV, OGG, MP3) unless the Save to Score option is selected.

                                                                                    Change master tuning

                                                                                    Notes: Applies to all scores. Current session only (tuning resets to default on MuseScore exit). Affects playback but doesn't affect exported audio files (WAV, OGG, MP3, and MIDI).

                                                                                    1. View→Synthesizer.
                                                                                    2. Click the Tuning tab.
                                                                                    3. Enter a new Master Tuning value (Minimum value = 300 Hz; Maximum value = 600.0 Hz; Default 440 Hz).
                                                                                    4. Click Change Tuning.

                                                                                    Set default tuning

                                                                                    Note: Applies to all scores. Current session and all subsequent sessions (until you change it again). Affects playback but doesn't affect exported audio files (WAV, OGG, MP3, and MIDI).

                                                                                    1. Change the Master Tuning as shown above for the current session.
                                                                                    2. Select Set as Default.

                                                                                    Change tuning for an individual score

                                                                                    Note: Applies to current score for current session, use the Save to Score button, and settings can be recovered in subsequent sessions with Load from Score. Affects playback and exported audio files (WAV, OGG, MP3).

                                                                                    1. Change the Master Tuning as shown above for the current session.
                                                                                    2. Click Save to Score.
                                                                                    3. You will now get this new tuning in exported audio files of the current score, but other scores will export with the default tuning as expected. However, due to a limitation in MuseScore, you need to click Load from Score to get the correct tuning on playback.

                                                                                    See also

                                                                                    • SoundFont
                                                                                    • Mixer

                                                                                    Tempo

                                                                                      Tempo markings can be found in the Tempo palette of the Basic and Advanced workspaces. They are supplied as metronome marks, but can be subsequently edited to display any tempo or expression you want. Playback tempo can be varied throughout the score by using multiple tempo markings, visible or invisible.

                                                                                      Add a tempo marking

                                                                                      Use any of the following methods:

                                                                                      • Select a note or rest and press the keyboard shortcut Alt+T.
                                                                                      • Select a note or rest, and from the menu bar chose Add→Text...→Tempo Marking.
                                                                                      • Select a note or rest and double-click an appropriate metronome mark in the Tempo palette;
                                                                                      • Drag-and-drop a metronome mark from the Tempo palette directly onto a note or rest.

                                                                                      Note: If a tempo marking is applied from the menu or using a keyboard shortcut, the beat note automatically follows the time signature. The advantage of applying from a palette is that you can chose which beat note to use.

                                                                                      Edit tempo

                                                                                      To change the tempo of an existing metronome mark in the score:

                                                                                      1. Enter Edit mode for the tempo mark in question;
                                                                                      2. Edit the metronome number and/or the beat note as required;
                                                                                      3. Exit Edit mode.

                                                                                      You can also override the tempo of an existing metronome mark from the Inspector:

                                                                                      1. Select the tempo mark;
                                                                                      2. Untick "Follow text" in the "Tempo Marking" section of the Inspector;

                                                                                        Inspector, Tempo

                                                                                      3. Set the desired playback tempo in the "Tempo" field underneath.

                                                                                      Note: Playback may be faster or slower if the tempo setting in the play panel is at a percentage other than 100%.

                                                                                      Edit tempo text

                                                                                      Tempo marks can be edited and formatted just like any other text object. To set text properties or text style, see Text styles and properties.

                                                                                      The tempo indicated by a metronome mark usually persists even if overwritten by an expression—such as Andante, Moderato etc. You can also add further text to a plain metronome mark. e.g.

                                                                                      Metronome mark: Andante quarter note = 75

                                                                                      Ritardando and accelerando

                                                                                      Gradual tempo changes like ritardando ("rit.") and accelerando ("accel.") can be added to the score as system text, but currently don't have any effect on playback. The effect can be achieved, however, by stepping down the tempo using multiple invisible tempo markings. In this example, the tempo is decreased by 10 BPM on the first note of each measure, starting from 110 BPM before the ritardando. Each tempo change is made invisible by unchecking the Visible checkbox in the Inspector, so that only the ritardando shows on the printed score.

                                                                                      Ritardando

                                                                                      A plugin has been developed to automate this process: TempoChanges

                                                                                      Fermatas

                                                                                      Fermatas, available in the Articulations and Ornaments palette, have a Time stretch property that can be set via the Inspector. By default, this property is set to 1.00. To have MuseScore play back a fermata for twice its normal duration, click on the fermata and set "Time stretch" to 2.00.

                                                                                      Play panel

                                                                                      • Display the play panel: View→Play Panel or F11 (Mac: fn+F11)

                                                                                        Play Panel

                                                                                      • Change the percentage of the score's actual tempo using the Tempo slider

                                                                                      This setting is not saved in the score and will proportionally override all tempo markings set in the score. If you have multiple tempo markings in the score, the BPM (Beats per Minute) number displayed above the slider will depend on where in the score you are. For example, if you have a tempo of 80 BPM set, and the Play Panel is set to 120% of tempo, the actual tempo of the playback will be 96 BPM, which you can tell by the number displayed above the percentage in the Play Panel.

                                                                                      Note: BPM is always measured and displayed in quarter note beats per minute, regardless of the (denominator of the) time signature in effect.

                                                                                      See also

                                                                                      • Play mode
                                                                                      • Time signature

                                                                                      Toistotila

                                                                                        Basic playback functions are accessed from the Play toolbar located above the document window:

                                                                                        Play Toolbar

                                                                                        From left to right, the icons are:

                                                                                        • Rewind to start position: Playback returns to the beginning of the score, or to the start of the loop (if one is set).
                                                                                        • Start or stop playback: See Start/stop playback.
                                                                                        • Toggle loop playback: See Loop playback.
                                                                                        • Play repeats: Turn off if you want playback to ignore repeats.
                                                                                        • Pan score during playback: Turn off if you want the score to remain stationary.
                                                                                        • Play metronome: See Metronome playback.

                                                                                        Playback commands

                                                                                        Start/stop playback

                                                                                        To start playback:

                                                                                        1. Click on a note, rest or the blank part of a measure to establish the starting point. Note: If no selection is made, playback returns to the place it left off—or, if no previous playback, to the start of the score.
                                                                                        2. Press the play button Play Icon button; or press Space.

                                                                                        During playback you can jump to a specific note or rest in the score by simply clicking on it.

                                                                                        To stop playback:

                                                                                        • Press the Playback button; or press Space.

                                                                                        During playback

                                                                                        Once playback has started, the following commands are available:

                                                                                        • Go back to previous chord: ←
                                                                                        • Advance to next chord: →
                                                                                        • Go back to start of previous measure: Ctrl+← (Mac: Cmd+←)
                                                                                        • Advance to start of next measure: Ctrl+→ (Mac: Cmd+→)
                                                                                        • Rewind to start of score: Home (Mac: ⌘+Home); or press the Rewind button (playback toolbar).

                                                                                        During playback you can still use keyboard shortcuts to open and close panels, such as Play, Synthesizer, Mixer etc.

                                                                                        Play panel

                                                                                        To open the Play Panel use one of the following options:

                                                                                        • Press F11 (Mac: Fn+F11).
                                                                                        • From the menu bar, select View → Play Panel.

                                                                                        Play panel

                                                                                        The Play Panel offers temporary controls over playback, including playback speed (labelled 'tempo'), loop playback (with specified starting and ending positions), and general volume.

                                                                                        Note: Changes to the parameters in the Play Panel are not saved with the score: they only affect playback in the current session. Permanent changes to tempo should be made using tempo text. To change the default playback volume of the score, see Synthesizer.

                                                                                        Count in

                                                                                        You can switch on and off a count-in to be played each time the playback starts. The count-in plays beats for a full measure (according to nominal time signature at playback starting point); if the starting point is mid-measure or at a 'short' measure (anacrusis), it also plays enough beats to fill that measure. The conductor icon in the play panel enables, or disables count-in.

                                                                                        Metronome playback

                                                                                        You can also switch on/off the accompanying metronome as the score is played (see the metronome icon on the play panel).

                                                                                        Loop playback

                                                                                        You can loop playback of a selected passage in the score using either the Play toolbar (see image above) or the play panel.

                                                                                        To loop from the Play toolbar:

                                                                                        • Playback should be off, and the "Loop playback button" on.
                                                                                        • Select the desired region of the score for loop playback.
                                                                                        • Press the playback button.

                                                                                        Playback will now cycle within the region marked by the blue flags.

                                                                                        • Use the "Loop playback" button to toggle the loop on or off.

                                                                                        To loop from the Play Panel:

                                                                                        • Select the note from which you want playback to start and click on the "Set loop in position" button. The "Loop Playback" button becomes active.
                                                                                        • Select the last note of the desired playback region and click on the "Set loop out position" button.
                                                                                        • Press the play button.

                                                                                        Playback will now cycle within the region marked by the blue flags.

                                                                                        • You can use the "Loop playback" button to toggle the loop on or off.

                                                                                        Äänifontit ja SFZ-tiedostot

                                                                                          Audio playback for MuseScore is provided by virtual (or software) instruments, which can be either of two formats:

                                                                                          • SoundFont (file extension sf2/sf3). A single file containing one or more virtual instruments.
                                                                                          • SFZ (file extension sfz). A collection of audio and definition files containing one or more virtual instruments.

                                                                                          SF2/SF3 SoundFonts

                                                                                          A SoundFont (extension sf2 or, if using compressed samples, sf3) is a special type of file containing sound samples of one or more musical instruments, and is used to play back MIDI files. MuseScore 2.2 uses the SoundFont MuseScore_General.sf3. MuseScore 2.0–2.1 used the SoundFont FluidR3Mono_GM.sf3, which MuseScore_General is based on with several improvements. MuseScore 1 used a completely different SoundFont, TimGM6mb.sf2. These are General MIDI (GM) sample libraries consisting of 128+ musical instruments and various kinds of drum/percussion sets.

                                                                                          Once your score is set up to play correctly through FluidR3, it should be able to trigger similar instruments from any other GM sound source. This makes it possible to share scores even with non-MuseScore users, by exporting them as MusicXML or MIDI files (see Export).

                                                                                          Many different soundfonts are available on the Internet, both free and commercial. Larger SoundFonts often sound better but may be too large to run on your computer. If you find MuseScore runs slowly after installing a large SoundFont, or your computer can't keep up during playback, then look for a smaller SoundFont.

                                                                                          Once a SoundFont has been installed, you can use it for playback in MuseScore (and control other aspects of the sound output) with the Synthesizer. To display the Synthesizer, go to View → Synthesizer.

                                                                                          Install a SoundFont

                                                                                          After finding and decompressing a SoundFont (see →below), double-click to open it. In most cases, the SoundFont file type will already be associated with MuseScore, and MuseScore will start and a dialog will appear asking if you want to install the SoundFont. Occasionally an application other than MuseScore will be associated with the SoundFont file type; if this is the case, you will need to right-click or control-click on the file, so as to display a menu from which you can choose to open the file in MuseScore. In either case, when the dialog appears asking if you want to install the SoundFont, click "Yes" to place a copy of the SoundFont file in MuseScore's SoundFonts directory. This directory can be viewed or changed in MuseScore's Preferences, but the default location is:

                                                                                          • Windows: %HOMEPATH%\Documents\MuseScore2\Soundfonts

                                                                                          • macOS and Linux: ~/Documents/MuseScore2/Soundfonts

                                                                                          In contrast to user-added SoundFonts, the initial default SoundFont installed with MuseScore is located in a system directory, meant only for that purpose, which should not be modified. This directory and its default SoundFont file is:

                                                                                          • Windows (32-bit): %ProgramFiles%\MuseScore 2\sound\MuseScore_General.sf3
                                                                                          • Windows (64-bit): %ProgramFiles(x86)%\MuseScore 2\sound\MuseScore_General.sf3

                                                                                          • macOS: /Applications/MuseScore 2.app/Contents/Resources/sound/MuseScore_General.sf3

                                                                                          • Linux (Ubuntu): /usr/share/mscore-xxx/sounds/MuseScore_General.sf3 (with xxx being the MuseScore version)

                                                                                          Uninstall

                                                                                          To uninstall a SoundFont, simply open the folder where its file is installed and delete it.

                                                                                          SFZ

                                                                                          An SFZ consists of a bunch of files and directories, an SFZ file and a bunch of actual sound files in WAV or FLAC format, with the SFZ file being a text file that basically describes what sound file is located where and to be used for what instrument and pitch range.

                                                                                          Note: For full support of SFZ, MuseScore 2.1 or later is need, prior versions had only limited support, namely for Salamander Grand Piano

                                                                                          Install an SFZ

                                                                                          After finding an SFZ (see →below), you'd need to manually extract all the files that belong to the SZF (the SFZ file itself and all the subdirectories and the actual sound files within) into the directory listed above.

                                                                                          Uninstall

                                                                                          To uninstall an SFZ, simply open the folder where its files are installed (see above) and delete them all.

                                                                                          Synthesizer

                                                                                          The Synthesizer is MuseScore's central control panel for sound output. Once a SoundFont has been installed, it needs to be loaded into the Synthesizer in order for MuseScore to use it for playback. To make a different SoundFont the default, load it in the Synthesizer and click Set as Default.

                                                                                          To display the Synthesizer, go to View → Synthesizer. For more details, see Synthesizer.

                                                                                          Synthesizer

                                                                                          List of downloadable soundfiles

                                                                                          GM SoundFonts

                                                                                          The following sound libraries conform to the General MIDI (GM2) standard. This specification gives you a sound set of 128 virtual instruments, plus percussion kits.

                                                                                          • GeneralUser GS (29.8 MB uncompressed)
                                                                                            Courtesy of S. Christian Collins
                                                                                          • Magic Sound Font, version 2.0 (67.8 MB uncompressed)
                                                                                          • Arachno SoundFont, version 1.0 (148MB uncompressed)
                                                                                            Courtesy of Maxime Abbey
                                                                                          • MuseScore 1 came with TimGM6mb (5.7 MB uncompressed)
                                                                                            License: GNU GPL, version 2
                                                                                            Courtesy of Tim Brechbill
                                                                                          • MuseScore 2 (up to version 2.1) comes with FluidR3Mono_GM.sf3 (13.8 MB).
                                                                                          • MuseScore 2 (as of version 2.2) comes with MuseScore_General.sf3 (35.9 MB).

                                                                                            License: released under the MIT license

                                                                                          • Timbres of Heaven, version 3.2 (369 MB uncompressed)
                                                                                            Courtesy of Don Allen

                                                                                          Orchestral soundfiles

                                                                                          • Sonatina Symphonic Orchestra (503 MB uncompressed)
                                                                                            Downloads: SoundFont | SFZ format
                                                                                            License: Creative Commons Sampling Plus 1.0

                                                                                          Piano soundfiles

                                                                                          SF2 Pianos
                                                                                          • Acoustic grand piano, release 2016-08-04
                                                                                            Description: Yamaha Disklavier Pro Grand Piano, sf2 format, 36MiB compressed, 113MiB uncompressed, 121 samples, 5 velocity layers
                                                                                            More information: http://freepats.zenvoid.org/ including other soundfonts.
                                                                                            License: Creative Commons Attribution 3.0
                                                                                            Courtesy of Roberto Gordo Saez
                                                                                          SFZ Pianos
                                                                                          • Salamander Grand Piano
                                                                                            Downloads: version 2 | version 3
                                                                                            Description: Yamaha C5, 48kHz, 24bit, 16 velocity layers, between 80 MB and 1.9 GB uncompressed
                                                                                            License: Creative Commons Attribution 3.0
                                                                                            Courtesy of Alexander Holm
                                                                                          • Detuned Piano (244 MB uncompressed)
                                                                                            License: Creative Commons Attribution-ShareAlike 3.0
                                                                                          • Plucked Piano Strings
                                                                                            Description: 44.1kHz, 16bit, stereo, 168 MB uncompressed
                                                                                            License: Creative Commons Attribution-ShareAlike 3.0
                                                                                          • The City Piano
                                                                                            Description: Baldwin Baby Grand, 4 velocity layers, 696 MB uncompressed
                                                                                            License: Public domain
                                                                                            Courtesy of Big Cat Instruments
                                                                                          • Kawai Upright Piano, release 2017-01-28
                                                                                            Description: 68 samples, 44KHz, 24bit, stereo, 2 velocity layers, 58MiB uncompressed
                                                                                            License: GNU General Public License version 3 or later, with a special exception
                                                                                            Courtesy of Gonzalo and Roberto

                                                                                          Unzipping downloaded soundfiles

                                                                                          Since soundfiles are large, they are often zipped (compressed) into a variety of formats, including .zip, .sfArk, and .tar.gz. You need to unzip (decompress) these files before they can be used.

                                                                                          • ZIP is standard compression format supported by most operating systems.

                                                                                          • sfArk is a compression format designed especially for compressing SoundFont files. Use the special sfArk software to decompress it, or use this online service: https://cloudconvert.com/sfark-to-sf2

                                                                                          • .tar.gz is a popular compression format for Linux. Windows users can use 7-Zip; Mac users can use The Unarchiver, or macOS' built-in Archive Utility. Note that if using 7-Zip, you will need to apply decompression twice—once for GZip and once for TAR.

                                                                                          Troubleshooting

                                                                                          If the toolbar play panel is greyed out, or not visible, follow the instructions below to get your sound working again:

                                                                                          • Do a right-click on the menu bar and make sure there is a check mark next to the Transport Tools menu item. You can add or remove the check mark by clicking on the corresponding menu item. If this step does not solve your problem, continue below.
                                                                                          • If the play panel disappears after changing the SoundFont, go to Edit → Preferences... → I/O tab and click OK without making any changes. After restarting MuseScore, the play panel should reappear.

                                                                                          If you are setting up a SoundFont for the first time, please use one of the recommended SoundFonts listed above.

                                                                                          If playback stutters, then your computer is not able to handle the SoundFont being used. Two solutions:

                                                                                          1. Reduce the amount of RAM (memory) used by MuseScore by using a smaller SoundFont. See list above for suggestions.
                                                                                          2. Increase the amount of RAM available for MuseScore by quitting all applications except MuseScore. If you still have problems and a large SoundFont is important to you, consider more RAM for your computer.

                                                                                          See also

                                                                                          • Synthesizer
                                                                                          • Mixer

                                                                                          External links

                                                                                          • How to change the SoundFont or add another
                                                                                          • The SFZ Format (for details about the sfz specification)

                                                                                          Dynamiikka

                                                                                            Dynamiikkamerkinnät ilmaisevat nuotin tai säkeen voimakkuutta. Symbolit on löydettävissä Dynamiikka-paletista joko Perus- tai Edistyneessä työtilassa:

                                                                                            Dynamics palette (Advanced)

                                                                                            Note: Overall playback volume of the score can be changed using the volume slider in the Play Panel or Synthesizer.

                                                                                            Add a dynamic

                                                                                            To apply a dynamic to the score, use one of the following methods:

                                                                                            • Select a note and double-click a dynamic symbol in a palette.
                                                                                            • Drag a dynamic symbol from a palette onto a note.

                                                                                            For additional dynamics use the Master Palette (Shift+F9). You can also create a custom palette for future use.

                                                                                            To create a crescendo or decrescendo sign, see Hairpin.

                                                                                            Adjusting playback volume for a dynamic

                                                                                            Click on the dynamic to select it, and adjust its Velocity in the Inspector—higher for louder, lower for softer.

                                                                                            Adjusting range for a dynamic

                                                                                            Via the Inspector you can set the staves affected by a dynamic. The "Dynamic range" is by default set to "part," which means all staves for an instrument will be affected. Changing this to "staff" will limit the dynamic to the staff it is entered on only. Changing this to "System" will cause all instruments to play this dynamic.

                                                                                            List of dynamics in palettes

                                                                                            In the Basic workspace, there are 8 options in the Dynamics palette: ppp, pp, p, mp, mf, f, ff, fff.

                                                                                            In the Advanced workspace, there are all of the above plus 15 additional options in the Dynamics palette: fp, sf, sfz, sff, sffz, sfp, sfpp, rfz, rf, fz, m, r, s, z, n.

                                                                                            In the Dynamics section of the Master Palette, there are all of the above plus 6 additional options: pppppp, ppppp, pppp, ffff, fffff, ffffff.

                                                                                            Edit a dynamic

                                                                                            Any dynamic can be edited after being added to the score, just like standard text. See Text editing.

                                                                                            See also

                                                                                            • Tempo

                                                                                            External links

                                                                                            • Video tutorial: Lesson 10 - Articulations, Dynamics and Text
                                                                                            • Dynamics at Wikipedia

                                                                                            Teksti

                                                                                              MuseScoressa on käytettävissä paljon erilaisia tekstejä, kuten viivaston teksti, dynamiikka, tempo, sormitus, sanoitukset ym. Lisäksi tekstiä voi löytää viivoihin yhdistyneenä,—kuten maalit, oktaavinsiirrot, kitaran barreviivat jne.

                                                                                              This chapter covers some of the different classes of text available in MuseScore, and shows you how to format them. Other specific types of text are covered in other chapters:

                                                                                              • Tempo (→Sound and playback)
                                                                                              • Dynamiikka—p, mf, etc. (→Sound and playback)
                                                                                              • Swing (→Sound and playback)
                                                                                              • Mid-staff Instrument changes (→Sound and playback)
                                                                                              • Kertaukset ja hypyt —DC, Fine, Coda, etc. (→Notation)
                                                                                              • Figured bass (→Advanced topics)
                                                                                              • Frame text—in vertical, horizontal or text frames (→Formatting)
                                                                                              • Headers and footers —different from standard text objects (→Formatting)
                                                                                              • Lines (→Notation)

                                                                                              Tekstin perusteet

                                                                                                Add text

                                                                                                To add a text-based element to the score, use one of the following general methods:

                                                                                                • Keyboard shortcut: For example, press Ctrl+Tto enter Staff text , Ctrl+L to enter Lyrics, and so on.
                                                                                                • Menu command: Add→Text allows you to chose from a range of text-based elements.
                                                                                                • Workspace: Select a note and double-click an icon in one of the palettes; or, alternatively, drag a symbol from a palette onto the staff. e.g. Swing text, Tempo text etc.

                                                                                                Notes: (1) The exact method depends on the type of text you are adding (see Text). (2) For general-purpose text boxes attached to staves, see Staff and system text.

                                                                                                Format text

                                                                                                Every text-based element in the score has three levels of formatting:

                                                                                                • Text style: This is the highest level of formatting and applies to all text elements in the score of a particular type. For details, see Text style.
                                                                                                • Text properties: This applies to the style of one specific text object only. For details, see Text properties.
                                                                                                • Character formatting; The style applied to individual text characters during editing. For details, see Text editing.

                                                                                                Adjust position of text objects

                                                                                                To position a text object, use any of the following methods:

                                                                                                • Drag the object.
                                                                                                • Select the object and adjust the horizontal or vertical offset values in the Inspector.
                                                                                                • Select the object and apply any of the following keyboard shortcuts:
                                                                                                  • ←: Move text left 0.1 staff space.
                                                                                                  • →: Move text right 0.1 staff space.
                                                                                                  • ↑: Move text up 0.1 staff space.
                                                                                                  • ↓: Move text down 0.1 staff space.
                                                                                                  • Ctrl+← (Mac: ⌘+←): Move text left one staff space.
                                                                                                  • Ctrl+→ (Mac: ⌘+→): Move text right one staff space.
                                                                                                  • Ctrl+↑ (Mac: ⌘+↑): Move text up one staff space.
                                                                                                  • Ctrl+↓ (Mac: ⌘+↓): Moves text down one staff space.

                                                                                                Text anchors

                                                                                                When you apply a text element to the score, its anchor position will depend on the type:

                                                                                                • Title, Subtitle, Composer, Poet: Anchored to a frame.
                                                                                                • Fingering: Anchored to note heads.
                                                                                                • Lyrics: Anchored to a time position (a note/chord, but not a rest).
                                                                                                • Chord symbol: Anchored to a time position.
                                                                                                • Staff text: Anchored to a time position.
                                                                                                • System text: Anchored to a time position.

                                                                                                Tekstin muokkaaminen

                                                                                                  Enter/exit text edit mode

                                                                                                  To enter Text edit mode use one of the following methods:

                                                                                                  • Double click on a text element.
                                                                                                  • Right-click on a text element and select Edit element.
                                                                                                  • Click on a text element and press Ctrl+E (Mac: Cmd+E).

                                                                                                  Sample text in edit mode

                                                                                                  In this mode you can apply formatting to individual characters, including options such as Bold, Italic, font, font size, subscript and superscript. These are accessed from the Text toolbar below the document window:

                                                                                                  Text toolbar

                                                                                                  To exit Text edit mode use one of the following:

                                                                                                  • Press Esc.
                                                                                                  • Click on a part of the score outside the edit window.

                                                                                                  Keyboard shortcuts

                                                                                                  In Text edit mode, the following keyboard shortcuts are available:

                                                                                                  • Ctrl+B (Mac: ⌘+B) toggles bold face.
                                                                                                  • Ctrl+I (Mac: ⌘+I) toggles italic.
                                                                                                  • Ctrl+U (Mac: ⌘+U) toggles underline.
                                                                                                  • Home End ← → ↑ ↓ moves cursor.
                                                                                                  • Backspace (Mac: Delete) remove character to the left of the cursor.
                                                                                                  • Delete (Mac: → Delete or fn+Delete) remove character to the right of the cursor.
                                                                                                  • Return start new line.
                                                                                                  • F2 (Mac: fn+F2) Insert special characters (see below).

                                                                                                  Symbols and special characters

                                                                                                  You can use the Special Characters window to insert quarter notes, fractions, and many other kinds of special symbols or characters into your text. A few symbols can also be accessed by shortcut (see below).

                                                                                                  The Special Characters palette contains buttons for inserting symbols into the text (e.g. quarter note), or special characters (e.g. copyright symbol, ©)

                                                                                                  To open Special Characters, use any of the following methods:

                                                                                                  • Click on the Keyboard Icon icon in the text toolbar (below the score window).
                                                                                                  • Press F2 (Mac: fn+F2).

                                                                                                  Note: (1) This only works in Text edit mode; (2) The Special Characters dialog should not be confused with the menu item of the same name in the macOS version of MuseScore.

                                                                                                  The dialog is divided into 3 tabs: Common symbols, musical symbols and unicode symbols. The musical and unicode tabs are further subdivided into alphabetically-arranged categories.

                                                                                                  Double-clicking an item in the Special Characters dialog immediately adds it to the text where the cursor is positioned. Multiple items can be applied without closing the dialog box, and the user can even continue to type normally, delete characters, enter numerical character codes etc., with it open.

                                                                                                  Special character shortcuts

                                                                                                  In Text edit mode the following keyboard shortcuts can be used to access certain special characters:

                                                                                                  Ctrl+Shift+B: Flat.
                                                                                                  Ctrl+Shift+F: Forte.
                                                                                                  Ctrl+Shift+H: Natural.
                                                                                                  Ctrl+Shift+M: Mezzo.
                                                                                                  Ctrl+Shift+N: Niente.
                                                                                                  Ctrl+Shift+R: Rinforzando.
                                                                                                  Ctrl+Shift+S: Sforzando.
                                                                                                  Ctrl+Shift+Z: Z.

                                                                                                  See also

                                                                                                  • Chord symbol
                                                                                                  • Lyrics
                                                                                                  • Frame
                                                                                                  • Edit mode

                                                                                                  Tekstin tyylit ja ominaisuudet

                                                                                                    Text styles and text properties

                                                                                                    Every piece of text has a basic style. Title text, for example, is centered and uses a large font size; Composer text is smaller and aligned to the right within the top vertical frame.

                                                                                                    To edit text styles, use any of the following methods:

                                                                                                    • From the menu bar, select Style → Text...
                                                                                                    • Right-click on a text object and select Text Style...

                                                                                                    Note: Changes to a text style will affect all text that uses that style within a score.

                                                                                                    To edit a text property (which has the same parameters as the text style):

                                                                                                    • Right-click on a text object and select Text Properties....

                                                                                                    Unlike changes to a text style, changes to text properties only apply to the single specific piece of text you right-clicked on. The text style for the rest of the score remains unchanged, and other text using the same style is unaffected.

                                                                                                    During text editing you can make changes that depart from the basic style and may also differ from the specific text properties of a given piece of text. You can revert changes made through text editing (such as font size and italics) with the reset text to style option.

                                                                                                    Text Styles

                                                                                                    The available options are divided into categories:

                                                                                                    • Text
                                                                                                      • Font: name of the font such as "Times New Roman" or "Arial"
                                                                                                      • Size: size of the font in points
                                                                                                      • Style: style of the font, italic, bold, underline
                                                                                                      • Color: click on the color demonstrated to change
                                                                                                      • Size follows "Staff space" setting: whether size follows the distance between two lines in a 5-lines standard staff
                                                                                                      • System flag: text applies to all staves of a system.
                                                                                                    • Offset
                                                                                                      • Horizontal
                                                                                                      • Vertical
                                                                                                      • Offset Unit: in mm or Staff space units
                                                                                                    • Alignment
                                                                                                      • Horizontal: left, right, center
                                                                                                      • Vertical: align top edge of text to reference point, center text vertical to reference point, center text vertical to text baseline or align bottom edge of text to reference point
                                                                                                    • Frame

                                                                                                      • Frame: add a frame around the text
                                                                                                      • Frame Type: Circle or Box
                                                                                                      • Border thickness: thickness of the line of the frame in space units
                                                                                                      • Border radius: for box frame, radius of rounded corner
                                                                                                      • Text margin : inner frame margin in space units
                                                                                                      • Foreground color: of the frame border
                                                                                                      • Background color: of the background within the frame.

                                                                                                      Note: Opacity is set by the parameter "Alpha channel" in the colors dialog: a value between 0, transparent, and 255, opaque.

                                                                                                    Text types

                                                                                                    • Title, Subtitle, Composer, Poet: anchored to page
                                                                                                    • Fingering: Fingerings are anchored to note heads.
                                                                                                    • Lyrics: Lyrics are anchored to a time position (a note/chord, but not a rest).
                                                                                                    • Chord symbol: Chord symbols are anchored to a time position.
                                                                                                    • System text: Applies to all staves in a system. Anchored to a time position.
                                                                                                    • Staff text: Applies to a single staff in a system. Anchored to a time position.

                                                                                                    The distinction between system text and staff text matters for part extraction in ensemble scores. System text will extract to all parts. Staff text will only extract to the part to which it is anchored. For details, see Text.

                                                                                                    Create a new text style

                                                                                                    1. From the menu bar, select Style → Text...; or right-click on a text object and select Text Style...;
                                                                                                    2. Click on New ;
                                                                                                    3. Set a name;
                                                                                                    4. Set all properties as desired.

                                                                                                    This text style will be saved along with the score. It will not be available in other scores, unless you explicitly save the style sheet and load it with another score.

                                                                                                    Apply options

                                                                                                    You can apply to either the score or part you are seeing, if you hit Apply and then OK.

                                                                                                    If you are in one of the parts of your score, you also have the option to use the Apply to all parts button before OK, so you don't have to manipulate all parts individually.

                                                                                                    Reset text to style

                                                                                                    If you have made changes to an individual piece of text and you want to return it to the defined text style for the score, or if you changed the style with an old version of MuseScore and you want the style to correspond to the default text style in MuseScore 2, you can use the Reset Text to Style option.

                                                                                                    Select the text you want to reset to style and click on Reset Text to Style in the Inspector. If you need all text from a given style to be "reset", right-click on one, then from the context menu choose Select → All Similar Elements first.

                                                                                                    Save and load text styles

                                                                                                    Text styles (together with all other styles in a document) can be saved as a style file and loaded into other MuseScore files. See Save and load style.

                                                                                                    See also

                                                                                                    • Text editing
                                                                                                    • Header/Footer

                                                                                                    Staff and system text

                                                                                                      For general-purpose text, use Staff Text or System Text. The difference between these two types of text is whether you want it to apply to a single staff, or the whole system. This matters when extracting parts: staff text will only appear in a part that contains the specific instrument the text is attached to, while system text will appear in all parts. Additionally, if you choose to hide empty staves, any staff text belonging to an empty staff will also be hidden. System text is never hidden by the "hide empty staves" feature.

                                                                                                      Staff text

                                                                                                      Staff text is general purpose text associated with a particular staff at a particular location in the score. To create staff text, choose a location by selecting a note or rest and then use the menu option Add → Text → Staff Text, or use the shortcut Ctrl+T (Mac: ⌘+T). A small text box appears and you can immediately start typing. You can exit the text box at any time (even without typing anything) by pressing Esc.

                                                                                                      Staff text can, for example, be used to apply indications such as "Solo" or "Pizzicato" to one staff in a score. Depending on what the instructions of the staff text are, MIDI playback of that staff at the text location can be altered to match the instructions by right-clicking on the staff text and selecting Staff Text Properties…. See Mid-staff sound change.

                                                                                                      System text

                                                                                                      System text is used when you wish to apply text indications to a whole system rather than just to one staff line. This makes a difference when extracting parts, or if you choose to hide empty staves. To create system text, chose a location by selecting a note or rest and then use the menu option Add → Text → System Text, or use the shortcut Ctrl+Shift+T (Mac: ⌘+Shift+T). A small text box appears and you can immediately start typing. You can exit the text box at any time (even without typing anything) by pressing Esc.

                                                                                                      See also

                                                                                                      • Mid-staff sound change

                                                                                                      External links

                                                                                                      • How to change instrument sound (e.g. pizz., con sordino) midway through score

                                                                                                      Sointumerkintä

                                                                                                        Aloittaaksesi Sointumerkkien lisäämisen partituuriisi, valitse ensin nuotti tai tauko ja paina Ctrl+K (Mac: ⌘+K). Tämä asemoi kursorin viivaston yläpuolelle, minkä jälkeen viivasto on valmis tietojen syöttöön.

                                                                                                        Sijoita sointumerkki

                                                                                                        Sointumerkintöjä voidaan syöttää ja muokata aivan kuten normaalia tekstiä. Korotukset (♯) ja alennukset (♭) syötetään seuraavanlaisesti:

                                                                                                        • korotus: #.
                                                                                                        • Alennus: b.
                                                                                                        • Kaksoiskorotus: x tai ##.
                                                                                                        • Kaksoisalennus: bb.

                                                                                                        Note: When you exit the chord symbol, the characters you have typed will automatically assume the correct format : a "#" or "b" will turn into a proper sharp (♯) or flat (♭) and so on. Do not try to use actual flat and sharp signs as MuseScore will not understand those properly.

                                                                                                        Chord symbols

                                                                                                        After you have finished entering a chord symbol you can either:

                                                                                                        • Exit by pressing Esc.
                                                                                                        • Move the cursor forward or backwards to continue note entry (see commands below).

                                                                                                        Keyboard Commands

                                                                                                        The following commands are available for chord symbol entry:

                                                                                                        • Space move Cursor to next note, rest, or beat
                                                                                                        • Shift+Space move cursor to previous note, rest, or beat
                                                                                                        • Ctrl+Space (Mac: ⌘+Space) add a space to the chord name
                                                                                                        • ; move cursor to next beat
                                                                                                        • : move cursor to previous beat
                                                                                                        • Tab move cursor to next measure
                                                                                                        • Shift+Tab move cursor to previous measure
                                                                                                        • Ctrl plus number (1 - 9) move Cursor by duration corresponding to number (e.g.; half note for 6)
                                                                                                        • Esc exit.

                                                                                                        Edit a chord symbol

                                                                                                        An existing chord symbol can be edited just like ordinary text. See Text editing.

                                                                                                        Chord symbol syntax

                                                                                                        MuseScore understands most of the abbreviations used in chord symbols:

                                                                                                        • major: M, Ma, Maj, ma, maj, Δ (type t or ˆ for the triangle)
                                                                                                        • minor: m, mi, min, -
                                                                                                        • diminished: dim, ° (entered with lowercase letter o, shows as ° if using the the Jazz style, as o otherwise)
                                                                                                        • half-diminished: ø (type 0, zero)
                                                                                                        • augmented: aug, +

                                                                                                        Note that for half-diminished chords, you can of course also enter abbreviations like mi7b5 and they will be rendered that way instead of using the ø.

                                                                                                        You can also use extensions and alterations like b9 or #5, sus, alt, and no3. You can indicate inversions and slash chords using notations like C7/E. You can use parentheses and commas within chord symbols, and you can also enclose an entire chord symbol in parentheses.

                                                                                                        Chord symbol text

                                                                                                        The appearance of chord symbol text can be adjusted in the Text Styles window (right click on any chord symbol and select Text Style…).

                                                                                                        Chord symbol style

                                                                                                        Formatting options for chord symbols are available in Style → General... → Chord Symbols, Fretboard Diagrams. Adjustable properties are listed under the following headings:

                                                                                                        Style

                                                                                                        MuseScore supports two primary styles of chords symbols: Standard and Jazz. You can select between these using the radio buttons.

                                                                                                        In the Standard style, chords are rendered simply, with the font determined by your chord symbol text style.

                                                                                                        Standard chord symbols

                                                                                                        In the Jazz style, the MuseJazz font is used for a handwritten look, and superscript and other formatting techniques are used as well.

                                                                                                        Jazz chord symbols

                                                                                                        The Jazz style is selected by default if you use any of the Jazz templates.

                                                                                                        The third radio button is mostly for compatibility with older scores. You can also use it to specify your own custom chord descriptions files. These can be created by copying one of the standard files and reading the documentation within them on their structure. However, this is for advanced users only, and there is no guarantee these files will be supported in the future.

                                                                                                        Note spelling

                                                                                                        By default, MuseScore uses letter names for chord symbols. For users in regions where other note naming schemes are used, MuseScore provides the following controls:

                                                                                                        • Standard: A, B♭, B, C, C♯,...
                                                                                                        • German: A, B♭, H, C, C♯,...
                                                                                                        • Full German: A, B, H, C, Cis,...
                                                                                                        • Solfeggio: Do, Do♯, Re♭, Re,...
                                                                                                        • French: Do, Do♯, Ré♭, Ré,...

                                                                                                        In addition, there are options to control capitalization. By default, MuseScore automatically capitalizes all note names as shown above, whether you originally enter those using capital or lower case letters. However, you can also choose other automatic capitalization options:

                                                                                                        • Lower case minor chords: c, cm, cm7,...
                                                                                                        • Lower case bass notes: C/e,...
                                                                                                        • All caps note names: DO, RE, MI,...

                                                                                                        You can also turn off the automatic capitalization completely, in which case note names are simply rendered the way you type them.

                                                                                                        Positioning

                                                                                                        • Default vertical position: The height at which the chord symbol is applied above the staff (negative values can be used)
                                                                                                        • Distance to fretboard diagram: If a fretboard diagram is present, this value is the height at which the chord symbol is applied above the diagram (negative values can be used).
                                                                                                        • Minimum chord spacing: The space to leave between chord symbols.
                                                                                                        • Maximum barline distance: Changes the size of the gap between the last chord symbol in the measure and the following barline. You only need to adjust this value if there is a continuous problem in the score with overlap between the last symbol in one measure and the first symbol in the next.

                                                                                                        Note: In addition to the settings described here, the default position of applied chord symbols is also determined by settings in the Text Styles dialog. The effect is cumulative.

                                                                                                        Capo

                                                                                                        Enter the number of the capo position at which you want to display substitute chords, in brackets, after all chord symbols in the score.

                                                                                                        Sormitus

                                                                                                          Fingering symbols for various instruments are found in the Fingering palette in the Advanced workspace.

                                                                                                          Fingering palette

                                                                                                          • Keyboard music employs the numbers 1–5 to represent fingers of the left or right hand. There is also a fingering positioner plugin to help you optimize the layout of piano or keyboard fingerings.

                                                                                                          • Guitar music uses the numbers 0–4 to represent left-hand fingering (T is occasionally used for the thumb). Right-hand fingering is indicated by the letters p, i, m, a, c. Circled numbers represent instrument strings.

                                                                                                          • The last five symbols in the palette are used for lute fingering in historical music. Note: To enable display of fingering in tablature, right-click on the TAB, select Staff Properties...→Advanced style properties, and tick "Show Fingerings".

                                                                                                          Add fingering to a single note

                                                                                                          Use any of the following methods:

                                                                                                          • Select a note and double click one of the fingering symbols in a Palette.
                                                                                                          • Drag and drop a fingering symbol from a palette onto a note

                                                                                                          When fingering is added to a note, the focus immediately shifts to the symbol, so you can adjust it right away.

                                                                                                          Add fingering to several notes

                                                                                                          1. Select the desired notes;
                                                                                                          2. Double-click a fingering symbol in a palette.

                                                                                                          Adjust position of fingering

                                                                                                          Single fingering

                                                                                                          To change the position of one symbol, use any of the following methods:

                                                                                                          • For fine adjustments (0.1 sp) use the arrow keys; For larger adjustments (1 sp) use Ctrl+Arrow.
                                                                                                          • Change horizontal and vertical offsets in the Inspector.
                                                                                                          • Drag the symbol using your mouse.

                                                                                                          Multiple fingering

                                                                                                          To change the position of multiple symbols:

                                                                                                          1. Select the desired fingering symbols;
                                                                                                          2. Adjust using the horizontal and vertical offset fields in the Inspector.

                                                                                                          Note: You can also use the fingering positioner plugin mentioned above to optimize the layout of piano fingerings.

                                                                                                          To restore a symbol to its default position, select it and press Ctrl+R.

                                                                                                          Edit fingering text

                                                                                                          Fingering is a form of text symbol and can be edited and styled like any other. Right-clicking on the symbol gives you a range of options.

                                                                                                          Sanoitukset

                                                                                                            Lisää sanoitukset partituuriin

                                                                                                            Liittääksesi sanat partituurin nuotteihin:

                                                                                                            1. Valitse nuotit, joihin aiot liittää sanat.
                                                                                                            2. Napauta yksittäistä säveltä, josta haluat sanoituksen alkavan.
                                                                                                            3. Kirjoita Ctrl+L (Mac: ⌘+L); tai valitse päävalikosta Luo→Teksti→Sanoitus. Kirjoita sitten tavu ensimmäiseen nuottiin.
                                                                                                            4. Käytä seuraavia vaihtoehtoja jatkaaksesi sanojen lisäämistä:
                                                                                                              • Kirjoita Välilyönti (tai Ctrl+→) sanan loppuun, jotta pääset seuraavaan nuottiin.
                                                                                                              • Lisää väliviiva - tavun loppuun päästääksesi seuraavaan nuottiin. Tavut ovat liitetty toisiinsa viivalla.
                                                                                                              • Paina Shift+Välilyönti (tai Ctrl+←) siirtyäksesi edelliseen tavuun.
                                                                                                              • Paina ↵ siirtyäksesi alaspäin seuraavaan sanastoriviin (Huomautus: älä käytä Enter-painiketta numeronäppäimistön kautta!)
                                                                                                              • Paina Ylänuoli-näppäintä palataksesi ylempänä olevaan sanastoriviin.
                                                                                                            5. Paina Esc-näppäintä lopettaaksesi sanojen syötön.
                                                                                                            6. To type a second or further lyric line repeat steps 2 and 3 above, or double-click the first syllable, hit ↵ and type the syllable for the first note, then continue at step 4

                                                                                                            Example

                                                                                                            Sample lyrics: A-des-te fi-del-es

                                                                                                            Melisma

                                                                                                            A melisma is a syllable or word that extends over two or more notes. It is indicated by an underline extending from the base of a syllable to the last note of the melisma. The underline is created by positioning the cursor at the end of a syllable and pressing Shift+_: once for each note in the melisma. See the image below:

                                                                                                            Syllable extension line, Melisma

                                                                                                            The above lyric was created in the following manner:

                                                                                                            1. Type the letters, soul,.
                                                                                                            2. At the end of the word, press Shift+___.
                                                                                                            3. Type the letters To, then press Esc.

                                                                                                            For non-last syllables to extend, just use additional dashes -, only one of them will show, and the syllable will right-align to the first note, similar to last syllables that got notated with a melisma, see above.

                                                                                                            Elision / Synalepha / Lyric Slur

                                                                                                            Two syllables under a note can be joined with an elision character, also known as a "lyric slur" or "synalepha".

                                                                                                            Sample lyric slur under a note

                                                                                                            In the text toolbar, click on the keyboard icon Keyboard Icon, or hit F2 to open the Text Symbols palette. The synalepha is the 4th from the end (U+203F ‿ "undertie"). The synalepha will be evenly centered separating the syllables with two spaces and by inserting it after the first. For the "e͜ A" example shown above:

                                                                                                            1. Type e
                                                                                                            2. Insert the synalepha using the F2 palette
                                                                                                            3. Type Ctrl+Space (Mac: ⌥+Space)
                                                                                                            4. Type A

                                                                                                            Not all fonts include the synalepha character. To find out which fonts on your computer support the synalepha, see "fontlist" (look for any font that shows a tie between "e" and "A" instead of a blank rectangle). The alignment of the character also varies between fonts.

                                                                                                            Special characters

                                                                                                            Lyrics can be edited as normal text with the exception of a few characters: If you want to add a space, hyphen, or underscore to a single syllable, use the following shortcuts:

                                                                                                            • Ctrl+Space (Mac: ⌥+Space) enters a space ( ) into the lyrics text.

                                                                                                            • Ctrl+- (Mac: ⌥+-) or AltGr+- enters a hyphen ("-") into the lyrics text.

                                                                                                            • Ctrl+↵ (Mac: ⌥+Return) or Enter (from the numeric keypad) enters a line feed into the lyrics text.

                                                                                                            Adjusting individual lyric lines

                                                                                                            The top margin and line height of all lyric lines can be adjusted globally from the menu, Style→General...→Page.

                                                                                                            However, the horizontal (and vertical) offset of individual lyric lines can be finely adjusted by right-clicking on a word in the desired line, and using the various selection options available to select all the words that you wish to change. Then adjust using the offset option in the Inspector.

                                                                                                            For example, to change the horizontal position of the lyrics in one staff only of one particular system: right click on a word in that line, choose Select→More..., then tick the boxes labelled "Same Staff" and "Same System". Now use "horizontal offset" in the Inspector to fine tune the line position.

                                                                                                            To select lyrics for a range of notes, first select the range of notes (click first note, shift+click last), then right click a lyric and choose Select / All Similar Elements in Range Selection. Now use the Inspector to adjust the lyrics.

                                                                                                            Copy lyrics to clipboard

                                                                                                            In MuseScore 2.0.3 and above, select Edit→Tools→Copy Lyrics to Clipboard.

                                                                                                            Paste lyrics from clipboard

                                                                                                            To copy and paste lyrics from a text file into a score:

                                                                                                            1. Enter the notes in the score to which the lyrics will be attached.
                                                                                                            2. Set up your lyrics in a text file, with appropriate spaces, hyphens, line-breaks etc.
                                                                                                            3. Copy the lyrics from the text-file.
                                                                                                            4. Select the start note in MuseScore, and press Ctrl+L (Mac: Cmd+L) (step 3 under Enter lyrics in a score).
                                                                                                            5. Repeatedly applying paste will enter successive words of the lyrics. You may need to enter melismas and make other corrections as you go along.

                                                                                                            See also

                                                                                                            • Text
                                                                                                            • Chord symbol

                                                                                                            External links

                                                                                                            • How to insert Lyrics
                                                                                                            • How to move lyrics
                                                                                                            • How to copy lyrics, or lyrics with rhythm
                                                                                                            • How to add a block of text to a score
                                                                                                            • Video tutorial: MuseScore in Minutes: Lesson 6 - Text, Lyrics and Chords

                                                                                                            Harjoitusmerkit

                                                                                                              Rehearsal marks can be used in one or more ways:

                                                                                                              • To identify specific points in a score to facilitate rehearsing.
                                                                                                              • As bookmarks in the score to which you can instantly navigate—using the Find/Search command.
                                                                                                              • To mark the various sections in the score.

                                                                                                              Typically, a rehearsal mark consists of one or more letters or numbers, or a combination of both. Marks appear in sequence in the score—e.g. A, B, C…, or 1, 2, 3… etc.; or they may contain the number of the measure they are attached to (usually larger than plain measure numbers, often boldface and/or enclosed in boxes).

                                                                                                              Rehearsal marks can be added to the score (i) automatically—which ensures that they are named in sequence—or (ii) manually, allowing you to name them as you wish.

                                                                                                              Add a rehearsal mark

                                                                                                              Manual Placement

                                                                                                              The simplest way to add a rehearsal mark is to click on a note (or rest) at the start of a rehearsal section and use the keyboard shortcut Ctrl+M (Mac: Cmd+M), or use the menu command Add → Text → Rehearsal Mark: then enter the desired text yourself.

                                                                                                              Automatic placement

                                                                                                              Alternatively, select a note, open the Text palette, and double-click the [B1] rehearsal mark icon: the correct letter or number is entered automatically, according to the following rules:

                                                                                                              1. The first automatic rehearsal mark you create is labelled "A," the second "B," the third "C," and so on. If you want to establish a different format (lower case, number or measure-number), change the first rehearsal mark accordingly before adding the second one. Subsequently-added rehearsal marks follow the format of the previously-added mark.

                                                                                                              2. If you add a (palette) rehearsal mark between two existing alphabetical marks, a "1" is appended to the name of the new mark: so a mark added between letters "C" and "D" becomes "C1," and so on. Similarly, if you add a new rehearsal mark between two existing numerical marks, an "A" is appended: so a mark added between numbers "3" and "4" becomes "3A" and so on. Afterward, you can automatically resequence the rehearsal marks, if required (see →below).

                                                                                                              3. To create a series based on measure number, the first rehearsal mark should be altered, before creating a second one, so that it reads the same as the number of the measure it is attached to. (If the number of the rehearsal mark is different from the actual measure number, subsequent marks will assume a numerical order.)

                                                                                                              Automatically resequence rehearsal marks

                                                                                                              MuseScore allows the user to automatically re-order a series of rehearsal marks if they have got out of sequence for any reason. Use the following method:

                                                                                                              1. Before making a selection, you can, if desired, establish a new format for the rehearsal marks (lower/upper case, number, or measure number) by manually altering the first mark in the range accordingly.
                                                                                                              2. Select the range of measures you wish to apply the Resequence command to (if there is no selection then the program assumes you wish to resequence all measures).
                                                                                                              3. Select Edit → Tools → Resequence Rehearsal Marks.

                                                                                                              MuseScore automatically detects the sequence based on the first rehearsal mark in the selection—all rehearsal marks in the selection are then altered accordingly. The following sequences are possible:

                                                                                                              • A, B, C etc.
                                                                                                              • a, b, c etc.
                                                                                                              • Numerical: 1, 2, 3 etc.
                                                                                                              • Numerical: according to measure numbers. This requires the number of the first mark in the series to be equal to the number of the measure it is attached to.

                                                                                                              Search for a rehearsal mark

                                                                                                              To navigate to a specific rehearsal mark, press Ctrl+F (Mac: Cmd+F) to open the Find bar, then enter the name of the rehearsal mark. The first character of a rehearsal mark must be a letter for it to be found: subsequent characters can be letters or numbers. As of version 2.1 all rehearsal marks can be searched for by typing an "r" followed by the rehearsal mark.

                                                                                                              Note: If the text entered in the Find bar consists only of numbers, the program assumes you are searching for a measure number. See Viewing and Navigation: Find.

                                                                                                              Text style

                                                                                                              Rehearsal marks are a variety of system text. They will appear on every part and on the score. Multi-measure rests are automatically broken before and after rehearsal marks.

                                                                                                              By default, rehearsal marks are bold, in large font size, and enclosed in frames with rounded corners. All aspects of their appearance can be changed globally via the rehearsal mark Text style.

                                                                                                              See also

                                                                                                              • Text properties

                                                                                                              External links

                                                                                                              • Rehearsal Letter (Wikipedia article)

                                                                                                              Muotoilu

                                                                                                              Ulkoasu ja muotoilu

                                                                                                                Layout and formatting options for the score can be accessed mainly from the Layout and Style menus.

                                                                                                                Ways to affect layout

                                                                                                                This section lists the main commands and dialogs affecting score layout. Other formatting options are covered in either Layout menu or Style menu below (for text, see Text styles and properties).

                                                                                                                From the Layout menu:

                                                                                                                • Page Settings: Adjust the overall dimensions of your score such as page size, page margins, and scaling.

                                                                                                                • Increase Stretch/Decrease Stretch: Adjust the score spacing by stretching or squashing selected measures.

                                                                                                                From the Style menu:

                                                                                                                • Score Style: Set overall score details, such as music font, display of multi-measure rests, and whether to hide empty staves.

                                                                                                                • Page Style: Adjust staff and system spacing, score and lyric margins etc.

                                                                                                                • Measure Style: Set the measure spacing, which affects the number of measures per line.

                                                                                                                • Sizes: Set the default size of "small" and grace notes, small staves and small clefs.

                                                                                                                Other commands:

                                                                                                                • Add/Remove line breaks: Set the number of measures per system.

                                                                                                                • Vaihdot ja välistäjät: Apply line, page or section breaks. You can also add extra space between particular systems or staves where needed.

                                                                                                                Layout menu

                                                                                                                Page Settings...

                                                                                                                See Page settings.

                                                                                                                Reset

                                                                                                                The Reset command restores all selected score elements to their default position. It also restores the default directions of note stems and beams. To apply:

                                                                                                                1. Select the elements or the region of the score that you wish to reset. Or use Ctrl+A to select the whole score.
                                                                                                                2. Press Ctrl+R; or from the menu select Layout→Reset.

                                                                                                                Increase Stretch/Decrease Stretch

                                                                                                                Menu: Layout

                                                                                                                Increase or decrease the horizontal spacing of notes within selected measures. To apply:

                                                                                                                1. Select a range of measures. Or use Ctrl+A to select the whole score.
                                                                                                                2. Chose one of two options:
                                                                                                                  • To increase stretch:
                                                                                                                    • Use the shortcut } (right curly bracket) (Mac: Ctrl+Alt+9);
                                                                                                                    • Or from the menu bar, select Layout→Increase Stretch;
                                                                                                                  • To decrease stretch:
                                                                                                                    • Use the shortcut { (left curly bracket) (Mac: Ctrl+Alt+8);
                                                                                                                    • Or from the menu bar, select Layout→Decrease Stretch.

                                                                                                                See also Measure Properties: Layout stretch. This allows you to set the stretch more precisely.

                                                                                                                Reset Stretch

                                                                                                                To reset stretch to the default spacing of 1:

                                                                                                                1. Select a range of measures. Or use Ctrl+A to select the whole score.
                                                                                                                2. From the menu, select Layout→Reset Stretch.

                                                                                                                Reset Beam Mode

                                                                                                                To restore beams to the mode defined in the local time signatures:

                                                                                                                1. Select the section of the score you want to reset. If nothing is selected, the operation will apply to the whole score;
                                                                                                                2. Select Layout→Reset Beam Mode.

                                                                                                                See also Beams.

                                                                                                                Regroup Rhythms

                                                                                                                As of version 2.1, this option corrects note ties, durations and beaming so that they are grouped according to standard music notation practice. For example:
                                                                                                                Before:
                                                                                                                regroup_rhythms_before.png
                                                                                                                After:
                                                                                                                regroup_rhythms_after.png

                                                                                                                Any notes that are tied and are the same length as a dotted note will be changed to the dotted note with two limitations. (i) Only the last note of a group of tied notes will have a single dot. Notes with more than one dot are not produced using this option. (ii) Dotted notes will not span from one group of beamed notes to another unless their duration is the same as all of the beam groups it covers. Any notes with more than one dot will be regrouped according to the above rules.

                                                                                                                To apply:

                                                                                                                1. Select the section of the score you want to reset. If nothing is selected, the operation will apply to the whole score;
                                                                                                                2. Select Layout→Regroup Rhythms.

                                                                                                                Note: This is an experimental feature and there are known bugs. Articulations and ornaments are deleted and some pitches respelt. Ties across barlines may be lost on UNDO.

                                                                                                                Style menu

                                                                                                                General: Score

                                                                                                                To open the Score dialog: from the menu, select Style→General...→Score.

                                                                                                                Dialog: Style / General... / Score

                                                                                                                This dialog allows you to set global properties, such as the music font, display of multimeasure rests, whether or not to hide empty staves, "swing" playback etc.

                                                                                                                • Musical symbols font: Choice of display in Emmentaler, Bravura or Gonville fonts.
                                                                                                                • Musical text font: Choice of display in Emmentaler, Bravura, Gonville or MuseJazz fonts.

                                                                                                                • Display in concert pitch: Tick this option to display the score at concert pitch. If unticked the score is displayed at written pitch.

                                                                                                                • Create multimeasure rests: Tick to display multimeasure rests.

                                                                                                                  • Minimum number of empty measures; The default is 2.
                                                                                                                  • Minimum width of measure: The default width is 4 sp.
                                                                                                                • Hide empty staves: This option saves space by hiding those staves in a system which consist of only empty measures. Used for condensed scores.

                                                                                                                • Don't hide empty staves in first system: Always display staves in first system even if they consist of empty measures.

                                                                                                                • Display note values across measure bar: A feature useful for notating early music. See Unbarred notation.

                                                                                                                • Hide instrument name if there is only one instrument: You don't usually need to display the instrument name in this case.

                                                                                                                • Swing setting: The default is off. Choice of swung eighth or sixteenth notes.

                                                                                                                  • Select swing ratio: The default setting is 60%.

                                                                                                                See also, Swing

                                                                                                                General: Page

                                                                                                                To open the Page dialog: from the menu, select Style→General...→Page.

                                                                                                                Dialog: Style / General... / Page

                                                                                                                This dialog allows you to adjust the space above and below systems, staves, lyrics, and vertical frames; and between the score and the top/bottom page margins. You can also control the display of key signatures, time signatures and clefs.

                                                                                                                score_layout.png

                                                                                                                Distance to page margins
                                                                                                                • Music top margin: The distance between the top staff line of the first staff on the page and the top page margin.
                                                                                                                • Music bottom margin: The distance between the bottom staff line of the last staff on the page and the bottom page margin.
                                                                                                                Distance between staves
                                                                                                                • Staff distance: The space between staves which are not part of a grand staff (see below).
                                                                                                                • Grand staff distance: The space between staves that share the same instrument—such as the piano, organ, or those of a guitar staff/tab pair.

                                                                                                                Note: To alter the space above one particular staff see Extra distance above staff (Staff properties).

                                                                                                                Distance between systems
                                                                                                                • Min. system distance: The minimum distance allowed between one system and the next.
                                                                                                                • Max. system distance: The maximum distance allowed between one system and the next.
                                                                                                                Lyrics Margins
                                                                                                                • Lyrics top margin: The height of the margin above the top lyrics line (in a system).
                                                                                                                • Lyrics bottom margin: The height of the margin underneath the bottom lyrics line (in a system).
                                                                                                                • Lyrics line height: The distance between lyrics line (in a system), expressed as a percentage of the line height associated with the lyrics text style.
                                                                                                                Vertical frame margins
                                                                                                                • Vertical frame top margin: The default margin height above a vertical frame.
                                                                                                                • Vertical frame bottom margin: The default margin height below a vertical frame.
                                                                                                                Last system fill threshold
                                                                                                                • If the last system is longer than this percentage of the page width, it gets stretched to fill that width.
                                                                                                                Clefs and key signatures
                                                                                                                • Create clef for all systems: Untick this box to prevent a clef from automatically displaying at the start of any system except the first.
                                                                                                                • Create key signature for all systems: Untick this box to prevent a key signature from automatically displaying at the start of any system except the first.

                                                                                                                Ticking the following boxes, allows the display of courtesy elements at the end of systems:

                                                                                                                • Create courtesy time signatures:
                                                                                                                • Create courtesy key signatures
                                                                                                                • Create courtesy clefs

                                                                                                                General: Header, Footer, Numbers

                                                                                                                Open from the menu: Style→General...→Header, Footer, Numbers.

                                                                                                                Dialog: Style / General... / Header, Footer, Numbers

                                                                                                                You can show the content of a score's meta tags (see Score information) or show page numbers in a header or footer for your score. To create a header or footer for a score with linked parts, make sure the main score is in the active tab. To create a header or footer for an individual part, that part needs to be the active tab.

                                                                                                                If you hover with your mouse over the Header or Footer text region, a list of macros will appear, showing their meaning, as well as the existing meta tags and their content.

                                                                                                                You can create different Headers and Footers for even and odd pages, such as putting page numbers on the right for odd-numbered pages and on the left for even-numbered pages.

                                                                                                                You can also edit whether and how often measure numbers appear.

                                                                                                                General: System

                                                                                                                Open from the menu: Style→General...→ System.

                                                                                                                Dialog: Style / General... / System

                                                                                                                This dialog allows you to:

                                                                                                                • Set the distance between system brackets or braces and the start barlines.
                                                                                                                • Set the width of system brackets and braces.

                                                                                                                See also Brackets.

                                                                                                                General: Measure

                                                                                                                See Yleinen tyyli: tahti.

                                                                                                                General: Barlines

                                                                                                                Open from the menu: Style→General...→Barlines.

                                                                                                                Dialog: Style / General... / Barlines

                                                                                                                • Control whether to show barlines at the beginning of a staff or multiple staves.
                                                                                                                • Scale barlines to staff size affects "small" staves only. See Barline adjustment possibilities (external link) for details.
                                                                                                                • Control proportion of thickness and distance within double barlines, including repeat barlines.

                                                                                                                General: Notes

                                                                                                                Open from the menu: Style→General...→Notes.

                                                                                                                Dialog: Style / General... / Notes

                                                                                                                This page can also be accessed direct from the score by right-clicking on any note and selecting "Style…" Here you can adjust the distance and thickness of note-related objects (stems, ledger lines, dots, accidentals). Changing these would be unusual.

                                                                                                                General: Clefs

                                                                                                                Open from the menu: Style→General...→Clefs.

                                                                                                                Dialog: Style / General... / Clefs

                                                                                                                You can choose between Serif and Standard clef for your tablature sheet.

                                                                                                                General: Arpeggios

                                                                                                                Open from the menu: Style→General...→Arpeggios.

                                                                                                                Dialog: Style / General... / Arpeggios

                                                                                                                Here you can change the thickness, spacing and hook height of the following arpeggio and strum symbols:

                                                                                                                Arpeggio and strum symbols

                                                                                                                Changes to these properties would be unusual.

                                                                                                                General: Beams

                                                                                                                Open from the menu: Style→General...→Beams.

                                                                                                                Dialog: Style / General... / Beams

                                                                                                                General: Slurs/Ties

                                                                                                                Open from the menu: Style→General...→Slurs/Ties.

                                                                                                                Dialog: Style / General... / Slurs/Ties

                                                                                                                General: Sizes

                                                                                                                Open from the menu: Style→General...→Sizes.

                                                                                                                Dialog: Style / General... / Sizes

                                                                                                                Sets the proportional size of "small" and grace notes, as well as small staves and clefs. Changing this would be unusual.

                                                                                                                General: Hairpins, Volta, Ottava

                                                                                                                Open from the menu: Style→General...→Hairpins, Volta, Ottava.

                                                                                                                Dialog: Style / General... / Hairpins, Volta, Ottava

                                                                                                                The Reset value button returns the setting to the original value.

                                                                                                                General: Pedal, Trill

                                                                                                                Open from the menu: Style→General...→Pedal, Trill.

                                                                                                                Dialog: Style / General... / Pedal, Trill

                                                                                                                General: Chord Symbols, Fretboard Diagrams

                                                                                                                Open from the menu: Style→General...→Chord Symbols, Fretboard Diagrams.

                                                                                                                Dialog: Style / General... / Chord Symbols, Fretboard Diagrams

                                                                                                                This section allows you to adjust the format and positioning of chord symbols and Fretboard diagrams.

                                                                                                                Appearance: Chose a default chord symbol style—Standard, Jazz or Custom.

                                                                                                                Note Spelling: Chose the spelling convention for chord symbols and whether to use capital or small letters.

                                                                                                                Positioning:

                                                                                                                • Default vertical position: The default vertical distance in space units (sp.) between a newly-applied chord symbol and the music staff. Negative values may be used.
                                                                                                                • Distance to fretboard diagram: The distance (in sp. units) from a chord symbol to a fretboard diagram when both are applied to the same location on a staff. This value overrides the above "Default vertical position" setting. The user can chose to place a chord symbol below a fretboard diagram by entering a negative value.
                                                                                                                • Minimum chord spacing: The minimum space to allow between chord symbols.
                                                                                                                • Maximum barline distance: Increases the distance between the final chord symbol in a measure and the following barline. You may wish to adjust this value if there is a recurring problem in the score with overlap between the final chord symbol in one measure and the following chord symbol.

                                                                                                                Capo: Enter the number of the capo position at which you want to display substitute chords, in brackets, for all chord symbols in the score.

                                                                                                                Fretboard diagrams:

                                                                                                                • Default vertical position: the distance in sp. units from a newly applied fretboard diagram to a staff. A negative value may be used.
                                                                                                                • Scale: Increase or decrease the size of the fretboard diagram in the score.
                                                                                                                • Fret offset number font size: Increase or decrease the size of a fret number displayed next to a diagram.
                                                                                                                • Position Left/Right: Display fret number to the left or right of the fretboard diagram.
                                                                                                                • Barre line thickness: Make barre lines in fretboard diagrams thicker or thinner.

                                                                                                                General: Figured Bass

                                                                                                                Open from the menu: Style→General...→Figured Bass.

                                                                                                                Dialog: Style / General... / Figured Bass

                                                                                                                Options about figured bass font, style and alignment.
                                                                                                                See also Figured bass

                                                                                                                General: Articulations, Ornaments

                                                                                                                Open from the menu: Style→General...→Articulations, Ornaments.

                                                                                                                Dialog: Style / General... / Articulations, Ornaments

                                                                                                                Position of articulation with respect to the notes and staves

                                                                                                                General: Accidentals

                                                                                                                Open from the menu: Style→General...→Accidentals.

                                                                                                                Dialog: Style / General... / Accidentals

                                                                                                                Options about naturals at key signature changes

                                                                                                                General: Tuplets

                                                                                                                Open from the menu: Style→General...→Tuplets.

                                                                                                                Dialog: Style / General... / Tuplets

                                                                                                                Apply and OK buttons

                                                                                                                By pressing the Apply button you can see how the changes you have made in the dialogs affect the score without closing the window. Press OK to save your changes to the score and close the window.

                                                                                                                Apply to all parts in one go

                                                                                                                When in a part tab while changing layout and formatting, you can use the Apply to all Parts button to apply all changes (either in Layout→Page Settings.... or Style→General...) to apply the new settings to all parts in just one click.

                                                                                                                Save/Load style

                                                                                                                It is easy to transfer a complete set of styles (all General Style settings, all text styles, and page settings) from one score to the other using the Save/Load Style functions.

                                                                                                                To save a customized style:

                                                                                                                1. Go to Style→Save Style....
                                                                                                                2. Name and save the style file (the default folder is set in your Asetukset). Styles are stored as *.mss files.

                                                                                                                Note: You can also define a preferred style for scores and parts in the Score section of MuseScore's Preferences.

                                                                                                                To load a customized style:

                                                                                                                1. Go to Style→Load Style....
                                                                                                                2. Navigate to and select the Style file (.mss) and click Open (or double click on the file).

                                                                                                                All existing styles in the score should update automatically.

                                                                                                                See also

                                                                                                                • To edit spacing between notes
                                                                                                                • Upgrading from MuseScore 1.x, local relayout

                                                                                                                External links

                                                                                                                • Tutorial – How to create large-print stave notation (MSN)
                                                                                                                • MuseScore in 10 Easy Steps: Part 10A Layout and Formatting (a video tutorial)
                                                                                                                • MuseScore in 10 Easy Steps: Part 10B Layout and Formatting (a video tutorial)

                                                                                                                Yleinen tyyli: tahti

                                                                                                                  General style: Measure

                                                                                                                  Style → General → Measure allows you to adjust the distance between various items within measures.

                                                                                                                  Introduction

                                                                                                                  If you change a measure style property (see image above), MuseScore automatically adjusts the score to maintain the correct spacing between notes and rests according to best music engraving practice. It will also correctly reposition any elements attached to notes or rests, such as fingerings, dynamics, lines etc.

                                                                                                                  All settings related to measure width and note spacing are minimum values. Measures are automatically stretched, if necessary, to maintain existing page margins.

                                                                                                                  All the properties listed below use the staff space (abbreviated to "sp") as the basic unit of measurement. See Page settings: Scaling for more details.

                                                                                                                  Options

                                                                                                                  • Minimum measure width
                                                                                                                    Sets the minimum horizontal length of measures. In measures containing very little content (e.g., a single whole note or whole measure rest), the measure will only shrink as far as this minimum.

                                                                                                                  • Spacing (1=tight)
                                                                                                                    Condenses or expands the space after notes or rests. This setting thus affects not only space between notes but also between the last note and the ending barline. For the space between the beginning of the measure and the first note or rest, see Barline to note distance (below).

                                                                                                                    Note: Changes to an individual measure's Stretch (under Layout → Increase Stretch, Decrease Stretch) are calculated after, and proportional to, the global Spacing setting.

                                                                                                                  • Barline to note distance
                                                                                                                    Sets the distance between the barline which begins a measure and the first note or rest in that measure. For the initial measures of systems, which start with clefs instead of barlines, use Clef/key right margin (below).

                                                                                                                  • Barline to grace note distance
                                                                                                                    Sets the distance between a barline and a grace note that occurs before the first actual note in a measure (independently of the "Barline to note distance" setting).

                                                                                                                  • Barline to accidental distance
                                                                                                                    Sets the distance between a barline and an accidental placed before the first note in a measure (independently of the "Barline to note distance" setting).

                                                                                                                  • Note to barline distance
                                                                                                                    (To be added).

                                                                                                                  • Minimum note distance
                                                                                                                    Specifies the smallest amount of space MuseScore will allow after each note (depending on other factors, more space may be allowed).

                                                                                                                  • Clef left margin
                                                                                                                    Sets the distance between the very beginning of each line and the clef. (This option is rarely needed.)

                                                                                                                  • Key signature left margin
                                                                                                                    Sets the distance between the key signature and the clef preceding it.

                                                                                                                  • Time signature left margin
                                                                                                                    Sets the distance between the time signature and the key signature or clef preceding it.

                                                                                                                  • Clef/key right margin
                                                                                                                    Sets the distance between the material at the beginning of each line (such as the clef and key signature) and the first note or rest of the first measure on the line. (Note that, although not named in the option, if a time signature is present, it is the element from which the spacing begins.)

                                                                                                                  • Clef to barline distance
                                                                                                                    Sets the distance between a barline and a clef change preceding it.

                                                                                                                  • Multi-measure rest margin
                                                                                                                    Sets the distance between a multi-measure rest and the barlines on either side.

                                                                                                                  • Staff line thickness
                                                                                                                    Sets the thickness of the lines of the staff, which allows you to make the staff thicker and darker, if you need greater visibility on your printouts.

                                                                                                                  Sivun asetukset

                                                                                                                    Page settings allows you to adjust the overall dimensions of your score such as page size, page margins, and scaling. It is one of the main layout tools in MuseScore—along with the options available from Style→General...

                                                                                                                    To open the Page settings dialog: from the menu, select Layout → Page Settings....

                                                                                                                    Layout / Page Settings dialog

                                                                                                                    Page size

                                                                                                                    Here you can select the paper format, either by standard name (e.g., Letter or A4), or by specifying the height and width in either mm or inches (use the radio buttons to choose which unit of measurement to use). The initial default page size depends on your localization—in the United States, Letter size paper is standard.

                                                                                                                    You can also choose to format your music in Landscape or Portrait orientation using the radio buttons. Prior to version 2.1 unchecking Landscape enabled Portrait format. You can optionally use Two sided layout (i.e., book format, with mirror left and right margins for even and odd pages—see below).

                                                                                                                    Odd/Even Page Margins

                                                                                                                    The Even Page Margins and Odd Page Margins settings allow you to define the printable area of your pages. Aside from changing the margins around the music on the page, other settings, such as the positions of headers and footers, are calculated relative to the margins defined here.

                                                                                                                    If the "Two sided" checkbox under "Page Size" is selected, you can set margins differently for mirroring odd and even pages. Otherwise, only one set of margins can be modified, but will apply to all pages.

                                                                                                                    To display page margins in your score on screen (though not in print), go to View→Show Page Margins.

                                                                                                                    Scaling

                                                                                                                    The Scaling property allows you to increase or decrease the size of your score.

                                                                                                                    In MuseScore, the sizes of score elements, such as note heads, note stems, accidentals, clefs etc., are defined in terms of a unit of measurement called a staff space (abbreviated to "sp"). One staff space is equal to the space between two lines of a music staff (or one-quarter the size of the full five-line staff).

                                                                                                                    As you change the "Staff space" setting (under Scaling), all score elements follow suit and thus correct proportions are maintained. The exception is Text in which you can set an absolute value, independent of "Scaling."

                                                                                                                    Note: Changing the "Scaling" does not always change the number of systems per page, because system distance can vary between limits set under "Min system distance" and "Max system distance" (see Style→General...→Page).

                                                                                                                    Miscellaneous

                                                                                                                    First page number

                                                                                                                    Sets the number of the first page of the particular score. Page numbers below 1 won't get printed—e.g., setting the first page number to -1 would result in the first and second page showing no page number, and page number 1 appearing on the third page.

                                                                                                                    Apply to all Parts

                                                                                                                    The Apply to all Parts button is available when modifying a part, rather than the main score (see Part extraction). If you change the page settings of one part and want the rest of the parts to have the same settings, this button will apply the change to all parts in one go.

                                                                                                                    Vaihdot ja välistäjät

                                                                                                                      The Breaks & Spacers palette in the Advanced workspace contains the following non-printing symbols:

                                                                                                                      Breaks and Spacers Palette

                                                                                                                      • A line break forces the next part of the score to start in a new system.
                                                                                                                      • A page break forces the next part of the score to start on a new page.
                                                                                                                      • A section break divides the score into sections (see below), and forces the next part of the score to start in a new system. It can be combined with a page break if required.
                                                                                                                      • Spacers look like down/up arrows and are used to increase the space between two adjacent staves or systems.

                                                                                                                      Add a break or spacer

                                                                                                                      A break can be applied to either a measure or a frame. A spacer (up or down) is applied to a measure only.

                                                                                                                      Add a break

                                                                                                                      Use one of the following options:

                                                                                                                      • Select a measure or frame, then double-click a palette break symbol.
                                                                                                                      • Drag a break or spacer symbol from a palette onto a measure or frame.
                                                                                                                      • For line breaks only, click on a barline and press Return. Press again to remove the line break.
                                                                                                                      • For page breaks only, click on a barline and press Ctrl+Return (Mac: Cmd+Return). Press again to remove the page break.

                                                                                                                      A break is inserted after the marked measure or frame. Blue break symbols are visible on the screen, but do not appear on printouts.

                                                                                                                      Notes: (1) To add (or remove) line breaks over all or part of the score, see Add/Remove line breaks. (2) To split a measure, see Measure operations: Split and join.

                                                                                                                      Move a break

                                                                                                                      To reposition a break:

                                                                                                                      1. Enter edit mode for the break in question;
                                                                                                                      2. Use the keyboard arrow buttons as described in Adjust position of text objects.

                                                                                                                      Add a spacer

                                                                                                                      Use either of the following options:

                                                                                                                      • Select a measure, then double-click a palette spacer symbol.
                                                                                                                      • Drag a spacer symbol from a palette onto a measure or frame.

                                                                                                                      Blue spacer symbols are visible on the screen, but do not appear on printouts.

                                                                                                                      Note: Spacers are designed for local adjustments only. If you wish to adjust the space between staves across the whole score, use the settings in Style → General... → Page instead.

                                                                                                                      Adjust a spacer

                                                                                                                      To adjust the height of a spacer, chose one of these options:

                                                                                                                      • Double-click the spacer and drag the blue end-handle up and down.
                                                                                                                      • Double-click the spacer and use the ↑ ↓ keys and/or Ctrl+↑ ↓ to move the end-handle up and down.
                                                                                                                      • Click (or double-click) on the spacer and adjust the height property in the Inspector.

                                                                                                                      Delete a break or spacer

                                                                                                                      To delete a break or spacer:

                                                                                                                      1. Single click the break or spacer (it will turn into a darker blue to indicate that it is selected)
                                                                                                                      2. Press the Delete key.

                                                                                                                      See also: Add / Remove line breaks.

                                                                                                                      Section break

                                                                                                                      A section break, as the name suggests, is used to create separate sections within a score. Like a line break, it forces the next measure or frame to begin a new system, and can also be used in association with a page break if required.

                                                                                                                      A section break could be used, for example, to divide a piece into separate movements.

                                                                                                                      Each section can have its own measure numbering independent of the rest of the score. By default, the first measure of a section is numbered "1" (see image below), though like the first measure of the score itelf, the number is not displayed unless configured in the measure properties dialog. The same dialog can be used to change the numbering according to your preference.

                                                                                                                      If you change Time signature or Key signature at the beginning of the new section, there will be no courtesy signature at the end of the previous section. See example below:

                                                                                                                      Example of use of section break

                                                                                                                      When you play back the score, the program adds a short pause between each section. In addition, the first end repeat barline in a section always sends the playback cursor to the beginning of the section, so a start repeat barline is optional.

                                                                                                                      Section Break Properties

                                                                                                                      Right click a section break and select Section Break Properties... to specify:

                                                                                                                      • Pause length;
                                                                                                                      • If the new section's first system shows long instrument names;
                                                                                                                      • If the new section starts numbering measures at 1.

                                                                                                                      Kehykset

                                                                                                                        A Frame is a rectangular container for empty space, text or pictures in the score. It can be one of three types:

                                                                                                                        • Horizontal: Used to create a break in a particular system. It can contain text or pictures.
                                                                                                                        • Vertical: Inserted above or below a particular system. It can contain text or pictures.
                                                                                                                        • Text: Inserted above or below a particular system. It can contain one item of text only.

                                                                                                                        Horizontal frame

                                                                                                                        Horizontal frames are used to create a break in a system. For example, you can:

                                                                                                                        • Create a coda, with an adjustable gap separating it from the rest of the score (as in the example below).
                                                                                                                          Horizontal frame in edit mode
                                                                                                                        • Create an offset at the beginning of the score, where there is no staff name to perform the same function.
                                                                                                                        • Create an adjustable right margin at the end of a system.
                                                                                                                        • Create space for some text or image(s).
                                                                                                                        • Create a space between a 'historical incipit' and the beginning of the modern edition.

                                                                                                                        Insert/append horizontal frame

                                                                                                                        See Create a Frame (below).

                                                                                                                        Adjust width of horizontal frame

                                                                                                                        Use one of the following methods:

                                                                                                                        • Double-click the frame and drag the handle to the right or left.
                                                                                                                        • Select the frame and adjust "Width" in the Inspector.

                                                                                                                        Notes: (1) "Left Gap" and "Right Gap" are currently unallocated (verion 2.1); (2) It is possible to create a 'Negative-width' horizontal frame, by dragging the edit-handle back over the left border of the frame. However, this is not a standard feature and once editing is finished you cannot reselect the frame.

                                                                                                                        Add text or image to horizontal frame

                                                                                                                        To add text:

                                                                                                                        • Right-click on the frame and select Add → Text.

                                                                                                                        To add an image:

                                                                                                                        • Right-click on the frame and select Add → Image.

                                                                                                                        Vertical frame

                                                                                                                        Vertical frames provide empty space between, before or after systems, and can contain one or more text objects and/or images. The height is adjustable and the width equals the system width.

                                                                                                                        Vertical Frame in edit mode

                                                                                                                        You can use a vertical frame to:

                                                                                                                        • Create an area at the head of a score for Title/Subtitle/Composer/Lyricist text etc. (see below).
                                                                                                                        • Add single- or multi-column lyric text.

                                                                                                                        Insert/append vertical frame

                                                                                                                        See Create a Frame (below).

                                                                                                                        Adjust height of vertical frame

                                                                                                                        Use one of the following methods:

                                                                                                                        • Double-click the frame and drag the handle up or down.
                                                                                                                        • Select the frame and adjust "Height" in the Inspector.

                                                                                                                        Edit vertical frame properties

                                                                                                                        Selecting the frame allows you to adjust various parameters in the Inspector:

                                                                                                                        Inspector for vertical frame

                                                                                                                        Top Gap: Adjusts distance between frame and element above (negative values not currently supported).
                                                                                                                        Bottom Gap: Adjusts distance between frame and element below (Negative values can be entered).
                                                                                                                        Height: Adjusts height of the frame.
                                                                                                                        Left Margin: Moves left-aligned text objects to the right.
                                                                                                                        Right Margin: Moves right-aligned text objects to the left.
                                                                                                                        Top margin: Moves top-aligned text objects downwards (see also Style → General... → Page).
                                                                                                                        Bottom Margin: Moves bottom-aligned text objects upwards (see also Style → General... → Page).

                                                                                                                        Add text or image to vertical frame

                                                                                                                        To add text:

                                                                                                                        • Right-click on the frame and select Add → Text/Title/Subtitle/Composer/Lyricist.

                                                                                                                        To add an image:

                                                                                                                        • Right-click on the frame and select Add → Image.

                                                                                                                        You can create as many objects as you like within a frame. Their positions can be adjusted independently by dragging or, more accurately, by altering the offset values in the Inspector. To format text objects, see Text editing and Text styles and properties.

                                                                                                                        Insert horizontal frame in vertical frame

                                                                                                                        • Right-click on the frame and select Add → Insert Horizontal Frame.

                                                                                                                        The horizontal frame is automatically left-aligned and fills the entire vertical frame. To right-align it:

                                                                                                                        1. Reduce the width of the horizontal frame.
                                                                                                                        2. Deselect the frame then drag it to the right. To restore left-alignment, drag the frame to the left.

                                                                                                                        "Title" frame

                                                                                                                        A vertical frame is automatically created at the beginning of a score, showing the title, subtitle, composer, lyricist etc., when you fill in the information fields provided on page 1 of the New Score Wizard.

                                                                                                                        If the score does not have a vertical frame at the beginning, you can create one as follows:

                                                                                                                        • Right-click on an empty space in the document window and select Text → Title/Subtitle/Composer/Lyricist.

                                                                                                                        Text frame

                                                                                                                        A text frame looks like a vertical frame, but is specifically designed to allow the user to enter text quickly and easily: as soon as the frame is created the user can start typing. Unlike the vertical frame, only one text object is allowed per frame, the height automatically expands to fit the content and there is no height adjustment handle.

                                                                                                                        Insert/ append text frame

                                                                                                                        See Create a Frame (below).

                                                                                                                        Edit text frame properties

                                                                                                                        Selecting the frame allows you to adjust various parameters in the Inspector:

                                                                                                                        Top Gap: Adjusts distance between frame and element above (negative values not currently supported).
                                                                                                                        Bottom Gap: Adjusts distance between frame and element below (negative values can be entered).
                                                                                                                        Height: Not applicable to text frames.
                                                                                                                        Left Margin: Moves left-aligned text objects to the right.
                                                                                                                        Right Margin: Moves right-aligned text objects to the left.
                                                                                                                        Top margin: Moves top-aligned text objects downwards.
                                                                                                                        Bottom Margin: Moves bottom-aligned text upwards.

                                                                                                                        Create a frame

                                                                                                                        Insert a frame into the score

                                                                                                                        1. Select a measure.
                                                                                                                        2. Chose one of the following options:
                                                                                                                          • From the menu select Add → Frames → Insert...
                                                                                                                          • Right-click on an empty space in the score window and select Frames → Insert...

                                                                                                                        Append a frame to the score

                                                                                                                        Chose one of the following options:

                                                                                                                        • From the menu select Add → Frames → Append...
                                                                                                                        • Right-click on an empty space in the score window and select Frames → Append...

                                                                                                                        Delete a frame

                                                                                                                        Select the frame and press Del.

                                                                                                                        Apply a break

                                                                                                                        Line, page or section breaks can be applied to frames as well as measures. Use one of two methods:

                                                                                                                        • Select a frame and double-click a palette break symbol (for example, in the Breaks & Spacers palette).
                                                                                                                        • Drag a break symbol from a palette onto a frame.

                                                                                                                        See also

                                                                                                                        • Text Properties—put a visual frame (border) around text

                                                                                                                        External links

                                                                                                                        • How to add a block of text to a score
                                                                                                                        • Page Formatting in MuseScore 1.1 - 1. Frames, Text & Line Breaks [video]

                                                                                                                        Kuvat

                                                                                                                        You can use Images to illustrate scores, or to add symbols that are not included in the standard palettes.

                                                                                                                        Add image

                                                                                                                        • Drag-and-drop an image file (from outside MuseScore) either into a frame or onto a note or rest in the score.
                                                                                                                        • Right-click on a frame, select Add→Picture, then pick an image from the file selector.

                                                                                                                        Cut/copy and paste image

                                                                                                                        1. Click on an image in the score.
                                                                                                                        2. Apply any of the standard copy/cut commands.
                                                                                                                        3. Click on a note, rest or frame.
                                                                                                                        4. Apply any of the standard paste commands.

                                                                                                                        Modify image

                                                                                                                        To modify the width/height of an image, double-click it and drag any of the handles. If you want to adjust width or height separately, untick "Lock aspect ratio" first in the Inspector.

                                                                                                                        You can adjust the position of an image by simply dragging it.

                                                                                                                        Image formats

                                                                                                                        MuseScore supports the following formats:

                                                                                                                        • PNG (*.png)
                                                                                                                        • JPEG files (*.jpg and *.jpeg)
                                                                                                                        • SVG files (*.svg) (MuseScore currently does not support SVG shading, blurring, clipping or masking.)

                                                                                                                        See also

                                                                                                                        • Image capture
                                                                                                                        • Custom palettes

                                                                                                                        External links

                                                                                                                        • How to create an ossia with image capture

                                                                                                                        Kuvakaappaus

                                                                                                                        MuseScore's image capture feature allows you to save a snapshot of any part of the score window. PNG, PDF and SVG formats are supported.

                                                                                                                        Save a snapshot

                                                                                                                        1. Click on the Toggle image capture button, Image capture button.
                                                                                                                        2. Press Shift + drag, to create a new selection rectangle.
                                                                                                                        3. Fine tune the rectangle position, if required, by dragging it and/or changing the "Position" values in the "Lasso" section of the Inspector.
                                                                                                                        4. Fine tune the rectangle area, if required, by dragging the handles, and/or changing the "Size" values in the Inspector.
                                                                                                                        5. Right-click on the selection rectangle to open the Image Capture menu. Select the desired option:

                                                                                                                          • Save As (Print Mode). This saves an image of the selection area as it would look if printed, e.g.
                                                                                                                            Score snippet
                                                                                                                          • Save as (Screenshot Mode). This saves a selection of the actual screen, including any line break symbols, invisible elements etc., e.g.
                                                                                                                            Image capture snippet

                                                                                                                          You can save the image in either PNG (default), SVG or PDF format.

                                                                                                                        Image capture menu

                                                                                                                        Right-clicking on the selection rectangle opens the Image Capture menu:

                                                                                                                        Image capture context menu

                                                                                                                        • Copy image: Chose this to copy an image before pasting it in the same or another MuseScore file.
                                                                                                                        • Resolution: Set the resolution, and hence the size of the saved or copied image. Try 100 dpi to start with, if you are unsure.
                                                                                                                        • Transparent background: Turn image transparency on or off.
                                                                                                                        • Auto re-size to page: Adjusts the selection rectangle to fit the page.
                                                                                                                        • Resize to A/B/C/D: Chose a customised selection rectangle (as set below).
                                                                                                                        • Set Standard Size: Resize the selection rectangle, then chose "Set size A/B/C/D" to store it.

                                                                                                                        See also

                                                                                                                        • Image

                                                                                                                        External links

                                                                                                                        • Create an ossia with image capture

                                                                                                                        Kohdista elementit

                                                                                                                        While dragging an element:

                                                                                                                        • Press Ctrl to constrain movement to the horizontal only.
                                                                                                                        • Press Shift to constrain movement to the vertical only.

                                                                                                                        Snap to grid

                                                                                                                        Snap to grid is a feature which allows you to drag an element in precise steps—useful for exact positioning.

                                                                                                                        Snap to grid buttons

                                                                                                                        To enable snap to grid, select an element and click one or both of the snap to grid buttons, located to the right of the horizontal and vertical offset fields in the Inspector. You can then drag the element in steps equal to the grid spacing. The default value is 0.5 sp.

                                                                                                                        To change the grid spacing:

                                                                                                                        1. Right-click on any of the snap to grid buttons in the Inspector, and select Configure Grid.
                                                                                                                        2. Set values for the horizontal and vertical grid spacing as required. Note that this is a fractional setting.

                                                                                                                        Vaativat aiheet

                                                                                                                        Albumit

                                                                                                                        The Album Manager allows you to prepare a list of multiple scores and save the list as an album file ("*.album"), print all the scores as one long print job with consistent page numbers, or even join the scores into a single new MSCZ score. This is ideal for preparing an exercise book or combining multiple movements of an orchestration.

                                                                                                                        To open the Album Manager, go to File → Album...

                                                                                                                        Album Manager

                                                                                                                        Create album

                                                                                                                        1. To create a new album, click the New button. Fill in a title in the "Album Name:" box at the top.
                                                                                                                        2. To add scores to the album, click Add Score. A file selection dialog will appear and let you choose one or multiple scores from your file system. Click OK.
                                                                                                                        3. The scores you add will appear in a list in the Album Manager. You can rearrange their order by selecting a score and clicking the Up or Down button.

                                                                                                                        Load album

                                                                                                                        If you have previously created an album, you can open it through the Album Manager by clicking the Load button. A file selection dialog will appear to let you load the .album file from your file system.

                                                                                                                        Print album

                                                                                                                        To print an album as if it were a single document, click Print Album. The scores loaded into the Album Manager are printed in the order they are listed in with the correct page numbers, ignoring the page number offset values in Layout → Page Settings... → First page number for all but the first score. As the album is printed in one print job, double-sided printing (duplex printing) also works as expected.

                                                                                                                        Join scores

                                                                                                                        To combine multiple scores into a single .mscz file, click Join Scores. The scores are combined in the selected order into one single score. If not already present, line- and section breaks are added to the last measure or frame of each score in the combined file.
                                                                                                                        All style settings are taken from the first score, different style settings from subsequent score are ignored.

                                                                                                                        All the scores should have the same number of parts and staves for this to work correctly, ideally with the same instruments in the same order. If the scores have the same total number of instruments but not the same ones, or not in the same order, then the instrument names from the first score will overwrite ones from subsequent scores. If some of the scores have fewer instruments than the first score, then empty staves will be created for those sections. Any part or staff that is not present in the first score will be lost in the joined score.

                                                                                                                        Save album

                                                                                                                        Upon clicking the Close button, you will be prompted to save your album as a .album file. This file is not the same as a joined score; it simply consists of the list of scores. Album files can be loaded into the Album Manager as described above.

                                                                                                                        Asetukset

                                                                                                                          You can customize many of MuseScore's default behaviors via the menu: Edit→Preferences... (Mac: MuseScore→Preferences...).

                                                                                                                          The Preferences dialog has multiple tabs:

                                                                                                                          Tabs in Preferences dialog

                                                                                                                          Reset All Preferences to Default will reset all preferences to the ones MuseScore had when you installed it.

                                                                                                                          Cancel will close the dialog without applying changes.

                                                                                                                          General

                                                                                                                          General Preferences

                                                                                                                          Here you can define:

                                                                                                                          • Your opening score
                                                                                                                          • The default folder to search for/save to scores, styles, templates, plugins, SoundFonts, and images
                                                                                                                          • Your auto save timing
                                                                                                                          • The languages of MuseScore (translations may be updated from here too)
                                                                                                                          • The style of your MuseScore windows and size of icons
                                                                                                                          • The windows to show at startup (Play Panel, Navigator, Start Center)
                                                                                                                            Note that language translation updates can also be done via the menu: Help→Resource Manager.

                                                                                                                          Canvas

                                                                                                                          Canvas Preferences

                                                                                                                          Use Canvas to set your preferred color and wallpaper for the score background and paper.

                                                                                                                          Under Scroll Pages, you can choose whether to display pages of a multi-page score laid out in a horizontal row, or scrolling in a vertical column.

                                                                                                                          Under Miscellaneous, checking Draw antialiased (on by default) makes diagonal lines and edges of shapes look smoother (less jagged). Proximity for selecting elements controls the distance the mouse may be from an object and still act on it. Smaller numbers require more precision, making it harder to click on small objects. Larger numbers are less precise, making it harder not to click on nearby objects unintentionally. Choose a comfortable working value.

                                                                                                                          Note input

                                                                                                                          Note Input Preferences

                                                                                                                          On this tab there are note input and MIDI remote control preferences. Here the following can be set:

                                                                                                                          • Enter notes via MIDI
                                                                                                                          • Enable playback on entering a note
                                                                                                                          • Its playback duration
                                                                                                                          • Color notes outside the usable pitch range
                                                                                                                          • MIDI Remote Control settings

                                                                                                                          Midi Remote Control allows you to enter or leave note input mode and also choose the duration for notes and rest directly from the MIDI keyboard as you enter notes into the score via MIDI, without having to use the computer mouse or keyboard at the same time.
                                                                                                                          The default setting for Midi Remote Control is 'off' with the checkbox blank, and all the option buttons below are grey. In order to set preferences it must be turned on with the MIDI keyboard connected.

                                                                                                                          To turn on Midi Remote Control click the checkbox, the current status of all Midi Remote Control Key settings is now indicated by the colored input option buttons:
                                                                                                                          - Green button is lit only if the MIDI key action is defined by the user.
                                                                                                                          - Red button is lit only during the preference setting process.
                                                                                                                          - By default no MIDI key actions are set and all buttons are unlit.

                                                                                                                          To enable a MIDI key operation: click the red button which lights up and stays lit until you press your chosen MIDI key for that operation and the green button is lit permanently. Once you have defined your key settings you can use the MIDI keyboard to control note input operations. You can verify your key settings by observing the MuseScore Note Input panel while pressing the MIDI keys.

                                                                                                                          To temporarily deactivate Midi Remote Control: click the Midi Remote Control checkbox, it is un-ticked and all MIDI input key action buttons are greyed. Your selections are always saved between MuseScore sessions so you can deactivate remote control at any time without losing your settings.

                                                                                                                          IMPORTANT, at the time of writing:-
                                                                                                                          1. The Clear option turns off all the green buttons for the current MuseScore session but all the user recorded MIDI key settings are retained and will be reloaded on the next session.
                                                                                                                          2. A MIDI key setting that is activated cannot afterwards be turned off and the green button will always remain lit but it can be overwritten with a different MIDI key by using the red button again.
                                                                                                                          3. Unfortunately, if the same MIDI key is used accidentally for two (or more) note inputs then both (or all) the associated green buttons stay lit but only one will work. You can fix this as in 2 above.

                                                                                                                          Score

                                                                                                                          Score Preferences

                                                                                                                          Score preferences include

                                                                                                                          • Default instrument list files (two may be selected)
                                                                                                                          • Default style for score and parts
                                                                                                                          • Default zoom

                                                                                                                          I/O

                                                                                                                          I/O Preferences

                                                                                                                          Input/Output preferences enable you to set what device will be used for audio playback (e.g., built-in speakers, USB headset, wireless, etc.), whether to use a MIDI trigger (plugged-in keyboard), and whether to route audio output through JACK.

                                                                                                                          Import

                                                                                                                          Import Preferences

                                                                                                                          These settings determine how files from other sources are imported:

                                                                                                                          • Using either the built in MuseScore style or a style you choose
                                                                                                                          • Guitar Pro and Overture character sets
                                                                                                                          • MusicXML layout options
                                                                                                                          • Shortest note in MIDI files

                                                                                                                          Export

                                                                                                                          Export Preferences

                                                                                                                          These settings determine how MuseScore files are exported:

                                                                                                                          • PNG/SVG image resolution (in DPI) and whether to use transparent background
                                                                                                                          • Whether to expand repeats in exported MIDI files
                                                                                                                          • Digital audio sample rate
                                                                                                                          • MP3 bitrate (as of MuseScore 2.1)
                                                                                                                          • Whether to export the layout and how to export system and page breaks to MusicXML

                                                                                                                          Shortcuts

                                                                                                                          Shortcuts Preferences

                                                                                                                          Every action possible with MuseScore is listed, with the associated shortcut if it exists. To define a new shortcut, select an existing entry in the list and click Define... (or just double click the entry), then enter the new shortcut using up to four keys. You can also reset any shortcut in the list to its default value, or clear a shortcut you select. Shortcuts listed in preferences appear next to their associated commands in the menus.

                                                                                                                          Note: Some shortcuts, including default ones, may not work with some keyboards.

                                                                                                                          The list of shortcuts can be printed out or exported to other media (pdf etc.) using the Print button in the bottom right of the window.

                                                                                                                          Update

                                                                                                                          Update Preferences

                                                                                                                          This sets whether MuseScore will check for updates at startup.

                                                                                                                          Updates may be checked manually in Help→Check for updates

                                                                                                                          See also

                                                                                                                          • Keyboard shortcuts
                                                                                                                          • Language settings and translation updates
                                                                                                                          • Update checking

                                                                                                                          Erilliset stemmat

                                                                                                                          MuseScore not only allows you to create and print the full score but also the individual instrument parts.

                                                                                                                          Note: In the current version of MuseScore, it is not possible to split a single staff (that contains two or more voices) into separate parts. So, any instrument that you want to print out a separate part for also needs to have its own staff in the full score.

                                                                                                                          Set up all parts at once

                                                                                                                          If you have an orchestral score in which each instrument gets its own part, this is the easiest method:

                                                                                                                          1. From the menu, select File → Parts...;
                                                                                                                          2. Click the New All button (parts are named with the instrument name, and a number added to differentiate parts that have the same label in the main score);
                                                                                                                            Part creation - all in one go
                                                                                                                          3. Click OK.

                                                                                                                          The parts can now be accessed by clicking on tabs above the document window.

                                                                                                                          Define specific parts

                                                                                                                          You can define the parts at any point after creating a new score. You only need to define the parts once for each score, but you can make changes if needed. The following instructions use a string quartet as an example, but the same principles apply for any other ensemble.

                                                                                                                          1. From the menu, select File → Parts...;
                                                                                                                            Part creation - step 1
                                                                                                                          2. In the Parts window click New to create a "part definition;"
                                                                                                                            Part creation - step 2
                                                                                                                          3. In the right pane, type the words you want to use for the "Part title" (this also serves for the corresponding part of the filename when exporting);
                                                                                                                          4. Pick the instrument that you want to appear in your part by marking the relevant box in the right-hand pane. Usually, you only want one instrument per part, but sometimes you might need a part that includes more than one instrument (such as multiple percussion staves). MuseScore allows you to mark as many instruments per part as you need;
                                                                                                                            Part creation step 4
                                                                                                                          5. Repeat steps two through four (above) for each part as needed;
                                                                                                                            Part creation step 5
                                                                                                                          6. Once you're done, click OK to dismiss the Parts window.

                                                                                                                          You have now finished setting up the parts. You do not need to do this again, unless you add or remove an instrument from your full score.

                                                                                                                          Export the parts

                                                                                                                          1. From the menu, select File → Export Parts...;
                                                                                                                          2. Navigate to the place you want them to be exported to and select the file format (PDF is the default);
                                                                                                                          3. For filename just enter whatever prefix is useful for all parts, or leave the default (the filename of your score);
                                                                                                                          4. Click OK.

                                                                                                                          This will generate files with the names "<title>" + "-" + "<part name>.<extension>". In addition, when exporting as PDF, this will also generate "<title>" + "-Score_And_Parts.pdf".

                                                                                                                          Save the parts

                                                                                                                          Parts and score are "linked", which means that any change to the content in one will affect the other, but changes to the layout will not. When you have the parts created, they are saved along with the score (if you open the score you have tabs for the score and every part you created).

                                                                                                                          However, if you wish to save a part individually:

                                                                                                                          1. Make sure the part is "active." Select its tab if not;
                                                                                                                          2. From the menu, select File → Save As....

                                                                                                                          Print a part

                                                                                                                          1. Make sure the part is "active." Select its tab if not;
                                                                                                                          2. From the menu, select File → Print to open the print dialog.

                                                                                                                          Esteettömyys

                                                                                                                            Introduction

                                                                                                                            This document is written for blind and visually impaired users of MuseScore 2.0. It is not intended to provide a full description of all of the features of MuseScore; you should read this in conjunction with the regular MuseScore documentation.

                                                                                                                            MuseScore comes with support for the free and open source NVDA screen reader for Windows. The features in this document have been tested on Windows with NVDA. There is no support at the moment for other screen readers such as Jaws for Windows, or VoiceOver for macOS, which may work differently, or not at all.

                                                                                                                            At this point in time, MuseScore 2.0 is mostly accessible as a score reader, not so much as a score editor. This document will focus on the score reading features, with only a brief description of score editing.

                                                                                                                            Initial setup

                                                                                                                            When you run MuseScore for the first time, you may want to permanently disable the Start Center window. To do so, go close the Start Center window first, then the Edit menu (Alt+E), choose Preferences, and in there, uncheck Show Start Center. Save and close the preferences window.

                                                                                                                            Finding your way around

                                                                                                                            The user interface in MuseScore works much like other notation programs, or other document-oriented programs in general. It has a single main document window in which you can work with a score. MuseScore supports multiple document tabs within this window. It also supports a split-screen view to let you work with two documents at once, and you can have multiple tabs in each window.
                                                                                                                            In addition to the score window, MuseScore has a menu bar that you can access via the shortcuts for the individual menus:

                                                                                                                            • File: Alt+F
                                                                                                                            • Edit: Alt+E
                                                                                                                            • View: Alt+V
                                                                                                                            • Add: Alt+A
                                                                                                                            • Notes: Alt+N
                                                                                                                            • Layout: Alt+L
                                                                                                                            • Style: Alt+S
                                                                                                                            • Plugins: Alt+P
                                                                                                                            • Help: Alt+H

                                                                                                                            Of these, only the File menu is of much interest when using MuseScore as a score reader. Once opening a menu, it may take several presses of the Up or Down keys before everything is read properly.

                                                                                                                            There are also a number of toolbars, palettes, and subwindows within MuseScore, and you can cycle through the controls in these using Tab (or Shift+Tab to move backwards through this same cycle). When you first start MuseScore, or load a score, focus should be in the main score window. Pressing Tab takes you to a toolbar containing a series of buttons for operations like New, Open, Play, and so forth. Tab will skip any buttons that aren't currently active. The names and shortcuts (where applicable) for these buttons should be read by your screen reader.

                                                                                                                            Once you have cycled through the buttons on the toolbar, the next window Tab will visit is the Palette. This would be used to add various elements to a score, but it is not currently accessible except for two buttons that are visited by Tab: a drop down to select between different workspaces (a saved arrangement of palettes), and a button to create a new workspace.

                                                                                                                            If you have opened one of the optional windows, such as the Inspector, or the Selection Filter, the Tab key will also visit these. You can close windows you do not need by going to the View menu and making sure none of the first set of checkboxes are selected (the windows that appear before the Zoom settings). By default, only the Palette, Navigator and MuseScore Connect should be selected, and the latter two are not included in the Tab order.

                                                                                                                            To return focus to the score window after visiting the toolbar, or a subwindow, press Esc. This also clears any selection you may have made in the score window.

                                                                                                                            The score window

                                                                                                                            When you first start MuseScore 2.0, an empty example score entitled “My First Score” is loaded by default. If you wish to experiment with editing features, this would be a good place to begin. Otherwise, you will probably want to start by loading a score. MuseScore uses the standard shortcuts to access system commands like Ctrl+O (Mac: Cmd+O) to open a file, Ctrl+S (Mac: Cmd+S) to save, Ctrl+W (Mac: Cmd+W) to close, etc.

                                                                                                                            If you press Ctrl+O (Mac: Cmd+O) to load a score, you are presented with a fairly standard file dialog. MuseScore can open scores in its own format (MSCZ or MSCX) as well as import scores in the standard MusicXML format, in MIDI format, or from a few other programs such as Guitar Pro, Capella, and Band-in-a-Box. Once you have loaded a score, it is displayed in a new tab within the score window. You can move between the tabs in the score window using Ctrl+Tab (does not apply for Mac).

                                                                                                                            There are a few interesting things you can do with a loaded score besides reading it note by note. You can press Space to have MuseScore play the score for you. You can use File / Export to convert to another format, including PDF, PNG, WAV, MP3, MIDI, MusicXML, etc. And of course, you can print it via File / Print or Ctrl+P (Mac: Cmd+P).

                                                                                                                            If a score contains multiple instruments, it may already have linked parts generated. Linked parts are presented as part tabs within score tabs, but currently, there is no way to navigate these part tabs using the keyboard. The parts would not normally contain information different from the score; they would just be displayed differently (each part on its own page). If a score does not already have parts generated, you can do so through File / Parts, and that dialog is accessible. If you wish to print the parts, you can work around the inability of accessing part tabs individually by using the File / Export Parts dialog, which automatically exports PDF’s (or other formats) for all parts in one step.

                                                                                                                            Score reading

                                                                                                                            When you first load a score, the score window has the keyboard focus, but there will be nothing selected. The first step to reading a score is to select something, and the most natural place to begin is with the first element of the score. Ctrl+Home (Mac: Cmd+Home) will do this. You will probably also want to use this, should you ever clear your selection by pressing Esc.

                                                                                                                            As you navigate between elements, your screen reader should give the name of the selected element (most likely the clef at the beginning of the top staff of your score). You will hear it read the name of the element (for example, “Treble clef”) and also give position information (for example, “Measure 1; Beat 1; Staff 1”). The amount of information read is not currently customizable, but we tried to place the most important first so you can quickly move on to the next element before it has finished reading, or just ignore the rest of what is read. Pressing Shift currently interrupts the reading, which might also be useful.

                                                                                                                            Most navigation in MuseScore is centered around notes and rests only – it will skip clefs, key signatures, time signatures, barlines, and other elements. So if you just use the standard Right and Left keys to move through your score, you will only hear about notes and rests (and the elements attached to them). However, there are two special navigation commands that you will find useful to gain a more complete summarization of the score:

                                                                                                                            • Next element: Ctrl+Alt+Shift+Right (Mac: Cmd+Option+Shift+Right)
                                                                                                                            • Previous element: Ctrl+Alt+Shift+Left (Mac: Cmd+Option+Shift+Left

                                                                                                                            These commands include clefs and other elements that the other navigation commands skip, and also navigate through all voices within the current staff, whereas other navigation commands such as Right and Left only navigate through the currently selected voice until you explicitly change voices. For instance, if you are on a quarter note on beat 1 of measure 1, and there are two voices in that measure, then pressing Right will move on to the next note of voice 1—which will be on beat 2—whereas pressing Ctrl+Alt+Shift+Right (Mac: Cmd+Option+Shift+Right) will stay on beat 1 but move to the note on voice 2. Only once you have moved through all notes on the current beat on the current staff will the shortcut move you on to the next beat. The intent is that this shortcut should be useful for navigating through a score if you don’t already know what the contents are.

                                                                                                                            When you navigate to an element, your screen reader should read information about it. For notes and rests, it will also read information about elements attached to them, such as lyrics, articulations, chord symbols, etc. For the time being, there is no way to navigate directly to these elements.
                                                                                                                            One important note: Up and Down by themselves, with Shift, or with Ctrl / Cmd are not useful shortcuts for navigation! Instead, they change the pitch of the currently selected note or notes. Be careful not to inadvertently edit a score you are trying to read. Up and Down should only be used with Alt/Option if your intent is navigation only. See the list of navigation shortcuts below.

                                                                                                                            Moving forwards or backwards in time

                                                                                                                            The following shortcuts are useful for moving “horizontally” through a score:

                                                                                                                            • Next element: Ctrl+Alt+Shift+Right
                                                                                                                            • Previous element: Ctrl+Alt+Shift+Left
                                                                                                                            • Next chord or rest: Right
                                                                                                                            • Previous chord or rest: Left
                                                                                                                            • Next measure: Ctrl+Right
                                                                                                                            • Previous measure: Ctrl+Left
                                                                                                                            • Go to measure: Ctrl+F
                                                                                                                            • First element: Ctrl+Home
                                                                                                                            • Last element: Ctrl+End

                                                                                                                            Moving between notes at a given point in time

                                                                                                                            • The following shortcuts are useful for moving “vertically” through a score:

                                                                                                                            • Next element: Ctrl+Alt+Shift+Right

                                                                                                                            • Previous element: Ctrl+Alt+Shift+Left
                                                                                                                            • Next higher note in voice, previous voice, or staff above: Alt+Up
                                                                                                                            • Next lower note in voice, next voice, or staff below: Alt+Down
                                                                                                                            • Top note in chord: Ctrl+Alt+Up
                                                                                                                            • Bottom note in chord: Ctrl+Alt+Down

                                                                                                                            The Alt+Up and Alt+Down commands are similar to the Ctrl+Alt+Shift+Right and Ctrl+Alt+Shift+Left commands in that they are designed to help you discover the content of a score. You do not need to know how many notes are in a chord, how many voices are in a staff, or how many staves are in a score in order to move vertically through the score using these commands.

                                                                                                                            Filtering score reading

                                                                                                                            Excluding certain elements like lyrics, or chord names while reading the score is possible by using the Selection filter (F6). Uncheck those elements you don't want to read.

                                                                                                                            Score playback

                                                                                                                            The Space bar serves both to start and stop playback. Playback will start with the currently selected note if one is selected; where playback was last stopped if no note is selected; or at the beginning of the score on first playback.

                                                                                                                            MuseScore supports looped playback so you can repeat a section of a piece for practice purposes. To set the “in” and “out” points for the loop playback via the Play Panel (F11):

                                                                                                                            1. First select the note in the score window where the loop should start
                                                                                                                            2. Go to the Play Panel and press the Set loop In position toggle button
                                                                                                                            3. Back to the score window, navigate to the note where you want the loop to end
                                                                                                                            4. Switch again to Play Panel, and press the Set loop Out position toggle button
                                                                                                                            5. To enable or disable the loop, press the Loop Playback toggle button

                                                                                                                            You can also control the loop playback and control other playback parameters, such as overriding the basic tempo of a score, using the View / Play Panel (F11).

                                                                                                                            Score editing

                                                                                                                            Score editing is currently not very accessible – too many score elements require intervention of the mouse in order to place objects onto a score. Additionally, visual reference and manual adjustment of the position of various elements is sometimes necessary due to MuseScore's limited support for conflict avoidance of elements.

                                                                                                                            In contrast, MuseScore does often provide ample default, and a platform to experiment with the basics of note input.
                                                                                                                            To enter note input mode, first navigate to the measure in which you would like to enter notes, then press “N”. Almost everything about note input is designed to be keyboard accessible, and the standard documentation should be good to help you through the process. Bear in mind that MuseScore can either be in note input or normal mode, and it won’t always be clear which mode of these you are in. When in doubt, press Esc. If you were in note input mode, this will take you out. If you were in normal mode, you will stay there, although you will also lose your selection.

                                                                                                                            Customization

                                                                                                                            You can customize the keyboard shortcuts using Edit / Preferences / Shortcuts. At some point, we may provide a set of special accessibility-optimized shortcuts and/or a way of saving and loading sets of shortcut definitions.

                                                                                                                            External links

                                                                                                                            • Creating a New Score in MuseScore with NVDA
                                                                                                                            • Inputting notes in MuseScore with NVDA
                                                                                                                            • Creating Modified Stave Notation in MuseScore

                                                                                                                            Kenraalibasso

                                                                                                                              Adding a new figured bass indication

                                                                                                                              1. Select the note to which the figured bass applies
                                                                                                                              2. Press the Figured Bass shortcut (default Ctrl+G; can be changed in Preferences)
                                                                                                                              3. Enter the text in the editor 'blue box' as required (see below)
                                                                                                                              4. Press Space to move to the next note ready for another figured bass indication (or click outside the editor box to exit it)

                                                                                                                              Example 1

                                                                                                                              With Space, the editor advances to the next note, or rest of the staff to which figured bass is being added. To move to a point in between, or to extend a figured bass group for a longer duration, see below Group Duration.

                                                                                                                              Tab advances the editing box to the beginning of the next measure.

                                                                                                                              Shift+Space moves the editing box to the previous staff note or rest.

                                                                                                                              Shift+Tab moves the editing box to the beginning of the previous measure.

                                                                                                                              Text format

                                                                                                                              Digits

                                                                                                                              Digits are entered directly. Groups of several digits stacked one above the other are also entered directly in a single text, stacking them with Enter:

                                                                                                                              Example 2

                                                                                                                              Accidentals

                                                                                                                              Accidentals can be entered using regular keys:

                                                                                                                              To enter: type:
                                                                                                                              double flat bb
                                                                                                                              flat b
                                                                                                                              natural h
                                                                                                                              sharp #
                                                                                                                              double sharp ##

                                                                                                                              These characters will automatically turn into the proper signs when you leave the editor. Accidentals can be entered before, or after a digit (and of course, in place of a digit, for altered thirds), according to the required style; both styles are properly aligned, with the accidental 'hanging' at the left, or the right.

                                                                                                                              Combined shapes

                                                                                                                              Slashed digits or digits with a cross can be entered by adding \, / or + after the digit (combining suffixes); the proper combined shape will be substituted when leaving the editor:

                                                                                                                              Example 3

                                                                                                                              The built-in font can manage combination equivalence, favoring the more common substitution:

                                                                                                                              1+, 2+, 3+, 4+ result in Modern digits 1 (or Historic digits 1)

                                                                                                                              and 5\, 6\, 7\, 8\, 9\ result in Modern digits 2 (or Historic digits 2)

                                                                                                                              Please remember that / can only by combined with 5; any other 'slashed' figure is rendered with a question mark.

                                                                                                                              + can also be used before a digit; in this case it is not combined, but it is properly aligned ('+' hanging at the left side).

                                                                                                                              Parentheses

                                                                                                                              Open and closed parentheses, both round: '(', ')' and square: '[', ']', can be inserted before and after accidentals, before and after a digit, before and after a continuation line; added parentheses will not disturb the proper alignment of the main character.

                                                                                                                              Notes:

                                                                                                                              • The editor does not check that parentheses, open and closed, round or square, are properly balanced.
                                                                                                                              • Several parentheses in a row are non-syntactical and prevent proper recognition of the entered text.
                                                                                                                              • A parenthesis between a digit and a combining suffix ('+', '\', '/') is accepted, but prevents shape combination.

                                                                                                                              Continuation lines

                                                                                                                              Continuation lines are input by adding an '_' (underscore) at the end of the line. Each digit of a group can have its own continuation line:

                                                                                                                              Example 4

                                                                                                                              Continuation lines are drawn for the whole duration of the figured bass group (but currently are not continued on following systems, the same as for lyric continuation lines).

                                                                                                                              'Extended' continuation lines

                                                                                                                              Occasionally, a continuation line has to connect with the continuation line of a following group, when a chord degree has to be kept across two groups. Examples (both from J. Boismortier, Pièces de viole, op. 31, Paris 1730):

                                                                                                                              Example 4b

                                                                                                                              In the first case, each group has its own continuation line; in the second, the continuation line of the first group is carried 'into' the second.

                                                                                                                              This can be obtained by entering several (two or more) underscores "__" at the end of the text line of the first group.

                                                                                                                              Duration

                                                                                                                              Each figured bass group has a duration, which is indicated by a light gray line above it (of course, this line is for information only and it is not printed or exported to PDF).

                                                                                                                              Initially, a group has the same duration of the note to which it is attached. A different duration may be required to fit several groups under a single note or to extend a group to span several notes.

                                                                                                                              To achieve this, each key combination of the list below can be used:

                                                                                                                              • to advance the editing box by the indicated duration
                                                                                                                                AND
                                                                                                                              • to set the duration of the previous group up to the new editing box position.

                                                                                                                              Pressing several of them in sequence without entering any figured bass text repeatedly extends the previous group.

                                                                                                                              Type: to get:
                                                                                                                              Ctrl+1 1/64
                                                                                                                              Ctrl+2 1/32
                                                                                                                              Ctrl+3 1/16
                                                                                                                              Ctrl+4 1/8 (quaver)
                                                                                                                              Ctrl+5 1/4 (crochet)
                                                                                                                              Ctrl+6 half note (minim)
                                                                                                                              Ctrl+7 whole note (semibreve)
                                                                                                                              Ctrl+8 2 whole notes (breve)

                                                                                                                              (The digits are the same as are used to set the note durations)

                                                                                                                              Setting the exact figured bass group duration is only mandatory in two cases:

                                                                                                                              1. When several groups are fit under a single staff note (there is no other way).
                                                                                                                              2. When continuation lines are used, as line length depends on the group duration.

                                                                                                                              However, it is a good practice to always set the duration to the intended value for the purposes of plugins and MusicXML.

                                                                                                                              Editing existing figured basses

                                                                                                                              To edit a figured bass indication already entered:

                                                                                                                              • Select it, or the note it belongs to and press the same Figured Bass shortcut used to create a new one
                                                                                                                                or
                                                                                                                              • Double-click it

                                                                                                                              The usual text editor box will open with the text converted back to plain characters ('b', '#' and 'h' for accidentals, separate combining suffixes, underscores, etc.) for simpler editing.

                                                                                                                              Once done, press Space to move to a next note, or click outside the editor box to exit it, as for newly created figured basses.

                                                                                                                              Style

                                                                                                                              The Style → General... menu command allows to configure how figured bass is rendered. Select "Figured Bass" in the list on the left side to display the following dialogue box:

                                                                                                                              Configuration dialog box

                                                                                                                              The Font drop list contains all the fonts which have been configured for figured bass. A standard installation contains only one font, "MuseScore Figured Bass", which is also the default font.

                                                                                                                              The Size is the size of the font (in points). It is linked to the spatium value: for the default spatium, the entered value is used; for smaller or larger spatium values, a size value proportionally smaller or larger is used.

                                                                                                                              Vertical Position is the distance (in spatia) from the top of the staff to the top margin of the figured bass text. Negative values go up (figured bass above the staff) and positive values go down (figured bass below the staff: a value greater than 4 is needed to step over the staff itself).

                                                                                                                              Line Height is the distance between the base line of each figured bass line; it is expressed in percent of the font size.

                                                                                                                              The following picture visualizes each numeric parameter:

                                                                                                                              Parameters

                                                                                                                              The Top / Bottom radio buttons select the vertical alignment: with Top, the top line of each group is aligned with the main vertical position and the group 'hangs' from it (this is normally used with figured bass notation and is the default); with Bottom, the bottom line is aligned with the main vertical position and the group 'sits' on it (this is sometimes used in some kinds of harmonic analysis notations):

                                                                                                                              Vertical alignment

                                                                                                                              The Modern / Historic radio buttons select the typographic style of the combined shapes. The difference between the two styles is shown below:

                                                                                                                              Styles

                                                                                                                              Proper syntax

                                                                                                                              For the relevant substitutions and shape combinations to take effect and for proper alignment, the figured bass mechanism expects input texts to follow some rules (which are in any case, the rules for a syntactical figured bass indication):

                                                                                                                              • There can be only one accidental (before or after), or only one combining suffix per figure;
                                                                                                                              • There cannot be both an accidental and a combining suffix;
                                                                                                                              • There can be an accidental without a digit (altered third), but not a combining suffix without a digit.
                                                                                                                              • Any other character not listed above is not expected.

                                                                                                                              If a text entered does not follow these rules, it will not be processed: it will be stored and displayed as it is, without any layout.

                                                                                                                              Summary of keys

                                                                                                                              Type: to get:
                                                                                                                              Ctrl+G Adds a new figured bass group to the selected note.
                                                                                                                              Space Advances the editing box to the next note.
                                                                                                                              Shift+Space Moves the editing box to the previous note.
                                                                                                                              Tab Advances the editing box to the next measure.
                                                                                                                              Shift+Tab Moves the editing box to the previous measure.
                                                                                                                              Ctrl+1 Advances the editing box by 1/64, setting the duration of the previous group.
                                                                                                                              Ctrl+2 Advances the editing box by 1/32, setting the duration of the previous group.
                                                                                                                              Ctrl+3 Advances the editing box by 1/16, setting the duration of the previous group.
                                                                                                                              Ctrl+4 Advances the editing box by 1/8 (quaver), setting the duration of the previous group.
                                                                                                                              Ctrl+5 Advances the editing box by 1/4 (crochet), setting the duration of the previous group.
                                                                                                                              Ctrl+6 Advances the editing box by a half note (minim), setting the duration of the previous group.
                                                                                                                              Ctrl+7 Advances the editing box by a whole note (semibreve), setting the duration of the previous group.
                                                                                                                              Ctrl+8 Advances the editing box by two whole notes (breve), setting the duration of the previous group.
                                                                                                                              Ctrl+Space Enters an actual space; useful when figure appears "on the second line" (e.g., 5 4 -> 3).
                                                                                                                              BB Enters a double flat.
                                                                                                                              B Enters a flat.
                                                                                                                              H Enters a natural.
                                                                                                                              # Enters a sharp.
                                                                                                                              ## Enters a double sharp.
                                                                                                                              _ Enters a continuation line.
                                                                                                                              __ Enters an extended continuation line.

                                                                                                                              Plugins

                                                                                                                                Overview

                                                                                                                                Plugins are small pieces of code that add a particular feature to MuseScore. By enabling a plugin, a new menu option will be appended to the Plugins menu in MuseScore to accomplish a given action on the score or a part of it.

                                                                                                                                Some plugins come pre-installed with MuseScore—see →below. You can find many more plugins in the plugin repository. Some plugins there work with MuseScore 2; others will only work with older versions of MuseScore, some work with either.
                                                                                                                                To tell one from the other: for MuseScore 2.x the plugin code files have an extension of .qml, for older versions, it is .js.

                                                                                                                                Installation

                                                                                                                                Note that some plugins may require the installation of other components (fonts, e.g.) to work. Check the plugin's documentation for more information.

                                                                                                                                Most plugins are provided as ZIP archives, so download the plugin's .zip file and uncompress it to one of the directories mentioned below. If a plugin is provided directly as an (unzipped) .qml file, simply download and place into one of these directories.

                                                                                                                                Once a plugin is installed, it needs to be enabled in the Plugin Manager in order to use it—see →below.

                                                                                                                                Windows

                                                                                                                                MuseScore looks for pre-installed plugins in %ProgramFiles%\MuseScore 2\Plugins (or %ProgramFiles(x86)%\MuseScore 2\Plugins for the 64-bit versions) and in %LOCALAPPDATA%\MuseScore\MuseScore 2\plugins on Vista, Seven and 10 or C:\Documents and Settings\USERNAME\Local Settings\Application Data\MuseScore\MuseScore 2\plugins (adjusted to your language version) on XP.

                                                                                                                                To install new plugins, the above folders should not be used or modified. Instead you can add other plugins to %HOMEPATH%\Documents\MuseScore2\Plugins, or specify a different folder to look for plugins in MuseScore's Preferences.

                                                                                                                                macOS

                                                                                                                                On macOS, MuseScore looks for pre-installed plugins in the MuseScore bundle in /Applications/MuseScore 2.app/Contents/Resources/plugins (to reveal files in the app bundle, right click on MuseScore 2.app and choose "Show package contents") and in ~/Library/Application Support/MuseScore/MuseScore 2/plugins.

                                                                                                                                To install new plugins, the above folders should not be used or modified. Instead you can add other plugins to ~/Documents/MuseScore2/Plugins, or specify a different folder to look for plugins in MuseScore's Preferences.

                                                                                                                                Linux

                                                                                                                                In Linux, MuseScore looks for plugins in /usr/share/mscore-2.0/plugins and in ~/.local/share/data/MuseScore/MuseScore 2/plugins.

                                                                                                                                To install new plugins, the above folders should not be used or modified. Instead you can add other plugins to ~/Documents/MuseScore2/Plugins, or specify a different folder to look for plugins in MuseScore's Preferences.

                                                                                                                                Enable/disable plugins

                                                                                                                                To be able to access the installed plugins from the Plugins menu, they need to be enabled in the Plugin Manager:

                                                                                                                                Plugin manager

                                                                                                                                Create/edit/run plugins

                                                                                                                                It is possible to create new or edit existing plugins and run them via the Plugin Creator:

                                                                                                                                Plugin creator

                                                                                                                                Here also the documentation of all available elements can be found

                                                                                                                                Plugins installed by default

                                                                                                                                Some plugins come pre-installed with MuseScore, but they are not enabled by default. See →above to enable plugins.

                                                                                                                                ABC Import

                                                                                                                                This plugin imports ABC text from a file or the clipboard. Internet connection is required, because it uses an external web-service for the conversion, which uses abc2xml and gets send the ABC data, returns MusicXML and imports that into MuseScore.

                                                                                                                                Break Every X Measures

                                                                                                                                This plugin enters line breaks in the interval you select on the selected measures or, if no measures are selected, the entire score. It is no longer being distributed and has been replaced by Edit → Tools → Add/Remove Line Breaks. If you ever used an early beta version of MuseScore 2, though, you may still see the plugin left over.

                                                                                                                                Notes → Color Notes

                                                                                                                                This demo plugin colors notes in the selected range (or the entire score), depending on their pitch. It colors the note head of all notes in all staves and voices according to the Boomwhackers convention. Each pitch has a different color. C and C♯ have a different color. C♯ and D♭ have the same color.
                                                                                                                                To color all the notes in black, just run that plugin again (on the same selection). You could also use the 'Remove Notes Color' plugin for this.

                                                                                                                                Create Score

                                                                                                                                This demo plugin creates a new score. It creates a new piano score with 4 quarters C D E F. It's a good start to learn how to make a new score and add notes from a plugin.

                                                                                                                                helloQml

                                                                                                                                This demo plugin shows some basic tasks.

                                                                                                                                Notes → Note Names

                                                                                                                                This plugin names notes in the selected range or the entire score. It displays the names of the notes (as a staff text) as per MuseScore's language settings, for voices 1 and 3 above the staff, for voices 2 and 4 below the staff, and for chords in a comma separated list, starting with the top note.

                                                                                                                                Panel

                                                                                                                                This demo plugin creates a GUI panel.

                                                                                                                                random

                                                                                                                                Creates a random score.

                                                                                                                                random2

                                                                                                                                Creates a random score too

                                                                                                                                run

                                                                                                                                This demo plugin runs an external command. Probably this will only work on Linux.

                                                                                                                                scorelist

                                                                                                                                This test plugin iterates through the score list.

                                                                                                                                ScoreView

                                                                                                                                Demo plugin to demonstrate the use of a ScoreView

                                                                                                                                Walk

                                                                                                                                This test plugin walks through all elements in a score

                                                                                                                                See also

                                                                                                                                • Tools

                                                                                                                                MIDI-tuonti

                                                                                                                                  MuseScore can import MIDI files (.mid/.midi/.kar) and convert them into music notation. To import, use the standard Open command.

                                                                                                                                  Initially, the programs renders the MIDI to notation using certain default settings. A MIDI Import Panel appears at the bottom of the screen, showing a list of tracks (only tracks with note events are shown) and the operations available for each track. You can change these settings on a track-by-track basis and then reimport the data: The “Apply” button (at the top) submits any changes with immediate effect. The "Cancel" button immediately cancels any unsaved changes. The final result should be a better quality score reproduction of the file.

                                                                                                                                  Use Shift+Wheel or Ctrl+Wheel to scroll track options horizontally; scroll tracks vertically without those modifiers.

                                                                                                                                  If there are multiple tracks, then one more track is added at the top of the list to select all tracks at once.

                                                                                                                                  MIDI Import Panel

                                                                                                                                  In the MIDI Import Panel, you can choose which tracks to import and reorder them. Some information about each track is displayed: sound, staff name, and lyrics, if any. The presence of the lyric column is an indication that the file contains a lyric track—assignable to different tracks through the drop-down menu.

                                                                                                                                  The MIDI import panel updates the relevant information of whatever file is in view, if the user has several open. If the MIDI import panel is no longer required, it can be closed by clicking the close button in the top-left corner. The panel will re-appear after clicking on the button "Show MIDI import panel" which appears right after the panel is closed.

                                                                                                                                  After saving the score, the MIDI Import Panel will not be available, because MuseScore is no longer importing a MIDI file.

                                                                                                                                  Available operations

                                                                                                                                  MuseScore instrument
                                                                                                                                  Assign a MuseScore instrument (listed in instruments.xml or in specified custom xml file in Preferences) that defines staff name, clef, transposition, articulations, etc.
                                                                                                                                  Quantization

                                                                                                                                  Quantize MIDI notes by some regular grid. The grid MAX resolution can be set via the drop-down menu:

                                                                                                                                  • Value from preferences (default) - quantization value is taken from the main Preferences dialog of MuseScore (in the “Import” tab)
                                                                                                                                  • Quarter, Eighth, 16th, 32nd, 64th, 128th - user-defined values

                                                                                                                                  However, the actual quantization grid size is adaptive and reduces when the note length is small, so for each note the quantization value is different. But there is an upper limit for the quantization value, and that value can be set by the user as "max. quantization".
                                                                                                                                  For example, if some note is long - say, half note, and the max. quantization is set to 8th, then the note will be quantized with the 8th-note grid, not the half- or quarter-note grid as it supposed to be by the algorithm.
                                                                                                                                  Such quantization scheme allows to quantize all notes in the score (with different lengths!) adequately.

                                                                                                                                  Max. voices
                                                                                                                                  Sets maximum count of allowed musical voices.
                                                                                                                                  Search tuplets
                                                                                                                                  When enabled, this option attempts to detect tuplets and applies the corresponding quantization grid to the tuplet chords.
                                                                                                                                  Is human performance
                                                                                                                                  If enabled, this option reduces the accuracy of MIDI-to-score conversion in favor of readability. It is useful for unaligned MIDI files, when no regular quantization grid is provided. For such files the automatic beat tracking algorithm is used which tries to detect the bar positions throughout the piece.
                                                                                                                                  2x less measure count
                                                                                                                                  The option is active for unaligned MIDI files (when "Is human performance" is checked by default). It halves measure count obtained in the internal beat tracking operation. It may be convenient when the beat tracking gives 2x more frequent bar subdivision than necessary.
                                                                                                                                  Time signature
                                                                                                                                  The option is active for unaligned MIDI files. The user can choose an appropriate time signature for the whole piece if the default detected value is wrong. The option is useful because it handles imported tuplets correctly unlike the direct time signature setting from the palette.
                                                                                                                                  Split staff
                                                                                                                                  This option is suited mainly for piano tracks - to assign notes to the left or right hand of the performer. It uses constant pitch separation (the user may choose the pitch via sub-options) or floating pitch separation (depending on the hand width - sort of a guess from the program point of view).
                                                                                                                                  For drum tracks (“Percussion” sound in the track list) it splits the staff into multiple staves, each of which gets only one drum pitch (i.e. drum sound). There is also a sub-option to allow/disallow the application of the square bracket for the newly created set of drum tracks.
                                                                                                                                  Clef changes
                                                                                                                                  Small clefs can be inserted within a staff to keep chords closer to the 5 staff lines. Clef changes depend on the average pitch of the chord. Tied groups of notes are not broken by the clef insertion (if it occurs, one can report a bug for algorithm in importmidi_clef.cpp). This option is available for non-drum tracks only.
                                                                                                                                  Simplify durations
                                                                                                                                  Reduces number of rests to form more "simple" note durations. For drum tracks this option can remove rests and lengthen notes as well.
                                                                                                                                  Show staccato
                                                                                                                                  Option to show/hide staccato markings in the score.
                                                                                                                                  Dotted notes
                                                                                                                                  Controls whether MuseScore will use dotted notes or ties.
                                                                                                                                  Show tempo text
                                                                                                                                  Shows/hides tempo text markings in the score.
                                                                                                                                  Show chord names
                                                                                                                                  Shows/hides chord names in the score, if any, for XF MIDI file format.
                                                                                                                                  Recognize pickup measure
                                                                                                                                  When enabled, this option doesn't change the time signature of the first bar that is shorter than the second bar. It is also called anacrusis. This option is only available for all tracks at once.
                                                                                                                                  Detect swing
                                                                                                                                  MuseScore tries to detect swing, and automatically replace a pattern of 4th + 8th notes in triplets (for the most common swing feel, 2:1), or a dotted 8th + 16th pattern (for shuffle, 3:1), with two straight 8ths and a “Swing” or “Shuffle” text at the beginning.

                                                                                                                                  Nuotinpäät

                                                                                                                                    A range of alternative noteheads – in addition to the "normal" – can be found in the Note Heads palette of the Advanced workspace and via the Inspector (see Change notehead group, below).

                                                                                                                                    Note: The design of the notehead may vary depending on the music font selected (Emmentaler, Gonville or Bravura). Those in the palette are displayed as half notes in Bravura font.

                                                                                                                                    Notehead groups

                                                                                                                                    MuseScore supports a number of notehead styles:

                                                                                                                                    • Normal: A standard notehead.
                                                                                                                                    • Crosshead (Ghost note): Used in percussion notation to represent cymbals. It also indicates muted and/or percussive effects in stringed instruments such as the guitar.
                                                                                                                                    • Diamond: Used to indicate harmonic notes in instruments such as the guitar, violin etc.
                                                                                                                                    • Slash: Used to notate rhythmic values.
                                                                                                                                    • Triangle: Used in percussion notation.
                                                                                                                                    • Shape notes: Do, Re, Mi, Fa, Sol, La, Ti.
                                                                                                                                    • Circle cross: Used in percussion notation.
                                                                                                                                    • Alternative Brevis: Used in early music notation.
                                                                                                                                    • Brackets (Parentheses): When applied, these go round the existing note (or accidental).

                                                                                                                                    Change notehead group

                                                                                                                                    To change the shape of one or more noteheads in the score, use one of the following:

                                                                                                                                    • Select one or more notes and double click a notehead in a palette
                                                                                                                                    • Drag a notehead from a palette onto a note in the score.
                                                                                                                                    • Select one or more notes and change the notehead in the Inspector, using the drop-down list under Note → Head group (not supported for drum staves).

                                                                                                                                    Change notehead type

                                                                                                                                    Occasionally you may need to change the apparent duration of a notehead—i.e. notehead type—without altering its actual, underlying duration:

                                                                                                                                    1. Select one or more notes.
                                                                                                                                    2. Chose one of the following options from the Inspector under Note → Head type:
                                                                                                                                      • Auto: Automatic, i.e, apparent duration = actual duration.
                                                                                                                                      • Whole: Whole notehead, regardless of actual duration.
                                                                                                                                      • Half: Half notehead, regardless of actual duration.
                                                                                                                                      • Quarter: Quarter notehead, regardless of actual duration.
                                                                                                                                      • Breve: Breve notehead, regardless of actual duration.

                                                                                                                                    Shared noteheads

                                                                                                                                    When two notes of the same written pitch fall on the same beat, they are either offset – arranged side by side – or allowed to share the same notehead (the latter is particularly common in classical and fingerstyle guitar music).

                                                                                                                                    Note: The rules governing the default behavior of such unison notes are as follows:

                                                                                                                                    • Unison notes in the same voice do not share noteheads.
                                                                                                                                    • Notes with stems in the same direction do not share noteheads.
                                                                                                                                    • Dotted notes do not share noteheads with undotted notes.
                                                                                                                                    • Black notes do not share noteheads with white notes.
                                                                                                                                    • Whole notes never share noteheads.

                                                                                                                                    Change offset noteheads to shared

                                                                                                                                    Offset noteheads can be turned into shared noteheads in one of two ways:

                                                                                                                                    • Make the smaller-value notehead invisible by selecting it and using the keyboard shortcut V (or unchecking the "Visible" option in the Inspector).
                                                                                                                                    • Alter the notehead type of the shorter-duration note to match the longer one by switching "Head type" in the "Note" section of the Inspector.

                                                                                                                                    Examples of notehead sharing

                                                                                                                                    1. In the first example below, the notes of voices 1 and 2 share noteheads by default, because they are all black, undotted notes:

                                                                                                                                      Shared black undotted noteheads

                                                                                                                                    2. By contrast, in the next example, white notes cannot share noteheads with black notes, so are offset to the right:

                                                                                                                                      Non-shared noteheads

                                                                                                                                      To create a shared notehead, make the black eighth note invisible or change its head type to match that of the white note (as explained above):

                                                                                                                                      Shared white noteheads

                                                                                                                                    Remove duplicate fret marks

                                                                                                                                    In certain cases, a shared notehead, when pasted to a tablature staff, may result in two separate fret marks on adjacent strings. To correct this, make any extraneous tablature notes invisible by selecting them and using the keyboard shortcut V (or by unchecking the "visible" option in the Inspector).

                                                                                                                                    External links

                                                                                                                                    • Shape notes at Wikipedia.
                                                                                                                                    • Ghost notes at Wikipedia.

                                                                                                                                    Nuotinsyöttötilat

                                                                                                                                      From version 2.1, you can enter notation using one of several new note input modes—in addition to the pre-existing Step-time and Re-pitch modes. These are accessed by clicking a small dropdown arrow next to the note entry button on the note input toolbar.

                                                                                                                                      Note entry modes

                                                                                                                                      Step-time

                                                                                                                                      This is the method of note entry that MuseScore has had from the beginning. You enter notes in Step-time mode by choosing a duration using the mouse or keyboard, and then choosing a pitch using the mouse, keyboard, MIDI keyboard or virtual piano.

                                                                                                                                      For details see Basic note entry.

                                                                                                                                      Re-pitch

                                                                                                                                      Re-pitch mode allows you to correct the pitches of a sequence of notes while leaving their durations unchanged (not to be confused with Accidental: Respell pitches).

                                                                                                                                      1. Select a note as your starting point;
                                                                                                                                      2. If you are using a pre-2.1 version of the program press N to enter note-input mode. This step is optional from 2.1 onwards.
                                                                                                                                      3. Select the Re-Pitch option from the Note input drop-down menu (or, for pre-2.1 versions, from the note input toolbar); or use the keyboard shortcut, Ctrl+Shift+I (Mac: Shift+Cmd+I).
                                                                                                                                      4. Now enter pitches using the keyboard, MIDI keyboard or virtual piano keyboard.

                                                                                                                                      You can also use the Re-pitch function to create a new passage from an existing one of the same sequence of durations—by copying and pasting the latter, then applying Re-pitch.

                                                                                                                                      Rhythm

                                                                                                                                      Rhythm mode allows you to enter durations with a single keypress. Combining Rhythm and Re-pitch modes makes for a very efficient method of note entry.

                                                                                                                                      1. Select your starting point in the score and enter Rhythm mode.
                                                                                                                                      2. Select a duration from the note input toolbar, or press a duration shortcut (numbers 1-9) on your computer keyboard. A note will be added to the score with the selected duration. In contrast to Basic note entry, pressing the . key will toggle dotting or not dotting all subsequent durations. All following rhythms will be dotted until the . key is pressed again. Unlike Basic note entry, the dot is to be pressed prior to entering the rhythm.
                                                                                                                                      3. Entering rests is similar to adding dotted notes. Press the 0 key to toggle entering rests. All rhythms entered will be rests until the 0 key is pressed again. This can be used concurrently with dotted notes.
                                                                                                                                      4. Continue pressing duration keys to enter notes with the chosen durations.
                                                                                                                                      5. Now use Re-pitch mode to set the pitches of the notes you just added.

                                                                                                                                      Real-time (automatic)

                                                                                                                                      The Real-time modes basically allow you to perform the piece on a MIDI keyboard (or MuseScore's virtual piano keyboard) and have the notation added for you. However, you should be aware of the following limitations which currently apply:

                                                                                                                                      • It is not possible to use a computer keyboard for Real-time input
                                                                                                                                      • You cannot enter tuplets or notes shorter than the selected duration
                                                                                                                                      • You cannot enter notes into more than one voice at a time

                                                                                                                                      However, these restrictions mean that MuseScore has very little guessing to do when working out how your input should be notated, which helps to keep the Real-time modes accurate.

                                                                                                                                      In the automatic version of Real-time input, you play at a fixed tempo indicated by a metronome click. You can adjust the tempo by changing the delay between clicks from the menu: Edit → Preferences... → Note Input (Mac: MuseScore → Preferences... → Note Input).

                                                                                                                                      1. Select your starting position in the score and enter Real-time (automatic) mode.
                                                                                                                                      2. Select a duration from the note input toolbar.
                                                                                                                                      3. Press and hold a MIDI key or virtual piano key (a note will be added to the score).
                                                                                                                                      4. Listen for the metronome clicks. With each click the note grows by the selected duration.
                                                                                                                                      5. Release the key when the note has reached the desired length.

                                                                                                                                      The score stops advancing as soon as you release the key. If you want the score to continue advancing (e.g. to allow you to enter rests) then you can use the Real-time Advance shortcut to start the metronome.

                                                                                                                                      Real-time (manual)

                                                                                                                                      In the manual version of Real-time input, you have to indicate your input tempo by tapping on a key or pedal, but you can play at any speed you like and it doesn't have to be constant. The default key for setting the tempo (called "Real-time Advance") is Enter on the numeric keypad (Mac: fn+Return), but it is highly recommended that you change this to a MIDI key or MIDI pedal (see below).

                                                                                                                                      1. Select your starting position in the score and enter Real-time (manual) mode.
                                                                                                                                      2. Select a duration from the note input toolbar.
                                                                                                                                      3. Press and hold a MIDI key or virtual piano key (a note will be added to the score).
                                                                                                                                      4. Press the Real-time Advance key. With each press the note grows by the selected duration.
                                                                                                                                      5. Release the note when it has reached the desired length.

                                                                                                                                      Real-time Advance shortcut

                                                                                                                                      The Real-time Advance shortcut is used to tap beats in manual Real-time mode, or to start the metronome clicks in automatic Real-time mode. It is called "Real-time Advance" because it causes the input position to more forward, or "advance", through the score.

                                                                                                                                      The default key for Real-time Advance is Enter on the numeric keypad (Mac: fn+Return), but it is highly recommended that you assign this to a MIDI key or MIDI pedal via MuseScore's MIDI remote control. The MIDI remote control is available from the menu: Edit → Preferences... → Note Input (Mac: MuseScore → Preferences... → Note Input).

                                                                                                                                      Alternatively, if you have a USB footswitch or computer pedal which can simulate keyboard keys, you could set it to simulate Enter on the numeric keypad.

                                                                                                                                      See also

                                                                                                                                      • Note input
                                                                                                                                      • Copy and paste

                                                                                                                                      External links

                                                                                                                                      • Video: Semi-Realtime MIDI Demo Part 1: New note entry modes (available as of MuseScore 2.1)
                                                                                                                                      • Introduction to the new Repitch Mode (YouTube)

                                                                                                                                      Otelautakuvat

                                                                                                                                        As of MuseScore 2.0.3, a range of common fretboard (or chord) diagrams for the guitar are provided in the Fretboard Diagrams palette in the Advanced Workspace (previous versions featured only one diagram).

                                                                                                                                        Fretboard diagrams palette

                                                                                                                                        A chord diagram can be created for any fretted, stringed instrument by customizing an existing one. It can be saved to a custom palette for future use if required.

                                                                                                                                        Add a fretboard diagram

                                                                                                                                        To add a fretboard diagram to the score, use one of the following methods:

                                                                                                                                        • Select a note in voice 1 and double-click a fretboard diagram from a palette.
                                                                                                                                        • Drag and drop a fretboard diagram from a palette to the desired position in the score.

                                                                                                                                        Edit fretboard (chord) diagram

                                                                                                                                        1. Right-click on the diagram and select Fretboard Diagram Properties....
                                                                                                                                        2. Adjust the number of instrument strings, using the "Strings" spin box at the bottom left of the window.
                                                                                                                                        3. Adjust the fret position number using the scroll bar on the right-hand side.
                                                                                                                                        4. Adjust how many frets to display (height-wise) using the "Frets" spin-box at the bottom right of the window.
                                                                                                                                        5. To place a dot on a string fret, click on that fret. To remove the dot, click on the fret again.
                                                                                                                                        6. Click above the lowest fret to toggle a string between:
                                                                                                                                          • Open string (o),
                                                                                                                                          • mute/unplayed string (x)
                                                                                                                                          • Off.
                                                                                                                                        7. To create a barre or partial barre:
                                                                                                                                          i. Make sure the desired fret position is clear of black dots (click on a dot to remove it);
                                                                                                                                          ii. Hold Shift and click on the fret where you want the barre to begin. Note: Only one barre can be applied per diagram;
                                                                                                                                          iii. To delete a barre, click on the black dot where the barre begins.

                                                                                                                                        For example, to create a full-barre F# chord, from a C chord:

                                                                                                                                        1. Place the C fretboard diagram on the score, right-click on it and select Fretboard Diagram Properties....
                                                                                                                                        2. Click on the relevant fret positions to establish the fingering dots.
                                                                                                                                        3. Set "Frets" to "4" and fret number (right-hand scroll bar) to "2." The diagram should now look like this:

                                                                                                                                          Fretboard diagram - step 1

                                                                                                                                        4. Create the barre by holding Shift and clicking on the second fret of the 6th string. Click "OK" to exit and you should get this:

                                                                                                                                          Fretboard diagram - step 2

                                                                                                                                          The same principle applies if you want a partial barré. For example, the partial barré in an A7 chord is created by pressing Shift, then clicking on the 4th string, second fret:

                                                                                                                                          A7 chord

                                                                                                                                        Adjust position, size, color

                                                                                                                                        The size ("Scale"), color and position of a fretboard diagram can be changed by clicking on it and altering the relevant values in the Inspector.

                                                                                                                                        The position of the fretboard diagram can also be adjusted in Edit mode:

                                                                                                                                        1. Double-click on the diagram (or click on it and press Ctrl+E (Mac: Cmd+E); or right-click on it and select Edit element).
                                                                                                                                        2. Press the arrow keys for fine positioning (0.1 sp. at a time); or press Ctrl+Arrow (Mac: Cmd+Arrow) for larger adjustments (1 sp. at a time).

                                                                                                                                        Fretboard diagram style

                                                                                                                                        Some default properties of fretboard diagrams (barre thickness, vertical position, size etc.) can be adjusted from the menu: select Style → General… → Chord Symbols, Fretboard Diagrams. Any changes made here affect all existing diagrams, as well as those applied subsequently.

                                                                                                                                        Palautetut tiedostot

                                                                                                                                        If MuseScore or your computer should crash, or if power is lost, a pop-up message upon restarting MuseScore will ask if you wish to restore the previous session.
                                                                                                                                        Restore session dialog
                                                                                                                                        If you click No, any work from your previous session will be lost. If you click Yes, MuseScore will attempt to recover the files that were open.

                                                                                                                                        Behavior of saving after session recovery

                                                                                                                                        When MuseScore recovers files after a crash, it renames them with the full path name added in front of the original file name. This very long name will appear in the tab(s) above the active score window. On some operating systems, when a user saves any of these recovered files, it will be saved in the folder in which the program itself is running. This is not necessarily the same directory in which the scores were saved when they were created. You may not be able to locate the revised file in the usual folder.

                                                                                                                                        To avoid this, do not use "Save" the first time you save a recovered file. Use the "Save As..." menu item before making any revisions to the score, to save each recovered file under either its original name or a new name. This will open a window to allow you to navigate to the correct folder and directory. This is important in order to ensure that the file is saved to the folder in which you expect to find it later.

                                                                                                                                        Finding recovered files

                                                                                                                                        In the event that "Save" is used instead of "Save As..." with a recovered file, you will have to find the files in your computer. The actual location of those files will vary, depending on your operating system, and in which directory MuseScore is installed.

                                                                                                                                        For Windows 7, with a default installation of MuseScore to the x86 program files directory, recovered files are auto-saved to C:\Program Files (x86)\MuseScore2\bin.

                                                                                                                                        For Windows 10, look in C:\Users\[User Name]\AppData\Local\VirtualStore\Program Files (x86)\MuseScore 2\bin

                                                                                                                                        You may need to run a system-wide search in order to find files saved directly after a session recovery. Use keywords from the original file name as well as wildcards, and specify the date modified.

                                                                                                                                        See also

                                                                                                                                        Save/Export/Print

                                                                                                                                        External links

                                                                                                                                        How to recover a backup copy of a score

                                                                                                                                        Partituurin ominaisuudet

                                                                                                                                          The Score Properties dialog contains the document meta tags such as "workTitle," "Composer," "Copyright" etc. To view the dialog:

                                                                                                                                          1. Make sure that the applicable score or instrument part is the active tab;
                                                                                                                                          2. From the menu, select File → Score Properties (File → Info... in versions earlier than 2.0.3).

                                                                                                                                          Several meta tags are generated automatically when you create a score using the New Score Wizard, and others may be added later. Meta tags can also be incorporated into a header or footer if required—see below.

                                                                                                                                          Edit meta tags

                                                                                                                                          1. Make sure that the applicable score or instrument part is the active tab;
                                                                                                                                          2. From the menu, select File → Score Properties (File → Info... in versions earlier than 2.0.3);
                                                                                                                                            Score Properties
                                                                                                                                          3. Edit the text of the various meta tags as required;
                                                                                                                                          4. To add another meta tag, click on the New button. Fill in the "New tag name" field and press OK;
                                                                                                                                            Input tag name

                                                                                                                                          Preexisting meta tags

                                                                                                                                          Every score has the following fields available in Score Properties. Some are automatically filled in on score creation, while others will be empty unless specifically changed. The first four items in the following list are not user-modifiable, and cannot be used in the header or footer (they are not really meta tags).

                                                                                                                                          • File Path: The score file's location on your Computer (2.0.3 and later).
                                                                                                                                          • MuseScore Version: The version of MuseScore the score was last saved with.
                                                                                                                                          • Revision: The revision of MuseScore the score was last saved with.
                                                                                                                                          • API-Level: The file format version.
                                                                                                                                          • arranger: (empty)
                                                                                                                                          • composer: As entered in the New Score Wizard (which is also used to fill the composer text in the top vertical frame—be aware that later changes to one are not reflected in the other).
                                                                                                                                          • copyright: As entered in the New Score Wizard. Copyright info appears as seemingly uneditable text at the bottom of every page of a score, but it can be edited or removed by changing the value here.
                                                                                                                                          • creationDate: Date of the score creation. This could be empty, if the score was saved in test mode (see Command line options).
                                                                                                                                          • lyricist: As entered in the New Score Wizard (which is also used to fill the corresponding lyricist text in the top vertical frame—be aware that later changes to one are not reflected in the other).
                                                                                                                                          • movementNumber: (empty)
                                                                                                                                          • movementTitle: (empty)
                                                                                                                                          • originalFormat: This tag exists only if the score got imported and then contains the format the score got imported from (see file formats).
                                                                                                                                          • platform: The platform the score was created on: "Microsoft Windows", "Apple Macintosh", "Linux" or "Unknown". This might be empty if the score was saved in test mode.
                                                                                                                                          • poet: (empty)
                                                                                                                                          • source: May contain a URL if the score was downloaded from or saved to MuseScore.com.
                                                                                                                                          • translator: (empty)
                                                                                                                                          • workNumber: (empty)
                                                                                                                                          • workTitle: As entered in the New Score Wizard (which is also used to fill the corresponding title text in the top vertical frame—be aware that later changes to one are not reflected in the other).

                                                                                                                                          When working on multiple scores that belong to one larger work, the nomenclature is like this: workNumber and workTitle are the number and title of the larger work (e.g. opus 8, “Le quattro stagioni” (The four seasons) by Antonio Vivaldi), movementNumber is the number of the movement you’re working on (e.g. 3 for Autumn) and movementTitle is its title (“L’autunno”). It is customary, when using the New Score Wizard, to create a work with the movementTitle as title (even though it ends up in workTitle then) and, directly after creating the score, fixing up this information in the Score Properties dialogue. This ensures that the title frame of the printed score contains the information you expect but the metadata is also correct.

                                                                                                                                          Every part additionally has the following meta tag, generated and filled on part creation:

                                                                                                                                          • partName: Name of the part as given on part creation (which is also used to fill the corresponding part name text in the top vertical frame—be aware that later changes to one are not reflected in the other).

                                                                                                                                          Header/Footer

                                                                                                                                          To show the content of one or more meta tags in a header or footer for your score/part:

                                                                                                                                          1. Make sure that the correct score or instrument part is the active tab;
                                                                                                                                          2. From the menu, select Style → General... → Header, Footer, Numbers;

                                                                                                                                            Style / Header,Footer,Numbers

                                                                                                                                            If you hover with your mouse over the Header or Footer text region, a list of macros will appear, showing their meaning, as well as the existing meta tags and their content.

                                                                                                                                            Style / Header,Footer,Numbers

                                                                                                                                          3. Add tags (e.g. $:workTitle:) and macros (e.g. $M) to the appropriate boxes, as required;

                                                                                                                                          4. Click Apply to see how the header or footer looks in the score. Make corrections to the dialog if required;
                                                                                                                                          5. If an instrument part is in the active tab, click Apply to all parts, if you want to apply these settings to all the score parts;
                                                                                                                                          6. Click OK to assign the header or footer and exit the dialog.

                                                                                                                                          See also

                                                                                                                                          • Layout and formatting: Header and footer
                                                                                                                                          • Command line options: Test mode

                                                                                                                                          Pääpaletti

                                                                                                                                          The Master Palette enables you to access all the possible elements that could be added to custom palettes, and, in the case of Time Signatures and Key Signatures, make your own.

                                                                                                                                          To open, use either of the following options:

                                                                                                                                          • Press Shift+F9 (Mac: fn+Shift+F9).
                                                                                                                                          • From the menu, select View → Master Palette.

                                                                                                                                          Master Palette

                                                                                                                                          Hovering the mouse over an item shows a tool tip (a short definition in black on yellow background).

                                                                                                                                          Symbols

                                                                                                                                          The Symbols section of the Master Palette is a large repository of hundreds of musical symbols in addition to those found in the default palettes. You can open it from the Master Palette, or directly from the score by using the shortcut Z.

                                                                                                                                          Symbols

                                                                                                                                          Find a symbol

                                                                                                                                          The symbols are listed under their respective musical font types: use the font menu on the bottom right of the box to specify Emmentaler, Gonville or Bravura. You can search for a particular symbol by entering a keyword in the search box.

                                                                                                                                          Apply a symbol

                                                                                                                                          Symbols are applied to the score by dragging and dropping, or by selecting a note or rest and double-clicking the symbol. The position can then be adjusted by dragging or by changing the horizontal / vertical offsets in the Inspector. Color and visibility can also be adjusted in the Inspector.

                                                                                                                                          Note: Elements from the Symbols section do not follow any positioning rules (in many cases unlike identical elements from other sections of the Master Palette), nor do they affect score playback.

                                                                                                                                          Connect symbols

                                                                                                                                          Elements from the Symbols section can be connected to each other on the score page, so that they can be moved as one unit:

                                                                                                                                          1. Apply first symbol to the score. Adjust position as required.
                                                                                                                                          2. Double click, or drag-and-drop, a second element onto the first symbol. Adjust position as required.

                                                                                                                                          Drag the first element and the attached element will follow.

                                                                                                                                          See also

                                                                                                                                          • Palettes

                                                                                                                                          Tiedostomuodot

                                                                                                                                            MuseScore tukee monia tiedostomuotoja, joiden avulla voit jakaa ja julkaista partituureja muodossa, joka parhaiten vastaa tarpeitasi.

                                                                                                                                            Tuo/vie

                                                                                                                                            Tuo tiedosto

                                                                                                                                            1. Chose any of the following options:
                                                                                                                                              • Press Ctrl+O.
                                                                                                                                              • Click on the "Load score" icon on the left side of the toolbar area.
                                                                                                                                              • From the menu bar, select File→Open....
                                                                                                                                            2. Select a file and click Open; or simply double-click a file.

                                                                                                                                            Vie tiedosto

                                                                                                                                            1. From the menu bar, select File→Export....
                                                                                                                                            2. Edit "File name" as appropriate, and select the desired file format in "Save as type."
                                                                                                                                            3. Click Save.

                                                                                                                                            For more details, see Save/Export/Print.

                                                                                                                                            Share scores online

                                                                                                                                            To save and share your scores on the web at MuseScore.com:

                                                                                                                                            • From the menu bar, select File→Save Online....

                                                                                                                                            For more details, see Share scores online.

                                                                                                                                            MuseScore native format

                                                                                                                                            MuseScore saves files in the following native formats:

                                                                                                                                            • *.MSCZ: The default MuseScore file format. Being compressed it takes up relatively little disk space.
                                                                                                                                            • *.MSCX: An uncompressed MuseScore file format.
                                                                                                                                            • .*.MSCZ, / .*.MSCX,: These are backup files. Notice the point (full stop) added before the file name, and the comma added to the file extension.

                                                                                                                                            A note about fonts: MuseScore does not embed text fonts in saved or exported native format files. If you want your MuseScore file to be viewed by other MuseScore users, make sure you are using the built-in FreeSerif or FreeSans font families for your text, or a font that the other parties have installed too. If a system does not have the fonts specified in your original file, MuseScore will use a fallback option, which may cause your score to appear differently.

                                                                                                                                            MuseScore format (*.mscz)

                                                                                                                                            MSCZ is the standard MuseScore file format and recommended for most uses. A score saved in this format takes up very little disk space, but preserves all the necessary information. The format is a ZIP-compressed version of .mscx files and includes any images.

                                                                                                                                            Uncompressed MuseScore format (*.mscx)

                                                                                                                                            MSCX is the uncompressed version of the MuseScore file format. A score saved in this format will retain all information, except images. It is recommended for when manually editing the file format (using a text editor).

                                                                                                                                            MuseScore backup file (.*.mscz,) or (.*.mscx,)

                                                                                                                                            Backup files are created automatically and saved in the same folder as your normal MuseScore file. The backup copy contains the previously saved version of the MuseScore file and can be important if your normal copy becomes corrupted, or for looking at an older version of the score.

                                                                                                                                            The backup file adds a period to the beginning of the file name (.) and a comma (,) to the end (e.g. if your normal file is called "untitled.mscz", the backup copy will be ".untitled.mscz,"), and the period and comma need to be removed from the name in order to open the backup file in MuseScore. As it is stored in the same folder as your normal MuseScore file, you may also need to give it a unique name (e.g. changing ".untitled.mscz," to "untitled-backup1.mscz").

                                                                                                                                            Note: In order to see the MuseScore backup files, you may need to change your system settings to "Show hidden files". See also How to recover a backup copy of a score (MuseScore 2.x).

                                                                                                                                            Graphic files (export only)

                                                                                                                                            MuseScore can export a score as a graphic file in either PDF, PNG or SVG format.

                                                                                                                                            PDF (*.pdf)

                                                                                                                                            PDF (Portable Document Format) files are ideal for sharing your sheet music with others who do not need to edit the content. This is a very widely-used format and most users will have a PDF viewer of some kind on their computer.

                                                                                                                                            To set the resolutuion of exported PDFs:

                                                                                                                                            1. From the menu bar, chose Edit→Preferences... (Mac: MuseScore→Preferences...), and select the "Export" tab;
                                                                                                                                            2. Set the resolution in the "PDF" section.

                                                                                                                                            PNG (*.png)

                                                                                                                                            PNG (Portable Network Graphics) files are based on a bitmap image format, widely supported by software on Windows, Mac OS, and Linux, and very popular on the web. MuseScore creates PNG images as they would appear if printed, one image per page.

                                                                                                                                            To set the resolution of exported PNG images:

                                                                                                                                            1. From the menu bar, chose Edit→Preferences... (Mac: MuseScore→Preferences...), and select the "Export" tab;
                                                                                                                                            2. Set the resolution and transparency in the PNG/SVG section.

                                                                                                                                            Note: If you want to create images that show only parts of the score (with or without screen-only items such as frame boxes, invisible notes, and out-of-range note colors), use Image capture instead.

                                                                                                                                            SVG (*.svg)

                                                                                                                                            SVG (Scalable Vector Graphics) files can be opened by most web browsers (except Internet Explorer before version 9) and most vector graphics software. However, most SVG software does not support embedded fonts, so the appropriate MuseScore fonts must be installed to view these files correctly.

                                                                                                                                            To set resolution and transparency of exported SVG files, see the instructions under PNG (above).

                                                                                                                                            Audio files (export only)

                                                                                                                                            MuseScore can export normalized synthesized audio of the score (via the File → Export... command) to the following formats:

                                                                                                                                            WAV audio (*.wav)

                                                                                                                                            WAV (Waveform Audio Format) is an uncompressed sound format. This was developed by Microsoft and IBM, and is widely supported by software for Windows, OS X, and Linux. It is an ideal format for use when creating CDs, as full sound quality is preserved. However, the large file sizes make it difficult to share via email or the web.

                                                                                                                                            FLAC audio (*.flac)

                                                                                                                                            Free Lossless Audio Codec (FLAC) is compressed audio format. FLAC files are approximately half the size of uncompressed audio and just as good quality. Windows and OS X do not have built-in support for FLAC, but software such as the free and open source VLC media player can play FLAC files on any operating system.

                                                                                                                                            Ogg Vorbis (*.ogg)

                                                                                                                                            Ogg Vorbis is intended as a patent-free replacement for the popular MP3 audio format (which MuseScore also supports—see below). Like MP3, Ogg Vorbis files are relatively small (often a tenth of uncompressed audio), but some sound quality is lost. Windows and OS X do not have built-in support for Ogg Vorbis. However, software such as VLC media player and Firefox can play Ogg files on any operating system.

                                                                                                                                            MP3 (*.mp3)

                                                                                                                                            MP3 files are relatively small (often a tenth of uncompressed audio), but some sound quality is lost. To be able to create MP3 files, an additional library, lame_enc.dll (Windows) or libmp3lame.dylib (Mac), needs to be installed. MuseScore will prompt you for its location. You can get it at http://lame.buanzo.org/.

                                                                                                                                            Some Mac users may find MuseScore encounters an error loading the MP3 library, possibly due to that library being a 32-bit library. A 64-bit build that will work with MuseScore is available from http://thalictrum.com/en/products/lame (note that it is necessary to rename the file to libmp3lame.dylib for MuseScore to recognize it). Homebrew users just need to run brew install lame.

                                                                                                                                            As of version 2.1 you can set the MP3 bitrate:

                                                                                                                                            1. From the menu bar, chose Edit→Preferences... (Mac: MuseScore→Preferences...), and select the "Export" tab;
                                                                                                                                            2. Set the MP3 bitrate in the Audio section.

                                                                                                                                            For all audio formats you can set the sample rate:

                                                                                                                                            1. From the menu bar, chose Edit→Preferences... (Mac: MuseScore→Preferences...), and select the "Export" tab;
                                                                                                                                            2. Set the Sample rate in the Audio section.

                                                                                                                                            Share with other music software

                                                                                                                                            The following are musical score formats (like MuseScore's native format, MSCZ), which allow you to import files made with other music notation programs or export files that you can open with other music notation programs.

                                                                                                                                            MusicXML (*.xml)

                                                                                                                                            MusicXML is the universal standard for sheet music. It is the recommended format for sharing sheet music between different scorewriters, including MuseScore, Sibelius, Finale, and more than 100 others.

                                                                                                                                            Compressed MusicXML (*.mxl)

                                                                                                                                            Compressed MusicXML creates smaller files than regular MusicXML. This is a newer standard and isn't as widely supported by older scorewriters, but MuseScore has full import and export support.

                                                                                                                                            MIDI (*.mid, *.midi, *.kar)

                                                                                                                                            Musical Instrument Digital Interface (MIDI) (external link) is a format widely supported by sequencers and music notation software.

                                                                                                                                            MIDI files are designed for playback purposes and do not contain score layout information about formatting, pitch spelling, voicing, ornaments, articulations, repeats, or key signatures, among other things. To share files between different music notation software, MusicXML is recommended instead. If you are only interested in playback, use MIDI.

                                                                                                                                            MuseData (*.md) (import only)

                                                                                                                                            MuseData is a format developed by Walter B. Hewlett beginning in 1983 as an early means of sharing music notation between software. It has since been eclipsed by MusicXML, but several thousand scores in this format are still available online.

                                                                                                                                            Capella (*.cap, *.capx) (import only)

                                                                                                                                            CAP and CAPX files are created by the score writer, Capella. MuseScore imports version 2000 (3.0) or later fairly accurately (2.x doesn't work, while the *.all format from 1.x versions is not supported at all).

                                                                                                                                            Bagpipe Music Writer (*.bww) (import only)

                                                                                                                                            BWW files are created by the niche score writer, Bagpipe Music Writer.

                                                                                                                                            BB (*.mgu, *.sgu) (import only)

                                                                                                                                            BB files are created by the music arranging software, Band-in-a-Box. MuseScore's support is currently experimental.

                                                                                                                                            Overture (*.ove) (import only)

                                                                                                                                            OVE files are created by the score writer Overture. This format is mainly popular in Chinese-language environments, such as Mainland China, Hong Kong, and Taiwan. MuseScore's support is currently experimental.

                                                                                                                                            Guitar Pro (*.gtp, *.gp3, *.gp4, *.gp5, *.gpx) (import only)

                                                                                                                                            GP files are created by Guitar Pro.

                                                                                                                                            See also

                                                                                                                                            • Save/Export/Print
                                                                                                                                            • Recovered files

                                                                                                                                            External links

                                                                                                                                            • How to recover a backup copy of a score

                                                                                                                                            Työkalut

                                                                                                                                              A number of useful commands can be found in the Edit → Tools submenu.

                                                                                                                                              Add / Remove line breaks

                                                                                                                                              This tool adds or removes line breaks over all or part of the score:

                                                                                                                                              1. Select a range of measures: if no selection is made, the command is applied to the whole score.
                                                                                                                                              2. Chose Edit→Tools→Add/Remove Line Breaks…. The following dialog appears.

                                                                                                                                                Add/Remove Line Breaks

                                                                                                                                              3. Chose one of the following options:

                                                                                                                                                • Break lines every X (select number) measures.
                                                                                                                                                • Add line break at the end of each system.
                                                                                                                                                • Remove current line breaks.
                                                                                                                                              4. Press OK.

                                                                                                                                              Explode

                                                                                                                                              The explode command allows you to select a passage of music in a single staff and split (explode) the chords into their constituent notes. The top note of each chord is retained on this "source staff" while lower notes are moved to subsequent staves. Explode only affects notes in voice 1.

                                                                                                                                              Note: If the desired passage also contains notes in other voices apart from voice 1, you should, instead, cut and paste each voice to a separate staff with the help of the selection filter.

                                                                                                                                              To explode a section of the score:

                                                                                                                                              1. Make sure all notes to be exploded are in voice 1.
                                                                                                                                              2. Ensure that there are enough staves underneath the "source staff" to receive the exploded notes. Create extra staves if necessary in the Instruments dialog.
                                                                                                                                              3. Chose one of two options:
                                                                                                                                                • Select a range of measures in the "source staff": this allows all notes to be exploded if there are enough staves available.
                                                                                                                                                • Select a range of measures that includes both the source staff and also extends downwards to include one or more destination staves: This limits the number of exploded notes to the number of selected staves.
                                                                                                                                              4. Chose Edit→Tools→Explode.

                                                                                                                                              Notes: (1) MuseScore will discard the lowest note(s) of any chord that contains more notes than the number of staves in the selection. (2) If a given chord has fewer notes than the number of destination staves, then notes will be duplicated as needed so that every staff receives a note. (3) Any existing music in the destination staves is overwritten. (4) If you select a partial measure, the explode command will automatically expand it to a full measure.

                                                                                                                                              Implode

                                                                                                                                              The Implode command works in the opposite way to "explode":

                                                                                                                                              • If several staves are selected, all voice 1 notes in underlying staves are copied to the top staff.
                                                                                                                                              • If just one staff is selected, all notes in voices 1–4 are combined into voice 1.

                                                                                                                                              Note: Implode works best if the rhythms of selected underlying staves are similar to that of the top staff—the latter providing the rhythmic template for the operation.

                                                                                                                                              Apply implode to multiple staves

                                                                                                                                              1. Select a range of measures in a staff and extend this selection downwards to include the other staves to be imploded.
                                                                                                                                              2. Chose Edit→Tools→Implode.

                                                                                                                                              The voice 1 notes of underlying staves are copied to the top staff in the selection.

                                                                                                                                              Apply implode to a single staff

                                                                                                                                              1. Select a range of measures in the desired staff.
                                                                                                                                              2. Chose Edit→Tools→Implode.

                                                                                                                                              All selected notes in the staff are now displayed in voice 1.

                                                                                                                                              Fill with slashes

                                                                                                                                              This command fills the selection with slashes, one per beat. For normal (empty) measures, the slashes are added in voice 1.

                                                                                                                                              Slash notation

                                                                                                                                              If there are already notes in a measure in the selection, the command will put the slashes into the first empty voice it finds. If a measure contains notes in all 4 voices, voice 1 will be filled with slashes, over-writing any existing notes. In voices 1 and 2 the slashes will be centered on the middle line of the staff, in voices 3 and 4 they appear small and above or below the staff. All slashes are set to not transpose or playback.

                                                                                                                                              Toggle rhythmic slash notation

                                                                                                                                              This command toggles selected notes between normal notes and rhythmic slash notation: notes with slash heads, set to not transpose or playback. For notes in voices one or two, the notes are fixed to the middle staff line.

                                                                                                                                              Rhythmic slash notation

                                                                                                                                              For notes in voices three or four, the notes are fixed above or below the staff and are also marked small (also known as "accent" notation). You may find it helpful to use the selection filter to exclude voices one and two from your selection before running this command, so only the notes in voices three and four are affected.

                                                                                                                                              Accent notation

                                                                                                                                              In percussion staves, the notes in voices 3 and 4 are not converted to small slashes but to small notes above or below the staff.

                                                                                                                                              Rhythmic slash - percussion

                                                                                                                                              Resequence rehearsal marks

                                                                                                                                              Rehearsal marks added via the text palette will automatically be labeled with the next letter or number (based on whatever you typed into the first rehearsal mark), but with the menu command Edit→Tools→Resequence Rehearsal Marks, you can change all marks at once from letters to numbers (e.g.) or correct marks that have become out of order through use of copy and paste. Select the range of measures you want to apply the command to before running it.

                                                                                                                                              MuseScore automatically detects the sequence based on the first rehearsal mark in the selection—all rehearsal marks in the selection are then altered accordingly.

                                                                                                                                              The sequence can be:

                                                                                                                                              • a, b, c,
                                                                                                                                              • A, B, C,
                                                                                                                                              • numerically simple sequence - 1, 2, 3,
                                                                                                                                              • numerically corresponding to measure numbers

                                                                                                                                              Copy lyrics to clipboard

                                                                                                                                              This command, available in MuseScore 2.0.3 and above, copies all the lyrics of a score, so you can paste them into another document.

                                                                                                                                              See also

                                                                                                                                              • Breaks and spacers
                                                                                                                                              • Rehearsal marks

                                                                                                                                              Varhaiset musiikkiominaisuudet

                                                                                                                                              MuseScore 2 offers several specialized functions to create engravings of early music (particularly medieval and renaissance) akin to commercial editions from the 20th century onwards.

                                                                                                                                              Unbarred (or unmetered) notation

                                                                                                                                              In MuseScore, notes lasting longer than the duration of a measure are normally tied across barlines. However MuseScore has a special feature which allows it to display the note values intact, without splitting and tying them in this way. This enables you to notate music which is unbarred (i.e. not divided into measures), such as that of the renaissance:

                                                                                                                                              1. From the menu bar, select Style→General...→Score.
                                                                                                                                              2. Tick the box labelled "Display note values across measure bar."
                                                                                                                                                Dialog: Style / General.. / Early Music
                                                                                                                                              3. Click "OK" or "Apply." The existing score is immediately updated.

                                                                                                                                              Example

                                                                                                                                              1. The example below shows an excerpt from the original score of "De Profundis Clamavi" for 4 voices by Nicolas Champion:
                                                                                                                                                Early music - original
                                                                                                                                              2. The same excerpt displayed in MuseScore:
                                                                                                                                                Early music - barred
                                                                                                                                              3. And after activating "Display note values across measure bar."
                                                                                                                                                Early music - unbarred
                                                                                                                                              4. To get rid of the barlines, just untick the “Show barlines” box in the Staff properties dialog. See also Mensurstrich (below).

                                                                                                                                              Note: The feature is still in development and may contain bugs. The longest supported note value is the longa (a dotted longa is still broken up and tied over).

                                                                                                                                              Mensurstrich

                                                                                                                                              Since a complete lack of barlines could make performing the music more difficult for current musicians, many modern engravers settled on a compromise called Mensurstrich, where barlines are drawn between, but not across, staves.

                                                                                                                                              Mensurstrich

                                                                                                                                              To place barlines between staves:

                                                                                                                                              1. Enter edit mode by double-clicking a barline in a staff above where you want the Mensurstriche;
                                                                                                                                              2. Hold Shift and drag the lower handle of the barline down until it meets the top of the staff below;
                                                                                                                                              3. Hold Shift and drag the upper handle of the barline down until it meets the bottom of the current staff;
                                                                                                                                              4. Exit edit mode by pressing Esc or clicking on a blank area of the document window.

                                                                                                                                              Alternatively, you can use the Inspector:

                                                                                                                                              1. In the staff below the proposed Mensurstriche, uncheck "Show barlines" in the Viivaston ominaisuudet dialog;
                                                                                                                                              2. In the staff above where you want the Mensurstriche, right-click on one barline and chose Select→All Similar Elements in Same Staff;
                                                                                                                                              3. In the Inspector, under "Barline," make the following settings: "Spanned staves" = 2; "Spanned from" = 8; "Spanned to = "0."

                                                                                                                                              Note: To reset barlines, select the relevant barlines and make the following settings: "Spanned staves" = 1; "Spanned from" = 0; "Spanned to = "8."

                                                                                                                                              Ambitus

                                                                                                                                              Before there was the concept of an absolute pitch, performers were required to transpose vocal music to a singable range for their ensemble "on the fly." To aid them, an ambitus was sometimes included, marking the entire range of a voice at the beginning of the piece.

                                                                                                                                              To apply an ambitus, use one of the following methods:

                                                                                                                                              • Drag the ambitus symbol (from the Lines palette of the Advanced workspace) onto a clef.
                                                                                                                                              • Select a clef, then double-click the ambitus symbol (in the Lines palette of the Advanced workspace).

                                                                                                                                              Ambitus

                                                                                                                                              When applied, the ambitus automatically displays the note range of the score: if there is a section break then only the note range of the section is displayed. Beyond the section break a new ambitus may be applied.

                                                                                                                                              The note range of the ambitus can be adjusted manually by selecting it and changing the "Top note" and "Bottom note" values in the Inspector. For automatic adjustment click the Update Range button in the inspector.

                                                                                                                                              Mensural time signatures

                                                                                                                                              In the mensural notation system, time signatures did not define the length of a measure, but the length of breves and semibreves. MuseScore supports mensural time symbols as a display method in the Time signature properties dialog rather than as symbols, but they are just for show, as the proportion of e.g. half notes per whole notes cannot be modified.
                                                                                                                                              One way to make use of these symbols is to replicate when composers of the renaissance had multiple voices in different time signatures simultaneously without using tuplets. Edit the time signature on a per-staff basis, as long as the beginning and end of a measure in all staves match up. If they do not, then consider increasing the size of the measures to the lowest common denominator.

                                                                                                                                              Prolation
                                                                                                                                              De Profundis Clamavi for 5 voices by Josquin Des Prez

                                                                                                                                              See also

                                                                                                                                              • Measure Operations: Split and join

                                                                                                                                              Viivastojen välinen palkitus

                                                                                                                                              Pianopartituureissa on yleistä käyttää molempia viivastoja (basso ja diskanttiavain) musiikillisen fraasin kirjoittamiseen. Tämän voi tehdä MuseScorella seuraavasti:

                                                                                                                                              1. Kirjoita kaikki nuotit samalle viivastolle:

                                                                                                                                                Beamed notes in upper staff

                                                                                                                                              2. Ctrl+Vaihto+↓ siirtää valitun nuotin tai soinnun seuraavalle alemmalle viivastolle (Mac: ⌘+Vaihto+↓):

                                                                                                                                                crossbeams1a.png

                                                                                                                                                Note : this moves the whole chord, not just a single note from a multi note chord. If you need notes in the old staff at the same place, use voices.

                                                                                                                                              3. To adjust the beam, double-click it to show the handles. Use the keyboard arrows or drag the handles to change the beam angle and position:

                                                                                                                                                Selected note moved to lower staff

                                                                                                                                              Katso myös

                                                                                                                                              • Connect barlines: How to extend barlines over multiple staves.

                                                                                                                                              Ulkoiset linkit

                                                                                                                                              • How to span a chord or stem over two staves (MuseScore "Howto")

                                                                                                                                              Viivaston ominaisuudet

                                                                                                                                                The Staff Properties dialog allows you to make changes to the display of a staff, adjust its tuning and transposition, change instrument etc. To open:

                                                                                                                                                • Right-click on a staff and select Staff Properties....

                                                                                                                                                Staff type properties
                                                                                                                                                Staff Properties dialog, as of version 2.1.

                                                                                                                                                Staff Types

                                                                                                                                                For practical purposes, there are four different types of staff:

                                                                                                                                                1a. Standard staff I. A pitched staff used for most instruments except fretted, plucked-string ones.
                                                                                                                                                1b. Standard staff II. A pitched staff containing a fretted, plucked-string instrument, with options to set the number of instrument strings and tuning.
                                                                                                                                                2. Tablature staff. A staff containing a fretted, plucked-string instrument, which displays music as a series of fret-marks on strings. Also contains options to set the number of instrument strings and tuning.
                                                                                                                                                3. Percussion staff. A pitched staff for percussion instruments.

                                                                                                                                                It is possible to change one type of staff into another using the Instruments dialog, as long as the original staff is loaded with the right instrument. For example, in order to change a standard staff to tablature, it must contain a plucked-string instrument. Similarly, to change a standard staff to a percussion staff you need to ensure that it has an appropriate percussion instrument loaded and so on.

                                                                                                                                                Most options in the Staff properties dialog are common to all staves, but each type also has one or two specific options of its own.

                                                                                                                                                Staff Properties: all staves

                                                                                                                                                The following Staff Properties options are common to all staves:

                                                                                                                                                Lines
                                                                                                                                                The number of lines making up the staff.

                                                                                                                                                Line Distance
                                                                                                                                                The distance between two staff lines, measured in spaces (abbr.: sp). If you set this to a higher value, the lines are spaced more widely apart; a lower value and they are closer together. It is not recommended to change this value for the standard group, for which the default distance is 1.0 (instead, change the actual size of the sp unit in Sivun asetukset); other groups may have different default values (for instance, tablature usually has a line distance of 1.5 sp).

                                                                                                                                                Extra distance above staff
                                                                                                                                                Increases or decreases the distance between the selected staff and the one above in all systems. However, it does not apply to the top staff of a system, which is controlled by the minimum/maximum system distance (see Layout and formatting: Style → General... → Page).

                                                                                                                                                Alternatively, you can alter the "Extra distance above staff" directly from the score page:
                                                                                                                                                1. Press and hold the Shift key.
                                                                                                                                                2. Click on an empty space in a staff and drag it up or down with the mouse.

                                                                                                                                                Note: To alter the spacing above just one staff line in a particular system, see Vaihdot ja välistäjät.

                                                                                                                                                Scale
                                                                                                                                                Changes the size of the selected staff and all associated elements, as a percentage (to adjust the overall score size, use Scaling from the Layout→Page Settings… menu).

                                                                                                                                                Never Hide
                                                                                                                                                Never hide this staff. This overrules any "Hide empty staves" setting in Layout and Formatting: Style → General... → Score.

                                                                                                                                                Show clef
                                                                                                                                                Whether the staff clef will be shown.

                                                                                                                                                Show time signature
                                                                                                                                                Whether the staff time signature(s) will be shown or not.

                                                                                                                                                Show barlines
                                                                                                                                                Whether the staff barlines will be shown.

                                                                                                                                                Hide system barline
                                                                                                                                                Show/hide barline at left-hand edge of the staff.

                                                                                                                                                Do not hide if system is empty
                                                                                                                                                Never hide this staff, even if the entire system is empty. This overrules any "Hide empty staves" setting in Layout and Formatting: Style → General... → Score.

                                                                                                                                                Small staff
                                                                                                                                                Create a reduced-size staff. You can set the default from the menu in Layout and Formatting: Style → General... → Sizes

                                                                                                                                                Invisible staff lines
                                                                                                                                                Make staff lines invisible.

                                                                                                                                                Staff line color
                                                                                                                                                Use a color picker to change the color of the staff lines.

                                                                                                                                                Part name
                                                                                                                                                The name of the part. This is also displayed in the Mixer and the Instruments dialog (I).

                                                                                                                                                Instrument
                                                                                                                                                The instrument loaded in the Instruments (I) or Select Instrument dialog. The sound associated with this instrument can be changed, if desired, in the Mixer.

                                                                                                                                                Long instrument name
                                                                                                                                                Name displayed to the left of the staff in the first system of the score. The long instrument name may also be edited directly as a text object (as of version 2.1): see Text editing.

                                                                                                                                                Short instrument name
                                                                                                                                                Name displayed to the left of the staff in subsequent systems of the score. The short instrument name may also be edited directly as a text object (as of version 2.1): see Text editing. Editing affects all occurrences in the score.

                                                                                                                                                Usable pitch range
                                                                                                                                                Notes outside this range will be marked in red in the score window, if "Color notes outside of usable pitch range" is ticked in Preferences > Note input.

                                                                                                                                                Transpose written pitches (as of version 2.1) / Play transposition
                                                                                                                                                This option ensures that the staves of transposing instruments display music at the correct written pitch. Set the transpose in term of a musical interval (plus octave if required) up or down. For plucked-string instruments such as the guitar, this property can be used to create the effect of applying a capo.

                                                                                                                                                Navigation arrows (as of version 2.1)
                                                                                                                                                Use the ↑ and ↓ buttons, at the bottom left of the Staff Properties window, to navigate to the previous or next staff.

                                                                                                                                                Staff Properties: plucked strings only

                                                                                                                                                Staves of fretted, plucked-string instruments have a few extra options in addition to those listed above,

                                                                                                                                                Number of strings
                                                                                                                                                Displays the number of instrument strings.

                                                                                                                                                Edit String Data…
                                                                                                                                                This button opens a dialog box which allows you to set the number and tuning of strings. See Change string tuning.

                                                                                                                                                Advanced Style Properties

                                                                                                                                                Clicking the Advanced Style Properties... button opens a window giving access to advanced display options for the staff. These will vary depending on the staff type chosen: see the relevant sections below for details.

                                                                                                                                                Change staff type

                                                                                                                                                At the bottom of the Advanced Style Properties dialog there are a number of buttons which allow you to easily change the following:

                                                                                                                                                • The number of lines displayed by a percussion staff.
                                                                                                                                                • The staff type of a plucked-string instrument. For example, you can change from standard staff to tablature and vice versa, or select from a number of tablature options.
                                                                                                                                                1. Make a selection from the drop-down list labelled "Template";
                                                                                                                                                2. Press < Reset to Template;
                                                                                                                                                3. Press OK to accept the changes and exit the dialog (or Cancel to cancel the operation).

                                                                                                                                                Standard and Percussion staff options

                                                                                                                                                Show key signature
                                                                                                                                                Whether the staff key signature will be shown.

                                                                                                                                                Show ledger lines
                                                                                                                                                Whether the staff ledger lines will be shown.

                                                                                                                                                Stemless
                                                                                                                                                If checked, staff notes will have no stem, hook or beam.

                                                                                                                                                Tablature staff options

                                                                                                                                                Upside down
                                                                                                                                                If not checked, the top tablature line will refer to the highest string and the bottom tablature line will refer to the lowest string (most common case). If checked, the top tablature line will refer to the lowest string and the bottom tablature line will refer to the highest line (used in Italian style lute tablatures).

                                                                                                                                                Tablature staff options: Fret Marks

                                                                                                                                                Fret marks are the numbers or letters used to indicate the location of notes on the fingerboard. The following group of properties define the appearance of fret marks:

                                                                                                                                                Font
                                                                                                                                                The font used to draw fret marks. As of version 2.1, 8 fonts are provided supporting all the necessary symbols in 8 different styles (modern Serif, modern Sans, Renaissance, Phalèse, Bonneuil-de Visée, Bonneuil-Gaultier, Dowland, Lute Didactic).

                                                                                                                                                Size
                                                                                                                                                Font size of fret marks in typographic points. Built-in fonts usually look good at a size of 9-10pt.

                                                                                                                                                Vertical offset
                                                                                                                                                MuseScore tries to place symbols in a sensible way and you do not usually need to alter this value (set to 0) for built-in fonts. If the font has symbols not aligned on the base line (or in some other way MuseScore does not expect), this property allows you to move fret-marks up (negative offsets) or down (positive offsets) for better vertical positioning. Values are in sp.

                                                                                                                                                Numbers / Letters
                                                                                                                                                Whether to use numbers (‘1’, ‘2’...) or letters (‘a’, ‘b’...) as fret marks. When letters are used, ‘j’ is skipped and ‘k’ is used for the 9th fret.

                                                                                                                                                On lines / Above lines
                                                                                                                                                Whether marks should be placed on the string lines or above them.

                                                                                                                                                Continuous / Broken
                                                                                                                                                Whether string lines should pass ‘through’ fret marks or should stop at them.
                                                                                                                                                Example of numbers on broken lines:

                                                                                                                                                Example: numbers

                                                                                                                                                Example of letters above continuous lines:

                                                                                                                                                Example: letters

                                                                                                                                                Example of 'upside down' tablature (same contents as number example above):

                                                                                                                                                Example: 'upside-down' tablature

                                                                                                                                                Show back-tied fret marks
                                                                                                                                                If unticked, only the first note in a series of tied notes is displayed. If ticked, all notes in the tied series are displayed.

                                                                                                                                                Show fingerings
                                                                                                                                                From version 2.1, tick to allow the display of fingering symbols applied from a palette.

                                                                                                                                                Tablature staff options: Note Values

                                                                                                                                                This group of properties defines the appearance of the symbols indicating note values.

                                                                                                                                                Font
                                                                                                                                                The font used to draw the value symbols. Currently 5 fonts are provided supporting all the necessary symbols in 5 different styles (modern, Italian tablature, French tablature, French baroque (headless), French baroque). Used only with the Note symbols option.

                                                                                                                                                Size
                                                                                                                                                Font size, in typographic points. Built-in fonts usually look good at a size of 15pt. Used only with the Note symbols option.

                                                                                                                                                Vertical offset
                                                                                                                                                Applies only when Note symbols is selected (see below). Use negative offset values to raise the note value symbols, positive values to lower them.

                                                                                                                                                Shown as: None
                                                                                                                                                No note value will be drawn (as in the examples above)

                                                                                                                                                Shown as: Note symbols
                                                                                                                                                Symbols in the shape of notes will be drawn above the staff. When this option is selected, symbols are drawn only when the note value changes, without being repeated (by default) for a sequence of notes all of the same value.
                                                                                                                                                Example of values indicated by note symbols:

                                                                                                                                                Example: note symbols

                                                                                                                                                Shown as: Stems and beams
                                                                                                                                                Note stems and beams (or hooks) will be drawn. Values are indicated for each note, using the same typographic devices as for a regular staff; all commands of the standard Beam Palette can be applied to these beams too.
                                                                                                                                                Example of values indicated by note stems:

                                                                                                                                                Example: stems

                                                                                                                                                Repeat: Never / At new system / At new measure / Always
                                                                                                                                                Whether and when to repeat the same note symbol, if several notes in sequence have the same value (only available with the Note symbols option).

                                                                                                                                                Beside staff / Through staff
                                                                                                                                                Whether stems are drawn as fixed height lines above/below the staff or run through the staff to reach the fret marks each refers to (only available with the Stems and Beams option).

                                                                                                                                                Above / Below staff
                                                                                                                                                Whether stems and beams are drawn above or below the staff (only available with the Stems and Beams option / Beside staff sub-option).

                                                                                                                                                None / As short stems / As slashed stems
                                                                                                                                                To select three different styles to draw stems for half notes (only available with the Stems and Beams option / Beside staff sub-option).

                                                                                                                                                Show rests
                                                                                                                                                Whether note symbols should be used to indicate also the rests; when used for rests, note symbols are drawn at a slightly lower position. Used only with the Note symbols option.

                                                                                                                                                Preview

                                                                                                                                                Displays a short score in tablature format with all the current parameters applied.

                                                                                                                                                Change instrument

                                                                                                                                                You can change any instrument in a score to a different instrument at any time. The following method updates instrument sound, staff name, and staff transposition all at once.

                                                                                                                                                1. Right-click on an empty part of any measure OR on the instrument name and choose Staff Properties...;
                                                                                                                                                2. Click on Change Instrument... (under "Part Properties");
                                                                                                                                                3. Choose your new instrument and click OK to return to the Staff Properties dialog;
                                                                                                                                                4. Click OK again to return to the score.

                                                                                                                                                Not to be confused with Mid-staff instrument change.

                                                                                                                                                External links

                                                                                                                                                • How to turn a staff into an ossia.

                                                                                                                                                Tuki

                                                                                                                                                Tässä luvussa kerrotaan, miten löytää apua MuseScoren käyttämiseen: parhaat paikat mistä katsoa, paras tapa esittää kysymys foorumeilla, ja vinkkejä vian raportointiin.

                                                                                                                                                Auta kehittämään käännöksiä

                                                                                                                                                You can help translate the MuseScore software and documentation into your own language, as mentioned in Development / Translating.

                                                                                                                                                Software translation

                                                                                                                                                1. Ask in the forum to improve translation
                                                                                                                                                2. Connect to Transifex/MuseScore http://translate.musescore.org, which will redirect you to https://www.transifex.com/projects/p/musescore
                                                                                                                                                3. Select the language and then the section you want to help with (musescore or instruments)
                                                                                                                                                4. Click on the "translate" button (the button text will depend on your language...)
                                                                                                                                                5. Search for "strings" (informational meaning) you want to translate (you could filter "already translated items")

                                                                                                                                                Here is a technical explanation: Continuous translation for MuseScore 2.0

                                                                                                                                                Website and handbook translation

                                                                                                                                                See Translation instructions

                                                                                                                                                See also

                                                                                                                                                • Language Settings and Update Translation, Update Translation

                                                                                                                                                Kuinka kysytään apua tai raportoidaan virheistä

                                                                                                                                                  Ennen kuin lähetät tukipyynnön foorumiin:

                                                                                                                                                  • Yritä löytää ratkaisu Käsikirjasta (hae käsikirjasta)
                                                                                                                                                  • Tarkista Ohjeet, UKK ja Tutoriaalit
                                                                                                                                                  • Hae nettisivun foorumeista nähdäksesi, onko joku kohdannut ennestään saman ongelman

                                                                                                                                                  If posting in either the issue tracker (for established reports), or forum (for inquiries/discussions):

                                                                                                                                                  • Try to reproduce the issue with the latest nightly. You may also view and version history to check whether it has been fixed/implemented already.
                                                                                                                                                  • Please include as much of the following information as you know and limit each issue to one report:

                                                                                                                                                    • Version/revision of MuseScore you are using (e.g. version 2.1, revision 871c8c3). Check Help → About... (Mac: MuseScore → About MuseScore...).
                                                                                                                                                    • Operating system being used (e.g. Windows 7, macOS 10.12 or Ubuntu 14.04)
                                                                                                                                                    • If reporting a bug, describe the precise steps that lead to the problem (where do you click, what keys do you press, what do you see, etc.).
                                                                                                                                                      If you are not able to reproduce the problem with the steps, it is probably not worth reporting it as the developers will not be able to reproduce (and solve) it either. Remember that the goal of a bug report is not only to show the problem, but to allow others to reproduce it easily.
                                                                                                                                                  • Please remember:

                                                                                                                                                    • attach the score that shows the problem —use the "File attachments" option at the bottom of the page, just above the Save and Preview buttons when you're typing your post.

                                                                                                                                                  External links

                                                                                                                                                  • How to write a good bug report: step-by-step instructions

                                                                                                                                                  Palauta tehdasasetuksiin

                                                                                                                                                  Uusissa MuseScore versioissa on mahdollista palauttaa takaisin standardit sisäänrakennetut oletusarvot eli "tehdasasetukset". Joskus tämä on hyödyllistä, jos asetukset ovat vioittuneet. Varoitus: Tehdasasetusten palauttaminen poistaa kaikki tekemäsi muutokset asetuksista, paleteista tai ikkuna-asetuksista. Tämä menettely ei ole yleensä tarpeellinen; kysy foorumeilla ensin neuvoa, sillä niissä saattaa olla ratkaisu ongelmaasi ilman, että tarvitsee nollata kaikkea.

                                                                                                                                                  MuseScore 2.0.3 ja korkeammat

                                                                                                                                                  In recent versions it is possible to revert from within MuseScore, providing that MuseScore itself is able to start.
                                                                                                                                                  Go to Help→Revert to Factory Settings. A warning dialog will appear:

                                                                                                                                                  Revert to factory settings

                                                                                                                                                  Clicking Yes resets all MuseScore's settings as if the program was installed for the first time, and MuseScore will immediately restart. No will safely cancel the revert.

                                                                                                                                                  MuseScore 2.0 through 2.0.2

                                                                                                                                                  In older versions of MuseScore, or in later versions if they do not start, you must run this process via the command line.

                                                                                                                                                  Instructions for Windows

                                                                                                                                                  1. If you have MuseScore open, you need to close it first (File→Quit)
                                                                                                                                                  2. Type Windows key+R to open the Run dialog (The Windows key is the one with the logo for Microsoft Windows). Alternatively select Start using your mouse.
                                                                                                                                                  3. Click Browse...
                                                                                                                                                  4. Look for MuseScore.exe on your computer. The location may vary depending on your installation, but it is probably something similar to My Computer → Local Disk → Program Files (or Program Files (x86)) → MuseScore 2 → bin → MuseScore.exe
                                                                                                                                                  5. Click Open to leave the Browse dialog and return to the Run dialog. The following text (or something similar) should display in the Run dialog

                                                                                                                                                    "C:\Program Files\MuseScore 2\bin\MuseScore.exe"
                                                                                                                                                    

                                                                                                                                                    For 64-bit Windows, the location is

                                                                                                                                                    "C:\Program Files (x86)\MuseScore 2\bin\MuseScore.exe"
                                                                                                                                                    
                                                                                                                                                  6. Click after the quote and add a space followed by a hyphen and a capital F: -F

                                                                                                                                                  7. Press OK

                                                                                                                                                  After a few seconds, MuseScore should start and all the settings reverted to "factory settings".

                                                                                                                                                  For advanced users, the main preference file is located at:

                                                                                                                                                  • Windows Vista or later: C:\Users\<USERNAME>\AppData\Roaming\MuseScore\MuseScore2.ini
                                                                                                                                                  • Windows XP or earlier: C:\Documents and Settings\USERNAME\Application Data\MuseScore\MuseScore2.ini

                                                                                                                                                  The other preferences (palette, session...) are in:

                                                                                                                                                  • Windows Vista or later: C:\Users\<USERNAME>\AppData\Local\MuseScore\MuseScore2\
                                                                                                                                                  • Windows XP or earlier: C:\Documents and Settings\USERNAME\Local Settings\Application Data\MuseScore\MuseScore2\

                                                                                                                                                  Instructions for MacOS

                                                                                                                                                  1. If you have MuseScore open, you need to quit the application first (MuseScore→Quit)
                                                                                                                                                  2. Open Terminal (in Applications/Utilities, or via Spotlight search) and a session window should appear
                                                                                                                                                  3. Type (or copy/paste) the following command into your terminal line (include the '/' at the front):

                                                                                                                                                    /Applications/MuseScore\ 2.app/Contents/MacOS/mscore -F
                                                                                                                                                    

                                                                                                                                                  This resets all MuseScore preferences to factory settings and immediately launches the MuseScore application. Note that you cannot quit the Terminal without quitting MuseScore. You can safely quit MuseScore, quit the Terminal, and then reopen MuseScore in the normal fashion, ready to continue using.

                                                                                                                                                  For advanced users, the main MuseScore preference file is located at ~/Library/Preferences/org.musescore.MuseScore2.plist.

                                                                                                                                                  The other preferences (palette, session...) are in ~/Library/Application\ Support/MuseScore/MuseScore2/

                                                                                                                                                  Instructions for Linux

                                                                                                                                                  The following is true for Ubuntu, and most likely all other Linux distributions and UNIX-style operating systems.

                                                                                                                                                  1. If you have MuseScore open, you need to quit the application first (File→Quit)
                                                                                                                                                  2. From the Ubuntu main menu, choose Applications→Accessories→Terminal. A Terminal session window should appear
                                                                                                                                                  3. Type, (or copy/paste) the following command into your terminal line (Ctrl+Shift+V to paste in Terminal):

                                                                                                                                                    mscore -F
                                                                                                                                                    

                                                                                                                                                    Or, if you are using the AppImage version, you must first use the cd command to change directory to wherever you saved the AppImage. For example, if you saved it to your Desktop:

                                                                                                                                                    cd ~/Desktop
                                                                                                                                                    ./MuseScore*.AppImage -F
                                                                                                                                                    

                                                                                                                                                  This resets all MuseScore preferences to factory settings and immediately launches the MuseScore application. You can now quit Terminal, and continue using MuseScore.

                                                                                                                                                  For advanced users, the main MuseScore preference file is located at ~/.config/MuseScore/MuseScore2.ini. The other preferences (palette, session...) are in ~/.local/share/data/MuseScore/MuseScore2/

                                                                                                                                                  See also

                                                                                                                                                  • Command line options

                                                                                                                                                  Tunnetut yhteensopivuusongelmat

                                                                                                                                                  Laitteiston yhteensopimattomuudet

                                                                                                                                                  Seuraavien ohjelmien tiedetään kaatavan MuseScoren käynnistettäessä:

                                                                                                                                                  • Samson USB Microphone, ajurin nimi "Samson ASIO Driver", samsonasiodriver.dll. Lisätietoja
                                                                                                                                                  • Digidesign MME Refresh Service. Lisätietoa
                                                                                                                                                  • Windows XP SP3 + Realtek Azalia Audio Driver. Lisätietoa
                                                                                                                                                  • Wacom tablet. Lisätietoa and QTBUG-6127

                                                                                                                                                  Ohjelmiston yhteensopimattomuudet

                                                                                                                                                  • Maple virtual cable is known to prevent MuseScore from closing properly.
                                                                                                                                                  • KDE (Linux) window settings can cause the whole window to move when dragging a note. Changing the window settings of the operating system avoids the problem.
                                                                                                                                                  • Nitro PDF Creator may prevent MuseScore 2 from starting on Windows 10, if being used as the default printer. Same for Amyumi/Quickbooks PDF Printer, see here and also some cloud printing services, see here.
                                                                                                                                                  • Creative Sound Blaster Z Series ASIO driver may prevent MuseScore 2 from starting on Windows 10.

                                                                                                                                                  AVG Internet Security hangs MuseScore

                                                                                                                                                  MuseScore requires access to your internet connection with AVG. MuseScore doesn't need an internet connection to function, but if AVG blocks it, MuseScore hangs.

                                                                                                                                                  If AVG prompts you, Allow MuseScore and check "Save my answer as a permanent rule and do not ask me next time."

                                                                                                                                                  If it doesn't prompt you anymore,

                                                                                                                                                  1. Open the AVG user interface (right-click on the AVG icon, close to your clock -> Open AVG User Interface
                                                                                                                                                  2. Click on Firewall
                                                                                                                                                  3. Click Advanced Settings
                                                                                                                                                  4. Click Applications
                                                                                                                                                  5. Find MSCORE.EXE in the list and double click it
                                                                                                                                                  6. Change Application Action to Allow for All

                                                                                                                                                  Font problem on macOS

                                                                                                                                                  MuseScore is known to display notes as square when some fonts are damaged on macOS.
                                                                                                                                                  To troubleshoot this issue:

                                                                                                                                                  1. Go to Applications -> Font Book
                                                                                                                                                  2. Select a font and press ⌘+A to select them all
                                                                                                                                                  3. Go to File -> Validate Fonts
                                                                                                                                                  4. If any font is reported as damaged or with minor problems, select it and delete it
                                                                                                                                                  5. Restart MuseScore if necessary

                                                                                                                                                  In Bug in noteheads, a user believes to have found the font "Adobe Jenson Pro (ajenson)" to be the culprit, regardless of not being reported as broken, or problematic as per the above validation, and solved the problem by deleting that font, so this is worth checking too.

                                                                                                                                                  Font problem on Linux

                                                                                                                                                  If the default desktop environment application font is set to bold, MuseScore will not display the notes properly.
                                                                                                                                                  To troubleshoot this issue (gnome 2.*/MATE users):

                                                                                                                                                  1. Right-click on your desktop and select Change Desktop background
                                                                                                                                                  2. Click on Fonts tab
                                                                                                                                                  3. Set Regular style for Application font
                                                                                                                                                  4. Restart MuseScore if necessary

                                                                                                                                                  For GNOME 3/SHELL users

                                                                                                                                                  1. Open the shell and open "Advanced Settings"
                                                                                                                                                  2. Click on the Fonts option in the list
                                                                                                                                                  3. Set the default font to something non-bold
                                                                                                                                                  4. Restart MuseScore if necessary

                                                                                                                                                  Save As dialog empty on Linux

                                                                                                                                                  Some users reported that the Save As dialog is empty on Debian 6.0 and Lubuntu 10.10.
                                                                                                                                                  To troubleshoot this issue:

                                                                                                                                                  1. Type the following in a terminal

                                                                                                                                                    which mscore
                                                                                                                                                    
                                                                                                                                                  2. The command will answer with the path of mscore. Edit it with your preferred text editor and add the following line at the beginning

                                                                                                                                                    export QT_NO_GLIB=1
                                                                                                                                                    

                                                                                                                                                  Launch MuseScore and the problem should be solved.

                                                                                                                                                  Uudet ominaisuudet MuseScore 2:ssa

                                                                                                                                                  For an overview about the new features, see What's New in MuseScore 2, Release notes for MuseScore 2.0, Release notes for MuseScore 2.0.1, Release notes for MuseScore 2.0.2, MuseScore 2.0.2 is released, Release notes for MuseScore 2.0.3, MuseScore 2.0.3 is released, Release notes for MuseScore 2.1, MuseScore 2.1 is released,Release notes for MuseScore 2.2, MuseScore 2.2 is released and Changes for MuseScore 2.0.
                                                                                                                                                  Documentation of new features are available in the chapter they belong to logically (except the one that is referring to upgrading from 1.x) , but for users coming from 1.x here's a collection of links to be able to see at a glance what can be done now...

                                                                                                                                                  See also

                                                                                                                                                  • Album (→Advanced topics)
                                                                                                                                                  • View modes: Continuous view and Navigator (→Basics)
                                                                                                                                                  • Copy and paste: Selection filter (→Basics)
                                                                                                                                                  • Custom palettes (→Advanced topics)
                                                                                                                                                  • Early music features (→Advanced topics)
                                                                                                                                                  • Figured bass (→Advanced topics)
                                                                                                                                                  • Grid-based movement of symbols and staff text (→Text)
                                                                                                                                                  • Image capture (→Formatting)
                                                                                                                                                  • Inspector and object properties (→Advanced topics)
                                                                                                                                                  • Measure operations: Split and join (→Basics)
                                                                                                                                                  • MIDI import (→Sound and playback)
                                                                                                                                                  • Mid-staff instrument change (→Sound and playback)
                                                                                                                                                  • Part extraction (new options available) (→Advanced Topic)
                                                                                                                                                  • Rehearsal marks: Automatic next rehearsal mark and Search for a rehearsal mark (→Text)
                                                                                                                                                  • Save/Export (→Basics)
                                                                                                                                                  • Staff type properties (→Advanced topics)
                                                                                                                                                  • Swing (→Sound and playback)
                                                                                                                                                  • Tablature (→Advanced topics)
                                                                                                                                                  • Workspace (→Basics)
                                                                                                                                                  • Master palette (→Advanced topics)
                                                                                                                                                  • Layout and formatting (some options have changed, and there is a new "apply to all parts" feature) (→Formatting)
                                                                                                                                                  • Break and spacer: Section break (→Formatting)
                                                                                                                                                  • Selection modes: Select all similar new options (same subtype) (→Basics)
                                                                                                                                                  • Create a new score: start center (→Basics)
                                                                                                                                                  • Languages settings and translation updates (→Basics)
                                                                                                                                                  • Helping and improve translation (→Support)
                                                                                                                                                  • Accidentals: Respell pitches (→Notation)
                                                                                                                                                  • Re-pitch mode (→Advanced topics)
                                                                                                                                                  • Tools (→Advanced topics)
                                                                                                                                                  • Score Information (→Advanced topics)

                                                                                                                                                  Päivitä MuseScoren versioista 1.x

                                                                                                                                                  How to upgrade MuseScore

                                                                                                                                                  Download and install the latest version from the download page as described at Installation. If you want to remove 1.x, check the installation page of the 1.x handbook.

                                                                                                                                                  Installing MuseScore 2 won't uninstall 1.x—both versions can coexist peacefully and can even be used in parallel. So this isn't really an upgrade but an installation of a new and different program.

                                                                                                                                                  Opening 1.x scores in MuseScore 2

                                                                                                                                                  MuseScore 2 significantly improved the typesetting quality to make scores attractive and easier to read. Improvements cover many items such as beam slope, stem height, layout of accidentals in chords and general note spacing. However, this means that sheet music made with MuseScore 1.x looks slightly different from sheet music made with 2.x.

                                                                                                                                                  It also means that scores saved with 2.x won't open with 1.x.

                                                                                                                                                  To prevent you from accidentally overwriting your 1.x scores, 2.x treats them as an import, which means:

                                                                                                                                                  • The score gets marked as being modified, even if you haven't change anything
                                                                                                                                                  • On exiting MuseScore you're asked to save the score (as a result from the above)
                                                                                                                                                  • MuseScore uses the "Save As" dialog to save it, not the "Save" dialog
                                                                                                                                                  • MuseScore uses the score's title to create a default filename rather than taking the old filename

                                                                                                                                                  Relayout

                                                                                                                                                  If you did not manually adjust the layout of a 1.x score, then MuseScore uses the 2.x typesetting engine to layout the score. If you did touch the layout of the 1.x score, the individual adjustments you may have made should remain after opening it in MuseScore 2.x, but due to slight changes in the surrounding layout they may still not appear correct in context. If you wish to reset even manual adjustments to use the 2.x typesetting engine throughout, select the complete score with the shortcut Ctrl+A (Mac: Cmd+A) and reset the layout with Ctrl+R (Mac: Cmd+R).

                                                                                                                                                  Getting the sound from MuseScore 1.x

                                                                                                                                                  While the sound in 2.x has been much improved, you may still prefer the sound from MuseScore 1.x. In that case, you can get the 1.x sound in 2.x by downloading the 1.3 SoundFont and add it in 2.x. You can do this in two steps:

                                                                                                                                                  1. Download the 1.3 SoundFont named TimGM6mb
                                                                                                                                                  2. Install and use the TimGM6mb SoundFont in 2.0

                                                                                                                                                  Lisäys

                                                                                                                                                  Known limitations of MuseScore 2.x

                                                                                                                                                    While all members of the development team did their best to make the software easy to use and bug-free, there are some known issues and limitations in MuseScore 2.x.

                                                                                                                                                    Local time signatures

                                                                                                                                                    The local time signature feature, which allows you to have different time signatures in different staves at the same time, is very limited. You can only add a local time signature to measures that are empty, and only if there are no linked parts. When adding notes to measures with local time signatures, you can enter notes normally via note input mode, but copy and paste does not work correctly and may lead to corruption or even crashes. The join and split commands are disabled for measures with local time signatures.

                                                                                                                                                    Regroup Rhythms

                                                                                                                                                    The Regroup Rhythms command found under the Layout menu may have unintended side effects, including changing the spelling of pitches and deleting some elements like articulations, glissandos, tremolos, grace notes and, esp. on undo, ties. Use this tool with caution on limited selections, so that you can tell if any unwanted changes are made.

                                                                                                                                                    Tablature staff linked with standard staff

                                                                                                                                                    When entering multiple-note chords on a standard staff in a linked staff/tablature system, the notes should be entered in order from the top (first) string to the bottom string to ensure correct fret assignment.

                                                                                                                                                    This limitation does not apply if entering notes directly onto a tablature staff, or when using an unlinked staff/tablature system.

                                                                                                                                                    Mixer

                                                                                                                                                    Changing settings in the mixer other than the sound doesn't mark the score 'dirty'. That means if you close a score you may not get the warning "Save changes to the score before closing?". Changing mixer values are also not undoable.

                                                                                                                                                    Header & footer

                                                                                                                                                    There is no way to edit Header and Footer in a WYSIWYG manner. The fields in Style → General → Header, Footer, Numbers are plain text. They can contain "HTML like" syntax, but the text style, layout, etc. can't be edited with a WYSIWYG editor.

                                                                                                                                                    Pikanäppäimet

                                                                                                                                                      Most keyboard shortcuts can be customized via the menu: select Edit→Preferences...→Shortcuts (Mac: MuseScore→Preferences...→Shortcuts). Below is a list of some of the initial shortcut settings.

                                                                                                                                                      Navigation

                                                                                                                                                      Beginning of score: Home
                                                                                                                                                      Last page of score: End
                                                                                                                                                      Find (measure number, rehearsal mark, or pXX when XX is a page number): Ctrl+F (Mac: Cmd+F)

                                                                                                                                                      Next score: Ctrl+Tab
                                                                                                                                                      Previous score: Shift+Ctrl+Tab

                                                                                                                                                      Zoom in: Ctrl++ (doesn't work on some systems) (Mac: Cmd++) or Ctrl (Mac: Cmd) + scroll up
                                                                                                                                                      Zoom out: Ctrl+- (Mac: Cmd+-) or Ctrl (Mac: Cmd) + scroll down

                                                                                                                                                      Next page: Pg Dn or Shift + scroll down
                                                                                                                                                      Previous page: Pg Up or Shift + scroll up

                                                                                                                                                      Next measure: Ctrl+→ (Mac: Cmd+→)
                                                                                                                                                      Previous measure: Ctrl+← (Mac: Cmd+←)

                                                                                                                                                      Next note: →
                                                                                                                                                      Previous note: ←

                                                                                                                                                      Note below (within a chord or on lower staff): Alt+↓
                                                                                                                                                      Note above (within a chord or on higher staff): Alt+↑

                                                                                                                                                      Top note in chord: Ctrl+Alt+↑ (Ubuntu uses this shortcut for Workspaces instead)
                                                                                                                                                      Bottom note in chord: Ctrl+Alt+↓ (Ubuntu uses this shortcut for Workspaces instead)

                                                                                                                                                      Note input

                                                                                                                                                      Begin note input mode: N
                                                                                                                                                      Leave note input mode: N or Esc

                                                                                                                                                      Duration

                                                                                                                                                      1 ... 9 selects a duration. See also Note input.

                                                                                                                                                      Half duration of previous note: Q
                                                                                                                                                      Double duration of previous note: W
                                                                                                                                                      Decrease duration by a dot (for example, a dotted quarter note/crotchet becomes a quarter note/crotchet and a quarter note/crotchet becomes a dotted eighth note/quaver), available as of version 2.1: Shift+Q
                                                                                                                                                      Increase duration by a dot (for example an eighth note/quaver becomes a dotted eighth note/quaver and a dotted eighth note/quaver becomes a quarter note/crotchet), available as of version 2.1: Shift+W

                                                                                                                                                      Voices

                                                                                                                                                      To select a voice in note input mode.

                                                                                                                                                      Voice 1: Ctrl+Alt+1 (Mac: Cmd+Option+1)
                                                                                                                                                      Voice 2: Ctrl+Alt+2 (Mac: Cmd+Option+2)
                                                                                                                                                      Voice 3: Ctrl+Alt+3 (Mac: Cmd+Option+3)
                                                                                                                                                      Voice 4: Ctrl+Alt+4 (Mac: Cmd+Option+4)

                                                                                                                                                      Pitch

                                                                                                                                                      Pitches can be entered by their letter name (A-G), or via MIDI keyboard. See Note input for full details.

                                                                                                                                                      Repeat previous note or chord: R (the repeat can be of a different note value by selecting duration beforehand)

                                                                                                                                                      Repeat selection: R (The selection will be repeated from the first note position after the end of the selection)

                                                                                                                                                      Raise pitch by octave: Ctrl+↑ (Mac: Cmd+↑)
                                                                                                                                                      Lower pitch by octave: Ctrl+↓ (Mac: Cmd+↓)

                                                                                                                                                      Raise pitch by semi-tone (prefer sharp): ↑
                                                                                                                                                      Lower pitch by semi-tone (prefer flat): ↓
                                                                                                                                                      Raise pitch diatonically: Alt+Shift+↑
                                                                                                                                                      Lower pitch diatonically: Alt+Shift+↓

                                                                                                                                                      Cycle up through enharmonic spellings: J
                                                                                                                                                      Cycle down through enharmonic spellings: Shift+J
                                                                                                                                                      Cycle through spellings in concert pitch only or transposed only: Ctrl+J (Mac: Cmd+J)

                                                                                                                                                      Rest: 0 (zero)

                                                                                                                                                      Interval

                                                                                                                                                      Add interval above current note: Alt+[Number]

                                                                                                                                                      Layout

                                                                                                                                                      Flip direction (stem, slur, tie, tuplet bracket, etc.): X
                                                                                                                                                      Mirror note head: Shift+X
                                                                                                                                                      Increase stretch of measure(s): }
                                                                                                                                                      Decrease stretch of measure(s): {
                                                                                                                                                      Line break on selected barline: Return
                                                                                                                                                      Page break on selected barline: Ctrl+Return (Mac: Cmd+Return)
                                                                                                                                                      Adjust space between staves (within a system), for the entire score: Shift+ drag

                                                                                                                                                      Articulations

                                                                                                                                                      Staccato: Shift+S
                                                                                                                                                      Tenuto: Shift+N
                                                                                                                                                      Sforzato (accent): Shift+V
                                                                                                                                                      Marcato: Shift+O
                                                                                                                                                      Grace note (acciaccatura): /
                                                                                                                                                      Crescendo: <
                                                                                                                                                      Decrescendo: >

                                                                                                                                                      Text entry

                                                                                                                                                      Staff text: Ctrl+T (Mac:Cmd+T)
                                                                                                                                                      System text: Ctrl+Shift+T (Mac: Cmd+Shift+T)
                                                                                                                                                      Tempo text: Alt+T
                                                                                                                                                      Rehearsal Mark: Ctrl+M (Mac: Cmd+M)

                                                                                                                                                      Lyrics entry

                                                                                                                                                      Enter lyrics on a note: Ctrl+L (Mac: Cmd+L)
                                                                                                                                                      Previous lyric syllable: Shift+Space
                                                                                                                                                      Next lyric syllable: if the current and the next syllables are separated by a '-': -, else Space
                                                                                                                                                      Move lyric syllable left by 0.1sp: ←
                                                                                                                                                      Move lyric syllable right by 0.1sp: →
                                                                                                                                                      Move lyric syllable left by 1sp: Ctrl+← (Mac: Cmd+←)
                                                                                                                                                      Move lyric syllable right by 1sp: Ctrl+→ (Mac: Cmd+→)
                                                                                                                                                      Move lyric syllable left by 0.01sp: Alt+←
                                                                                                                                                      Move lyric syllable right by 0.01sp: Alt+→

                                                                                                                                                      Up to previous stanza: Ctrl+↑ (Mac: Cmd+↑)
                                                                                                                                                      Down to next stanza: Ctrl+↓ (Mac: Cmd+↓)

                                                                                                                                                      For more lyric shortcuts, see Lyrics.

                                                                                                                                                      Display

                                                                                                                                                      Navigator: F12 (Mac: fn+F12)
                                                                                                                                                      Play Panel: F11 (Mac: fn+F11)
                                                                                                                                                      Mixer: F10 (Mac: fn+F10)
                                                                                                                                                      Palette: F9 (Mac: fn+F9)
                                                                                                                                                      Inspector: F8 (Mac: fn+F8)
                                                                                                                                                      Piano Keyboard: P
                                                                                                                                                      Selection filter: F6
                                                                                                                                                      Display full screen: Ctrl+U

                                                                                                                                                      Miscellaneous

                                                                                                                                                      Toggle visibility on selected element(s): V
                                                                                                                                                      Show Instruments dialog: I
                                                                                                                                                      Toggle multi-measure rests on or off: M

                                                                                                                                                      See also

                                                                                                                                                      • Preferences: Shortcuts

                                                                                                                                                      Command line options

                                                                                                                                                        You can launch MuseScore from the command line by typing

                                                                                                                                                        • mscore [options] [filename] (Mac and Linux)
                                                                                                                                                        • MuseScore.exe [options] [filename] (Windows)

                                                                                                                                                        [options] and [filename] are optional. For this to work the MuseScore executable must be in %PATH% (Windows) resp. $PATH (Mac and Linux). If it is not, see Revert to factory settings for detailed instructions on how and where to find and execute the MuseScore executable from the command line on the various supported platforms.

                                                                                                                                                        The following options are available

                                                                                                                                                        -?, -h, --help
                                                                                                                                                        Display help (doesn't work on Windows)
                                                                                                                                                        -v, --version
                                                                                                                                                        Displays MuseScore's current version in the command line without starting the graphical interface (doesn't work on Windows)
                                                                                                                                                        --long-version
                                                                                                                                                        Displays MuseScore's current version and revision in the command line without starting the graphical interface (doesn't work on Windows)
                                                                                                                                                        -d, --debug
                                                                                                                                                        Starts MuseScore in debug mode
                                                                                                                                                        -L, --layout-debug
                                                                                                                                                        Starts MuseScore in layout debug mode
                                                                                                                                                        -s, --no-synthesizer
                                                                                                                                                        Disables the integrated software synthesizer
                                                                                                                                                        -m, --no-midi
                                                                                                                                                        Disables MIDI input
                                                                                                                                                        -a, --use-audio <driver>
                                                                                                                                                        Use audio driver: jack, alsa, pulse, portaudio
                                                                                                                                                        -n, --new-score
                                                                                                                                                        Starts with the new score wizard regardless of preference setting for start mode
                                                                                                                                                        -I, --dump-midi-in
                                                                                                                                                        Displays all MIDI input on the console
                                                                                                                                                        -O, --dump-midi-out
                                                                                                                                                        Displays all MIDI output on the console
                                                                                                                                                        -o, --export-to <filename>
                                                                                                                                                        Exports the currently opened file to the specified <filename>. The file type depends on the filename extension. This option switches to the "converter" mode and avoids any graphical interface. You can also add a filename before the -o if you want to import and export files from the command line. For example mscore -o "My Score.pdf" "My Score.mscz"
                                                                                                                                                        -r, --image-resolution <dpi>
                                                                                                                                                        Determines the output resolution for the output to PNG images in the converter mode. The default resolution is taken from Preferences, Export, PNG/SVG.
                                                                                                                                                        -T, --trim-image <margin>
                                                                                                                                                        Trims exported PNG and SVG images to remove surrounding whitespace around the score. The specified number of pixels of whitespace will be added as a margin; use 0 for a tightly cropped image. For SVG, this option works only with single-page scores.
                                                                                                                                                        -x, --gui-scaling <factor>
                                                                                                                                                        Scales the score display and other GUI elements by the specified factor, for use with high resolution displays.
                                                                                                                                                        -D, --monitor-resolution <dpi>
                                                                                                                                                        Specify monitor resolution, for use with high resolution displays (as of version 2.1).
                                                                                                                                                        -S, --style <style>
                                                                                                                                                        Loads a style file; useful when you convert with the -o option
                                                                                                                                                        -p, --plugin <name>
                                                                                                                                                        Execute the named plugin
                                                                                                                                                        --template-mode
                                                                                                                                                        Save template mode, no page size
                                                                                                                                                        -F, --factory-settings
                                                                                                                                                        Use only the standard built-in presets or "factory-settings" and delete preferences. For details, see Palauta tehdasasetuksiin
                                                                                                                                                        -R, --revert-settings
                                                                                                                                                        Use only the standard built-in presets or "factory-settings", but do not delete preferences
                                                                                                                                                        -i, --load-icons
                                                                                                                                                        Load icons from the file system. Useful if you want to edit the MuseScore icons and preview the changes
                                                                                                                                                        -j, --job <filename>
                                                                                                                                                        Process a conversion job (as of version 2.1)
                                                                                                                                                        -e, --experimental
                                                                                                                                                        Enable experimental features. See e.g. Layer (experimental)
                                                                                                                                                        -c, --config-folder <pathname>
                                                                                                                                                        Set config path
                                                                                                                                                        -t, --test-mode
                                                                                                                                                        Enable test mode
                                                                                                                                                        -M, --midi-operations <filename>
                                                                                                                                                        Specify MIDI import operations file; See this example file: midi_import_options.xml
                                                                                                                                                        -w, --no-webview
                                                                                                                                                        No web view in Start Center
                                                                                                                                                        -P, --export-score-parts
                                                                                                                                                        Used with -o <filename>.pdf, export score and parts
                                                                                                                                                        --no-fallback-font
                                                                                                                                                        Don't use Bravura as fallback musical font
                                                                                                                                                        -f, --force
                                                                                                                                                        Used with -o, ignore warnings reg. score being corrupted or from wrong version (as of version 2.1)
                                                                                                                                                        -b, --bitrate <bitrate>
                                                                                                                                                        Used with -o <filename>.mp3, sets bitrate in kbps (as of version 2.1)
                                                                                                                                                        -E, --install-extension <extension file>
                                                                                                                                                        Install an extension, load soundfont as default unless if -e is passed too (as of version 2.3)

                                                                                                                                                        Qt Toolkit Options

                                                                                                                                                        -style= <style>
                                                                                                                                                        -style <style>
                                                                                                                                                        Determines the style of the GUI application. Possible values are "motif", "windows" and "platinum". Depending on the platform other styles may be available
                                                                                                                                                        -stylesheet= <stylesheet>
                                                                                                                                                        -stylesheet <stylesheet>
                                                                                                                                                        Sets the application stylesheet. The value of "stylesheet" is a path to a file that contains the stylesheet
                                                                                                                                                        -platform <platformname[:options]>
                                                                                                                                                        Specifies the Qt Platform Abstraction (QPA) plugin.
                                                                                                                                                        Example: MuseScore.exe -platform windows:fontengine=freetype

                                                                                                                                                        See also

                                                                                                                                                        • Revert to factory settings

                                                                                                                                                        External links

                                                                                                                                                        • How to use the "conversion job" command-line option
                                                                                                                                                        • Layer (experimental)
                                                                                                                                                        • http://doc.qt.io/qt-5/qapplication.html#QApplication
                                                                                                                                                        • http://doc.qt.io/qt-5/qguiapplication.html#QGuiApplication

                                                                                                                                                        Sanasto

                                                                                                                                                        Sanasto on työn alla—auta, jos suinkin voit. Voit keskustella tästä sivusta dokumentaatiofoorumissa.

                                                                                                                                                        Alla oleva lista on sanasto sekä usein esiintyvistä termeistä että niiden merkityksistä MuseScoressa.

                                                                                                                                                        Acciaccatura
                                                                                                                                                        Lyhyt →etuhelenuotti.
                                                                                                                                                        Etumerkki
                                                                                                                                                        sävellajiaan korottavan tai alentavan nuotin edessä oleva merkki. Tavallisimmat etumerkit ovat →korotusmerkit, →flats tai →palautusmerkit, mutta kaksoisylennyksiä ja -alennuksia käytetään myös. Accidentals affect all notes on the same →staff position only for the remainder of the measure in which they occur, but they can be canceled by another accidental. In notes tied across a →barline, the accidental continues across the →barline to the tied note, but not to later untied notes on the same →staff position in that measure.
                                                                                                                                                        Nousutahti
                                                                                                                                                        Katso →Pickup Measure.
                                                                                                                                                        Ankkuri
                                                                                                                                                        The point of attachment to the score of objects such as Text and Lines: When the object is dragged, the anchor appears as small brown circle connected to the object by a dotted line. Depending on the object selected, its anchor may be attached to either (a) a note (e.g. fingering), (b) a staff line (e.g. staff text), or (c) a barline (e.g. repeats).
                                                                                                                                                        Appoggiatura
                                                                                                                                                        Pitkä →etuhelenuotti.
                                                                                                                                                        Nuottiviiva
                                                                                                                                                        Vaakasuora viiva, joka menee läpi →viivaston, viivastojen tai koko →systeemin, joka erottaa →tahdit.
                                                                                                                                                        Palkki
                                                                                                                                                        Nuotit, jotka ovat aika-arvoltaan →kahdeksasosanuotteja tai pienempiä, sisältävät →vään tai palkin. Palkkeja käytetään nuottien ryhmittämiseen.
                                                                                                                                                        BPM
                                                                                                                                                        Iskuja/lyöntejä minuutissa (beats per minute) on tempon yksikkö. katso →Metronome mark
                                                                                                                                                        Breve
                                                                                                                                                        Brevis
                                                                                                                                                        kaksoiskokonuotti tai breve on nuotti, joka on aika-arvoltaan kaksi kokonuottia.
                                                                                                                                                        Sentti
                                                                                                                                                        Mikrointervalli, joka vastaa tasavireisen puoliaskelen sadasosaa.
                                                                                                                                                        Sointu
                                                                                                                                                        Kuten yleisesti ymmärretään, sointu on kahden tai useamman sävelen samanaikaisesti muodostama ääni. Kuitenkin, MuseScoressa sointu on myös tekninen termi, jolla viitataan kaikkiin nuottiin, jotka ovat tietyssä kohtaa viivastolla. Käytännön syistä, soinnun saat painamalla Vaihtonäppäintä ja klikkaamalla nuottia viivastolla (ja sisältää klikkaamasi nuotin aika-arvon). Täten, jopa vain yksi sävel voi olla "sointu."
                                                                                                                                                        Nuottiavain
                                                                                                                                                        Symboli →nuottiviivaston. Sitä käytetään ilmaisemaan, mitkä nuotit ovat nuottiviivojen päällä __ ja __välissä __.
                                                                                                                                                        On olemassa kaksi F-avainta, neljä C-avainta ja kaksi G-avainta: F third, __F
                                                                                                                                                        fourth, C first, C second, C third, C fourth, G first, G second (known as treble clef too).
                                                                                                                                                        G first and F fourth are equivalent.
                                                                                                                                                        Clefs are very useful for →transposition.
                                                                                                                                                        Concert Pitch
                                                                                                                                                        Enables you to switch between concert pitch and transposing pitch (see Concert pitch and Transposition).
                                                                                                                                                        Demisemiquaver (BE)
                                                                                                                                                        1/32-nuotti.
                                                                                                                                                        Duoli
                                                                                                                                                        Katso →Poikkeusjako.
                                                                                                                                                        Muokkaustila
                                                                                                                                                        Tila, josta voit muokata partituurin eri osia eli elementtejä.
                                                                                                                                                        Kahdeksasosanuotti
                                                                                                                                                        Nuotti, jonka aika-arvo on kahdeksasosa kokonuotista (semibreve).
                                                                                                                                                        Endings
                                                                                                                                                        See →Volta.
                                                                                                                                                        Enharmoniset nuotit
                                                                                                                                                        Nuotit, joilla on sama sävelkorkeus, mutta eri kirjoitusasu. Esimerkiksi: G# ja Ab ovat enharmonisia nuotteja.
                                                                                                                                                        Väkä
                                                                                                                                                        Katso →Palkki.
                                                                                                                                                        Alennusmerkki
                                                                                                                                                        Merkki, joka kertoo, että nuotin sävelkorkeutta pitää alentaa puolisävelaskeleen verran.
                                                                                                                                                        Etuhelenuotti
                                                                                                                                                        Pieni sävel tai säveljoukko, joka sijaitsee normaalin kokoisen pääsävelen edessä. Lyhyen etuheleen eli (→acciaccaturan) varrella on poikkiviiva; pitkällä etuheleellä, (→appoggiaturalla) poikkiviivaa ei ole.
                                                                                                                                                        Grand Staff (AE)
                                                                                                                                                        Great Stave (BE)
                                                                                                                                                        A system of two or more staves, featuring treble and bass clefs, used to notate music for keyboard instruments and the harp.
                                                                                                                                                        Puolinuotti
                                                                                                                                                        A note whose duration is half of a whole note (semibreve). Same as British →minim.
                                                                                                                                                        Hemidemisemiquaver (BE)
                                                                                                                                                        A sixty-fourth note.
                                                                                                                                                        Intervalli
                                                                                                                                                        The difference in pitch between two notes, expressed in terms of the scale degree (e.g. major second, minor third, perfect fifth etc.). See Degree (Music) (Wikipedia).
                                                                                                                                                        Hyppy
                                                                                                                                                        In MuseScore, "jumps" are notations such as D.S. al Coda, found in the Repeats and Jumps palette.
                                                                                                                                                        Sävellaji
                                                                                                                                                        Set of →sharps or →flats at the beginning of the →staves. It gives an idea about the tonality and avoids repeating those signs all along the →staff.
                                                                                                                                                        A key signature with B flat means F major or D minor tonality.
                                                                                                                                                        Koron
                                                                                                                                                        An Iranian →accidental which lowers the pitch of a note by a quarter tone (in comparison to the →flat which lowers a note by a semitone). It is possible to use this accidental in a →key signature.
                                                                                                                                                        See also →Sori.
                                                                                                                                                        Longa
                                                                                                                                                        Longa (lat. 'pitkä') on nelinkertainen kokonuotti.
                                                                                                                                                        Apuviiva
                                                                                                                                                        Viiva tai viivat, jotka lisätään viivaston ylä- tai alapuolelle.
                                                                                                                                                        Tahti (AE)
                                                                                                                                                        A segment of time defined by a given number of beats. Dividing music into bars provides regular reference points to pinpoint locations within a piece of music.
                                                                                                                                                        Metronome mark
                                                                                                                                                        Metronome marks are usually given by a note length equaling a certain playback speed in →BPM. In MuseScore, metronome marks are used in tempo texts.
                                                                                                                                                        Minim (BE)
                                                                                                                                                        A minim is the British term for a half note. It has half the duration of a whole note (→semibreve).
                                                                                                                                                        Palautusmerkki
                                                                                                                                                        Palautusmerkki kumoaa voimassa olevan ylennyksen tai alennuksen tahdin loppuun asti.
                                                                                                                                                        Normaalitila
                                                                                                                                                        The operating mode of MuseScore outside note input mode or edit mode: press Esc to enter it. In Normal mode you can navigate through the score, select and move elements, adjust Inspector properties, and alter the pitches of existing notes.
                                                                                                                                                        Nuotinsyöttötila
                                                                                                                                                        Tila, jota käytetään nuottikirjoitukseen.
                                                                                                                                                        Käyttöjärjestelmä
                                                                                                                                                        OS
                                                                                                                                                        Underlying set of programs which set up a computer, enabling additional programs (such as MuseScore). Popular OSes are Microsoft Windows, macOS, and GNU/Linux.
                                                                                                                                                        Not to be confused with a sheet music →System.
                                                                                                                                                        Stemma
                                                                                                                                                        Music to be played or sung by one or a group of musicians using the same instrument. In a string quartet, 1st part = Violin 1, 2nd part = Violin 2, 3rd part = Viola, 4th part = Cello, in a choir there might be parts for soprano, alto, tenor and bass. A part has one or more →staves (e.g. Piano has 2 staves, Organ can have 2 or 3 staves).
                                                                                                                                                        Kohotahti (→Anacrusis, →Upbeat)
                                                                                                                                                        Sävellyksen tai musiikkikappaleen osan ensimmäinen vajaa tahti.
                                                                                                                                                        Katso myös Luo uusi partituuri: Tahtiosoitus... and Measure operations: Exclude from measure count.
                                                                                                                                                        Quaver (BE)
                                                                                                                                                        The British quaver is what is called an →eighth note in American English. It has an eighth the duration of a whole note.
                                                                                                                                                        Quadruplet
                                                                                                                                                        See →Tuplet.
                                                                                                                                                        Neljäsosanuotti
                                                                                                                                                        Sävel, jonka aika-arvo on neljäsosa kokonuotista (semibreve).
                                                                                                                                                        Quintuplet
                                                                                                                                                        See →Tuplet.
                                                                                                                                                        Respell Pitches
                                                                                                                                                        Tries to guess the right accidentals for the whole score (see Accidentals).
                                                                                                                                                        Tauko
                                                                                                                                                        Tiettyyn aika-arvoon määritetty äänetön hetki.
                                                                                                                                                        Re-pitch mode
                                                                                                                                                        Allows you to rewrite an existing passage of music by changing the note pitches without altering the rhythm.
                                                                                                                                                        Semibreve (BE)
                                                                                                                                                        A semibreve is the British term for a whole note. It lasts a whole measure in 4/4 time.
                                                                                                                                                        Semiquaver (BE)
                                                                                                                                                        A sixteenth note.
                                                                                                                                                        Semihemidemisemiquaver (Quasihemidemisemiquaver) (BE)
                                                                                                                                                        Sadaskahdeskymmeneskahdeksasosanuotti (tai vain 1/128-nuotti).
                                                                                                                                                        Sekstoli
                                                                                                                                                        Katso →Poikkeusjako.
                                                                                                                                                        Korotusmerkki
                                                                                                                                                        Sign that indicates that the pitch of a note has to be raised one semitone.
                                                                                                                                                        Slur
                                                                                                                                                        A curved line over or under two or more notes, meaning that the notes will be played smooth and connected (legato).
                                                                                                                                                        See also →Tie.
                                                                                                                                                        Sori
                                                                                                                                                        An Iranian →accidental which raises the pitch of a note by a quarter tone (in comparison to the sharp which raises it by a semitone). It is possible to use this accidental in a →key signature.
                                                                                                                                                        See also →Koron.
                                                                                                                                                        Spatium (plural: Spatia)
                                                                                                                                                        Space
                                                                                                                                                        Staff Space
                                                                                                                                                        sp (abbr./unit)
                                                                                                                                                        The distance between two lines of a normal 5-line staff. In MuseScore this unit influences most size settings. See also Page settings.
                                                                                                                                                        Staff (AE)
                                                                                                                                                        Stave (BE)
                                                                                                                                                        Group of one to five horizontal lines used to lay on musical signs. In ancient music notation (before 11th century) the staff/stave may have any number of lines (the plural of 'staff' is 'staves', in BE and AE).
                                                                                                                                                        Step-time input
                                                                                                                                                        MuseScore's default note input mode, allowing you to enter music notation one note (or rest) at a time.
                                                                                                                                                        Systeemi
                                                                                                                                                        Sarja samanaikaisesti luettavia viivastoja partituurissa.
                                                                                                                                                        Katso myös →Käyttöjärjestelmä (OS).
                                                                                                                                                        Tie

                                                                                                                                                        A curved line between two or more notes on the same pitch to indicate a single note of combined duration:

                                                                                                                                                        • Quarter note + Tie + Quarter note = Half note
                                                                                                                                                        • Quarter note + Tie + Eighth note = Dotted Quarter note
                                                                                                                                                        • Quarter note + Tie + Eighth note + Tie + 16th note = Double Dotted Quarter note

                                                                                                                                                        See also →Slur.

                                                                                                                                                        Transposition

                                                                                                                                                        The act of moving the pitches of one or more notes up or down by a constant interval. There may be several reasons for transposing a piece, for example:

                                                                                                                                                        1. The tune is too low or too high for a singer. In this case the whole orchestra will have to be transposed as well—easily done using MuseScore.
                                                                                                                                                        2. The part is written for a particular instrument but needs to be played by a different one.
                                                                                                                                                        3. The score is written for an orchestra and you want to hear what the individual instruments sound like. This requires changing the transposing instrument parts to concert pitch.
                                                                                                                                                        4. A darker or a more brilliant sound is desired.
                                                                                                                                                        Trioli
                                                                                                                                                        Katso →Poikkeusjako.
                                                                                                                                                        Poikkeusjako
                                                                                                                                                        A tuplet divides its next higher note value by a number of notes other than given by the time signature. For example a →triplet divides the next higher note value into three parts, rather than two. Tuplets may be: →triplets, →duplets, →quintuplets, and other.
                                                                                                                                                        Nousutahti
                                                                                                                                                        Katso →Kohotahti.
                                                                                                                                                        Velocity
                                                                                                                                                        The velocity property of a note controls how loudly the note is played. This usage of the term comes from MIDI synthesizers. On a keyboard instrument, it is the speed with which a key is pressed that controls its volume. The usual scale for velocity is 0 (silent) to 127 (maximum).
                                                                                                                                                        Ääni
                                                                                                                                                        Polyphonic instruments like Keyboards, Violins, or Drums need to write notes or chords of different duration at the same time on the same →staff. To write such things each horizontal succession of notes or chords has to be written on the staff independently. In MuseScore you can have up to 4 voices per staff. Not to be confused with vocalists, singing voices like soprano, alto, tenor and bass, which are better viewed as instruments.
                                                                                                                                                        Volta
                                                                                                                                                        In a repeated section of music, it is common for the last few measures of the section to differ. Markings called voltas are used to indicate how the section is to be ended each time. These markings are often referred to simply as →endings.

                                                                                                                                                        External links

                                                                                                                                                        • http://www.robertcarney.net/musical-terms-definitions.htm

                                                                                                                                                        Table of Contents

                                                                                                                                                        Getting started

                                                                                                                                                        • Installation
                                                                                                                                                        • Create new score
                                                                                                                                                        • Language settings and translation updates
                                                                                                                                                        • Checking for updates

                                                                                                                                                        Perusteet

                                                                                                                                                        • Create new score (→Getting started)
                                                                                                                                                        • Note input
                                                                                                                                                        • Concert pitch
                                                                                                                                                        • Copy and paste
                                                                                                                                                        • Edit mode
                                                                                                                                                        • Measure operations
                                                                                                                                                        • Palette
                                                                                                                                                        • Preferences
                                                                                                                                                        • Save/Export/Print
                                                                                                                                                        • Selection modes
                                                                                                                                                        • Undo and redo
                                                                                                                                                        • View modes
                                                                                                                                                        • File format
                                                                                                                                                        • Share scores online

                                                                                                                                                        Notation

                                                                                                                                                        • Note input (→Basics)
                                                                                                                                                        • Palette (→Basics)
                                                                                                                                                        • Accidental
                                                                                                                                                        • Arpeggio and glissando
                                                                                                                                                        • Bar line
                                                                                                                                                        • Beam
                                                                                                                                                        • Bracket
                                                                                                                                                        • Breath and pause
                                                                                                                                                        • Clef
                                                                                                                                                        • Drum notation
                                                                                                                                                        • Grace note
                                                                                                                                                        • Hairpin
                                                                                                                                                        • Key signature
                                                                                                                                                        • Lines
                                                                                                                                                        • Measure rest
                                                                                                                                                        • Repeat
                                                                                                                                                        • Slur
                                                                                                                                                        • Tie
                                                                                                                                                        • Time signature
                                                                                                                                                        • Transposition
                                                                                                                                                        • Tremolo
                                                                                                                                                        • Tuplet
                                                                                                                                                        • Voices
                                                                                                                                                        • Volta (1st and 2nd time endings)

                                                                                                                                                        Sound and playback

                                                                                                                                                        • MIDI import
                                                                                                                                                        • Mid-staff instrument change
                                                                                                                                                        • Play mode
                                                                                                                                                        • Soundfont
                                                                                                                                                        • Swing
                                                                                                                                                        • Tempo
                                                                                                                                                        • Dynamics
                                                                                                                                                        • Change and adjust sound

                                                                                                                                                        Text

                                                                                                                                                        • Grid-based movement of symbols and staff text
                                                                                                                                                        • Rehearsal marks
                                                                                                                                                        • Text editing
                                                                                                                                                        • Text style
                                                                                                                                                        • Chord symbols
                                                                                                                                                        • Fingering
                                                                                                                                                        • Lyrics
                                                                                                                                                        • Tempo (→Sound and playback)

                                                                                                                                                        Formatting

                                                                                                                                                        • Layout and formatting (overview)
                                                                                                                                                        • Breaks and spacers
                                                                                                                                                        • Frame
                                                                                                                                                        • Image
                                                                                                                                                        • Image capture

                                                                                                                                                        Advanced topics

                                                                                                                                                        • Accessibility
                                                                                                                                                        • Album
                                                                                                                                                        • Cross staff beaming
                                                                                                                                                        • Custom palette
                                                                                                                                                        • Early music features
                                                                                                                                                        • Figured bass
                                                                                                                                                        • Fretboard diagram
                                                                                                                                                        • Inspector and object properties
                                                                                                                                                        • Master palette
                                                                                                                                                        • Part extraction
                                                                                                                                                        • Plugins
                                                                                                                                                        • Replace pitches without changing rhythms
                                                                                                                                                        • Score information
                                                                                                                                                        • Staff type properties
                                                                                                                                                        • Tablature
                                                                                                                                                        • Tools
                                                                                                                                                        • Nonexistant node nid: 39841

                                                                                                                                                        New features in MuseScore 2.0

                                                                                                                                                        • What's New in MuseScore 2
                                                                                                                                                        • MuseScore 2.0 Release Notes
                                                                                                                                                        • Changes for MuseScore 2.0.

                                                                                                                                                          • Album (→Advanced topics)
                                                                                                                                                          • View modes: Continuous view and Navigator (→Basics)
                                                                                                                                                          • Copy and paste: Selection filter (→Basics)
                                                                                                                                                          • Custom palette (→Advanced topics)
                                                                                                                                                          • Early music features (→Advanced topics)
                                                                                                                                                          • Figured bass (→Advanced topics)
                                                                                                                                                          • Grid-based movement of symbols and staff text (→Text)
                                                                                                                                                          • Image capture (→Formatting)
                                                                                                                                                          • Inspector and object properties (→Advanced topics)
                                                                                                                                                          • Measure operations: Split and join (→Basics)
                                                                                                                                                          • MIDI import (→Sound and playback)
                                                                                                                                                          • Mid-staff instrument change (→Sound and playback)
                                                                                                                                                          • Part extraction (new options available) (→Advanced Topic)
                                                                                                                                                        • Rehearsal marks: Automatic next rehearsal mark and Search for a rehearsal mark (→Text)
                                                                                                                                                          • Save/Export (→Basics) - Staff type properties (→Advanced topics)
                                                                                                                                                          • Swing (→Sound and playback)
                                                                                                                                                          • Tablature (→Advanced topics)
                                                                                                                                                          • Nonexistant node nid: 39841 (→Advanced topics)
                                                                                                                                                          • Master palette (→Advanced topics)
                                                                                                                                                          • Layout and formatting (some options have changed, and there is a new "apply to all parts" feature) (→Formatting)
                                                                                                                                                          • Breaks and spacers, section break (→Formatting)
                                                                                                                                                          • Selection modes, select all similar new options (same subtype) (→Basics)
                                                                                                                                                          • Create a new score, start center (→Basics)
                                                                                                                                                          • Languages settings and translation Updates (→Basics)
                                                                                                                                                          • Helping and improve translation (→Support)
                                                                                                                                                          • Accidentals, respell pitches (→Notation)
                                                                                                                                                          • Replace pitches without changing rhythms (→Advanced topics)
                                                                                                                                                          • Tools (→Advanced topics)
                                                                                                                                                          • Meta tags (→Advanced topics)
                                                                                                                                                          • Upgrading from MuseScore 1.x

                                                                                                                                                        Support

                                                                                                                                                        • Helping and improve translation
                                                                                                                                                        • How to ask for support or file reports
                                                                                                                                                        • Revert to factory settings
                                                                                                                                                        • Known incompatibilities

                                                                                                                                                        Appendix

                                                                                                                                                        • Keyboard shortcuts
                                                                                                                                                        • Known limitations of MuseScore 2.x
                                                                                                                                                        • Command line options
                                                                                                                                                        • Glossary
                                                                                                                                                        • Handbook for MuseScore 1.x