Basics
This page is an administration page intended for the editing community only. Click this link to go to the handbook front page intended for public viewing.
Ввод нот
MuseScore позволяет вам вводить ноты с помощью любого из четырех устройств ввода: клавиатуры компьютера, мыши, MIDI-клавиатуры или клавиатуры виртуального пианино. Режим ввода по умолчанию это Пошаговый ввод, в котором ноты или паузы вводятся по одной в каждый момент времени. Однако, также доступны другие режимы ввода .
После выхода из Мастера новой партитуры, ваша новая партитура будет состоять из последовательности тактов, заполненных целыми паузами:

По мере ввода нот в такт, целые паузы заменяются соответствующими по длительности для того, чтобы заполнить остаток такта:

Ноты разной длительности, начинающиеся в одной доле, вводятся с помощью голосов:

Основные способы ввода нот
Эта секция знакомит вас с основами ввода нот и пауз в режиме Пошаговый ввод с помощью клавиатуры компьютера. Рекомендуется, чтобы вы проработали урок "Getting Started: An introduction to note entry in MuseScore". Он доступен из Быстрого старта.
Шаг 1. Выбор начальной позиции
Выберите начальную позицию для ноты, щелкнув по ноте или выбрав такт с помощью мыши. Если вы не выберете начальную точку, то курсор автоматически установится на начало партитуры, когда вы войдете в режим Ввод нот ("Шаг 2" ниже).
Шаг 2. Вход в режим ввода нот
Чтобы войти в режим Ввод нот , воспользуйтесь одним из следующих способов:
- Щелкните по иконке "N" (первая кнопка панели инструментов Ввод нот ).
- Нажмите N на клавиатуре компьютера.
Из режима Ввод нот можно выйти одним из следующих способов:
- Нажмите N.
- Нажмите Esc.
- Щелкните по кнопке "N" панели инструментов.
Шаг 3. Выбор длительности
Когда вы находитесь в режиме Ввод нот , выберите длительность ноты одним из способов:
- Щелкните по соответствующей иконке ноты на Панели инструментов ввода нот (находится прямо над окном документа):

- Нажмите соответствующее нужной длительности сочетание клавиш на клавиатуре (см. ниже).
Шаг 4. Ввод нот или пауз
- Чтобы ввести ноту высотой от Ля до Соль (A–G), просто нажмите соответствующую букву на клавиатуре компьютера (используется английская система обозначения, без H).
- Чтобы ввести паузу, нажмите 0 (ноль).
Этот способ ввода также работает, если вы даже не входили в режим ввода нот, но у вас выбрана нота или пауза, или же это только что созданная партитура (в этом случае режим ввода нот установлен по умолчанию).
Выбор длительность ноты или паузы
Следующие сочетания клавиш используются чтобы выбрать длительность ноты или паузы в режиме Ввод нот:
- 1/64-я (шестьдесят четвертая): 1
- 1/32-я (тридцать вторая): 2
- 1/16-я (шестнадцатая): 3
- 1/8-я (восьмая): 4
- 1/4-я (четвертная): 5
- 1/2 (половинная): 6
- 1/1 (целая): 7
- 2/1 (бревис): 8
- 4/1 (лонга): 9
- точка: . (превращает выбранную ноту (паузу) в ноту с точкой)
См. также: мультиоли.
Дополнительные длительности
- Двойные, тройные и четверные точки: устанавливаются с панели инструментов ввода нот в расширенной рабочей среде или через настраиваемое сочетание клавиш.
- 128-я нота (сто двадцать восьмая): то же самое.
- 256-я, 512-я или 1024-я длительности: сперва введите 128-ю ноту (или большей длительности), затем поделите ее пополам столько раз, сколько нужно, с помощью сочетания клавиш Q.
Устройства ввода
Партитура может вводиться с помощью:
- Кавиатуры компьютера.
- Мыши.
- MIDI-клавиатуры.
- Клавиатуры виртуального пианино.
- Любой комбинацией вышеперечисленного.
Клавиатура компьютера
Этот раздел дополняет раздел "Основные способы ввода нот" (см. выше) и знакомит вас с полным спектром команд, доступных для ввода нот и пауз с клавиатуры компьютера.
Ввод нот и пауз
Вы можете вводить ноту набором соответствующей буквы на клавиатуре. Так, после входа в режим Ввод нот, введите: 5 C D E F G A B C.

Примечание: Когда вы вводите ноту с помощью клавиатуры, MuseScore помещает ее непосредственно сразу за предыдущей введенной нотой.
Чтобы ввести паузу, нажмите "0" (ноль). Например, после входа в режим Ввод нот, наберите: 5 C D 0 E.

Примечание: Длительность, выбранная на панели инструментов, применяется и к нотам, и к паузам.
Если вы хотите ввести ноту с точкой, нажмите . (точка) после выбора длительности.
Например, после входа в режим Ввод нот, наберите: 5 . C 4 D E F G A.

Если вы хотите ввести особый вид ритмического деления (например, триоль): см. Мультиоли.
Если вы хотите писать музыку с двумя и более одновременными мелодическими линиями на одном нотном стане, см. Голоса.
Перемещение нот вверх/вниз
Чтобы поднять или опустить ноту на один полутон:
- Нажмите стрелку ↑ или ↓.
Чтобы поднять или опустить ноту диатонически:
- Нажмите Alt+Shift+↑ или Alt+Shift+↓.
Чтобы поднять или опустить ноту на октаву:
- Нажмите Ctrl+↑ (Mac: Cmd+↑) или Ctrl+↓ (Mac: Cmd+↓).
Добавление знаков альтерации
Когда нота поднимается или опускается с помощью стрелки (см. выше), любые требуемые знаки альтерации устанавливаются программой автоматически. Знаки альтерации также могут быть добавлены вручную — см. Знаки альтерации.
Аккорды
Если вы хотите добавить ноту аккорда выше ранее введенной:
- Нажмите и удерживайте Shift, затем введите любую ноту от A до G.
Так, набрав C, D, Shift+F, Shift+A, E, F в результате вы получите:

Чтобы добавить ноту с определенным интервалом выше или ниже одной или более нот:
- Убедитесь, что одна или более нот аккорда выбраны;
- Воспользуйтесь одним из способов:
- В пункте меню Добавить→Интервалы выберите нужный интервал из списка;
- Нажмите Alt+1-9 для интервалов выше (интервалы ниже также могут быть доступны, если вы установите соответствующие горячие клавиши в Настройках).
Примечание: Чтобы создать аккорды с различной длительностью составляющих их нот, вам надо использовать более одного голоса.
Вставка нот
Обычно, когда вы вводите музыку в MuseScore, любые существующие ноты или паузы замещаются. Но есть несколько способов вставки нот:
- Вставка дополнительных тактов в партитуру.
- Вырезать и вставить секцию партитуры на нужное количество тактов позади исходного расположения этой секции, а затем ввести ноты в образовавшееся пространство.
- Чтобы вставить ноту, нажмите Ctrl + Shift (Mac: Cmd + Shift) + буква ноты (A - G). Это вставит ноту выбранной длительности и сдвинет вслед идущие ноты правее в том же такте. Если длительность такта превысит установленный тактовый размер, над тактом отобразится синий плюс, как это показано в Режим вставки.
Удаление нот
Чтобы удалить одну ноту:
- Выберите ноту и нажмите Delete.
Чтобы удалить аккорд:
- Нажмите Esc чтобы убедиться, что вы в обычном режиме.
- Нажмите Shift и щелкните по ноте, чтобы выбрать весь аккорд.
- Нажмите Delete.
Команда удаления также может быть применена к выбранному диапазону нот/аккордов.
Сочетания клавиш
Список сочетаний клавиш, доступных в режиме ввода нот:
- ↑ (Вверх): Увеличить высоту ноты на полутон (используется ♯).
- ↓ (Вниз): Уменьшить высоту ноты на полутон (используется ♭).
- Alt+1-9: Добавить интервал (от примы до ноны) выше текущей ноты.
- J: Изменить ноту вверх или вниз на ее энгармонический эквивалент (например, D♯ to E♭). Это действие также изменит обозначение как в концертном строе, так и в режиме транспонирования. См. Знаки альтерации.
- Ctrl+J (Mac Cmd+J): Изменить ноту вверх или вниз на ее энгармонический эквивалент. Это действие изменяет обозначение только в текущем режиме. См. Знаки альтерации
- Alt+Shift+↑: Увеличить высоту ноты, используя ключевые знаки альтерации
- Alt+Shift+↓: Уменьшить высоту ноты, используя ключевые знаки альтерации
- R: Повторить последнюю введенную ноту
- Q: Наполовину уменьшить длительность последней введенной ноты
- W: Удвоить длительность последней введенной ноты
- Shift+Q: Уменьшить длительность на точку (например, четвертная с точкой станет четвертной, а четвертная станет восьмой с точкой).
- Shift+W: Увеличить длительность на точку (например, восьмая нота станет восьмой нотой с точкой, а вот восьмая нота с точкой станет четвертной нотой, а не восьмой с двумя точками).
- Backspace: Отменить последний ввод ноты
- Shift+←: Поменять местами последнюю введенную ноту с нотой перед ней (повторить, чтобы продолжить передвигать ноту на более ранние доли такта)
- Shift+→: Поменять местами ноту, сдвинутую с помощью Shift+←, со следующей за ней нотой
- X: Поменять направление штиля ноты (может быть сброшено в Авто в Инспекторе, в свойстве "Направление штиля")
- Shift+X: Сдвинуть головку ноты на противоположный конец штиля (может быть сброшено в Авто в Инспекторе, в свойстве "Направление штиля")
- Ctrl+Alt+1-4: Переключиться на соответствующий голос)
Мышь
Вводить ноты мышью легко, но это не самый быстрый способ для ввода множества нот.
- Щелкните по кнопке с символом желаемой длительности ноты на Панели инструментов ввода нот.
- Щелкните по нотоносцу, чтобы добавить ноту выбранной длительности.
- Чтобы добавить дополнительные ноты в существующий аккорд, просто повторите шаг 2.
- Чтобы заменить существующий аккорд (вместо добавления ноты к нему), нажмите Shift перед щелчком.
- Чтобы добавить паузу, щелкните правой кнопкой мыши.
Примечание: Если, находясь в режиме ввода нот, вы наведете курсор на нотоносец, то будет показан предпросмотр ноты или паузы, которая будет добавлена.
MIDI-клавиатура
Вы также можете добавлять ноты с помощью MIDI-клавиатуры.
- Подключите MIDI-клавиатуру к компьютеру и включите ее
- Запустите MuseScore (это нужно делать после включения клавиатуры)
- Создание новой партитуры
- Щелкните по паузе в первом такте, чтобы указать точку, с которой начнется ввод нот
- Нажмите N для входа в
режим ввода нот - Выберите длительность нот, например, 5 для четвертных, как описано выше
- Нажмите нужную клавишу на MIDI-клавиатуре.
Нота будет добавлена в партитуру.
Примечание: Способ ввода по умолчанию, Пошаговый ввод, дает вводить вам по одной ноте за раз. Но доступны и другие режимы ввода нот: см. Режимы ввода нот.
Если к вашему компьютеру подключено несколько MIDI-устройств, вы можете указать MuseScore, какое из них является MIDI-клавиатурой:
- В меню выберите Правка→Настройки (Mac: MuseScore→Preferences...).
- Перейдите на вкладку Ввод/Вывод и выберите ваше устройство в секции "MIDI input".
- Нажмите OK чтобы закрыть окно. Для принятия изменений вам надо будет перезапустить MuseScore.
Клавиатура виртуального пианино
Вы также можете вводить ноты, используя виртуальную экранную клавиатуру пианино.
- Чтобы включить или выключить виртуальную клавиатуру: Нажмите P (или выберите select Вид→Фортепианная клавиатура).
- Чтобы изменить размер клавиатуры: Поместите курсор над клавишами клавиатуры, нажмите Ctrl (Mac: Cmd) и покрутите колесико мыши вверх (увеличить) или вниз (уменьшить).
Метод ввода нот такой же, как и для MIDI-клавиатуры:
- Убедитесь, что вы в режиме ввода нот.
- Чтобы ввести:
- Одну ноту: Щелкните по соответствующей клавише виртуального пианино.
- Аккорд: Выберите ноту, к которой вы хотите добавить другие, нажмите и придержите Shift, затем щелкните по клавише клавиатуры (до версии 2.1, используйте Ctrl (Mac: Cmd)). Повторите столько раз, сколько нужно.
Режимы ввода нот
MuseScore предлагает несколько режимов ввода нот в дополнение к пошаговому вводу. Все они доступны по нажатию на кнопку с маленькой стрелкой рядом с кнопкой "N" на панели инструментов ввода нот:
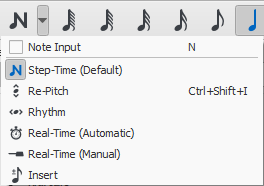
- Пошаговый ввод (по умолчанию): Способ ввода нот по умолчанию. См. Основные способы ввода нот (выше).
- Пересчёт высоты: Изменяет высоту нот без изменения ритма.
- Ритм: Ввод длительностей простым щелчком мыши или нажатием клавиш клавиатуры.
- В реальном времени (автоматически): исполняйте пьесу в фиксированном темпе, обозначенном ударами метронома.
- В реальном времени (вручную): исполняйте пьесу, устанавливая темп нажатием клавиши или педали.
- Вставить: (называлось "Timewise" до версии 3.0.2) вставка и удаление нот и пауз в тактах, с автоматическим сдвигом последующей музыки вперед или назад.
Окраска нот вне диапазона инструмента
В зависимости от мастерства исполнителя, некоторые ноты считаются выходящими за пределы диапазона конкретного инструмента. В целях информирования, MuseScore может окрашивать ноты в красный цвет, если они лежат вне диапазона "профессионального" музыканта, и в оливково-зеленый/темно-желтый вне диапазона "начинающего любителя." Цвета отображаются на экране компьютера, но не при распечатке.

Чтобы включить или выключить окрашивание нот и установить диапазоны "профессионала" и "любителя", см. Usable pitch range (Staff properties: all staves).
Маленькие ноты/маленькие головки нот
- Выберите ноту, которую вы хотите видеть в уменьшенном размере.
- Установите флажок "Уменьшенный размер" в Инспекторе. Он находится в секции
Нотаи используется только для уменьшения размера головки конкретной ноты; Такой же флажок в секцииАккордизменяет размер всего сразу - головки, штиля, вязки и флажка.
По умолчанию, уменьшенный размер составляет 70% от нормального. Вы можете изменить эту установку в Формат → Стиль…→Размеры.
Изменение уже введенных нот и пауз
Изменение длительности
Версия 3.3.3 и выше
1. Убедитесь, что вы в обычном режиме.
2. Выберите одну или несколько нот/пауз, or note-stems/hooks. Примените сочетание клавиш для нужной длительности (перечислены выше), или щелкните соответствующую кнопку длительности на панели инструментов.
До версии 3.3.3
1. Убедитесь, что вы в обычном режиме.
2. Щелкните по ноте или паузе. Примените сочетание клавиш для нужной длительности (перечислены выше), или щелкните соответствующую кнопку длительности на панели инструментов.
Примечание: Увеличение длительности заменит (удалит) ноты и паузы, которые следуют за изменяемой нотой; уменьшение длительности добавит паузы между изменяемой нотой и последующими.
Например, чтобы заменить три шестнадцатых паузы на одну восьмую с точкой:
- Щелкните по первой шестнадцатой паузе.
- Нажмите 4 чтобы превратить ее в восьмую.
- Нажмите . чтобы превратить ее в восьмую с точкой.
По мере увеличения длительности, это действие будет убирать заменяемые шестнадцатые .
Изменение высоты ноты
Чтобы изменить высоту ноты:
1.Убедитесь, что вы не находитесь в режиме ввода нот и у вас не выделено никакой ноты.
2. Выберите желаемую ноту и воспользуйтесь одним из способов::
* Мышью перетащите головку ноты вверх или вниз;
* Нажмите стрелки на клавиатуре: ↑ (вверх) or ↓ (вниз);
* Напечатайте новую букву ноты (A…G). Если нужно, то используйте Ctrl+↓ or Ctrl+↑ чтобы изменить октаву (Mac: Cmd+↓ or Cmd+↑). Это действие автоматически включит режим ввода нот.
Чтобы изменить энгармоничное написание ноты, выберите ее и используйте команду J. Более детальную информацию см. в Знаки альтерации.
Чтобы изменить высоту нот в пассаже на постоянный интервал, вы можете использовать
Транспонирование.
To change the pitches of a passage of music to a different melody, while keeping the rhythm unchanged, use Re-pitch mode.
Если ваша нотная запись содержит множество неверных знаков альтерации, вы можете попробовать использовать команду Respell Pitches (см. Accidentals: Respell pitches).
Изменение голоса
Чтобы перенести одну или несколько нот в другой голос, см. Голоса.
Изменение паузы в ноту и наоборот
Чтобы заменить ноту на паузу той же длительности:
- Убедитесь, что вы не находитесь в режиме ввода нот (нажмите Esc для выхода из него).
- Выберите паузу.
- Замените ее на желаемую ноту вводом буквенного обозначения этой ноты , A–G.
Чтобы заменить ноту на паузу той же длительности:
- Убедитесь, что вы не находитесь в режиме ввода нот (нажмите Esc для выхода из него).
- Выберите ноту.
- Нажмите 0 (ноль).
Свойства ноты
- Чтобы отрегулировать горизонтальное положение ноты или аккорда см. Смещение нот.
- Чтобы изменить свойства ноты в общем (расстояние между ними, смещение, размер, цвет, направление головки ноты, воспроизведение ее и т.д.): см. Инспектор и свойства объектов.
- Чтобы отрегулировать расположение всех нот на нотоносце: см. Layout and formatting, особенно секцию о ноты, знаки альтерации and мультиоли.
См. также
Внешние ссылки
- Как ввести аккорд
- Как ввести паузу
- How to span a stem over two staves
- How to add cue notes
- Video tutorial: MuseScore in Minutes: Lesson 3 - Note input
- Video tutorial: MuseScore in Minutes: Lesson 4 - MIDI Keyboard Input
- Video tutorial: MuseScore in Minutes: Lesson 5 - More Input Ideas
- Video: Semi-Realtime MIDI Demo Part 1: New note entry modes
Create a new score
To create a new score, open the New Score Wizard (see Create new score below): this can also be accessed via the Start Center.
Start Center
This is the window that is displayed when you open MuseScore for the very first time:
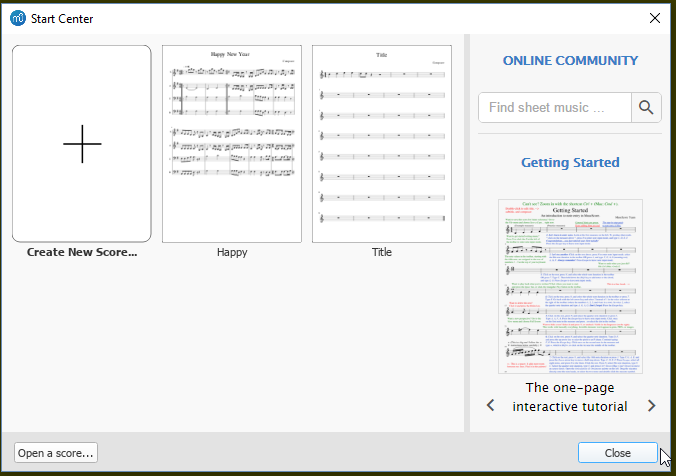
To open the Start Center (if not already visible), use any of the following options:
- Press F4.
- From the menu bar, select File→Start Center...
To stop the Start Center from showing up when you open MuseScore:
- From the menu bar, select Edit→Preferences... (Mac: MuseScore→Preferences...) and uncheck "Show start center" in the Program Start section of the General tab.
From the Start Center you can:
- Create a new score (by clicking on the icon with the plus sign).
- View thumbnails of previously-opened scores: click on a thumbnail to open it.
- Open a score from your computer's file system: click on Open a score ...
- Open the "Getting Started" tutorial score. Use the arrow buttons in the right-hand pane to access the link.
- Search sheet music on musecore.com.
- Access various other facilities (see right-hand pane).
Create new score
To open the New Score Wizard when the Start Center is not open, use one of the following options:
- Click on the New Score icon in the toolbar on the top left of the window;
- Use keyboard shortcut Ctrl+N (Mac: Cmd+N);
- From the menu, select File→New....
This opens a step-by-step wizard:
- Enter score information
- Choose template file
- Choose instruments (or voice parts)
- Choose key signature (and tempo)
- Choose time signature, tempo, pickup measure, and number of measures
Enter score information
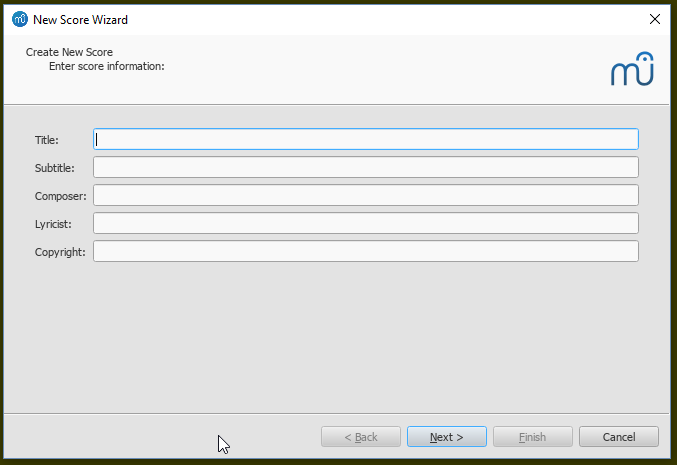
Step 1: Enter score information.
Enter the title, composer or any other information as shown above, then click on Next >. This step is optional: you can also add this information after the score has been created (see Vertical frame).
Choose template file
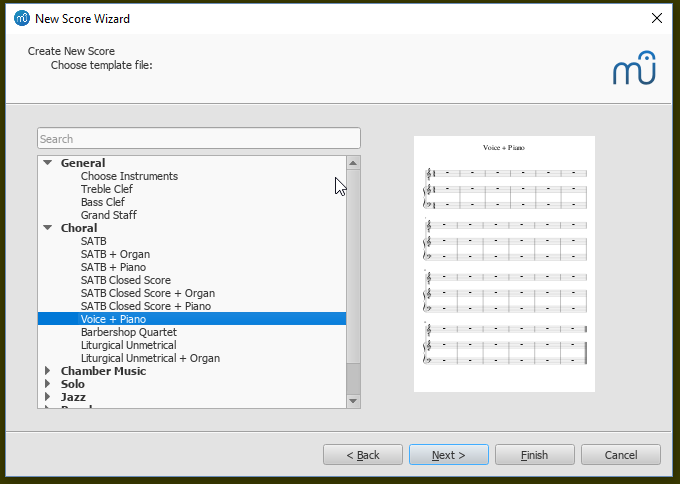
Step 2: Choose template file.
In the left column is a list of pre-defined solo, ensemble and orchestral templates, divided into categories according to musical styles, and custom template.
To choose a pre-defined score template:
1 Browse or use the Search bar (top left) to find specific templates.
2 Click a score template name to select it.
3 Click either: Next > (or just double-click the score template name in the previous step), or Finish.
To choose a custom score template:
- Choose an option under the "Custom Templates" category. This category is hidden if there is no custom templates on this machine. In Musescore 3, the preview window shows what the template file looks like when opened as a score, it is not the preview of what a new score looks like when created from this template.
To add individual staffs (Musescore instruments):
- On the left, select "Choose Instruments" option under the "General" category, then click Next >; or just double-click the option
- Follow instructions in Instruments, staff setup and templates chapter.
Choose instruments (or voice parts)
- In the "Choose template file" window, on the left, select "Choose Instruments" option under the "General" category, then click Next >; or just double-click the option
- Follow instructions in Instruments, staff setup and templates chapter.
Choose key signature (and tempo)
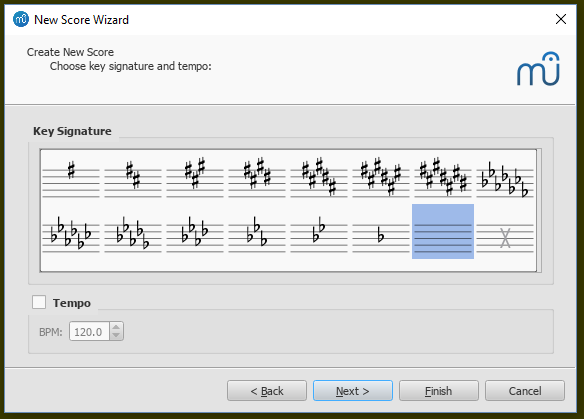
Step 3: Choose key signature (and tempo).
- Select the desired key signature, then click Next > to continue. Prior to version 3.5, you can also set the tempo here.
Choose time signature, tempo, pickup measure, and number of measures
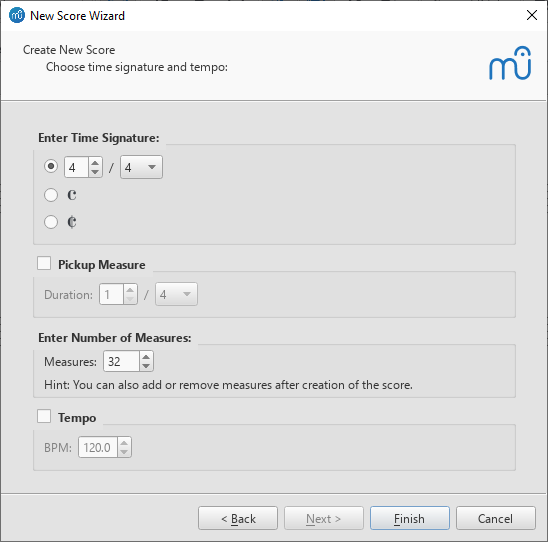
Step 4: Choose time signature etc.
Here, you can set:
- The initial time signature.
- A pickup measure (anacrusis or upbeat measure), and its duration.
- The initial number of measures in the score (the default is 32, but you can add/remove measures from the score edit window).
- Tempo (prior to version 3.5, this is set on the Choose key signature (and tempo) page instead).
Click Finish to end the wizard and create your new score.
Adjustments to score after creation
All settings you have made when you create a new score can be changed afterwards, browse the handbook, some relevant chapters:
- Score properties
- Create a pickup measure.
- Insert, Append, Delete measures.
- Key signature
- Time signature
- Clef
- Tempo
- Add text.
- Edit text.
Change instrument and staff setup
Adjust score layout and formatting
Edit mode
Edit mode allows you to perform a wide range of editing operations on individual score elements, such as:
- Adjust the length and shape of slurs, lines, barlines etc.
- Add, delete and format text in text objects.
- Adjust the position of most score elements (but not text).
Enter edit mode
MuseScore versions 3.4 and above
For lines, hairpins, slurs, note-stems, note-beams, and barlines, use one of the following methods:
- Click on an element.
- Right-click on an element and, from the menu, select Edit Element.
For other elements, use one of the following methods:
- Double-click an element.
- Click on an object already selected (text-based objects only).
- Right-click on an element and, from the menu, select Edit Element.
- Click on an element and press Alt+Shift+E.
MuseScore versions prior to 3.4
Use one of the following methods:
- Double-click an element.
- Right-click on an element and, from the menu, select Edit Element.
- Click on an element and press Alt+Shift+E.
Exit edit mode
To exit Edit mode use any of the following:
- Press Esc.
- Click on a blank area of the document window.
Text
For text edit mode, see Text editing.
Lines
See Lines: Change length, and Adjust slur.
Notes
Offset notes
Sometimes it is necessary to shift a note to the right or left—to avoid a collision with another element or to override automatic notehead sharing for example:
- Enter Edit mode on the desired note;
- Press the arrow key in the direction (left or right) that you wish to nudge the note (or use Ctrl+← or Ctrl+→ for larger adjustments);
- Press the Esc key. This will allow the note stem to be redrawn.
Alternatively, you can select the notehead and change the "Horizontal offset" (under "Chord") in the Inspector.
Adjust note stem length
- Enter Edit mode on the desired note stem;
- Use keyboard shortcuts (below) to extend or shorten the stem;
- Exit edit mode.
Alternatively, you can select the stem and change the "Length Offset" (under "Stem") in the Inspector.
To reposition a note stem, you should select it and adjust the "X" or "Y" setting for the "Offset" under "Automatic placement" in the "Element" section of the Inspector.
Keyboard shortcuts
In Edit mode the following keyboard commands can be used to change the position of either (1) a score element (e.g. ornament, accidental etc.) or (2) an adjustment handle (e.g. slur, line etc.):
- ←: Move left 0.1 staff space.
- →: Move right 0.1 staff space
- ↑: Move up 0.1 staff space
- ↓: Move down 0.1 staff space
- Ctrl+← (Mac: Cmd+←): Move left one staff space
- Ctrl+→ (Mac: Cmd+→): Move right one staff space
- Ctrl+↑ (Mac: Cmd+↑): Move up one staff space
- Ctrl+↓ (Mac: Cmd+↓): Moves down one staff space
- Alt+←: Move left 0.01 staff space
- Alt+→: Move right 0.01 staff space
- Alt+↑: Move up 0.01 staff space
- Alt+↓: Move down 0.01 staff space
The following commands only apply to adjustment handles:
- Shift+←: Move end handle's anchor left by one note/rest.
- Shift+→: Move end handle's anchor right by one note/rest.
- Tab: Go to next handle.
To undo all edits, ensure you are not in edit mode and press Ctrl+R.
See also
Palettes
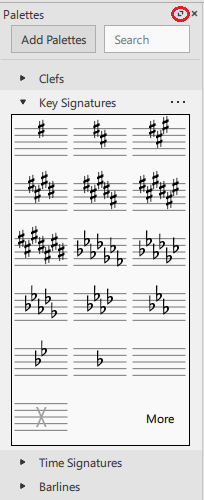
Overview
Using the Palettes Area is the recommended way to apply musical symbols and text to your score, second to keyboard shortcut.
MuseScore is shipped with predefined palettes that organize items by nature, click on hyperlink to jump to their main chapter.
- Visible by default in the built-in MuseScore 3.6.2 Basic workspace profile: Clefs, Key Signatures, Time Signatures, Accidentals, Articulations , Grace Notes, Lines , Barlines, Text, Tempo, Dynamics, Repeats & Jumps, Breaks & Spacers, Beam Properties.
- Visible by default in the built-in MuseScore 3.6.2 Advanced workspace profile, in addition to all of the above palettes: Brackets, Ornaments, Breaths & Pauses, Noteheads, Arpeggios & glissandi, Tremolos, Fingering, Fretboard Diagrams, Frames & Measures.
- Not yet visible in any build-in workspace profile by default: Accordion (see How-to: Accordion notation and playback), Bagpipe Embellishments.
All palettes can be unhide in any workspace (see below (jump to).) The current visibility setting and expand/collapse status palettes are automatically saved to the current in-use workspace profile. No further action is needed.
Palette contents can be edited, you can also create an empty custom palette and populate it, see below (jump to). Visit https://musescore.org/en/node/355834 for palettes shared by other musicians.
Alternative ways to apply musical symbols and text:
- Use Keyboard shortcuts, see also Note input
- Use Toolbar buttons
- Use the Master palette, or
- Use Images.
View / hide the Palette Area
The default position of the Palette Area is to the left of the document window. To view or hide it:
- From the menu, select View → Palettes, or use the keyboard shortcut F9.
To undock the Palette area:
- Click the double-chevron symbol (circled in the image above), or double-click the top bar of the panel.
To re-attach the panel, double-click on the top bar again. See Side panels for more information.
Using palette items
Apply symbols from a palette
Versions 3.4 or above
- Select one or more score elements, then click the desired palette symbol. Or, drag and drop the symbol onto the desired score element in the staff.
Versions prior to 3.4
- Select one or more score elements, then double-click the desired palette symbol. Or, drag and drop the symbol onto the desired score element in the staff.
If you are dragging a symbol to the score and decide you don't want to apply it, press Esc.
Tip: To prevent accidental rearrangement of contents during use, right-click a palette name and uncheck Enable Editing.
Apply the last selected item
MuseScore does not offer keyboard shortcut bindings to palette items, but you can configure a shortcut to apply the same symbol multiple times consecutively to improve efficiency. Some users find this method handy when applying piano pedal marks. (N.B. piano pedal mark symbol is under Lines palette)
- Assign a keyboard shortcut key to "Apply current palette element" in Preferences: Shortcuts.
- Select some score elements.
- Click on a palette item to apply it to the score once.
- Select other elements. TIPS: Use Shift selection Shift+←/→.
- Press the "Apply current palette element" shortcut to apply the same (last applied) item.
- Repeat as required.
See also Dynamics actions, a MuseScore plugin that you can assign keyboard shortcut to add individual dynamics symbol.
Search for symbols
Search by symbol name to locate a symbol without visually searching through palettes. All symbols are searched regardless of palettes' visible / hidden status and expand / collapse status.
Use the Search box at the top of the Palette Area. As you type, symbols and/or palettes with names matching your keystrokes are displayed below, updating continuously as your typed input changes.
To show all palettes, some of which may be temporarily hidden because it does not match the search string, click X in the search box.
Items added to the score can be copied, pasted, and duplicated: see Copy and paste.
Behavior of applied text and lines
If the symbol you are adding to the score from a palette contains or belongs to a Text element (e.g. staff text, dynamic, fingering, volta etc.), then properties such as font type, font size, text color and alignment will adapt according to the following rules:
- Text properties which have not been altered by the user will adopt the relevant text styles.
- Custom text properties—those changed by the user before saving the symbol to a custom palette—remain as customized.
By contrast, the line properties of Lines applied from a palette as is.
Customize the Palette Area
Expand / Collapse a palette
- Either click on the arrow next to the palette name, or double-click the palette name (in versions prior to MuseScore 3.3, click once on either the arrow or the palette name).
Single Palette mode
- To enable automatic collapsing of all other palettes when you expand one palette, click the ... button at the top of the Palettes Area and check the Open only one Palette at a time box.
Reveal a hidden palette
- Click Add Palettes at the top of the palette list and click Add beside the palette name.
Create a new custom palette
- At the top of the Palette Area, click Add Palettes→Create custom palette. Or, right-click any palette and click Insert New Palette.
- Type the name of the new palette in the Create Palette dialog.
- To add symbols, see Customize palettes below (jump to).
Hide a palette
To hide a predefined palette:
- Right-click the name of the palette you want to hide and click Hide Palette.
To hide a custom palette you created:
- Right-click the name of the palette you want to hide, click Hide/Delete Palette, then click Hide in the dialog.
Delete a palette
Only custom palettes can be deleted, you can hide all palettes though.
- Right-click the name of the palette you want to delete, click Hide/Delete Palette, then click Delete permanently in the dialog.
Change the order of palettes
- Drag the name of a palette up or down to any desired position.
Customize palette contents
Symbols may be added or deleted and layouts can be rearranged. (in version prior to 3.3, only new workspace is capable of customizations).
Before customizing a palette:
- Right-click on the palette name and make sure that Enable Editing is checked. It is automatically checked for new palettes you create yourself.
- Make sure the palette is expanded.
Add from an opened score
Score items, when added to a palette, are saved with their custom properties.
- Press and hold Ctrl+Shift (Mac: Cmd+Shift), then drag the score element from the score onto a palette. The score element could be a symbol, line, text, dynamic, fretboard diagram, imported image etc.
Add from the Master Palette
- If the Master Palette is not visible, select View → Master Palette from the menu, or use the keyboard shortcut Shift+F9 (Mac: fn+Shift+F9).
- Drag the symbol from the Master Palette window onto a palette.
Rearrange symbol order
- Drag the symbol to the cell in which you wish to display it. Nearby symbols will automatically move to make space available.
Change the position and size of a symbol in a palette cell
- Right-click the cell and click Properties. The following dialog is displayed:
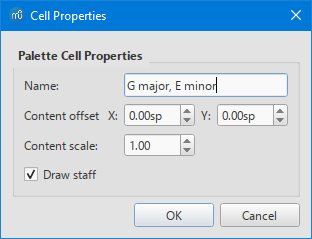
- Name: Used in search function, also shown as tooltip that appears when you mouse over the cell.
- Content offset X, Y: Adjusts the position of the symbol in the cell.
- Content scale: Makes the symbol appear larger or smaller in the cell.
- Draw staff: Draws the five lines of a musical staff behind the symbol.
Note: Changing these values only affects the appearance of symbols within the palette. It does not change their sizes or offsets on the score page.
Remove a symbol from a palette
- Right-click the symbol and click Delete. Or, select the symbol and click the trash icon to the right of the palette name.
Items removed from predefined palettes are moved under More.
In custom palettes, the More button offers browsing predefined palettes ( Use < and > ) and adding their items ( Use drag-and-drop, or selecting and clicking Add to)
Palette menu
The following menu options may appear either by right-clicking the name of a palette or by clicking the ... to the right of the name:
- Hide Palette: Hide predefined palette into under Add Palettes.
- Hide/Delete Palette: Allows you to either hide or permanently delete a custom palette.
- Insert New Palette: Creates a new empty palette. Identical to Add Palettes→Create custom palette.
- Enable Editing: Allows you to modify the contents and layout of the palette.
- Reset Palette: Discards any customizations made to a palette and restore its default contents and layout. Custom palettes will be emptied.
- Save Palette...: Saves the current palette as an .mpal file.
- Load Palette...: Loads a palette from an .mpal file and reveal it, does not replace current palette, nor any existing palettes.
- Palette Properties...: Displays the following dialog, where you can adjust the appearance of a palette:
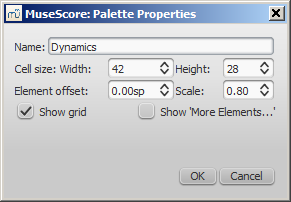
- Name: The name of the current palette.
- Cell Size: Width, Height: The dimensions of each individual cell in the palette.
- Element Offset: Adjusts the vertical offset of all symbols in the palette.
- Scale: Makes all symbols in the palette appear larger or smaller.
- Show grid: Draws a border around each palette cell.
See also
External
- https://musescore.org/en/node/355834 custom palettes shared by other musicians.
Workspaces
Workspace is the visual settings, also known as graphical user interface (GUI), of the Musescore program itself. An analogy to the position of the pen, ruler etc on a composer's desk. It includes:
- the toolbars and buttons at the top of the window,
- the side panels, or sidebars, to the left of the window, such as Palette, Inspector, Timeline etc,
- their configuration settings and position information, and
- theme and canvas settings, see Preferences.
Note that the followings do not count as workspace:
- View→ Documents Side by Side, Documents Stacked, Full screen, covered in Viewing and navigation chapter.
- View→ Show visible, Show Invisible, Show Unprintable, Show Frames, Show Page Margins, Mark irregular measures, and toolbar's Concert pitch, Zoom level and Page View/Continuous View/Single Page options : these settings are covered in Viewing and navigation chapter. They are score data. They are saved to and loaded from each score file. Templates contain these settings and will be used when you create a new score from a template, see Instruments, staff setup and templates.
Workspace presets are setting profiles for workspace, user can choose the options a preset contains so that only those options are loaded and saved when the preset is applied. There are two default presets: Basic and Advanced, you can create your own custom workspaces.
Apply a preset
Use either one of the following methods:
- Select a new preset from the drop-down menu to the right of the Note Input Toolbar (in versions prior to 3.3. this is located at the bottom of the workspace panel), or
- From the menu, select View→Workspaces, and click on one of the options.
Create a new preset
To create a new preset:
- Select an existing preset, see Apply a preset,
- Either
- Click the + button next to the dropdown list, or
- Click View→Workspace→New,
- The following dialog is shown:
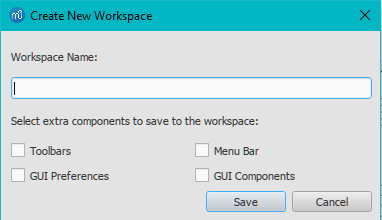
- Enter a name for the new preset,
- Choose what the preset saves and loads, namely:
- Toolbars: Information about toolbars and toolbar buttons and their order.
- Menu bar: No function, as this is not implemented in MuseScore 3.
- GUI Components: Information about the position of the GUI components and whether they are open or not.
- GUI Preferences: Settings in Preferences such as Theme and Canvas settings.
- Press Save
Edit what settings a preset contains
To change what settings a preset contains, select View→Workspace→Edit. In versions prior to MuseScore 3.3, you must create a new preset and then edit it, you cannot edit the Basic preset or the Advanced preset, see Create new workspace preset.
Changes made to the current workspace are automatically saved to the current preset, no further action is required, see Edit the workspace below.
Edit the workspace
Any changes you make to the current workspace are automatically saved to the current preset, no further action is required.
See the main chapter Viewing and navigation, these are some popular ways:
- To choose which toolbar is displayed, toggle them under View→Toolbars menu.
- To edit toolbar buttons, select View→Toolbars→Customize toolbars, see Viewing and navigation : Toolbars. You cannot add items to a toolbar from the Master palette.
- To choose which sidebar is displayed, toggle them under View menu.
- To dock or undock sidebars, see Viewing and navigation : Side panels.
- To setup different sidebars, refer to their relevant chapters. For example, to set up palette see Palettes and Master palette.
Preset directory
Each preset is saved as a separate file under:
- Windows:
C:\Users\[USERNAME]\AppData\Local\MuseScore\MuseScore3\(actually%LOCALAPPDATA%\MuseScore\MuseScore3) - MacOS:
~/Library/Application\ Support/MuseScore/MuseScore3/. - Linux:
${XDG_DATA_HOME:-~/.local/share}/MuseScore/MuseScore3/.
See also
- Viewing and navigation for setting up toolbar and buttons.
- Palettes
- Master palette
Inspector
Overview
The Inspector shows layout and playback properties of the selected objects.
When the current selection of objects consist of several different object types, the Inspector shows and allows adjustment of color, visibility, and automatic placement, see "Element" section. Press any of Notes, Grace Notes, Rests buttons at the bottom to to narrow to that object type only, as shown in image below. See also "Select all similar" and "Selection Filter" sections in the Selection modes chapter.
When multiple objects are selected, if a single property has diverse values for each object, that particular property is displayed in the color blue.
Displaying the Inspector
The Inspector appears by default on the right. To show or hide it:
- Press shortcut F8 (Mac: fn+F8), or
- From the menu, select View and check or uncheck Inspector.
Docking/undocking the Inspector

Click the double-chevron symbol or double-click the top bar of the panel. To re-attach the panel double-click on the top bar again. See also: Side panels.
"Reset to style default" and "Set to style" buttons
Two buttons may be displayed to the right of a property:
- Reset to style default: removes the specific property, in effect resets the property to the default value.
- Save as style : Does these:
- Assigns the property value to the coresponding one in the style profile used by this object currently, found under Format→Style. See Layout and formatting chapter.
- And then clears the property value specific to this object.
- The result is that this object does not have the specific property anymore, but it uses the value in the style profile, which is the same value, because it is being assigned just now. All objects using that style profile across the score is affected.
Shown below is the Reset to style default button, it looks like an unclosed circular loop with a letter x inside

Shown below is the Set as style button, it looks like a bold capitalized S

Inspector categories
Properties are conveniently listed under bold categories in the Inspector. For example, when barline(s) are selected, the following is displayed at the top:
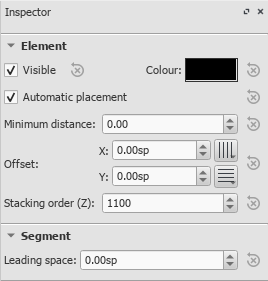
For details of the various categories and their properties, see below:
Element
All score elements—except frames, breaks and spacers—display this category in the Inspector when selected. The options are as follows:
- Visible: Uncheck this box to make selected elements invisible; alternatively, use the shortcut V (toggle). Invisible elements do not appear in the music when printed out or exported as a PDF or image. If you still want them to remain on display in the document window, make sure that the "Show Invisible" option is selected in View → Show Invisible. Invisible elements will then be colored light gray.
- Color: Click on the rectangle to open a "Color Select" dialog. Adjust the color and opacity of selected elements.
- Automatic placement: See Automatic placement.
- Minimum distance: Minimum distance from other elements when automatic placement is enabled.
- Offset X/Y: Allows you to position selected elements exactly (in terms of space units). A positive number moves the elements right or down; a negative number moves the elements left or up. Snap to grid buttons are also provided.
- Stacking order (Z): See Automatic placement: Stacking order
Element Group
This category is displayed only when you have selected a mixture of different types of elements, and allows editing of color, visibility, and automatic placement only.
Segment
- Leading Space: Use this to increase or decrease the space before an element. This also affects any associated lyric syllables.
Chord
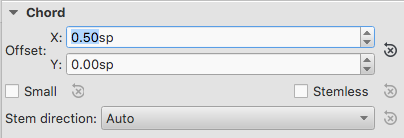
- Offset X/Y: This changes the positon of every note in the same voice as the selected note(s). If you want to make changes to the position of just one note, use the Element category instead).
- Small: Make noteheads and stem small.
- Stemless: Make chord stemless.
- Stem direction: Choice of Auto, Up, or Down.
Note
This category allows you to make changes to selected notes (but for note position—see Element). It contains the following properties:
- Small: Make notehead smaller (you can specify the relative size of all small notes from the menu: Format → Style… → Sizes…).
- Head group: See Notehead groups.
- Head type: See Notehead types.
- Mirror head: Position notehead to the left or right of the stem (default is "Auto").
- Fix to line: When ticked, the note is fixed to the top line of the standard 5-line staff.
- Line: A positive number moves the "fixed" note down; a negative number moves it upwards.
- Play: Unticking this box silences the note.
- Tuning: Adjust tuning of note to the nearest cent.
- Velocity type: Sets the MIDI velocity of notes directly. Choose one of two options:
- Offset: Make the value shown in "Velocity" relative to the previous dynamic marking. The value is taken as a percent offset, i.e. the note’s real MIDI velocity would be ((100 + Velocity) / 100) times what it would have been without this adjustment. Enter negative values to lower the velocity accordingly.
- User: Make the value shown in "Velocity" absolute (i.e. the MIDI velocity is unaffected by dynamic markings).
- Velocity: Set the MIDI velocity according to the option displayed in "Velocity type."
Dynamic
See Dynamics
Text
See Text basics
Tempo text
See Tempo
Fermata
Select
This category appears differently according to the selection you have made:
- If you select a notehead, the "Select" category displays buttons which allow you to easily switch the selection to the stem, beam, hook, duration dot (or dots) or tuplet number associated with the notehead (see image below).

- If you select a range of measures, the "Select" category allows you to select either all notes, grace notes, or rests.
Beam
This section is displayed in the Inspector when you select one or more note beams, and allows you to make fine adjustments to beam position and angle, and also change the spacing of beamed notes.
Clef
This section appears when you select a clef: the tick box allows you to turn on/off the display of a preceding courtesy clef.

Articulation
This category appears when you select an articulation or ornament. The following options are available:
- Direction: Whether the symbol points up or down: only applicable to certain symbols.
- Anchor: The vertical placement of the symbol:
- Play: Turn on/off playback effect.
- Time stretch: Obsolete. Jump to Fermata instead.
- Ornament style: A choice of default or Baroque playback.
Fretboard diagram
See Fretboard diagrams.
Line
This category is displayed when a line is selected. Here, you can set various general properties.
- Visible: Hide or display just the line: any text remains visible.
- Allow diagonal: The default is horizontal (unticked). Tick if you want to edit the line to create a slope.
- Line color/thickness/style: Set various properties of the line.
Text Line Details
This category is displayed when a line is selected. It allows you to set the wording of a line, edit text properties, set line hooks, and align the text in relation to the line.
- Begin hook / Height: At the beginning of the line, specify None, 90° (vertical), 45° (angled), or 90° centered; set hook length.
- End hook / Height: Ditto for the very end of the line.
- Begin Text / Continue Text / End Text: Refers to text at the very beginning of the line; at the beginning of any continuation line; or at the end of the very last line. All have the same properties, as follows:
- Text: Create or edit the text associated with the line.
- Font face / Size / Style: Set the text properties, and/or edit the text style of the line.
- Align: Set the horizontal and vertical alignment of the text in relation to the line.
- Placement: Place the text on (Above/Below), or to the left of the line.
- Offset X / Y: Adjust the x and y offsets for exact positioning.
Properties dialogs
Some object types have additional properties. These are accessed by right-clicking on the object and choosing a "... properties" option from the context menu. The settings available in these dialogs are explained in the description of the object type in Notation or Advanced topics.
See:
- Articulations and ornaments
- Time signatures
- Staff and system text
- Measure operations
- Staff/Part properties
See also
Instruments, staff setup and templates
This chapter discuss real world instruments and vocals, Musescore Instruments, score instrument setup and score template files.
Instruments
An instrument in Musescore is an abstraction that contains,
- Tablature(s) or staff(s). See also Layout and formatting;
- Settings related to playback audio created by the Musescore synthesizer. When setting up sound, start with changing instrument setup;
- Notation styles such as clefs, noteheads; and
- Other musical behaviors such as transposition, playable range.
A Musescore instrument contains staff(s) that can represent a single or multiple real world instrument(s), for example in Beethoven's Symphony No.3, Op.55 First edition published by Cianchettini & Sperati, n.d.[1809] London, the third staff Corni 1 & 2 in Eb represents two French horn players:
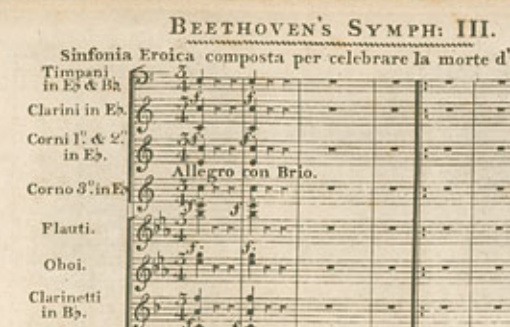
To transcribe this, add one Musescore instrument "Horn in Eb". Optionally rename it. Playback is not affected by naming.
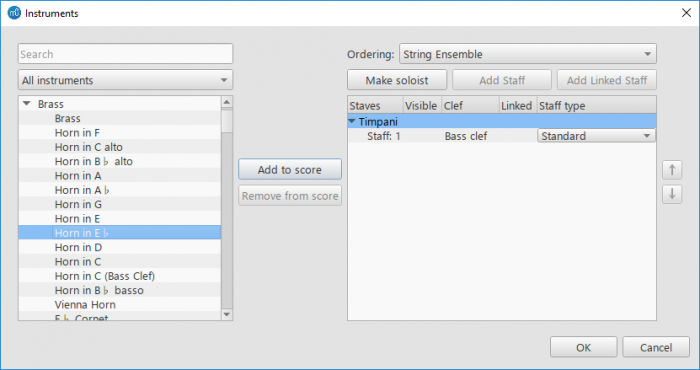
The detailed relationship between Musescore Instrument and real world instrument (staff or tablature), instrument section, vocals, and choir:
- A Musescore Instrument using the same name, such as "Piano", "Acoustic Guitar", "Acoustic Guitar (Tablature)", "Violin", "Violins", "Strings", "Soprano", "Voice", "Women" and some percussions such as "Timpani", "Concert Bass Drum", "Cymbal" (concert). Similar items might have different playback.
- "Drumset" Musescore instrument "Standard" (the option "Drumset"), a single item containing "Snare", "Bass Drum", "Ride Cymbal" etc. There are no seperate MuseScore Instrument for these.
- "Drumset" Musescore instrument "Standard 1" and other variations, (same for "Room", "Power", "Jazz" and theirs), use them by changing Mixer: Sound dropbox. They are different in playback only.
- "Drumset" Musescore instrument "Brush" and variations, use them by changing Mixer: Sound dropbox. The brush snare is the "Electric Snare" item in Drum notation, only creates short brush playback. There is no seperate MuseScore Instrument for brush snare.
Instruments supported by Musescore 3.6.2 (archived https://musescore.org/en/instruments page December 2022). To suggest adding a missing instrument, see https://musescore.org/en/contribute
Choose instruments
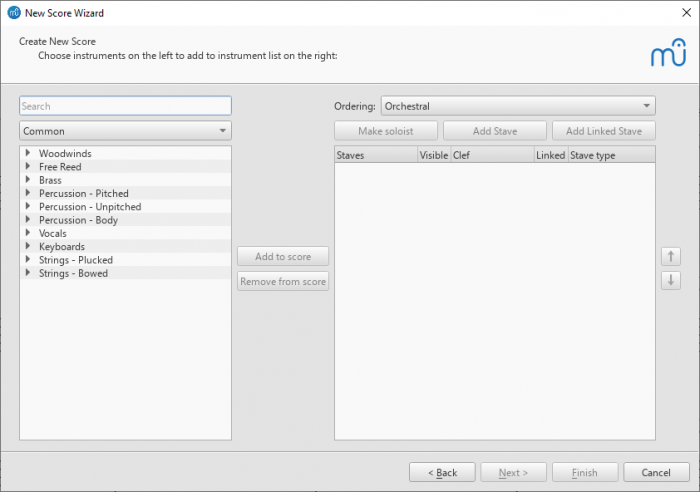
Two ways to open this window to manage setup:
- File New Score Wizard window: Choose Instruments when user create a new score, or
- In a score, use the keyboard shortcut I; or select from the menu Edit→Instruments....
This window contains the following items:
- The search box at the top left filters items to be shown underneath. Clear it out to show all available instruments.
- The type filtering dropdown box under the search box filters items to be shown in the space underneath. "Common" is selected by default, which filters out some uncommon instruments or voice parts. Select "All instruments" to show all available instruments.
- The left column space shows a list of instruments or voice parts that can be added. They are grouped by the instrument families they belong to. Click on a family name subheading to expand or collapse that group.
- The Ordering dropdown box at the top right shows the current automatic vertical arrangement (ordering) of staffs. 'Orchestral' is the default preset. User can always rearrange staffs manually. User cannot edit or create new presets inside Musescore. To utilize templates for custom default ordering on new scores, see template section.
- The right column space shows currect score setup, the vertical order represents the real instrument vertical order on score. Empty column means the score contains no staffs.
The result of actions available in this window are explained in the list below, the steps to do each are shown under corresponding section headings later.
- Add a new instrument to the score: The essential and most common action. Adds a new instrument and staff(s).
- Add a staff to an existing instrument: Inserts an extra editable staff to an existing instrument (on the right column space) and create a custom instrument. For example, to create a piano that use three staffs rather than normally two staffs. Rarely used because its limitation on playback - staffs under the same instrument cannot be configured to use different sounds, nor can they be muted individually. It is advisable to utilize multiple instruments.
- Add a linked staff to an existing instrument: Inserts an non-editable, ready-only staff to an existing instrument (on the right column space). A linked staff automatically mirrors content. Use case includes displaying two staffs for a guitar (a standard staff + a linked tablature) where user enters notes onto the standard staff and the same music is automatically reflected the tablature.
- Make an existing instrument soloist:
-
- Reorders an existing instrument on the score (all its staffs) to the soloist position. The soloist position is defined in the instrument ordering setting chosen in Ordering dropdown box. For example, in an 'Orchestral' ordering preset, soloists are above the strings.
-
- Adds "solo" and a number to its name. Non-soloists do not affect the numbering.
- The soloist designation is a score layout feature only and has no impact on playback. A score can contain multiple "soloist" instruments.
-
Add instrument
To manage instruments of "Drumset" Musescore instrument, see Drum notation
To add a new Musescore instrument to the score, use any of the following options:
- Select one or more instruments in the left column, and then click Add to score in the middle of the window, or
- Double-click an instrument in the left column.
The instrument names, and their associated staff lines, now appear in the list of instruments in the right column.
Add Staff
To add an editable staff to an existing instrument in the score:
- Select a staff of the instrument in the score list on the right-hand side
- Click Add Staff at the top.
- Adjust the Staff type, if applicable.
Add Linked Staff
To add a non-editable ready-only staff to an existing instrument in the score:
- Select a staff to be linked in the score list on the right-hand side.
- Click Add Linked Staff at the top.
- Adjust the Staff type, if applicable.
See also, Combine pitched staff with tablature.
Make / undo soloist
To make an existing instrument soloist, or to undo it:
- Select an instrument name subheading in the score list on the right-hand side.
- Click Make soloist or Undo soloist at the top.
Change order of instruments or staffs on a score
- Click either an instrument name or a staff in the right-hand column, and click the arrow buttons.
Delete an instrument or staff
- Select an instrument (all of its staffs) or a staff in the right-hand column and click Remove from score in the middle.
Change instrument and staff setup
- To change instrument setup of a score: In a score, use the keyboard shortcut I; or select from the menu Edit→Instruments... to open the Instruments window.
- To change instrument setup of a Musescore Part: See Parts.
- To change instrument setup of a the "drumset" Musescore Instrument: See Drum notation: edit drumset.
- To change the Musescore Instrument used by staff on score: See Staff / Part properties: Change instrument.
- To change staff size: It is recommended to use Page settings to change all staffs everywhere on a score , before changing each staff's Staff / Part properties.
- To change staff layout:
- To change staff type and staff layout everywhere on a score (change number of lines, hide etc): See Staff / Part properties, and Tablature
- To hide a staff under certain conditions : See Style window: Score settings.
- To create ossia: See Staff / Part properties: external links
- See also other global style settings in Layout and formatting.
Hiding and unhiding staffs
Edit Format→Style→Score (Style window: Score settings) and Staff / Part properties. Handbook 4 Showing staves only where needed chapter summaries different methods with use cases, the workflow in musescore 3 is similar.
Templates
Not to be confused with Staff / Part properties : staff type template
Score template can be used to quickly set up a new score with staffs and tablatures. A template file is a score file under certain directory that Musescore uses. You can create a score file from scratch and save it to that directory. You can also copy any existing .mscz file to that directory to use it as template.
Generally speaking, global settings are re-used when the new score is created, specific formatting settings on individual objects are not re-used.
There are two kinds of templates:
- Pre-defined System templates shipped with MuseScore,
When you create a new score, they are sorted into categories in Choose template file window . - Custom templates created by user,
The score files must be stored inside the custom templates folder. When you create a new score, they are under Choose template file window : Custom Templates .
As of Musescore 3.6.2, a template contains the following information,
- instrument setup (staffs and tablatures),
- these items of the 'Full score' only,
- Staff / Part properties of all instruments;
- settings under Format→Style and Format → Page Settings. See Layout and formatting chapter;
- the View→ Show visible, Show Invisible, Show Unprintable, Show Frames, Show Page Margins, Mark irregular measures, and toolbar's Concert pitch, Zoom level and Page View/Continuous View/Single Page options. See also Viewing and navigation chapter; and
- the setup (only) of every Musescore Part.
Check out the Score from Template plugin by parkingb which improves template function.
Save a score as a custom template
Click File > Save as and save the score file as .mscz format into the template directory Musescore uses. File name is used as the template name.
Creating a score from a custom template
- Make sure the custom template file is in the correct folder.
- Choose a custom template when you create a new score. In Musescore 3, the preview window shows what the template file looks like when opened as a score, it is not the preview of what a new score looks like when created from this template.
System templates folder
Not recommended to use this folder for custom templates
This folder contains the pre-defined templates. It can be found in the following directory:
- Windows: Usually at
C:\Program Files\MuseScore 3\templatesorC:\Program Files (x86)\MuseScore 3\templates(Actually%ProgramFiles%\MuseScore 3\templatesor%ProgramFiles(x86)%\MuseScore 3\templates, respectively) . - Linux: Under
/usr/share/mscore-xxxif you installed from the package manager. If you compiled MuseScore on Linux yourself, then look under/usr/local/share/mscore-xxx(withxxxbeing the version you are using). - MacOS: Under
/Applications/MuseScore 3.app/Contents/Resources/templates.
Custom templates folder
Custom template files must be stored here. The default directory of the custom templates folder is as follows (The folder name "Templates" varies with the language version of Musescore installed):
- Windows:
%HOMEPATH%\Documents\MuseScore3\Templates. - MacOS and Linux:
~/Documents/MuseScore3/Templates.
To configure the directory of custom templates folder: From the menu, select Edit→Preferences...→General.
External links
- Instruments supported by Musescore 3.6.2 (archived https://musescore.org/en/instruments page December 2022)
- Instruments supported by latest Musescore
Measure operations
This chapter covers adding, removing, splitting and joining measures etc, in addition to the Measure properties dialog which is used to adjust individual measure—such as visibility, duration, numbering and width ("Stretch"). The Measure chapter outline related formattings.
Adding and removing measures in effect insert or remove segment of time, affecting all instruments and staffs. Score items associated with that segment are removed along with it, while rest symbols are added automatically whereever necessary. To ensure that inserted or appended measures display correctly, multimeasure rests should be set to off (toggle M).
Select
Single measure
- To select a single measure, click on a space within the measure.
Range of measures
- To select a continuous range of measures, see Shift + click selection and Shift selection.
Insert
Insert an empty measure into the score
- Select a measure or a frame, then press Ins (Mac: Shift+I); or
- Select a measure or a frame, then choose from the menu: Add→Measures→Insert Measure.
Insert multiple measures
- Select a measure or a frame, then press Ctrl+Ins (Mac: Shift+Del+I); fill in the "Number of measures to insert" field and press OK; or
- Select a measure or a frame, then choose from the menu: Add→Measures→Insert Measures...; fill in the "Number of measures to insert" field and press OK.
Append
Append an empty measure to the end of a score
Use one of the following options:
- Press Ctrl+B (Mac: Cmd+B).
- Select from the menu: Add→Measures→Append One Measure.
Append multiple measures to the end of a score
Use one of the following options:
- Press Alt+Shift+B; fill in the "Number of measures to append" field and press OK.
- Select from the menu: Add→Measures→Append Measures...; fill in the "Number of measures to append" field and press OK.
Remove
Remove a single measure
- Select the measure
- Press Ctrl+Del (Mac: Cmd+Del).
Remove a range of measures
- Select a range of measures;
- Press Ctrl+Del (Mac: Cmd+Del).
Remove empty trailing measures
To automatically remove any blank measures from the end of the score:
- From the menu, select Tools→Remove empty trailing measures.
Delete measure contents
To delete only the measure contents (and not the measure itself):
- Select one or more measures;
- Press Del.
The "Measure Properties" window
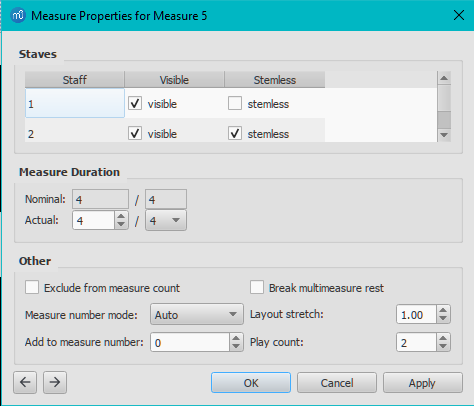
To open this window, right-click an empty part of the measure and select Measure Properties.... Modification are not applied until the user presses the Apply button. Use the left and right arrow buttons at the bottom left to navigate to a neighbouring measure.
Under Staves,
- Visible: Show staff lines.
- Stemless: Hide all note stems.
Under Measure duration,
- Nominal The Time signatures displayed when appropiate.
- Actual The real timespan allowed to accomodate notes and rests.
Under Other,
- Exclude from measure count: Exclude from counting. Used in e.g. a pickup measure.
- Break multimeasure rests: Prevent a multimeasure rest at the start of the selected measure. Edit this property prior to turning on Format → Style → Score → Create multimeasure rests if needed.
- Measure number mode: Whether and how measure numbers are displayed. See also the Layout and format : Measure Numbers chapter.
- Auto: Follows the setting in Format → Style → Measure Numbers.
- Always Show: Forces display of number.
- Always Hide: Hides number.
- Layout stretch: Controls the amount of horizontal space between score elements (notes, rests, etc.): See Increase/Decrease Stretch ({ and }).
- Add to measure number": Enter a positive or negative number to change the number of the selected measure, and subsequent meaures. A value of "-1" has the same effect as marking a measure to be excluded from measure count.
- Play count: If a measure precedes an end repeat barline, this value controls the number of times that the entire repeat section plays back. See the Repeats and jumps chapter.
Creating a pickup measure or anacrusis
Adjust Nominal and Actual settings to create pickup measure (also known as anacrusis or upbeat), cadenza, ad lib section etc.
In the image below, the quarter note pickup measure has a nominal time signature of 4/4, but an actual time sig. of 1/4. The measures in the middle are in normal 4/4 time. The complementary measure at the end of the staff, with a dotted half note, has an actual time sig. of 3/4.

A small - or + sign above the measure indicates its duration is different than indicated by the time signature (see image below). They can be turned off with View menu &arr; Mark Irregular Measures. The markers do not appear in printed copies.

Vertical alignment
See Barlines:Vertical alignment
Numbering
See the Layout and format : Measure Numbers chapter.
Split and join
Functions under Tools → Measure are disabled if the score contains Musescore Parts.
Split measures and join measures commands change Actual properties to adjust measure duration. They do not affect Time signature on the score, but beam grouping setting may be reset.
Join measures
- Select measure(s) on the score;
- Select Tools → Measure → Join Selected Measures.
Alternatively, join two neighbouring measures by selecting the barline in between and either (1) press Ctrl+Del (Mac: Cmd+Del) ; or (2) press V to make the barline invisible in printed copies (the barline still takes space).
Split a measure
Choose one of the following methods:
- Select a note; then hold Ctrl and click a barline in a palette (double-click in versions prior to 3.4);
- Hold Ctrl and drag a barline (from a palette) to the note that starts the next measure; or
- Select a note and press Tools → Measure → Split Measure Before Selected Note/Rest.
See also
- Barlines
- Measure (Layout and formatting style)
- Layout and formatting
- Breaks and spacers
External links
- How to span a measure over multiple systems (MuseScore HowTo, 1.x)
- How to split a measure (MuseScore HowTo, 1.x)
- How to delete measures (MuseScore HowTo)
- How to get scores without time signature (and clef) (MuseScore HowTo)
Голоса
Голос это музыкальная линия или партия независящая от других голосов этого же нотоносца. Другое понятие "Голос" в некоторых нотных редакторах это "слои".
У вас может быть до четырёх голосов на каждом нотоносце. В полифоническом такте для голоса 1 (и голоса 3) ноты обычно пишут штилями вверх, а голоса 2 (и голоса 4) - штилями вниз.

Внимание! Будьте аккуратны, чтобы не спутать понятие голосов MuseScore (1, 2, 3, 4) с порядком голосов, находящихся в вокальных партитурах SATB (Сопрано Альт Тенор Бас):
- В Открытых партитурах SATB (где на каждый из четырёх нотоносцев приходится по одной голосовой партии), т.е. в MuseScore нужно использовать Голос 1 в каждом нотоносце.
- In Закрытых партитурах SATB (где на два нотоносца приходится 4 голоса , например как в гимнах), в MuseScore используются Голос 1 и 2 для любого из нотоносцев.
- Нет необходимости использовать голоса 3 и 4 если в каждом нотоносце не больше двух вокальных партий. Это означает что в басовом ключе "закрытой партитуры" тенору присваивается голос 1 и басу голос 2 — новички часто бездумно присваивают для партии баса голос 1 и в результате получают ноты штилями вверх, либо назначают партии тенора голосу 3, для баса голос 4 что ведёт к появлению путанных пауз в голосе 1 (и они не удаляются).
Как отображаются голоса
Selecting a section of the score highlights each voice in a different color: voice 1 blue, voice 2 green, voice 3 orange and voice 4 purple.

When to use voices
- If you need stems pointing in opposite directions within a chord, on a single staff.
- If you need notes of different durations within a single staff, played simultaneously.
How to enter notes in different voices
The following instructions show you how to notate a passage of music in two voices:
-
Enter voice 1 notes first: Make sure you are in note input mode : the Voice 1 button becomes highlighted in blue in the toolbar.
 Enter the notes in the top voice first. On inputting, some notes may have down-stems, but these will flip automatically when the second voice is added.
The following excerpt shows a treble staff with just the voice 1 notes entered:

-
Move cursor back to start of section: When you have finished entering a section of voice 1 notes, press the ← key repeatedly to move the cursor, note-by-note, back to the first note of the section; or alternatively use Ctrl+← (Mac:Cmd+←) to move the cursor back one measure at a time. Or else you can simply exit note input mode (press Esc) and click directly on the first note.
-
Enter voice 2 notes: Make sure you are in note-input mode and that the voice 1 note at the beginning of the section is selected. Click on the "Voice 2" button
 (on the right of the toolbar), or use the shortcut Ctrl+Alt+2 (Mac: Cmd+Alt+2). Enter all the lower voice notes (down-stem).
The following image shows the above example after the addition of voice 2 notes:

Deleting and hiding rests
All rests can be made invisible, if required: select the desired rest(s) and press V, or uncheck the "Visible" checkbox in the Inspector. Rests in voices 2, 3 or 4 (but not voice 1) can also be deleted (by selecting them and pressing Delete) but it is not recommended: make them invisible instead.
A voice 1 rest can only be deleted by removing that part of the measure from the score as well: see Remove selected range; or Delete measure(s).
Restoring deleted rests
If a rest has been deleted in voices 2-4, you will need to restore it before you can enter a note on that beat in that voice (the problem may arise, for example, in imported XML or MIDI files). The easiest way to fix such a measure is to exchange that voice with voice 1 twice. For the exact method, see Exchange voices of notes (below).
Exchange voices of notes
To swap the notes between any two voices:
- Select one or more continuous measures (or a range of notes);
- From the Menu bar, select Tools → Voices;
- Select the option for the two voices you want to exchange.
Notes: (a) The selection can encompass content of any voice, but only two will be processed at once. (b) If you select a partial measure the operation will still apply to the whole measure.
Move notes to another voice (without swapping)
You can also move notes from one voice to another (without note-swapping):
- Ensure you are not in note input mode.
- Select one or more noteheads (in any voice).
- Click on the destination voice in the Note Input toolbar or use the shortcut Ctrl+Alt+1–4 (Mac: Cmd+Alt+1-4).
Note: For a successful move, the following conditions need to be met:
- The chord in the destination voice must be the same duration as the note to be moved there.
- Alternatively, if the destination voice is occupied by a rest, it must be of sufficient duration to accommodate the moved note.
- Notes should not be tied.
Navigate between voices
To select a note in a higher-numbered voice than the current one:
- Use Alt + ↓, to move the selection to the bottommost note in the current voice;
- Press Alt + ↓, to move to the higher-numbered voice;
- Repeat any of the above steps, as necessary, until the desired note is selected.
To select a note in a lower-numbered voice than the current one:
- Use Alt + ↑, to move the selection to the topmost note in the current voice;
- Press Alt + ↑, to move to the lower-numbered voice.
- Repeat any of the above steps, as necessary, until the desired note is selected.
See also
External links
Selecting elements
Not to be confused with the note input cursor explained in Note input chapter
Select elements on a score for further action such as duplication. Elements currently selected on the score are shown colorized with the Voice each element belongs to, otherwise black by default. Voice 1 blue, Voice 2 green, Voice 3 orange and Voice 4 purple. The color can be changed under Edit→Preferences : Advanced, see Preferences chapter.
The current selection status is shown on the bottom left status bar, it changes whenever the selection is updated by the user. There are four selection status:
- "nothing is selected" status, the status bar shows blank. Press Esc to deselect all, furiously spam the button just to be safe, like all professional accountants do to calculators.
- "single item selection" status, the status bar shows the element's type.
- List Selection status, where multiple individual objects are selected.
- Range Selection status, where Musescore automatically selects useful elements between given beginning and ending time positions across a given set of staves. These elements includes all of the notes, rests, Musescore Texts such as dynamics symbols, Musescore Lines such as pedal etc. System-wide elements such as Tempo, Time signatures, Repeats, Layout breaks are not included in the automatic selection. A blue rectangle surrounding the selection is visible on the score in this status, as shown in image below.
Many common operations such as Copy and Paste requires a Range Selection.
Shown below are "single item selection" of a Voice 1 item (top) and "Range Selection" and its status bar (bottom).
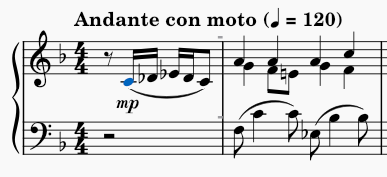
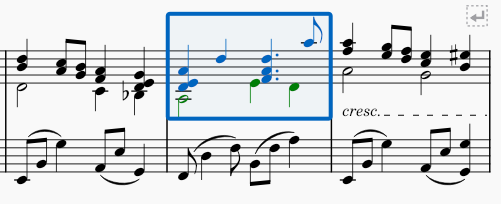
Selecting a single element
To select a single element with the mouse, simply click it. Clicking on an element always select it only, except for the measure element. Clicking on the blank space of a measure (inside the measure's five staff lines) to select it also automatically selects multiple objects inside that measure, the result is a Range Selection.
To select a single element with the keyboard, use the cursor keys to navigate to the element, see all navigation keyboard keys in Viewing and navigation chapter. In Normal mode (press keyboard Esc to use this mode), the left and right cursor keys ← → navigate through a randomly selected note or rest at each time moment only. Use Alt + cursor keys to navigate through all elements at each time moment, including all notes, articulation, dynamics, and other markings.
Overlapping elements
When multiple objects occupy the same position on a score and fully overlap each other, such as two notes having same pitch but in different Voices, Ctrl + click on it repeatedly to cycle through the set, until the desired element is selected.
Different ways of a single note
To use pitch only Copy and paste commands, select the notehead of a note. To copy and paste everything, including duration etc, create a Range Selection of the note, see "Creating a Range Selection" section. Pitch only feature is removed in Musescore 4.
Selecting individual element inside a note
Most commands that operate on a single note requires selecting the notehead, for example, changing the note's pitch. A note is also a collection of elements including notehead, stem, flag, dot, accidental, etc. Each of these items can be selected individually for purpose like fine tuning its layout position.
Different ways of selecting notes in a chord
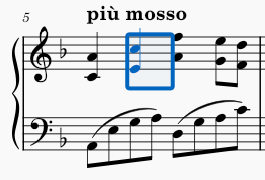
Multiple notes of a single chord can be selected one by one to create a List Selection. A single chord can also be selected with the time positions it starts and ends at to create a Range Selection.
Many commonly used commands, including Copy and paste, that can be used on a single chord requires a Range Selection of it, as shown in the image above. Besides the method explained in "Creating a Range Selection" section, there is a special quick way to do it for a single chord. First make sure nothing is currently selected (press Esc to be sure) and then Shift+click on any one of the notehead of the chord.
As Range Selection automatically selects base on time positions, notes in other voices may be included unless explicitly excluded, see "Excluding elements from Range Selection" section.
The repeat selection command (R) works on a single chord, either on a Range Selection of it, and when exactly one note of that chord is selected. See Copy and paste: Repeating a selection chapter.
Creating a List Selection
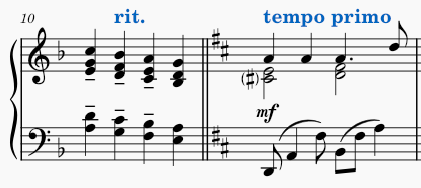
Create a List Selection manually by using mouse clicks, drag select, or by using commands.
Selecting multiple elements manually
(All Musescore 3 versions)
Elements positioned outside of the area of any staff lines and does not overlap with other elements, can be selected together using mouse drag select. Shift + click on any blank space (outside of staff lines) and drag the cursor to create a selection box. This creates a List Selection only if no notes or rests are included, otherwise a Range selection using the "starting and end time position method" is created.
(Requires Musescore 3.5 version or later)
To add an object to the selection, or remove one, Ctrl (Mac: Cmd) + click on the object. This converts the selection to List Selection. Measure does not support the addition/removal method. Adding and removing element from a Range Selection also converts it into a List Selection.
Selecting similar elements automatically
To select all elements of a given type in the entire score or in a given staff:
- Right-click one such element
- In the resulting menu, click Select→All Similar Elements or Select→All Similar Elements in Same Staff as appropriate
To select all elements of a given type between two time positions:
(Requires Musescore 3.5 version or later)
- Click the first such element
- Shift+click the last such element
—OR—
(All Musescore 3 versions)
- Create a Range selection
- Right-click one such element
- In the resulting menu, click Select→All Similar Elements in Range Selection
To create more complex selections of similar elements:
- (Optional) Create a Range selection
- Right-click one such element
- In the resulting menu, click Select→More
- Check the desired boxes within the resulting dialog (see below)
The options available in the select dialog will depend on the type of element you right-clicked.
The selection options specific to notes are:
- Same notehead: see Noteheads chapter.
- Same pitch: notes with the same pitch name, accidental, and octave
- Same string: notes with the on the same string (tablature only)
- Same type: notes of the same type (normal, acciaccatura, appoggiatura)
- Same note type: notes of the same duration, not considering presence of dots or tuplets
- Same duration: notes of the same actual duration
- Same note name: notes with the same pitch name and accidental, not considering octave
- Same staff: notes in the same staff
- Same voice: notes in the same voice
- Same beat: based on time signature only, not beaming
- In selection: notes within the current selection
- Same system: notes in the same system (layout concept), see Layout and formatting.
- Same measure: notes in the same measure
In addition to the type-specific selection options, there are action options at the bottom of the dialog that are common to all element types. These control what happens to the selected elements, and only one of these can be chosen at a time:
- Replace selection: if checked, this action selection replaces an existing selection
- Add to selection: if checked, this action adds elements to an existing selection
- Search in selection: if checked, this action applies only to elements within an existing selection
- Subtract from selection: if checked, this action removes elements from an existing selection
Creating a Range Selection
A Range selection instructs Musescore to automatically select useful elements between a given beginning and ending time position across a given set of staves.
Range Selection by dragging
Suitable for selections that fit on one screen. Shift + click on any blank space (outside of staff lines) and drag the cursor to create a selection box. Include at least one note or rests to create a Range selection.
Range Selection by clicking
Suitable for selections that span several pages.
- Click a note or rest that marks a starting / end time position.
- (Optional) Reposition the score using command explained in Viewing and navigation chapter.
- Shift+click another note or rest that marks the other time position.
Range Selection using the keyboard
Using the keyboard alone or primarily:
- Select the first note or rest using keyboard navigation or by clicking
- Hold Shift while using keyboard navigation to extend the selection as you navigate
The available commands include:
- Shift+Left and Shift+Right to extend the selection one chord at a time
- Shift+Ctrl+Left and Shift+Ctrl+Right to extend the selection one measure at a time (Mac: use Cmd instead of Ctrl)
- Shift+Up and Shift+Down to extend the selection one staff at a time
- Shift+Home and Shift+End to extend to the beginning or end of the system (layout concept), see Layout and formatting.
- Shift+Ctrl+Home and Shift+Ctrl+End to extend to the beginning or end of the score (Mac: use Cmd instead of Ctrl)
Special Range Selections
MuseScore includes some special commands to make command selections:
- Edit→Select all or Ctrl+A (Mac: Cmd+A) to select the entire score
- Edit→Select section to select the current section of the score, that is everything between the previous and next section break, see Breaks and spacers chapter.
Excluding elements from a Range Selection
Before executing actions on a Range Selection, it is possible to exclude elements by type. For example, leaving out the lyrics when duplicating notes, rest etc of a phrase; or deleting everything not in voice 1 in a multiple voices passage. To exclude elements of a given type:
- Open the Selection Filter with View→Selection filter or press F6 (Mac: Fn+F6);
- Remove the checkmarks next to any element types you want excluded from the selection
Note that if you exclude voice 1, you will not be able to select any measures that lack content in other voices. So be sure to restore voice 1 after performing the operation for which you are excluding voice 1. For example, if you wish to copy and paste only voice 2, make your range selection, use the Selection Filter to exclude voice 1, use Edit→Copy or Ctrl+C, then restore the checkbox next to voice 1 before attempting to select the destination to paste.
Example: Suppose you want to copy measures 1 and 2 in the following passage (see image), to give measures 3 and 4:
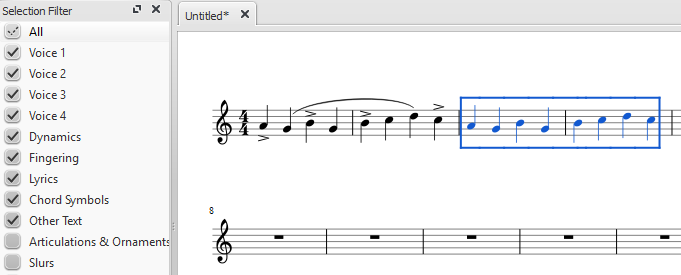
- Make sure the Selection Filter is displayed (see above);
- Uncheck the "Articulations & Ornaments" and "Slurs" tickboxes;
- Copy and paste the desired measures (in this example, 1-2 into 3-4).
Undo and redo
MuseScore remembers an unlimited number of undo/redo actions.
The standard shortcuts are:
| Action | Windows & Linux | Mac |
|---|---|---|
| Undo | Ctrl+Z | Cmd+Z |
| Redo | Ctrl+Shift+Z or Ctrl+Y | Cmd+Shift+Z |
Or use the toolbar buttons: 
Viewing and navigation
This chapter describes the options available in the View Menu, and in the Zoom and Page View/Continuous View menus (located in the toolbar above the score). It also details the various navigation commands and functions.
View menu
Show sidebars/panels
- Palettes: F9
- Master palette: Shift+F9 (Mac: Fn+Shift+F9)
- Inspector: F8 (Mac: Fn+F8)
- Play Panel: F11 (Mac: Fn+F11)
- Navigator
- Timeline: F12
- Mixer: F10 (Mac: Fn+F10)
- Synthesizer
- Selection filter: F6 (Mac: Fn+F6)
- Piano keyboard: P
- Score comparison tool
Zoom in/out
There are several ways to zoom the score in or out:
-
Keyboard shortcut:
- Zoom In: Ctrl++ (Mac: Cmd ++)
- Zoom Out: Ctrl +- (Mac: Cmd +-).
-
View menu:
- Zoom In: View→Zoom In
- Zoom Out: View→Zoom Out.
-
Mouse
- Zoom In: Scroll up with the mouse wheel while holding down Ctrl (Mac: Cmd)
- Zoom Out: Scroll down with the mouse wheel while holding down Ctrl (Mac: Cmd).
-
Drop-down menu: To set a specific zoom, use the dropdown menu in the standard toolbar to set the view magnification of the score (25–1600 %) or display it using the options "Page Width", "Whole Page", or "Two Pages".
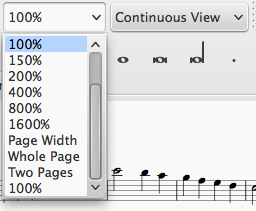
You may type a custom zoom % into the dropdown field if your desired zoom level isn't available by default. -
To return to 100% zoom: Use the shortcut Ctrl+0 (Mac: Cmd+0).
Toolbars
The Toolbar area is located between the Menu bar and the document window.

It contains the following toolbars:
- File Operations: New score, Load score, Save, Print, Undo, Redo.
- Zoom/Page View.
- Playback controls: Enable MIDI, Rewind, Play/Stop, Loop, Play Repeats, Metronome.
- Concert Pitch: Displays score in written or concert (sounding) pitch.
- Image Capture: Allows you to take a snapshot of part of the score.
- Note Input: Note entry mode, Duration, Tie, Rest, Accidentals, Flip stem direction, Voice (1, 2, 3, 4).
Show/hide toolbars
To show or hide certain toolbars:
- Select View→Toolbars, and tick/untick the options as required.
- Alternatively, right-click on an empty space in the toolbar area, or the title bar of the Inspector, and, from the menu, check or uncheck the required options.
Note: This option also allows you to show or hide the Timeline, Score Comparison Tool, Script Recorder, Piano Keyboard, Selection Filter, and Drumset Tools.
Customize toolbar area
-
Select View→Toolbars, and click on "Customize Toolbars…"
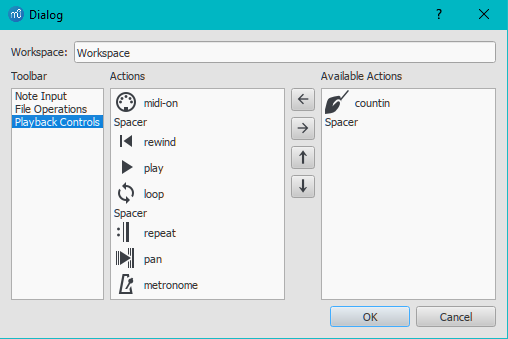
The dialog shows the toolbars that can be customized on the left, the current tool buttons for the selected toolbar in the middle, and the buttons that can be added on the right. When you have selected a toolbar in the left panel, you can do any of the following actions:
- Remove a toolbutton: Select the button in the middle panel, and press →.
- Add a toolbutton: Select the button in the right panel, and press ←.
- Move a toolbutton: Select the button in the middle panel, and move it up or down using ↑ or ↓.
Note: The toolbar cannot be customized unless a custom workspace is selected (see below).
Workspaces
Select this option to create a custom workspace or to edit an existing workspace.
Show Status bar
The Status bar, at the bottom of the screen, gives information about selected score elements. Tick/untick this option to display or hide.
Split display
It is possible to split the document display so as to view two documents at once, or to view two different parts of the same document. Tabs allow you to choose which document to display in each view. You can drag the barrier separating the two scores to adjust the amount of space in the window devoted to each:
- Documents Side by Side: Divides the window vertically into two score views.
- Documents Stacked: Divides the window horizontally into two score views, one above the other.
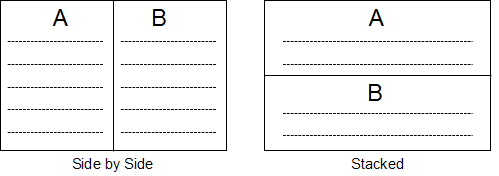
Visibility options
This section allows you to display or hide various non-printing elements:
- Show Invisible: View/hide elements that have been made invisible for printing and export. If this option is ticked, invisible elements are shown in the score window as light gray.
- Show Unprintable: View/hide breaks and spacer symbols.
- Show Frames: View/hide the dotted outlines of frames.
- Show Page Margins: View/hide Page Margins.
Mark irregular measures
A plus sign or minus sign at the top right of a measure indicates that its duration differs from that set by the time signature.
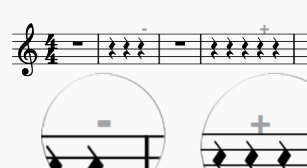
Full screen
Full Screen mode expands MuseScore to fill your screen so more content is visible.
Page/Continuous View
You can switch between different views of the score using the drop-down list in the toolbar area:
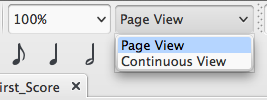
To scroll the score:
- Vertically: Move the mouse wheel up or down.
- Horizontally: Press Shift and move the mouse wheel up or down.
Page View
In Page View, the score is formatted as it will appear when printed or exported as a PDF or image file: that is, page by page, with margins. MuseScore applies system (line) and page breaks automatically, according to the settings made in Page settings and Style…. In addition, you can apply your own system (line), page or section breaks.
To choose between horizontal or vertical page scrolling, see Preferences: Canvas (Scroll pages).
Continuous View
In Continuous View, the score is shown as one unbroken system. Even if the starting point is not in view, measure numbers, instrument names, clefs, time and key signatures will always be displayed on the left of the window.
Note: Because the layout is simpler, MuseScore may perform faster in Continuous View than Page View.
Single Page View
In Single Page View the score is shown as a single page with a header but no margins, and with an infinite page height. System (line) breaks are added automatically, according to the settings made in Page settings and Style…. In addition, you can apply your own system (line) or section breaks.
Side panels
The workspaces, Inspector and Selection filter are conveniently displayed as side panels to the left and right of the score window. To undock a side panel use one of the following methods:
- Drag the panel;
- Click on the double chevron at the top of the panel;
- Double-click in the title area at the top of the panel.
To dock a panel use one of the following procedures:
- Drag the panel to the top/bottom of an existing side panel and it will stack vertically above/below that panel.
- Drag the panel to the middle of an existing side panel and it will overlay that panel. Both panels can then be accessed by tabs.
Alternatively, double-clicking the title bar of the panel will restore it to its previously docked position.
Navigation
Commands
Various commands are available to help you navigate more easily through the score. These are listed under Keyboard shortcuts: Navigation.
Navigator
The Navigator is an optional panel which displays page thumbnails of the score at the bottom or to the right of the document window.
- To view or hide the Navigator, select View→Navigator; or use a customized shortcut.

The Navigator appears at the bottom of the document window if scrolling pages horizontally; or on the right if scrolling pages vertically (see Preferences: Canvas).
The blue box represents the area of the score that is currently visible in the document window: drag the box, or click directly on the navigator panel to bring another part of the score into view. You can also drag the scrollbar.
Timeline
The Timeline panel provides a detailed overview of the score, with expanded possibilities for navigation and interaction.
- To display the Timeline, press F12; or select View→Timeline.
For details, see Timeline.
Find / Go to
The Find / Go to function allows you to speedily navigate to a specific measure, rehearsal mark or page number in the score:
- Press Ctrl+F (Mac: Cmd+F), or select Edit→Find. This opens the Find (or Go to) bar at the bottom of the workspace.
-
Use one of the following options:
- To go to a numbered measure: enter the measure number (counting every measure, starting with 1, irrespective of pickup measures, section breaks or manual changes to measure number offsets).
- To go to a numbered page: enter the page number using the format pXX (where XX is the page number).
- To go to a numerical rehearsal mark: enter the number using the format rXX (where XX is the name of the rehearsal mark).
- To go to a rehearsal mark starting with a letter: enter the name of the rehearsal mark (the search is case insensitive).
N.B.: It is best to avoid naming rehearsal marks with the single letters "R", "r", "P", "p", or one of these letters with an integer (e.g. "R1" or "p3"), as this can confuse the search algorithm.
Note: The "Pan score automatically" toolbar button must be enabled for the Find command to be able to reposition the score view to the correct location.
See also
Concert pitch
You can choose to display the score in either written or concert (sounding) pitch. Written pitch displays the score as it should look when printed for musicians to read. However, during preparation you may prefer the convenience of seeing the transposing instruments notated as they sound, without transposition. In this case you should select the "Concert pitch" option.
To toggle the score display between written or concert pitch:
- Press the Concert Pitch button (located in the top right of the toolbar area). When this button is highlighted the score is in concert pitch.
Before printing the score, exporting it to PDF or saving it online, you should ensure that the Concert Pitch button is off, and that the individual parts are correctly transposed.
See also
External links
- Concert pitch (Wikipedia article)
- Transposing Instrument (Wikipedia article)
- Concert pitch or not? (MuseScore forum discussion)
Copy and paste
The cut, copy, and paste commands can be used to reproduce entire passages of music, to move music earlier or later, to copy text or other markings between staves, to exchange the content in different measures, and more.
Accessing the commands
In all cases, the first step is to create a selection of element(s), see Selecting elements chapter.
As with other programs that support cut, copy, and paste, you can access these commands from the Edit menu, from a context menu that appears upon right-click or related gesture (e.g., Ctrl+click, or two-finger tap), or via the standard keyboard shortcuts.
| Command | Shortcut (Windows) | Shortcut (Mac) | Context menu | Main menu |
|---|---|---|---|---|
| Cut | Ctrl+X | Cmd+X | Cut | Edit→Cut |
| Copy | Ctrl+C | Cmd+C | Copy | Edit→Copy |
| Paste | Ctrl+V | Cmd+V | Paste | Edit→Paste |
| Swap with clipboard | Ctrl+Shift+X | Cmd+Shift+X | Swap with Clipboard | Edit→Swap with clipboard |
| Paste half duration | Ctrl+Shift+Q | Cmd+Shift+Q | N/A | Edit→Paste half duration |
| Paste double duration | Ctrl+Shift+W | Cmd+Shift+W | N/A | Edit→Paste double duration |
Note: (1) When using the context menu, take care to always right-click on a selected item; if you right-click on an empty space by mistake your selection will be lost! (2) Paste half/double duration requires Musescore 3.1 version or later.
Copying a Range Selection
As explained in the Selecting Elements chapter, in a Range selection, Musescore automatically selects useful elements between given beginning and ending time positions across a given set of staves. These elements includes all of the notes, rests, Musescore Texts such as dynamics symbols, Musescore Lines such as pedal etc. System-wide elements such as Tempo, Time signatures, Repeats, Layout breaks are not included in the automatic selection, thus are not copied.
Upon pasting onto a destination time position, the copied music replaces all of its existing content, except for its original measure rhythm structure and system-wide elements.
- Create a Range Selection.
- (Optional) Use the Selection Filter to exclude other elements of a given type.
- Use the Copy command from the menu or press Ctrl+C (Mac: Cmd+C)
- Select the first note or rest of the destination
- Use the Paste command from the menu or press Ctrl+V (Mac: Cmd+V)
Copying a single element or a List Selection
(Copying a List Selection requires Musescore 3.5 version or later)
MuseScore also allows copying a single element, or a List Selection of multiple lyrics, chord symbols, dynamics, articulation, or other markings from one place to another, while keeping the content such as notes in the destination intact.
If a single note selected by notehead, upon copying only the pitch is copyed into the destination note. To copy and paste everything, including duration etc, create a Range Selection of the note first, see Selecting Elements chapter. Pitch only feature is removed in Musescore 4.
Multiple notes List Selection cannot be copied.
MuseScore preserves the relative time positions of the markings based on literal note value distance if possible, measure rhythm is not taken into account. This includes case of copying chord symbols and dynamics. Valid note or rest anchors are required at the destination music when pasting lyrics and articulations.
- Select a single element (except Measure), or create a List Selection , see Selecting Elements chapter.
- Use the Copy command from the menu or press Ctrl+C (Mac: Cmd+C)
- Select the first note or rest of the destination
- Use the Paste command from the menu or press Ctrl+V (Mac: Cmd+V)
Moving elements
Cut and paste commands can be used to
- move a passage to another staff, such as music on flute to clarinet, or
- shift a passage earlier or later. This method is especially useful as a way to insert or delete a note or rest and also shifts existing notes and rests to create or trim silence.
Measures (their rhythmic structure) cannot be moved, but see Measure operations and Time signatures chapters. When moving List Selection, its elements' relative positions are preserved if possible, see "Copying a List Selection" section.
To move a selection:
- Select what you want to move
- Use the Cut command from the menu or press Ctrl+X (Mac: Cmd+X)
- Select the first note or rest of the destination
- Use the Paste command from the menu or press Ctrl+V (Mac: Cmd+V)
Swapping a selection with the clipboard
The swap with clipboard command combines two operations into one: (1) First it overwrites a selected part of the score with the contents of the clipboard, just like the paste command; (2) Second, it transfers the overwritten part of the score back to the clipboard, just like the copy command.
It can be used, for example, to swap two equal-length sections of a score, A and B:
- Select section A
- Apply the cut command
- Select section B
- Apply the swap with clipboard command to paste A over the contents of B while moving the contents of B to the clipboard
- Select section A again (or just the first note, rest, or measure)
- Apply the paste command
Like the other commands discussed here, you can access the swap with clipboard command from the menu or via a keyboard shortcut—in this case, it is Ctrl+Shift+X (Mac: Cmd+Shift+X).
Repeating a selection
A common use for copy and paste is to duplicate a given passage (including notes, chords etc) immediately after the original. Use the special repeat selection command to simplify this process.
- Select a single element on the score, or create a Range Selection, see Selecting Elements chapter.
- Press R
This does not work on List Selection. It works on a single chord, either on a Range Selection of it, and when exactly one note of that chord is selected. See Selecting Elements chapter. In note input mode, this command repeats the entire chord that contains the current note. This is useful for creating a series of repeated chords.
Copying a Range Selection to multiple staves
If you wish to copy a passage to multiple staves—for instance, to double music of flute with oboes and clarinets&mdash:
- Select the passage you wish to copy
- Extend the selection to include the staves below (e.g., by pressing Shift+↓)
- Use Tools→Explode
This copies the original selection, assuming it contains only single notes—no chords and no multiple voices. If there are chords or multiple voices, then these are distributed among the remaining staves. For more on Explode command, see Tools chapter.
Paste half/double duration
Requires Musescore 3.1 version or later.
If you have entered a passage using mostly eighth notes but wish to halve the entire passage to using mostly sixteenth notes, or double it to quarter notes, MuseScore provides a pair of special commands to accomplish this. You can either modify the durations of a selection in place or create a separate copy of the passage with the modified durations. To halve or double the duration of a passage:
- Create a Range Selection
- Use the copy command
- If you wish to create a separate copy of the passage with the modified durations, select the destination
- Use the paste half duration or paste double duration command Ctrl+Shift+Q/W ( Cmd+Shift+Q/W)
Duplicating individual elements
Individual elements—even those that are not selected automatically in a Range Selection, like time signatures or voltas—can be selected and then duplicated using a mouse.
- While pressing Ctrl+Shift (Mac: Cmd+Shift), and click and hold on an element
- Drag it anywhere in the score
- When you release the mouse button, the selected element is copied to the new location
See also
- To change notes without altering the rhythm, use Note input mode, select Re-pitch mode, then use copy and paste commands. See Note input modes chapter.
Open/Save/Export/Print
Native format compatibility
MuseScore native format (*.mscz and *.mscx) are backward compatible: MuseScore 4 opens MuseScore 3's *.mscz without error.
MuseScore native format has never been forward compatible, see forum discussion. Although partial data retrieval is still possible as of MuseScore 4.0.2, you should not rely on it for score data integrity. Some features present in MuseScore 3 have not (yet) been included in MuseScore 4, and internal data conversion occurs when you open a older version file with a newer version program and then overwrite the file using the save function.
Some users find it useful to keep all data intact by creating seperate folders to store score files designated for editing on different Musescore versions, it is recommended to duplicate files before opening them as required.
File menu
In the File menu you can find options for opening, saving, exporting and printing your file:
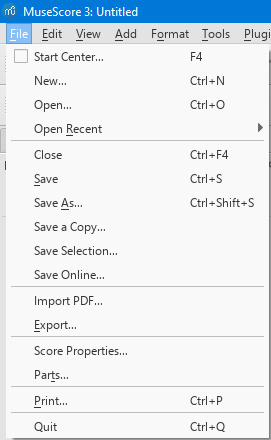
Open
Apart from native format files (*.mscz and *.mscx), MuseScore can also open MusicXML, compressed MusicXML and MIDI files, as well as a variety of files in other formats.
To open any supported file:
- Choose one of the following options:
- Press Ctrl+O.
- Click on the "Load score" icon on the left side of the toolbar area.
- From the menu bar, select File→Open....
- Select a file and click Open; or simply double-click a file.
Open recent allows you to choose from a list of recently-opened scores.
Save
Save, Save As…, Save a Copy… and Save Selection… allow you to save native MuseScore files (.mscz and .mscx).
- Save: Save current score to file.
- Save As...: Save current score to new file.
- Save a Copy...: Save current score to new file, but continue to edit original file.
- Save Selection...: Save selected measures to new file.
- Save Online...: To save and share your scores on the web at MuseScore.com. For details, see Share scores online.
Export
Export... allows you to create non-MuseScore files, such as PDF, MusicXML, MIDI, and various audio and image formats. In the Export dialog, you can choose which format to export to.
- Export...: Export current score to format of your choice.
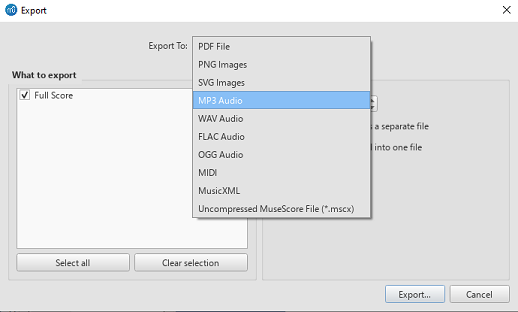
Here you can also select whether to export parts and which
MuseScore remembers which format you picked the last time and makes that the default for the next time.
Print... allows to print your MuseScore file directly to a printer from MuseScore. Depending on your printer you will have different options, but generally you can define the page range, number of copies and collation.
If you have a PDF printer installed, you could also "export" to PDF using Print, but it's usually better to use the native PDF option under Export for more accurate rendition. Note: For this to work properly with Adobe PDF, make sure to uncheck "Rely on system fonts only, do not use document fonts" in Printer properties.
See also
Share scores online
Musescore.com allows you to:
- View and listen to scores from a large repository created by the MuseScore community.
- Download any score in a variety of formats—MuseScore, MusicXML, PDF, MIDI, MP3.
- Upload your own scores: control whether to share them publicly or privately (via a secret link).
- Synchronize your score with a YouTube video ("Videoscores").
Note: A MuseScore Pro account is required for all scores not marked as PD (Public Domain) or "Original" work, the latter must also have the approval of the score owner.
Create an account
- Visit MuseScore.com and click on "Create new account". Pick a username and enter a valid email and press "Create New Account".
- Wait a few minutes for an email from MuseScore.com support. If no email arrives, check your spam folder.
- Click the link in the email and visit your user profile to change your password.
Share a score directly from MuseScore
To save a score online:
- Make sure that the Concert Pitch button is off, and that the individual parts are correctly transposed.
-
From the menu, select File→Save Online.... The "Log in to MuseScore" dialog will appear:
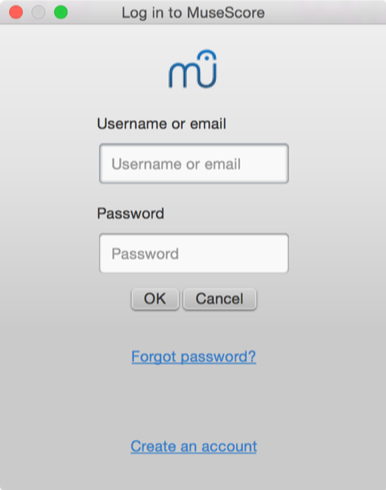
-
Enter your email address or MuseScore username, and password, then click OK. Note: If you don't have a MuseScore account yet, create one first by clicking on the "Create an account" link. That will open your browser app and bring you to musescore.com/user/register.
-
Upon successfully logging in and if the score already exists online, it will be updated automatically. Uncheck Update the existing score to save online as a new score.

-
If you are using a different SoundFont than the default one and if you are able to export MP3 files (may not be the case on some Linux versions), a checkbox Upload score audio will be visible:

If the checkbox is checked, MuseScore will render the audio of the score using the current synthesizer settings and upload the audio to MuseScore.com. -
Now you'll be able to enter your score information.
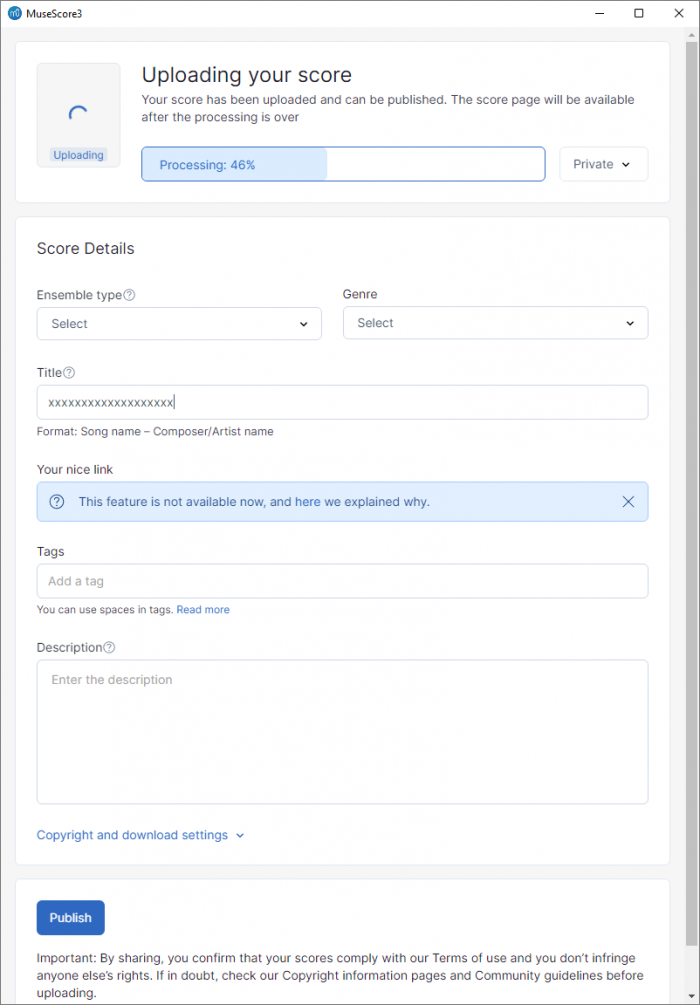
- Make the score private: If selected, the score can only be viewed via a private link. If set to public, the score is visible to all.
- Ensemble type: A list of possible values
- Genre: A list of possible values
- Title: The title of the score.
- Description: The descriptive text that will appear next to it.
- Copyright and download settings: Choose an appropriate copyright license from the drop-down list.
Note: Creative Commons license, allows people to use your scores under certain restrictions.
Here you also can restrict the ability of others to download your score (requires a Pro membership on MuseScore.com).
Upload a score on MuseScore.com
You can also upload a score on MuseScore.com directly:
- Click the Upload link on MuseScore.com.
- You have the same options as with the Save Online menu, except for uploading score audio.
Edit a score on MuseScore.com
If you want to make changes to one of your scores on MuseScore.com, edit the MuseScore file on your own computer, save it, and then do the following:
- If you originally shared the score directly from within MuseScore, simply go to File→Save Online... again to update the online score.
- If you originally uploaded the score via the Upload page on MuseScore.com, then you must follow these steps to update the online score:
- Go to the score page on MuseScore.com.
- Click the three dots menu ⋮ on the right and choose "Update this score".
- In the form, you can upload a replacement score file as well as change the accompanying information and privacy settings.
Switch to the direct method of updating an online score
It is much more convenient to update online scores from directly within MuseScore than by updating the score manually from the score page. Follow these steps if you originally uploaded the score via the Upload page and now want to switch to the direct method:
- Go to the score page on MuseScore.com and copy the URL.
- Open the score file on your computer with MuseScore.
- From the menu, select File→Score Properties... and paste the URL into the "Source" field.
Now whenever you want to update the online score simply go to File→Save Online....
Note: The URL should be follow the format of https://musescore.com/XXXXXXXX/scores/XXXXXXXX and should not contain 'Nice Link's.