基础操作
创建乐谱
概述
本章重点介绍乐器设置和基本乐谱信息设置。您应该已经熟悉了 Musescore 的基本工作流程,该工作流程在快速入门教程创建您的第一个乐谱中有所涵盖。
乐器
在 Musescore 中,一个乐器是一个抽象概念,包含了指法谱或五线谱(参见页面布局概念:谱表),记谱风格(谱号、符头等)、音乐行为(移调、演奏范围)以及为 Musescore 合成器创建的播放音频相关的设置。
一个 Musescore 乐器包含可以代表单个或多个真实世界乐器的五线谱,例如在贝多芬的《交响曲第3号,作品55》中,由Cianchettini&Sperati出版,n.d.[1809]伦敦的第三谱表Corni 1 & 2 in Eb代表两个法国号:
NOT FOUND: corni1.png
要转录此内容,您应该添加一个Musescore乐器“圆号”并选择Eb调,同时将其重命名,命名不影响播放。
NOT FOUND: corni2.png
Musescore 支持很多真实世界的乐器、乐器组、人声和合唱,有几种方式:
- 具有相同名称的 Musescore 乐器,例如“钢琴”、“小提琴”、“小提琴组”、“弦乐”、“女高音”、“声乐”、“女声”以及一些打击乐器,如“定音鼓”、“管弦乐大鼓”、“钹”(管弦)。相似的项目可能具有不同的播放效果。
- “鼓组”,一个包含“军鼓”、“踢鼓”、“低音鼓”、“高音筒鼓”、“钹”等项目的单个谱表。这些没有单独的MuseScore乐器。参见定制鼓组
- Musescore 也提供一个短小的 用刷子演奏的军鼓音色,参见混音器。
也可以使用从模板创建新的乐谱,您还可以在任何分谱中设置乐器。
MuseScore 包含500多种乐器,请参阅 https://musescore.org/en/instruments。要向我们建议添加缺失的乐器,请参阅 https://musescore.org/en/contribute。
选择乐器
创建新乐谱时,您可以在新建乐谱对话框中单击打开选择乐器选项卡。在"创建乐谱后更改乐器"中提到的某些方法也会打开此窗口。
乐器按左侧乐器族标题下的下拉菜单中显示的类型/流派进行过滤。默认情况下选择“常见”,这会显示您可能需要的一些最常见的乐器或音色。注意:要显示所有可用的乐器,必须选择“全部乐器”。
乐器按其所属的乐器族分组。如果您知道您要查找的乐器/音色,只需在乐器标题下的搜索栏中输入其名称或部分名称即可。按下清除按钮(X)清除选择。
添加乐器
要向您的乐谱添加乐器:
- 双击乐器下的一个乐器
或
- 选择乐器下的一个乐器
- 单击→按钮将乐器添加到您的乐谱中(小提示:双击乐器名称也会执行相同的操作)。
乐谱上的谱表按照右侧您的乐谱标题下显示的顺序排列。次序 … 下拉菜单会显示当前使用的谱表顺序预设。
通过使其独奏来更改乐器的顺序
独奏乐器的排序顺序在乐谱上与其他乐器是不一样的。例如,在“管弦乐队”预设中,独奏者位于弦乐之上。独奏并不意味“乐谱上只有一个”。
您可以在您的乐谱标题下的次序 …下拉列表中选择样式。
要将乐器(其所有谱表)重新排列独奏:
- 选择您的乐谱下的一个乐器
- 单击“使其独奏”按钮。
手动更改乐器顺序
要手动更改乐器的顺序:
- 选择您的乐谱面板下选择一个乐器
- 单击↑或↓以更改其位置
删除乐器
要从您的乐谱中删除乐器:
- 双击您的乐谱下的一个乐器
或
- 选择您的乐谱下的一个乐器
- 单击垃圾桶图标

您还可以通过首先按住Shift并选择多个乐器,然后单击垃圾桶图标一次删除多个乐器。
从模板创建
您也可以用预置好的模板创建乐谱。模板根据音乐风格或编制分为多个类别。模板中有这种编制通常使用的乐器,乐器的顺序和排版也符合惯例。
要从模板创建乐谱:
- 单击从模板创建
- 从类别面板中选择一类模板
- 从中间的面板中选择所需的模板
- 单击完成
您还可以在搜索栏中搜索所有可用的模板。
访问Templates and styles了解更多模板信息,包括如何创建自己的模板。
附加乐谱信息
在新建乐谱对话框中单击下一步以指定附加乐谱信息屏幕中的其他信息,例如调号、拍号、速度、起始小节(弱起小节)和小节数。
请注意,这是在创建新乐谱时添加信息的一种方便方法,但不是唯一的方法。您可以随时使用其他方法修改乐谱的附加信息,例如键盘快捷键、使用符号面板、项目属性等。
调号
默认情况下,新的乐谱创建时带有一个不带升降号的调号(C大调)。单击调号下的按钮指定不同的调号。默认显示大调,可以通过选择小调选项卡显示小调。
拍号
创建新乐谱时拍号默认为 4/4 拍。单击拍号下的按钮更改此设置。使用文本框中的箭头更改每小节的拍数,右边的下拉菜单选择以几分音符为一拍。您也可以在弹窗中选择 common(C拍号,4/4拍)和cut-common(¢拍号,2/2拍)两种拍号。
速度
默认情况下,新的乐谱将以每分钟120个四分音符的速度播放。新乐谱中不会自动包含速度记号。
要自定义起始播放速度,并在最上面的五线谱上显示速度记号:
- 单击速度下的按钮
- 勾选在我的乐谱上显示速度记号
- 选择所需的速度值
- 在文本框中输入所需的每分钟拍数(20-400),或使用上下箭头调整。
在速度记号中了解更多关于速度文本、节拍标记和播放速度的信息。
小节
新的乐谱创建时默认有32个小节且没有弱起。要更改新乐谱的起始小节数:
- 单击小节下的按钮
- 在初始小节数字段中输入所需的小节数
您可以在这里找到如何在创建乐谱之后增加或删除小节。
若要让乐谱以弱起开始:
- 单击小节下的按钮
- 勾选创建弱起小节
- 在文本框中输入弱起小节的所需拍数
- 从下拉菜单中选择弱起小节的节拍值
您随时可以创建弱起小节。你可以在这里找到如何在创建乐谱之后增加弱起与拍不准小节。
标题和其他文本
在新建乐谱对话框底部的文本框中输入文本,MuseScore 将自动以适当的格式将其放置在您的新乐谱中。您可以为乐谱输入文本标签:
- 标题
- 作曲家
- 副标题
- 作词人
- 版权
此信息也同时成为乐谱的项目属性(文件菜单中)中的数据,您可以随时更改它。
一旦您完成乐谱信息的输入,点击完成将会保存您的输入并创建乐谱。
在创建乐谱后更改乐器
以下是三种可以在创建乐谱后修改乐器的方法:
输入音符和休止符
本章仅解释了在标准五线谱上的音乐创作,还请参阅指法谱和打击乐谱章节。
概述
通过电脑键盘输入音乐既快捷又容易。要输入音符或休止符,只需选择一个时值,然后键入音名(A - G),或为休止符键入0(零)。您还可以使用鼠标,MIDI 键盘或 MuseScore 自己的虚拟钢琴键盘输入音符(详细信息见下文)。
MuseScore 支持几乎无限的撤销,所以你不必太担心输错。要撤销输入,只需单击工具栏最右边的撤销按钮,或使用标准键盘快捷键Ctrl+Z(Mac: Cmd+Z)。
输入音符
本页的信息主要涵盖如何在标准五线谱上输入音符。其他类型乐谱的输入请参考指法谱和打击乐谱。
最常见的输入方法,也是本页面所教的方法是每次输入一个音符或休止符。在这里你可以找到其他输入音符的方法.
选择一个起点
要在乐谱中添加音符或休止符,首先你应该选择开始添加的位置。你可以使用鼠标或键盘导航指令来选中。

进入音符输入模式
接下来,您可以点击工具栏中的钢笔按钮或使用键盘快捷键N进入音符输入模式。屏幕上将会显示一个光标告诉您哪里将被插入音符。

如果您忘记在进入音符输入模式前选择一个输入起点,音符输入可能会从上一次输入音符的地方继续,或者是从一些其他的地方开始。因此在输入音符前,请确认光标在您预设的位置上。
进入音符输入模式后,您可以从前到后输入音符。首先您应该选择时值,然后输入音高或休止符。当您一个地方输完了音符,想要做一些其他的事情——例如在别的地方输入音符,添加记号,或执行其他操作(如复制或粘贴)——的时候,您可以单击音符输入按钮或者再次按N。您也可以按Esc返回到正常模式。
选择时值
在音符输入模式下,您可以按照以下几种方法为下一个被输入的音符选择时值:
- 在音符输入工具栏直接单击对应的音符图标(在乐谱的正上方)
-
使用键盘快捷键1–9选择对应的时值

使用键盘快捷键可以高效地选择时值。最常见的时值是八分音符、四分音符、和二分音符,他们对应的键盘快捷键是4、5、6(数字小键盘的中间一行)。较短的时值用较小的数字表示,较长的时值用较大的数字表示。完整快捷键列表如下:
- 六十四分音符:1
- 三十二分音符:2
- 十六分音符:3
- 八分音符:4
- 四分音符:5
- 二分音符:6
- 全音符:7
- 二全音符:8
- 四全音符:9
- 附点:. (使音符或休止符带上附点)
其他时值,例如复附点或一百二十八分音符,可以通过自定义工具栏或修改键盘快捷键输入。
注:如果您设置了对应的按键,您也可以使用 MIDI 键盘选择时值。
输入音符
在选择了一个时值之后,您可以使用电脑键盘、鼠标、MIDI 键盘或虚拟钢琴键盘输入音符。
使用电脑键盘输入音符
这几乎是 Musescore 里最高效的输入音高的方法。
只需在键盘上按下您想要输入的音的音名(A–G),您就可以轻松地输入音符。

使用这种方式输入的音符会替换掉光标处任何已有的音符或休止符。若您想要在现有音符或和弦中添加一个音,您需要在输入音符的时候按住Shift。您可以在下面的输入和弦部分学到更多信息。
当你通过音名输入音符的时候,Musescore 将自动选择最接近前一个音符的音高。如果您想要更大的跨度,您可以按Ctrl+↑或Ctrl+↓ (Mac:Cmd+↑或Cmd+↓)使刚才输入的音符升高或降低一个八度。
使用鼠标输入音符
要使用鼠标输入音符,您需要将鼠标放置在五线谱中的您想要的线或间上,然后单击。鼠标光标将显示您即将输入的音符的预览,以帮助您准确地放置它。

如果在您输入音符的位置已经有一个存在的音符,新的音符将会添加在已有音符的上方或者下方。如果想要替换现有的音符,您可以在单击鼠标的同时按下Shift。
使用这种方法很难直接输入很高的或者很低的音,因为 Musescore 可能会以为您想要在上面或下面一个谱表输入音符。您可以尝试在高八度或低八度的位置输入对应的音符,然后通过按Ctrl+↑或Ctrl+↓(Mac:Cmd+↑或Cmd+↓)使您刚才输入的音高一个八度或低一个八度。
注:虽然一般情况下,音符是从前到后被输入的,但鼠标输入实际上允许您在现有乐谱中的任何一个位置输入音符。
使用 MIDI 键盘输入音符
如果您有一台 MIDI 键盘连接到您的电脑上,您可以通过按下对应的键输入对应的音符。
当您在 MIDI 键盘上输入音符时,如果您在输入下一个音符前完全松开上一个键,音符就会被连续地输入,否则,新的音符将会被添加到原有音符的上方或下方。
使用 MIDI 键盘输入的音符可能会自动使用变音号,但是这些变音号可能不符合您的预期。您可以通过按下J改变变音号的形式。
使用虚拟钢琴键盘输入音符
您也可以通过钢琴键盘窗口输入音符。您可以在视图→钢琴键盘或按下键盘快捷键P打开或关闭这个窗口。

要输入某个音高的音符,只需用鼠标单击对应的钢琴键。
与使用电脑键盘输入音符一样,以这种方式输入的音符会自动替换掉任何现有的音符或休止符。如果您想要创建和弦,请在输入音符的同时按下Shift。
注:如果您想改变虚拟钢琴键盘的大小,您可以先选中虚拟钢琴键盘窗口,然后按住Ctrl(Mac:Cmd)同时向上或向下滚动鼠标滚轮。
输入和弦
在本节中,和弦是指在同一时间开始的多个音符的组合,且这些音符都具有相同的时值且共用一个符干。

如果您希望输入两个音,但是它们的开始时间、持续时间或是结束时间不同,或不共享同一个符干,请参见声部。形如“Dm7”的文本是一个和弦记号,参见和弦记号.
就像输入单个音符一样,和弦可以通过电脑键盘、鼠标、MIDI 键盘或虚拟钢琴键盘被输入。除了在 MIDI 键盘上您可以一次演奏多个音符以外,音符输入仍然是一次一个,你需要以某种方式告诉 MuseScore 将它们组合成一个和弦,而不是按顺序添加它们。
- 要使用电脑键盘在和弦中添加一个音符,请在输入音符时按住Shift
- 要使用鼠标在和弦中添加一个音符,请直接单击您想要添加音符的地方
- 要使用 MIDI 键盘在和弦中添加一个音符,您可以同时弹奏全部的音符,或者一次弹奏一个,但是在按下下一个音符前不要松手
- 要使用虚拟钢琴键盘在和弦中添加一个音符,请在输入音符时按住Shift
当您使用Shift+A–G往和弦中添加一个音符的时候,该音符将被添加到光标处的任何一个已经存在的音符的上方。您也可以基于音程来输入音符。
- 要在选中音符上方添加音程,你可以:
- 在菜单栏中选择添加→音程然后从列表中选择一个音程;
- 使用键盘快捷键Alt+1-9。
- 要在选中音符下方添加音程,您可能需要自定义键盘快捷键(参见偏好设置)。
输入休止符
休止符可以通过电脑键盘或鼠标被输入。选择休止符的时值的方式与选择音符的时值的方式相同(例如,您可以使用键盘快捷键1–9)。选择时值之后,您不需要像输入音符那样输入音高,而是:
- 使用电脑键盘:按下0(零)
- 使用音符输入工具栏:点击休止符按钮,然后点击乐谱上对应的位置
-
使用鼠标:在乐谱上右键

变音号

标准的变音号(还原号、升号、降号、重升号、重降号)既可以在输入音符前被选中,也可以在现有的音符上被添加。
在输入音符之前选中变音号
要想指定下一个被输入的音符的变音号,您可以点击乐谱上方的音符输入工具栏中的对应按钮或者使用对应的键盘快捷键。 这步操作既可以在选择时值之前完成,也可以在选择时值之前完成。

默认的键盘快捷键是:
- 降号:-
- 升号:+
- 还原号:=
与时值不同,变音号的选择仅对下一个被输入的音符有效。但是通常的记谱规则仍然适用,即如果你给一个音符加了降号,那么你在同一小节中输入的任何相同音高的后续音符也会被降音,即使它们没有明确的写在乐谱上的降号。
在输入音符之后添加变音号
当你升高或降低被选中音符的音高时,合适的变音号会被自动添加到乐谱中:
- ↑:使音符上升一个半音(使用升号)。
- ↓:使音符下降一个半音(使用降号)。
您也可以通过点击符号面板→变音号中的适当图标向现有音符添加一个变音号。符号面板里面还包含了大量的微分音记号或是其他特殊的变音号。
添加辅助变音号
尽管记谱规则确定同一小节内的同一个音共用变音号,下一个小节里的同一个音会回到到原来的音高,但无论如何,添加辅助 变音号可以帮助演奏者更顺畅地识谱。这不会改变音符的音高,所以它们不能够通过键盘快捷键↑和↓被添加。然而,您仍然可以使用前面所说的其他几种方法添加辅助变音号。
虽然辅助变音号不需要括号或者方括号,但是有一部分人仍然习惯给这些记号加一个括号。如果您想向一个变音号外围添加一个圆括号或者方括号,您需要暂时退出音符输入模式,然后在属性面板里面选择您想要的括号类型,或者在符号面板的变音号菜单里面的更多里面找到括号。
注:Musescore 还预装了一些插件,您可以使用它们来根据需要自动添加辅助变音号。
延音线
延音线是连接两个具有相同音高音符的曲线,表示了它们要作为一个组合音符被演奏。尽管延音线和圆滑线十分相似,但是您不应该将这两者混淆。圆滑线将不同音高的音符连接在一起,并表示不同的发音。
在 Musescore 里输入延音线十分容易,因为延音线总是出现在具有相同音高的音符之间。所以你不需要输入第二个音符的音高,只需要选择时值并输入延音线,Muesecore 会自动添加一个新的音符。要想创建一个延音线,你应该:
- 为第二个音符选择时值
-
单击工具栏上的延音线按钮或使用键盘快捷键T

延音线会自动添加第二个音符,并直接将这个音符与第一个音符绑定。如果你选中的第一个音符是一个和弦的一部分,延音线会为第二个音符创建完整的一个和弦。和弦里的每个音与前面一个和弦完全相同,且每个对应的音之间用延音线连起来。

连线位置(可选)
在 MuseScore 4.1 版本之前,默认行为是将单个音符的连线绘制到外部(连接音符头部的顶部/底部),将和弦的连线绘制到内部(连接音符头部的右侧和左侧)。从 MuseScore 4.2 开始,单个音符和和弦的连线位置现在可以配置为任何方式;新乐谱的默认设置是所有连线都绘制在外部。除了全局风格设置(在 格式 > 样式 > 圆滑线与延音线 > 延音线 中),还可以为任何特定连线使用设置(通过 属性 > 延音线位置)。
注:尽管延音线通常用来连接相同声部中的两个相邻音符,但是 MuseScore 同样支持连接两个非相邻的音符,以及连接两个不同声部的音符。参见编辑音符和休止符。
另请参阅
处理多声部
概览
MuseScore 的一个 声部 是谱表上的一行音乐,其节奏与同一谱表上的其他音乐独立。其他软件可能将其称为“层”。
“声部”在另一个意义上也可能指代声乐音乐中的音域——女高音、女中音、男高音、男低音等。重要的是不要混淆这两个含义,比如假定 SATB 合唱中的四个“声部”等同于 MuseScore 的“声部” 1–4(见下文);那就是把两者搞混了。
MuseScore 允许在一个谱表中 最多使用四个声部:声部1、声部2、声部3 和声部4。当在谱表上书写音乐时,通常从声部1开始,然后转到声部2。声部3 和声部4 较少使用。
同一谱表上的两个声部通常使用对立的符杆来表示——上声部符杆向上,下声部符杆向下:

在一个标准的 SATB 编配中,你会在上谱表上使用声部1和2,用于女高音和女中音,下谱表上使用声部1和2,用于男高音和男低音:

在多个声部输入音符和休止符
输入多个声部的第一步是确定你需要将音符作为 一个谱表 中的声部书写,还是将声部分布在 多个谱表 中,比如在钢琴的两个谱表中分布四个声部,或在 多个乐器 中分布四个声部。你应该考虑 MuseScore 的符号功能设计和你的制作需求,不要仅仅基于学术原因做出决定:
- MuseScore 根据使用的声部 以及 每个小节中使用的声部来自动设置符杆方向。在只使用声部1的小节,但没有音符或休止符写在声部2、声部3或声部4上时,音符的符杆方向由音高决定——在中线以上的音符,符杆向下,中线以下的音符,符杆向上。否则,符杆方向根据声部确定——声部1和声部3向上,声部2和声部4向下。
- 要手动分配覆盖符杆方向设置,使用工具栏上的 翻转方向 按钮,或键盘快捷键 X,也可参见 符干和符头。
- 直接在声部2上书写可能在学术上看起来是正确的,但 MuseScore 将自动创建 声部1中的休止符号,这在某些情况下可能是多余的。在这种情况下的流行选择有:之后手动隐藏休止符(这里);或者简单地使用声部1而不是声部2。
- 尚不能为各声部分配不同的音色,因此可能需要使用多个乐器。例如,你不能将女高音 VSTi 分配给声部1,将男高音 VSTi 分配给声部2,只能选择其中一个。
- 有时必须在 一个谱表中使用多个声部,以在 MuseScore 中创建特定的视觉符号结果,即使在音乐上它们并不是不同的声部。例如,在 MuseScore 中,一个和弦只能由持续时间相同的音符创建。如果一个和弦的组成音符持续时间不同,你必须使用不同的声部来书写它们。关于常见类似情况的列表可参见 Musescore 3 使用手册:声部 页。
使用多个乐器
如果你决定需要将不同的声部作为不同乐器上的音符来书写,首先创建多个乐器,使用 创建乐谱:修改乐器,然后根据需要编辑谱表上的谱号,然后在 所有这些谱表上都使用声部1进行创作。 一个常见的例子是在四个乐器的声部1上书写四声部的 SATB 乐谱。
如果您需要将不同的谱表合成同一谱表中的不同声部,或者进行相反的操作,请参见 合并或分解谱表。一个常见的例子是 SATB 开放谱 <-> 短谱的转换,
在一个谱表中输入多个声部的音符和休止符
要在一个声部中输入新的音符:
- 选择你的音乐中的起始点。
- 单击工具栏上的笔图标或按 N 进入 音符输入模式。
- 使用工具栏图标选择所需的声部,或按下键盘快捷键 Ctrl+Alt+1–Ctrl+Alt+4
- 正常输入音符和休止符,如 输入音符 中所述
你可以重复这些步骤来将音符输入到其他声部中。
注意:要输入新的音符,请确保在选择所需声部之前处于 音符输入模式,否则你将 改变当前选择元素的声部。
注意:音符工具栏默认只显示声部1和2的图标。你可以使用工具栏上点击齿轮图标时出现的控件来使所有声部图标可见。有关更多信息,请参见 自定义音符输入工具栏 部分。
编辑多个声部中的音符和休止符
调整休止符
通常情况下,为了显示小节中的所有节拍,每个声部都包含全部的休止符。然而,这可能会导致乐谱看上去乱糟糟的。Musescore 会自动调整休止符的位置以避免休止符与其他声部中的音符发生冲突。但在某些情况下,您可能想要手动调节休止符的位置。在节拍足够清晰的情况下,您可能希望隐藏或删除一些不必要的休止符。
要隐藏、删除或调整这些休止符的位置以创建更好的布局,请使用以下方法之一:

隐藏或删除休止符
可通过选择休止符并在 属性 面板中取消选中 可见 复选框,或使用键盘快捷键 V 来隐藏休止符。
声部2-4 中的休止符也可以通过选择它们然后按下 Delete 来删除。然而,这会留下声部中的“空洞”,以后可能很难编辑。要从声部中恢复丢失的休止符,你可以使用 工具→声部 中的命令来交换声部的内容与声部1的内容,这将再次填补空洞。然后您可以使用相同的操作将两个声部对调回去。
注意:为了确保每个小节持续的时间是正确的,第一声部中的休止符可以被隐藏,但是不可以被删除。
调整休止符的位置
即使 MuseScore 会自动避免休止符与其他声部的音符发生冲突,有时候手动调整休止符的上下位置可以使得休止符到底归属于哪个声部变得更清楚。
要垂直移动休止符,您只需在选中那个休止符之后按下 Up 或 Down ,这会使休止符被移动一定的距离。
有关手动定位的更多信息,请参见 改变元素的位置。
你还可以在 格式→样式…→休止符 中将休止符和其他声部元素之间的默认垂直偏移量从1个间隔改为2个间隔。
更改现有音符的声部
最初输入到一个声部中的音符可以移到另一个声部中,具体取决于情况。有关更多信息,请参见 在正常模式下更改声部。
将声部合并为和弦
在节奏匹配的情况下,原本在多个声部中的音符可以被合并成一个声部中的和弦。有关更多信息,请参见 合并 命令。
将和弦分成声部
将在一个声部中书写的和弦分成不同声部的单独音符时:
另请参阅
其他音符输入模式
如何进入其他音符输入模式
除了默认的阶跃时间音符输入模式,Musescore 还提供了几种其他的音符输入模式。
要想进入其他音符输入模式,您可以:
- 单击并长按音符输入工具栏中的音符输入按钮。
- 从几种不同的音符输入模式中选择一种。
使用键盘的用户可以通过多次按下Shift+Tab或Shift+F6选中音符输入按钮。如果您使用了屏幕阅读器,它会朗读诸如"音符输入工具栏:默认(阶跃时间)"的话。您可以继续按下空格键以展开选择其他音符输入模式的菜单。
您也可以使用指定好的键盘快捷键直接进入这些音符输入模式(不会管理键盘快捷键?请看Keyboard shortcuts)。
请注意,您选中的音符输入模式会被 Musescore 记住。下一次进入音符输入模式的时候,Musescore 仍然会进入上一次您使用的的音符输入模式。所以如果您如果想要暂时使用重调现有音符的音高模式,别忘了在退出音符输入模式前切换回默认(阶跃时间)模式。
节拍编辑(非音高)
节拍编辑(非音高)音符输入模式让你可以在仅按一次键盘的情况下编辑音符的时值。这对于编辑单一音高的无音高打击乐器的乐谱十分有用。另外,在某些情况下,您还可以将节拍编辑模式和重调现有音符的音高模式混合使用以增加您的效率。
- 在乐谱中选择编辑的起点。
- 如上文所述进入节拍编辑(非音高)音符输入模式。
- 从音符输入工具栏中选中一个时值,或者使用键盘快捷键1-9增加一个音符。
- 按.先选中附点,然后选择您想要的时值。在这个模式下,附点会被持续选中而不是在输入一个音符之后自动取消。值得注意的是,您应该在输入音符之前就选择好附点,而不是之后。
- 按下音符输入工具栏中的休止符图标进入休止符输入模式,然后选中一个时值可以直接输入休止符。如果您想要的时值已经被选中,您可以直接按下0输入休止符。重新按下音符输入工具栏中的休止符图标可以退出休止符输入模式。
- 继续选择时值输入其他音符。
默认情况下,音符被输入到五线谱的中线上。你可以使用键盘的上下箭头微调刚才输入的音的音高,每一个新音符的音高跟前一个音符的音高相同。您也可以使用重调现有音符的音高模式快速地在一段已经输入节奏的乐谱上面修改音高。
重调现有音符的音高
重调现有音符的音高音符输入模式能让你在保持音符时值不变的情况下方便地改变音符的音高。
- 在乐谱中选择编辑的起点。
- 如上文所述进入重调现有音符的音高音符输入模式,也可以使用快捷键Ctrl+Shift+I(Mac:Cmd+Shift+I)进入该模式。
- 使用电脑键盘,MIDI 键盘或是虚拟钢琴键盘输入音高。注意您不能在重调现有音符的音高音符输入模式里使用鼠标输入音符。
重调现有音符的音高模式可以让你非常高效地输入具有重复节奏的音乐片段。您可以直接复制粘贴节奏相同的段落,然后使用重调现有音符的音高模式改变音高。同样的技巧也可以用在一些共享节奏,但是音高不同的多乐器或声乐段落。
实时
实时音符输入模式基本允许您在 MIDI 键盘(或 Musescore 的虚拟钢琴键盘)上演奏乐曲来输入音符。然而,您应该注意这个模式有以下的一些限制:
- 您必须提前选择您想用的最小的时值。
- 您不能在实时音符输入模式内输入三连音。
- 就像其他音符输入模式一样,您只能在单个谱表的单个声部上输入音符。
- 您不能在实时音符输入模式内使用电脑键盘输入音符。
这些限制意味着 MuseScore 在计算应该如何将输入转换为五线谱时几乎不需要做猜测,这有助于保持产出的乐谱和您预期的相符。
实时(节拍器)
在实时(节拍器)音符输入模式中,您需要听节拍器以一个固定的节拍演奏乐谱。您可以在菜单中改变节拍器的速度:编辑→偏好设置...→音符输入(Mac: MuseScore→偏好设置...→音符输入)。
- 在乐谱中选择编辑的起点。
- 如上文所述进入实时(节拍器)音符输入模式。
- 在音符输入工具栏中选择您想要的最小的时值。
- 按下 MIDI 键盘或虚拟钢琴键盘输入对应时值的音符。
- 听节拍器—节拍器每响一次,音符增长所选时值一次。
- 当音符达到您所需的长度时,松开键盘。
一旦您松开了键盘,音符输入就停止了。如果您想要在松开键盘的情况下仍然让程序继续输入休止符,您可以使用实时增强快捷键启动或停止节拍器。
实时(踏板)
在实时(踏板)音符输入模式里,您可以通过按键盘或者踏板的方式自己打节拍。您可以以任何的速度演奏,而且你不需要维持一个恒定的节奏。默认用来打节拍的键(称作“实时增强”)是数字小键盘上的Enter(Mac:Fn+Return)但是我们强烈推荐您把这个快捷键设到 MIDI 键盘上的某个键或者踏板上。(见下方)。
- 在乐谱中选择编辑的起点。
- 如上文所述进入实时(踏板)音符输入模式。
- 在音符输入工具栏中选择一个时值,您打的节奏的时值以你选择的时值为基准。
- 按下 MIDI 键盘或虚拟钢琴键盘输入对应时值的音符。
- 按下“实时增强”按键,音符的长度将会增长一个(3)中所选的时值。
- 当音符达到您所需的长度时,松开键盘。
实时增强快捷键
“实时增强”快捷键是用来在实时(节拍器)音符输入模式中启动节拍器,或实时(踏板)音符输入模式插入一个所选时值的休止符。它被称作“实时增强”是因为它能使输入光标在乐谱中的位置向后移。
实时增强的默认按键是数字小键盘上的Enter(Mac:Fn+Return),但是我们强烈推荐您把这个快捷键通过 Musescore 的远程控制设到 MIDI 键盘上的某个键或者踏板上。您可以在下面菜单中找到 Musescore 的远程控制设置:编辑→偏好设置...→MIDI 映射(Mac:MuseScore→偏好设置...→MIDI 映射)。
另外,如果你有一个 USB 脚踏开关或电脑踏板,你可以将他们设置到数字小键盘上的 Enter 键。
插入
插入音符输入模式能使您在两个音符之间插入音符或休止符,这会自动向前或向后移动插入点前后音符的位置。 小节时值会被自动修改。
要插入一个音符,您需要:
- 在乐谱中选择被插入位置之后的一个音符(或休止符)。
- 如上文所述进入插入音符输入模式。
- 像在阶跃时间音符输入模式里面一样输入音符或休止符。每一个音符都被插入在当前光标之前,小节的总时值被自动拉长,但是小节线位置不变。
输入音符时,新的音符会被放置在用蓝色方框高亮的选中元素之前。被选中的元素和相同小节后续的元素都会自动向后移。您可以使用方向键→或←调整插入点,之后新的插入点将会被高亮显示。
另外,如果您只有一两个音符要被插入,您可以直接在默认的阶跃时间音符输入模式里在用鼠标或键盘(A-G)插入音符时使用键盘快捷键Ctrl+Shift(Mac:Cmd+Shift)。
要插入休止符,您可以首先插入所需时值的音符,然后按Delete。
要清除音符或休止符,您可以使用键盘快捷键Ctrl+Shift+Delete。小节长度会被自动缩短。此快捷键在阶跃时间和插入音符输入模式中均可用。
由于插入音符可能会导致小节时值增加或减少,使小节真正时长与拍号不符,因此当这种情况发生时,小节上方将显示一个小的“+”或“-”符号。
增加或删除小节
插入小节
Musescore 允许您使用多种不同的方法插入或删除小节。小节可以被用以下几种方式插入:
- 选区后
- 选区前
- 在乐谱开头
- 于乐谱结尾
小节菜单栏
您可以通过以下方式插入一个或多个小节:
- 右击某小节的空白区域
- 选择菜单栏中的插入小节
- 在侧面的子菜单中选择您想插入小节的位置
- 在对话框中输入想要插入的小节数量,然后点击好
属性面板
您还可以通过以下方式插入一个或多个小节:
- 单击选中一个小节
- 切换到属性面板
- 点击小节下面的插入小节
- 输入您想要插入的小节数量(默认为“1”)
- 选择您想要插入小节的位置(默认为“所选区域之后”)
- 点击+按钮
这个临时弹窗在你点击+按钮后仍然不会自动被关闭,所以你可以继续点击+按钮插入小节。
另外,你还可以通过下面几种方法插入小节:
音符输入工具栏
- 在乐谱中选中除了线性记号以外的某个东西
- 点击音符输入工具栏中的+按钮
- 找到小节
- 选择你想要插入小节的位置
菜单栏
- 在乐谱中选中除了线性记号以外的某个东西
- 点击菜单栏中的添加
- 找到小节
- 选择你想要插入小节的位置
使用键盘快捷键插入小节
您可以使用以下方法在您选中的选区之前快速插入一个小节:
- 在乐谱中选中除了线性记号以外的某个东西
- 按下Ins
您可以多次按下Ins插入多个小节。
您可以使用以下方法在您选中的选区之前插入多个小节:
- 在乐谱中选中除了线性记号以外的某个东西
- 按下Ctrl+Ins(Mac:⌘+Ins)
- 在弹出的对话框中输入想要插入的小节的数量
- 单击好
如果您想要在乐谱末尾插入小节,您可以使用键盘快捷键Ctrl+B(Mac:⌘+B)插入一个小节,或者Alt+Shift+B(Mac:Option+Shift+B)插入多个小节。
在占位框前后插入小节
您也可以向乐谱中的占位框前后插入小节:
- 单击占位框
- 使用上述“音符输入工具栏”、“菜单栏”方法或键盘快捷键
删除小节
您可以使用下述的键盘快捷键删除一个或多个小节:
- 选中某个小节(或者按下Shift选中多个小节)
- 按下Ctrl+Backspace或Ctrl+Del(Mac:⌘+Backspace或⌘+Del)。
或者,您也可以:
- 选中某个小节(或者按下Shift选中多个小节)
- 右键您选中的任意一个小节
- 点击删除小节
您也可以:
- 选中某个小节(或者按下Shift选中多个小节)
- 点击菜单栏中的工具
- 点击移除所选区域
移除末尾空小节
要想移除乐谱末尾的空小节,您可以:
- 点击菜单栏中的工具
- 点击移除末尾空小节
另请参阅
一些其他与小节有关的页面:
选择元素
不要与输入音符和休止符:音符输入模式中讲解的音符输入光标混淆
如果你需要对乐谱上的某些元素进行操作(例如复制),你需要先选中这些元素。在当前的 Musescore 中,乐谱上被选中的元素会用其所属的声部的颜色高亮显示,未选中的元素显示为黑色(译注:有时超过乐器音域的音符会被高亮为黄色或红色)。默认情况下声部1使用蓝色高亮,声部2使用绿色高亮,声部3使用橙色高亮,声部4使用紫色高亮。默认的颜色可以在编辑→偏好设置:高级下更改,详见偏好设置章节。
被选中元素的状态会被简要地显示在左下角的状态栏上,每当用户选择不同的元素时,状态栏会立刻显示新的元素信息。总共有四种选择状态:
- “未选中任何内容”状态,状态栏显示为空白。您可以按Esc取消选择所有内容。为了确保确保安全,您可以经常点击Esc键,就像专业会计师对待计算器一样。
- “选中单个元素”状态,状态栏显示被选中元素的基本信息。
- 列表选取状态,选择了多个单独的对象。
- 范围选取状态,给定一个选择起始点和选择终止点,Musescore 可以自动选择一些谱表上两个时间点之间的可用元素。这些元素包括所有的音符、休止符、Musescore 文本(如力度符号),Musescore 线性记号(如踏板)等。系统范围的元素,如速度、拍号、重复记号、排版控制元素不被包括在自动选择中。在此状态下,谱表上会显示一个蓝色的矩形框围绕所选内容,如下图所示。
许多常见操作,如复制和粘贴都需要进行范围选择。
下面两张图分别展示了“选中单个元素”(上图)和“范围选取”(下图)。


NOT FOUND: ms42statusbar.PNG
选中单个元素
您可以用鼠标单击某个元素选中它。除了单击整个小节以外,单击元素总会只选中这一个元素。如果您在某谱表内单击了某个小节的空白处,Musescore 会自动范围选择该小节内部的多个对象。
要使用键盘选择单个元素,请使用光标键导航到该元素。在普通模式下(按键盘Esc键使用此模式),左右光标键← →只会导航到下一个(或前一个)音符或休止符。您可以使用Alt + 光标键导航到所有元素,包括所有的音符、装饰记号、力度符号和其他标记。
重叠的元素
目前该特性无法使用(Musescore 4.2),如果您有能力并且乐意帮助我们,请点这里
当多个对象占据谱表上的相同位置并完全重叠时,例如两个音符具有相同音高但位于不同的声部时,您可以重复按Ctrl + 单击该位置,直到选中所需的元素。
选择音符内部的单个元素
一般来说,选择符头可以控制单个音符的大部分特性,例如改变音符的音高。另外,音符也包括符杆、符旗、符点、变音记号等一系列元素。每个元素都可以被单独选择,以便精调其布局位置。
选择和弦中的音符的不同方法

您可以逐个选择单个和弦的多个音符以创建列表选择,也可以通过选中开始和结束的时间位置以创建范围选择。(参见下文)
许多常用的命令,包括复制和粘贴可以用于单个和弦,但是必须对其进行范围选择(如上图所示)。如果您只想范围选中某一个和弦,除了在创建范围选择部分中描述的方法之外,您也可以使用这个方法:首先确保当前没有选定任何内容(按Esc以确保),然后在和弦的任一音符头上按Shift+单击。
由于范围选择是根据时间位置自动选择的,因此其他声部中的音符可能会被包括,要明确排除它们,请参阅从范围选择中排除元素。
重复选区命令(R)适用于单个和弦,无论是对其的范围选择,还是确切选择的单个音符。请参阅复制和粘贴:重复选区章节。
创建列表选择

您可以通过鼠标点击、拖拽选区或使用命令手动创建列表选择。
手动选择多个元素
要将对象添加到列表选择中或将其删除,请按Ctrl(Mac: Cmd) + 单击该对象。这将将选择转换为列表选择。但是,不能使用这一方法选中或删去一整个小节。向范围选择中添加和删除元素也会将其转换为列表选择。
位于任何谱线区域之外并且不与其他元素重叠的元素可以一起使用鼠标拖拽选区进行选择。按Shift + 单击任何空白处(在谱线之外)并拖动鼠标以创建选择框。如果选区不包括任何音符或休止符,则这一操作会创建列表选择,否则会创建一个使用“开始和结束时间位置方法”的范围选择。
自动选择相似元素
要选择整个谱表中或给定谱表中特定类型的所有元素:
- 右键单击其中一个此类元素
- 在弹出的菜单中,单击选择→相似内容或选择→此谱表上的相似内容
要选择两个时间位置之间特定类型的所有元素:
- 单击第一个此类元素
- Shift+单击最后一个此类元素
—或—
- 创建一个范围选择
- 右键单击其中一个此类元素
- 在弹出的菜单中,单击选择→此选区内的相似元素
要创建更复杂的相似元素选择:
- (可选)创建一个范围选择
- 右键单击其中一个此类元素
- 在弹出的菜单中,单击选择→更多
- 在对话框中选中您想要的部分(见下图)
对话框中可用的选项取决于您右键单击的元素类型。

与音符特定的选择选项有关的选项是:
- 同一符头:具有相同符头组(普通、交叉、斜线等)的音符。
- 同一音高:具有相同音高名、变音符号和八度的音符。
- 同弦:在同一弦上的音符(仅限吉他谱)。
- 同一类型:相同类型的音符(普通、acciaccatura、appoggiatura)。
- 同类音符:相同持续时间的音符,不考虑点或三连音的存在。
- 同一时值:实际持续时间相同的音符。
- 同一音名:具有相同音高名称和变音符号,不考虑八度。
- 同一谱表:同一谱表中的音符。
- 同一声部:同一声部中的音符。
- 选中:在当前选区中的音符。
- 相同系统:同一系统中的音符。
除了特定于元素类型的选择选项外,对话框底部还有一些通用于所有元素类型的操作选项。这些控制所选元素的操作,一次只能选择一个:
- 替换选区:如果选中,此操作选择将替换现有选区。
- 添加到选区:如果选中,此操作将元素添加到现有选区。
- 从选区减去:如果选中,此操作从现有选区中移除元素。
创建范围选择
范围选择能让 Musescore 自动在给定谱表的给定开始和结束时间位置之间选择有用的元素。
通过拖拽进行范围选择
当选择范围不超出屏幕范围时,您可以按Shift + 单击任何空白处(在谱线之外)并拖动鼠标以创建选择框。范围选择至少需要包括一个音符或休止符。
通过点击进行范围选择
适用于跨越多页的选择。
- 先单击选中开始/结束时间位置的音符或休止符。
- (可选)使用在导航章节中解释的命令重新定位谱表。
- Shift+单击另一个时间位置的音符或休止符。
使用键盘进行范围选择
仅使用键盘或主要使用键盘:
- 使用键盘导航或单击选择第一个音符或休止符。
- 在导航时按住Shift以扩展选择。
可用的命令包括:
- Shift+Left和Shift+Right以每次扩展一个音符或休止符。
- Shift+Ctrl+Left和Shift+Ctrl+Right以每次扩展一个小节(Mac:使用Cmd而不是Ctrl)。
- Shift+Up和Shift+Down以每次扩展一个谱表。
- Shift+Home和Shift+End以扩展到一行的开头或结尾。
- Shift+Ctrl+Home和Shift+Ctrl+End以扩展到谱表的开头或结尾(Mac:使用Cmd而不是Ctrl)。
特殊的范围选择
MuseScore 也提供一些特殊的命令来进行范围选择:
- 编辑→全选或Ctrl+A(Mac:Cmd+A)以选择整个乐谱。
- 编辑→选择章节以选择谱表的当前部分(位于前一个和下一个Systems and horizontal spacing之间的所有内容)。
从范围选择中排除元素
在执行对范围选择的操作之前,可以通过类型排除元素。例如,在复制音符、休止符等短语时排除歌词;或者在多声部乐段中仅保留声部1中的所有内容。要排除给定类型的元素:
- 使用视图→筛选器打开筛选器。
- 取消选中要从选择中排除的任何元素类型旁边的复选框。

请注意,如果排除声部1,则将无法选择缺少其他声部内容的任何小节。因此,在排除声部1,执行排除声部1的操作之后,请务必将其恢复。例如,如果您只希望复制并粘贴声部2,请进行范围选择,使用选择过滤器排除声部1,在使用编辑→拷贝或Ctrl+C之后,在尝试选择目标以粘贴之前,您必须将声部1的复选框恢复。
编辑音符和休止符
概述
本章讨论了编辑乐谱中已有的音符的方法。请确保您已熟悉输入音符和休止符章节中解释的输入新的音符的方法。
要编辑乐谱中的音符(音高、时值、时间位置等)和休止符,可以使用:
在音符输入模式中进行编辑
NOT FOUND: enter_note_input.png
在按工具栏中的笔图标或使用快捷键N进入音符输入模式后。屏幕上会显示一个浅蓝色的覆盖整个谱表的音符输入光标。音符输入光标的存在表示 Musescore 当前处于音符输入模式。
在音符输入模式下,使用键盘箭头键← →将音符输入光标移动到当前谱表中的相邻音符或休止符位置。
在音符输入模式下编辑时值
在音符输入模式下,有两个命令可以编辑现有音符或休止符的时值:
- Shift+W 增加时值
- Shift+Q 减少时值
这两个命令首先会尝试添加或移除附点,其次会更改到下一个较大或较小的音符时值。例如,按Shift+W在四分音符上会将其编辑为附点四分音符,再按一次Shift+W会将其编辑为二分音符。
在音符输入模式下编辑音高
在音符输入模式下编辑选定音符音高的命令是:
- ↑ - 将音高上移半音(该操作会尽可能使用升号作为变音符号)
- ↓ - 将音高下移半音(该操作会尽可能使用降号作为变音符号)
- Alt+Shift+↑ - 将音高按音阶上移一步
- Alt+Shift+↓ - 将音高按音阶下移一步
- Ctrl+↑(Mac: Cmd+↑) - 将音高上移一个八度
- Ctrl+↓(Mac: Cmd+↓) - 将音高下移一个八度
在音符输入模式下替换音符和休止符
在默认输入模式阶跃时间下,音符和休止符是一个一个输入的。阶跃时间模式的逻辑是,当用户添加新音符或休止符时,后续音符和休止符的时值会自动调整,而不影响小节内的总拍数。
一个类比是 Microsoft Word 等文字处理器中的“替换”或“覆盖”模式。要用不同的音符替换一个音符,直接输入新音符即可。新音符会自动覆盖之前的音符,无需先删除旧音符。
要添加新音符并使后续音符不被覆盖,可以:
在音符输入模式下删除音符
要用休止符替换音符,直接按Del键。
注意:如果希望将后续音符提前以取代已删除的音符,则无需先删除原音符。直接使用剪切和粘贴移动后续音符即可。
在音符输入模式下移动音符
尽管大多数情况下,移动音符到不同时间位置是在正常模式下完成的,但在音符输入模式下也有一对命令可以在某些情况下编辑音符或休止符的时间位置。如果有两个相同时值的音符或休止符,您希望在音符输入模式下交换它们,可以使用Shift+←或Shift+→将音符或休止符与其相邻的相同时值的音符或休止符交换。
在正常模式下进行编辑
您需要退出所有其他模式以进入正常模式。
如果 Musescore 当前处于音符输入模式,要退出音符输入模式,可以按键盘上的Esc键,或点击音符输入按钮,或再次按N键。在此之后,音符输入光标应不可见。请参阅在音符输入模式下进行编辑部分。
如果 Musescore 当前处于编辑模式,要退出编辑模式,请按键盘上的Esc键。请参阅主章节直接调整元素。
除非另有说明,以下方法全部适用于单个选定的音符或休止符、包含多个音符或休止符的列表选择或整个范围选择。有关更多信息,请参阅选择页面。
在正常模式下编辑时值
将选定音符编辑为特定时值
在正常模式下,将一个或多个选定音符的时值编辑为特定时值,只需点击相应的时值图标或使用快捷键1–9。
增加或减少选定音符的时值
要增加选定音符的时值,可以使用命令Shift+W如上所述。如果音符没有附点,这会添加一个附点;如果音符已有附点,则会编辑为下一个更长的时值。例如,八分音符会变成附点八分音符,附点四分音符会变成二分音符。您也可以使用W直接将时值加倍,从而将八分音符直接变成四分音符,或将附点八分音符变成附点四分音符。
命令Shift+Q和Q执行相反的操作,以相同方式减少或减半时值。
所有这些命令仅适用于单个选定的音符。
将范围选择内的所有音符时值加倍或减半
如果您输入了一个包含八分音符和十六分音符的段落,但希望将所有音符和休止符的时值加倍,从而使段落的时值本身加倍,请参阅粘贴时值减半/加倍命令部分。
在正常模式下编辑音高
在音符输入模式下用于编辑音高的命令在正常模式下也同样适用,包括单个、列表和范围选择。这些命令是:
- ↑ - 将音高上移半音(该操作会尽可能使用升号作为变音符号)
- ↓ - 将音高下移半音(该操作会尽可能使用降号作为变音符号)
- Alt+Shift+↑ - 将音高按音阶上移一步
- Alt+Shift+↓ - 将音高按音阶下移一步
- Ctrl+↑(Mac: Cmd+↑) - 将音高上移一个八度
- Ctrl+↓(Mac: Cmd+降) - 将音高下移一个八度
此外,在正常模式下,您也可以使用音符输入工具栏上的临时记号按钮或相应的快捷键为任何选定的音符切换(添加或移除)临时记号,从而(可能)改变其音高。临时记号面板也可用于为选定音符添加临时记号。
在正常模式下删除音符和休止符
要用休止符替换音符,直接按Del键。
如果选择了多个音符作为列表,按Del键会分别将它们替换为休止符。
如果选择了一个范围,按Del键之后,软件会尝试将整个段落替换为若干个总时值相同的休止符。
通常情况下,您无法删除一个休止符,因为删除它们会使小节的拍数少于应有的拍数。然而,您也可以参考下文的移除选定范围命令部分,了解在需要时如何删除休止符。此外,2至4声部中的休止符可以在保持小节总时长不变的情况下随意地被删除。
彻底移除选定范围
完全移除某些音符或休止符会导致小节数量的减少或小节内拍数的减少。要彻底移除选定的音符或休止符,您可以使用工具→移除选定范围或快捷键Ctrl+Del(Mac: Cmd+Del)。
在正常模式下添加连音线
您可以在正常模式下添加连音线,但与在音符输入模式下自动添加音符创建的连音线不同,正常模式下的连音线要求前后两个音符已经存在。
在正常模式下添加连音线的方法:
- 选择要与下一个相同音高的音符连音的音符
- 点击连音按钮或使用快捷键T
这种方法也适用于下一个相同音高的音符在不同声部的情况。
如果选择了多个音符,MuseScore会在每个选定音符处开始一个连音线。您可以用这种方法一次性为整个和弦中的所有音符添加连音线。
这个方法还允许您使用连音线连接不相邻的音符,例如在钢琴上的延音琶音。
在正常模式下编辑声部
在条件允许的情况下,输入到一个声部的音符可以被移到另一个声部,或者可以交换两个声部的内容。
将选定音符移到另一声部
要将一个或多个选定音符移到另一声部,按工具栏上的声部按钮或使用快捷键Ctrl+Alt+1–4(Mac: Cmd+Option+1–4)。音符将在不影响目标声部当前内容的情况下尽可能地移动。
如果目标声部在该时间位置为休止符或没有任何内容,音符就会移到新声部。
如果目标声部在该时间位置已经有一个或多个相同时值的音符或和弦,音符会与现有音符或和弦合并。
交换两个声部的内容
MuseScore还可以交换任何两声部的内容。这些命令仅适用于完整的小节(或多个小节),不适用于单个音符。
要交换任意两声部的内容,使用工具→声部中的相应命令:
- 交换声部1-2
- 交换声部1-3
- 交换声部1-4
- 交换声部2-3
- 交换声部2-4
- 交换声部3-4
另请参阅
复制与粘贴
剪切、复制和粘贴命令可用于复制整段音乐,将音乐提前或延后,复制文本或其他标记到不同的谱表之间,交换不同小节中的内容等等。
概述
首先,您必须选择你想要剪切或复制的内容。
如同其他支持剪切、复制和粘贴的程序一样,你可以从编辑菜单、右键菜单(如Ctrl+单击或双指点击)或通过标准键盘快捷键访问这些命令。
| 命令 | 快捷键(Windows) | 快捷键(Mac) | 右键菜单 | 主菜单 |
|---|---|---|---|---|
| 剪切 | Ctrl+X | Cmd+X | 剪切 | 编辑→剪切 |
| 复制 | Ctrl+C | Cmd+C | 复制 | 编辑→拷贝 |
| 粘贴 | Ctrl+V | Cmd+V | 粘贴 | 编辑→粘贴 |
| 与剪贴板交换 | Ctrl+Shift+X | Cmd+Shift+X | 与剪贴板交换 | 编辑→与剪贴板交换 |
| 粘贴(时值减半) | Ctrl+Shift+Q | Cmd+Shift+Q | 无 | 编辑→半时值粘贴 |
| 粘贴(时值加倍) | Ctrl+Shift+W | Cmd+Shift+W | 无 | 编辑→倍时值粘贴 |
注意: 使用右键菜单时,请务必右键点击选中的项目;如果错误地右键点击空白区域,选中的区域会丢失!
复制范围选择
如选择元素章节所述,在范围选择中,MuseScore会自动选择给定起始和结束时间位置之间的一组谱表中的有用元素。这些元素包括所有的音符、休止符、MuseScore文本(如力度符号)、MuseScore线条(如延音线)等。系统元素(如速度、拍号、反复记号、版面控制符)不包含在自动选择中,因此不会被复制。
粘贴时,复制的元素将会替换所有原有内容,但是原始小节的节奏结构和系统元素除外。
- 创建一个范围选择。
- (可选)使用选择过滤器排除其他类型的元素。
- 从菜单中使用复制命令或按Ctrl+C(Mac: Cmd+C)。
- 选择目标位置的第一个音符或休止符。
-
从菜单中使用粘贴命令或按Ctrl+V(Mac: Cmd+V)。

复制单个元素或列表选择
MuseScore也允许复制单个元素或列表选择的多个歌词、和弦符号、力度、表情记号或其他标记到另一个位置,同时保持目标位置的内容(如音符)不变。但是,您无法复制多个音符的列表选择。
复制和弦符号和力度等文本时,MuseScore会尽可能根据实际音符时值的距离保持标记的相对时间位置,但是小节内部的节奏不会被考虑。粘贴歌词或表情记号时,您必须指定一个有效的音符或休止符作为锚点。
- 选择单个元素(除小节外),或创建一个列表选择,详见选择元素章节。
- 从菜单中使用复制命令或按Ctrl+C(Mac: Cmd+C)。
- 选择目标位置的第一个音符或休止符。
- 从菜单中使用粘贴命令或按Ctrl+V(Mac: Cmd+V)。
移动元素
剪切和粘贴命令可以用于:
- 将一个段落移动到另一谱表,例如将长笛的音乐移到单簧管,或
- 将一个段落提前或延后。此方法尤其适用于插入或删除一个音符或休止符并同时移动现有音符和休止符以创建或消除空白。
小节(及其节奏结构)无法移动,但请参见添加和删除小节章节。移动列表选择时,其元素的相对位置会尽可能保留,详见复制列表选择部分。
移动选择内容:
- 选择你想移动的内容。
- 从菜单中使用剪切命令或按Ctrl+X(Mac: Cmd+X)。
- 选择目标位置的第一个音符或休止符。
- 从菜单中使用粘贴命令或按Ctrl+V(Mac: Cmd+V)。
与剪贴板交换选择
与剪贴板交换命令将两个操作合并为一个:(1)首先用剪贴板内容覆盖选定的乐谱部分,就像粘贴命令一样;(2)然后将被覆盖的乐谱部分转移回剪贴板,就像复制命令一样。
例如,可以用它来交换乐谱中的两个等长段落A和B:
像这里讨论的其他命令一样,你可以从菜单或通过键盘快捷键访问与剪贴板交换命令,此快捷键为Ctrl+Shift+X(Mac: Cmd+Shift+X)。
重复选择
复制和粘贴的常见用途是将给定段落(包括音符、和弦等)在原位置后重复一遍。使用特殊的重复选择命令可以简化此过程。
- 选择乐谱上的单个元素,或创建一个范围选择,详见选择元素章节。
- 按R。
此命令不适用于列表选择。它仅适用于单个或范围选择的和弦,且只有该和弦的一个音符被选择时。详见选择元素章节。在音符输入模式下,此命令会重复包含当前音符的整个和弦。这对创建一系列重复的和弦很有用。
复制范围选择到多个谱表
如果你想将一段音乐复制到多个谱表——例如,将长笛的音乐复制给双簧管和单簧管——可以使用分解命令:
- 选择你要复制的段落。
- 扩展选择范围以包含下面的谱表(例如,按Shift+↓)。
- 使用工具→分解。
这会复制原选择内容,假设它仅包含单音符——没有和弦和多声部。如果有和弦或多声部,则这些会分配到其余的谱表,详见分解命令部分。
减半/加倍时值粘贴
如果你输入了一段主要使用八分音符的音乐,但希望将其整个变为主要使用十六分音符,或变为四分音符,MuseScore提供了一对特殊命令来完成此操作。你可以修改选择范围的时值,或者创建一个具有修改时值的段落副本。要将段落时值减半或加倍:
复制单个元素
单个元素——即使在范围选择中未自动选中的元素,如拍号或反复记号——可以选择后用鼠标复制。
- 按住Ctrl+Shift(Mac: Cmd+Shift),单击并按住一个元素。
- 将其拖动到乐谱的任意位置。
-
当你释放鼠标按钮时,选定元素会复制到新位置。

参见
使用符号面板
概述
您可以使用 符号面板 将音乐符号和文本添加到乐谱中。MuseScore 提供了一个预设的符号面板分类,包含 调号 和 奏法记号 等。默认情况下,符号面板会显示基本的符号,但如果需要,也可以显示更高级或专业的符号。
您可以在符号面板中的任意位置添加、删除、编辑或重新排列元素,还可以创建和自定义自己的符号面板。
本章节将向您展示如何显示符号面板、搜索元素以及如何将符号面板中的符号添加到乐谱中。关于如何自定义符号面板,请参阅自定义符号面板。
访问符号面板
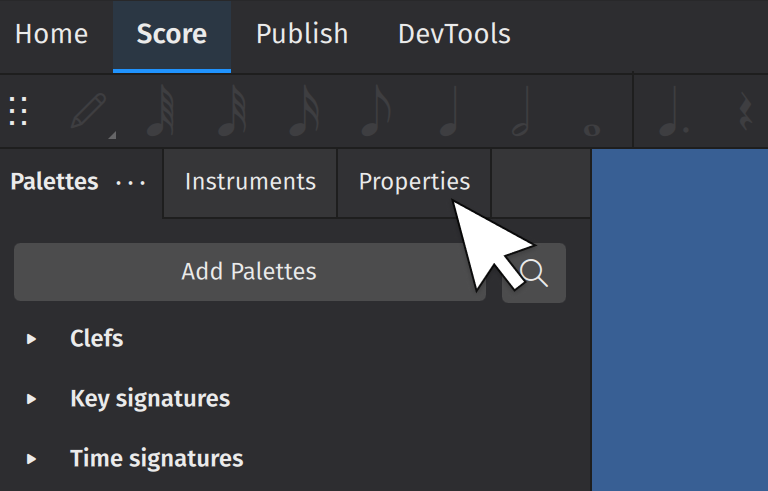
符号面板 通常显示在主窗口的左侧边栏。侧边栏顶部显示三个选项卡:符号面板、乐器 和 属性。如果侧边栏中当前显示的是其他选项卡,点击 符号面板 选项卡即可显示符号面板。

您可以通过 视图→符号面板 菜单或使用键盘快捷键 F9 打开和关闭 符号面板。如果关闭了侧边栏中的所有面板,侧边栏本身也会关闭,以腾出更多的乐谱显示空间。
与 MuseScore 中的大多数其他面板一样,符号面板 窗口也可以被 分离,作为一个独立的窗口使用。
将元素添加到乐谱中
要将元素添加到乐谱中,首先您需要在符号面板中打开相应的面板。您可以点击其标题或其左侧的箭头图标打开某面板。面板中的元素将被排列显示。

通常情况下,要将元素添加到乐谱中,您可以先选择乐谱中被添加的目标元素,然后点击符号面板中的元素,或者您也可以将元素从符号面板拖动到目标元素上。有关通过键盘添加元素的信息,请参阅下面的搜索与导航部分。
作用于单个乐谱元素的元素
许多元素——例如,演奏法、力度标记和大多数其他文本——可以应用于单个音符、休止符或其他乐谱元素。如果您使用拖放方式添加这些元素,请确保将元素拖到特定的乐谱元素上,并且在目标元素被高亮显示以表示它可以接受该元素之前不要松手。
然而,通常更有效的方法是先在乐谱中选中目标元素,然后再点击元素。如果您希望将同一个元素添加到多个乐谱元素上,这种方法尤其有效,因为它允许您一次性将一个元素添加到多个乐谱元素上。
要将符号面板中的元素添加到一个或多个乐谱元素上,您需要:
- 选中被添加的目标元素(单个、列表或范围选择均可)。
- 点击符号面板中的元素。
通常,符号面板中的元素会被添加到每个被选中的元素上。但是,当选择了一个范围时,添加表示文本的元素(例如力度标记和速度标记)时,元素将仅添加到范围内的第一个元素中。系统文本(例如速度标记)将被添加到整个谱表的最上方;其他文本将被添加到每个选定谱表的第一个选定元素上。
作用于一个范围的元素
渐强线、延音线、八度音线和踏板标记等元素需要应用于某个范围而不是单个音符或休止符。添加它们的过程类似:
- 选中您希望添加元素的范围。
- 点击符号面板中的元素。
作用于一个小节的元素
某些元素,如小节线、拍号、反复记号和布局设置需要应用于整个小节或一组小节,而不是特定的音符或休止符。将它们添加到乐谱中的过程与其他元素相同:
- 选中您希望添加元素的小节或小节范围。
- 点击符号面板中的元素。
展开和折叠符号面板
可以通过点击标题栏或标题左侧的图标以展开或折叠某个符号面板。此外,您还可以一次性展开或折叠所有符号面板,或者让 MuseScore 自动关闭符号面板。要使用这些功能,您需要点击符号面板窗口顶部的 ... 按钮以弹出符号面板菜单。

- 单击以打开一个面板: 控制符号面板是否通过单击一次或双击打开。
- 每次只展开一个面板: 如果选中此项,那么每次您打开一个符号面板时,任何已经打开的符号面板将自动关闭。
- 收起所有符号面板: 立即关闭所有已打开的符号面板。
- 展开所有符号面板: 立即打开所有符号面板。
在符号面板中搜索与导航
您也可以使用键盘而不是鼠标来搜索和导航符号面板。
搜索
要按名称搜索元素,请使用键盘快捷键 Ctrl+F9(Mac:Cmd+F9),或点击 符号面板 顶部的放大镜图标。

这将显示一个搜索框。当您在框中输入字符时,MuseScore 将显示任何匹配的元素。

要关闭搜索框,请点击“X”图标。
导航
符号面板完全可以通过键盘访问。前面描述的搜索功能是您可以用来开始此过程的一种方法,但您也可以使用 Shift+F6 将光标移动到侧边栏,从而将光标对准 符号面板。
一旦光标在符号面板上,您可以使用↑ 和 ↓ 键在各个符号面板之间切换。您可以通过按 Enter 键来打开和关闭某特定的符号面板。要访问符号面板中的元素,请按 → 键访问符号面板,然后按 ↑ 和 ↓ 键在符号面板上的元素之间移动。按 Enter 键将以与点击相同的方式添加元素。
访问更多元素
某些符号面板还包含默认情况下未显示的其他元素。要访问这些元素,请点击符号面板右下角的 更多 按钮。

您可以通过简单的拖动将任何这些其他元素添加到符号面板中。有关更多信息,请参阅自定义中符号面板部分。
添加更多符号面板
默认情况下显示的符号面板是大多数用户经常需要的。但 MuseScore 提供了其他符号面板,您可能也会发现这些符号面板很有用。
要访问这些额外的符号面板:
-
点击 符号面板 顶部的 添加符号面板 按钮。

这将显示您可以添加到 符号面板 的符号面板列表。要添加任意符号面板,请点击符号面板名称旁边的 + 按钮。

添加的符号面板会显示在面板顶部。要重新排序它们,只需将它们拖动到所需位置。
您还可以创建一个空白的自定义符号面板,稍后可以根据需要填充自己的元素。
- 点击 创建自定义符号面板 按钮,请参阅自定义符号面板。
符号总面板
符号总面板 里包含 MuseScore 支持的所有音乐符号;您还可以使用它创建自定义调号和自定义拍号。
要显示 符号总面板,请使用键盘快捷键 Shift+F9,或从菜单中选择 视图→符号总面板。

符号总面板 窗口按类别划分,这些类别名称与 符号面板 中的默认符号面板(无论是显示还是隐藏)的名称相匹配;事实上,每个小符号面板的内容都取自符号总面板中对应的部分。唯一的例外是 符号总面板 中的符号类别,其中包含 符号面板 中从未出现的元素。
您可以像从符号面板一样从 符号总面板 向乐谱中添加元素;然而,除非你要从 符号 部分添加非常不常见的元素外,通常最好从 符号面板 中进行操作。
符号总面板 窗口中除“符号”外的所有部分中的元素都是会改变乐谱的特性,它们对乐谱具有影响:例如,添加调号和拍号会改变乐谱本身调号和拍号的设置。而 符号 中的元素则不会,它们仅仅只是显示在乐谱上。
另请参阅其他符号章节。
另请参阅
属性面板
您可以在属性面板中查找或修改选中对象或文本对象内选中字符的布局和播放属性。当没有选中任何内容时,它将显示乐谱的属性。如果您是从 MuseScore 3 升级而来,您可以把属性面板理解为检视器的升级版本,但它同时具有文本工具栏的功能,详见输入和编辑文本章节以及MuseScore 3手册的检视器和文本编辑章节。
MuseScore 4 使用手册的编写风格也与 Musescore 3 手册不同,本章仅讨论面板本身和大部分对象共有的属性。关于其他元素的属性,请查找其最相关的章节。(对于编辑者:如果属性不是多个对象共有的,请随意将内容移动到最相关的章节)
访问属性面板
- 打开乐谱选项卡
- 按下键盘快捷键 F8;或者点击屏幕左侧的属性选项卡。
乐谱的属性
乐谱属性保存在乐谱文件(*.mscz)中。不要与工作区混淆。
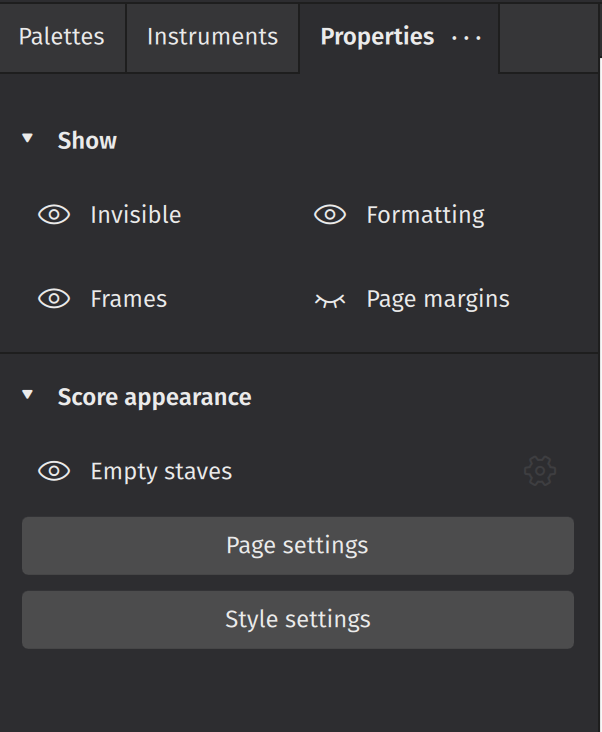
当没有选中任何内容时,属性面板显示乐谱的属性。
在显示副标题下,
在乐谱外观副标题下,
- 空白谱表:隐藏/显示总谱中不包含音符的谱表。此设置与样式对话框中的隐藏总谱中的空白谱表设置相对应。
- 页面设定:打开页面设定对话框。与格式→页面设置相同。详见模板和样式。
- 样式设定:打开样式对话框。与格式→样式相同。详见模板和样式。
对象的属性
当一个或多个对象被选中时,属性面板显示它们共有的布局和播放属性。按下任何对应的按钮将仅显示该对象类型的项目。
NOT FOUND: notation_section.png
一些常见设置:
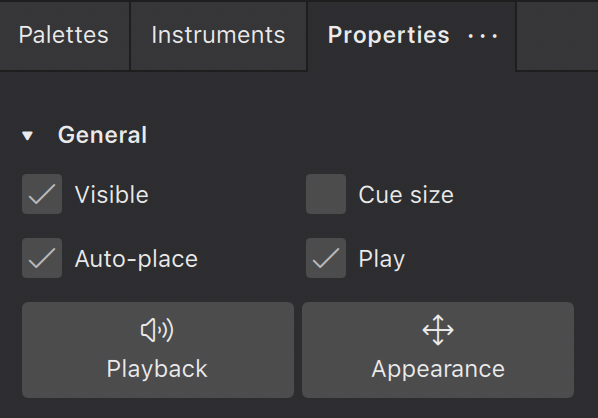
- 可见:点击此框以隐藏/显示选定的元素,或使用快捷键V。使用此功能可隐藏某元素,使其不会出现在导出或打印的乐谱中。例如,如果您想在 MuseScore 中影响播放而应用速度标记或力度标记,但又不希望其出现在到处的乐谱中时,您需要使用此功能。
- 自动排布:默认通常勾选此选项,勾选后,MuseScore 会根据垂直和水平碰撞避免算法来排布选定对象。取消勾选自动排布可以更好地自定义某些元素的位置。了解有关此功能的更多信息,请参阅定位元素。
- 缩小化元素:此功能用于创建小的提示音符(通过暗示其他成员在同一时间演奏的内容来帮助演奏者的音符)。勾选该框会使选定的音符变小,包括其符干和任何连接的符杠。
- 播放:勾选此选项可使选定元素播放。不勾选播放可使元素静音。
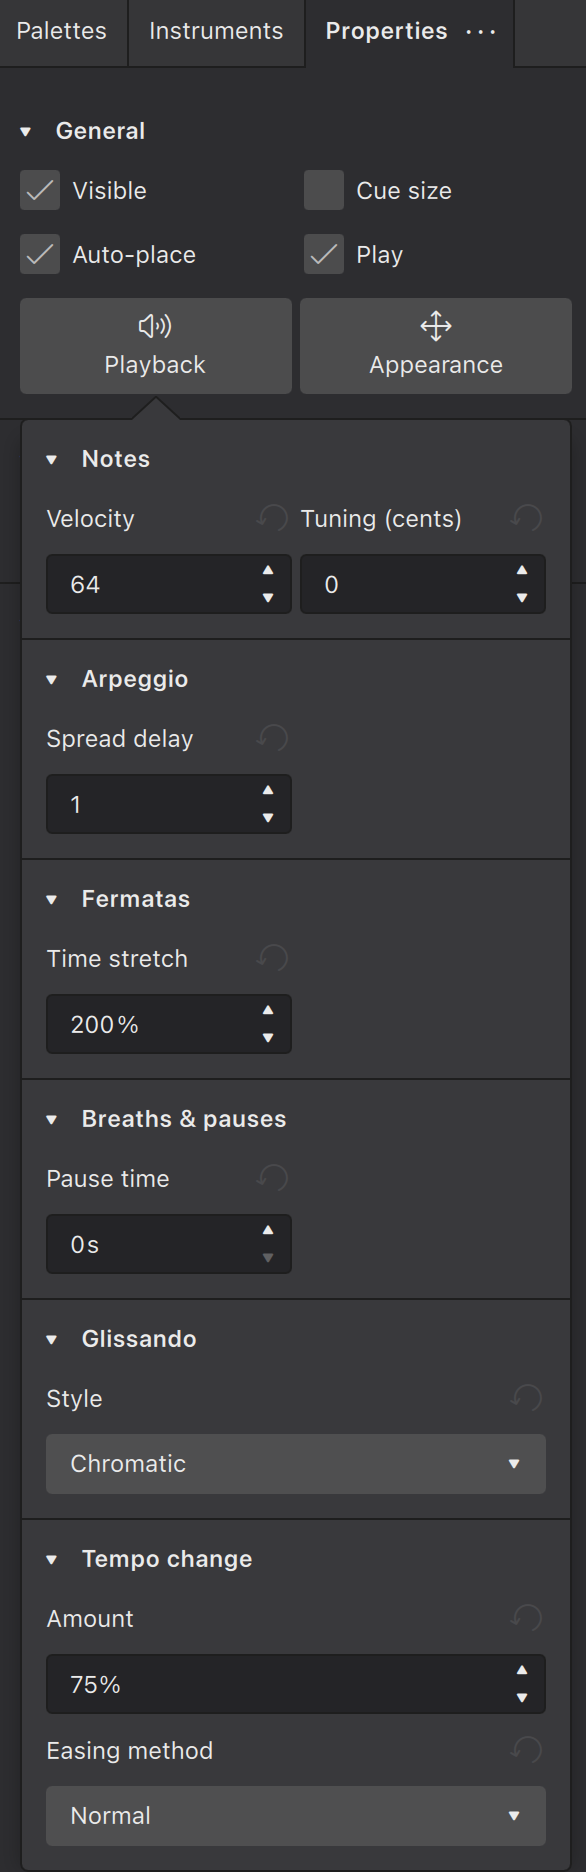
播放选项卡
力度符号的播放功能正在积极开发中,可能会在不同软件版本中发生重大变化。此处提供的信息适用于MuseScore 4.2 beta(2023年11月)。在阅读时可能已过时,请帮助更新本章节。
在播放按钮下,如果选定元素有播放属性,则会显示这些属性。
- 力度:
- 调音:
- 仅音符具有调音属性。MuseScore 3 中合成器的默认 440Hz 的基准音高调整功能已被移除,详见调音控制。要使用以赫兹/Hz为单位的调音值来更改以分为单位的调音属性,请参阅MuseScore 4 中的调音中的公式。
- 它们影响使用 Soundfont 的乐器的音高[此要点正在进行中,请使用 VST 和MuseSounds 信息改进此要点]
外观选项卡
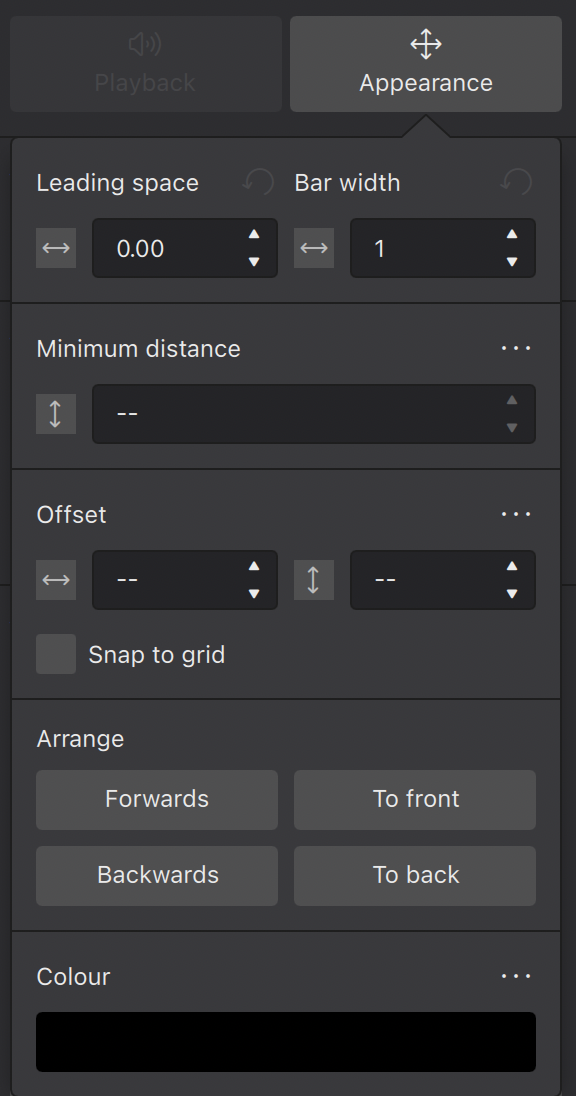
- 前导空间:更改选定元素的前导空间(元素前的空间)大小。前导空间调整能应用于所有谱表,以便相同时刻的音符保持对齐。
- 小节宽度:以原始宽度的比例更改小节的宽度:例如,1.5 = 默认宽度的1.5倍。
- 最小间距:此功能仅改变自动放置碰撞避免算法,仅适用于默认情况下应用于谱表上方/下方的元素,例如谱表文本、力度、指法、线条等。它设置选定对象与更靠近谱表的其他元素或谱表本身之间的最小距离(以sp.为单位)。
- 偏移:将元素偏移默认位置。水平/垂直偏移为您提供了一种比拖动或使用键盘箭头移动更精确地放置元素的方法。
- 吸附于网格:此功能允许您将拖动操作影响的距离限制某增量的整数倍。首先需要勾选吸附于网格框,然后按下设置网格线并设置您想要的水平/垂直间距。根据需要通过勾选/取消勾选框来打开/关闭对齐网格。
- 在排列副标题下,四个按钮控制如何绘制重叠的元素:
- 下移一层将选定元素移到下一个元素的下面
- 上移一层将选定元素移到下一个元素的上面
- 置于顶层将选定元素移到所有其他元素的最上方。
- 置于底层将选定元素移到所有其他元素的最下方,包括谱表线。
- 颜色:点击此按钮更改选定元素的颜色。您可以选择预设颜色或自定义颜色,或通过点击+按钮创建自己的颜色。这会存储在右侧的自定义颜色列表中,以供将来使用。
文本对象内的字符属性
当文本对象被选中时(对象本身,而不是字符),属性面板显示文本对象的格式设置。编辑这些属性会更改对象,它会被应用于对象内的所有字符。
当文本对象内的字符被选中时,属性面板显示字符的格式设置。编辑这些属性仅更改选定的字符。详见格式化文本章节。
保存和恢复默认值
详见主章节模板和样式。
在属性旁边的省略号菜单按钮(三个点菜单按钮)下,有两个按钮:
- 重置:删除特定属性,实际上,此按钮将属性重置为默认值。
- 保存为此乐谱的默认样式:执行以下操作:
- 将属性值分配给该对象当前使用的样式配置文件中的对应值,位于格式→样式下。详见模板和样式。
- 然后清除该对象的特定属性值。
- 最终,该对象不再具有特定的属性。乐谱中所有使用该样式配置的对象都会受到影响。
直接调整元素
本章节解释了在乐谱上微调元素精确位置的方法,以实现排版的目的。更常见的音乐编辑方法请参考输入和编辑文本和编辑音符和休止符章节。
改变元素的位置
要微调乐谱上元素的精确位置,可以通过以下方法实现:
- 拖动元素,详见对齐到网格章节,或者
- 选择乐谱上的元素,调整它们的偏移属性,参见属性面板章节,或者
-
使用编辑模式。
要进入编辑模式,可以通过以下方法:
- 右键单击 → 编辑元素,或者
- 选择乐谱上的一个元素,使用快捷键F2,或者
- 选择乐谱上的一个元素,使用快捷键Alt+Shift+E(Mac: ⌥+Shift+E)
然后,在编辑模式下,按键盘方向键← → ↑ ↓以0.5 sp为单位移动对象,或者
-
直接编辑,此方法不适用于音符、休止符以及从符号总面板→符号中添加的元素(详见其他符号章节)。选择乐谱上的元素,按下键盘方向键← → ↑ ↓以小步进(0.1 sp)移动。结合Ctrl(Mac: ⌘),它们可以以大步进(1 sp)移动。
关于单位sp的更多信息,请参阅页面布局概念章节。
改变元素的形状
- 单击要调整的圆滑线或延音线
- 单击并拖动出现在元素周围的调整手柄(注意:下图中的红色字母仅供参考)

注意:
- 手柄B、C和D可以改变曲线在该点的形状
- 手柄A和E可以调整元素的长度(也可以通过按下Shift+←/→一次移动一个和弦/休止符来实现)
- 手柄F在不改变形状或长度的情况下移动整条线
如果希望更改圆滑线或延音线连接的音符范围,建议使用上面描述的键盘快捷键(Shift+←/→)。这是更改圆滑线或延音线所包含的音符范围的最有效方法。
处理线条
另见主要章节其他线条。
改变线条的范围
要改变线条的起点和终点:
- 选择线条以显示其调整手柄

- 单击起点或终点的调整手柄
- 按下Shift+←/→一步一步地移动手柄(一步=一个音符/休止符或一个小节,具体取决于线条类型)。注意:调整时可以使用Tab在手柄之间切换焦点。
- 如有需要,可以使用键盘方向键←/→微调手柄的位置。注意,这不会影响线条的播放范围。
与圆滑线或延音线一样,建议在使用方向键调整线条长度时使用Shift,以确保播放范围也相应调整。
创建斜线
虽然线条默认是水平的,但可以通过拖动起点或终点的调整手柄,或选择起点/终点手柄并使用上下方向键,将线条设置为任意角度。
编辑线条对象中的文本
要编辑线条对象中的文本(如“系统文本线”、“谱表文本线”和“横按线”,参见输入和编辑文本)的显示文本:
- 选择一个线条元素
- 打开属性面板
- 打开对应的文本选项卡
- 编辑以下字段:
- 起始文本
- 在新谱行处连续时的文本:当对象跨越多个行时显示的文本,详见页面布局概念章节。
另见
分谱
Opening a part
MuseScore 4 automatically creates a separate (default) part for every instrument in your score.
To open all parts at once:
- Click Parts in the toolbar (This will open the Parts dialog)
- Click Open all
To open an individual part:
- Click Parts in the toolbar
- Click a part to select it
- Click Open selected
You can also select specific parts to open at once. Do this by holding Control (Mac: ⌘) while selecting the parts you’d like to open, then click Open selected. You can also select a range of contiguous parts by clicking the first and holding Shift while clicking the last.
Closing a part
Click the X close button in a part tab to close a part.
Note that changes you make to a part will be saved with that part and retrievable the next time you open it from the Parts dialog.
Creating custom parts
The Parts dialog is tightly integrated with the Instruments panel. This integration makes it easy for you to create parts with any combination of instruments from your score.
There are two ways to customize parts in MuseScore 4: using the default (i.e. ready-made) parts to reveal other instruments, and creating entirely new parts.
Reveal instruments in default parts
As we’ve already seen, MuseScore 4 automatically creates a new (default) part for every instrument in your score. All you have to do is open the part from the Parts dialog.
In fact, each default part already contains all of the instruments in your score – they’re simply hidden from view (except, of course, the chosen part instrument).
This means you can “reveal” other instruments within any of the default parts. To do this:
- Open a part (as described above)
- Select the Instruments panel
- Click the eye icon next to another instrument
This instrument will now be visible in the chosen part.
This makes creating custom parts an incredibly flexible process. Revealing or hiding other instruments is completely non-destructive, meaning you can customize every instrument in every part, and hide or show only what you want to reveal to different players (or for different musical projects) without having to create entirely new parts each time.
Create a new part
You can create a completely "blank" part from scratch, allowing you full control over which instruments it shows. To do this:
- Click Parts in the toolbar to open the Parts dialog
- Click Create new part
- Give your new part a name
- Click Open selected
Your new part will now be open in the Score tab, but it will appear to contain no instruments. To add instruments to this part:
- Go to the Instruments panel
- Click the "eye" icon next to each instrument you’d like to appear in your part
Choose which voices appear in each part
Sometimes it will be necessary to create individual parts from staves that contain multiple voices. You might, for example, want to extract separate parts for orchestral players who share a staff in the main score (E.g. Flute I and Flute II). Or you might wish to create individual vocal parts from choral scores where, for example, four voices are notated across two staves.
You'll need to first create (see above) or duplicate (see below) a part. To then select which voices will appear in a part:
- Open a part (see above)
- Go to the Instruments panel
- Expand an instrument by clicking on the triangular dropdown icon
- Click the settings icon next to the staff name
- Select which voice(s) you want to appear in your part by ticking/un-ticking the checkboxes under Voices visible in the score
Applying styles to parts
Style settings for a wide range of engraving elements can be applied specifically to parts without affecting the main score.
To change style settings for a specific part:
- Ensure a part has been opened and is currently selected in the Score tab
- Go to Format → Style...
- Make your desired style settings changes (applicable changes will be visible in the score in real time)
- Click OK to confirm your changes
Changes you make in this dialog will affect only the part selected in the Score tab. If you want changes to affect all parts (but not the main score), select Apply to all parts before clicking OK.
Learn more about saving and loading default style settings in Templates and styles.
Managing synchronisation of score and parts
(This section describes features that are new or considerably enhanced in MuseScore 4.2.)
When you make changes to the content of the score - adding or deleting an item, or changing pitches and durations of notes, for example - these changes are always reflected in the parts, and vice versa.
However, just as you can apply different styles to score and parts, you may want the properties (position, style/appearance) of certain items to differ between score and parts. Therefore:
- When you change any property of an item in a part, that change will not be reflected in the score and the item will be marked as 'desynchronised' from the score, if it is not already;
- When you change any property of an item in the score, that change will be reflected in the part, unless that item is already desynchronised.
When an item in a part is desynchronised, its colour when selected changes to orange and, according on which properties have been changed, the toggles which appear in the Properties panel under Score and part synchronisation will switch off:
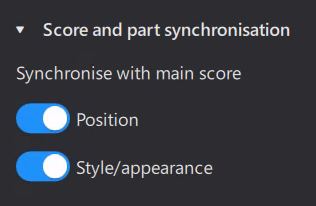
Position refers to offset, leading space, minimum distance, autoplace, direction (up/down, above/below), alignment, and a few other properties specific to certain types. Style/appearance is, essentially, all other properties.
If you have made changes to an item in the part but wish to resynchronise that item with the score, you can turn these toggles back on to reset those properties to match the score.
Text items have a third toggle, Text, which allows you to control synchronisation of the content and formatting of a text item. Unlike other properties, this must be manually switched off before you make changes to a text item in a part which you do not want to be reflected in the score.
Excluding items from parts or score
In some cases you may wish certain items to be in the score but not to appear in the parts at all, or to appear in a part but not in the score. This is not the same as simply making the item invisible, as invisible items sometimes affect the layout.
This option is available for frames, clef changes, ottava lines, staff text and system text. In the case of clefs and ottavas, excluding these items from one view will cause the notes there to be repositioned accordingly.
To exclude an item from parts:
- Select the item in the score
- Open Properties
- Under Score and part synchronisation, check Exclude from parts
To exclude an item from the score:
- Select the item in the part
- Open Properties
- Under Score and part synchronisation, check Exclude from score
Renaming, duplicating and deleting parts
This all takes place in the Parts dialog (accessible from the Parts button in the toolbar).
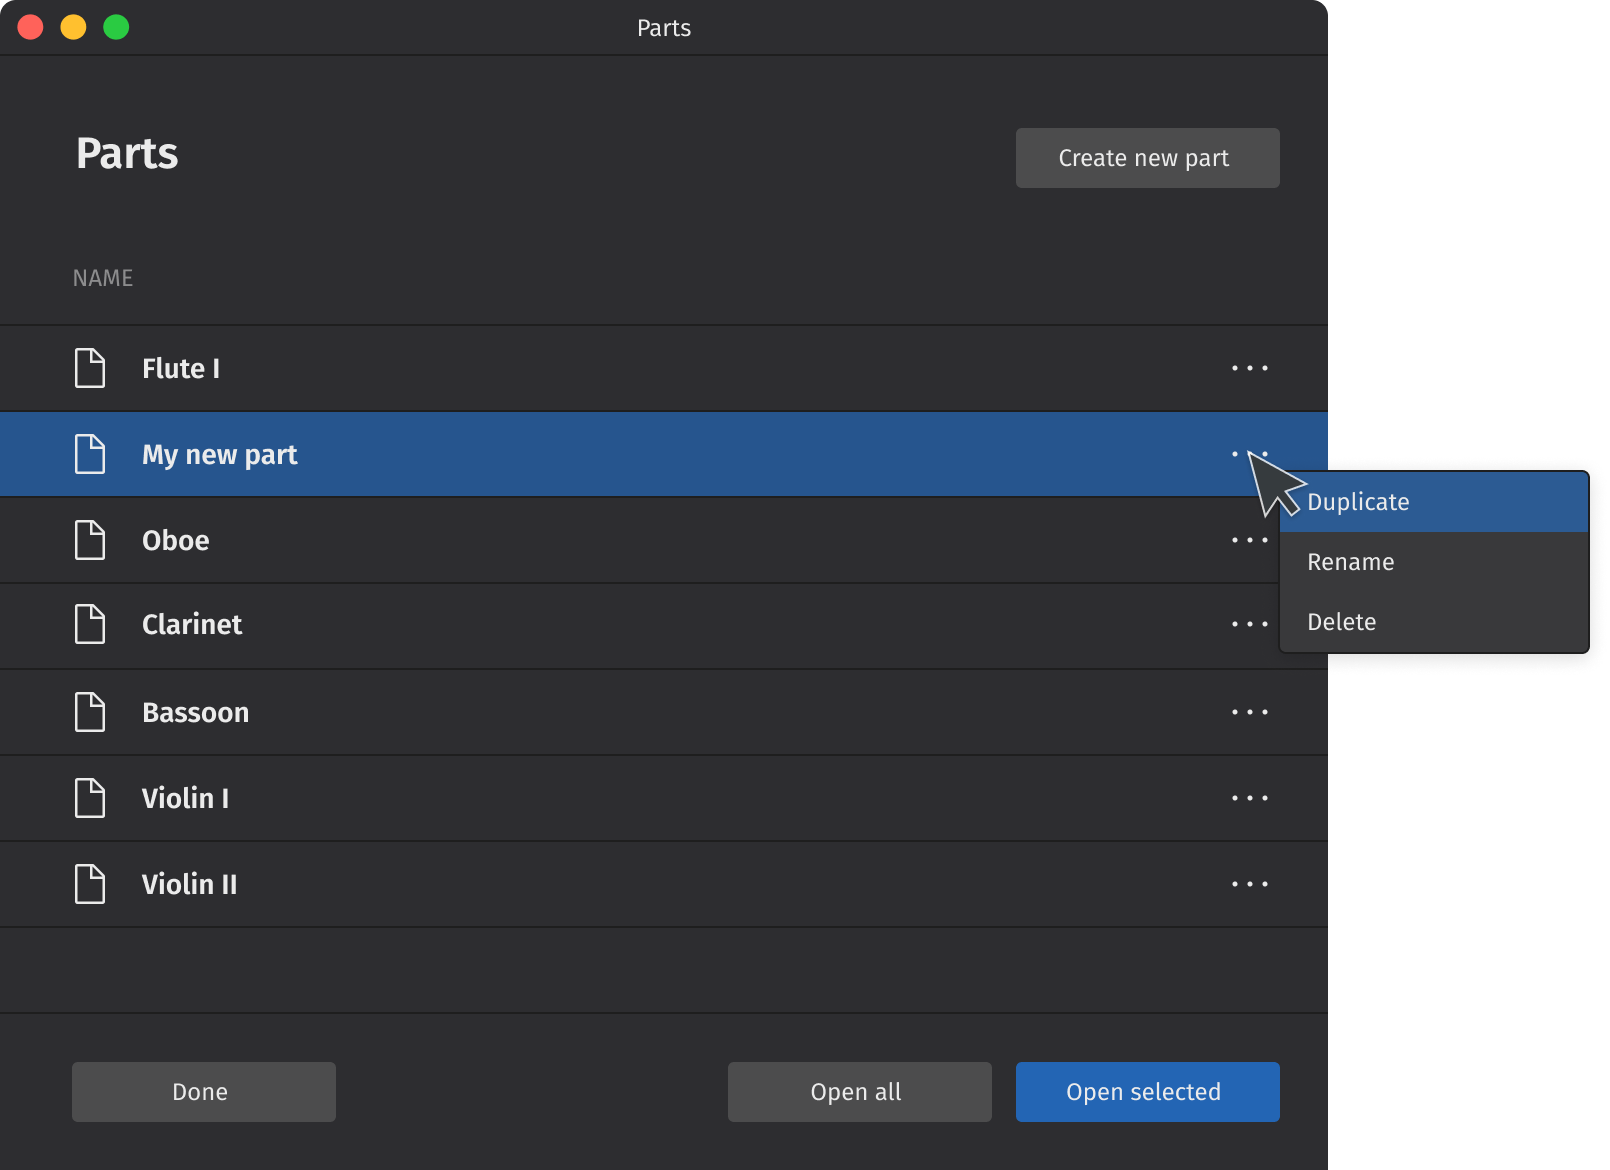
Simply click the "three dots" menu icon next to a selected part to reveal its options. Note that only newly created parts (created by clicking the Create new part button) can be deleted. All parts can be duplicated or renamed.
To duplicate any part:
- Select a part in the Parts dialog
- Click the "three dots" menu icon for the selected part
- Select Duplicate from the context menu that appears
- Enter a new name for the part (or leave the default name as is)
- Hit Enter, or click anywhere in the Parts dialog
To rename any part:
- Select a part in the Parts dialog
- Click the "three dots" menu icon for the selected part
- Select Rename from the context menu that appears
- Type your new part name
- Hit Enter to confirm the new name
Note you can also double click on any part in the Parts dialog to rename it.
To delete a newly created part:
- Select a newly created part in the Parts dialog
- Click the "three dots" menu icon for the selected part
- Select Delete from the context menu that appears
When a part is deleted, its tab in the Score tab (if already opened) will be closed. Any customizations made to that part will also be lost. The part will also no longer appear in the Parts dialog.
Exporting and printing parts
To export parts:
- Click File → Export... (alternatively, select the Publish tab and click Export...)
- Check the box next to the part(s) you want to export, or click Select all to choose all parts at once
- Select whether to export all parts combined in one file, or leave the default export setting as each part to a separate file
- Click Export...
- Select your destination file and name your score in your operating system's Export dialog
- Click Save
Parts will be exported in the PDF format by default. To change the export format, select your preferred format from the dropdown menu in Export settings. You can export your parts in a range of image and audio formats, as well as the braille format for compatible printers. For more information, see File Export.
To print parts:
- Ensure the part you wish to print is selected in the Score tab
- Click File → Print
- Use your operating system's print dialog to print the selected part
Note that parts can currently only be printed one at a time.
Default keyboard shortcuts
On macOS, make the following substitutions:
- Replace Ctrl with Cmd (or ⌘)
- Replace Alt with Option (or ⌥)
- Replace Home with Fn+Left
- Replace End with Fn+Right
- Replace PgUp with Fn+Up
- Replace PgDn with Fn+Down
- Add Fn with function keys
Navigation
Page navigation
| Action | Windows/Linux | macOS |
|---|---|---|
| Zoom in | Ctrl+= | Cmd+= |
| Zoom out | Ctrl+- | Cmd+- |
| Zoom to 100% | Ctrl+0 | Cmd+0 |
| Go to first element in score | Ctrl+Home | Cmd+Fn+Left |
| Go to last element in score | Ctrl+End | Cmd+Fn+Right |
| Jump to next screen | PgDn | Fn+Down |
| Jump to previous screen | PgUp | Fn+Up |
| Jump to top of first page | Home | Fn+Left |
| Jump to bottom of last page | End | Fn+Right |
| Jump to next page | Ctrl+PgDn | Cmd+Fn+Down |
| Jump to previous page | Ctrl+PgUp | Cmd+Fn+Up |
| Find / Go to | Ctrl+F | Cmd+F |
Score navigation
| Action | Windows/Linux | macOS |
|---|---|---|
| Select next chord | Right | Right |
| Select previous chord | Left | Left |
| Go to next measure | Ctrl+Right | Cmd+Right |
| Go to previous measure | Ctrl+Left | Cmd+Left |
| Select next element in score | Alt+Right | Option+Right |
| Select previous element in score | Alt+Left | Option+Left |
| Select note/rest above | Alt+Up | Option+Up |
| Select note/rest below | Alt+Down | Option+Down |
Note input
General
| Action | Windows/Linux | macOS |
|---|---|---|
| Note input: toggle note input mode | N | N |
| Show/hide piano keyboard | P | P |
| Use voice 1 | Ctrl+Alt+1 | Cmd+Option+1 |
| Use voice 2 | Ctrl+Alt+2 | Cmd+Option+2 |
Duration
| Action | Windows/Linux | macOS |
|---|---|---|
| Set duration | 1 – 9 | 1 – 9 |
| Set duration: 32nd note | 2 | 2 |
| Set duration: 16th note | 3 | 3 |
| Set duration: 8th note | 4 | 4 |
| Set duration: quarter note | 5 | 5 |
| Set duration: half note | 6 | 6 |
| Set duration: whole note | 7 | 7 |
| Toggle duration dot | . | . |
| Enter tuplet | Ctrl+2 – Ctrl+9 | Cmd+2 – Cmd+9 |
| Enter tuplet: duplet | Ctrl+2 | Cmd+2 |
| Enter tuplet: triplet | Ctrl+3 | Cmd+3 |
| Enter tuplet: quadruplet | Ctrl+4 | Cmd+4 |
| Add tied note | T | T |
| Halve selected duration (includes dotted values) | Shift+Q | Shift+Q |
| Double select duration (includes dotted values) | Shift+W | Shift+W |
Pitch
| Action | Windows/Linux | macOS |
|---|---|---|
| Enter note | A – G | A – G |
| Add note to chord | Shift+A – Shift+G | Shift+A – Shift+G |
| Enter interval | Alt+1 – Alt+9 | Option+1 – Option+9 |
| Toggle accidental: flat | - | - |
| Toggle accidental: natural | = | = |
| Toggle accidental: sharp | + | + |
| Enter rest | 0 | 0 |
| Add grace note: acciaccatura | / | / |
Tablature
| Action | Windows/Linux | macOS |
|---|---|---|
| Set duration (TAB) | Shift+0 – Shift+9 | Shift+0 – Shift+9 |
| Set duration: 32nd note (TAB) | Shift+2 | Shift+2 |
| Set duration: 16th note (TAB) | Shift+3 | Shift+3 |
| Set duration: 8th note (TAB) | Shift+4 | Shift+4 |
| Set duration: quarter note (TAB) | Shift+5 | Shift+5 |
| Set duration: half note (TAB) | Shift+6 | Shift+6 |
| Set duration: whole note (TAB) | Shift+7 | Shift+7 |
| Enter TAB: fret | 0 – 9 | 0 – 9 |
| Enter TAB: fret | A – K | A – K |
| Go to string above (TAB) | Up | Up |
| Go to string below (TAB) | Down | Down |
| Toggle ghost note | Shift+X | Shift+X |
Selecting
| Action | Windows/Linux | macOS |
|---|---|---|
| Select all | Ctrl+A | Cmd+A |
| Add to selection: previous note/rest | Shift+Left | Shift+Left |
| Add to selection: next note/rest | Shift+Right | Shift+Right |
| Add to selection: staff above | Shift+Up | Shift+Up |
| Add to selection: staff below | Shift+Down | Shift+Down |
| Select to beginning of measure | Ctrl+Shift+Left | Cmd+Shift+Left |
| Select to end of measure | Ctrl+Shift+Right | Cmd+Shift+Right |
| Select to beginning of score | Ctrl+Shift+Home | Cmd+Shift+Fn+Left |
| Select to end of score | Ctrl+Shift+End | Cmd+Shift+Fn+Right |
Editing
General
| Action | Windows/Linux | macOS |
|---|---|---|
| Escape | Esc | Esc |
| Undo | Ctrl+Z | Cmd+Z |
| Redo | Ctrl+Shift+Z | Cmd+Shift+Z |
| Copy | Ctrl+C | Cmd+C |
| Cut | Ctrl+X | Cmd+X |
| Paste | Ctrl+V | Cmd+V |
| Repeat selection | R | R |
| Insert one measure before selection | Ins | Ins |
| Insert measures before selection | Ctrl+Ins | Cmd+Ins |
| Insert one measure at end of score | Ctrl+B | Cmd+B |
| Insert measures at end of score | Alt+Shift+B | Option+Shift+B |
| Delete | Del | Del |
| Delete selected measures | Ctrl+Del | Cmd+Del |
| Show/hide properties | F8 | Fn+F8 |
| Edit element | F2 | Fn+F2 |
Duration
| Action | Windows/Linux | macOS |
|---|---|---|
| Set duration | 1 – 9 | 1 – 9 |
| Enter tuplet | Ctrl+2 – Ctrl+9 | Cmd+2 – Cmd+9 |
| Add tied note | T | T |
Pitch
| Action | Windows/Linux | macOS |
|---|---|---|
| Toggle accidental: flat | - | - |
| Toggle accidental: natural | = | = |
| Toggle accidental: sharp | + | + |
| Move pitch/selection up | Up | Up |
| Move pitch/selection down | Down | Down |
| Move pitch up an octave | Ctrl+Up | Cmd+Up |
| Move pitch down an octave | Ctrl+Down | Cmd+Down |
| Change enharmonic spelling (concert and written pitch) | J | J |
| Move note to higher string (TAB) | Ctrl+Up | Cmd+Up |
| Move note to lower string (TAB) | Ctrl+Down | Cmd+Down |
Notation
| Action | Windows/Linux | macOS |
|---|---|---|
| Flip direction | X | X |
| Use voice 1 | Ctrl+Alt+1 | Cmd+Option+1 |
| Use voice 2 | Ctrl+Alt+2 | Cmd+Option+2 |
Manual adjustment
| Action | Windows/Linux | macOS |
|---|---|---|
| Move text left | Left | Left |
| Move text right | Right | Right |
| Move text left quickly | Ctrl+Left | Cmd+Left |
| Move text right quickly | Ctrl+Right | Cmd+Right |
| Move selection up | Up | Up |
| Move selection down | Down | Down |
| Move selection up quickly | Ctrl+Up | Cmd+Up |
| Move selection down quickly | Ctrl+Down | Cmd+Down |
Text
General
| Action | Windows/Linux | macOS |
|---|---|---|
| Add text: staff text | Ctrl+T | Cmd+T |
| Add text: expression text | Ctrl+E | Cmd+E |
| Add text: system text | Ctrl+Shift+T | Cmd+Shift+T |
| Add text: tempo marking | Alt+Shift+T | Option+Shift+T |
| Add text: rehearsal mark | Ctrl+M | Cmd+M |
Formatting
| Action | Windows/Linux | macOS |
|---|---|---|
| Format text: bold face | Ctrl+B | Cmd+B |
| Format text: italic | Ctrl+I | Cmd+I |
| Format text: underline | Ctrl+U | Cmd+U |
Lyrics
| Action | Windows/Linux | macOS |
|---|---|---|
| Add text: lyrics | Ctrl+L | Cmd+L |
| Go to next syllable | Space | Space |
| Go to previous syllable | Shift+Space | Shift+Space |
| Lyrics: enter hyphen | - | - |
| Lyrics: enter melisma | _ | _ |
| Add lyric verse | Return | Return |
| Go to next lyric verse | Down | Down |
| Go to previous lyric verse | Up | Up |
Chord symbols, Roman numeral analysis, Nashville numbers, figured bass
| Action | Windows/Linux | macOS |
|---|---|---|
| Add text: chord symbol | Ctrl+K | Cmd+K |
| Next text element | Space | Space |
| Previous text element | Shift+Space | Shift+Space |
| Advance cursor: next beat | ; | ; |
| Advance cursor: previous beat | Shift+; | Shift+; |
| Advance cursor: duration | Ctrl+1 – Ctrl+9 | Cmd+1 – Cmd+9 |
Other score elements
| Action | Windows/Linux | macOS |
|---|---|---|
| Show/hide palettes | F9 | Fn+F9 |
| Search palettes | Ctrl+F9 | Cmd+Fn+F9 |
| Add slur | S | S |
| Add articulation: accent | Shift+V | Shift+V |
| Add articulation: marcato | Shift+O | Shift+O |
| Add articulation: staccato | Shift+S | Shift+S |
| Add articulation: tenuto | Shift+N | Shift+N |
| Add hairpin: crescendo | < | < |
| Add hairpin: decrescendo | > | > |
Score setup and formatting
| Action | Windows/Linux | macOS |
|---|---|---|
| Add/remove instruments | I | I |
| Open instruments dialog | F7 | Fn+F7 |
| Toggle visibility of elements | V | V |
| Decrease layout stretch | { | { |
| Increase layout stretch | } | } |
| Add/remove system break | Return | Return |
| Add/remove page break | Ctrl+Return | Cmd+Return |
| Reset shapes and positions | Ctrl+R | Cmd+R |
File Operations
| Action | Windows/Linux | macOS |
|---|---|---|
| New | Ctrl+N | Cmd+N |
| Open | Ctrl+O | Cmd+O |
| Close | Ctrl+W | Cmd+W |
| Save | Ctrl+S | Cmd+S |
| Ctrl+P | Cmd+P | |
| Quit | Ctrl+Q | Cmd+Q |
User interface
Playback
| Action | Windows/Linux | macOS |
|---|---|---|
| Play | Space | Space |
| Show/hide mixer | F10 | Fn+F10 |