Published on MuseScore (https://musescore.org)

Håndbog

This handbook is for MuseScore version 2.0 and above. It is maintained by the MuseScore community. Find out how you can help.

Kom igang

Dette kapitel hjælper dig med at installere MuseScore og starte programmet første gang. Kapitlet vil også vise dig hvordan du opretter et nyt nodeark.

Installation

MuseScore fungerer på flere forskellige operativsystemer bl. a. Windows og macOS, plus på en række Linux distributioner, og flere BSD varianter.
Find vejledningen til det system du bruger nedenfor.

Installer på Windows

    Installer

    Du kan hente installationsprogrammet til Windows fra download siden på MuseScore websitet. Klik på linket for at starte download af installationsfilen. Din browser vil muligvis bede dig bekræfte, at du vil hente denne fil. Klik da på Gem.

    Når download er færdigt, skal du dobbeltklikke på filen, for at starte installationen. Windows vil muligvis komme med en sikkerhedsadvarsel, som du skal bekræfte inden, du kan starte softwaren. Klik Kør for at fortsætte, (Ja på Windows 10) .
    Du vil så kortvarigt se

    Preparing to install

    fulgt af

    Computing space requirements

    Hvis du ser noget andet end installationsvinduet, kan det skyldes at filtypen .msi, ikke er knyttet til msiexec.exe. Du kan enten rette dette .<ret associationen>. Eller du kan downloade og bruge den portable version i stedet. <portabel version af MuseScore>.

    Det næste du vil se er

    Welcome to the MuseScore 2 Setup Wizard

    Hvis du klikker Cancel, her eller senere, vil du få beskeden:

    MuseScore 2 Setup Wizard was interrupted

    Hvis du i stedet klikker Next for at fortsætte, vil du få vist betingelserne for den gratis software licens.

    End-User License Agreement

    Læs licensbetingelserne og sørg for at boksen ved siden af, I accept the terms in the License Agreement er markeret, og klik så Next for at fortsætte. Installationsprogrammet vil nu bede dig bekræfte placeringen, som du ønsker at installere MuseScore på.

    Destination Folder

    HVis du er ved at installere en nyere version af MuseScore, og stadig ønsker at beholde den gamle på din computer, skal du ændre folderen. (Bemærk at MuseScore 2 kan eksistere smmen med MuseScore 1 uden behov for ændringer). Ellers klik på Next for at fortsætte.

    Ready to install MuseScore 2

    Klik på Install for at fortsætte.

    Giv installationsprogrammet et par minutter til at installere de nødvendige filer og konfigurationer.
    Imens vises

    Installing MuseScore 2, progress

    og til sidst

    Completed the MuseScore 2 Setup Wizard

    Klik Finish for at forlade installationsprogrammet. Du kan nu slette de installationsfiler, som du har downloaded.

    Start MuseScore

    For at starte MuseScore skal du vælge Start→All Programs→MuseScore 2→MuseScore 2.

    Troubleshooting

    På Windows XP and Vista, kan installationsprogrammet blive blokeret af systemet. Hvis det ikke lykkes for dig at installaere MuseScore, skal du højreklikke på den downloadede fil, og vælge Egenskaber. Hvis der er en besked "This file came from another computer and might be blocked to help protect this computer", klik da på "Unblock", "OK" og dobbeltklik på den downloadede fil igen.

    External links

    • How to install MuseScore on Windows without administrator rights
    • How to run MuseScore as Administrator on Windows
    • How to change the language in MuseScore

    Installer på macOS

      Installer

      Du finder DMG (disk image) filen på download siden på MuseScore websitet. Klik på macOS linket for at starte downloadet. Når download af filen er færdigt, skal du dobbeltklikke på DMG filen, for at montere et virtuelt diskdrev.

      Install Mac

      Træk og slip så MuseScore iconet til Applications folder iconet.

      Hvis du ikke er logget ind som administrator, kan macOS bede om et password: Klik Authenticate og indtast dit password for at fortsætte.

      Copying

      Når kopiering af applikationen er færdig, skubbes disk imaget ud. Du kan nu starte MuseScore fra Applications folderen, fra Spotlight, eller Launchpad.

      Afinstaller

      For at afinstallere skal du blot slette MuseScore fra Applications folderen.

      Installer med Apple Remote Desktop

      Du kan distribuere MuseScore til flere computere med "Kopi" faciliteten i ARD. Da MuseScore er en færdigpakket applikation, kan du blot kopiere den til '/Application' folderen på de øvrige maskiner. Det er også muligt at installere flere versioner samtidig, når bare deres navne er forskellige.

      External links

      • How to run MuseScore 2.x on Mac OS X 10.6
      • How to change the language in MuseScore

      Installer på Linux

        Med MuseScore 2.0.3 kan du, for første gang, få en kopi til Linux direkte fra download siden. Fuldstændig som Windows og Mac brugere. Dette er blevet muligt takket være AppImage pakke formatet, som kører på stort set ale Linux distributioner. Hvis du foretrækker, er det stadig muligt at få det på den traditionelle måde via distribution's package manager (men du kan blive nødt til at vente på at få den pakket af den tilknyttede vedligeholder). Selvfølgelig kan du altid bygge fra source.

        AppImage

        AppImage formatet er en ny måde at pakke Linux applikationer på. AppImages er portable - så de behøver ikke at blive Installeret - og de kan køre på stort set alle Linux distributioner. Afhægigheder er indeholdt i selve AppImage filen.

        Trin 1 - Download

        Før du kan downloade et AppImage, skal du kende din processor's arkitektur. Disse terminal kommadoer vil vise den.

            arch

        eller

            uname -m

        Resultatet vil være noget som dette: "i686", "x86_64" eller "armv7":

        • i686 (eller lignende) - 32 bit Intel/AMD processor. (Findes på ældre maskiner)
        • x86_64 (eller lignende) - 64 bit Intel/AMD processor. (Moderne laptops og desktop computers, de fleste Chromebooks.)
        • armv7 (eller senere) - ARM processor. (Telefoner & tablets, Raspberry Pi 2/3 med Ubuntu Mate, nogle Chromebooks. Som regel 32 bit)

        Nu kan du gå over til download og finde det AppImage som bedst passer til din arkitektur. Når filen er hentet vil den hedde "MuseScore-X.Y.Z-$(arch).AppImage".

        Trin 2 - Giv execute rettigheder

        Før du kan anvende et AppImage skal du give det rettigheder til at køre som et program.

        Fra terminalen:

        Denne kommando giver brugeren (u) tilladelse til at afvikle (execute)
        (x) et AppImage. Den fungerer på alle Linux systemer.

            cd ~/Downloads
            chmod u+x MuseScore*.AppImage

        Note: Brug "cd" kommandoen til at gå til folderen, hvor du gemte AppImage filen.

        Fra en File Manager:

        Hvis du foretrækker at undgå kommando linien, er der normalt mulighed for at tildele rettigheder indefra File Manager.

        I GNOME Files (Nautilus), blot:

        1. Højre-klik på AppImage og vælg "Properties".
        2. Åben "Permissions" tab.
        3. Marker optionen benævnt "Allow executing file as a program".

        Fremgangsmåden kan være lidt anderledes på andre File managers.

        Trin 3 - Kør programmet!

        Nu skulle du kunne køre programmet blot ved at dobbeltklikke på det!

        Da du hentede AppImage, blev det sikkert gemt i Downloads folderen, men du kan flytte det når som helst (f.eks. placere det på din desktop). Hvis du nogensinde får lyst til at fjerne det, kan du bare slette det.

        Installer et AppImage (valgfrit)

        Du kan køre et AppImage, uden at installere det, men du er nødt til at installere det, hvis du vil have det fuldt integreret i din desktop. Dette har følgende fordele:

        • Tilføjer AppImage til din Applications Menu eller Launcher
        • Sætter de korrekte ikoner på MuseScore's filer (MSCZ, MSCX) og på MusicXML filer (MXL, XML)
        • Gør AppImage tilgængelig via din File Manager's højre-klik "Open with..." menu

        For at installere det, skal du køre AppImage fra Terminalen med "install" option (se lige herunder). Dette kopierer en desktop fil og forskellige ikoner til din computer. Hvis du vil fjerne dem, må du køre med "remove" option før du sletter AppImage. Dette berører ikke nodeark, som du har oprettet med MuseScore - uanset version.

        Brug af kommando linie optioner

        Afvikling af AppImage fraTerminalen giver dig mulighed for at anvende forskellige kommando linie optioner. AppImage har nogle specielle optioner udover MuseScore's normale kommando line optioner.

        Du skal skifte folder (cd) til der hvor du har gemt AppImage på dit system, for eksempel:

            cd ~/Desktop
            ./MuseScore*.AppImage *option*

        Eller angive stien til AppImage:

         
         ~/desktop/MuseScore*.AppImage *option*

        Brug "--help" og "man" optionerne til at få mere information om de tilgængelige kommando linie optioner:

            ./MuseScore*.AppImage --help   # viser en komplet liste af kommando linie optioner
         
            ./MuseScore*.AppImage man      # viser siden fra manualen (forklarer hvad optionen gør)

        Distributions pakker

        Fedora

        1. Importer GPG nøglen:

          su
          rpm --import http://prereleases.musescore.org/linux/Fedora/RPM-GPG-KEY-Seve
           
        2. Gå til download siden på MuseScore websitet. Klik på linket til den stabile Fedora download og vælg den korrekte rpm pakke til din arkitektur.

        3. Brug en af de to sæt af kommandoer, afhængig af din arkitektur, til at installere MuseScore

          • for arch i386
              su
              yum localinstall musescore-X.Y-1.fc10.i386.rpm
           
          • for arch x86_64
              su
              yum localinstall musescore-X.Y-1.fc10.x86_64.rpm
           

        Hvis du har problemer med lyd, se Fedora 11 og lyd.
        Se også hints omkring de forskellige distributioner på download siden.

        External links

        • How to run the MuseScore AppImage on Linux - video
        • How to change the language in MuseScore

        Installer på Chromebook

        MuseScore vil ikke fungere direkte på Chrome OS, men der findes nogle workarounds.

        1. Via Crouton: Dette indebærer, at der installeres et Linux baseret operativ system, som kører parallelt med Chrome OS, og at MuseScore så Installes på Linux.

        2. Via en software-on-demand service som f.eks. Rollapp: Ved blot at besøge websitet, kan du køre MuseScore i browseren, men du kan kun oprette nodeark fra bunden, og kun gemme dem på din online MuseScore konto via menuen File→Save Online.... Lyd og afspilning vil ikke fungere.

        External links

        • How to run MuseScore on a Chromebook
        • Check the installation procedure from the comments in this thread
        • How to change the language in MuseScore

        Opret et nyt nodeark

          Ny node hjælper guider dig gennem opsætningen af et nyt nodeark (partitur). Se i Opret nyt nodeark (herunder) hvordan du kommer direkte til 'Ny node hjælper'. Du kan også komme til 'Ny node hjælper' via Opstartcenter.

          Opstartcenter

          Opstartcenter

          Dette vindue vises hver gang du åbner MuseScore. Du kan også åbne det fra menuen ved at vælge Vis→Opstartcenter... (genvejstast, F4).

          Her kan du vælge mellem forskellige muligheder, som f. eks.:

          • Oprette et nyt nodeark (ved at klikke på ikonet med plustegnet)
          • Åbne et nodeark du tidligere har åbnet
          • Åbne nodearket med guiden "Kom godt igang", hvis det er første gang du åbner MuseScore
          • Åbne et eksisterende nodeark fra computerens filsystem
          • Afspille instruktionsvideoer
          • Se dagens "In the spotlight" nodeark
          • Søge efter nodeblade på musecore.com
          • Linke til apps på telefonen
          • Linke til MuseScore på de sociale medier

          Opret nyt nodeark

          For at åbne Ny node hjælper når Opstartcenter ikke er åbent, kan du bruge en af disse muligheder:

          • Klik på Ny Node ikonet i værktøjslinien øverst til venstre på skærmen;
          • Bruge genvejstasten Ctrl+N (Mac: Cmd+N);
          • Vælge Fil→Ny... fra menuen;

          Titel, komponist og anden information

          Titei, komponist og anden information
          Trin 1: Indtast nodeark information.

          Indsæt titel, komponist eller andre oplysninger, som vist herover, og klik så på Næste >. Dette trin er valgfrit: du kan også tilføje disse oplysninger efter at nodearket er oprettet (see Lodret ramme).

          Vælg skabelon

          Ny_Node-Skabelon.PNG
          Trin 2: Vælg skabelon.

          Her kan du vælge mellem en række forskellige skabeloner til solo, ensemble og orkester. Hvis du selv vil vælge præcis hvilke instrumenter, der skal være i dit nodeark, så klik på "Vælg instrumenter" (under "General").

          Du kan også oprette dine egne skabeloner. Disse vil blive vist under "Custom Templates". Se nedenfor.

          Vælg instrumenter eller vokal stemmer

          Hvis du ikke kan finde en passende skabelon, så klik på "Vælg instrumenter".

          Ny node hjælper: Vælg instrumenter

          Vælg instrumenter vinduet er delt i to kolonner:

          • Den venstre kolonne indeholder en liste af instrumenter og vokal stemmer, til at vælge fra. Listen er opdelt i kategorier med forskellige instrument familier. Når der er valgt en kategori vises familierne, og ved at klikke på en familie, får man vist alle instrumenterne i denne familie.

            Som default vælges fra kategorien "Almindelige instrumenter", men du kan bruge andre, herunder "Jazz instrumenter" og "Tidlig musik". Der er et søgefelt i bunden af instrument vinduet: indtastes navnet på et instrument her, vil der blive søgt efter det i "Alle instrumenter".

          • Den højre kolonne starter tom, men vil efterhånden blive udfyldt med en liste af instrumenter til dit nye nodeark, vist i den rækkefølge de vil blive placeret i.

          Tilføj instrumenter

          For at tilføje instrumenter til nodearket kan du bruge en af disse to muligheder:

          • Marker et eller flere instrumenter i den venstre kolonne og klik på Tilføj.
          • Dobbeltklik på et instrument i venstre kolonne.

          Instrumenternes navne og de tilknyttede nodelinier, vil nu blive tilføjet til listen af instrumenter i den højre kolonne. Du kan tilføje flere instrumenter og vokal stemmer efter behov. Hvert instrument som tilføjes på denne måde får tildelt sin egen Mixer kanal.

          Note: Hvis du ønsker at flere nodelinier skal dele det samme instrument, skal du bruge Tilføj nodelinie/sammenkædet nodelinie kommandoen i stedet (se herunder).

          Tilføj nodelinie/sammenkædet nodelinie

          For at tilføje en ny nodelinie til et eksisterende instrument i nodearket:

          1. Vælg en nodelinie i listen af instrumenter til højre (som f.eks. Linie 1 i billedet herunder) og klik Tilføj nodelinie eller
            Tilføj sammenkædet nodelinie.
          2. Tilret Nodelinietype efter behov, hvis instrumentet har flere typer.

            Tilføj nodelinie

          Tilføj nodelinie vil indsætte en ny nodelinie, som ikke er sammenkædet med de øvrige. Dette betyder at nodelinierne kan redigeres uafhængigt af hinanden.
          Tilføj sammenkædet nodelinie
          indsætter en nodelinie, som indgår i en gruppe af sammenkædede nodelinier. Dette betyder at ændringer i en af nodelinierne straks overføres til de andre.

          Note: Alle linier som tilføjes på denne måde deler egenskaber. Bl.a. Instrument navn, mixer kanal, dynamik mm.

          Tilføj nodelinie knappen kan benyttes til at tilføje nodelinier til instrumenter, som kan spille flere stemmer. (F.eks. orgel, klaver og harpe), eller tilføje uafhængige nodelinier/tabulaturer for guitar o.l.
          Hvis man foretrækker sammenkædede nodelinier/tabulaturer for de sidste, benyttes Tilføj sammenkædet nodelinie knappen i stedet. (Se Kombiner nodelinie og tabulatur)

          Note: Afstanden mellem nodelinierne indenfor et instrument kan ændres med indstillingen Klaversystemafstand.

          Skift rækkefølge af instrumenter

          For at ændre rækkefølgen af instrumenter (eller nodelinier) i nodearket:

          • Klik enten på et instrument navn eller en nodelinie i den højre kolonne, og brug ↑ eller ↓ knapperne til at flytte den op/ned.

          Fjern et instrument

          For at fjerne et instrument, eller en nodelinie fra nodearket:

          • Vælg et instrument eller en nodelinie i den højre kolonne og klik på Fjern.

          Vælg toneart og tempo

          Ny node hjælper: Vælg toneart og tempo

          Trin 3: Vælg toneart og tempo.

          Her spørges om to ting: Tonearten og tempoet i starten af nodearket. Vælg en af de viste tonearter og klik på Næste > for at fortsætte. Du kan også sætte det indledende tempo her.

          Vælg taktart, optakt og antal takter

          Ny node hjælper: Vælg taktart, optakt og antal takter
          Step 4: Vælg taktart mv.

          Her kan du sætte den indledende taktart. Hvis nodearket starter med en optakt, skal chekboxen Optakt markeres, og Varighed skal rettes til.

          Taktantallet er som standard sat til 32: Du kan ændre antallet her, eller tilføje/fjerne takter i nodearket senere.

          Klik Afslut for at oprette dit nye nodeark.

          Ændringer til nodearket efter oprettelse

          De indstillinger du laver i Ny Node Hjælper kan alle ændres når du begynder at arbejde i nodearket:

          Tilføj/slet takter

          For at tilføje/fjerne takter se under Arbejde med takter

          Tilføj/slet tekst

          For at ændre en vilkårlig tekst, se Tekst redigering. For at tilføje en manglende Titel (ełler et andet tekst element), brug menuen Tilføj→Tekst→Titel (eller en anden teksttype )

          Ændre instrument opsætningen

          Til at slette, tilføje eller ændre rækkefølgen af instrumenterne benyttes menuen Rediger→Instrumenter... eller tast I. Dette åbner Instrument billedet som praktisk talt er identisk med Vælg instrumenter billedet i Ny node hjælper (se ovenfor).

          Se også Skift instrument (Takt egenskaber).

          Skabeloner

          Nummer to billedet i "Ny node hjælper" giver adgang til at vælge en skabelon, til at oprette det nye nodeark med (se herover for flere detaljer). For at oprette et nodeark på denne måde, skal man klikke på en skabelon, i stedet for "Vælg Instrumenter". Fortsæt herfra og afslut "Ny node hjælper" som sædvanlig.

          Skabeloner er normale MuseScore filer, som er gemt i en særlig folder.
          Der oprettes som standard to foldere til skabeloner: en system folder det indeholder de skabeloner, som Installes sammen med MuseScore og aldrig bør ændres, samt en private bruger folder til at gemme dine egne skabeloner i. Du kan oprette din egen skabelon, som vil blive vist i"Ny node hjælper", ved blot at gemme et nodeark i bruger folderen.

          Bruger folder

          Du kan konfigurere placeringen af din private skabelon folder i Rediger→Indstillinger...→Generelt, men MuseScore opretter en folder til formålet.

          På Windows, er bruger folderen placeret i %HOMEPATH%\Documents\MuseScore2\Skabeloner.

          På macOS og Linux, er bruger folderen placeret i ~/Documents/MuseScore2/Skabeloner.

          Ny node hjælper vil vise skabeloner fra både system og bruger folderne.

          System folder

          Indholdet i denne folder bør aldrig ændres.

          På Windows er system folderen normalt placeret i C:\Program Files\MuseScore 2\templates eller ib64-bit versioner i C:\Program Files (x86)\MuseScore 2\templates.

          På Linux, sevunder /usr/share/mscore-xxx hvis du installere de fra package manager. Hvis du selv kompilerede MuseScore på Linux, så se under /usr/local/share/mscore-xxx (hvor xxx er den version du bruger).

          På macOS, se under /Applications/MuseScore 2.app/Contents/Resources/templates.

          Se også

          • Toneart
          • Taktart
          • Nøgle
          • Tempo
          • Nodelinie egenskaber

          Externe links

          • Video tutorial: MuseScore in Minutes: Lesson 1 - Score Setup

          Sprogindstillinger og opdatering af oversættelse

            MuseScore installeres og arbejder med dit "System" sprog (det som bruges til de fleste programmer, og generelt er baseret på dit land, og spogindstillingerne på PC'en ełler kontoen).

            Skift sprog

            1. Gå tilRediger→Indstillinger... (Mac: MuseScore→Indstillinger...)
            2. På General fanen, er en Sprog sektion:

              Indstillinger_da.PNG

            Du kan ændre sproget og også opdatere oversættelsen med Opdater Oversættlse
            knappen. Et nyt vindue vil blive vist med dit sprog øverst - se herunder.

            Som det indikeres vil du være nødt til at forlade og genåbne MuseScore før ændringer og opdateringer træder i kraft.

            Opdater oversættlse

            Du kan opdatere oversættelsen som forklaret ovenfor, men der er også en anden mulighed:

            1. Gå til Hjælp→Resourcehåndtering
            2. Klik på knappen Opdater.

              Hjælp_Resursehåndtering_da.PNG
              Her vil du også være nødt til at forlade og genåbne MuseScore før opdateringerne træder i kraft.

            Se også

            • Hjælpe til og forbedre oversættelsen

            External links

            • How to change the language in MuseScore

            Check for opdateringer

              Der er to måder til at checke for opdateringer.

              Automatisk opdaterings check

              1. Gå til Rediger→Indstillinger... (Mac: MuseScore→Indstillinger...)
              2. Vælg fanen Opdater
              3. Marker i Tjek for ny version ...

                Dialog: Rediger / Indstillinger../Update

              MuseScore vil nu checke for opdateringer hver gang den starter, og vil give dig besked når det er nødvendigt.

              Check for opdateringer

              1. Vælg Hjælp→Tjek for Opdateringer

                Menu: Help / Check for Update

              2. Et vindue vil blive vist med status for opdateringer: enten "Ingen opdateringer klar" eller "En opdatering til MuseScore er klar:" fulgt af et link til download.

              Note: Dette menupunkt findes kun i Mac og Windows versioner af MuseScore, da de kan opdateres direkte fra MuseScore.org. Linux distributioner har andre måder til at gøre Opdateringer tilgængelige.

              Se også

              • Indstillinger: Opdateringer

              Grundlæggende funktioner

              Det foregående kapitel "Kom igang" guider dig igennem installation af MuseScore og processen til at oprette et nyt nodeark. Kapitlet "Grundlæggende funktioner" giver et overblik over MuseScore og beskriver de almindelige måder at arbejde med et nodeark på.

              Redigering

                Redigeringstilstand bruges til at tilpasse elementer, som er tilføjet til et nodeark. De fleste elementer kan tilpasses på en eller anden måde i redigeringstilstand.

                For at skifte til redigeringstilstand brug en af disse muligheder:

                • Dobbeltklik på et vilkårligt element
                • Højreklik på elementet og vælg Rediger Element
                • Klik en gang på elementet og brug genvejen Ctrl+E (Mac: Cmd+E).

                For at forlade redigeringstilstand, tryk Esc, ełler klik på et blankt område i dokument vinduet.

                Tekst

                Om textredigeringstilstand, se Tekst redigering.

                Linier

                Linier—som buer, hårnåle, volter osv.— får kvadratiske håndtag i redigerings tilstand (som bliver blå når de markeres). En legato bue, ser for eksempel sådan ud:

                Sample slur in Edit Mode

                Håndtagene i enderne bruges til at justere længden af linien. Det midterste bruges til at ændre den lodrette placering.
                Legato- og bindebuer har tre håndtag mere, som bruges til at justere formen på buen. (se billedet herover).

                For at flytte et håndtag, klikker man på det og bruger en tastatur genvej (se herunder). Man kan også flytte håndtaget med musen.

                Håndtagene i hver ende er forbundet med en stiplet linie til et anker på nodelinien. Ankrene angiver start og slut på den del af noden, som styres af linien. Som standard er et håndtag placeret lodret over sit anker.

                • For at flytte et endepunkt håndtag og det tilhørende anker, markerer man håndtaget og bruger Skift+→ eller Shift+←.
                • For at flytte et endepunkt håndtag uden at påvirke ankeret, markerer man håndtaget og bruger enten højre/venstre pilene, eller den tilhørende Ctrl (Mac: ⌘) kommando. Se tastatur genveje herunder.

                Tastatur genveje

                De følgende tastatur genveje kan bruges til at justere placeringen af det markerede anker:

                • ←: Flyt håndtaget 0.1 linieafstand til venstre.
                • →: Flyt håndtaget 0.1 linieafstand til højre.
                • ↑: Flyt håndtaget 0.1 linieafstand op
                • ↓: Flyt håndtaget 0.1 linieafstand ned.
                • Ctrl+← (Mac: ⌘+←): Flyt håndtaget en linieafstand til venstre.
                • Ctrl+→ (Mac: ⌘+→): Flyt håndtaget en linieafstand til højre.
                • Ctrl+↑ (Mac: ⌘+↑): Flyt håndtaget en linieafstand op.
                • Ctrl+↓ (Mac: ⌘+↓): Flyt håndtaget en linieafstand ned.
                • Alt+←: Flyt håndtaget 0.01linieafstand til venstre.
                • Alt+→: Flyt håndtaget 0.01 linieafstand til højre.
                • Alt+↑: Flyt håndtaget 0.01 linieafstand op.
                • Alt+↓: Flyt håndtaget 0.01 linieafstand ned.
                • Shift+←: Flyt et endehåndtags anker en node/pause til venstre.
                • Shift+→: Flyt et endehåndtags anker en node/pause til højre.
                • Tab: Gå til næste håndtag.

                Noder

                Forskydning af noder

                For at flytte en enkelt node til højre eller venstre (f.eks. for at undgå overlapning af et andet element, eller for at undgå delte nodehoveder), markeres nodehovedet og Akkord - vandret offset ændres i Inspektør. Man kan dog også vælge, at lave ændringerne i redigeringstilstand:

                1. Skift til redigeringstilstand ved at (i) dobbeltklikke på et nodehoved ELLER (ii) højreklikke på et nodehoved og vælge "Rediger element", EŁLER (iii) vælge et nodehoved og trykke Ctrl + E.
                2. Brug piletasterne til at flytte noden (til venstre eller højre) i små trin. (eller brugCtrl+← eller Ctrl+→ til større justeringer).
                3. Tryk på Esc tasten, så vil nodehalsen blive flyttet til den nye position.

                Note: Redigeringstilstand for node halsen giver mulighed for at ændre længden på halsen, men ikke til at flytte den i vandret retning. For at ændre nodehalsens placering, klikkes på den, og vandret offset rettes i Inspektør.

                Se også

                • Tekst redigering
                • Legatobue
                • Klammer
                • Linie
                • Bjælke
                • Håpind

                Paletter og arbejdsområder

                  En palet er et område, som indeholder en gruppe af ensartede musikalske symboler. Et arbejdsområde er en samling af paletter, der som standard er placeret fastgjort til venstre for hoved vinduet.

                  Visning af paletter kan slås til og fra via menuen Vis → Paletter eller med genvejen F9 (Mac: fn+F9).

                  Arbejdsområder

                  Et Arbejdsområde er en samling af paletter. MuseScore har to forudindlagte arbejdsområder: Grundlæggende (sat som standard) og Udvidet (en version med flere paletter og symboler). Man skifter mellem de to via rullemenuen i bunden af arbejdsområde panelet.

                  Navnene på de enkelte paletter er tydeligt vist i en liste under ordet "Paletter".For at åbne eller lukke en palet klikker man på navnet eller på den tilhørende pil.

                  animeret gif som viser hvordan man skifter mellem Grundlæggende og Udvidet arbejdsområde

                  Paletterne i de forudindlagte arbejdsområder kan ikke udvides eller redigeres. For at kunne det, skal man først oprette sit eget arbejdsområde (se herunder).

                  Enkelt palette visning

                  Hvis man kun ønsker at en enkelt palet må være åben ad gangen, kan man højreklikke i toppen af arbejdsområdet og sætte markering ved ""Enkelt palette.

                  Frigøre/fastgøre palettepanel

                  For at frigøre eller fastgøre et arbejdsområde se Side paneler.

                  Brugertilpasset arbejdsområde

                  For at oprette et arbejdsområde, som kan tilpasses:

                  1. Vælg et af de eksisterende arbejdsområder. Brug evt. rullemenuen i bunden af arbejdsområdet.
                  2. Klik på + knappen, indtast navnet på det nye arbejdsområde, og tryk OK. Det nye arbejdsområde vil blive tilføjet til panelet.

                  I stedet kan man også bruge menuen:

                  1. Vælg Rediger → Arbejdsområder.
                  2. Vælg Ny. Udfyld navnet på arbejdsområdet og klik OK.

                  Når det nye arbejdsområde er oprettet, kan man frit indsætte,, slette, omdøbe, og omorganisere de tilhørende paletter: nye symboler kan tilføjes, og eksisterende kan fjernes osv. Se mere i Brugertilpassede paletter og Palette menu (herunder).

                  Paletter

                  Anvende symboler fra en palet

                  For at se indholdet i en palet, klikker man på paletten navn. Et symbol fra en palet tilføjes til nodearket på en af følgende måder:

                  • Vælg et eller flere elementer i nodearket og dobbeltklik på symbolet i paletten.
                  • Træk og slip symbolet hen på det ønskede element i nodelinien.

                  For eksempel, for at tilføje tenuto markeringer (—) til et udvalg af noder.

                  1. Vælg de ønskede noder.
                  2. I paletten Artikulationer & ornamenter dobbeltklik på tenuto symbolet.

                  Når de en gang er tilføjet til nodearket, kan objekterne frit kopieres og indsættes—se Kopier og sæt ind.

                  Paletter i de forudindlagte arbejdsområder kan ikke redigeres. For at kunne det, skal man først oprette et bruger tilpasset arbejdsområde.

                  Faste paletter (Udvidet arbejdsområde)

                  Det meget omfattende Udvidet arbejdsområde indeholder følgende paletter:

                  • Forslagsnoder
                  • Nøgler
                  • Tonearter
                  • Taktarter
                  • Taktstreger
                  • Linier
                  • Arpeggios og Glissandi
                  • Vejrtrækning og pauser
                  • Klammer
                  • Artikulationer & Ornamenter
                  • Fortegn
                  • Dynamik
                  • Fingersætning
                  • Nodehoveder
                  • Tremolo
                  • Gentagelser & spring
                  • Tempo
                  • Tekst
                  • Linieskift og afstande
                  • Sækkepibeforsiringer
                  • Bjælkeplacering
                  • Rammer & Takter
                  • Becifringsdiagrammer

                  Brugertilpassede paletter

                  Når man har oprettet et nyt arbejdsområde (se ovenfor), og dermed har fået adgang til at redigere (se Palette menu herunder), kan man tilpasse de tilhørende paletter til sine egne behov.

                  For at tilføje et eksisterende element fra nodearket (f.eks. en linie, tekst, dynamik, becifringsdiagram osv.) til en tilpasset palet:
                  Tryk og hold Ctrl+Skift, og træk så symbolet over på paletten. Symboler fra Hovedpaletten kan også tilføjes til en tilpasset palet.

                  Palette menu

                  Ved at højreklikke på navnet på en palet, får man vist en menu med en række muligheder:

                  • Paletteegenskaber...: Giver mulighed for at justere udseendet af den valgte palet:

                    Paletteegenskaber

                    • Navn
                    • Cellestørrelse: Bredde, Højde
                    • Element offset: Ændrer den lodrette forskydning for alle elementer i paletten.
                    • Skalering: Får alle elementer i paletten til at fremstå større eller mindre.
                    • Vis gitter: Marker dette punkt for at opdele paletten i celler, en for hvert element.
                    • Vis ‘Flere Elementer…’: Marker dette punkt for at oprette en celle, der viser Hovedpaletten (Celle med ???.
                  • Indsæt ny palette: Opretter en ny tom palet.
                  • Flyt palette op / Flyt palette ned: Giver mulighed for at ændre rækkefølgen af paletterne.
                  • Så redigering til: Marker dette punkt hvis det skal være muligt at redigere denne palet.
                  • Gem palette...: Gem som en .mpal fil.
                  • Indlæs palette...: Åbner en .mpal fil.
                  • Slet palette

                  Ved at højreklikke på et element i en palet (hvis redigering er tilladt) vises en menu med følgende muligheder:

                  • Ryd: Fjerner elemetet fra paletten
                  • Egenskaber...: Åbner skærmbilledet Celleegenskaber:
                    • Navn: Tip som vises når man holder musen over elementet.
                    • Indholdsoffset (X, Y): Juster placeringen af elementet indenfor paletten.
                    • Indholdsskala: Får elementet til at fremstå større eller mindre i paletten.
                    • Tegn nodelinie: Tegner de fem streger fra en nodelinie bagved elemetet.
                  • Flere Elementer: Åbner det relevante afsnit fra Hovedpaletten.

                  Note: Ændring af værdier i "Celleegenskaber" påvirker kun udseendet af elementet i paletten. Det ændrer ikke på størrelse eller forskydning i nodearket.

                  Hovedpaletten

                  Musiksymboler, som ikke er med i palletterne i Udvidet arbejdsområdet, kan findes i Hovedpaletten ved at trykke Z eller Skift+F9 (Mac: fn+Skift+F9).

                  Virkning af tilføjede linier og tekst

                  Hvis de symboler, som tilføjes til nodearket fra en palet, indeholder et tekst element (f.eks. nodelinie tekst, dynamik, fingersætninger, volter osv.), vil egenskaber som font-type, font-størrelse, tekst farve, og justering blive tilpasset efter følgende regler:

                  1. Tekst egenskaber, som ikke er blevet ændret af brugeren, vil få den relevante gældende Layoutstil.

                  2. Tilpassede tekst egenskaber—dvs. de som er ændret af brugeren, inden symbolet blev tilføjet til en tilpasset palet—forbliver som de er.

                  Når der tilføjes en linie, forbliver linieegenskaberne altid uændrede (dvs. som de er sat af brugeren, inden symbolet blev tilføjet til en tilpasset palet, eller som de erdefineret i Grundlæggende/Udvidet arbejdsområderne).

                  Se også

                  • Hovedpalet

                  Inspektør og objekt egenskaber

                    De fleste elementer i nodearket har egenskaber, som kan redigeres, på en af to måder:

                    • Klik på et vilkårligt element, og mange af dets egenskaber kan ses og ændres fra Inspektør panelet i højre side af skærmen.

                    • Højreklik på et element og vælg punktet med ordet Egenskaber i sig. Dette giver adgang til en dialog med avancerede egenskaber, som er afhængige af elementets type.

                    Inspektør

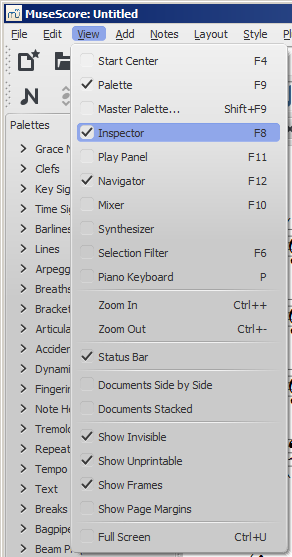
                    Inspektør panelet vises normalt i højre side af skærmen. For at vise eller gemme det, åbnes Vis menuen, og man sætter eller fjerner makeringen ved punktet Inspektør. Man kan også bruge genvejstasten F8 (Mac: fn+F8).

                    I Inspektør vil egenskaberne for et markeret element blive vist, og kan redigeres. Dette gælder for stort set hvert eneste element i nodearket—noder, tekst, taktstreger, artikulationer osv. Flere elementer kan markeres og derefter redigeres samtidig, så længe de er af samme type. Hvis de derimod er af forskellig type tillader Inspektør kun, at redigere synlighed og farver.

                    Inspektør panelet kan frigøres, så det bliver flytbart, ved at klikke på dobbelt-pilene, eller ved at dobbeltklikke på bjælken i toppen af panelet.

                    Inspektør bjælke

                    For at fastgøre panelet dobbeltkliker man på bjælken igen. Se også: Sidepaneler.

                    Inspektør kategorier

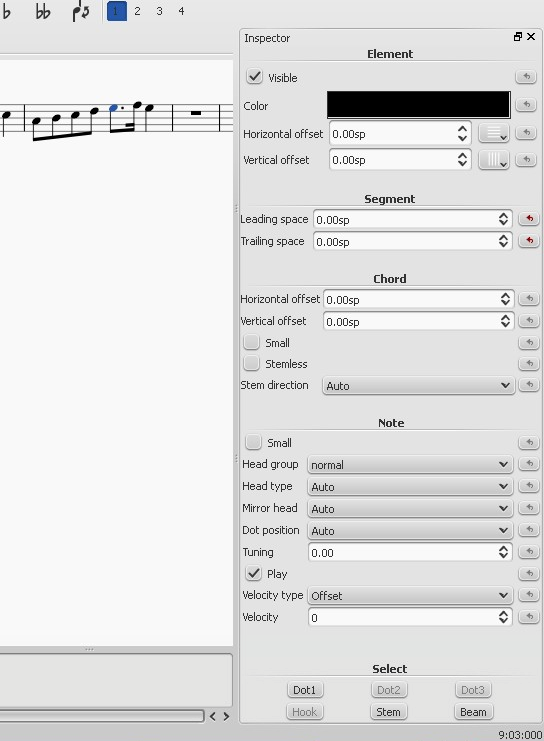
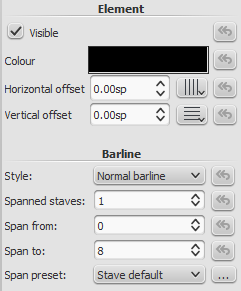
                    Når man markerer et eller flere elementer af en bestemt type, vil de egenskaber, som kan redigeres, blive opdelt i kategorier i Inspektør. Kategorier kan kendes på at navnet er centreret og med fed skrift. Hvis man for eksempel vælger en taktstreg, vil man få vist det følgende i toppen af Inspektør:

                    Taktstreg Inspektør

                    En detaljeret beskrivelse af de egenskaber, som kan redigeres, kan findes i håndbogen under de enkelte elementer. Dog vil nogle generelle punkter blive dækket her:

                    Element

                    Alle typer elementer, undtagen rammer, vil have denne kategori i Inspektør, når de markeres. Her kan man sætte synlighed og farve, og man kan justere placeringen ved at ændre værdierne for vandret og lodret offset. Der er desuden knapper for at aktivere justering mod gitterlinier. Mulighederne er følgende:

                    • Synlig: Fjernes mærket fra boksen, vil de markerede elementer blive usynlige. Usynlige elementer vises ikke når musikken udskrives eller eksporteres til PDF eller billedfiler. De vil blive vist med gråtone, for at vise at de er usynlige (hvis usynlige elementer også ønskes usynlige på skærmen, skal man fjerne mærket ved Vis → Vis usynlige). Man kan også bruge tastatur genvejen V til skifte synligheden for de markerede elementer mellem synlig og usynlig.

                    • Farve: Ved at klikke på firkanten åbnes "Vælg farve" dialog boksen hvor man kan vælge farve og mætning for de markerede elementer.

                    • Vandret offset og Lodret offset: Giver mulighed for at fin-tune placeringen af et enkelt element ved at angive den præcise forskydning fra standard positionen. Indtast antallet af standartrin - negativt til venste eller nedad, positivt til højre eller opad.

                    Element Gruppe

                    Denne kategori vises kun, når man har valgt en blanding af forskellige typer elementer, og giver kun mulighed for at ændre farve og synlighed.

                    Segment

                    Denne kategori bruges til at forøge eller reducere afstanden før/efter et element på nodelinien. Ændring af afstandene før/efter vil også gælde for eventuelle tilknyttede stavelser i sangtekster.

                    Akkord

                    Kategorien vises kun når der er markeret noder. Alle ændringer til egenskaberne for nodehoveder, vil gælde for hele akkorden. (dvs. alle noder i en stemme) , og ikke
                    kun for den markerede node. Hvis man ønsker at ændre placeringen af en bestemt node i en akkord, skal man bruge Element kategorien (herover).

                    Node

                    Denne kategori giver mulighed for ændringer til markerede noder (undtagen nodens placering—se Element). Den indeholder følgende muligheder:

                    • Lille: Gør nodehovedet mindre (man bestemmer den relative størrelse for alle små noder i Layoutstil → General… → Størrelser…).
                    • Hovedgruppe: Se Nodehoved grupper.
                    • Hovedtype: Se Nodehoved typer.
                    • Spejvend hoved: Placer nodehovedet til højre eller venstre for nodehalsen (standard er "Auto").
                    • Stemning: Flyt stemning ned eller op med indtil to halvtoner, ved at indsætte værdier mellem -200 og 200..
                    • Afspil: Fjernes afkrydsningen, vil noden blive tavs.
                    • Anslagstype: Bestemmer hvordan anslagsstyrken skal opfattes. Vælg en af mulighederne:
                      • Offset: Sætter værdien vist i "Anslagsstyrke" relativt, i forhold til den seneste dynamik angivelse.
                      • Bruger: Gør værdien vist i "Anslagsstyrke" absolut (dvs. uafhængig af dynamik angivelser).
                    • Anslagsstyrke: Kan hæve eller sænke styrken i anslaget, i overensstemmelse med den valgte mulighed i "Anslagstype".
                    • Bind til streg: Når den akrydses vil noden blive bundet til den øverste streg i den normale 5-stregs nodelinie..
                    • Linie: Et positivt tal flytter den "bundne" node nedad; et negativt tal flytter den opad.

                    Vælg

                    Denne kategori vil være forskellig afhængig af den type element, der er markeret:

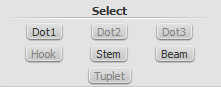
                    • Hvis man har markeret et nodehoved vil "Vælg" kategorien vise knapper, giver let adgang til at skifte markeringen til nodehals, bjælke, anker, punktering(er) eller tuplet nummeret, som er knyttet til nodehovedet. (se billedet herunder).

                      Vælg kategori

                    • Hvis man har markeret en række takter, vil "Vælg" kategorien give adgang til at vælge alle noder, forslagsnoder (fra version 2.1) ełler pauser.

                    Egenskaber

                    Man kan tilpasse egenskaberne for nogle typer elementer, ved hjælp af skærmbilledet "Egenskaber", som nås ved at højreklikke på elementet og vælge "Egenskaber" fra menuen: disse er i tillæg til de egenskaber for elementet, som vises i Inspektør.

                    (Note: Egenskaber bør ikke forveksles med Layoutstil. Ændringer i egenskaber berører kun det markerede element; alle layoutstil indstillinger gælder for hele nodearket).

                    Artikulationsegenskaber

                    Højreklik på en artikulation og vælg Artikulationsegenskaber... Se Artikulationer og ornamenter.

                    Becifringsdiagram egenskaber

                    Højreklik på et Becifringsdiagram og vælg Becifringsdiagram egenskaber... Her er der mulighed for at oprette et brugerdefineret becifringsdiagram. Se Rediger becifringsdiagram.

                    Linieegenskaber

                    Højreklik på en linie og vælg Linieegenskaber... Her er der indstillinger for start, slut eller forlængelse af linien. Man kan fjerne eller tilføje tekst, justere placeringen af teksten, samt sætte længden og vinklen på valgfrie ankre. Klik på. ... knappen for at få adgang til tekstegenskaber for de tekster, der er knyttet til linien. Se Brugerdefinerede linier og linieegenskaber.
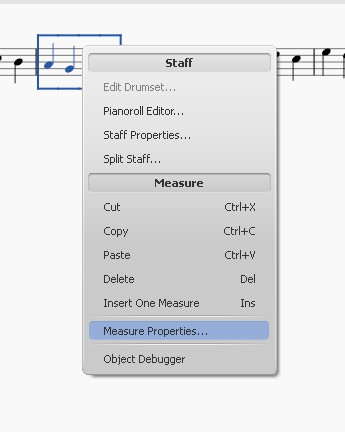
                    Taktegenskaber

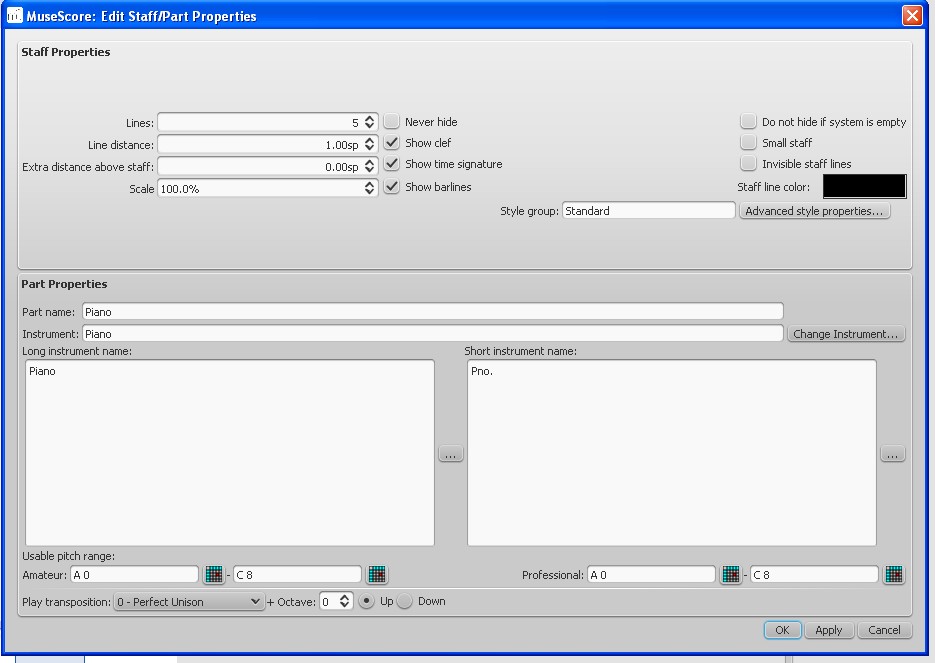
                    Højreklik et tomt sted i en takt og vælg Taktegenskaber... Tilpas synlighed, takt varighed, gentagelser, stræk og nummerering. Se Taktegenskaber.

                    Nodelinieegenskaber

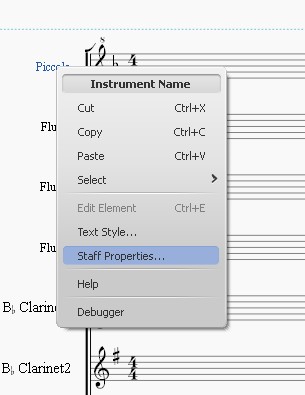
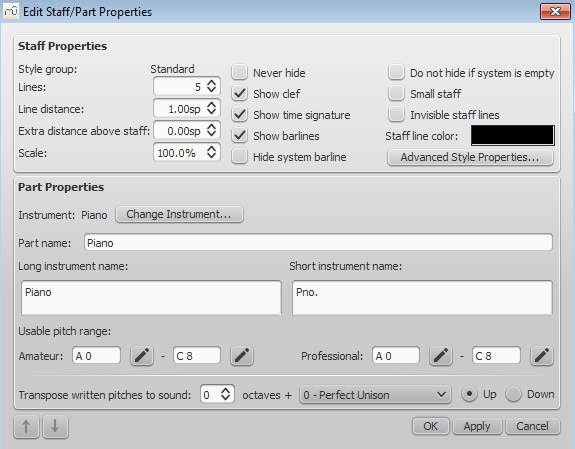
                    Højreklik enten på et tomt sted i en takt eller på et instrumentnavn, og vælg Nodelinieegenskaber... Dette skærmbillede giver adgang til at tilrette indstillinger for både den enkelte nodelinie, og det instrument, som den er en del af. Se Nodelinieegenskaber.

                    Tekstegenskaber

                    Højreklik på et tekstbaseret element og vælg Tekstegenskaber... Se Tekst stil og egenskaber. Hvis elementet er en linie med inkluderet tekst, se → herover.

                    Taktartegenskaber

                    Højreklik på et taktart symbol og vælg Taktartegenskaber... Dette bruges til at tilpasse udseendet af taktart symbolet, og egenskaberne for node bjælker. Se Taktarter.

                    Se også

                    • Arbejde med takter
                    • Nodeindtastning
                    • Layout og formattering
                    • Taktegenskaber
                    • Opdeling i stemmer
                    upload
                    Bilag Størrelse
                    Note inspector.jpg 67.14 KB
                    Staffproperties.jpg 91.41 KB
                    Buttonstaffproperties.jpg 1.03 KB
                    Staffproperties2ndaccess.jpg 22.51 KB
                    View_en.png 25.03 KB
                    Note inspector.png 133.85 KB
                    Measure Properties 1.png 53.21 KB
                    notes.png 2.65 KB
                    inspector_select.png 3.25 KB
                    Barline inspector.png 10.85 KB
                    Measure Properties 2.png 60.54 KB
                    inspector-top-bar.jpg 3.08 KB
                    Previous_Next_Buttons.png 7.36 KB
                    Staff_Properties_en.png 30.14 KB
                    clef_inspector.png 2.09 KB

                    Arbejde med takter

                      Markering af takter

                      Før man kan udføre handlinger på takter, skal de være markerede.

                      • For at markere en enkelt takt, klikkes et tomt sted indenfor takten.
                      • For at markere en række sammenhængende takter, se Markeringstyper: Skift-klik .

                      Indsæt

                      Indsæt en tom takt

                      Brug en af de følgende muligheder:

                      • Marker en takt og tryk Ins (ingen genvej på Mac).
                      • Marker en takt og vælg så fra menuen: Tilføj → Takter → Indsæt takt.

                      Indsæt flere takter

                      Brug en af de følgende muligheder:

                      • Marker en takt og tryk Ctrl+Ins (ingen genvej på Mac); udfyld "Antal takter ... " feltet og tryk OK.
                      • Marker en takt og vælg så fra menuen: Tilføj → Takter → Indsæt takter..; udfyld "Antal takter..." feltet og tryk OK.

                      Tilføj

                      Tilføj en takt til enden af nodearket

                      Brug en af de følgende muligheder:

                      • Tryk Ctrl+B (Mac: ⌘+B).
                      • Vælg fra menuen: Tilføj → Takter → Tilføj en takt.

                      Tilføj flere takter til enden af nodearket

                      Brug en af de følgende muligheder:

                      • Tryk Alt+Shift+B (Mac: Option+Shift+B); udfyld "Antal takter ..." feltet og tryk OK.
                      • Vælg fra menuen: Tilføj → Takter → Tilføj takter ...; udfyld"Antal takter ..." feltet og tryk OK.

                      Slet

                      Slet en enkelt takt

                      • Marker takten og tryk Ctrl+Del (Mac: Cmd+Del).

                      Slet en serie af takter

                      1. Marker rækken af takter som skal slettes
                      2. Tryk Ctrl+Del (Mac: Cmd+Del).

                      Slet fra en markeret takt til enden af nodearket

                      1. Marker den første i rækken af takter, og tryk Ctrl+Shift+End (Mac: Cmd+Shift+End); slip tasterne
                      2. Tryk Ctrl+Del (Mac: Cmd+Del).

                      Slet fra starten af nodearket til en markeret takt

                      1. Marker den sidste i rækken af takter, og tryk Ctrl+Shift+Home (Mac: Cmd+Shift+Home); slip tasterne.
                      2. Tryk Ctrl+Del (Mac: Cmd+Del).

                      Note: I nodeark med flere nodelinier vil sletning af takter også fjerne de tilsvarende takter i de andre nodelinier i systemet, selv om de ikke er markerede.

                      Hvis man kun ønsker at slette indholdet (noder, symboler, tekst), og ikke selve takterne, markerer man en takt eller en række af takter, og trykker Del. De markerede takter vil blive udfyldt med heltakts pauser.

                      Egenskaber

                      For at redigere egenskaberne for en takt, højreklikker man på et tomt sted i takten, og vælger Taktegenskaber :

                      Dialog:Taktegenskaer

                      Vinduet giver adgang til en række indstillinger for takter. Man kan bruge knapperne i bunden af vinduet, til at skifte til forrige eller næste takt. Forrige/Næste

                      Nodelinier

                      • Synlig giver mulighed for at vise/skjule noder og nodelinier i den aktuelle takt.
                      • Uden hals giver mulighed for at skjule/vise alle nodehalse i den aktuelle takt. For noder som fjerdedele og halvnoder, der normalt har en hals, vil kun nodehovedet blive vist, når takten markeres "uden hals".

                      Taktvarighed

                      Denne sektion giver mulighed for, at gøre varigheden af en takt længere eller kortere, end angivet ved den synlige (nominelle) taktart. Brug det til at lave en optakt ved starten af et afsnit, ełler ufuldstændige takter til cadenzas, ad lib passager o.l.

                      • Den Nominelle varighed af en takt er den samme, som taktarten vist i nodearket, og kan ikke ændres.
                      • Den Aktuelle varighed af en takt kan sættes frit, og helt uafhængigt af den taktart, der er angivet i nodearket.

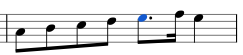
                      I eksemplet herunder har fjerdedels-optakten en nominel varighed på 4/4, men en aktuel varighed på 1/4. Takterne i midten har både en nominel og aktuel varighed på 4/4. Den sidste takt, med kun en punkteret halvnode har en aktuel varighed på 3/4:

                      Incomplete measures

                      Andet

                      Sektionen samler forskelligartede instatillinger for takten.

                      • Udeluk fra takt nummerering
                        Brug "Udeluk fra taktnummerering" til "irregulære" takter, dvs. takter, som ikke skal tælles med i taktnummereringen. Normalt vil en optakt være markeret med "Udeluk fra taktnummerering".

                      • Læg til taktnummer
                        Man kan også bruge muligheden "Tilføj til taktnummer" til at justere takt nummereringen. Man kan indsætte positive eller negative tal. Bemærk at dette påvirker alle efterfølgende takter. En værdi på "-1" har samme effekt, som at markere takten, som udelukket fra takt nummereringen.

                      • Layoutstræk
                        Med denne mulighed kan man forøge eller formindske den vandrette afstand mellem elementer i nodearket (noder, pauser o.l.). Man angiver den faktor, som den normale afstand skal multipliceres med.
                        At gøre det her i Taktegenskaber giver en mere præcis kontrol over aftandsegenskaberne, end hvis man bruger menupunktet, eller tastatur genvejen til Øg/Mindsk Spredning ({ og }), som også kan anvendes mens en takt er markeret.

                      • Afspilningsantal (fra version 2.1) / Gentagelsesantal (før version 2.1)
                        Hvis takten indeholder et afsluttende gentagelsestegn, kan man bestemme hvor mange gange gentagelsen skal spilles.

                      • Bryd flertaktspause
                        Denne indstilling benyttes, hvis man ønsker at bryde en flertaktspause ved starten af den markerede takt. Indstillingen bør være valgt før man slår den automatiske oprettelse af fletaktspauser til.
                        Man styrer den automatiske oprettelse på fanebladet "Nodeark" under Layoutstil → Generelt .... Hvis "Opret flertaktspauser" markeres, vil der automatisk blive oprettet flertaktspauser, som vil blive brudt ved vigtige skift, som øvemærker, ændring af taktart, dobbeltstreger, irregulære takter osv. Standard for nodeark (partiturer) er fra, mens det for partier sat til.

                      Nummerering

                      MuseScore sætter automatisk nummer ved den første takt i hvert System - undtagen i takt 1, men der er flere andre muligheder for nummerering. Fra hovedmenuen vælges Layoutstil → Generelt...; vælg fanebladet "Hoved, bund, numre" i det venstre panel. I bunden af det højre panel finder man nu gruppen "Taktnumre".

                      Sæt markering ud for "Taktnumre", for at slå den automatiske taktnummerering til.

                      Marker "Vis først", hvis første takt ønskes nummereret.

                      Marker "Alle nodelinier", hvis der skal være numre på alle linier. Ellers vil der kun blive vist taktnumre på den øverste nodelinie i hvert system.

                      Vælg at vise numre på "Hvert system", som vil sætte nummer ved den første takt på hvert system, eller vælg at vise numre for hvert "Interval", og angiv størrelsen af intervallet. For eksempel vil et interval på 1 sætte numre på alle takter; et interval på 5 vil sætte nummer på hver femte takt.

                      Deling og samling

                      Det er muligt at have en længere eller kortere takt, uden at ændre taktarten. Man kan ændre taktens varighed i Taktegenskaber, men man kan også dele eller samle takter. (Bjælker vil blive tilpasset automatisk).

                      Samling af takter

                      1. Marker de takter, som ønskes samlet;;
                      2. Fra menuen vælges Rediger → Takter → Saml valgte takter.

                      Note: Hvis man kun markerer takter på en nodelinie, i et system med flere linier, vil de samme takter blive samlet på alle nodelinier i systemet.

                      Eksemplet herunder viser resultatet af at anvende Samle kommandoen på de fire takter i den øverste nodelinie;

                      Eksempel på samling af takter

                      Deling af en takt

                      1. Marker en node (eller akkord);
                      2. Fra menuen vælges Rediger → Takter → Del takt før markeret node.

                      Note: Selvom man kun markerer én node i en nodelinie, vil alle nodelinier i systemet blive delt samme sted.

                      Eksterne links

                      • How to delete measures
                      • How to span a measure over multiple systems
                      • How to get scores without time signature (and clef)

                      Stemmer

                        En stemme er en musikalsk linie eller et tema, som kan have sin egen rytme, uafhængigt af andre stemmer på den samme nodelinie. Stemmer kaldes også "lag" i andre nodeskrivnings programmer.

                        Man kan have op til 4 stemmer på hver nodelinie. I en flerstemmig takt vil 1. stemme normalt have opadvendt nodehals, og 2. stemme have nedadvendt nodehals.

                        Polyphonisk takt

                        Bemærk: "Stemme" funktionen må ikke forveksles med "vokal linier", som kan tilføjes fra Instrument dialogen (åbnes ved at taste I).
                        Når der arbejdes med et lukket SATB nodeark, benyttes Stemme 1 og 2 til Sopran og Alt stemmerne på den øverste nodelinie, og Stemme 1 og 2 til Tenor og Bas stemmerne på den nederste nodelinie. Brug ikke Stemme 3 og 4 til Tenor og Bas.

                        Hvornår bruges stemmer

                        • Hvis der er brug for modsat rettede nodehalse til en akkord på en enkelt nodelinie.
                        • Hvis der er brug for forskellige varigheder på noder i en takt, som spilles samtidig.

                        Indtastning af noder i forskellige stemmer

                        I denne instruktion vises hvordan man indtaster en musik passage i to stemmer:

                        1. Indsæt stemme 1 noderne først: Vær sikker på at du er i notationstilstand: Knappen for Stemme 1 vil være fremhævet i blåt i værktøjslinien. Indtast noderne til den højeste stemme først. Under indtastningen vil nogen noder få nedadvendt hals, men det vil automatisk blive ændret når den anden stemme tilføjes.

                        Udklippet herunder viser en diskant linie med kun stemme 1 noderne indsat:

                        Stemme 1 noder

                        1. Flyt markøren tilbage til starten af blokken: Når man er færdig med at indtaste en blok af stemme 1 noder, trykkes ← gentagne gange for at flytte markøren, node for node, tilbage til den første node i blokken; alternativt bruges Ctrl+← (Mac:Cmd+←) for at flytte markøren en takt bagud ad gangen. Man kan også blot forlade notationstilstand (tryk Esc) og klikke direkte på den første node.

                        2. Indsæt stemme 2 noderne: Vær sikker på at du er i notationstilstand, og at noden fra stemme 1 i starten af blokken er markeret. Klik på "Stemme 2" knappen Stemme 2 knap (i højre side af værktøjslinien), eller brug genvejen Ctrl+Alt+2 (Mac: Cmd+Option+2). Indtast alle noderne til den lave stemme (nedadvendt hals).

                        Udklippet herunder viser samme eksempel som ovenfor, efter tilføjelse af stemme 2 noderne:

                        Stemme 1 og 2

                        Slette og skjule pauser

                        Pauser i stemmerne 2, 3 og 4 kan slettes, men pauser i stemme 1 er permanente. De kan dog skjules hvis det er nødvendigt, ved at gøre dem usynlige. For at skjule en pause, skal man markere den og trykke V; eller fjerne markeringen ud for "Synlig" i
                        Inspektør (se også Synlighed).

                        Ombytning af stemmer

                        For at ombytte noder fra to vilkårlige stemmer:

                        1. Marker en samling af takter.
                        2. Vælg Rediger → Stemmer fra menuen.
                        3. Vælg fra listen, hvilke stemmer, der skal ombyttes

                        Note: (a) Udvælgelsen kan omfatte noder fra flere stemmer, men kun to kan ombyttes ad gangen. (b) Selvom man kun udvælger en del af en takt, vil ombytningen alligevel ske for hele takten.

                        Flyt noder til en anden stemme

                        Man kan også flytte noder fra en stemme til en anden uden at lave en ombytning:

                        1. Vær sikker på ikke at være i notationstilstand.
                        2. Marker et eller flere nodehoveder (uanset stemme).
                        3. Klik på stemmen de skal flyttes til, i værktøjslinien Nodeindtastning, eller brug genvejen Ctrl+Alt+1–4 (Mac: Cmd+Option+1-4).

                        Note: For at noderne kan flyttes skal følgende være i orden:

                        • Akkorderne i den stemme, der flyttes til, skal have samme varighed, som de noder der flyttes.
                        • Der skal være nok varighed af pauser, i den kommende stemme, til at give plads til de nye noder.
                        • Noderne må ikke være forbundet med en bindebue.

                        Se også

                        • Stemmer: tastatur genveje
                        • Delte nodehoveder

                        External links

                        • How to merge/combine/implode two staves in one with two voices
                        • Video tutorial: How To Write Two Parts On One Staff: Voices

                        Kopier og sæt ind

                          MuseScore understøtter standard kopier, klip, indsæt og (fra version 2.1) ombyt med klippebord funktioner. Kommandoerne kan udføres på en samling af:

                          • Noder: f.eks. for at gentage et afsnit af musikken, eller flytte en passage et slag ełler en takt.
                          • Andre elementer: såsom artikulationer, linie tekster, dynamik, fingersætning etc.

                          Note: Linier kan ikke kopieres, men de kan duplikeres (se →herunder).

                          Før man udfører en kopier, klip, indsæt eller ombyt kommando, skal man sikre sig, at man ikke er i notationstilstand eller redigeringstilstand. Tryk Esc for at skifte til "normal" tilstand.

                          Noder

                          Man kan klippe, kopiere, indsætte, eller ombytte en passage ełler en enkelt akkord som følger:

                          Kopier eller klip

                          For at kopiere/klippe en enkelt akkord

                          1. Hold Skift nede og klik på en node i akkorden.
                          2. Vælg en mulighed:
                            • Kopier. Vælg Rediger → Kopier; eller tryk Ctrl+C (Mac: ⌘+C); eller højre klik på akkorden og vælg Kopier.
                            • Klip. Vælg Rediger → Klip; eller tryk Ctrl+X (Mac: ⌘+X); eller højre klik på akkorden og vælg Klip.

                          For at kopiere/klippe en blok af akkorder

                          1. Klik på den første node eller takt, der ønskes udvalgt.
                          2. Skift+Klik på den sidste node eller takt, der ønskes udvalgt. En blå ramme viser det område der er valgt.
                          3. Vælg en mulighed:
                            • Kopier. Vælg Rediger → Kopier; eller tryk Ctrl+C (Mac: ⌘+C); eller højre klik på det markerede område og vælg Kopier.
                            • Klip. Vælg Rediger → Klip; eller tryk Ctrl+X (Mac: ⌘+X); eller højre klik på det markerede område og vælg Klip.

                          Indsæt

                          1. Klik på den node eller takt, hvor indsættelsen, af det udvalgte, skal starte.
                          2. Vælg Rediger → Indsæt; eller tryk Ctrl+V (Mac: ⌘+V); eller højre klik på akkorden og vælg Indsæt.

                          Ombytte med klippebordet

                          Fra og med version 2.1, kan ombyt kommandoen samle to kommandoer i en: (1) Først overskrives en udvalgt del af nodearket med indholdet af klippebordet - fuldstændig som i indsæt kommandoen; (2) Dernæst flyttes den overskrevne del af nodearket tilbage til klippebordet - fuldstændig som i kopier kommandoen.

                          For at ombytte med klippebordet:

                          1. Tryk Skift og Klik på den node hvor ombytningen med klippebordet skal starte. Eller marker blot en start takt.
                          2. Vælg en af de følgende muligheder;
                            • Fra menuen, vælg Rediger → Ombyt med klippebordet;
                            • Tryk Ctrl+Skift +X (Mac: ⌘+shift+X);
                            • Højreklik på et tomt sted i udvælgelsesområdet, og vælg Ombyt med klippebordet.

                          Note: MuseScore vil automatisk tilpasse udvælgelsesområdet så det passer til indholdet af klippebordet.

                          Kopier tonehøjden for en enkelt node

                          Det er muligt kun at kopiere tonehøjden (og ingen andre egenskaber), ved at klikke på nodehovedet og anvende de almindelige kopier og indsæt, eller kopier og ombyt metoder.Tonehøjden på destinations-noden ændres, så den svarer til den kopierede node, mens varigheden ikke ændres.

                          Andre elementer

                          Andre elementer i nodearket—så som nodelinie tekster, dynamik, fingersætninger, akkord diagrammer ol.—kan klippes, kopieres, og indsættes et ad gangen. For artikulationer (sforzato, staccato etc.), kan man udvælge flere af gangen.

                          Kopier og klip

                          1. Marker elementet (eller elementerne).
                          2. Vælg en mulighed:
                            • Kopier. VælgRediger → Kopier; eller tryk Ctrl+C (Mac: ⌘+C); eller højreklik på akkorden og vælgKopier.
                            • Klip. Vælg Rediger → Klip; eller tryk Ctrl+X (Mac: ⌘+X); eller højreklik på akkorden og vælgKlip.

                          Indsæt

                          1. Klik hvor indsættelse af de udvalgte elementer skal starte.
                          2. Fra menuen vælg Rediger → Indsæt; eller tryk Ctrl+V (Mac: ⌘+V); eller højreklik og vælg Indsæt.

                          Bemærk at artikulationer bliver indsat på noderne i nøjagtig den samme rækkefølge, som de havde i den oprindelige udvælgelse.

                          Ombyt med klippebordet

                          Ombyt med klippebordet er tænkt til brug med afsnit af musik fremfor enkelt elementer. Brug af kommandoen med enkelte elementer anbefales ikke, da resultatet normalt ikke bliver som forventet.

                          Hurtig gentagelse

                          For hurtigt at kopiere og indsætte en node, takt eller passage:

                          1. Vælg en akkord, takt eller passage, som beskrevet ovenfor.
                          2. Tryk R .

                          MuseScore kopierer og indsætter den valgte notation umiddelbart efter den sidste node i udvælgelsen. Eksisterede noder i området, hvor der indsættes, vil blive overskevet.

                          Duplikere

                          For øjeblikkeligt at kopiere og indsætte et tekst element, en linie ełler et andet objekt:

                          1. Hold Ctrl+Skift (Mac: ⌘+Shift) nede, klik på elementet og træk det til et vilkårligt sted i nodearket.
                          2. Slip musen, og det valgte element bliver klonet til den nye placering.

                          Filtrer udvælgelse

                          Det er muligt at sætte et filter før man kopierer en udvælgelse, for at kunne vælge præcis, hvad der skal kopieres og senere indsættes.

                          1. Klargør filteret ved at trykke F6 (Mac: fn+F6), ełler vælg Vis → Afgrænsningsfilter

                          Afgrænsningsfilteret vil normalt blive vist under Paletten. Det kan frigøres og laves til et flydende vindue. Hvis dette vindue trækkes direkte over på Pallet eller Inspektør, vil begge dele det samme område, med faneblade i i bunden.

                          1. Fjern markeringerne fra de ting, der ikke ønskes kopieret.
                            Eksempel: Markering fjernet fra Artikulationer og Legatobuer.

                            Afgrænsningsfilter. Artikulationer og buer fravalgt

                          2. Kopier og indsæt som før
                            (i eksemplet er takt 1 til 4 kopieret og indsat i takt 5 til 8)

                          3. Se resultatet—legatobuer er ikke blevet kopieret

                          Resultat_Kopier_da.png

                          1. Afgrænsningsfilteret kan også bruges ved ombytning med klippebordet. Før kommandoen til at ombytte med klippebordet udvælges de ting, som ønskes kopieret. De vil blive kopieret fuldstændig som normalt ved Kopier kommandoen. Afgrænsningsfilteret ændrer ikke på hvad der bliver indsat efter ombytningen. Hele indholdet af klippebordet vil blive kopieret tilbage. Filteret vil derimod styre hvad der kopieres til klippebordet.

                          Se også

                          Hvis man ønsker at ændre toner uden at forandre rytmen, kan man kombinere transponering eller Ændr tonehøjde metoden med Kopier og Indsæt.

                          External links

                          • Video tutorial: Lyrics, copying & dynamics

                          Udvælg objekter

                            Før man kan arbejde med objekter i nodearket—som noder, takter, artikulationer osv.—skal de markeres.
                            Objekter kan udvælges, og dermed markeres på flere måder: (1) enkeltvis, (2) i en sammenhængende rækkefølge, eller (3) som en liste.

                            Udvælg et enkelt objekt

                            De fleste objekter i nodearket kan udvælges blot ved at klikke på dem i "normal" tilstand (dvs. ikke i notationstilstand).

                            Udvælg en enkelt node

                            1. Vær sikker på ikke at være i notationstilstand
                            2. Klik på en node.

                            Note: At udvælge en enkelt node, og derefter kopiere og indsætte den, vil kun kopiere tonehøjden—ikke varighed eller andre egenskaber (f.eks. uden hals). For at kopiere hele noden, inklusive alle egenskaber, skal man holde Skift tasten nede—ligesom ved udvælgelse af akkorder (herunder).

                            Udvælg en hel akkord

                            1. Vær sikker på ikke at være i notationstilstand
                            2. Tryk og hold Skift, og klik så på en node i akkorden.

                            Udvælg en enkelt takt

                            • Klik på et tomt sted indenfor takten.

                            Note: For at udvælge en sammenhængende række af takter, se udvælg med skift + klik (herunder).

                            Udvælg et sammenhængende sæt af objekter

                            Der er flere muligheder for at udvælge et sammenhængende sæt af noder, akkorder eller takter:

                            1. Udvælg med Skift

                            1. Vær sikker på ikke at være i notationstilstand.
                            2. Vælg den første node, takt eller akkord i rækken. Udvælgelsen kan, hvis ønsket, udvides op eller ned til de tilstødende nodelinier,
                              ved at benytte Skift+↑ eller ↓.
                            3. Vælg så en af følgende muligheder:
                              • For at udvide udvælgelsen en akkord ad gangen til højre: Tryk Skift+→.
                              • For at udvide udvælgelsen en akkord ad gangen til venstre:
                                Tryk Skift+←.
                              • For at udvide udvælgelsen en takt ad gangen til højre: Tryk Skift+Ctrl+→ (Mac: Skift+Cmd+→).
                              • For at udvide udvælgelsen en takt ad gangen til venstre: Tryk Skift+Ctrl+← (Mac: Skift+Cmd+←).
                              • For at forlænge udvælgelsen til starten af linien: Tryk Skift+Home (Mac: Skift+Fn+←).
                              • For at forlænge udvælgelsen til slutningen af linien: TrykSkift+End (Mac: Skift+Fn+→).
                              • For at forlænge udvælgelsen til starten af nodearket: Tryk Skift+Ctrl+Home (Mac: Skift+Cmd+Fn+←).
                              • For at forlænge udvælgelsen til slutningen af nodearket: Tryk Skift+Ctrl+End (Mac: Skift+Cmd+Fn+→).

                            2. Udvælg med Skift + Klik

                            For at udvælge en række af noder eller pauser:

                            1. Vær sikker på ikke at være i notationstilstand.
                            2. Klik på den første node eller pause i rækken
                            3. Tryk og hold Skift
                            4. Klik på den sidste ønskede node eller pause.

                            Note: Det sidst valgte element kan være på samme nodelinie, eller i nodelinierne over eller under den først valgte node/pause. Alle de udvalgte elementer vil blive indrammet af et blåt rektangel, inklusive tilknyttede linier og artikulationer (dog ikke volter). Man kan gentage handlingen efter behov, for at udvide den udvalgte række at elementer .

                            For at udvælge en række af takter:

                            1. Klik på et tomt sted i den første ønskede takt
                            2. Hold Skift nede og klik på et tomt sted i den sidste takt i den ønskede række.

                            Note: Som ved udvælgelse af noder kan den udvalgte række udvides både lodret og vandret.

                            3. Udvælg med Skift + mus

                            Denne metode kan bruges til at udvælge noder eller pauser, eller uafhængigt at udvælge andre symboler, som staccato prikker, lyrik etc.:

                            • Tryk og holdSkift, og træk så med musen for at udvælge det ønskede sæt.

                            4. Udvælg alt

                            Denne metode udvælger hele nodearket inklusive noder, pauser og tilknyttede elementer.
                            Brug en af de følgende muligheder:

                            • Tryk Ctrl+A (Mac: Cmd+A).
                            • Vælg menupunktet Rediger → Vælg alt.

                            5. Udvælg et afsnit

                            Denne metode bruges til at udvælge et afsnit - et område i nodearket, som starter og/eller slutter ved en afsnitsmarkering:

                            1. Klik på et tomt sted i en takt indenfor afsnittet.
                            2. Vælg menupunktet Rediger → Vælg afsnit.

                            Note: Se Kopier og indsæt: Afgrænsningsfilter for at udelukke bestemte typer af elementer fra at blive udvalgt i en sammenhængende udvælgelse.

                            Udvælg en liste af objekter

                            For at udvælge en liste (et ikke sammenhængende sæt) af elementer fra nodearket:

                            1. Udvælg (klik på) det første element.
                            2. Hold Ctrl (Mac: Cmd) nede mens der udvælges (klikkes på) de øvrige ønskede elementer.

                            Note: Denne metode kan ikke bruges til at udvælge takter. Brug udvælgelse af en enkelt eller en række istedet.

                            Udvælg alle lignende

                            For at udvælge alle elementer af en bestemt type (f.eks. alle taktstreger, alle tekst elementer, alle staccato markeringer):

                            1. Marker et element
                            2. Højreklik → Vælg
                            3. Adskillige muligheder er til rådighed:

                              • Alle lignende elementer: Vælger alle elementer i nodearket magen til det markerede
                              • Alle lignende elementer i samme nodelinie: Udvælger alle elementer i samme nodelinie magen til den markerede
                              • Alle lignende elementer i samme udvalg: kan kun anvendes hvis et sammenhængende sæt er valgt. Udvælger alle elementer i sættet magen til det markerede
                              • Mere...: åbner en dialog, som giver adgang til at forfine med flere muligheder. Hvis man for eksempel har markeret et nodehoved, vil dialogen se ud som her (fra version 2.1—tidligere versioner havde færre muligheder):

                              Dialog: Vælg noder / Mere...

                              Vælg

                              • Samme nodehoved: I dette tilfælde vil kun nodehoveder fra samme guppe blive udvalgt;
                              • Samme tonehøjde: Kun nodehoveder med samme tonehøjde vil blive udvalgt;
                              • Samme type: Alle nodehoveder af samme type (uanset gruppe) vil blive udvalgt;
                              • Samme varighed: Kun nodehoveder med samme varighed vil blive udvalgt;
                              • Samme nodenavn: Nodehoveder med samme nodenavn i alle oktaver vil blive udvalgt;
                              • Samme nodelinie: Kun nodehoveder i samme nodelinie vil blive udvalgt.

                              Handling

                              • Erstat det valgte: Den normale funktion: udvælgelsen startes forfra;
                              • Tilføj til det valgte: Bevarer alt det udvalgte og tilføjer den nuværende udvælgelse hertil;
                              • Søg i det valgte:
                              • Udtræk fra det valgte: Bevarer alt tidligere udvalgt, men fjerner den nuværende udvælgelse herfra.

                            Hvad udvælgelse kan bruges til

                            • Kopier og sæt ind
                            • Redigering
                            • Inspektør og objekt egenskaber
                            • Værktøjer

                            Se også

                            • Grundlæggende funktioner
                              særlig afsnit Nodeindtastning
                            • Notation særlig afsnit Fortegn
                            • Tekst særlig afsnit Tekst redigering og Flytning af symboler og tekst med gitterlinier

                            Visning og navigation

                              Dette kapitel gennemgår de muligheder, der er i MuseScore til at bestemme udseendet af skærmen, og hvilke værktøjer, der skal være til rådighed.

                              Menuen Vis

                              Fra menuen Vis, kan man med afkrydsninger (flueben) angive hvilke paneler og værktøjslinier, der skal være åbne.

                              Vis arbejdsområder/paneler

                              • Opstartcenter: F4
                              • Paletter: F9
                              • Hovedpalette: Skift+F9
                              • Inspektør: F8
                              • Afspilningspanel: F11
                              • Navigator: F12
                              • Mixer: F10
                              • Afgrænsningsfilter: F6
                              • Klaviatur: P

                              Zoom ind/ud

                              Der er flere måder man kan bruge til at zoome ind eller ud på:

                              • Tastatur genvej:

                                • Zoom ind: Ctrl++ (Mac: Cmd ++)
                                • Zoom ud: Ctrl +- (Mac: Cmd +-).
                              • Vis menuen:

                                • Zoom ind: Vis → Zoom ind
                                • Zoom ud: Vis → Zoom ud.
                              • Mus

                                • Zoom ind: Scroll op med musens hjul, mens Ctrl (Mac: Cmd) holdes nede.
                                • Zoom ud: Scroll ned med musens hjul, mens Ctrl (Mac: Cmd) holdes nede.
                              • Rullemenu: Ved at bruge rullemenuen i standard værktøjslinien kan man sætte en fast zoomfaktor for nodearket (25–1600 %), eller vise det med en af mulighederne "Sidebredde", "Hele siden", eller "To sider".

                              Zoom

                              • For at vende tilbage til 100% zoom: Brug genvejen Ctrl+0 (Mac: Cmd+0).

                              Statuslinie

                              Statuslinien helt i bunden af skærmen, viser informationer om de markerede elementer i nodearket.

                              Dokumenter side om side/stablet

                              Det er muligt at dele hovedvinduet, så man kan se to nodeark samtidig, eller få vist to dele af det samme dokument. Faneblade giver adgang til at vælge hvilket nodeark der skal vises i hver del. Man kan trække i skillestregen, for at justere hvor meget plads, der skal bruges til hvert af de to nodeark.

                              • Documenter side om side: Opdeler vinduet lodret, så to nodeark vises ved siden af hinanden.

                                Dokumenter side om side

                              • Documenter stablet: Opdeler vinduet vandret, så to nodeark vises over hinanden.

                                Dokumenter stablet

                              Indstillinger for synlighed

                              Man har mulighed for at vælge at vise eller skjule forskellige ikke-printbare elementer:

                              • Vis usynlige: Vis/skjul elementer, der er gjort Vis usynlige for udskrivning og eksport. Hvis muligheden er markeret vil usynlige elementer blive vist lysegrå i dokumentvinduet.
                              • Vis ikke-udskriftsbare: Vis/skjul symboler for Vis ikke-udskriftsbare.
                              • Vis rammer: Vis/skjul det stiplede omrids af Vis rammer.
                              • Vis sidemargen: Vis/skjul Vis sidemargen.

                              Fuldskærm

                              Fuldskærm visning udvider MuseScore, så det fylder hele skærmen, og gør mere af indeholdet synligt.

                              Side/Sammenhængende visning

                              Man kan skifte mellem to forskellige visninger af nodearket ved at bruge rullemenuen på værktøjslinien:

                              Side visning

                              Eksemple på sidevisning

                              Ved Sidevisning vil nodearket blive formateret som det vil fremstå når det udskrives eller eksporteres som PDF eller billedfil: dvs. opdelt i sider med marginer. Linie- og sideskift tilføjes automatisk—hvor det er muligt—så nodearket tilpasses den plads, som er til rådighed. Man kan frit overskrive det automatiske layout ved at indsættene sine egne linie-, side-, ełler systemskift.

                              Sammenhængende visning

                              Eksempel på sammenhængende visning

                              Ved Sammenhængende visning vil nodearket blive vist som et langt, ubrudt system. Hvis startpunktet ikke er synligt, vil taktnumre, instrumentnavne, nøgler, taktaktart, og toneart altid blive vist i venstre side af vinduet.

                              Note: Fordi layoutet er simplere, vil MuseScore muligvis fungere hurtigere i Kontinuerlig visning end i Side visning.

                              Værktøjslinier

                              Toolbars

                              Området til Værktøjslinier er placeret mellem Menubjælken og Hovedvinduet. Det indeholder ikoner, som giver adgang til en række funktioner. Området kan opdeles på de følgende værktøjslinier:

                              • Filoperationer: Lav nyt nodeark, Indlæs nodeark, Gem, Udskriv, Fortryd, Gentag.
                              • Zoom/Side visning.
                              • Afspilningsknapper: Slå MIDI til , Spol tilbage, Afspil/Stop, Slå 'løkkeafspilning' til, Afspil gentagelser, Panorér, Metronom.
                              • C partitur: Viser nodearket som skrevet, eller som C partitur (som afspillet).
                              • Billedfangst: Giver mulighed for at tage snapshots af dele af nodearket.
                              • Nodeindtastning: Notationstilstand, Varighed, Bindebuer, Pauser, Fortegn, Skift retning på hals, Stemme (1, 2, 3, 4).

                              Man vælger hvilke værktøjslinier, der skal vises, ved at højreklikke på et tomt sted i værktøjsområdet (eller på topbjælken i Inspektør), og får vist en menu, hvor man kan sætte/fjerne fluebenet ud for de enkelte muligheder. I denne menu kan man også vælge at vise/skjule Paletter, Inspektør, Klaviatur, Afgrænsningsfilter, og Trommeværktøj, Fra 2.1 kan også sætte/fjerne flubenene for værktøjslinierne i Vis→Værktøjslinier.

                              Sidepaneler

                              Panelerne Inspektør, Paletter og Afgrænsnigsfilter vises, let tilgængelige, som sidepaneler til venstre og højre for hovedvinduet.
                              For at frigøre et panel bruges en af følgende måder:

                              • Træk i paletten;
                              • Klik på dobbelt-pilene i toppen af panelet;
                              • Dobbeltklik på titelbjælken i toppen af panelet;

                              For at fastgøre et panel bruges en af følgende måder:

                              • Trækkes panelett til top eller bund af et eksisterende panel, vil det blive vist lodret over/under dette.
                              • Trækkes panelet til midten af et eksisterende panel, vil det blive lagt ovenpå dette. Begge paneler vil kunne vises ved hjælp af faneblade.

                              Endelig kan man dobbeltklikke i titelbjælken i toppen af panelet. Det vil så blive fastgjort på den seneste placering.

                              Navigation

                              Der er en række kommandoer til rådighed, til at finde rundt i nodearket. De kan findes under Tastatur genveje: Navigation.

                              Navigation

                              Navigation er et valgfrit panel som giver lettere mulighed for at finde rundt i et langt nodeark, eller for at flytte til bestemte sider. For at vise/skjule navigation, gå til Vis menuen og marker Navigaton, eller brug genvejen F12 (Mac: fn+F12). Panelet vil blive placeret under hovedvinduet, hvis der rulles vandret, og ved højre side af hovedvinduet, hvis der rulles lodret. (se Indstillinger: Baggrundsflade).

                              Navigator

                              Den blå boks angiver den del af nodearket, som er synlig i dokumentvinduet. Man flytter fokus ved at trække enten den blå boks, eller scrollbaren, ełler man kan klikke på et område for at springe direkte dertil.

                              Søgefunktion

                              Funktionen Søg giver mulighed for hurtigt at flytte til en bestemt takt, til et øvemærke, eller et side nummer i nodearket:

                              1. Tryk Ctrl+F (Mac: Cmd+F), eller vælg Rediger → Søg. Dette åbner feltet Gå til i bunden af hovedskærmen.
                              2. Bruge en af de følgende muligheder:
                                • For at flytte til en takt, indtast nummeret på takten (alle takter tælles med startende med 1, uanset optakter, afsnit, ełler manuelle ændringer til taktnumrene).
                                • For at flytte til et øvemærke, Indtast dets navn (det første tegn skal være et bogstav, for at det kan blive "fremsøgt". Den øvrige tekst kan være tal eller bogstaver; søgningen tager ikke hensyn til små/store bogstaver).
                                • For at flytte til et numerisk øvemærke (især et der ikke svarer til taktnummeret), indtast nummeret i formatet rXX (hvor XX er øvemærket. For at finde et øvemærke, som starter med "R" brug rrXX. For at finde et øvemærke, som starter med "P" og fortsætter med et tal brug rpXX). Dette fungerer fra version 2.1.
                                • For at flytte til en side, indtast sidenummeret i formatet pXX hvor XX er sidenummeret. (Dette betyder at man i versioner før 2.1 ikke kan finde øvemærker, som begynder med "P" og fortsætter med et tal).

                              Se også

                              • Gem/Eksporter/Udskriv
                              • Fil formater
                              • Layout og formattering

                              Fortryd og gendan

                                MuseScore husker et ubegrænset antal fortryd/gendan handlinger.

                                Standard genvejene er:

                                • Fortryd Ctrl+Z (Mac: ⌘+Z)
                                • Gendan Ctrl+Shift+Z or Ctrl+Y (Mac: ⌘+Shift+Z)

                                Eller brug knapperne fra værktøjslinien: Undo/Redo buttons

                                Gem/Eksportér/Udskriv

                                  Fil menuen i MuseScore, indeholder punkter som Gem..., Gem som..., Gem en kopi..., Gem det valgte..., Gem Online..., Eksporter..., Eksporter Stemmer... og
                                  Udskriv....

                                  Fil Gem/eksporet/Udskriv

                                  Gem

                                  Gem..., Gem som..., Gem en kopi..., og Gem det valgte.. giver mulighed for at gemme filer i MuseScore's formater (.mscz and .mscx).

                                  • Gem...: Gem det aktive nodeark som fil.
                                  • Gem som...: Gem det aktive nodeark i en ny fil.
                                  • Gem en kopi...: Gem en kopi i en ny fil, men fortsæt med at redigere originalen.
                                  • Gem det valgte...: Gem markerede takter i en ny fil. I MuseScore versioner før 2.1 gemmes filen kun korrekt, hvis taktarten er vist i den første af de udvalgte takter, medmindre den er 4/4.
                                  • Gem online...: Gem det aktive nodeark på MuseScore.com (se Del nodeark online).

                                  Eksporter

                                  Eksportér... og Eksportér Stemmer... giver mulighed for at oprette andre typer end MuseScore filer, som PDF, MusicXML, MIDI, og forskellige audio og image formater.

                                  I Eksport dialogen, vælger man hvilket format, der eksporteres til:

                                  Dialog: Eksport

                                  • Eksportér...: Eksporterer det aktive nodeark til det ønskede format.
                                  • Eksportér Stemmer...: Eksporterer det aktive nodeark, og alle tilknyttede stemmer til separate filer i det ønskede format.

                                  MuseScore husker det valgte format, og vælger dette som default næste gang.

                                  Note: Det ukomprimerede MuseScore format (MSCX) er til rådighed ved både 'Gem' og 'Eksporter'.

                                  Udskriv

                                  Udskriv... giver mulighed for at udskrive filer fra MuseScore direkte til en printer. Afhængig af printeren vil der være forskellige muligheder, men generelt man vælge sider, antal kopier og sortering.

                                  Hvis der er en PDF printer installeret, kan man også "eksportere" til PDF ved brug af denne, men det anbefales ikke.
                                  For at det skal virke korrekt med Adobe PDF, skal man sikre at Rely on system fonts only, do not use document fonts ikke er sat i Printer indstillingerne.

                                  Se også

                                  • Fil formater
                                  • Opdeling i Stemmer

                                  Gem nodeark online

                                    Gå til musescore.com/sheetmusic for at se andre partituer udført i MuseScore.

                                    Du kan gemme og dele dine nodeark (partiturer) online på MuseScore.com. Du kan vælge at gemme et nodeark privat, til eget brug fra en vilkårlig computer, eller dele det offentligt. MuseScore.com gør det muligt at se og afspille nodeark i din webbrowser - en ekstra feature kaldet VideoScores giver adgang til at synkronisere et nodeark med en YouTube video. Til brug udenfor webbrowseren kan man downloade nodearket i en række forskellige formater (bl.a. PDF, MIDI, MP3, MusicXML, og som en original MuseScore fil).

                                    Opret en konto

                                    1. Besøg MuseScore.com og klik på "Create new account". Vælg et brugernavn, angiv en gyldig email adresse, og tryk "Create New Account".
                                    2. Vent nogle få minutter på en mail fra MuseScore.com support. Hvis du ikke modtager en mail, så check din spam folder.
                                    3. Klik på linket i mailen og besøg din brugerprofil for at skifte dit password.

                                    Del et nodeark direkte fra MuseScore

                                    Du kan direkte gemme dit nodeark online via Fil → Gem Online....

                                    Advarsel: Før du gemmer et nodeark online, bør du sikre dig at C Partitur knappen er fra, og at de enkelte stemmer er korrekt transponerede

                                    Login på MuseScore

                                    Hvis du ikke allerede har en MuseScore konto, så opret en først ved at klikke på 'Opret en konto' linket. Det vil åbne din browser og bringe dig til https://musescore.com/user/register.

                                    Indtast din email addresse eller MuseScore brugernavn og password. Når du er logget ind, vil du kunne indtaste oplysninger om dit nodeark.

                                    Information om nodearket

                                    1. I Titel angives navnet på nodearket.
                                    2. Beskrivelse vil blive vist ved siden af.
                                    3. Adgang vil være Public (synligt for alle), men kan gøres Privat (kun synlig for dig, og dem du deler et "hemmeligt link" med), ved at sætte markering ved "Gør dette nodeark privat".
                                    4. Vælg en Licens fra rullemenuen. Benyttes Creative Commons license, tillader du at andre kan bruge dit nodeark med bestemte begrænsninger.
                                    5. Du kan tilføje Tags til hjælp med at identificere nodearket påt MuseScore.com. Brug komma til at adskille flere tags.
                                    6. Hvis du allerede har gemt nodearket online tidligere, vil det automatisk blive opdateret. Fra version 2.1, kan man, i et særligt felt, tilføje yderligere informationer i en ændrings-log.
                                      Fjern markeringen ved Opdatér aktivt nodeark for at gemme online som et nyt nodeark.

                                      Maarker for at opdatere eksisterende nodeark

                                    7. (Fra version 2.1) Hvis der er anvendt en anden soundfont end standarden, og hvis man kan eksportere til MP3 filer, vil der blive vist en checkbox "Upload score audio". Hvis den markeres, vil MuseScore danne en lydfil til nodearket ved brug af synthesizer indstillingerne og oploade den til MuseScore.com.

                                    Opload et nodeark til MuseScore.com

                                    Du kan også oploade et nodeark direkte til MuseScore.com.

                                    1. Klik på Upload linket på MuseScore.com.
                                    2. Du vil have de samme muligheder, som i du har i 'Gem online' menuen.
                                    3. Du får også adgang til flere informationer, som f.eks. Genre.

                                    Note: Hvis du støder mod loftet på fem nodeark, kan du stadig oploade nodeark direkte fra MuseScore, men kun de seneste fem vil være synlige. Hvis du vil have mulighed for at gemme flere end det, må du først opgradere til en Pro Account.

                                    Rediger et nodeark på MuseScore.com

                                    HVis du vil ændre på et af dine nodeark på MuseScore.com, skal du redigere MuseScore filen på din egen computer, gemme den, og derefter gøre følgende:

                                    • Hvis du oprindeligt delte nodearket direkte inde fra MuseScore, går du blot til Fil → Gem online... igen, for at opdatere online nodearket.
                                    • Hvis du oprindeligt oploadede nodearket via Upload siden på MuseScore.com, skal du følge disse trin for at opdatere online nodearket:
                                      1. Gå til nodeark oversigten på MuseScore.com.
                                      2. Klik menuen med de tre prikker ⋮ i højre side, og vælg "Update this score".
                                      3. Fra formularen kan du oploade en nodearkfil til udskiftning, og desuden kan du ændre den tilhørende information, og privatindstillingerne.

                                    Skift til den direkte metode til at opdatere et online nodeark

                                    Det er langt enklere at opdatere dine online nodeark direkte fra MuseScore, end at opdatere nodearkene manuelt fra nodearklisten. Hvis du oprindeligt har oploadet dit nodeark via Upload siden, og nu ønsker at skifte til den direkte metode, skal du udføre disse trin:

                                    1. Gå til nodearklisten på MuseScore.com og kopier URL'en.
                                    2. Åben nodearket på din computer med MuseScore.
                                    3. Gå til Fil → Nodearksegenskaber... og sæt URL'en ind i "source" feltet.

                                    Nu kan du nårsomhelst opdatere online nodearket ved at gå til Fil → Gem online....

                                    External links

                                    • How to delete a score saved on MuseScore.com

                                    C partitur

                                    Man kan vælge at få vist nodearket enten som tranponeret partitur, eller som C partitur. Dette har betydning for de transponerende instrumenter, som er noteret i en anden toneart og tonehøjde, end den de klinger i.

                                    For at vise hele nodearket som C partitur:

                                    • Tryk på knappen C partitur, som er placeret i øverste højre hjørne af værktøjslinierne.

                                    Før man udskriver nodearket, eksporterer det til PDF, eller gemmer det on-line, bør man sikre sig, at C partitur knappen er fra, og at alle instrumenter er korrekt transponerede.

                                    Se også

                                    • Transponering: Transponerende instrumenter
                                    • Fortegn: Opdater nodebetegnelser

                                    External links

                                    • Concert pitch (Wikipedia article)
                                    • Transposing Instrument (Wikipedia article)
                                    • Concert pitch or not?? (MuseScore forum discussion)

                                    Notation

                                    I forrige kapitel "Grundlæggende funktioner" genemgås indtastning af noder og benyttelse af paletter som værktøj. Kapitlet "Notation" beskriver mere detaljeret de forskellige elementer i musiknotation. Desuden gennemgås mere specielle emner, som slagtøjs- eller trommenotation og notering af strengeinstrumenter med tabulaturer.

                                    Se også "Advanced topics".

                                    Nøgler

                                      Almindeligt brugte Nøgler (Diskant, Bas, Alt, Tenor) findes i paletten Nøgler i arbejdsområdet Grundlæggende. Et mere komplet udvalg findes i det Udvidede arbejdsområde (se billedet herunder).

                                      Clefs palette (Advanced workspace)

                                      Note: Man kan skræddersy visningen af nøgler til sit eget behov, ved hjælp af en tilpasset palet.

                                      Tilføj en nøgle

                                      Tilføj en nøgle til starten af en takt

                                      Metode 1—tilføj en nøgle til starten af en takt, uanset om det er den første takt i systemet

                                      • Marker en takt og dobbeltklik på nøglen i palletten
                                        Eller
                                      • Træk en nøgle fra palletten over på takten.

                                      Metode 2—kun til at ændre nøglen i starten af systemet

                                      • Marker den eksisterende nøgle og dobbeltklik på en ny nøgle i palletten
                                        Eller
                                      • Træk en ny nøgle fra palletten direkte over på den eksisterende nøgle.

                                      Tilføj en nøgle midt i en takt

                                      For at tilføje en nøgle midt i en takt:

                                      • Klik på en node, og dobbeltklik derefter på en nøgle i palletten.

                                      Note: Hvis nøglen ikke er den første i systemet, vil den blive tegnet mindre.

                                      Billedet viser øverste nodelinie, som starter med en diskantnøgle, og lige efter skifter til basnøgle. Efter en node og en pause skiftes der tilbage til diskantnøgle.

                                      Mid-measure clef changes

                                      Note: Ændring af nøgler påvirker ikke tonehøjden. I stedet vil noderne blive flyttet så tonehøjden bevares. Hvis man har brug for det, kan lave en Transponering i forbindelse med ændringen af en nøgle..

                                      Hjælpenøgler

                                      Hvis ændringen af en nøgle falder sammen med starten af et system, vil der blive indsat en hjælpenøgle ved enden af det foregående system. For at vise eller skjule hjælpenøglen anvender man Layoutstil → Generelt... → Side og sætter/fjerner fluebenet ved "Opret hjælpenøgler".

                                      Fjern nøgler

                                      Marker nøglen og tryk Del.

                                      Skjul nøgler

                                      Vis kun nøgler i den første takt (for alle nodelinier)

                                      • Anvend Layoutstil → Genereltl... → Side og fjern fluebenet ved "Opret nøgle for alle systemer".

                                      Vis kun nøgle i den første takt (for en bestemt nodelinie)

                                      1. Højreklik på nodelinien, vælg Nodelinie egenskaber... og fjern fluebenet ved "Vis nøgle".
                                      2. Åben Hovedpaletten og vælg punktet "Symboler".
                                      3. Træk et symbol hen på den første takt ELLER marker den første node og dobbeltklik på en nøgle i Hovedpaletten.

                                      Note: Denne mulighed kan være nyttig for TAB brugere, som ikke ønsker nøglen gentaget på alle efterfølgende linier.

                                      Skjul alle nøgler i en bestem nodelinie

                                      • Højreklik på nodelinien, vælg Nodelinie egenskaber... og fjern fluebenet ved "Vis nøgle".

                                      Taktarter

                                        Paletten Taktart er til rådighed både i Grundlæggende og Udvidet arbejdsområde.

                                        Paletten taktart

                                        Tilføj en taktart til et nodeark

                                        En taktart kan tilføjes med en af disse metoder:

                                        • Træk en taktart fra palletten over på et tomt sted i en takt.
                                        • Marker en takt og dobbeltklik på en taktart i palletten.
                                        • Marker en node eller en pause og dobbeltklik på en taktart i palletten.

                                        Taktarten vil blive indsat først i den aktuelle takt.

                                        En taktart kan ændres med en af disse metoder:

                                        • Træk en taktart fra paletten over på en eksisterende taktart.
                                        • Marker en eksisterende taktart og dobbeltklik på en taktart i palletten.

                                        Sletning af en taktart

                                        En taktart slettes ved at markere den og trykke på Del.

                                        Opret en ny taktart

                                        Hvis den taktart, man har brug for, ikke findes i nogen af paletterne, kan man oprette en ny, og føje den til Hovedpaletten:

                                        1. Tryk Skift+T for ar åbne Taktart sektionen i Hovedpaletten.
                                        2. Vælg en taktart at redigere i midterpanelet.
                                        3. Rediger de forskellige parametre (tæller, nævner, text, bjælkemønster) i Opret taktart panelet, for at få den taktart, og de egenskaber, som ønskes. Hvis det bliver nødvendigt at vende tilbage til standard bjælkemønsteret, kan man trykke på Nulstil.
                                        4. Tryk Tilføj for at overføre den nyoprettede taktart til midterpanelet. For at fjerne en taktart fra midterpanelet, højreklikkes der på den, og vælges "Ryd".
                                        5. Træk taktarten fra Hovedpaletten over på det ønskede sted i nodearket.

                                        Man kan også overføre en taktart fra Hovedpaletten til et tilpasset arbejdsområde, ved at trække den over på en palette i arbejdsområdet.

                                        Additive taktarter

                                        Additive taktarter bruges sommetider, for at tydeliggøre opdelingen af slag indefor en takt. Den viste Taktart (tal adskilt af plus tegn) indsættes i Tekst feltet i Opret taktart panelet:

                                        Opret ny taktart

                                        Ændring af bjælkeindstillinger

                                        Hvis man vil lave en ændring, i en del eller hele nodearket, i den måde bjælker bliver indsat på, skal man højreklikke på den relevante taktart (i nodearket) og vælge "Taktart egenskaber".

                                        Taktart egenskaber

                                        Her får man adgang til at justere bjælkeindstillingerne for 1/8, 1/16 og 1/32 noder i panelet "Nodegrupper". Fra version 2.1 vil en markering ved "Ændr også kortere noder" betyde at bjælkindstillingerne ændres samtidig for alle kortere varigheder. I tidligere versioner skal hver nodegruppe ændres for sig,

                                        For at bryde en bjælke klikker man på noden lige efter. For at sætte bjælken igen, klikkes samme sted.
                                        Note: Denne metode fungerer kun hvis alle sekundære bjælker findes på det ønskede sted – hvis det ikke er tilfældet bruges ikonerne i stedet (se herunder).
                                        Knappen Nulstil annullerer alle de udførte ændringer.

                                        Man kan lave yderligere ændringer til bjælke mønstrene ved at trække et af ikonerne Beams palette (nederst til venstre under vinduet) hen på en node i "Nodegrupper" panelet:

                                        • Start en bjælke ved denne node.
                                        • Slut ikke en bjælke ved denne node.
                                        • 1/8-dels node bjælke til venstre for denne node.
                                        • 1/16-dels node bjælke til venstre for denne node.

                                        Ændring af varighed

                                        Der er tilfælde hvor den faktiske varighed er forskellig fra den, der er angivet ved taktarten. Optakter og Improvisationssteder er almindelige eksempler. For at ændre den aktuelle varighed af en takt, uden at ændre den viste taktart, se Arbejde med takter: Egenskaber, taktvarighed.

                                        Lokale taktarter

                                        Taktarter kan være forskellige på forskellige nodelinjer. Eksemplet her er Bach's 26. Goldberg Variation:

                                        Bach's 26. Goldberg Variation

                                        MuseScore benytter et koncept med en global taktart, og en aktuel (lokal) taktart. For at ændre den globale taktart indsættes en taktart fra paletten på en nodelinje. Den globale taktart bruges til at tælle taktslag (som vist i statuslinjen) og er grundlaget for tempoangivelser. Den globale taktart er den samme for alle nodelinjer, og er normalt den samme, som den aktuelle taktart.

                                        Den aktuelle taktart sættes i billedet "Taktart Egenskaber", og kan være forskellig fra den globale taktart for hver nodelinje (øverste linje er 18/16 i eksemplet).

                                        Tilpas lokal taktart

                                        Teksten kan sættes uafhængigt af de aktuelle værdier.

                                        En lokal taktart tilføjes ved at holde Ctrl key (Mac: Cmd) trykket ned, mens en taktart trækkes fra paletten hen på den takt (ikke taktarten), som indeholder den globale taktart. En lokal taktart gælder for en enkelt nodelinje. En global taktart bliver gentaget på alle nodelinjer.

                                        Ændring af taktarter og brud

                                        Flertakts pauser bliver afbrudt ved ændring i taktarten. Hvis skiftet sker ved et sektionsbrud vil der ikke blive vist en hjælpe taktart, ved slutningen af den foregående takt.

                                        Se også

                                        • Tonearter

                                        External links

                                        • How To Using Polyrhythm, mixed meters and local time signatures in MuseScore
                                        • Additive meters at Wikipedia.

                                        Taktstreger

                                        De forskrllige typer af taktstreger kan findes i palletten Taktstreger:

                                        Taktstreger paletten (Udvidet)

                                        Ændring af taktstreger

                                        For at ændre en eksisterende taktstreg, til en anden type, bruges en af følgende måder:

                                        • Markér en taktstreg og dobbeltklik på den nye type i palletten Taktstreger.
                                        • Vælg typen i palletten Taktstreger, og træk den over på taktstregen i nodearket.
                                        • Vælg typen i palletten Taktstreger, og træk den over på en takt.
                                        • Marker en takt, og dobbeltklik på den nye type i palletten.

                                        'Note': Når man vælger en takt, vil taktstregen efter takten blive ændret.

                                        Hvis man vil indsætte en ny taktstreg mellem to eksisterende kan man enten:

                                        • Trække et symbol fra palletten Taktstreger over på en node eller en pause.
                                        • Markere en node eller en pause, og dobbeltklikke på den ønskede type i palletten Taktstreger.

                                        Taktstreger kan også ændres i Inspektør. Andre muligheder her omfatter:

                                        • Stiplede eller optrukne taktstreger
                                        • Afslutning, dobbelt, og gentagelser
                                        • Justerbare delvise taktstreger
                                        • Inkluderede nodelinier
                                        • Farve
                                        • Forskydning

                                        Vil man skjule en taktstreg helt, markerer man stregen og trykker V, eller man fjerner hakket ved Synlig i Inspektør.

                                        Forbind taktstreger

                                        Taktstreger kan spænde over flere nodelinier, som i en klavernode, eller et orkesterpartitur,, hvor den samler instrumenter i samme sektion. Taktstreger forbindes ved at:

                                        1. Dobbeltklikke på en taktstreg for at skifte til Redigeringstilstand.

                                          Taktstreg i Redigeringstilstand

                                        2. Klik på det nederste blå håndtag og træk det ned til den nodelinie, der skal forbindes til. Håndtaget springer selv i position, så man behøver ikke at placere det nøjagtigt.

                                        3. Tryk Esc for at forlade redigeringstilstand. Dette vil bevirke, alle relevante taktstreger også opdateres.

                                          Forbundne taktstreger

                                        Se også

                                        • Arbejde med takter
                                        • Tilføj fermat til en taktstreg

                                        Tonearter

                                          De forskellige standard Tonearter er indeholdt i paletten Toneart i Grundlæggende eller Udvidet arbejdsområde. Man kan også oprette sine egne toneart symboler, ved at bruge Tonearter sektionen i Hovedpaletten (tryk Shift+K for at vise), som også giver mulighed for at benytte en lang række ikke-standard symboler.

                                          Nøgle paletten (Udvidet arbejdsområde)

                                          Indsæt en ny toneart

                                          Indsæt en ny toneart på alle nodelinier

                                          • Træk en toneart fra paletten over til et tomt sted i en takt
                                            ELLER
                                          • Marker en takt og dobbeltklik på en toneart i palletten,
                                            ELLER
                                          • Marker en node og dobbeltklik på en toneart i palletten.

                                          Indsæt en ny toneart på en enkelt nodelinie

                                          Hvis man kun ønsker at indsætte en toneart på en af nodelinierne, og lade de andre være uændrede:

                                          • Tryk på Ctrl (Mac: ⌘) og hold den nede, mens en toneart trækkes fra palletten hen på takten.

                                          Udskift en eksisterende toneart

                                          Udskift en eksisterende toneart på alle nodelinier

                                          • Træk tonearten fra palletten over på den toneart, der skal udskiftes (eller på den takt, som indeholder tonearten),
                                            EŁLER
                                          • Marker den toneart, som skal udskiftes, og dobbeltklik på en ny toneart i palletten.

                                          Udskift en eksisterende toneart på en enkelt nodelinie

                                          Hvis man kun ønsker at ændre tonearten på en af nodelinierne, og lade de andre være uændrede:

                                          • Tryk Ctrl (Mac: ⌘) og hold den nede mens en toneart trækkes fra paletten hen på den toneart, som skal udskiftes (eller hen på den takt, som indeholder tonearten).

                                          Fjern en toneart

                                          • Klik på en eksisterende toneart og tryk Del
                                            ELLER
                                          • Træk symbolet med den tomme toneart fra palletten over på takten.

                                          Hjælpe toneart

                                          Har man markeret en toneart, er der et punkt i Inspektør, hvor man kan afkrydse "Vis hjælpetoneart." Der er også et punkt i Layoutstil → Generelt... → Side, hvor man kan afkrydse "Opret hjælpetonearter". Indstillingen i Inspektør vil kun gælde for den markerede toneart, mens Layoutstil vi gælde for hele nodearket.

                                          Opløsningstegn ved ændring af toneart

                                          Som standard indsætter MuseScore kun opløsningstegn når der skiftes til en toneart uden fortegn. (C dur/A mol). I alle andre tilfælde vises blot den nye toneart:
                                          Standard ændring af toneart

                                          Man kan vælge om opløsningstegnene skal vises i bestemte tilfælde, når der skiftes toneart. Under Layoutstil → Generelt... → Fortegn findes mulighederne:

                                          Dialog: Layoutstil / Generelt... /Fortegn

                                          Man kan trykke Udfør eller klikke OK for at gemme indstillingerne. Hvis man er i et tilknyttet parti, og ikke i hovedarket, kan man bruge knappen Gør gældene for alle stemmer.

                                          Vælger man 'Før toneart ved ændring til færre ♯/♭' får man dette resultat:
                                          Opløsningstegn før toneart

                                          Den tredje mulighed 'Efter toneart ved ændring til færre ♯/♭. Før ved skift mellem ♯ og ♭' giver dette resultat:
                                          Opløsningstegn før og efter toneart

                                          Tonearter ved flertakters pauser

                                          Flertakters pauser bliver afbrudt, hvis der skiftes toneart.

                                          Eksempel med flertakters pause

                                          Se Flertakters pause

                                          Hjælpetonearter og sektionsbrud

                                          Der vises ikke hjælptonearter ved et sektionsbrud.
                                          See Brud og mellemrum: Sektionsbrud

                                          Tilpassede tonearter

                                          Tryk Skift+K for at få vist sektionen Tonearter fra Hovedpaletten.

                                          Hovedpaletten: Tonearter

                                          Det venstre panel indeholder et bibliotek af tonearter. Til højre er panelet Opret toneart, hvor man kan tilpasse en toneart, ved at trække fortegn fra paletten til det ønskede sted i nodelinien ovenover. Når man er færdig, trykkes Tilføj for at flytte den nye toneneart til biblioteket. Tryk på Ryd fjerner den nye toneneart, og giver mulighed for at starte forfra.

                                          Et fuldt sæt af fortegnsymboler er til rådighed—både konventionelle, og ikke-standard (som halv-krydser, halv-b'er, osv.).

                                          Note: Afspilning af tilpassede tonearter, er indtil videre ikke understøttet.

                                          Tonearter fra Hovedpaletten kan flyttes til en tilpasset palette i brugerens arbejdsområde, ved at trække dem over. Det er også muligt at indsætte en toneart i nodearket, direkte fra Hovedpaletten. Enten ved at markere en takt og dobbeltklikke på tonearten, eller ved at trække en toneart over på en takt.

                                          Arpeggios og glissandi

                                            Arpeggio og Glissando tegn kan hentes i paletten "Arpeggios & Glissandi", i det udvidede arbejdsområde. Paletten indeholder også anslagspile (strum arrows), en arpeggio parantes, blæseinstrument artikulationer og glid ind/glid ud symboler.

                                            Arpeggios & Glissandi Palette

                                            For at tilføje et symbol til nodearket, bruges en af følgende måder:

                                            • Marker en eller flere noder, og dobbeltklik på et symbol i "Arpeggios & Glissandi" paletten.
                                            • Træk et symbol fra "Arpeggios & Glissandi" paletten over på en node.

                                            Symbolerne kan tilpasses ved at ændre deres egenskaber i Inspektør. Håndtag til at ændre længde/kurve er også, i de fleste tilfælde, til rådighed i Redigeringstilstand. Hvis der er behov for det, til fremtidigt brug, kan det tilrettede symbol gemmes i en tilpasset palette.

                                            Arpeggios (Akkordbrud)

                                            Når et arpeggio eller en anslagspil (strum arrow) tilføjes til nodearket, vil det i første omgang kun gælde for en stemme. Man kan dog let ændre dets højde ved at dobbeltklikke på symbolet og trække håndtagene op eller ned (til mere præcise justeringer anvendes pil-tasterne). Afspilning kan slås til og fra i Inspektør.

                                            Arpeggio som dækker to nodelinier

                                            Glissandi

                                            Et Glissando eller, mindre formelt, en glidetone, vil dække to nabonoder, normalt i den samme stemme.

                                            glissandi med lige eller bølgende linier

                                            Glissandi på akkorder er også mulige.

                                            Chord slide

                                            Tilpas start og slut punkter

                                            1. Dobbeltklik på symbolet for at gå i redigeringstilstand;
                                            2. Klik på start- eller sluthåndtaget:
                                              • Brug Shift+↑↓ for at flytte håndtaget op eller ned, fra node til node.
                                              • Brug Shift+←→ for at flytte håndtaget vandret fra node til node.

                                            Denne metode tillader også at flytte håndtaget mellem noder i forskellige stemmer, eller til og med fra en nodelinie til en anden. Man kan også bruge piletasterne, eller Ctrl + pil, til den sidste justering af håndtagenes placering.

                                            Tilrettede glissandi

                                            For at tilrette et glissando til sine egne behov, skal man markere det, og rette egenskaberne i Inspektør på følgende måde:

                                            • Type: Vælg mellem Bølget eller Linie;
                                            • Tekst: Rediger, eller slet teksten. Note: Hvis der ikke er plads nok mellem noderne, vil teksten ikke blive vist;
                                            • Layoutstil: Vælg hvordan glissando et skal spilles. Der er fire muligheder: Kromatisk, Hvide tangenter, Sorte tangenter, Diatonisk;
                                            • Afspil: Sæt/fjern flueben for at slå afspilning til eller fra.

                                            Blæseinstrument artikulationer

                                            Man har Fall, Doit, Plop og Scoop symboler til rådighed. For at ændre længde og kurveform, marker symbolet, skift til redigeringstilstand, og juster håndtagene, som beskrevet i Redigering: Linier.

                                            Glid ind/ud

                                            Glid ind og Glid ud linier findes også i "Arpeggio & Glissandi" paletten. For at ændre længde og vinkel på en linie, dobbeltklikker man på den, og trækker i håndtaget (eller man bruger pil-tasterne til mindre korrektioner).

                                            External links

                                            • Akkordbrydning ell. glissando i Musikipedia Fagordbog
                                            • Arpeggio at Wikipedia
                                            • Glissando at Wikipedia

                                            Artikulationer og ornamenter

                                              Articulationer & Ornamenter paletten i det Udvidede arbejdsområde indholder et omfattende udvalg af symboler.

                                              Articulations and Ornaments

                                              Der er også et mere begrænset udvalg i arbejdsområdet Grundlæggende

                                              Artikulationer

                                              Artikulationer er symboler, som føjes til nodearket for at vise hvordan en node eller en akkord skal spilles. De vigtigste symboler i denne gruppe er:

                                              • Fermater
                                              • Staccato
                                              • Mezzo-staccato / Portato
                                              • Staccatissimo
                                              • Tenuto
                                              • Sforzato
                                              • Marcato

                                              Specielle artikulationer til strengeinstrumenter, blæseinstrumenter osv. er også medtaget.

                                              Ornamenter

                                              Ornamenter omfatter:

                                              • Dobbeltslag, Omvendt dobbeltslag, Pralltrille
                                              • Triller
                                              • Bends

                                              Note: Appoggiatura og acciaccatura findes i palletten Forslagsnoder.

                                              Tilføj artikulationer/ornamenter

                                              1. Marker en node eller en samling af noder.
                                              2. Dobbeltklik på et symbol i paletten.

                                              Alternativt kan man tilføje et symbol ved at trække det direkte fra palletten over på et nodehoved.

                                              Tilføj fortegn til en artikulation

                                              Vil man tilføje et fortegn til en eksisterende artikulation , f.eks. en trille, gøres dette med et tekst objekt, via Specialtegn vinduet (i værktøjslinien Tekst).
                                              Man kan også i stedet sætte et fortegn på noden fra Hovedpaletten.

                                              Tilføj fermat til en taktstreg

                                              En fermat kan føjes direkte til en taktstreg ved at markere taktstregen og dobbeltklikke fermaten i paletten.

                                              Tastatur genveje

                                              • Skift Staccato til/fra: Shift+S
                                              • Skift Tenuto til/fra: Shift+N
                                              • Skift Sforzato (accent) til/fra: Shift+V
                                              • Skift Marcato til/fra: Shift+O
                                              • Tilføj Acciaccatura (forslag): /

                                              Tastatur genveje kan skræddersyes i MuseScore's Indstillinger.

                                              Juster positionen

                                              Når en artikulation eller ornament er tilføjet fra paletten, er symbolet automatisk markeret, og kan umiddelbart flyttes op eller ned med tastaturet:

                                              • Tryk pil op/ned for små justeringer (0.1 sp ad gangen);
                                              • Tryk Ctrl+↑ eller Ctrl+↓ (Mac: Cmd+↑ or Cmd+↓) for større lodrette justeringer (1 sp ad gangen).
                                              • Et symbol kan (hvis det giver mening) flyttes til den anden ende af noden, ved at trykke X.

                                              For at kunne justere i alle retninger med tastaturet:

                                              1. Dobbeltklik på symbolet for at gå til Redigeringstilstand, eller klik på symbolet og tryk Ctrl+E (Mac: Cmd+E) , eller højreklik på symbolet og vælg "Rediger element";
                                              2. Brug piletasterne til små justeringer (0.1 sp ad gangen); eller Ctrl+Pil (Mac: Cmd+Pil) til større ændringer (1 sp ad gangen).

                                              Man kan også ændre værdien af den vandrette eller lodrette forskydning i Inspektør. For at ændre placeringen af mere end et symbol ad gangen, kan man markere de ønskede symboler, og tilrette størrelsen af forskydningen i Inspektør.

                                              Note: Et symbol kan også flyttes ved klikke og trække det, men man op år bedre kontrol med metoderne herover.

                                              Artikulationsegenskaber

                                              For at få adgang til egenskaberne for en artikulation, kan man klikke på symbolet og lave de ønskede ændringer i Inspektør. De viste egenskaber vil afhænge af typen af artikulation. Andre egenskaber (bl.a. retning og placering af anker) får man adgang til ved at højreklikke på symbolet og vælge Artikulationsegenskaber….

                                              Man kan også lave generelle ændringer til alle eksisterende, og efterfølgende indsatte artikulationer ved at vælgeLayoutstil… → Generelt… → Artikulationer, Ornamenter.

                                              Se også

                                              • Forslagsnoder

                                              External links

                                              • Artikulationer i Musikipedia fagordbog
                                              • Ornamenter i Musikipedia
                                              • Ornaments at Wikipedia

                                              Bends

                                                A variety of simple and complex (multi-stage) bends can be created with the Bend Tool bend_palette_sym.png, located in the Articulations and Ornaments palette of the Advanced workspace.

                                                Apply a bend

                                                To apply one or more bends to the score, use one of the following options:

                                                • Select one or more notes and double-click a bend symbol in the palette.
                                                • Drag a bend symbol from the palette on to a note.

                                                Edit a bend

                                                To edit a bend, use one of the following:

                                                • Right click on a bend symbol in the score and select "Bend properties."
                                                • Select a bend symbol in the score and press "Properties" in the "Bend" section of the Inspector.

                                                  Bend tool

                                                Preset options are available, if needed, on the left hand side of the Bend properties window. The current bend is represented by a graph consisting of gray lines connected by square, blue nodes (see image above). The slope of the line indicates the type of bend:

                                                • Up-slope = Up-bend
                                                • Down-slope = Down-bend
                                                • Horizontal line = Hold

                                                The vertical axis of the graph represents the amount by which the pitch is bent up or down: one unit equals a quarter-tone: 2 units a semitone, 4 units a whole-tone, and so on. The horizontal axis of the graph indicates the length of the bend: each gray line segment extends for 1 space (sp) in the score.

                                                A bend is modified by adding or deleting nodes in the graph:

                                                • To add a node, click on an empty intersection.
                                                • To delete a node, click on it.

                                                Adding a node lengthens the bend by 1 sp; deleting a node shortens the bend by 1 sp. The Start and End points of the bend can be moved up and down only.

                                                Adjust height

                                                The height of the bend symbol is automatically adjusted so that it appears just above the staff. This height can be reduced, if necessary, with a workaround:

                                                1. Create another note on the top line (or space) of the staff, vertically above the note at which you want the bend to start.
                                                2. Apply the bend to the higher note first: this will give you a bend symbol with the lowest height.
                                                3. To increase the height of the bend move this note downward.
                                                4. Drag the bend symbol downwards to the correct position.
                                                5. Mark the top note invisible and silent (using the Inspector).

                                                Adjust position

                                                To adjust position use one of the following:

                                                • Drag the bend symbol with a mouse.
                                                • Click on the symbol and adjust the horizontal and vertical offsets in the Inspector.
                                                • Double click on the symbol; or click on it and press Ctrl+E (Mac: Cmd+E); or right-click on the symbol and select "Edit element." Then use the arrow keys for fine positioning (0.1 sp at a time); or Ctrl+Arrow (Mac: Cmd+Arrow) for larger adjustments (1 sp at a time).

                                                Custom bends

                                                After a bend has been created in the score it can be saved for future use by dragging and dropping the symbol to a palette while holding down Ctrl+Shift (Mac: Cmd+Shift). See Custom Workspace

                                                Bindebuer

                                                  En bindebue er en kurvet linie mellem to noder med samme tonehøjde, som angiver at de skal spilles som en node med den samlede varighed (se external links herunder). Bindebuer oprettes normalt mellem to nabonoder i den samme stemme, men MuseScore understøtter også bindebuer mellem to noder som ikke er naboer og mellem noder i forskellige stemmer.

                                                  I notationstilstand, vil programmet automatisk oprette den korrekte slutnode for bindebuen, hvis man indsætter buen lige efter man har indsat en node eller en akkord. Man kan naturligvis også oprette buen efterfølgende mellem eksisterende noder.

                                                  Note: Bindebuer, som forbinder noder med samme tonehøjde, må ikke forveksles med legatobuer, som forbinder noder med forskellig tonehøjde og angiver , at en passage skal spilles legato.

                                                  Sammenbinding af noder

                                                  1. Tryk Esc for at sikre ikke at være i notationstilstand.

                                                  2. Klik på en node, eller brug Ctrl (Mac: Cmd) + klik til at vælge flere noder.

                                                    Første node markeret

                                                  3. Tryk + eller bindebue knappen. bindebue knappen.

                                                    Bindebue oprettet.

                                                  Bindebuer vil blive oprettet mellem de markerede node(r) og de følgende node(r) med samme tonehøjde.

                                                  Sammenbinding af akkorder

                                                  Vil man lave en bindebue for alle noder i en akkord på en gang, kan man enten
                                                  * Klikke på nodehalsen i akkorden, eller
                                                  * Holde Skift nede, og klikke på en vilkårlig node i akkorden.
                                                  Tryk så + eller bindebue knappen. bindebue knappen. Bindebuer vil blive oprettet mellem alle noderne i akkorden og de følgende noder med samme tonehøjder.

                                                  animated gif showing how to tie a chord using the mouse

                                                  Tilføj en sammenbundet node under indtastning

                                                  For at oprette en bindebue mellem to enkelte noder i notationstilstand:

                                                  1. Marker en enkelt node (en som ikke indgår i en akkord).
                                                  2. Vælg varigheden for den næste node.
                                                  3. Tryk + eller bindebue knappen. bindebue knappen.

                                                  En ny node med samme tonehøjde vil blive indsat og forbundet med en bindebue.
                                                  Hvis der allerede er en node eller en akkord, som indeholder en node med samme tonehøjde, vil der blot blive oprettet en bindebue til denne.

                                                  Tilføj en sammenbundet akkord under indtastning

                                                  1. Sørg for at en node i en akkord er markeret.
                                                  2. Vælg varigheden for den følgende akkord.
                                                  3. Tryk + eller bindebue knappen. bindebue knappen.
                                                    Akkord med markeret node
                                                    En ny akkord med de samme tonehøjder vil blive indsat og forbundet med bindebuer.
                                                    Hvis der allerede er en node eller en akkord, som indeholder en eller flere noder med de samme tonehøjder, vil der blot blive oprettet bindebuer til dem, mens de manglende tonehøjder vil blive indsat.
                                                    Akkord efter oprettelse af buer

                                                  Sammenbinding af unisone noder

                                                  Hvis akkorder, som skal sammenbindes, indeholder unisone noder, er den bedste måde til at sikre korrekt notation:

                                                  1. Tildel hver af de unisone noder til sin egen stemme.
                                                  2. Sørg for at en af noderne i det unisone par sættes til "uden hals" for at undgå overlappende nodehalse og faner.
                                                  3. Tilføj bindebuer stemme for stemme. Juster placering og længde efter behov.

                                                  Vending af en bindebue

                                                  X skifter retningen på en bindebue fra over noden til under noden og omvendt.

                                                  Se også

                                                  Legatobuer

                                                  External links

                                                  • Sammenbinding og punkteringer i Musikipedia
                                                  • Ties (music) at Wikipedia

                                                  Bjælker

                                                    Bjælker tilføjes automatisk, efter regler bestemt af taktarten.
                                                    For at ændre på disse, kan man højreklikke på angivelsen af taktarten, og vælge "Taktart egenskaber". Se Ændring af bjælkeindstillinger for detaljer.

                                                    Hvis man blot ønsker at tilrette bjælkerne manuelt, gang for gang, kan man bruge bjælke symboler fra palletten Bjælker, som både findes i Grundlæggende og Udvidet arbejdsområde:

                                                    Bjælke palette (Udvidet arbejdsområde)

                                                    Bjælke symboler

                                                    Her følger en liste af bjælke symboler og deres betydning:

                                                    • Start en bjælke ved denne node (eller pause).
                                                    • Slut ikke en bjælke ved denne node (eller pause).
                                                    • Sæt ikke bjælke på denne node.
                                                    • Start anden bjælke (16-del) ved denne node.
                                                    • Start tredje bjælke (32-del) ved denne node.
                                                    • Gå tilbage til Automatiktilstand.
                                                    • Start en fjer-bjælke (langsommere) ved denne node.
                                                    • Start en fjer-bjælke (hurtigere) ved denne node.

                                                    Note: Automatiktilstand er den tilstand, som MuseScore vælger ved nodeindtastning, afhængigt af den aktuelle taktart og dennes bjælke indstillinger.

                                                    Ændring af bjælker

                                                    Hvis man vil ændre en eller flere bjælker (undtagen fjer-bjælker, herunder), kan man bruge en af følgende måder:

                                                    • Træk et bjælke symbol fra et arbejdsområde over på en node i nodearket.

                                                    • Marker en eller flere noder og dobbeltklik på det ønskede bjælke symbol i arbejdsområdet.

                                                    For at indsætte en fjer-bjælke bruges en af følgende måder:

                                                    • Træk et fjer-bjælke symbol fra et arbejdsområde over på en eksisterende bjælke i nodearket.

                                                    • Marker en eller flere bjælker i nodearket, og dobbeltklik på det ønskede fjer-bjælke symbol i arbejdsområdet.

                                                    Note:: (1) Fjer-bjælker kan bruge 2 eller3 linier, afhængig af tempoet og den ønskede varighed af ændringen; (2) For at oprette en fjer-bjælke med 2 linier, skal man starte med en ubrudt række af 16-dels noder, med bjælker; (3) For at oprette en fjer-bjælke med 3 linier, skal man starte med en ubrudt række af 32-dels noder, med bjælker; (4) Afspilning af fjer-bjælker er ikke understøttet.

                                                    Juster bjælker med tastatur/mus

                                                    Juster bjælkens hældning

                                                    1. Dobbeltklik på en bjælke for at gå i redigeringstilstand—det højre håndtag vil automatisk være markeret.
                                                    2. Brug piletasterne eller træk med musen i det højre håndtag, for at ændre hældningen på bjælken.
                                                    3. Tryk Esc for at forlade redigeringstilstand.

                                                    Juster bjælkens højde

                                                    1. Dobbeltklik på en bjælke for at gå i redigeringstilstand—det højre håndtag vil automatisk være markeret.
                                                    2. Tryk Shift+Tab eller klik på det venstre håndtag for at markere det.
                                                      3.Brug piletasterne eller træk med musen i det venstre håndtag, for at ændre højden på bjælken.
                                                    3. Tryk Esc for at forlade redigeringstilstand.

                                                    Juster bjælker i Inspektør

                                                    En anden mulighed er at bruge Inspektør til alle justeringer:

                                                    Juster bjælkens hældning

                                                    1. Klik på en bjælke.
                                                    2. Sæt hak ved "Brugerdefineret placering" i "Bjælke" sektionen af Inspektør.
                                                    3. Sæt værdierne for "Position" svarende til den ønskede hældning.

                                                    Juster bjælkens højde

                                                    1. Klik på en bjælke.
                                                    2. Sæt hak ved "Brugerdefineret placering" i "Bjælke" sektionen af Inspektør.
                                                    3. Sæt værdierne for "Position" svarende til den ønskede højde.

                                                    Gør en bjælke vandret

                                                    1. Marker en Bjælke
                                                    2. Sæt hak ved "Vandret" i "Bjælke" sektionen af Inspektør.
                                                    3. Hvis man ønsker kan bjælkens højde justeres med tastatur/mus: se herover.

                                                    Hvis man ønsker at alle bjælker i nodearket skal være vandrette, kan man sætte dette ved brug af punktet "Gør alle nodebjælker vandret" i Layoutstil → Generelt → Bjælker.

                                                    Juster fjer-bjælker

                                                    For at justere en fjer-bjælke skal man:

                                                    1. Markere en bjælke.
                                                    2. Rette værdierne for "Voks mod venstre" og/ełler "Voks mod højre" i "Bjælke" sektionen af Inspektør.

                                                    Lokal layoutændring

                                                    Efter normal praksis for trykte noder, vil Musescore bestemme nodernes afstand i forhold til deres varighed. Hvis der er flere nodelinier, kan dette resultere i en uensartet afstand mellem noderne, som i eksemplet herunder.

                                                    normal_layout_100dpi.png
                                                    Hvis man laver en Lokal layoutændring, kan man angive de passager, hvor man man ønsker at nodernes afstand skal være uafhængig af de øvrige nodelinier. I eksemplet herunder er dette gjort for den øverste nodelinie, og resulterer i en mere ensartet fordeling.

                                                    local_relayout_100dpi.png

                                                    Man laver en Lokal layoutændring ved at:
                                                    1. Markere en eller flere bjælker.
                                                    2. Sætte flueben ud for Lokal layoutændring, under Bjælke sektionen af Inspektør.

                                                    Skift over/under node

                                                    For at ændre bjælkens placering fra over til under noden, eller omvendt:

                                                    1. Marker en eller flere bjælker
                                                    2. Brug en af følgende måder:
                                                      • Tryk på X tasten;
                                                      • Tryk på "Skift retning" ikonet nederst til højre i værktøjslinie området.
                                                      • Vælg en af mulighederne (Auto, Op, eller Ned) ved punktet "Retning" i "Bjælke" sektionen af Inspektør.

                                                    Nulstil bjælke tilstand

                                                    For at nulstille bjælker til den tilstand, der er defineret ved den lokale taktart:

                                                    1. Marker den del af nodearket, som ønskes nulstillet. Hvis der ikke er markeret noget, vil nulstillingen gælde for hele nodearket;
                                                    2. Vælg Layout → Nulstil bjælketilstand.

                                                    Se også

                                                    • Fler-liniet notation
                                                    • Redigeringstilstand
                                                    • Nodeindtastning

                                                    External links

                                                    • How to add a beam over a rest
                                                    • How to place a beam between notes

                                                    Forslagsnoder

                                                      En forslagsnode er en type musikalsk ornament, som normalt skrives mindre end almindelige noder. Det Korte forslag, eller Acciaccatura, skrives som en lille node med en streg gennem halsen. Det Lange forslag, eller Appoggiatura, har ingen streg.

                                                      Paletten Forslagsnoder (Udvidet arbejdsområde)

                                                      Opret forslagsnoder

                                                      Forslagsnoder kan findes i paletten Forslagsnoder under det Grundlæggende eller Udvidede arbejdsområde

                                                      Tilføj en forslagsnode

                                                      Anvend en af de følgende måder:

                                                      • Marker en almindelig node, og dobbeltklik på en forslagsnode i paletten;
                                                      • Træk en forslagsnode fra paletten over på en almindelig node;
                                                      • Marker en node og tryk / for at tilføje en acciaccatura.

                                                      Dette vil tilføje en forslagsnode med samme tonehøjde som den almindelige node. Man kan tilføje en række af forslagsnoder ved at gentage ovenstående så mange gange som ønsket. Se også Ret tonehøjde (herunder).

                                                      Note: Der tilføjes ikke automatisk en legatobue når en forslagsnode indsættes, så denne må tilføjes selvstændigt. Se Legatobuer.

                                                      Tilføj en akkord af forslagsnoder

                                                      Akkorder med forslagsnoder bygges fuldstændig som almindelige akkorder:

                                                      1. Indsæt den første node i akkorden som vist ovenfor
                                                      2. Marker den første forslagsnode, og tilføj de øvrige noder ligesom i almindelige akkorder (dvs. Shift+A...G).

                                                      Man kan også bygge en akkord af forslagsnode, ved at bruge genvejen tilføj interval i trin 2:
                                                      Alt+1...9 for intervaller fra unison til en niende over.

                                                      Ændre tonehøjde

                                                      Tonehøjden for en forslagsnode kan ændres på samme måde, som en almindelig node:

                                                      1. Marker en eller flere forslagsnoder
                                                      2. Tilpas tonehøjden med pil-tasterne:
                                                        • ↑ eller ↓ for at hæve eller sænke tonehøjden med en halvtone
                                                        • Alt+Shift+↑ eller Alt+Shift+↓ for at hæve eller sænke tonehøjden med et trin, indenfor tonearten.

                                                      Ændre varighed

                                                      Hvis man vil ændre varigheden af en tidligere indsat forslagsnode, markerer man den, og vælger en ny varighed fra værktøjslinien, eller indtaster den med en af tasterne 1...9 (se Nodeindtastning).

                                                      Manuel justering

                                                      Hvis placeringen af en forslagsnode efter en node (f.eks. afslutningen af en trille) skal justeres, markerer man noden og skifter til redigeringstilstand og bruger højre/venstre pil-tasterne. Man kan også ændre akkord offset værdierne Inspektør.

                                                      External links

                                                      • Grace note at Wikipedia
                                                      • Appoggiatura at Wikipedia
                                                      • Acciaccatura at Wikipedia

                                                      Fortegn

                                                        De mest almindelige typer af fortegn kan hentes fra værktøjslinien Fortegn ovenover nodearket, og i Fortegn paletten i det Grundlæggende arbejdsområde. Et mere omfattende udvalg findes i Fortegn paletten i det udvidede arbejdsområde.

                                                        Accidentals palette (Basic workspace)

                                                        Tilføj fortegn

                                                        Fortegn tilføjes automatiskal til en node, hvis det er nødvendigt, når man hæver eller sænker tonehøjden:

                                                        • ↑: Forhøjer tonen med en halvtone (bruger♯).
                                                        • ↓: Sænker tonehøjden med en halvtone (bruger♭).

                                                        For at tilføje (i) et dobbelt kryds eller dobbelt b, (ii) et hjælpefortegn eller (iii) et ikke-standard fortegn, benyttes en af følgende måder:

                                                        • Marker en node og klik på fortegnet i værktøjslinien over nodearket.
                                                        • Marker en node og dobbeltklik et fortegn i Fortegn paletten (Grundlæggende eller udvidet arbejdsområde).
                                                        • Træk et fortegn fra Fortegn paletten hen på noden.

                                                        Hvis man vil tilføje en parantes om et hjælpefortegn, benyttes en af de følgende måder:

                                                        • Marker fortegnet i nodearket og dobbeltklik på parantes symbolet i Fortegn paletten.
                                                        • Træk parantes symbolet fra paletten over på fortegnet.
                                                        • Marker fortegnet og sæt flueben ved "Har ramme" i Inspektør (fra version 2.1).

                                                        Hvis man senere ændrer på tonehøjden for en node ved brug af piletasterne, vil manuelle tilføjelser til fortegnet blive fjernet.

                                                        Fortegn kan slettes, hvis man ønsker det, ved at klikke på dem og tykke Del.

                                                        Skift enharmonisk navn

                                                        For at ændre det enharmoniske navn for en node, eller noder, i både transponeret og C-notation:

                                                        1. Marker en node, eller gruppe af noder;
                                                        2. Tryk J;
                                                        3. Fortsæt mad at trykkeJ for at bladre gennem de enharmoniske ækvivalenter.

                                                        For kun at ændre det enharmoniske navn for en node, eller noder, i den aktuelle notation:

                                                        1. Marker en node, eller gruppe af noder;
                                                        2. Tryk Ctrl+J (Mac: Cmd+J);
                                                        3. Fortsæt mad at trykke den samme taste kombination for at bladre gennem de enharmoniske ækvivalenter.

                                                        Note: Hvis tonehøjden ikke er den samme for alle de valgte noder, er resultatet uforudsigeligt.

                                                        Tonehøjde tolkning

                                                        Menu funktionen Noder → Tonehøjde tolkning forsøger at indsætte de rette fortegn for alle noder i hele nodearket..

                                                        Se også

                                                        • Toneart: Ændring

                                                        External links

                                                        • Accidental at Wikipedia
                                                        • Enharmonic at Wikipedia

                                                        Heltakts pauser

                                                          Heltakts pauser

                                                          En hel pause, centreret i en takt (vist herunder) benyttes til at angive at hele takten (eller en stemme indenfor takten) er tavs, uanset taktart.

                                                          Heltakts pause

                                                          Oprettelse af heltakts pauser

                                                          Hvis alle takter er "standard"—dvs. uden tilrettede varigheder bruges denne metode:

                                                          1 Marker en takt, eller en række af takter.
                                                          2. Tryk Del.

                                                          Hvis varigheden, i en eller flere takter er tilrettet, bruges denne metode i stedet:

                                                          1. Marker en takt, eller en række af takter.
                                                          2. Tryk Ctrl+Shift+Del.

                                                          Oprettelse af heltakts pause i en bestemt stemme

                                                          1. Opret en pause, som varer hele takten, i den bestemte stemme.
                                                          2. Kontroller at pausen er markeret og tryk Ctrl+Shift+Del.

                                                          Flertakts pauser

                                                          Flertakts pause

                                                          Flertakts pauser bruges til at angive tavshed for et instrument i en længere periode. De bruges hyppigt i ensemble partiturer. De afbrydes automatisk ved vigtige punkter, som dobbelte taktstreger, øve mærker, skift i takt- elller toneart o.l.

                                                          Nummeret over en Flertakts pause angiver, hvor mange takter pausen skal vare.

                                                          Visning af Flertakts pauser

                                                          Tryk M på tastaturet for at slå Flertakts pauser til og fra.

                                                          Alternativt:

                                                          1. Vælg menuen Layoutstil → Generelt...
                                                          2. Klik på fanebladet "Nodeark", hvis det ikke allerede er valgt.
                                                          3. Sæt flueben ved "Opret flertakts pauser"

                                                          Note: Ændringen af Layoutstil betyder at tomme takter automatisk samles i fler-takters pauser i hele nodearket. Det anbefales derfor at man indtaster alle noder inden man slår oprettelse af flertakts pauser til.

                                                          Bryd flertakts pauser

                                                          Se også: Arbejde med takter: Bryd flertakts pause

                                                          Der kan være brug for at dele en flertakts pause i to..

                                                          Opdelingen bør ske inden "Opret flertakts pauser" slås til på fanebladet "Nodeark" i Layoutstil → Generelt....
                                                          Marker den takt hvor den anden flertakts pause skal starte, og højreklik Taktegenskaber → Bryd flertakts pause.

                                                          Bemærk at flertakters pauser bliver afbrudt hvis der er et øvemærke (ikke bare tekst), sektions brud, eller en dobbelt taktstreg, samt ved ændring i takt- eller toneart.

                                                          Kiler (Hårnåle)

                                                            Crescendo og Diminuendo (Decrescendo) betegner dynamiske ændringer, som kan noteres enten med symboler eller med tekst.
                                                            På dansk bruges betegnelserne "Kiler" eller "Krokodillenæb" om disse symboler. I den danske udgave at MuseScore bruges betegnelsen "Kiler/Hårnåle" (fra engelske"Hairpins"). Her er valgt at benytte betegnelsen "Kiler"

                                                            Tilføj en kile

                                                            Symbolerne for Kiler findes i linje paletten. For at oprette en kile markerer man først den række af noder, den skal dække.

                                                            < indsætter en crescendo kile
                                                            > indsætter en diminuendo kile (decrescendo)

                                                            En-takt crescendo

                                                            Man kan også tilføje kiler ved at dobbeltklikke på symbolet i Linjer paletten, mens noderne er markerede.

                                                            Note: Som standard placeres kiler under nodelinjen. Dette kan ændres med værdien "Standard lodret position", via Layoutstil->Generelt->Hårnåle, volter...,

                                                            Redigering af kiler

                                                            Ved at dobbetklikke på en kile skifter man til redigeringstilstand. I denne tilstand vil kilen være forsynet med fire håndtag, som kan flyttes, enten ved at trække med musen, eller ved at bruge genvejstaster.

                                                            Crescendo med håndtag i redigeringstilstand

                                                            Flytning af ankre:
                                                            Hvert endepunkt er forbundet med et anker, som bestemmer hvilke noder der påvirkes ved afspilning, og gør det muligt for kilen at række over linieskift. For at få kilen til at dække flere eller færre noder markeres et endepunkt, og man bruger Skift+→ eller Skift+← til at flytte ankeret fra node til node.
                                                            Crescendo med anker flyttet

                                                            I redigeringstilstand kan man også justere kilens udsende, ved at ændre længde placering osv.
                                                            Til små flytninger benyttes → ← ↓ eller ↑
                                                            Til større benyttes Ctrl + Pil (Mac: Cmd + Pil)

                                                            Ændring af længden: Længden af kilen ændres med de to håndtag i endepunkterne, som kan flyttes vandret, i begge retninger.

                                                            Ændring af placeringen: Placeringen ændres med håndtaget i midten, som kan flyttes i alle retninger.

                                                            Ændring af højden: Højden af kilenn (dvs. afstanden mellem de to åbne ender) ændres med det håndtag, som er placeret på den nederste gren, ved at flytte det i lodret retning. Højden kan også ændres ved at sætte en ny værdi for "Højde" i Inspektør.

                                                            Note: Kommandoen Ctrl+R (Mac: Cmd+R) vil tilbageføre justeringer af længde og placering, men ikke højde og ankre.

                                                            Redigering med Inspektør

                                                            I Inspektør kan man ændre en række andre egenskaber for kilen.

                                                            Ændre type: Man kan skifte mellem Crescendo og Diminuendo (Decrescendo) ved at ændre "Type".

                                                            Tilføje 'al niente': Ved at sætte markering ved "Cirkel på spidsen" vil en sådan blive indsat, for at angive et Crescendo/diminuendo al niente. Dvs, at det starter/slutter i fuldkommen stilhed.

                                                            Tilpasse højde ved linieskift: Værdien for "Fortsæt højde" benyttes når en kile rækker over et linie- eller sideskift. Den bestemmer højden af kilen lige efter/før for crescendo/diminuendo.

                                                            Crescendo brudt ved sideskift

                                                            Dynamikomfang: Her kan vælges:
                                                            * Nodelinie: Kilen gælder kun for en enkelt nodelinie
                                                            * Del: Kilenn gælder alle nodelinier for et instrument
                                                            * System: Kilen gælder alle nodelinier i systemet

                                                            Anslagsstyrkeændring: Benyttes ved aspilning. se herunder

                                                            Cresc. og dim. linier

                                                            Ud over kiler er der cresc.   _     _     _ og dim.   _     _     _ linier med den samme funktion i Linier paletten.
                                                            Man ændrer en kile til den tilsvarende tekst linie ved at sætte flueben ved "Tekstlinie" i inspektør. Evt. kan man samtidig ændre på "Liniestil" (f.eks. til "Bred stiplet") .
                                                            For at ændre teksten (f.eks. til cresc. poco a poco, eller decresc. i stedet for dim), højreklikker man på linien og vælger Linieegenskaber....

                                                            Kiler ved afspilning

                                                            Afspilning af crescendi og diminuendi fungerer kun fra en node til den næste; det er indtil videre ikke muligt at ændre på dynamikken henover en enkelt node. Som standard vil kiler kun påvirke afspilning hvis dynamikangivelser anvendes både før og efter kilen.

                                                            For eksempel vil et crescendo, som dækker noder mellem p og f angivelser, medføre en dynamisk ændring ved afspilning. Mellem to på hinanden følgende dynamikangivelser, vil kun den første -relevante- kile påvirke afspilningen: et diminuendo mellem p og f vil blive ignoreret; ved to eller flere crescendi mellem p og f, vil alle andre end det første, blive ignorerede.

                                                            En kile kan bruges selvom der ikke er dynamik angivelser, ved at rette "Anslagsstyrkeændring" i inspektør (et tal mellem 0 og 127).

                                                            External links

                                                            • Dynamik i Musikipedia

                                                            Klammer

                                                            MuseScore har et sæt almindelige klammer og en krøllet klamme i paletten Klammer under det Udvidede arbejdsområde.

                                                            Klamme Paletten

                                                            Tilføj en klamme

                                                            For at tilføje en klamme til et system, kan man bruge en af to måder:

                                                            • Træk et symbol fra paletten hen til et tomt sted i den første takt på en nodelinie, der hvor klammen skal starte.
                                                            • Marker den første takt på en nodelinie, der hvor klammen skal starte, og dobbeltklik på symbolet for klammen i palletten.

                                                            Slet en klamme

                                                            • Marker klammen og tryke Del.

                                                            Ændre en klamme

                                                            • Træk et nyt symbol fra paletten hen på en eksisterende klamme i nodearket.

                                                            Rediger en klamme

                                                            Når en klamme tilføjes vil den kun dække en nodelinie. For at udvide den til andre nodelinier, skal man dobbeltklikke på den, (eller klikke på den og trykke Ctrl + E) for at skifte til redigeringstilstand . Herefter trækkes håndtaget nedad til klammen dækker de ønskede nodelinier. Håndtaget springer selv i position, så det er ikke nødvendigt med stor præcision.

                                                            Layoutstil

                                                            Standarden for stregtykkelse og afstanden fra klammer og akkolader til systemet kan tilpasses i Layoutstil → Generelt... → System.

                                                            Legatobuer

                                                              En legatobue er en kurvet linie over to eller flere noder, som angiver, at de skal spilles uden afbrydelse. Hvis to noder med samme tonehøjde skal forbindes, bruges en Bindebue.

                                                              Metoder til oprettelse

                                                              En legatobue kan oprettes fra paletten Linier, men det anbefales at bruge en af metoderne herunder.

                                                              Første metode

                                                              1. Marker den første node legatobuen skal dække, uden at være i notationstilstand:

                                                                Første node markeret

                                                              2. S opretter en bue til nabonoden:

                                                                Legatobue til nabonode

                                                              3. Skift+→ forlænger buen til næste node::

                                                                Legato ovee tre noder

                                                              4. X skifter buens placering over/under:

                                                                Legatobue over nodehalsene

                                                              5. Esc afslutter redigeringstilstand:

                                                                Legatobue, som ikke er i redigeringstilstand

                                                              Anden metode

                                                              1. Marker den første node legatobuen skal dække, uden at være i notationstilstand:
                                                              2. Hold Ctrl (⌘ på Mac) nede, og marker den sidste node, som legatobuen skal dække
                                                              3. Press S

                                                              Note: Hvis man Skift-markerer den sidste node, vil legatobuer blive føjet til i alle stemmer.

                                                              Tredie metode

                                                              1. I notationstilstand, indtastes den første node, i legato-forløbet
                                                              2. Tast S for at starte legatobuen
                                                              3. Indtast de resterende noder i legato-forløbet
                                                              4. Tast S for at afslutte legatobuen

                                                              Justeringer

                                                              For at justere størrelse og form på buen skiftes til redigeringstilstand ved at dobbeltklikke (eller bruge Ctrl+E, eller højreklikke og vælge "Rediger Element"). De to yderste håndtag ændrer start og slut for buen, mens de tre håndtag på buen bruges til at ændre formen. Det midterste håndtag på den rette linie, bruges til at flytte hele buen op/ned/højre/venstre. Tab tasten kan bruges til at skifte mellem håndtagene.

                                                              Til små justeringer klikkes på et enkelt håndtag, som kan flyttes med pil-tasterne. Større justeringer kan laves ved at trække i håndtaget med musen, eller bruge Ctrl+Pil).

                                                              En række genveje kan bruges til at flytte det venstre og højre håndtag en node af gangen:

                                                              • Skift+→ Flyt til næste node.
                                                              • Skift+← Flyt til forrige node.
                                                              • Skift+↑ Flyt til en lavere stemme (stemme 2 til stemme 1 osv.).
                                                              • Skift+↓ Flyt til en højere stemme (stemme 1 til stemme 2 osv..).

                                                              En legatobue kan række over adskillige systemer og sider. Starten og slutningen af buen er forankret til en node/akkord eller en pause. Hvis noderne flyttes i forbindelse med ændringer i layout, stræk, eller stil, vil legatobuen flytte med, og blive justeret i størrelse.

                                                              I eksemplet herunder vises en legatobue, som rækker fra bas til diskantnøglen. Den oprettes ved at markere den første node i buen, holde Ctrl (Mac: ⌘) nede, og markere den sidste node i buen, og derefter trykke på S for at tilføje legatobuen.

                                                              Legatobue over flere nodelinier

                                                              X ændrer placeringen af en valgt bue fra under til over noderne, og omvendt.

                                                              Stiplede legatobuer

                                                              Stiplede buer bruges af og til i sange, hvor buen ikke anvendes i alle strofer. Stiplede buer kan også bruges til at vise udgiverens forslag (i modsætning til komponistens originale angivelser). For at ændre en eksisterende legatobue til en stiplet eller prikket bue, markeres den, og i Inspektør (F8) ændres Linietype fra "Sammenhængende" to "Stiplet ." ełler "Stiplet -".

                                                              Se også

                                                              • Bindebue
                                                              • Redigeringstilstand
                                                              • Notationstilstand

                                                              Linjer

                                                                Linje paletten i det udvidede arbejdsområde indeholder de følgende typer af linjer:

                                                                • Legatobue
                                                                • Crescendo og diminuendo
                                                                • Volter
                                                                • Oktaveringer (8va, 8vb, 15 MB osv.)
                                                                • Klaver pedal markeringer
                                                                • Udvidede ornamenter (Triller etc.)
                                                                • Guitar barre linjer

                                                                  Linje paletten, Udvidet arbejdsområde

                                                                Tilføjelse af linjer til nodearket

                                                                Linjer kan tilføjes på følgende måder:

                                                                • Marker en node og dobbeltklik derefter på en linje.
                                                                  Buer strækker sig til næste node, andre til enden af takt

                                                                • Udvælg en række af noder, ved at klikke på den første, og bruge Skift-klik til at markere den sidste node. Dobbeltklik herefter på en linje i palletten.
                                                                  Buer strækker sig fra første til sidste, andre over hele rækken

                                                                • Træk en linje fra paletten over på nodearket
                                                                  Buer strækker sig til næste node, andre til enden af takt. Anker vil markere starten

                                                                • Marker en række af takter og dobbeltklik på en linje.
                                                                  Buer strækker sig fra første til sidste, andre over hele rækken

                                                                • Tilføjelse af en linje til en enkelt node eller akkord: Marker noden og Ctrl+Klik den næste node. Dobbeltklik derefter på en linje i palletten. Legatobuer kan også tilføjes med genvejstasten S.
                                                                  Alle linjer vil strække sig fra første til sidste node.

                                                                Volter vil altid dække en hel eller en række af takter.

                                                                Ændring af den lodrette placering

                                                                Den lodrette placering for en eller flere linjer kan ændres samtidigt:

                                                                1. Vær sikker på ikke at være i notationstilstand eller redigeringstilstand.
                                                                2. Anvend en af disse måder:
                                                                • Klik på en eller flere linjer, og ret værdien for lodret offset i Inspektør;
                                                                • Klik på en linje, tryk og hold Skift mede, og træk linjen op/ned med musen.

                                                                Note: Den lodrette placering kan også ændres i Redigeringstilstand mode.

                                                                Ændring af længden

                                                                1. Vær sikker på ikke at være i notationstilstand (tryk evt. Esc for at forlade);

                                                                2. Dobbeltklik på den linje, som skal ændres, for at skifte til redigeringstilstand;

                                                                3. Klik på et af håndtagene i enderne, og brug en af disse genveje:

                                                                  • Skift+→ for at flytte håndtaget og det tilhørende anker en node til højre (i tilfælde af Volter, en takt)
                                                                  • Skift+← for at flytte håndtaget og det tilhørende anker en node til venstre (i tilfælde af Volter, en takt);
                                                                4. For at flytte et håndtag uden at flytte det tilhørende anker, kan man bruge følgende:

                                                                  • → for at flytte håndtaget 0.1 sp til højre (1 sp = en nodelinje afstand = afstanden mellem to linier i en nodelinje).
                                                                  • ← for at flytte håndtaget 0.1 sp til venstre.
                                                                  • Ctrl+→ (Mac: Cmd+→) for at flytte håndtaget 1 sp til højre.
                                                                  • Ctrl+← (Mac: Cmd+→) for at flytte håndtaget 1 sp til venstre.

                                                                  Note: Endehåndtagene kan også trækkes med musen.

                                                                Linje egenskaber og tilretning af linjer

                                                                Linjer kan have forskellige egenskaber, såsom håndtag i enderne og tilhørende tekster (f.eks. oktaveringer og volter). Når en linje er indsat i nodearket, kan den tilrettes, og gemmes i et tilpasset arbejdsområde til fremtidigt brug:

                                                                1. Højreklik på en linje og vælg Linjeegenskaber…

                                                                2. Tilføj den ekstra tekst, som ønskes tilføjet

                                                                  • Start: Tekst tilføjet her, vil blive vist i starten af linjen:
                                                                  • Fortsæt: Tekst tilføjet her, vil blive vist i starten af en fortsættelse af linjen:
                                                                  • Slut: Tekst tilføjet her vil blive vist i enden af linjen.

                                                                  Klik på ... knapperne for at ændre Tekst egenskaberne for hver position.

                                                                3. Hvis der er brug for et anker, afkrydses det relevante "Anker" felt afkrydses, og ankers længde og hældning justeres.

                                                                4. Vælg en af mulighederne for "Placering": "Over" eller "Under" vil placere teksten, så den overlapper linjen; "Venstre" vil placere teksten til venstre for linjen.

                                                                  Note: Yderligere muligheder for placering kan findes i vinduet "Tekstegenskaber" (se trin 2, herover).

                                                                5. Klik OK for at afslutte Linjeegenskaber.

                                                                6. Lav eventuelt ændringer til Farve, Linjetykkelse og Linje type (fuld, stiplet osv.) i "Linje" sektionen i Inspektør. Afkrydses "Diagonal" vil det være muligt at oprette en diagonal linie ved at trække i endehåndtagene.

                                                                7. Linjen kan gemmes til fremtidig brug, som beskrevet under Brugertilpassede paletter.

                                                                Kopiering af linjer

                                                                Når linjer er indsat i nodearket, kan de ikke kopieres med de sædvanlige kopier og sæt ind funktioner. Linjer kan dog duplikeres indenfor et nodeark: tryk på Ctrl+Skift (Mac: Cmd+Skift) og hold dem nede mens der klikkes på linjen, og den trækkes til den ønskede placering.

                                                                Udvidede ornamenter

                                                                Et fortegn kan tilføjes til et udvidet ornament, som f.eks. en trille, ved at markere ornament linien, og dobbeltklikke på et symbol i palletten Fortegn.

                                                                External links

                                                                • Piano pedal marks at Wikipedia
                                                                • Guitar Barre at Wikipedia

                                                                Oktaveringer

                                                                Oktaveringer er linier, der benyttes til at markere at en passage skal spilles en eller flere oktaver over eller under den skrevne tonehøjde:
                                                                Linien kan være stiplet eller fuldt optrukket.
                                                                Oktaveringer er indeholdt i Linie paletten i Grundlæggende og Udvidet arbejdsområde.

                                                                8─────┐eller 8va─────┐: Spil en oktav over den skrevne tonehøjde
                                                                8─────┘eller 8vb─────┘: Spil en oktav under den skrevne tonehøjde

                                                                8va/8vb linier er særligt almindelige i klaver noder, selvom de også sommetider bruges i anden instrumental musik. 1 15ma (2 oktaver over) og 15mb (2 oktaver under) benyttes også indimellem.

                                                                Debussy. Études, Book II, X

                                                                Indsæt en oktavering

                                                                Brug en af følgende måder:

                                                                • Marker en samling noder og dobbeltklik på oktavering symbolet i paletten.
                                                                • Marker en eller flere takter og dobbeltklik på oktavering symbolet i paletten.
                                                                • Klik på en node og dobbeltklik på oktavering symbolet i paletten (linien vil blive forlænget fra noden til enden af takten).
                                                                • Træk et oktavering symbol fra paletten over på en node (linien vil blive forlænget fra noden til enden af takten).

                                                                Se også, Linier: Juster lodret placering.

                                                                Ændring af længden

                                                                Se Linier: Ændring af længde.

                                                                Tilpasning af linier

                                                                Oktaveringer kan tilpasses ligesom alle andre linier.

                                                                Se Linier: Tilpassede linier og linieegenskaber.

                                                                External links

                                                                • Octave at Wikipedia

                                                                1. Gerou/Lusk. Essential Dictionary of Music Notation (Internet Archive). ↩︎

                                                                Tremolo

                                                                Tremolo er en hurtig getagelse af en tone, eller et hurtigt skift mellem to toner eller akkorder. Det markeres med streger gennem halsen på noder eller akkorder. Hvis et tremolo omfatter to toner sættes stregerne imellem noderne. Tremolo symboler bruges også til at angive trommehvirvler.

                                                                Paletten Tremolo i det udvidede arbejdsområde indeholder særskilte symboler for enkelt tone tremolo (vist med halse herunder) og for to-tone tremoloer (vist uden halse herunder).

                                                                Tremolo paletten

                                                                Et tremolo føjes til en enkelt node, ved at markere noden, og dobbeltklikke på det ønskede symbol i tremolo paletten.

                                                                Til et to-tone tremolo skal hver node have den fulde varighed af tremoloet. Til et tremolo, af en halvnodes varighed, indsættes to normale fjerdedels noder. Når tremolo symbolet er tilføjet til den første node, vil node værdierne automatisk blive fordoblet til to halvnoder.

                                                                Tupletter

                                                                  Tupletter bruges til at skrive uregelmæssige rytmer, som ikke følger den opdeling i slag, som normalt passer til taktarten. For eksempel vil en sekstendedels triol opdele et ottendelsslag i tre sekstendedele i stedet for to:

                                                                  16-dels triol

                                                                  I 6/8 takt vil en ottendels duol opdele en punkteret fjerdedel i to ottendele i stedet for tre:

                                                                  8-dels duol

                                                                  Oprettelse af tupletter

                                                                  Måden, en tuplet oprettes på, afhænger af om man starter i notationstilstand eller "normaltilstand" (dvs. ikke i notationstilstand). Her er først et simpelt eksempel på oprettelse af en ottendels triol.

                                                                  Opret en triol i normaltilstand

                                                                  1. Marker en node eller pause, som har hele den ønskede varighed for triol gruppen. I eksemplet her med en ottendels triol, skal det være en fjerdedels node eller pause—som vist herunder:

                                                                    Fjerdedel markeret

                                                                  2. Vælg Noder→Tupletter→Trioler fra hovedmenuen, eller tryk Ctrl+3 (Mac: ⌘+3). Dette vil give resultatet herunder:

                                                                    Triol ottendel fulgt af pauser

                                                                  3. Programmet skifter automatisk til notationstilstand, og vælger den varighed der passer bedst—i dette tilfælde en ottendel. Herefter indsættes de ønskede noder/pauser. For eksempel:

                                                                    Triol med tre ottendele

                                                                  Opret en triol i notationstilstand

                                                                  1. Sørg for at være i notationstilstand (tast N).
                                                                  2. Flyt til den node/pause (ełler en tom takt) hvor triolen skal starte (brug piletasterne til at flytte).
                                                                  3. Vælg den samlede varighed for hele triol gruppen. I tilfældet med en ottendels triol, klik på fjerdedels noden i Nodeindtastning værktøjslinien, (eller tryk 5 på tastaturet).
                                                                  4. Vælg Noder→Tupletter→Triol fra hovedmenuen, eller tryk Ctrl+3 (Mac: ⌘+3). Dette opretter en triol klamme, og opdeler den oprindelige node/pause.
                                                                  5. Programmet vælger automatisk den varighed, der passer bedst—i dette tilfælde en ottendel—og giver mulighed for straks at indtaste den ønskede serie af noder/pauser.

                                                                  Opret andre tupletter

                                                                  De fleste andre tupletter kan oprettes på lignende måde. Ved at indsætte den generelle opret tuplet genvej – Ctrl+2–9 (Mac users Cmd+2–9) – i den beskrevne serie af trin ovenfor, oprettes der tupletter fra en duol (2) til en nonol (9). For mere komplekse tilfældet, se herunder.

                                                                  Specielle tupletter

                                                                  Tupletter, udover de fast definerede, (f.eks. 13 sekstendedele indenfor en fjerdedel), kan også oprettes:

                                                                  1. Indsæt/marker en node eller pause med den samlede varighed for tupletten.
                                                                  2. Åben Opret Tuplet billedet fra menuen: Noder→Tupletter→Andet...
                                                                  3. Indsæt det ønskede forholdstal (f.eks. 13/4 for tretten sekstendedele indenfor en fjerdedels varighed) under "Relation" i "Type" sektionen. Vælg indstillingene for "Nummer" og "Klamme" i "Format" sektionen.

                                                                    Opret tuplet billedet

                                                                  4. Klik OK for at lukke billedet.

                                                                    Tretten-tuplet indenfor en fjerdedels  varighed

                                                                  Sletning af tupletter

                                                                  En tuplet slettes ved at markere nummeret/klammen og trykke Del.

                                                                  Indstillinger

                                                                  For at ændre udseendet af en tuplet, kan man ændre egenskaberne i Inspektør. Man kan også generelt ændre udseendet af tupletter i nodearket.

                                                                  Inspektør

                                                                  For at ændre udseendet af en tuplet, markerer man nummeret eller klammen og bruger Inspektør.

                                                                  Tuplet egenskaber i Inspektør

                                                                  Hvis hverken nummeret eller klammen bliver vist, kan man markere en node fra tupletten, og derefter bruge Tuplet knappen i Inspektør for at få vist billedet herover.

                                                                  Vælg tuplet i Inspektør

                                                                  Retning sættes til Autohvis klammen skal placeres på samme side af nodehovederne, som hals eller bjælke. Vælg Op, eller Ned for at få klammen placeret over eller under nodehovedet, uanset halsens retning.
                                                                  Nummer type, kan sættes til Nummer for at få vist et heltal, Relation for at få vist en brøkdel, eller Intet for ikke at få vist et nummer.

                                                                  Tuplet med et 5:6 forhold og automatisk klamme

                                                                  Klamme type kan sættes tilAutomatisk så klammen skjules for noder med bjælker, og vises hvis tupletten indeholder pauser eller noderbuden bjælke.
                                                                  Vælg Klammeeller Intet for altid at få vist eller skjult klammen.

                                                                  Layoutstil

                                                                  Åben Layoutstil → Generelt... og vælg Tuplets. Her kan egenskaber for tupletter indstilles for hele nodearket.

                                                                  Dialog: Layoutstil / Generelt... / Tupletter

                                                                  Justeringer kan foretages for henholdsvis Vandret og Lodret:

                                                                  • Det er tre muligheder for lodrette justeringer, med værdier angivet i standard enheder (space units) , og en med afkrydsning.
                                                                    • Maksimal hældning: standard værdi 0.50; interval fra 0.10 til 1.00
                                                                    • Lodret afstand fra nodehals (se (2) herunder): standard værdi 0.25; interval fra -5.00 til 5.00
                                                                    • Loddret afstand fra nodehoved (se (3) herunder): standard værdi 0.50; interval fra -5.00 til 5.00
                                                                    • Undgå nodelinierne: markeret som standard
                                                                  • Det er fire vandrette justeringer angivet i standard enheder
                                                                  • Afstand før nodehalsen på første node (se (5) herunder): standard værdi 0.50; interval fra -5.00 til 5.00
                                                                    • Afstand før nodehoved på første node: standard værdi 0.00; interval fra -5.00 til 5.00
                                                                    • Afstand efter nodehals på sidste node (se(6) herunder): standard værdi 0.50; interval fra -5.00 til 5.00
                                                                    • Afstand efter hovedet på sidste node: standard værdi 0.00; interval fra -5.00 til 5.00

                                                                  Tuplet Layoutstil indstillinger

                                                                  External links

                                                                  • How to create triplets and other tuplets
                                                                  • Tuplet at Wikipedia
                                                                  • The User Guide to Tuplets in MuseScore [video]

                                                                  Vejrtrækning og pauser

                                                                    Markeringer for Vejrtrækning og pauser findes i paletten Vejrtrækning & Pauser under det Udvidede arbejdsområde.

                                                                    Vejrtrækning & Pauser, Paletten

                                                                    Tilføj et symbol

                                                                    For at tilføje symboler for vejrtrækning ełler pauser (også kaldet en cæsur) til nodearket bruges en af følgende måder:

                                                                    • Marker en node eller en pause og dobbeltklik på det ønskede symbol i palletten.
                                                                    • Træk symbolet fra palletten direkte over på en node eller en pause i nodearket.

                                                                    Vejrtræknings symbol i nodearket (Emmentaler font)

                                                                    Symbolet vil blive placeret efter den markerede node.

                                                                    Man kan efterfølgende justere placeringen ved at skifte til redigeringstilstand (Ctrl+E, on Mac: Cmd+E), og bruge pil-tasterne, trække med musen, eller ved at ændre offset i Inspektør.

                                                                    Juster varighed

                                                                    Fra version 2.1 og fremefter kan man ændre varigheden (i sekunder), for en vejrtrækning, eller en cæsur, via den tilhørende sektion i Inspektør.

                                                                    Gentagelser og spring

                                                                      Simple gentagelser

                                                                      En simpel gentagelse oprettes ved at placere gentagelsestegn i starten og slutningen af en passage. Gentagelsestegnene indsættes fra paletten Taktstreger , eller, fra og med version 2.1, fra palletten Gentagelser & Spring.

                                                                      Simple repeat

                                                                      Note: Hvis starten af en gentagelse falder sammen med starten af et stykke eller en section, kan start gentagelsestegnet udelades. Tilsvarende kan slut gentagelsestegnet udelades ved enden af en sektion eller af stykket.

                                                                      Simpelt gentagelsestegn udeladt ved starten

                                                                      1. og 2. volter

                                                                      Indsæt først en simpel gentagelse, som vist ovenfor, og tilføj derefter 1. og 2. volte—se Volter.

                                                                      Afspilning

                                                                      For at høre gentagelserne under afspilning, skal knappen "Afspil gentagelser" på værktøjslinien være aktiveret. Afspilning af gentagelser slås fra ved at deaktivere knappen.

                                                                      Antallet af gange en gentagelse bliver afspillet kan indstilles :

                                                                      1. Start og slut gentagelsestegnene skal være på plads (se Simple gentagelser herover).
                                                                      2. Højreklik på den sidste takt før slut gentagelsestegnet og vælg Taktegenskaber.
                                                                      3. Ret "Afspilningsantal" ("Gentagelsesantal" indtil version 2.1) efter behov.

                                                                      Symboler og tekst

                                                                      Tekst og symboler forbundet med gentagelser er placeret i paletten "Gentagelser & Spring" i (Grundlæggende eller Udvidet arbejdsområde).
                                                                      Paletten indeholder:

                                                                      • Bis-tegn, Segno, Coda, og (fra version 2.1) gentagelsestegn
                                                                      • D.S., D.C., To Coda, og Fine tekst

                                                                      Gentagelser & Spring

                                                                      Et gentagelsessymbol kan indsættes i nodearket på en af disse måder:

                                                                      • Træk symbolet fra paletten hen på (ikke over) den ønskede takt (så takten ændrer farve).
                                                                      • Marker en takt og dobbeltklik på symbolet i palletten.

                                                                      Spring

                                                                      Spring er symboler i nodearket, som dirigerer musikeren, og afspilningen, til at flytte til en navngivet markør (se herunder). Spring omfatter de forskellige typer af D.C. (Da Capo) og D.S. (Dal Segno) tekster.

                                                                      Hvis man klikker på et spring får man vist tre 'tags', som vises i sektionen "Spring" i Inspektør. Det er:

                                                                      • Gå til: Flyt til den markør hvis "Label" er den samme som "Gå til" tagget.
                                                                      • Spil indtil: Fortsæt med at spille indtil man møder en markør hvis "Label"er den samme som "Spil indtil" tagget.
                                                                      • Fortsæt fra: Skift til den næste markør hvis "Label" er den samme som "Fortsæt fra" tagget.

                                                                      Hver markør har en forskellig Label knyttet til sig, som kan ses ved at klikke på symbolet, og læse "Label" i "Markør" sektionen af Inspektør.

                                                                      Note: Taggene start og end, som henviser til starten og slutningen af et nodeark, ełler en sektion, er implicitte, og behøver derfor ikke at blive indsat af brugeren.

                                                                      Simple gentagelser foretages ikke efter et spring, og afspilningen udføres som om man er i den sidste gentagelse (og dermed i sidste volte).

                                                                      Markører

                                                                      Markører er de steder, der henvises til i springene. Udover de implicitte 'start' og 'end' findes:

                                                                      • Segno (label: segno)
                                                                      • Segno Variation (label: varsegno)
                                                                      • Coda (label: codab)
                                                                      • Coda Variation (label: varcoda)
                                                                      • Fine (label: fine)
                                                                      • To Coda (label: coda)

                                                                      Eksempler

                                                                      Efter spring instruktionen Da Capo vil afspilningen skifte til starten (til den implicitte start label) og spille hele nodearket eller sektionen igen (frem til den implicitte end label).

                                                                      Efter spring instruktionen Da Capo al Fine vil afspilningen skifte til starten (til den implicitte start label), og spille nodearket frem til Fine (labelen fine).

                                                                      Dal Segno al Fine (eller D.S. al Fine) skifter til Segno symbolet (labelen segno) og spiller derfra frem til Fine (labelen fine).

                                                                      Dal Segno al Coda (eller D.S. al Coda) skifter til Segno symbolet (labelen segno) og spiller derfra frem til To Coda (labelen coda). Afspilningen fortsætter fra Coda symbolet (labelen codab).

                                                                      Egenskaberne for spring og markører (bl.a. label navnene) kan sættes i Inspektør. Det vil være nødvendigt at ændre dem, hvis der er brug for flere spring og markører.

                                                                      Se også

                                                                      • Taktstreger
                                                                      • Volter

                                                                      External links

                                                                      • Musikipedia - Form og repetition
                                                                      • MuseScore in Minutes: Repeats and Endings, part 2 (video tutorial)
                                                                      • How to separate a coda from the rest of the score (MuseScore HowTo)

                                                                      Volter

                                                                        Volter - oftest 1. og 2. - er betegnelsen for forskellige slutninger på en gentagelse. Symbolerne for volter er vist her.

                                                                        Eksempel på 1. og 2. volte

                                                                        Tilføjelse af en volte til nodearket

                                                                        Brug en af følgende måder:

                                                                        • Marker en takt, eller en række af takter, og dobbeltklik på et Volte symbol i paletten Linier.
                                                                        • Træk et Volte symbol fra paletten Linier hen på en takt, og juster derefter længden efter behov (se herunder).

                                                                        Ændring af antallet af takter en volte dækker

                                                                        1. Dobbeltklik på en volte for at skifte til redigeringstilstand. Håndtaget i enden vil automatisk være markeret
                                                                        2. Tryk Skift+→ for at flytte håndtaget en takt fremad. Tryk Skift+← for at flytte håndtaget en takt bagud. Gentag efter behov.

                                                                        Note: Kun brug af Skift kommandoer vil ændre de start- og slutpunkter, som påvirker afspilning af volten. Mindre justeringer af de visuelle start- og slutpunkter, kan gøres med andre piltast kommandoer, eller ved at trække håndtagene med musen, men disse ændringer vil ikke påvirke afspilningen.

                                                                        Når man markerer et start- eller sluthåndtag vil en stiplet linie blive vist, som forbinder det til et ankerpunkt på nodelinien. Ankerene viser start- og slutpositionerne for afspilningen af Volten.

                                                                        Second-ending volta in edit mode

                                                                        Tekst

                                                                        Man kan ændre teksten og flere andre egenskaber for et volte symbol, via dialogen Linieegenskaber. Højreklik på volte symbolet, og vælg Lineegenskaber.... I figuren herunder er voltens tekst sat som "1.-5."

                                                                        Linieegenskaber dialogen

                                                                        Eksempel: Første til femte slutning, fulgt af sjette slutning

                                                                        Ved at højreklikke kan man også komme til dialogen Volteegenskaber. Her kan man ændre både den viste Volte tekst (den samme som i Linieegenskaber herover) og gentagelseslisten. Hvis man ønsker at en volte afspilles i bestemte gentagelsee, mens en anden volte afspilles i andre gentagelser, kan man indsætte gentagelsesnumrene i en kommasepereret liste. I eksemplet herunder vil volten blive afspillet i gentagelserne 1, 2, 4, 5 og 7. En anden volte vil have de andre gentagelser, f.eks. 3, 6, og muligvis også højere numre, som 8, 9, etc.

                                                                        Volteegenskaber dialogen

                                                                        Afspilning

                                                                        Sommetider skal en gentagelse spille mere end to gange. I figuren herover peger volte teksten på, at den skal afspilles fem gange, før der fortsættes. Hvis antallet af gange, MuseScore afspiller en gentagelse, skal ændres, går man til den takt, som indeholder gentagelsestegnet, og ændrer dens "Afspilningsantal".(Gentagelsesantal indtil version 2.1). Se Arbejde med takter:Andet for detailjer.

                                                                        External links

                                                                        • MuseScore in Minutes, Lesson 8: Repeats and Endings, Part 1

                                                                        Transponering

                                                                          Ved transponering flyttes en udvalgt række af noder opad eller nedad på nodelinjen. MuseScore understøtter flere slags transponering, inklusive transponerende instrumenter.

                                                                          Man starter med at udvælge noder fra en eller flere nodelinjer. Hvis der ikke vælges noget, vil transponeringen gælde for hele nodearket.
                                                                          Herefter åbnes dialogen "Transponer" ved at vælge Noder → Transponer..., og man vælger mellem kromatisk og diatonisk transponering.

                                                                          Dialogen Transponèr

                                                                          Kromatisk transponering

                                                                          Ved kromatisk transponering flyttes de udvalgte noder op eller ned i halvtonetrin. Sæt markering ved "Transponer kromatisk", og vælg enten "Ved toneart" eller "Ved interval".
                                                                          Som standard vil punktet "Transponer tonearter" være markeret, og dermed vil de faste fortegn vil blive ændret samtidig.

                                                                          Transponering ved toneart

                                                                          Den nuværende toneart vises på rullemenuen, hvor man vælger hvilken toneart, der skal skiftes til. Hvis man vælger "Nærmeste" bestemmer programmet, om der skal flyttes op eller ned, afhængigt af hvad der kræver færrest trin. Man kan også selv markere "Op" eller "Ned".
                                                                          Transponerende instrumenter vil blive transponeret til den nye toneart på grundlag af klang, og ikke på basis af den noterede toneart.

                                                                          Transponering ved interval

                                                                          Det ønskede interval vælges fra rullemenuen, og det vælges, om der skal flyttes "Op" eller "Ned".

                                                                          Man kan også flytte de valgte noder ved brug af piltasterne. (↑ eller ↓), uden at tonearten ændres.

                                                                          Diatonisk transponering

                                                                          Diatonisk transponering (også benævnt skala transponering) flytter noderne trinvis op eller ned indenfor skalaen, som angives af tonearten. Man vælger antallet af trin fra rullemenuen, og det vælges om der skal flyttes "Op" eller "Ned".
                                                                          Man kan flytte en enkelt node ved at trække den op eller ned. Tilsvarende kan man flytte et sæt udvalgte noder med Ctrl + klik og træk.
                                                                          Som standard vil punktet "Behold gradvise ændringer" være markeret, og dermed vil lokale fortegn blive bevaret. Fjernes markeringen vil lokale fortegn blive fjernet, så alle noder følger skalaen.

                                                                          Valgmuligheder

                                                                          I sektionen "Valgmuligheder" kan man markere om eventuelle akkordsymboler skal transponeres eller ej.
                                                                          Desuden har man valget mellem "Brug dobbelt "#/b" og "Kun enkelt "#/b".

                                                                          Genveje ved transponering

                                                                          Ctrl+↑ (Mac: Cmd+↑): Transponer udvalgte noder en oktav OP.
                                                                          Ctrl+↓ (Mac: Cmd+↓): Transponer udvalgte noder en oktav NED.

                                                                          Indtil version 2.1

                                                                          F2 (Mac: fn+F2): Transponer nodearket og tonearten en halvtone OP.
                                                                          Skift+F2 (Mac: Skift+fn+F2): Transponer nodearket og tonearten en halvtone NED.

                                                                          Note: Disse blev deaktiveret pga. konflikt med genveje i andre sammenhænge.

                                                                          Man kan benytte Rediger → Indstillinger → Genvej til at sætte en tastatur genvej til at åbne dialogen "Transponer", eller til at aktivere F2 (Mac: fn+F2) og Skift+F2 (Mac: Skift+fn+F2 genvbejene.

                                                                          Transponerende instrumenter

                                                                          Nogle instrumenter som B trompet og Es alt saxofon kaldes transponerende. Disse instrumenter klinger lavere eller højere end deres noterede tonehøjde. MuseScore har indbygget undersøgelse af transponerende instrumenter.

                                                                          Knappen C-partitur og punktet Noder → C-partitur i hovedmenuen, giver mulighed for at skifte mellem C-partitur og transponerende notation. C-partituret hjælper komponister og arrangører fordi det viser alle instrumenterne i samme toneart, så noderne på nodelinjen svarer til deres klang. Når C-partitur slås fra, vil noderne for nogle instrumenter ikke svare til den spillede klang, men de er klar til brug for udøveren.
                                                                          Hvis man bruger C-partitur under redigeringen, skal man huske at slå det fra inden udskrivning af de enkelte stemmer.

                                                                          Ændring af transponering for en nodelinjen

                                                                          Måden instrumenter transponerer på, er på forhånd sat op i MuseScore. Hvis man har brug for et sjældent instrument, eller en speciel transponering, som ikke findes i MuseScore, kan man få brug for at ændre instrumentets transponering manuelt. Højreklik på et tomt sted i nodelinjen og vælg Nodelinjeegenskaber.... I bunden af billedet Nodelinjeegenskaber kan man vælge interval for transponeringen, eventuelle oktav ændringer, vælge "Op" (klinger højere end noteret) eller "Ned" (klinger lavere end noteret).

                                                                          Man kan også bruge knappen Skift Instrument… i Nodelinjeegenskaber billedet til automatisk at ændre transponeringen, så den svarer til et standard instrument.

                                                                          External links

                                                                          • How to transpose (MuseScore How-To)
                                                                          • Concert pitch or not?? (forum discussion)

                                                                          Tabulaturer

                                                                            Musik for strengeinstrumenter med faste bånd, noteres ofte ved hjælpe af et tabulatur, også kaldet tab, som giver en visuel fremstilling af strengene og båndenes numre:

                                                                            Tabulatur

                                                                            Et Tabulatur kan også kombineres med sædvanlig notation på nodelinjer:

                                                                            Standard nodelinie plus tabulatur

                                                                            Opret et nyt tabulatur

                                                                            Et tabulatur indsættes fra billedet "Instrumenter". Når der oprettes et nyt nodeark, kan det åbnes fra Ny Node hjælper, ved at man på siden Vælg skabelon , klikker på Vælg Instrumenter. I et eksisterende nodeark åbnes det ved at trykke I; eller ved at vælge Rediger → Instrumenter… fra hovedmenuen.

                                                                            1. I venstre kolonne åbnes gruppen "Strengeinstrumenter", og der vælges et (eller flere) af de mulige tabulaturer.

                                                                              Instrument liste: Strengeinstrumenter

                                                                              Note: Rullemenuen over listen af instrumenter kan bruges til at skifte mellem kategorier. Alternativt kan man søge efter et bestemt instrument ved at bruge "Søg" feltet under instrument listen.

                                                                            2. Dobbeltklik eller klik på Tilføj for at indsætte tabulaturet i den højre kolonne.

                                                                            3. Klik på nodelinjen/tabulaturet i den højre kolonne, og brug rullemenuen til at vælge den ønskede type tabulatur/nodelinje.

                                                                            Ændring af nodelinjens type

                                                                            Et tabulatur kan ændres til en anden type, eller til en standard nodelinje, og omvendt:

                                                                            1. Åben billedet instrumenter (trykI; eller vælg Rediger → Instrumenter… fra hovedmenuen).
                                                                            2. Klik på nodelinjen i den højre kolonne, og skift "Nodelinjetype" til det ønskede tabulatur/nodelinje.

                                                                            Note: Hvis det ønskede tabulatur ikke findes i Vælg instrument listen, må man indsætte et lignende tabulatur, og tilpasse det efterfølgende. (se Tilretning af tabulatur):

                                                                            Opret kombination af nodelinje og tabulatur

                                                                            Et tabulatur kan kombineres med notering på en sædvanlig nodelinje:
                                                                            1. Åben billedet instrumenter (trykI; eller vælg Rediger → Instrumenter… fra hovedmenuen).
                                                                            2. Marker tablatur/nodelinjen i den højre kolonne, og vælg en af de to muligheder:
                                                                            * Klik Tilføj nodelinje for at oprette et nodelinje/tabulatur par, som ikke er sammenkædet.
                                                                            * Klik Tilføj sammenkædet nodelinje for at oprette et nodelinje/tabulatur par, som er sammenkædet.
                                                                            3. Klik på den nyoprettede linje i den højre kolonne, og skift "Nodelinjetype" til det ønskede tabulatur/nodelinje.
                                                                            4. Byt eventuelt om på rækkefølgen af nodelinjerne ved at bruge ↑.

                                                                            Note: Se mere under Kombiner nodelinje og tabulatur.

                                                                            Indtast noder i tabulatur

                                                                            Med computer tastatur

                                                                            • Vær sikker på ikke at være i notationstilstand. Marker en takt eller en eksisterende node, hvor indtatningen skal starte.
                                                                            • Skift til notationstilstand (N): en markør - ' en kort blå firkant' - vil blive vist om en af strengene: dette er den aktuelle streng.
                                                                            • Vælg varigheden for den node eller pause, der skal indsættes (se herunder).
                                                                            • Tryk pil op/ned for at flytte markøren til den ønskede streng. Brug højre/venstre pilene til at flytte gennem nodearket.
                                                                            • Tryk 0 til 9 for at indsætte et gribemærke (fret mark) fra 0 til 9 på den aktuelle streng; for at indsætte tal med flere cifre tryk hvert ciffer i rækkefølge.
                                                                              Tasterne A til K (udelad I) kan også benyttes.Dette kan især være hensigtsmæssigt når der arbejdes i Fransk tabulatur. Til L , M, N, må man dog bruge det alphanumeriske tastatur, og taste henholdsvis 10, 11, 12...

                                                                              Note: Man kan ikke indtaste tal større end det "Antal bånd" der er angivet i Redigér Strenge billedet.

                                                                            • Tryk ; (semikolon) for indsætte en pause med den valgte varighed.

                                                                            • Man kan indsætte noder i forskellige stemmer hvis der er brug for det—fuldstændig som i en almindelig nodelinje.

                                                                            Se også, Redigér noder (herunder).

                                                                            Historiske tabulaturer

                                                                            Fra version 2.1, understøttes historiske notationer for bas strenge (lut og lign.):

                                                                            • Fransk tabulatur: anvender bogstaver med foranstillede skråstreger, umiddelbart under det faste tab: f.eks. 7. streng: "a", 8. streng: "/a", 9. streng: "//a" og så videre, alle på den første plads under tabulaturet.

                                                                            • Italiensk tabulatur: anvender tal med 'ledestreger'- som små dele af en streng - placeret over det faste tab: f.eks. 7. streng: "0" en position over tabulaturet, med en 'ledestreg'; 8. streng: "0" to positioner over the tabulaturet, med to 'ledestreger' og så videre.

                                                                            Indtastning kan kun foretages via tastaturet: ved at flytte markøren under (Fransk) eller over (Italiensk) tabulaturet, vil der blive vist skråstreger eller ledestreger, som angiver hvilken streng gribemærket vil blive indsat på.
                                                                            Når båndet angives, ved at trykke på den tilhørende tast, vil noden blive indsat på den viste streng.

                                                                            Med mus

                                                                            Indsætning med brug af mus:

                                                                            • Gå til notationstilstand, og vælg varigheden af node eller pause (se herunder).
                                                                            • Klik på den streng, noden skal indsættes på. Noder oprettes fra starten på bånd 0 (eller a ved Fransk tabulatur): dette ændres ved at indtaste den rigtige værdi på tastaturet.
                                                                            • Gribemærket kan ændres opad/nedad ved at bruge Alt+Shift+↑ eller Alt+Shift+↓.
                                                                            • Man kan indsætte noder i forskellige stemmer hvis der er brug for det—fuldstændig som i en almindelig nodelinje.

                                                                            Se også, Rediger noder (herunder).

                                                                            Vælg nodens varighed

                                                                            I notationstilstand kan nodens varighed vælges på en af de følgende måder:

                                                                            • Tryk Skift+1 til Shift+9: Sætter varigheden fra en 128ende del til Longa (muligheden for at bruge disse genveje afhænger af platform og tastatur layout);
                                                                            • Tryk NumPad 1 til NumPad 9: Sætter varigheden fra en 128ende del til Longa, (hvis NumLock er sat);
                                                                            • Klik på ikonet for den ønskede varighed i værktøjslinjen Node indtastning over hovedvinduet.
                                                                            • Tryk Q for at forkorte varigheden og W for at forlænge den.

                                                                            Rediger noder

                                                                            Notationstilstand

                                                                            Redigering af et eksiterende gribemærke i notationstilstand:

                                                                            • Placer markøren over gribemærket, og genindtast nummeret på båndet.
                                                                            • Flyt gribemærket op eller ned ved brug af Alt+Skift+↑ eller Alt+Skift+↓.

                                                                            Ikke i notationstilstand

                                                                            Ændring af et eksisterende gribemærke udenfor notationstilstand:

                                                                            1. Marker et eller flere gribemærker.
                                                                            2. Brug en af de følgende måder:
                                                                              • Flyt op eller ned uden at skifte streng: Tryk ↑ / ↓.
                                                                              • Flyt op eller ned, og skift samtidig streng, for at få det laveste bånd, når det er muligt: Tryk Alt+Skift+↑ / ↓
                                                                              • Flyt til en nabostreng (hvis den er fri, og kan producere noden): Tryk Ctrl+↑ / ↓ .

                                                                            Note: Man kan ikke indtaste tal større end det "Antal bånd" der er angivet i Redigér Strenge billedet.

                                                                            Krydsede nodehoveder

                                                                            Skift gribemærket til et krydset nodehoved:

                                                                            1. Marker et ełler flere gribemærker (ikke i notationstilstand).
                                                                            2. Tryk Skift+X for at slå skygge nodehoveder til/fra.

                                                                            Resume af tastatur genveje

                                                                            Notationstilstand

                                                                            Tast: og få:
                                                                            ↑ Flyt markøren til strengen ovenover
                                                                            ↓ Flyt markøren til strengen nedenunder.
                                                                            Skift+1 indtil Skift+9 Vælg nodens varighed (128ende del til longa)
                                                                            NumPad 1 til NumPad 9 Vælg nodens varighed (128ende del til longa)
                                                                            Q Formindsk nuværende nodes varighed.
                                                                            W Forøg nuværende nodes varighed.
                                                                            0 til 9 Indsæt nummer/bogstav for et bånd.
                                                                            A til K Indsæt nummer/bogstav for et bånd. (I udeladt).
                                                                            Alt+Skift+↑ Flyt gribemærket opad.
                                                                            Alt+Skuft+↓ Flyt gribemærket nedad.
                                                                            ; (semikolon) Indsæt en pause

                                                                            Redigeringstilstand

                                                                            Tast: og få:
                                                                            0 til 9 Skift den markerede nodes/pauses varighed (128ende dels node til longa)
                                                                            Alt+Shkft+↑ Forøg den markerede nodes tonehøjde (MuseScore vælger strengen).
                                                                            ↑ Forøg tonehøjden uden at skifte streng.
                                                                            Alt+Skift+↓ Sænk den markerede nodes tonehøjde (MuseScore vælger strengen).
                                                                            ↓ Sænk tonehøjden uden at skifte streng.
                                                                            Ctrl+↑ Skift til strengen ovenover uden at ændre tonehøjde.
                                                                            Ctrl+↓ Skift til strengen nedenunder uden at ændre tonehøjde.
                                                                            Skift+X Slå skygge nodehoveder til/fra.

                                                                            Tilretning af tabulatur

                                                                            Et tabulatur kan tilpasses på flere måder, for at passe til behovet.
                                                                            Ændringerne foretages fra billedet Redigér nodelinje/stemme egenskaber. Billedet åbnes ved at højreklikke på tabulaturet og vælge Nodelinjeegenskaber ….

                                                                            Rediger nodelinje/stemme egenskaber

                                                                            Ændring af udseende

                                                                            Selve tabulaturets udseende og måden gribemærkerne vises på, kan tilrettes ved at vælge knappen Udvidede layoutegenskaber. (Se mere her).

                                                                            Rediger strenge

                                                                            I billedet Redigér nodelinje/stemme egenskaber vælges knappen Redigér strenge… i bunden af billedet, som åbner billedet Strenge
                                                                            Redigér strenge

                                                                            Skift stemning
                                                                            1. Dobbeltklik på tonehøjden for en streng, eller klik og vælg knappen Redigér streng….
                                                                            2. Dobbeltklik på en ny tonehøjde i billedet Nodevalg eller klik og tryk OK.
                                                                            3. Klik OK for at lukke billedet "Strenge".

                                                                            Noter: (1) Hvis stemningen ændres i et tabulatur, som allerede indeholder noder, vil gribemærkerne blive rettet automatisk (hvis muligt); (2) Rettelser vil kun gælde for det aktuelle nodeark, og vil ikke påvirke nogen af standard indstillingerne.

                                                                            Tilføj en streng
                                                                            1. Klik på tonehøjden for en streng og tryk Ny streng.
                                                                            2. Dobbeltklik på en tonehøjde i billedet Nodevalg eller vælg tonehøjden og tryk OK. Den nye streng vil blive indsat under den markerede streng.

                                                                            Note: Tilføjelse af en streng vil ikke ændre antallet af linier i tabulaturet. Dette må rettes i billedet Nodelinjeegenskaber.

                                                                            Slet en streng
                                                                            1. Klik på tonehøjden for en streng og tryk Slet streng.

                                                                            Note Efter sletning af en streng må antallet af linjer i tabulaturet rettes i billedet Nodelinjeegenskaber.

                                                                            Marker en streng "åben"

                                                                            Denne facilitet kan bruges til at angive strenge uden bånd - som på en Lut:

                                                                            1. Sæt flueben i kolonnen "Åbn" for de strenge, der ikke skal benytte bånd.
                                                                            Skift antal bånd på instrumentet

                                                                            Denne indstilling angiver det største bånd-nummer, som kan indsættes på tabulaturet.

                                                                            1. Indtast antallet af bånd, eller vælg det i rullefeltet "Antal bånd".

                                                                            Kombiner nodelinje og tabulatur

                                                                            Strengeinstrumenter med faste bånd—som guitar—noteres ofte ved brug af nodelinje og tabulatur (TAB) samtidig.
                                                                            Kombinerede nodelinjer oprettes som beskrevet herover, og kan oprettes enten som sammenkædede eller ikke sammenkædede.

                                                                            1. Ikke sammenkædede nodelinjer: Notation i en nodelinje kan indsættes, slettes eller redigeres, uden at påvirke den anden linje. Den noterede musik kan flyttes fra en linje til den anden, ved at markere det ønskede område, og kopiere og indsætte det i den anden linje.

                                                                            2. Sammenkædede nodelinjer: Alle ændringer, som laves i en af nodelinjerne, overføres automatisk til den anden ("gensidig oversættelse").

                                                                            Note: Indimellem kan det forekomme at der er tal vist med rødt i et tabulatur. Dette skyldes at et gribemærke ikke kan vises fordi det konflikter med et eksisterende. Dette kan løses ved flytte og justere de eksisterende gribemærker (se Redigering af noder).
                                                                            Et overlap af gribemærker på den nederste linje kræver dog ikke justering—dette er "by design" og det røde mærke vil ikke optræde i udskrifter.

                                                                            External links

                                                                            • Video tutorial: MuseScore in Minutes: Lesson 7 - Tablature and Drum Notation

                                                                            Trommenotation

                                                                              Notering af slagtøj er en del anderledes end Indtastning for et stemt instrument (som klaver eller violin). Alligevel anbefales det at læse kapitlet om Nodeindtastning for stemte instrumenter først.

                                                                              Nodelinier til slagtøj

                                                                              Når man tilføjer slagtøj til nodearket med Ny node hjælper eller med Instrument dialogen, bliver der automatisk indsat en nodelinie af den rigtige slags (1-liniet, 3-liniet eller 5-linet). Hvis det behøves, kan man ændre det med "Nodelinietype" kolonnen på Vælg instrumenter siden. Er der behov for yderligere ændringer (f.eks.en 2-linet nodelinie o.l.) kan de laves fra nodearket, ved at højreklikke på nodelinien og vælge Nodelinieegenskaber… → Avancerede egenskaber for Layoutstil.

                                                                              På en 5-linet slagtøjsnodelinie får hver instrument tildelt en bestemt plads på nodelinien (linie eller mellemrum) og en type nodehoved. Når man skriver for et trommesæt, er det almindeligt at bruge to stemmer:
                                                                              stemme 1 (den øverste stemme) indeholder normalt (med halsen opad) noder, som spllles med hænderne, mens
                                                                              stemme 2 (den nederste stemme) normalt indeholder noder (med halsen nedad), som spilles med fødderne (se billedet herunder).

                                                                              Slagtøjslinier, eksempel på  brug af stemmer

                                                                              Indtastningsmetoder

                                                                              Man kan indsætte noder på en slagtøjslinie på alle de følgende måder:

                                                                              • Eksternt MIDI tastatur;
                                                                              • Klaviatur (virtuelt);
                                                                              • Computer tastatur;
                                                                              • Mus.

                                                                              De forskellige måder kan bruges i en vilkårlig kombination:

                                                                              MIDI tastatur

                                                                              Indtast noder til en slagtøjslinie med et MIDI tastatur:

                                                                              1. Kontroller at MIDI tastaturet er tilsluttet og fungerer korrekt.

                                                                                Note: Hvis man klikker på slagtøjslinien uden at være i notationstilstand, kan man afprøve slagtøjsinstrumenterne med MIDI tastaturet.

                                                                              2. Klik på den node eller pause, hvor indtatningen skal starte.
                                                                              3. Skift til Nodeindtastning.
                                                                              4. Vælg den ønskede stemme. For eksempel bliver lilletromme, kantslag og alle bækkener normalt indsat i stemme 1; stortromme i stemme 2.
                                                                              5. Sæt nodens varighed.
                                                                              6. Tast på en tangent for at indsætte en node i nodearket. Hold tangenten nede, og tryk på en ny tangent, for at indsætte en node mere på samme position

                                                                              Note: Brug en GM2 tromme tabel for at se hvilken tangent på MIDI tastaturet, der svarer til hvilket slagtøjsinstrument. Nogen tastaturer (bl.a. Casio) viser slagtøjssymboler ved siden af tangenterne, som hjælp til brugeren.

                                                                              Virtuelt klaviatur

                                                                              Indtast noder til en slagtøjslinie med det virtuelle klaviatur:

                                                                              1. Kontroller at det virtuelle klaviatur vises. Tryk P (eller marker det i Vis → Klaviatur).

                                                                                Note: Hvis man klikker på slagtøjslinien uden at være i notationstilstand, kan man afprøve slagtøjsinstrumenterne med klaviaturet.

                                                                              2. Klik på den node eller pause, hvor indtatningen skal starte.
                                                                              3. Skift til Nodeindtastning.
                                                                              4. Vælg den ønskede stemme. For eksempel bliver lilletromme, kantslag og alle bækkener normalt indsat i stemme 1; stortromme i stemme 2.
                                                                              5. Sæt nodens varighed.
                                                                              6. Tast på en tangent (på det virtuelle klaviatur) for at indsætte en node i nodearket.
                                                                              7. For at tilføje en node til en eksisterende, trykkes Skift ned, og holdes nede, mens der trykkes på en ny tangent (indtil version 2.1, bruges Ctrl (Mac: Cmd)).

                                                                              Note: Brug en GM2 tromme tabel for at se hvilken tangent på klaviaturet, der svarer til hvilket slagtøjsinstrument.

                                                                              Som standard er klaviatur paletten fastgjort i bunden af skærmen - til venstre for Trommeværktøjet. Man kan frigøre den ved at trække den og fastgøre den igen på flere måder:

                                                                              • Trækkes panelet nedad mod midten, vil det blive placeret oven på Trommeværktøjet, i fuld bredde. Man skifter mellem panelerne med faneblade, som vises under det aktive panel.
                                                                              • Trækkes panelet nedad mod højre eller venstre, vil det blive placeret ved siden af Trommeværktøjet.

                                                                              Computer tastatur

                                                                              Indtast noder til en slagtøjslinie med computer tastaturet:

                                                                              1. Klik på den node eller pause, hvor indtatningen skal starte.
                                                                              2. Skift til Nodeindtastning. Slagtøjs paletten vil nu blive vist i bunden af skærmen. (se herunder).
                                                                              3. Sæt nodens varighed.
                                                                              4. Tryk på genvejstasten (A–G) for det instrument, der skal indsættes
                                                                                — i henhold til Trommeværktøjet.
                                                                              5. Hvis man vil tilføje endnu en node til en eksisterende, trykkes Skift + [A-G].

                                                                              Note: Tildelingen af stemmer vises med farver på slagtøjs paletten: blå for stemme 1, grøn for stemme 2.

                                                                              Mus

                                                                              Indtast noder til en slagtøjslinie med musen:

                                                                              Indsæt noder i en slagtøjslinie:

                                                                              Brug følgende metode til at tilføje en ny node eller for at erstatte en eksisterende akkord.

                                                                              1. Vælg den node eller pause hvor indtatningen skal starte. Man kan også markere en takt.
                                                                              2. Tryk N for at skifte til notationstilstand. Trommeværktøjet vil nu blive vist i bunden af skærmen. (se herunder)
                                                                              3. Sæt nodens varighed.
                                                                              4. Vælg en af disse måder:
                                                                                • Dobbeltklik på en node i Trommeværktøjet.
                                                                                • Marker en node (f.eks. Stortromme eller lilletromme) i Trommeværktøjet, klik herefter på en node eller pause i nodearket.

                                                                              Tilføj en node til en eksisterende akkord i en slagtøjslinie:

                                                                              1. Kontroller at der ikke er valgt note input mode.
                                                                              2. Vælg en varighed svarende til den node, der skal tilføjes til.
                                                                              3. Klik på den nye node i Trommeværktøjet.
                                                                              4. Klik over eller under den eksisterende node i slagtøjslinien.

                                                                              Note: Tildelingen af stemmer vises med farver på slagtøjs paletten: blå for stemme 1, grøn for stemme 2.

                                                                              Trommeværktøjet

                                                                              Når man er i notationstilstand og vælger en slagtøjslinie, åbnes et vindue i bunden af skærmen, som kaldes Trommeværktøjet. Vinduet er helt essentielt for indtatning med musen. Desuden viser det genvejstasterne for computer tastaturet. Det har ingen funktion når man bruger et MIDI tastatur eller det virtueller klaviatur.

                                                                              Hver node repræsenterer et slagtøjs instrument: Holdes markøren over noden, vil instrumentnavne blive vist.

                                                                              Trommeværktøjet

                                                                              Bogstaverne A–G (som vises over visse af noderne i værktøjet) er defineret som genveje til indtastning af bestemte instrumenter (stortromme, lilletromme, lukket hi-hat osv.), i stedet for at henvise til tonehøjder. De kan, efter behov tildeles til andre instrumenter, i Rediger trommesæt vinduet.

                                                                              Når Trommeværktøjet er åbent, kan man dobbeltklikke på en node, eller taste bogstavet for en af genvejene, og få indsat noden for instrumentet i slagtøjslinien. Tildelingen af stemmer vises med farver på slagtøjs paletten: blå for stemme 1, grøn for stemme 2. Dette kan ændres i Rediger trommesæt billedet, hvis man ønsker det.

                                                                              Tildelingen af stemmer gælder kun for indtastning med tastatur og mus: ved indtastning via et MIDI tastatur, eller det virtuelle klaviatur kan alle stemmer benyttes.

                                                                              Rediger trommesæt

                                                                              Ved at klikke på Rediger trommesæt til venstre for Trommeværktøjet, åbnes vinduet Rediger trommesæt. Man kan også højreklikke på en slagtøjslinie, og vælge "Rediger trommesæt."

                                                                              Rediger trommesæt vinduet

                                                                              Rediger trommesæt vinduet viser de slagtøjsinstrumenter, som er til rådighed, og de tilhørende MIDI noder og deres numre. I vinduet vises også hvordan det enkelte instrument bliver vist på slagtøjslinien — navn, position, nodehoved type og nodehalsens retning.
                                                                              Note: Alle ændringer, som foretages her, gemmes automatisk i MuseScores basis fil.

                                                                              Ved at klikke på en række i den venstre kolonne, får man adgang til at redigere egenskaberne for en node:

                                                                              Navn: Navnet som ønskes vist i Trommeværktøjet, når musen holdes over noden.
                                                                              Nodehoved: Vælg udseendet for nodehovedet fra drop-down listen (hvis det sættes til "Invalid," vil instrumentet ikke blive vist i Trommeværktøjet).
                                                                              Nodelinie placering: Nummeret angiver hvilken linie/mellemrum, i nodelinien, noden vil blive vist på. "0" betyder den øverste linie i en 5-liniet nodelinie. Negative tal flytter noden opad trin for trin, mens positive tal flytter den nedad på samme måde.
                                                                              Nodehalsens retning: Auto, Op eller Ned.
                                                                              Standard stemme: Tildeler noden til en af de fire stemmer. Dette vil ikke berøre indtatning fra MIDI tastatur eller virtuelt klaviatur.
                                                                              Genvej: Tildel en tastatur genvej til indtatning af denne node.

                                                                              Det tilrettede trommesæt kan gemmes, som en .drm fil, ved at trykke Gem. Man kan også importere et tilrettet trommesæt, ved at bruge knappen Indlæs.

                                                                              Note: I MuseScore 2.1, vil nogle af tonehøjderne for Tenor Trommer instrumentet ikke blive afspillet korrekt.
                                                                              En DRM fil, som løser problemet kan downloades her.

                                                                              Hvirvel

                                                                              For at lave en trommehvirvel bruges Tremolo.

                                                                              External links

                                                                              • How to create jazz drum notation [MuseScore How-To]
                                                                              • Video tutorial: MuseScore in Minutes: Lesson 7 - Tablature and Drum Notation
                                                                              • Drum Parts [video]
                                                                              • Editing the Drum Palette in MuseScore 1.1 [video]
                                                                              • Saving Drumset Changes in MuseScore 1.1 [video]
                                                                              • Guide to Drum and Percussion Notation

                                                                              Lyd og afspilning

                                                                              MuseScore har indbyggede faciliteter til "Lyd og afspilning". Dette kapitel dækker mulighedene for import, kontrollerne til afspilning, og måder til at udvide instrumenternes lyd, ud over den indbyggede klaver lyd.

                                                                              Afspilning

                                                                                De almindelige afspilningsfunktioner er samlet i et værktøjslinjen Afspilning, som er placeret over dokument vinduet::

                                                                                Afspilning

                                                                                Fra venstre til højre er funktionerne:

                                                                                • Spol tilbage til start: Afspilning vil vende tilbage til starten af nodearket, eller til starten af en sløjfe ( hvis der er en).
                                                                                • Start eller stop afspilning: Se Start/stop afspilning.
                                                                                • Sæt løkke til/fra: Se Afspilning af løkke.
                                                                                • Afspil gentagelser: Slås fra hvis afspilning skal ignorere gentagelsestegn.
                                                                                • Panorer under afspilning: Slås fra hvis nodearket ikke skal flytte sig under afspilning.
                                                                                • Afspil metronome: Se Afspilning metronom .

                                                                                Afspilninsfunktioner

                                                                                Start/stop afspilning

                                                                                For at starte afspilning:

                                                                                1. Klik på en node, en pause, eller i en tom del af en takt for et etablere et startpunkt.
                                                                                  Note: Hvis der ikke markeres noget, vil afspilning starte hvor det stoppede sidst - eller fra starten af nodearket.
                                                                                2. Tryk på knappen Afspil Play Icon eller tryk påMellemrum.

                                                                                Under afspilning kan man springe til en vilkårlig node, ved at klikke på den.

                                                                                For at stoppe afspilning:

                                                                                • Tryk på knappen Afspil; eller tryk på Mellemrum.

                                                                                Under afspilning

                                                                                Når afspilning er startet har man de følgende funktioner til rådighed:

                                                                                • Flyt tilbage til forrige akkord: ←
                                                                                • Flyt frem til næste akkord: →
                                                                                • Flyt tilbage til starten af forrige takt: Ctrl+← (Mac: Cmd+←)
                                                                                • Flyt frem til starten af næste takt: Ctrl+→ (Mac: Cmd+→)
                                                                                • Spol tilbage til starten af nodearket: Home (Mac: ⌘+Home); eller tryk på knappen Spol tilbage (værktøjslinjen afspilning).

                                                                                Under afspilning kan man stadig bruge tastatur genveje til at åbne og lukke paneler, som f.eks Afspil, Synthesizer, Mixer osv.

                                                                                Afspilningspanel

                                                                                Afspilningspanelet kan åbnes på en af disse måder:

                                                                                • Tryk F11 (Mac: Fn+F11).
                                                                                • Vælg Vis → Afspilningspanel fra menuen.

                                                                                Afspilningspanel

                                                                                Afspilningsanelet giver midlertidig kontrol over afspilningen, herunder hastigheden (benævnt 'tempo'), afspilningsanelet (med specifikke start- og slutpositioner), og det generelle lydniveau.

                                                                                Note: Ændring af parametrene i Afspilningsanelet bliver ikke gemt i nodearket: De bestemmer kun afspilningen for den igangværende session. Permanente ændringer af tempoet bør laves v.hj.a en tempo tekst. For ændring af standard lydniveauet for afspilning, se Synthesizer.

                                                                                Forslag

                                                                                Forslag, som spilles hver gang en afspilning startes, kan slås til og fra. Forslaget spiller taktslagene for en hel takt (for den taktart, der gælder på det sted , hvor afspilningen starter); hvis afspilning starter midt i en takt eller i en 'kort' takt (optakt), vil der blive spillet taktslag nok til at udfylde takten. Dirigent ikonet i afspilningsanelet slår
                                                                                forslag til og fra.

                                                                                Metronom afspilning

                                                                                Ved at bruge metronom ikonet i Afspilningspanelet, kan man slå lyden af en ledsagende metronom til og fra, under afspilningen.

                                                                                Afspilning af løkke

                                                                                En udvalgt passage kan afspilles i en løkke, enten ved at bruge værktøjslinjen Afspilning (se billedet herover) eller v.hj.a Afspilningspanelet.

                                                                                Brug af værktøjslinjen:

                                                                                • Afspilning skal være slået fra, og "Spil løkke knappen" til.
                                                                                • Marker det afsnit af nodearket der skal afspilles i løkke.
                                                                                • Tryk på afspilningsknappen.

                                                                                Afspilning vil nu ske i løkke gennem afsnittet markeret med de blå flag.

                                                                                • Brug knappen "Spil løkke" til at slå løkken til og fra.

                                                                                Brug af Afspilningspanelet:

                                                                                • Marker den node afspilningen skal starte fra, og klik på knappen "Start løkke". Knappen "Afspil løkke" vil nu blive aktiv.
                                                                                • Marker den node afsnittet skal slutte ved, og klik på knappen "Afslut løkke".
                                                                                • Tryk på Afspil.

                                                                                Afspilning vil nu ske i løkke gennem afsnittet markeret med de blå flag.

                                                                                • Knappen "Afspil løkke" kan bruges til at slå løkken til og fra.

                                                                                Mixer

                                                                                  Mixeren giver mulighed for at ændre lyden for et instrument, og for at indstille lydstyrke og panorering for den enkelte nodelinje.

                                                                                  For at vise/skjule mixeren kan man benytte en af følgende:

                                                                                  • Tryk F10 (Mac: fn+F10).
                                                                                  • Fra hovedmenuen, vælg Vis→Mixer.

                                                                                  The mixer shows dials for each part

                                                                                  Note: Særskilt indstilling af rumklang og kor effekter for hver kanal er endnu ikke implementeret; brug synthesizer effekt enheden i stedet.

                                                                                  Navnet på den enkelte mixer kanal er det samme som Stemmenavn i dialogen Nodelinje egenskaber.

                                                                                  Stum og Solo

                                                                                  • For at afbryde afpilningen af en nodelinje, markeres checkboxen "Stum". Kan gentag for flere nodelinjer efter behov.
                                                                                  • For kun at afspille en enkelt nodelinje markeres checkboxen "Solo" for denne.

                                                                                  Indstillinger

                                                                                  Klik og træk opad for at dreje en knap med uret , klik og træk nedad for at dreje en knap mod uret. Man kan også holde markøren over knappen og brug musens hjul. Ved at dobbeltklikke på en knap vil den blive sat tilbage til standard positionen.

                                                                                  Lyd

                                                                                  Menuen "Lyd" viser en menu med en oversigt over alle instrumenter, som er indeholdt i den aktuelle SoundFont. Hvis man har flere SoundFont indlæst i Synthesizeren, vil tilføjelserne fra alle SoundFont (og/eller SFZ filer) blive vist i en enkelt lang liste - i den rækkefølge der tidligere er indstillet i Synthesizer.

                                                                                  Tip: For at finde et instrument, klik på listen "Lyd", og indtast det første bogstav i instrumentets navn. Gentag efter behov.

                                                                                  Ændring af lyd for en nodelinje (pizz., con sordino, etc.)

                                                                                  Nogle instrumenter har flere kanaler i Mixereb, som kan bruges til at ændre lyden midt i et nodeark. For eksempel er en nodelinje til et strengeinstrument (violin, viola, cello etc.) tildelt tre kanaler: en til "arco" (eller "normal"), en anden til "pizzicato", og en tredje til "tremolo." En trompet linje vil have en kanal til "normal" og en anden forbeholdt "mute", o.s.v.

                                                                                  Instruktionerne bruger strengeinstrument med pizzicato som eksempel, men de samme principper kan bruges til alle andre instrumenter, der tillader ændringer i lyden.

                                                                                  1. Marker den første node i den sektion, som ønskes pizzicato;
                                                                                  2. I hovedmenuen vælges Tilfæj→Tekst→Nodelinjetekst;
                                                                                  3. Tast "pizz." Denne tekst benyttes kun som visuel markering, og påvirker ikke afspilning direkte;
                                                                                  4. Højreklik på den indsatte nodelinjetekst og vælg Nodelinjetekst egenskaber...;
                                                                                  5. På fanebladet "Skift kanal" vælges en eller flere stemmer i venstre side;
                                                                                  6. I dropdown menuen vælges pizzicato;

                                                                                    Nodelinjetekst egenskaber

                                                                                  7. Klik på OK for at vende tilbage til nodearket.

                                                                                  Alle noder efter den indsatte nodelinjetekst vil blive spillet pizzicato. For at vende tilbage til den normale instrument lyd senere, følges samme fremgangsmåde som ovenfor. Blot tastes i trin 3 "arco", og der vælges normal i trin 6.

                                                                                  Se også

                                                                                  • Lyd fonte
                                                                                  • Synthesizer
                                                                                  • Skift instrument

                                                                                  External links

                                                                                  • How to change instrument sound (e.g. pizz., con sordino) midway through score

                                                                                  Skift instrument på nodelinjen

                                                                                    Når en musiker skal dubblere på et andet instrument, i en del af værket, vil instruksen om at skifte instrument normalt blive placeret over nodelinjen i starten af et afsnit. Tilbagevenden til det primære instrument håndteres på samme måde.

                                                                                    MuseScore giver mulighed for at indsætte en særlig type tekst, kaldt Skift Instrument, til dette formål. Denne type tekst er forskellig fra både Nodelinje og System tekster, da den kobler teksten sammen med afspilningen, og ændrer lyden til det nye instrument.

                                                                                    Instrument skifte i version 2.1

                                                                                    Version 2.1 har en stærkt forbedret funktion til skift af instrumenter, i forhold til tidligere versioner. Der er dog stadig begrænsninger, som bør man bør overveje, inden man bruger funktionen.

                                                                                    1. Instrument skift kan kun foretages for samme type nodelinje. Man kan f.eks. ikke skifte mellem slagtøj og strengeinstrumenter, eller omvendt.

                                                                                    2. Instrument navnet vil ikke blive ændret i mixeren. Det vil stadig blive vist med det oprindelige navn for nodelinjen.

                                                                                    3. Tonearten ændres ikke automatisk. Man må selv skifte toneart, hvis det er nødvendigt.

                                                                                    4. Man kan nu indsætte de noder, som musikeren skal spille, når instrumentet er skiftet, og den rigtige toneart er sat ind.

                                                                                    5. Med mindre man vil ændre nodelinjetypen, bør man altid bruge Skift Instrument tekst.

                                                                                    Instrument skifte i version 2.0

                                                                                    Der er adskillige begrænsninger for dette i version 2.0, som man må forstå før man forsøger at bruge det.

                                                                                    1. Automatisk transponering fra C-partitur til den korrekte toneart for de transponerende blæserinstrumenter er ikke understøttet. Ved ændring til instrumenter noteret i en anden toneart (C fløjte til E♭ fløjte; Obo til Engelskhorn osv.), er det bedst at bruge almindelig Nodelinjetekst til at angive ændringen, og foretage transponeringen efter musikken er indsat. (brug Noder→Transponering fra hovedmenuen). For at undgå disharmonier ved afspilning, må det instrument, som er tilknyttet nodelinjen, gøres tavst i Mixeren (F10).

                                                                                    2. Hvis instrumentets lyd skal kunne høres under afspilning, skal Skift Instrument tekst funktionen bruges. Efter et instrument skifte, hvor de to instrumenter på nodelinjen ikke er noteret i samme toneart, bør man aldrig forsøge at indsætte noder direkte fra tastaturet. I stedet må noderne (a) kopieres ind, eller (b) indsættes før instrument skiftet udføres. Ny indtastning i takterne efter instrument skiftet er berørt af to kendte programfejl, som ikke kan rettes i de nuværende 2.0.x versioner, uden at påvirke bagud kompatibilitet. (Dette er løst i version 2.1). Desuden skal nodearket forblive som C-partitur, da en transponering ellers vil resultere i disharmonier. Som en hjælp, kan en kopi af stemmen gemmes i en seperat fil, hvorefter de relevante sektioner kan transponeres til den ønskede toneart inden udskrivning.

                                                                                    3. Når der skiftes fra et C-instrument til et andet, eller fra et ransponerende til
                                                                                      et andet i samme stemning (Bb trompet til Bb kornet ell. flygelhorn osv.) kan Skift Instrument Tekst benyttes for at sikre at lyden ved afspilning ændres til det nye instrument. Indtastning kan ske som normalt, og er ikke berørt af de programfejl, der er nævnt ovenfor.

                                                                                    Kompatibilitet

                                                                                    Der visse problemer med kompatibilitet mellem de to versioner.

                                                                                    1. Instrument skift oprettet med version 2.0 og åbnet i version 2.1 vil fortsat enten vise ełler afspille noderne forkert som i version 2.0. Sletning og genindsættelse af instrument skiftet vil rette de fleste fejl, med kun behov for få mindre rettelser.

                                                                                    2. Instrument skift oprettet med version 2.1 og åbnet i 2.0 vil generelt blive afspiller korrekt, men vil vise noderne forkert.

                                                                                    Tilføj et instrument skift

                                                                                    1. Vælg start punktet ved at markere en node eller en pause.
                                                                                    2. Åben hovedpaletten ved at taste F9 (eller brug Vis menuen), og vælg Tekst for at åbne tekst-palette.
                                                                                      Text palette
                                                                                    3. Dobbeltklik på Instrument
                                                                                    4. Ordet "Instrument" vil nu blive indsat over den valgte node eller pause.
                                                                                    5. Dobbeltklik på "Instrument", og tast Ctrl+A for at markere hele ordet.
                                                                                    6. Indtast den tekst, som skal vises i nodearket, og klik udenfor feltet for at afslutte redigering.
                                                                                    7. Højreklik på teksten og vælg "Skift Instrument…"

                                                                                      Menu: Instrument change

                                                                                    8. Vælg det ønskede instrument, og klik OK.

                                                                                      Select instrument change

                                                                                    Se også

                                                                                    • Skift instrument
                                                                                    • Skift lyd for nodelinjen

                                                                                    External links

                                                                                    • How to change instrument sound (e.g. pizz., con sordino) midway through score

                                                                                    SoundFonts og SFZ filer

                                                                                      Afspilning udføres med MuseScore's indbyggede synthesizer, som indeholder et stort udvalg af virtuelle (eller software) instrumenter—herunder slagtøj og lydeffekter.

                                                                                      MuseScore understøtter virtuelle instrumenter i to formater:

                                                                                      • SoundFont (.sf2/.sf3): En enkelt fil med et eller flere virtuelle instrumenter.
                                                                                      • SFZ (.sfz): Et sæt af audio filer og definitions filer, med et eller flere virtuelle instrumenter.

                                                                                      SoundFonts

                                                                                      En SoundFont (.sf2/.sf3) er en enkelt fil med et eller flere virtuelle instrumenter. Fra version 2.2, leveres MuseScore installeret med en SoundFont kaldt MuseScore_General.sf3. Dette er et GM (General MIDI) sæt, som indeholder mere end 128 instrumenter, lydeffekter, og forskellige tromme- og slagtøjskits.

                                                                                      Note: Ældre versioner af MuseScore leveres installeret med andre Soundfont: MuseScore 2.0–2.1 med FluidR3Mono_GM.sf3; MuseScore 1 med TimGM6mb.sf2.

                                                                                      GM (General MIDI) er et universelt format, så når et nodeark en gang er sat op til korrekt afspilning med MuseScore's indbyggede SoundFont, bør det være muligt, at exportere det i et vilkårligt lydformat og få det afspillet på en anden brugers computer.

                                                                                      SoundFonts kan findes mange steder på Internettet: nogle gratis andre kommercielle. Herunder er en liste af gratis SoundFonts.

                                                                                      Installer en SoundFont

                                                                                      Når man har fundet og udpakket en SoundFont (se herunder), dobbelt klikkes for at åbne den. I de fleste tilfælde vil SoundFont filtypen allerede være associeret med MuseScore, så MuseScore vil starte, og åbne en dialog, som spørger om man vil installere en SoundFont.
                                                                                      Indimellen vil SoundFont filtypen være associeret med en anden applikation. Hvis det sker må man højreklikke på filen, så man får en menu, hvor man kan vælge at åbne filen med MuseScore.
                                                                                      Når dialogen kommer op, og spørger, om SoundFont skal installeres, vælger man "Ja", for at få en kopi oprettet i MuseScore's SoundFont folder. Folderens placering kan ses og ændres i MuseScore's Indstillinger, men den normale placering er:

                                                                                      • Windows: %HOMEPATH%\Documenter\MuseScore2\Soundfonts

                                                                                      • macOS og Linux: ~/Documents/MuseScore2/Soundfonts

                                                                                      I modsætning til de SoundFonts brugeren har tilføjet, er den indbyggede standard SoundFont placeret i en system folder, som er beregnet til dette formål, og som ikke bør ændres. Folderen og standard SoundFont filen er:

                                                                                      • Windows (32-bit): %ProgramFiles%\MuseScore 2\sound\MuseScore_General.sf3
                                                                                      • Windows (64-bit): %ProgramFiles(x86)%\MuseScore 2\sound\MuseScore_General.sf3

                                                                                      • macOS: /Applications/MuseScore 2.app/Contents/Resources/sound/MuseScore_General.sf3

                                                                                      • Linux (Ubuntu): /usr/share/mscore-xxx/sounds/MuseScore_General.sf3 (hvor xxx er MuseScore versionen)

                                                                                      Afinstaller

                                                                                      En SoundFont afinstalleres ved at åbne folderen, hvor den er installeret, og slette filen

                                                                                      SFZ

                                                                                      En SFZ består af en samling filer og mapper, en SFZ fil og en række lydfiler i WAV eller FLAC format, hvor SFZ filen grundlæggende er en tekst fil, som beskriver hvilke lydfiler, der er placeret hvor, og hvilket instrument og toneomfang, de skal bruges til.

                                                                                      Note: For fuld understøttelse af SFZ, kræves MuseScore 2.1 eller senere, tidligere versioner har kun begrænset understøttlese af SFZ, nemlig Salamander Grand Piano.

                                                                                      Installer en SFZ

                                                                                      Når en SFZ (se herunder) er henter skal man selv pakke alle de tilhørende filer (SFZ filen selv og alle undermapper) ud i den folder, der er angivet herover. Lad undermapperne og deres indhold blive som de er.

                                                                                      Afinstaller

                                                                                      En SFZ afinstalleres ved at åbne folderen, hvor dens filer er installeret, (se herover) og slette dem alle.

                                                                                      Synthesizer

                                                                                      Synthesizeren er MuseScore's centrale kontrol panel for lydgengivelse. Når en SoundFont er installeret, skal den hentes ind i Synthesizeren, før MuseScore kan bruge den til afspilning. For at skifte til en anden SoundFont som standard, hentes den ind i Synthesizeren, og der klikkes på Brug som standard.

                                                                                      Synthesizer vises ved at vælge Vis → Synthesizer. Se flere detaljer under Synthesizer.

                                                                                      Synthesizer

                                                                                      Liste over lydfiler til download

                                                                                      GM SoundFonts

                                                                                      Disse lyd biblioteker følger General MIDI (GM2) standarden. Denne specifikation indeholder et sæt med 128 virtuelle instrumenter, plus slagtøjs-kits.

                                                                                      • GeneralUser GS (29.8 MB ukomprimeret)
                                                                                        Med tilladelse fra S. Christian Collins
                                                                                      • Magic Sound Font, version 2.0 (67.8 MB ukomprimeret)
                                                                                      • Arachno SoundFont, version 1.0 (148MB ukomprimeret)
                                                                                        Med tilladelse fra Maxime Abbey
                                                                                      • MuseScore 1 blev levere med TimGM6mb (5.7 MB ukomprimeret)
                                                                                        Licens: GNU GPL, version 2
                                                                                        Med tilladelse fra Tim Brechbill
                                                                                      • MuseScore 2 (indtil version 2.1) leveres med FluidR3Mono_GM.sf3 (13.8 MB).
                                                                                      • MuseScore 2 (fra og med version 2.2) leveres med MuseScore_General.sf3 (35.9 MB) (SF2 version (208 MB)).
                                                                                        Licens: Frigivet under MIT license
                                                                                        Med tilladelse fra S. Christian Collins
                                                                                      • Timbres of Heaven, version 3.2 (369 MB ukomprimeret)
                                                                                        Med tilladelse fra Don Allen

                                                                                      Orkester lydfiler

                                                                                      • Sonatina Symphonic Orchestra (503 MB ukomprimeret)
                                                                                        Download: SoundFont | SFZ format
                                                                                        Licens: Creative Commons Sampling Plus 1.0
                                                                                      • Aegean Symphonic Orchestra
                                                                                        Courtesy of Ziya Mete Demircan (352 MB ukomprimeret)

                                                                                      Klaver lydfiler

                                                                                      SF2 Klaverer
                                                                                      • Acoustic grand piano, release 2016-08-04
                                                                                        Beskrivelse: Yamaha Disklavier Pro Grand Piano, sf2 format, 36MiB compressed, 113MiB ukomprimeret, 121 samples, 5 hastighedslag
                                                                                        Mere information: http://freepats.zenvoid.org/ inklusive flere lydfiler.
                                                                                        Licens: Creative Commons Attribution 3.0
                                                                                        Med tilladelse fra Roberto Gordo Saez
                                                                                      • Salamander C5 Light
                                                                                        Med tilladelse fra Ziya Mete Demircan (24.5 MB ukomprimeret)
                                                                                      SFZ Klaverer
                                                                                      • Salamander Grand Piano
                                                                                        Download: version 2 | version 3
                                                                                        Beskrivelse: Yamaha C5, 48kHz, 24bit, 16 hastighedslag, mellem 80 MB og 1.9 GB ukomprimeret
                                                                                        Licens: Creative Commons Attribution 3.0
                                                                                        Med tilladelse fra Alexander Holm
                                                                                      • Detuned Piano (244 MB ukomprimeret)
                                                                                        Licens: Creative Commons Attribution-ShareAlike 3.0
                                                                                      • Plucked Piano Strings
                                                                                        Beskrivelse: 44.1kHz, 16bit, stereo, 168 MB ukomprimeret
                                                                                        Licens: Creative Commons Attribution-ShareAlike 3.0
                                                                                      • The City Piano
                                                                                        Beskrivelse: Baldwin Baby Grand, 4 velocity layers, 696 MB ukomprimeret
                                                                                        Licens: Public domain
                                                                                        Med tilladelse fra Big Cat Instruments
                                                                                      • Kawai Upright Piano, release 2017-01-28
                                                                                        Beskrivelse: 68 samples, 44KHz, 24bit, stereo, 2 hastighedslag, 58MiB ukomprimeret
                                                                                        License: GNU General Public License version 3 or later, with a special exception
                                                                                        Med tilladelse fra Gonzalo and Roberto

                                                                                      Udpakning af hentede lydfiler

                                                                                      Da lydfiler er store, er de oftest komprimerede (zippede) med en række forskellige formater (bl.a. .zip, .sfArk og .tar.gz), og de skal derfor pakkes ud (dekomprimeres) inden de kan bruges.

                                                                                      • ZIP er et standard komprimeringsformat, som undestøttes af de fleste operativsystemer.

                                                                                      • sfArk er et format, der er udviklet specielt til at komprimere SoundFont filer. For at dekomprimere kan man bruge Polyphone; eller denne on-line service: https://cloudconvert.com/sfark-to-sf2

                                                                                      • .tar.gz er et populært komprimeringsformat til Linux. Windows brugere kan benytte 7-Zip; Mac brugere kan benytte Unarchiveren, eller macOS' indbyggede Archive Utility. Bemærk at hvis man bruger 7-Zip, skal man udpakke to gange - en gang for GZip, og en gang for TAR,

                                                                                      Fejlsøgning

                                                                                      Hvis afspilningspanelet i værktøjslinien ikke er aktivt (gråt), eller ikke er synligt, så følg vejledningen herunder for at få lyden til at virke igen:

                                                                                      1. Højreklik på menu linien og kontroller at der er sat hak ved punktet Afspilningsknapper. Hvis dette ikke løser problemet så gå til trin 2.
                                                                                      2. Hvis afspilningspanelet forsvinder efter en ændring af lydfilen, så gå til fanedbladet Rediger → Indstillinger → I/O, og klik OK uden at foretage nogen ændringer. Efter genstart af MuseScore skulle afspilningspanelet blive vist igen.

                                                                                      Hvis det er første gang,der installerers en lydfil, anbefales det at bruge en af de, der er i listen herover.

                                                                                      Hvis afspilningen ar ujævn kan det skyldes at computeren ikke kan håndtere den anvendte lydfil. Måske kan det løses med dette råd:

                                                                                      • Reducer den mængde RAM (hukommelse) der anvendes af MuseScore ved at benytte en mindre lydfil. Se listen herover for muligheder.
                                                                                      • Forøg den mængde RAM, der er til rådighed for MuseScore, ved at lukke alle andre applikationer. Hvis der stadig er problemer, og en stor lydfil er vigtig, så overvej at tilføje mere RAM til computeren.

                                                                                      Se også

                                                                                      • Synthesizer
                                                                                      • Mixer

                                                                                      Eksterne links

                                                                                      • How to change the SoundFont or add another
                                                                                      • The SFZ Format (for details about the sfz specification)

                                                                                      Swing

                                                                                        MuseScore's swing feature allows you to change the playback of your score from a straight to a swing rhythm. Swing can be applied globally or only to a section of the score, and is fully variable.

                                                                                        Apply swing to a score section

                                                                                        1. Click on the note where you want swing to start;
                                                                                        2. Double-click Swing in the Text palette (shown below);

                                                                                          Swing text

                                                                                        3. Edit the Swing text as required;

                                                                                        4. If you need to vary swing from the default setting, right click the Swing text and select System text properties... Click on the "Swing Settings" tab and adjust note duration and "Swing ratio" as required.

                                                                                        Swing text can be edited just like any other text element: you can change it, style it, make it invisible etc.

                                                                                        Triplet in tempo marking

                                                                                        Often this notation is used to indicate swing:

                                                                                        swing_markings.png

                                                                                        MuseScore does not have a way to include a triplet in text as a tempo marking, but there is an easy workaround:

                                                                                        1. Add Swing text as described above and make it invisible (shortcut V, or untick "Visible" in the Inspector);
                                                                                        2. Add an appropriate Image of the required tempo marking to the score. This can be downloaded from the bottom of the "How To" page: How to create a visual swing marking.
                                                                                        3. Resize and reposition the image as required.

                                                                                        Return to straight rhythm

                                                                                        If you want playback to return to straight time after a swing section:

                                                                                        1. Add Swing text to the first note or rest of the "straight" section (see above).
                                                                                        2. Edit the text to indicate a return to straight time: e.g. "Straight."
                                                                                        3. Right-click on the text and select System Text Properties…. Click on the "Swing Settings" tab and set "Swing to "Off."

                                                                                        Apply swing globally

                                                                                        If you wish to apply swing to the whole score, you can do so from the menu:

                                                                                        1. Select Style → General... → Score.
                                                                                        2. In the "Swing Settings" section, set the desired note value and "swing ratio."

                                                                                        External links

                                                                                        • How to create a visual swing marking.
                                                                                        • Swing (jazz performance style) (Wikipedia)

                                                                                        Synthesizer

                                                                                          Oversigt

                                                                                          For at vise Synthesizeren: Vælg Vis→Synthesizer fra menuen.

                                                                                          Synthesizeren kontrollerer lyden fra MuseScore, og giver mulighed for at:

                                                                                          • Indlæse og organisere lydeksempler fra forskellige lydbiblioteker, så lyden kan afspilles
                                                                                          • Tilføje effekter som rumklang og komprimering
                                                                                          • Justere den overordnede stemning
                                                                                          • Ændre lydstyrken for både musik og for den (valgfrie) metronom.

                                                                                          Synthesizer vinduet er opdelt på fire faneblade:

                                                                                          • Fluid: En software synthesizer som kan afspille lydprøver fra SF2/SF3 SoundFont biblioteker.
                                                                                          • Zerberus: En software synthesizer som kan afspille lydprøver fra biblioteker i SFZ format.
                                                                                          • Overordnede effekter: Bruges til at tilføje diverse effekterne til nodearket.
                                                                                          • Stemning: Bruges til at justere den overordnede stemning for afspilning.

                                                                                          Gem/Indlæs Synthesizer indstillinger

                                                                                          Knapperne i bunden af synthesizer vinduet har disse funktioner:

                                                                                          Knap Funktion
                                                                                          Sæt som standard Gemmer alle aktuelle synthesizer indstillinger, som standard indstillinger. These are automatically applied to the Synthesizer when you open MuseScore.
                                                                                          Indlæs standard Indlæser de senest gemte standard indstillinger i synthesizeren.
                                                                                          Gem i nodeark Gemmer alle aktuelle synthesizer indstillinger i det aktuelle nodeark.
                                                                                          Indlæs fra nodeark Indlæser indstillingene fra det aktuelle nodeark i synthesizeren.

                                                                                          Note: (1) "Synthesizer indstillinger" omfatter rækkefølgen af Soundfonts og SFX filer, effekt indstilligerne, samt overordnet stemning og volumen. (2) Kun et sæt indstilliger kan være aktivt ad gangen - dvs. at hvis der er flere nodeark åbne samtidigt, så vil indstilligerne komme til at gælde for dem allesammen. (3) Ændringer i synthesizer indstilligerne vil ikke blive brugt ved eksport af lydfiler, medmindre de først er gemt i nodearket (se tabellen, herover). Se også Stemning (herunder).

                                                                                          Fluid

                                                                                          Klik på fanebladet Fluid for at få adgang til kontrolpanelet for biblioteker med lydprøver i SF2/SF3 SoundFont. Som standard vil SoundFont biblioteket FluidR3Mono_GM.sf3 være indlæst.

                                                                                          Fluid in Synthesizer

                                                                                          Soundfonts kan indlæses, sorteres, og slettes efter behov. Afspilning kan deles mellem en vilkårlig kombination af soundfonts (og/eller SFZ filer). Rækkefølgen af soundfonts i Fluid vil blive afspejler i standard rækkefølgen af instrumenter i mixeren.

                                                                                          Indlæsning af en soundfont

                                                                                          1. Klik på knappen Tilføj
                                                                                          2. Klik på en soundfont i listen.

                                                                                          For at kunne indlæse en soundfont, skal den først være installeret i Soundfont folderen. Dette vil sikre at den bliver vist i listen i trin 2 (herover).

                                                                                          Sortering af soundfonts

                                                                                          1. Klik på en soundfont
                                                                                          2. Brug op/ned pilene (i højre side) for at ændre rækkefølgen.
                                                                                          3. Gentag med andre soundfonte i listen efter behov.

                                                                                          Hvis der ikke er blevet ændret på nogen lyde i Mixeren, vil den SoundFont, som er øverst på listen også være den, der bruges ved afspilning. Hvis Mixeren bruges til at afspille forskellige instrumenter, med lyde fra forskellige SoundFonts, vil afspilning kun fungere korrekt, hvis man har de samme SoundFonts indlæst, i den samme rækkefølge, i Synthesizeren. Derfor anbefales det, hvis man bruger flere SoundFonts, at klikke på Gem i nodeark knappen i Synthesizeren, så man kan genkalde listen af indlæste SoundFonts (og andre synthesizer indstilliger) næste gang nodearket åbnes, ved at bruge knappen Indlæs fra nodeark.

                                                                                          Fjernelse af en soundfont

                                                                                          1. Klik på et soundfont navn
                                                                                          2. Klik på knappen Slet.

                                                                                          Dette vil fjerne soundfonten fra synthesizeren, men vil ikke afinstallere den fra Soundfont folderen: den vil stadig kunne indlæses senere.

                                                                                          Zerberus

                                                                                          Klik på fanebladet Zerberus for at åbne kontrolpanelet for biblioteket med SFZ lydprøver. Filer kan tilføjes eller slettes på samme måde, som i Fluid fanebladet. Bemærk at, ligesom med Fluid, skal SFZ filerne installeres i soundfonts folderen før de kan indlæses i synthesizeren.

                                                                                          Volumen

                                                                                          I højre side af Synthesizeren er der to volumenkontroller. Den ene kontrollerer lydstyrken for afspilning, den anden kontrollerer lydstyrken for den indbyggede metronom. Metronomen kan slås til og fra, ved at klikke på knappen lige under dens volumenkontrol. Som for de øvrige kontroller i Synthesizeren vil ændringer være midlertidige, medmindre de gemmes i nodearket, eller sættes som ny standard.

                                                                                          Volume slider in Synthesizer

                                                                                          Effekter

                                                                                          Fanebladet Overordnede effekter giver mulighed for at indstille graden af af rumklang og, fra og med version 2.0.3, komprimering, som anvendes i nodearket.

                                                                                          Master Effects in Synthesizer

                                                                                          For at tilføje eller fjerne en effekt:

                                                                                          • Vælg en a mulighederne i listen ud for Effekt A eller Effekt B (effekter tilføjes i rækkefølgen A → B).

                                                                                          For at gemme eller indlæse effekt indstilligerne bruges knapperne i bunden af Synthesizer vinduet. Se Synthesizer indstilliger (herover).

                                                                                          Zita 1 rumklang

                                                                                          Zita 1 stereo rumklang modulet gør det muligt at simulere omgivelserne i alt fra et lille lokale til en stor hal. Forsinkelse, efterklangstid og efterklangslyd kan indstilles med stor nøjagtighed med de kontroller, som er til rådighed:

                                                                                          • Delay: Sæt en forsinkelse for efterklangen mellem 20-100 ms.
                                                                                            frekvensbåndet.reverb from 20-100 ms.
                                                                                          • Low RT60 (Bastone området): Brug den grå knap til at justere center frekvensen (50–1000 Hz) for det frekvensområde, som indstilligerne skal gælde for: brug den grønne knap til at justere efterklangstiden (1–8 sek.) for dette frekvens område.
                                                                                          • Mid RT60 (Mellemtone området): Juster efterklangstiden (1–8 sek.) for mellemtone frekvensområdet.
                                                                                          • HF Damping: Indstiller dæmpningen af efterklangen for høje frekvenser. Forøgelse af værdien vil ændre frekvensen for afskæringspunktet, og få efterklangen til at lyde klarere, og vare længere.
                                                                                          • EQ1: Tillader at sænke eller hæve niveauet (-15 til +15) for frekvensbåndet (center = 40 Hz - 2 KHz) i den nedre del af spektret.
                                                                                          • EQ2: Tillader at sænke eller hæve niveauet (-15 til +15) for frekvensbåndet (center = 160 Hz - 10 KHz) i den øvre del af spektret.
                                                                                          • Output: Kontrollerer hvor meget effekt der lægges på. "Dry (tør)" betyder ingen effekt. "Wet (våd)" angiver 100% efterklang. "Mix" er en 50/50 blanding af wet/dry signal.

                                                                                          Note: EQ1 og EQ2 påvirker kun tonerne i efterklangen, ikke det tørre (ubearbejdede) signal.

                                                                                          For en hurtig opsætning af effekt indstilligerne, sættes "Output" til "Mix" og "Mid RT60" knappen sættes til den ønskede efterklangstid. Herefter kan effekten finindstilles, som forklaret herover.

                                                                                          SC4 kompressor

                                                                                          SC4 stereo kompressoren (inkluderet fra og med version 2.0.3) tilbyder detaljeret kontrol over det dynamiske omfang af afspilningen, ved at reducere forskellen i styrke mellem svage og kraftige lyde. It offers the following controls:

                                                                                          • RMS: Justerer forholdet mellem RMS (0) og Spids (1) kompression. Ved den første reagerer kompressoren på det udjævnede middel-niveau, ved det andet reagerer kompressoren på spids-niveauet.
                                                                                          • Attack: (1.5–400 ms) Den tid det vil tage for kompressionen at være fuldt virksom, efter at signalet har oversteget grænse niveauet.
                                                                                          • Release: (2–800 ms) Den tid det vil tage for kompressionen at vende tilbage til nul, efter at signalet er faldet under grænse niveauet.
                                                                                          • Threshold: (in dB) Niveauet for signalet, hvorover kompressionen sætter ind. Sænkning af grænse niveauet, vil forøge andelen af signalet, som bliver komprimeret.
                                                                                          • Ratio: Omfanget af kompression, som anvendes på signalet over grænse niveauet.Jo højere værdi, jo mere bliver signaler komprimeret. Kan varieres mellem 1:1 og 20:1.
                                                                                          • Knee: Giver mulighed for at variere mellem et "blødt knæ" og et "hårdt knæ". Jo blødere knæ, jo mere gradvis vil overgangen være mellem det ukomprimerede og det komprimerede signal.
                                                                                          • Gain: Komprimering vil ofte resultere i en sænkning af lydstyrken, så brug denne knap til at øge forstærkningen, og dermed signalstyrken, efter behov.

                                                                                          For en hurtig opsætning forsøg RMS = 1, Threshold = -20 db, Ratio = 6. Forøg Increase forstærkningen for at genskabe tabet i lydstyrke. Finindstil som forklaret ovenfor.

                                                                                          Stemning

                                                                                          Fanebladet Stemning er stedet, hvor man kan indstille programmets overordnede stemning. Instrumenter stemt i C, vil have A4 = 440 Hz som standard.

                                                                                          Tuning in Synthesizer

                                                                                          For at ændre den Overordnede stemning:

                                                                                          • Indtast en ny værdi i feltet Overordnet stemning og tryk på Skift stemning.

                                                                                          Note: (1) Stemningen vil kun gælde for nodeark i den igangværende session. For at sætte det som ny standard for programmet, eller for at gemme det for et bestemt nodeark, se Gem/Inddlæs Synthesizer indstilliger. (2) For at benytte den nye tuning i eksporterde audio filer (WAV, MP3, OGG), skal der trykkesGem i nodeark før der eksporteres.

                                                                                          Se også

                                                                                          • SoundFont
                                                                                          • Mixer

                                                                                          Tempo

                                                                                            Tempo angivelser kan indsættes fra Tempo paletten i Grundlæggende eller Udvidet arbejdsområde.
                                                                                            De starter som metronomangivelser, men kan redigeres til at vise de forskellige tempo betegnelser, eller udtryk. Tempoet for afspilning kan varieres gennem hele nodearket, ved at benytte flere forskellige tempo angivelser, synlige eller usynlige.

                                                                                            Tilføj en tempo angivelse

                                                                                            Brug en af følgende måder:

                                                                                            • Marker en node og indtast tastatur genvejen Alt+T.
                                                                                            • Marker en node eller pause, og vælg Tilføj→Tekst...→Tempoangivelse fra menuen.
                                                                                            • Marker en node eller pause og dobbelt klik på den ønskede metronom angivelse i paletten Tempo;
                                                                                            • Træk en metronomangivelse fra paletten Tempo direkte hen på en node eller pause.

                                                                                            Note: Hvis en tempoangivelse indsættes fra menuen eller med en tastatur genvej, vil taktslaget automatisk følge den valgte node. Fordelen ved at benytte paletten er at du bestemmer hvilket taktslag, der skal benyttes.

                                                                                            Rediger tempoet

                                                                                            En eksisterende metronomangivelse i nodearket kan ændres:

                                                                                            1. Skift til Redigeringtilstand for den ønskede tempoangivelse;
                                                                                            2. Skift metronomangivelsen eller taktslaget efter behov;
                                                                                            3. Forlad redigeringtilstand.

                                                                                            Man kan også overskrive tempoet for en metronomangivelse fra Inspektør:

                                                                                            1. Marker tempoangivelsen;
                                                                                            2. Fjern markeringen ved "Følg tekst i sektionen "Tempoangivelse" i Inspektør;

                                                                                              Inspector, Tempo

                                                                                            3. indsæt det ønskede afspilningstempo i "Tempo" feltet nedenunder.

                                                                                            Note: Afspilningen kan ske hurtigere eller langsommere hvis tempoangivelsen i Afspilnings panelet er sat til andet end 100%.

                                                                                            Rediger tempo tekst

                                                                                            Tempoangivelser kan redigerrs og formatteres fuldstændig som andre tekst objekter. For indstillig af tekst egenskaber eller stil, se Tekst stil og egenskaber.

                                                                                            Tempoangivelser sat med en metronomangivelse vil normalt blive fastholdt selvom de overskrives af et udtryk - som Andante, Moderato o.l. Man kan også indsætte supplerende tekst til en metronomangivelse. F.eks.

                                                                                            Metronome mark: Andante quarter note = 75

                                                                                            Annullering af en tempoangivelse

                                                                                            Man kan midlertidigt annullere det angivne tempo, og afspille med et vilkårligt tempo, ved at bruge afspilningspanelet:

                                                                                            1. Vis afspilningsanelet: Vis→Afspilningspanel eller F11 (Mac: fn+F11):

                                                                                              Play Panel

                                                                                            2. Flyt tempo skyderen op eller ned efter behov. Tempoet vises både som en absolut værdi, og som en procentdel af den nuværende tempoangivelse. Dobbeltklik på skyderen for at nulstille den.

                                                                                            Note: Antal slag i minuttet (BPM) vises altid som antallet af fjerdedele pr. minut, uanset den aktuelle taktangivelse.

                                                                                            Afspilning af ritardando og accelerando

                                                                                            Man kan simulere ritardando ("rit.") og accelerando ("accel.") ved at tilføje skjulte tempoangivelser til nodearket. Tempoangivelsen ved udskrivning kan bedst indsættes som en nodelinje/systemtekst.

                                                                                            I eksemplet herunder var tempoet oprindeligt 110 slag i minuttet. Efter ritardandoet bliver tempoet sat ned med 10 på det første slag i hver takt. Alle tempo skiftene gøres usynlige, ved at fjerne markeringen ved Synlig i Inspektør, så kun teksten ritardando bliver vist ved udskrivning af nodearket:

                                                                                            Ritardando

                                                                                            Der er udviklet et plugin, som kan automatisere denne opgave: TempoChanges

                                                                                            Fermater

                                                                                            Fermater, som kan indsættes fra paletten Artikulationer & Ornamenter, kan tildeles en Tidsstræk angivelse, som sættes fra Inspektør. Denne er som standard sat til 1.00. Hvis MuseScore skal afspille en fermat med det dobbelte af nodens normale varighed, markeres fermaten, og "Tidsstræk" sættes til 2.00. Dette virker dog ikke for fermater sat på taktstreger, da taktstreger ikke har en varighed, som kan strækkes.

                                                                                            Se også

                                                                                            • Afspilning
                                                                                            • Taktarter

                                                                                            Dynamik

                                                                                              Dynamikangivelser bruges til at angive styrken for en node, eller en musikalsk frase. Angivelserne kan hentes fra paletten Dynamik i enten det Grundlæggende eller Udvidede arbejdsområde:

                                                                                              Dynamik palette (Udvidet)

                                                                                              Note: Det generelle lydniveau for afspilning af nodearket kan indstilles med volumenkontrollen i Afspilningsanelet, i Mixeren, eller i Synthesizeren.

                                                                                              Tilføj en dynamikangivelse

                                                                                              Indsæt et ny dynamikangivelse i nodearket på en af disse måder:

                                                                                              • Marker en node og dobbelt-klik på en dynamikangivelse i paletten.
                                                                                              • Træk en dynamikangivelse fra paletten over på en node.

                                                                                              Yderligere dynamikangivelser kan hentes fra Hovedoaletten (Skift+F9). Man kan også oprette entilpasset palette til senere brug.

                                                                                              Ønskes en crescendo eller en decrescendo angivelse, se Kiler.

                                                                                              Indstilling af volumen for en dynamikangivelse

                                                                                              Marker en dynamikangivelse, og juster dens Hastighed i Inspektør—højere for kraftigere, lavere værdi for svagere.

                                                                                              Indstil omfanget for en dynamikangivelse

                                                                                              Via Inspektør kan man bestemme hvilke nodelinjer en dynamikangivelse gælder for. Det "Dynamiske omfang" er, som standard, sat til "stemme", som betyder at alle nodelinjer for et instrument vil være omfattet. Ændring til "nodelinje" vil begrænse dynamikangivelsen til den nodelinje, den er indsat på. Ændring til "System" betyder, at alle instrumenter vil blive afspillet med den valgte dynamikangivelse.

                                                                                              Liste over dynamikangivelser i paletter

                                                                                              I det Grundlæggende arbejdsområde er der 8 valgmuligheder i paletten Dynamik: ppp, pp, p, mp, mf, f, ff, fff.

                                                                                              I det Udvidede arbejdsområde er alle ovenstående, plus 15 yderligere valgmuligheder i paletten Dynamik: fp, sf, sfz, sff, sffz, sfp, sfpp, rfz, rf, fz, m, r, s, z, n.

                                                                                              I sektionen Dynamik i Hovedpaletten findes alle de nævnte plus 6 muligheder mere: pppppp, ppppp, pppp, ffff, fffff, ffffff.

                                                                                              Rediger en dynamikangivelse

                                                                                              Alle dynamikangivelser kan redigeres, efter de er indsat i nodearket, fuldstændig som standard tekster. Se Tekstredigering.

                                                                                              Se også

                                                                                              • Tempo

                                                                                              Externe links

                                                                                              • Video tutorial: Lesson 10 - Articulations, Dynamics and Text
                                                                                              • Dynamics at Wikipedia

                                                                                              Text

                                                                                                MuseScore indeholder mange forskellige slags tekst objekter, som nodelinje tekst, dynamik, tempo, fingersætning, lyrik osv. Desuden kan tekst være en del af linjer—som f.eks. volter, ottava, guitar barre linjer mm.

                                                                                                This chapter covers some of the different classes of text available in MuseScore, and shows you how to format them. Other specific types of text are covered in other chapters:

                                                                                                • Tempo (→Sound and playback)
                                                                                                • Dynamics—p, mf, etc. (→Sound and playback)
                                                                                                • Swing (→Sound and playback)
                                                                                                • Mid-staff Instrument changes (→Sound and playback)
                                                                                                • Repeats and jumps —DC, Fine, Coda, etc. (→Notation)
                                                                                                • Figured bass (→Advanced topics)
                                                                                                • Frame text—in vertical, horizontal or text frames (→Formatting)
                                                                                                • Headers and footers —different from standard text objects (→Formatting)
                                                                                                • Lines (→Notation)

                                                                                                Text basics

                                                                                                  Add text

                                                                                                  To add a text-based element to the score, use one of the following general methods:

                                                                                                  • Keyboard shortcut: For example, press Ctrl+Tto enter Staff text , Ctrl+L to enter Lyrics, and so on.
                                                                                                  • Menu command: Add→Text allows you to chose from a range of text-based elements.
                                                                                                  • Workspace: Select a note and double-click an icon in one of the palettes; or, alternatively, drag a symbol from a palette onto the staff. e.g. Swing text, Tempo text etc.

                                                                                                  Notes: (1) The exact method depends on the type of text you are adding (see Text). (2) For general-purpose text boxes attached to staves, see Staff and system text.

                                                                                                  Format text

                                                                                                  Every text-based element in the score has three levels of formatting:

                                                                                                  • Text style: This is the highest level of formatting and applies to all text elements in the score of a particular type. For details, see Text style.
                                                                                                  • Text properties: This applies to the style of one specific text object only. For details, see Text properties.
                                                                                                  • Character formatting; The style applied to individual text characters during editing. For details, see Text editing.

                                                                                                  Adjust position of text objects

                                                                                                  To position a text object, use any of the following methods:

                                                                                                  • Drag the object.
                                                                                                  • Select the object and adjust the horizontal or vertical offset values in the Inspector.
                                                                                                  • Select the object and apply any of the following keyboard shortcuts:
                                                                                                    • ←: Move text left 0.1 staff space.
                                                                                                    • →: Move text right 0.1 staff space.
                                                                                                    • ↑: Move text up 0.1 staff space.
                                                                                                    • ↓: Move text down 0.1 staff space.
                                                                                                    • Ctrl+← (Mac: ⌘+←): Move text left one staff space.
                                                                                                    • Ctrl+→ (Mac: ⌘+→): Move text right one staff space.
                                                                                                    • Ctrl+↑ (Mac: ⌘+↑): Move text up one staff space.
                                                                                                    • Ctrl+↓ (Mac: ⌘+↓): Moves text down one staff space.

                                                                                                  Text anchors

                                                                                                  When you apply a text element to the score, its anchor position will depend on the type:

                                                                                                  • Title, Subtitle, Composer, Poet: Anchored to a frame.
                                                                                                  • Fingering: Anchored to note heads.
                                                                                                  • Lyrics: Anchored to a time position (a note/chord, but not a rest).
                                                                                                  • Chord symbol: Anchored to a time position.
                                                                                                  • Staff text: Anchored to a time position.
                                                                                                  • System text: Anchored to a time position.

                                                                                                  Text editing

                                                                                                    Enter/exit text edit mode

                                                                                                    To enter Text edit mode use one of the following methods:

                                                                                                    • Double click on a text element.
                                                                                                    • Right-click on a text element and select Edit element.
                                                                                                    • Click on a text element and press Ctrl+E (Mac: Cmd+E).

                                                                                                    Sample text in edit mode

                                                                                                    In this mode you can apply formatting to individual characters, including options such as bold, italic, underline, subscript, superscript, font family and font size. These are accessed from the Text toolbar below the document window:

                                                                                                    Text toolbar

                                                                                                    To exit Text edit mode use one of the following:

                                                                                                    • Press Esc.
                                                                                                    • Click on a part of the score outside the edit window.

                                                                                                    Keyboard shortcuts

                                                                                                    In Text edit mode, the following keyboard shortcuts are available:

                                                                                                    • Ctrl+B (Mac: ⌘+B) toggles bold face.
                                                                                                    • Ctrl+I (Mac: ⌘+I) toggles italic.
                                                                                                    • Ctrl+U (Mac: ⌘+U) toggles underline.
                                                                                                    • Home End ← → ↑ ↓ moves cursor.
                                                                                                    • Backspace (Mac: Delete) removes character to the left of the cursor.
                                                                                                    • Del (Mac: → Delete or fn+Delete) removes character to the right of the cursor.
                                                                                                    • ↵ starts new line.
                                                                                                    • F2 (Mac: fn+F2) Inserts special characters (see below).

                                                                                                    Symbols and special characters

                                                                                                    You can use the Special Characters window to insert quarter notes, fractions, and many other kinds of special symbols or characters into your text. A few symbols can also be accessed by shortcut (see below).

                                                                                                    The Special Characters palette contains buttons for inserting symbols into the text (e.g. quarter note), or special characters (e.g. copyright symbol, ©)

                                                                                                    To open Special Characters, use any of the following methods:

                                                                                                    • Click on the keyboard icon in the text toolbar (below the score window).
                                                                                                    • Press F2 (Mac: fn+F2).

                                                                                                    Note: (1) This only works in Text edit mode; (2) The Special Characters dialog should not be confused with the menu item of the same name in the macOS version of MuseScore.

                                                                                                    The dialog is divided into 3 tabs: Common symbols, musical symbols and unicode symbols. The musical and unicode tabs are further subdivided into alphabetically-arranged categories.

                                                                                                    Double-clicking an item in the Special Characters dialog immediately adds it to the text where the cursor is positioned. Multiple items can be applied without closing the dialog box, and the user can even continue to type normally, delete characters, enter numerical character codes etc., with it open.

                                                                                                    Special character shortcuts

                                                                                                    In Text edit mode the following keyboard shortcuts can be used to access certain special characters:

                                                                                                    Ctrl+Shift+B: Flat.
                                                                                                    Ctrl+Shift+F: Forte.
                                                                                                    Ctrl+Shift+H: Natural.
                                                                                                    Ctrl+Shift+M: Mezzo.
                                                                                                    Ctrl+Shift+N: Niente.
                                                                                                    Ctrl+Shift+P: Piano (dynamic mark).
                                                                                                    Ctrl+Shift+R: Rinforzando.
                                                                                                    Ctrl+Shift+S: Sforzando.
                                                                                                    Ctrl+Shift+Z: Z.
                                                                                                    Ctrl+Shift+#: Sharp.

                                                                                                    See also

                                                                                                    • Chord symbol
                                                                                                    • Lyrics
                                                                                                    • Frame
                                                                                                    • Edit mode

                                                                                                    Text styles and properties

                                                                                                      Text Style

                                                                                                      This is the highest level of text formatting and applies to all text elements in the score of a particular type. Staff text objects, for example, have a unique style, as do all tempo markings, all lyrics, all chord symbols and so on. Editing a text style allows you to change the appearance of all objects which share that style in one go.

                                                                                                      Edit style

                                                                                                      To edit a text style, use any of the following methods:

                                                                                                      • From the main menu, chose Style→Text…. Then select the relevant style from the list.
                                                                                                      • Right-click a text object and select Text Style….

                                                                                                      This will display the Edit Text Styles dialog:

                                                                                                      Text Styles

                                                                                                      The options available are divided into categories:

                                                                                                      • Text
                                                                                                        • Font: name of the font such as "Times New Roman" or "Arial"
                                                                                                        • Size: size of the font in points
                                                                                                        • Style: style of the font, italic, bold, underline
                                                                                                        • Color: click on the color demonstrated to change
                                                                                                        • Size follows "Staff space" setting: whether size follows the distance between two lines in a 5-lines standard staff
                                                                                                        • System flag: text applies to all staves of a system.
                                                                                                      • Offset
                                                                                                        • Horizontal
                                                                                                        • Vertical
                                                                                                        • Offset Unit: in mm or Staff space units
                                                                                                      • Alignment
                                                                                                        • Horizontal: left, right, center
                                                                                                        • Vertical: align top edge of text to reference point, center text vertical to reference point, center text vertical to text baseline or align bottom edge of text to reference point
                                                                                                      • Frame
                                                                                                        • Frame: add a frame around the text
                                                                                                        • Frame Type: Circle or Box
                                                                                                        • Border thickness: thickness of the line of the frame in space units
                                                                                                        • Border radius: for box frame, radius of rounded corner
                                                                                                        • Text margin : inner frame margin in space units
                                                                                                        • Foreground color: of the frame border
                                                                                                        • Background color: of the background within the frame.

                                                                                                      Note: Opacity is set by the parameter "Alpha channel" in the colors dialogs: a value between 0, transparent, and 255, opaque.

                                                                                                      Create a new text style

                                                                                                      1. From the menu bar, select Style → Text...; or right-click on a text object and select Text Style...;
                                                                                                      2. Click on New ;
                                                                                                      3. Set a name;
                                                                                                      4. Set all properties as desired.

                                                                                                      This text style will be saved along with the score. It will not be available in other scores, unless you explicitly save the style sheet and load it with another score.

                                                                                                      Apply options

                                                                                                      You can apply any changes made to either the score or the part you are seeing, by pressing Apply and then OK.

                                                                                                      If you are in one of the parts of your score, you also have the option to use the Apply to all parts button before OK, so you don't have to manipulate all parts individually.

                                                                                                      Reset text to style

                                                                                                      If you have made changes to an individual piece of text and you want to return it to the defined text style for the score, or if you changed the style with an old version of MuseScore and you want the style to correspond to the default text style in MuseScore 2, you can use the Reset Text to Style option.

                                                                                                      Select the text you want to reset to style and click on Reset Text to Style in the Inspector. If you need all text from a given style to be "reset", right-click on one, then from the context menu choose Select → All Similar Elements first.

                                                                                                      Save and load text styles

                                                                                                      Text styles (together with all other styles in a document) can be saved as a style file and loaded into other MuseScore files. See Save and load style.

                                                                                                      Text Properties

                                                                                                      This is the next level down in the formatting hierarchy and affects the style of the text in one specific text object only.

                                                                                                      Edit properties

                                                                                                      To edit the text properties of a particular object—and no other:

                                                                                                      • Right click on the text and select Text Properties….

                                                                                                      This displays the following dialog:

                                                                                                      text_properties_dialog_en.png

                                                                                                      Most of the properties on display will be familiar from the Edit Text Styles dialog. You also have a Reset to Style button allowing you to apply a style to the object from a drop-down list.

                                                                                                      See also

                                                                                                      • Text editing
                                                                                                      • Header/Footer
                                                                                                      • Behavior of applied text and lines

                                                                                                      Staff and system text

                                                                                                        For general-purpose text, use Staff Text or System Text. The difference between these two types of text is whether you want it to apply to a single staff, or the whole system. This matters when extracting parts: staff text will only appear in a part that contains the specific instrument the text is attached to, while system text will appear in all parts. Additionally, if you choose to hide empty staves, any staff text belonging to an empty staff will also be hidden. System text is never hidden by the "hide empty staves" feature.

                                                                                                        Staff text

                                                                                                        Staff text is general purpose text associated with a particular staff at a particular location in the score. To create staff text, choose a location by selecting a note or rest and then use the menu option Add → Text → Staff Text, or use the shortcut Ctrl+T (Mac: ⌘+T). A small text box appears and you can immediately start typing. You can exit the text box at any time (even without typing anything) by pressing Esc.

                                                                                                        Staff text can, for example, be used to apply indications such as "Solo" or "Pizzicato" to one staff in a score. Depending on what the instructions of the staff text are, MIDI playback of that staff at the text location can be altered to match the instructions by right-clicking on the staff text and selecting Staff Text Properties…. See Mid-staff sound change.

                                                                                                        System text

                                                                                                        System text is used when you wish to apply text indications to a whole system rather than just to one staff line. This makes a difference when extracting parts, or if you choose to hide empty staves. To create system text, chose a location by selecting a note or rest and then use the menu option Add → Text → System Text, or use the shortcut Ctrl+Shift+T (Mac: ⌘+Shift+T). A small text box appears and you can immediately start typing. You can exit the text box at any time (even without typing anything) by pressing Esc.

                                                                                                        See also

                                                                                                        • Mid-staff sound change

                                                                                                        External links

                                                                                                        • How to change instrument sound (e.g. pizz., con sordino) midway through score

                                                                                                        Chord symbols

                                                                                                          Chord symbols are an abbreviated way of representing musical chords (see Chord names and symbols (Wikipedia) for further details). For example:

                                                                                                          Chord symbols

                                                                                                          Enter a chord symbol

                                                                                                          1. Select a note or a slash;
                                                                                                          2. Press Ctrl+K (Mac: ⌘+K).

                                                                                                          The cursor is now positioned above the score ready for input. Enter the chord symbol just like normal text, as follows:

                                                                                                          • Root note: A, B, C, D, E, F, G.
                                                                                                          • Sharp: # (hash symbol).
                                                                                                          • Flat: b (small letter "b").
                                                                                                          • Double sharp: x (small letter "x") or ## (two hash symbols).
                                                                                                          • Double flat: bb (small letter "b" twice).
                                                                                                          • Natural: natural (no space before "natural").
                                                                                                          • For other symbols, see Chord symbol syntax (below).

                                                                                                          When you exit the chord symbol, the characters you have typed will automatically assume the correct format: by default a root note typed in lower case will turn into upper case (for alternative options, see Automatic Capitalization); a "#" or "b" will turn into a proper sharp (♯) or flat (♭) and so on. Do not try to use actual flat and sharp signs as MuseScore will not understand those properly.

                                                                                                          After you have finished entering a chord symbol you can either:

                                                                                                          • Move the cursor forward or backwards to continue entering or editing chord symbols (see commands below).
                                                                                                          • Exit chord symbol mode by pressing Esc.

                                                                                                          Note: To fill measures with slashes, see Fill with slashes or Toggle rhythmic slash notation.

                                                                                                          Keyboard Commands

                                                                                                          The following commands are available during chord symbol entry:

                                                                                                          • Space move Cursor to next note, rest, or beat
                                                                                                          • Shift+Space move cursor to previous note, rest, or beat
                                                                                                          • Ctrl+Space (Mac: ⌘+Space) add a space to the chord name
                                                                                                          • ; move cursor to next beat
                                                                                                          • : move cursor to previous beat
                                                                                                          • Tab move cursor to next measure
                                                                                                          • Shift+Tab move cursor to previous measure
                                                                                                          • Ctrl plus number (1 - 9) move Cursor by duration corresponding to number (e.g.; half note for 6)
                                                                                                          • Esc exit.

                                                                                                          Chord symbol syntax

                                                                                                          MuseScore understands most of the abbreviations used in chord symbols:

                                                                                                          • Major: M, Ma, Maj, ma, maj, Δ (type t or ˆ for the triangle)
                                                                                                          • Minor: m, mi, min, -
                                                                                                          • Diminished: dim, ° (entered with lowercase letter o, shows as ° if using the the Jazz style, as o otherwise)
                                                                                                          • Half-diminished: ø (type 0, zero). Alternatively, you can, of course, chose abbreviations such as mi7b5 etc.
                                                                                                          • Augmented: aug, +
                                                                                                          • The following abbreviations are also valid: extensions and alterations like b9 or #5, sus, alt, and no3; inversions and slash chords, such as C7/E; commas; parentheses, which can enclose part, or even all, of a chord symbol.

                                                                                                          Edit a chord symbol

                                                                                                          An existing chord symbol can be edited in a similar way to ordinary text: See Text editing.

                                                                                                          Transpose chord symbols

                                                                                                          Chord symbols are automatically transposed by default if you apply the menu Transpose command to the containing measures. If this is not required, you can untick the "Transpose chord symbols" option in the same dialog.

                                                                                                          Chord symbol text

                                                                                                          To adjust the appearance of all chord symbol text, use any of the following options:

                                                                                                          • From the main menu, chose Style → Text… → Chord Symbol
                                                                                                          • Right click on any chord symbol and select Text Style…

                                                                                                          This displays the Edit Text Styles dialog, allowing you to make changes to any text property.

                                                                                                          Chord symbol style

                                                                                                          Formatting options for chord symbols are available in Style→General...→Chord Symbols, Fretboard Diagrams. Adjustable properties are listed under the following headings:

                                                                                                          Appearance

                                                                                                          Three options are possible: Standard and Jazz and Custom. You can select between these using the radio buttons.

                                                                                                          • In the Standard style, chords are rendered simply, with the font determined by your chord symbol text style.

                                                                                                            Standard chord symbols

                                                                                                          • In the Jazz style, the MuseJazz font is used for a handwritten look, with distinctive superscript and other formatting characteristics. The Jazz style is selected by default if you use any of the Jazz templates.

                                                                                                            Jazz chord symbols

                                                                                                          • The Custom style option allows you to customise the look of chord symbols (and also ensures compatibility with older scores). Select a customised Chord symbols style file in the field below: this can be created by copying and modifying one of the pre-existing files in the "styles" folder. Documentation can be found in the same folder. Note, however, that this is for advanced users only, and there is no guarantee these files will be supported in the future.

                                                                                                          Note spelling

                                                                                                          By default, MuseScore uses letter names for chord symbols. For users in regions where other note naming schemes are used, MuseScore provides the following controls:

                                                                                                          • Standard: A, B♭, B, C, C♯,...
                                                                                                          • German: A, B♭, H, C, C♯,...
                                                                                                          • Full German: A, B, H, C, Cis,...
                                                                                                          • Solfeggio: Do, Do♯, Re♭, Re,...
                                                                                                          • French: Do, Do♯, Ré♭, Ré,...
                                                                                                          Automatic Capitalization

                                                                                                          By default, MuseScore automatically capitalizes all note names on exit, regardless of whether you entered them in upper or lower case. However, you can also choose other automatic capitalization options:

                                                                                                          • Lower case minor chords: c, cm, cm7,...
                                                                                                          • Lower case bass notes: C/e,...
                                                                                                          • All caps note names: DO, RE, MI,...

                                                                                                          You can also turn off the automatic capitalization completely, in which case note names are simply rendered the way you type them.

                                                                                                          Positioning

                                                                                                          • Default vertical position: The height at which the chord symbol is applied above the staff (negative values can be used)
                                                                                                          • Distance to fretboard diagram: If a fretboard diagram is present, this value is the height at which the chord symbol is applied above the diagram (negative values can be used).
                                                                                                          • Minimum chord spacing: The space to leave between chord symbols.
                                                                                                          • Maximum barline distance: Changes the size of the gap between the last chord symbol in the measure and the following barline. You only need to adjust this value if there is a continuous problem in the score with overlap between the last symbol in one measure and the first symbol in the next.

                                                                                                          Note: In addition to the settings described here, the default position of applied chord symbols is also determined by settings in the Text Styles dialog. The effect is cumulative.

                                                                                                          Capo

                                                                                                          Enter the number of the capo position at which you want to display substitute chords, in brackets, after all chord symbols in the score.

                                                                                                          Fingering

                                                                                                            Fingering symbols for various instruments are found in the Fingering palette in the Advanced workspace.

                                                                                                            Fingering palette

                                                                                                            • Keyboard music employs the numbers 1–5 to represent fingers of the left or right hand. There is also a fingering positioner plugin to help you optimize the layout of piano or keyboard fingerings.

                                                                                                            • Guitar music uses the numbers 0–4 to represent left-hand fingering (T is occasionally used for the thumb). Right-hand fingering is indicated by the letters p, i, m, a, c. Circled numbers represent instrument strings.

                                                                                                            • The last five symbols in the palette are used for lute fingering in historical music. Note: To enable display of fingering in tablature, right-click on the TAB, select Staff Properties...→Advanced style properties, and tick "Show Fingerings".

                                                                                                            Add fingering to a single note

                                                                                                            Use any of the following methods:

                                                                                                            • Select a note and double click one of the fingering symbols in a Palette.
                                                                                                            • Drag and drop a fingering symbol from a palette onto a note

                                                                                                            When fingering is added to a note, the focus immediately shifts to the symbol, so you can adjust it right away.

                                                                                                            Add fingering to several notes

                                                                                                            1. Select the desired notes;
                                                                                                            2. Double-click a fingering symbol in a palette.

                                                                                                            Adjust position of fingering

                                                                                                            Single fingering

                                                                                                            To change the position of one symbol, use any of the following methods:

                                                                                                            • For fine adjustments (0.1 sp) use the arrow keys; For larger adjustments (1 sp) use Ctrl+Arrow.
                                                                                                            • Change horizontal and vertical offsets in the Inspector.
                                                                                                            • Drag the symbol using your mouse.

                                                                                                            Multiple fingering

                                                                                                            To change the position of multiple symbols:

                                                                                                            1. Select the desired fingering symbols;
                                                                                                            2. Adjust using the horizontal and vertical offset fields in the Inspector.

                                                                                                            Note: You can also use the fingering positioner plugin mentioned above to optimize the layout of piano fingerings.

                                                                                                            To restore a symbol to its default position, select it and press Ctrl+R.

                                                                                                            Edit fingering text

                                                                                                            Fingering is a form of text symbol and can be edited and styled like any other. Right-clicking on the symbol gives you a range of options.

                                                                                                            Lyrics

                                                                                                              Enter a lyrics line

                                                                                                              First line

                                                                                                              1. Enter the notes of the melody line;
                                                                                                              2. Select the note where you want to start entering lyrics;
                                                                                                              3. To enter lyrics mode, type Ctrl+L (Mac: ⌘+L); or from the main menu, select Add→Text→Lyrics;
                                                                                                              4. Type a syllable;
                                                                                                              5. Use the following options to continue entering lyrics:
                                                                                                                • Go to the next syllable: Press Space (or Ctrl+→) at the end of a syllable.
                                                                                                                • Hyphen (to connect syllables): Press - at the end of a syllable.
                                                                                                                • Go to the previous syllable: Press Shift+Space (or Ctrl+←).
                                                                                                                • Move left: Press ← (left arrow). If the cursor is at the beginning of a syllable, it will jump to the previous one.
                                                                                                                • Move right: Press → (right arrow). If the cursor is at the end of a syllable, it will jump to the next one.
                                                                                                                • Move to the syllable below: Press ↓ (down arrow).
                                                                                                                • Move to the syllable above: Press ↑ (up arrow).
                                                                                                                • Start new lyrics line: Press ↵ (Return) at the end of an existing lyrics syllable (Note: Don't use the Enter key from the numeric keypad!).
                                                                                                              6. To exit lyrics mode, press Esc.

                                                                                                              Subsequent lines

                                                                                                              If you want to add another lyrics line to an existing one (e.g. a 2nd or 3rd verse etc.):

                                                                                                              1. Chose one of the following options:
                                                                                                                • Select the note where you want to start the new lyrics line. Enter lyrics mode as shown in step 3 (above). The cursor moves to a new (blank) line.
                                                                                                                • Enter text edit mode on an existing syllable, go to the end of the syllable and press ↵ (Return). The cursor moves to the next line.
                                                                                                              2. Continue entering lyrics from step 4 (above).

                                                                                                              Example:

                                                                                                              Sample lyrics: A-des-te fi-del-es

                                                                                                              Special characters

                                                                                                              In most cases, lyrics can be edited just like normal text. However, special keyboard shortcuts are required to enter the following characters:

                                                                                                              • Character space: Ctrl+Space (Mac: ⌥+Space).

                                                                                                              • - (hyphen): Ctrl+- (Mac: ⌥+-) or AltGr+-.

                                                                                                              • Line feed: Ctrl+↵ (Mac: ⌥+Return) or Enter (from the numeric keypad).

                                                                                                              Melisma

                                                                                                              A melisma is a syllable or word that extends over two or more notes. It is indicated by an underline extending from the base of a syllable to the last note of the melisma. The underline is created by positioning the cursor at the end of a syllable and pressing Shift+_: once for each note in the melisma. See the image below:

                                                                                                              Syllable extension line, Melisma

                                                                                                              The above lyric was created in the following manner:

                                                                                                              1. Type the letters, soul,.
                                                                                                              2. At the end of the word, press Shift+___.
                                                                                                              3. Type the letters To, then press Esc.

                                                                                                              For non-last syllables to extend, just use additional dashes -, usually only one of them will show (more when the distance between the syllables is large enough), and the syllable will right-align to the first note, similar to last syllables that got notated with a melisma, see above.

                                                                                                              Elision (Lyric) slur / Synalepha

                                                                                                              Two syllables under a note can be joined with an elision slur, also known as a "lyric slur" or "synalepha". For example:

                                                                                                              Sample lyric slur under a note

                                                                                                              To create the example lyric text, starting with the syllable text "te":

                                                                                                              1. Type te;
                                                                                                              2. Click on the keyboard icon Keyboard Icon, or press F2 to open the Special Characters palette;
                                                                                                              3. Use one of the following options:

                                                                                                                • Double-click one of the three elision slurs in the "Common Symbols" tab: "Narrow elision", "Elision", or "Wide elision" (these can be found between the "C Clef" and the "p" dynamic—see image below):
                                                                                                                  Elision in the Special Symbols palette
                                                                                                                • Double-click the elision slur found after the 7/8 fraction in the "Common Symbols" tab (next to last character in the image above). Depending on the font, add one or more spaces before/after the slur using Ctrl+Space (Mac: ⌥+Space).
                                                                                                                  Note: Not all fonts include the "undertie" character (U+203F ‿ "undertie", present in "Special Characters" mainly for compatibility with MuseScore 1.x scores). To find out which fonts on your computer support it, see "fontlist" (look for any font that shows a tie between "te" and "A" instead of a blank rectangle).
                                                                                                              4. Type A.

                                                                                                              Edit Lyrics

                                                                                                              1. Enter text edit mode on an existing syllable;
                                                                                                              2. Use standard text editing commands to make changes;
                                                                                                              3. Continue entering lyrics (see above); or exit lyrics mode by pressing Esc.

                                                                                                              Adjust position of lyrics

                                                                                                              The top and bottom margins and the line height of all lyric lines can be set globally:

                                                                                                              1. From the menu, select Style→General...→Page;
                                                                                                              2. Adjust the properties marked "Lyrics top margin," "Lyrics bottom margin" and "Lyrics line height" (see General: Page: Lyrics Margins).

                                                                                                              To adjust the position of a particular lyrics line:

                                                                                                              1. Select the lyrics line: i.e. right click on a word in the line, and (from the menu) chose Select→More...; then check the relevant options, which should include "Same system";
                                                                                                              2. Adjust the Horizontal and Vertical offsets in the Inspector.

                                                                                                              Copy lyrics to clipboard

                                                                                                              To copy all lyrics to the clipboard (as of version 2.0.3):

                                                                                                              • From the menu bar, select Edit→Tools→Copy Lyrics to Clipboard.

                                                                                                              Paste lyrics from clipboard

                                                                                                              To copy and paste lyrics from a text file (say) into a score:

                                                                                                              1. Enter the notes in the score to which the lyrics will be attached.
                                                                                                              2. Set up your lyrics in a text file, with appropriate spaces, hyphens, line-breaks etc.
                                                                                                              3. Copy the lyrics from the text-file into the clipboard.
                                                                                                              4. Select the start note in MuseScore, and press Ctrl+L (Mac: Cmd+L) (step 3 under Enter lyrics in a score).
                                                                                                              5. Repeatedly applying paste will enter successive words of the lyrics. You may need to enter melismas and make other corrections as you go along.

                                                                                                              See also

                                                                                                              • Text
                                                                                                              • Chord symbol

                                                                                                              External links

                                                                                                              • How to insert Lyrics
                                                                                                              • How to move lyrics
                                                                                                              • How to copy lyrics, or lyrics with rhythm
                                                                                                              • How to add a block of text to a score
                                                                                                              • Video tutorial: MuseScore in Minutes: Lesson 6 - Text, Lyrics and Chords

                                                                                                              Rehearsal marks

                                                                                                                Rehearsal marks can be used in a number of ways:

                                                                                                                • To identify specific points in a score to facilitate rehearsing.
                                                                                                                • As bookmarks in the score to which you can instantly navigate—using the Find/Search command.
                                                                                                                • To mark the various sections in the score.

                                                                                                                Typically, rehearsal marks consist of one or more letters and/or numbers, and appear in sequence in the score—e.g. A, B, C…, or 1, 2, 3… etc. Alternatively, they may display measure numbers (usually larger than standard measure numbers, boldface and/or enclosed in boxes). Multi-measure rests are automatically broken before and after rehearsal marks.

                                                                                                                Rehearsal marks can be added to the score (i) automatically—which ensures that they are named in sequence—or (ii) manually, allowing you to name them as you wish.

                                                                                                                Add a rehearsal mark

                                                                                                                Manual Placement

                                                                                                                To create a rehearsal mark manually:

                                                                                                                1. Click on a note (or rest) at the desired location;
                                                                                                                2. Select one of the following options:
                                                                                                                  • Press Ctrl+M (Mac: Cmd+M);
                                                                                                                  • From the menu, chose Add → Text → Rehearsal Mark;
                                                                                                                3. Enter the desired text.

                                                                                                                Automatic placement

                                                                                                                Add an alphanumeric rehearsal mark

                                                                                                                Use either of the following options:

                                                                                                                • Click on a note (or rest) at the desired location, then double-click the [B1] rehearsal mark icon in the "Text" palette.
                                                                                                                • Drag and drop the rehearsal mark from the "Text" palette onto the score.

                                                                                                                Notes: (1) By default, marks are added in the sequence, A, B, C etc. (2) To change the format of subsequently-added marks (to lower case letters, or numbers), edit the previous rehearsal mark accordingly. (3) Marks added between existing rehearsal marks append a number or letter to the previous mark: it is a good idea to apply the Resequence command afterwards (see below).

                                                                                                                Add a measure-number rehearsal mark
                                                                                                                1. Add the first rehearsal mark in the series as an alphabetical one; then edit it to read the same as the number of the measure it is attached to;
                                                                                                                2. Add subsequent marks as shown above. They will automatically adopt the measure-number format.

                                                                                                                Automatically resequence rehearsal marks

                                                                                                                MuseScore allows the user to automatically re-order a series of rehearsal marks if they have got out of sequence for any reason. Use the following method:

                                                                                                                1. Before making a selection, you can, if desired, establish a new format for the rehearsal marks (lower/upper case, number, or measure number) by manually altering the first mark in the range accordingly.
                                                                                                                2. Select the range of measures you wish to apply the Resequence command to (if there is no selection then the program assumes you wish to resequence all measures).
                                                                                                                3. From the menu, select Edit → Tools → Resequence Rehearsal Marks.

                                                                                                                MuseScore automatically detects the sequence based on the first rehearsal mark in the selection—all rehearsal marks in the selection are then altered accordingly. The following sequences are possible:

                                                                                                                • A, B, C etc.
                                                                                                                • a, b, c etc.
                                                                                                                • Numerical: 1, 2, 3 etc.
                                                                                                                • Numerical: according to measure numbers. This requires the number of the first mark in the series to be equal to the number of the measure it is attached to.

                                                                                                                Text style

                                                                                                                Rehearsal marks are a variety of system text, appearing both on the score and on every part. By default, they are in a large bold font, and enclosed in frames with rounded corners. All aspects of their appearance can be changed globally via the rehearsal mark Text style.

                                                                                                                Search for a rehearsal mark

                                                                                                                See Find (Viewing and navigation).

                                                                                                                See also

                                                                                                                • Text properties

                                                                                                                External links

                                                                                                                • Rehearsal Letter (Wikipedia article)

                                                                                                                Formatting

                                                                                                                Layout and formatting

                                                                                                                  Layout and formatting options for the score can be accessed mainly from the Layout and Style menus.

                                                                                                                  Ways to affect layout

                                                                                                                  This section lists the main commands and dialogs affecting score layout. Other formatting options are covered in either Layout menu or Style menu below (for text, see Text styles and properties).

                                                                                                                  From the Layout menu:

                                                                                                                  • Page Settings: Adjust the overall dimensions of your score such as page size, page margins, and scaling.

                                                                                                                  • Increase Stretch/Decrease Stretch: Adjust the score spacing by stretching or squashing selected measures.

                                                                                                                  From the Style menu:

                                                                                                                  • Score Style: Set overall score details, such as music font, display of multi-measure rests, and whether to hide empty staves.

                                                                                                                  • Page Style: Adjust staff and system spacing, score and lyric margins etc.

                                                                                                                  • Measure Style: Set the measure spacing, which affects the number of measures per line.

                                                                                                                  • Sizes: Set the default size of "small" and grace notes, small staves and small clefs.

                                                                                                                  Other commands:

                                                                                                                  • Add/Remove line breaks: Set the number of measures per system.

                                                                                                                  • Breaks and spacers: Apply line, page or section breaks. You can also add extra space between particular systems or staves where needed.

                                                                                                                  Layout menu

                                                                                                                  Page Settings...

                                                                                                                  See Page settings.

                                                                                                                  Reset

                                                                                                                  The Reset command restores all selected score elements to their default position. It also restores the default directions of note stems and beams. To apply:

                                                                                                                  1. Select the elements or the region of the score that you wish to reset. Or use Ctrl+A to select the whole score.
                                                                                                                  2. Press Ctrl+R; or from the menu select Layout→Reset.

                                                                                                                  Increase Stretch/Decrease Stretch

                                                                                                                  Menu: Layout

                                                                                                                  Increase or decrease the horizontal spacing of notes within selected measures. To apply:

                                                                                                                  1. Select a range of measures. Or use Ctrl+A to select the whole score.
                                                                                                                  2. Chose one of two options:
                                                                                                                    • To increase stretch:
                                                                                                                      • Use the shortcut } (right curly bracket) (Mac: Ctrl+Alt+9);
                                                                                                                      • Or from the menu bar, select Layout→Increase Stretch;
                                                                                                                    • To decrease stretch:
                                                                                                                      • Use the shortcut { (left curly bracket) (Mac: Ctrl+Alt+8);
                                                                                                                      • Or from the menu bar, select Layout→Decrease Stretch.

                                                                                                                  See also Measure Properties: Layout stretch. This allows you to set the stretch more precisely.

                                                                                                                  Reset Stretch

                                                                                                                  To reset stretch to the default spacing of 1:

                                                                                                                  1. Select a range of measures. Or use Ctrl+A to select the whole score.
                                                                                                                  2. From the menu, select Layout→Reset Stretch.

                                                                                                                  Reset Beam Mode

                                                                                                                  To restore beams to the mode defined in the local time signatures:

                                                                                                                  1. Select the section of the score you want to reset. If nothing is selected, the operation will apply to the whole score;
                                                                                                                  2. Select Layout→Reset Beam Mode.

                                                                                                                  See also Beams.

                                                                                                                  Regroup Rhythms

                                                                                                                  As of version 2.1, this option corrects note ties, durations and beaming so that they are grouped according to standard music notation practice. For example:
                                                                                                                  Before:
                                                                                                                  regroup_rhythms_before.png
                                                                                                                  After:
                                                                                                                  regroup_rhythms_after.png

                                                                                                                  Any notes that are tied and are the same length as a dotted note will be changed to the dotted note with two limitations. (i) Only the last note of a group of tied notes will have a single dot. Notes with more than one dot are not produced using this option. (ii) Dotted notes will not span from one group of beamed notes to another unless their duration is the same as all of the beam groups it covers. Any notes with more than one dot will be regrouped according to the above rules.

                                                                                                                  To apply:

                                                                                                                  1. Select the section of the score you want to reset. If nothing is selected, the operation will apply to the whole score;
                                                                                                                  2. Select Layout→Regroup Rhythms.

                                                                                                                  Note: This is an experimental feature and there are known bugs. Articulations and ornaments are deleted and some pitches respelt. Ties across barlines may be lost on UNDO.

                                                                                                                  Style menu

                                                                                                                  General: Score

                                                                                                                  To open the Score dialog: from the menu, select Style→General...→Score.

                                                                                                                  Dialog: Style / General... / Score

                                                                                                                  This dialog allows you to set global properties, such as the music font, display of multimeasure rests, whether or not to hide empty staves, "swing" playback etc.

                                                                                                                  • Musical symbols font: Choice of display in Emmentaler, Bravura or Gonville fonts.
                                                                                                                  • Musical text font: Choice of display in Emmentaler, Bravura, Gonville or MuseJazz fonts.

                                                                                                                  • Display in concert pitch: Tick this option to display the score at concert pitch. If unticked the score is displayed at written pitch.

                                                                                                                  • Create multimeasure rests: Tick to display multimeasure rests.

                                                                                                                    • Minimum number of empty measures; The default is 2.
                                                                                                                    • Minimum width of measure: The default width is 4 sp.
                                                                                                                  • Hide empty staves: This option saves space by hiding those staves in a system which consist of only empty measures. Used for condensed scores.

                                                                                                                  • Don't hide empty staves in first system: Always display staves in first system even if they consist of empty measures.

                                                                                                                  • Display note values across measure bar: A feature useful for notating early music. See Unbarred notation.

                                                                                                                  • Hide instrument name if there is only one instrument: You don't usually need to display the instrument name in this case.

                                                                                                                  • Swing setting: The default is off. Choice of swung eighth or sixteenth notes.

                                                                                                                    • Select swing ratio: The default setting is 60%.

                                                                                                                  See also, Swing

                                                                                                                  General: Page

                                                                                                                  To open the Page dialog: from the menu, select Style→General...→Page.

                                                                                                                  Dialog: Style / General... / Page

                                                                                                                  This dialog allows you to adjust the space above and below systems, staves, lyrics, and vertical frames; and between the score and the top/bottom page margins. You can also control the display of key signatures, time signatures and clefs.

                                                                                                                  score_layout.png

                                                                                                                  Distance to page margins
                                                                                                                  • Music top margin: The distance between the top staff line of the first staff on the page and the top page margin.
                                                                                                                  • Music bottom margin: The distance between the bottom staff line of the last staff on the page and the bottom page margin.
                                                                                                                  Distance between staves
                                                                                                                  • Staff distance: The space between staves which are not part of a grand staff (see below).
                                                                                                                  • Grand staff distance: The space between staves that share the same instrument—such as the piano, organ, or those of a guitar staff/tab pair.

                                                                                                                  Note: To alter the space above one particular staff see Extra distance above staff (Staff properties).

                                                                                                                  Distance between systems
                                                                                                                  • Min. system distance: The minimum distance allowed between one system and the next.
                                                                                                                  • Max. system distance: The maximum distance allowed between one system and the next.
                                                                                                                  Lyrics Margins
                                                                                                                  • Lyrics top margin: The height of the margin above the top lyrics line (in a system).
                                                                                                                  • Lyrics bottom margin: The height of the margin underneath the bottom lyrics line (in a system).
                                                                                                                  • Lyrics line height: The distance between lyrics line (in a system), expressed as a percentage of the line height associated with the lyrics text style.
                                                                                                                  Vertical frame margins
                                                                                                                  • Vertical frame top margin: The default margin height above a vertical frame.
                                                                                                                  • Vertical frame bottom margin: The default margin height below a vertical frame.
                                                                                                                  Last system fill threshold
                                                                                                                  • If the last system is longer than this percentage of the page width, it gets stretched to fill that width.
                                                                                                                  Clefs and key signatures
                                                                                                                  • Create clef for all systems: Untick this box to prevent a clef from automatically displaying at the start of any system except the first.
                                                                                                                  • Create key signature for all systems: Untick this box to prevent a key signature from automatically displaying at the start of any system except the first.

                                                                                                                  Ticking the following boxes, allows the display of courtesy elements at the end of systems:

                                                                                                                  • Create courtesy time signatures:
                                                                                                                  • Create courtesy key signatures
                                                                                                                  • Create courtesy clefs

                                                                                                                  General: Header, Footer, Numbers

                                                                                                                  Open from the menu: Style→General...→Header, Footer, Numbers.

                                                                                                                  Dialog: Style / General... / Header, Footer, Numbers

                                                                                                                  You can show the content of a score's meta tags (see Score information) or show page numbers in a header or footer for your score. To create a header or footer for a score with linked parts, make sure the main score is in the active tab. To create a header or footer for an individual part, that part needs to be the active tab.

                                                                                                                  If you hover with your mouse over the Header or Footer text region, a list of macros will appear, showing their meaning, as well as the existing meta tags and their content.

                                                                                                                  You can create different Headers and Footers for even and odd pages, such as putting page numbers on the right for odd-numbered pages and on the left for even-numbered pages.

                                                                                                                  You can also edit whether and how often measure numbers appear.

                                                                                                                  General: System

                                                                                                                  Open from the menu: Style→General...→ System.

                                                                                                                  Dialog: Style / General... / System

                                                                                                                  This dialog allows you to:

                                                                                                                  • Set the distance between system brackets or braces and the start barlines.
                                                                                                                  • Set the width of system brackets and braces.

                                                                                                                  See also Brackets.

                                                                                                                  General: Measure

                                                                                                                  See General style: Measure.

                                                                                                                  General: Barlines

                                                                                                                  Open from the menu: Style→General...→Barlines.

                                                                                                                  Dialog: Style / General... / Barlines

                                                                                                                  • Control whether to show barlines at the beginning of a staff or multiple staves.
                                                                                                                  • Scale barlines to staff size affects "small" staves only. See Barline adjustment possibilities (external link) for details.
                                                                                                                  • Control proportion of thickness and distance within double barlines, including repeat barlines.

                                                                                                                  General: Notes

                                                                                                                  Open from the menu: Style→General...→Notes.

                                                                                                                  Dialog: Style / General... / Notes

                                                                                                                  This page can also be accessed direct from the score by right-clicking on any note and selecting "Style…" Here you can adjust the distance and thickness of note-related objects (stems, ledger lines, dots, accidentals). Changing these would be unusual.

                                                                                                                  General: Clefs

                                                                                                                  Open from the menu: Style→General...→Clefs.

                                                                                                                  Dialog: Style / General... / Clefs

                                                                                                                  You can choose between Serif and Standard clef for your tablature sheet.

                                                                                                                  General: Arpeggios

                                                                                                                  Open from the menu: Style→General...→Arpeggios.

                                                                                                                  Dialog: Style / General... / Arpeggios

                                                                                                                  Here you can change the thickness, spacing and hook height of the following arpeggio and strum symbols:

                                                                                                                  Arpeggio and strum symbols

                                                                                                                  Changes to these properties would be unusual.

                                                                                                                  General: Beams

                                                                                                                  Open from the menu: Style→General...→Beams.

                                                                                                                  Dialog: Style / General... / Beams

                                                                                                                  General: Slurs/Ties

                                                                                                                  Open from the menu: Style→General...→Slurs/Ties.

                                                                                                                  Dialog: Style / General... / Slurs/Ties

                                                                                                                  General: Sizes

                                                                                                                  Open from the menu: Style→General...→Sizes.

                                                                                                                  Dialog: Style / General... / Sizes

                                                                                                                  Sets the proportional size of "small" and grace notes, as well as small staves and clefs. Changing this would be unusual.

                                                                                                                  General: Hairpins, Volta, Ottava

                                                                                                                  Open from the menu: Style→General...→Hairpins, Volta, Ottava.

                                                                                                                  Dialog: Style / General... / Hairpins, Volta, Ottava

                                                                                                                  The Reset value button returns the setting to the original value.

                                                                                                                  General: Pedal, Trill

                                                                                                                  Open from the menu: Style→General...→Pedal, Trill.

                                                                                                                  Dialog: Style / General... / Pedal, Trill

                                                                                                                  General: Chord Symbols, Fretboard Diagrams

                                                                                                                  Open from the menu: Style→General...→Chord Symbols, Fretboard Diagrams.

                                                                                                                  Dialog: Style / General... / Chord Symbols, Fretboard Diagrams

                                                                                                                  This section allows you to adjust the format and positioning of chord symbols and Fretboard diagrams.

                                                                                                                  Appearance: Chose a default chord symbol style—Standard, Jazz or Custom.

                                                                                                                  Note Spelling: Chose the spelling convention for chord symbols and whether to use capital or small letters.

                                                                                                                  Positioning:

                                                                                                                  • Default vertical position: The default vertical distance in space units (sp.) between a newly-applied chord symbol and the music staff. Negative values may be used.
                                                                                                                  • Distance to fretboard diagram: The distance (in sp. units) from a chord symbol to a fretboard diagram when both are applied to the same location on a staff. This value overrides the above "Default vertical position" setting. The user can chose to place a chord symbol below a fretboard diagram by entering a negative value.
                                                                                                                  • Minimum chord spacing: The minimum space to allow between chord symbols.
                                                                                                                  • Maximum barline distance: Increases the distance between the final chord symbol in a measure and the following barline. You may wish to adjust this value if there is a recurring problem in the score with overlap between the final chord symbol in one measure and the following chord symbol.

                                                                                                                  Capo: Enter the number of the capo position at which you want to display substitute chords, in brackets, for all chord symbols in the score.

                                                                                                                  Fretboard diagrams:

                                                                                                                  • Default vertical position: the distance in sp. units from a newly applied fretboard diagram to a staff. A negative value may be used.
                                                                                                                  • Scale: Increase or decrease the size of the fretboard diagram in the score.
                                                                                                                  • Fret offset number font size: Increase or decrease the size of a fret number displayed next to a diagram.
                                                                                                                  • Position Left/Right: Display fret number to the left or right of the fretboard diagram.
                                                                                                                  • Barre line thickness: Make barre lines in fretboard diagrams thicker or thinner.

                                                                                                                  General: Figured Bass

                                                                                                                  Open from the menu: Style→General...→Figured Bass.

                                                                                                                  Dialog: Style / General... / Figured Bass

                                                                                                                  Options about figured bass font, style and alignment.
                                                                                                                  See also Figured bass

                                                                                                                  General: Articulations, Ornaments

                                                                                                                  Open from the menu: Style→General...→Articulations, Ornaments.

                                                                                                                  Dialog: Style / General... / Articulations, Ornaments

                                                                                                                  Position of articulation with respect to the notes and staves

                                                                                                                  General: Accidentals

                                                                                                                  Open from the menu: Style→General...→Accidentals.

                                                                                                                  Dialog: Style / General... / Accidentals

                                                                                                                  Options about naturals at key signature changes

                                                                                                                  General: Tuplets

                                                                                                                  Open from the menu: Style→General...→Tuplets.

                                                                                                                  Dialog: Style / General... / Tuplets

                                                                                                                  Apply and OK buttons

                                                                                                                  By pressing the Apply button you can see how the changes you have made in the dialogs affect the score without closing the window. Press OK to save your changes to the score and close the window.

                                                                                                                  Apply to all parts in one go

                                                                                                                  When in a part tab while changing layout and formatting, you can use the Apply to all Parts button to apply all changes (either in Layout→Page Settings.... or Style→General...) to apply the new settings to all parts in just one click.

                                                                                                                  Save/Load style

                                                                                                                  It is easy to transfer a complete set of styles (all General Style settings, all text styles, and page settings) from one score to the other using the Save/Load Style functions.

                                                                                                                  To save a customized style:

                                                                                                                  1. Go to Style→Save Style....
                                                                                                                  2. Name and save the style file (the default folder is set in your Preferences). Styles are stored as *.mss files.

                                                                                                                  Note: You can also define a preferred style for scores and parts in the Score section of MuseScore's Preferences.

                                                                                                                  To load a customized style:

                                                                                                                  1. Go to Style→Load Style....
                                                                                                                  2. Navigate to and select the Style file (.mss) and click Open (or double click on the file).

                                                                                                                  All existing styles in the score should update automatically.

                                                                                                                  See also

                                                                                                                  • To edit spacing between notes
                                                                                                                  • Upgrading from MuseScore 1.x, local relayout

                                                                                                                  External links

                                                                                                                  • Tutorial – How to create large-print stave notation (MSN)
                                                                                                                  • MuseScore in 10 Easy Steps: Part 10A Layout and Formatting (a video tutorial)
                                                                                                                  • MuseScore in 10 Easy Steps: Part 10B Layout and Formatting (a video tutorial)

                                                                                                                  General style: Measure

                                                                                                                    General style: Measure

                                                                                                                    Style → General → Measure allows you to adjust the distance between various items within measures.

                                                                                                                    Introduction

                                                                                                                    If you change a measure style property (see image above), MuseScore automatically adjusts the score to maintain the correct spacing between notes and rests according to best music engraving practice. It will also correctly reposition any elements attached to notes or rests, such as fingerings, dynamics, lines etc.

                                                                                                                    All settings related to measure width and note spacing are minimum values. Measures are automatically stretched, if necessary, to maintain existing page margins.

                                                                                                                    All the properties listed below use the staff space (abbreviated to "sp") as the basic unit of measurement. See Page settings: Scaling for more details.

                                                                                                                    Options

                                                                                                                    • Minimum measure width
                                                                                                                      Sets the minimum horizontal length of measures. In measures containing very little content (e.g., a single whole note or whole measure rest), the measure will only shrink as far as this minimum.

                                                                                                                    • Spacing (1=tight)
                                                                                                                      Condenses or expands the space after notes or rests. This setting thus affects not only space between notes but also between the last note and the ending barline. For the space between the beginning of the measure and the first note or rest, see Barline to note distance (below).

                                                                                                                      Note: Changes to an individual measure's Stretch (under Layout → Increase Stretch, Decrease Stretch) are calculated after, and proportional to, the global Spacing setting.

                                                                                                                    • Barline to note distance
                                                                                                                      Sets the distance between the barline which begins a measure and the first note or rest in that measure. For the initial measures of systems, which start with clefs instead of barlines, use Clef/key right margin (below).

                                                                                                                    • Barline to grace note distance
                                                                                                                      Sets the distance between a barline and a grace note that occurs before the first actual note in a measure (independently of the "Barline to note distance" setting).

                                                                                                                    • Barline to accidental distance
                                                                                                                      Sets the distance between a barline and an accidental placed before the first note in a measure (independently of the "Barline to note distance" setting).

                                                                                                                    • Note to barline distance
                                                                                                                      (To be added).

                                                                                                                    • Minimum note distance
                                                                                                                      Specifies the smallest amount of space MuseScore will allow after each note (depending on other factors, more space may be allowed).

                                                                                                                    • Clef left margin
                                                                                                                      Sets the distance between the very beginning of each line and the clef. (This option is rarely needed.)

                                                                                                                    • Key signature left margin
                                                                                                                      Sets the distance between the key signature and the clef preceding it.

                                                                                                                    • Time signature left margin
                                                                                                                      Sets the distance between the time signature and the key signature or clef preceding it.

                                                                                                                    • Clef/key right margin
                                                                                                                      Sets the distance between the material at the beginning of each line (such as the clef and key signature) and the first note or rest of the first measure on the line. (Note that, although not named in the option, if a time signature is present, it is the element from which the spacing begins.)

                                                                                                                    • Clef to barline distance
                                                                                                                      Sets the distance between a barline and a clef change preceding it.

                                                                                                                    • Multi-measure rest margin
                                                                                                                      Sets the distance between a multi-measure rest and the barlines on either side.

                                                                                                                    • Staff line thickness
                                                                                                                      Sets the thickness of the lines of the staff, which allows you to make the staff thicker and darker, if you need greater visibility on your printouts.

                                                                                                                    Page settings

                                                                                                                      Page settings allows you to adjust the overall dimensions of your score such as page size, page margins, and scaling. It is one of the main layout tools in MuseScore—along with the options available from Style→General...

                                                                                                                      To open the Page settings dialog: from the menu, select Layout → Page Settings....

                                                                                                                      Layout / Page Settings dialog

                                                                                                                      Page size

                                                                                                                      Here you can select the paper format, either by standard name (e.g., Letter or A4), or by specifying the height and width in either mm or inches (use the radio buttons to choose which unit of measurement to use). The initial default page size depends on your localization—in the United States, Letter size paper is standard.

                                                                                                                      You can also choose to format your music in Landscape or Portrait orientation using the radio buttons. Prior to version 2.1 unchecking Landscape enabled Portrait format. You can optionally use Two sided layout (i.e., book format, with mirror left and right margins for even and odd pages—see below).

                                                                                                                      Odd/Even Page Margins

                                                                                                                      The Even Page Margins and Odd Page Margins settings allow you to define the printable area of your pages. Aside from changing the margins around the music on the page, other settings, such as the positions of headers and footers, are calculated relative to the margins defined here.

                                                                                                                      If the "Two sided" checkbox under "Page Size" is selected, you can set margins differently for mirroring odd and even pages. Otherwise, only one set of margins can be modified, but will apply to all pages.

                                                                                                                      To display page margins in your score on screen (though not in print), go to View→Show Page Margins.

                                                                                                                      Scaling

                                                                                                                      The Scaling property allows you to increase or decrease the size of your score.

                                                                                                                      In MuseScore, the sizes of score elements, such as note heads, note stems, accidentals, clefs etc., are defined in terms of a unit of measurement called a staff space (abbreviated to "sp"). One staff space is equal to the space between two lines of a music staff (or one-quarter the size of the full five-line staff).

                                                                                                                      As you change the "Staff space" setting (under Scaling), all score elements follow suit and thus correct proportions are maintained. The exception is Text in which you can set an absolute value, independent of "Scaling."

                                                                                                                      Note: Changing the "Scaling" does not always change the number of systems per page, because system distance can vary between limits set under "Min system distance" and "Max system distance" (see Style→General...→Page).

                                                                                                                      Miscellaneous

                                                                                                                      First page number

                                                                                                                      Sets the number of the first page of the particular score. Page numbers below 1 won't get printed—e.g., setting the first page number to -1 would result in the first and second page showing no page number, and page number 1 appearing on the third page.

                                                                                                                      Apply to all Parts

                                                                                                                      The Apply to all Parts button is available when modifying a part, rather than the main score (see Part extraction). If you change the page settings of one part and want the rest of the parts to have the same settings, this button will apply the change to all parts in one go.

                                                                                                                      Breaks and spacers

                                                                                                                        The Breaks & Spacers palette in the Advanced workspace contains the following non-printing symbols:

                                                                                                                        Breaks and Spacers Palette

                                                                                                                        The first three symbols are called breaks; the blue up and down arrows are known as spacers.

                                                                                                                        Breaks

                                                                                                                        A break can be applied to either a measure or a frame. There are three types:

                                                                                                                        • System break (called a line break prior to version 2.2): Forces the next part of the score to start in a new system.
                                                                                                                        • Page break: Forces the next part of the score to start on a new page.
                                                                                                                        • Section break: Divides the score into sections (see below), and forces the next part of the score to start in a new system. It can be combined with a page break if required.

                                                                                                                        Notes: (1) Blue break symbols are visible on the screen, but do not appear on printouts. (2) To add (or remove) system breaks over all or part of the score, see Add/Remove system breaks. (3) To split a measure, see Measure operations: Split and join.

                                                                                                                        Add a break to a measure

                                                                                                                        Breaks can be added using either (1) a keyboard shortcut; or (2) a break symbol from a palette.

                                                                                                                        Using a keyboard shortcut

                                                                                                                        To add a System (Line) break or a Page break only:

                                                                                                                        1. Click on any one of the following elements:
                                                                                                                          • Barline;
                                                                                                                          • Measure;
                                                                                                                          • Measure range (as of version 2.2);
                                                                                                                          • Notehead (as of version 2.2);
                                                                                                                          • A text element associated with a staff (e.g. lyric syllable, chord symbol, staff text etc.) (as of version 2.2);
                                                                                                                        2. Chose one of the following options:
                                                                                                                          • System (Line) break: Press↵ (toggle).
                                                                                                                          • Page break: Press Ctrl+↵ (Mac: Cmd+↵) (toggle).

                                                                                                                        Note: If you select a measure range, the break will be applied before and after the selection.

                                                                                                                        Using a palette symbol

                                                                                                                        Any break can be added from a workspace palette:

                                                                                                                        1. Select any one of the following elements:
                                                                                                                          • Barline;
                                                                                                                          • Measure;
                                                                                                                          • Measure range (as of version 2.2);
                                                                                                                          • Notehead (as of version 2.2);
                                                                                                                          • A text element associated with a staff (e.g. lyric syllable, chord symbol, staff text etc.) (as of version 2.2);
                                                                                                                        2. Double click a break symbol in a palette (toggle).

                                                                                                                        Note: If you select a measure range, the break will be applied before and after the selection.

                                                                                                                        • Alternatively, drag a break symbol from a palette onto a measure.

                                                                                                                        Add a break to a frame

                                                                                                                        To add a break to a frame, use one of the following options:

                                                                                                                        • Drag a break from a palette onto a frame.
                                                                                                                        • Select a frame then double-click a palette break symbol.

                                                                                                                        Move a break

                                                                                                                        To reposition a break:

                                                                                                                        1. Enter edit mode for the break in question;
                                                                                                                        2. Use the keyboard arrow buttons as described in Adjust position of text objects.

                                                                                                                        Delete breaks

                                                                                                                        Use one of the following options:

                                                                                                                        • Select one or more breaks and press Del.

                                                                                                                        See also: Add / Remove system breaks.

                                                                                                                        Section break

                                                                                                                        A Section break, as the name suggests, is used to create separate sections within a score. Like a system break, it forces the next measure or frame to begin a new system, and can also be used in association with a page break if required. A section break could be used, for example, to divide a piece into separate movements.

                                                                                                                        Each section can have its own measure numbering independent of the rest of the score. By default, the first measure of a section is numbered "1" (see image below), though like the first measure of the score itelf, the number is not displayed unless configured in the measure properties dialog. The same dialog can be used to change the numbering according to your preference.

                                                                                                                        If you change Time signature or Key signature at the beginning of the new section, there will be no courtesy signature at the end of the previous section. See example below:

                                                                                                                        Example of use of section break

                                                                                                                        When you play back the score, the program adds a short pause between each section. In addition, the first end repeat barline in a section always sends the playback cursor to the beginning of the section, so a start repeat barline is optional.

                                                                                                                        Right click a Section break and select Section Break Properties... to specify:

                                                                                                                        • Pause length;
                                                                                                                        • If the new section's first system shows long instrument names;
                                                                                                                        • If the new section starts numbering measures at 1.

                                                                                                                        Spacers

                                                                                                                        A Spacer looks like a blue UP or DOWN arrow and is used to add extra space above or below a system (it cannot be applied to a frame).

                                                                                                                        Add a spacer

                                                                                                                        Use either of the following options:

                                                                                                                        • Select a measure, then double-click a palette spacer symbol.
                                                                                                                        • Drag a spacer symbol from a palette onto a measure.

                                                                                                                        Blue spacer symbols are visible on the screen, but do not appear on printouts.

                                                                                                                        Note: Spacers are designed for local adjustments only. If you wish to adjust the space between staves across the whole score, use the settings in Style → General... → Page instead.

                                                                                                                        Adjust a spacer

                                                                                                                        To adjust the height of a spacer, chose one of these options:

                                                                                                                        • Double-click the spacer and drag the blue end-handle up and down.
                                                                                                                        • Double-click the spacer and use the ↑ ↓ keys and/or Ctrl+↑ ↓ to move the end-handle up and down.
                                                                                                                        • Click (or double-click) on the spacer and adjust the height property in the Inspector.

                                                                                                                        Delete a spacer

                                                                                                                        • Click on the spacer and press the Del key.

                                                                                                                        See also

                                                                                                                        • Add / Remove system breaks

                                                                                                                        Frames

                                                                                                                          A Frame is a rectangular container for empty space, text or pictures in the score. It can be one of three types:

                                                                                                                          • Horizontal: Used to create a break in a particular system. Can contain one or more text objects and/or images.
                                                                                                                          • Vertical: Inserted above a system or appended to the last system. Can contain one or more text objects and/or images.
                                                                                                                          • Text: Inserted above a system or appended to the last system. Can contain one text object only.

                                                                                                                          Horizontal frame

                                                                                                                          A horizontal frame is used to create a break in a system. For example, you can:

                                                                                                                          • Create a coda, with an adjustable gap separating it from the rest of the score (as in the example below).
                                                                                                                            Horizontal frame in edit mode
                                                                                                                          • Create an offset at the beginning of the score, where there is no staff name to perform the same function.
                                                                                                                          • Create an adjustable right margin at the end of a system.
                                                                                                                          • Create space for some text or image(s).
                                                                                                                          • Create a space between a 'historical incipit' and the beginning of the modern edition.

                                                                                                                          Insert/append horizontal frame

                                                                                                                          See Create a Frame (below).

                                                                                                                          Adjust width of horizontal frame

                                                                                                                          Use one of the following methods:

                                                                                                                          • Double-click the frame and drag the handle to the right or left.
                                                                                                                          • Select the frame and adjust "Width" in the Inspector.

                                                                                                                          Notes: (1) "Left Gap" and "Right Gap" are currently unused (version 2.x); (2) It is possible to create a 'Negative-width' horizontal frame, by dragging the edit-handle back over the left border of the frame. However, this is not a standard feature and once editing is finished you cannot reselect the frame.

                                                                                                                          Add text or image to horizontal frame

                                                                                                                          To add text:

                                                                                                                          • Right-click on the frame and select Add → Text.

                                                                                                                          To add an image:

                                                                                                                          • Right-click on the frame and select Add → Image.

                                                                                                                          Vertical frame

                                                                                                                          A vertical frame can be inserted above a system or appended to the last system. It can contain one or more text objects and/or images. The height is adjustable and the width equals the system width.

                                                                                                                          It can be used, for example, to:

                                                                                                                          • Create an area at the head of a score for Title/Subtitle/Composer/Lyricist text etc. (see below).
                                                                                                                          • Add single- or multi-column lyric text (at the end of a score).
                                                                                                                          • Create a title page.
                                                                                                                          • Create subtitles and other annotations between systems.

                                                                                                                          Insert/append vertical frame

                                                                                                                          See Create a Frame (below).

                                                                                                                          Adjust height of vertical frame

                                                                                                                          Use one of the following methods:

                                                                                                                          • Double-click the frame and drag the handle up or down.
                                                                                                                          • Select the frame and adjust "Height" in the Inspector.

                                                                                                                          Edit vertical frame properties

                                                                                                                          Selecting the frame allows you to adjust various parameters in the Inspector:

                                                                                                                          Inspector for vertical frame

                                                                                                                          Top Gap: Adjusts distance between frame and element above (negative values not currently supported).
                                                                                                                          Bottom Gap: Adjusts distance between frame and element below (Negative values can be entered).
                                                                                                                          Height: Adjusts height of the frame.
                                                                                                                          Left Margin: Moves left-aligned text objects to the right.
                                                                                                                          Right Margin: Moves right-aligned text objects to the left.
                                                                                                                          Top margin: Moves top-aligned text objects downwards (see also Style → General... → Page).
                                                                                                                          Bottom Margin: Moves bottom-aligned text objects upwards (see also Style → General... → Page).

                                                                                                                          Add text or image to vertical frame

                                                                                                                          To add text:

                                                                                                                          • Right-click on the frame and select Add → Text/Title/Subtitle/Composer/Lyricist.

                                                                                                                          To add an image:

                                                                                                                          • Right-click on the frame and select Add → Image.

                                                                                                                          You can create as many objects as you like within a frame. Their positions can be adjusted independently by dragging or, more accurately, by altering the offset values in the Inspector. To format text objects, see Text editing and Text styles and properties.

                                                                                                                          Insert horizontal frame in vertical frame

                                                                                                                          • Right-click on the frame and select Add → Insert Horizontal Frame.

                                                                                                                          The horizontal frame is automatically left-aligned and fills the entire vertical frame. To right-align it:

                                                                                                                          1. Reduce the width of the horizontal frame.
                                                                                                                          2. Deselect the frame then drag it to the right. To restore left-alignment, drag the frame to the left.

                                                                                                                          "Title" frame

                                                                                                                          A vertical frame is automatically created at the beginning of a score, showing the title, subtitle, composer, lyricist etc., when you fill in the information fields provided on page 1 of the New Score Wizard.

                                                                                                                          If the score does not have a vertical frame at the beginning, you can create one as follows:

                                                                                                                          • Right-click on an empty space in the document window and select Text → Title/Subtitle/Composer/Lyricist.

                                                                                                                          Text frame

                                                                                                                          A Text frame looks like a vertical frame, but is specialised for text input: one text object is allowed per frame. The height automatically expands to fit the content and there is no height adjustment handle.

                                                                                                                          A text frame can be used, for example, to:

                                                                                                                          • Create lyric text at the end of a score.
                                                                                                                          • Create subtitles and other annotations between systems.

                                                                                                                          Insert/ append text frame

                                                                                                                          See Create a Frame (below).

                                                                                                                          Edit text frame properties

                                                                                                                          Selecting the frame allows you to adjust various parameters in the Inspector:

                                                                                                                          Top Gap: Adjusts distance between frame and element above (negative values not currently supported).
                                                                                                                          Bottom Gap: Adjusts distance between frame and element below (negative values can be entered).
                                                                                                                          Height: Not applicable to text frames.
                                                                                                                          Left Margin: Moves left-aligned text objects to the right.
                                                                                                                          Right Margin: Moves right-aligned text objects to the left.
                                                                                                                          Top margin: Moves top-aligned text objects downwards.
                                                                                                                          Bottom Margin: Moves bottom-aligned text upwards.

                                                                                                                          Create a frame

                                                                                                                          Insert a frame into the score

                                                                                                                          1. Select a measure.
                                                                                                                          2. Chose one of the following options:
                                                                                                                            • From the menu select Add → Frames → Insert...
                                                                                                                            • Right-click on an empty space in the score window and select Frames → Insert...

                                                                                                                          Append a frame to the score

                                                                                                                          Chose one of the following options:

                                                                                                                          • From the menu select Add → Frames → Append...
                                                                                                                          • Right-click on an empty space in the score window and select Frames → Append...

                                                                                                                          Delete a frame

                                                                                                                          Select the frame and press Del.

                                                                                                                          Apply a break

                                                                                                                          Line, page or section breaks can be applied to frames as well as measures. Use one of two methods:

                                                                                                                          • Select a frame and double-click a palette break symbol (for example, in the Breaks & Spacers palette).
                                                                                                                          • Drag a break symbol from a palette onto a frame.

                                                                                                                          See also

                                                                                                                          • Text Properties: to put a visual frame (border) around text.
                                                                                                                          • Insert measures: to insert measures before a frame.

                                                                                                                          External links

                                                                                                                          • How to add a block of text to a score
                                                                                                                          • Page Formatting in MuseScore 1.1 - 1. Frames, Text & Line Breaks [video]

                                                                                                                          Images

                                                                                                                          You can use Images to illustrate scores, or to add symbols that are not included in the standard palettes. MuseScore supports the following formats:

                                                                                                                          • PNG (*.png)
                                                                                                                          • JPEG (*.jpg and *.jpeg)
                                                                                                                          • SVG (*.svg) (MuseScore currently does not support SVG shading, blurring, clipping or masking.)

                                                                                                                          Add image

                                                                                                                          Use one of the following options:

                                                                                                                          • Drag-and-drop an image file (from outside MuseScore) either into a frame or onto a note or rest in the score.
                                                                                                                          • Right-click on a frame, select Add→Picture, then pick an image from the file selector.

                                                                                                                          Cut/copy and paste image

                                                                                                                          1. Click on an image in the score.
                                                                                                                          2. Apply any of the standard copy/cut commands.
                                                                                                                          3. Click on a note, rest or frame.
                                                                                                                          4. Apply any of the standard paste commands.

                                                                                                                          Modify image

                                                                                                                          To modify the width/height of an image, double-click it and drag any of the handles. If you want to adjust width or height separately, untick "Lock aspect ratio" first in the Inspector.

                                                                                                                          You can adjust the position of an image by simply dragging it.

                                                                                                                          See also

                                                                                                                          • Image capture
                                                                                                                          • Custom palettes

                                                                                                                          External links

                                                                                                                          • How to create an ossia with image capture
                                                                                                                          • How to create an ossia with another staff

                                                                                                                          Image capture

                                                                                                                          MuseScore's image capture feature allows you to save a snapshot of any part of the score window. PNG, PDF and SVG formats are supported.

                                                                                                                          Save a snapshot

                                                                                                                          1. Click on the Toggle image capture button, Image capture button.
                                                                                                                          2. Press Shift + drag, to create a new selection rectangle.
                                                                                                                          3. Fine tune the rectangle position, if required, by dragging it and/or changing the "Position" values in the "Lasso" section of the Inspector.
                                                                                                                          4. Fine tune the rectangle area, if required, by dragging the handles, and/or changing the "Size" values in the Inspector.
                                                                                                                          5. Right-click on the selection rectangle to open the Image Capture menu. Select the desired option:

                                                                                                                            • Save As (Print Mode). This saves an image of the selection area as it would look if printed, e.g.
                                                                                                                              Score snippet
                                                                                                                            • Save as (Screenshot Mode). This saves a selection of the actual screen, including any line break symbols, invisible elements etc., e.g.
                                                                                                                              Image capture snippet

                                                                                                                            You can save the image in either PNG (default), SVG or PDF format.

                                                                                                                          Image capture menu

                                                                                                                          Right-clicking on the selection rectangle opens the Image Capture menu:

                                                                                                                          Image capture context menu

                                                                                                                          • Copy image: Chose this to copy an image before pasting it in the same or another MuseScore file.
                                                                                                                          • Resolution: Set the resolution, and hence the size of the saved or copied image. Try 100 dpi to start with, if you are unsure.
                                                                                                                          • Transparent background: Turn image transparency on or off.
                                                                                                                          • Auto re-size to page: Adjusts the selection rectangle to fit the page.
                                                                                                                          • Resize to A/B/C/D: Chose a customised selection rectangle (as set below).
                                                                                                                          • Set Standard Size: Resize the selection rectangle, then chose "Set size A/B/C/D" to store it.

                                                                                                                          See also

                                                                                                                          • Image

                                                                                                                          External links

                                                                                                                          • Create an ossia with image capture
                                                                                                                          • How to create an ossia with another staff

                                                                                                                          Align elements

                                                                                                                          While dragging an element:

                                                                                                                          • Press Ctrl to constrain movement to the horizontal only.
                                                                                                                          • Press Shift to constrain movement to the vertical only.

                                                                                                                          Snap to grid

                                                                                                                          Snap to grid is a feature which allows you to drag an element in precise steps—useful for exact positioning.

                                                                                                                          Snap to grid buttons

                                                                                                                          To enable snap to grid, select an element and click one or both of the snap to grid buttons, located to the right of the horizontal and vertical offset fields in the Inspector. You can then drag the element in steps equal to the grid spacing. The default value is 0.5 sp.

                                                                                                                          To change the grid spacing:

                                                                                                                          1. Right-click on any of the snap to grid buttons in the Inspector, and select Configure Grid.
                                                                                                                          2. Set values for the horizontal and vertical grid spacing as required. Note that this is a fractional setting.

                                                                                                                          Advanced topics

                                                                                                                          Accessibility

                                                                                                                            Introduction

                                                                                                                            This document is written for blind and visually impaired users of MuseScore 2.x. It is not intended to provide a full description of all of the features of MuseScore; you should read this in conjunction with the regular MuseScore documentation.

                                                                                                                            MuseScore comes with support for the free and open source NVDA screen reader for Windows. The features in this document have been tested on Windows with NVDA. There is no support at the moment for other screen readers such as Jaws for Windows, or VoiceOver for macOS, which may work differently, or not at all.

                                                                                                                            At this point in time, MuseScore 2.x is mostly accessible as a score reader, not so much as a score editor. This document will focus on the score reading features, with only a brief description of score editing.

                                                                                                                            Initial setup

                                                                                                                            When you run MuseScore for the first time, you may want to permanently disable the Start Center window. To do so, go close the Start Center window first, then the Edit menu (Alt+E), choose Preferences, and in there, uncheck Show Start Center. Save and close the preferences window.

                                                                                                                            Finding your way around

                                                                                                                            The user interface in MuseScore works much like other notation programs, or other document-oriented programs in general. It has a single main document window in which you can work with a score. MuseScore supports multiple document tabs within this window. It also supports a split-screen view to let you work with two documents at once, and you can have multiple tabs in each window.
                                                                                                                            In addition to the score window, MuseScore has a menu bar that you can access via the shortcuts for the individual menus:

                                                                                                                            • File: Alt+F
                                                                                                                            • Edit: Alt+E
                                                                                                                            • View: Alt+V
                                                                                                                            • Add: Alt+A
                                                                                                                            • Notes: Alt+N
                                                                                                                            • Layout: Alt+L
                                                                                                                            • Style: Alt+S
                                                                                                                            • Plugins: Alt+P
                                                                                                                            • Help: Alt+H

                                                                                                                            Of these, only the File menu is of much interest when using MuseScore as a score reader. Once opening a menu, it may take several presses of the Up or Down keys before everything is read properly.

                                                                                                                            There are also a number of toolbars, palettes, and subwindows within MuseScore, and you can cycle through the controls in these using Tab (or Shift+Tab to move backwards through this same cycle). When you first start MuseScore, or load a score, focus should be in the main score window. Pressing Tab takes you to a toolbar containing a series of buttons for operations like New, Open, Play, and so forth. Tab will skip any buttons that aren't currently active. The names and shortcuts (where applicable) for these buttons should be read by your screen reader.

                                                                                                                            Once you have cycled through the buttons on the toolbar, the next window Tab will visit is the Palette. This would be used to add various elements to a score, but it is not currently accessible except for two buttons that are visited by Tab: a drop down to select between different workspaces (a saved arrangement of palettes), and a button to create a new workspace.

                                                                                                                            If you have opened one of the optional windows, such as the Inspector, or the Selection Filter, the Tab key will also visit these. You can close windows you do not need by going to the View menu and making sure none of the first set of checkboxes are selected (the windows that appear before the Zoom settings). By default, only the Start Center, Palettes and Inspector should be selected. See Initial Setup for instructions for disabling the Start Center. F9 can be used to toggle the Palettes while F8 will toggle the Inspector.

                                                                                                                            To return focus to the score window after visiting the toolbar, or a subwindow, press Esc. This also clears any selection you may have made in the score window.

                                                                                                                            The score window

                                                                                                                            When you first start MuseScore 2.x, an empty example score entitled “My First Score” is loaded by default. If you wish to experiment with editing features, this would be a good place to begin. Otherwise, you will probably want to start by loading a score. MuseScore uses the standard shortcuts to access system commands like Ctrl+O (Mac: Cmd+O) to open a file, Ctrl+S (Mac: Cmd+S) to save, Ctrl+W (Mac: Cmd+W) to close, etc.

                                                                                                                            If you press Ctrl+O (Mac: Cmd+O) to load a score, you are presented with a fairly standard file dialog. MuseScore can open scores in its own format (MSCZ or MSCX) as well as import scores in the standard MusicXML format, in MIDI format, or from a few other programs such as Guitar Pro, Capella, and Band-in-a-Box. Once you have loaded a score, it is displayed in a new tab within the score window. You can move between the tabs in the score window using Ctrl+Tab (does not apply for Mac).

                                                                                                                            There are a few interesting things you can do with a loaded score besides reading it note by note. You can press Space to have MuseScore play the score for you. You can use File / Export to convert to another format, including PDF, PNG, WAV, MP3, MIDI, MusicXML, etc. And of course, you can print it via File / Print or Ctrl+P (Mac: Cmd+P).

                                                                                                                            If a score contains multiple instruments, it may already have linked parts generated. Linked parts are presented as part tabs within score tabs, but currently, there is no way to navigate these part tabs using the keyboard. The parts would not normally contain information different from the score; they would just be displayed differently (each part on its own page). If a score does not already have parts generated, you can do so through File / Parts, and that dialog is accessible. If you wish to print the parts, you can work around the inability of accessing part tabs individually by using the File / Export Parts dialog, which automatically exports PDF’s (or other formats) for all parts in one step.

                                                                                                                            Score reading

                                                                                                                            When you first load a score, the score window has the keyboard focus, but there will be nothing selected. The first step to reading a score is to select something, and the most natural place to begin is with the first element of the score. Ctrl+Home (Mac: Cmd+Home) will do this. You will probably also want to use this, should you ever clear your selection by pressing Esc.

                                                                                                                            As you navigate between elements, your screen reader should give the name of the selected element (most likely the clef at the beginning of the top staff of your score). You will hear it read the name of the element (for example, “Treble clef”) and also give position information (for example, “Measure 1; Beat 1; Staff 1”). The amount of information read is not currently customizable, but we tried to place the most important first so you can quickly move on to the next element before it has finished reading, or just ignore the rest of what is read. Pressing Shift currently interrupts the reading, which might also be useful.

                                                                                                                            Most navigation in MuseScore is centered around notes and rests only – it will skip clefs, key signatures, time signatures, barlines, and other elements. So if you just use the standard Right and Left keys to move through your score, you will only hear about notes and rests (and the elements attached to them). However, there are two special navigation commands that you will find useful to gain a more complete summarization of the score:

                                                                                                                            • Next element: Ctrl+Alt+Shift+Right (Mac: Cmd+Option+Shift+Right)
                                                                                                                            • Previous element: Ctrl+Alt+Shift+Left (Mac: Cmd+Option+Shift+Left

                                                                                                                            These commands include clefs and other elements that the other navigation commands skip, and also navigate through all voices within the current staff, whereas other navigation commands such as Right and Left only navigate through the currently selected voice until you explicitly change voices. For instance, if you are on a quarter note on beat 1 of measure 1, and there are two voices in that measure, then pressing Right will move on to the next note of voice 1—which will be on beat 2—whereas pressing Ctrl+Alt+Shift+Right (Mac: Cmd+Option+Shift+Right) will stay on beat 1 but move to the note on voice 2. Only once you have moved through all notes on the current beat on the current staff will the shortcut move you on to the next beat. The intent is that this shortcut should be useful for navigating through a score if you don’t already know what the contents are.

                                                                                                                            When you navigate to an element, your screen reader should read information about it. For notes and rests, it will also read information about elements attached to them, such as lyrics, articulations, chord symbols, etc. For the time being, there is no way to navigate directly to these elements.
                                                                                                                            One important note: Up and Down by themselves, with Shift, or with Ctrl / Cmd are not useful shortcuts for navigation! Instead, they change the pitch of the currently selected note or notes. Be careful not to inadvertently edit a score you are trying to read. Up and Down should only be used with Alt/Option if your intent is navigation only. See the list of navigation shortcuts below.

                                                                                                                            Moving forwards or backwards in time

                                                                                                                            The following shortcuts are useful for moving “horizontally” through a score:

                                                                                                                            • Next element: Ctrl+Alt+Shift+Right
                                                                                                                            • Previous element: Ctrl+Alt+Shift+Left
                                                                                                                            • Next chord or rest: Right
                                                                                                                            • Previous chord or rest: Left
                                                                                                                            • Next measure: Ctrl+Right
                                                                                                                            • Previous measure: Ctrl+Left
                                                                                                                            • Go to measure: Ctrl+F
                                                                                                                            • First element: Ctrl+Home
                                                                                                                            • Last element: Ctrl+End

                                                                                                                            Moving between notes at a given point in time

                                                                                                                            • The following shortcuts are useful for moving “vertically” through a score:

                                                                                                                            • Next element: Ctrl+Alt+Shift+Right

                                                                                                                            • Previous element: Ctrl+Alt+Shift+Left
                                                                                                                            • Next higher note in voice, previous voice, or staff above: Alt+Up
                                                                                                                            • Next lower note in voice, next voice, or staff below: Alt+Down
                                                                                                                            • Top note in chord: Ctrl+Alt+Up
                                                                                                                            • Bottom note in chord: Ctrl+Alt+Down

                                                                                                                            The Alt+Up and Alt+Down commands are similar to the Ctrl+Alt+Shift+Right and Ctrl+Alt+Shift+Left commands in that they are designed to help you discover the content of a score. You do not need to know how many notes are in a chord, how many voices are in a staff, or how many staves are in a score in order to move vertically through the score using these commands.

                                                                                                                            Filtering score reading

                                                                                                                            Excluding certain elements like lyrics, or chord names while reading the score is possible by using the Selection filter (F6). Uncheck those elements you don't want to read.

                                                                                                                            Score playback

                                                                                                                            The Space bar serves both to start and stop playback. Playback will start with the currently selected note if one is selected; where playback was last stopped if no note is selected; or at the beginning of the score on first playback.

                                                                                                                            MuseScore supports looped playback so you can repeat a section of a piece for practice purposes. To set the “in” and “out” points for the loop playback via the Play Panel (F11):

                                                                                                                            1. First select the note in the score window where the loop should start
                                                                                                                            2. Go to the Play Panel and press the Set loop In position toggle button
                                                                                                                            3. Back to the score window, navigate to the note where you want the loop to end
                                                                                                                            4. Switch again to Play Panel, and press the Set loop Out position toggle button
                                                                                                                            5. To enable or disable the loop, press the Loop Playback toggle button

                                                                                                                            You can also control the loop playback and control other playback parameters, such as overriding the basic tempo of a score, using the View / Play Panel (F11).

                                                                                                                            Score editing

                                                                                                                            Score editing is currently not very accessible – too many score elements require intervention of the mouse in order to place objects onto a score. Additionally, visual reference and manual adjustment of the position of various elements is sometimes necessary due to MuseScore's limited support for conflict avoidance of elements.

                                                                                                                            In contrast, MuseScore does often provide ample default, and a platform to experiment with the basics of note input.
                                                                                                                            To enter note input mode, first navigate to the measure in which you would like to enter notes, then press “N”. Almost everything about note input is designed to be keyboard accessible, and the standard documentation should be good to help you through the process. Bear in mind that MuseScore can either be in note input or normal mode, and it won’t always be clear which mode of these you are in. When in doubt, press Esc. If you were in note input mode, this will take you out. If you were in normal mode, you will stay there, although you will also lose your selection.

                                                                                                                            Customization

                                                                                                                            You can customize the keyboard shortcuts using Edit / Preferences / Shortcuts. At some point, we may provide a set of special accessibility-optimized shortcuts and/or a way of saving and loading sets of shortcut definitions.

                                                                                                                            External links

                                                                                                                            • Creating a New Score in MuseScore with NVDA
                                                                                                                            • Inputting notes in MuseScore with NVDA
                                                                                                                            • Creating Modified Stave Notation in MuseScore

                                                                                                                            Albums

                                                                                                                            The Album Manager allows you to prepare a list of multiple scores and save the list as an album file ("*.album"), print all the scores as one long print job with consistent page numbers, or even join the scores into a single new MSCZ score. This is ideal for preparing an exercise book or combining multiple movements of an orchestration.

                                                                                                                            To open the Album Manager, go to File → Album...

                                                                                                                            Album Manager

                                                                                                                            Create album

                                                                                                                            1. To create a new album, click the New button. Fill in a title in the "Album Name:" box at the top.
                                                                                                                            2. To add scores to the album, click Add Score. A file selection dialog will appear and let you choose one or multiple scores from your file system. Click OK.
                                                                                                                            3. The scores you add will appear in a list in the Album Manager. You can rearrange their order by selecting a score and clicking the Up or Down button.

                                                                                                                            Load album

                                                                                                                            If you have previously created an album, you can open it through the Album Manager by clicking the Load button. A file selection dialog will appear to let you load the .album file from your file system.

                                                                                                                            Print album

                                                                                                                            To print an album as if it were a single document, click Print Album. The scores loaded into the Album Manager are printed in the order they are listed in with the correct page numbers, ignoring the page number offset values in Layout → Page Settings... → First page number for all but the first score. As the album is printed in one print job, double-sided printing (duplex printing) also works as expected.

                                                                                                                            Join scores

                                                                                                                            To combine multiple scores into a single .mscz file, click Join Scores. The scores are combined in the selected order into one single score. If not already present, line- and section breaks are added to the last measure or frame of each score in the combined file.
                                                                                                                            All style settings are taken from the first score, different style settings from subsequent score are ignored.

                                                                                                                            All the scores should have the same number of parts and staves for this to work correctly, ideally with the same instruments in the same order. If the scores have the same total number of instruments but not the same ones, or not in the same order, then the instrument names from the first score will overwrite ones from subsequent scores. If some of the scores have fewer instruments than the first score, then empty staves will be created for those sections. Any part or staff that is not present in the first score will be lost in the joined score.

                                                                                                                            Save album

                                                                                                                            Upon clicking the Close button, you will be prompted to save your album as a .album file. This file is not the same as a joined score; it simply consists of the list of scores. Album files can be loaded into the Album Manager as described above.

                                                                                                                            Cross-staff notation

                                                                                                                            In piano scores, it is common to write a musical phrase extending across both staves—bass and treble. This can be entered in MuseScore as follows:

                                                                                                                            1. Enter all notes in one staff:

                                                                                                                              Beamed notes in upper staff

                                                                                                                            2. Ctrl+Shift+↓ moves the selected note, or chord to the next staff (Mac: ⌘+Shift+↓):

                                                                                                                              Selected note moved to lower staff

                                                                                                                              Note : this moves the whole chord, not just a single note from a multi note chord. If you need notes in the old staff at the same place, use voices.

                                                                                                                            3. To adjust the beam, double-click it to show the handles. Use the keyboard arrows or drag the handles to change the beam angle and position:

                                                                                                                              Selected note moved to lower staff

                                                                                                                            See also

                                                                                                                            • Connect barlines: How to extend barlines over multiple staves.

                                                                                                                            External links

                                                                                                                            • How to span a chord or stem over two staves (MuseScore "Howto")

                                                                                                                            Early music features

                                                                                                                            MuseScore 2 offers several specialized functions to create engravings of early music (particularly medieval and renaissance) akin to commercial editions from the 20th century onwards.

                                                                                                                            Unbarred (or unmetered) notation

                                                                                                                            In MuseScore, notes lasting longer than the duration of a measure are normally tied across barlines. However MuseScore has a special feature which allows it to display the note values intact, without splitting and tying them in this way. This enables you to notate music which is unbarred (i.e. not divided into measures), such as that of the renaissance:

                                                                                                                            1. From the menu bar, select Style→General...→Score.
                                                                                                                            2. Tick the box labelled "Display note values across measure bar."
                                                                                                                              Dialog: Style / General.. / Early Music
                                                                                                                            3. Click "OK" or "Apply." The existing score is immediately updated.

                                                                                                                            Example

                                                                                                                            1. The example below shows an excerpt from the original score of "De Profundis Clamavi" for 4 voices by Nicolas Champion:
                                                                                                                              Early music - original
                                                                                                                            2. The same excerpt displayed in MuseScore:
                                                                                                                              Early music - barred
                                                                                                                            3. And after activating "Display note values across measure bar."
                                                                                                                              Early music - unbarred
                                                                                                                            4. To get rid of the barlines, just untick the “Show barlines” box in the Staff properties dialog. See also Mensurstrich (below).

                                                                                                                            Note: The feature is still in development and may contain bugs. The longest supported note value is the longa (a dotted longa is still broken up and tied over).

                                                                                                                            Mensurstrich

                                                                                                                            Since a complete lack of barlines could make performing the music more difficult for current musicians, many modern engravers settled on a compromise called Mensurstrich, where barlines are drawn between, but not across, staves.

                                                                                                                            Mensurstrich

                                                                                                                            To place barlines between staves:

                                                                                                                            1. Enter edit mode by double-clicking a barline in a staff above where you want the Mensurstriche;
                                                                                                                            2. Hold Shift and drag the lower handle of the barline down until it meets the top of the staff below;
                                                                                                                            3. Hold Shift and drag the upper handle of the barline down until it meets the bottom of the current staff;
                                                                                                                            4. Exit edit mode by pressing Esc or clicking on a blank area of the document window.

                                                                                                                            Alternatively, you can use the Inspector:

                                                                                                                            1. In the staff below the proposed Mensurstriche, uncheck "Show barlines" in the Staff properties dialog;
                                                                                                                            2. In the staff above where you want the Mensurstriche, right-click on one barline and chose Select→All Similar Elements in Same Staff;
                                                                                                                            3. In the Inspector, under "Barline," make the following settings: "Spanned staves" = 2; "Spanned from" = 8; "Spanned to = "0."

                                                                                                                            Note: To reset barlines, select the relevant barlines and make the following settings: "Spanned staves" = 1; "Spanned from" = 0; "Spanned to = "8."

                                                                                                                            Ambitus

                                                                                                                            Before there was the concept of an absolute pitch, performers were required to transpose vocal music to a singable range for their ensemble "on the fly." To aid them, an ambitus was sometimes included, marking the entire range of a voice at the beginning of the piece.

                                                                                                                            To apply an ambitus, use one of the following methods:

                                                                                                                            • Drag the ambitus symbol (from the Lines palette of the Advanced workspace) onto a clef.
                                                                                                                            • Select a clef, then double-click the ambitus symbol (in the Lines palette of the Advanced workspace).

                                                                                                                            Ambitus

                                                                                                                            When applied, the ambitus automatically displays the note range of the score: if there is a section break then only the note range of the section is displayed. Beyond the section break a new ambitus may be applied.

                                                                                                                            The note range of the ambitus can be adjusted manually by selecting it and changing the "Top note" and "Bottom note" values in the Inspector. For automatic adjustment click the Update Range button in the inspector.

                                                                                                                            Mensural time signatures

                                                                                                                            In the mensural notation system, time signatures did not define the length of a measure, but the length of breves and semibreves. MuseScore supports mensural time symbols as a display method in the Time signature properties dialog rather than as symbols, but they are just for show, as the proportion of e.g. half notes per whole notes cannot be modified.
                                                                                                                            One way to make use of these symbols is to replicate when composers of the renaissance had multiple voices in different time signatures simultaneously without using tuplets. Edit the time signature on a per-staff basis, as long as the beginning and end of a measure in all staves match up. If they do not, then consider increasing the size of the measures to the lowest common denominator.

                                                                                                                            Prolation
                                                                                                                            De Profundis Clamavi for 5 voices by Josquin Des Prez

                                                                                                                            See also

                                                                                                                            • Measure Operations: Split and join

                                                                                                                            Figured bass

                                                                                                                              Adding a new figured bass indication

                                                                                                                              1. Select the note to which the figured bass applies
                                                                                                                              2. Press the Figured Bass shortcut (default Ctrl+G; can be changed in Preferences)
                                                                                                                              3. Enter the text in the editor 'blue box' as required (see below)
                                                                                                                              4. Press Space to move to the next note ready for another figured bass indication (or click outside the editor box to exit it)

                                                                                                                              Example 1

                                                                                                                              With Space, the editor advances to the next note, or rest of the staff to which figured bass is being added. To move to a point in between, or to extend a figured bass group for a longer duration, see below Group Duration.

                                                                                                                              Tab advances the editing box to the beginning of the next measure.

                                                                                                                              Shift+Space moves the editing box to the previous staff note or rest.

                                                                                                                              Shift+Tab moves the editing box to the beginning of the previous measure.

                                                                                                                              Text format

                                                                                                                              Digits

                                                                                                                              Digits are entered directly. Groups of several digits stacked one above the other are also entered directly in a single text, stacking them with Enter:

                                                                                                                              Example 2

                                                                                                                              Accidentals

                                                                                                                              Accidentals can be entered using regular keys:

                                                                                                                              To enter: type:
                                                                                                                              double flat bb
                                                                                                                              flat b
                                                                                                                              natural h
                                                                                                                              sharp #
                                                                                                                              double sharp ##

                                                                                                                              These characters will automatically turn into the proper signs when you leave the editor. Accidentals can be entered before, or after a digit (and of course, in place of a digit, for altered thirds), according to the required style; both styles are properly aligned, with the accidental 'hanging' at the left, or the right.

                                                                                                                              Combined shapes

                                                                                                                              Slashed digits or digits with a cross can be entered by adding \, / or + after the digit (combining suffixes); the proper combined shape will be substituted when leaving the editor:

                                                                                                                              Example 3

                                                                                                                              The built-in font can manage combination equivalence, favoring the more common substitution:

                                                                                                                              1+, 2+, 3+, 4+ result in Modern digits 1 (or Historic digits 1)

                                                                                                                              and 5\, 6\, 7\, 8\, 9\ result in Modern digits 2 (or Historic digits 2)

                                                                                                                              Please remember that / can only by combined with 5; any other 'slashed' figure is rendered with a question mark.

                                                                                                                              + can also be used before a digit; in this case it is not combined, but it is properly aligned ('+' hanging at the left side).

                                                                                                                              Parentheses

                                                                                                                              Open and closed parentheses, both round: '(', ')' and square: '[', ']', can be inserted before and after accidentals, before and after a digit, before and after a continuation line; added parentheses will not disturb the proper alignment of the main character.

                                                                                                                              Notes:

                                                                                                                              • The editor does not check that parentheses, open and closed, round or square, are properly balanced.
                                                                                                                              • Several parentheses in a row are non-syntactical and prevent proper recognition of the entered text.
                                                                                                                              • A parenthesis between a digit and a combining suffix ('+', '\', '/') is accepted, but prevents shape combination.

                                                                                                                              Continuation lines

                                                                                                                              Continuation lines are input by adding an '_' (underscore) at the end of the line. Each digit of a group can have its own continuation line:

                                                                                                                              Example 4

                                                                                                                              Continuation lines are drawn for the whole duration of the figured bass group.

                                                                                                                              'Extended' continuation lines

                                                                                                                              Occasionally, a continuation line has to connect with the continuation line of a following group, when a chord degree has to be kept across two groups. Examples (both from J. Boismortier, Pièces de viole, op. 31, Paris 1730):

                                                                                                                              Example 4b

                                                                                                                              In the first case, each group has its own continuation line; in the second, the continuation line of the first group is carried 'into' the second.

                                                                                                                              This can be obtained by entering several (two or more) underscores "__" at the end of the text line of the first group.

                                                                                                                              Duration

                                                                                                                              Each figured bass group has a duration, which is indicated by a light gray line above it (of course, this line is for information only and it is not printed or exported to PDF).

                                                                                                                              Initially, a group has the same duration of the note to which it is attached. A different duration may be required to fit several groups under a single note or to extend a group to span several notes.

                                                                                                                              To achieve this, each key combination of the list below can be used:

                                                                                                                              • to advance the editing box by the indicated duration
                                                                                                                                AND
                                                                                                                              • to set the duration of the previous group up to the new editing box position.

                                                                                                                              Pressing several of them in sequence without entering any figured bass text repeatedly extends the previous group.

                                                                                                                              Type: to get:
                                                                                                                              Ctrl+1 1/64
                                                                                                                              Ctrl+2 1/32
                                                                                                                              Ctrl+3 1/16
                                                                                                                              Ctrl+4 1/8 (quaver)
                                                                                                                              Ctrl+5 1/4 (crochet)
                                                                                                                              Ctrl+6 half note (minim)
                                                                                                                              Ctrl+7 whole note (semibreve)
                                                                                                                              Ctrl+8 2 whole notes (breve)

                                                                                                                              (The digits are the same as are used to set the note durations)

                                                                                                                              Setting the exact figured bass group duration is only mandatory in two cases:

                                                                                                                              1. When several groups are fit under a single staff note (there is no other way).
                                                                                                                              2. When continuation lines are used, as line length depends on the group duration.

                                                                                                                              However, it is a good practice to always set the duration to the intended value for the purposes of plugins and MusicXML.

                                                                                                                              Editing existing figured basses

                                                                                                                              To edit a figured bass indication already entered:

                                                                                                                              • Select it, or the note it belongs to and press the same Figured Bass shortcut used to create a new one
                                                                                                                                or
                                                                                                                              • Double-click it

                                                                                                                              The usual text editor box will open with the text converted back to plain characters ('b', '#' and 'h' for accidentals, separate combining suffixes, underscores, etc.) for simpler editing.

                                                                                                                              Once done, press Space to move to a next note, or click outside the editor box to exit it, as for newly created figured basses.

                                                                                                                              Style

                                                                                                                              To configure how figured bass is rendered: from the menu, select Style → General.… → Figured Bass.

                                                                                                                              Configuration dialog box

                                                                                                                              • Font: The dropdown list contains all the fonts which have been configured for figured bass. A standard installation contains only one font, "MuseScore Figured Bass," which is also the default font.
                                                                                                                              • Size: Select a font-size in points. Note: This value is also modified by any change made to Scaling (Layout → Page Settings.…), or Scale ("Staff properties").
                                                                                                                              • Vertical Position: The distance (in spatia) from the top of the staff to the top margin of the figured bass text. Negative values go up (figured bass above the staff) and positive values go down (figured bass below the staff: a value greater than 4 is needed to step over the staff itself).
                                                                                                                              • Line Height: The distance between the base line of each figured bass line, as a percentage of font size.

                                                                                                                                The following picture visualizes each numeric parameter:

                                                                                                                                Parameters

                                                                                                                              • Alignment: Select the vertical alignment: with Top, the top line of each group is aligned with the main vertical position and the group 'hangs' from it (this is normally used with figured bass notation and is the default); with Bottom, the bottom line is aligned with the main vertical position and the group 'sits' on it (this is sometimes used in some kinds of harmonic analysis notations):

                                                                                                                                Vertical alignment

                                                                                                                              • Style: Chose between "Modern" or "Historic." The difference between the two styles is shown below:

                                                                                                                                Styles

                                                                                                                              Proper syntax

                                                                                                                              For the relevant substitutions and shape combinations to take effect and for proper alignment, the figured bass mechanism expects input texts to follow some rules (which are in any case, the rules for a syntactical figured bass indication):

                                                                                                                              • There can be only one accidental (before or after), or only one combining suffix per figure;
                                                                                                                              • There cannot be both an accidental and a combining suffix;
                                                                                                                              • There can be an accidental without a digit (altered third), but not a combining suffix without a digit.
                                                                                                                              • Any other character not listed above is not expected.

                                                                                                                              If a text entered does not follow these rules, it will not be processed: it will be stored and displayed as it is, without any layout.

                                                                                                                              Summary of keys

                                                                                                                              Type: to get:
                                                                                                                              Ctrl+G Adds a new figured bass group to the selected note.
                                                                                                                              Space Advances the editing box to the next note.
                                                                                                                              Shift+Space Moves the editing box to the previous note.
                                                                                                                              Tab Advances the editing box to the next measure.
                                                                                                                              Shift+Tab Moves the editing box to the previous measure.
                                                                                                                              Ctrl+1 Advances the editing box by 1/64, setting the duration of the previous group.
                                                                                                                              Ctrl+2 Advances the editing box by 1/32, setting the duration of the previous group.
                                                                                                                              Ctrl+3 Advances the editing box by 1/16, setting the duration of the previous group.
                                                                                                                              Ctrl+4 Advances the editing box by 1/8 (quaver), setting the duration of the previous group.
                                                                                                                              Ctrl+5 Advances the editing box by 1/4 (crochet), setting the duration of the previous group.
                                                                                                                              Ctrl+6 Advances the editing box by a half note (minim), setting the duration of the previous group.
                                                                                                                              Ctrl+7 Advances the editing box by a whole note (semibreve), setting the duration of the previous group.
                                                                                                                              Ctrl+8 Advances the editing box by two whole notes (breve), setting the duration of the previous group.
                                                                                                                              Ctrl+Space Enters an actual space; useful when figure appears "on the second line" (e.g., 5 4 -> 3).
                                                                                                                              BB Enters a double flat.
                                                                                                                              B Enters a flat.
                                                                                                                              H Enters a natural.
                                                                                                                              # Enters a sharp.
                                                                                                                              ## Enters a double sharp.
                                                                                                                              _ Enters a continuation line.
                                                                                                                              __ Enters an extended continuation line.

                                                                                                                              File formats

                                                                                                                                MuseScore can import and export a wide variety of file formats, allowing you to share and publish scores in the format that best meets your needs.

                                                                                                                                MuseScore native format

                                                                                                                                MuseScore saves files in the following native formats:

                                                                                                                                • *.MSCZ: The default MuseScore file format. Being compressed it takes up relatively little disk space.
                                                                                                                                • *.MSCX: An uncompressed MuseScore file format.
                                                                                                                                • .*.MSCZ, / .*.MSCX,: These are backup files. Notice the point (full stop) added before the file name, and the comma added to the file extension.

                                                                                                                                A note about fonts: MuseScore does not embed text fonts in saved or exported native format files. If you want your MuseScore file to be viewed by other MuseScore users, make sure you are using the built-in FreeSerif or FreeSans font families for your text, or a font that the other parties have installed too. If a system does not have the fonts specified in your original file, MuseScore will use a fallback option, which may cause your score to appear differently.

                                                                                                                                MuseScore format (*.mscz)

                                                                                                                                MSCZ is the standard MuseScore file format and recommended for most uses. A score saved in this format takes up very little disk space, but preserves all the necessary information. The format is a ZIP-compressed version of .mscx files and includes any images.

                                                                                                                                Uncompressed MuseScore format (*.mscx)

                                                                                                                                MSCX is the uncompressed version of the MuseScore file format. A score saved in this format will retain all information, except images. It can be opened with a text editor, allowing the user access to the file's source code.

                                                                                                                                MuseScore backup file (.*.mscz,) or (.*.mscx,)

                                                                                                                                Backup files are created automatically and saved in the same folder as your normal MuseScore file. The backup copy contains the previously saved version of the MuseScore file and can be important if your normal copy becomes corrupted, or for looking at an older version of the score.

                                                                                                                                The backup file adds a period to the beginning of the file name (.) and a comma (,) to the end (e.g. if your normal file is called "untitled.mscz", the backup copy will be ".untitled.mscz,"), and the period and comma need to be removed from the name in order to open the backup file in MuseScore. As it is stored in the same folder as your normal MuseScore file, you may also need to give it a unique name (e.g. changing ".untitled.mscz," to "untitled-backup1.mscz").

                                                                                                                                Note: In order to see the MuseScore backup files, you may need to change your system settings to "Show hidden files". See also How to recover a backup copy of a score (MuseScore 2.x).

                                                                                                                                Graphic files (export only)

                                                                                                                                MuseScore can export a score as a graphic file in either PDF, PNG or SVG format.

                                                                                                                                PDF (*.pdf)

                                                                                                                                PDF (Portable Document Format) files are ideal for sharing your sheet music with others who do not need to edit the content. This is a very widely-used format and most users will have a PDF viewer of some kind on their computers.

                                                                                                                                To set the resolution of exported PDFs:

                                                                                                                                1. From the menu bar, chose Edit→Preferences... (Mac: MuseScore→Preferences...), and select the "Export" tab;
                                                                                                                                2. Set the resolution in the "PDF" section.

                                                                                                                                PNG (*.png)

                                                                                                                                PNG (Portable Network Graphics) files are based on a bitmap image format, widely supported by software on Windows, Mac OS, and Linux, and very popular on the web. MuseScore creates PNG images as they would appear if printed, one image per page.

                                                                                                                                To set the resolution of exported PNG images:

                                                                                                                                1. From the menu bar, chose Edit→Preferences... (Mac: MuseScore→Preferences...), and select the "Export" tab;
                                                                                                                                2. Set the resolution and transparency in the PNG/SVG section.

                                                                                                                                Note: If you want to create images that show only parts of the score (with or without screen-only items such as frame boxes, invisible notes, and out-of-range note colors), use Image capture instead.

                                                                                                                                SVG (*.svg)

                                                                                                                                SVG (Scalable Vector Graphics) files can be opened by most web browsers (except Internet Explorer before version 9) and most vector graphics software. However, most SVG software does not support embedded fonts, so the appropriate MuseScore fonts must be installed to view these files correctly. SVG is the format used on MuseScore.com for all scores saved online since May 2017 (coinciding with the release of MuseScore 2.1: before this the format was PNG).

                                                                                                                                To set resolution and transparency of exported SVG files, see the instructions under PNG (above). Note that MuseScore does not (yet) support gradients on export (although it does for images in a score).

                                                                                                                                Audio files (export only)

                                                                                                                                MuseScore can create normalised, stereo audio of the score in any of the following formats: WAV, MP3, OGG VORBIS, FLAC. To export an audio file:

                                                                                                                                1. From the menu, select File → Export...;
                                                                                                                                2. Chose the desired format from the dropdown menu, then press Save.

                                                                                                                                You can adjust the sample rate of all audio formats as follows:

                                                                                                                                1. From the menu bar, select Edit→Preferences... (Mac: MuseScore→Preferences...), and click on the Export tab;
                                                                                                                                2. Set "Sample rate" in the "Audio" section.

                                                                                                                                WAV audio (*.wav)

                                                                                                                                WAV (Waveform Audio Format) is an uncompressed sound format. This was developed by Microsoft and IBM, and is widely supported by software for Windows, OS X, and Linux. It is an ideal format for use when creating CDs, as full sound quality is preserved. For sharing via email or the internet, use a compressed alternative such as MP3.

                                                                                                                                MP3 (*.mp3)

                                                                                                                                MP3 is a very widely-used compressed audio format. MP3 files are ideal for sharing and downloading over the internet due to their relatively small size.

                                                                                                                                For Windows and Mac users with an older version of MuseScore (Windows: prior to 2.2, Mac prior to 2.3.2), an additional library, lame_enc.dll (Windows) or libmp3lame.dylib (Mac), must be installed to create MP3 files (for Linux, it is up to the distribution maintainer whether or not to include this). MuseScore will prompt you for its location on the first attempt of an MP3 export. You can get it at http://lame.buanzo.org/.

                                                                                                                                Some Mac users may find MuseScore encounters an error loading the MP3 library, possibly due to that library being a 32-bit library. A 64-bit build that will work with MuseScore is available from http://thalictrum.com/en/products/lame (note that it is necessary to rename the file to libmp3lame.dylib for MuseScore to recognize it). Homebrew users just need to run brew install lame.

                                                                                                                                As of version 2.1 you can set the MP3 bitrate:

                                                                                                                                1. From the menu bar, chose Edit→Preferences... (Mac: MuseScore→Preferences...), and select the "Export" tab;
                                                                                                                                2. Set the MP3 bitrate in the "Audio" section.

                                                                                                                                FLAC audio (*.flac)

                                                                                                                                Free Lossless Audio Codec (FLAC) is compressed audio format. FLAC files are approximately half the size of uncompressed audio and just as good quality. Windows and OS X do not have built-in support for FLAC, but software such as the free and open source VLC media player can play FLAC files on any operating system.

                                                                                                                                Ogg Vorbis (*.ogg)

                                                                                                                                Ogg Vorbis is intended as a patent-free replacement for the popular MP3 audio format (which MuseScore also supports—see above). Like MP3, Ogg Vorbis files are relatively small (often a tenth of uncompressed audio), but some sound quality is lost. Windows and OS X do not have built-in support for Ogg Vorbis. However, software such as VLC media player and Firefox can play Ogg files on any operating system.

                                                                                                                                Share with other music software

                                                                                                                                MuseScore can import and export MusicXML and MIDI files; it is also able to import a variety of native format files from other music notation programs.

                                                                                                                                MusicXML (*.xml, *.musicxml)

                                                                                                                                MusicXML is the universal standard for sheet music. It is the recommended format for sharing sheet music between different scorewriters, including MuseScore, Sibelius, Finale, and more than 100 others. As of version 2.2, MuseScore exports as .musicxml, and imports both, *.xml and *.musicxml.

                                                                                                                                Compressed MusicXML (*.mxl)

                                                                                                                                Compressed MusicXML creates smaller files than regular MusicXML. This is a newer standard and isn't as widely supported by older scorewriters, but MuseScore has full import and export support.

                                                                                                                                MIDI (*.mid, *.midi, *.kar)

                                                                                                                                MIDI (Musical Instrument Digital Interface) is a format widely supported by sequencers and music notation software. For details of the protocol see the MIDI Association website.

                                                                                                                                MIDI files are very useful for playback purposes but contain little in the way of score layout information (formatting, pitch spelling, voicing, ornaments, articulations, repeats, key signatures etc.). To share files between different music notation software, MusicXML is recommended instead.

                                                                                                                                For details about how to import MIDI files see MIDI import.

                                                                                                                                MuseData (*.md) (import only)

                                                                                                                                MuseData is a format developed by Walter B. Hewlett beginning in 1983 as an early means of sharing music notation between software. It has since been eclipsed by MusicXML, but several thousand scores in this format are still available online.

                                                                                                                                Capella (*.cap, *.capx) (import only)

                                                                                                                                CAP and CAPX files are created by the score writer, Capella. MuseScore imports version 2000 (3.0) or later fairly accurately (2.x doesn't work, while the *.all format from 1.x versions is not supported at all).

                                                                                                                                Bagpipe Music Writer (*.bww) (import only)

                                                                                                                                BWW files are created by the niche score writer, Bagpipe Music Writer.

                                                                                                                                BB (*.mgu, *.sgu) (import only)

                                                                                                                                BB files are created by the music arranging software, Band-in-a-Box. MuseScore's support is currently experimental.

                                                                                                                                Overture (*.ove) (import only)

                                                                                                                                OVE files are created by the score writer Overture. This format is mainly popular in Chinese-language environments, such as Mainland China, Hong Kong, and Taiwan. MuseScore's support is currently experimental.

                                                                                                                                Guitar Pro (*.gtp, *.gp3, *.gp4, *.gp5, *.gpx) (import only)

                                                                                                                                GP files are created by Guitar Pro.

                                                                                                                                See also

                                                                                                                                • Open/Save/Export/Print
                                                                                                                                • Recovered files

                                                                                                                                External links

                                                                                                                                • How to recover a backup copy of a score

                                                                                                                                Fretboard diagrams

                                                                                                                                  A range of fretboard (or chord) diagrams for the guitar are pre-provided in the Fretboard Diagrams palette in the Advanced Workspace (versions prior to 2.0.3 feature only one diagram).

                                                                                                                                  Fretboard diagrams palette

                                                                                                                                  You can create a chord diagram for any fretted, stringed instrument by editing an existing one. It can be saved to a custom palette for future use if required.

                                                                                                                                  Add a fretboard diagram

                                                                                                                                  To add a fretboard diagram to the score, use one of the following methods:

                                                                                                                                  • Select a note in voice 1 and double-click a fretboard diagram from a palette.
                                                                                                                                  • Drag and drop a fretboard diagram from a palette to the desired position in the score.

                                                                                                                                  Edit fretboard diagram

                                                                                                                                  1. Right-click on a diagram in the score and select Fretboard Diagram Properties....
                                                                                                                                  2. Adjust the number of instrument strings, using the "Strings" spin box at the bottom left of the window.
                                                                                                                                  3. Adjust the fret position number using the scroll bar on the right-hand side.
                                                                                                                                  4. Adjust how many frets to display (height-wise) using the "Frets" spin-box at the bottom right of the window.
                                                                                                                                  5. To place a dot on a string fret, click on that fret. To remove the dot, click on the fret again.
                                                                                                                                  6. Click just above the diagram to toggle a string between:
                                                                                                                                    • Open (o)
                                                                                                                                    • Mute/unplayed (x)
                                                                                                                                    • No indication.
                                                                                                                                  7. To create a barre or partial barre:
                                                                                                                                    i. Make sure the desired fret position is clear of black dots (click on a dot to remove it);
                                                                                                                                    ii. Hold Shift and click on the fret where you want the barre to begin. Note: Only one barre can be applied per diagram;
                                                                                                                                    iii. To delete a barre, click on the black dot where the barre begins.

                                                                                                                                  For example, to create a full-barre F# chord, from a C chord:

                                                                                                                                  1. Place the C fretboard diagram on the score, right-click on it and select Fretboard Diagram Properties....
                                                                                                                                  2. Click on the relevant fret positions to establish the fingering dots.
                                                                                                                                  3. Set "Frets" to "4" and fret number (right-hand scroll bar) to "2." The diagram should now look like this:

                                                                                                                                    Fretboard diagram - step 1

                                                                                                                                  4. Create the barre by holding Shift and clicking on the second fret of the 6th string. Click "OK" to exit and you should get this:

                                                                                                                                    Fretboard diagram - step 2

                                                                                                                                    The same principle applies if you want a partial barré. For example, the partial barré in an A7 chord is created by pressing Shift, then clicking on the 4th string, second fret:

                                                                                                                                    A7 chord

                                                                                                                                  Adjust position, size, color

                                                                                                                                  The size ("Scale"), color and position of a fretboard diagram can be changed by clicking on it and altering the relevant values in the Inspector.

                                                                                                                                  The position of the fretboard diagram can also be adjusted in Edit mode:

                                                                                                                                  1. Double-click on the diagram (or click on it and press Ctrl+E (Mac: Cmd+E); or right-click on it and select Edit element).
                                                                                                                                  2. Press the arrow keys for fine positioning (0.1 sp. at a time); or press Ctrl+Arrow (Mac: Cmd+Arrow) for larger adjustments (1 sp. at a time).

                                                                                                                                  Fretboard diagram style

                                                                                                                                  Some default properties of fretboard diagrams (barre thickness, vertical position, size etc.) can be adjusted from the menu: select Style → General… → Chord Symbols, Fretboard Diagrams. Any changes made here affect all existing diagrams, as well as those applied subsequently.

                                                                                                                                  MIDI import

                                                                                                                                    MuseScore kan importere MIDI filer (.mid/.midi/.kar) og konvertere dem til musiknotation. Filer importeres ved at bruge standard Åbn funktionen.

                                                                                                                                    Import af filer

                                                                                                                                    Programmet vil i første omgang omsætte MIDI til notation, med brug af standard indstillinger. Et MIDI Import Panel , med en liste af kanaler, vil blive vist i bunden af skærmen, sammen med de mulige indstillinger for hver kanal (Kun kanaler som indholder nodeinformation, vil blive vist). Indstillingerne kan ændres kanal for kanal, og data kan derefter re-importeres: Knappen "Aktivér" i toppen af panelet, vil straks udføre ændringerne. "Fortryd" knappen vil annulere ændringer, som ikke er gemt. Det fædige resultat skulle gerne være, at filen overføres til nodearket i en bedre kvalitet.

                                                                                                                                    Brug Skift+hjul eller Ctrl+hjul til at forskyde indstillingerne vandret; brug musens hjul alene til at bladre gennem kanalerne (eller brug skyderne i højre side og forneden).

                                                                                                                                    Hvis der er mere end en kanal, vil der blive indsat en ekstra kanal øverst, som ændrer alle kanaler på en gang.

                                                                                                                                    MIDI Import Panel

                                                                                                                                    I MIDI Import Panelet kan der vælges hvilke kanaler, der skal importeres, og rækkefølgen kan ændres. En række informationer om hver kanal vises: Lyd, nodelinjens navn, og sangtekster hvis der er nogen. Hvis kolonnen "Sangtekster" vIses, betyder det at der er en kanal med tekster, som kan knyttes til de øvrige kanaler via drop-down menuen.

                                                                                                                                    MIDI import panelet opdaterer informationerne for det aktuelle nodeark, hvis brugeren har flere åbne. Når MIDI panelet ikke længere skal bruges, kan det lukkes ved at klikke på X i øverste venstre hjørne. Panelet kan åbnes igen ved tryk på knappen "Vis MIDI import panel", som kommer frem i bunden af skærmen, når panelet lukkes.

                                                                                                                                    Når nodearket er blevet gemt, vil MIDI Import Panelet ikke være tilgængeligt, da MuseScore ikke længere er ved at importere en MIDI fil.

                                                                                                                                    Indstillingsmuligheder

                                                                                                                                    MuseScore instrument
                                                                                                                                    Tildel et MuseScore instrument (fra instruments.xml eller fra en brugerdefineret xml fil fra Foretrukne) som definerer nodelinjerne navn, nøgle, transponering, artikulationer osv.
                                                                                                                                    Max. kvantificering

                                                                                                                                    Kvantificer MIDI noder efter et fast gitter. Max. opløsningen for gitteret kan sættes fra rullemenuen:

                                                                                                                                    • Værdi fra Foretrukne (standard) - værdien for kvantificering hentes fra billedet Foretrukne (på “Import” fanen)
                                                                                                                                    • Kvart, Ottendedel, 16. del, 32. del, 64. del, 128. del - brugerdefineret værdi

                                                                                                                                    Det aktuelle kvantificerings gitter er dog adaptivt, og reduceres når nodens varighed er kort, så kvantificerings værdien er forskellig for hver node. Der er dog en øvre grænse for kvantificerings værdien, der kan sættes af brugeren som "max. kvantificering".
                                                                                                                                    Hvis noden f.eks. er lang -en halvnode - og max. kvantificering er sat til 8. del, så vil noden blive kvantificeret med 8. dels-node-gitteret, og ikke med halv- eller flerdelsnode, som det ellers er forudsat i algoritmen.
                                                                                                                                    En sådan tilgang til kvantificeringen vil sikre at alle noder i nodearket (uanset længde) bliver korrekt kvantificeret.

                                                                                                                                    Max. stemmer
                                                                                                                                    Sætter det maksimalt tilladte antal musikalske stemmer.
                                                                                                                                    Find tupletter
                                                                                                                                    Når denne mulighed er sat, vil der blive søgt efter tupletter, og det tilsvarende kvantificerings gitter vil blive anvendt. I undermenuen kan der vælges hvilke typer tupletter, der søges efter
                                                                                                                                    Menneskelig udførelse
                                                                                                                                    Hvis denne indstilling er sat, vil nøjagtigheden for MIDI-til-nodeark konverteringen blive reduceret, til fordel for læseligheden. Det er især brugbart for MIDI filer, som ikke er rettet ind, så et fast kvantificerings gitter kan bruges. For disse filer vil der, i hele musikstykket, blive brugt en automatisk rutine til søgning efter taktslag, som vil forsøge at bestemme taktstregernes placering.
                                                                                                                                    Halveret taktantal
                                                                                                                                    Denne indstilling kan bruges for MIDI files, som ikke er rettet ind (ved "menneskelig udførelse"). Det vil halvere antallet af takter i forhold til det der er fundet ved søgning efter taktslag. Kan specielt bruges hvis søgerutinen giver dobbelt så mange takter, som nødvendigt.
                                                                                                                                    Taktart
                                                                                                                                    Denne indstilling er til rådighed for MIÐI filer, som ikke er rettet ind. Brugeren kan vælge en passende taktart for hele stykket, hvis den detekterede værdi er forkert. Denne mulighed kan være nyttig, da den håndterer importerede tupletter korrekt, i modsætning til taktarten fra paletten.
                                                                                                                                    Del nodelinje
                                                                                                                                    Denne indstilling kan bruges på mange klaver kanaler - for at tildele noder til musikerens højre og venstre hånd. Der kan bruges fast tonehøjde opdeling - som kan indstilles fra et underpunkt - eller flydende opdeling (programmet vil nærmest gætte sig frem på basis af en hånds bredde).
                                                                                                                                    For slagtøjskanaler vil hver trommelyd få sin egen nodelinie. Der er også et underpunkt, hvor man kan bestemme om der må anvendes kantede pararanteser om de nyoprettede tromme kanaler.
                                                                                                                                    Nøgleændringer
                                                                                                                                    Små nøgler kan blive indsat på en nodelinje, for at få akkorder placeret tættere på de 5 linjer. Nøgleændringerne baseres på den gennemsnitlige tonehøjde for noderne i akkorden. Sammenbundne grupper af noder brydes ikke ved indsættelse af nøgler (skulle det ske bør det raporteres som en fejl på importmidi_clef.cpp). Denne indstilling er ikke til rådighed for slagtøjslinjer.
                                                                                                                                    Forenklede varigheder
                                                                                                                                    Reducerer antallet af pauser, for at give "simplere" node varigheder. Denne indstilling kan også fjerne pauser og forlænge noder på slagtøjslinjer.
                                                                                                                                    Vis staccato
                                                                                                                                    Indstillingen vil vise/skjule staccato markeringer i nodearket.
                                                                                                                                    Punkterede noder
                                                                                                                                    Bestemmer om MuseScore skal benytte punkterede noder eller bindebuer.
                                                                                                                                    Vis tempo tekst
                                                                                                                                    Viser/skjuler tempoangivelser i nodearket.
                                                                                                                                    Vis akkordnavne
                                                                                                                                    Viser/skjuler akkordnavne - hvis der er nogen - i nodearket, for XF MIDI fil formatet.
                                                                                                                                    Genkend optakt
                                                                                                                                    Når denne indstilling er valgt vil taktarten ikke blive ændret, når den første takt er kortere end den næste. Dette betegnes som en optakt, og vil gælde for alle spor under et.
                                                                                                                                    Genkend swing
                                                                                                                                    MuseScore forsøger at genkende swing, og automatisk erstatte et mønster af 4dels+8dels noder i trioler (for den mest almindelige swing fornemmelse, 2:1), eller en punkteret 8dels+16dels mønster (for shuffle, 3:1), med to 8dele og teksten “Swing” eller “Shuffle” i starten.

                                                                                                                                    Master palette

                                                                                                                                    The Master Palette is a repository of symbols used to populate the workspaces (Basic, Advanced, and Custom). It is also used to create new Time Signatures and Key Signatures.

                                                                                                                                    To open, use either of the following options:

                                                                                                                                    • Press Shift+F9 (Mac: fn+Shift+F9).
                                                                                                                                    • From the menu, select View → Master Palette.

                                                                                                                                    Master Palette

                                                                                                                                    The Master palette is divided into sections based on symbol type. Hovering the mouse over an item shows a tool tip (a short definition in black on yellow background).

                                                                                                                                    To transfer a Master palette item to a custom palette:

                                                                                                                                    • Drag the symbol from the Master Palette window into a custom palette.

                                                                                                                                    Note: Except for the Symbols section (below), it is not usual to add items directly to the score from the Master palette: use the workspace palettes instead. However, if desired, items can be added directly using either (i) drag-and-drop or (ii) by selecting one or more notes/rests and double-clicking the item.

                                                                                                                                    Symbols

                                                                                                                                    The Symbols section of the Master Palette is a large repository of hundreds of musical symbols in addition to those found in the preset workspaces. You can open it from the Master Palette, or directly from the score by using the shortcut Z.

                                                                                                                                    Symbols

                                                                                                                                    Find a symbol

                                                                                                                                    The symbols are listed under their respective musical font types: use the font menu on the bottom right of the box to specify Emmentaler, Gonville or Bravura. You can search for a particular symbol by entering a keyword in the search box.

                                                                                                                                    Apply a symbol

                                                                                                                                    To add an item to the score from the Symbols section, use any of the following options:

                                                                                                                                    • Drag and drop a symbol onto a staff.
                                                                                                                                    • Select a note or rest and double-click a symbol.

                                                                                                                                    The position of the symbol can be adjusted by dragging or by changing the horizontal / vertical offsets in the Inspector. Color and visibility can also be adjusted in the Inspector.

                                                                                                                                    Note: Elements from the Symbols section do not follow any positioning rules (in many cases unlike identical elements from other sections of the Master Palette), nor do they affect score playback.

                                                                                                                                    Connect symbols

                                                                                                                                    Elements from the Symbols section can be connected to each other on the score page, so that they can be moved as one unit:

                                                                                                                                    1. Apply first symbol to the score. Adjust position as required.
                                                                                                                                    2. Double click, or drag-and-drop, a second element onto the first symbol. Adjust position as required.

                                                                                                                                    Drag the first element and the attached element will follow.

                                                                                                                                    See also

                                                                                                                                    • Palettes and workspaces
                                                                                                                                    • Symbols and special characters (add musical symbols to text objects)

                                                                                                                                    Note input modes

                                                                                                                                      From version 2.1, you can enter notation using one of several new note input modes—in addition to the pre-existing Step-time and Re-pitch modes. These are accessed by clicking a small dropdown arrow next to the note entry button on the note input toolbar.

                                                                                                                                      Note entry modes

                                                                                                                                      Step-time

                                                                                                                                      This is the method of note entry that MuseScore has had from the beginning. You enter notes in Step-time mode by choosing a duration using the mouse or keyboard, and then choosing a pitch using the mouse, keyboard, MIDI keyboard or virtual piano.

                                                                                                                                      For details see Basic note entry.

                                                                                                                                      Re-pitch

                                                                                                                                      Re-pitch mode allows you to correct the pitches of a sequence of notes while leaving their durations unchanged (not to be confused with Accidental: Respell pitches).

                                                                                                                                      1. Select a note as your starting point;
                                                                                                                                      2. If you are using a pre-2.1 version of the program press N to enter note-input mode. This step is optional from 2.1 onwards.
                                                                                                                                      3. Select the Re-Pitch option from the Note input drop-down menu (or, for pre-2.1 versions, from the note input toolbar); or use the keyboard shortcut, Ctrl+Shift+I (Mac: Cmd+Shift+I).
                                                                                                                                      4. Now enter pitches using the keyboard, MIDI keyboard or virtual piano keyboard.

                                                                                                                                      You can also use the Re-pitch function to create a new passage from an existing one of the same sequence of durations—by copying and pasting the latter, then applying Re-pitch.

                                                                                                                                      Rhythm

                                                                                                                                      Rhythm mode allows you to enter durations with a single keypress. Combining Rhythm and Re-pitch modes makes for a very efficient method of note entry.

                                                                                                                                      1. Select your starting point in the score and enter Rhythm mode.
                                                                                                                                      2. Select a duration from the note input toolbar, or press a duration shortcut (numbers 1-9) on your computer keyboard. A note will be added to the score with the selected duration. In contrast to Basic note entry, pressing the . key will toggle dotting or not dotting all subsequent durations. All following rhythms will be dotted until the . key is pressed again. Unlike Basic note entry, the dot is to be pressed prior to entering the rhythm.
                                                                                                                                      3. Entering rests is similar to adding dotted notes. Press the 0 key to toggle entering rests. All rhythms entered will be rests until the 0 key is pressed again. This can be used concurrently with dotted notes.
                                                                                                                                      4. Continue pressing duration keys to enter notes with the chosen durations.
                                                                                                                                      5. Now use Re-pitch mode to set the pitches of the notes you just added.

                                                                                                                                      Real-time (automatic)

                                                                                                                                      The Real-time modes basically allow you to perform the piece on a MIDI keyboard (or MuseScore's virtual piano keyboard) and have the notation added for you. However, you should be aware of the following limitations which currently apply:

                                                                                                                                      • It is not possible to use a computer keyboard for Real-time input
                                                                                                                                      • You cannot enter tuplets or notes shorter than the selected duration
                                                                                                                                      • You cannot enter notes into more than one voice at a time

                                                                                                                                      However, these restrictions mean that MuseScore has very little guessing to do when working out how your input should be notated, which helps to keep the Real-time modes accurate.

                                                                                                                                      In the automatic version of Real-time input, you play at a fixed tempo indicated by a metronome click. You can adjust the tempo by changing the delay between clicks from the menu: Edit → Preferences... → Note Input (Mac: MuseScore → Preferences... → Note Input).

                                                                                                                                      1. Select your starting position in the score and enter Real-time (automatic) mode.
                                                                                                                                      2. Select a duration from the note input toolbar.
                                                                                                                                      3. Press and hold a MIDI key or virtual piano key (a note will be added to the score).
                                                                                                                                      4. Listen for the metronome clicks. With each click the note grows by the selected duration.
                                                                                                                                      5. Release the key when the note has reached the desired length.

                                                                                                                                      The score stops advancing as soon as you release the key. If you want the score to continue advancing (e.g. to allow you to enter rests) then you can use the Real-time Advance shortcut to start the metronome.

                                                                                                                                      Real-time (manual)

                                                                                                                                      In the manual version of Real-time input, you have to indicate your input tempo by tapping on a key or pedal, but you can play at any speed you like and it doesn't have to be constant. The default key for setting the tempo (called "Real-time Advance") is Enter on the numeric keypad (Mac: fn+Return), but it is highly recommended that you change this to a MIDI key or MIDI pedal (see below).

                                                                                                                                      1. Select your starting position in the score and enter Real-time (manual) mode.
                                                                                                                                      2. Select a duration from the note input toolbar.
                                                                                                                                      3. Press and hold a MIDI key or virtual piano key (a note will be added to the score).
                                                                                                                                      4. Press the Real-time Advance key. With each press the note grows by the selected duration.
                                                                                                                                      5. Release the note when it has reached the desired length.

                                                                                                                                      Real-time Advance shortcut

                                                                                                                                      The Real-time Advance shortcut is used to tap beats in manual Real-time mode, or to start the metronome clicks in automatic Real-time mode. It is called "Real-time Advance" because it causes the input position to more forward, or "advance", through the score.

                                                                                                                                      The default key for Real-time Advance is Enter on the numeric keypad (Mac: fn+Return), but it is highly recommended that you assign this to a MIDI key or MIDI pedal via MuseScore's MIDI remote control. The MIDI remote control is available from the menu: Edit → Preferences... → Note Input (Mac: MuseScore → Preferences... → Note Input).

                                                                                                                                      Alternatively, if you have a USB footswitch or computer pedal which can simulate keyboard keys, you could set it to simulate Enter on the numeric keypad.

                                                                                                                                      See also

                                                                                                                                      • Note input
                                                                                                                                      • Copy and paste

                                                                                                                                      External links

                                                                                                                                      • Video: Semi-Realtime MIDI Demo Part 1: New note entry modes (available as of MuseScore 2.1)
                                                                                                                                      • Introduction to the new Repitch Mode (YouTube)

                                                                                                                                      Noteheads

                                                                                                                                        A range of alternative noteheads – in addition to the "normal" – can be found in the Note Heads palette of the Advanced workspace and via the Inspector (see Change notehead group, below).

                                                                                                                                        Note: The design of the notehead may vary depending on the music font selected (Emmentaler, Gonville or Bravura). Those in the palette are displayed as half notes in Bravura font.

                                                                                                                                        Notehead groups

                                                                                                                                        MuseScore supports a number of notehead styles:

                                                                                                                                        • Normal: A standard notehead.
                                                                                                                                        • Crosshead (Ghost note): Used in percussion notation to represent cymbals. It also indicates muted and/or percussive effects in stringed instruments such as the guitar.
                                                                                                                                        • Diamond: Used to indicate harmonic notes in instruments such as the guitar, violin etc.
                                                                                                                                        • Slash: Used to notate rhythmic values.
                                                                                                                                        • Triangle: Used in percussion notation.
                                                                                                                                        • Shape notes: Do, Re, Mi, Fa, Sol, La, Ti.
                                                                                                                                        • Circle cross: Used in percussion notation.
                                                                                                                                        • Alternative Brevis: Used in early music notation.
                                                                                                                                        • Brackets (Parentheses): When applied, these go around the existing note (or accidental).

                                                                                                                                        Change notehead group

                                                                                                                                        To change the shape of one or more noteheads in the score, use one of the following:

                                                                                                                                        • Select one or more notes and double click a notehead in a palette
                                                                                                                                        • Drag a notehead from a palette onto a note in the score.
                                                                                                                                        • Select one or more notes and change the notehead in the Inspector, using the drop-down list under Note → Head group (not supported for drum staves).

                                                                                                                                        Change notehead type

                                                                                                                                        Occasionally you may need to change the apparent duration of a notehead—i.e. notehead type—without altering its actual, underlying duration:

                                                                                                                                        1. Select one or more notes.
                                                                                                                                        2. Chose one of the following options from the Inspector under Note → Head type:
                                                                                                                                          • Auto: Automatic, i.e, apparent duration = actual duration.
                                                                                                                                          • Whole: Whole notehead, regardless of actual duration.
                                                                                                                                          • Half: Half notehead, regardless of actual duration.
                                                                                                                                          • Quarter: Quarter notehead, regardless of actual duration.
                                                                                                                                          • Breve: Breve notehead, regardless of actual duration.

                                                                                                                                        Shared noteheads

                                                                                                                                        When two notes in different voices, but of the same written pitch, fall on the same beat, one of two things may happen:

                                                                                                                                        • The notes may share the same notehead.
                                                                                                                                        • The notes may be offset: i.e. arranged side by side.

                                                                                                                                        MuseScore follows standard music notation practice as follows:

                                                                                                                                        • Notes with stems in the same direction do not share noteheads.
                                                                                                                                        • Dotted notes do not share noteheads with undotted notes.
                                                                                                                                        • Black notes do not share noteheads with white notes.
                                                                                                                                        • Whole notes never share noteheads.

                                                                                                                                        Note: If two unison notes occur in the same voice they are always offset.

                                                                                                                                        Change offset noteheads to shared

                                                                                                                                        Offset noteheads can be turned into shared noteheads in one of two ways:

                                                                                                                                        • Make the smaller-value notehead invisible by selecting it and using the keyboard shortcut V (or unchecking the "Visible" option in the Inspector).
                                                                                                                                        • Alter the notehead type of the shorter-duration note to match the longer one by switching "Head type" in the "Note" section of the Inspector.

                                                                                                                                        Examples of notehead sharing

                                                                                                                                        1. In the first example below, the notes of voices 1 and 2 share noteheads by default, because they are all black, undotted notes:

                                                                                                                                          Shared black undotted noteheads

                                                                                                                                        2. By contrast, in the next example, white notes cannot share noteheads with black notes, so are offset to the right:

                                                                                                                                          Non-shared noteheads

                                                                                                                                          To create a shared notehead, make the black eighth note invisible or change its head type to match that of the white note (as explained above):

                                                                                                                                          Shared white noteheads

                                                                                                                                        Remove duplicate fret marks

                                                                                                                                        In certain cases, a shared notehead, when pasted to a tablature staff, may result in two separate fret marks on adjacent strings. To correct this, make any extraneous tablature notes invisible by selecting them and using the keyboard shortcut V (or by unchecking the "visible" option in the Inspector).

                                                                                                                                        External links

                                                                                                                                        • Shape notes at Wikipedia.
                                                                                                                                        • Ghost notes at Wikipedia.

                                                                                                                                        Parts

                                                                                                                                        MuseScore not only allows you to create and print the full score but also the individual instrument parts.

                                                                                                                                        Note: In the current version of MuseScore, only one part can be generated per single staff (or grand staff or staff/TAB system). If you want to create a part for a particular voice, you need to ensure that it has its own staff as well.

                                                                                                                                        Set up all parts at once

                                                                                                                                        This is the most straightforward method. Parts are generated on a one-to-one basis from the corresponding Instruments in the score:

                                                                                                                                        1. From the menu, select File → Parts...;
                                                                                                                                        2. Click the New All button (parts are named with the instrument name, and a number added to differentiate parts that have the same label in the main score);
                                                                                                                                          Part creation - all in one go
                                                                                                                                        3. Click OK.

                                                                                                                                        The parts can now be accessed by clicking on tabs above the document window.

                                                                                                                                        Define specific parts

                                                                                                                                        This method allows you to generate specific parts (rather than all-at-once), or to alter a previous parts set-up. It also allows you to specify multi-instrument parts, and define part names differently from the corresponding instruments, if needed.

                                                                                                                                        The following instructions use a string quartet as an example, but the same principles apply for any other ensemble:

                                                                                                                                        1. From the menu, select File → Parts...;
                                                                                                                                          Part creation - step 1
                                                                                                                                        2. In the Parts window click New to create a "part definition;"
                                                                                                                                          Part creation - step 2
                                                                                                                                        3. In the right pane, type the words you want to use for the "Part title" (this also serves for the corresponding part of the filename when exporting);
                                                                                                                                        4. Pick the instrument that you want to appear in your part by marking the relevant box in the right-hand pane. Usually, you only want one instrument per part, but sometimes you might need a part that includes more than one instrument (such as multiple percussion staves). MuseScore allows you to mark as many instruments per part as you need;
                                                                                                                                          Part creation step 4
                                                                                                                                        5. Repeat steps two through four (above) for each part as needed;
                                                                                                                                          Part creation step 5
                                                                                                                                        6. Once you're done, click OK to dismiss the Parts window.

                                                                                                                                        You have now finished setting up the parts. You do not need to do this again, unless you add or remove an instrument from your full score.

                                                                                                                                        Delete a Part

                                                                                                                                        1. Open the Parts dialog (File → Parts...);
                                                                                                                                        2. Select the relevant Part in the "Select Part" section;
                                                                                                                                        3. Press Delete.

                                                                                                                                        Export the parts

                                                                                                                                        1. From the menu, select File → Export Parts...;
                                                                                                                                        2. Navigate to the place you want them to be exported to and select the file format (PDF is the default);
                                                                                                                                        3. For filename just enter whatever prefix is useful for all parts, or leave the default (the filename of your score);
                                                                                                                                        4. Click OK.

                                                                                                                                        This will generate files with the names "<title>" + "-" + "<part name>.<extension>". In addition, when exporting as PDF, this will also generate "<title>" + "-Score_And_Parts.pdf".

                                                                                                                                        Save the parts

                                                                                                                                        Parts and score are "linked", which means that any change to the content in one will affect the other, but changes to the layout will not. When you have the parts created, they are saved along with the score (if you open the score you have tabs for the score and every part you created).

                                                                                                                                        However, if you wish to save a part individually:

                                                                                                                                        1. Make sure the part is "active." Select its tab if not;
                                                                                                                                        2. From the menu, select File → Save As....

                                                                                                                                        Print a part

                                                                                                                                        1. Make sure the part is "active." Select its tab if not;
                                                                                                                                        2. From the menu, select File → Print to open the print dialog.

                                                                                                                                        Plugins

                                                                                                                                          Overview

                                                                                                                                          Plugins are small pieces of code that add a particular feature to MuseScore. By enabling a plugin, a new menu option will be appended to the Plugins menu in MuseScore to accomplish a given action on the score or a part of it.

                                                                                                                                          Some plugins come pre-installed with MuseScore—see →below. You can find many more plugins in the plugin repository. Some plugins there work with MuseScore 2; others will only work with older versions of MuseScore, some work with either.
                                                                                                                                          To tell one from the other: for MuseScore 2.x the plugin code files have an extension of .qml, for older versions, it is .js.

                                                                                                                                          Installation

                                                                                                                                          Note that some plugins may require the installation of other components (fonts, e.g.) to work. Check the plugin's documentation for more information.

                                                                                                                                          Most plugins are provided as ZIP archives, so download the plugin's .zip file and uncompress it to one of the directories mentioned below. If a plugin is provided directly as an (unzipped) .qml file, simply download and place into one of these directories.

                                                                                                                                          Once a plugin is installed, it needs to be enabled in the Plugin Manager in order to use it—see →below.

                                                                                                                                          Windows

                                                                                                                                          MuseScore looks for pre-installed plugins in %ProgramFiles%\MuseScore 2\Plugins (or %ProgramFiles(x86)%\MuseScore 2\Plugins for the 64-bit versions) and in %LOCALAPPDATA%\MuseScore\MuseScore 2\plugins on Vista, Seven and 10 or C:\Documents and Settings\USERNAME\Local Settings\Application Data\MuseScore\MuseScore 2\plugins (adjusted to your language version) on XP.

                                                                                                                                          To install new plugins, the above folders should not be used or modified. Instead you can add other plugins to %HOMEPATH%\Documents\MuseScore2\Plugins, or specify a different folder to look for plugins in MuseScore's Preferences.

                                                                                                                                          macOS

                                                                                                                                          On macOS, MuseScore looks for pre-installed plugins in the MuseScore bundle in /Applications/MuseScore 2.app/Contents/Resources/plugins (to reveal files in the app bundle, right click on MuseScore 2.app and choose "Show package contents") and in ~/Library/Application Support/MuseScore/MuseScore 2/plugins.

                                                                                                                                          To install new plugins, the above folders should not be used or modified. Instead you can add other plugins to ~/Documents/MuseScore2/Plugins, or specify a different folder to look for plugins in MuseScore's Preferences.

                                                                                                                                          Linux

                                                                                                                                          In Linux, MuseScore looks for plugins in /usr/share/mscore-2.0/plugins and in ~/.local/share/data/MuseScore/MuseScore 2/plugins.

                                                                                                                                          To install new plugins, the above folders should not be used or modified. Instead you can add other plugins to ~/Documents/MuseScore2/Plugins, or specify a different folder to look for plugins in MuseScore's Preferences.

                                                                                                                                          Enable/disable plugins

                                                                                                                                          To be able to access the installed plugins from the Plugins menu, they need to be enabled in the Plugin Manager:

                                                                                                                                          Plugin manager

                                                                                                                                          Create/edit/run plugins

                                                                                                                                          It is possible to create new or edit existing plugins and run them via the Plugin Creator:

                                                                                                                                          Plugin creator

                                                                                                                                          Here also the documentation of all available elements can be found

                                                                                                                                          Plugins installed by default

                                                                                                                                          Some plugins come pre-installed with MuseScore, but they are not enabled by default. See →above to enable plugins.

                                                                                                                                          ABC Import

                                                                                                                                          This plugin imports ABC text from a file or the clipboard. Internet connection is required, because it uses an external web-service for the conversion, which uses abc2xml and gets send the ABC data, returns MusicXML and imports that into MuseScore.

                                                                                                                                          Break Every X Measures

                                                                                                                                          This plugin enters line breaks in the interval you select on the selected measures or, if no measures are selected, the entire score. It is no longer being distributed and has been replaced by Edit → Tools → Add/Remove Line Breaks. If you ever used an early beta version of MuseScore 2, though, you may still see the plugin left over.

                                                                                                                                          Notes → Color Notes

                                                                                                                                          This demo plugin colors notes in the selected range (or the entire score), depending on their pitch. It colors the note head of all notes in all staves and voices according to the Boomwhackers convention. Each pitch has a different color. C and C♯ have a different color. C♯ and D♭ have the same color.
                                                                                                                                          To color all the notes in black, just run that plugin again (on the same selection). You could also use the 'Remove Notes Color' plugin for this.

                                                                                                                                          Create Score

                                                                                                                                          This demo plugin creates a new score. It creates a new piano score with 4 quarters C D E F. It's a good start to learn how to make a new score and add notes from a plugin.

                                                                                                                                          helloQml

                                                                                                                                          This demo plugin shows some basic tasks.

                                                                                                                                          Notes → Note Names

                                                                                                                                          This plugin names notes in the selected range or the entire score. It displays the names of the notes (as a staff text) as per MuseScore's language settings, for voices 1 and 3 above the staff, for voices 2 and 4 below the staff, and for chords in a comma separated list, starting with the top note.

                                                                                                                                          Panel

                                                                                                                                          This demo plugin creates a GUI panel.

                                                                                                                                          random

                                                                                                                                          Creates a random score.

                                                                                                                                          random2

                                                                                                                                          Creates a random score too

                                                                                                                                          run

                                                                                                                                          This demo plugin runs an external command. Probably this will only work on Linux.

                                                                                                                                          scorelist

                                                                                                                                          This test plugin iterates through the score list.

                                                                                                                                          ScoreView

                                                                                                                                          Demo plugin to demonstrate the use of a ScoreView

                                                                                                                                          Walk

                                                                                                                                          This test plugin walks through all elements in a score

                                                                                                                                          See also

                                                                                                                                          • Tools

                                                                                                                                          Preferences

                                                                                                                                            You can customize many of MuseScore's default behaviors via the menu: Edit→Preferences... (Mac: MuseScore→Preferences...).

                                                                                                                                            The Preferences dialog has multiple tabs:

                                                                                                                                            Tabs in Preferences dialog

                                                                                                                                            Reset All Preferences to Default will reset all preferences to the ones MuseScore had when you installed it.

                                                                                                                                            Cancel will close the dialog without applying changes.

                                                                                                                                            General

                                                                                                                                            General Preferences

                                                                                                                                            Here you can define:

                                                                                                                                            • Program Start: Tick the boxes as appropriate to specify which score and what panels (Play Panel, Navigator, Start Center) you want to see when MuseScore opens.
                                                                                                                                            • Folders: Specify the default folders for score files, style files, custom score templates, plugins, additional SoundFonts and images.
                                                                                                                                            • Language: Chose the language used by the program. Translations may be updated from here too. Note that language translation updates can also be done via the menu: Help→Resource Manager.
                                                                                                                                            • Theme / Style (prior to version 2.1): Specify a dark or light theme and the size of icons.
                                                                                                                                            • Auto Save: How frequently the program autosaves.
                                                                                                                                            • OSC Remote Control:

                                                                                                                                            Canvas

                                                                                                                                            Canvas Preferences

                                                                                                                                            Use Canvas to set your preferred color and wallpaper for the score background and paper. The default "Background" is grey (RGB 221, 221, 221; Alpha 221) and the default "Paper," white.

                                                                                                                                            • Background: Use this to set the color or background around the score pages. Select "Color" then click on the bar to the right and make a choice from the color picker; or select "Wallpaper," click on the file icon and set a background image.
                                                                                                                                            • Paper : Sets the color or background of the score pages. Controls identical to "Background" (above).
                                                                                                                                            • Scroll Pages: This defines the way that the pages are layed out in the score. Chose "Horizontally" for a row layout, or "Vertically" for a column layout.
                                                                                                                                            • Miscellaneous: "Draw antialiased" (the default option) makes diagonal lines and edges of shapes look smoother. "Proximity for selecting elements" controls the distance the mouse may be from an object and still act on it. Smaller numbers require more precision, making it harder to click on small objects. Larger numbers are less precise, making it harder not to click on nearby objects unintentionally. Choose a comfortable working value.

                                                                                                                                            Note input

                                                                                                                                            Note Input Preferences

                                                                                                                                            On this tab there are note input and MIDI remote control preferences. Here the following can be set:

                                                                                                                                            Note Input

                                                                                                                                            • Enable MIDI Input: Leave checked to allow MIDI input of notes.
                                                                                                                                            • Color notes outside of usable pitch range: For details, see Coloring of notes outside an instrument's range and Usable pitch range (Staff properties: all staves).
                                                                                                                                            • Delay between notes in automatic real-time mode (as of version 2.1): See Real-time (automatic).
                                                                                                                                            • Play notes when editing: When ticked, MuseScore sounds the note when it is entered or selected. Tick "Play whole chord when adding note," if you want to hear all the notes of a chord when it is added to. You can also edit the "Default duration".

                                                                                                                                            MIDI Remote Control

                                                                                                                                            Midi Remote Control allows you to use certain keys on your MIDI keyboard to enter notes and rests and to select note durations, without involving the computer mouse or (computer) keyboard. The default setting is off.

                                                                                                                                            To assign a command to a MIDI key:

                                                                                                                                            1. Ensure that "MIDI Remote Control" is checked (your MIDI keyboard should be connected befor opening the program).
                                                                                                                                            2. Click the red button next to the option you wish to assign a MIDI key to: the red button now lights up.
                                                                                                                                            3. Press a MIDI keyboard key. The red button becomes unlit and the green button lights up instead. The MIDI key has now been assigned to the desired option.
                                                                                                                                            4. Repeat "2" and "3" to assign other keys.

                                                                                                                                            Once you have defined your key settings you can use the MIDI keyboard to control note input operations. You can verify your key settings by observing the MuseScore Note Input toolbar while pressing the MIDI keys.

                                                                                                                                            To temporarily deactivate Midi Remote Control: uncheck "Midi Remote Control": all MIDI input key action buttons are now greyed out. Note: Your key assignments are always saved between MuseScore sessions and are not affected by deactivation.

                                                                                                                                            Notes: (1) The "Clear" option turns off all the green buttons for the current MuseScore session but all the user-recorded MIDI key settings are retained and will be reloaded on the next session. (2) A MIDI key setting that is activated cannot afterwards be turned off, and the green button will always remain lit: however it can be overwritten with a different MIDI key by using the red button again. (3) If the same MIDI key is accidentally assigned to more than one option, then all the associated green buttons remain lit although only one will work. To fix, see "(2)".

                                                                                                                                            Score

                                                                                                                                            Score Preferences

                                                                                                                                            Score preferences include

                                                                                                                                            • Default instrument list files (two may be selected)
                                                                                                                                            • Default style for score and parts
                                                                                                                                            • Default zoom

                                                                                                                                            I/O

                                                                                                                                            I/O Preferences

                                                                                                                                            API / Device

                                                                                                                                            This enables you to set the audio interface (API) and specify the device to be used for audio playback: e.g. built-in speakers/headphones, USB headset, wireless, etc.

                                                                                                                                            MIDI Input/Output/Output Latency

                                                                                                                                            When an external MIDI input device is connected, its identifier appears in MIDI Input. As of MuseScore 2.2, when the device is connected for the first time, you also need to select the correct MIDI Output option in order to enable note input and correct audio playback (e.g. in Windows, this might be "MMS<device name>"): then close and reopen the program to confirm the changes.

                                                                                                                                            Versions of MuseScore prior to 2.2 only have the "MIDI Input" option. The correct MIDI output is automatically specified as long as the MIDI input device is connected correctly.

                                                                                                                                            Jack Audio Server

                                                                                                                                            Check these options as required if using the JACK Audio Connection Kit.

                                                                                                                                            Import

                                                                                                                                            Import Preferences

                                                                                                                                            These settings determine how files from other sources are imported:

                                                                                                                                            • Using either the built in MuseScore style or a style you choose
                                                                                                                                            • Guitar Pro and Overture character sets
                                                                                                                                            • MusicXML layout options
                                                                                                                                            • Shortest note in MIDI files

                                                                                                                                            Export

                                                                                                                                            Export Preferences

                                                                                                                                            These settings determine how MuseScore files are exported:

                                                                                                                                            • PNG/SVG image resolution (in DPI) and whether to use transparent background
                                                                                                                                            • Whether to expand repeats in exported MIDI files
                                                                                                                                            • Digital audio sample rate
                                                                                                                                            • MP3 bitrate (as of MuseScore 2.1)
                                                                                                                                            • Whether to export the layout and how to export system and page breaks to MusicXML

                                                                                                                                            Shortcuts

                                                                                                                                            Shortcuts Preferences

                                                                                                                                            Every action possible with MuseScore is listed, with the associated shortcut if it exists. To define a new shortcut, select an existing entry in the list and click Define... (or just double click the entry), then enter the new shortcut using up to four keys. You can also reset any shortcut in the list to its default value, or clear a shortcut you select. Shortcuts listed in preferences appear next to their associated commands in the menus.

                                                                                                                                            Note: Some shortcuts, including default ones, may not work with some keyboards.

                                                                                                                                            The list of shortcuts can be printed out or exported to other media (pdf etc.) using the Print button in the bottom right of the window.

                                                                                                                                            Update

                                                                                                                                            Update Preferences

                                                                                                                                            This sets whether MuseScore will check for updates at startup.

                                                                                                                                            Updates may be checked manually in Help→Check for updates.

                                                                                                                                            See also

                                                                                                                                            • Keyboard shortcuts
                                                                                                                                            • Language settings and translation updates
                                                                                                                                            • Update checking

                                                                                                                                            Recovered files

                                                                                                                                            If MuseScore or your computer should crash, or if power is lost, a pop-up message upon restarting MuseScore will ask if you wish to restore the previous session.
                                                                                                                                            Restore session dialog
                                                                                                                                            If you click No, any work from your previous session will be lost. If you click Yes, MuseScore will attempt to recover the files that were open.

                                                                                                                                            Behavior of saving after session recovery

                                                                                                                                            When MuseScore recovers files after a crash, it renames them with the full path name added in front of the original file name. This very long name will appear in the tab(s) above the active score window. On some operating systems, when a user saves any of these recovered files, it will be saved in the folder in which the program itself is running. This is not necessarily the same directory in which the scores were saved when they were created. You may not be able to locate the revised file in the usual folder.

                                                                                                                                            To avoid this, do not use "Save" the first time you save a recovered file. Use the "Save As..." menu item before making any revisions to the score, to save each recovered file under either its original name or a new name. This will open a window to allow you to navigate to the correct folder and directory. This is important in order to ensure that the file is saved to the folder in which you expect to find it later.

                                                                                                                                            Finding recovered files

                                                                                                                                            In the event that "Save" is used instead of "Save As..." with a recovered file, you will have to find the files in your computer. The actual location of those files will vary, depending on your operating system, and in which directory MuseScore is installed.

                                                                                                                                            For Windows 7, with a default installation of MuseScore to the x86 program files directory, recovered files are auto-saved to C:\Program Files (x86)\MuseScore 2\bin (actually %ProgramFiles(x86)%\MuseScore 2\bin).

                                                                                                                                            For Windows 10, look in C:\Users\[User Name]\AppData\Local\VirtualStore\Program Files (x86)\MuseScore 2\bin (actually%LOCALAPPDATA%\VirtualStore\%ProgramFiles(x86):~3%\MuseScore 2\bin).

                                                                                                                                            You may need to run a system-wide search in order to find files saved directly after a session recovery. Use keywords from the original file name as well as wildcards, and specify the date modified.

                                                                                                                                            See also

                                                                                                                                            Save/Export/Print

                                                                                                                                            External links

                                                                                                                                            How to recover a backup copy of a score

                                                                                                                                            Score properties

                                                                                                                                              The Score Properties dialog contains the document meta tags such as "workTitle," "Composer," "Copyright" etc. To view the dialog:

                                                                                                                                              1. Make sure that the applicable score or instrument part is the active tab;
                                                                                                                                              2. From the menu, select File → Score Properties (File → Info... in versions earlier than 2.0.3).

                                                                                                                                              Several meta tags are generated automatically when you create a score using the New Score Wizard, and others may be added later. Meta tags can also be incorporated into a header or footer if required—see below.

                                                                                                                                              Edit meta tags

                                                                                                                                              1. Make sure that the applicable score or instrument part is the active tab;
                                                                                                                                              2. From the menu, select File → Score Properties (File → Info... in versions earlier than 2.0.3);
                                                                                                                                                Score Properties
                                                                                                                                              3. Edit the text of the various meta tags as required;
                                                                                                                                              4. To add another meta tag, click on the New button. Fill in the "New tag name" field and press OK;
                                                                                                                                                Input tag name

                                                                                                                                              Preexisting meta tags

                                                                                                                                              Every score has the following fields available in Score Properties. Some are automatically filled in on score creation, while others will be empty unless specifically changed. The first four items in the following list are not user-modifiable, and cannot be used in the header or footer (they are not really meta tags).

                                                                                                                                              • File Path: The score file's location on your Computer (2.0.3 and later).
                                                                                                                                              • MuseScore Version: The version of MuseScore the score was last saved with.
                                                                                                                                              • Revision: The revision of MuseScore the score was last saved with.
                                                                                                                                              • API-Level: The file format version.
                                                                                                                                              • arranger: (empty)
                                                                                                                                              • composer: As entered in the New Score Wizard (which is also used to fill the composer text in the top vertical frame—be aware that later changes to one are not reflected in the other).
                                                                                                                                              • copyright: As entered in the New Score Wizard. Copyright info appears as seemingly uneditable text at the bottom of every page of a score, but it can be edited or removed by changing the value here.
                                                                                                                                              • creationDate: Date of the score creation. This could be empty, if the score was saved in test mode (see Command line options).
                                                                                                                                              • lyricist: As entered in the New Score Wizard (which is also used to fill the corresponding lyricist text in the top vertical frame—be aware that later changes to one are not reflected in the other).
                                                                                                                                              • movementNumber: (empty)
                                                                                                                                              • movementTitle: (empty)
                                                                                                                                              • originalFormat: This tag exists only if the score got imported and then contains the format the score got imported from (see file formats).
                                                                                                                                              • platform: The platform the score was created on: "Microsoft Windows", "Apple Macintosh", "Linux" or "Unknown". This might be empty if the score was saved in test mode.
                                                                                                                                              • poet: (empty)
                                                                                                                                              • source: May contain a URL if the score was downloaded from or saved to MuseScore.com.
                                                                                                                                              • translator: (empty)
                                                                                                                                              • workNumber: (empty)
                                                                                                                                              • workTitle: As entered in the New Score Wizard (which is also used to fill the corresponding title text in the top vertical frame—be aware that later changes to one are not reflected in the other).

                                                                                                                                              When working on multiple scores that belong to one larger work, the nomenclature is like this: workNumber and workTitle are the number and title of the larger work (e.g. opus 8, “Le quattro stagioni” (The four seasons) by Antonio Vivaldi), movementNumber is the number of the movement you’re working on (e.g. 3 for Autumn) and movementTitle is its title (“L’autunno”). It is customary, when using the New Score Wizard, to create a work with the movementTitle as title (even though it ends up in workTitle then) and, directly after creating the score, fixing up this information in the Score Properties dialogue. This ensures that the title frame of the printed score contains the information you expect but the metadata is also correct.

                                                                                                                                              Every part additionally has the following meta tag, generated and filled on part creation:

                                                                                                                                              • partName: Name of the part as given on part creation (which is also used to fill the corresponding part name text in the top vertical frame—be aware that later changes to one are not reflected in the other).

                                                                                                                                              Header/Footer

                                                                                                                                              To show the content of one or more meta tags in a header or footer for your score/part:

                                                                                                                                              1. Make sure that the correct score or instrument part is the active tab;
                                                                                                                                              2. From the menu, select Style → General... → Header, Footer, Numbers;

                                                                                                                                                Style / Header,Footer,Numbers

                                                                                                                                                If you hover with your mouse over the Header or Footer text region, a list of macros will appear, showing their meaning, as well as the existing meta tags and their content.

                                                                                                                                                Style / Header,Footer,Numbers

                                                                                                                                              3. Add tags (e.g. $:workTitle:) and macros (e.g. $M) to the appropriate boxes, as required;

                                                                                                                                              4. Click Apply to see how the header or footer looks in the score. Make corrections to the dialog if required;
                                                                                                                                              5. If an instrument part is in the active tab, click Apply to all parts, if you want to apply these settings to all the score parts;
                                                                                                                                              6. Click OK to assign the header or footer and exit the dialog.

                                                                                                                                              See also

                                                                                                                                              • Layout and formatting: Header and footer
                                                                                                                                              • Command line options: Test mode

                                                                                                                                              Staff properties

                                                                                                                                                The Staff Properties dialog allows you to make changes to the display of a staff, adjust its tuning and transposition, change instrument etc. To open:

                                                                                                                                                • Right-click on a staff and select Staff Properties....

                                                                                                                                                Staff type properties
                                                                                                                                                Staff Properties dialog, as of version 2.1.

                                                                                                                                                Staff Types

                                                                                                                                                For practical purposes, there are four different types of staff:

                                                                                                                                                1a. Standard staff I. A pitched staff used for most instruments except fretted, plucked-string ones.
                                                                                                                                                1b. Standard staff II. A pitched staff containing a fretted, plucked-string instrument, with options to set the number of instrument strings and tuning.
                                                                                                                                                2. Tablature staff. A staff containing a fretted, plucked-string instrument, which displays music as a series of fret-marks on strings. Also contains options to set the number of instrument strings and tuning.
                                                                                                                                                3. Percussion staff. A pitched staff for percussion instruments.

                                                                                                                                                It is possible to change one type of staff into another using the Instruments dialog, as long as the original staff is loaded with the right instrument. For example, in order to change a standard staff to tablature, it must contain a plucked-string instrument. Similarly, to change a standard staff to a percussion staff you need to ensure that it has an appropriate percussion instrument loaded and so on.

                                                                                                                                                Most options in the Staff properties dialog are common to all staves, but each type also has one or two specific options of its own.

                                                                                                                                                Staff Properties: all staves

                                                                                                                                                The following Staff Properties options are common to all staves:

                                                                                                                                                Lines
                                                                                                                                                The number of lines making up the staff.

                                                                                                                                                Line Distance
                                                                                                                                                The distance between two staff lines, measured in spaces (abbr.: sp). If you set this to a higher value, the lines are spaced more widely apart; a lower value and they are closer together. It is not recommended to change this value for the standard group, for which the default distance is 1.0 (instead, change the actual size of the sp unit in Page settings); other groups may have different default values (for instance, tablature usually has a line distance of 1.5 sp).

                                                                                                                                                Extra distance above staff
                                                                                                                                                Increases or decreases the distance between the selected staff and the one above in all systems. However, it does not apply to the top staff of a system, which is controlled by the minimum/maximum system distance (see Layout and formatting: Style → General... → Page).

                                                                                                                                                Alternatively, you can alter the "Extra distance above staff" directly from the score page:
                                                                                                                                                1. Press and hold the Shift key.
                                                                                                                                                2. Click on an empty space in a staff and drag it up or down with the mouse.

                                                                                                                                                Note: To alter the spacing above just one staff line in a particular system, see Breaks and spacers.

                                                                                                                                                Scale
                                                                                                                                                Changes the size of the selected staff and all associated elements, as a percentage (to adjust the overall score size, use Scaling from the Layout→Page Settings… menu).

                                                                                                                                                Never Hide
                                                                                                                                                Never hide this staff. This overrules any "Hide empty staves" setting in Layout and Formatting: Style → General... → Score.

                                                                                                                                                Show clef
                                                                                                                                                Whether the staff clef will be shown.

                                                                                                                                                Show time signature
                                                                                                                                                Whether the staff time signature(s) will be shown or not.

                                                                                                                                                Show barlines
                                                                                                                                                Whether the staff barlines will be shown.

                                                                                                                                                Hide system barline
                                                                                                                                                Show/hide barline at left-hand edge of the staff.

                                                                                                                                                Do not hide if system is empty
                                                                                                                                                Never hide this staff, even if the entire system is empty. This overrules any "Hide empty staves" setting in Layout and Formatting: Style → General... → Score.

                                                                                                                                                Small staff
                                                                                                                                                Create a reduced-size staff. You can set the default from the menu in Layout and Formatting: Style → General... → Sizes

                                                                                                                                                Invisible staff lines
                                                                                                                                                Make staff lines invisible.

                                                                                                                                                Staff line color
                                                                                                                                                Use a color picker to change the color of the staff lines.

                                                                                                                                                Part name
                                                                                                                                                The name of the part. This is also displayed in the Mixer and the Instruments dialog (I).

                                                                                                                                                Instrument
                                                                                                                                                The instrument loaded in the Instruments (I) or Select Instrument dialog. The sound associated with this instrument can be changed, if desired, in the Mixer.

                                                                                                                                                Long instrument name
                                                                                                                                                Name displayed to the left of the staff in the first system of the score. The long instrument name may also be edited directly as a text object (as of version 2.1): see Text editing.

                                                                                                                                                Short instrument name
                                                                                                                                                Name displayed to the left of the staff in subsequent systems of the score. The short instrument name may also be edited directly as a text object (as of version 2.1): see Text editing. Editing affects all occurrences in the score.

                                                                                                                                                Usable pitch range

                                                                                                                                                • Amateur: Notes outside this range will be colored olive green/dark yellow in the score.
                                                                                                                                                • Professional: Notes outside this range will be colored red in the score.

                                                                                                                                                To disable out-of-range coloration of notes: From the menu, select Edit→Preferences... (Mac: MuseScore→Preferences...), click on the "Note Input" tab, and uncheck "Color notes outside of usable pitch range."

                                                                                                                                                See also, Coloring of notes outside an instrument's range.

                                                                                                                                                Transpose written pitches (as of version 2.1) / Play transposition
                                                                                                                                                This option ensures that the staves of transposing instruments display music at the correct written pitch. Set the transpose in term of a musical interval (plus octave if required) up or down. For plucked-string instruments such as the guitar, this property can be used to create the effect of applying a capo.

                                                                                                                                                Navigation arrows (as of version 2.1)
                                                                                                                                                Use the ↑ and ↓ buttons, at the bottom left of the Staff Properties window, to navigate to the previous or next staff.

                                                                                                                                                Staff Properties: plucked strings only

                                                                                                                                                Staves of fretted, plucked-string instruments have a few extra options in addition to those listed above,

                                                                                                                                                Number of strings
                                                                                                                                                Displays the number of instrument strings.

                                                                                                                                                Edit String Data…
                                                                                                                                                This button opens a dialog box which allows you to set the number and tuning of strings. See Change string tuning.

                                                                                                                                                Advanced Style Properties

                                                                                                                                                Clicking the Advanced Style Properties... button opens a window giving access to advanced display options for the staff. These will vary depending on the staff type chosen: see the relevant sections below for details.

                                                                                                                                                Change staff type

                                                                                                                                                At the bottom of the Advanced Style Properties dialog there are a number of buttons which allow you to easily change the following:

                                                                                                                                                • The number of lines displayed by a percussion staff.
                                                                                                                                                • The staff type of a plucked-string instrument. For example, you can change from standard staff to tablature and vice versa, or select from a number of tablature options.
                                                                                                                                                1. Make a selection from the drop-down list labelled "Template";
                                                                                                                                                2. Press < Reset to Template;
                                                                                                                                                3. Press OK to accept the changes and exit the dialog (or Cancel to cancel the operation).

                                                                                                                                                Standard and Percussion staff options

                                                                                                                                                Show key signature
                                                                                                                                                Whether the staff key signature will be shown.

                                                                                                                                                Show ledger lines
                                                                                                                                                Whether the staff ledger lines will be shown.

                                                                                                                                                Stemless
                                                                                                                                                If checked, staff notes will have no stem, hook or beam.

                                                                                                                                                Tablature staff options

                                                                                                                                                Upside down
                                                                                                                                                If not checked, the top tablature line will refer to the highest string and the bottom tablature line will refer to the lowest string (most common case). If checked, the top tablature line will refer to the lowest string and the bottom tablature line will refer to the highest line (used in Italian style lute tablatures).

                                                                                                                                                Tablature staff options: Fret Marks

                                                                                                                                                Fret marks are the numbers or letters used to indicate the location of notes on the fingerboard. The following group of properties define the appearance of fret marks:

                                                                                                                                                Font
                                                                                                                                                The font used to draw fret marks. As of version 2.1, 8 fonts are provided supporting all the necessary symbols in 8 different styles (modern Serif, modern Sans, Renaissance, Phalèse, Bonneuil-de Visée, Bonneuil-Gaultier, Dowland, Lute Didactic).

                                                                                                                                                Size
                                                                                                                                                Font size of fret marks in typographic points. Built-in fonts usually look good at a size of 9-10pt.

                                                                                                                                                Vertical offset
                                                                                                                                                MuseScore tries to place symbols in a sensible way and you do not usually need to alter this value (set to 0) for built-in fonts. If the font has symbols not aligned on the base line (or in some other way MuseScore does not expect), this property allows you to move fret-marks up (negative offsets) or down (positive offsets) for better vertical positioning. Values are in sp.

                                                                                                                                                Numbers / Letters
                                                                                                                                                Whether to use numbers (‘1’, ‘2’...) or letters (‘a’, ‘b’...) as fret marks. When letters are used, ‘j’ is skipped and ‘k’ is used for the 9th fret.

                                                                                                                                                On lines / Above lines
                                                                                                                                                Whether marks should be placed on the string lines or above them.

                                                                                                                                                Continuous / Broken
                                                                                                                                                Whether string lines should pass ‘through’ fret marks or should stop at them.
                                                                                                                                                Example of numbers on broken lines:

                                                                                                                                                Example: numbers

                                                                                                                                                Example of letters above continuous lines:

                                                                                                                                                Example: letters

                                                                                                                                                Example of 'upside down' tablature (same contents as number example above):

                                                                                                                                                Example: 'upside-down' tablature

                                                                                                                                                Show back-tied fret marks
                                                                                                                                                If unticked, only the first note in a series of tied notes is displayed. If ticked, all notes in the tied series are displayed.

                                                                                                                                                Show fingerings
                                                                                                                                                From version 2.1, tick to allow the display of fingering symbols applied from a palette.

                                                                                                                                                Tablature staff options: Note Values

                                                                                                                                                This group of properties defines the appearance of the symbols indicating note values.

                                                                                                                                                Font
                                                                                                                                                The font used to draw the value symbols. Currently 5 fonts are provided supporting all the necessary symbols in 5 different styles (modern, Italian tablature, French tablature, French baroque (headless), French baroque). Used only with the Note symbols option.

                                                                                                                                                Size
                                                                                                                                                Font size, in typographic points. Built-in fonts usually look good at a size of 15pt. Used only with the Note symbols option.

                                                                                                                                                Vertical offset
                                                                                                                                                Applies only when Note symbols is selected (see below). Use negative offset values to raise the note value symbols, positive values to lower them.

                                                                                                                                                Shown as:

                                                                                                                                                • None: No note value will be drawn (as in the examples above)
                                                                                                                                                • Note symbols: Symbols in the shape of notes will be drawn above the staff. When this option is selected, symbols are drawn only when the note value changes, without being repeated (by default) for a sequence of notes all of the same value. E.g.
                                                                                                                                                  Example: note symbols
                                                                                                                                                • Stems and beams: Note stems and beams (or hooks) will be drawn. Values are indicated for each note, using the same typographic devices as for a regular staff; all commands of the standard Beam Palette can be applied to these beams too. E.g.
                                                                                                                                                  Example: stems

                                                                                                                                                Repeat:

                                                                                                                                                If several notes in sequence have the same duration, you can specify if and where to repeat the same note symbol. i.e.

                                                                                                                                                • Never
                                                                                                                                                • At new system
                                                                                                                                                • At new measure
                                                                                                                                                • Always

                                                                                                                                                Note: This option is only available if "Shown as: Note symbols" is selected (see above).

                                                                                                                                                Stem style:

                                                                                                                                                • Beside staff: Stems are drawn as fixed height lines above/below the staff.
                                                                                                                                                • Through staff: Stems run through the staff to reach the fret marks.

                                                                                                                                                Note: This option is only available when "Shown as: Stems and Beams" is selected (see above).

                                                                                                                                                Stem position:

                                                                                                                                                • Above: Stems and beams are drawn above the staff.
                                                                                                                                                • Below: Stems and beams are drawn below the staff.

                                                                                                                                                Note: This option is only available when "Shown as: Stems and Beams" and "Stem style: Beside staff" is selected (see above).

                                                                                                                                                Half notes:

                                                                                                                                                • None
                                                                                                                                                • As short stems
                                                                                                                                                • As slashed stems

                                                                                                                                                Note: This option is only available when "Shown as: Stems and Beams and "Stem style: Beside staff" is selected (see above).

                                                                                                                                                Show rests
                                                                                                                                                Whether note symbols should be used to indicate also the rests; when used for rests, note symbols are drawn at a slightly lower position. Used only with the Note symbols option.

                                                                                                                                                Preview

                                                                                                                                                Displays a short score in tablature format with all the current parameters applied.

                                                                                                                                                Change instrument

                                                                                                                                                You can change any instrument in a score to a different instrument at any time. The following method updates instrument sound, staff name, and staff transposition all at once.

                                                                                                                                                1. Right-click on an empty part of any measure OR on the instrument name and choose Staff Properties...;
                                                                                                                                                2. Click on Change Instrument... (under "Part Properties");
                                                                                                                                                3. Choose your new instrument and click OK to return to the Staff Properties dialog;
                                                                                                                                                4. Click OK again to return to the score.

                                                                                                                                                Not to be confused with Mid-staff instrument change.

                                                                                                                                                External links

                                                                                                                                                • How to turn a staff into an ossia.

                                                                                                                                                Tools

                                                                                                                                                  A number of useful commands can be found in the Edit → Tools submenu.

                                                                                                                                                  Add / Remove system/line breaks

                                                                                                                                                  This tool adds or removes system breaks (Line breaks prior to version 2.2) over all or part of the score:

                                                                                                                                                  1. Select a range of measures: if no selection is made, the command is applied to the whole score.
                                                                                                                                                  2. Chose Edit→Tools→Add/Remove System (Line) Breaks…. The following dialog appears.

                                                                                                                                                    Add/Remove Line Breaks

                                                                                                                                                  3. Chose one of the following options:

                                                                                                                                                    • Break systems/lines every X (select number) measures.
                                                                                                                                                    • Add system/line breaks at the end of each system.
                                                                                                                                                    • Remove current system/line breaks.
                                                                                                                                                  4. Press OK.

                                                                                                                                                  Explode

                                                                                                                                                  The explode command allows you to select a passage of music in a single staff and split (explode) the chords into their constituent notes. The top note of each chord is retained on this "source staff" while lower notes are moved to subsequent staves. Explode only affects notes in voice 1.

                                                                                                                                                  Note: If the desired passage also contains notes in other voices apart from voice 1, you should, instead, cut and paste each voice to a separate staff with the help of the selection filter.

                                                                                                                                                  To explode a section of the score:

                                                                                                                                                  1. Make sure all notes to be exploded are in voice 1.
                                                                                                                                                  2. Ensure that there are enough staves underneath the "source staff" to receive the exploded notes. Create extra staves if necessary in the Instruments dialog.
                                                                                                                                                  3. Chose one of two options:
                                                                                                                                                    • Select a range of measures in the "source staff": this allows all notes to be exploded if there are enough staves available.
                                                                                                                                                    • Select a range of measures that includes both the source staff and also extends downwards to include one or more destination staves: This limits the number of exploded notes to the number of selected staves.
                                                                                                                                                  4. Chose Edit→Tools→Explode.

                                                                                                                                                  Notes: (1) MuseScore will discard the lowest note(s) of any chord that contains more notes than the number of staves in the selection. (2) If a given chord has fewer notes than the number of destination staves, then notes will be duplicated as needed so that every staff receives a note. (3) Any existing music in the destination staves is overwritten. (4) If you select a partial measure, the explode command will automatically expand it to a full measure.

                                                                                                                                                  Implode

                                                                                                                                                  The Implode command works in the opposite way to "explode":

                                                                                                                                                  • If several staves are selected, all voice 1 notes in underlying staves are copied to the top staff.
                                                                                                                                                  • If just one staff is selected, all notes in voices 1–4 are combined into voice 1.

                                                                                                                                                  Note: Implode works best if the rhythms of selected underlying staves are similar to that of the top staff—the latter providing the rhythmic template for the operation.

                                                                                                                                                  Apply implode to multiple staves

                                                                                                                                                  1. Select a range of measures in a staff and extend this selection downwards to include the other staves to be imploded.
                                                                                                                                                  2. Chose Edit→Tools→Implode.

                                                                                                                                                  The voice 1 notes of underlying staves are copied to the top staff in the selection.

                                                                                                                                                  Apply implode to a single staff

                                                                                                                                                  1. Select a range of measures in the desired staff.
                                                                                                                                                  2. Chose Edit→Tools→Implode.

                                                                                                                                                  All selected notes in the staff are now displayed in voice 1.

                                                                                                                                                  Fill with slashes

                                                                                                                                                  This command fills the selection with slashes, one per beat:

                                                                                                                                                  1. Select one or more measures;
                                                                                                                                                  2. From the menu, select Edit→Tools→Fill With Slashes.

                                                                                                                                                  If a measure is empty the slashes are added to voice 1, full-sized and centered on the middle line of the staff:

                                                                                                                                                  Slash notation

                                                                                                                                                  Notes: (1) If there are already notes in a measure in the selection, the command will put the slashes into the first available empty voice. (2) Voice 2 slashes are full-sized and centered on the middle line of the staff; voices 3 slashes appear small and above the staff; voice 4 slashes are small and below the staff. (3) If a measure contains notes in all 4 voices, voice 1 will be overwritten. (4) All slashes are set to not transpose or playback.

                                                                                                                                                  Toggle rhythmic slash notation

                                                                                                                                                  This command toggles selected notes between normal notes and rhythmic slash notation:

                                                                                                                                                  1. Select a range of notes or measures (Note: use the selection filter if you need to exclude certain voices);
                                                                                                                                                  2. From the menu, select Edit→Tools→Toggle Rhythmic Slash Notation.

                                                                                                                                                  The selected noteheads are changed to slash noteheads which do not transpose or playback.

                                                                                                                                                  Rhythmic slash notation

                                                                                                                                                  Slash-notehead notes in voices one or two are fixed to the middle staff line; those in voices three or four are small ("accent" notation) and fixed above or below the staff:

                                                                                                                                                  Accent notation

                                                                                                                                                  In percussion staves, notes in voices 3 and 4 are not converted to small slashes but to small notes above or below the staff.

                                                                                                                                                  Rhythmic slash - percussion

                                                                                                                                                  Resequence rehearsal marks

                                                                                                                                                  The Resequence Rehearsal Marks command allows you to re-order the numbering/lettering of rehearsal marks if, for any reason, they have got out of sequence. For details see Automatically resequence rehearsal marks.

                                                                                                                                                  Copy lyrics to clipboard

                                                                                                                                                  This command, available in MuseScore 2.0.3 and above, copies all the lyrics of the score to the clipboard:

                                                                                                                                                  • From the menu, select Edit→Tools→Copy Lyrics to Clipboard.

                                                                                                                                                  See also

                                                                                                                                                  • Breaks and spacers
                                                                                                                                                  • Rehearsal marks

                                                                                                                                                  New features in MuseScore 2

                                                                                                                                                  For an overview about the new features, see What's New in MuseScore 2, Release notes for MuseScore 2.0, Release notes for MuseScore 2.0.1, Release notes for MuseScore 2.0.2, MuseScore 2.0.2 is released, Release notes for MuseScore 2.0.3, MuseScore 2.0.3 is released, Release notes for MuseScore 2.1, MuseScore 2.1 is released, Release notes for MuseScore 2.2, MuseScore 2.2(.1) is released, Release notes for MuseScore 2.2.1, Release notes for MuseScore 2.3, MuseScore 2.3(.1) is released, Release notes for MuseScore 2.3.1, MuseScore 2.3.2 is released, Release notes for MuseScore 2.3.2 and Changes for MuseScore 2.0.
                                                                                                                                                  Documentation of new features are available in the chapter they belong to logically (except the one that is referring to upgrading from 1.x) , but for users coming from 1.x here's a collection of links to be able to see at a glance what can be done now...

                                                                                                                                                  See also

                                                                                                                                                  • Album (→Advanced topics)
                                                                                                                                                  • View modes: Continuous view and Navigator (→Basics)
                                                                                                                                                  • Copy and paste: Selection filter (→Basics)
                                                                                                                                                  • Custom palettes (→Advanced topics)
                                                                                                                                                  • Early music features (→Advanced topics)
                                                                                                                                                  • Figured bass (→Advanced topics)
                                                                                                                                                  • Grid-based movement of symbols and staff text (→Text)
                                                                                                                                                  • Image capture (→Formatting)
                                                                                                                                                  • Inspector and object properties (→Advanced topics)
                                                                                                                                                  • Measure operations: Split and join (→Basics)
                                                                                                                                                  • MIDI import (→Sound and playback)
                                                                                                                                                  • Mid-staff instrument change (→Sound and playback)
                                                                                                                                                  • Part extraction (new options available) (→Advanced Topic)
                                                                                                                                                  • Rehearsal marks: Automatic next rehearsal mark and Search for a rehearsal mark (→Text)
                                                                                                                                                  • Save/Export (→Basics)
                                                                                                                                                  • Staff type properties (→Advanced topics)
                                                                                                                                                  • Swing (→Sound and playback)
                                                                                                                                                  • Tablature (→Advanced topics)
                                                                                                                                                  • Workspace (→Basics)
                                                                                                                                                  • Master palette (→Advanced topics)
                                                                                                                                                  • Layout and formatting (some options have changed, and there is a new "apply to all parts" feature) (→Formatting)
                                                                                                                                                  • Break and spacer: Section break (→Formatting)
                                                                                                                                                  • Selection modes: Select all similar new options (same subtype) (→Basics)
                                                                                                                                                  • Create a new score: start center (→Basics)
                                                                                                                                                  • Languages settings and translation updates (→Basics)
                                                                                                                                                  • Helping and improve translation (→Support)
                                                                                                                                                  • Accidentals: Respell pitches (→Notation)
                                                                                                                                                  • Re-pitch mode (→Advanced topics)
                                                                                                                                                  • Tools (→Advanced topics)
                                                                                                                                                  • Score Information (→Advanced topics)

                                                                                                                                                  Upgrade from MuseScore 1.x

                                                                                                                                                  How to upgrade MuseScore

                                                                                                                                                  Download and install the latest version from the download page as described at Installation. If you want to remove 1.x, check the installation page of the 1.x handbook.

                                                                                                                                                  Installing MuseScore 2 won't uninstall 1.x—both versions can coexist peacefully and can even be used in parallel. So this isn't really an upgrade but an installation of a new and different program.

                                                                                                                                                  Opening 1.x scores in MuseScore 2

                                                                                                                                                  MuseScore 2 significantly improved the typesetting quality to make scores attractive and easier to read. Improvements cover many items such as beam slope, stem height, layout of accidentals in chords and general note spacing. However, this means that sheet music made with MuseScore 1.x looks slightly different from sheet music made with 2.x.

                                                                                                                                                  It also means that scores saved with 2.x won't open with 1.x.

                                                                                                                                                  To prevent you from accidentally overwriting your 1.x scores, 2.x treats them as an import, which means:

                                                                                                                                                  • The score gets marked as being modified, even if you haven't change anything
                                                                                                                                                  • On exiting MuseScore you're asked to save the score (as a result from the above)
                                                                                                                                                  • MuseScore uses the "Save As" dialog to save it, not the "Save" dialog
                                                                                                                                                  • MuseScore uses the score's title to create a default filename rather than taking the old filename

                                                                                                                                                  Relayout

                                                                                                                                                  If you did not manually adjust the layout of a 1.x score, then MuseScore uses the 2.x typesetting engine to layout the score. If you did touch the layout of the 1.x score, the individual adjustments you may have made should remain after opening it in MuseScore 2.x, but due to slight changes in the surrounding layout they may still not appear correct in context. If you wish to reset even manual adjustments to use the 2.x typesetting engine throughout, select the complete score with the shortcut Ctrl+A (Mac: Cmd+A) and reset the layout with Ctrl+R (Mac: Cmd+R).

                                                                                                                                                  Getting the sound from MuseScore 1.x

                                                                                                                                                  While the sound in 2.x has been much improved, you may still prefer the sound from MuseScore 1.x. In that case, you can get the 1.x sound in 2.x by downloading the 1.3 SoundFont and add it in 2.x. You can do this in two steps:

                                                                                                                                                  1. Download the 1.3 SoundFont named TimGM6mb
                                                                                                                                                  2. Install and use the TimGM6mb SoundFont in 2.0

                                                                                                                                                  Support

                                                                                                                                                  This chapter describes how to find help using MuseScore: the best places to look, the best way to ask a question on the forums, and tips for reporting a bug.

                                                                                                                                                  Helping improve translations

                                                                                                                                                  You can help translate the MuseScore software and documentation into your own language, as mentioned in Development / Translating.

                                                                                                                                                  Software translation

                                                                                                                                                  1. Ask in the forum to improve translation
                                                                                                                                                  2. Connect to Transifex/MuseScore http://translate.musescore.org, which will redirect you to https://www.transifex.com/projects/p/musescore
                                                                                                                                                  3. Select the language and then the section you want to help with (musescore or instruments)
                                                                                                                                                  4. Click on the "translate" button (the button text will depend on your language...)
                                                                                                                                                  5. Search for "strings" (informational meaning) you want to translate (you could filter "already translated items")

                                                                                                                                                  Here is a technical explanation: Continuous translation for MuseScore 2.0

                                                                                                                                                  Website and handbook translation

                                                                                                                                                  See Translation instructions

                                                                                                                                                  See also

                                                                                                                                                  • Language Settings and Update Translation, Update Translation

                                                                                                                                                  How to ask for support or file bug reports

                                                                                                                                                    Before submitting your support request in the forum, please:

                                                                                                                                                    • Look for a solution in the Handbook (search the Handbook)
                                                                                                                                                    • Check the How Tos, FAQ and Tutorials
                                                                                                                                                    • Search the forums of the website to see if someone has already encountered the same problem

                                                                                                                                                    If posting in either the issue tracker (for established reports), or forum (for inquiries/discussions):

                                                                                                                                                    • Try to reproduce the issue with the latest nightly. You may also view and version history to check whether it has been fixed/implemented already.
                                                                                                                                                    • Please include as much of the following information as you know and limit each issue to one report:

                                                                                                                                                      • Version/revision of MuseScore you are using (e.g. version 2.1, revision 871c8ce). Check Help → About... (Mac: MuseScore → About MuseScore...).
                                                                                                                                                      • Operating system being used (e.g. Windows 7, macOS 10.12 or Ubuntu 14.04)
                                                                                                                                                      • If reporting a bug, describe the precise steps that lead to the problem (where do you click, what keys do you press, what do you see, etc.).
                                                                                                                                                        If you are not able to reproduce the problem with the steps, it is probably not worth reporting it as the developers will not be able to reproduce (and solve) it either. Remember that the goal of a bug report is not only to show the problem, but to allow others to reproduce it easily.
                                                                                                                                                    • Please remember:

                                                                                                                                                      • attach the score that shows the problem —use the "File attachments" option at the bottom of the page, just above the Save and Preview buttons when you're typing your post.

                                                                                                                                                    External links

                                                                                                                                                    • How to write a good bug report: step-by-step instructions

                                                                                                                                                    Revert to factory settings

                                                                                                                                                    Recent versions of MuseScore have the option to revert back to the standard built-in presets or "factory-settings". This can be necessary if your settings are corrupted. Warning: Reverting to factory settings removes any changes you have made to the preferences, palettes, or window settings. This is not a commonly needed procedure; consult the forums first, as there may be a way to solve your problem without resetting everything.

                                                                                                                                                    MuseScore 2.0.3 and above

                                                                                                                                                    In recent versions it is possible to revert from within MuseScore, providing that MuseScore itself is able to start.
                                                                                                                                                    Go to Help→Revert to Factory Settings. A warning dialog will appear:

                                                                                                                                                    Revert to factory settings

                                                                                                                                                    Clicking Yes resets all MuseScore's settings as if the program was installed for the first time, and MuseScore will immediately restart. No will safely cancel the revert.

                                                                                                                                                    MuseScore 2.0 through 2.0.2

                                                                                                                                                    In older versions of MuseScore, or in later versions if they do not start, you must run this process via the command line.

                                                                                                                                                    Instructions for Windows

                                                                                                                                                    1. If you have MuseScore open, you need to close it first (File→Quit)
                                                                                                                                                    2. Type Windows key+R to open the Run dialog (The Windows key is the one with the logo for Microsoft Windows). Alternatively select Start using your mouse.
                                                                                                                                                    3. Click Browse...
                                                                                                                                                    4. Look for MuseScore.exe on your computer. The location may vary depending on your installation, but it is probably something similar to My Computer → Local Disk → Program Files (or Program Files (x86)) → MuseScore 2 → bin → MuseScore.exe
                                                                                                                                                    5. Click Open to leave the Browse dialog and return to the Run dialog. The following text (or something similar) should display in the Run dialog

                                                                                                                                                      C:\Program Files\MuseScore 2\bin\MuseScore.exe (actually %ProgramFiles%\MuseScore 2\bin\MuseScore.exe)

                                                                                                                                                      For 64-bit Windows, the location is

                                                                                                                                                      C:\Program Files (x86)\MuseScore 2\bin\MuseScore.exe (actually %ProgramFiles(x86)%\MuseScore 2\bin\MuseScore.exe)

                                                                                                                                                      For the Windows Store version (Windows 10), it is pretty well hidden, search for it via Windows Explorer

                                                                                                                                                    6. Click after the quote and add a space followed by a hyphen and a capital F: -F

                                                                                                                                                    7. Press OK

                                                                                                                                                    After a few seconds, MuseScore should start and all the settings reverted to "factory settings".

                                                                                                                                                    For advanced users, the main preference file is located at:

                                                                                                                                                    • Windows Vista or later: C:\Users\<USERNAME>\AppData\Roaming\MuseScore\MuseScore2.ini
                                                                                                                                                      (actually %APPDATA%\MuseScore\MuseScore2.ini)
                                                                                                                                                    • Windows XP or earlier: C:\Documents and Settings\<USERNAME>\Application Data\MuseScore\MuseScore2.ini

                                                                                                                                                    The other preferences (palettes, session, shortcuts, workspaces...) are in:

                                                                                                                                                    • Windows Vista or later: C:\Users\<USERNAME>\AppData\Local\MuseScore\MuseScore2\
                                                                                                                                                      (actually %APPDATA%\MuseScore\MuseScore2\)
                                                                                                                                                    • Windows XP or earlier: C:\Documents and Settings\<USERNAME>\Local Settings\Application Data\MuseScore\MuseScore2\

                                                                                                                                                      For the Windows Store version (Windows 10), these are pretty well hidden, search for them via Windows Explorer

                                                                                                                                                    Instructions for MacOS

                                                                                                                                                    1. If you have MuseScore open, you need to quit the application first (MuseScore→Quit)
                                                                                                                                                    2. Open Terminal (in Applications/Utilities, or via Spotlight search) and a session window should appear
                                                                                                                                                    3. Type (or copy/paste) the following command into your terminal line (include the '/' at the front):

                                                                                                                                                      /Applications/MuseScore\ 2.app/Contents/MacOS/mscore -F
                                                                                                                                                      

                                                                                                                                                    This resets all MuseScore preferences to factory settings and immediately launches the MuseScore application. Note that you cannot quit the Terminal without quitting MuseScore. You can safely quit MuseScore, quit the Terminal, and then reopen MuseScore in the normal fashion, ready to continue using.

                                                                                                                                                    For advanced users, the main MuseScore preference file is located at ~/Library/Preferences/org.musescore.MuseScore2.plist.
                                                                                                                                                    The other preferences (palettes, session, shortcuts, workspaces...) are in ~/Library/Application\ Support/MuseScore/MuseScore2/.

                                                                                                                                                    Instructions for Linux

                                                                                                                                                    The following is true for Ubuntu, and most likely all other Linux distributions and UNIX-style operating systems.

                                                                                                                                                    1. If you have MuseScore open, you need to quit the application first (File→Quit)
                                                                                                                                                    2. From the Ubuntu main menu, choose Applications→Accessories→Terminal. A Terminal session window should appear
                                                                                                                                                    3. Type, (or copy/paste) the following command into your terminal line (Ctrl+Shift+V to paste in Terminal):

                                                                                                                                                      mscore -F
                                                                                                                                                      

                                                                                                                                                      Or, if you are using the AppImage version, you must first use the cd command to change directory to wherever you saved the AppImage. For example, if you saved it to your Desktop:

                                                                                                                                                      cd ~/Desktop
                                                                                                                                                      ./MuseScore*.AppImage -F
                                                                                                                                                      

                                                                                                                                                    This resets all MuseScore preferences to factory settings and immediately launches the MuseScore application. You can now quit Terminal, and continue using MuseScore.

                                                                                                                                                    For advanced users, the main MuseScore preference file is located at ~/.config/MuseScore/MuseScore2.ini.
                                                                                                                                                    The other preferences (palettes, session, shortcuts, workspaces...) are in ~/.local/share/data/MuseScore/MuseScore2/.

                                                                                                                                                    See also

                                                                                                                                                    • Command line options

                                                                                                                                                    Known incompatibilities

                                                                                                                                                    Hardware incompatibilities

                                                                                                                                                    The following software is known to crash MuseScore on startup:

                                                                                                                                                    • Samson USB Microphone, driver name "Samson ASIO Driver", samsonasiodriver.dll. More info
                                                                                                                                                    • Digidesign MME Refresh Service. More info
                                                                                                                                                    • Windows XP SP3 + Realtek Azalia Audio Driver. More info
                                                                                                                                                    • Wacom tablet. More info and QTBUG-6127

                                                                                                                                                    Software incompatibilities

                                                                                                                                                    • Maple virtual cable is known to prevent MuseScore from closing properly.
                                                                                                                                                    • KDE (Linux) window settings can cause the whole window to move when dragging a note. Changing the window settings of the operating system avoids the problem.
                                                                                                                                                    • Nitro PDF Creator may prevent MuseScore 2 from starting on Windows 10, if being used as the default printer. Same for Amyumi/Quickbooks PDF Printer, see here and also some cloud printing services, see here.
                                                                                                                                                    • Creative Sound Blaster Z Series ASIO driver may prevent MuseScore 2 from starting on Windows 10.
                                                                                                                                                    • Untrusted Font Blocking policy prevents MuseScore 2 from starting (except in debug mode, i.e. using the -d option) on Windows 10. (Solution in the links provided here)

                                                                                                                                                    AVG Internet Security hangs MuseScore

                                                                                                                                                    MuseScore requires access to your internet connection with AVG. MuseScore doesn't need an internet connection to function, but if AVG blocks it, MuseScore hangs.

                                                                                                                                                    If AVG prompts you, Allow MuseScore and check "Save my answer as a permanent rule and do not ask me next time."

                                                                                                                                                    If it doesn't prompt you anymore,

                                                                                                                                                    1. Open the AVG user interface (right-click on the AVG icon, close to your clock -> Open AVG User Interface
                                                                                                                                                    2. Click on Firewall
                                                                                                                                                    3. Click Advanced Settings
                                                                                                                                                    4. Click Applications
                                                                                                                                                    5. Find MSCORE.EXE in the list and double click it
                                                                                                                                                    6. Change Application Action to Allow for All

                                                                                                                                                    Font problem on macOS

                                                                                                                                                    MuseScore is known to display notes as square when some fonts are damaged on macOS.
                                                                                                                                                    To troubleshoot this issue:

                                                                                                                                                    1. Go to Applications -> Font Book
                                                                                                                                                    2. Select a font and press ⌘+A to select them all
                                                                                                                                                    3. Go to File -> Validate Fonts
                                                                                                                                                    4. If any font is reported as damaged or with minor problems, select it and delete it
                                                                                                                                                    5. Restart MuseScore if necessary

                                                                                                                                                    In Bug in noteheads, a user believes to have found the font "Adobe Jenson Pro (ajenson)" to be the culprit, regardless of not being reported as broken, or problematic as per the above validation, and solved the problem by deleting that font, so this is worth checking too.

                                                                                                                                                    Font problem on Linux

                                                                                                                                                    If the default desktop environment application font is set to bold, MuseScore will not display the notes properly.
                                                                                                                                                    To troubleshoot this issue (gnome 2.*/MATE users):

                                                                                                                                                    1. Right-click on your desktop and select Change Desktop background
                                                                                                                                                    2. Click on Fonts tab
                                                                                                                                                    3. Set Regular style for Application font
                                                                                                                                                    4. Restart MuseScore if necessary

                                                                                                                                                    For GNOME 3/SHELL users

                                                                                                                                                    1. Open the shell and open "Advanced Settings"
                                                                                                                                                    2. Click on the Fonts option in the list
                                                                                                                                                    3. Set the default font to something non-bold
                                                                                                                                                    4. Restart MuseScore if necessary

                                                                                                                                                    Save As dialog empty on Linux

                                                                                                                                                    Some users reported that the Save As dialog is empty on Debian 6.0 and Lubuntu 10.10.
                                                                                                                                                    To troubleshoot this issue:

                                                                                                                                                    1. Type the following in a terminal

                                                                                                                                                      which mscore
                                                                                                                                                      
                                                                                                                                                    2. The command will answer with the path of mscore. Edit it with your preferred text editor and add the following line at the beginning

                                                                                                                                                      export QT_NO_GLIB=1
                                                                                                                                                      

                                                                                                                                                    Launch MuseScore and the problem should be solved.

                                                                                                                                                    Appendix

                                                                                                                                                    Keyboard shortcuts

                                                                                                                                                      Most keyboard shortcuts can be customized via the menu: select Edit→Preferences...→Shortcuts (Mac: MuseScore→Preferences...→Shortcuts). Below is a list of some of the initial shortcut settings.

                                                                                                                                                      Navigation

                                                                                                                                                      Beginning of score: Home (Mac: Fn+←)
                                                                                                                                                      Last page of score: End (Mac: Fn+→)
                                                                                                                                                      Find (measure number, rehearsal mark, or pXX when XX is a page number): Ctrl+F (Mac: Cmd+F)

                                                                                                                                                      Next score: Ctrl+Tab
                                                                                                                                                      Previous score: Shift+Ctrl+Tab

                                                                                                                                                      Zoom in: Ctrl++ (doesn't work on some systems) (Mac: Cmd++); or Ctrl (Mac: Cmd) + scroll up
                                                                                                                                                      Zoom out: Ctrl+- (Mac: Cmd+-); or Ctrl (Mac: Cmd) + scroll down

                                                                                                                                                      Next page: Pg Dn; or Shift + scroll down (Mac: Fn+↓)
                                                                                                                                                      Previous page: Pg Up; or Shift + scroll up (Mac: Fn+↑)

                                                                                                                                                      Next measure: Ctrl+→ (Mac: Cmd+→)
                                                                                                                                                      Previous measure: Ctrl+← (Mac: Cmd+←)

                                                                                                                                                      Next note: →
                                                                                                                                                      Previous note: ←

                                                                                                                                                      Note below (within a chord or on lower staff): Alt+↓
                                                                                                                                                      Note above (within a chord or on higher staff): Alt+↑

                                                                                                                                                      Top note in chord: Ctrl+Alt+↑ (Ubuntu uses this shortcut for Workspaces instead)
                                                                                                                                                      Bottom note in chord: Ctrl+Alt+↓ (Ubuntu uses this shortcut for Workspaces instead)

                                                                                                                                                      Note input

                                                                                                                                                      Begin note input mode: N
                                                                                                                                                      Leave note input mode: N or Esc

                                                                                                                                                      Duration

                                                                                                                                                      1 ... 9 selects a duration. See also Note input.

                                                                                                                                                      Half duration of previous note: Q
                                                                                                                                                      Double duration of previous note: W
                                                                                                                                                      Decrease duration by one dot: (as of version 2.1) Shift+Q (e.g. a dotted quarter note becomes a quarter note; a quarter note becomes a dotted eighth note)
                                                                                                                                                      Increase duration by one dot : (as of version 2.1) Shift+W (e.g. an eighth note becomes a dotted eighth note; a dotted eighth note becomes a quarter note)

                                                                                                                                                      Voices

                                                                                                                                                      To select a voice in note input mode.

                                                                                                                                                      Voice 1: Ctrl+Alt+1 (Mac: Cmd+Option+1)
                                                                                                                                                      Voice 2: Ctrl+Alt+2 (Mac: Cmd+Option+2)
                                                                                                                                                      Voice 3: Ctrl+Alt+3 (Mac: Cmd+Option+3)
                                                                                                                                                      Voice 4: Ctrl+Alt+4 (Mac: Cmd+Option+4)

                                                                                                                                                      Pitch

                                                                                                                                                      Pitches can be entered by their letter name (A-G), or via MIDI keyboard. See Note input for full details.

                                                                                                                                                      Repeat previous note or chord: R (the repeat can be of a different note value by selecting duration beforehand)

                                                                                                                                                      Repeat selection: R (The selection will be repeated from the first note position after the end of the selection)

                                                                                                                                                      Raise pitch by octave: Ctrl+↑ (Mac: Cmd+↑)
                                                                                                                                                      Lower pitch by octave: Ctrl+↓ (Mac: Cmd+↓)

                                                                                                                                                      Raise pitch by semi-tone (prefer sharp): ↑
                                                                                                                                                      Lower pitch by semi-tone (prefer flat): ↓
                                                                                                                                                      Raise pitch diatonically: Alt+Shift+↑
                                                                                                                                                      Lower pitch diatonically: Alt+Shift+↓

                                                                                                                                                      Change enharmonic spelling in both written and concert pitch views: J
                                                                                                                                                      Change enharmonic spelling in current view only: Ctrl+J (Mac: Cmd+J)

                                                                                                                                                      Rest: 0 (zero)

                                                                                                                                                      Interval

                                                                                                                                                      Add interval above current note: Alt+[Number]

                                                                                                                                                      Layout

                                                                                                                                                      Flip direction (stem, slur, tie, tuplet bracket, etc.): X
                                                                                                                                                      Mirror note head: Shift+X
                                                                                                                                                      Increase stretch of measure(s): }
                                                                                                                                                      Decrease stretch of measure(s): {
                                                                                                                                                      Line break on selected barline: Return
                                                                                                                                                      Page break on selected barline: Ctrl+Return (Mac: Cmd+Return)
                                                                                                                                                      Adjust space above a staff (except the top staff) for the whole score: Press Shift, click on the staff and drag

                                                                                                                                                      Articulations

                                                                                                                                                      Staccato: Shift+S
                                                                                                                                                      Tenuto: Shift+N
                                                                                                                                                      Sforzato (accent): Shift+V
                                                                                                                                                      Marcato: Shift+O
                                                                                                                                                      Grace note (acciaccatura): /
                                                                                                                                                      Crescendo: <
                                                                                                                                                      Decrescendo: >

                                                                                                                                                      Text entry

                                                                                                                                                      Staff text: Ctrl+T (Mac:Cmd+T)
                                                                                                                                                      System text: Ctrl+Shift+T (Mac: Cmd+Shift+T)
                                                                                                                                                      Tempo text: Alt+T
                                                                                                                                                      Rehearsal Mark: Ctrl+M (Mac: Cmd+M)

                                                                                                                                                      Lyrics entry

                                                                                                                                                      Enter lyrics on a note: Ctrl+L (Mac: Cmd+L)
                                                                                                                                                      Previous lyric syllable: Shift+Space
                                                                                                                                                      Next lyric syllable: if the current and the next syllables are separated by a '-': -, else Space
                                                                                                                                                      Move lyric syllable left by 0.1sp: ←
                                                                                                                                                      Move lyric syllable right by 0.1sp: →
                                                                                                                                                      Move lyric syllable left by 1sp: Ctrl+← (Mac: Cmd+←)
                                                                                                                                                      Move lyric syllable right by 1sp: Ctrl+→ (Mac: Cmd+→)
                                                                                                                                                      Move lyric syllable left by 0.01sp: Alt+←
                                                                                                                                                      Move lyric syllable right by 0.01sp: Alt+→

                                                                                                                                                      Up to previous stanza: Ctrl+↑ (Mac: Cmd+↑)
                                                                                                                                                      Down to next stanza: Ctrl+↓ (Mac: Cmd+↓)

                                                                                                                                                      For more lyric shortcuts, see Lyrics.

                                                                                                                                                      Display

                                                                                                                                                      Navigator: F12 (Mac: fn+F12)
                                                                                                                                                      Play Panel: F11 (Mac: fn+F11)
                                                                                                                                                      Mixer: F10 (Mac: fn+F10)
                                                                                                                                                      Palette: F9 (Mac: fn+F9)
                                                                                                                                                      Inspector: F8 (Mac: fn+F8)
                                                                                                                                                      Piano Keyboard: P
                                                                                                                                                      Selection filter: F6
                                                                                                                                                      Display full screen: Ctrl+U

                                                                                                                                                      Miscellaneous

                                                                                                                                                      Toggle visibility on selected element(s): V
                                                                                                                                                      Show Instruments dialog: I
                                                                                                                                                      Toggle multi-measure rests on or off: M

                                                                                                                                                      See also

                                                                                                                                                      • Preferences: Shortcuts

                                                                                                                                                      Known limitations of MuseScore 2.x

                                                                                                                                                        While all members of the development team did their best to make the software easy to use and bug-free, there are some known issues and limitations in MuseScore 2.x.

                                                                                                                                                        Local time signatures

                                                                                                                                                        The local time signature feature, which allows you to have different time signatures in different staves at the same time, is very limited. You can only add a local time signature to measures that are empty, and only if there are no linked parts. When adding notes to measures with local time signatures, you can enter notes normally via note input mode, but copy and paste does not work correctly and may lead to corruption or even crashes. The join and split commands are disabled for measures with local time signatures.

                                                                                                                                                        Regroup Rhythms

                                                                                                                                                        The Regroup Rhythms command found under the Layout menu may have unintended side effects, including changing the spelling of pitches and deleting some elements like articulations, glissandos, tremolos, grace notes and, esp. on undo, ties. Use this tool with caution on limited selections, so that you can tell if any unwanted changes are made.

                                                                                                                                                        Tablature staff linked with standard staff

                                                                                                                                                        When entering multiple-note chords on a standard staff in a linked staff/tablature system, the notes should be entered in order from the top (first) string to the bottom string to ensure correct fret assignment.

                                                                                                                                                        This limitation does not apply if entering notes directly onto a tablature staff, or when using an unlinked staff/tablature system.

                                                                                                                                                        Mixer

                                                                                                                                                        Changing settings in the mixer other than the sound doesn't mark the score 'dirty'. That means if you close a score you may not get the warning "Save changes to the score before closing?". Changing mixer values are also not undoable.

                                                                                                                                                        Header & footer

                                                                                                                                                        There is no way to edit Header and Footer in a WYSIWYG manner. The fields in Style → General → Header, Footer, Numbers are plain text. They can contain "HTML like" syntax, but the text style, layout, etc. can't be edited with a WYSIWYG editor.

                                                                                                                                                        Command line options

                                                                                                                                                          You can launch MuseScore from the command line by typing

                                                                                                                                                          • mscore [options] [filename] (Mac and Linux)
                                                                                                                                                          • MuseScore.exe [options] [filename] (Windows)

                                                                                                                                                          [options] and [filename] are optional. For this to work the MuseScore executable must be in %PATH% (Windows) resp. $PATH (Mac and Linux). If it is not, see Revert to factory settings for detailed instructions on how and where to find and execute the MuseScore executable from the command line on the various supported platforms.

                                                                                                                                                          The following options are available

                                                                                                                                                          -?, -h, --help
                                                                                                                                                          Display help (doesn't work on Windows)
                                                                                                                                                          -v, --version
                                                                                                                                                          Displays MuseScore's current version in the command line without starting the graphical interface (doesn't work on Windows)
                                                                                                                                                          --long-version
                                                                                                                                                          Displays MuseScore's current version and revision in the command line without starting the graphical interface (doesn't work on Windows)
                                                                                                                                                          -d, --debug
                                                                                                                                                          Starts MuseScore in debug mode
                                                                                                                                                          -L, --layout-debug
                                                                                                                                                          Starts MuseScore in layout debug mode
                                                                                                                                                          -s, --no-synthesizer
                                                                                                                                                          Disables the integrated software synthesizer
                                                                                                                                                          -m, --no-midi
                                                                                                                                                          Disables MIDI input
                                                                                                                                                          -a, --use-audio <driver>
                                                                                                                                                          Use audio driver: jack, alsa, pulse, portaudio
                                                                                                                                                          -n, --new-score
                                                                                                                                                          Starts with the new score wizard regardless of preference setting for start mode
                                                                                                                                                          -I, --dump-midi-in
                                                                                                                                                          Displays all MIDI input on the console
                                                                                                                                                          -O, --dump-midi-out
                                                                                                                                                          Displays all MIDI output on the console
                                                                                                                                                          -o, --export-to <filename>
                                                                                                                                                          Exports the currently opened file to the specified <filename>. The file type depends on the filename extension. This option switches to the "converter" mode and avoids any graphical interface. You can also add a filename before the -o if you want to import and export files from the command line. For example mscore -o "My Score.pdf" "My Score.mscz"
                                                                                                                                                          -r, --image-resolution <dpi>
                                                                                                                                                          Determines the output resolution for the output to PNG images in the converter mode. The default resolution is taken from Preferences, Export, PNG/SVG.
                                                                                                                                                          -T, --trim-image <margin>
                                                                                                                                                          Trims exported PNG and SVG images to remove surrounding whitespace around the score. The specified number of pixels of whitespace will be added as a margin; use 0 for a tightly cropped image. For SVG, this option works only with single-page scores.
                                                                                                                                                          -x, --gui-scaling <factor>
                                                                                                                                                          Scales the score display and other GUI elements by the specified factor, for use with high resolution displays.
                                                                                                                                                          -D, --monitor-resolution <dpi>
                                                                                                                                                          Specify monitor resolution, for use with high resolution displays (as of version 2.1).
                                                                                                                                                          -S, --style <style>
                                                                                                                                                          Loads a style file; useful when you convert with the -o option
                                                                                                                                                          -p, --plugin <name>
                                                                                                                                                          Execute the named plugin
                                                                                                                                                          --template-mode
                                                                                                                                                          Save template mode, no page size
                                                                                                                                                          -F, --factory-settings
                                                                                                                                                          Use only the standard built-in presets or "factory-settings" and delete preferences. For details, see Revert to factory settings
                                                                                                                                                          -R, --revert-settings
                                                                                                                                                          Use only the standard built-in presets or "factory-settings", but do not delete preferences
                                                                                                                                                          -i, --load-icons
                                                                                                                                                          Load icons from the file system. Useful if you want to edit the MuseScore icons and preview the changes
                                                                                                                                                          -j, --job <filename>
                                                                                                                                                          Process a conversion job (as of version 2.1)
                                                                                                                                                          -e, --experimental
                                                                                                                                                          Enable experimental features. See e.g. Layer (experimental)
                                                                                                                                                          -c, --config-folder <pathname>
                                                                                                                                                          Set config path
                                                                                                                                                          -t, --test-mode
                                                                                                                                                          Enable test mode
                                                                                                                                                          -M, --midi-operations <filename>
                                                                                                                                                          Specify MIDI import operations file; See this example file: midi_import_options.xml
                                                                                                                                                          -w, --no-webview
                                                                                                                                                          No web view in Start Center
                                                                                                                                                          -P, --export-score-parts
                                                                                                                                                          Used with -o <filename>.pdf, export score and parts
                                                                                                                                                          --no-fallback-font
                                                                                                                                                          Don't use Bravura as fallback musical font
                                                                                                                                                          -f, --force
                                                                                                                                                          Used with -o, ignore warnings reg. score being corrupted or from wrong version (as of version 2.1)
                                                                                                                                                          -b, --bitrate <bitrate>
                                                                                                                                                          Used with -o <filename>.mp3, sets bitrate in kbps (as of version 2.1)
                                                                                                                                                          -E, --install-extension <extension file>
                                                                                                                                                          Install an extension, load soundfont as default unless if -e is passed too (as of version 2.3)

                                                                                                                                                          Qt Toolkit Options

                                                                                                                                                          -style= <style>
                                                                                                                                                          -style <style>
                                                                                                                                                          Determines the style of the GUI application. Possible values are "motif", "windows" and "platinum". Depending on the platform other styles may be available
                                                                                                                                                          -stylesheet= <stylesheet>
                                                                                                                                                          -stylesheet <stylesheet>
                                                                                                                                                          Sets the application stylesheet. The value of "stylesheet" is a path to a file that contains the stylesheet
                                                                                                                                                          -platform <platformname[:options]>
                                                                                                                                                          Specifies the Qt Platform Abstraction (QPA) plugin.
                                                                                                                                                          Example: MuseScore.exe -platform windows:fontengine=freetype

                                                                                                                                                          See also

                                                                                                                                                          • Revert to factory settings

                                                                                                                                                          External links

                                                                                                                                                          • How to use the "conversion job" command-line option
                                                                                                                                                          • Layer (experimental)
                                                                                                                                                          • http://doc.qt.io/qt-5/qapplication.html#QApplication
                                                                                                                                                          • http://doc.qt.io/qt-5/qguiapplication.html#QGuiApplication

                                                                                                                                                          Glossary

                                                                                                                                                          The glossary is a work in progress—please help if you can. You can discuss this page in the documentation forum.

                                                                                                                                                          The list below is a glossary of frequently used terms in MuseScore as well as their meaning. The differences between American English and British English are marked with "(AE)" and "(BE)", respectively.

                                                                                                                                                          Acciaccatura
                                                                                                                                                          acciaccatura.png A short →grace note which appears as a small note with a stroke through the stem. It is quickly executed and technically takes no value from its associated note.
                                                                                                                                                          Accidental
                                                                                                                                                          A sign appearing in front of a note that raises or lowers its pitch. The most common accidentals are →sharps, →flats or →naturals, but double sharps and double flats are also used. Also →koron, and →sori and other quarter tone accidentals. Accidentals affect all notes on the same →staff position only for the remainder of the measure in which they occur, but they can be canceled by another accidental. In notes tied across a →barline, the accidental continues across the →barline to the tied note, but not to later untied notes on the same →staff position in that measure.
                                                                                                                                                          Anacrusis
                                                                                                                                                          See →Pickup measure.
                                                                                                                                                          Anchor
                                                                                                                                                          The point of attachment to the score of objects such as Text and Lines: When the object is dragged, the anchor appears as small brown circle connected to the object by a dotted line. Depending on the object selected, its anchor may be attached to either (a) a note (e.g. fingering), (b) a staff line (e.g. staff text), or (c) a barline (e.g. repeats).
                                                                                                                                                          Appoggiatura
                                                                                                                                                          A long →grace note which takes value from its associated note. Its functions include: passing tone, anticipation, struck suspension, and escape tone.
                                                                                                                                                          Bar (BE)
                                                                                                                                                          See →measure.
                                                                                                                                                          Barline
                                                                                                                                                          Vertical line through a →staff, staves, or a full →system that separates →measures.
                                                                                                                                                          Beam
                                                                                                                                                          Notes with a duration of an →eighth or shorter either carry a →flag or a beam. Beams are used for grouping notes.
                                                                                                                                                          BPM
                                                                                                                                                          Beats Per Minute is the unit for measuring tempo. See →metronome mark
                                                                                                                                                          Breve
                                                                                                                                                          Brevis
                                                                                                                                                          A double whole note or breve is a note that has the duration of two whole notes.
                                                                                                                                                          Cent
                                                                                                                                                          An interval equal to one hundredth of a semitone.
                                                                                                                                                          Chord
                                                                                                                                                          A group of two or more notes sounding together. To select a chord in MuseScore, press Shift and click on a note. In the Inspector, however, the word "Chord" only covers notes in the same voice as the selected note(s).
                                                                                                                                                          Clef
                                                                                                                                                          Sign at the beginning of a →staff, used to tell which are the musical notes on the lines and between the lines.
                                                                                                                                                          Clefs are very useful for →transposition.
                                                                                                                                                          Concert pitch
                                                                                                                                                          Enables you to switch between concert pitch and transposing pitch (see Concert pitch and Transposition).
                                                                                                                                                          Crotchet (BE)
                                                                                                                                                          See →Quarter note.
                                                                                                                                                          Demisemiquaver (BE)
                                                                                                                                                          A thirty-second note.
                                                                                                                                                          Duplet
                                                                                                                                                          See →tuplet.
                                                                                                                                                          Edit mode
                                                                                                                                                          The program mode from which you can edit various score elements.
                                                                                                                                                          Eighth note
                                                                                                                                                          A note whose duration is an eighth of a whole note (semibreve). Same as a quaver (BE).
                                                                                                                                                          Endings
                                                                                                                                                          See →volta.
                                                                                                                                                          Enharmonic notes
                                                                                                                                                          Notes that sound the same pitch but are written differently. Example: G♯ and A♭ are enharmonic notes.
                                                                                                                                                          Flag
                                                                                                                                                          See →beam.
                                                                                                                                                          Flat
                                                                                                                                                          Sign (♭) that indicates that the pitch of a note has to be lowered one semitone.
                                                                                                                                                          Grace note
                                                                                                                                                          Grace notes appear as small notes in front of a normal-sized main note. See →acciaccatura and →appoggiatura.
                                                                                                                                                          Grand Staff (AE)
                                                                                                                                                          Great Stave (BE)
                                                                                                                                                          A system of two or more staves, featuring treble and bass clefs, used to notate music for keyboard instruments and the harp.
                                                                                                                                                          Half Note
                                                                                                                                                          A note whose duration is half of a whole note (semibreve). Same as a minim (BE).
                                                                                                                                                          Hemidemisemiquaver (BE)
                                                                                                                                                          A sixty-fourth note.
                                                                                                                                                          Interval
                                                                                                                                                          The difference in pitch between two notes, expressed in terms of the scale degree (e.g. major second, minor third, perfect fifth etc.). See Degree (Music) (Wikipedia).
                                                                                                                                                          Jump
                                                                                                                                                          In MuseScore, "jumps" are notations such as "D.S. al Coda", found in the "Repeats & Jumps" palette.
                                                                                                                                                          Key Signature
                                                                                                                                                          Set of →sharps or →flats at the beginning of the →staves. It gives an idea about the tonality and avoids repeating those signs all along the →staff.
                                                                                                                                                          A key signature with B flat means F major or D minor tonality.
                                                                                                                                                          Koron
                                                                                                                                                          An Iranian →accidental which lowers the pitch of a note by a quarter tone (in comparison to the →flat which lowers a note by a semitone). It is possible to use this accidental in a →key signature.
                                                                                                                                                          See also →sori.
                                                                                                                                                          Longa
                                                                                                                                                          A longa is a quadruple whole note.
                                                                                                                                                          Ledger Line
                                                                                                                                                          Line(s) that are added above or below the staff.
                                                                                                                                                          Measure (AE)
                                                                                                                                                          A segment of time defined by a given number of beats. Dividing music into bars provides regular reference points to pinpoint locations within a piece of music. Same as → bar (BE).
                                                                                                                                                          Metronome mark
                                                                                                                                                          Metronome marks are usually given by a note length equaling a certain playback speed in →BPM. In MuseScore, metronome marks are used in Tempo texts.
                                                                                                                                                          Minim (BE)
                                                                                                                                                          See →Half note.
                                                                                                                                                          Natural
                                                                                                                                                          A natural (♮) is a sign that cancels a previous alteration on notes of the same pitch.
                                                                                                                                                          Normal mode
                                                                                                                                                          The operating mode of MuseScore outside note input mode or edit mode: press Esc to enter it. In Normal mode you can navigate through the score, select and move elements, adjust Inspector properties, and alter the pitches of existing notes.
                                                                                                                                                          Note input mode
                                                                                                                                                          The program mode used for entering music notation.
                                                                                                                                                          Operating System
                                                                                                                                                          OS
                                                                                                                                                          Underlying set of programs which set up a computer, enabling additional programs (such as MuseScore). Popular OSes are Microsoft Windows, macOS, and GNU/Linux.
                                                                                                                                                          Not to be confused with a sheet music →system.
                                                                                                                                                          Part
                                                                                                                                                          Music to be played or sung by one or a group of musicians using the same instrument. In a string quartet, 1st part = Violin 1, 2nd part = Violin 2, 3rd part = Viola, 4th part = Cello, in a choir there might be parts for soprano, alto, tenor and bass. A part has one or more →staves (e.g. Piano has 2 staves, Organ can have 2 or 3 staves).
                                                                                                                                                          Pickup Measure (also known as an Anacrusis or Upbeat)
                                                                                                                                                          Incomplete first measure of a piece or a section of a piece of music. See Measure duration and Create new score: Pickup measure. Also Exclude from measure count.
                                                                                                                                                          Quadruplet
                                                                                                                                                          See →tuplet.
                                                                                                                                                          Quarter note
                                                                                                                                                          A note whose duration is a quarter of a whole note (semibreve). Same as a crotchet (BE).
                                                                                                                                                          Quaver (BE)
                                                                                                                                                          See →eighth note.
                                                                                                                                                          Quintuplet
                                                                                                                                                          See →tuplet.
                                                                                                                                                          Respell Pitches
                                                                                                                                                          Tries to guess the right accidentals for the whole score (see Accidentals).
                                                                                                                                                          Rest
                                                                                                                                                          Interval of silence of a specified duration.
                                                                                                                                                          Re-pitch mode
                                                                                                                                                          Allows you to rewrite an existing passage of music by changing the note pitches without altering the rhythm.
                                                                                                                                                          Semibreve (BE)
                                                                                                                                                          A whole note (AE). It lasts a whole measure in 4/4 time.
                                                                                                                                                          Semiquaver (BE)
                                                                                                                                                          A sixteenth note.
                                                                                                                                                          Semihemidemisemiquaver (Quasihemidemisemiquaver) (BE)
                                                                                                                                                          An hundred and twenty eighth note.
                                                                                                                                                          Sextuplet
                                                                                                                                                          See →tuplet.
                                                                                                                                                          SFZ
                                                                                                                                                          A virtual instrument format supported by MuseScore (along with →SoundFonts). An SFZ library consists of one or more SFZ text files, each defining a particular instrument setup, and many audio sound samples.
                                                                                                                                                          Sharp
                                                                                                                                                          Sign (♯) that indicates that the pitch of a note has to be raised one semitone.
                                                                                                                                                          Slur
                                                                                                                                                          A curved line over or under two or more notes, meaning that the notes will be played smooth and connected (legato).
                                                                                                                                                          See also →tie.
                                                                                                                                                          Sori
                                                                                                                                                          An Iranian →accidental which raises the pitch of a note by a quarter tone (in comparison to the sharp which raises it by a semitone). It is possible to use this accidental in a →key signature.
                                                                                                                                                          See also →koron.
                                                                                                                                                          SoundFont
                                                                                                                                                          A virtual instrument format supported by MuseScore (along with →SFZ). A SoundFont is a special type of file (extension .sf2, or .sf3 if compressed) containing sound samples of one or more musical instruments. In effect, a virtual synthesizer which acts as a sound source for MIDI files. MuseScore 2.2 comes with the SoundFont "MuseScore_General.sf3" pre-installed.
                                                                                                                                                          Spatium (plural: Spatia)
                                                                                                                                                          Space
                                                                                                                                                          Staff Space
                                                                                                                                                          sp (abbr./unit)
                                                                                                                                                          The distance between two lines of a normal 5-line staff. In MuseScore this unit influences most size settings. See also Page settings.
                                                                                                                                                          Staff (AE)
                                                                                                                                                          Stave (BE)
                                                                                                                                                          Group of one to five horizontal lines used to lay on musical signs. In ancient music notation (before 11th century) the staff/stave may have any number of lines (the plural of 'staff' is 'staves', in BE and AE).
                                                                                                                                                          Step-time input
                                                                                                                                                          MuseScore's default note input mode, allowing you to enter music notation one note (or rest) at a time.
                                                                                                                                                          System
                                                                                                                                                          Set of staves to be read simultaneously in a score.
                                                                                                                                                          See also →Operating System (OS).
                                                                                                                                                          Tie

                                                                                                                                                          A curved line between two or more notes on the same pitch to indicate a single note of combined duration:

                                                                                                                                                          • Quarter note + Tie + Quarter note = Half note
                                                                                                                                                          • Quarter note + Tie + Eighth note = Dotted Quarter note
                                                                                                                                                          • Quarter note + Tie + Eighth note + Tie + 16th note = Double Dotted Quarter note

                                                                                                                                                          See also →slur.

                                                                                                                                                          Transposition

                                                                                                                                                          The act of moving the pitches of one or more notes up or down by a constant interval. There may be several reasons for transposing a piece, for example:

                                                                                                                                                          1. The tune is too low or too high for a singer. In this case the whole orchestra will have to be transposed as well—easily done using MuseScore.
                                                                                                                                                          2. The part is written for a particular instrument but needs to be played by a different one.
                                                                                                                                                          3. The score is written for an orchestra and you want to hear what the individual instruments sound like. This requires changing the transposing instrument parts to concert pitch.
                                                                                                                                                          4. A darker or a more brilliant sound is desired.
                                                                                                                                                          Triplet
                                                                                                                                                          See →tuplet.
                                                                                                                                                          Tuplet
                                                                                                                                                          A tuplet divides its next higher note value by a number of notes other than given by the time signature. For example a →triplet divides the next higher note value into three parts, rather than two. Tuplets may be: →triplets, →duplets, →quintuplets, and other.
                                                                                                                                                          Upbeat
                                                                                                                                                          See →pickup measure.
                                                                                                                                                          Velocity
                                                                                                                                                          The velocity property of a note controls how loudly the note is played. This usage of the term comes from MIDI synthesizers. On a keyboard instrument, it is the speed with which a key is pressed that controls its volume. The usual scale for velocity is 0 (silent) to 127 (maximum).
                                                                                                                                                          Voice
                                                                                                                                                          Polyphonic instruments like Keyboards, Violins, or Drums need to write notes or chords of different duration at the same time on the same →staff. To write such things each horizontal succession of notes or chords has to be written on the staff independently. In MuseScore you can have up to 4 voices per staff. Not to be confused with vocalists, singing voices like soprano, alto, tenor and bass, which are better viewed as instruments.
                                                                                                                                                          Volta
                                                                                                                                                          In a repeated section of music, it is common for the last few measures of the section to differ. Markings called voltas are used to indicate how the section is to be ended each time. These markings are often referred to simply as →endings.

                                                                                                                                                          External links

                                                                                                                                                          • http://www.robertcarney.net/musical-terms-definitions.htm
                                                                                                                                                          • https://en.wikipedia.org/wiki/List_of_musical_symbols

                                                                                                                                                          Table of Contents

                                                                                                                                                          Getting started

                                                                                                                                                          • Installation
                                                                                                                                                          • Create new score
                                                                                                                                                          • Language settings and translation updates
                                                                                                                                                          • Checking for updates

                                                                                                                                                          Grundlæggende funktioner

                                                                                                                                                          • Create new score (→Getting started)
                                                                                                                                                          • Note input
                                                                                                                                                          • Concert pitch
                                                                                                                                                          • Copy and paste
                                                                                                                                                          • Edit mode
                                                                                                                                                          • Measure operations
                                                                                                                                                          • Palette
                                                                                                                                                          • Preferences
                                                                                                                                                          • Save/Export/Print
                                                                                                                                                          • Selection modes
                                                                                                                                                          • Undo and redo
                                                                                                                                                          • View modes
                                                                                                                                                          • File format
                                                                                                                                                          • Share scores online

                                                                                                                                                          Notation

                                                                                                                                                          • Note input (→Basics)
                                                                                                                                                          • Palette (→Basics)
                                                                                                                                                          • Accidental
                                                                                                                                                          • Arpeggio and glissando
                                                                                                                                                          • Bar line
                                                                                                                                                          • Beam
                                                                                                                                                          • Bracket
                                                                                                                                                          • Breath and pause
                                                                                                                                                          • Clef
                                                                                                                                                          • Drum notation
                                                                                                                                                          • Grace note
                                                                                                                                                          • Hairpin
                                                                                                                                                          • Key signature
                                                                                                                                                          • Lines
                                                                                                                                                          • Measure rest
                                                                                                                                                          • Repeat
                                                                                                                                                          • Slur
                                                                                                                                                          • Tie
                                                                                                                                                          • Time signature
                                                                                                                                                          • Transposition
                                                                                                                                                          • Tremolo
                                                                                                                                                          • Tuplet
                                                                                                                                                          • Voices
                                                                                                                                                          • Volta (1st and 2nd time endings)

                                                                                                                                                          Sound and playback

                                                                                                                                                          • MIDI import
                                                                                                                                                          • Mid-staff instrument change
                                                                                                                                                          • Play mode
                                                                                                                                                          • Soundfont
                                                                                                                                                          • Swing
                                                                                                                                                          • Tempo
                                                                                                                                                          • Dynamics
                                                                                                                                                          • Change and adjust sound

                                                                                                                                                          Text

                                                                                                                                                          • Grid-based movement of symbols and staff text
                                                                                                                                                          • Rehearsal marks
                                                                                                                                                          • Text editing
                                                                                                                                                          • Text style
                                                                                                                                                          • Chord symbols
                                                                                                                                                          • Fingering
                                                                                                                                                          • Lyrics
                                                                                                                                                          • Tempo (→Sound and playback)

                                                                                                                                                          Formatting

                                                                                                                                                          • Layout and formatting (overview)
                                                                                                                                                          • Breaks and spacers
                                                                                                                                                          • Frame
                                                                                                                                                          • Image
                                                                                                                                                          • Image capture

                                                                                                                                                          Advanced topics

                                                                                                                                                          • Accessibility
                                                                                                                                                          • Album
                                                                                                                                                          • Cross staff beaming
                                                                                                                                                          • Custom palette
                                                                                                                                                          • Early music features
                                                                                                                                                          • Figured bass
                                                                                                                                                          • Fretboard diagram
                                                                                                                                                          • Inspector and object properties
                                                                                                                                                          • Master palette
                                                                                                                                                          • Part extraction
                                                                                                                                                          • Plugins
                                                                                                                                                          • Replace pitches without changing rhythms
                                                                                                                                                          • Score information
                                                                                                                                                          • Staff type properties
                                                                                                                                                          • Tablature
                                                                                                                                                          • Tools
                                                                                                                                                          • Nonexistant node nid: 39841

                                                                                                                                                          New features in MuseScore 2.0

                                                                                                                                                          • What's New in MuseScore 2
                                                                                                                                                          • MuseScore 2.0 Release Notes
                                                                                                                                                          • Changes for MuseScore 2.0.

                                                                                                                                                            • Album (→Advanced topics)
                                                                                                                                                            • View modes: Continuous view and Navigator (→Basics)
                                                                                                                                                            • Copy and paste: Selection filter (→Basics)
                                                                                                                                                            • Custom palette (→Advanced topics)
                                                                                                                                                            • Early music features (→Advanced topics)
                                                                                                                                                            • Figured bass (→Advanced topics)
                                                                                                                                                            • Grid-based movement of symbols and staff text (→Text)
                                                                                                                                                            • Image capture (→Formatting)
                                                                                                                                                            • Inspector and object properties (→Advanced topics)
                                                                                                                                                            • Measure operations: Split and join (→Basics)
                                                                                                                                                            • MIDI import (→Sound and playback)
                                                                                                                                                            • Mid-staff instrument change (→Sound and playback)
                                                                                                                                                            • Part extraction (new options available) (→Advanced Topic)
                                                                                                                                                          • Rehearsal marks: Automatic next rehearsal mark and Search for a rehearsal mark (→Text)
                                                                                                                                                            • Save/Export (→Basics) - Staff type properties (→Advanced topics)
                                                                                                                                                            • Swing (→Sound and playback)
                                                                                                                                                            • Tablature (→Advanced topics)
                                                                                                                                                            • Nonexistant node nid: 39841 (→Advanced topics)
                                                                                                                                                            • Master palette (→Advanced topics)
                                                                                                                                                            • Layout and formatting (some options have changed, and there is a new "apply to all parts" feature) (→Formatting)
                                                                                                                                                            • Breaks and spacers, section break (→Formatting)
                                                                                                                                                            • Selection modes, select all similar new options (same subtype) (→Basics)
                                                                                                                                                            • Create a new score, start center (→Basics)
                                                                                                                                                            • Languages settings and translation Updates (→Basics)
                                                                                                                                                            • Helping and improve translation (→Support)
                                                                                                                                                            • Accidentals, respell pitches (→Notation)
                                                                                                                                                            • Replace pitches without changing rhythms (→Advanced topics)
                                                                                                                                                            • Tools (→Advanced topics)
                                                                                                                                                            • Meta tags (→Advanced topics)
                                                                                                                                                            • Upgrading from MuseScore 1.x

                                                                                                                                                          Support

                                                                                                                                                          • Helping and improve translation
                                                                                                                                                          • How to ask for support or file reports
                                                                                                                                                          • Revert to factory settings
                                                                                                                                                          • Known incompatibilities

                                                                                                                                                          Appendix

                                                                                                                                                          • Keyboard shortcuts
                                                                                                                                                          • Known limitations of MuseScore 2.x
                                                                                                                                                          • Command line options
                                                                                                                                                          • Glossary
                                                                                                                                                          • Handbook for MuseScore 1.x