Parts
MuseScore allows you to not only create and print a full score but also to generate individual player's parts from it.
A part can be created from a specific instrument staff in the main score or even from a specific voice within a staff. This allows you to display multiple parts (e.g. Flute 1 & 2) on a single staff in the score but to extract them as separate parts.
Part Playback
Musescore "solos" the Part you're viewing during playback—i.e. no other Parts sound. This is because the Mixer’s “Play Part Only” box is checked by default.
Simply uncheck the “Play Part Only” checkbox if you want hear all play enabled tracks while viewing a Part. Additionally you can use the Mixer's mute and solo buttons to achieve various partial mixes of all available tracks. This can prove quite helpful because it allows you to proofread, arrange and compose within any Part while hearing other tracks for context.
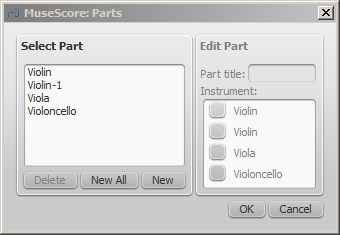
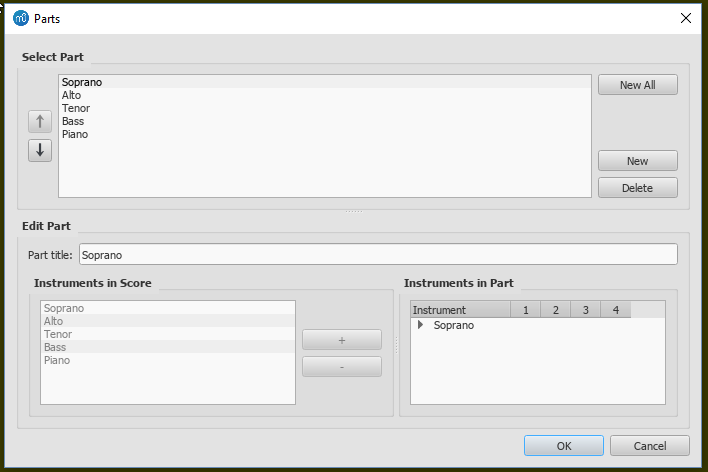
Create all parts
The most straightforward method is to create all parts at once. Parts are generated on a one-to-one basis from the corresponding Instruments in the score:
- From the menu, select File → Parts….
- Click All Parts (MuseScore 3.2-3.3.4: Generate; prior to MuseScore 3.2: New All) (parts are named with the instrument name, and a number added to differentiate parts that have the same label in the main score).

- Click OK.
The parts can now be accessed by clicking on tabs above the document window.
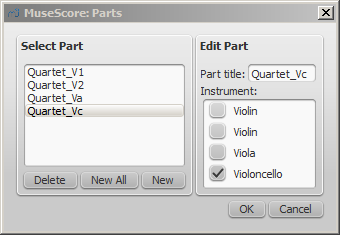
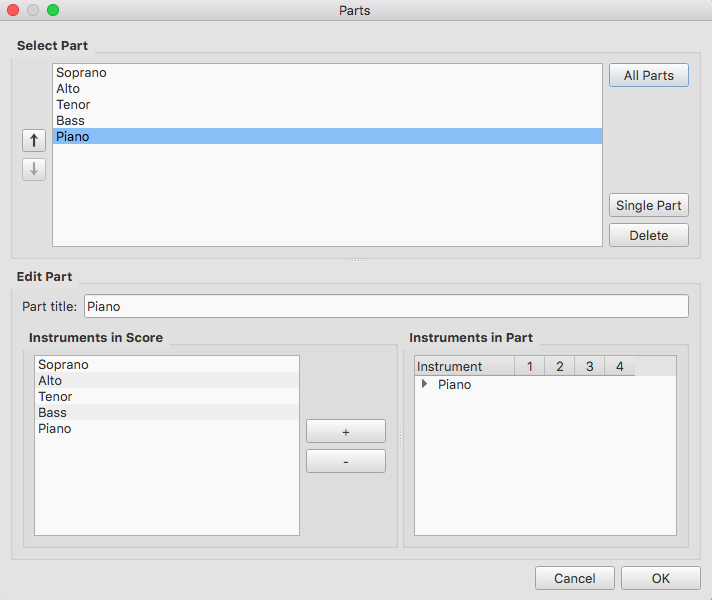
Create specific parts
This method allows you to generate specific parts for only selected instruments (rather than all-at-once):
- In the Parts window click Single Part (prior to MuseScore 3.4 New) to create a part;
- In the center pane, type the words you want to use for the "Part title" (this also serves for the corresponding part of the filename when exporting);
- Pick the instrument that you want to appear in your part from the "Instruments in Score" pane, and press + to add it to the "Instruments in Part" pane.
If you wish to create more parts, repeat steps 1 through 3 (above) for each part.
- Click OK to save the parts.
You have now finished setting up the parts. You do not need to do this again, unless you add or remove an instrument from your full score.
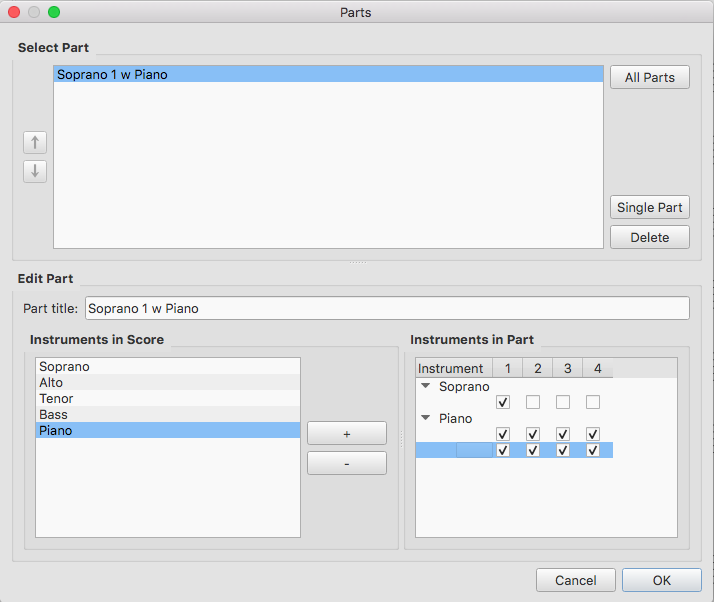
Customize parts
Once you have generated a part (or all parts), you can select any part at the top and use the controls at the bottom to control not only what instrument is in the part, but also which staves and voices within the instrument are included.

Add instruments to a part
To add instruments to an existing part:
- Select the part in the "Parts" pane.
- Select the instrument from the "Instruments in Score" pane.
- Press + to add it to the "Instruments in Part" pane.
Remove instruments from a part
To remove instruments from an existing part:
- Select the part in the "Parts" pane.
- Select the instrument from the "Instruments in Part" pane.
- Press - to remove the instrument.
Select staves for an instrument
To select the staves of an instrument to include in the part:
- Select the part in the "Parts" pane.
- Click the arrow next to the instrument in "Instruments in Part" to expand the listing to show all staves and voices of the instrument.
- Select the staff to be removed.
- Press - to remove it from the instrument.
Select voices for an instrument
- Select the part in the "Parts" pane.
- Click the arrow next to the instrument in "Instruments in Part" to expand the listing to show all staves and voices of the instrument.
- Uncheck the voices to be removed.
Note: If you select only voice 1 for a given staff, then only the content in voice 1 for that staff will be included in the part. Thus, in order to share flute 1 & 2 on the same staff, you will need to enter all notes onto both voices, even in passages where they share content. You also cannot enter the two parts as chords in the passages where they share rhythms.
Delete a Part
- Open the Parts dialog (File → Parts…);
- Select the relevant Part in the "Parts" pane;
- Press Delete.
Export parts
In order to be able to export parts, those need to have been created first, see above
- From the menu, select File → Export Parts…;
- Navigate to the place you want them to be exported to and select the file format (PDF is the default);
- For filename just enter whatever prefix is useful for all parts, or leave the default (the filename of your score);
- Click OK.
This will generate files with the names "<title>" + "-" + "<part name>.<extension>". In addition, when exporting as PDF, this will also generate "<title>" + "-Score_And_Parts.pdf".
Save parts
Parts and score are "linked", which means that any change to the content in one will affect the other, but changes to the layout will not. When you have the parts created, they are saved along with the score (if you open the score you have tabs for the score and every part you created).
However, if you wish to save a part individually:
- Make sure the part is "active." Select its tab if not;
- From the menu, select File → Save As….
Print a part
- Make sure the part is "active." Select its tab if not;
- From the menu, select File → Print to open the print dialog.
| Adjunto | Tamaño |
|---|---|
| Part_Creation5_en.png | 10.48 KB |
| Part_Creation4_en.png | 11.28 KB |
| Part_Creation3_en.png | 11.06 KB |
| Part_Creation2_en.png | 10.36 KB |
| Part_Creation1_en.png | 10.01 KB |
| Parts-create-all_en.png | 18.89 KB |
| Parts-create-voices_en.png | 19.64 KB |
| Parts_create_All_Parts_en.png | 48.29 KB |
| Parts_create_Single_Part_en.png | 51.83 KB |