Published on MuseScore.org

Sổ tay hướng dẫn

Đây là sổ tay hướng dẫn cho phiên bản MuseScore 2.0 và cao hơn. Nó được duy trì bởi cộng đồng MuseScore. Tìm hiểu xem bạn có thể giúp gì.

Khởi động

Chương này sẽ giúp bạn cài đặt và chạy MuseScore trong lần đầu tiên. Nó cũng hướng dẫn bạn cách tạo một bản nhạc mới.

Cài đặt

MuseScore làm việc được trên nhiều hệ thống máy tính khác nhau bao gồm Windows, Mac OS X, và Linux.

Windows

Cài đặt

Bạn có thể lấy gói cài đặt trên Windows từ trang Nonexistant node nid: 27 này của MuseScore. Nhấp trên liên kết này để bắt đầu tải về. Trình duyệt mạng của bạn sẽ yêu cầu bạn xác nhận rằng bạn muốn tải tập tin này về không. Nhấp Save File.

Khi việc tải về hoàn thành, nhấp đôi trên tập tin này để bắt đầu cài đặt. Windows có thể sẽ yêu cầu bạn xác nhận việc này trong một cửa sổ bảo mật trước khi chạy phần mềm này. Nhấp Run để tiếp tục, sau đó bạn sẽ thấy

NOT FOUND: Win-Install-Wizard-1a.png

ngay sau đó là

NOT FOUND: Win-Install-Wizard-1b.png

và

NOT FOUND: Win-Install-Wizard-1c.png

Nếu bạn nhấp Cancel, ở đây hoặc sau đó, bạn sẽ thấy:

NOT FOUND: Win-Install-Wizard-2a.png

Thay vì thế nếu bạn nhấp Next để tiếp tục, trình dẫn cài đặt sẽ hiển thị các điều khoản của giấy phép đối với phần mềm miễn phí này.

NOT FOUND: Win-Install-Wizard-2b.png

Hãy chọn I accept the terms in the License Agreement và nhấp vào Next để tiếp tục. Tiếp theo nó sẽ xác nhận vị trí để cài đặt MuseScore.

NOT FOUND: Win-Install-Wizard-3.png

Nếu muốn cài đặt phiên bản mới hơn của MuseScore những vẫn muốn giữ lại phiên bản cũ, thì bạn phải chọn một thư mục cài đặt khác (phiên bản 2.0 và 1.x có thể cùng tồn tại và không ghi đè lên nhau, vì vậy không cần thay đổi gì đối với hai phiên bản này). Mặt khác hãy nhấp Next để tiếp tục.

NOT FOUND: Win-Install-Wizard-4.png

Nhấp vào Install để tiếp tục.

Đợi vài phút để trình dẫn cài đặt thiết lập cấu hình và các tập tin cần thiết. Sau đó bạn thấy

NOT FOUND: Win-Install-Wizard-5a.png

rồi tới

NOT FOUND: Win-Install-Wizard-5b.png

và cuối cùng

NOT FOUND: Win-Install-Wizard-5c.png

Nhấp vào Finish để thoát cài đặt. Bây giờ bạn có thể xóa tập tin cài đặt mà bạn đã tải về.

Khởi động MuseScore

Để khởi động MuseScore chọn vào Start → All Programs → MuseScore 2 → MuseScore 2.

Gỡ bỏ MuseScore

Bạn có thể gỡ bỏ trên Windows 32-bit bằng cách

    cd C:\Program Files\MuseScore
    Uninstall.exe /S

và trên Windows 64-bit bằng cách

    cd C:\Program Files (x86)\MuseScore
    Uninstall.exe /S

Mac OS X

Cài đặt

Bạn sẽ thấy tập tin DMG trên trang Nonexistant node nid: 27 của MuseScore. Nhấp trên liên kết đó để bắt đầu tải về.

NOT FOUND: Mac_Install.png

  1. Kéo và thả biểu tượng MuseScore vào biểu tượng thư mục Applications. Nếu bạn không đăng nhập như administrator, Mac OS X có thể sẽ hỏi bạn mật khẩu: nhấp vào Authenticate và nhập mật khẩu để xử lý.
  2. Bạn có thể chạy MuseScore từ thư mục Applications, Spotlight, hoặc Launchpad.

Gỡ bỏ

Đơn giản là xóa MuseScore trong thư mục Applications.

Linux

Vui lòng xem trang Nonexistant node nid: 27 này để có hướng dẫn thích hợp cho MuseScore trên Linux. Các gói cái đặt được cung cấp cho Debian, Ubuntu, Fedora và PCLinuxOS. Những bản phân phối khác bản sẽ phải tự làm từ mã nguồn. Những chỉ dẫn riêng biệt cho Fedora, xem bên dưới.

Fedora

  1. Nhập GPG key:

    su
    rpm --import http://prereleases.musescore.org/linux/Fedora/RPM-GPG-KEY-Seve
    
  2. Tới trang Nonexistant node nid: 27 của MuseScore. Nhấp vào liên kết tải về bản ổn định cho Fedora và chọn chính xác gói rpm cho kiến trúc máy của bạn.

  3. Tùy thuộc vào kiến trúc máy của bạn, sử dụng một trong hai tập lệnh này để cài đặt MuseScore

    • đối với arch i386

      su
      yum localinstall musescore-X.Y-1.fc10.i386.rpm
      
    • đối với arch x86_64

      su
      yum localinstall musescore-X.Y-1.fc10.x86_64.rpm
      

Nếu bạn có vấn đề về âm thanh, hãy xem Fedora 11 và âm thanh

Tham khảo thêm

  • Cách thay đổi ngôn ngữ trong MuseScore
  • Cách cài đặt MuseScore trên Windows mà không có quyền administrator
  • Cách chạy MuseScore với quyền Administrator trên Windows

Install on Windows

    Install

    If you're on Windows 10, MuseScore can be installed from the Windows Store. Clicking here will open Musescore's page in the Store app. There you will only have to click Get the app > and MuseScore will be downloaded and installed.

    Otherwise you can get the Windows installer from the download page of the MuseScore website. Click on the link to start the download. Your Internet browser will ask you to confirm that you want to download this file. Click Save File.

    When the download finishes, double-click on the file to start the installation. Windows may prompt you with a security window to confirm this before running the software. Click Run to continue, you'll then briefly see

    Preparing to install

    followed by

    Computing space requirements

    In case you don't see this installer window but something else, it's possible that the .msi extension is not associated with msiexec.exe. Either you can fix the association, or download and use the portable version of MuseScore instead.

    Continuing you'll see

    Welcome to the MuseScore 2 Setup Wizard

    If you click Cancel, here or later, you'll see:

    MuseScore 2 Setup Wizard was interrupted

    If instead you click Next to continue, the setup wizard displays the terms of the free software license.

    End-User License Agreement

    Read the terms of the license, make sure the box next to "I accept the terms in the License Agreement" is checked, and click Next to continue. Next the installer will ask you to confirm the location in which to install MuseScore.

    Destination Folder

    If you are installing a newer version of MuseScore but still want to keep the old version on your computer, then you should change the folder (note that MuseScore 2 can coexist with MuseScore 1 with no changes needed). Otherwise click Next to continue.

    Ready to install MuseScore 2

    Click Install to continue.

    Give the setup wizard a few minutes to install the necessary files and configurations. You'll see

    Installing MuseScore 2, progress

    and finally

    Completed the MuseScore 2 Setup Wizard

    Click Finish to exit the installer. You may delete the installer file you downloaded.

    Start MuseScore

    To start MuseScore, from the menu, select Start→All Programs→MuseScore 2→MuseScore 2.

    Uninstall

    You can uninstall MuseScore from the menu by selecting Start→All Programs→MuseScore 2→Uninstall MuseScore; or via Windows' Control Panel. Note that this will not remove your scores nor your MuseScore settings.

    Troubleshooting

    On Windows XP and Vista, the installer might be blocked by the system. If you don't manage to install MuseScore, right click the downloaded file and click Properties. If there is a message "This file came from another computer and might be blocked to help protect this computer", click on "Unblock", "OK" and double click on the downloaded file again.

    External links

    • How to install MuseScore on Windows without administrator rights
    • How to run MuseScore as Administrator on Windows
    • How to change the language in MuseScore

    Install on macOS

      Install

      You will find the DMG (disk image) file on the download page of the MuseScore website. Click on the macOS link to start the download. When the download is complete, double-click the DMG file to mount the disk image.

      Install Mac

      Drag and drop the MuseScore icon to the Applications folder icon.

      If you are not logged in as administrator, macOS may ask for a password: click Authenticate and enter your password to proceed.

      Copying

      When the application has finished copying, eject the disk image. You can now launch MuseScore from the Applications folder, Spotlight, or Launchpad.

      Uninstall

      Simply delete MuseScore from Applications folder.

      Install with Apple Remote Desktop

      You can deploy MuseScore to multiple computers with the "Copy" feature of ARD. Since MuseScore is a self-contained application you can simply copy the application to the '/Application' folder on the target machines. It is also possible to install multiple versions of the application as long as their names differ.

      External links

      • How to run MuseScore 2.x on Mac OS X 10.6
      • How to change the language in MuseScore

      Install on Linux

        As of MuseScore 2.0.3 you can, for the first time, get hold of a copy for Linux straight from the download page, just like Windows and Mac users. This is possible thanks to the AppImage packaging format, which runs on pretty much all Linux distributions. If you prefer, there is still the option to get it the traditional way via your distribution's package manager (but you may have to wait for it to get packaged by the relevant maintainer). Of course, you can always build from source.

        AppImage

        The AppImage format is a new way of packaging Linux applications. AppImages are portable - they don't have to be installed - and they run on pretty much any Linux distribution. Dependencies are included in the one AppImage file.

        Step 1 - Download

        Before you download an AppImage, you need to know your processor's architecture. These terminal commands will show it:

            arch

        or

            uname -m

        The output will be something like "i686", "x86_64" or "armv7":

        • i686 (or similar) - 32-bit Intel/AMD processor (found on older machines).
        • x86_64 (or similar) - 64-bit Intel/AMD processor (modern laptop and desktop computers, most Chromebooks).
        • armv7 (or later) - ARM processor (phones & tablets, Raspberry Pi 2/3 running Ubuntu Mate, some Chromebooks, usually 32-bit at present).

        Now you can head over to the download page and find the AppImage that best matches your architecture. Once downloaded, the file will be named "MuseScore-X.Y.Z-$(arch).AppImage".

        Step 2 - Give execute permission

        Before you can use the AppImage you need to give permission for it to be run as a program.

        From the Terminal:

        This command gives the user (u) permission to execute (x) the AppImage. It works on all Linux systems.

            cd ~/Downloads
            chmod u+x MuseScore*.AppImage

        Note: Use the "cd" command to change directory to wherever you saved the AppImage.

        From a File Manager:

        If you prefer to avoid the command line, there is usually a way give execute permission from inside a File Manager.

        In GNOME Files (Nautilus), simply:

        1. Right-click on the AppImage and select "Properties".
        2. Open the "Permissions" tab.
        3. Enable the option labelled "Allow executing file as a program".

        The process may be slightly different in other file managers.

        Step 3 - Run it!

        Now you should be able to run the program simply by double-clicking on it!

        When you downloaded the AppImage it was probably saved in your Downloads folder, but you can move somewhere else it at any time (e.g. you could put it on your desktop for easy access). If you ever want to remove it then simply delete it.

        Installing the AppImage (optional)

        You can run the AppImage without installing it, but you must install it if you want it to be completely integrated with your desktop environment. This has the following benefits:

        • Adds the AppImage to your Applications Menu or Launcher
        • Sets the correct icons for MuseScore's files (MSCZ, MSCX) and for MusicXML files (MXL, XML)
        • Makes the AppImage available via your File Manager's right-click "Open with..." menu

        To install it, run the AppImage from the Terminal with the "install" option (see immediately below). This copies a desktop file and various icons to your computer. If you want to remove them you will need to run the "remove" option before you delete the AppImage. This does not affect any scores created with any version of MuseScore.

        Using command line options

        Running the AppImage from the Terminal allows you to use various command line options. The AppImage has some special options in addition to MuseScore's normal command line options.

        You will need to change directory (cd) to wherever the AppImage is saved your system, for example:

            cd ~/Desktop
            ./MuseScore*.AppImage [option...]

        Or give the path to the AppImage:

            ~/desktop/MuseScore*.AppImage [option...]

        Use the "--help" and "man" options to get more information about the available command line options:

            ./MuseScore*.AppImage --help   # displays a complete list of command line options
            ./MuseScore*.AppImage man      # displays the manual page (explains what the options do)

        Distribution Packages

        Fedora

        1. Import the GPG key:

          su
          rpm --import http://prereleases.musescore.org/linux/Fedora/RPM-GPG-KEY-Seve
           
        2. Go to the download page of the MuseScore website. Click on the link for the stable Fedora download and choose the correct rpm package for your architecture.

        3. Depending on your architecture, use one of the two sets of commands to install MuseScore

          • for arch i386

            su
            yum localinstall musescore-X.Y-1.fc10.i386.rpm
             
          • for arch x86_64

            su
            yum localinstall musescore-X.Y-1.fc10.x86_64.rpm
             

        If you have difficulty with sound, see Fedora 11 and sound.
        See also the hints for the various distributions on the download page.

        External links

        • How to run the MuseScore AppImage on Linux - video
        • How to change the language in MuseScore

        Install on Chromebook

        Desktop program

        MuseScore's desktop program will not work natively on Chrome OS, but there are some workaround solutions:

        1. Since Chrome OS 69, certain chromebook models are able to run Linux apps and so you can install MuseScore for Linux as provided on our Download page. Feedback about the installation process and supported hardware is welcome on the forum

        2. Via software-on-demand service such as rollApp: By just visiting this website, you can run MuseScore in the browser. You can access your scores via cloud services such as Google Drive or save them to your online MuseScore account through the menu File→Save Online.... Note that currently, sound and playback does not work on rollApp.

        3. Via Crouton: Involves installing a Linux based operating system which runs in parallel with Chrome OS, and then installing MuseScore on Linux.

        Android app (playback only)

        Alternatively, it is possible to install MuseScore's Android app on recent Chromebooks. You will need to update to the latest version of Chrome OS first. See the Chromebook support documentation for help installing Android apps on Chromebooks, and a list of supported devices. The app only supports playback of existing scores, not score editing or creation, but you can sign-in to your MuseScore account for easy access to all your scores on MuseScore.com.

        External links

        • How to run MuseScore on a Chromebook
        • Check the installation procedure from the comments in this thread
        • How to change the language in MuseScore

        Thiết lập ngôn ngữ và cập nhật bản dịch

          MuseScore sẽ được cài đặt và hoạt động trong ngôn ngữ của "Hệ thống" (một lựa chọn được dùng bởi hầu hết các chương trình, và thông thường phụ thuộc vào ngôn ngữ và quốc gia đã được thiết lập trên máy tính của bạn hay tài khoản).

          Thay đổi ngôn ngữ

          1. Đi tới Điều chỉnh → Thiết lập... (Mac: MuseScore → Thiết lập...)
          2. Trong thẻ Tổng quát , có một khu vực là Ngôn ngữ :

            Dialog: Edit / Preferences / General

          Bạn có thể thay đổi và cập nhật bản dịch bằng nút Cập nhật bản dịch. Một cửa sổ xuất hiện, hiển thị ngôn ngữ của bạn trên cùng - xem bên dưới.

          Sau khi chỉ định xong, bạn sẽ phải thoát và mở lại MuseScore để những thay đổi và cập nhật có hiệu lực.

          Cập nhật bản dịch

          Bạn có thể cập nhật bản dịch như đã giải thích ở trên, nhưng có một cách khác là:

          1. Đi tới Hỗ trợ → Quản lý tài nguyên...
          2. Nhấp vào nút 'Cập nhật'

            Dialog: Help / Resource Manager

          Tại đây bạn cũng phải thoát và mở lại MuseScore để việc cập nhật có hiệu lực.

          Xem thêm

          • Trợ giúp và cải thiện bản dịch

          Kiểm tra cập nhật

            Có hai cách để kiểm tra cập nhật.

            Kiểm tra cập nhật tự động

            1. Đi tới Điều chỉnh → Thiết lập... (Mac: MuseScore → Thiết lập...)
            2. Chọn thẻ Cập nhật
            3. Chọn vào 'Check for new version of MuseScore'

              Dialog: Edit / Preferences... / Update

            Bây giờ MuseScore sẽ kiểm tra cập nhật mỗi lần chạy và thông bào cho bạn nếu cần.

            Kiểm tra cập nhật

            1. Chọn Hỗ trợ → Kiểm tra Cập nhật

              Menu: Help / Check for Update

            2. Một hộp thoại sẽ xuất hiện cho biết trạng thái cập nhật: hoặc là "Không có bản cập nhật" hoặc là "MuseScore có phiên bản cập nhật:" theo sau là một liên kết để tải nó về.

            Xem thêm

            • Thiết lập: Cập nhật

            Các thao tác cơ bản

            Chương "Khởi động" trước đã hướng dẫn các bạn cách cài đặt và xử lý việc tạo một bản nhạc mới. Chương "Các thao tác cơ bản" này sẽ cho bạn thấy tổng quản về MuseScore và mô tả những cách chung để tương tác với bản nhạc.

            Chế độ điều chỉnh

              Rất nhiều đối tượng trong bản nhạc có thể được chỉnh sửa trong Chế độ điều chỉnh:

              • Nhấp đôi chuột để: Bắt đầu Chế độ điều chỉnh
              • Nhấn Esc để: Kết thúc Chế độ điều chỉnh

              Một vài đối tượng có các điểm điều khiển trong chế độ điều chỉnh, nó có thể được di chuyển bằng cách kéo chuột hay các lệnh từ bàn phím.

              Dấu luyến trong Chế độ điều chỉnh:

              Sample slur in Edit Mode

              Các lệnh từ bàn phím có thể dùng:

              • ←: Dịch điểm điều khiển sang trái một Khe-nhạc (khoảng cách giữa hai dòng kẻ của khuông nhạc)
              • →: Dịch điểm điều khiển sang phải một Khe-nhạc
              • ↑: Dịch điểm điều khiển lên một Khe-nhạc
              • ↓: Dịch điểm điều khiển xuống một Khe-nhạc
              • Ctrl+← (Mac: ⌘+←): Dịch điểm điều khiển sang trái 0.1 Khe-nhạc
              • Ctrl+→ (Mac: ⌘+→): Dịch điểm điều khiển sang phải 0.1 Khe-nhạc
              • Ctrl+↑ (Mac: ⌘+↑): Dịch điểm điều khiển lên 0.1 Khe-nhạc
              • Ctrl+↓ (Mac: ⌘+↓): Dịch điểm điều khiển xuống 0.1 Khe-nhạc
              • Alt+←: Dịch điểm điều khiển sang trái 0.01 Khe-nhạc
              • Alt+→: Dịch điểm điều khiển sang phải 0.01 Khe-nhạc
              • Alt+↑: Dịch điểm điều khiển lên 0.01 Khe-nhạc
              • Alt+↓: Dịch điểm điều khiển xuống 0.01 Khe-nhạc
              • Shift+←: Dịch điểm neo của điểm điều khiển sang trái
              • Shift+→: Dịch điểm neo của điểm điều khiển sang phải
              • Tab: Nhảy tới điểm điều khiển kế tiếp

              Nếu muốn di chuyển các đối tượng trong bản nhạc bằng tay, hãy nhấp đôi vào nó và dùng các phím mũi tên (phím định hướng).

              Xem thêm

              • Điều chỉnh chữ viết
              • Dấu luyến
              • Ngoặc nối khuông nhạc
              • Đường kẻ hay nét vẽ
              • Dấu nối-cờ-nốt
              • Dấu biến cường

              Bảng công cụ

                Có thể ẩn/hiện bảng công cụ bằng trình đơn Xem → Bảng công cụ (hoặc dùng phím tắt F9).

                Thêm các ký hiệu vào bản nhạc

                Bạn có thể kéo thả các ký hiệu từ bảng công cụ lên trên các đối tượng trong bản nhạc.

                Nhấp đôi vào một ký hiệu từ bảng công cụ cũng tương đương với việc kéo thả nó từng đối tượng được chọn trên bản nhạc.

                Ví dụ, bạn có thể thêm dấu tenuto cho một nhóm nốt như sau:

                1. Chọn các nốt
                2. Trong bảng công cụ "Dấu diễn đạt & Dấu hoa mỹ", nhấp đôi vào ký hiệu tenuto

                Các bảng công cụ Cơ bản và Chi tiết

                Có lẽ bạn muốn có thêm nhiều ký hiệu/bảng công cụ trong không gian làm việc của mình.
                Xem mục Nonexistant node nid: 39841 để sửa đổi nhóm các bảng công cụ.

                Các ký hiệu âm nhạc khác

                Các ký hiệu âm nhạc khác có thể tìm thấy trong Bảng công cụ gốc.

                Điều chỉnh một bảng công cụ

                Để thêm các ký hiệu âm nhạc khác vào một bảng công cụ, xem mục Tùy chỉnh bảng công cụ.

                Xem thêm

                • Tùy chỉnh bảng công cụ
                • Nonexistant node nid: 39841
                • Bảng công cụ gốc

                Inspector and object properties

                  Most score elements have properties that can be edited in one of two ways:

                  • Click on any element, and many of its properties can be viewed and changed from the Inspector panel on the right-hand side of your screen.

                  • Right-click on an element and select an option with the word Properties in it. This option opens a dialog with advanced properties, only available for certain types of elements.
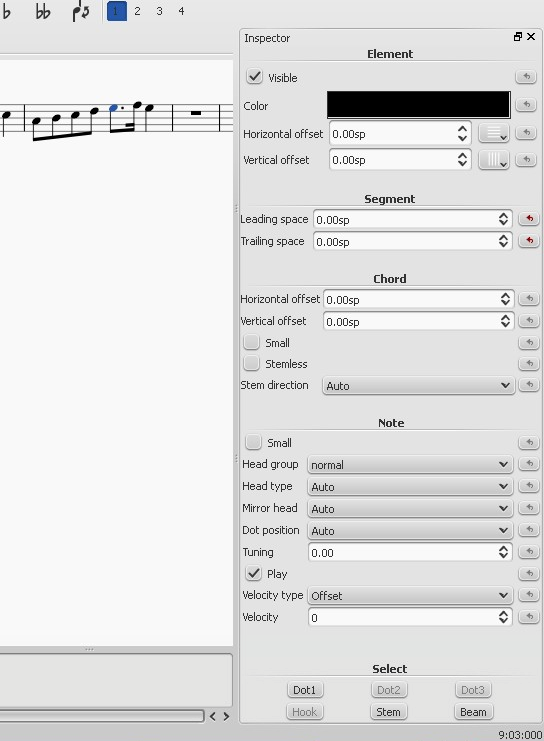
                  Inspector

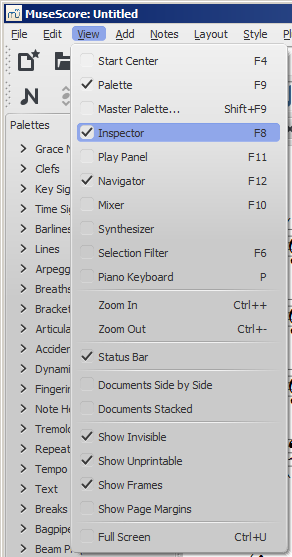
                  The Inspector is shown by default on the right of your screen. It can be displayed or hidden from the menu: select View and check/uncheck Inspector, or use the shortcut F8 (Mac: fn+F8).

                  In the Inspector, the properties of any selected object are displayed and can be edited. This applies to virtually every single element in the score window—notes, text, barlines, articulations etc. Multiple elements can also be selected and edited simultaneously, as long as they are of the same type. However, if the selected objects are of different types, then the Inspector restricts you to editing color and visibility only.

                  The Inspector panel can be un-docked to become a floating panel by clicking the double-chevron symbol or double-clicking the top bar of the panel.

                  Inspector top bar

                  To re-attach the panel double-click on the top bar again. See also: Side panels.

                  Inspector categories

                  When you select one or more elements of a specific type, the properties which can be edited are conveniently divided into categories in the Inspector. Categories can be identified by their bold, centered lettering. For example, if you select a barline, you will see the following displayed at the top of the Inspector:

                  Barline inspector

                  For details about how to adjust the properties of various score elements, refer to the relevant sections in the handbook. However, a few general points will be covered here:

                  Element

                  All score elements, except frames, breaks and spacers, display this category in the Inspector when selected. The various options are as follows:

                  • Visible: Uncheck this box to make selected elements invisible: alternatively, use the shortcut V (toggle). Invisible elements do not appear in the music when printed out or exported as a PDF or image. If you still want them to remain on display in the document window, make sure that the "Show Invisible" option is selected in View → Show Invisible. Invisible elements will then be colored light gray.

                  • Color: Click on the rectangle to open a "Color Select" dialog. Adjust the color and opacity of selected elements.

                  • Horizontal offset / Vertical offset: Allows you to position selected elements exactly (in terms of space units). A positive number moves the elements right or down; a negative number moves the elements left or up. Snap to grid buttons are also provided.

                  Element Group

                  This category is displayed only when you have selected a mixture of different types of elements, and allows editing of color and visibility only.

                  Segment

                  This category is used to increase or decrease the space before/after an element in a music staff. Adjusting leading/trailing space here also affects any associated lyric syllables.

                  Chord

                  This category is displayed only if notes are selected. Any change to a notehead property under Chord affects the whole chord (i.e. all the notes in one voice) at that location—and not just the selected note. If you want to make changes to the position of just one note in a chord, then use the Element category (above).

                  Note

                  This category allows you to make changes to selected notes (but for note position—see Element). It contains the following properties:

                  • Small: Make notehead smaller (you can specify the relative size of all small notes from the menu: Style → General… → Sizes…).
                  • Head group: See Notehead groups.
                  • Head type: See Notehead types.
                  • Mirror head: Position notehead to the left or right of the stem (default is "Auto").
                  • Tuning: Adjust tuning of note to the nearest cent.
                  • Play: Unticking this box silences the note.
                  • Velocity type: Sets the MIDI velocity of notes directly. Chose one of two options:
                    • Offset: Make the value shown in "Velocity" relative to the previous dynamic marking.
                    • User: Make the value shown in "Velocity" absolute (i.e. the MIDI velocity is unaffected by dynamic markings).
                  • Velocity: Set the MIDI velocity according to the option displayed in "Velocity type."
                  • Fix to line: When ticked, the note is fixed to the top line of the standard 5-line staff.
                  • Line: A positive number moves the "fixed" note down; a negative number moves it upwards.

                  Select

                  This category appears differently according to the selection you have made:

                  • If you select a notehead, the "Select" category displays buttons which allow you to easily switch the selection to the stem, beam, hook, duration dot (or dots) or tuplet number associated with the notehead (see image below).

                  Inspector: Select category

                  • If you select a range of measures, the "Select" category allows you to select either all notes, grace notes (from version 2.1) or rests.

                  Beam

                  This section is displayed in the Inspector when you select one or more note beams, and allows you to make fine adjustments to beam position and angle, and also change the spacing of beamed notes. See Adjust beam with the inspector.

                  Clef

                  This section appears when you select a clef: the tick box allows you to turn on/off the display of a preceding courtesy clef.

                  clef_inspector.png

                  Properties dialogs

                  Properties of some objects are accessed by right-clicking on the object and choosing a "Properties" option from the context menu: these are in addition to the object's properties displayed in the Inspector.

                  (Note: Properties should not be confused with Styles. Changes to properties only affect the single element selected; all style controls apply to the entire score.)

                  Articulation properties

                  Right-click on an articulation and select Articulation Properties... See Articulations and ornaments.

                  Fretboard diagram properties

                  Right-click on a fretboard diagram and select Fretboard Diagram Properties... Allows you to create custom fretboard diagrams. See Edit fretboard diagram.

                  Line properties

                  Right-click on a line and select Line Properties... There are settings for the beginning, end, or continuation of the line. You can add or remove text, adjust the text's placement, and set the length and angle of optional hooks. Click the ... button to access text properties for text included in the line. See Custom lines and line properties.
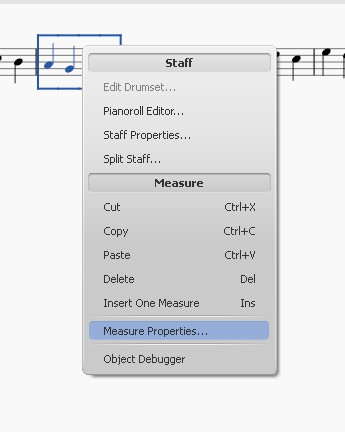
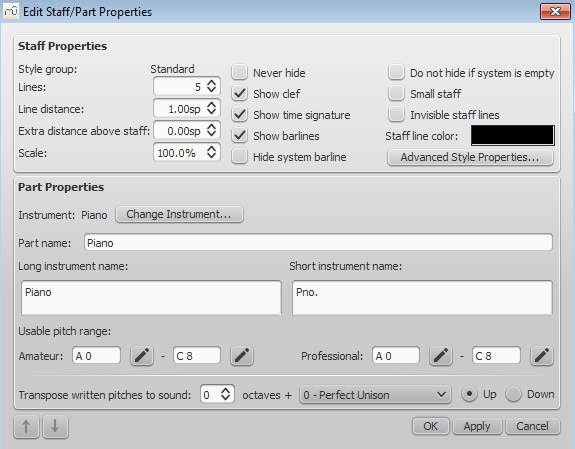
                  Measure properties

                  Right-click on an empty part of the measure and select Measure Properties... Adjust visibility, bar duration, repeats, stretch and numbering. See Measure properties.
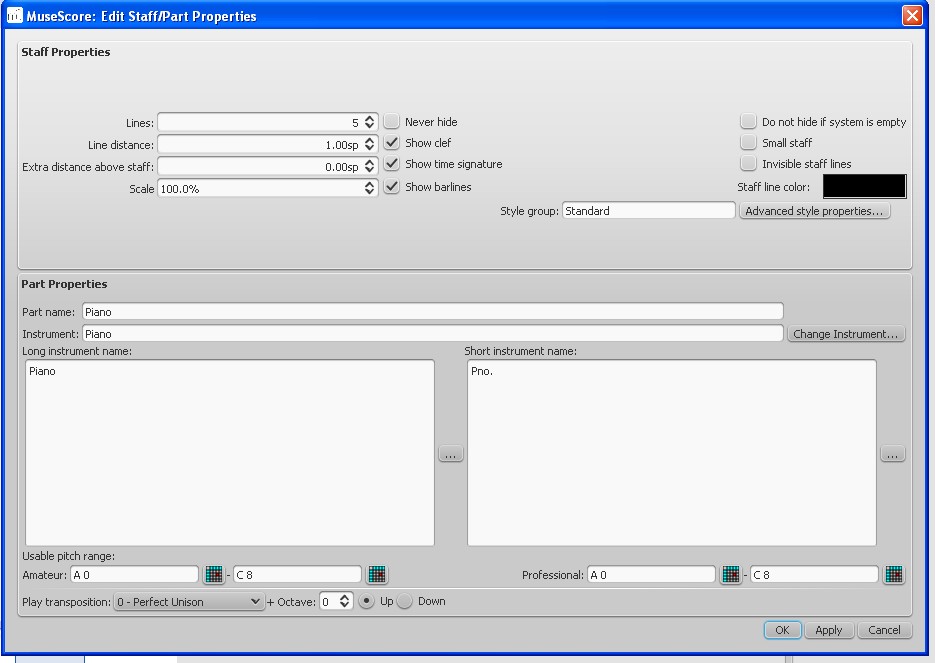
                  Staff properties

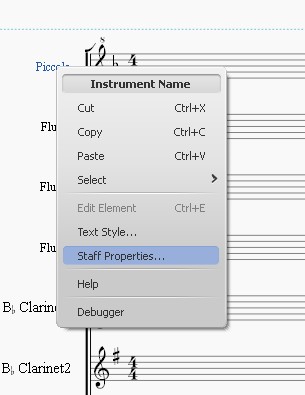
                  Right-click either an empty part of a measure or the name of an instrument and select Staff Properties... This dialog allows you to adjust attributes of both the single staff and the instrument it is a part of. See Staff properties.

                  Text properties

                  Right click on a text-based element and select Text Properties... See Text styles and properties. If the element is a line with text in it, see → above.

                  Time signature properties

                  Right-click on a time signature and select Time Signature Properties... Used to adjust appearance of time sig. and beam properties of notes. See Time signatures.

                  See also

                  • Measure operations
                  • Note input
                  • Layout and formatting
                  • Staff properties
                  • Part extraction
                  upload
                  Đính kèm Dung lượng
                  Note inspector.jpg 67.14 KB
                  Staffproperties.jpg 91.41 KB
                  Buttonstaffproperties.jpg 1.03 KB
                  Staffproperties2ndaccess.jpg 22.51 KB
                  View_en.png 25.03 KB
                  Note inspector.png 133.85 KB
                  Measure Properties 1.png 53.21 KB
                  notes.png 2.65 KB
                  inspector_select.png 3.25 KB
                  Barline inspector.png 10.85 KB
                  Measure Properties 2.png 60.54 KB
                  inspector-top-bar.jpg 3.08 KB
                  Previous_Next_Buttons.png 7.36 KB
                  Staff_Properties_en.png 30.14 KB
                  clef_inspector.png 2.09 KB

                  Các thao tác trên ô nhịp

                    Nối thêm

                    Để thêm một ô nhịp vào cuối bản nhạc, nhấn Ctrl+B (Mac: ⌘+B), hoặc từ trình đơn, chọn Thêm → Ô nhịp → Nối thêm một ô nhịp. Để thêm nhiều ô nhịp, nhấn Alt+Shift+B (Mac: Option+Shift+B) hoặc từ trình đơn Thêm → Ô nhịp → Nối thêm nhiều ô nhịp....

                    Chèn thêm

                    Chọn một ô nhịp, sau đó nhấn phím Ins hoặc dùng trình đơn Thêm → Ô nhịp → Chèn một ô nhịp để chèn thêm một ô nhịp rỗng nằm đằng trước ô được chọn. Để chèn nhiều ô nhịp, nhấn Ctrl+Ins (không có phím tắt cho Mac) hoặc từ trình đơn, chọn Thêm → Ô nhịp → Chèn nhiều ô nhịp....

                    Xóa bỏ

                    Chọn ô nhịp, sau đó nhấn Ctrl+Del (Mac: ⌘+Fn+Del).

                    Các đặc tính

                    Để chỉnh sửa các đặc tính của một ô nhịp, nhấp phải chuột vào chỗ trống của ô nhịp và chọn Đặc tính ô nhịp...:

                    Dialog: Measure Properties

                    Khuông nhạc

                    • Thuộc tính hiển thị cho phép bạn ẩn/hiện các nốt và các dòng kẻ khuông đối với ô nhịp hiện tại.
                    • Thuộc tính ẩn thân nốt cho phép bạn ẩn/hiện tất cả thân nốt đối với ô nhịp hiện tại. Chú ý, bình thường thì một nốt sẽ có một thân nốt ví dụ nốt trắng (minims) và nốt đen (crotchets) nhưng khi được đánh dấu là 'ẩn thân nốt' thì chỉ còn hiện đầu nốt mà thôi.

                    Trường độ của ô nhịp

                    • Thuộc tính Trên mặt chữ là số chỉ nhịp hiển thị trên bản nhạc.
                    • Bạn có thể thay đổi thuộc tính Thực tế của ô nhịp thành bất kỳ số chỉ nhịp nào.
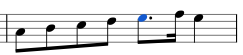
                      Bình thường, thuộc tính trên-mặt-chữ và thực-tế của ô nhịp là giống nhau. Tuy nhiên, một ô nhịp (ví dụ: ô nhịp lấy đà, anacrusis) có thể có trường độ thực-tế ngắn hơn.

                    Trong hình dưới, ô nhịp lấy đà chứa nốt đen (crotchet) có trường độ ô nhịp trên-mặt-chữ là 4/4, nhưng trường độ thực-tế là 1/4. Các ô nhịp trong giữa thì có trường độ thực-tế và trên-mặt-chữ là 4/4. Ô nhịp cuối chỉ chứa một nốt trắng có chấm, lại có trường độ thực-tế là 3/4:

                    Incomplete measures

                    Những thuộc tính khác

                    • Loại khỏi bộ đếm ô nhịp
                      Sử dụng thuộc tính "Loại khỏi bộ đếm ô nhịp" đối với những ô nhịp "bất thường", tức là những ô nhịp này không nên tính trong việc đánh số cho ô nhịp. Bình thường, một ô nhịp lấy đà sẽ được đánh dấu là "Loại khỏi bộ đếm ô nhịp".

                    • Tăng chỉ số ô nhịp lên
                      Bạn có thể dùng thuộc tính "Tăng chỉ số ô nhịp lên" để tác động tới việc đánh số cho ô nhịp. Bạn có thể nhập một số dương hoặc âm ở đây. Chú ý, việc làm này sẽ gây ảnh hưởng tới những ô nhịp phía sau. Nếu nhập giá trị là "-1" thì kết quả cũng giống như việc bạn đánh dấu một ô nhịp là "loại khỏi bộ đếm ô nhịp".

                    • Độ giãn
                      Với thuộc tính này bạn có thể tăng, hoặc giãn không gian chiều ngang giữa các đối tượng của bản nhạc (các nốt nhạc, dấu lặng, v.v..).

                    • Số lần lặp lại
                      Nếu ô nhịp này nằm ngay trước một dấu lặp, bạn có thể định rõ nó được chơi mấy lần.

                    • Không dùng dấu-lặng-đa-ô-nhịp
                      Thuộc tính sẽ tách một dấu lặng đa ô nhịp tại điểm bắt đầu của ô nhịp được chọn. Tùy chọn này nên được đánh dấu trước khi bạn bật tùy chọn "Tạo dấu lặng đa ô nhịp" trong Định kiểu → Tổng quát..., trong thẻ "Bản nhạc".
                      Dấu lặng đa ô nhịp sẽ tự động được hủy tại những chỗ ngắt quan trọng, ví dụ như nhãn diễn lặp, những nơi số chỉ nhịp bị đổi, vạch nhịp kép, các ô nhịp bất thường, v.v.. Mặc định sẽ tắt cho mọi bản nhạc, đối với các bè thì bật

                    Việc đánh số

                    MuseScore sẽ tự động đánh số cho các ô nhịp đầu tiên của từng dòng nhạc (ngoại trừ dòng nhạc đầu tiên, thực sự là chỉ đối với ô nhịp số 1), nhưng vẫn có các tùy chọn đánh số khác. Từ trình đơn chính, chọn Định kiểu → Tổng quát..., tại khung bên trái, chọn thẻ "Khung tin đầu trang, chân trang, Đánh số ô nhịp". Tại cuối khung bên phải là khu vực "Đánh số ô nhịp" ("Chỉ số ô nhịp").

                    Đánh dấu vào ô "Đánh số cho ô nhịp" ("Chỉ số ô nhịp") để bật tính năng tự động đánh số cho ô nhịp.

                    Đánh dấu vào "Áp dụng cho cái đầu tiên" nếu bạn muốn hiện chỉ số ô nhịp cho ô nhịp đầu tiên.

                    Đánh dấu vào "Tất cả các khuông nhạc" nếu bạn muốn đánh số cho tất cả các khuông nhạc. Ngoài ra, chỉ có khuông trên cùng của mỗi dòng nhạc sẽ hiển thị chỉ số ô nhịp.

                    Chọn vào "Đầu mỗi dòng nhạc" cái này sẽ đánh số tại ô nhịp đầu tiên của mỗi dòng, hoặc chọn mục "Bước nhảy" để chỉ ra khoảng nhảy. Ví dụ, khoảng nhảy là mỗi 1 ô nhịp; hay khoảng nhảy là cứ 5 ô nhịp thì đánh chỉ số cho ô nhịp.

                    Tách và ghép

                    Có thể bạn sẽ muốn có một ô nhịp dài hơn bình thường, hoặc ngắn hơn. Bạn có thể thay đổi chỉ số ô nhịp và số chỉ nhịp trong thuộc tính ô nhịp, nhưng giờ đã có tùy chọn mới để tách và ghép các ô nhịp. Các dấu nối cờ nốt có thể sẽ tự động thay đổi.

                    • Ghép ô nhịp

                      1. Chọn các ô nhịp bạn muốn nối
                      2. Điều chỉnh → Ô nhịp → Ghép các ô nhịp lại một

                    Chú ý: Nếu chỉ chọn một khuông nhạc, tất cả các ô nhịp trong mỗi khuông hoặc dòng nhạc sẽ được ghép lại.

                    Example of joined measure 
                    
                    • Tách ô nhịp

                      1. Chọn một nốt (hay gam)
                      2. Điều chỉnh → Ô nhịp → Tách ô nhịp

                    Chú ý: Nếu chỉ chọn một nốt trong một khuông, thì mỗi khuông của dòng nhạc sẽ được tách ra cùng một chỗ.

                    Xem thêm

                    • Cách xóa bỏ ô nhịp
                    • Cách mở rộng một ô nhịp qua nhiều dòng
                    • Cách tạo bản nhạc không có số chỉ nhịp (và khóa nhạc)

                    Các giọng

                      Voices allow you to have notes on a single staff which start at the same time, yet have different durations. Voices are sometimes called "layers" in other notation software.

                      In a polyphonic measure, voice 1 usually takes the up-stem notes and voice 2 takes the down-stem notes.

                      Polyphonic measure

                      When to use voices

                      • If you need stems pointing in opposite directions within a chord, on a single staff.
                      • If you need notes of different durations within a single staff, played simultaneously.

                      Instructions

                      Start by entering the top voice (the up-stem notes in the image above). When inputting, some notes may have down-stems, but these will flip automatically when the second voice is added.

                      Voice 1 notes
                      

                      If you are using a keyboard (computer or MIDI) to enter notes, use the ← key to move your cursor back to the beginning of the staff (or measure). If you are using the mouse to position notes on the staff, this is not necessary.

                      Click on the "Voice 2" button Voice 2 button (at the right in the toolbar).

                      Enter all the bottom voice notes (all the down-stem notes). When finished, it might look something like this:

                      Voices 1 and 2
                      

                      Note that you must be in Note input mode to select another voice.

                      Hidden spacer rests

                      Only the rests of voices 2, 3, and 4 can be deleted, but those of the main voice (1 - blue) can be hidden.

                      voice selector

                      To hide a rest, select it and press V or uncheck the "Visible" checkbox in the Inspector, which can be enabled from the View menu or with the shortcut F8 (Mac: fn+F8). If you have Show Invisible turned on in the View menu, the rest still shows in gray on your screen. The hidden rest will not appear if you print, or export as PDF, PNG, SVG, etc.

                      Exchange voices of notes

                      1. Select range of notes
                      2. Edit → Voices
                      3. Exchange any two voices

                      Note: The selection can encompass content of any voice, but only two will be processed at once.

                      See also

                      • How to merge/combine/implode two staves in one with two voices
                      • How to input multiple notes on a staff with different durations
                      • How to make notes in unison overlapping

                      External links

                      • Video tutorial: How To Write Two Parts On One Staff: Voices

                      Các chế độ chọn

                        Có nhiều chế độ chọn khác nhau (nhiều cách để chọn các đối tượng).

                        Chỉ chọn một đối tượng

                        • Chỉ cần nhấp chuột trên nó.

                        Chọn một dãy

                        1. Chọn đối tượng đầu tiên (hiểu là: nhấp chuột trên nó)
                        2. Nhấn Shift
                        3. Chọn (nhấp chuột) trên đối tượng cuối

                        Tất cả các đối tượng được chọn sẽ nằm trong khung chữ nhật màu xanh lam.

                        Chú ý 1: Một vài đối tượng có thể chọn thành dãy: Nốt nhạc, dấu lặng, dấu diễn đạt ...
                        Chú ý 2: Xem mục Sao chép và dán: Bộ lọc cho vùng được chọn để chọn chỉ những đối tượng cần chọn trong dãy.

                        Chọn nhiều đối tượng không liền nhau

                        1. Chọn đối tượng đầu tiên (hiểu là: nhấp chuột trên nó)
                        2. Nhấn và giữ Ctrl
                        3. Chọn (nhấp chuột) trên các đối tượng khác

                        Chú ý 1 ở trên vẫn áp dụng.

                        Chọn tất cả đối tượng tương tự

                        1. Chọn một đối tượng
                        2. Chuột phải trên nó vào → Chọn >
                        3. Vài lựa chọn có sẵn

                          • Các đối tượng tương tự: trong toàn bộ bản nhạc
                          • Các đối tượng tương tự trong cùng khuông: chỉ trong cùng khuông
                          • Các đối tượng tương tự trong vùng đang chọn: chỉ nếu một →vùng chọn có hiệu lực, chọn các đối tượng tương tự nằm trong vùng chọn đó
                          • Thêm nữa...

                          Ví dụ: Một dấu giáng (dấu hóa bất thường) được chọn

                          Dialog: Select / More...

                          Bạn có thể đánh dấu (và kết hợp) các lựa chọn bên dưới:

                          • Cùng kiểu-phụ: trong ví dụ này chỉ các dấu giáng mới được chọn (không phải thăng cũng không phải dấu bình); một vài đối tượng có kiểu-phụ (ví dụ dấu diễn đạt, dấu hóa bất thường ...)
                          • Cùng khuông: chỉ các đối tượng nằm trong cùng khuông nhạc
                          • Cùng giọng: chỉ các đối tượng nằm cùng một giọng
                          • Cùng dòng nhạc: chỉ các đối tượng nằm cùng dòng nhạc
                          • Trong vùng được chọn: nếu một vùng chọn có hiệu lực, chỉ các đối tượng nằm trong vùng chọn đó

                          Các thao tác khác có thể được thực hiện (chỉ chọn một): Thêm, Trừ đi, Thay thế và Tìm

                        Chúng dùng cho mục đích gì

                        • Sao chép và dán
                        • Chế độ điều chỉnh để Di chuyển đối tượng tương tự
                        • Bảng kiểm soát và các thuộc tính của đối tượng

                        Xem thêm

                        • Chương Các thao tác cơ bản , nhất là mục Nhập nốt nhạc
                        • Chương Ký âm , nhất là mục Dấu hóa bất thường
                        • Chương Chữ viết , nhất là mục Chỉnh sửa chữ viết và Di chuyển các ký hiệu và chữ viết khuông nhạc dựa trên lưới

                        Các chế độ xem

                          Bạn có thể xem bản nhạc của mình trong các chế độ khác nhau.

                          Ngoại trừ chế độ xem "Xem-theo-trang/Xem-liền-dòng, tất cả các tùy chọn khác có thể thấy bên dưới trình đơn Xem trong MuseScore.

                          Chế độ Xem-theo-trang/Xem-liền-dòng

                          Trong chế độ "Xem theo trang", bạn có thể thấy định dạng bản nhạc của mình giống như khi được in hoặc khi xuất ra tập tin ảnh hay PDF. Còn chế độ "Xem liền dòng" , nguyên bản nhạc sẽ hiện thị trên một dòng dài liên tục.

                          Chú ý khi chuyển qua lại giữa hai chế độ này, bản nhạc sẽ được định dạng lại cách nhìn và các điều chỉnh trước đó bạn sẽ phải chỉnh lại.

                          Cách chuyển qua lại giữa hai chế độ:

                          Viewing Modes

                          Chế độ Xem-theo-trang

                          Trong chế độ này, bản nhạc hiện thị một hoặc nhiều trang theo kích cỡ chỉ định với lề trang của nó, và bạn sẽ thấy được tất cả các ngắt dòng và ngắt trang, bao gồm các dấu ngắt bạn tự tay thêm vào và những ngắt được tính toán tự động bởi chương trình. (Các ngắt trang mà bạn tự thêm có thể hữu dụng để đặt các trang đúng chỗ cho các bè trong một dàn nhạc, đó là một ví dụ.)

                          Chế độ Xem-liền-dòng

                          Chế độ này sẽ hiển thị bản nhạc trên một dòng dài liên tục. Nếu điểm khởi đầu của bản nhạc không còn nằm trong khung nhìn nữa, thì sẽ có một khung chữ nhật thay thế chứa chỉ số ô nhịp, tên nhạc cụ, khóa nhạc, chỉ số nhịp và hóa biểu của bản nhạc được hiện lên.

                          Example of continuous view

                          Trước khi in ấn, hãy quay về chế độ "Xem theo trang" để kiểm lại các ngắt dòng và ngắt trang.

                          Chú ý: Bởi vì sự bố trí thì đơn giản hơn nên có thể trong chế độ "Xem liền dòng" MuseScore sẽ thực thi nhanh hơn trong chế độ "Xem theo trang".

                          Thu phóng

                          Trong chế độ "Xem theo trang" hay "Xem liền dòng", bạn có thể thay đổi cấp độ thu phóng ở đây (chú ý: điều này không ảnh hưởng gì tới kích cỡ bản in).

                          Zoom

                          Trong hộp trình đơn cuộn, bạn có thể chọn một tỷ lệ % hiển thị cho bản nhạc, hoặc là Khít Ngang, Nguyên Trang hay Hai Trang, and Two Pages, những tỷ lệ này là những tỷ lệ tương đối so với kích cỡ của cửa sổ.

                          Bạn có thể thấy các lựa chọn Phóng to - Thu nhỏ và các phím tắt trong trình đơn "Xem", và bạn cũng có thể phóng to thu nhỏ bằng cách văn chuột giữa lên hoặc xuống trong khi nhấn giữ phím Ctrl (Mac: Cmd).

                          Cách hiển thị khác của bản nhạc

                          Có thể bạn sẽ muốn xem các tài liệu theo kiểu nằm ngang theo nhau

                          Documents side by side

                          hoặc dọc theo nhau

                          Documents stacked

                          Bạn có thể kéo thanh chắn tách biệt giữa hai bản nhạc để điều chỉnh không gian cửa sổ dành cho từng cái.

                          Chế độ Toàn-màn-hình

                          Chế độ "Toàn màn hình" sẽ mở rộng không gian MuseScore lấp đầy màn hình, cho bạn khung nhìn rộng hơn.

                          Full screen

                          Bộ điều hướng

                          Nếu bạn có một bản nhạc dài và muốn xem mình đang ở vị trí nào hoặc muốn nhảy tới một trang nào đó, hãy sử dụng cửa sổ Bộ điều hướng nằm dưới cuối màn hình.
                          Navigator

                          Khung chữ nhật xanh lam thì tương ứng với khu vực mà bản nhạc được nhìn thấy trong cửa sổ chính. Bạn có thể kéo khung này hoặc thanh cuộn, hay nhấp chuột vào một vùng nào đó, ngay lập tức nó sẽ nhảy đến đó.

                          Navigator bar

                          Để ẩn/hiện cửa sổ điều hướng này, đi tới trình đơn Xem và chọn Bộ điều hướng, hoặc sử dụng phím tắt F12 (Mac: fn+F12).

                          Xem thêm

                          • Lưu trữ/Xuất dữ liệu/In ấn
                          • Định dạng tập tin
                          • Sự bố trí và định dạng

                          Sao chép và dán

                            Sao chép và dán là công cụ rất hữu dụng để viết lặp lại một đoạn nhạc nào đó, hoặc để dịch một đoạn nhạc đi một phách hay một ô nhịp.

                            Sao chép

                            1. Nhấn Chuột trái trên nốt đầu tiên của vùng muốn chọn
                            2. Shift+Chuột trái trên nốt cuối cùng của vùng muốn chọn. Một khung chữ nhật màu xanh lam sẽ tô sáng vùng bạn đã chọn
                            3. Từ trình đơn, chọn Điều chỉnh → Sao chép hoặc nhấn Ctrl+C (Mac: ⌘+C)

                            Dán

                            1. Nhấn Chuột trái vào một nốt nhạc hoặc một ô nhịp nơi bắt đầu cho vùng cần dán.
                            2. Từ trình đơn, chọn Điều chỉnh → Dán hoặc nhấn Ctrl+V (Mac: ⌘+V)

                            Nhân bản nhanh

                            1. Chọn một nốt hoặc ô nhịp
                            2. Nhấn R và rồi MuseScore sẽ nhân đôi đối tượng đã chọn

                            Bộ lọc cho vùng được chọn

                            Có thể dùng bộ lọc trước khi sao chép một vùng đã chọn, để có thể chọn được chính xác những gì sẽ được sao chép và dán sau đó.

                            1. Để mở bảng "Bộ lọc cho vùng được chọn" nhấn F6 (Mac: fn+F6) hoặc vào Xem → Bộ lọc cho vùng được chọn

                              Menu: View / Selection Filter

                              Bộ lọc cho vùng được chọn nhìn giống thế này:

                              Selection filter, everything checked

                            Thẻ Bộ lọc cho vùng được chọn mặc định sẽ xuất hiện bên dưới thẻ "Các bảng công cụ". Nó có thể tách ra và tạo thành một cửa sổ riêng, và nếu kéo nó trực tiếp lên trên thẻ "Các bảng công cụ", hay "Bảng kiểm soát", thì cả hai sẽ hiển thị theo dạng thẻ ở phía dưới cửa sổ.

                            1. Bỏ chọn những thứ bạn không muốn sao chép
                              Ví dụ: Các Dấu diễn đạt và Dấu luyến không được chọn.

                              Selection filter, Articulations and Slurs unchecked

                            2. Sao chép và dán như mục trước
                              (trong ví dụ này, sao chép ô nhịp 4 và 5 rồi dán nó vào ô nhịp 12 và 13)

                            3. Hãy xem kết quả này—dấu luyến đã không được sao chép:

                              Result of  copy and paste

                            Xem thêm

                            Nếu muốn thay đổi nốt nhạc mà không thay đổi tiết tấu, bạn có thể dùng chức năng chuyển tông hoặc chế độ nhập lại cao độ kết hợp với chức năng sao chép và dán.

                            Những liên kết khác

                            • Vi-deo hướng dẫn: Lời bản nhạc, việc sao chép & dấu cường độ

                            Hoàn-tác và làm-lại

                              MuseScore có thể ghi nhớ số lượng thao tác hoàn-tác/làm-lại không giới hạn.

                              Phím tắt như dưới đây:

                              • Hoàn tác:Ctrl+Z (Mac: ⌘+Z)
                              • Làm lại:Ctrl+Shift+Z hoặc Ctrl+Y (Mac: ⌘+Shift+Z)

                              Hoặc sử dụng các nút trên thanh công cụ:

                              Undo/Redo buttons

                              Lưu trữ/Xuất dữ liệu/In ấn

                                Việc lưu trữ và xuất dữ liệu được tách thành hai mục: 'Lưu trữ' và 'Lưu trữ với' (cũng như 'Lưu một bản sao' và 'Lưu phần đang chọn') đối với tập tin của riêng MuseScore (.mscz và .mscx) và 'Xuất bản nhạc' (và 'Xuất các bè nhạc') đối với các định dạng không phải của riêng (MusicXML, MIDI, các định dạng âm thanh và hiển thị khác). 'In ấn' là để đưa tập tin MuseScore tới máy in trong chương trình MuseScore.

                                Trình đơn "Tập tin"

                                Các mục có hiệu lực: 'Lưu trữ', 'Lưu trữ với...', 'Lưu một bản sao...', 'Lưu phần đang chọn...', 'Lưu trực tuyến...', 'Xuất bản nhạc...', 'Xuất các bè nhạc...' và 'In ấn...'

                                Menu: File

                                Các định dạng trong trình đơn 'Lưu trữ', 'Lưu trữ với...', 'Lưu một bản sao...', 'Lưu phần đang chọn...' và 'Lưu trực tuyến...'

                                Dialog: Save As

                                Các định dạng trong trình đơn 'Xuất bản nhạc' (và 'Xuất các bè nhạc...')

                                Dialog: Export

                                Chú ý: Định dạng Uncompressed MuseScore thì có cả trong 'Lưu trữ' và 'Xuất bản nhạc'.

                                Trình đơn "In ấn"

                                Phụ thuộc vào máy in, bạn sẽ có các lựa chọn khác nhau. Nhìn chung các lựa chọn sau đều có sẵn: page range - All, Selection, Current Page, hoặc Pages - number of copies and collation.
                                Nếu bạn có cài đặt máy in ảo PDF, bạn cũng có thể 'xuất' thành tập tin PDF theo cách này.

                                Xem thêm

                                • Định dạng tập tin
                                • Trích xuất các bè

                                Chia sẻ bản nhạc trực tuyến

                                  Đi tới trang musescore.com/sheetmusic để xem những bản nhạc của người khác từ MuseScore.

                                  Bạn có thể lưu và chia sẽ các bản nhạc của bạn trực tuyến tại MuseScore.com. Bạn có thể chọn lưu trữ bản nhạc một cách cá nhân đối với những ai muốn truy xuất bản nhạc của bạn từ bất kỳ máy tính nào, hoặc chia sẽ nó cách công khai. MuseScore.com có thể hiển thị và phát bản nhạc trong trình duyệt mạng của bạn - một tính nặng phụ thêm để đặt tựa đề VideoScores cho phép đồng bộ hóa giữa bản nhạc và một vi-deo YouTube. Để sử dụng bên ngoài trình duyệt mạng, bạn có thể tải bản nhạc về trong nhiều định dạng khác nhau (gồm có PDF, MIDI, MP3, MusicXML, và tập tin gốc MuseScore).

                                  Tạo tài khoản

                                  1. Tới trang MuseScore.com và nhấp vào tạo tài khoản "Create new account". Nhập một username (Tên đăng nhập) và một email tồn tại và nhấn "Create New Account".
                                  2. Chờ vài phút đợi email từ hỗ trợ của MuseScore.com. Nếu không có email nào được chuyển tới, kiểm tra thư mục spam (thư rác) trong hộp mail của bạn.
                                  3. Nhấp vào liên kết trong email và đi tới lược sử của tôi user profile để thay đổi password (mật khẩu).

                                  Chia sẻ bản nhạc trực tiếp từ phần mềm MuseScore

                                  Có thể lưu trực tiếp bản nhạc trực tuyến từ trình đơn Tập tin → Lưu trực tuyến....

                                  MuseScore Save Online

                                  Nếu bạn chưa có tài khoản MuseScore, hãy tạo một cái bằng cách nhấp vào liên kết "Tạo tài khoản". Nó sẽ mở trình duyệt mạng của bạn và đưa bạn tới trang https://musescore.com/user/register

                                  Tiếp theo, nhập địa chỉ email (thư điện tử) hoặc username (tên đăng nhập), và password (mật khẩu) trong MuseScore . Khi đăng nhập thành công, bạn sẽ có thể nhập thông tin bản nhạc của bạn.

                                  Enter the score information

                                  1. Mục Tựa đề là tựa đề của bản nhạc.
                                  2. Mục Miêu tả nằm ngay dưới nó.
                                  3. Mục "Đặt bản nhạc ở trạng thái riêng tư" nếu không đánh dấu sẽ là Công khai (tức là ai cũng được xem), hoặc được đánh dấu thì sẽ là Riêng tư (tức là chỉ bạn được xem) - tuy nhiên liên kết bí mật có thể được sinh ra.
                                  4. Chọn một giấy phép. Bằng cách dùng một Giấy phép bản quyền sáng tác, bạn sẽ cho phép mọi người sử dụng bản nhạc của bạn trong giới hạn cho phép.
                                  5. Bạn có thể thêm vào các thẻ chữ để giúp nhận biết các bản nhạc trên MuseScore.com - chúng được tách nhau bằng dấu phẩy.
                                  6. Trong trường hợp bạn đã lưu bản nhạc này trực tuyến trước đó rồi, nó sẽ tự động cập nhật tới bản nhạc đó. Nếu muốn lưu nó trực tuyến như một bản nhạc mới thì bỏ chọn mục Cập nhật tới bản nhạc hiện đã có.

                                  Check to update an existing score

                                  Tải bản nhạc lên trang MuseScore.com

                                  Có thể tải bản nhạc trực tiếp lên trang MuseScore.com như sau:

                                  1. Nhấp vào Liên kết Upload (Tải lên) để tải lên MuseScore.com.
                                  2. Bạn sẽ có các lựa chọn giống trong trình đơn "Lưu trực tuyến" trên phần mềm.
                                  3. Bạn cũng sẽ có thể truy xuất nhiều thông tin hơn, ví dụ như Genre (thể loại).

                                  Chú ý: Bạn chỉ có thể tải lên một lúc 5 bản nhạc, sau đó bạn vẫn có thể tiếp tục tải lên bản nhạc trực tiếp từ phần mềm MuseScore, nhưng chỉ thấy được 5 cái cuối. Nếu bạn muốn số lượng nhiều hơn, hãy nâng cấp thành tài khoản Pro Account.

                                  Điều chỉnh bản nhạc trên trang MuseScore.com

                                  Nếu muốn thay đổi bản nhạc của bạn trên trang MuseScore.com, hãy chỉnh sửa tập tin MuseScore trên máy tính của bạn trước đã rồi theo các bước bên dưới.

                                  1. Đi tới trang nhạc MuseScore.com.
                                  2. Nhấp vào liên kết edit (chỉnh sửa).
                                  3. Trong biểu mẫu, bạn có thể thay đổi tập tin bản nhạc, thông tin và các đặc quyền.

                                  Xem thêm

                                  • Cách xóa bản nhạc đã lưu trên trang MuseScore.com

                                  Cao độ theo âm

                                  Chức năng Cao độ theo âm cho phép chuyển các nốt ký âm trên khuông nhạc của chúng, thành các nốt có cao độ đúng với âm thanh của nhạc cụ phát ra, và các "nhạc cụ dị tông" (hay nhạc cụ chuyển vị) thì cần đến chúng để được viết ra. Điều này có lẽ sẽ thay đổi hóa biểu và/hoặc khóa nhạc cho phù hợp với các "nhạc cụ dị tông".

                                  Concert pitch button

                                  Chú ý: Trước khi in ấn, nếu như bạn có các nhạc cụ dị tông trong bản nhạc, bạn phải chắc chắn rằng các bè nhạc không ở trong chế độ 'cao độ theo âm'.

                                  "Nhạc cụ dị tông" ví dụ như: cla-ri-net B♭

                                  Xem thêm

                                  • Sự chuyển tông: Các nhạc cụ dị tông
                                  • Dấu hóa bất thường: Xác định lại cao độ

                                  Ký âm

                                  Trong chương "Các thao tác cơ bản" bạn đã học cách nhập nốt và tương tác với bảng công cụ. Chương "Ký âm" mô tả chi tiết hơn về các kiểu ký âm khác nhau, bao gồm cả các ký hiệu âm nhạc nâng cao.

                                  Xem thêm "Các mục nâng cao"

                                  Hóa biểu

                                    Key signatures can be created or changed by dragging one from the Key Signatures palette to a measure, or onto an existing signature.

                                    Key Signatures palette

                                    F9 (Mac: fn+F9) toggles the palette window.

                                    Replace an existing key signature

                                    Drag a key signature from the palette directly onto a key signature in the score. If you want to change the key signature to only one staff of your score (which might be done in some contemporary music, for example), press Ctrl (Mac: ⌘) while dragging the key to the right staff.

                                    Add a new key signature

                                    Drag a key signature from the palette onto an empty part of a measure. This will place the key signature at the beginning of the measure. If you want to add the key signature to only one staff of your score (which might be done in some contemporary music, for example), press Ctrl (Mac: ⌘) while dragging the key to the right staff.

                                    Remove a key signature

                                    Click on an existing key signature and press Del, or drag the empty key signature from the palette (in the advanced workspace) onto the measure.

                                    Courtesy key signature

                                    In the Inspector for a selected key signature, there is an option for "Show courtesy." Additionally, Style → General... → Page has on option for "Create courtesy key signatures". The Inspector will affect only the selected one; the style setting will affect the entire score.

                                    Naturals on key signature changes

                                    You can choose whether to show natural(s) in certain cases when changing the key signatire. Under Style → General... → Accidentals you'll see the options:

                                    NOT FOUND: Key_signature-Naturals_en.png

                                    You can Apply the changes, or click OK. If you are in a linked part, rather than in the primary score, you can apply the change to all parts with the corresponding button.

                                    In this example, the key signature change is showing naturals.

                                    Key change showing naturals]

                                    Key signature and multimeasure rest

                                    Multimeasure rests are interrupted, if there is change in the key signature.

                                    Example with multimeasure rests

                                    See Multimeasure rest

                                    Courtesy key signature and section break

                                    A courtesy key signature will not be shown just before a section break
                                    See Break or spacer: Section break

                                    Custom key signatures

                                    Press Shift+K to bring up the master key signature palette.

                                    Master_palette-Key_sig_en.png

                                    You can even use half-flats, half-sharps, etc.

                                    Master_palette-Accidentals_en.png

                                    Note, however, that currently the playback of custom key signatures is not supported.

                                    Khóa nhạc

                                      Clefs are created or changed by dragging a clef symbol from the Clefs palette into a measure or onto another clef. Use F9 (Mac: ⌥+⌘+K) to show or hide the palette window.

                                      Note: Some clefs are only available from the master palette.

                                      Clefs palette (Advanced)

                                      Add

                                      Drag a clef from the palette into an empty part of a measure - this creates a clef at the beginning of the measure.

                                      Drag a clef onto a particular note to create a mid-measure clef - if the measure is not the first in the staff, it is drawn smaller. An example is a piano score, in which the top staff starts with a G clef and switches immediately to an F clef, then after a note and a rest, back to a G clef.
                                      Clef changes

                                      Note: a clef dragged onto a note (and especially onto the first note), will not be affected by 'Courtesy clef' properties.
                                      To see whether the change will apply to the note or the measure, check what changes color when you drag it.
                                      You can also select the note, or measure first, and double-click the clef on the palette to make sure it affects the right one.

                                      Remove

                                      Select a clef and press Del.

                                      Notes:

                                      • Changing a clef does not change the pitch of any note. Instead, the notes move to preserve pitch.
                                      • Special/rarely used clefs are not shown in the palette by default. These can be found in the aforementioned master palette instead.

                                      Số chỉ nhịp

                                        Time signatures are available in the main palette sidebar. You can drag and drop the time signatures onto the score (see Palette for general information on working with palettes in MuseScore).

                                        Time signature palette

                                        Create your own Time Signature

                                        If a time signature is needed that is not found in the corresponding workspace palette, open the Master Palette directly to the Time Signature section (ShiftT) to create your own. You can edit the numerator and the denominator in the Create Time Signature Panel by pressing the Add button. Once added, just drag and drop the time signature to the score from the window where you created it. Be aware that it will not appear in the workspace palette. If you want to add it in the palette, read Custom Palette.

                                        Change default beaming

                                        To adjust beams from the automatic offering, you can click the notes you want to modify.

                                        For example: by default 5/8 is beamed 3+2. You can click the third and then fourth note to beam it 2+3. Don't forget to do it for the other two subdivisions. To edit the third one drag an icon from Edit-beam-division-en.png to the right note. In this example, the "beam start" icon got dragged to the 9th note and the Beam 16th sub icon to the 13th note.

                                        Dialog: Time signature properties with modified beaming

                                        Delete a time signature

                                        Time signatures you don't need (any longer) can be removed in the above dialog box via right-click → "Delete Content".

                                        Edit to additive meters

                                        In most cases, you'll only need to edit the first of the upper numbers. The additional upper numbers are for additive meters, which contain multiple upper numbers separated by a plus sign.

                                        Create new time signatures

                                        Different duration from time signature: Pickup measures (Anacrusis) and Cadenzas

                                        There are occasions when the actual duration of a measure is different from the duration specified by the time signature. Pickup measures and Cadenzas are a common example. To change the actual duration of a measure without displaying a different time signature, see Measure operations: Properties, Measure duration.

                                        Local Time Signatures

                                        Time signatures can be different for different staves. An example here is Bach's 26. Goldberg Variation:

                                        Bach's 26. Goldberg Variation

                                        MuseScore has the concept of a global time signature and an actual (local) time signature. To change the global time signature drag and drop a palette object to a staff. The global time signature is used to count beats (as shown in the status line) and is the reference for tempo markings. The global time signature is the same for all staves and normally identical to the actual time signature.

                                        The actual time signature is set in the time signature property dialog and can deviate from the global time signature for every staff (left hand 18/16 in the example).

                                        NOT FOUND: Time_Signature_Properties_en.png

                                        The text of the time signature can be set independent of the actual values.

                                        A local time signature is set by dropping a time signature symbol while holding the Ctrl key. The local time signature is set only for one staff. A global time signature is replicated for all staves.

                                        Time signature changes and Other Objects

                                        Multimeasure breaks are interrupted when a time signature change occurs.
                                        Also, a section break will prevent a courtesy time signature being shown at the end of the previous measure.

                                        See also

                                        • Measure rest
                                        • Break or Spacer

                                        Vạch nhịp

                                        Change bar line type

                                        Bar lines are changed by dragging a bar line symbol from the bar line palette to a bar line in the score.

                                        Bar Line palette (Advanced)

                                        To hide a bar line entirely, select the line and untick Visible in the Inspector (F8).

                                        Create grand staff (great stave)

                                        To extend bar lines over multiple staves, double-click on a bar line (see Edit mode).

                                        Bar Line edit mode

                                        Click and drag the blue handle down to the next staff.

                                        The staff bar line updates appear after leaving edit mode.

                                        Grand staff

                                        See also

                                        • Measure operations

                                        Articulations and ornaments

                                          A comprehensive set of symbols can be found in the Articulations and Ornaments palette in the Advanced workspace:

                                          Advanced Articulations and Ornaments

                                          There is also an abbreviated version in the Basic workspace.

                                          Articulations

                                          Articulations are the symbols added to the score to show how a note or chord is to be played. The principal symbols in this group are:

                                          • Fermatas
                                          • Staccato
                                          • Mezzo-staccato / Portato
                                          • Staccatissimo
                                          • Tenuto
                                          • Sforzato
                                          • Marcato

                                          Specialist articulations are also included for bowed and plucked strings, wind instruments etc.

                                          Ornaments

                                          Ornaments include:

                                          • Mordents, Inverted Mordents, Pralltrillers
                                          • Trills
                                          • Turns
                                          • Bends

                                          Note: Appoggiaturas and acciaccaturas can be found in the Grace Notes palette.

                                          Add articulation/ornament

                                          Use either of the following methods:

                                          • Select a note or a range of notes, then double-click a symbol in a palette.
                                          • Drag a symbol from a palette onto a notehead.

                                          Add accidental to an ornament

                                          To apply an accidental to an existing ornament, such as a trill:

                                          1. Select the note to which the ornament is attached;
                                          2. Open the Symbols section of the Master palette;
                                          3. Search for and apply the desired accidental to the score (small accidentals can be found using the search term "figured bass");
                                          4. Drag the accidental into position (or reposition using keyboard shortcuts or the Inspector).

                                          Add fermata to a barline

                                          A fermata can be applied directly to a barline by selecting the barline and double-clicking the fermata from a palette. This does not affect playback though.

                                          Keyboard shortcuts

                                          • Toggle Staccato: Shift+S
                                          • Toggle Tenuto: Shift+N
                                          • Toggle Sforzato (accent): Shift+V
                                          • Toggle Marcato: Shift+O
                                          • Add Acciaccatura (grace note): /

                                          Keyboard shortcuts can be customized in MuseScore's Preferences.

                                          Adjust position

                                          Immediately after adding an articulation or ornament from a palette, the symbol is automatically selected: It can then be moved up or down from the keyboard as follows:

                                          • Press up/down arrow keys for fine positioning (0.1 sp at a time);
                                          • Press Ctrl+↑ or Ctrl+↓ (Mac: Cmd+↑ or Cmd+↓) for larger vertical adjustments (1 sp at a time).
                                          • To flip a symbol to the other side of the note (where applicable), select it and press X.

                                          To enable adjustments in all directions from the keyboard:

                                          1. Double click on the symbol to enter Edit mode, or click on it and press Ctrl+E (Mac: Cmd+E) , or right-click on the symbol and select "Edit element";
                                          2. Press arrow keys for fine positioning (0.1 sp at a time); or press Ctrl+Arrow (Mac: Cmd+Arrow) for larger adjustments (1 sp at a time).

                                          You can also change the horizontal and vertical offset values in the Inspector. To position more than one symbol at a time, select the desired symbols and adjust the offset values in the Inspector.

                                          Note: The symbol can also be repositioned by clicking and dragging, but for more precise control, use the methods above.

                                          Articulation properties

                                          Most properties of articulations/ornaments can be edited from the Inspector. Other properties (i.e. direction and anchor position) can also be accessed by right-clicking on the symbol and selecting Articulation Properties….

                                          You can also make global adjustments to all existing and subsequently-applied articulations by selecting Style… → General… → Articulations, Ornaments.

                                          See also

                                          • Grace notes

                                          External links

                                          • Ornaments at Wikipedia

                                          Bends

                                            A variety of simple and complex (multi-stage) bends can be created with the Bend Tool bend_palette_sym.png, located in the Articulations and Ornaments palette of the Advanced workspace.

                                            Apply a bend

                                            To apply one or more bends to the score, use one of the following options:

                                            • Select one or more notes and double-click a bend symbol in the palette.
                                            • Drag a bend symbol from the palette on to a note.

                                            Edit a bend

                                            To edit a bend, use one of the following:

                                            • Right click on a bend symbol in the score and select "Bend properties."
                                            • Select a bend symbol in the score and press "Properties" in the "Bend" section of the Inspector.

                                              Bend tool

                                            Preset options are available, if needed, on the left hand side of the Bend properties window. The current bend is represented by a graph consisting of gray lines connected by square, blue nodes (see image above). The slope of the line indicates the type of bend:

                                            • Up-slope = Up-bend
                                            • Down-slope = Down-bend
                                            • Horizontal line = Hold

                                            The vertical axis of the graph represents the amount by which the pitch is bent up or down: one unit equals a quarter-tone: 2 units a semitone, 4 units a whole-tone, and so on. The horizontal axis of the graph indicates the length of the bend: each gray line segment extends for 1 space (sp) in the score.

                                            A bend is modified by adding or deleting nodes in the graph:

                                            • To add a node, click on an empty intersection.
                                            • To delete a node, click on it.

                                            Adding a node lengthens the bend by 1 sp; deleting a node shortens the bend by 1 sp. The Start and End points of the bend can be moved up and down only.

                                            Adjust height

                                            The height of the bend symbol is automatically adjusted so that it appears just above the staff. This height can be reduced, if necessary, with a workaround:

                                            1. Create another note on the top line (or space) of the staff, vertically above the note at which you want the bend to start.
                                            2. Apply the bend to the higher note first: this will give you a bend symbol with the lowest height.
                                            3. To increase the height of the bend move this note downward.
                                            4. Drag the bend symbol downwards to the correct position.
                                            5. Mark the top note invisible and silent (using the Inspector).

                                            Adjust position

                                            To adjust position use one of the following:

                                            • Drag the bend symbol with a mouse.
                                            • Click on the symbol and adjust the horizontal and vertical offsets in the Inspector.
                                            • Double click on the symbol; or click on it and press Ctrl+E (Mac: Cmd+E); or right-click on the symbol and select "Edit element." Then use the arrow keys for fine positioning (0.1 sp at a time); or Ctrl+Arrow (Mac: Cmd+Arrow) for larger adjustments (1 sp at a time).

                                            Custom bends

                                            After a bend has been created in the score it can be saved for future use by dragging and dropping the symbol to a palette while holding down Ctrl+Shift (Mac: Cmd+Shift). See Custom Workspace

                                            Dấu biến cường

                                              Hairpins are line objects. To create a hairpin, select a note to mark the start point.

                                              • <: Creates a crescendo hairpin
                                              • >: Creates a diminuendo hairpin (decrescendo)

                                              You can also create hairpins by dragging a hairpin symbol from the line palette to a note head.

                                              1. < creates a crescendo hairpin:

                                                One-measure crescendo

                                              2. Double click switches to edit mode.
                                                Then select (click on) the end point to move:

                                                Crescendo shows handles and anchors in edit mode

                                              3. Shift+→ moves the anchor of the selected end point:

                                                Crescendo anchor extends to the next note

                                              4. → and Ctrl→ move the selected end point:

                                                Crescendo visually extends beyond anchor point

                                              Dấu hóa bất thường

                                                Dấu hóa bất thường có thể được thiết-lập/thay-đổi bằng cách kéo một dấu hóa bất thường từ bảng công cụ Dấu-hóa-bất-thường tới một nốt nhạc trong bản nhạc.

                                                Bảng công cụ dấu hóa bất thường (Cơ bản)

                                                Nếu muốn thay đổi cao độ của nốt, bạn có thể chọn nốt và nhấn:

                                                • ↑: Tăng cao độ của nốt lên nửa cung (các dấu thăng hay dùng).
                                                • ↓: Giảm cao độ của nốt xuống nửa cung (các dấu giáng hay dùng).
                                                • Ctrl+↑ (Mac: Cmd+↑): Tăng cao độ của nốt lên một ốc-ta hay quãng tám.
                                                • Ctrl+↓ (Mac: Cmd+↓): Giảm cao độ của nốt xuống một ốc-ta hay quãng tám.
                                                • J: Thay đổi cách viết trùng âm của một nốt.

                                                Để đưa một dấu hóa bất thường thành dạng dấu hóa báo trước (nghĩa là dấu hóa để trong ngoặc đơn), bạn hãy kéo dấu ngoặc đơn từ bảng công cụ dấu hóa bất thường lên trên dấu hóa mà bạn muốn (không phải lên trên đầu nốt nha). Để bỏ dấu ngoặc đơn này đi, hãy chọn dấu hóa đó và nhấn Del.

                                                Nếu sau đó bạn thay đổi cao độ bằng các phím mũi tên, các thiết lập bằng tay này trên dấu hóa bất thường sẽ bị loại bỏ.

                                                Xác định lại cao độ

                                                Chức năng trong trình đơn Nốt → Xác định lại cao độ sẽ cố gắng chỉnh lại cho đúng cách ghi các dấu hóa bất thường cho toàn bộ bản nhạc.

                                                Xem thêm

                                                • Hóa biểu: Thay đổi

                                                Liên kết bên ngoài

                                                • Dấu hóa trên trang Wikipedia

                                                Dấu liên

                                                  Tuplets are used to write rhythms beyond the beat divisions usually permitted by the time signature. For example, triplet eighth notes (quavers) in a 4-4 time signature divide the quarter note (crotchet) beat into three instead of two.

                                                  Instructions

                                                  To create a triplet, first select a note on the score that specifies the full duration of the triplet group. For example, a group of triplet eighth notes (quavers) has a "full duration" of one quarter note (crotchet).

                                                  Quarter note selected

                                                  From the main menu, choose Notes → Tuplets → Triplet. This creates a triplet by dividing the full duration into three equal parts.

                                                  Triplet eight note followed by rests

                                                  They can be further edited.

                                                  Three triplet eight notes

                                                  Note input mode

                                                  Tuplet entry works slightly differently in note input mode than the method outlined above. You must select the duration first, and enter pitches afterward. Below are step-by-step instructions for making triplet eighth notes.

                                                  1. Switch to note input mode by pressing N
                                                  2. Make sure the note input marker is in the place that you want to start the tuplet (use the right and left arrow keys if necessary)
                                                  3. Choose the duration for the whole tuplet group from the note input toolbar. For this example, click on the quarter note (or press 5 on the keyboard)
                                                  4. From the main menu, choose Notes → Tuplets → Triplet, or press Ctrl+3 (Mac: ⌘+3)
                                                  5. Notice that an eighth note duration is automatically selected. Click on the staff to add pitches or enter them via computer or MIDI keyboard

                                                  Properties

                                                  To change the display properties of a tuplet, select the tuplet number, or bracket, and use the Inspector (F8).

                                                  Tuplet Properties in Inspector

                                                  If neither the number nor the bracket is shown, select a note from the tuplet, then use the Tuplet button in Inspector to see the above dialog.

                                                  Select tuplet in Inspector

                                                  For Direction, choose Auto to place the bracket on the same side of the note heads as the stem, or beam. Choose Up, or Down to explicitly place the bracket above or below the note heads, respectively, regardless of the stem, or beam position.

                                                  For Number type, choose Number to show an integer, Relation to show a ratio of two integers, or Nothing to show no number at all.

                                                  For Bracket type, choose Automatic to hide the bracket for beamed notes and show the bracket if the tuplet includes unbeamed notes or rests. Choose Bracket, or Nothing to explicitly show, or hide the bracket, respectively.

                                                  Tuplet with a 5:6 ratio and auto beam

                                                  If you move the bracket, or tuplet number, you can see vertical and horizontal offset being updated (default offsets are 0sp for both).

                                                  NOT FOUND: insepector2.png

                                                  You can restore default settings with the arrow return button on the right.

                                                  NOT FOUND: insepector_restoredafaultsettings.png

                                                  Style

                                                  Go to Style → General... and select Tuplets. It enables you to change all tuplet properties.

                                                  Dialog: Style / General... / Tuplets

                                                  Two adjustments are possible: Vertical and Horizontal

                                                  • Vertical adjustment has three options with values in space units and one (un)ticked option
                                                    • Maximum slope: default value is 0.50; range is from 0.10 to 1.00
                                                    • Vertical distance from stem (see (2) below): default value is 0.25; range is from -5.00 to 5.00
                                                    • Vertical distance from note head (see (3) below): default value is 0.50; range is from -5.00 to 5.00
                                                    • Avoid the staves: by default ticked
                                                  • Horizontal has four options with values in space units
                                                    • Distance before the stem of the first note (see (5) below): default value is 0.50; range is from -5.00 to 5.00
                                                    • Distance before the head of the first note: default value is 0.00; range is from -5.00 to 5.00
                                                    • Distance after the stem of the last note (see (6) below): default value is 0.50; range is from -5.00 to 5.00
                                                    • Distance after the head of the last note: default value is 0.00; range is from -5.00 to 5.00

                                                  Tuplet stye legend

                                                  See also

                                                  • How to create triplets and other tuplets

                                                  External links

                                                  • Tuplet at Wikipedia
                                                  • How To Create Triplets in MuseScore [video]
                                                  • The User Guide to Tuplets in MuseScore [video]

                                                  Dấu luyến

                                                    A slur is a curved line between two or more notes that indicates they are to be played without separation. If you mean to join two notes of the same pitch, see Tie

                                                    First Method

                                                    1. Leave Note input mode and select the first note:

                                                      First note selected

                                                    2. S creates a slur:

                                                      Slur to adjacent note

                                                    3. Shift+Right moves the slur end to the next note:

                                                      Three-note slur

                                                    4. X flips the slur direction:

                                                      Slur above note stems

                                                    5. Esc ends Slur Edit mode:

                                                      Slur no longer in edit mode

                                                    Second Method

                                                    1. Leave Note input mode and select the first note
                                                    2. Ctrl-select (⌘-select on a Mac) or Shift-select the last note
                                                    3. Hit S

                                                    Third Method

                                                    1. While in Note input mode, key in the first note in the slurred section
                                                    2. Hit S to begin the slurred section
                                                    3. Key in the remaining notes in the slurred section
                                                    4. Hit S to end the slurred section

                                                    Adjustments

                                                    The handles (displayed in the images for steps 2-4 above) can be adjusted with the mouse. The two outer ones adjust the start and end of the slur, whilst the two inner handles adjust the contour.

                                                    A slur can span several systems and pages. The start and end of a slur is anchored to a note/chord or rest. If the notes are repositioned due to changes in the layout, stretch or style, the slur also moves and adjusts in size.

                                                    This example shows a slur spanning from the bass to the treble clef. Using the mouse, select the first note of the slur, hold down Ctrl (resp. ⌘ on a Mac) and select the last note for the slur, and press S to add the slur.

                                                    Slur across staves

                                                    Dotted line

                                                    Dotted slurs are sometimes used in songs where the presence of a slur varies between stanzas. Dotted slurs are also used to indicate an editor's suggestion (as opposed to the composer's original markings). To change an existing slur into a dotted or dashed slur, select it and then in Inspector (F8) change Line type from Continuous to Dotted or Dashed.

                                                    X flips the direction of a selected slur.

                                                    See also

                                                    • Tie
                                                    • Edit mode
                                                    • Note input

                                                    Dấu lấy/ngắt hơi

                                                      To place a breath symbol, drag it from the breath palette (from the Advanced workspace) to a note in the score. The breath symbol is placed after the note.

                                                      Breaths + Pauses Palette

                                                      Breath symbol in score:

                                                      Breath

                                                      Caesura (informally called tram lines or railroad tracks) work the same way.

                                                      Dấu lặng trong ô nhịp

                                                        Full measure rest

                                                        Full measure rest

                                                        When an entire measure is devoid of notes, a full measure (full bar) rest is used.
                                                        A full measure rest looks like a whole note (semi-breve) rest, except it is centered in the middle of a measure

                                                        To create a full measure rest, select a measure and press Del. All notes and rests in this measure are then replaced by a full measure rest.

                                                        Multi-measure rest

                                                        Multi-measure rest

                                                        Multi-measure (multi-bar) rests indicate a long duration of silence for an instrument and are frequently used in ensemble sheet music. They are automatically interrupted at important points, such as double bar lines, rehearsal marks, key- or time signatures, etc.
                                                        Multi-measure rests have a number above the staff indicating the duration of the rest by the number of measures

                                                        Instructions

                                                        1. From the menu, choose Style → General...
                                                        2. Click on the "Score" tab, if it is not already selected
                                                        3. Add a check mark next to "Create multi-measure rests"

                                                        Limitations

                                                        The style option automatically creates multi-measure rests throughout the score. Therefore, it is recommended that you enter all your notes first and then turn on multi-measure rests afterward.

                                                        Break multimeasure rest

                                                        See also: Measure operation: Break multi-measure rest

                                                        You may want to have a multi-measure rest divided into two multi-measure rests.

                                                        This option should be checked before turning on the "Create multi-measure rests" option in Style → General..., in the "Score" tab.
                                                        Select the first measure where you want the second multi-measure rest to start, and do a right-click Measure Properties → Break multi-measure rest.

                                                        Note that multi-measure rests are interrupted if there is a rehearsal mark (not a simple text), section break, key or time signature change, or double bar line.

                                                        Dấu nối

                                                          A tie is a curved line between two notes of the same pitch. If you want a curved line that spans multiple pitches, see Slur.

                                                          First method

                                                          Select first note:

                                                          First note selected

                                                          + creates a tie:

                                                          Slur to adjacent note

                                                          (+ or the tie button,tie_button.png, located on the top to the right of the notes in the note input toolbar)

                                                          Second method

                                                          To create ties during note input, press + after the first note of the tie.

                                                          Tied chords

                                                          To add ties between two chords, select the stem of the first chord, or Shift + click on the first chord and press +. Note input mode must not be enabled.

                                                          X flips the direction of a selected tie.

                                                          Dấu nối-cờ-nốt

                                                            Beams are set automatically, but they can be altered manually. Drag a beam symbol from the "Beam Properties" palette to a note in order to change its behavior.

                                                            Beam Properties Palette (Advanced)

                                                            Alternatively, you can first select a note, and then double-click the appropriate symbol in the palette.

                                                            • Start beam button Start a beam at this note.

                                                            • Middle of beam button Do not end a beam at this note.

                                                            • No beam button Do not beam this note.

                                                            • 16th sub beam button Start a second level beam at this note.

                                                            • 32nd sub beam button Start a third level beam at this note.

                                                            • Automatic mode button (back to) Automatic mode: the mode MuseScore chooses on note input, dependent on current time signature.

                                                            • Feathered beam slower button Start feathered beam (slower) at this note.

                                                            • Feathered beam faster button Start feathered beam (faster) at this note.

                                                            To change the beam angle, or the distance of the beam to the notes (i.e. the length of the stems), double-click on the beam to put it into edit mode, with the right end handle being selected. Up/down arrow will now change the angle. Selecting the left end handle and using the up/down arrow keys will lengthen/shorten the stems. Hit Esc to get out of edit mode, once done with the changes.

                                                            To move a beam from above to below the notes, or vice-versa, flip the direction of the stems by using the button along the second top row (before the voice indicators) that shows a note with stems attached above and below or use the X key.

                                                            See also

                                                            • Cross staff beaming
                                                            • Edit mode
                                                            • Note input
                                                            • How to add a beam over a rest
                                                            • How to place a beam between notes

                                                            Dấu rải gam và vuốt phím

                                                              Arpeggios are set by dragging an arpeggio symbol from the Arpeggio & Glissando palette to a note of a chord.

                                                              Arpeggios + Glissandi Palette

                                                              To change the length of the arpeggio, double-click the arpeggio and drag the handle up, or down.

                                                              Arpeggio spanning two staves

                                                              Glissandi are set by dragging a glissando symbol from the Arpeggio & Glissando palette to the first of two consecutive notes on the same staff.

                                                              glissandos with straight or wiggly lines

                                                              Edit, or delete the text of a glissando by right-clicking it and select "Glissando Properties" in menu or in the Inspector. If there isn't enough room between two notes, MuseScore will not display the text.

                                                              External links

                                                              • Arpeggio on Wikipedia
                                                              • Glissando on Wikipedia

                                                              Ngoặc nối khuông

                                                              Delete

                                                              Select the bracket and press Del

                                                              Add

                                                              Drag a bracket symbol from the bracket palette to an empty space in the first measure of a system.

                                                              Brackets Palette

                                                              Change

                                                              Drag a bracket symbol from the bracket palette to a bracket in the score.

                                                              Edit

                                                              Double-click on a bracket to enter edit mode. In edit mode, you can drag the height of a bracket to span arbitrary staves of a system.

                                                              Horizontal offset

                                                              If you need to move a bracket further left or right, then double-click the bracket to enter edit mode, and press Shift+← or Shift+→.

                                                              Nốt láy

                                                                Short grace notes (Acciaccatura) appear as small notes with a stroke through the stem. Long grace notes (Appoggiatura) have no stroke. Both are placed before the normal-sized main note.

                                                                Instructions

                                                                Create a grace note by dragging a grace note symbol from the Grace Notes palette to a regular note on the score. It's also possible to create a grace note by selecting a note head and double-clicking a grace note symbol from the grace notes palette.

                                                                To add more than one grace note, drag successive grace notes on the note head.

                                                                To add a chord of grace notes, enter the first one and select it, then use Shift+ note names (C, D, E etc...)

                                                                If you want to change the duration of a previously created grace note, select it and choose a duration from the toolbar or enter with one of the keys 1 ... 9 (see Note input).

                                                                Grace notes after a note (such as a trill termination) may have to be manually adjusted with Ctrl + arrow keys.

                                                                Grace Notes palette

                                                                External links

                                                                • Grace note at Wikipedia
                                                                • Appoggiatura at Wikipedia
                                                                • Acciaccatura at Wikipedia

                                                                Octave lines

                                                                Octave (Ottava) lines are used to indicate that a section of music is to be played one or more octaves above or below written pitch: The line may be dotted or solid. Ottavas are available in the Lines palette of the Basic and Advanced workspaces.

                                                                8─────┐or 8va─────┐: Play one octave above written pitch
                                                                8─────┘or 8vb─────┘: Play one octave below written pitch

                                                                8va/8vb lines are particularly common in piano scores, though they are sometimes used in other instrumental music.1 15ma (2 octaves above) and 15mb (2 octaves below) are also occasionally used.

                                                                Debussy. Études, Book II, X

                                                                Apply an octave line

                                                                Use one of the following:

                                                                • Select a range of notes, then double click an octave line from a palette.
                                                                • Select one or more measures, then double click an octave line from a palette.
                                                                • Click on a note, then double-click an octave line from the palette (extends line from selected note to end of bar).
                                                                • Drag an octave line from a palette onto a note (extends line from selected note to end of bar).

                                                                See also, Lines: Adjust vertical position.

                                                                Change length

                                                                See Lines: Change length.

                                                                Custom lines

                                                                Octaves can be customized just like any other line. See Lines: Custom lines and line properties.

                                                                External links

                                                                • Octave at Wikipedia

                                                                1. Gerou/Lusk. Essential Dictionary of Music Notation (Internet Archive). ↩︎

                                                                Tiếng vê

                                                                Tremolo is the rapid repetition of one note, or a rapid alternation between two or more notes. It is indicated by strokes through the stems of the notes. If the tremolo is between two or more notes, the bars are drawn between them. Tremolo symbols are also used to notate drum rolls.

                                                                The tremolo palette contains separate symbols for one note tremolos (shown with stems below) and for two note tremolos (shown with no stem below).

                                                                Tremolo palette

                                                                To add tremolo to the stem of a single note, select the note head and double-click the desired symbol in the tremolo palette.

                                                                In a two note tremolo, every note has the value of the whole tremolo duration. To enter a tremolo with the duration of a half note (minim), enter two normal quarter notes (crotchets), and after applying a tremolo symbol to the first note, the note values automatically double to half notes.

                                                                Đường kẻ hay nét vẽ

                                                                  The Lines palette, like other palettes, works via "drag-and-drop". Use the mouse to drag an item from the palette and drop it onto the score.

                                                                  Lines palette

                                                                  Change length

                                                                  If you change the length of a line using the mouse, the anchor positions (the notes or measures they apply to) do not change. Therefore, the following method is recommended for adjusting the start or end points of a line.

                                                                  1. If you are in Note Input mode then press Esc to leave note input
                                                                  2. Double click the line that you want to change
                                                                  3. Move the handles using the following shortcuts
                                                                    • Shift+→ to move the anchor right by one note (or measure)
                                                                    • Shift+← to move the anchor left by one note (or measure)
                                                                  4. If you need to change the length visually without changing the notes or measures that the line is anchored to then use the following shortcuts:
                                                                    • → to move the handle right by one unit
                                                                    • ← to move the anchor left by one unit

                                                                  See also

                                                                  • Hairpin
                                                                  • Volta (1st and 2nd endings)
                                                                  • Early music feature (ambitus section)

                                                                  Dấu lặp

                                                                    The start and end of simple repeats can be defined by setting appropriate bar lines. For instructions on first and second ending measures, see Volta.

                                                                    Playback

                                                                    To hear repeats during playback, make sure the "Play Repeats" Play Repeats icon button on the toolbar is selected. Likewise, you can turn off repeats during playback by deselecting the button.

                                                                    In the last measure of a repeat, you can set the property "Repeat count" to define the number of played repeats.

                                                                    Repeat symbols and text

                                                                    Text and symbols related to repeats are located in the Repeats palette.
                                                                    The repeats palette contains the symbols for measure repeat, segno and coda. It also contains 'D.S.', 'D.C.', and Fine text:

                                                                    Repeats palette

                                                                    To add an object from the repeats palette, drag it onto (not above) the desired measure (so the measure changes color), then drop. The object will then appear above that measure in your score.

                                                                    Jumps

                                                                    Jumps generally consist of three parts:

                                                                    • Jump to tag
                                                                    • Play up to tag
                                                                    • Continue at tag

                                                                    Tags are names you give to certain measure positions. Two tags ("start", "end") denote the start and end of the score and don't need to get added explicitly.

                                                                    Examples:

                                                                    At the jump instruction Da Capo the playback jumps to the start and plays the entire score again (up to the implicit end tag).

                                                                    At the jump instruction Da Capo al Fine the playback jumps to the start and plays the score up to the tag Fine.

                                                                    Dal Segno al Fine (or D.S. al Fine) jumps to the Segno tag and then plays up to the tag Fine

                                                                    Dal Segno al Coda jumps to the Segno tag and then plays up the first Coda tag. Playback then continues at the second Coda tag. The properties of jumps can get set via a right-click at the D.S. al Coda tag.

                                                                    See also

                                                                    • Volta
                                                                    • How to separate a coda from the rest of the score

                                                                    External links

                                                                    • Video tutorial: Codas

                                                                    Dấu Volta

                                                                      Volta brackets, or first and second ending brackets are used to mark different endings for a repeat.

                                                                      Sample first and second endings

                                                                      To place a volta bracket on the score, drag-and-drop the item from the Lines palette.

                                                                      The brackets can span more than one measure. Double-click the volta to enter edit mode, and move the handles with:

                                                                      • one measure right Shift+→
                                                                      • one measure left Shift+←

                                                                      These commands move the "logical" start or end of the volta bracket, which determines playback in MuseScore and layout over multiple systems. Moving the handles using the left or right arrows keys only, or using the mouse allows finer adjustments, but does not change how the repeat is played.

                                                                      If you move the handles, a dashed line from the logical position to the actual position is shown

                                                                      Second-ending volta in edit mode

                                                                      Text

                                                                      You can change the text and many other properties of a volta bracket using the line properties dialog. Right-click on a volta bracket and choose Line Properties.... The figure below shows the volta text as "1.-5."

                                                                      Line Properties dialog

                                                                      Sample first-through-fifth ending followed by sixth ending

                                                                      You can also right-click on the volta and bring up the volta properties dialog. From here, you can change both the displayed Volta text (the same from the line properties above) and the repeat list. If you want one volta to be played only on certain repeats and another volta on other repeats, enter the repeat times in a comma separated list. In the example below, this volta will be played during repeat 1, 2, 4, 5 and 7. Another volta will have the other ending, like 3, 6 and possibly other higher numbers like 8, 9, etc.

                                                                      Volta Properties dialog

                                                                      Playback

                                                                      Sometimes a repeat plays more than two times. In the figure above, the volta text indicates that it should play five times before it continues. If you want to change the number of times MuseScore plays a repeat, go to the measure containing the end repeat bar line and change its Repeat count (see Measure operations: Other properties for details).

                                                                      External links

                                                                      • Video tutorial: Repeats, 1st and 2nd time endings
                                                                      • Screencast: Add alternative repeats with MuseScore

                                                                      Sự chuyển tông hay giọng

                                                                        Transposition moves a selection of notes higher, or lower on the staff. MuseScore supports several kinds of transposition.

                                                                        Chromatic transposition, by key

                                                                        Chromatic transposition moves notes up or down in semitone increments. From the main menu, choose Notes → Transpose..., select which key signature to transpose - closest, up or down.

                                                                        Chromatic transposition, by interval

                                                                        Chromatic transposition moves notes up or down in semitone increments. From the main menu, choose Notes → Transpose.... Tick "By Interval", select the interval from the popup menus and whether to transpose up or down.
                                                                        You can also transpose a selection of notes using the arrow keys (↑ or ↓).

                                                                        Diatonic transposition

                                                                        Diatonic transposition (also known as scalar transposition) moves notes up, or down the current scale according to the key signature. You can move a single note by dragging it up, or down. You can move a selection of multiple notes with Ctrl + click and drag.

                                                                        Transposing instruments

                                                                        Certain instruments such as B-flat trumpet or alto sax are known as transposing instruments. These instruments sound lower, or higher than their written pitch. MuseScore has built-in support for transposing instruments.

                                                                        The Concert Pitch button and Notes → Concert Pitch from the main menu lets you switch between concert pitch and transposing pitch. Concert pitch helps composers and arrangers because it displays every instrument in the same key, so the notes on the staff match their sounding pitches. When concert pitch is turned off, the notes on some instrument staves may not match their sounding pitches, but they are ready for an instrumentalist to play from. If you use concert pitch during your session, remember to turn off concert pitch before printing the parts.

                                                                        Instrument transpositions are already set up in MuseScore. However, if you want a rare instrument or transposition that is not available in MuseScore, you may need to edit the instrument transposition manually. Right-click an empty part of the instrument staff and choose Staff Properties.... At the bottom of the Staff Properties window, you can select the interval of transposition, any octave shifts, and whether the interval is "Up" (sounds higher than written) or "Down" (sounds lower than written).

                                                                        See also

                                                                        • How to transpose

                                                                        Ký âm cho trống

                                                                          Example drum notation:

                                                                          Sample Drum Notation

                                                                          Notation for drumsets often includes simultaneous upstem and downstem notes. If you are unfamiliar with editing multiple voices in a single staff, see Voices for an overview. See below for instructions specific to percussion notation.

                                                                          MIDI Keyboard

                                                                          The easiest way to add drum notation to your score is via MIDI keyboard. Some MIDI keyboards have percussion markings above each key. If you press the key for high hat, then MuseScore will add the correct notation to the score. MuseScore automatically takes care of the stem direction and type of note head.

                                                                          Computer Keyboard

                                                                          7 drum sounds are mapped to a shortcut (A-G) by default and you can only remap those 7 shortcuts to other drum-instruments (or change other properties of the drum palettes contents) via the Edit Drumset button of the drum input tool (see →below).

                                                                          Edit Drumset

                                                                          If you wish to enter a new drum note at the same position as an existing note - for example if you wanted the snare and hi-hat to sound simultaneously - and you were entering the new note via the computer keyboard you would need to hold Shift when entering the new note so as not to overwrite the existing note. This is the same method as used when entering chords for tuned instruments under MuseScore.

                                                                          Mouse

                                                                          Note input for unpitched percussion works differently than for other instruments, so here are the special steps:

                                                                          1. Select a note or rest in the percussion staff
                                                                          2. Press N to begin note input
                                                                            Please note that the drum input tool will only appear when you have completed this step:
                                                                            Drum inpit tool
                                                                          3. Select a note duration from the note input toolbar
                                                                          4. Select a type of note (such as bass drum, or snare) from the drum input tool
                                                                          5. Click on the percussion staff to add the note to the score

                                                                          Drumset

                                                                          Drumsets are stored as .drm files, but customizations can be saved and loaded into others.

                                                                          External links

                                                                          • Video tutorial: MuseScore in Minutes: Lesson 7 - Tablature and Drum Notation
                                                                          • Drum Parts [video]
                                                                          • Editing the Drum Palette in MuseScore 1.1 [video]
                                                                          • Saving Drumset Changes in MuseScore 1.1 [video]
                                                                          • Guide to Drum and Percussion Notation

                                                                          Tablature

                                                                            Music for fretted, stringed instruments is commonly notated using tablature, also known as tab, which provides a visual representation of the strings and fret numbers:

                                                                            Tablature

                                                                            Tablature can also be combined with traditional staff notation:

                                                                            Standard staff plus tablature

                                                                            Create a new tablature staff

                                                                            If you wish to create tablature as part of a new score, use the New Score Wizard. If you want to add tablature to an existing score, use the Instruments dialog. Or, alternatively, you can convert an existing standard staff. See below for details.

                                                                            With the New Score wizard

                                                                            To create tablature in a new score (for combined staff/tablature systems see → below):

                                                                            1. Open the New Score wizard.
                                                                            2. Enter the score details (optional). Click Next.
                                                                            3. On the Chose template file page, click on Choose Instruments.
                                                                            4. On the Instruments page, select one (or more) tablature options under "Plucked strings" in the left-hand column (see image below). Then click Add.

                                                                              Instrument list: Plucked strings

                                                                              Note: You can use the dropdown list above the Instrument list to change the category displayed. Alternately you can search for the instrument using the "Search" field below the Instrument list.

                                                                            5. Complete the rest of the New Score Wizard.

                                                                            If the desired tablature is not available in the Choose Instrument list:

                                                                            1. At step "4" (above), select an existing "Plucked strings" tablature staff.
                                                                            2. Press Add to move it to the right-hand column.
                                                                            3. Check the drop-down menu to the right of the newly-added instrument for the most suitable Tab option, if any.
                                                                            4. Complete the rest of the New Score wizard and exit.
                                                                            5. Modify the number of strings and tuning of the tablature, if needed, in the Staff properties window (see → below).
                                                                            6. Change the Instrument name in Staff Properties, if required.

                                                                            This allows you to create tablature for any chromatically-fretted instrument.

                                                                            With the Instruments dialog

                                                                            To add a single tablature staff to an existing score (for combined staff/tab system see → below):

                                                                            1. Open the instruments dialog (press I; or from the menu bar, select Edit → Instruments…).
                                                                            2. Add the tab staff as described in Add instruments ("Create a new score").

                                                                            By changing staff type

                                                                            To convert an existing standard staff to tablature, or tablature to a standard staff:

                                                                            1. Right click on the staff and select Staff Properties…. If "Instrument" is already set to a plucked-strings type, then exit staff properties and go to step 4.
                                                                            2. If "Instrument" is not a plucked-strings type, click on Change instrument and select an appropriate instrument from "Plucked strings."
                                                                            3. Click on OK twice to exit staff properties.
                                                                            4. Open the instruments dialog (press I, or from the menu bar select Edit → Instruments…).
                                                                            5. Click on the staff in the right-hand column and change the "Staff type" to the desired option.
                                                                            6. Click OK to exit the Instrument editor and return to the score page.

                                                                            Note: If you subsequently need to make further adjustments to the staff (e.g. tuning, number of lines/strings etc.), right click on the staff and select Staff Properties….

                                                                            Alternative method (using just the "Staff Properties" dialog):

                                                                            1. Right click on the staff and select Staff Properties….
                                                                            2. If the Instrument displayed is in the "Plucked strings" category, go to step 4.
                                                                            3. If the Instrument displayed is not in the "Plucked strings" category, click Change instrument and select an appropriate instrument from "Plucked strings". Click on OK.
                                                                            4. Click Advanced Style Properties..., change "Template" to the desired option and press < Reset to Template.
                                                                            5. Click OK twice to close the Staff Properties dialog box..

                                                                            Note: Other adjustments to the staff (e.g. tuning, number of lines/strings etc.), can also be made in the Staff Properties… dialog.

                                                                            Edit string data

                                                                            Change tuning

                                                                            Note: If you only want to view (rather than change) the instrument tuning, follow steps 1 and 2 only.

                                                                            1. Right-click on the staff and select Staff Properties….

                                                                              Staff properties dialog

                                                                            2. Press the Edit String Data… button at the bottom of the dialog box. The String Data dialog opens:

                                                                              String data

                                                                            3. Click on a string pitch and select Edit String…. Or, alternatively, just double-click the string pitch.

                                                                            4. Select a new pitch in the Note Selection box and click OK. Or, alternatively, just double-click the new pitch.
                                                                            5. Click OK to close the "String Data" dialog box. Then click OK to close the "Staff/Part Edit Properties" dialog box.

                                                                            Notes: (1) If tuning is changed when the tablature for that instrument already contains some notes, fret marks will be adjusted automatically (if possible); (2) Any change of tuning to a particular instrument applies only to the score at hand, and does not change any program default settings.

                                                                            Add a string

                                                                            1. Right-click on the staff, select Staff Properties…, then press Edit String Data.
                                                                            2. Click on a string pitch and select New String....
                                                                            3. Select the new pitch and press OK—or, alternatively, just double-click the new pitch. The new string is inserted below the selected string.

                                                                            Note: After adding a tablature string you will need to adjust the number of lines in the Staff properties dialog.

                                                                            Delete a string

                                                                            1. Right-click on the staff, select Staff Properties…, then press Edit String Data.
                                                                            2. Click on a string pitch and select Delete String.

                                                                            Note: After deleting a tablature string you will need to adjust the number of lines in the Staff properties dialog.

                                                                            Mark unfretted string "open"

                                                                            This feature is used to mark a (bass) course as unstopped (i.e. outside of the fingerboard and always sounding open): as on a Baroque lute or Theorbo etc. This means that only "0" (zero) or "a" is accepted as a fret mark: any other fret mark will be converted to 0/a.

                                                                            1. Right-click on the staff, select Staff Properties…, then press Edit String Data.
                                                                            2. Check one or more boxes in the "Open" column.

                                                                            Change number of instrument frets

                                                                            This property defines the maximum fret number which can be entered on a tablature staff.

                                                                            1. Right-click on the staff, select Staff Properties…, then press Edit String Data.
                                                                            2. Select or enter a new number in the "Number of frets" spin box.

                                                                            Change tablature display

                                                                            You can customize both the appearance of a tablature staff and the way that it displays the fret marks. To access these options:

                                                                            1. Right click on the staff and select Staff Properties….
                                                                            2. Click on the Advanced Style Properties… button.

                                                                            Combine pitched staff with tablature

                                                                            Plucked-string instruments—such as the guitar—are commonly notated using both a music staff and tablature (TAB) together. MuseScore gives you the option of having the two staves either unlinked or linked:

                                                                            1. Unlinked Staves: You can enter, delete or edit notation in one staff without affecting the other. To transfer music notation from one staff to the other, select the desired range and copy and paste it into the other staff.

                                                                            2. Linked Staves: Any changes you make in one staff are automatically applied to the other staff as well ("mutual translation").

                                                                            A note on fret mark conflicts: When the same note is entered in two different voices, MuseScore tries to ensure that the fret marks do not overlap on the same string. Any overlaps which do occur are marked with red squares: these appear only in the document window and not on any printed copy. In almost all cases (e.g. frets 0 to 4 on the 6th string), overlapping is the desired result and no further adjustment is required. As of version 2.2, you can hide the red marks by selecting "View" and unticking "Show Unprintable."

                                                                            Create a staff/tablature pair with the New Score wizard

                                                                            1. Open the New Score wizard.
                                                                            2. Enter the score details (optional). Click Next.
                                                                            3. On the Chose template file page, click on Choose Instruments.
                                                                            4. Select a pitched staff in the "Plucked strings" section of the left-hand column. Then click Add.
                                                                            5. Select the newly-created staff line (i.e. marked "Staff …") in the right-hand column and chose one of two options:
                                                                              • Click Add Staff to create an unlinked staff/tab pair.
                                                                              • Click Add Linked Staff to create a linked staff/tab pair.
                                                                            6. In the Staff type column, click on the dropdown list for the newly-created staff and select a tablature option (this can be modified later, if required, on the score page—see Staff Properties).
                                                                            7. Complete the rest of the New Score Wizard, or click Finish.

                                                                            Note: To create unlinked staves with separate mixer channels, instead of step "5" (above), select a Tablature staff in the left-hand column and click Add. Then continue with steps 6 and 7.

                                                                            Create a staff/tablature pair in an existing score

                                                                            1. Open the Instruments editor (press I, or from the menu bar, select Edit → Instruments…).
                                                                            2. Select a pitched staff in the "Plucked strings" section of the left-hand column. Then click Add.
                                                                            3. Select the newly-created staff line (i.e. marked "Staff …") in the right-hand column and chose one of two options:
                                                                              • Click Add Staff to create an unlinked staff/tab pair.
                                                                              • Click Add Linked Staff to create a linked staff/tab pair.
                                                                            4. In the Staff type column, click on the dropdown list for the newly-created staff and select a tablature option (this can be modified later, if required, on the score page—see Staff Properties).
                                                                            5. Change the staff order using the ↑ button if needed.
                                                                            6. Click OK to return to the score.

                                                                            Note: To create unlinked staves with separate mixer channels, instead of step "3" (above), select a Tablature staff in the left-hand column and click Add. Then continue with steps 4–6.

                                                                            Create a staff/tablature pair from an existing staff

                                                                            To add tablature to a plucked-string staff in the score (or vice versa):

                                                                            1. Open the Instruments editor (press I, or from the menu bar, select Edit → Instruments…).
                                                                            2. Select the staff line (marked "Staff 1") in the right-hand column that you want to add to.
                                                                            3. Chose one of two options:
                                                                              • Click Add Staff to create an unlinked staff/tab pair
                                                                              • Click Add Linked Staff to create a linked staff/tab pair
                                                                            4. In the Staff type column, click on the dropdown list for the newly-created staff and select an option (this can be modified later, if required, on the score page—see Staff Properties).
                                                                            5. Change the staff order using the ↑ button if needed.
                                                                            6. Click OK.

                                                                            Notes: To create unlinked staves with separate mixer channels, instead of step "3" (above), select an appropriate staff in the left-hand column and click Add. Then continue with steps 4–6.

                                                                            Enter notes in tablature

                                                                            Using a computer keyboard

                                                                            • First, ensure that you are not in note-input mode. Select the measure or existing note from which you want to begin note entry.
                                                                            • Switch to note input mode (N): a short 'blue rectangle' appears around one tablature string: this is the current string.
                                                                            • Select the duration of the note or rest that you wish to enter (see below).
                                                                            • Press the up/down arrow keys to move the cursor to the desired string. Use the left/right arrow keys to navigate through the score.
                                                                            • Press 0 to 9 to enter a fret mark from 0 to 9 on the current string; to enter numbers with several digits press each digit in sequence. Keys A to K (skipping I) can also be used: convenient when working in French tablature. For L , M, N, use the alphanumeric keyboard and type respectively 10, 11, 12...

                                                                              Note: You cannot enter a number higher than the "Number of frets" value set in the Edit String Data dialog.

                                                                            • Press ; (semicolon) to enter a rest of the selected duration.

                                                                            • You can enter notes in different voices if required—just as you would in a standard staff.

                                                                            See also, Edit notes (below).

                                                                            Historical tablature

                                                                            As of version 2.1, period notation for bass strings (lutes and sim.) is supported:

                                                                            • French tablature: letters with prefixed slash-like strokes right under the tab body: i.e. 7th string: "a", 8th string: "/a", 9th string: "//a" and so on, all in the first position below the tab body.

                                                                            • Italian tablature: numbers with 'ledger line'- like segment of string above the tab body: i.e. 7th string: "0" one position above the tab body with one 'ledger line'; 8th string: "0" two positions above the tab body with two 'ledger lines' and so on.

                                                                            Input of is via computer keyboard only: by moving the note entry cursor below (French) or above (Italian) the tab body, 'shadow' slashes or ledger lines will indicate the target string to which the fret mark will be applied; pressing one of the fret keys, will enter (and lay out) the note on that string.

                                                                            Using a mouse

                                                                            To enter notes into tablature with a mouse:

                                                                            • Enter note input mode and select the note or rest duration (see below).
                                                                            • Click on a string to create a note there. Notes are initially created on fret 0 (or a for French tablatures): to correct, type in the right number from the keyboard.
                                                                            • You can also increase/decrease the fret mark using Alt+Shift+↑ or Alt+Shift+↓.
                                                                            • You can enter notes in different voices if required—just as you would in a standard staff.

                                                                            See also, Edit notes (below).

                                                                            Select note duration

                                                                            In note input mode, you can use any of the following methods to set note duration in tablature:

                                                                            • Press Shift+1 to Shift+9: Sets duration from a 128th note to a longa (availability of these shortcuts may depend on the platform and/or keyboard layout);
                                                                            • Press NumPad 1 to Numpad 9: Sets duration from a 128th note to a longa (if a numeric keypad exists and NumLock is on);
                                                                            • Click on a note duration icon in the Note Input toolbar above the document window;
                                                                            • Press Q to decrease the selected duration and W to increase it.

                                                                            Edit notes

                                                                            Note input mode

                                                                            To edit an existing fret mark in note-input mode:

                                                                            • Position the cursor above the fret mark and simply retype the number.
                                                                            • Increment or decrement the fret mark using Alt+Shift+↑ or Alt+Shift+↓.

                                                                            Non note input mode

                                                                            To edit an existing fret mark outside note-input mode:

                                                                            1. Select one or more fret marks.
                                                                            2. Use any of the following commands:
                                                                              • To increment or decrement, without changing the string: Press ↑ / ↓.
                                                                              • To increment or decrement, changing strings, when possible, to minimize the fret number: Press Alt+Shift+↑ / ↓
                                                                              • To move to an adjacent string (if the string is free and can produce that note): Press Ctrl+↑ / ↓ (Mac: Cmd+↑ / ↓) .

                                                                            Note: The fret mark cannot be higher than the "Number of frets" value set in the Edit String Data dialog.

                                                                            Crosshead notes

                                                                            To change a fret mark to a crosshead note:

                                                                            1. Select one or more fret marks (in non-note-input mode).
                                                                            2. Press Shift+X to toggles ghost noteheads on/off.

                                                                            Summary of keyboard commands

                                                                            Note input mode

                                                                            Type: to get:
                                                                            ↑ Select above string as current.
                                                                            ↓ Select below string as current.
                                                                            Shift+1 to Shift+9 Select a duration (128th note to a longa)
                                                                            NumPad 1 to NumPad 9 Select a duration (128th note to a longa)
                                                                            Q Decrease current input duration.
                                                                            W Increase current input duration.
                                                                            0 to 9 Enter a fret digit / letter.
                                                                            A to K Enter a fret digit / letter (I excluded).
                                                                            Alt+Shift+↑ Increase current fret mark.
                                                                            Alt+Shift+↓ Decrease current fret mark.
                                                                            ; (semicolon) Enter a rest

                                                                            Normal mode

                                                                            Type: to get:
                                                                            0 to 9 Change duration of selected note or rest (128th note to longa)
                                                                            Alt+Shift+↑ Increase the pitch of the selected note (MuseScore chooses the string).
                                                                            ↑ Increase the pitch without changing string.
                                                                            Alt+Shift+↓ Decrease the pitch of the selected note (MuseScore chooses the string).
                                                                            ↓ Decrease the pitch without changing string.
                                                                            Ctrl+↑ (Mac: Cmd+↑) Move note to above string, keeping the pitch.
                                                                            Ctrl+↓ (Mac: Cmd+↓) Move note to below string, keeping the pitch.
                                                                            Shift+X Toggle the ghost notehead on/off.

                                                                            External links

                                                                            • Video tutorial: MuseScore in Minutes: Lesson 7 - Tablature and Drum Notation

                                                                            Vấn đề âm thanh và phát bản nhạc

                                                                            MuseScore has "Sound and playback" capabilities built-in. This chapter covers the playback controls and ways to extend the instrument sounds beyond the built-in piano sound.

                                                                            Mid-staff instrument changes

                                                                              When a musician is required to double on a different instrument for a section of a piece, the instruction to switch instruments is generally placed above the staff at the beginning of that section. A return to the primary instrument is handled in the same manner.

                                                                              MuseScore enables users to insert a special class of text called Change Instrument text for this purpose. This class of text is different from either Staff or System text in that it links the text to the playback and changes the sound to the new instrument.

                                                                              Instrument changes as of version 2.1

                                                                              Version 2.1 introduces a greatly improved mid-staff instrument change over previous versions. There are still some limitations that need to be considered prior to using it.

                                                                              1. Mid-staff instrument changes are limited to the same type of staff. For example, you cannot change between a percussion staff and a pitched instrument staff or vice versa.

                                                                              2. The instrument name is not changed in the mixer. It will still be listed under the instrument in the original definition of the staff.

                                                                              3. The key signature is not automatically updated at the instrument change. You must manually change the Key signature if needed.

                                                                              4. You can now enter the notes a musician would play once the instrument is changed and the correct key signature is entered if necessary.

                                                                              5. Unless you are changing the type of staff, you will always use the Change Instrument text.

                                                                              Instrument changes in version 2.0

                                                                              There are several limitations to this in version 2.0 which should be understood before attempting to use it.

                                                                              1. Automatic transposition from concert pitch to the appropriate key for the transposing brass and woodwind instruments is not currently supported. For changes to instruments notated in a different key (C flute to E♭ flute; Oboe to English Horn, etc.), the use of ordinary Staff Text to indicate the change is preferable, and the transposition must be done after the music is entered (using Notes→Transpose from the main menu). To avoid discord on playback, the instrument assigned to that staff should be muted in the F10 Mixer.

                                                                              2. If it is necessary to hear the new instrument sound on playback, the Change Instrument text function must be used. However, after a mid-staff instrument change where the two instruments on the staff are not notated in the same key, no attempt should be made to enter new music directly from the keyboard. Instead, the music must be (a) pasted in, or (b) entered before the instrument change is affected. New input into measures following an instrument change is subject to two known program bugs, which cannot be resolved in the current 2.0.x versions without adversely affecting backwards compatibility. (This has been fixed in version 2.1) In addition, the score must remain notated in concert pitch, or discord will result from the transposition. As a convenience to the players, a copy of the part may be saved as a separate file and the required sections transposed to the appropriate key before the part is printed. (Note that transposing a linked part will affect the score as well.)

                                                                              3. When changing from one concert-pitch instrument to another, or from one transposing instrument to another in the same key (Bb trumpet to Bb cornet or Flugelhorn, etc.), the Change Instrument Text may be used to ensure that the playback sound is altered to the new instrument. Input may be done in the usual manner, and is not affected by the bugs mentioned above.

                                                                              Incompatibilities

                                                                              There are some incompatibilities between the two versions.

                                                                              1. Instrument changes created with version 2.0 and opened in version 2.1 or above will continue to either display the notes wrong or play the notes wrongs as in version 2.0. Deleting and reentering the instrument change will fix most incompatibility issues with only minor changes being needed.

                                                                              2. Instrument changes created with version 2.1 or above and opened in version 2.0 will generally playback correctly but continue to display the wrong notes.

                                                                              Add an instrument change

                                                                              1. Select the start point of the change by clicking on a note or rest.
                                                                              2. Open the main palette by typing F9 (or by using the View menu), and click on Text to open the text sub-palette.
                                                                                Text palette
                                                                              3. Double-click on Instrument
                                                                              4. The word "Instrument" will appear above the anchor note or rest.
                                                                              5. Double-click the word "Instrument", then type Ctrl+A to select all of it.
                                                                              6. Type the actual text you wish to appear in the score, then click outside the box to exit text edit mode.
                                                                              7. Right-click the text and choose "Change Instrument…"

                                                                                Menu: Instrument change

                                                                              8. Choose the instrument, then click OK

                                                                                Select instrument change

                                                                              See also

                                                                              • Change instrument
                                                                              • Mid-staff sound change

                                                                              External links

                                                                              • How to change instrument sound (e.g. pizz., con sordino) midway through score

                                                                              Mixer

                                                                                The Mixer allows you to change instrument sounds and adjust the volume and panning for each staff.

                                                                                To display/hide the mixer, use one of the following:

                                                                                • Press F10 (Mac: fn+F10).
                                                                                • From the main menu, select View→Mixer.

                                                                                The mixer shows dials for each part

                                                                                Note: Separate reverb and chorus effects for each channel are not yet implemented; use the synthesizer effects unit instead.

                                                                                The name of each mixer channel is the same as the Part name in the Staff properties dialog.

                                                                                Mute and Solo

                                                                                • To silence a selected staff, tick its "Mute" checkbox. Repeat as required.
                                                                                • To solo a selected staff, tick the "Solo" checkbox for that staff.

                                                                                Dials

                                                                                To turn a dial clockwise, click and drag upwards. To turn a dial counter-clockwise, click and drag downwards. You can also hover the mouse pointer over the dial and then move the mouse wheel. Double-clicking on any dial restores it to its default position.

                                                                                Sound

                                                                                The "Sound" drop-down menu lists every instrument supported by your current SoundFont. If you have multiple SoundFonts loaded in the Synthesizer, all the patches from all the SoundFonts (and/or SFZ files) will appear in a single long list—in the order previously set in the Synthesizer.

                                                                                Tip: To find an instrument, click on the "Sound" list and type the first letter of the instrument name. Repeat as required.

                                                                                Mid-staff sound change (pizz., con sordino, etc.)

                                                                                Some instruments come with multiple channels in the Mixer that can be used to change sounds midway through a score. For example, a staff for a stringed instrument (violin, viola, cello etc.) is allocated three channels: one for "arco" (or "normal"), another for "pizzicato" and another for "tremolo." A trumpet staff will have one channel for "normal" and another reserved for "mute," and so on.

                                                                                The following instructions use pizzicato strings as an example, but the same principle can be applied to any other instrument staff that allows sound changes.

                                                                                1. Select the first note of the section you want to be pizzicato;
                                                                                2. From the main menu, choose Add→Text→Staff Text;
                                                                                3. Type "pizz." This text is for visual reference only and does not affect playback;
                                                                                4. Right-click on the applied staff text and select Staff Text Properties…;
                                                                                5. In the "Change Channel" tab of the "Staff Text Properties" dialog, select one or more voices on the left;
                                                                                6. From the dropdown menu, select pizzicato;

                                                                                  Staff text properties

                                                                                7. Click OK to return to the score.

                                                                                Every note after the staff text you added now sounds pizzicato. To return to a normal strings sound later in the piece, follow the same guidelines as above except type "arco" in step 3 and select normal in step 6.

                                                                                See also

                                                                                • SoundFont
                                                                                • Synthesizer
                                                                                • Change instrument

                                                                                External links

                                                                                • How to change instrument sound (e.g. pizz., con sordino) midway through score

                                                                                Play mode

                                                                                  Basic playback functions are accessed from the Play toolbar located above the document window:

                                                                                  Play Toolbar

                                                                                  From left to right, the icons are:

                                                                                  • Rewind to start position: Playback returns to the beginning of the score, or to the start of the loop (if one is set).
                                                                                  • Start or stop playback: See Start/stop playback.
                                                                                  • Toggle loop playback: See Loop playback.
                                                                                  • Play repeats: Turn off if you want playback to ignore repeats.
                                                                                  • Pan score during playback: Turn off if you want the score to remain stationary.
                                                                                  • Play metronome: See Metronome playback.

                                                                                  Playback commands

                                                                                  Start/stop playback

                                                                                  To start playback:

                                                                                  1. Click on a note, rest or the blank part of a measure to establish the starting point. Note: If no selection is made, playback returns to the place it left off—or, if no previous playback, to the start of the score.
                                                                                  2. Press the play button Play Icon button; or press Space.

                                                                                  During playback you can jump to a specific note or rest in the score by simply clicking on it.

                                                                                  To stop playback:

                                                                                  • Press the Playback button; or press Space.

                                                                                  During playback

                                                                                  Once playback has started, the following commands are available:

                                                                                  • Go back to previous chord: ←
                                                                                  • Advance to next chord: →
                                                                                  • Go back to start of previous measure: Ctrl+← (Mac: Cmd+←)
                                                                                  • Advance to start of next measure: Ctrl+→ (Mac: Cmd+→)
                                                                                  • Rewind to start of score: Home (Mac: ⌘+Home); or press the Rewind button (playback toolbar).

                                                                                  During playback you can still use keyboard shortcuts to open and close panels, such as Play, Synthesizer, Mixer etc.

                                                                                  Play panel

                                                                                  To open the Play Panel use one of the following options:

                                                                                  • Press F11 (Mac: Fn+F11).
                                                                                  • From the menu bar, select View → Play Panel.

                                                                                  Play panel

                                                                                  The Play Panel offers temporary controls over playback, including playback speed (labelled 'tempo'), loop playback (with specified starting and ending positions), and general volume.

                                                                                  Note: Changes to the parameters in the Play Panel are not saved with the score: they only affect playback in the current session. Permanent changes to tempo should be made using tempo text. To change the default playback volume of the score, see Synthesizer.

                                                                                  Count in

                                                                                  You can switch on and off a count-in to be played each time the playback starts. The count-in plays beats for a full measure (according to nominal time signature at playback starting point); if the starting point is mid-measure or at a 'short' measure (anacrusis), it also plays enough beats to fill that measure. The conductor icon in the play panel enables, or disables count-in.

                                                                                  Metronome playback

                                                                                  You can also switch on/off the accompanying metronome as the score is played (see the metronome icon on the play panel).

                                                                                  Loop playback

                                                                                  You can loop playback of a selected passage in the score using either the Play toolbar (see image above) or the play panel.

                                                                                  To loop from the Play toolbar:

                                                                                  • Playback should be off, and the "Loop playback button" on.
                                                                                  • Select the desired region of the score for loop playback.
                                                                                  • Press the playback button.

                                                                                  Playback will now cycle within the region marked by the blue flags.

                                                                                  • Use the "Loop playback" button to toggle the loop on or off.

                                                                                  To loop from the Play Panel:

                                                                                  • Select the note from which you want playback to start and click on the "Set loop in position" button. The "Loop Playback" button becomes active.
                                                                                  • Select the last note of the desired playback region and click on the "Set loop out position" button.
                                                                                  • Press the play button.

                                                                                  Playback will now cycle within the region marked by the blue flags.

                                                                                  • You can use the "Loop playback" button to toggle the loop on or off.

                                                                                  SoundFonts and SFZ files

                                                                                    Audio playback is provided by MuseScore's onboard synthesizer, which houses a large selection of virtual (or software) instruments—including percussion and sound effects.

                                                                                    MuseScore supports virtual instruments in two formats:

                                                                                    • SoundFont (.sf2/.sf3): A single file containing one or more virtual instruments.
                                                                                    • SFZ (.sfz): A set of audio and definition files containing one or more virtual instruments.

                                                                                    SoundFonts

                                                                                    A Soundfont (.sf2/.sf3) is a single file containing one or more virtual instruments. As of version 2.2, MuseScore is installed with a SoundFont called MuseScore_General.sf3. This is a GM (General MIDI) set containing over 128 instruments, sound effects and various drum/percussion kits.

                                                                                    Note: Older versions of MuseScore are installed with a different Soundfont: MuseScore 2.0–2.1 with FluidR3Mono_GM.sf3; MuseScore 1 with TimGM6mb.sf2.

                                                                                    GM (General MIDI) is a universal format, so once your score is set up for correct playback using MuseScore's native Soundfont, you should be able to export it in a format of your choice and have it play back on any other user's computer.

                                                                                    Many different Soundfonts are available on the Internet: some free, some commercial. For a list of free soundfonts, see below.

                                                                                    Install a SoundFont

                                                                                    After finding and decompressing a SoundFont (see →below), double-click to open it. In most cases, the SoundFont file type will already be associated with MuseScore, and MuseScore will start and a dialog will appear asking if you want to install the SoundFont. Occasionally an application other than MuseScore will be associated with the SoundFont file type; if this is the case, you will need to right-click or control-click on the file, so as to display a menu from which you can choose to open the file in MuseScore. In either case, when the dialog appears asking if you want to install the SoundFont, click "Yes" to place a copy of the SoundFont file in MuseScore's SoundFonts directory. This directory can be viewed or changed in MuseScore's Preferences, but the default location is:

                                                                                    • Windows: %HOMEPATH%\Documents\MuseScore2\Soundfonts

                                                                                    • macOS and Linux: ~/Documents/MuseScore2/Soundfonts

                                                                                    In contrast to user-added SoundFonts, the initial default SoundFont installed with MuseScore is located in a system directory, meant only for that purpose, which should not be modified. This directory and its default SoundFont file is:

                                                                                    • Windows (32-bit): %ProgramFiles%\MuseScore 2\sound\MuseScore_General.sf3
                                                                                    • Windows (64-bit): %ProgramFiles(x86)%\MuseScore 2\sound\MuseScore_General.sf3

                                                                                    • macOS: /Applications/MuseScore 2.app/Contents/Resources/sound/MuseScore_General.sf3

                                                                                    • Linux (Ubuntu): /usr/share/mscore-xxx/sounds/MuseScore_General.sf3 (with xxx being the MuseScore version)

                                                                                    Uninstall

                                                                                    To uninstall a SoundFont, simply open the folder where its file is installed and delete it.

                                                                                    SFZ

                                                                                    An SFZ consists of a bunch of files and directories, an SFZ file and a bunch of actual sound files in WAV or FLAC format, with the SFZ file being a text file that basically describes what sound file is located where and to be used for what instrument and pitch range.

                                                                                    Note: For full support of SFZ, MuseScore 2.1 or later is need, prior versions had only limited support, namely for Salamander Grand Piano

                                                                                    Install an SFZ

                                                                                    After downloading an SFZ (see →below), you need to manually extract all the files that belong to the SFZ (the SFZ file itself and all the subdirectories) into the directory listed above. Leave the subdirectories and their contents as they are.

                                                                                    Uninstall

                                                                                    To uninstall an SFZ, simply open the folder where its files are installed (see above) and delete them all.

                                                                                    Synthesizer

                                                                                    The Synthesizer is MuseScore's central control panel for sound output. Once a SoundFont has been installed, it needs to be loaded into the Synthesizer in order for MuseScore to use it for playback. To make a different SoundFont the default, load it in the Synthesizer and click Set as Default.

                                                                                    To display the Synthesizer, go to View → Synthesizer. For more details, see Synthesizer.

                                                                                    Synthesizer

                                                                                    List of downloadable soundfiles

                                                                                    GM SoundFonts

                                                                                    The following sound libraries conform to the General MIDI (GM2) standard. This specification gives you a sound set of 128 virtual instruments, plus percussion kits.

                                                                                    • GeneralUser GS (29.8 MB uncompressed)
                                                                                      Courtesy of S. Christian Collins
                                                                                    • Magic Sound Font, version 2.0 (67.8 MB uncompressed)
                                                                                    • Arachno SoundFont, version 1.0 (148MB uncompressed)
                                                                                      Courtesy of Maxime Abbey
                                                                                    • MuseScore 1 came with TimGM6mb (5.7 MB uncompressed)
                                                                                      License: GNU GPL, version 2
                                                                                      Courtesy of Tim Brechbill
                                                                                    • MuseScore 2 (up to version 2.1) comes with FluidR3Mono_GM.sf3 (13.8 MB).
                                                                                    • MuseScore 2 (as of version 2.2) comes with MuseScore_General.sf3 (35.9 MB) (SF2 version (208 MB)).
                                                                                      License: released under the MIT license
                                                                                      Courtesy of S. Christian Collins
                                                                                    • Timbres of Heaven, version 3.2 (369 MB uncompressed)
                                                                                      Courtesy of Don Allen

                                                                                    Orchestral soundfiles

                                                                                    • Sonatina Symphonic Orchestra (503 MB uncompressed)
                                                                                      Downloads: SoundFont | SFZ format
                                                                                      License: Creative Commons Sampling Plus 1.0
                                                                                    • Aegean Symphonic Orchestra
                                                                                      Courtesy of Ziya Mete Demircan (352 MB uncompressed)

                                                                                    Piano soundfiles

                                                                                    SF2 Pianos
                                                                                    • Acoustic grand piano, release 2016-08-04
                                                                                      Description: Yamaha Disklavier Pro Grand Piano, sf2 format, 36MiB compressed, 113MiB uncompressed, 121 samples, 5 velocity layers
                                                                                      More information: http://freepats.zenvoid.org/ including other soundfonts.
                                                                                      License: Creative Commons Attribution 3.0
                                                                                      Courtesy of Roberto Gordo Saez
                                                                                    • Salamander C5 Light
                                                                                      Courtesy of Ziya Mete Demircan (24.5 MB uncompressed)
                                                                                    SFZ Pianos
                                                                                    • Salamander Grand Piano
                                                                                      Downloads: version 2 | version 3
                                                                                      Description: Yamaha C5, 48kHz, 24bit, 16 velocity layers, between 80 MB and 1.9 GB uncompressed
                                                                                      License: Creative Commons Attribution 3.0
                                                                                      Courtesy of Alexander Holm
                                                                                    • Detuned Piano (244 MB uncompressed)
                                                                                      License: Creative Commons Attribution-ShareAlike 3.0
                                                                                    • Plucked Piano Strings
                                                                                      Description: 44.1kHz, 16bit, stereo, 168 MB uncompressed
                                                                                      License: Creative Commons Attribution-ShareAlike 3.0
                                                                                    • The City Piano
                                                                                      Description: Baldwin Baby Grand, 4 velocity layers, 696 MB uncompressed
                                                                                      License: Public domain
                                                                                      Courtesy of Big Cat Instruments
                                                                                    • Kawai Upright Piano, release 2017-01-28
                                                                                      Description: 68 samples, 44KHz, 24bit, stereo, 2 velocity layers, 58MiB uncompressed
                                                                                      License: GNU General Public License version 3 or later, with a special exception
                                                                                      Courtesy of Gonzalo and Roberto

                                                                                    Unzipping downloaded soundfiles

                                                                                    Since soundfiles are large, they are often zipped (compressed) into a variety of formats, including .zip, .sfArk, and .tar.gz. You need to unzip (decompress) these files before they can be used.

                                                                                    • ZIP is standard compression format supported by most operating systems.

                                                                                    • sfArk is a compression format designed especially for compressing SoundFont files. To decompress it, use Polyphone (cross-platform software); or this online service: https://cloudconvert.com/sfark-to-sf2

                                                                                    • .tar.gz is a popular compression format for Linux. Windows users can use 7-Zip; Mac users can use The Unarchiver, or macOS' built-in Archive Utility. Note that if using 7-Zip, you will need to apply decompression twice—once for GZip and once for TAR.

                                                                                    Troubleshooting

                                                                                    If the toolbar play panel is greyed out, or not visible, follow the instructions below to get your sound working again:

                                                                                    1. Right-click on the menu bar and make sure there is a check mark next to the Playback Controls menu item. If this step does not solve your problem, go to Step 2.
                                                                                    2. If the play panel disappears after changing the SoundFont, go to Edit → Preferences... → I/O tab and click OK without making any changes. After restarting MuseScore, the play panel should reappear.

                                                                                    If you are setting up a SoundFont for the first time, please use one of the recommended SoundFonts listed above.

                                                                                    If playback stutters, then your computer may not not able to handle the SoundFont being used. The following advice may help:

                                                                                    • Reduce the amount of RAM (memory) used by MuseScore by using a smaller SoundFont. See the list above for suggestions.
                                                                                    • Increase the amount of RAM available for MuseScore by quitting all applications except MuseScore. If you still have problems and a large SoundFont is important to you, consider more RAM for your computer.

                                                                                    See also

                                                                                    • Synthesizer
                                                                                    • Mixer

                                                                                    External links

                                                                                    • How to change the SoundFont or add another
                                                                                    • The SFZ Format (for details about the sfz specification)

                                                                                    Swing

                                                                                      MuseScore's swing feature allows you to change the playback of your score from a straight to a swing rhythm. Swing can be applied globally or only to a section of the score, and is fully variable.

                                                                                      Apply swing to a score section

                                                                                      1. Click on the note where you want swing to start;
                                                                                      2. Double-click Swing in the Text palette (shown below);

                                                                                        Swing text

                                                                                      3. Edit the Swing text as required;

                                                                                      4. If you need to vary swing from the default setting, right click the Swing text and select System text properties... Click on the "Swing Settings" tab and adjust note duration and "Swing ratio" as required.

                                                                                      Swing text can be edited just like any other text element: you can change it, style it, make it invisible etc.

                                                                                      Triplet in tempo marking

                                                                                      Often this notation is used to indicate swing:

                                                                                      swing_markings.png

                                                                                      MuseScore does not have a way to include a triplet in text as a tempo marking, but there is an easy workaround:

                                                                                      1. Add Swing text as described above and make it invisible (shortcut V, or untick "Visible" in the Inspector);
                                                                                      2. Add an appropriate Image of the required tempo marking to the score. This can be downloaded from the bottom of the "How To" page: How to create a visual swing marking.
                                                                                      3. Resize and reposition the image as required.

                                                                                      Return to straight rhythm

                                                                                      If you want playback to return to straight time after a swing section:

                                                                                      1. Add Swing text to the first note or rest of the "straight" section (see above).
                                                                                      2. Edit the text to indicate a return to straight time: e.g. "Straight."
                                                                                      3. Right-click on the text and select System Text Properties…. Click on the "Swing Settings" tab and set "Swing to "Off."

                                                                                      Apply swing globally

                                                                                      If you wish to apply swing to the whole score, you can do so from the menu:

                                                                                      1. Select Style → General... → Score.
                                                                                      2. In the "Swing Settings" section, set the desired note value and "swing ratio."

                                                                                      External links

                                                                                      • How to create a visual swing marking.
                                                                                      • Swing (jazz performance style) (Wikipedia)

                                                                                      Synthesizer

                                                                                        Overview

                                                                                        To display the Synthesizer: from the menu, select View→Synthesizer.

                                                                                        The Synthesizer controls MuseScore's sound output and allows you to:

                                                                                        • Load and organize different sound sample libraries to play back the music
                                                                                        • Apply effects such as reverb and compression
                                                                                        • Adjust overall tuning
                                                                                        • Alter the output volume of both music and the (optional) metronome.

                                                                                        The Synthesizer window is divided into four sections/tabs:

                                                                                        • Fluid: A software synthesizer that plays SF2/SF3 SoundFont sample libraries.
                                                                                        • Zerberus: A software synthesizer that plays SFZ format sample libraries.
                                                                                        • Master Effects: Used to apply multi-effects to the score.
                                                                                        • Tuning: Used to adjust overall playback tuning.

                                                                                        Save/Load Synthesizer settings

                                                                                        The buttons at the bottom of the Synthesizer window have the following functions:

                                                                                        Button Function
                                                                                        Set as Default Saves all current synthesizer settings as the default settings. These are automatically applied to the Synthesizer when you open MuseScore.
                                                                                        Load Default Loads the last saved default settings to the Synthesizer.
                                                                                        Save to Score Saves all current synthesizer settings to the current score only.
                                                                                        Load from Score Loads the settings from the current score to the synthesizer.

                                                                                        Notes: (1) "Synthesizer settings" include the order of Soundfonts and SFX files, the effects configuration, master tuning and volume. (2) Only one set of Synthesizer settings can be in effect at a time—i.e. if multiple scores are open at once, it is not possible to make changes to the Synthesizer in one score and leave other scores' settings untouched. (3) Changes to synthesizer settings will not be heard in exported audio files unless saved to the score first (see table, above). See also Tuning (below).

                                                                                        Fluid

                                                                                        Click on the Fluid tab to access the control panel for SF2/SF3 SoundFont sample libraries. By default, the SoundFont FluidR3Mono_GM.sf3 should already be loaded.

                                                                                        Fluid in Synthesizer

                                                                                        You can load, rearrange and delete soundfonts as required. Playback can be shared between any combination of different soundfonts (and/or SFZ files). The order of soundfonts in Fluid is reflected in the default order of instruments in the mixer.

                                                                                        To load a soundfont

                                                                                        1. Click on the Add button
                                                                                        2. Click on a soundfont in the list.

                                                                                        To be able to load the soundfont, it first needs to be installed in your Soundfonts folder. This will ensure that it appears in the list in step 2 (above).

                                                                                        To reorder the soundfonts

                                                                                        1. Click on a soundfont
                                                                                        2. Use the up/down arrows (on the right-hand side) to adjust the order.
                                                                                        3. Repeat with other soundfonts in the list if required.

                                                                                        If you have not changed any sounds in the Mixer, then the SoundFont at the top of the list is the one that will be used for playback. However, if you are using the Mixer to play different instruments with sounds from different SoundFonts, playback will only work correctly if you have the same SoundFonts loaded in the same order in the Synthesizer. Therefore, if you are using multiple SoundFonts, it is advised to click the Save to Score button in the Synthesizer, so that the next time you open that score you can recall the list of SoundFonts loaded (and other Synthesizer settings) with the Load from Score button.

                                                                                        To remove a soundfont

                                                                                        1. Click on the name of the soundfont
                                                                                        2. Click on the Delete button.

                                                                                        This removes the soundfont from the synthesizer but does not uninstall it from the Soundfonts folder: it will still be available if you wish to reload it later.

                                                                                        Zerberus

                                                                                        Click on the Zerberus tab to access the control panel for SFZ sound sample libraries. You can add or delete files in a similar way to the Fluid tab. Note that, as with Fluid, the the SFZ files must first be installed in your soundfonts folder before they can be loaded into the synthesizer.

                                                                                        Volume

                                                                                        At the right in the Synthesizer are two sliders. One controls the playback volume, the other controls the volume of the optional built-in metronome. You can turn the metronome on or off by clicking the button underneath its volume slider. As with all the rest of the Synthesizer controls, any changes made here are temporary unless saved to the score or set as the new default.

                                                                                        Volume slider in Synthesizer

                                                                                        Effects

                                                                                        The Master Effects tab of the Synthesizer allows you to adjust the degree of reverb and, as of version 2.0.3, compression applied to your score.

                                                                                        Master Effects in Synthesizer

                                                                                        To turn an effect on or off:

                                                                                        • Select an option from the drop-down list next to Effect A or Effect B (the effects are applied in series, A → B).

                                                                                        To store and load effects configurations, use the buttons at the bottom of the Synthesizer window. See Synthesizer settings (above) for details.

                                                                                        Zita 1 reverb

                                                                                        The Zita 1 stereo reverb module allows you to simulate the ambience of anything from a small room to a large hall. The pre-delay, reverb time and tone of the reverb can be finely tuned using the controls provided:

                                                                                        • Delay: Set a pre-delay for the reverb from 20-100 ms.
                                                                                        • Low RT60 (Low frequency reverb time): Use the grey control to adjust the center frequency (50–1000 Hz) of the low frequency band which you want to affect: the green control adjusts the reverb time (1–8 secs) of this frequency band.
                                                                                        • Mid RT60 (Mid-range reverb time): Adjust the reverb time (1–8 secs) of the mid-range frequency band.
                                                                                        • HF Damping: Adjusts the high frequency component of the reverb. Increasing this value increases the frequency of the cut-off point and makes the reverb appear brighter and longer.
                                                                                        • EQ1: Allows you to cut or boost (-15 to +15) a frequency band (center = 40 Hz - 2 KHz) in the lower part of the spectrum.
                                                                                        • EQ2: Allows you to cut or boost (-15 to +15) a frequency band (center = 160 Hz - 10 KHz) in the higher part of the spectrum.
                                                                                        • Output: Controls the amount of effect applied. "Dry" is no effect. "Wet" indicates 100% reverb. "Mix" is a 50/50 balance of wet/dry signal.

                                                                                        Note: EQ1 and EQ2 affect the tone of the reverb only, not the dry (unprocessed) signal.

                                                                                        To quickly set up an effects patch, set "Output" to "Mix" and adjust the "Mid RT60" control to the desired reverb time. Then fine tune the effect as explained above.

                                                                                        SC4 compressor

                                                                                        The SC4 stereo compressor (available as of version 2.0.3) gives you fine control over the playback's dynamic range, reducing the volume variation between loud and soft sounds. It offers the following controls:

                                                                                        • RMS: Adjusts the balance between RMS (0) and Peak (1) compression. In the former, the compressor responds to averaged-out levels in the signal; in Peak mode, the compressor responds to peak levels.
                                                                                        • Attack: (1.5–400 ms) The length of time it takes for compression to engage fully after the signal exceeds the threshold level.
                                                                                        • Release: (2–800 ms) The time it takes for compression to return to zero after the signal falls below the threshold level.
                                                                                        • Threshold: (in dB) The signal level above which compression starts to take effect. Lowering the threshold increases the amount of signal that is compressed.
                                                                                        • Ratio: The amount of compression applied to the signal above the threshold. The higher the ratio, the greater the compression. Varies between 1:1 to 20:1.
                                                                                        • Knee: Allows you to select a range between "soft knee" and "hard knee". The softer the knee, the more gradual the transition between uncompressed and compressed signal.
                                                                                        • Gain: Compression tends to lower the volume, so use this control to boost the signal as required.

                                                                                        To quickly set-up, try setting RMS = 1, Threshold = -20 db, Ratio = 6. Increase Gain to restore the lost volume. Then fine-tune as explained above.

                                                                                        Tuning

                                                                                        The Tuning tab is where you can adjust the program's master tuning. For Concert Pitch instruments, A4 = 440 Hz by default.

                                                                                        Tuning in Synthesizer

                                                                                        To change the Master tuning:

                                                                                        • Enter a new value in the Master tuning field, then press Change Tuning.

                                                                                        Notes: (1) This tuning applies to all scores in the current session only. To make this the program default or to store it to a particular score, see Save/Load Synthesizer settings. (2) To apply the new tuning to exported audio files (WAV, MP3, OGG), press Save to Score before exporting.

                                                                                        See also

                                                                                        • SoundFont
                                                                                        • Mixer

                                                                                        Tempo

                                                                                          Tempo markings can be found in the Tempo palette of the Basic and Advanced workspaces. They are supplied as metronome marks, but can be subsequently edited to display any tempo or expression you want. Playback tempo can be varied throughout the score by using multiple tempo markings, visible or invisible.

                                                                                          Add a tempo marking

                                                                                          Use any of the following methods:

                                                                                          • Select a note or rest and press the keyboard shortcut Alt+T.
                                                                                          • Select a note or rest, and from the menu bar chose Add→Text...→Tempo Marking.
                                                                                          • Select a note or rest and double-click an appropriate metronome mark in the Tempo palette;
                                                                                          • Drag-and-drop a metronome mark from the Tempo palette directly onto a note or rest.

                                                                                          Note: If a tempo marking is applied from the menu or using a keyboard shortcut, the beat note automatically follows the time signature. The advantage of applying from a palette is that you can chose which beat note to use.

                                                                                          Edit tempo

                                                                                          To change the tempo of an existing metronome mark in the score:

                                                                                          1. Enter Edit mode for the tempo mark in question;
                                                                                          2. Edit the metronome number and/or the beat note as required;
                                                                                          3. Exit Edit mode.

                                                                                          You can also override the tempo of an existing metronome mark from the Inspector:

                                                                                          1. Select the tempo mark;
                                                                                          2. Untick "Follow text" in the "Tempo Marking" section of the Inspector;

                                                                                            Inspector, Tempo

                                                                                          3. Set the desired playback tempo in the "Tempo" field underneath.

                                                                                          Note: Playback may be faster or slower if the tempo setting in the play panel is at a percentage other than 100%.

                                                                                          Edit tempo text

                                                                                          Tempo marks can be edited and formatted just like any other text object. To set text properties or text style, see Text styles and properties.

                                                                                          The tempo indicated by a metronome mark usually persists even if overwritten by an expression—such as Andante, Moderato etc. You can also add further text to a plain metronome mark. e.g.

                                                                                          Metronome mark: Andante quarter note = 75

                                                                                          Overriding the tempo marking

                                                                                          You can temporarily override the indicated tempo, and play the score back at any tempo you like using the play panel:

                                                                                          1. Display the play panel: View→Play Panel or F11 (Mac: fn+F11):

                                                                                            Play Panel

                                                                                          2. Move the tempo slider up or down as required. The tempo is shown both as an absolute value and as a percentage of the currently indicated tempo mark. Double-click the tempo slider to reset it.

                                                                                          Note: BPM is always measured and displayed in quarter note beats per minute, regardless of the (denominator of the) time signature in effect.

                                                                                          Ritardando and accelerando playback

                                                                                          You can simulate ritardando ("rit.") and accelerando ("accel.") playback by adding hidden tempo markings to the score. The printed indication to the musician should be added as staff/system text in addition.

                                                                                          In the example illustrated below, the tempo was originally 110 BPM (beats per minute). At the ritardando, the tempo decreases by 10 BPM on the first note of each measure. Each tempo change is made invisible by unchecking the Visible checkbox in the Inspector, so that only the ritardando shows on the printed score:

                                                                                          Ritardando

                                                                                          A plugin has been developed to automate this process: TempoChanges

                                                                                          Fermatas

                                                                                          Fermatas, available in the Articulations and Ornaments palette, have a Time stretch property that can be set via the Inspector. By default, this property is set to 1.00. To have MuseScore play back a fermata for twice its normal duration, click on the fermata and set "Time stretch" to 2.00. This of course does not work for fermatas applied to barlines, as barlines don't have a duration to stretch.

                                                                                          See also

                                                                                          • Play mode
                                                                                          • Time signature

                                                                                          Dynamics

                                                                                            Dynamics are symbols indicating the loudness of a note or phrase of music. Symbols can be found in the Dynamics palette in either the Basic or Advanced workspace:

                                                                                            Dynamics palette (Advanced)

                                                                                            Note: Overall playback volume of the score can be changed using the volume slider in the Play Panel or Synthesizer.

                                                                                            Add a dynamic

                                                                                            To apply a dynamic to the score, use one of the following methods:

                                                                                            • Select a note and double-click a dynamic symbol in a palette.
                                                                                            • Drag a dynamic symbol from a palette onto a note.

                                                                                            For additional dynamics use the Master Palette (Shift+F9). You can also create a custom palette for future use.

                                                                                            To create a crescendo or decrescendo sign, see Hairpin.

                                                                                            Adjusting playback volume for a dynamic

                                                                                            Click on the dynamic to select it, and adjust its Velocity in the Inspector—higher for louder, lower for softer.

                                                                                            Adjusting range for a dynamic

                                                                                            Via the Inspector you can set the staves affected by a dynamic. The "Dynamic range" is by default set to "part," which means all staves for an instrument will be affected. Changing this to "staff" will limit the dynamic to the staff it is entered on only. Changing this to "System" will cause all instruments to play this dynamic.

                                                                                            List of dynamics in palettes

                                                                                            In the Basic workspace, there are 8 options in the Dynamics palette: ppp, pp, p, mp, mf, f, ff, fff.

                                                                                            In the Advanced workspace, there are all of the above plus 15 additional options in the Dynamics palette: fp, sf, sfz, sff, sffz, sfp, sfpp, rfz, rf, fz, m, r, s, z, n.

                                                                                            In the Dynamics section of the Master Palette, there are all of the above plus 6 additional options: pppppp, ppppp, pppp, ffff, fffff, ffffff.

                                                                                            Edit a dynamic

                                                                                            Any dynamic can be edited after being added to the score, just like standard text. See Text editing.

                                                                                            See also

                                                                                            • Tempo

                                                                                            External links

                                                                                            • Video tutorial: Lesson 10 - Articulations, Dynamics and Text
                                                                                            • Dynamics at Wikipedia

                                                                                            Chữ viết

                                                                                              The previous chapter covers text that affects playback tempo, but there are many other types of text available in MuseScore: lyrics, chord symbols, dynamic markings, fingering, figured bass, headings, rehearsal marks, plus many more. These are all accessible from the main menu via Add → Text.

                                                                                              For short generic text, use staff or system text. The difference between these two texts is whether you want it to apply to a single staff, or the whole system. This makes a difference when extracting parts.

                                                                                              Text basics

                                                                                                Add text

                                                                                                To add a text-based element to the score, use one of the following general methods:

                                                                                                • Keyboard shortcut: For example, press Ctrl+Tto enter Staff text , Ctrl+L to enter Lyrics, and so on.
                                                                                                • Menu command: Add→Text allows you to chose from a range of text-based elements.
                                                                                                • Workspace: Select a note and double-click an icon in one of the palettes; or, alternatively, drag a symbol from a palette onto the staff. e.g. Swing text, Tempo text etc.

                                                                                                Notes: (1) The exact method depends on the type of text you are adding (see Text). (2) For general-purpose text boxes attached to staves, see Staff and system text.

                                                                                                Format text

                                                                                                Every text-based element in the score has three levels of formatting:

                                                                                                • Text style: This is the highest level of formatting and applies to all text elements in the score of a particular type. For details, see Text style.
                                                                                                • Text properties: This applies to the style of one specific text object only. For details, see Text properties.
                                                                                                • Character formatting; The style applied to individual text characters during editing. For details, see Text editing.

                                                                                                Adjust position of text objects

                                                                                                To position a text object, use any of the following methods:

                                                                                                • Drag the object.
                                                                                                • Select the object and adjust the horizontal or vertical offset values in the Inspector.
                                                                                                • Select the object and apply any of the following keyboard shortcuts:
                                                                                                  • ←: Move text left 0.1 staff space.
                                                                                                  • →: Move text right 0.1 staff space.
                                                                                                  • ↑: Move text up 0.1 staff space.
                                                                                                  • ↓: Move text down 0.1 staff space.
                                                                                                  • Ctrl+← (Mac: ⌘+←): Move text left one staff space.
                                                                                                  • Ctrl+→ (Mac: ⌘+→): Move text right one staff space.
                                                                                                  • Ctrl+↑ (Mac: ⌘+↑): Move text up one staff space.
                                                                                                  • Ctrl+↓ (Mac: ⌘+↓): Moves text down one staff space.

                                                                                                Text anchors

                                                                                                When you apply a text element to the score, its anchor position will depend on the type:

                                                                                                • Title, Subtitle, Composer, Poet: Anchored to a frame.
                                                                                                • Fingering: Anchored to note heads.
                                                                                                • Lyrics: Anchored to a time position (a note/chord, but not a rest).
                                                                                                • Chord symbol: Anchored to a time position.
                                                                                                • Staff text: Anchored to a time position.
                                                                                                • System text: Anchored to a time position.

                                                                                                Text editing

                                                                                                  Enter/exit text edit mode

                                                                                                  To enter Text edit mode use one of the following methods:

                                                                                                  • Double click on a text element.
                                                                                                  • Right-click on a text element and select Edit element.
                                                                                                  • Click on a text element and press Ctrl+E (Mac: Cmd+E).

                                                                                                  Sample text in edit mode

                                                                                                  In this mode you can apply formatting to individual characters, including options such as bold, italic, underline, subscript, superscript, font family and font size. These are accessed from the Text toolbar below the document window:

                                                                                                  Text toolbar

                                                                                                  To exit Text edit mode use one of the following:

                                                                                                  • Press Esc.
                                                                                                  • Click on a part of the score outside the edit window.

                                                                                                  Keyboard shortcuts

                                                                                                  In Text edit mode, the following keyboard shortcuts are available:

                                                                                                  • Ctrl+B (Mac: ⌘+B) toggles bold face.
                                                                                                  • Ctrl+I (Mac: ⌘+I) toggles italic.
                                                                                                  • Ctrl+U (Mac: ⌘+U) toggles underline.
                                                                                                  • Home End ← → ↑ ↓ moves cursor.
                                                                                                  • Backspace (Mac: Delete) removes character to the left of the cursor.
                                                                                                  • Del (Mac: → Delete or fn+Delete) removes character to the right of the cursor.
                                                                                                  • ↵ starts new line.
                                                                                                  • F2 (Mac: fn+F2) Inserts special characters (see below).

                                                                                                  Symbols and special characters

                                                                                                  You can use the Special Characters window to insert quarter notes, fractions, and many other kinds of special symbols or characters into your text. A few symbols can also be accessed by shortcut (see below).

                                                                                                  The Special Characters palette contains buttons for inserting symbols into the text (e.g. quarter note), or special characters (e.g. copyright symbol, ©)

                                                                                                  To open Special Characters, use any of the following methods:

                                                                                                  • Click on the keyboard icon in the text toolbar (below the score window).
                                                                                                  • Press F2 (Mac: fn+F2).

                                                                                                  Note: (1) This only works in Text edit mode; (2) The Special Characters dialog should not be confused with the menu item of the same name in the macOS version of MuseScore.

                                                                                                  The dialog is divided into 3 tabs: Common symbols, musical symbols and unicode symbols. The musical and unicode tabs are further subdivided into alphabetically-arranged categories.

                                                                                                  Double-clicking an item in the Special Characters dialog immediately adds it to the text where the cursor is positioned. Multiple items can be applied without closing the dialog box, and the user can even continue to type normally, delete characters, enter numerical character codes etc., with it open.

                                                                                                  Special character shortcuts

                                                                                                  In Text edit mode the following keyboard shortcuts can be used to access certain special characters:

                                                                                                  Ctrl+Shift+B: Flat.
                                                                                                  Ctrl+Shift+F: Forte.
                                                                                                  Ctrl+Shift+H: Natural.
                                                                                                  Ctrl+Shift+M: Mezzo.
                                                                                                  Ctrl+Shift+N: Niente.
                                                                                                  Ctrl+Shift+P: Piano (dynamic mark).
                                                                                                  Ctrl+Shift+R: Rinforzando.
                                                                                                  Ctrl+Shift+S: Sforzando.
                                                                                                  Ctrl+Shift+Z: Z.
                                                                                                  Ctrl+Shift+#: Sharp.

                                                                                                  See also

                                                                                                  • Chord symbol
                                                                                                  • Lyrics
                                                                                                  • Frame
                                                                                                  • Edit mode

                                                                                                  Text styles and properties

                                                                                                    Text Style

                                                                                                    This is the highest level of text formatting and applies to all text elements in the score of a particular type. Staff text objects, for example, have a unique style, as do all tempo markings, all lyrics, all chord symbols and so on. Editing a text style allows you to change the appearance of all objects which share that style in one go.

                                                                                                    Edit style

                                                                                                    To edit a text style, use any of the following methods:

                                                                                                    • From the main menu, chose Style→Text…. Then select the relevant style from the list.
                                                                                                    • Right-click a text object and select Text Style….

                                                                                                    This will display the Edit Text Styles dialog:

                                                                                                    Text Styles

                                                                                                    The options available are divided into categories:

                                                                                                    • Text
                                                                                                      • Font: name of the font such as "Times New Roman" or "Arial"
                                                                                                      • Size: size of the font in points
                                                                                                      • Style: style of the font, italic, bold, underline
                                                                                                      • Color: click on the color demonstrated to change
                                                                                                      • Size follows "Staff space" setting: whether size follows the distance between two lines in a 5-lines standard staff
                                                                                                      • System flag: text applies to all staves of a system.
                                                                                                    • Offset
                                                                                                      • Horizontal
                                                                                                      • Vertical
                                                                                                      • Offset Unit: in mm or Staff space units
                                                                                                    • Alignment
                                                                                                      • Horizontal: left, right, center
                                                                                                      • Vertical: align top edge of text to reference point, center text vertical to reference point, center text vertical to text baseline or align bottom edge of text to reference point
                                                                                                    • Frame
                                                                                                      • Frame: add a frame around the text
                                                                                                      • Frame Type: Circle or Box
                                                                                                      • Border thickness: thickness of the line of the frame in space units
                                                                                                      • Border radius: for box frame, radius of rounded corner
                                                                                                      • Text margin : inner frame margin in space units
                                                                                                      • Foreground color: of the frame border
                                                                                                      • Background color: of the background within the frame.

                                                                                                    Note: Opacity is set by the parameter "Alpha channel" in the colors dialogs: a value between 0, transparent, and 255, opaque.

                                                                                                    Create a new text style

                                                                                                    1. From the menu bar, select Style → Text...; or right-click on a text object and select Text Style...;
                                                                                                    2. Click on New ;
                                                                                                    3. Set a name;
                                                                                                    4. Set all properties as desired.

                                                                                                    This text style will be saved along with the score. It will not be available in other scores, unless you explicitly save the style sheet and load it with another score.

                                                                                                    Apply options

                                                                                                    You can apply any changes made to either the score or the part you are seeing, by pressing Apply and then OK.

                                                                                                    If you are in one of the parts of your score, you also have the option to use the Apply to all parts button before OK, so you don't have to manipulate all parts individually.

                                                                                                    Reset text to style

                                                                                                    If you have made changes to an individual piece of text and you want to return it to the defined text style for the score, or if you changed the style with an old version of MuseScore and you want the style to correspond to the default text style in MuseScore 2, you can use the Reset Text to Style option.

                                                                                                    Select the text you want to reset to style and click on Reset Text to Style in the Inspector. If you need all text from a given style to be "reset", right-click on one, then from the context menu choose Select → All Similar Elements first.

                                                                                                    Save and load text styles

                                                                                                    Text styles (together with all other styles in a document) can be saved as a style file and loaded into other MuseScore files. See Save and load style.

                                                                                                    Text Properties

                                                                                                    This is the next level down in the formatting hierarchy and affects the style of the text in one specific text object only.

                                                                                                    Edit properties

                                                                                                    To edit the text properties of a particular object—and no other:

                                                                                                    • Right click on the text and select Text Properties….

                                                                                                    This displays the following dialog:

                                                                                                    text_properties_dialog_en.png

                                                                                                    Most of the properties on display will be familiar from the Edit Text Styles dialog. You also have a Reset to Style button allowing you to apply a style to the object from a drop-down list.

                                                                                                    See also

                                                                                                    • Text editing
                                                                                                    • Header/Footer
                                                                                                    • Behavior of applied text and lines

                                                                                                    Staff and system text

                                                                                                      For general-purpose text, use Staff Text or System Text. The difference between these two types of text is whether you want it to apply to a single staff, or the whole system. This matters when extracting parts: staff text will only appear in a part that contains the specific instrument the text is attached to, while system text will appear in all parts. Additionally, if you choose to hide empty staves, any staff text belonging to an empty staff will also be hidden. System text is never hidden by the "hide empty staves" feature.

                                                                                                      Staff text

                                                                                                      Staff text is general purpose text associated with a particular staff at a particular location in the score. To create staff text, choose a location by selecting a note or rest and then use the menu option Add → Text → Staff Text, or use the shortcut Ctrl+T (Mac: ⌘+T). A small text box appears and you can immediately start typing. You can exit the text box at any time (even without typing anything) by pressing Esc.

                                                                                                      Staff text can, for example, be used to apply indications such as "Solo" or "Pizzicato" to one staff in a score. Depending on what the instructions of the staff text are, MIDI playback of that staff at the text location can be altered to match the instructions by right-clicking on the staff text and selecting Staff Text Properties…. See Mid-staff sound change.

                                                                                                      System text

                                                                                                      System text is used when you wish to apply text indications to a whole system rather than just to one staff line. This makes a difference when extracting parts, or if you choose to hide empty staves. To create system text, chose a location by selecting a note or rest and then use the menu option Add → Text → System Text, or use the shortcut Ctrl+Shift+T (Mac: ⌘+Shift+T). A small text box appears and you can immediately start typing. You can exit the text box at any time (even without typing anything) by pressing Esc.

                                                                                                      See also

                                                                                                      • Mid-staff sound change

                                                                                                      External links

                                                                                                      • How to change instrument sound (e.g. pizz., con sordino) midway through score

                                                                                                      Chord symbols

                                                                                                        Chord symbols are an abbreviated way of representing musical chords (see Chord names and symbols (Wikipedia) for further details). For example:

                                                                                                        Chord symbols

                                                                                                        Enter a chord symbol

                                                                                                        1. Select a note or a slash;
                                                                                                        2. Press Ctrl+K (Mac: ⌘+K).

                                                                                                        The cursor is now positioned above the score ready for input. Enter the chord symbol just like normal text, as follows:

                                                                                                        • Root note: A, B, C, D, E, F, G.
                                                                                                        • Sharp: # (hash symbol).
                                                                                                        • Flat: b (small letter "b").
                                                                                                        • Double sharp: x (small letter "x") or ## (two hash symbols).
                                                                                                        • Double flat: bb (small letter "b" twice).
                                                                                                        • Natural: natural (no space before "natural").
                                                                                                        • For other symbols, see Chord symbol syntax (below).

                                                                                                        When you exit the chord symbol, the characters you have typed will automatically assume the correct format: by default a root note typed in lower case will turn into upper case (for alternative options, see Automatic Capitalization); a "#" or "b" will turn into a proper sharp (♯) or flat (♭) and so on. Do not try to use actual flat and sharp signs as MuseScore will not understand those properly.

                                                                                                        After you have finished entering a chord symbol you can either:

                                                                                                        • Move the cursor forward or backwards to continue entering or editing chord symbols (see commands below).
                                                                                                        • Exit chord symbol mode by pressing Esc.

                                                                                                        Note: To fill measures with slashes, see Fill with slashes or Toggle rhythmic slash notation.

                                                                                                        Keyboard Commands

                                                                                                        The following commands are available during chord symbol entry:

                                                                                                        • Space move Cursor to next note, rest, or beat
                                                                                                        • Shift+Space move cursor to previous note, rest, or beat
                                                                                                        • Ctrl+Space (Mac: ⌘+Space) add a space to the chord name
                                                                                                        • ; move cursor to next beat
                                                                                                        • : move cursor to previous beat
                                                                                                        • Tab move cursor to next measure
                                                                                                        • Shift+Tab move cursor to previous measure
                                                                                                        • Ctrl plus number (1 - 9) move Cursor by duration corresponding to number (e.g.; half note for 6)
                                                                                                        • Esc exit.

                                                                                                        Chord symbol syntax

                                                                                                        MuseScore understands most of the abbreviations used in chord symbols:

                                                                                                        • Major: M, Ma, Maj, ma, maj, Δ (type t or ˆ for the triangle)
                                                                                                        • Minor: m, mi, min, -
                                                                                                        • Diminished: dim, ° (entered with lowercase letter o, shows as ° if using the the Jazz style, as o otherwise)
                                                                                                        • Half-diminished: ø (type 0, zero). Alternatively, you can, of course, chose abbreviations such as mi7b5 etc.
                                                                                                        • Augmented: aug, +
                                                                                                        • The following abbreviations are also valid: extensions and alterations like b9 or #5, sus, alt, and no3; inversions and slash chords, such as C7/E; commas; parentheses, which can enclose part, or even all, of a chord symbol.

                                                                                                        Edit a chord symbol

                                                                                                        An existing chord symbol can be edited in a similar way to ordinary text: See Text editing.

                                                                                                        Transpose chord symbols

                                                                                                        Chord symbols are automatically transposed by default if you apply the menu Transpose command to the containing measures. If this is not required, you can untick the "Transpose chord symbols" option in the same dialog.

                                                                                                        Chord symbol text

                                                                                                        To adjust the appearance of all chord symbol text, use any of the following options:

                                                                                                        • From the main menu, chose Style → Text… → Chord Symbol
                                                                                                        • Right click on any chord symbol and select Text Style…

                                                                                                        This displays the Edit Text Styles dialog, allowing you to make changes to any text property.

                                                                                                        Chord symbol style

                                                                                                        Formatting options for chord symbols are available in Style→General...→Chord Symbols, Fretboard Diagrams. Adjustable properties are listed under the following headings:

                                                                                                        Appearance

                                                                                                        Three options are possible: Standard and Jazz and Custom. You can select between these using the radio buttons.

                                                                                                        • In the Standard style, chords are rendered simply, with the font determined by your chord symbol text style.

                                                                                                          Standard chord symbols

                                                                                                        • In the Jazz style, the MuseJazz font is used for a handwritten look, with distinctive superscript and other formatting characteristics. The Jazz style is selected by default if you use any of the Jazz templates.

                                                                                                          Jazz chord symbols

                                                                                                        • The Custom style option allows you to customise the look of chord symbols (and also ensures compatibility with older scores). Select a customised Chord symbols style file in the field below: this can be created by copying and modifying one of the pre-existing files in the "styles" folder. Documentation can be found in the same folder. Note, however, that this is for advanced users only, and there is no guarantee these files will be supported in the future.

                                                                                                        Note spelling

                                                                                                        By default, MuseScore uses letter names for chord symbols. For users in regions where other note naming schemes are used, MuseScore provides the following controls:

                                                                                                        • Standard: A, B♭, B, C, C♯,...
                                                                                                        • German: A, B♭, H, C, C♯,...
                                                                                                        • Full German: A, B, H, C, Cis,...
                                                                                                        • Solfeggio: Do, Do♯, Re♭, Re,...
                                                                                                        • French: Do, Do♯, Ré♭, Ré,...
                                                                                                        Automatic Capitalization

                                                                                                        By default, MuseScore automatically capitalizes all note names on exit, regardless of whether you entered them in upper or lower case. However, you can also choose other automatic capitalization options:

                                                                                                        • Lower case minor chords: c, cm, cm7,...
                                                                                                        • Lower case bass notes: C/e,...
                                                                                                        • All caps note names: DO, RE, MI,...

                                                                                                        You can also turn off the automatic capitalization completely, in which case note names are simply rendered the way you type them.

                                                                                                        Positioning

                                                                                                        • Default vertical position: The height at which the chord symbol is applied above the staff (negative values can be used)
                                                                                                        • Distance to fretboard diagram: If a fretboard diagram is present, this value is the height at which the chord symbol is applied above the diagram (negative values can be used).
                                                                                                        • Minimum chord spacing: The space to leave between chord symbols.
                                                                                                        • Maximum barline distance: Changes the size of the gap between the last chord symbol in the measure and the following barline. You only need to adjust this value if there is a continuous problem in the score with overlap between the last symbol in one measure and the first symbol in the next.

                                                                                                        Note: In addition to the settings described here, the default position of applied chord symbols is also determined by settings in the Text Styles dialog. The effect is cumulative.

                                                                                                        Capo

                                                                                                        Enter the number of the capo position at which you want to display substitute chords, in brackets, after all chord symbols in the score.

                                                                                                        Fingering

                                                                                                          Fingering symbols for various instruments are found in the Fingering palette in the Advanced workspace.

                                                                                                          Fingering palette

                                                                                                          • Keyboard music employs the numbers 1–5 to represent fingers of the left or right hand. There is also a fingering positioner plugin to help you optimize the layout of piano or keyboard fingerings.

                                                                                                          • Guitar music uses the numbers 0–4 to represent left-hand fingering (T is occasionally used for the thumb). Right-hand fingering is indicated by the letters p, i, m, a, c. Circled numbers represent instrument strings.

                                                                                                          • The last five symbols in the palette are used for lute fingering in historical music. Note: To enable display of fingering in tablature, right-click on the TAB, select Staff Properties...→Advanced style properties, and tick "Show Fingerings".

                                                                                                          Add fingering to a single note

                                                                                                          Use any of the following methods:

                                                                                                          • Select a note and double click one of the fingering symbols in a Palette.
                                                                                                          • Drag and drop a fingering symbol from a palette onto a note

                                                                                                          When fingering is added to a note, the focus immediately shifts to the symbol, so you can adjust it right away.

                                                                                                          Add fingering to several notes

                                                                                                          1. Select the desired notes;
                                                                                                          2. Double-click a fingering symbol in a palette.

                                                                                                          Adjust position of fingering

                                                                                                          Single fingering

                                                                                                          To change the position of one symbol, use any of the following methods:

                                                                                                          • For fine adjustments (0.1 sp) use the arrow keys; For larger adjustments (1 sp) use Ctrl+Arrow.
                                                                                                          • Change horizontal and vertical offsets in the Inspector.
                                                                                                          • Drag the symbol using your mouse.

                                                                                                          Multiple fingering

                                                                                                          To change the position of multiple symbols:

                                                                                                          1. Select the desired fingering symbols;
                                                                                                          2. Adjust using the horizontal and vertical offset fields in the Inspector.

                                                                                                          Note: You can also use the fingering positioner plugin mentioned above to optimize the layout of piano fingerings.

                                                                                                          To restore a symbol to its default position, select it and press Ctrl+R.

                                                                                                          Edit fingering text

                                                                                                          Fingering is a form of text symbol and can be edited and styled like any other. Right-clicking on the symbol gives you a range of options.

                                                                                                          Lyrics

                                                                                                            Enter a lyrics line

                                                                                                            First line

                                                                                                            1. Enter the notes of the melody line;
                                                                                                            2. Select the note where you want to start entering lyrics;
                                                                                                            3. To enter lyrics mode, type Ctrl+L (Mac: ⌘+L); or from the main menu, select Add→Text→Lyrics;
                                                                                                            4. Type a syllable;
                                                                                                            5. Use the following options to continue entering lyrics:
                                                                                                              • Go to the next syllable: Press Space (or Ctrl+→) at the end of a syllable.
                                                                                                              • Hyphen (to connect syllables): Press - at the end of a syllable.
                                                                                                              • Go to the previous syllable: Press Shift+Space (or Ctrl+←).
                                                                                                              • Move left: Press ← (left arrow). If the cursor is at the beginning of a syllable, it will jump to the previous one.
                                                                                                              • Move right: Press → (right arrow). If the cursor is at the end of a syllable, it will jump to the next one.
                                                                                                              • Move to the syllable below: Press ↓ (down arrow).
                                                                                                              • Move to the syllable above: Press ↑ (up arrow).
                                                                                                              • Start new lyrics line: Press ↵ (Return) at the end of an existing lyrics syllable (Note: Don't use the Enter key from the numeric keypad!).
                                                                                                            6. To exit lyrics mode, press Esc.

                                                                                                            Subsequent lines

                                                                                                            If you want to add another lyrics line to an existing one (e.g. a 2nd or 3rd verse etc.):

                                                                                                            1. Chose one of the following options:
                                                                                                              • Select the note where you want to start the new lyrics line. Enter lyrics mode as shown in step 3 (above). The cursor moves to a new (blank) line.
                                                                                                              • Enter text edit mode on an existing syllable, go to the end of the syllable and press ↵ (Return). The cursor moves to the next line.
                                                                                                            2. Continue entering lyrics from step 4 (above).

                                                                                                            Example:

                                                                                                            Sample lyrics: A-des-te fi-del-es

                                                                                                            Special characters

                                                                                                            In most cases, lyrics can be edited just like normal text. However, special keyboard shortcuts are required to enter the following characters:

                                                                                                            • Character space: Ctrl+Space (Mac: ⌥+Space).

                                                                                                            • - (hyphen): Ctrl+- (Mac: ⌥+-) or AltGr+-.

                                                                                                            • Line feed: Ctrl+↵ (Mac: ⌥+Return) or Enter (from the numeric keypad).

                                                                                                            Melisma

                                                                                                            A melisma is a syllable or word that extends over two or more notes. It is indicated by an underline extending from the base of a syllable to the last note of the melisma. The underline is created by positioning the cursor at the end of a syllable and pressing Shift+_: once for each note in the melisma. See the image below:

                                                                                                            Syllable extension line, Melisma

                                                                                                            The above lyric was created in the following manner:

                                                                                                            1. Type the letters, soul,.
                                                                                                            2. At the end of the word, press Shift+___.
                                                                                                            3. Type the letters To, then press Esc.

                                                                                                            For non-last syllables to extend, just use additional dashes -, usually only one of them will show (more when the distance between the syllables is large enough), and the syllable will right-align to the first note, similar to last syllables that got notated with a melisma, see above.

                                                                                                            Elision (Lyric) slur / Synalepha

                                                                                                            Two syllables under a note can be joined with an elision slur, also known as a "lyric slur" or "synalepha". For example:

                                                                                                            Sample lyric slur under a note

                                                                                                            To create the example lyric text, starting with the syllable text "te":

                                                                                                            1. Type te;
                                                                                                            2. Click on the keyboard icon Keyboard Icon, or press F2 to open the Special Characters palette;
                                                                                                            3. Use one of the following options:

                                                                                                              • Double-click one of the three elision slurs in the "Common Symbols" tab: "Narrow elision", "Elision", or "Wide elision" (these can be found between the "C Clef" and the "p" dynamic—see image below):
                                                                                                                Elision in the Special Symbols palette
                                                                                                              • Double-click the elision slur found after the 7/8 fraction in the "Common Symbols" tab (next to last character in the image above). Depending on the font, add one or more spaces before/after the slur using Ctrl+Space (Mac: ⌥+Space).
                                                                                                                Note: Not all fonts include the "undertie" character (U+203F ‿ "undertie", present in "Special Characters" mainly for compatibility with MuseScore 1.x scores). To find out which fonts on your computer support it, see "fontlist" (look for any font that shows a tie between "te" and "A" instead of a blank rectangle).
                                                                                                            4. Type A.

                                                                                                            Edit Lyrics

                                                                                                            1. Enter text edit mode on an existing syllable;
                                                                                                            2. Use standard text editing commands to make changes;
                                                                                                            3. Continue entering lyrics (see above); or exit lyrics mode by pressing Esc.

                                                                                                            Adjust position of lyrics

                                                                                                            The top and bottom margins and the line height of all lyric lines can be set globally:

                                                                                                            1. From the menu, select Style→General...→Page;
                                                                                                            2. Adjust the properties marked "Lyrics top margin," "Lyrics bottom margin" and "Lyrics line height" (see General: Page: Lyrics Margins).

                                                                                                            To adjust the position of a particular lyrics line:

                                                                                                            1. Select the lyrics line: i.e. right click on a word in the line, and (from the menu) chose Select→More...; then check the relevant options, which should include "Same system";
                                                                                                            2. Adjust the Horizontal and Vertical offsets in the Inspector.

                                                                                                            Copy lyrics to clipboard

                                                                                                            To copy all lyrics to the clipboard (as of version 2.0.3):

                                                                                                            • From the menu bar, select Edit→Tools→Copy Lyrics to Clipboard.

                                                                                                            Paste lyrics from clipboard

                                                                                                            To copy and paste lyrics from a text file (say) into a score:

                                                                                                            1. Enter the notes in the score to which the lyrics will be attached.
                                                                                                            2. Set up your lyrics in a text file, with appropriate spaces, hyphens, line-breaks etc.
                                                                                                            3. Copy the lyrics from the text-file into the clipboard.
                                                                                                            4. Select the start note in MuseScore, and press Ctrl+L (Mac: Cmd+L) (step 3 under Enter lyrics in a score).
                                                                                                            5. Repeatedly applying paste will enter successive words of the lyrics. You may need to enter melismas and make other corrections as you go along.

                                                                                                            See also

                                                                                                            • Text
                                                                                                            • Chord symbol

                                                                                                            External links

                                                                                                            • How to insert Lyrics
                                                                                                            • How to move lyrics
                                                                                                            • How to copy lyrics, or lyrics with rhythm
                                                                                                            • How to add a block of text to a score
                                                                                                            • Video tutorial: MuseScore in Minutes: Lesson 6 - Text, Lyrics and Chords

                                                                                                            Rehearsal marks

                                                                                                              Rehearsal marks can be used in a number of ways:

                                                                                                              • To identify specific points in a score to facilitate rehearsing.
                                                                                                              • As bookmarks in the score to which you can instantly navigate—using the Find/Search command.
                                                                                                              • To mark the various sections in the score.

                                                                                                              Typically, rehearsal marks consist of one or more letters and/or numbers, and appear in sequence in the score—e.g. A, B, C…, or 1, 2, 3… etc. Alternatively, they may display measure numbers (usually larger than standard measure numbers, boldface and/or enclosed in boxes). Multi-measure rests are automatically broken before and after rehearsal marks.

                                                                                                              Rehearsal marks can be added to the score (i) automatically—which ensures that they are named in sequence—or (ii) manually, allowing you to name them as you wish.

                                                                                                              Add a rehearsal mark

                                                                                                              Manual Placement

                                                                                                              To create a rehearsal mark manually:

                                                                                                              1. Click on a note (or rest) at the desired location;
                                                                                                              2. Select one of the following options:
                                                                                                                • Press Ctrl+M (Mac: Cmd+M);
                                                                                                                • From the menu, chose Add → Text → Rehearsal Mark;
                                                                                                              3. Enter the desired text.

                                                                                                              Automatic placement

                                                                                                              Add an alphanumeric rehearsal mark

                                                                                                              Use either of the following options:

                                                                                                              • Click on a note (or rest) at the desired location, then double-click the [B1] rehearsal mark icon in the "Text" palette.
                                                                                                              • Drag and drop the rehearsal mark from the "Text" palette onto the score.

                                                                                                              Notes: (1) By default, marks are added in the sequence, A, B, C etc. (2) To change the format of subsequently-added marks (to lower case letters, or numbers), edit the previous rehearsal mark accordingly. (3) Marks added between existing rehearsal marks append a number or letter to the previous mark: it is a good idea to apply the Resequence command afterwards (see below).

                                                                                                              Add a measure-number rehearsal mark
                                                                                                              1. Add the first rehearsal mark in the series as an alphabetical one; then edit it to read the same as the number of the measure it is attached to;
                                                                                                              2. Add subsequent marks as shown above. They will automatically adopt the measure-number format.

                                                                                                              Automatically resequence rehearsal marks

                                                                                                              MuseScore allows the user to automatically re-order a series of rehearsal marks if they have got out of sequence for any reason. Use the following method:

                                                                                                              1. Before making a selection, you can, if desired, establish a new format for the rehearsal marks (lower/upper case, number, or measure number) by manually altering the first mark in the range accordingly.
                                                                                                              2. Select the range of measures you wish to apply the Resequence command to (if there is no selection then the program assumes you wish to resequence all measures).
                                                                                                              3. From the menu, select Edit → Tools → Resequence Rehearsal Marks.

                                                                                                              MuseScore automatically detects the sequence based on the first rehearsal mark in the selection—all rehearsal marks in the selection are then altered accordingly. The following sequences are possible:

                                                                                                              • A, B, C etc.
                                                                                                              • a, b, c etc.
                                                                                                              • Numerical: 1, 2, 3 etc.
                                                                                                              • Numerical: according to measure numbers. This requires the number of the first mark in the series to be equal to the number of the measure it is attached to.

                                                                                                              Text style

                                                                                                              Rehearsal marks are a variety of system text, appearing both on the score and on every part. By default, they are in a large bold font, and enclosed in frames with rounded corners. All aspects of their appearance can be changed globally via the rehearsal mark Text style.

                                                                                                              Search for a rehearsal mark

                                                                                                              See Find (Viewing and navigation).

                                                                                                              See also

                                                                                                              • Text properties

                                                                                                              External links

                                                                                                              • Rehearsal Letter (Wikipedia article)

                                                                                                              Định dạng

                                                                                                              Layout and formatting

                                                                                                                Layout and formatting options for the score can be accessed mainly from the Layout and Style menus.

                                                                                                                Ways to affect layout

                                                                                                                This section lists the main commands and dialogs affecting score layout. Other formatting options are covered in either Layout menu or Style menu below (for text, see Text styles and properties).

                                                                                                                From the Layout menu:

                                                                                                                • Page Settings: Adjust the overall dimensions of your score such as page size, page margins, and scaling.

                                                                                                                • Increase Stretch/Decrease Stretch: Adjust the score spacing by stretching or squashing selected measures.

                                                                                                                From the Style menu:

                                                                                                                • Score Style: Set overall score details, such as music font, display of multi-measure rests, and whether to hide empty staves.

                                                                                                                • Page Style: Adjust staff and system spacing, score and lyric margins etc.

                                                                                                                • Measure Style: Set the measure spacing, which affects the number of measures per line.

                                                                                                                • Sizes: Set the default size of "small" and grace notes, small staves and small clefs.

                                                                                                                Other commands:

                                                                                                                • Add/Remove line breaks: Set the number of measures per system.

                                                                                                                • Breaks and spacers: Apply line, page or section breaks. You can also add extra space between particular systems or staves where needed.

                                                                                                                Layout menu

                                                                                                                Page Settings...

                                                                                                                See Page settings.

                                                                                                                Reset

                                                                                                                The Reset command restores all selected score elements to their default position. It also restores the default directions of note stems and beams. To apply:

                                                                                                                1. Select the elements or the region of the score that you wish to reset. Or use Ctrl+A to select the whole score.
                                                                                                                2. Press Ctrl+R; or from the menu select Layout→Reset.

                                                                                                                Increase Stretch/Decrease Stretch

                                                                                                                Menu: Layout

                                                                                                                Increase or decrease the horizontal spacing of notes within selected measures. To apply:

                                                                                                                1. Select a range of measures. Or use Ctrl+A to select the whole score.
                                                                                                                2. Chose one of two options:
                                                                                                                  • To increase stretch:
                                                                                                                    • Use the shortcut } (right curly bracket) (Mac: Ctrl+Alt+9);
                                                                                                                    • Or from the menu bar, select Layout→Increase Stretch;
                                                                                                                  • To decrease stretch:
                                                                                                                    • Use the shortcut { (left curly bracket) (Mac: Ctrl+Alt+8);
                                                                                                                    • Or from the menu bar, select Layout→Decrease Stretch.

                                                                                                                See also Measure Properties: Layout stretch. This allows you to set the stretch more precisely.

                                                                                                                Reset Stretch

                                                                                                                To reset stretch to the default spacing of 1:

                                                                                                                1. Select a range of measures. Or use Ctrl+A to select the whole score.
                                                                                                                2. From the menu, select Layout→Reset Stretch.

                                                                                                                Reset Beam Mode

                                                                                                                To restore beams to the mode defined in the local time signatures:

                                                                                                                1. Select the section of the score you want to reset. If nothing is selected, the operation will apply to the whole score;
                                                                                                                2. Select Layout→Reset Beam Mode.

                                                                                                                See also Beams.

                                                                                                                Regroup Rhythms

                                                                                                                As of version 2.1, this option corrects note ties, durations and beaming so that they are grouped according to standard music notation practice. For example:
                                                                                                                Before:
                                                                                                                regroup_rhythms_before.png
                                                                                                                After:
                                                                                                                regroup_rhythms_after.png

                                                                                                                Any notes that are tied and are the same length as a dotted note will be changed to the dotted note with two limitations. (i) Only the last note of a group of tied notes will have a single dot. Notes with more than one dot are not produced using this option. (ii) Dotted notes will not span from one group of beamed notes to another unless their duration is the same as all of the beam groups it covers. Any notes with more than one dot will be regrouped according to the above rules.

                                                                                                                To apply:

                                                                                                                1. Select the section of the score you want to reset. If nothing is selected, the operation will apply to the whole score;
                                                                                                                2. Select Layout→Regroup Rhythms.

                                                                                                                Note: This is an experimental feature and there are known bugs. Articulations and ornaments are deleted and some pitches respelt. Ties across barlines may be lost on UNDO.

                                                                                                                Style menu

                                                                                                                General: Score

                                                                                                                To open the Score dialog: from the menu, select Style→General...→Score.

                                                                                                                Dialog: Style / General... / Score

                                                                                                                This dialog allows you to set global properties, such as the music font, display of multimeasure rests, whether or not to hide empty staves, "swing" playback etc.

                                                                                                                • Musical symbols font: Choice of display in Emmentaler, Bravura or Gonville fonts.
                                                                                                                • Musical text font: Choice of display in Emmentaler, Bravura, Gonville or MuseJazz fonts.

                                                                                                                • Display in concert pitch: Tick this option to display the score at concert pitch. If unticked the score is displayed at written pitch.

                                                                                                                • Create multimeasure rests: Tick to display multimeasure rests.

                                                                                                                  • Minimum number of empty measures; The default is 2.
                                                                                                                  • Minimum width of measure: The default width is 4 sp.
                                                                                                                • Hide empty staves: This option saves space by hiding those staves in a system which consist of only empty measures. Used for condensed scores.

                                                                                                                • Don't hide empty staves in first system: Always display staves in first system even if they consist of empty measures.

                                                                                                                • Display note values across measure bar: A feature useful for notating early music. See Unbarred notation.

                                                                                                                • Hide instrument name if there is only one instrument: You don't usually need to display the instrument name in this case.

                                                                                                                • Swing setting: The default is off. Choice of swung eighth or sixteenth notes.

                                                                                                                  • Select swing ratio: The default setting is 60%.

                                                                                                                See also, Swing

                                                                                                                General: Page

                                                                                                                To open the Page dialog: from the menu, select Style→General...→Page.

                                                                                                                Dialog: Style / General... / Page

                                                                                                                This dialog allows you to adjust the space above and below systems, staves, lyrics, and vertical frames; and between the score and the top/bottom page margins. You can also control the display of key signatures, time signatures and clefs.

                                                                                                                score_layout.png

                                                                                                                Distance to page margins
                                                                                                                • Music top margin: The distance between the top staff line of the first staff on the page and the top page margin.
                                                                                                                • Music bottom margin: The distance between the bottom staff line of the last staff on the page and the bottom page margin.
                                                                                                                Distance between staves
                                                                                                                • Staff distance: The space between staves which are not part of a grand staff (see below).
                                                                                                                • Grand staff distance: The space between staves that share the same instrument—such as the piano, organ, or those of a guitar staff/tab pair.

                                                                                                                Note: To alter the space above one particular staff see Extra distance above staff (Staff properties).

                                                                                                                Distance between systems
                                                                                                                • Min. system distance: The minimum distance allowed between one system and the next.
                                                                                                                • Max. system distance: The maximum distance allowed between one system and the next.
                                                                                                                Lyrics Margins
                                                                                                                • Lyrics top margin: The height of the margin above the top lyrics line (in a system).
                                                                                                                • Lyrics bottom margin: The height of the margin underneath the bottom lyrics line (in a system).
                                                                                                                • Lyrics line height: The distance between lyrics line (in a system), expressed as a percentage of the line height associated with the lyrics text style.
                                                                                                                Vertical frame margins
                                                                                                                • Vertical frame top margin: The default margin height above a vertical frame.
                                                                                                                • Vertical frame bottom margin: The default margin height below a vertical frame.
                                                                                                                Last system fill threshold
                                                                                                                • If the last system is longer than this percentage of the page width, it gets stretched to fill that width.
                                                                                                                Clefs and key signatures
                                                                                                                • Create clef for all systems: Untick this box to prevent a clef from automatically displaying at the start of any system except the first.
                                                                                                                • Create key signature for all systems: Untick this box to prevent a key signature from automatically displaying at the start of any system except the first.

                                                                                                                Ticking the following boxes, allows the display of courtesy elements at the end of systems:

                                                                                                                • Create courtesy time signatures:
                                                                                                                • Create courtesy key signatures
                                                                                                                • Create courtesy clefs

                                                                                                                General: Header, Footer, Numbers

                                                                                                                Open from the menu: Style→General...→Header, Footer, Numbers.

                                                                                                                Dialog: Style / General... / Header, Footer, Numbers

                                                                                                                You can show the content of a score's meta tags (see Score information) or show page numbers in a header or footer for your score. To create a header or footer for a score with linked parts, make sure the main score is in the active tab. To create a header or footer for an individual part, that part needs to be the active tab.

                                                                                                                If you hover with your mouse over the Header or Footer text region, a list of macros will appear, showing their meaning, as well as the existing meta tags and their content.

                                                                                                                You can create different Headers and Footers for even and odd pages, such as putting page numbers on the right for odd-numbered pages and on the left for even-numbered pages.

                                                                                                                You can also edit whether and how often measure numbers appear.

                                                                                                                General: System

                                                                                                                Open from the menu: Style→General...→ System.

                                                                                                                Dialog: Style / General... / System

                                                                                                                This dialog allows you to:

                                                                                                                • Set the distance between system brackets or braces and the start barlines.
                                                                                                                • Set the width of system brackets and braces.

                                                                                                                See also Brackets.

                                                                                                                General: Measure

                                                                                                                See General style: Measure.

                                                                                                                General: Barlines

                                                                                                                Open from the menu: Style→General...→Barlines.

                                                                                                                Dialog: Style / General... / Barlines

                                                                                                                • Control whether to show barlines at the beginning of a staff or multiple staves.
                                                                                                                • Scale barlines to staff size affects "small" staves only. See Barline adjustment possibilities (external link) for details.
                                                                                                                • Control proportion of thickness and distance within double barlines, including repeat barlines.

                                                                                                                General: Notes

                                                                                                                Open from the menu: Style→General...→Notes.

                                                                                                                Dialog: Style / General... / Notes

                                                                                                                This page can also be accessed direct from the score by right-clicking on any note and selecting "Style…" Here you can adjust the distance and thickness of note-related objects (stems, ledger lines, dots, accidentals). Changing these would be unusual.

                                                                                                                General: Clefs

                                                                                                                Open from the menu: Style→General...→Clefs.

                                                                                                                Dialog: Style / General... / Clefs

                                                                                                                You can choose between Serif and Standard clef for your tablature sheet.

                                                                                                                General: Arpeggios

                                                                                                                Open from the menu: Style→General...→Arpeggios.

                                                                                                                Dialog: Style / General... / Arpeggios

                                                                                                                Here you can change the thickness, spacing and hook height of the following arpeggio and strum symbols:

                                                                                                                Arpeggio and strum symbols

                                                                                                                Changes to these properties would be unusual.

                                                                                                                General: Beams

                                                                                                                Open from the menu: Style→General...→Beams.

                                                                                                                Dialog: Style / General... / Beams

                                                                                                                General: Slurs/Ties

                                                                                                                Open from the menu: Style→General...→Slurs/Ties.

                                                                                                                Dialog: Style / General... / Slurs/Ties

                                                                                                                General: Sizes

                                                                                                                Open from the menu: Style→General...→Sizes.

                                                                                                                Dialog: Style / General... / Sizes

                                                                                                                Sets the proportional size of "small" and grace notes, as well as small staves and clefs. Changing this would be unusual.

                                                                                                                General: Hairpins, Volta, Ottava

                                                                                                                Open from the menu: Style→General...→Hairpins, Volta, Ottava.

                                                                                                                Dialog: Style / General... / Hairpins, Volta, Ottava

                                                                                                                The Reset value button returns the setting to the original value.

                                                                                                                General: Pedal, Trill

                                                                                                                Open from the menu: Style→General...→Pedal, Trill.

                                                                                                                Dialog: Style / General... / Pedal, Trill

                                                                                                                General: Chord Symbols, Fretboard Diagrams

                                                                                                                Open from the menu: Style→General...→Chord Symbols, Fretboard Diagrams.

                                                                                                                Dialog: Style / General... / Chord Symbols, Fretboard Diagrams

                                                                                                                This section allows you to adjust the format and positioning of chord symbols and Fretboard diagrams.

                                                                                                                Appearance: Chose a default chord symbol style—Standard, Jazz or Custom.

                                                                                                                Note Spelling: Chose the spelling convention for chord symbols and whether to use capital or small letters.

                                                                                                                Positioning:

                                                                                                                • Default vertical position: The default vertical distance in space units (sp.) between a newly-applied chord symbol and the music staff. Negative values may be used.
                                                                                                                • Distance to fretboard diagram: The distance (in sp. units) from a chord symbol to a fretboard diagram when both are applied to the same location on a staff. This value overrides the above "Default vertical position" setting. The user can chose to place a chord symbol below a fretboard diagram by entering a negative value.
                                                                                                                • Minimum chord spacing: The minimum space to allow between chord symbols.
                                                                                                                • Maximum barline distance: Increases the distance between the final chord symbol in a measure and the following barline. You may wish to adjust this value if there is a recurring problem in the score with overlap between the final chord symbol in one measure and the following chord symbol.

                                                                                                                Capo: Enter the number of the capo position at which you want to display substitute chords, in brackets, for all chord symbols in the score.

                                                                                                                Fretboard diagrams:

                                                                                                                • Default vertical position: the distance in sp. units from a newly applied fretboard diagram to a staff. A negative value may be used.
                                                                                                                • Scale: Increase or decrease the size of the fretboard diagram in the score.
                                                                                                                • Fret offset number font size: Increase or decrease the size of a fret number displayed next to a diagram.
                                                                                                                • Position Left/Right: Display fret number to the left or right of the fretboard diagram.
                                                                                                                • Barre line thickness: Make barre lines in fretboard diagrams thicker or thinner.

                                                                                                                General: Figured Bass

                                                                                                                Open from the menu: Style→General...→Figured Bass.

                                                                                                                Dialog: Style / General... / Figured Bass

                                                                                                                Options about figured bass font, style and alignment.
                                                                                                                See also Figured bass

                                                                                                                General: Articulations, Ornaments

                                                                                                                Open from the menu: Style→General...→Articulations, Ornaments.

                                                                                                                Dialog: Style / General... / Articulations, Ornaments

                                                                                                                Position of articulation with respect to the notes and staves

                                                                                                                General: Accidentals

                                                                                                                Open from the menu: Style→General...→Accidentals.

                                                                                                                Dialog: Style / General... / Accidentals

                                                                                                                Options about naturals at key signature changes

                                                                                                                General: Tuplets

                                                                                                                Open from the menu: Style→General...→Tuplets.

                                                                                                                Dialog: Style / General... / Tuplets

                                                                                                                Apply and OK buttons

                                                                                                                By pressing the Apply button you can see how the changes you have made in the dialogs affect the score without closing the window. Press OK to save your changes to the score and close the window.

                                                                                                                Apply to all parts in one go

                                                                                                                When in a part tab while changing layout and formatting, you can use the Apply to all Parts button to apply all changes (either in Layout→Page Settings.... or Style→General...) to apply the new settings to all parts in just one click.

                                                                                                                Save/Load style

                                                                                                                It is easy to transfer a complete set of styles (all General Style settings, all text styles, and page settings) from one score to the other using the Save/Load Style functions.

                                                                                                                To save a customized style:

                                                                                                                1. Go to Style→Save Style....
                                                                                                                2. Name and save the style file (the default folder is set in your Thiết lập). Styles are stored as *.mss files.

                                                                                                                Note: You can also define a preferred style for scores and parts in the Score section of MuseScore's Preferences.

                                                                                                                To load a customized style:

                                                                                                                1. Go to Style→Load Style....
                                                                                                                2. Navigate to and select the Style file (.mss) and click Open (or double click on the file).

                                                                                                                All existing styles in the score should update automatically.

                                                                                                                See also

                                                                                                                • To edit spacing between notes
                                                                                                                • Upgrading from MuseScore 1.x, local relayout

                                                                                                                External links

                                                                                                                • Tutorial – How to create large-print stave notation (MSN)
                                                                                                                • MuseScore in 10 Easy Steps: Part 10A Layout and Formatting (a video tutorial)
                                                                                                                • MuseScore in 10 Easy Steps: Part 10B Layout and Formatting (a video tutorial)

                                                                                                                General style: Measure

                                                                                                                  General style: Measure

                                                                                                                  Style → General → Measure allows you to adjust the distance between various items within measures.

                                                                                                                  Introduction

                                                                                                                  If you change a measure style property (see image above), MuseScore automatically adjusts the score to maintain the correct spacing between notes and rests according to best music engraving practice. It will also correctly reposition any elements attached to notes or rests, such as fingerings, dynamics, lines etc.

                                                                                                                  All settings related to measure width and note spacing are minimum values. Measures are automatically stretched, if necessary, to maintain existing page margins.

                                                                                                                  All the properties listed below use the staff space (abbreviated to "sp") as the basic unit of measurement. See Page settings: Scaling for more details.

                                                                                                                  Options

                                                                                                                  • Minimum measure width
                                                                                                                    Sets the minimum horizontal length of measures. In measures containing very little content (e.g., a single whole note or whole measure rest), the measure will only shrink as far as this minimum.

                                                                                                                  • Spacing (1=tight)
                                                                                                                    Condenses or expands the space after notes or rests. This setting thus affects not only space between notes but also between the last note and the ending barline. For the space between the beginning of the measure and the first note or rest, see Barline to note distance (below).

                                                                                                                    Note: Changes to an individual measure's Stretch (under Layout → Increase Stretch, Decrease Stretch) are calculated after, and proportional to, the global Spacing setting.

                                                                                                                  • Barline to note distance
                                                                                                                    Sets the distance between the barline which begins a measure and the first note or rest in that measure. For the initial measures of systems, which start with clefs instead of barlines, use Clef/key right margin (below).

                                                                                                                  • Barline to grace note distance
                                                                                                                    Sets the distance between a barline and a grace note that occurs before the first actual note in a measure (independently of the "Barline to note distance" setting).

                                                                                                                  • Barline to accidental distance
                                                                                                                    Sets the distance between a barline and an accidental placed before the first note in a measure (independently of the "Barline to note distance" setting).

                                                                                                                  • Note to barline distance
                                                                                                                    (To be added).

                                                                                                                  • Minimum note distance
                                                                                                                    Specifies the smallest amount of space MuseScore will allow after each note (depending on other factors, more space may be allowed).

                                                                                                                  • Clef left margin
                                                                                                                    Sets the distance between the very beginning of each line and the clef. (This option is rarely needed.)

                                                                                                                  • Key signature left margin
                                                                                                                    Sets the distance between the key signature and the clef preceding it.

                                                                                                                  • Time signature left margin
                                                                                                                    Sets the distance between the time signature and the key signature or clef preceding it.

                                                                                                                  • Clef/key right margin
                                                                                                                    Sets the distance between the material at the beginning of each line (such as the clef and key signature) and the first note or rest of the first measure on the line. (Note that, although not named in the option, if a time signature is present, it is the element from which the spacing begins.)

                                                                                                                  • Clef to barline distance
                                                                                                                    Sets the distance between a barline and a clef change preceding it.

                                                                                                                  • Multi-measure rest margin
                                                                                                                    Sets the distance between a multi-measure rest and the barlines on either side.

                                                                                                                  • Staff line thickness
                                                                                                                    Sets the thickness of the lines of the staff, which allows you to make the staff thicker and darker, if you need greater visibility on your printouts.

                                                                                                                  Page settings

                                                                                                                    Page settings allows you to adjust the overall dimensions of your score such as page size, page margins, and scaling. It is one of the main layout tools in MuseScore—along with the options available from Style→General...

                                                                                                                    To open the Page settings dialog: from the menu, select Layout → Page Settings....

                                                                                                                    Layout / Page Settings dialog

                                                                                                                    Page size

                                                                                                                    Here you can select the paper format, either by standard name (e.g., Letter or A4), or by specifying the height and width in either mm or inches (use the radio buttons to choose which unit of measurement to use). The initial default page size depends on your localization—in the United States, Letter size paper is standard.

                                                                                                                    You can also choose to format your music in Landscape or Portrait orientation using the radio buttons. Prior to version 2.1 unchecking Landscape enabled Portrait format. You can optionally use Two sided layout (i.e., book format, with mirror left and right margins for even and odd pages—see below).

                                                                                                                    Odd/Even Page Margins

                                                                                                                    The Even Page Margins and Odd Page Margins settings allow you to define the printable area of your pages. Aside from changing the margins around the music on the page, other settings, such as the positions of headers and footers, are calculated relative to the margins defined here.

                                                                                                                    If the "Two sided" checkbox under "Page Size" is selected, you can set margins differently for mirroring odd and even pages. Otherwise, only one set of margins can be modified, but will apply to all pages.

                                                                                                                    To display page margins in your score on screen (though not in print), go to View→Show Page Margins.

                                                                                                                    Scaling

                                                                                                                    The Scaling property allows you to increase or decrease the size of your score.

                                                                                                                    In MuseScore, the sizes of score elements, such as note heads, note stems, accidentals, clefs etc., are defined in terms of a unit of measurement called a staff space (abbreviated to "sp"). One staff space is equal to the space between two lines of a music staff (or one-quarter the size of the full five-line staff).

                                                                                                                    As you change the "Staff space" setting (under Scaling), all score elements follow suit and thus correct proportions are maintained. The exception is Text in which you can set an absolute value, independent of "Scaling."

                                                                                                                    Note: Changing the "Scaling" does not always change the number of systems per page, because system distance can vary between limits set under "Min system distance" and "Max system distance" (see Style→General...→Page).

                                                                                                                    Miscellaneous

                                                                                                                    First page number

                                                                                                                    Sets the number of the first page of the particular score. Page numbers below 1 won't get printed—e.g., setting the first page number to -1 would result in the first and second page showing no page number, and page number 1 appearing on the third page.

                                                                                                                    Apply to all Parts

                                                                                                                    The Apply to all Parts button is available when modifying a part, rather than the main score (see Part extraction). If you change the page settings of one part and want the rest of the parts to have the same settings, this button will apply the change to all parts in one go.

                                                                                                                    Breaks and spacers

                                                                                                                      The Breaks & Spacers palette in the Advanced workspace contains the following non-printing symbols:

                                                                                                                      Breaks and Spacers Palette

                                                                                                                      The first three symbols are called breaks; the blue up and down arrows are known as spacers.

                                                                                                                      Breaks

                                                                                                                      A break can be applied to either a measure or a frame. There are three types:

                                                                                                                      • System break (called a line break prior to version 2.2): Forces the next part of the score to start in a new system.
                                                                                                                      • Page break: Forces the next part of the score to start on a new page.
                                                                                                                      • Section break: Divides the score into sections (see below), and forces the next part of the score to start in a new system. It can be combined with a page break if required.

                                                                                                                      Notes: (1) Blue break symbols are visible on the screen, but do not appear on printouts. (2) To add (or remove) system breaks over all or part of the score, see Add/Remove system breaks. (3) To split a measure, see Measure operations: Split and join.

                                                                                                                      Add a break to a measure

                                                                                                                      Breaks can be added using either (1) a keyboard shortcut; or (2) a break symbol from a palette.

                                                                                                                      Using a keyboard shortcut

                                                                                                                      To add a System (Line) break or a Page break only:

                                                                                                                      1. Click on any one of the following elements:
                                                                                                                        • Barline;
                                                                                                                        • Measure;
                                                                                                                        • Measure range (as of version 2.2);
                                                                                                                        • Notehead (as of version 2.2);
                                                                                                                        • A text element associated with a staff (e.g. lyric syllable, chord symbol, staff text etc.) (as of version 2.2);
                                                                                                                      2. Chose one of the following options:
                                                                                                                        • System (Line) break: Press↵ (toggle).
                                                                                                                        • Page break: Press Ctrl+↵ (Mac: Cmd+↵) (toggle).

                                                                                                                      Note: If you select a measure range, the break will be applied before and after the selection.

                                                                                                                      Using a palette symbol

                                                                                                                      Any break can be added from a workspace palette:

                                                                                                                      1. Select any one of the following elements:
                                                                                                                        • Barline;
                                                                                                                        • Measure;
                                                                                                                        • Measure range (as of version 2.2);
                                                                                                                        • Notehead (as of version 2.2);
                                                                                                                        • A text element associated with a staff (e.g. lyric syllable, chord symbol, staff text etc.) (as of version 2.2);
                                                                                                                      2. Double click a break symbol in a palette (toggle).

                                                                                                                      Note: If you select a measure range, the break will be applied before and after the selection.

                                                                                                                      • Alternatively, drag a break symbol from a palette onto a measure.

                                                                                                                      Add a break to a frame

                                                                                                                      To add a break to a frame, use one of the following options:

                                                                                                                      • Drag a break from a palette onto a frame.
                                                                                                                      • Select a frame then double-click a palette break symbol.

                                                                                                                      Move a break

                                                                                                                      To reposition a break:

                                                                                                                      1. Enter edit mode for the break in question;
                                                                                                                      2. Use the keyboard arrow buttons as described in Adjust position of text objects.

                                                                                                                      Delete breaks

                                                                                                                      Use one of the following options:

                                                                                                                      • Select one or more breaks and press Del.

                                                                                                                      See also: Add / Remove system breaks.

                                                                                                                      Section break

                                                                                                                      A Section break, as the name suggests, is used to create separate sections within a score. Like a system break, it forces the next measure or frame to begin a new system, and can also be used in association with a page break if required. A section break could be used, for example, to divide a piece into separate movements.

                                                                                                                      Each section can have its own measure numbering independent of the rest of the score. By default, the first measure of a section is numbered "1" (see image below), though like the first measure of the score itelf, the number is not displayed unless configured in the measure properties dialog. The same dialog can be used to change the numbering according to your preference.

                                                                                                                      If you change Time signature or Key signature at the beginning of the new section, there will be no courtesy signature at the end of the previous section. See example below:

                                                                                                                      Example of use of section break

                                                                                                                      When you play back the score, the program adds a short pause between each section. In addition, the first end repeat barline in a section always sends the playback cursor to the beginning of the section, so a start repeat barline is optional.

                                                                                                                      Right click a Section break and select Section Break Properties... to specify:

                                                                                                                      • Pause length;
                                                                                                                      • If the new section's first system shows long instrument names;
                                                                                                                      • If the new section starts numbering measures at 1.

                                                                                                                      Spacers

                                                                                                                      A Spacer looks like a blue UP or DOWN arrow and is used to add extra space above or below a system (it cannot be applied to a frame).

                                                                                                                      Add a spacer

                                                                                                                      Use either of the following options:

                                                                                                                      • Select a measure, then double-click a palette spacer symbol.
                                                                                                                      • Drag a spacer symbol from a palette onto a measure.

                                                                                                                      Blue spacer symbols are visible on the screen, but do not appear on printouts.

                                                                                                                      Note: Spacers are designed for local adjustments only. If you wish to adjust the space between staves across the whole score, use the settings in Style → General... → Page instead.

                                                                                                                      Adjust a spacer

                                                                                                                      To adjust the height of a spacer, chose one of these options:

                                                                                                                      • Double-click the spacer and drag the blue end-handle up and down.
                                                                                                                      • Double-click the spacer and use the ↑ ↓ keys and/or Ctrl+↑ ↓ to move the end-handle up and down.
                                                                                                                      • Click (or double-click) on the spacer and adjust the height property in the Inspector.

                                                                                                                      Delete a spacer

                                                                                                                      • Click on the spacer and press the Del key.

                                                                                                                      See also

                                                                                                                      • Add / Remove system breaks

                                                                                                                      Frames

                                                                                                                        A Frame is a rectangular container for empty space, text or pictures in the score. It can be one of three types:

                                                                                                                        • Horizontal: Used to create a break in a particular system. Can contain one or more text objects and/or images.
                                                                                                                        • Vertical: Inserted above a system or appended to the last system. Can contain one or more text objects and/or images.
                                                                                                                        • Text: Inserted above a system or appended to the last system. Can contain one text object only.

                                                                                                                        Horizontal frame

                                                                                                                        A horizontal frame is used to create a break in a system. For example, you can:

                                                                                                                        • Create a coda, with an adjustable gap separating it from the rest of the score (as in the example below).
                                                                                                                          Horizontal frame in edit mode
                                                                                                                        • Create an offset at the beginning of the score, where there is no staff name to perform the same function.
                                                                                                                        • Create an adjustable right margin at the end of a system.
                                                                                                                        • Create space for some text or image(s).
                                                                                                                        • Create a space between a 'historical incipit' and the beginning of the modern edition.

                                                                                                                        Insert/append horizontal frame

                                                                                                                        See Create a Frame (below).

                                                                                                                        Adjust width of horizontal frame

                                                                                                                        Use one of the following methods:

                                                                                                                        • Double-click the frame and drag the handle to the right or left.
                                                                                                                        • Select the frame and adjust "Width" in the Inspector.

                                                                                                                        Notes: (1) "Left Gap" and "Right Gap" are currently unused (version 2.x); (2) It is possible to create a 'Negative-width' horizontal frame, by dragging the edit-handle back over the left border of the frame. However, this is not a standard feature and once editing is finished you cannot reselect the frame.

                                                                                                                        Add text or image to horizontal frame

                                                                                                                        To add text:

                                                                                                                        • Right-click on the frame and select Add → Text.

                                                                                                                        To add an image:

                                                                                                                        • Right-click on the frame and select Add → Image.

                                                                                                                        Vertical frame

                                                                                                                        A vertical frame can be inserted above a system or appended to the last system. It can contain one or more text objects and/or images. The height is adjustable and the width equals the system width.

                                                                                                                        It can be used, for example, to:

                                                                                                                        • Create an area at the head of a score for Title/Subtitle/Composer/Lyricist text etc. (see below).
                                                                                                                        • Add single- or multi-column lyric text (at the end of a score).
                                                                                                                        • Create a title page.
                                                                                                                        • Create subtitles and other annotations between systems.

                                                                                                                        Insert/append vertical frame

                                                                                                                        See Create a Frame (below).

                                                                                                                        Adjust height of vertical frame

                                                                                                                        Use one of the following methods:

                                                                                                                        • Double-click the frame and drag the handle up or down.
                                                                                                                        • Select the frame and adjust "Height" in the Inspector.

                                                                                                                        Edit vertical frame properties

                                                                                                                        Selecting the frame allows you to adjust various parameters in the Inspector:

                                                                                                                        Inspector for vertical frame

                                                                                                                        Top Gap: Adjusts distance between frame and element above (negative values not currently supported).
                                                                                                                        Bottom Gap: Adjusts distance between frame and element below (Negative values can be entered).
                                                                                                                        Height: Adjusts height of the frame.
                                                                                                                        Left Margin: Moves left-aligned text objects to the right.
                                                                                                                        Right Margin: Moves right-aligned text objects to the left.
                                                                                                                        Top margin: Moves top-aligned text objects downwards (see also Style → General... → Page).
                                                                                                                        Bottom Margin: Moves bottom-aligned text objects upwards (see also Style → General... → Page).

                                                                                                                        Add text or image to vertical frame

                                                                                                                        To add text:

                                                                                                                        • Right-click on the frame and select Add → Text/Title/Subtitle/Composer/Lyricist.

                                                                                                                        To add an image:

                                                                                                                        • Right-click on the frame and select Add → Image.

                                                                                                                        You can create as many objects as you like within a frame. Their positions can be adjusted independently by dragging or, more accurately, by altering the offset values in the Inspector. To format text objects, see Text editing and Text styles and properties.

                                                                                                                        Insert horizontal frame in vertical frame

                                                                                                                        • Right-click on the frame and select Add → Insert Horizontal Frame.

                                                                                                                        The horizontal frame is automatically left-aligned and fills the entire vertical frame. To right-align it:

                                                                                                                        1. Reduce the width of the horizontal frame.
                                                                                                                        2. Deselect the frame then drag it to the right. To restore left-alignment, drag the frame to the left.

                                                                                                                        "Title" frame

                                                                                                                        A vertical frame is automatically created at the beginning of a score, showing the title, subtitle, composer, lyricist etc., when you fill in the information fields provided on page 1 of the New Score Wizard.

                                                                                                                        If the score does not have a vertical frame at the beginning, you can create one as follows:

                                                                                                                        • Right-click on an empty space in the document window and select Text → Title/Subtitle/Composer/Lyricist.

                                                                                                                        Text frame

                                                                                                                        A Text frame looks like a vertical frame, but is specialised for text input: one text object is allowed per frame. The height automatically expands to fit the content and there is no height adjustment handle.

                                                                                                                        A text frame can be used, for example, to:

                                                                                                                        • Create lyric text at the end of a score.
                                                                                                                        • Create subtitles and other annotations between systems.

                                                                                                                        Insert/ append text frame

                                                                                                                        See Create a Frame (below).

                                                                                                                        Edit text frame properties

                                                                                                                        Selecting the frame allows you to adjust various parameters in the Inspector:

                                                                                                                        Top Gap: Adjusts distance between frame and element above (negative values not currently supported).
                                                                                                                        Bottom Gap: Adjusts distance between frame and element below (negative values can be entered).
                                                                                                                        Height: Not applicable to text frames.
                                                                                                                        Left Margin: Moves left-aligned text objects to the right.
                                                                                                                        Right Margin: Moves right-aligned text objects to the left.
                                                                                                                        Top margin: Moves top-aligned text objects downwards.
                                                                                                                        Bottom Margin: Moves bottom-aligned text upwards.

                                                                                                                        Create a frame

                                                                                                                        Insert a frame into the score

                                                                                                                        1. Select a measure.
                                                                                                                        2. Chose one of the following options:
                                                                                                                          • From the menu select Add → Frames → Insert...
                                                                                                                          • Right-click on an empty space in the score window and select Frames → Insert...

                                                                                                                        Append a frame to the score

                                                                                                                        Chose one of the following options:

                                                                                                                        • From the menu select Add → Frames → Append...
                                                                                                                        • Right-click on an empty space in the score window and select Frames → Append...

                                                                                                                        Delete a frame

                                                                                                                        Select the frame and press Del.

                                                                                                                        Apply a break

                                                                                                                        Line, page or section breaks can be applied to frames as well as measures. Use one of two methods:

                                                                                                                        • Select a frame and double-click a palette break symbol (for example, in the Breaks & Spacers palette).
                                                                                                                        • Drag a break symbol from a palette onto a frame.

                                                                                                                        See also

                                                                                                                        • Text Properties: to put a visual frame (border) around text.
                                                                                                                        • Insert measures: to insert measures before a frame.

                                                                                                                        External links

                                                                                                                        • How to add a block of text to a score
                                                                                                                        • Page Formatting in MuseScore 1.1 - 1. Frames, Text & Line Breaks [video]

                                                                                                                        Images

                                                                                                                        You can use Images to illustrate scores, or to add symbols that are not included in the standard palettes. MuseScore supports the following formats:

                                                                                                                        • PNG (*.png)
                                                                                                                        • JPEG (*.jpg and *.jpeg)
                                                                                                                        • SVG (*.svg) (MuseScore currently does not support SVG shading, blurring, clipping or masking.)

                                                                                                                        Add image

                                                                                                                        Use one of the following options:

                                                                                                                        • Drag-and-drop an image file (from outside MuseScore) either into a frame or onto a note or rest in the score.
                                                                                                                        • Right-click on a frame, select Add→Picture, then pick an image from the file selector.

                                                                                                                        Cut/copy and paste image

                                                                                                                        1. Click on an image in the score.
                                                                                                                        2. Apply any of the standard copy/cut commands.
                                                                                                                        3. Click on a note, rest or frame.
                                                                                                                        4. Apply any of the standard paste commands.

                                                                                                                        Modify image

                                                                                                                        To modify the width/height of an image, double-click it and drag any of the handles. If you want to adjust width or height separately, untick "Lock aspect ratio" first in the Inspector.

                                                                                                                        You can adjust the position of an image by simply dragging it.

                                                                                                                        See also

                                                                                                                        • Image capture
                                                                                                                        • Custom palettes

                                                                                                                        External links

                                                                                                                        • How to create an ossia with image capture
                                                                                                                        • How to create an ossia with another staff

                                                                                                                        Image capture

                                                                                                                        MuseScore's image capture feature allows you to save a snapshot of any part of the score window. PNG, PDF and SVG formats are supported.

                                                                                                                        Save a snapshot

                                                                                                                        1. Click on the Toggle image capture button, Image capture button.
                                                                                                                        2. Press Shift + drag, to create a new selection rectangle.
                                                                                                                        3. Fine tune the rectangle position, if required, by dragging it and/or changing the "Position" values in the "Lasso" section of the Inspector.
                                                                                                                        4. Fine tune the rectangle area, if required, by dragging the handles, and/or changing the "Size" values in the Inspector.
                                                                                                                        5. Right-click on the selection rectangle to open the Image Capture menu. Select the desired option:

                                                                                                                          • Save As (Print Mode). This saves an image of the selection area as it would look if printed, e.g.
                                                                                                                            Score snippet
                                                                                                                          • Save as (Screenshot Mode). This saves a selection of the actual screen, including any line break symbols, invisible elements etc., e.g.
                                                                                                                            Image capture snippet

                                                                                                                          You can save the image in either PNG (default), SVG or PDF format.

                                                                                                                        Image capture menu

                                                                                                                        Right-clicking on the selection rectangle opens the Image Capture menu:

                                                                                                                        Image capture context menu

                                                                                                                        • Copy image: Chose this to copy an image before pasting it in the same or another MuseScore file.
                                                                                                                        • Resolution: Set the resolution, and hence the size of the saved or copied image. Try 100 dpi to start with, if you are unsure.
                                                                                                                        • Transparent background: Turn image transparency on or off.
                                                                                                                        • Auto re-size to page: Adjusts the selection rectangle to fit the page.
                                                                                                                        • Resize to A/B/C/D: Chose a customised selection rectangle (as set below).
                                                                                                                        • Set Standard Size: Resize the selection rectangle, then chose "Set size A/B/C/D" to store it.

                                                                                                                        See also

                                                                                                                        • Image

                                                                                                                        External links

                                                                                                                        • Create an ossia with image capture
                                                                                                                        • How to create an ossia with another staff

                                                                                                                        Align elements

                                                                                                                        While dragging an element:

                                                                                                                        • Press Ctrl to constrain movement to the horizontal only.
                                                                                                                        • Press Shift to constrain movement to the vertical only.

                                                                                                                        Snap to grid

                                                                                                                        Snap to grid is a feature which allows you to drag an element in precise steps—useful for exact positioning.

                                                                                                                        Snap to grid buttons

                                                                                                                        To enable snap to grid, select an element and click one or both of the snap to grid buttons, located to the right of the horizontal and vertical offset fields in the Inspector. You can then drag the element in steps equal to the grid spacing. The default value is 0.5 sp.

                                                                                                                        To change the grid spacing:

                                                                                                                        1. Right-click on any of the snap to grid buttons in the Inspector, and select Configure Grid.
                                                                                                                        2. Set values for the horizontal and vertical grid spacing as required. Note that this is a fractional setting.

                                                                                                                        Các chủ đề nâng cao

                                                                                                                        Accessibility

                                                                                                                          Introduction

                                                                                                                          This document is written for blind and visually impaired users of MuseScore 2.x. It is not intended to provide a full description of all of the features of MuseScore; you should read this in conjunction with the regular MuseScore documentation.

                                                                                                                          MuseScore comes with support for the free and open source NVDA screen reader for Windows. The features in this document have been tested on Windows with NVDA. There is no support at the moment for other screen readers such as Jaws for Windows, or VoiceOver for macOS, which may work differently, or not at all.

                                                                                                                          At this point in time, MuseScore 2.x is mostly accessible as a score reader, not so much as a score editor. This document will focus on the score reading features, with only a brief description of score editing.

                                                                                                                          Initial setup

                                                                                                                          When you run MuseScore for the first time, you may want to permanently disable the Start Center window. To do so, go close the Start Center window first, then the Edit menu (Alt+E), choose Preferences, and in there, uncheck Show Start Center. Save and close the preferences window.

                                                                                                                          Finding your way around

                                                                                                                          The user interface in MuseScore works much like other notation programs, or other document-oriented programs in general. It has a single main document window in which you can work with a score. MuseScore supports multiple document tabs within this window. It also supports a split-screen view to let you work with two documents at once, and you can have multiple tabs in each window.
                                                                                                                          In addition to the score window, MuseScore has a menu bar that you can access via the shortcuts for the individual menus:

                                                                                                                          • File: Alt+F
                                                                                                                          • Edit: Alt+E
                                                                                                                          • View: Alt+V
                                                                                                                          • Add: Alt+A
                                                                                                                          • Notes: Alt+N
                                                                                                                          • Layout: Alt+L
                                                                                                                          • Style: Alt+S
                                                                                                                          • Plugins: Alt+P
                                                                                                                          • Help: Alt+H

                                                                                                                          Of these, only the File menu is of much interest when using MuseScore as a score reader. Once opening a menu, it may take several presses of the Up or Down keys before everything is read properly.

                                                                                                                          There are also a number of toolbars, palettes, and subwindows within MuseScore, and you can cycle through the controls in these using Tab (or Shift+Tab to move backwards through this same cycle). When you first start MuseScore, or load a score, focus should be in the main score window. Pressing Tab takes you to a toolbar containing a series of buttons for operations like New, Open, Play, and so forth. Tab will skip any buttons that aren't currently active. The names and shortcuts (where applicable) for these buttons should be read by your screen reader.

                                                                                                                          Once you have cycled through the buttons on the toolbar, the next window Tab will visit is the Palette. This would be used to add various elements to a score, but it is not currently accessible except for two buttons that are visited by Tab: a drop down to select between different workspaces (a saved arrangement of palettes), and a button to create a new workspace.

                                                                                                                          If you have opened one of the optional windows, such as the Inspector, or the Selection Filter, the Tab key will also visit these. You can close windows you do not need by going to the View menu and making sure none of the first set of checkboxes are selected (the windows that appear before the Zoom settings). By default, only the Start Center, Palettes and Inspector should be selected. See Initial Setup for instructions for disabling the Start Center. F9 can be used to toggle the Palettes while F8 will toggle the Inspector.

                                                                                                                          To return focus to the score window after visiting the toolbar, or a subwindow, press Esc. This also clears any selection you may have made in the score window.

                                                                                                                          The score window

                                                                                                                          When you first start MuseScore 2.x, an empty example score entitled “My First Score” is loaded by default. If you wish to experiment with editing features, this would be a good place to begin. Otherwise, you will probably want to start by loading a score. MuseScore uses the standard shortcuts to access system commands like Ctrl+O (Mac: Cmd+O) to open a file, Ctrl+S (Mac: Cmd+S) to save, Ctrl+W (Mac: Cmd+W) to close, etc.

                                                                                                                          If you press Ctrl+O (Mac: Cmd+O) to load a score, you are presented with a fairly standard file dialog. MuseScore can open scores in its own format (MSCZ or MSCX) as well as import scores in the standard MusicXML format, in MIDI format, or from a few other programs such as Guitar Pro, Capella, and Band-in-a-Box. Once you have loaded a score, it is displayed in a new tab within the score window. You can move between the tabs in the score window using Ctrl+Tab (does not apply for Mac).

                                                                                                                          There are a few interesting things you can do with a loaded score besides reading it note by note. You can press Space to have MuseScore play the score for you. You can use File / Export to convert to another format, including PDF, PNG, WAV, MP3, MIDI, MusicXML, etc. And of course, you can print it via File / Print or Ctrl+P (Mac: Cmd+P).

                                                                                                                          If a score contains multiple instruments, it may already have linked parts generated. Linked parts are presented as part tabs within score tabs, but currently, there is no way to navigate these part tabs using the keyboard. The parts would not normally contain information different from the score; they would just be displayed differently (each part on its own page). If a score does not already have parts generated, you can do so through File / Parts, and that dialog is accessible. If you wish to print the parts, you can work around the inability of accessing part tabs individually by using the File / Export Parts dialog, which automatically exports PDF’s (or other formats) for all parts in one step.

                                                                                                                          Score reading

                                                                                                                          When you first load a score, the score window has the keyboard focus, but there will be nothing selected. The first step to reading a score is to select something, and the most natural place to begin is with the first element of the score. Ctrl+Home (Mac: Cmd+Home) will do this. You will probably also want to use this, should you ever clear your selection by pressing Esc.

                                                                                                                          As you navigate between elements, your screen reader should give the name of the selected element (most likely the clef at the beginning of the top staff of your score). You will hear it read the name of the element (for example, “Treble clef”) and also give position information (for example, “Measure 1; Beat 1; Staff 1”). The amount of information read is not currently customizable, but we tried to place the most important first so you can quickly move on to the next element before it has finished reading, or just ignore the rest of what is read. Pressing Shift currently interrupts the reading, which might also be useful.

                                                                                                                          Most navigation in MuseScore is centered around notes and rests only – it will skip clefs, key signatures, time signatures, barlines, and other elements. So if you just use the standard Right and Left keys to move through your score, you will only hear about notes and rests (and the elements attached to them). However, there are two special navigation commands that you will find useful to gain a more complete summarization of the score:

                                                                                                                          • Next element: Ctrl+Alt+Shift+Right (Mac: Cmd+Option+Shift+Right)
                                                                                                                          • Previous element: Ctrl+Alt+Shift+Left (Mac: Cmd+Option+Shift+Left

                                                                                                                          These commands include clefs and other elements that the other navigation commands skip, and also navigate through all voices within the current staff, whereas other navigation commands such as Right and Left only navigate through the currently selected voice until you explicitly change voices. For instance, if you are on a quarter note on beat 1 of measure 1, and there are two voices in that measure, then pressing Right will move on to the next note of voice 1—which will be on beat 2—whereas pressing Ctrl+Alt+Shift+Right (Mac: Cmd+Option+Shift+Right) will stay on beat 1 but move to the note on voice 2. Only once you have moved through all notes on the current beat on the current staff will the shortcut move you on to the next beat. The intent is that this shortcut should be useful for navigating through a score if you don’t already know what the contents are.

                                                                                                                          When you navigate to an element, your screen reader should read information about it. For notes and rests, it will also read information about elements attached to them, such as lyrics, articulations, chord symbols, etc. For the time being, there is no way to navigate directly to these elements.
                                                                                                                          One important note: Up and Down by themselves, with Shift, or with Ctrl / Cmd are not useful shortcuts for navigation! Instead, they change the pitch of the currently selected note or notes. Be careful not to inadvertently edit a score you are trying to read. Up and Down should only be used with Alt/Option if your intent is navigation only. See the list of navigation shortcuts below.

                                                                                                                          Moving forwards or backwards in time

                                                                                                                          The following shortcuts are useful for moving “horizontally” through a score:

                                                                                                                          • Next element: Ctrl+Alt+Shift+Right
                                                                                                                          • Previous element: Ctrl+Alt+Shift+Left
                                                                                                                          • Next chord or rest: Right
                                                                                                                          • Previous chord or rest: Left
                                                                                                                          • Next measure: Ctrl+Right
                                                                                                                          • Previous measure: Ctrl+Left
                                                                                                                          • Go to measure: Ctrl+F
                                                                                                                          • First element: Ctrl+Home
                                                                                                                          • Last element: Ctrl+End

                                                                                                                          Moving between notes at a given point in time

                                                                                                                          • The following shortcuts are useful for moving “vertically” through a score:

                                                                                                                          • Next element: Ctrl+Alt+Shift+Right

                                                                                                                          • Previous element: Ctrl+Alt+Shift+Left
                                                                                                                          • Next higher note in voice, previous voice, or staff above: Alt+Up
                                                                                                                          • Next lower note in voice, next voice, or staff below: Alt+Down
                                                                                                                          • Top note in chord: Ctrl+Alt+Up
                                                                                                                          • Bottom note in chord: Ctrl+Alt+Down

                                                                                                                          The Alt+Up and Alt+Down commands are similar to the Ctrl+Alt+Shift+Right and Ctrl+Alt+Shift+Left commands in that they are designed to help you discover the content of a score. You do not need to know how many notes are in a chord, how many voices are in a staff, or how many staves are in a score in order to move vertically through the score using these commands.

                                                                                                                          Filtering score reading

                                                                                                                          Excluding certain elements like lyrics, or chord names while reading the score is possible by using the Selection filter (F6). Uncheck those elements you don't want to read.

                                                                                                                          Score playback

                                                                                                                          The Space bar serves both to start and stop playback. Playback will start with the currently selected note if one is selected; where playback was last stopped if no note is selected; or at the beginning of the score on first playback.

                                                                                                                          MuseScore supports looped playback so you can repeat a section of a piece for practice purposes. To set the “in” and “out” points for the loop playback via the Play Panel (F11):

                                                                                                                          1. First select the note in the score window where the loop should start
                                                                                                                          2. Go to the Play Panel and press the Set loop In position toggle button
                                                                                                                          3. Back to the score window, navigate to the note where you want the loop to end
                                                                                                                          4. Switch again to Play Panel, and press the Set loop Out position toggle button
                                                                                                                          5. To enable or disable the loop, press the Loop Playback toggle button

                                                                                                                          You can also control the loop playback and control other playback parameters, such as overriding the basic tempo of a score, using the View / Play Panel (F11).

                                                                                                                          Score editing

                                                                                                                          Score editing is currently not very accessible – too many score elements require intervention of the mouse in order to place objects onto a score. Additionally, visual reference and manual adjustment of the position of various elements is sometimes necessary due to MuseScore's limited support for conflict avoidance of elements.

                                                                                                                          In contrast, MuseScore does often provide ample default, and a platform to experiment with the basics of note input.
                                                                                                                          To enter note input mode, first navigate to the measure in which you would like to enter notes, then press “N”. Almost everything about note input is designed to be keyboard accessible, and the standard documentation should be good to help you through the process. Bear in mind that MuseScore can either be in note input or normal mode, and it won’t always be clear which mode of these you are in. When in doubt, press Esc. If you were in note input mode, this will take you out. If you were in normal mode, you will stay there, although you will also lose your selection.

                                                                                                                          Customization

                                                                                                                          You can customize the keyboard shortcuts using Edit / Preferences / Shortcuts. At some point, we may provide a set of special accessibility-optimized shortcuts and/or a way of saving and loading sets of shortcut definitions.

                                                                                                                          External links

                                                                                                                          • Creating a New Score in MuseScore with NVDA
                                                                                                                          • Inputting notes in MuseScore with NVDA
                                                                                                                          • Creating Modified Stave Notation in MuseScore

                                                                                                                          Albums

                                                                                                                          The Album Manager allows you to prepare a list of multiple scores and save the list as an album file ("*.album"), print all the scores as one long print job with consistent page numbers, or even join the scores into a single new MSCZ score. This is ideal for preparing an exercise book or combining multiple movements of an orchestration.

                                                                                                                          To open the Album Manager, go to File → Album...

                                                                                                                          Album Manager

                                                                                                                          Create album

                                                                                                                          1. To create a new album, click the New button. Fill in a title in the "Album Name:" box at the top.
                                                                                                                          2. To add scores to the album, click Add Score. A file selection dialog will appear and let you choose one or multiple scores from your file system. Click OK.
                                                                                                                          3. The scores you add will appear in a list in the Album Manager. You can rearrange their order by selecting a score and clicking the Up or Down button.

                                                                                                                          Load album

                                                                                                                          If you have previously created an album, you can open it through the Album Manager by clicking the Load button. A file selection dialog will appear to let you load the .album file from your file system.

                                                                                                                          Print album

                                                                                                                          To print an album as if it were a single document, click Print Album. The scores loaded into the Album Manager are printed in the order they are listed in with the correct page numbers, ignoring the page number offset values in Layout → Page Settings... → First page number for all but the first score. As the album is printed in one print job, double-sided printing (duplex printing) also works as expected.

                                                                                                                          Join scores

                                                                                                                          To combine multiple scores into a single .mscz file, click Join Scores. The scores are combined in the selected order into one single score. If not already present, line- and section breaks are added to the last measure or frame of each score in the combined file.
                                                                                                                          All style settings are taken from the first score, different style settings from subsequent score are ignored.

                                                                                                                          All the scores should have the same number of parts and staves for this to work correctly, ideally with the same instruments in the same order. If the scores have the same total number of instruments but not the same ones, or not in the same order, then the instrument names from the first score will overwrite ones from subsequent scores. If some of the scores have fewer instruments than the first score, then empty staves will be created for those sections. Any part or staff that is not present in the first score will be lost in the joined score.

                                                                                                                          Save album

                                                                                                                          Upon clicking the Close button, you will be prompted to save your album as a .album file. This file is not the same as a joined score; it simply consists of the list of scores. Album files can be loaded into the Album Manager as described above.

                                                                                                                          Cross-staff notation

                                                                                                                          In piano scores, it is common to write a musical phrase extending across both staves—bass and treble. This can be entered in MuseScore as follows:

                                                                                                                          1. Enter all notes in one staff:

                                                                                                                            Beamed notes in upper staff

                                                                                                                          2. Ctrl+Shift+↓ moves the selected note, or chord to the next staff (Mac: ⌘+Shift+↓):

                                                                                                                            Selected note moved to lower staff

                                                                                                                            Note : this moves the whole chord, not just a single note from a multi note chord. If you need notes in the old staff at the same place, use voices.

                                                                                                                          3. To adjust the beam, double-click it to show the handles. Use the keyboard arrows or drag the handles to change the beam angle and position:

                                                                                                                            Selected note moved to lower staff

                                                                                                                          See also

                                                                                                                          • Connect barlines: How to extend barlines over multiple staves.

                                                                                                                          External links

                                                                                                                          • How to span a chord or stem over two staves (MuseScore "Howto")

                                                                                                                          Early music features

                                                                                                                          MuseScore 2 offers several specialized functions to create engravings of early music (particularly medieval and renaissance) akin to commercial editions from the 20th century onwards.

                                                                                                                          Unbarred (or unmetered) notation

                                                                                                                          In MuseScore, notes lasting longer than the duration of a measure are normally tied across barlines. However MuseScore has a special feature which allows it to display the note values intact, without splitting and tying them in this way. This enables you to notate music which is unbarred (i.e. not divided into measures), such as that of the renaissance:

                                                                                                                          1. From the menu bar, select Style→General...→Score.
                                                                                                                          2. Tick the box labelled "Display note values across measure bar."
                                                                                                                            Dialog: Style / General.. / Early Music
                                                                                                                          3. Click "OK" or "Apply." The existing score is immediately updated.

                                                                                                                          Example

                                                                                                                          1. The example below shows an excerpt from the original score of "De Profundis Clamavi" for 4 voices by Nicolas Champion:
                                                                                                                            Early music - original
                                                                                                                          2. The same excerpt displayed in MuseScore:
                                                                                                                            Early music - barred
                                                                                                                          3. And after activating "Display note values across measure bar."
                                                                                                                            Early music - unbarred
                                                                                                                          4. To get rid of the barlines, just untick the “Show barlines” box in the Staff properties dialog. See also Mensurstrich (below).

                                                                                                                          Note: The feature is still in development and may contain bugs. The longest supported note value is the longa (a dotted longa is still broken up and tied over).

                                                                                                                          Mensurstrich

                                                                                                                          Since a complete lack of barlines could make performing the music more difficult for current musicians, many modern engravers settled on a compromise called Mensurstrich, where barlines are drawn between, but not across, staves.

                                                                                                                          Mensurstrich

                                                                                                                          To place barlines between staves:

                                                                                                                          1. Enter edit mode by double-clicking a barline in a staff above where you want the Mensurstriche;
                                                                                                                          2. Hold Shift and drag the lower handle of the barline down until it meets the top of the staff below;
                                                                                                                          3. Hold Shift and drag the upper handle of the barline down until it meets the bottom of the current staff;
                                                                                                                          4. Exit edit mode by pressing Esc or clicking on a blank area of the document window.

                                                                                                                          Alternatively, you can use the Inspector:

                                                                                                                          1. In the staff below the proposed Mensurstriche, uncheck "Show barlines" in the Staff properties dialog;
                                                                                                                          2. In the staff above where you want the Mensurstriche, right-click on one barline and chose Select→All Similar Elements in Same Staff;
                                                                                                                          3. In the Inspector, under "Barline," make the following settings: "Spanned staves" = 2; "Spanned from" = 8; "Spanned to = "0."

                                                                                                                          Note: To reset barlines, select the relevant barlines and make the following settings: "Spanned staves" = 1; "Spanned from" = 0; "Spanned to = "8."

                                                                                                                          Ambitus

                                                                                                                          Before there was the concept of an absolute pitch, performers were required to transpose vocal music to a singable range for their ensemble "on the fly." To aid them, an ambitus was sometimes included, marking the entire range of a voice at the beginning of the piece.

                                                                                                                          To apply an ambitus, use one of the following methods:

                                                                                                                          • Drag the ambitus symbol (from the Lines palette of the Advanced workspace) onto a clef.
                                                                                                                          • Select a clef, then double-click the ambitus symbol (in the Lines palette of the Advanced workspace).

                                                                                                                          Ambitus

                                                                                                                          When applied, the ambitus automatically displays the note range of the score: if there is a section break then only the note range of the section is displayed. Beyond the section break a new ambitus may be applied.

                                                                                                                          The note range of the ambitus can be adjusted manually by selecting it and changing the "Top note" and "Bottom note" values in the Inspector. For automatic adjustment click the Update Range button in the inspector.

                                                                                                                          Mensural time signatures

                                                                                                                          In the mensural notation system, time signatures did not define the length of a measure, but the length of breves and semibreves. MuseScore supports mensural time symbols as a display method in the Time signature properties dialog rather than as symbols, but they are just for show, as the proportion of e.g. half notes per whole notes cannot be modified.
                                                                                                                          One way to make use of these symbols is to replicate when composers of the renaissance had multiple voices in different time signatures simultaneously without using tuplets. Edit the time signature on a per-staff basis, as long as the beginning and end of a measure in all staves match up. If they do not, then consider increasing the size of the measures to the lowest common denominator.

                                                                                                                          Prolation
                                                                                                                          De Profundis Clamavi for 5 voices by Josquin Des Prez

                                                                                                                          See also

                                                                                                                          • Measure Operations: Split and join

                                                                                                                          Figured bass

                                                                                                                            Adding a new figured bass indication

                                                                                                                            1. Select the note to which the figured bass applies
                                                                                                                            2. Press the Figured Bass shortcut (default Ctrl+G; can be changed in Preferences)
                                                                                                                            3. Enter the text in the editor 'blue box' as required (see below)
                                                                                                                            4. Press Space to move to the next note ready for another figured bass indication (or click outside the editor box to exit it)

                                                                                                                            Example 1

                                                                                                                            With Space, the editor advances to the next note, or rest of the staff to which figured bass is being added. To move to a point in between, or to extend a figured bass group for a longer duration, see below Group Duration.

                                                                                                                            Tab advances the editing box to the beginning of the next measure.

                                                                                                                            Shift+Space moves the editing box to the previous staff note or rest.

                                                                                                                            Shift+Tab moves the editing box to the beginning of the previous measure.

                                                                                                                            Text format

                                                                                                                            Digits

                                                                                                                            Digits are entered directly. Groups of several digits stacked one above the other are also entered directly in a single text, stacking them with Enter:

                                                                                                                            Example 2

                                                                                                                            Accidentals

                                                                                                                            Accidentals can be entered using regular keys:

                                                                                                                            To enter: type:
                                                                                                                            double flat bb
                                                                                                                            flat b
                                                                                                                            natural h
                                                                                                                            sharp #
                                                                                                                            double sharp ##

                                                                                                                            These characters will automatically turn into the proper signs when you leave the editor. Accidentals can be entered before, or after a digit (and of course, in place of a digit, for altered thirds), according to the required style; both styles are properly aligned, with the accidental 'hanging' at the left, or the right.

                                                                                                                            Combined shapes

                                                                                                                            Slashed digits or digits with a cross can be entered by adding \, / or + after the digit (combining suffixes); the proper combined shape will be substituted when leaving the editor:

                                                                                                                            Example 3

                                                                                                                            The built-in font can manage combination equivalence, favoring the more common substitution:

                                                                                                                            1+, 2+, 3+, 4+ result in Modern digits 1 (or Historic digits 1)

                                                                                                                            and 5\, 6\, 7\, 8\, 9\ result in Modern digits 2 (or Historic digits 2)

                                                                                                                            Please remember that / can only by combined with 5; any other 'slashed' figure is rendered with a question mark.

                                                                                                                            + can also be used before a digit; in this case it is not combined, but it is properly aligned ('+' hanging at the left side).

                                                                                                                            Parentheses

                                                                                                                            Open and closed parentheses, both round: '(', ')' and square: '[', ']', can be inserted before and after accidentals, before and after a digit, before and after a continuation line; added parentheses will not disturb the proper alignment of the main character.

                                                                                                                            Notes:

                                                                                                                            • The editor does not check that parentheses, open and closed, round or square, are properly balanced.
                                                                                                                            • Several parentheses in a row are non-syntactical and prevent proper recognition of the entered text.
                                                                                                                            • A parenthesis between a digit and a combining suffix ('+', '\', '/') is accepted, but prevents shape combination.

                                                                                                                            Continuation lines

                                                                                                                            Continuation lines are input by adding an '_' (underscore) at the end of the line. Each digit of a group can have its own continuation line:

                                                                                                                            Example 4

                                                                                                                            Continuation lines are drawn for the whole duration of the figured bass group.

                                                                                                                            'Extended' continuation lines

                                                                                                                            Occasionally, a continuation line has to connect with the continuation line of a following group, when a chord degree has to be kept across two groups. Examples (both from J. Boismortier, Pièces de viole, op. 31, Paris 1730):

                                                                                                                            Example 4b

                                                                                                                            In the first case, each group has its own continuation line; in the second, the continuation line of the first group is carried 'into' the second.

                                                                                                                            This can be obtained by entering several (two or more) underscores "__" at the end of the text line of the first group.

                                                                                                                            Duration

                                                                                                                            Each figured bass group has a duration, which is indicated by a light gray line above it (of course, this line is for information only and it is not printed or exported to PDF).

                                                                                                                            Initially, a group has the same duration of the note to which it is attached. A different duration may be required to fit several groups under a single note or to extend a group to span several notes.

                                                                                                                            To achieve this, each key combination of the list below can be used:

                                                                                                                            • to advance the editing box by the indicated duration
                                                                                                                              AND
                                                                                                                            • to set the duration of the previous group up to the new editing box position.

                                                                                                                            Pressing several of them in sequence without entering any figured bass text repeatedly extends the previous group.

                                                                                                                            Type: to get:
                                                                                                                            Ctrl+1 1/64
                                                                                                                            Ctrl+2 1/32
                                                                                                                            Ctrl+3 1/16
                                                                                                                            Ctrl+4 1/8 (quaver)
                                                                                                                            Ctrl+5 1/4 (crochet)
                                                                                                                            Ctrl+6 half note (minim)
                                                                                                                            Ctrl+7 whole note (semibreve)
                                                                                                                            Ctrl+8 2 whole notes (breve)

                                                                                                                            (The digits are the same as are used to set the note durations)

                                                                                                                            Setting the exact figured bass group duration is only mandatory in two cases:

                                                                                                                            1. When several groups are fit under a single staff note (there is no other way).
                                                                                                                            2. When continuation lines are used, as line length depends on the group duration.

                                                                                                                            However, it is a good practice to always set the duration to the intended value for the purposes of plugins and MusicXML.

                                                                                                                            Editing existing figured basses

                                                                                                                            To edit a figured bass indication already entered:

                                                                                                                            • Select it, or the note it belongs to and press the same Figured Bass shortcut used to create a new one
                                                                                                                              or
                                                                                                                            • Double-click it

                                                                                                                            The usual text editor box will open with the text converted back to plain characters ('b', '#' and 'h' for accidentals, separate combining suffixes, underscores, etc.) for simpler editing.

                                                                                                                            Once done, press Space to move to a next note, or click outside the editor box to exit it, as for newly created figured basses.

                                                                                                                            Style

                                                                                                                            To configure how figured bass is rendered: from the menu, select Style → General.… → Figured Bass.

                                                                                                                            Configuration dialog box

                                                                                                                            • Font: The dropdown list contains all the fonts which have been configured for figured bass. A standard installation contains only one font, "MuseScore Figured Bass," which is also the default font.
                                                                                                                            • Size: Select a font-size in points. Note: This value is also modified by any change made to Scaling (Layout → Page Settings.…), or Scale ("Staff properties").
                                                                                                                            • Vertical Position: The distance (in spatia) from the top of the staff to the top margin of the figured bass text. Negative values go up (figured bass above the staff) and positive values go down (figured bass below the staff: a value greater than 4 is needed to step over the staff itself).
                                                                                                                            • Line Height: The distance between the base line of each figured bass line, as a percentage of font size.

                                                                                                                              The following picture visualizes each numeric parameter:

                                                                                                                              Parameters

                                                                                                                            • Alignment: Select the vertical alignment: with Top, the top line of each group is aligned with the main vertical position and the group 'hangs' from it (this is normally used with figured bass notation and is the default); with Bottom, the bottom line is aligned with the main vertical position and the group 'sits' on it (this is sometimes used in some kinds of harmonic analysis notations):

                                                                                                                              Vertical alignment

                                                                                                                            • Style: Chose between "Modern" or "Historic." The difference between the two styles is shown below:

                                                                                                                              Styles

                                                                                                                            Proper syntax

                                                                                                                            For the relevant substitutions and shape combinations to take effect and for proper alignment, the figured bass mechanism expects input texts to follow some rules (which are in any case, the rules for a syntactical figured bass indication):

                                                                                                                            • There can be only one accidental (before or after), or only one combining suffix per figure;
                                                                                                                            • There cannot be both an accidental and a combining suffix;
                                                                                                                            • There can be an accidental without a digit (altered third), but not a combining suffix without a digit.
                                                                                                                            • Any other character not listed above is not expected.

                                                                                                                            If a text entered does not follow these rules, it will not be processed: it will be stored and displayed as it is, without any layout.

                                                                                                                            Summary of keys

                                                                                                                            Type: to get:
                                                                                                                            Ctrl+G Adds a new figured bass group to the selected note.
                                                                                                                            Space Advances the editing box to the next note.
                                                                                                                            Shift+Space Moves the editing box to the previous note.
                                                                                                                            Tab Advances the editing box to the next measure.
                                                                                                                            Shift+Tab Moves the editing box to the previous measure.
                                                                                                                            Ctrl+1 Advances the editing box by 1/64, setting the duration of the previous group.
                                                                                                                            Ctrl+2 Advances the editing box by 1/32, setting the duration of the previous group.
                                                                                                                            Ctrl+3 Advances the editing box by 1/16, setting the duration of the previous group.
                                                                                                                            Ctrl+4 Advances the editing box by 1/8 (quaver), setting the duration of the previous group.
                                                                                                                            Ctrl+5 Advances the editing box by 1/4 (crochet), setting the duration of the previous group.
                                                                                                                            Ctrl+6 Advances the editing box by a half note (minim), setting the duration of the previous group.
                                                                                                                            Ctrl+7 Advances the editing box by a whole note (semibreve), setting the duration of the previous group.
                                                                                                                            Ctrl+8 Advances the editing box by two whole notes (breve), setting the duration of the previous group.
                                                                                                                            Ctrl+Space Enters an actual space; useful when figure appears "on the second line" (e.g., 5 4 -> 3).
                                                                                                                            BB Enters a double flat.
                                                                                                                            B Enters a flat.
                                                                                                                            H Enters a natural.
                                                                                                                            # Enters a sharp.
                                                                                                                            ## Enters a double sharp.
                                                                                                                            _ Enters a continuation line.
                                                                                                                            __ Enters an extended continuation line.

                                                                                                                            Fretboard diagrams

                                                                                                                              A range of fretboard (or chord) diagrams for the guitar are pre-provided in the Fretboard Diagrams palette in the Advanced Workspace (versions prior to 2.0.3 feature only one diagram).

                                                                                                                              Fretboard diagrams palette

                                                                                                                              You can create a chord diagram for any fretted, stringed instrument by editing an existing one. It can be saved to a custom palette for future use if required.

                                                                                                                              Add a fretboard diagram

                                                                                                                              To add a fretboard diagram to the score, use one of the following methods:

                                                                                                                              • Select a note in voice 1 and double-click a fretboard diagram from a palette.
                                                                                                                              • Drag and drop a fretboard diagram from a palette to the desired position in the score.

                                                                                                                              Edit fretboard diagram

                                                                                                                              1. Right-click on a diagram in the score and select Fretboard Diagram Properties....
                                                                                                                              2. Adjust the number of instrument strings, using the "Strings" spin box at the bottom left of the window.
                                                                                                                              3. Adjust the fret position number using the scroll bar on the right-hand side.
                                                                                                                              4. Adjust how many frets to display (height-wise) using the "Frets" spin-box at the bottom right of the window.
                                                                                                                              5. To place a dot on a string fret, click on that fret. To remove the dot, click on the fret again.
                                                                                                                              6. Click just above the diagram to toggle a string between:
                                                                                                                                • Open (o)
                                                                                                                                • Mute/unplayed (x)
                                                                                                                                • No indication.
                                                                                                                              7. To create a barre or partial barre:
                                                                                                                                i. Make sure the desired fret position is clear of black dots (click on a dot to remove it);
                                                                                                                                ii. Hold Shift and click on the fret where you want the barre to begin. Note: Only one barre can be applied per diagram;
                                                                                                                                iii. To delete a barre, click on the black dot where the barre begins.

                                                                                                                              For example, to create a full-barre F# chord, from a C chord:

                                                                                                                              1. Place the C fretboard diagram on the score, right-click on it and select Fretboard Diagram Properties....
                                                                                                                              2. Click on the relevant fret positions to establish the fingering dots.
                                                                                                                              3. Set "Frets" to "4" and fret number (right-hand scroll bar) to "2." The diagram should now look like this:

                                                                                                                                Fretboard diagram - step 1

                                                                                                                              4. Create the barre by holding Shift and clicking on the second fret of the 6th string. Click "OK" to exit and you should get this:

                                                                                                                                Fretboard diagram - step 2

                                                                                                                                The same principle applies if you want a partial barré. For example, the partial barré in an A7 chord is created by pressing Shift, then clicking on the 4th string, second fret:

                                                                                                                                A7 chord

                                                                                                                              Adjust position, size, color

                                                                                                                              The size ("Scale"), color and position of a fretboard diagram can be changed by clicking on it and altering the relevant values in the Inspector.

                                                                                                                              The position of the fretboard diagram can also be adjusted in Edit mode:

                                                                                                                              1. Double-click on the diagram (or click on it and press Ctrl+E (Mac: Cmd+E); or right-click on it and select Edit element).
                                                                                                                              2. Press the arrow keys for fine positioning (0.1 sp. at a time); or press Ctrl+Arrow (Mac: Cmd+Arrow) for larger adjustments (1 sp. at a time).

                                                                                                                              Fretboard diagram style

                                                                                                                              Some default properties of fretboard diagrams (barre thickness, vertical position, size etc.) can be adjusted from the menu: select Style → General… → Chord Symbols, Fretboard Diagrams. Any changes made here affect all existing diagrams, as well as those applied subsequently.

                                                                                                                              MIDI import

                                                                                                                                MuseScore can import MIDI files (.mid/.midi/.kar) and convert them into music notation. To import, use the standard Open command.

                                                                                                                                Initially, the program renders the MIDI to notation using certain default settings. A MIDI Import Panel appears at the bottom of the screen, showing a list of tracks (only tracks with note events are shown) and the operations available for each track. You can change these settings on a track-by-track basis and then reimport the data: The “Apply” button (at the top) submits any changes with immediate effect. The "Cancel" button immediately cancels any unsaved changes. The final result should be a better quality score reproduction of the file.

                                                                                                                                Use Shift+Wheel or Ctrl+Wheel to scroll track options horizontally; scroll tracks vertically without those modifiers.

                                                                                                                                If there are multiple tracks, then one more track is added at the top of the list to select all tracks at once.

                                                                                                                                MIDI Import Panel

                                                                                                                                In the MIDI Import Panel, you can choose which tracks to import and reorder them. Some information about each track is displayed: sound, staff name, and lyrics, if any. The presence of the lyric column is an indication that the file contains a lyric track—assignable to different tracks through the drop-down menu.

                                                                                                                                The MIDI import panel updates the relevant information of whatever file is in view, if the user has several open. If the MIDI import panel is no longer required, it can be closed by clicking the close button in the top-left corner. The panel will re-appear after clicking on the button "Show MIDI import panel" which appears right after the panel is closed.

                                                                                                                                After saving the score, the MIDI Import Panel will not be available, because MuseScore is no longer importing a MIDI file.

                                                                                                                                Available operations

                                                                                                                                MuseScore instrument
                                                                                                                                Assign a MuseScore instrument (listed in instruments.xml or in specified custom xml file in Preferences) that defines staff name, clef, transposition, articulations, etc.
                                                                                                                                Quantization

                                                                                                                                Quantize MIDI notes by some regular grid. The grid MAX resolution can be set via the drop-down menu:

                                                                                                                                • Value from preferences (default) - quantization value is taken from the main Preferences dialog of MuseScore (in the “Import” tab)
                                                                                                                                • Quarter, Eighth, 16th, 32nd, 64th, 128th - user-defined values

                                                                                                                                However, the actual quantization grid size is adaptive and reduces when the note length is small, so for each note the quantization value is different. But there is an upper limit for the quantization value, and that value can be set by the user as "max. quantization".
                                                                                                                                For example, if some note is long - say, half note, and the max. quantization is set to 8th, then the note will be quantized with the 8th-note grid, not the half- or quarter-note grid as it supposed to be by the algorithm.
                                                                                                                                Such quantization scheme allows to quantize all notes in the score (with different lengths!) adequately.

                                                                                                                                Max. voices
                                                                                                                                Sets maximum count of allowed musical voices.
                                                                                                                                Search tuplets
                                                                                                                                When enabled, this option attempts to detect tuplets and applies the corresponding quantization grid to the tuplet chords.
                                                                                                                                Is human performance
                                                                                                                                If enabled, this option reduces the accuracy of MIDI-to-score conversion in favor of readability. It is useful for unaligned MIDI files, when no regular quantization grid is provided. For such files the automatic beat tracking algorithm is used which tries to detect the bar positions throughout the piece.
                                                                                                                                2x less measure count
                                                                                                                                The option is active for unaligned MIDI files (when "Is human performance" is checked by default). It halves measure count obtained in the internal beat tracking operation. It may be convenient when the beat tracking gives 2x more frequent bar subdivision than necessary.
                                                                                                                                Time signature
                                                                                                                                The option is active for unaligned MIDI files. The user can choose an appropriate time signature for the whole piece if the default detected value is wrong. The option is useful because it handles imported tuplets correctly unlike the direct time signature setting from the palette.
                                                                                                                                Split staff
                                                                                                                                This option is suited mainly for piano tracks - to assign notes to the left or right hand of the performer. It uses constant pitch separation (the user may choose the pitch via sub-options) or floating pitch separation (depending on the hand width - sort of a guess from the program point of view).
                                                                                                                                For drum tracks (“Percussion” sound in the track list) it splits the staff into multiple staves, each of which gets only one drum pitch (i.e. drum sound). There is also a sub-option to allow/disallow the application of the square bracket for the newly created set of drum tracks.
                                                                                                                                Clef changes
                                                                                                                                Small clefs can be inserted within a staff to keep chords closer to the 5 staff lines. Clef changes depend on the average pitch of the chord. Tied groups of notes are not broken by the clef insertion (if it occurs, one can report a bug for algorithm in importmidi_clef.cpp). This option is available for non-drum tracks only.
                                                                                                                                Simplify durations
                                                                                                                                Reduces number of rests to form more "simple" note durations. For drum tracks this option can remove rests and lengthen notes as well.
                                                                                                                                Show staccato
                                                                                                                                Option to show/hide staccato markings in the score.
                                                                                                                                Dotted notes
                                                                                                                                Controls whether MuseScore will use dotted notes or ties.
                                                                                                                                Show tempo text
                                                                                                                                Shows/hides tempo text markings in the score.
                                                                                                                                Show chord names
                                                                                                                                Shows/hides chord names in the score, if any, for XF MIDI file format.
                                                                                                                                Recognize pickup measure
                                                                                                                                When enabled, this option doesn't change the time signature of the first bar that is shorter than the second bar. It is also called anacrusis. This option is only available for all tracks at once.
                                                                                                                                Detect swing
                                                                                                                                MuseScore tries to detect swing, and automatically replace a pattern of 4th + 8th notes in triplets (for the most common swing feel, 2:1), or a dotted 8th + 16th pattern (for shuffle, 3:1), with two straight 8ths and a “Swing” or “Shuffle” text at the beginning.

                                                                                                                                Master palette

                                                                                                                                The Master Palette is a repository of symbols used to populate the workspaces (Basic, Advanced, and Custom). It is also used to create new Time Signatures and Key Signatures.

                                                                                                                                To open, use either of the following options:

                                                                                                                                • Press Shift+F9 (Mac: fn+Shift+F9).
                                                                                                                                • From the menu, select View → Master Palette.

                                                                                                                                Master Palette

                                                                                                                                The Master palette is divided into sections based on symbol type. Hovering the mouse over an item shows a tool tip (a short definition in black on yellow background).

                                                                                                                                To transfer a Master palette item to a custom palette:

                                                                                                                                • Drag the symbol from the Master Palette window into a custom palette.

                                                                                                                                Note: Except for the Symbols section (below), it is not usual to add items directly to the score from the Master palette: use the workspace palettes instead. However, if desired, items can be added directly using either (i) drag-and-drop or (ii) by selecting one or more notes/rests and double-clicking the item.

                                                                                                                                Symbols

                                                                                                                                The Symbols section of the Master Palette is a large repository of hundreds of musical symbols in addition to those found in the preset workspaces. You can open it from the Master Palette, or directly from the score by using the shortcut Z.

                                                                                                                                Symbols

                                                                                                                                Find a symbol

                                                                                                                                The symbols are listed under their respective musical font types: use the font menu on the bottom right of the box to specify Emmentaler, Gonville or Bravura. You can search for a particular symbol by entering a keyword in the search box.

                                                                                                                                Apply a symbol

                                                                                                                                To add an item to the score from the Symbols section, use any of the following options:

                                                                                                                                • Drag and drop a symbol onto a staff.
                                                                                                                                • Select a note or rest and double-click a symbol.

                                                                                                                                The position of the symbol can be adjusted by dragging or by changing the horizontal / vertical offsets in the Inspector. Color and visibility can also be adjusted in the Inspector.

                                                                                                                                Note: Elements from the Symbols section do not follow any positioning rules (in many cases unlike identical elements from other sections of the Master Palette), nor do they affect score playback.

                                                                                                                                Connect symbols

                                                                                                                                Elements from the Symbols section can be connected to each other on the score page, so that they can be moved as one unit:

                                                                                                                                1. Apply first symbol to the score. Adjust position as required.
                                                                                                                                2. Double click, or drag-and-drop, a second element onto the first symbol. Adjust position as required.

                                                                                                                                Drag the first element and the attached element will follow.

                                                                                                                                See also

                                                                                                                                • Palettes and workspaces
                                                                                                                                • Symbols and special characters (add musical symbols to text objects)

                                                                                                                                Note input modes

                                                                                                                                  From version 2.1, you can enter notation using one of several new note input modes—in addition to the pre-existing Step-time and Re-pitch modes. These are accessed by clicking a small dropdown arrow next to the note entry button on the note input toolbar.

                                                                                                                                  Note entry modes

                                                                                                                                  Step-time

                                                                                                                                  This is the method of note entry that MuseScore has had from the beginning. You enter notes in Step-time mode by choosing a duration using the mouse or keyboard, and then choosing a pitch using the mouse, keyboard, MIDI keyboard or virtual piano.

                                                                                                                                  For details see Basic note entry.

                                                                                                                                  Re-pitch

                                                                                                                                  Re-pitch mode allows you to correct the pitches of a sequence of notes while leaving their durations unchanged (not to be confused with Accidental: Respell pitches).

                                                                                                                                  1. Select a note as your starting point;
                                                                                                                                  2. If you are using a pre-2.1 version of the program press N to enter note-input mode. This step is optional from 2.1 onwards.
                                                                                                                                  3. Select the Re-Pitch option from the Note input drop-down menu (or, for pre-2.1 versions, from the note input toolbar); or use the keyboard shortcut, Ctrl+Shift+I (Mac: Cmd+Shift+I).
                                                                                                                                  4. Now enter pitches using the keyboard, MIDI keyboard or virtual piano keyboard.

                                                                                                                                  You can also use the Re-pitch function to create a new passage from an existing one of the same sequence of durations—by copying and pasting the latter, then applying Re-pitch.

                                                                                                                                  Rhythm

                                                                                                                                  Rhythm mode allows you to enter durations with a single keypress. Combining Rhythm and Re-pitch modes makes for a very efficient method of note entry.

                                                                                                                                  1. Select your starting point in the score and enter Rhythm mode.
                                                                                                                                  2. Select a duration from the note input toolbar, or press a duration shortcut (numbers 1-9) on your computer keyboard. A note will be added to the score with the selected duration. In contrast to Basic note entry, pressing the . key will toggle dotting or not dotting all subsequent durations. All following rhythms will be dotted until the . key is pressed again. Unlike Basic note entry, the dot is to be pressed prior to entering the rhythm.
                                                                                                                                  3. Entering rests is similar to adding dotted notes. Press the 0 key to toggle entering rests. All rhythms entered will be rests until the 0 key is pressed again. This can be used concurrently with dotted notes.
                                                                                                                                  4. Continue pressing duration keys to enter notes with the chosen durations.
                                                                                                                                  5. Now use Re-pitch mode to set the pitches of the notes you just added.

                                                                                                                                  Real-time (automatic)

                                                                                                                                  The Real-time modes basically allow you to perform the piece on a MIDI keyboard (or MuseScore's virtual piano keyboard) and have the notation added for you. However, you should be aware of the following limitations which currently apply:

                                                                                                                                  • It is not possible to use a computer keyboard for Real-time input
                                                                                                                                  • You cannot enter tuplets or notes shorter than the selected duration
                                                                                                                                  • You cannot enter notes into more than one voice at a time

                                                                                                                                  However, these restrictions mean that MuseScore has very little guessing to do when working out how your input should be notated, which helps to keep the Real-time modes accurate.

                                                                                                                                  In the automatic version of Real-time input, you play at a fixed tempo indicated by a metronome click. You can adjust the tempo by changing the delay between clicks from the menu: Edit → Preferences... → Note Input (Mac: MuseScore → Preferences... → Note Input).

                                                                                                                                  1. Select your starting position in the score and enter Real-time (automatic) mode.
                                                                                                                                  2. Select a duration from the note input toolbar.
                                                                                                                                  3. Press and hold a MIDI key or virtual piano key (a note will be added to the score).
                                                                                                                                  4. Listen for the metronome clicks. With each click the note grows by the selected duration.
                                                                                                                                  5. Release the key when the note has reached the desired length.

                                                                                                                                  The score stops advancing as soon as you release the key. If you want the score to continue advancing (e.g. to allow you to enter rests) then you can use the Real-time Advance shortcut to start the metronome.

                                                                                                                                  Real-time (manual)

                                                                                                                                  In the manual version of Real-time input, you have to indicate your input tempo by tapping on a key or pedal, but you can play at any speed you like and it doesn't have to be constant. The default key for setting the tempo (called "Real-time Advance") is Enter on the numeric keypad (Mac: fn+Return), but it is highly recommended that you change this to a MIDI key or MIDI pedal (see below).

                                                                                                                                  1. Select your starting position in the score and enter Real-time (manual) mode.
                                                                                                                                  2. Select a duration from the note input toolbar.
                                                                                                                                  3. Press and hold a MIDI key or virtual piano key (a note will be added to the score).
                                                                                                                                  4. Press the Real-time Advance key. With each press the note grows by the selected duration.
                                                                                                                                  5. Release the note when it has reached the desired length.

                                                                                                                                  Real-time Advance shortcut

                                                                                                                                  The Real-time Advance shortcut is used to tap beats in manual Real-time mode, or to start the metronome clicks in automatic Real-time mode. It is called "Real-time Advance" because it causes the input position to more forward, or "advance", through the score.

                                                                                                                                  The default key for Real-time Advance is Enter on the numeric keypad (Mac: fn+Return), but it is highly recommended that you assign this to a MIDI key or MIDI pedal via MuseScore's MIDI remote control. The MIDI remote control is available from the menu: Edit → Preferences... → Note Input (Mac: MuseScore → Preferences... → Note Input).

                                                                                                                                  Alternatively, if you have a USB footswitch or computer pedal which can simulate keyboard keys, you could set it to simulate Enter on the numeric keypad.

                                                                                                                                  See also

                                                                                                                                  • Note input
                                                                                                                                  • Copy and paste

                                                                                                                                  External links

                                                                                                                                  • Video: Semi-Realtime MIDI Demo Part 1: New note entry modes (available as of MuseScore 2.1)
                                                                                                                                  • Introduction to the new Repitch Mode (YouTube)

                                                                                                                                  Noteheads

                                                                                                                                    A range of alternative noteheads – in addition to the "normal" – can be found in the Note Heads palette of the Advanced workspace and via the Inspector (see Change notehead group, below).

                                                                                                                                    Note: The design of the notehead may vary depending on the music font selected (Emmentaler, Gonville or Bravura). Those in the palette are displayed as half notes in Bravura font.

                                                                                                                                    Notehead groups

                                                                                                                                    MuseScore supports a number of notehead styles:

                                                                                                                                    • Normal: A standard notehead.
                                                                                                                                    • Crosshead (Ghost note): Used in percussion notation to represent cymbals. It also indicates muted and/or percussive effects in stringed instruments such as the guitar.
                                                                                                                                    • Diamond: Used to indicate harmonic notes in instruments such as the guitar, violin etc.
                                                                                                                                    • Slash: Used to notate rhythmic values.
                                                                                                                                    • Triangle: Used in percussion notation.
                                                                                                                                    • Shape notes: Do, Re, Mi, Fa, Sol, La, Ti.
                                                                                                                                    • Circle cross: Used in percussion notation.
                                                                                                                                    • Alternative Brevis: Used in early music notation.
                                                                                                                                    • Brackets (Parentheses): When applied, these go around the existing note (or accidental).

                                                                                                                                    Change notehead group

                                                                                                                                    To change the shape of one or more noteheads in the score, use one of the following:

                                                                                                                                    • Select one or more notes and double click a notehead in a palette
                                                                                                                                    • Drag a notehead from a palette onto a note in the score.
                                                                                                                                    • Select one or more notes and change the notehead in the Inspector, using the drop-down list under Note → Head group (not supported for drum staves).

                                                                                                                                    Change notehead type

                                                                                                                                    Occasionally you may need to change the apparent duration of a notehead—i.e. notehead type—without altering its actual, underlying duration:

                                                                                                                                    1. Select one or more notes.
                                                                                                                                    2. Chose one of the following options from the Inspector under Note → Head type:
                                                                                                                                      • Auto: Automatic, i.e, apparent duration = actual duration.
                                                                                                                                      • Whole: Whole notehead, regardless of actual duration.
                                                                                                                                      • Half: Half notehead, regardless of actual duration.
                                                                                                                                      • Quarter: Quarter notehead, regardless of actual duration.
                                                                                                                                      • Breve: Breve notehead, regardless of actual duration.

                                                                                                                                    Shared noteheads

                                                                                                                                    When two notes in different voices, but of the same written pitch, fall on the same beat, one of two things may happen:

                                                                                                                                    • The notes may share the same notehead.
                                                                                                                                    • The notes may be offset: i.e. arranged side by side.

                                                                                                                                    MuseScore follows standard music notation practice as follows:

                                                                                                                                    • Notes with stems in the same direction do not share noteheads.
                                                                                                                                    • Dotted notes do not share noteheads with undotted notes.
                                                                                                                                    • Black notes do not share noteheads with white notes.
                                                                                                                                    • Whole notes never share noteheads.

                                                                                                                                    Note: If two unison notes occur in the same voice they are always offset.

                                                                                                                                    Change offset noteheads to shared

                                                                                                                                    Offset noteheads can be turned into shared noteheads in one of two ways:

                                                                                                                                    • Make the smaller-value notehead invisible by selecting it and using the keyboard shortcut V (or unchecking the "Visible" option in the Inspector).
                                                                                                                                    • Alter the notehead type of the shorter-duration note to match the longer one by switching "Head type" in the "Note" section of the Inspector.

                                                                                                                                    Examples of notehead sharing

                                                                                                                                    1. In the first example below, the notes of voices 1 and 2 share noteheads by default, because they are all black, undotted notes:

                                                                                                                                      Shared black undotted noteheads

                                                                                                                                    2. By contrast, in the next example, white notes cannot share noteheads with black notes, so are offset to the right:

                                                                                                                                      Non-shared noteheads

                                                                                                                                      To create a shared notehead, make the black eighth note invisible or change its head type to match that of the white note (as explained above):

                                                                                                                                      Shared white noteheads

                                                                                                                                    Remove duplicate fret marks

                                                                                                                                    In certain cases, a shared notehead, when pasted to a tablature staff, may result in two separate fret marks on adjacent strings. To correct this, make any extraneous tablature notes invisible by selecting them and using the keyboard shortcut V (or by unchecking the "visible" option in the Inspector).

                                                                                                                                    External links

                                                                                                                                    • Shape notes at Wikipedia.
                                                                                                                                    • Ghost notes at Wikipedia.

                                                                                                                                    Parts

                                                                                                                                    MuseScore not only allows you to create and print the full score but also the individual instrument parts.

                                                                                                                                    Note: In the current version of MuseScore, only one part can be generated per single staff (or grand staff or staff/TAB system). If you want to create a part for a particular voice, you need to ensure that it has its own staff as well.

                                                                                                                                    Set up all parts at once

                                                                                                                                    This is the most straightforward method. Parts are generated on a one-to-one basis from the corresponding Instruments in the score:

                                                                                                                                    1. From the menu, select File → Parts...;
                                                                                                                                    2. Click the New All button (parts are named with the instrument name, and a number added to differentiate parts that have the same label in the main score);
                                                                                                                                      Part creation - all in one go
                                                                                                                                    3. Click OK.

                                                                                                                                    The parts can now be accessed by clicking on tabs above the document window.

                                                                                                                                    Define specific parts

                                                                                                                                    This method allows you to generate specific parts (rather than all-at-once), or to alter a previous parts set-up. It also allows you to specify multi-instrument parts, and define part names differently from the corresponding instruments, if needed.

                                                                                                                                    The following instructions use a string quartet as an example, but the same principles apply for any other ensemble:

                                                                                                                                    1. From the menu, select File → Parts...;
                                                                                                                                      Part creation - step 1
                                                                                                                                    2. In the Parts window click New to create a "part definition;"
                                                                                                                                      Part creation - step 2
                                                                                                                                    3. In the right pane, type the words you want to use for the "Part title" (this also serves for the corresponding part of the filename when exporting);
                                                                                                                                    4. Pick the instrument that you want to appear in your part by marking the relevant box in the right-hand pane. Usually, you only want one instrument per part, but sometimes you might need a part that includes more than one instrument (such as multiple percussion staves). MuseScore allows you to mark as many instruments per part as you need;
                                                                                                                                      Part creation step 4
                                                                                                                                    5. Repeat steps two through four (above) for each part as needed;
                                                                                                                                      Part creation step 5
                                                                                                                                    6. Once you're done, click OK to dismiss the Parts window.

                                                                                                                                    You have now finished setting up the parts. You do not need to do this again, unless you add or remove an instrument from your full score.

                                                                                                                                    Delete a Part

                                                                                                                                    1. Open the Parts dialog (File → Parts...);
                                                                                                                                    2. Select the relevant Part in the "Select Part" section;
                                                                                                                                    3. Press Delete.

                                                                                                                                    Export the parts

                                                                                                                                    1. From the menu, select File → Export Parts...;
                                                                                                                                    2. Navigate to the place you want them to be exported to and select the file format (PDF is the default);
                                                                                                                                    3. For filename just enter whatever prefix is useful for all parts, or leave the default (the filename of your score);
                                                                                                                                    4. Click OK.

                                                                                                                                    This will generate files with the names "<title>" + "-" + "<part name>.<extension>". In addition, when exporting as PDF, this will also generate "<title>" + "-Score_And_Parts.pdf".

                                                                                                                                    Save the parts

                                                                                                                                    Parts and score are "linked", which means that any change to the content in one will affect the other, but changes to the layout will not. When you have the parts created, they are saved along with the score (if you open the score you have tabs for the score and every part you created).

                                                                                                                                    However, if you wish to save a part individually:

                                                                                                                                    1. Make sure the part is "active." Select its tab if not;
                                                                                                                                    2. From the menu, select File → Save As....

                                                                                                                                    Print a part

                                                                                                                                    1. Make sure the part is "active." Select its tab if not;
                                                                                                                                    2. From the menu, select File → Print to open the print dialog.

                                                                                                                                    Plugins

                                                                                                                                      Overview

                                                                                                                                      Plugins are small pieces of code that add a particular feature to MuseScore. By enabling a plugin, a new menu option will be appended to the Plugins menu in MuseScore to accomplish a given action on the score or a part of it.

                                                                                                                                      Some plugins come pre-installed with MuseScore—see →below. You can find many more plugins in the plugin repository. Some plugins there work with MuseScore 2; others will only work with older versions of MuseScore, some work with either.
                                                                                                                                      To tell one from the other: for MuseScore 2.x the plugin code files have an extension of .qml, for older versions, it is .js.

                                                                                                                                      Installation

                                                                                                                                      Note that some plugins may require the installation of other components (fonts, e.g.) to work. Check the plugin's documentation for more information.

                                                                                                                                      Most plugins are provided as ZIP archives, so download the plugin's .zip file and uncompress it to one of the directories mentioned below. If a plugin is provided directly as an (unzipped) .qml file, simply download and place into one of these directories.

                                                                                                                                      Once a plugin is installed, it needs to be enabled in the Plugin Manager in order to use it—see →below.

                                                                                                                                      Windows

                                                                                                                                      MuseScore looks for pre-installed plugins in %ProgramFiles%\MuseScore 2\Plugins (or %ProgramFiles(x86)%\MuseScore 2\Plugins for the 64-bit versions) and in %LOCALAPPDATA%\MuseScore\MuseScore 2\plugins on Vista, Seven and 10 or C:\Documents and Settings\USERNAME\Local Settings\Application Data\MuseScore\MuseScore 2\plugins (adjusted to your language version) on XP.

                                                                                                                                      To install new plugins, the above folders should not be used or modified. Instead you can add other plugins to %HOMEPATH%\Documents\MuseScore2\Plugins, or specify a different folder to look for plugins in MuseScore's Preferences.

                                                                                                                                      macOS

                                                                                                                                      On macOS, MuseScore looks for pre-installed plugins in the MuseScore bundle in /Applications/MuseScore 2.app/Contents/Resources/plugins (to reveal files in the app bundle, right click on MuseScore 2.app and choose "Show package contents") and in ~/Library/Application Support/MuseScore/MuseScore 2/plugins.

                                                                                                                                      To install new plugins, the above folders should not be used or modified. Instead you can add other plugins to ~/Documents/MuseScore2/Plugins, or specify a different folder to look for plugins in MuseScore's Preferences.

                                                                                                                                      Linux

                                                                                                                                      In Linux, MuseScore looks for plugins in /usr/share/mscore-2.0/plugins and in ~/.local/share/data/MuseScore/MuseScore 2/plugins.

                                                                                                                                      To install new plugins, the above folders should not be used or modified. Instead you can add other plugins to ~/Documents/MuseScore2/Plugins, or specify a different folder to look for plugins in MuseScore's Preferences.

                                                                                                                                      Enable/disable plugins

                                                                                                                                      To be able to access the installed plugins from the Plugins menu, they need to be enabled in the Plugin Manager:

                                                                                                                                      Plugin manager

                                                                                                                                      Create/edit/run plugins

                                                                                                                                      It is possible to create new or edit existing plugins and run them via the Plugin Creator:

                                                                                                                                      Plugin creator

                                                                                                                                      Here also the documentation of all available elements can be found

                                                                                                                                      Plugins installed by default

                                                                                                                                      Some plugins come pre-installed with MuseScore, but they are not enabled by default. See →above to enable plugins.

                                                                                                                                      ABC Import

                                                                                                                                      This plugin imports ABC text from a file or the clipboard. Internet connection is required, because it uses an external web-service for the conversion, which uses abc2xml and gets send the ABC data, returns MusicXML and imports that into MuseScore.

                                                                                                                                      Break Every X Measures

                                                                                                                                      This plugin enters line breaks in the interval you select on the selected measures or, if no measures are selected, the entire score. It is no longer being distributed and has been replaced by Edit → Tools → Add/Remove Line Breaks. If you ever used an early beta version of MuseScore 2, though, you may still see the plugin left over.

                                                                                                                                      Notes → Color Notes

                                                                                                                                      This demo plugin colors notes in the selected range (or the entire score), depending on their pitch. It colors the note head of all notes in all staves and voices according to the Boomwhackers convention. Each pitch has a different color. C and C♯ have a different color. C♯ and D♭ have the same color.
                                                                                                                                      To color all the notes in black, just run that plugin again (on the same selection). You could also use the 'Remove Notes Color' plugin for this.

                                                                                                                                      Create Score

                                                                                                                                      This demo plugin creates a new score. It creates a new piano score with 4 quarters C D E F. It's a good start to learn how to make a new score and add notes from a plugin.

                                                                                                                                      helloQml

                                                                                                                                      This demo plugin shows some basic tasks.

                                                                                                                                      Notes → Note Names

                                                                                                                                      This plugin names notes in the selected range or the entire score. It displays the names of the notes (as a staff text) as per MuseScore's language settings, for voices 1 and 3 above the staff, for voices 2 and 4 below the staff, and for chords in a comma separated list, starting with the top note.

                                                                                                                                      Panel

                                                                                                                                      This demo plugin creates a GUI panel.

                                                                                                                                      random

                                                                                                                                      Creates a random score.

                                                                                                                                      random2

                                                                                                                                      Creates a random score too

                                                                                                                                      run

                                                                                                                                      This demo plugin runs an external command. Probably this will only work on Linux.

                                                                                                                                      scorelist

                                                                                                                                      This test plugin iterates through the score list.

                                                                                                                                      ScoreView

                                                                                                                                      Demo plugin to demonstrate the use of a ScoreView

                                                                                                                                      Walk

                                                                                                                                      This test plugin walks through all elements in a score

                                                                                                                                      See also

                                                                                                                                      • Tools

                                                                                                                                      Recovered files

                                                                                                                                      If MuseScore or your computer should crash, or if power is lost, a pop-up message upon restarting MuseScore will ask if you wish to restore the previous session.
                                                                                                                                      Restore session dialog
                                                                                                                                      If you click No, any work from your previous session will be lost. If you click Yes, MuseScore will attempt to recover the files that were open.

                                                                                                                                      Behavior of saving after session recovery

                                                                                                                                      When MuseScore recovers files after a crash, it renames them with the full path name added in front of the original file name. This very long name will appear in the tab(s) above the active score window. On some operating systems, when a user saves any of these recovered files, it will be saved in the folder in which the program itself is running. This is not necessarily the same directory in which the scores were saved when they were created. You may not be able to locate the revised file in the usual folder.

                                                                                                                                      To avoid this, do not use "Save" the first time you save a recovered file. Use the "Save As..." menu item before making any revisions to the score, to save each recovered file under either its original name or a new name. This will open a window to allow you to navigate to the correct folder and directory. This is important in order to ensure that the file is saved to the folder in which you expect to find it later.

                                                                                                                                      Finding recovered files

                                                                                                                                      In the event that "Save" is used instead of "Save As..." with a recovered file, you will have to find the files in your computer. The actual location of those files will vary, depending on your operating system, and in which directory MuseScore is installed.

                                                                                                                                      For Windows 7, with a default installation of MuseScore to the x86 program files directory, recovered files are auto-saved to C:\Program Files (x86)\MuseScore 2\bin (actually %ProgramFiles(x86)%\MuseScore 2\bin).

                                                                                                                                      For Windows 10, look in C:\Users\[User Name]\AppData\Local\VirtualStore\Program Files (x86)\MuseScore 2\bin (actually%LOCALAPPDATA%\VirtualStore\%ProgramFiles(x86):~3%\MuseScore 2\bin).

                                                                                                                                      You may need to run a system-wide search in order to find files saved directly after a session recovery. Use keywords from the original file name as well as wildcards, and specify the date modified.

                                                                                                                                      See also

                                                                                                                                      Save/Export/Print

                                                                                                                                      External links

                                                                                                                                      How to recover a backup copy of a score

                                                                                                                                      Score properties

                                                                                                                                        The Score Properties dialog contains the document meta tags such as "workTitle," "Composer," "Copyright" etc. To view the dialog:

                                                                                                                                        1. Make sure that the applicable score or instrument part is the active tab;
                                                                                                                                        2. From the menu, select File → Score Properties (File → Info... in versions earlier than 2.0.3).

                                                                                                                                        Several meta tags are generated automatically when you create a score using the New Score Wizard, and others may be added later. Meta tags can also be incorporated into a header or footer if required—see below.

                                                                                                                                        Edit meta tags

                                                                                                                                        1. Make sure that the applicable score or instrument part is the active tab;
                                                                                                                                        2. From the menu, select File → Score Properties (File → Info... in versions earlier than 2.0.3);
                                                                                                                                          Score Properties
                                                                                                                                        3. Edit the text of the various meta tags as required;
                                                                                                                                        4. To add another meta tag, click on the New button. Fill in the "New tag name" field and press OK;
                                                                                                                                          Input tag name

                                                                                                                                        Preexisting meta tags

                                                                                                                                        Every score has the following fields available in Score Properties. Some are automatically filled in on score creation, while others will be empty unless specifically changed. The first four items in the following list are not user-modifiable, and cannot be used in the header or footer (they are not really meta tags).

                                                                                                                                        • File Path: The score file's location on your Computer (2.0.3 and later).
                                                                                                                                        • MuseScore Version: The version of MuseScore the score was last saved with.
                                                                                                                                        • Revision: The revision of MuseScore the score was last saved with.
                                                                                                                                        • API-Level: The file format version.
                                                                                                                                        • arranger: (empty)
                                                                                                                                        • composer: As entered in the New Score Wizard (which is also used to fill the composer text in the top vertical frame—be aware that later changes to one are not reflected in the other).
                                                                                                                                        • copyright: As entered in the New Score Wizard. Copyright info appears as seemingly uneditable text at the bottom of every page of a score, but it can be edited or removed by changing the value here.
                                                                                                                                        • creationDate: Date of the score creation. This could be empty, if the score was saved in test mode (see Command line options).
                                                                                                                                        • lyricist: As entered in the New Score Wizard (which is also used to fill the corresponding lyricist text in the top vertical frame—be aware that later changes to one are not reflected in the other).
                                                                                                                                        • movementNumber: (empty)
                                                                                                                                        • movementTitle: (empty)
                                                                                                                                        • originalFormat: This tag exists only if the score got imported and then contains the format the score got imported from (see file formats).
                                                                                                                                        • platform: The platform the score was created on: "Microsoft Windows", "Apple Macintosh", "Linux" or "Unknown". This might be empty if the score was saved in test mode.
                                                                                                                                        • poet: (empty)
                                                                                                                                        • source: May contain a URL if the score was downloaded from or saved to MuseScore.com.
                                                                                                                                        • translator: (empty)
                                                                                                                                        • workNumber: (empty)
                                                                                                                                        • workTitle: As entered in the New Score Wizard (which is also used to fill the corresponding title text in the top vertical frame—be aware that later changes to one are not reflected in the other).

                                                                                                                                        When working on multiple scores that belong to one larger work, the nomenclature is like this: workNumber and workTitle are the number and title of the larger work (e.g. opus 8, “Le quattro stagioni” (The four seasons) by Antonio Vivaldi), movementNumber is the number of the movement you’re working on (e.g. 3 for Autumn) and movementTitle is its title (“L’autunno”). It is customary, when using the New Score Wizard, to create a work with the movementTitle as title (even though it ends up in workTitle then) and, directly after creating the score, fixing up this information in the Score Properties dialogue. This ensures that the title frame of the printed score contains the information you expect but the metadata is also correct.

                                                                                                                                        Every part additionally has the following meta tag, generated and filled on part creation:

                                                                                                                                        • partName: Name of the part as given on part creation (which is also used to fill the corresponding part name text in the top vertical frame—be aware that later changes to one are not reflected in the other).

                                                                                                                                        Header/Footer

                                                                                                                                        To show the content of one or more meta tags in a header or footer for your score/part:

                                                                                                                                        1. Make sure that the correct score or instrument part is the active tab;
                                                                                                                                        2. From the menu, select Style → General... → Header, Footer, Numbers;

                                                                                                                                          Style / Header,Footer,Numbers

                                                                                                                                          If you hover with your mouse over the Header or Footer text region, a list of macros will appear, showing their meaning, as well as the existing meta tags and their content.

                                                                                                                                          Style / Header,Footer,Numbers

                                                                                                                                        3. Add tags (e.g. $:workTitle:) and macros (e.g. $M) to the appropriate boxes, as required;

                                                                                                                                        4. Click Apply to see how the header or footer looks in the score. Make corrections to the dialog if required;
                                                                                                                                        5. If an instrument part is in the active tab, click Apply to all parts, if you want to apply these settings to all the score parts;
                                                                                                                                        6. Click OK to assign the header or footer and exit the dialog.

                                                                                                                                        See also

                                                                                                                                        • Layout and formatting: Header and footer
                                                                                                                                        • Command line options: Test mode

                                                                                                                                        Staff properties

                                                                                                                                          The Staff Properties dialog allows you to make changes to the display of a staff, adjust its tuning and transposition, change instrument etc. To open:

                                                                                                                                          • Right-click on a staff and select Staff Properties....

                                                                                                                                          Staff type properties
                                                                                                                                          Staff Properties dialog, as of version 2.1.

                                                                                                                                          Staff Types

                                                                                                                                          For practical purposes, there are four different types of staff:

                                                                                                                                          1a. Standard staff I. A pitched staff used for most instruments except fretted, plucked-string ones.
                                                                                                                                          1b. Standard staff II. A pitched staff containing a fretted, plucked-string instrument, with options to set the number of instrument strings and tuning.
                                                                                                                                          2. Tablature staff. A staff containing a fretted, plucked-string instrument, which displays music as a series of fret-marks on strings. Also contains options to set the number of instrument strings and tuning.
                                                                                                                                          3. Percussion staff. A pitched staff for percussion instruments.

                                                                                                                                          It is possible to change one type of staff into another using the Instruments dialog, as long as the original staff is loaded with the right instrument. For example, in order to change a standard staff to tablature, it must contain a plucked-string instrument. Similarly, to change a standard staff to a percussion staff you need to ensure that it has an appropriate percussion instrument loaded and so on.

                                                                                                                                          Most options in the Staff properties dialog are common to all staves, but each type also has one or two specific options of its own.

                                                                                                                                          Staff Properties: all staves

                                                                                                                                          The following Staff Properties options are common to all staves:

                                                                                                                                          Lines
                                                                                                                                          The number of lines making up the staff.

                                                                                                                                          Line Distance
                                                                                                                                          The distance between two staff lines, measured in spaces (abbr.: sp). If you set this to a higher value, the lines are spaced more widely apart; a lower value and they are closer together. It is not recommended to change this value for the standard group, for which the default distance is 1.0 (instead, change the actual size of the sp unit in Page settings); other groups may have different default values (for instance, tablature usually has a line distance of 1.5 sp).

                                                                                                                                          Extra distance above staff
                                                                                                                                          Increases or decreases the distance between the selected staff and the one above in all systems. However, it does not apply to the top staff of a system, which is controlled by the minimum/maximum system distance (see Layout and formatting: Style → General... → Page).

                                                                                                                                          Alternatively, you can alter the "Extra distance above staff" directly from the score page:
                                                                                                                                          1. Press and hold the Shift key.
                                                                                                                                          2. Click on an empty space in a staff and drag it up or down with the mouse.

                                                                                                                                          Note: To alter the spacing above just one staff line in a particular system, see Breaks and spacers.

                                                                                                                                          Scale
                                                                                                                                          Changes the size of the selected staff and all associated elements, as a percentage (to adjust the overall score size, use Scaling from the Layout→Page Settings… menu).

                                                                                                                                          Never Hide
                                                                                                                                          Never hide this staff. This overrules any "Hide empty staves" setting in Layout and Formatting: Style → General... → Score.

                                                                                                                                          Show clef
                                                                                                                                          Whether the staff clef will be shown.

                                                                                                                                          Show time signature
                                                                                                                                          Whether the staff time signature(s) will be shown or not.

                                                                                                                                          Show barlines
                                                                                                                                          Whether the staff barlines will be shown.

                                                                                                                                          Hide system barline
                                                                                                                                          Show/hide barline at left-hand edge of the staff.

                                                                                                                                          Do not hide if system is empty
                                                                                                                                          Never hide this staff, even if the entire system is empty. This overrules any "Hide empty staves" setting in Layout and Formatting: Style → General... → Score.

                                                                                                                                          Small staff
                                                                                                                                          Create a reduced-size staff. You can set the default from the menu in Layout and Formatting: Style → General... → Sizes

                                                                                                                                          Invisible staff lines
                                                                                                                                          Make staff lines invisible.

                                                                                                                                          Staff line color
                                                                                                                                          Use a color picker to change the color of the staff lines.

                                                                                                                                          Part name
                                                                                                                                          The name of the part. This is also displayed in the Mixer and the Instruments dialog (I).

                                                                                                                                          Instrument
                                                                                                                                          The instrument loaded in the Instruments (I) or Select Instrument dialog. The sound associated with this instrument can be changed, if desired, in the Mixer.

                                                                                                                                          Long instrument name
                                                                                                                                          Name displayed to the left of the staff in the first system of the score. The long instrument name may also be edited directly as a text object (as of version 2.1): see Text editing.

                                                                                                                                          Short instrument name
                                                                                                                                          Name displayed to the left of the staff in subsequent systems of the score. The short instrument name may also be edited directly as a text object (as of version 2.1): see Text editing. Editing affects all occurrences in the score.

                                                                                                                                          Usable pitch range

                                                                                                                                          • Amateur: Notes outside this range will be colored olive green/dark yellow in the score.
                                                                                                                                          • Professional: Notes outside this range will be colored red in the score.

                                                                                                                                          To disable out-of-range coloration of notes: From the menu, select Edit→Preferences... (Mac: MuseScore→Preferences...), click on the "Note Input" tab, and uncheck "Color notes outside of usable pitch range."

                                                                                                                                          See also, Coloring of notes outside an instrument's range.

                                                                                                                                          Transpose written pitches (as of version 2.1) / Play transposition
                                                                                                                                          This option ensures that the staves of transposing instruments display music at the correct written pitch. Set the transpose in term of a musical interval (plus octave if required) up or down. For plucked-string instruments such as the guitar, this property can be used to create the effect of applying a capo.

                                                                                                                                          Navigation arrows (as of version 2.1)
                                                                                                                                          Use the ↑ and ↓ buttons, at the bottom left of the Staff Properties window, to navigate to the previous or next staff.

                                                                                                                                          Staff Properties: plucked strings only

                                                                                                                                          Staves of fretted, plucked-string instruments have a few extra options in addition to those listed above,

                                                                                                                                          Number of strings
                                                                                                                                          Displays the number of instrument strings.

                                                                                                                                          Edit String Data…
                                                                                                                                          This button opens a dialog box which allows you to set the number and tuning of strings. See Change string tuning.

                                                                                                                                          Advanced Style Properties

                                                                                                                                          Clicking the Advanced Style Properties... button opens a window giving access to advanced display options for the staff. These will vary depending on the staff type chosen: see the relevant sections below for details.

                                                                                                                                          Change staff type

                                                                                                                                          At the bottom of the Advanced Style Properties dialog there are a number of buttons which allow you to easily change the following:

                                                                                                                                          • The number of lines displayed by a percussion staff.
                                                                                                                                          • The staff type of a plucked-string instrument. For example, you can change from standard staff to tablature and vice versa, or select from a number of tablature options.
                                                                                                                                          1. Make a selection from the drop-down list labelled "Template";
                                                                                                                                          2. Press < Reset to Template;
                                                                                                                                          3. Press OK to accept the changes and exit the dialog (or Cancel to cancel the operation).

                                                                                                                                          Standard and Percussion staff options

                                                                                                                                          Show key signature
                                                                                                                                          Whether the staff key signature will be shown.

                                                                                                                                          Show ledger lines
                                                                                                                                          Whether the staff ledger lines will be shown.

                                                                                                                                          Stemless
                                                                                                                                          If checked, staff notes will have no stem, hook or beam.

                                                                                                                                          Tablature staff options

                                                                                                                                          Upside down
                                                                                                                                          If not checked, the top tablature line will refer to the highest string and the bottom tablature line will refer to the lowest string (most common case). If checked, the top tablature line will refer to the lowest string and the bottom tablature line will refer to the highest line (used in Italian style lute tablatures).

                                                                                                                                          Tablature staff options: Fret Marks

                                                                                                                                          Fret marks are the numbers or letters used to indicate the location of notes on the fingerboard. The following group of properties define the appearance of fret marks:

                                                                                                                                          Font
                                                                                                                                          The font used to draw fret marks. As of version 2.1, 8 fonts are provided supporting all the necessary symbols in 8 different styles (modern Serif, modern Sans, Renaissance, Phalèse, Bonneuil-de Visée, Bonneuil-Gaultier, Dowland, Lute Didactic).

                                                                                                                                          Size
                                                                                                                                          Font size of fret marks in typographic points. Built-in fonts usually look good at a size of 9-10pt.

                                                                                                                                          Vertical offset
                                                                                                                                          MuseScore tries to place symbols in a sensible way and you do not usually need to alter this value (set to 0) for built-in fonts. If the font has symbols not aligned on the base line (or in some other way MuseScore does not expect), this property allows you to move fret-marks up (negative offsets) or down (positive offsets) for better vertical positioning. Values are in sp.

                                                                                                                                          Numbers / Letters
                                                                                                                                          Whether to use numbers (‘1’, ‘2’...) or letters (‘a’, ‘b’...) as fret marks. When letters are used, ‘j’ is skipped and ‘k’ is used for the 9th fret.

                                                                                                                                          On lines / Above lines
                                                                                                                                          Whether marks should be placed on the string lines or above them.

                                                                                                                                          Continuous / Broken
                                                                                                                                          Whether string lines should pass ‘through’ fret marks or should stop at them.
                                                                                                                                          Example of numbers on broken lines:

                                                                                                                                          Example: numbers

                                                                                                                                          Example of letters above continuous lines:

                                                                                                                                          Example: letters

                                                                                                                                          Example of 'upside down' tablature (same contents as number example above):

                                                                                                                                          Example: 'upside-down' tablature

                                                                                                                                          Show back-tied fret marks
                                                                                                                                          If unticked, only the first note in a series of tied notes is displayed. If ticked, all notes in the tied series are displayed.

                                                                                                                                          Show fingerings
                                                                                                                                          From version 2.1, tick to allow the display of fingering symbols applied from a palette.

                                                                                                                                          Tablature staff options: Note Values

                                                                                                                                          This group of properties defines the appearance of the symbols indicating note values.

                                                                                                                                          Font
                                                                                                                                          The font used to draw the value symbols. Currently 5 fonts are provided supporting all the necessary symbols in 5 different styles (modern, Italian tablature, French tablature, French baroque (headless), French baroque). Used only with the Note symbols option.

                                                                                                                                          Size
                                                                                                                                          Font size, in typographic points. Built-in fonts usually look good at a size of 15pt. Used only with the Note symbols option.

                                                                                                                                          Vertical offset
                                                                                                                                          Applies only when Note symbols is selected (see below). Use negative offset values to raise the note value symbols, positive values to lower them.

                                                                                                                                          Shown as:

                                                                                                                                          • None: No note value will be drawn (as in the examples above)
                                                                                                                                          • Note symbols: Symbols in the shape of notes will be drawn above the staff. When this option is selected, symbols are drawn only when the note value changes, without being repeated (by default) for a sequence of notes all of the same value. E.g.
                                                                                                                                            Example: note symbols
                                                                                                                                          • Stems and beams: Note stems and beams (or hooks) will be drawn. Values are indicated for each note, using the same typographic devices as for a regular staff; all commands of the standard Beam Palette can be applied to these beams too. E.g.
                                                                                                                                            Example: stems

                                                                                                                                          Repeat:

                                                                                                                                          If several notes in sequence have the same duration, you can specify if and where to repeat the same note symbol. i.e.

                                                                                                                                          • Never
                                                                                                                                          • At new system
                                                                                                                                          • At new measure
                                                                                                                                          • Always

                                                                                                                                          Note: This option is only available if "Shown as: Note symbols" is selected (see above).

                                                                                                                                          Stem style:

                                                                                                                                          • Beside staff: Stems are drawn as fixed height lines above/below the staff.
                                                                                                                                          • Through staff: Stems run through the staff to reach the fret marks.

                                                                                                                                          Note: This option is only available when "Shown as: Stems and Beams" is selected (see above).

                                                                                                                                          Stem position:

                                                                                                                                          • Above: Stems and beams are drawn above the staff.
                                                                                                                                          • Below: Stems and beams are drawn below the staff.

                                                                                                                                          Note: This option is only available when "Shown as: Stems and Beams" and "Stem style: Beside staff" is selected (see above).

                                                                                                                                          Half notes:

                                                                                                                                          • None
                                                                                                                                          • As short stems
                                                                                                                                          • As slashed stems

                                                                                                                                          Note: This option is only available when "Shown as: Stems and Beams and "Stem style: Beside staff" is selected (see above).

                                                                                                                                          Show rests
                                                                                                                                          Whether note symbols should be used to indicate also the rests; when used for rests, note symbols are drawn at a slightly lower position. Used only with the Note symbols option.

                                                                                                                                          Preview

                                                                                                                                          Displays a short score in tablature format with all the current parameters applied.

                                                                                                                                          Change instrument

                                                                                                                                          You can change any instrument in a score to a different instrument at any time. The following method updates instrument sound, staff name, and staff transposition all at once.

                                                                                                                                          1. Right-click on an empty part of any measure OR on the instrument name and choose Staff Properties...;
                                                                                                                                          2. Click on Change Instrument... (under "Part Properties");
                                                                                                                                          3. Choose your new instrument and click OK to return to the Staff Properties dialog;
                                                                                                                                          4. Click OK again to return to the score.

                                                                                                                                          Not to be confused with Mid-staff instrument change.

                                                                                                                                          External links

                                                                                                                                          • How to turn a staff into an ossia.

                                                                                                                                          Thiết lập

                                                                                                                                            Có lẽ bạn sẽ muốn có một định kiểu tổng quan hoặc các thư mục được chọn trước khi sử dụng MuseScore.
                                                                                                                                            Bạn có thể cài đặt điều này qua Điều chỉnh → Thiết lập... (Mac: MuseScore → Thiết lập...):

                                                                                                                                            Menu: Edit / Preferences...

                                                                                                                                            Một cửa sổ thiết lập sẽ xuất hiện có các thẻ để di chuyển bên trong:

                                                                                                                                            Tabs of dialog: Edit / Preferences...

                                                                                                                                            Một vài thay đổi có thể cần khởi động lại (thoát và mở lại) MuseScore thì mới có hiệu lực. Một hộp thông báo sẽ hiện lên khi bạn nhấp vào Áp dụng hoặc Đồng ý.

                                                                                                                                            Nút "Trả tất cả về mặc định" sẽ đưa chúng về một thiết lập mặc định của MuseScore lúc bạn cài đặt chương trình.
                                                                                                                                            Nút "Hủy bỏ" sẽ bỏ qua tất cả những thay đổi bạn vừa tạo ra.

                                                                                                                                            Thẻ "Tổng quát"

                                                                                                                                            Dialog: Edit / Preferences... / General

                                                                                                                                            Tại đây bạn có thể định rõ:

                                                                                                                                            • Bản nhạc sẽ mở
                                                                                                                                            • Thư mục mặc định để tìm kiếm các bản nhạc của bạn, gói âm thanh, kiểu mẫu, và vân vân
                                                                                                                                            • Khoảng thời gian sẽ tự động lưu trữ
                                                                                                                                            • Ngôn ngữ sử dụng (các bản dịch cũng có thể cập nhật tại đây)
                                                                                                                                            • Định kiểu các cửa sổ MuseScore và kích thước các biểu tượng công cụ
                                                                                                                                            • Các cửa sổ sẽ mở khi khởi động (Bảng điều khiển chơi nhạc, Bộ điều hướng, Cửa sổ kết nối MuseScore).
                                                                                                                                              Chú ý việc cập nhật bản dịch cho ngôn ngữ cũng có thể được hoàn thành thông qua Hỗ trợ → Quản lý tài nguyên

                                                                                                                                            Thẻ "Bộ vẽ"

                                                                                                                                            Dialog: Edit / Preferences... / Canvas

                                                                                                                                            Dùng thẻ "Bộ vẽ" để cài đặt màu và ảnh nền yêu thích của bạn cho nền bản nhạc và giấy.

                                                                                                                                            Bên dưới mục Những thứ linh tinh, chọn Khử răng cưa (đã bật theo mặc định) sẽ làm các đường kẻ xiên và các cạnh của các hình trông mượt hơn (bớt lởm chởm). Mục Vùng lân cận để chọn một vật sẽ kiểm soát khoảng cách mà chuột vẫn còn có thể tác động trên một vật, khoảng cách này là từ chuột tới vật. Số càng nhỏ đòi hỏi độ chính xác càng cao, sẽ khiến việc nhấp chọn khó hơn trên các đối tượng nhỏ. Số càng lớn đòi hỏi độ chính xác càng thấp, vô tình sẽ khiến việc nhấp chọn khó hơn trên các đối tượng gần nhau. Hãy chọn một giá trị làm việc thấy dễ chịu.

                                                                                                                                            Thẻ "Nhập nốt"

                                                                                                                                            Dialog: Edit / Preferences... / Note Input

                                                                                                                                            Trên thẻ này có các thiết lập nhập nốt và điều khiển MIDI từ xa. Tại đây có thể cài đặt những thứ bên dưới:

                                                                                                                                            • Nhập nốt theo MIDI
                                                                                                                                            • Kích hoạt phát nốt nhạc khi nhập nốt
                                                                                                                                            • Trường độ phát của nó
                                                                                                                                            • Tô màu các nốt nằm ngoài âm vực cho phép
                                                                                                                                            • Các thiết lập điều khiển MIDI từ xa

                                                                                                                                            Thẻ "Bản nhạc"

                                                                                                                                            Dialog: Edit / Preferences... / Score

                                                                                                                                            Các thiết lập bản nhạc gồm có

                                                                                                                                            • Các tập tin danh sách nhạc cụ mặc định (có thể chọn cả hai)
                                                                                                                                            • Định kiểu mặc định cho bản nhạc và các bè
                                                                                                                                            • Tỷ lệ xem mặc định

                                                                                                                                            Thẻ "Nhập/Xuất âm thanh"

                                                                                                                                            Dialog: Edit / Preferences... / I/O

                                                                                                                                            "Nhập/Xuất âm thanh" để thiết lập đầu vào và đầu ra cho âm thanh

                                                                                                                                            Thẻ "Nhập dữ liệu"

                                                                                                                                            Dialog: Edit / Preferences... / Import

                                                                                                                                            Các thiết lập này sẽ quyết định việc nhập liệu từ các tập tin của các nguồn khác:

                                                                                                                                            • Dùng định kiểu sẵn có trong MuseScore hoặc định kiểu mà bạn chọn
                                                                                                                                            • Bộ ký tự cho chương trình Guitar Pro và Overture
                                                                                                                                            • Các lựa chọn bố trí khi nhập từ MusicXML
                                                                                                                                            • Nốt ngắn nhất trong tập tin MIDI

                                                                                                                                            Thẻ "Xuất dữ liệu"

                                                                                                                                            Dialog: Edit / Preferences... / Export

                                                                                                                                            Các thiết lập này sẽ quyết định những gì tập tin MuseScore sẽ xuất ra:

                                                                                                                                            • Độ phân giải ảnh PNG/SVG (trong đơn vị DPI) và có dùng lựa chọn nền trong suốt hay không
                                                                                                                                            • Có xử lý khai triển các dấu lặp khi xuất tập tin MIDI hay không
                                                                                                                                            • Tần số lấy mẫu âm thanh kỹ thuật số
                                                                                                                                            • Có xuất các bố trí và các ngắt dòng hay ngắt trang ra tập tin MusicXML hay không

                                                                                                                                            Thẻ "Phím tắt"

                                                                                                                                            Dialog: Edit / Preferences... / Shortcuts

                                                                                                                                            Mọi thao tác có thể làm trong MuseScore được liệt kê ở đây, một phím tắt sẽ được liên kết với nó nếu có. Dùng nút "Định nghĩa..." để định nghĩa một phím tắt mới cho một thao tác. Bạn có thể sử dụng tối đa 4 phím để định nghĩa một phím tắt.
                                                                                                                                            Bạn có thể trả tất cả các phím tắt về mặc định, hoặc xóa một phím tắt mà bạn chọn.

                                                                                                                                            (Chú ý một vài phím tắt trùng với phím tắt mặc định sẽ không thể được sử dụng với một vài bàn phím. Hãy kiểm lại.)

                                                                                                                                            Thẻ "Cập nhật"

                                                                                                                                            Dialog: Edit / Preferences... / Update

                                                                                                                                            Cái này sẽ kiểm tra xem MuseScore có bản mới hay không lúc khởi chạy chương trình.

                                                                                                                                            Bản cập nhật có thể kiểm tra thủ công tại trình đơn Hỗ trợ → Kiểm tra phiên bản mới của MuseScore

                                                                                                                                            Xem thêm

                                                                                                                                            • Các phím tắt bàn phím
                                                                                                                                            • Thiết lập ngôn ngữ và cập nhật bản dịch
                                                                                                                                            • Kiểm tra cập nhật

                                                                                                                                            Tools

                                                                                                                                              A number of useful commands can be found in the Edit → Tools submenu.

                                                                                                                                              Add / Remove system/line breaks

                                                                                                                                              This tool adds or removes system breaks (Line breaks prior to version 2.2) over all or part of the score:

                                                                                                                                              1. Select a range of measures: if no selection is made, the command is applied to the whole score.
                                                                                                                                              2. Chose Edit→Tools→Add/Remove System (Line) Breaks…. The following dialog appears.

                                                                                                                                                Add/Remove Line Breaks

                                                                                                                                              3. Chose one of the following options:

                                                                                                                                                • Break systems/lines every X (select number) measures.
                                                                                                                                                • Add system/line breaks at the end of each system.
                                                                                                                                                • Remove current system/line breaks.
                                                                                                                                              4. Press OK.

                                                                                                                                              Explode

                                                                                                                                              The explode command allows you to select a passage of music in a single staff and split (explode) the chords into their constituent notes. The top note of each chord is retained on this "source staff" while lower notes are moved to subsequent staves. Explode only affects notes in voice 1.

                                                                                                                                              Note: If the desired passage also contains notes in other voices apart from voice 1, you should, instead, cut and paste each voice to a separate staff with the help of the selection filter.

                                                                                                                                              To explode a section of the score:

                                                                                                                                              1. Make sure all notes to be exploded are in voice 1.
                                                                                                                                              2. Ensure that there are enough staves underneath the "source staff" to receive the exploded notes. Create extra staves if necessary in the Instruments dialog.
                                                                                                                                              3. Chose one of two options:
                                                                                                                                                • Select a range of measures in the "source staff": this allows all notes to be exploded if there are enough staves available.
                                                                                                                                                • Select a range of measures that includes both the source staff and also extends downwards to include one or more destination staves: This limits the number of exploded notes to the number of selected staves.
                                                                                                                                              4. Chose Edit→Tools→Explode.

                                                                                                                                              Notes: (1) MuseScore will discard the lowest note(s) of any chord that contains more notes than the number of staves in the selection. (2) If a given chord has fewer notes than the number of destination staves, then notes will be duplicated as needed so that every staff receives a note. (3) Any existing music in the destination staves is overwritten. (4) If you select a partial measure, the explode command will automatically expand it to a full measure.

                                                                                                                                              Implode

                                                                                                                                              The Implode command works in the opposite way to "explode":

                                                                                                                                              • If several staves are selected, all voice 1 notes in underlying staves are copied to the top staff.
                                                                                                                                              • If just one staff is selected, all notes in voices 1–4 are combined into voice 1.

                                                                                                                                              Note: Implode works best if the rhythms of selected underlying staves are similar to that of the top staff—the latter providing the rhythmic template for the operation.

                                                                                                                                              Apply implode to multiple staves

                                                                                                                                              1. Select a range of measures in a staff and extend this selection downwards to include the other staves to be imploded.
                                                                                                                                              2. Chose Edit→Tools→Implode.

                                                                                                                                              The voice 1 notes of underlying staves are copied to the top staff in the selection.

                                                                                                                                              Apply implode to a single staff

                                                                                                                                              1. Select a range of measures in the desired staff.
                                                                                                                                              2. Chose Edit→Tools→Implode.

                                                                                                                                              All selected notes in the staff are now displayed in voice 1.

                                                                                                                                              Fill with slashes

                                                                                                                                              This command fills the selection with slashes, one per beat:

                                                                                                                                              1. Select one or more measures;
                                                                                                                                              2. From the menu, select Edit→Tools→Fill With Slashes.

                                                                                                                                              If a measure is empty the slashes are added to voice 1, full-sized and centered on the middle line of the staff:

                                                                                                                                              Slash notation

                                                                                                                                              Notes: (1) If there are already notes in a measure in the selection, the command will put the slashes into the first available empty voice. (2) Voice 2 slashes are full-sized and centered on the middle line of the staff; voices 3 slashes appear small and above the staff; voice 4 slashes are small and below the staff. (3) If a measure contains notes in all 4 voices, voice 1 will be overwritten. (4) All slashes are set to not transpose or playback.

                                                                                                                                              Toggle rhythmic slash notation

                                                                                                                                              This command toggles selected notes between normal notes and rhythmic slash notation:

                                                                                                                                              1. Select a range of notes or measures (Note: use the selection filter if you need to exclude certain voices);
                                                                                                                                              2. From the menu, select Edit→Tools→Toggle Rhythmic Slash Notation.

                                                                                                                                              The selected noteheads are changed to slash noteheads which do not transpose or playback.

                                                                                                                                              Rhythmic slash notation

                                                                                                                                              Slash-notehead notes in voices one or two are fixed to the middle staff line; those in voices three or four are small ("accent" notation) and fixed above or below the staff:

                                                                                                                                              Accent notation

                                                                                                                                              In percussion staves, notes in voices 3 and 4 are not converted to small slashes but to small notes above or below the staff.

                                                                                                                                              Rhythmic slash - percussion

                                                                                                                                              Resequence rehearsal marks

                                                                                                                                              The Resequence Rehearsal Marks command allows you to re-order the numbering/lettering of rehearsal marks if, for any reason, they have got out of sequence. For details see Automatically resequence rehearsal marks.

                                                                                                                                              Copy lyrics to clipboard

                                                                                                                                              This command, available in MuseScore 2.0.3 and above, copies all the lyrics of the score to the clipboard:

                                                                                                                                              • From the menu, select Edit→Tools→Copy Lyrics to Clipboard.

                                                                                                                                              See also

                                                                                                                                              • Breaks and spacers
                                                                                                                                              • Rehearsal marks

                                                                                                                                              Định dạng tập tin

                                                                                                                                                MuseScore hỗ trợ một dãy rộng các định dạng tập tin khác nhau, những tập tin cho phép bạn chia sẻ và xuất bản bản nhạc trong định dạng trông tốt nhất mà mình cần.
                                                                                                                                                Bạn có thể nhập dữ liệu từ các tập tin theo Tập tin → Mở... và xuất dữ liệu theo Tập tin → Xuất bản nhạc....
                                                                                                                                                Ngoài ra có các định dạng chi tiết dưới đây, bạn có thể lưu trữ và chia sẻ bản nhạc của mình trên trang mạng MuseScore.com vào Tập tin → Lưu trực tuyến.... Xem thêm Chia sẻ bản nhạc trực tuyến.

                                                                                                                                                Định dạng riêng của MuseScore

                                                                                                                                                Có nhiều định dạng sử dụng bởi hộp thoại Tập tin → Lưu trữ hoặc nút save hay phím tắt (Ctrl+S) và
                                                                                                                                                Tập tin → Lưu trữ với....

                                                                                                                                                Định dạng MuseScore (*.mscz)

                                                                                                                                                MSCZ là định dạng tập tin chuẩn của MuseScore và nên dùng nhất.

                                                                                                                                                Một bản nhạc được lưu trong định dạng này sẽ chiếm rất ít không gian đĩa cứng, nhưng giữ được tất cả thông tin cần thiết. Định dạng này là phiên bản nén ZIP-compressed của tập tin .mscx, nó cũng chứa được bất kỳ hình ảnh nào.

                                                                                                                                                Định dạng không nén Uncompressed MuseScore (*.mscx)

                                                                                                                                                MSCX là một định dạng tập tin không nén của MuseScore.

                                                                                                                                                Một bản nhạc lưu trữ trong định dạng này sẽ duy trì mọi thông tin, ngoại trừ hình ảnh. Nó chỉ nên dùng khi bạn muốn lưu nội dung dưới dạng có thể sửa được bằng tay (tức là có thể sửa được bằng một trình soạn thảo văn bản nào đó).

                                                                                                                                                Phiên bản trước của MuseScore sử dụng phần mở rộng tập tin là *.msc. Tuy nhiên, cái này xung đột với phần mở rộng tập tin của Microsoft Windows và đã bị khóa bởi một số nhà cung cấp email. Vì thế, nó được thay thế bằng phần mở rộng mới hơn MSCX.

                                                                                                                                                Hai định dạng MSCZ và MSCX của MuseScore 2.0 không thể được đọc bởi MuseScore 1.3 hoặc cũ hơn, sử dụng →XML hay →MXL đối với việc này.

                                                                                                                                                Lưu ý về phông chữ: MuseScore không nhúng các phông chữ trong tập tin, ngoại trừ FreeSerif, FreeSerifBold, FreeSerifItalic, FreeSerifBoldItalic và các họ phông FreeSans. Nếu bạn muốn chia sẻ một tập tin MuseScore với các nhóm khác, hãy chọn các phông chữ này cho chữ viết của mình, hoặc một phông chữ mà các nhóm khác cũng cài đặt nó. Khi một hệ thống không có các phông được chỉ định trong tập tin, MuseScore sẽ sử dụng một phông dự trữ - tuy nhiên, điều này có thể khiến bản nhạc của bạn hiển thị khác đi.

                                                                                                                                                Các tập tin dự phòng MuseScore

                                                                                                                                                Tập tin dự phòng MuseScore (*.mscz, hoặc *.mscx,)

                                                                                                                                                Các tập tin sao lưu dự phòng được tạo tự động và lưu trong cùng thư mục với tập tin MuseScore bình thường của bạn. Tập tin dự phòng có thêm một dấu chấm ở đầu tên tập tin (.) và một dấu phẩy (,) tại cuối (ví dụ nếu tập tin bình thường của bạn là "untitled.mscz", thì tập tin sao lưu dự phòng sẽ là ".untitled.mscz,").

                                                                                                                                                Bản sao lưu dự phòng sẽ chứa bản lưu trước đó của tập tin MuseScore và có thể sẽ trở nên quan trọng nếu bản sao bình thường của bạn bị lỗi, hoặc khi bạn cần tìm lại bản sao cũ hơn của bản nhạc.

                                                                                                                                                Để mở tập tin sao lưu dự phòng MuseScore, dấu chấm và dấu phẩy nên được loại bỏ khỏi tên tập tin. Vì nó được lưu cùng thư mục với tập tin MuseScore bình thường của bạn, nên có lẽ cần tạo cho nó một cái tên duy nhất (ví dụ đổi ".untitled.mscz," thành "untitled-backup1.mscz").

                                                                                                                                                Để nhìn thấy tập tin dự phòng MuseScore, bạn cần thay đổi thiết lập hệ thống thành "Show hidden files" (hiện các tập tin ẩn) . Xem thêm Cách lấy lại bản sao lưu dự phòng của bản nhạc (MuseScore 2.x).

                                                                                                                                                Xem và in ấn (dùng cho xuất dữ liệu)

                                                                                                                                                PDF (*.pdf)

                                                                                                                                                Định dạng văn bản di động (PDF - viết tắt của Portable Document Format) thì lý tưởng cho việc chia sẻ bản nhạc của bạn với những người khác, những người không cần chỉnh sửa lại nội dung của nó. Hầu hết mọi người đều có một trình xem PDF trên máy tính, vì thế sẽ không cần cài thêm phần mềm nào khác để xem nó.

                                                                                                                                                PNG (*.png)

                                                                                                                                                Tập tin Portable Network Graphics (PNG) là một định dạng ảnh bitmap được hỗ trợ rộng rãi bởi các phần mềm trên Windows, Mac OS, và Linux.

                                                                                                                                                Định dạng ảnh này thì đặc biệt phổ biến trên trang mạng. Bản nhạc có nhiều trang sẽ xuất ra một tập tin PNG cho từng trang. MuseScore sẽ tạo các ảnh y như chúng xuất hiện trên giấy in. Trong thẻ xuất dữ liệu Điều chỉnh → Thiết lập... (Mac: MuseScore → Thiết lập...), bạn có thể thiết lập độ phân giải và muốn dùng nền trong suốt hay không.
                                                                                                                                                Nếu muốn tạo các ảnh chỉ chứa một phần của bản nhạc, có hoặc không có các biểu tượng trong màn ảnh, ví dụ các khung chèn, các nốt ẩn, và màu các nốt nằm ngoài âm vực cho phép, hãy xem chụp hình ảnh

                                                                                                                                                SVG (*.svg)

                                                                                                                                                Tập tin Scalable Vector Graphics (SVG) có thể được mở bởi hầu hết các trình duyệt trang mạng (ngoại trừ Internet Explorer trước phiên bản 9) và các phần mềm đồ họa vec-tơ. Tuy nhiên, hầu hết các phần mềm SVG không hỗ trợ phông chữ được nhúng, vì thế các phông MuseScore thích hợp phải được cài đặt để hiển thị các tập tin này cách chính xác.

                                                                                                                                                Tập tin để nghe (dùng cho xuất dữ liệu)

                                                                                                                                                WAV audio (*.wav)

                                                                                                                                                WAV (Waveform Audio Format) là một định dạng âm thanh không nén.

                                                                                                                                                Tập tin được phát triển bởi Microsoft và IBM, nó được hỗ trợ bởi các phần mềm trên Windows, Mac OS, và Linux. Nó là một định dạng lý tượng để sử dụng khi tạo các CD với chất lượng âm thanh đầy đủ được duy trì. Tuy nhiên, dung lượng tập tin lớn khiến nó khó chia sẽ qua email hoặc các trang mạng.

                                                                                                                                                FLAC audio (*.flac)

                                                                                                                                                Free Lossless Audio Codec (FLAC) là định dạng âm thanh nén.

                                                                                                                                                Tập tin FLAC được ước lượng bằng nửa dung lượng tập tin âm thanh không nén và chất lượng thì tốt. Windows và Mac OS không hỗ trợ sẵn cho FLAC, nhưng phần mềm như VLC media player có thể chơi tập tin FLAC trên bất kỳ hệ điều hành nào.

                                                                                                                                                Ogg Vorbis (*.ogg)

                                                                                                                                                Ogg Vorbis được xem như một sự thay thế định dạng âm thanh phổ biến MP3 miễn phí về bản quyền.

                                                                                                                                                Giống như MP3, tập tin Ogg Vorbis thì tương đối nhỏ (thường là 1/10 so với âm thanh không nén), nhưng chất lượng âm thanh bị mất. Windows và Mac OS không hỗ trợ sẵn cho Ogg Vorbis. Tuy nhiên, VLC media player và Firefox có thể chơi tập tin Ogg trên mọi hệ điều hành.

                                                                                                                                                MP3 (*.mp3)

                                                                                                                                                Tập tin MP3 thì tương đối nhỏ (thường là 1/10 so với tập tin âm thanh không nén), những chất lượng âm thanh bị mất.

                                                                                                                                                Để có thể tạo tập tin MP3, cần một thư viện ngoài, lame_enc.dll (Windows) hoặc libmp3lame.dylib (Mac), được cài đặt. MuseScore sẽ hỏi bạn vị trí của nó. Bạn có thể tải nó về tại http://lame.buanzo.org/.

                                                                                                                                                Vài người dùng mày Mac có thể thấy MuseScore đụng phải một lỗi khi nạp thư viện MP3.Vấn đề có thể là do thư viện đó là một thư viện 32 -bit. Thư viện 64-bit sẽ làm việc với MuseScore thì có sẵn tại http://www.thalictrum.com/en/products/lame.html (chú ý nó cần được đổi tên thành libmp3lame.dylib để MuseScore nhận ra).

                                                                                                                                                Chia sẻ với phần mềm âm nhạc khác

                                                                                                                                                MusicXML (*.xml)

                                                                                                                                                MusicXML là một chuẩn thế giới cho việc lưu thông tin của một bản nhạc.

                                                                                                                                                Đây là một định dạng nên dùng để chia sẽ bản nhạc giữa các trình soạn nhạc khác nhau, bao gồm Sibelius, Finale, và hơn 100 phần mềm khác.

                                                                                                                                                Compressed MusicXML (*.mxl)

                                                                                                                                                Compressed MusicXML tạo ra tập tin nhỏ hơn so với tập tin MusicXML chính quy.

                                                                                                                                                Đây là một chuẩn mới hơn và không được hỗ trợ rộng rãi bởi các trình soạn nhạc khác tại thời điểm này.

                                                                                                                                                MIDI (*.mid, *.midi, *.kar)

                                                                                                                                                Musical Instrument Digital Interface (MIDI) là định dạng được hỗ trợ rộng rãi bởi sequencers và các phần mềm ký âm âm nhạc.

                                                                                                                                                Tập tin MIDI được thiết kế cho việc phát nhạc và không chứa các thông tin bố trí bản nhạc như định dạng, cao độ, giọng, dấu hoa mỹ, dấu diễn đạt, dấu lặp, hoặc khóa nhạc, và các thứ khác. Để chia sẻ tập tin giữa các phần mềm ký âm âm nhạc, MusicXML thì nên dùng. Nếu bạn chỉ thích phát lại các bản nhạc, thì dùng MIDI.

                                                                                                                                                MuseData (*.md) (dùng cho nhập dữ liệu)

                                                                                                                                                MuseData là định dạng được phát triển bởi Walter B. Hewlett đầu năm 1983 như một phương tiện đầu tiên chia sẻ ký âm âm nhạc giữa các phần mềm.

                                                                                                                                                Nó đã bị lu mờ bởi MusicXML, nhưng hàng ngàn bản nhạc trong định dạng này thì vẫn có sẵn trên mạng.

                                                                                                                                                Capella (*.cap, *.capx) (dùng cho nhập dữ liệu)

                                                                                                                                                Tập tin CAP và CAPX thì được tạo bởi trình soạn thảo bản nhạc "Capella".

                                                                                                                                                MuseScore nhập dữ liệu khá chính xác từ phiên bản 2000 (3.0) hoặc cao hơn của Capella (2.x thì không làm việc, định dạng *.all từ phiên bản 1.x thì hoàn toàn không hỗ trợ).

                                                                                                                                                Bagpipe Music Writer (*.bww) (dùng cho nhập dữ liệu)

                                                                                                                                                Tập tin BWW được tạo bởi trình soạn thảo nhạc niche, "Bagpipe Music Writer".

                                                                                                                                                BB (*.mgu, *.sgu) (dùng cho nhập dữ liệu)

                                                                                                                                                Tập tin BB được tạo bởi phần mềm hòa nhạc, "Band-in-a-Box".

                                                                                                                                                Hiện tại MuseScore đang thử nghiệm hỗ trợ cho tập tin này.

                                                                                                                                                Overture (*.ove) (dùng cho nhập dữ liệu)

                                                                                                                                                Tập tin OVE được tạo bởi trình soạn thảo nhạc "Overture".

                                                                                                                                                Định dạng này chủ yếu phổ biến trong môi trường ngôn ngữ Trung Quốc, như Lục địa Trung Quốc, Hong Kong, và Taiwan.

                                                                                                                                                Hiện tại MuseScore đang thử nghiệm hỗ trợ cho tập tin này.

                                                                                                                                                Guitar Pro (*.GTP, *.GP3, *.GP4, *.GP5, *.GPX) (dùng cho nhập dữ liệu)

                                                                                                                                                Xem thêm

                                                                                                                                                • Lưu trữ/Xuất dữ liệu/In ấn

                                                                                                                                                Các chức năng mới trong MuseScore 2.0

                                                                                                                                                For an overview of the new features, see What's New in MuseScore 2, Release notes for MuseScore 2.0, Release notes for MuseScore 2.0.1, and Changes in MuseScore 2.0.
                                                                                                                                                Documentation of new features are available in the chapter they belong to logically (except the one that is referring to upgrading from 1.3 to 2.0) , but for users coming from 1.x here's a collection of links to be able to see at a glance what can be done now...

                                                                                                                                                See also

                                                                                                                                                • Album (→Advanced topics)
                                                                                                                                                • View modes: Continuous view and Navigator (→Basics)
                                                                                                                                                • Copy and paste: Selection filter (→Basics)
                                                                                                                                                • Custom palette (→Advanced topics)
                                                                                                                                                • Early music features (→Advanced topics)
                                                                                                                                                • Figured bass (→Advanced topics)
                                                                                                                                                • Grid-based movement of symbols and staff text (→Text)
                                                                                                                                                • Image capture (→Formatting)
                                                                                                                                                • Inspector and object properties (→Advanced topics)
                                                                                                                                                • Measure operations: Split and join (→Basics)
                                                                                                                                                • MIDI import (→Sound and playback)
                                                                                                                                                • Mid-staff instrument change (→Sound and playback)
                                                                                                                                                • Part extraction (new options available) (→Advanced Topic)
                                                                                                                                                • Rehearsal marks: Automatic next rehearsal mark and Search for a rehearsal mark (→Text)
                                                                                                                                                • Save/Export (→Basics)
                                                                                                                                                • Staff type properties (→Advanced topics)
                                                                                                                                                • Swing (→Sound and playback)
                                                                                                                                                • Tablature (→Advanced topics)
                                                                                                                                                • Nonexistant node nid: 39841 (→Advanced topics)
                                                                                                                                                • Master palette (→Advanced topics)
                                                                                                                                                • Layout and formatting (some options have changed, and there is a new "apply to all parts" feature) (→Formatting)
                                                                                                                                                • Break and spacer: Section break (→Formatting)
                                                                                                                                                • Selection modes: Select all similar new options (same subtype) (→Basics)
                                                                                                                                                • Create a new score: start center (→Basics)
                                                                                                                                                • Languages settings and translation updates (→Basics)
                                                                                                                                                • Helping and improve translation (→Support)
                                                                                                                                                • Accidentals: Respell pitches (→Notation)
                                                                                                                                                • Re-pitch mode (→Advanced topics)
                                                                                                                                                • Tools (→Advanced topics)
                                                                                                                                                • Meta tags (→Advanced topics)

                                                                                                                                                Upgrade from MuseScore 1.x

                                                                                                                                                How to upgrade MuseScore

                                                                                                                                                Download and install the latest version from the download page as described at Installation. If you want to remove 1.x, check the installation page of the 1.x handbook.

                                                                                                                                                Installing MuseScore 2 won't uninstall 1.x—both versions can coexist peacefully and can even be used in parallel. So this isn't really an upgrade but an installation of a new and different program.

                                                                                                                                                Opening 1.x scores in MuseScore 2

                                                                                                                                                MuseScore 2 significantly improved the typesetting quality to make scores attractive and easier to read. Improvements cover many items such as beam slope, stem height, layout of accidentals in chords and general note spacing. However, this means that sheet music made with MuseScore 1.x looks slightly different from sheet music made with 2.x.

                                                                                                                                                It also means that scores saved with 2.x won't open with 1.x.

                                                                                                                                                To prevent you from accidentally overwriting your 1.x scores, 2.x treats them as an import, which means:

                                                                                                                                                • The score gets marked as being modified, even if you haven't change anything
                                                                                                                                                • On exiting MuseScore you're asked to save the score (as a result from the above)
                                                                                                                                                • MuseScore uses the "Save As" dialog to save it, not the "Save" dialog
                                                                                                                                                • MuseScore uses the score's title to create a default filename rather than taking the old filename

                                                                                                                                                Relayout

                                                                                                                                                If you did not manually adjust the layout of a 1.x score, then MuseScore uses the 2.x typesetting engine to layout the score. If you did touch the layout of the 1.x score, the individual adjustments you may have made should remain after opening it in MuseScore 2.x, but due to slight changes in the surrounding layout they may still not appear correct in context. If you wish to reset even manual adjustments to use the 2.x typesetting engine throughout, select the complete score with the shortcut Ctrl+A (Mac: Cmd+A) and reset the layout with Ctrl+R (Mac: Cmd+R).

                                                                                                                                                Getting the sound from MuseScore 1.x

                                                                                                                                                While the sound in 2.x has been much improved, you may still prefer the sound from MuseScore 1.x. In that case, you can get the 1.x sound in 2.x by downloading the 1.3 SoundFont and add it in 2.x. You can do this in two steps:

                                                                                                                                                1. Download the 1.3 SoundFont named TimGM6mb
                                                                                                                                                2. Install and use the TimGM6mb SoundFont in 2.0

                                                                                                                                                Hỗ trợ

                                                                                                                                                This chapter describes how to find help using MuseScore: the best places to look, the best way to ask a question on the forums, and tips for reporting a bug.

                                                                                                                                                Helping improve translations

                                                                                                                                                You can help translate the MuseScore software and documentation into your own language, as mentioned in Development / Translating.

                                                                                                                                                Software translation

                                                                                                                                                1. Ask in the forum to improve translation
                                                                                                                                                2. Connect to Transifex/MuseScore http://translate.musescore.org, which will redirect you to https://www.transifex.com/projects/p/musescore
                                                                                                                                                3. Select the language and then the section you want to help with (musescore or instruments)
                                                                                                                                                4. Click on the "translate" button (the button text will depend on your language...)
                                                                                                                                                5. Search for "strings" (informational meaning) you want to translate (you could filter "already translated items")

                                                                                                                                                Here is a technical explanation: Continuous translation for MuseScore 2.0

                                                                                                                                                Website and handbook translation

                                                                                                                                                See Translation instructions

                                                                                                                                                See also

                                                                                                                                                • Language Settings and Update Translation, Update Translation

                                                                                                                                                How to ask for support or file bug reports

                                                                                                                                                  Before submitting your support request in the forum, please:

                                                                                                                                                  • Look for a solution in the Handbook (search the Handbook)
                                                                                                                                                  • Check the How Tos, FAQ and Tutorials
                                                                                                                                                  • Search the forums of the website to see if someone has already encountered the same problem

                                                                                                                                                  If posting in either the issue tracker (for established reports), or forum (for inquiries/discussions):

                                                                                                                                                  • Try to reproduce the issue with the latest nightly. You may also view and version history to check whether it has been fixed/implemented already.
                                                                                                                                                  • Please include as much of the following information as you know and limit each issue to one report:

                                                                                                                                                    • Version/revision of MuseScore you are using (e.g. version 2.1, revision 871c8ce). Check Help → About... (Mac: MuseScore → About MuseScore...).
                                                                                                                                                    • Operating system being used (e.g. Windows 7, macOS 10.12 or Ubuntu 14.04)
                                                                                                                                                    • If reporting a bug, describe the precise steps that lead to the problem (where do you click, what keys do you press, what do you see, etc.).
                                                                                                                                                      If you are not able to reproduce the problem with the steps, it is probably not worth reporting it as the developers will not be able to reproduce (and solve) it either. Remember that the goal of a bug report is not only to show the problem, but to allow others to reproduce it easily.
                                                                                                                                                  • Please remember:

                                                                                                                                                    • attach the score that shows the problem —use the "File attachments" option at the bottom of the page, just above the Save and Preview buttons when you're typing your post.

                                                                                                                                                  External links

                                                                                                                                                  • How to write a good bug report: step-by-step instructions

                                                                                                                                                  Revert to factory settings

                                                                                                                                                  Recent versions of MuseScore have the option to revert back to the standard built-in presets or "factory-settings". This can be necessary if your settings are corrupted. Warning: Reverting to factory settings removes any changes you have made to the preferences, palettes, or window settings. This is not a commonly needed procedure; consult the forums first, as there may be a way to solve your problem without resetting everything.

                                                                                                                                                  MuseScore 2.0.3 and above

                                                                                                                                                  In recent versions it is possible to revert from within MuseScore, providing that MuseScore itself is able to start.
                                                                                                                                                  Go to Help→Revert to Factory Settings. A warning dialog will appear:

                                                                                                                                                  Revert to factory settings

                                                                                                                                                  Clicking Yes resets all MuseScore's settings as if the program was installed for the first time, and MuseScore will immediately restart. No will safely cancel the revert.

                                                                                                                                                  MuseScore 2.0 through 2.0.2

                                                                                                                                                  In older versions of MuseScore, or in later versions if they do not start, you must run this process via the command line.

                                                                                                                                                  Instructions for Windows

                                                                                                                                                  1. If you have MuseScore open, you need to close it first (File→Quit)
                                                                                                                                                  2. Type Windows key+R to open the Run dialog (The Windows key is the one with the logo for Microsoft Windows). Alternatively select Start using your mouse.
                                                                                                                                                  3. Click Browse...
                                                                                                                                                  4. Look for MuseScore.exe on your computer. The location may vary depending on your installation, but it is probably something similar to My Computer → Local Disk → Program Files (or Program Files (x86)) → MuseScore 2 → bin → MuseScore.exe
                                                                                                                                                  5. Click Open to leave the Browse dialog and return to the Run dialog. The following text (or something similar) should display in the Run dialog

                                                                                                                                                    C:\Program Files\MuseScore 2\bin\MuseScore.exe (actually %ProgramFiles%\MuseScore 2\bin\MuseScore.exe)

                                                                                                                                                    For 64-bit Windows, the location is

                                                                                                                                                    C:\Program Files (x86)\MuseScore 2\bin\MuseScore.exe (actually %ProgramFiles(x86)%\MuseScore 2\bin\MuseScore.exe)

                                                                                                                                                    For the Windows Store version (Windows 10), it is pretty well hidden, search for it via Windows Explorer

                                                                                                                                                  6. Click after the quote and add a space followed by a hyphen and a capital F: -F

                                                                                                                                                  7. Press OK

                                                                                                                                                  After a few seconds, MuseScore should start and all the settings reverted to "factory settings".

                                                                                                                                                  For advanced users, the main preference file is located at:

                                                                                                                                                  • Windows Vista or later: C:\Users\<USERNAME>\AppData\Roaming\MuseScore\MuseScore2.ini
                                                                                                                                                    (actually %APPDATA%\MuseScore\MuseScore2.ini)
                                                                                                                                                  • Windows XP or earlier: C:\Documents and Settings\<USERNAME>\Application Data\MuseScore\MuseScore2.ini

                                                                                                                                                  The other preferences (palettes, session, shortcuts, workspaces...) are in:

                                                                                                                                                  • Windows Vista or later: C:\Users\<USERNAME>\AppData\Local\MuseScore\MuseScore2\
                                                                                                                                                    (actually %APPDATA%\MuseScore\MuseScore2\)
                                                                                                                                                  • Windows XP or earlier: C:\Documents and Settings\<USERNAME>\Local Settings\Application Data\MuseScore\MuseScore2\

                                                                                                                                                    For the Windows Store version (Windows 10), these are pretty well hidden, search for them via Windows Explorer

                                                                                                                                                  Instructions for MacOS

                                                                                                                                                  1. If you have MuseScore open, you need to quit the application first (MuseScore→Quit)
                                                                                                                                                  2. Open Terminal (in Applications/Utilities, or via Spotlight search) and a session window should appear
                                                                                                                                                  3. Type (or copy/paste) the following command into your terminal line (include the '/' at the front):

                                                                                                                                                    /Applications/MuseScore\ 2.app/Contents/MacOS/mscore -F
                                                                                                                                                    

                                                                                                                                                  This resets all MuseScore preferences to factory settings and immediately launches the MuseScore application. Note that you cannot quit the Terminal without quitting MuseScore. You can safely quit MuseScore, quit the Terminal, and then reopen MuseScore in the normal fashion, ready to continue using.

                                                                                                                                                  For advanced users, the main MuseScore preference file is located at ~/Library/Preferences/org.musescore.MuseScore2.plist.
                                                                                                                                                  The other preferences (palettes, session, shortcuts, workspaces...) are in ~/Library/Application\ Support/MuseScore/MuseScore2/.

                                                                                                                                                  Instructions for Linux

                                                                                                                                                  The following is true for Ubuntu, and most likely all other Linux distributions and UNIX-style operating systems.

                                                                                                                                                  1. If you have MuseScore open, you need to quit the application first (File→Quit)
                                                                                                                                                  2. From the Ubuntu main menu, choose Applications→Accessories→Terminal. A Terminal session window should appear
                                                                                                                                                  3. Type, (or copy/paste) the following command into your terminal line (Ctrl+Shift+V to paste in Terminal):

                                                                                                                                                    mscore -F
                                                                                                                                                    

                                                                                                                                                    Or, if you are using the AppImage version, you must first use the cd command to change directory to wherever you saved the AppImage. For example, if you saved it to your Desktop:

                                                                                                                                                    cd ~/Desktop
                                                                                                                                                    ./MuseScore*.AppImage -F
                                                                                                                                                    

                                                                                                                                                  This resets all MuseScore preferences to factory settings and immediately launches the MuseScore application. You can now quit Terminal, and continue using MuseScore.

                                                                                                                                                  For advanced users, the main MuseScore preference file is located at ~/.config/MuseScore/MuseScore2.ini.
                                                                                                                                                  The other preferences (palettes, session, shortcuts, workspaces...) are in ~/.local/share/data/MuseScore/MuseScore2/.

                                                                                                                                                  See also

                                                                                                                                                  • Command line options

                                                                                                                                                  Known incompatibilities

                                                                                                                                                  Hardware incompatibilities

                                                                                                                                                  The following software is known to crash MuseScore on startup:

                                                                                                                                                  • Samson USB Microphone, driver name "Samson ASIO Driver", samsonasiodriver.dll. More info
                                                                                                                                                  • Digidesign MME Refresh Service. More info
                                                                                                                                                  • Windows XP SP3 + Realtek Azalia Audio Driver. More info
                                                                                                                                                  • Wacom tablet. More info and QTBUG-6127

                                                                                                                                                  Software incompatibilities

                                                                                                                                                  • Maple virtual cable is known to prevent MuseScore from closing properly.
                                                                                                                                                  • KDE (Linux) window settings can cause the whole window to move when dragging a note. Changing the window settings of the operating system avoids the problem.
                                                                                                                                                  • Nitro PDF Creator may prevent MuseScore 2 from starting on Windows 10, if being used as the default printer. Same for Amyumi/Quickbooks PDF Printer, see here and also some cloud printing services, see here.
                                                                                                                                                  • Creative Sound Blaster Z Series ASIO driver may prevent MuseScore 2 from starting on Windows 10.
                                                                                                                                                  • Untrusted Font Blocking policy prevents MuseScore 2 from starting (except in debug mode, i.e. using the -d option) on Windows 10. (Solution in the links provided here)

                                                                                                                                                  AVG Internet Security hangs MuseScore

                                                                                                                                                  MuseScore requires access to your internet connection with AVG. MuseScore doesn't need an internet connection to function, but if AVG blocks it, MuseScore hangs.

                                                                                                                                                  If AVG prompts you, Allow MuseScore and check "Save my answer as a permanent rule and do not ask me next time."

                                                                                                                                                  If it doesn't prompt you anymore,

                                                                                                                                                  1. Open the AVG user interface (right-click on the AVG icon, close to your clock -> Open AVG User Interface
                                                                                                                                                  2. Click on Firewall
                                                                                                                                                  3. Click Advanced Settings
                                                                                                                                                  4. Click Applications
                                                                                                                                                  5. Find MSCORE.EXE in the list and double click it
                                                                                                                                                  6. Change Application Action to Allow for All

                                                                                                                                                  Font problem on macOS

                                                                                                                                                  MuseScore is known to display notes as square when some fonts are damaged on macOS.
                                                                                                                                                  To troubleshoot this issue:

                                                                                                                                                  1. Go to Applications -> Font Book
                                                                                                                                                  2. Select a font and press ⌘+A to select them all
                                                                                                                                                  3. Go to File -> Validate Fonts
                                                                                                                                                  4. If any font is reported as damaged or with minor problems, select it and delete it
                                                                                                                                                  5. Restart MuseScore if necessary

                                                                                                                                                  In Bug in noteheads, a user believes to have found the font "Adobe Jenson Pro (ajenson)" to be the culprit, regardless of not being reported as broken, or problematic as per the above validation, and solved the problem by deleting that font, so this is worth checking too.

                                                                                                                                                  Font problem on Linux

                                                                                                                                                  If the default desktop environment application font is set to bold, MuseScore will not display the notes properly.
                                                                                                                                                  To troubleshoot this issue (gnome 2.*/MATE users):

                                                                                                                                                  1. Right-click on your desktop and select Change Desktop background
                                                                                                                                                  2. Click on Fonts tab
                                                                                                                                                  3. Set Regular style for Application font
                                                                                                                                                  4. Restart MuseScore if necessary

                                                                                                                                                  For GNOME 3/SHELL users

                                                                                                                                                  1. Open the shell and open "Advanced Settings"
                                                                                                                                                  2. Click on the Fonts option in the list
                                                                                                                                                  3. Set the default font to something non-bold
                                                                                                                                                  4. Restart MuseScore if necessary

                                                                                                                                                  Save As dialog empty on Linux

                                                                                                                                                  Some users reported that the Save As dialog is empty on Debian 6.0 and Lubuntu 10.10.
                                                                                                                                                  To troubleshoot this issue:

                                                                                                                                                  1. Type the following in a terminal

                                                                                                                                                    which mscore
                                                                                                                                                    
                                                                                                                                                  2. The command will answer with the path of mscore. Edit it with your preferred text editor and add the following line at the beginning

                                                                                                                                                    export QT_NO_GLIB=1
                                                                                                                                                    

                                                                                                                                                  Launch MuseScore and the problem should be solved.

                                                                                                                                                  Phụ lục

                                                                                                                                                  Keyboard shortcuts

                                                                                                                                                    Most keyboard shortcuts can be customized via the menu: select Edit→Preferences...→Shortcuts (Mac: MuseScore→Preferences...→Shortcuts). Below is a list of some of the initial shortcut settings.

                                                                                                                                                    Navigation

                                                                                                                                                    Beginning of score: Home (Mac: Fn+←)
                                                                                                                                                    Last page of score: End (Mac: Fn+→)
                                                                                                                                                    Find (measure number, rehearsal mark, or pXX when XX is a page number): Ctrl+F (Mac: Cmd+F)

                                                                                                                                                    Next score: Ctrl+Tab
                                                                                                                                                    Previous score: Shift+Ctrl+Tab

                                                                                                                                                    Zoom in: Ctrl++ (doesn't work on some systems) (Mac: Cmd++); or Ctrl (Mac: Cmd) + scroll up
                                                                                                                                                    Zoom out: Ctrl+- (Mac: Cmd+-); or Ctrl (Mac: Cmd) + scroll down

                                                                                                                                                    Next page: Pg Dn; or Shift + scroll down (Mac: Fn+↓)
                                                                                                                                                    Previous page: Pg Up; or Shift + scroll up (Mac: Fn+↑)

                                                                                                                                                    Next measure: Ctrl+→ (Mac: Cmd+→)
                                                                                                                                                    Previous measure: Ctrl+← (Mac: Cmd+←)

                                                                                                                                                    Next note: →
                                                                                                                                                    Previous note: ←

                                                                                                                                                    Note below (within a chord or on lower staff): Alt+↓
                                                                                                                                                    Note above (within a chord or on higher staff): Alt+↑

                                                                                                                                                    Top note in chord: Ctrl+Alt+↑ (Ubuntu uses this shortcut for Workspaces instead)
                                                                                                                                                    Bottom note in chord: Ctrl+Alt+↓ (Ubuntu uses this shortcut for Workspaces instead)

                                                                                                                                                    Note input

                                                                                                                                                    Begin note input mode: N
                                                                                                                                                    Leave note input mode: N or Esc

                                                                                                                                                    Duration

                                                                                                                                                    1 ... 9 selects a duration. See also Note input.

                                                                                                                                                    Half duration of previous note: Q
                                                                                                                                                    Double duration of previous note: W
                                                                                                                                                    Decrease duration by one dot: (as of version 2.1) Shift+Q (e.g. a dotted quarter note becomes a quarter note; a quarter note becomes a dotted eighth note)
                                                                                                                                                    Increase duration by one dot : (as of version 2.1) Shift+W (e.g. an eighth note becomes a dotted eighth note; a dotted eighth note becomes a quarter note)

                                                                                                                                                    Voices

                                                                                                                                                    To select a voice in note input mode.

                                                                                                                                                    Voice 1: Ctrl+Alt+1 (Mac: Cmd+Option+1)
                                                                                                                                                    Voice 2: Ctrl+Alt+2 (Mac: Cmd+Option+2)
                                                                                                                                                    Voice 3: Ctrl+Alt+3 (Mac: Cmd+Option+3)
                                                                                                                                                    Voice 4: Ctrl+Alt+4 (Mac: Cmd+Option+4)

                                                                                                                                                    Pitch

                                                                                                                                                    Pitches can be entered by their letter name (A-G), or via MIDI keyboard. See Note input for full details.

                                                                                                                                                    Repeat previous note or chord: R (the repeat can be of a different note value by selecting duration beforehand)

                                                                                                                                                    Repeat selection: R (The selection will be repeated from the first note position after the end of the selection)

                                                                                                                                                    Raise pitch by octave: Ctrl+↑ (Mac: Cmd+↑)
                                                                                                                                                    Lower pitch by octave: Ctrl+↓ (Mac: Cmd+↓)

                                                                                                                                                    Raise pitch by semi-tone (prefer sharp): ↑
                                                                                                                                                    Lower pitch by semi-tone (prefer flat): ↓
                                                                                                                                                    Raise pitch diatonically: Alt+Shift+↑
                                                                                                                                                    Lower pitch diatonically: Alt+Shift+↓

                                                                                                                                                    Change enharmonic spelling in both written and concert pitch views: J
                                                                                                                                                    Change enharmonic spelling in current view only: Ctrl+J (Mac: Cmd+J)

                                                                                                                                                    Rest: 0 (zero)

                                                                                                                                                    Interval

                                                                                                                                                    Add interval above current note: Alt+[Number]

                                                                                                                                                    Layout

                                                                                                                                                    Flip direction (stem, slur, tie, tuplet bracket, etc.): X
                                                                                                                                                    Mirror note head: Shift+X
                                                                                                                                                    Increase stretch of measure(s): }
                                                                                                                                                    Decrease stretch of measure(s): {
                                                                                                                                                    Line break on selected barline: Return
                                                                                                                                                    Page break on selected barline: Ctrl+Return (Mac: Cmd+Return)
                                                                                                                                                    Adjust space above a staff (except the top staff) for the whole score: Press Shift, click on the staff and drag

                                                                                                                                                    Articulations

                                                                                                                                                    Staccato: Shift+S
                                                                                                                                                    Tenuto: Shift+N
                                                                                                                                                    Sforzato (accent): Shift+V
                                                                                                                                                    Marcato: Shift+O
                                                                                                                                                    Grace note (acciaccatura): /
                                                                                                                                                    Crescendo: <
                                                                                                                                                    Decrescendo: >

                                                                                                                                                    Text entry

                                                                                                                                                    Staff text: Ctrl+T (Mac:Cmd+T)
                                                                                                                                                    System text: Ctrl+Shift+T (Mac: Cmd+Shift+T)
                                                                                                                                                    Tempo text: Alt+T
                                                                                                                                                    Rehearsal Mark: Ctrl+M (Mac: Cmd+M)

                                                                                                                                                    Lyrics entry

                                                                                                                                                    Enter lyrics on a note: Ctrl+L (Mac: Cmd+L)
                                                                                                                                                    Previous lyric syllable: Shift+Space
                                                                                                                                                    Next lyric syllable: if the current and the next syllables are separated by a '-': -, else Space
                                                                                                                                                    Move lyric syllable left by 0.1sp: ←
                                                                                                                                                    Move lyric syllable right by 0.1sp: →
                                                                                                                                                    Move lyric syllable left by 1sp: Ctrl+← (Mac: Cmd+←)
                                                                                                                                                    Move lyric syllable right by 1sp: Ctrl+→ (Mac: Cmd+→)
                                                                                                                                                    Move lyric syllable left by 0.01sp: Alt+←
                                                                                                                                                    Move lyric syllable right by 0.01sp: Alt+→

                                                                                                                                                    Up to previous stanza: Ctrl+↑ (Mac: Cmd+↑)
                                                                                                                                                    Down to next stanza: Ctrl+↓ (Mac: Cmd+↓)

                                                                                                                                                    For more lyric shortcuts, see Lyrics.

                                                                                                                                                    Display

                                                                                                                                                    Navigator: F12 (Mac: fn+F12)
                                                                                                                                                    Play Panel: F11 (Mac: fn+F11)
                                                                                                                                                    Mixer: F10 (Mac: fn+F10)
                                                                                                                                                    Palette: F9 (Mac: fn+F9)
                                                                                                                                                    Inspector: F8 (Mac: fn+F8)
                                                                                                                                                    Piano Keyboard: P
                                                                                                                                                    Selection filter: F6
                                                                                                                                                    Display full screen: Ctrl+U

                                                                                                                                                    Miscellaneous

                                                                                                                                                    Toggle visibility on selected element(s): V
                                                                                                                                                    Show Instruments dialog: I
                                                                                                                                                    Toggle multi-measure rests on or off: M

                                                                                                                                                    See also

                                                                                                                                                    • Preferences: Shortcuts

                                                                                                                                                    Known limitations of MuseScore 2.x

                                                                                                                                                      While all members of the development team did their best to make the software easy to use and bug-free, there are some known issues and limitations in MuseScore 2.x.

                                                                                                                                                      Local time signatures

                                                                                                                                                      The local time signature feature, which allows you to have different time signatures in different staves at the same time, is very limited. You can only add a local time signature to measures that are empty, and only if there are no linked parts. When adding notes to measures with local time signatures, you can enter notes normally via note input mode, but copy and paste does not work correctly and may lead to corruption or even crashes. The join and split commands are disabled for measures with local time signatures.

                                                                                                                                                      Regroup Rhythms

                                                                                                                                                      The Regroup Rhythms command found under the Layout menu may have unintended side effects, including changing the spelling of pitches and deleting some elements like articulations, glissandos, tremolos, grace notes and, esp. on undo, ties. Use this tool with caution on limited selections, so that you can tell if any unwanted changes are made.

                                                                                                                                                      Tablature staff linked with standard staff

                                                                                                                                                      When entering multiple-note chords on a standard staff in a linked staff/tablature system, the notes should be entered in order from the top (first) string to the bottom string to ensure correct fret assignment.

                                                                                                                                                      This limitation does not apply if entering notes directly onto a tablature staff, or when using an unlinked staff/tablature system.

                                                                                                                                                      Mixer

                                                                                                                                                      Changing settings in the mixer other than the sound doesn't mark the score 'dirty'. That means if you close a score you may not get the warning "Save changes to the score before closing?". Changing mixer values are also not undoable.

                                                                                                                                                      Header & footer

                                                                                                                                                      There is no way to edit Header and Footer in a WYSIWYG manner. The fields in Style → General → Header, Footer, Numbers are plain text. They can contain "HTML like" syntax, but the text style, layout, etc. can't be edited with a WYSIWYG editor.

                                                                                                                                                      Command line options

                                                                                                                                                        You can launch MuseScore from the command line by typing

                                                                                                                                                        • mscore [options] [filename] (Mac and Linux)
                                                                                                                                                        • MuseScore.exe [options] [filename] (Windows)

                                                                                                                                                        [options] and [filename] are optional. For this to work the MuseScore executable must be in %PATH% (Windows) resp. $PATH (Mac and Linux). If it is not, see Revert to factory settings for detailed instructions on how and where to find and execute the MuseScore executable from the command line on the various supported platforms.

                                                                                                                                                        The following options are available

                                                                                                                                                        -?, -h, --help
                                                                                                                                                        Display help (doesn't work on Windows)
                                                                                                                                                        -v, --version
                                                                                                                                                        Displays MuseScore's current version in the command line without starting the graphical interface (doesn't work on Windows)
                                                                                                                                                        --long-version
                                                                                                                                                        Displays MuseScore's current version and revision in the command line without starting the graphical interface (doesn't work on Windows)
                                                                                                                                                        -d, --debug
                                                                                                                                                        Starts MuseScore in debug mode
                                                                                                                                                        -L, --layout-debug
                                                                                                                                                        Starts MuseScore in layout debug mode
                                                                                                                                                        -s, --no-synthesizer
                                                                                                                                                        Disables the integrated software synthesizer
                                                                                                                                                        -m, --no-midi
                                                                                                                                                        Disables MIDI input
                                                                                                                                                        -a, --use-audio <driver>
                                                                                                                                                        Use audio driver: jack, alsa, pulse, portaudio
                                                                                                                                                        -n, --new-score
                                                                                                                                                        Starts with the new score wizard regardless of preference setting for start mode
                                                                                                                                                        -I, --dump-midi-in
                                                                                                                                                        Displays all MIDI input on the console
                                                                                                                                                        -O, --dump-midi-out
                                                                                                                                                        Displays all MIDI output on the console
                                                                                                                                                        -o, --export-to <filename>
                                                                                                                                                        Exports the currently opened file to the specified <filename>. The file type depends on the filename extension. This option switches to the "converter" mode and avoids any graphical interface. You can also add a filename before the -o if you want to import and export files from the command line. For example mscore -o "My Score.pdf" "My Score.mscz"
                                                                                                                                                        -r, --image-resolution <dpi>
                                                                                                                                                        Determines the output resolution for the output to PNG images in the converter mode. The default resolution is taken from Preferences, Export, PNG/SVG.
                                                                                                                                                        -T, --trim-image <margin>
                                                                                                                                                        Trims exported PNG and SVG images to remove surrounding whitespace around the score. The specified number of pixels of whitespace will be added as a margin; use 0 for a tightly cropped image. For SVG, this option works only with single-page scores.
                                                                                                                                                        -x, --gui-scaling <factor>
                                                                                                                                                        Scales the score display and other GUI elements by the specified factor, for use with high resolution displays.
                                                                                                                                                        -D, --monitor-resolution <dpi>
                                                                                                                                                        Specify monitor resolution, for use with high resolution displays (as of version 2.1).
                                                                                                                                                        -S, --style <style>
                                                                                                                                                        Loads a style file; useful when you convert with the -o option
                                                                                                                                                        -p, --plugin <name>
                                                                                                                                                        Execute the named plugin
                                                                                                                                                        --template-mode
                                                                                                                                                        Save template mode, no page size
                                                                                                                                                        -F, --factory-settings
                                                                                                                                                        Use only the standard built-in presets or "factory-settings" and delete preferences. For details, see Revert to factory settings
                                                                                                                                                        -R, --revert-settings
                                                                                                                                                        Use only the standard built-in presets or "factory-settings", but do not delete preferences
                                                                                                                                                        -i, --load-icons
                                                                                                                                                        Load icons from the file system. Useful if you want to edit the MuseScore icons and preview the changes
                                                                                                                                                        -j, --job <filename>
                                                                                                                                                        Process a conversion job (as of version 2.1)
                                                                                                                                                        -e, --experimental
                                                                                                                                                        Enable experimental features. See e.g. Layer (experimental)
                                                                                                                                                        -c, --config-folder <pathname>
                                                                                                                                                        Set config path
                                                                                                                                                        -t, --test-mode
                                                                                                                                                        Enable test mode
                                                                                                                                                        -M, --midi-operations <filename>
                                                                                                                                                        Specify MIDI import operations file; See this example file: midi_import_options.xml
                                                                                                                                                        -w, --no-webview
                                                                                                                                                        No web view in Start Center
                                                                                                                                                        -P, --export-score-parts
                                                                                                                                                        Used with -o <filename>.pdf, export score and parts
                                                                                                                                                        --no-fallback-font
                                                                                                                                                        Don't use Bravura as fallback musical font
                                                                                                                                                        -f, --force
                                                                                                                                                        Used with -o, ignore warnings reg. score being corrupted or from wrong version (as of version 2.1)
                                                                                                                                                        -b, --bitrate <bitrate>
                                                                                                                                                        Used with -o <filename>.mp3, sets bitrate in kbps (as of version 2.1)
                                                                                                                                                        -E, --install-extension <extension file>
                                                                                                                                                        Install an extension, load soundfont as default unless if -e is passed too (as of version 2.3)

                                                                                                                                                        Qt Toolkit Options

                                                                                                                                                        -style= <style>
                                                                                                                                                        -style <style>
                                                                                                                                                        Determines the style of the GUI application. Possible values are "motif", "windows" and "platinum". Depending on the platform other styles may be available
                                                                                                                                                        -stylesheet= <stylesheet>
                                                                                                                                                        -stylesheet <stylesheet>
                                                                                                                                                        Sets the application stylesheet. The value of "stylesheet" is a path to a file that contains the stylesheet
                                                                                                                                                        -platform <platformname[:options]>
                                                                                                                                                        Specifies the Qt Platform Abstraction (QPA) plugin.
                                                                                                                                                        Example: MuseScore.exe -platform windows:fontengine=freetype

                                                                                                                                                        See also

                                                                                                                                                        • Revert to factory settings

                                                                                                                                                        External links

                                                                                                                                                        • How to use the "conversion job" command-line option
                                                                                                                                                        • Layer (experimental)
                                                                                                                                                        • http://doc.qt.io/qt-5/qapplication.html#QApplication
                                                                                                                                                        • http://doc.qt.io/qt-5/qguiapplication.html#QGuiApplication

                                                                                                                                                        Glossary

                                                                                                                                                        The glossary is a work in progress—please help if you can. You can discuss this page in the documentation forum.

                                                                                                                                                        The list below is a glossary of frequently used terms in MuseScore as well as their meaning. The differences between American English and British English are marked with "(AE)" and "(BE)", respectively.

                                                                                                                                                        Acciaccatura
                                                                                                                                                        acciaccatura.png A short →grace note which appears as a small note with a stroke through the stem. It is quickly executed and technically takes no value from its associated note.
                                                                                                                                                        Accidental
                                                                                                                                                        A sign appearing in front of a note that raises or lowers its pitch. The most common accidentals are →sharps, →flats or →naturals, but double sharps and double flats are also used. Also →koron, and →sori and other quarter tone accidentals. Accidentals affect all notes on the same →staff position only for the remainder of the measure in which they occur, but they can be canceled by another accidental. In notes tied across a →barline, the accidental continues across the →barline to the tied note, but not to later untied notes on the same →staff position in that measure.
                                                                                                                                                        Anacrusis
                                                                                                                                                        See →Pickup measure.
                                                                                                                                                        Anchor
                                                                                                                                                        The point of attachment to the score of objects such as Text and Lines: When the object is dragged, the anchor appears as small brown circle connected to the object by a dotted line. Depending on the object selected, its anchor may be attached to either (a) a note (e.g. fingering), (b) a staff line (e.g. staff text), or (c) a barline (e.g. repeats).
                                                                                                                                                        Appoggiatura
                                                                                                                                                        A long →grace note which takes value from its associated note. Its functions include: passing tone, anticipation, struck suspension, and escape tone.
                                                                                                                                                        Bar (BE)
                                                                                                                                                        See →measure.
                                                                                                                                                        Barline
                                                                                                                                                        Vertical line through a →staff, staves, or a full →system that separates →measures.
                                                                                                                                                        Beam
                                                                                                                                                        Notes with a duration of an →eighth or shorter either carry a →flag or a beam. Beams are used for grouping notes.
                                                                                                                                                        BPM
                                                                                                                                                        Beats Per Minute is the unit for measuring tempo. See →metronome mark
                                                                                                                                                        Breve
                                                                                                                                                        Brevis
                                                                                                                                                        A double whole note or breve is a note that has the duration of two whole notes.
                                                                                                                                                        Cent
                                                                                                                                                        An interval equal to one hundredth of a semitone.
                                                                                                                                                        Chord
                                                                                                                                                        A group of two or more notes sounding together. To select a chord in MuseScore, press Shift and click on a note. In the Inspector, however, the word "Chord" only covers notes in the same voice as the selected note(s).
                                                                                                                                                        Clef
                                                                                                                                                        Sign at the beginning of a →staff, used to tell which are the musical notes on the lines and between the lines.
                                                                                                                                                        Clefs are very useful for →transposition.
                                                                                                                                                        Concert pitch
                                                                                                                                                        Enables you to switch between concert pitch and transposing pitch (see Concert pitch and Transposition).
                                                                                                                                                        Crotchet (BE)
                                                                                                                                                        See →Quarter note.
                                                                                                                                                        Demisemiquaver (BE)
                                                                                                                                                        A thirty-second note.
                                                                                                                                                        Duplet
                                                                                                                                                        See →tuplet.
                                                                                                                                                        Edit mode
                                                                                                                                                        The program mode from which you can edit various score elements.
                                                                                                                                                        Eighth note
                                                                                                                                                        A note whose duration is an eighth of a whole note (semibreve). Same as a quaver (BE).
                                                                                                                                                        Endings
                                                                                                                                                        See →volta.
                                                                                                                                                        Enharmonic notes
                                                                                                                                                        Notes that sound the same pitch but are written differently. Example: G♯ and A♭ are enharmonic notes.
                                                                                                                                                        Flag
                                                                                                                                                        See →beam.
                                                                                                                                                        Flat
                                                                                                                                                        Sign (♭) that indicates that the pitch of a note has to be lowered one semitone.
                                                                                                                                                        Grace note
                                                                                                                                                        Grace notes appear as small notes in front of a normal-sized main note. See →acciaccatura and →appoggiatura.
                                                                                                                                                        Grand Staff (AE)
                                                                                                                                                        Great Stave (BE)
                                                                                                                                                        A system of two or more staves, featuring treble and bass clefs, used to notate music for keyboard instruments and the harp.
                                                                                                                                                        Half Note
                                                                                                                                                        A note whose duration is half of a whole note (semibreve). Same as a minim (BE).
                                                                                                                                                        Hemidemisemiquaver (BE)
                                                                                                                                                        A sixty-fourth note.
                                                                                                                                                        Interval
                                                                                                                                                        The difference in pitch between two notes, expressed in terms of the scale degree (e.g. major second, minor third, perfect fifth etc.). See Degree (Music) (Wikipedia).
                                                                                                                                                        Jump
                                                                                                                                                        In MuseScore, "jumps" are notations such as "D.S. al Coda", found in the "Repeats & Jumps" palette.
                                                                                                                                                        Key Signature
                                                                                                                                                        Set of →sharps or →flats at the beginning of the →staves. It gives an idea about the tonality and avoids repeating those signs all along the →staff.
                                                                                                                                                        A key signature with B flat means F major or D minor tonality.
                                                                                                                                                        Koron
                                                                                                                                                        An Iranian →accidental which lowers the pitch of a note by a quarter tone (in comparison to the →flat which lowers a note by a semitone). It is possible to use this accidental in a →key signature.
                                                                                                                                                        See also →sori.
                                                                                                                                                        Longa
                                                                                                                                                        A longa is a quadruple whole note.
                                                                                                                                                        Ledger Line
                                                                                                                                                        Line(s) that are added above or below the staff.
                                                                                                                                                        Measure (AE)
                                                                                                                                                        A segment of time defined by a given number of beats. Dividing music into bars provides regular reference points to pinpoint locations within a piece of music. Same as → bar (BE).
                                                                                                                                                        Metronome mark
                                                                                                                                                        Metronome marks are usually given by a note length equaling a certain playback speed in →BPM. In MuseScore, metronome marks are used in Tempo texts.
                                                                                                                                                        Minim (BE)
                                                                                                                                                        See →Half note.
                                                                                                                                                        Natural
                                                                                                                                                        A natural (♮) is a sign that cancels a previous alteration on notes of the same pitch.
                                                                                                                                                        Normal mode
                                                                                                                                                        The operating mode of MuseScore outside note input mode or edit mode: press Esc to enter it. In Normal mode you can navigate through the score, select and move elements, adjust Inspector properties, and alter the pitches of existing notes.
                                                                                                                                                        Note input mode
                                                                                                                                                        The program mode used for entering music notation.
                                                                                                                                                        Operating System
                                                                                                                                                        OS
                                                                                                                                                        Underlying set of programs which set up a computer, enabling additional programs (such as MuseScore). Popular OSes are Microsoft Windows, macOS, and GNU/Linux.
                                                                                                                                                        Not to be confused with a sheet music →system.
                                                                                                                                                        Part
                                                                                                                                                        Music to be played or sung by one or a group of musicians using the same instrument. In a string quartet, 1st part = Violin 1, 2nd part = Violin 2, 3rd part = Viola, 4th part = Cello, in a choir there might be parts for soprano, alto, tenor and bass. A part has one or more →staves (e.g. Piano has 2 staves, Organ can have 2 or 3 staves).
                                                                                                                                                        Pickup Measure (also known as an Anacrusis or Upbeat)
                                                                                                                                                        Incomplete first measure of a piece or a section of a piece of music. See Measure duration and Create new score: Pickup measure. Also Exclude from measure count.
                                                                                                                                                        Quadruplet
                                                                                                                                                        See →tuplet.
                                                                                                                                                        Quarter note
                                                                                                                                                        A note whose duration is a quarter of a whole note (semibreve). Same as a crotchet (BE).
                                                                                                                                                        Quaver (BE)
                                                                                                                                                        See →eighth note.
                                                                                                                                                        Quintuplet
                                                                                                                                                        See →tuplet.
                                                                                                                                                        Respell Pitches
                                                                                                                                                        Tries to guess the right accidentals for the whole score (see Accidentals).
                                                                                                                                                        Rest
                                                                                                                                                        Interval of silence of a specified duration.
                                                                                                                                                        Re-pitch mode
                                                                                                                                                        Allows you to rewrite an existing passage of music by changing the note pitches without altering the rhythm.
                                                                                                                                                        Semibreve (BE)
                                                                                                                                                        A whole note (AE). It lasts a whole measure in 4/4 time.
                                                                                                                                                        Semiquaver (BE)
                                                                                                                                                        A sixteenth note.
                                                                                                                                                        Semihemidemisemiquaver (Quasihemidemisemiquaver) (BE)
                                                                                                                                                        An hundred and twenty eighth note.
                                                                                                                                                        Sextuplet
                                                                                                                                                        See →tuplet.
                                                                                                                                                        SFZ
                                                                                                                                                        A virtual instrument format supported by MuseScore (along with →SoundFonts). An SFZ library consists of one or more SFZ text files, each defining a particular instrument setup, and many audio sound samples.
                                                                                                                                                        Sharp
                                                                                                                                                        Sign (♯) that indicates that the pitch of a note has to be raised one semitone.
                                                                                                                                                        Slur
                                                                                                                                                        A curved line over or under two or more notes, meaning that the notes will be played smooth and connected (legato).
                                                                                                                                                        See also →tie.
                                                                                                                                                        Sori
                                                                                                                                                        An Iranian →accidental which raises the pitch of a note by a quarter tone (in comparison to the sharp which raises it by a semitone). It is possible to use this accidental in a →key signature.
                                                                                                                                                        See also →koron.
                                                                                                                                                        SoundFont
                                                                                                                                                        A virtual instrument format supported by MuseScore (along with →SFZ). A SoundFont is a special type of file (extension .sf2, or .sf3 if compressed) containing sound samples of one or more musical instruments. In effect, a virtual synthesizer which acts as a sound source for MIDI files. MuseScore 2.2 comes with the SoundFont "MuseScore_General.sf3" pre-installed.
                                                                                                                                                        Spatium (plural: Spatia)
                                                                                                                                                        Space
                                                                                                                                                        Staff Space
                                                                                                                                                        sp (abbr./unit)
                                                                                                                                                        The distance between two lines of a normal 5-line staff. In MuseScore this unit influences most size settings. See also Page settings.
                                                                                                                                                        Staff (AE)
                                                                                                                                                        Stave (BE)
                                                                                                                                                        Group of one to five horizontal lines used to lay on musical signs. In ancient music notation (before 11th century) the staff/stave may have any number of lines (the plural of 'staff' is 'staves', in BE and AE).
                                                                                                                                                        Step-time input
                                                                                                                                                        MuseScore's default note input mode, allowing you to enter music notation one note (or rest) at a time.
                                                                                                                                                        System
                                                                                                                                                        Set of staves to be read simultaneously in a score.
                                                                                                                                                        See also →Operating System (OS).
                                                                                                                                                        Tie

                                                                                                                                                        A curved line between two or more notes on the same pitch to indicate a single note of combined duration:

                                                                                                                                                        • Quarter note + Tie + Quarter note = Half note
                                                                                                                                                        • Quarter note + Tie + Eighth note = Dotted Quarter note
                                                                                                                                                        • Quarter note + Tie + Eighth note + Tie + 16th note = Double Dotted Quarter note

                                                                                                                                                        See also →slur.

                                                                                                                                                        Transposition

                                                                                                                                                        The act of moving the pitches of one or more notes up or down by a constant interval. There may be several reasons for transposing a piece, for example:

                                                                                                                                                        1. The tune is too low or too high for a singer. In this case the whole orchestra will have to be transposed as well—easily done using MuseScore.
                                                                                                                                                        2. The part is written for a particular instrument but needs to be played by a different one.
                                                                                                                                                        3. The score is written for an orchestra and you want to hear what the individual instruments sound like. This requires changing the transposing instrument parts to concert pitch.
                                                                                                                                                        4. A darker or a more brilliant sound is desired.
                                                                                                                                                        Triplet
                                                                                                                                                        See →tuplet.
                                                                                                                                                        Tuplet
                                                                                                                                                        A tuplet divides its next higher note value by a number of notes other than given by the time signature. For example a →triplet divides the next higher note value into three parts, rather than two. Tuplets may be: →triplets, →duplets, →quintuplets, and other.
                                                                                                                                                        Upbeat
                                                                                                                                                        See →pickup measure.
                                                                                                                                                        Velocity
                                                                                                                                                        The velocity property of a note controls how loudly the note is played. This usage of the term comes from MIDI synthesizers. On a keyboard instrument, it is the speed with which a key is pressed that controls its volume. The usual scale for velocity is 0 (silent) to 127 (maximum).
                                                                                                                                                        Voice
                                                                                                                                                        Polyphonic instruments like Keyboards, Violins, or Drums need to write notes or chords of different duration at the same time on the same →staff. To write such things each horizontal succession of notes or chords has to be written on the staff independently. In MuseScore you can have up to 4 voices per staff. Not to be confused with vocalists, singing voices like soprano, alto, tenor and bass, which are better viewed as instruments.
                                                                                                                                                        Volta
                                                                                                                                                        In a repeated section of music, it is common for the last few measures of the section to differ. Markings called voltas are used to indicate how the section is to be ended each time. These markings are often referred to simply as →endings.

                                                                                                                                                        External links

                                                                                                                                                        • http://www.robertcarney.net/musical-terms-definitions.htm
                                                                                                                                                        • https://en.wikipedia.org/wiki/List_of_musical_symbols

                                                                                                                                                        Table of Contents

                                                                                                                                                        Getting started

                                                                                                                                                        • Installation
                                                                                                                                                        • Create new score
                                                                                                                                                        • Language settings and translation updates
                                                                                                                                                        • Checking for updates

                                                                                                                                                        Các thao tác cơ bản

                                                                                                                                                        • Create new score (→Getting started)
                                                                                                                                                        • Note input
                                                                                                                                                        • Concert pitch
                                                                                                                                                        • Copy and paste
                                                                                                                                                        • Edit mode
                                                                                                                                                        • Measure operations
                                                                                                                                                        • Palette
                                                                                                                                                        • Preferences
                                                                                                                                                        • Save/Export/Print
                                                                                                                                                        • Selection modes
                                                                                                                                                        • Undo and redo
                                                                                                                                                        • View modes
                                                                                                                                                        • File format
                                                                                                                                                        • Share scores online

                                                                                                                                                        Notation

                                                                                                                                                        • Note input (→Basics)
                                                                                                                                                        • Palette (→Basics)
                                                                                                                                                        • Accidental
                                                                                                                                                        • Arpeggio and glissando
                                                                                                                                                        • Bar line
                                                                                                                                                        • Beam
                                                                                                                                                        • Bracket
                                                                                                                                                        • Breath and pause
                                                                                                                                                        • Clef
                                                                                                                                                        • Drum notation
                                                                                                                                                        • Grace note
                                                                                                                                                        • Hairpin
                                                                                                                                                        • Key signature
                                                                                                                                                        • Lines
                                                                                                                                                        • Measure rest
                                                                                                                                                        • Repeat
                                                                                                                                                        • Slur
                                                                                                                                                        • Tie
                                                                                                                                                        • Time signature
                                                                                                                                                        • Transposition
                                                                                                                                                        • Tremolo
                                                                                                                                                        • Tuplet
                                                                                                                                                        • Voices
                                                                                                                                                        • Volta (1st and 2nd time endings)

                                                                                                                                                        Sound and playback

                                                                                                                                                        • MIDI import
                                                                                                                                                        • Mid-staff instrument change
                                                                                                                                                        • Play mode
                                                                                                                                                        • Soundfont
                                                                                                                                                        • Swing
                                                                                                                                                        • Tempo
                                                                                                                                                        • Dynamics
                                                                                                                                                        • Change and adjust sound

                                                                                                                                                        Text

                                                                                                                                                        • Grid-based movement of symbols and staff text
                                                                                                                                                        • Rehearsal marks
                                                                                                                                                        • Text editing
                                                                                                                                                        • Text style
                                                                                                                                                        • Chord symbols
                                                                                                                                                        • Fingering
                                                                                                                                                        • Lyrics
                                                                                                                                                        • Tempo (→Sound and playback)

                                                                                                                                                        Formatting

                                                                                                                                                        • Layout and formatting (overview)
                                                                                                                                                        • Breaks and spacers
                                                                                                                                                        • Frame
                                                                                                                                                        • Image
                                                                                                                                                        • Image capture

                                                                                                                                                        Advanced topics

                                                                                                                                                        • Accessibility
                                                                                                                                                        • Album
                                                                                                                                                        • Cross staff beaming
                                                                                                                                                        • Custom palette
                                                                                                                                                        • Early music features
                                                                                                                                                        • Figured bass
                                                                                                                                                        • Fretboard diagram
                                                                                                                                                        • Inspector and object properties
                                                                                                                                                        • Master palette
                                                                                                                                                        • Part extraction
                                                                                                                                                        • Plugins
                                                                                                                                                        • Replace pitches without changing rhythms
                                                                                                                                                        • Score information
                                                                                                                                                        • Staff type properties
                                                                                                                                                        • Tablature
                                                                                                                                                        • Tools
                                                                                                                                                        • Nonexistant node nid: 39841

                                                                                                                                                        New features in MuseScore 2.0

                                                                                                                                                        • What's New in MuseScore 2
                                                                                                                                                        • MuseScore 2.0 Release Notes
                                                                                                                                                        • Changes for MuseScore 2.0.

                                                                                                                                                          • Album (→Advanced topics)
                                                                                                                                                          • View modes: Continuous view and Navigator (→Basics)
                                                                                                                                                          • Copy and paste: Selection filter (→Basics)
                                                                                                                                                          • Custom palette (→Advanced topics)
                                                                                                                                                          • Early music features (→Advanced topics)
                                                                                                                                                          • Figured bass (→Advanced topics)
                                                                                                                                                          • Grid-based movement of symbols and staff text (→Text)
                                                                                                                                                          • Image capture (→Formatting)
                                                                                                                                                          • Inspector and object properties (→Advanced topics)
                                                                                                                                                          • Measure operations: Split and join (→Basics)
                                                                                                                                                          • MIDI import (→Sound and playback)
                                                                                                                                                          • Mid-staff instrument change (→Sound and playback)
                                                                                                                                                          • Part extraction (new options available) (→Advanced Topic)
                                                                                                                                                        • Rehearsal marks: Automatic next rehearsal mark and Search for a rehearsal mark (→Text)
                                                                                                                                                          • Save/Export (→Basics) - Staff type properties (→Advanced topics)
                                                                                                                                                          • Swing (→Sound and playback)
                                                                                                                                                          • Tablature (→Advanced topics)
                                                                                                                                                          • Nonexistant node nid: 39841 (→Advanced topics)
                                                                                                                                                          • Master palette (→Advanced topics)
                                                                                                                                                          • Layout and formatting (some options have changed, and there is a new "apply to all parts" feature) (→Formatting)
                                                                                                                                                          • Breaks and spacers, section break (→Formatting)
                                                                                                                                                          • Selection modes, select all similar new options (same subtype) (→Basics)
                                                                                                                                                          • Create a new score, start center (→Basics)
                                                                                                                                                          • Languages settings and translation Updates (→Basics)
                                                                                                                                                          • Helping and improve translation (→Support)
                                                                                                                                                          • Accidentals, respell pitches (→Notation)
                                                                                                                                                          • Replace pitches without changing rhythms (→Advanced topics)
                                                                                                                                                          • Tools (→Advanced topics)
                                                                                                                                                          • Meta tags (→Advanced topics)
                                                                                                                                                          • Upgrading from MuseScore 1.x

                                                                                                                                                        Support

                                                                                                                                                        • Helping and improve translation
                                                                                                                                                        • How to ask for support or file reports
                                                                                                                                                        • Revert to factory settings
                                                                                                                                                        • Known incompatibilities

                                                                                                                                                        Appendix

                                                                                                                                                        • Keyboard shortcuts
                                                                                                                                                        • Known limitations of MuseScore 2.x
                                                                                                                                                        • Command line options
                                                                                                                                                        • Glossary
                                                                                                                                                        • Handbook for MuseScore 1.x