Notation: Rhythm, meter, and measures
Time signatures
Overview
Time signatures are applied to the score from the "Time Signatures" palette.
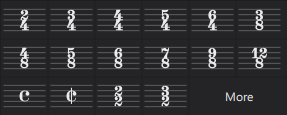
Setting the initial time signature for your score
This is done from page 2 of the New Score dialog.
Adding a time signature change to your score
Use any of the following methods:
- Select an existing time signature, measure, note or rest in the score, and click a time signature in a palette.
- Drag and drop a time signature from a palette onto a space in a measure, or onto an existing time signature.
Deleting a time signature
- To delete a time signature in the score, select it and press Del.
Controlling the visibility of time signatures
To hide/show time signatures on a particular staff:
- Right-click on the staff and choose "Staff/Part properties";
- Uncheck/Check "Show time signature".
To disable/enable all courtesy time signatures (at the end of systems):
- From the menu bar, select Format→Style→Page.
- Uncheck/Check "Create courtesy time signatures".
To hide or show an individual courtesy time signature:
- Select the parent time signature;
- In the Time signature section of the Properties panel, uncheck/check "Show courtesy time signature".
Creating a custom time signature
- In the Time Signatures palette, click on More, then, in the supplementary palette, click on the “Create Time Signature” button;
- In Value enter the Numerator, Denominator, and Text (the latter is optional, when you need the display to be different from the actual time signature);
- Adjust the note beaming in the Beam Groups section (see Beam groups (below)
- Press Add to transfer the newly-created time signature to the Time Signatures palette.
You can also do the same thing from the Master Palette (Shift+F9).
Adding a local time signature for a single staff
In certain cases a score may show staves with different time signatures running at the same time. For example, in the following (J. S. Bach’s Goldberg Variation no. 26):

The global time signature is 3/4, but the time signature of the upper staff has been set independently to 18/16.
To set a local time signature for just one staff:
- Hold down Ctrl (Mac: Cmd) and drag and drop a time signature from a palette onto an empty measure.
Resizing a time signature
- Select a time signature
- In the Time signature section of the Properties panel, adjust the horizontal and vertical Scale values.
Time signature properties
To open the Time signature properties dialog use one of the following:
- Right-click on a time signature and from the context menu select "Time signature properties".
- Select a time signature, then click on Time signature properties in the "Time signature" section of the Properties panel.
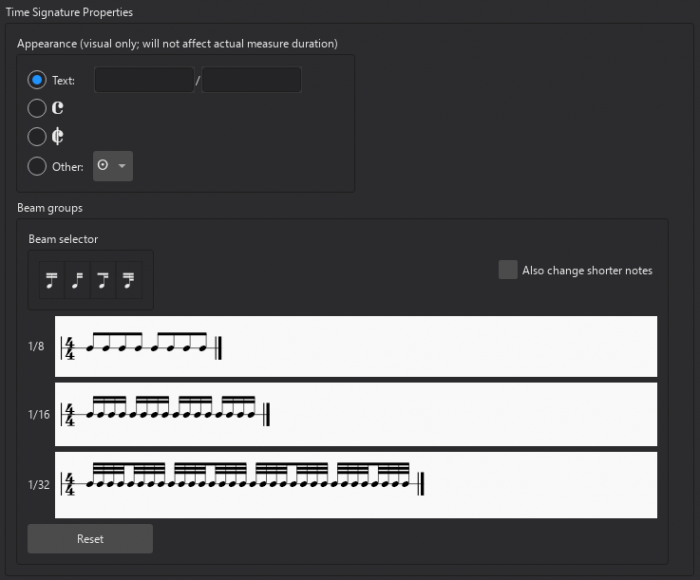
Appearance
This part of the dialog allows you to adjust the nominal appearance of the signature without affecting its underlying rhythmic value.
- Text: Insert the nominal numerator and denominator that you wish to appear on the score.
Alternatively, you can make a selection from a range of time signature symbols below.
Beam Groups
See the Beams chapter.
Time signature style
There are a few global style properties for time signatures (see Format→Style).
- Create courtesy time signatures: Found in the Clefs, key & time signatures section. Check or uncheck to turn on or off.
- Clef to time signature / Key signature to time signature / Barline to time signature / Time signature to barline / Time signature to first note: Found in the Measure section. Allows you to set spacing for various aspects of time signature layout.
音符的符干和符尾
音符的符干方向
默认的音符符干方向
MuseScore 按照音乐理论的惯例对齐声部1的音符的符干。相比之下,声部2和声部4的符干默认指向下,而声部3的符干则默认向上。当声部2或声部4添加了音符时,声部1的音符符干会自动向上翻转。
翻转音符符干的方向
- 如果有的话,选择音符符头、符干或附在音符上的符杠;
- 使用以下任何一种方法:
- 在键盘上按下 X 键
- 点击输入音符工具栏里的“翻转方向”的图标
- 从属性面板的符干选项卡中选择符干方向
该操作也会翻转任何连接该音符的符杠。
调整符干长度
- 选择符干
- 使用以下任何一种方法:
- 在键盘上按下 ↑ / ↓ 键以拉长或缩短符干
- 在属性面板中改变长度的值
创建没有符干的音符
如果要隐藏单个音符的符干,请按如下操作:
- 选择一个或更多的符头
- 前往属性面板
- 点击符干选项卡
- 勾选无符干前的复选框
如果需要隐藏谱表/分谱中的所有符干:
- 右键谱表,选择谱表/分谱属性
- 点击高级样式属性
- 勾选无符干前的复选框
音符的符干和符尾的属性
您可以通过属性面板中音符部分的符干选项卡编辑符干和符尾的特定属性:
- 无符干 将会移除所选音符的符干,并断开与其连接的符杠
- 符干方向:
- 自动将会根据所选音符的声部确定符干的方向
- ↑(上箭头) 和 ↓(下箭头) 将会覆盖默认的符干方向,使用所选的符杆方向。
- 符尾样式将会设置整个乐谱的符尾外观为传统(默认)或 直线
- 粗细 决定符干的粗细
- 长度 决定符干的长度
- 符干偏移可以用于在水平与垂直方向上移动符干
音符符干和符尾的样式设置
如要设置全局的符干粗细与符尾样式,您也可以在 格式→样式→音符中设置这些。
另请参阅
Beams
Overview
A beam is a line connecting consecutive notes to indicate rhythmic grouping of eighth or shorter notes (Wikipedia). You can change control the presence or absence of beams between notes as well as their appearance.
Controlling which notes are beamed
The default beaming of notes is determined by properties of the time signature. You can edit those defaults and thus affect the beaming of all notes within that time signature, and you can also override the beaming of individual notes to differ from the time signature defaults.
Setting the default beaming for a time signature
See the main chapter Time signatures
Each time signature has a set of beaming defaults that control the beaming of all notes in that time signature. Since you will normally want the beaming consistent throughout the score, this is usually the place to start when altering the beaming. To edit the defaults for a given time signature, use the Time signature properties dialog.
Accessing Time signature properties
- Select a time signature within the score
- Click the Time signature properties button in the Properties panel
- Edit the Beam Groups section as explained below
You can also access this dialog by right-clicking a time signature.
Note: the settings made in this dialog are per score and also per staff. To apply changes to other staves within the same score, you can Ctrl+Shift+drag the time signature to another staff, which acts similarly to adding it from the palette. To make a customized time signature available to other scores, Ctrl+Shift+drag it back to the palette.
Beam groups
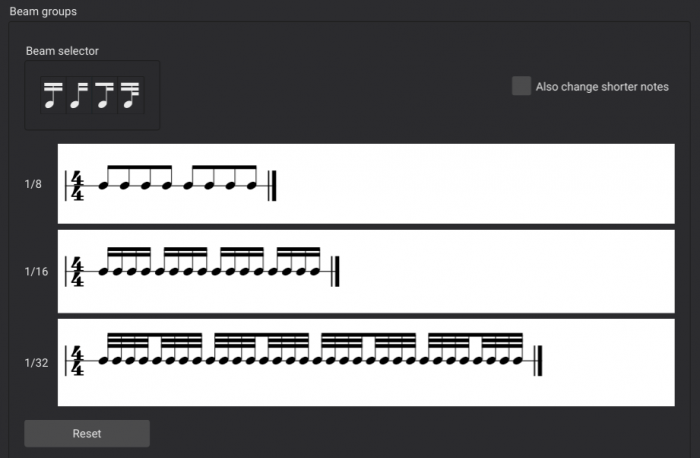
To change the beaming of a note of a given duration on a given beat, click the corresponding note in the Beam groups section to toggle the beam into that note on or off. That is, if you click a note that is currently beamed to the previous note, that will break the beam, and if you click a note that is not currently beamed to the previous note, that will join them. You can also drag one of the Beam selector icons to any given note to set its beaming as explained further below.
If you select the Also change shorter notes option, then changes made to any given note will affect notes on the same beat of shorter durations as well.
Click Reset to remove all changes made since this dialog was opened. Note that this button does not reset settings back to the original defaults from the palette. To revert all changes made since the time signature was added, use the palette to replace the time signature.
Overriding the default beaming for a specific note
The time signature properties control the default beaming for notes in your score, but you can override those defaults on a note-by-note basis, such as to have one measure beamed differently from another. This can be useful when writing certain rhythms that might be more readable beamed in a non-standard manner, or in cases where the options available in Time signature properties are insufficient to create the defaults you want. It is also the only way to create beams over rests.
Beam properties are set on the notes themselves. To change the beam between two notes, you will normally start by selecting the second of the two notes, as most of the beam properties control the beam into a note. Note that these properties can be set from the Properties panel or the Beam properties palette, but this discussion will focus on the Properties panel.
To change the beaming of a given note:
- Select the note
- Select the Beam tab in the Note section of the Properties panel
-
Select one of the icons to set the appropriate property

From left to right, the available properties are:
- Auto: resets the beaming of the note to the time signature default behavior
- No beam: breaks any beams into or out of the selected note
- Break beam left: breaks any beam into the selected note
- Break inner beams (8th): breaks all but one beam into the selected note (for notes that would otherwise have two or more beams)
- Break inner beams (16th): breaks all but two beams into the selected note (for notes that would otherwise have three or more beams)
- Join beams: joins a beam from the previous note into the selected note (unless the previous note is set to No beam)
Beaming over rests

To extend a beam over a rest:
- Select the rest
- Apply the Join beams or Break beam left property
Beaming over barlines

To extend a beam across a barline:
- Select the first note or rest after the barline
- Apply the Join beams property
Controlling the appearance of beams
While breaking and joining beams is a function of the individual notes, the actual appearance of the beam can be controlled by selecting either the beam itself or any of the notes it joins. Thus, to set these properties, you can either:
- Select a note that is currently beamed
- Select the Beam tab within the Note section of the Properties panel
or
- Select the beam itself
Either way, at that point, you will see the options to control the appearance of the beam.
Feathered beams

The buttons in the Feather beams section of the Properties panel can be used to indicate gradual slowing down or speeding up of the joined notes (note this is not supported in playback). These options only apply to 16th and shorter durations using multiple beams.

- None: reset the beam to standard (non-feathered) appearance
- Decelarate: feather the beams to fan inward to indicate a gradual slowing down
- Accelerate: feather the beams to fan outward to indicate a gradual speeding up
Beam angle
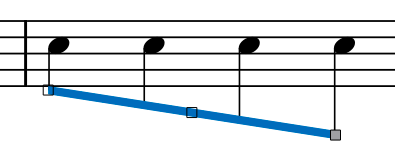
The angle of a beam can be edited directly by selecting it and moving the handles by dragging or using the cursor keys. But you can also use the settings in the Properties panel. You may need to click the More button first to display this section.

The two settings here correspond to the left and right handles on the beam and allow you to set the height of either side of the beam independently.
You can also force a beam to be horizontal by enabling the Force horizontal property.
Beam style
A few global properties of beams can be set from Format→Style→Beams:
- Beam distance: Set the vertical distance from one beam to the next.
- Beam thickness: Set the thickness of all beams.
- Broken beam minimum length : Set the minimum length of broken beams such as those used in dotted rhythms.
- Flatten all beams: Check to make all note beams horizontal, regardless of context.
See also
Regroup rhythms
Overview
Standard music notation normally follows a set of conventions designed to facilitate the reading of rhythm. The basic idea is to group notes in ways that clarify which notes belong to which beat. Rules include:
- sixteenth notes should be beamed in a way that clarifies each beat
- eighth notes should be beamed in a way that clarifies each group of two beats
- longer notes that start off the beat should be broken up with ties to clarify each beat or group of two beats
A full discussion of this topic is beyond the scope of this Handbook, but for more information, see this handout.
Here is an example of a rhythm written incorrectly and then correctly:

MuseScore can correct many of these cases automatically.
Regrouping rhythms
To regroup rhythms according to the common conventions of standard music notation:
- Select the passage you wish to regroup.
- From the main menu, select Tools→Regroup rhythms.
The rhythm itself is not changed—only the notation of it.
See also
连音
创建连音
连音是以一种不同于拍号通常所允许的方式划分节拍的音符组。一拍中由三个八分音符组成的三连音是最常见的连音。
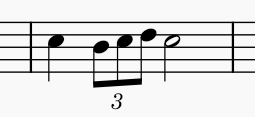
简单连音
如上图显示,三连音这样的简单连音可在音符输入模式或常规模式下输入。
音符输入模式中
- 导航到您想要创建连音位置的音符/休止符(或空白小节)。
- 为整个连音组选择一个时值 (如一组八分三连音占一个四分音符——快捷键 5).
- 使用以下任一命令:
- 按下键盘快捷键输入所需的连音:即Ctrl+3输入三连音、Ctrl+4四连音……Ctrl+9九连音封顶(Mac:Cmd+3……Cmd+9)。
- 从主菜单中选择添加→连音…,然后选取所需连音。
- 从音符输入工具栏中,单击连音图标并从下拉菜单中进行选择。
将自动为您划分音符或休止符,并应用适当的记谱法。
- 输入所需的一系列音符/休止符。
常规模式中
- 选中一个音符或休止符,指定连音组所需的完整时值。你可能需要先行在乐谱中将其创建。因此,若您想要一个八分音符三连音,需要先选中一个四分音符/休止符。
- 使用以下任一命令:
- 按下键盘快捷键输入所需的连音:即Ctrl+3输入三连音、Ctrl+4四连音……最高Ctrl+9九连音封顶(Mac:Cmd+3……Cmd+9)。
- 从主菜单中选择添加→连音…,然后选取所需连音。
- 从音符输入工具栏中,单击连音图标,并从下拉菜单中进行选择。
音符或休止符会自动为您划分,并应用适当的记谱法。
- 输入所需的一系列音符/休止符。
连续连音
若您需要输入一连串的连音,且不想重复连音命令,您可选中首个连音的首音符按照所需次数按下 R键(重复);然后使用键盘箭头来移动后续音符、重新输入或其他音符输入模式。
自定连音
更复杂的连音组可以创建如下:
- 在音符输入模式中,选中一个和连音总时值等值的音符,或在常规模式中选中一个所需整体时值的音符或休止符。
- 从主菜单中打开创建连音对话框(添加→连音…→ 其他…),或在音符输入工具栏中单击连音图标。
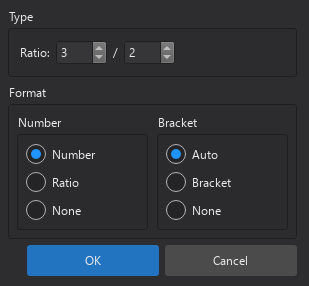
- 在比率字段中,指定连音所需的比率数字。
- 设置数字及括号以获得所需的连音显示。
- 按下 OK 以关闭对话框。
- 输入所需的一系列音符和休止符。
嵌套连音
连音可嵌套于其他连音内部。
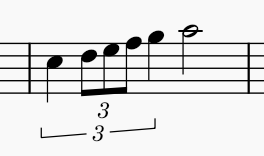
要创建嵌套连音 :
- 按上述方法创建外部连音。
- 在输入单个音符时,再以此方式创建内连音(为内连音选择时值,然后使用任一连音命令对其进行适当划分)。
更改连音的显示
可以选择显示或隐藏连音数字或连音括号及更改其方向或调整括号线条粗细。详请参阅连音属性(下文)。
连音属性
所选连音的显示可在属性面板的连音栏更改。
方向:决定连音记号出现在谱表的上方还是下方。可用选项有“自动”、“上方”(↑)或“下方(↓)。
数字类型:影响数字显示。选项有“数字”、“比率”、“无”。
括号类型:设置括号显示。选项有“自动”、“括号”、“无”。
线条粗细:可见状态下的连音括号粗细。
连音样式
参阅模板和样式
"连音样式"的值可在格式→样式→连音中编辑。
"连音内样式"的值可在格式→样式→文本样式→连音中编辑。
"连音样式"包含
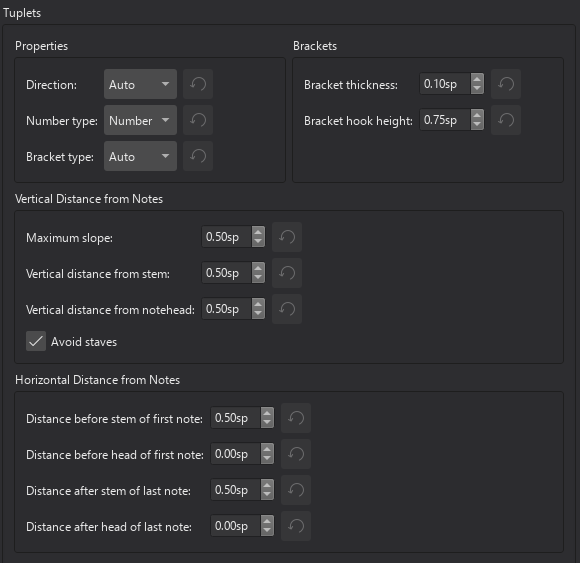
设置项包括:
- 属性
- 方向
- 数字类型
- 括号类型
- 连音括号
- 连音括号粗细
- 括号折钩高度
- 与音符的垂距
- 最大斜度
- 符干垂距
- 符头垂距
- 避开谱表
- 与音符的水平距离
- 与首音符符干的间距
- 与首音符符头的间距
- 与末音符符干的间距
- 与末音符符头的间距
Barlines
A full range of common barlines is contained in the Barlines palette.
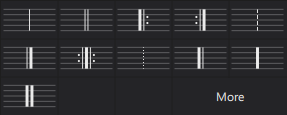
Adding double and other special barlines
Changing barline type for all staves
- Select one or more barlines in a staff ;
- Click on the desired barline in the palette.
Alternatively, you can drag a barline from the palette onto a barline in the score.
Changes are applied automatically to all barlines at the same point in the score.
Changing barline type for a single staff
- Select one or more barlines in the score;
- Hold Ctrl then click on the desired barline in the palette.
Alternatively, you can hold Ctrl and drag a barline from the palette onto a barline in the score.
Only barlines in the one staff are affected.
Adding mid-measure barlines
- Select one or more notes.
- Click on a barline in the palette.
This will add a "barline" in front of each selected note. The barline is for visual purposes and does not factor into any measure operations.
If you wish to divide a measure, inserting a real barline in the process, see Splitting a measure.
Changing barline length
Here we are concerned with the vertical extension of barlines in order to link staves together, or their reduction to create partial barlines.
Extending all barlines in a staff
- Select a barline on the "start" staff;
- Use either of the following:
- Drag the end handle downwards until it meets the destination staff. This method is the best for extending barlines through multiple staves.
- Select the edit handle and press ↓.
- Check the "Span to next staff" in the Barlines section of the Properties panel; then click Set as staff default
- Repeat if required for subsequent staves.
The barline snaps into place, and all other barlines in that staff follow.

Extending selected barlines in a staff
- Select one or more barlines (and their counterparts in the staves below if there are more than two staffs to join).
- Check the "Span to next staff" in the Barlines section of the Properties panel.
Creating partial barlines
Partial barlines can be easily created by adjusting "Span from" and "Span to" in the Barlines section of the Properties panel.
Creating barlines between staves only (Mensurstrich)
See Working with Mensurstrich.
Barline properties
You can edit properties specific to barlines in the Barlines section of the Properties panel:
Style: Used to change selected barlines to one in the dropdown list.
Span to next staff: Check this to make selected barlines extend to the staff beneath.
Span from/to: used to set the vertical start and end points of one or more selected barlines.
Set as staff default: Applies the changes made in Span to next staff and Span from/to to all barlines in the staff.
Span presets: Applies the selected preset to one or more selected barlines in the score.
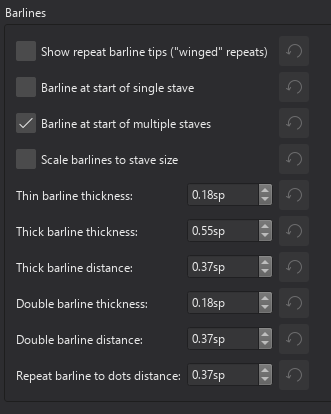
Barline style
Selected properties for all barlines in the score can be changed in Format→Style→Barlines:
See also
- Fixed Measure Widths for a workaround to ensure barlines are aligned vertically between systems.
- Repeat signs
Measure numbering
Showing and hiding measure numbers
Showing measure numbers automatically
By default, MuseScore shows measure numbers at the start of each system except the first one in a section. Numbering starts at the first complete measure in a section.
if you wish to change measure numbering:
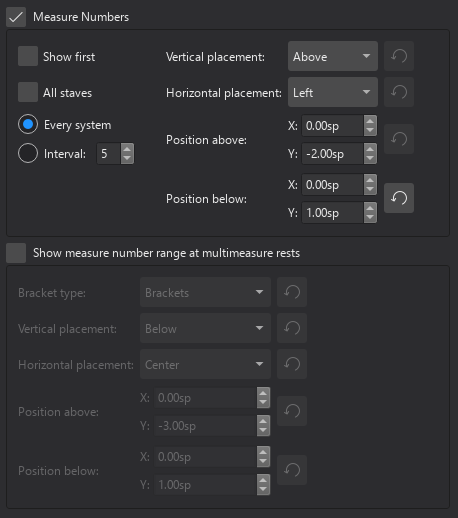
- From the menu bar, select Format→Style→Measure numbers.
- Edit the following properties as required:
- Measure numbers: This is ON by default. Uncheck to turn off measure numbering.
- Show first: Check to show measure number on the first system of a section.
- All staves: Check to show measure numbers on every staff.
- Every system / Interval: If "Every system" is selected, measure numbers are shown at the start of each system. If "Interval" is selected, you can choose a measure interval at which to display measures.
- Make changes to positioning using the controls on the right.
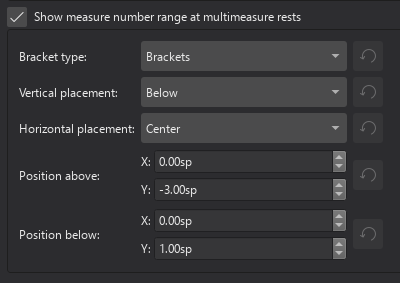
- Edit the display of multimeasure numbers in the section below:
- Show measure number range at multimeasure rests. If checked, you can also customize the appearance and position of the numbering. Unchecked (the default setting), only the count of multimeasure rests is displayed.
Showing measure numbers manually
To always show the number of a particular measure, regardless of style settings, open Measure properties and select "Always show" from the Measure number mode dropdown.
Hiding measure numbers
To hide all measure numbers, uncheck "Measure numbers" in Format→Style→Measure numbers.
To hide the number of a particular measure, regardless of style settings, open Measure properties and select "Always hide" from the Measure number mode dropdown.
Changing the measure number sequence
Excluding a measure from the count
In Measure properties, check "Exclude from measure count" (in the Other pane).
Altering the numbering of a measure
In Measure properties, edit "Add to measure number". Both positive and negative numbers are accepted.
Resetting measure numbering for a new section
By default, numbering of measures always restarts at the beginning of a new section. To prevent this, and make numbering continuous, select the break and in the Properties panel uncheck "Reset measure numbers for new section".
Changing the position of measure numbers
To adjust the position of all measure numbers, edit the X and Y offsets of "Position above" and "Position below" in Format→Style→Measure numbers.
Measure number properties
Note that any changes made to a measure number in the Properties panel may be lost if the layout changes.
Measure number style
Values of the "Style for Measure number" can be edited in Format→Style→Measure number.
Values of the "Style for text inside Measure number" can be edited in Format→Style→Text styles→Measure number.
See also
Other measure-related pages:
Measure rests and multimeasure rests
Measure rest
A measure rest looks like a whole rest, but is centered within a measure and indicates that the entire measure (or a voice within it) is silent:

It is commonly used in all meters (except 4/2 and 8/4).
To create one or more full measure rests
Use the following method if all selected measures are "standard"—i.e. with no custom durations:
1 Select a measure, or range of measures.
2. Press Del (Mac: Backspace).
If one or more of the measures contains a custom duration, use the following method instead:
To create a full measure rest in a particular voice
- In the appropriate voice, enter a rest that extends for the full measure.
- Make sure the rest is selected, then press Ctrl+Shift+Del (Mac: Cmd+Shift+Backspace).
If the voice contains only rests you can select the first rest and invoke the conversion keystroke.
Multimeasure rest
A multimeasure rest is used to indicate a run of empty measures, the number of measures being shown by a figure above/below the staff.

Enabling and disabling multimeasure rests
Multimeasure rests can be turned on/off with the shortcut M (prior to 4.4), Ctrl+ShiftM (as of 4.4, Mac: Cmd+Shift+M), or by checking "Multimeasure Rests" in Format→Style…→Rests.
By default, if multimeasure rests are enabled, any sequence of two or more empty measures is automatically converted to multimeasure rests.
To change the minimum number of empty measures needed to trigger multimeasure rests:
- From the menu, choose Format→Style…→Rests.
- Check "Multimeasure rests" (if the option is not already enabled).
- Edit "Minimum number of empty measures".
Multimeasure rests can be turned on/off independently in the score and instrument parts.
Breaking multimeasure rests
Multimeasure rests are automatically broken at important points, such as double barlines, rehearsal marks, key signature or time signature changes, section breaks etc.
However, you can opt to break a multimeasure rest elsewhere as follows.
- Disable multimeasure rests;
- Right-click on the measure at which you want the multimeasure rest to break, and select Measure properties.
- In the dialog, check "Break multimeasure rest".
- Click OK.
- Re-enable multimeasure rests.
Multimeasure rest properties
You can edit properties specific to multimeasure rests in the Multimeasure rest section of the Properties panel:
Show number: This box is checked by default. Uncheck it to hide the multimeasure number.
Number position: Adjust the vertical position of the multimeasure number, above or below the rest.
Multimeasure rest style
Values of the "Style for text inside Multimeasure rest range" can be edited in Format→Style→Text styles→Multimeasure rest range .
Values of the "Style for Measure numbers" can be set in Format→Style…→Measure numbers:
Others from Format→Style…→Rests:
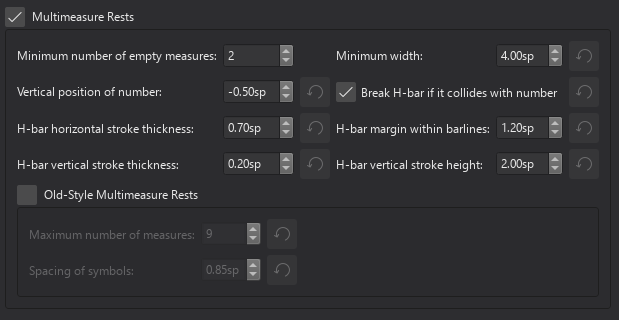
See also
Other measure-related pages:
Pickup and non-metered measures
Creating a pickup measure
A pickup measure, also known as an upbeat or anacrusis, is a partial, or incomplete, measure at the beginning of a score or section.
Note: By convention, measure numbering starts at the first complete measure.
Specifying the pickup duration during score creation
- Click on Measures in the "Additional score information" page (page 2) of the New Score dialog;
- Check "Create pickup measure";
- Choose an underlying time signature using the spin controls below.
Converting a measure into a pickup
- Right-click on the measure and choose Measure properties;
- In the Measure duration section, next to "Actual", choose an underlying "time signature";
- Click OK; or click Apply and then ← or → if you want to configure an adjacent partial measure.
It is accepted musical practice to omit the same duration as the pickup from the final measure of the piece or of the same repeat section. The same method of shortening the measure applies here.
Creating non-metered measures
A non-metered measure is one which is less or greater in duration than the indicated time signature.
A measures of less duration than the indicated signature may be created in exactly the same way as a pickup measure (see above).
Other ways of creating non-metered measures are described below:
Inserting notes and rests
Extra notes/rests can be inserted in a measure with the help of either a keyboard shortcut, or by using a special mode of entry called Insert mode:
Using a keyboard shortcut
- Select the note or rest in the score before which you want to insert notes/rests;
- Enter note-input mode;
- Select a duration;
- Press Ctrl+Shift (Mac: Cmd+Shift) while adding the note/rest from the keyboard or mouse.
Using Insert mode
- Make sure you have the element selected where you want to start inserting notes/rests;
- Click and hold the Note input icon, and select Insert (or if Insert is the current default, just press N);
- Enter a note or rest as you would in step-time mode. Each note is inserted before the current cursor position;
- Move the cursor forward and backward if required (using the arrow keys), to change the insertion point.
If, at any time, the total duration of the notes and rests within the measure does not match the time signature, a small + or - sign will be shown above the measure.
Joining measures
This command joins selected measures into one measure.
Method A. To join two measures only:
- Select the barline between the two measures;
- Press Ctrl+Del; or select Tools→Remove selected range.
Method B. To join any number of measures:
- Select the measures you want to join;
- From the menu bar, select Tools→Measures→Join selected measures.
Notes: (1) If you select measures on only one staff in a score with multiple staves, the same measures will be joined in each staff of the system. (2) Beaming may be automatically modified.
Splitting a measure
This command inserts a barline before a selected note, splitting the measure into two.
Use one of the following methods:
- Select a note; then hold Ctrl and click a barline in a palette.
- Hold Ctrl and drag a barline (from a palette) to a note.
- Select a note; then, from the menu bar, select Tools→Measures→Split Measure Before Selected Note/Rest.
See also
Other measure-related pages:
Measure properties
Opening and using the dialog
The Measure properties dialog allows you to adjust various properties of an individual measure—such as visibility, duration, numbering and width ("Stretch"). To change all measures on the score, use Format → Style window : Score, Page, Measure numbers, and Measure categories. To change all measures of one staff on the whole score, change the staff Staff / Part properties.
-
To open Measure properties, right-click on a measure and select "Measure properties".
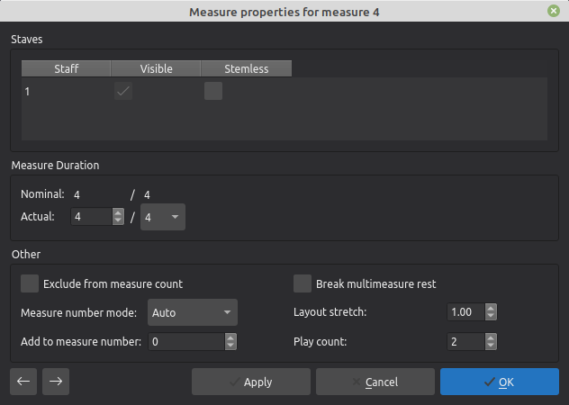
If you only want to adjust one measure, click OK to make the changes permanent. However, if you also want to adjust adjacent measures there is no need to close the dialog; simply click Apply, then use the arrows on the bottom left of the window to move the dialog to the new measure. The new measure number appears both at the top of the dialog and in the status bar.
Staves
Visible : Uncheck/check the boxes to hide/show the selected measure.
Stemless: Check/uncheck the box to hide/show stems.
Measure duration
Nominal: This is the time signature set in the score.
Actual: Adjust these figures to increase or decrease the duration of a measure.
Other
Exclude from measure count: Check to make the count skip the selected measure.
Break multimeasure rest: See Breaking multimeasure rest.
Measure number mode: Allows you to display/hide measure number for the selected measure irrespective of style settings.
Add to measure number: Changes numbering from this measure onwards in the score.
Layout stretch: This property is normally adjusted first with a shortcut (see Stretch); use "Measure properties" for fine adjustment.
Play count: This only appears if the measure is before an end repeat barline. It indicates the number of times the repeat section is played.
The play count of the measure with the end repeat barline must be set one higher than the number of times you want the measure to play (this is usually equal to the number of entries in that volta repeat list + 1).
Take the following score:

Measure 4 should have play count set to 4
Measure 6 should have play count set to 3
See also
- Fixed Measure Widths for a workaround to ensure barlines are aligned vertically between systems.
Other measure-related pages: