声音播放
MuseScore 有内置的“声音播放”功能。本章将介绍回放控制和扩展乐器音效的方式。
中途乐器更换
当音乐家需要在曲目的一个片段中将一种乐器更换为另一种时,更换乐器的指令通常位于该片段开头处该乐器谱表的上方。回到原来的乐器也使用同样的方法。
为了这项目的,MuseScore允许用户插入一种特殊类型的“更换乐器”文字。这种文字和谱表或者总谱文字的不同之处在于,它能和声音播放联系并更换为新乐器的声音。
更换乐器的效果
当乐器被更换时:
添加更换乐器
- 点击一个音符或者休止符作为更换点;
- 按F9来打开符号面板(或者从视图菜单),并点击文字来打开文字面板:
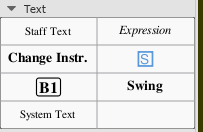
- 单击Change Instr(3.4以前的版本需要双击);
- “Change Instr.”字样会显示在该音符或休止符的上方;
- 双击该文字,并按Ctrl+A以选中其中全部文字;
- 输入您希望显示的文字,并退出编辑模式;
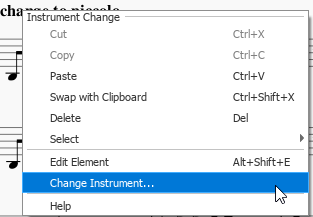
- 右击该文字并点击"改变乐器…":
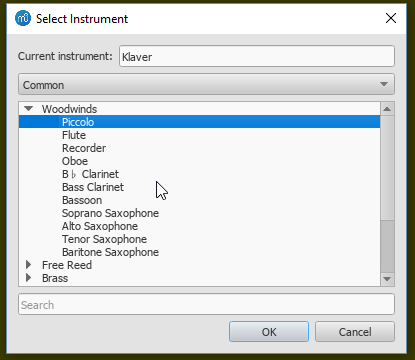
- 选择新乐器,并点击OK:
- 如果需要,在更换点对谱号不正确的谱表插入新的谱号。
注意: 只能对相同种类的谱表实施中途更换乐器。例如,您不能在打击乐谱表中替换为有音高乐器,反之亦然。
参阅
外部链接
混音器
混音器允许您更改乐器声音、调整音量和声像,以及对每个五线谱的播放进行其他调整。
打开混音器
要显示/隐藏混音器,请使用以下方法之一:
- 按下F10(Mac:Fn+F10)。
- 从主菜单中选择视图→混音器。
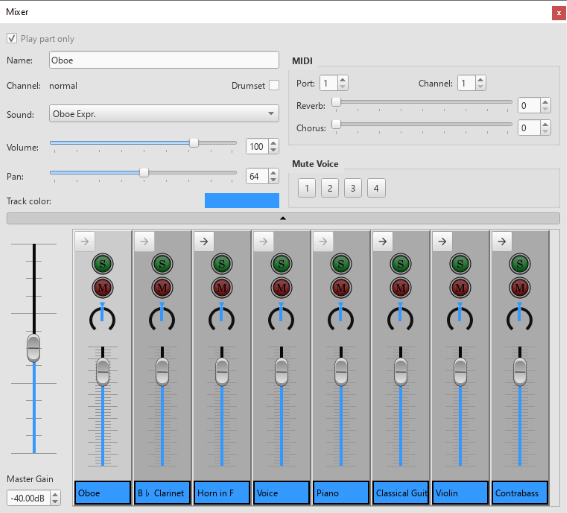
轨道区域
轨道区域在底部,显示全局增益以及一排轨道。 轨道区域显示允许您调整五线谱使用的乐器的音量。 单击其中一个面板将其选中,还允许您在“详细信息”区域中编辑其他乐器参数,例如乐器的选择、名称、声像、合唱、混响等。
MuseScore 为您乐谱中的每个五线谱创建一个“分谱轨道”。 这些分谱轨道可以进一步细分为对应于谱表中使用的不同声音的“通道轨道”。 虽然许多五线谱只需要一个通道轨道,但其他五线谱需要多个通道,以便乐器可以演奏多个 声道(例如,小提琴可以演奏arco、tremolo 或 pizzicato 音色); 或者因为 中途乐器变更。 通过单击轨道控件顶部的箭头按钮,可以显示或隐藏这些额外的通道轨道。
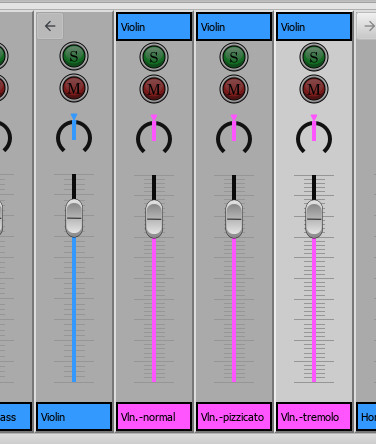
展开了部分轨道,以粉红色显示子轨道。
全局增益
全局增益控制整体输出音量。 要调整它,请单击并拖动滑块手柄或在下面的框中输入一个值。
通道显示箭头
每个分谱轨道顶部都有一个按钮,上面有一个箭头,当该乐器有多个通道时启用,例如小提琴(用于arco,pizzicato,tremolo),否则禁用。 单击时,这将切换是否在其旁边显示谱表的通道轨道。 通道轨道 没有箭头按钮。 相反,会显示它们所属的轨道的名称。
静音和独奏
每个轨道的顶部是一个绿色的独奏(S)按钮和一个红色的静音(M)按钮:每个按钮都可以打开或关闭。 如果选中任何独奏按钮,则只会播放独奏点亮的曲目。 如果没有独奏点亮,则所有部分都可以播放。 静音则相反:任何点亮静音的通道都不会播放。 通过组合使用静音和独奏按钮,您可以控制在播放期间听到哪些乐器。
声相平移
静音按钮下方的拨盘控制左右平移。 您可以单击并拖动刻度盘来更改平移值。 注意:MuseScore 尚不支持分谱轨道的声相值,因此分谱轨道改为显示第一个通道的声相值。 设置分谱轨道的平移值也会自动将其所有子项设置为相同的值。
音量
轨道中间的滑块控制播放音量。 注意:MuseScore 尚不支持分谱轨道的音量值,因此分谱轨道改为显示第一个通道的音量值。 设置分谱轨道的音量值也会自动将其所有子轨道设置为相同的值。
轨道名称
轨道底部的文本框包含轨道声部或通道的当前名称。
详细信息区域
详细信息区域显示并提供对当前所选轨道的更精细控制。

名称
与此轨道相关联的分谱的名称。 分谱轨道和通道轨道都显示分谱名称。
注:分谱名称是可编辑的,但这仅对混音器有效。 通道名称不可编辑。
通道
如果选择了通道轨道,通道名称将显示在此处。
架子鼓
指示此分谱是代表旋律乐器还是架子鼓。 对于常规的旋律乐器,同一音色中的每个音高通常具有相同的音色,而架子鼓音色通常对于每个音高具有不同的音色。
声音(之前称Patch)
要更改轨道中的声音:
- 单击所需曲目,使其详细信息显示在详细信息区域中。
- 单击“音色”下拉列表并选择另一个乐器。
“声音”下拉菜单列出了您当前支持的每种乐器 音色与SFZ文件。 如果您在 合成器 中加载了多个音色库,则所有音色库(和/或 SFZ 文件)中的所有补丁将按照合成器中设置的顺序出现。
提示:要查找乐器,请单击“音色”列表并键入乐器名称的第一个字母。 根据需要重复。
音量
播放声音的整体响度。
声相
声相应用于分谱。
轨道颜色
要更改轨道区域的颜色:
- 单击彩色矩形进入调色板,并进行所需的更改。
设置分谱轨道的颜色也会自动更改其所有子轨道的颜色。
MIDI 控制
端口和通道
输出 MIDI 端口和播放分谱通道。
混响/合唱
发送到 MIDI 输出的混响/合唱效果。 这是发送到 MIDI 设备的信息,不会影响 MuseScore 的内置音频播放
声部静音
这允许您将每个谱表中的个别声部静音。 每一行代表一个分谱中的不同谱表。 因此,按顶行的“2”将使该分谱第一个谱表的第二个声部静音。
隐藏详细信息按钮
在详细信息区域的底部是一个宽按钮,上面有一个小三角形。 单击此按钮将隐藏详细信息区域,为您提供更多空间。 再次单击它将恢复详细信息区域。
注:从“偏好设置”>“乐谱”中,可以选中“在混音器中显示 MIDI 控制”框,以在打开混音器时将其展开。
谱表中的音色变换(pizz.、con sordino等)
一些乐器在混音器中具有多个通道,可用于在乐谱中途改变声音。例如,弦乐器(小提琴、中提琴、大提琴等)的谱表被分配三个通道:一个“arco”(又“普通”),一个代表“pizzicato”,另一个代表“tremolo”。小号谱表有一个“通常”通道,另一个为“静音”保留通道,等等。
以下说明以拨奏琴弦为例,但同样的原则也适用于任何其他允许声音变化的乐器五线谱。
- 选择您想要拨奏的部分的第一个音符;
- 从主菜单中,选择添加→文本→谱表文本 或使用快捷键Ctrl+T;
- 输入“pizz.”。 这个文本仅供视觉参考,不影响播放;
- 右键单击应用的人员文本并选择 谱表文本属性...;
- 在“谱表文本属性”对话框的“切换通道”选项卡中,选择左侧的一个或多个声部;
-
从下拉菜单中选择pizzicato;
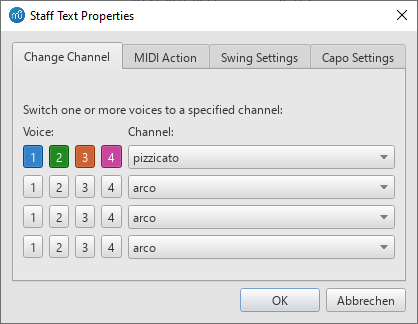
-
点击OK或按↵(返回)返回乐谱。
您添加的谱表文本之后的每个音符现在听起来都令人赞叹。 要在乐曲稍后恢复正常的弦乐声音,请遵循与上述相同的准则,除了在步骤 3 中键入“arco”并在步骤 6 中选择 arco。
大多数情况下,从文本面板调用相应的文本(pizz.、tremolo、arco、mute、open等)要容易得多。
另请参阅
外部链接
- 如何在乐谱中途更改乐器音色(例:拨弦pizz.、con sordino)(MuseScore指南)
钢琴卷帘编辑器
钢琴卷帘编辑器使您可以编辑单独的音符并微调播放效果。
打开钢琴卷帘编辑器
要打开钢琴卷帘编辑器,请在乐谱的小节上右击,然后在菜单中点选点击钢琴卷帘编辑器。钢琴卷帘编辑器将会打开并显示您单击位置的谱表与小节。若钢琴卷帘编辑器已打开,it will be updated to show the new staff and measure you clicked on.
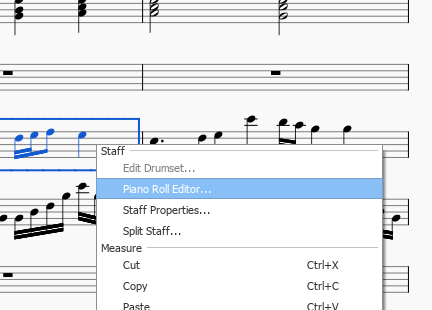
概述
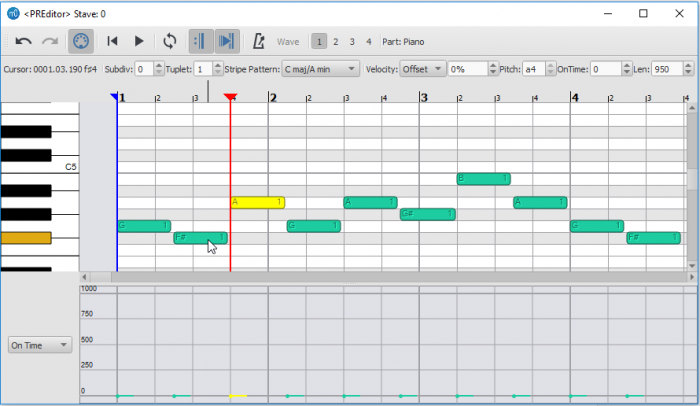
钢琴卷帘编辑器分为以下几个部分:At the very top is a row of buttons and controls that affect playback and can modify notes. The name of the 声部 being edited is at the top right.
The central portion contains the Note Display Area which allows you to view and edit notes. Each note is displayed as a block, with yellow blocks representing selected notes, and darker green blocks representing unselected notes (these colors can be changes in the Preferences). Given sufficient space, each block will display its pitch on the left and the voice it is assigned to on the right. Changing the size of the note blocks is covered in the navigation section.
To the left of the Note Display Area is the Keyboard. By clicking on a key in the Keyboard, you can hear a sample of that note playing. As you move the mouse in either the Node Display Area or the Keyboard, a key on the keyboard will light to corresponding to they pitch your are over. You can also hover your mouse over a particular key to get more information about that pitch. If you are using a Drumkit, the keys of the keyboard will show the name of the drum assigned to that particular pitch. For instruments that are not concert C, the keyboard will be adjusted so that the C of the keyboard matches the C of the instrument.
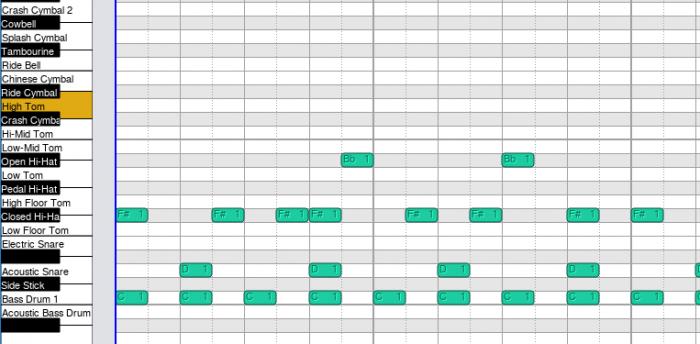
Along the top of the Note Display Area is the Measure Ruler which displays the current position of the playback head, as well as the current looping range if it set.
The bottom of the editor contains the Levels Display Area. It is a bar graph showing extra data values assigned to each note, such as its velocity or cutoff time. To the left of the Levels Display Area is a dropdown menu allowing you to select the type of data you wish to see displayed or edited.
导航
There are several ways to move about in the Piano Roll Editor. First of all, you can click and drag on the scroll bars on the edges of the Note Display Area.
The mouse wheel can also be used to pan and zoom as follows:
- 垂直滚动:滚动鼠标滚轮。
- 水平滚动:Shift + 鼠标滚轮。
- 垂直缩放:Ctrl + 鼠标滚轮。
- 水平缩放:Ctrl+Shift + 鼠标滚轮。
To jump to a particular measure, switch back to score view and find the measure you wish to see. Then right click on the measure and select Piano Roll Editor. The Piano Roll Editor will scroll to center on the measure you clicked.
选中音符
在音符显示区域中,you can click on single notes or click and drag to select a group of notes. Holding down the modifier keys will affect how your selection changes:
- Shift: 反转选区,例:notes that were previously selected are deselected, and notes which were not selected are selected. Useful for toggling a note between selected and not selected.
- Ctrl: 把音符加入选区。
- Ctrl+Shift: 从选区减去音符。
编辑音符
To change the pitch of a selection of notes: Drag a selected note up or down to a new pitch; or press the ↑ or ↓ arrows. Note: Dragging the note horizontally to change the start time is not supported at the moment.
要删除一个区域的音符:按下Del键。
要把一个区域的音符移到另一个声部:Click the desired voice number button at the top of the editor.
要添加音符:
Notes can be inserted by clicking in the Piano Note Area with the modifier keys held. These edit operations will use the beat or subbeat line to the left of the spot where you click as the point where a note is altered:
-
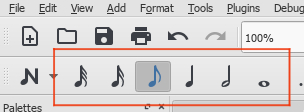
Ctrl: A note of the current insert note duration will be added at the subbeat and pitch where you clicked. The note insert length is the same as the one you use to add notes in note entry mode in the score. If you wish to change the duration, you will need to select this in the Score View as the Piano Roll Editor does not currently have these buttons. If notes already exist in this location, a chunk will be cut out of them to make room for the note you are inserting, unless they happen to have the same start time and duration of the note you're adding, in which case the new note will simply be appended to the existing chord. Tuplets are currently not supported, and so will be ignored.
-
Shift:Looks for a chord that already spans this subbeat line. If it finds one, appends a new pitch to the existing chord. Otherwise, this is a rest and the rest will be replaced with a note of equal start time and duration to the existing rest.
-
Ctrl+Shift:Looks for a chord or rest that spans this subbeat. This chord will be cut in two at this subbeat line. Tuplets are currently not supported, and so will be ignored.
要编辑音符事件数据:
Note event data can be changed in the Levels Display Area. To edit event data such as velocity or cutoff time, first select the notes you wish to edit in the note area. Then click in the Levels Display Area on the corresponding bar; the value of the level will changed to correspond to the point where you clicked. You can also click and drag in this area to change the levels of several notes with a single gesture. If you want the levels to all be set to the same value, hold Shift while dragging. Only selected notes will have their value changed - this is to prevent you from accidentally changing the values of other notes.
The Levels area can display the same data in multiple ways. For example, velocity data can be displayed both as absolute (ie, relative to the output midi volume) and relative (ie, as an offset to the dynamics value). You can switch between these display modes as you see fit.

控制
From left to right the controls have these functions;
首行
- 撤销
- 撤销前一步操作
- 恢复
- 恢复前一步操作
- MIDI Toggle
- Toggles MIDI input
- Rewind
- Rewind to start of score.
- 播放
- Starts/stops playback.
- 循环播放
- Sets the range of and toggles looping playback.
- 重复记号切换开关
- Toggles whether repeats are played.
- 播放时跟随光标
- If set, the window will automatically scroll to center on the playback head during playback.
- 节拍器
- Toggle metronome.
- 波形
- 目前无用。
- 声部号
- Moves selected notes to chosen voice.
- 分谱
- Name of part currently being viewed/edited.
次行
- 光标位置
- Provides feedback on the current measure and pitch of the position of the mouse within the Note Display Area.
- Subdiv
-
Subdivides the beat by adding extra divisions to the Note Display Area. The value indicated the number of time the beat will be subdivided. So for 4/4 time, a division of 2 will draw grid lines at every eighth note; a division of 3 at every sixteenth note, and so on. Setting the subdivision is necessary for some editing operations if you wish to place notes off the beat.
For larger numbers of subdivisions, you may need to be zoomed in to see the extra grid lines since grid lines are not drawn below a certain density. Combines with the tuplet control which also affects grid line placement.
- Tuplet
-
Adds additional grid lines, subdividing the beat to show the rhythmic placement of tuplets. For example, setting tuplets to 3 will show the beat subdivided into tree parts. Combines with the subdiv control to show subdivisions of the tuplet. For example, setting tuplets to 3 and subdiv to 2 will draw grid lines showing the tuplet beats subdivided into two parts - i.e., the beat will be subdivided into 6.
Selecting a tuplet mode other than 1 will disable some of the note insertion tools for the Piano Roll Editor. For larger numbers of subdivisions, you may need to be zoomed in to see the extra grid lines since grid lines are not drawn below a certain density.
- Stripe pattern
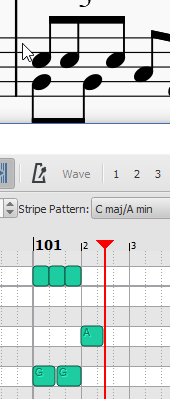
- Changes the pattern of stripes shown behind the notes in the Note Display Area. By default the pitches of C major are highlighted, but you can change this to highlight the pitches of a different key, or even scales such as the diminished or whole tone.
- 力度
-
Shows the velocity of the currently selected note (only one note may be selected). Indicates the loudness of the note. This can be expressed as 'Offset' or 'User':
- Offset: Value is treated as a multiplier for the velocity already set by the dynamics.
- User: This is the raw value being sent to MIDI and overrides the dynamics value. Values are between 0 and 127, where 64 is "middle, neither loud nor soft".
When you switch from User to Offset or visa versa, the value will be recalculated to best match the value in the other system. This way you could, for example, switch to User mode to set the value as you would like it to sound in MIDI output and then switch to Offset so that this value respects the dynamic marking instead of overriding it. At the moment you switch back, the offset value will be recalculated to match the User value in loudness but will no longer act as an override so you may later change the dynamic.
- 音高
- Shows the pitch and octave of the selected note in text format (i.e. f#4).
The pitch will chance if the note is dragged Up or down to a new pitch. Currently cannot be edited. - 起始时间
- Shifts the start of the note in time, which can be used to modify the playing style. Negative values will make the note sound earlier, positive will make it sound later. The duration of the note corresponds to a value of 1000 (e.g. setting the value to 250 will make the note sound 1/4 of its duration later).
- 长度
- Set the time that the note is sounding, which may be used to modify the degree of "legato". Lower values will make the note sound more staccato, higher values will make it sound more legato. The duration of the note corresponds to a length of 1000, but the value can be set higher. 950 is usually considered "non-legato".
键盘
Some keys are hooked up to perform special actions:
- ↑: Move selected notes up one semitone
- ↓: Move selected notes down one semitone
- Del: Delete selected notes
- Space: Start/stop playback
定制
The Piano Roll Editor will display in both normal mode and dark mode. If you wish to change the colors the Piano Roll Editor uses to display in these modes, they can be adjusted in the Preferences under the Advanced tab. All the Piano Roll Editor related properties begin with ui/pianoroll/light for light mode and ui/pianoroll/dark for dark mode.
Swing摇摆节拍
MuseScore中,Swing摇摆节拍功能使得您可以把平常节奏的旋律变为摇摆节奏。Swing摇摆节拍可以自由调节,既可以全局添加到整个乐谱,也可以只应用到一个乐段。
将Swing摇摆节拍应用到乐段
- 单击您想要应用Swing的乐段的首个音符;
- 双击左侧文字面板中的Swing;
- 按需要编辑Swing文字;
-
若您需要改变默认的Swing摇摆节拍设置,右击Swing文本并选择谱表组文字属性... 单击"Swing节拍设定"标签页并按需调整摇摆音符时值及"Swing摇摆节拍比率"。
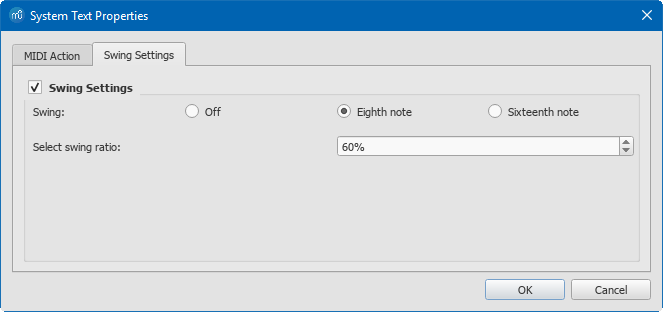
要仅将摆动应用于总谱中的特定谱表:
- 单击Swing将要开始处的音符;
- 添加谱表/总谱文本;
3.按需 编辑文本的外观; - 右键单击文本,选择谱表文本属性...,并单击“Swing设定”选项卡。 可按需修改;
- 若有需要,请对其他谱表重复第1-4步。
速度记号中的三连音
通常,下面两个记号表示Swing摇摆节拍:

MuseScore无法将三连音输入到文本中作为速度记号,但是有另一种解决方法:
- 按照前文所述的办法添加Swing文本并使之不可见(快捷键 V或者取消勾选检视器中的"可见");
- 向乐谱中添加所需速度记号的适当图像。这种图图像可以在底部分"如何"页面下载到:如何创建一个可视化Swing摇摆节拍记号。
- 按需调整图像的大小及位置。
恢复正常节奏
若您想要在应用Swing摇摆之后恢复平常节奏,请:
3.4版本后:
- 从工作区的符号面板中的“更多”处添加Straight文本至“straight”区段的首音符或休止符(见上文)。
3.4版本前:
- 把 Swing文字记号添加到“平常节拍”区段(见上文)。
- 双击添加的Swing文字,将它编辑为相应的的表示节奏恢复原先节奏的内容,例:Straight。
- 右键单击Swing文字,在弹出菜单中选择谱表组文字属性…,然后在弹出窗口中单击"Swing节拍设定"标签页,接着勾选"Swing"关闭选项。
全局应用Swing摇摆节拍
若您欲在整个乐谱中应用Swing摇摆节奏,您可以遵循以下步骤:
- 选择顶部菜单栏的格式 → 样式... → 乐谱。
- 在"Swing节拍设定"部分内设置希望的摇摆音符时值及"Swing节拍比例"。
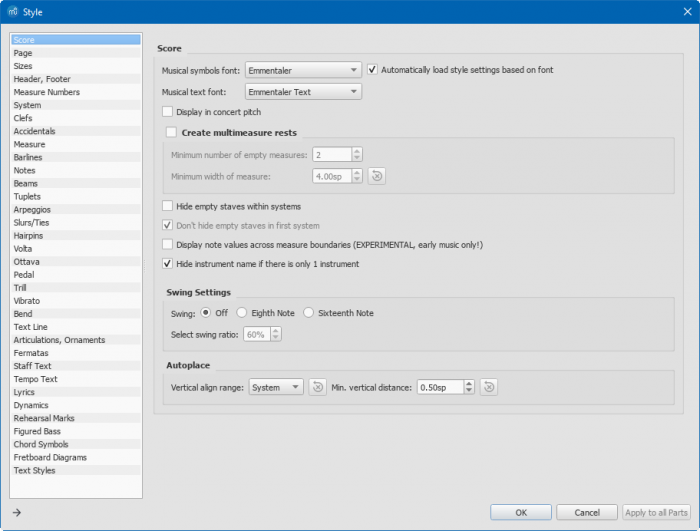
外链
- 如何创建一个可视化Swing摇摆节拍记号.
- Swing (摇摆乐) (百度百科)
播放模式
播放工具栏
基本播放功能可从文档窗口上方的播放工具栏访问:
从左到右的图标依次是:
- “MIDI输入”开关:
- 倒回到起点:播放返回到乐谱的开头或循环的开头(若已设置)。
- 开始或停止播放:请参阅开始/停止播放.
- 循环播放开关:请参阅循环播放.
- 播放反复记号:若您希望忽略重复记号的效果,请关闭。
- 播放时平移乐谱:如果您希望乐谱保持静止,请关闭.
- 播放节拍器:开关节拍器音效。
播放命令
开始/停止播放
要开始播放:
- 单击音符、休止符或小节空白处以建立起点。注:如果没有进行选择,将返回到中断的位置播放;如果没有之前的播放,则返回到乐谱的开头。
- 点按播放按钮或按空格键。
在播放期间,您只需单击特定音符即可跳转到特定音符或休止符。
要停止播放:
- 点按播放按钮或按空格键。
播放时
播放开始后,可以使用以下命令:
- 回到之前的和弦:←
- 进到下一个和弦:→
- 回到之前小节的开头:Ctrl+←(Mac:Cmd+←)
- 进到下一小节:Ctrl+→(Mac:Cmd+→)
- 退回小乐谱开头:Home(Mac:Cmd+Home)或点按播放面板中的快退 按钮。
在播放时您依旧可以使用快捷键来开关播放、合成器、混音器等面板。
循环播放
- 播放应为关闭状态,“循环播放按钮”为开启状态。
- 选中乐谱中想要循环播放的部分。
- 按下播放按钮。
现在,播放器将在以蓝旗标示的区域内循环播放。
- 使用“循环播放”按钮以开关循环。
另请参阅下文的播放面板。
播放面板
要打开播放面板,请使用以下选项之一:
- 按下F11(Mac:Fn+F11)。
- 从菜单栏中,选择视图 → 播放面板。
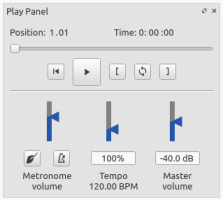
播放面板允许您临时更改速度和音量,在指定点之间循环播放等。
播放:和弦符号 / 纳什维尔数字和弦
从MuseScore 3.5版本开始,当您播放乐谱时,和弦符号和纳什维尔数字(但不是罗马数字)都会自动响起。
从MuseScore 3.5.1起,这仅适用于最初使用MuseScore 3.5或更高版本创建的乐谱,对于旧乐谱,您需要使用下文所述的方法启用它。
打开/关闭播放
对于所有乐谱(截至3.5.1版本)
要启用或禁用所有乐谱的和弦符号播放:
- 选择编辑(Mac:MuseScore)→偏好设置…→高级);然后根据需要调整以下选项:
- 禁用/启用版本3.5乐谱前的播放:勾选/撤选
score/harmony/play/disableCompatibility(默认勾选——不播放) - 要禁用/启用3.5及更高版本乐谱的播放:勾选/撤选
score/harmony/play/disableNew(默认撤选,播放)
- 禁用/启用版本3.5乐谱前的播放:勾选/撤选
对于当前乐谱
从3.5.1版本开始
打开/关闭所有和弦符号的播放:
- 勾选/撤选格式→样式…→和弦符号→播放。
从3.5版本开始
打开/关闭所有和弦符号的播放:
- 选择和弦符号或纳什维尔数字
- 在检视器的“和弦符号”栏中,选中/撤选“播放”框。
3.单击关联的“设置为样式”按钮(在该框右侧,您可能需要滚动一点)
或者,您可以在混音器中将播放轨道静音——请参阅见下文。例如,当您在多个谱表上添加了和弦符号,并且只希望播放其中一个时,这可能是必要的。乐谱的分谱需要单独调整。
To turn playback of a SELECTION of chord symbols on/off:
- 选中一个区域的记号。
- 右键单击和弦符号或纳什维尔数字。
- 在选择→菜单项中单击以选择所选范围内的所有类似元素、OK。
- In the "Chord Symbol" section of the Inspector check/uncheck the "Play" box.
或
- Click on first chord symbol or Nashville number in that range.
- Shift+click on last chord symbol or Nashville number in that range.
- In the "Chord Symbol" section of the Inspector check/uncheck the "Play" box.
注: This does not affect the parts which need to be adjusted seperately.
更改播放声音
The default sound for chord symbols is "Grand Piano". As of version 3.5.1, scores created from Guitar solo templates, use "Nylon String Guitar" instead.
要更改和弦符号播放声音:
- 开启混音器(快捷键:F10,Mac:Fn+F10)
- 在轨道区中定位找到相关项中的轨道。
- Click on the "Show channels" arrow to display all the child tracks for that part.
- Click on the track whose name contains the words "Chord syms." (may be truncated, should be the rightmost).
- Select a new "Sound" in the Sound drop-down list.
此设置由乐谱和部分共享。
更改播放音量/静音轨道
- Open the Mixer (shortcut: F10, Mac: Fn+F10)
- In the Track area locate the track for the part in question.
- Click on the "Show channels" arrow to display all the child tracks for that part.
- Click on the track whose name contains the words "Chord syms." (may be truncated, should be the rightmost).
- Adjust the volume slider; or press the "M" button to mute the track.
You'd need to do this for the score and/or the parts, separately.
编辑时打开/关闭符号声音
要在编辑时打开/关闭符号的声音:
- From the menu, select Edit (Mac: MuseScore)→Preferences…→Note input.
- Check/Uncheck the "Play chord symbol when editing" option.
Interpretation and voicing of chord symbols
If desired, you can adjust the playback properties of selected chord symbols as follows:
- Select one or more chord symbols.
- In the Inspector make changes as follows:
- Interpretation. The options are:
- Literal;
- Jazz. This adds color tones (e.g. the major 9th) but may also omit certain notes—this depends on both the chord itself and the context (the next chord in particular).
- Voicing. Options are:
- 自动
- 仅根音 = 仅低音音符;
- Close = arranges the notes within the span of an octave;
- Drop 2 = lowers the second highest note of the chord by one octave;
- 六音;
- 四音 = 第3、5、7、9个区间;
- 三音.
Note: All voicings include a bass note, 2 octaves below the root note of the chord.
- 时长:选项为
- Until next chord symbol
- Until measure end
- Chord/rest duration.
- Interpretation. The options are:
The following shows how the Interpretation and Voicing options affect the playback of a C major seventh symbol (Cmaj7 or CM7).

Note: The "Close" and "Auto" Voicing options are the same for this particular chord, but this isn't necessarily the case for every chord. So if you specifically want "Close", it is best to make the option explicit.
速度记号
速度记号可以在基础和进阶工作区的速度符号面板中找到。他们被作为节拍符号提供,但随后也可以被编辑,直至表达出您想表达的速度与表情。通过使用多种可见或不可见的速度记号,播放速度在乐谱的任何位置都可以变化。
添加速度记号
使用如下任何方法之一:
- 选择一个音符或休止符,并按下__键盘快捷键__Alt+Shift+T。
- 选择一个音符或休止符,并从菜单栏中选择 添加→文本...→速度记号。
- 选择一个音符或休止符,并点击速度符号面板中适当的速度记号(在3.4版本之前需要双击);
- 直接将速度符号面板中的速度记号拖动并放置在一个音符或休止符上。
注:若一个速度记号是通过菜单或键盘快捷键布置的,则该拍音会自动遵循拍子记号。从符号面板配置速度记号的优势在于您可以自由选择您想使用的拍音。
编辑速度
调整乐谱上一个速度记号所代表的速度的方法:
- 在想改变的速度符号中进入编辑模式;
- 按照需要的节拍数和/或拍音进行编辑;
- 退出编辑模式。
您也可以从检视器中覆盖一个已存在的速度记号的速度:
- 选中想修改的速度记号;
- 在检视器的速度文本模块中取消选择“随文本改变”选项;
- 在“速度”栏中选择您想使用的播放速度。
注:如果播放面板中的速度设定不是100%,播放速度可能会更快或更慢。
编辑速度文本
如同其它文本对象一样,速度符号可被编辑并调节格式。要设置文本属性或文本样式,请参阅文本样式和属性。
节拍器标记表示的速度通常会持续存在,即使被表情记号覆盖——例如行板Andante、中速Moderato等。您还可以将文本添加到纯节拍标记中。例如

覆盖速度符号
您可以暂时覆盖指示的速度,并使用播放面板以您中意的任何速度播放乐谱:
-
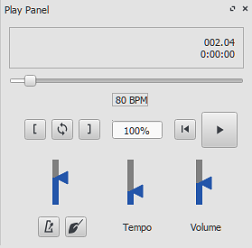
显示播放面板:视图→播放面板 或F11(Mac:fn+F11):
-
根据需要向上或向下移动速度滑块。速度既显示为绝对值,也显示为当前指示速度标记的百分比。双击速度滑块以重置。
_注:_BPM总是以每分钟的四分音符数量进行计量和显示,无论有效拍号(分母)如何。
渐缓与渐快的播放
您可以通过在乐谱中添加隐藏的速度标记来模拟渐缓(“rit.”)和渐快(“accel.”)的播放。对于音乐家的印刷指示应添加为额外的谱表/总谱文本。
在下图所示的示例中,速度最初是110 BPM(每分钟节拍)。在ritardando,每小节的首个音符的速度下降了10 BPM。在检视器中取消选中可见复选框,以隐藏每个速度记号,故只有ritardando会在输出的乐谱中显示。

已有一个插件可将此过程自动化:TempoChanges
延长音
延长音(可在 奏法与装饰音面板中找到)有一个时长属性可通过 检视器进行修改。默认情况下,此属性设为1.00。要让MuseScore以两倍的正常时值播放延长音,请单击延长音符号并将其“时长”设置为2.00。这当然不适用于[节点:278662,fragment="barline",title="应用于小节线的延长音"],因为小节线没有可延长的时长。
另请参阅
音色与SFZ文件
MuseScore内置的合成器中提供的音频回放,其中收录了大量包含打击乐器以及声音效果的虚拟乐器。
MuseScore支持以下两种格式的虚拟乐器:
音色
MuseScore自带GM音色(General MIDI)和MuseScore_General.sf3音色包——囊括了超过128种乐器、音效及不同的鼓/打击乐器套件。
GM (General MIDI) 是一个通用格式,一旦您的乐谱正确配置并使用MuseScore的自带音色,您应该可以将其以特定的格式导出并在他人计算机上播放。
互联网上有许多不同的音色可用:有免费版,也有收费版。下文列出免费音色列表.。
加载一个音色
找到并解压一个音色之后,请双击打开。绝大多数情况下,音色文件类型已经与MuseScore关联,此时 MuseScore将启动,之后弹出一个对话框,询问您是否要加载音色。偶尔有别的软件会把音色文件类型关联,倘若是这种情况,您就需要右击(Mac:control+单击)文件,在菜单中的打开方式中进行设置来使文件在MuseScore中打开。不管遇到上述哪种情况,当对话框询问您是否要加载音色,请单击"是"以将音色文件的副本加载到的音色目录下。这个目录的路径可在MuseScore的偏好设置中查看或更改。默认路径为:
-
Windows:
%HOMEPATH%\Documents\MuseScore3\Soundfonts -
macOS与Linux:
~/Documents/MuseScore3/Soundfonts
与用户所添加的音色文件不同的是,MuseScore自带的音色文件位于系统目录,仅可置于此,不得更改。音色文件的默认目录为:
- Windows(32位):
%ProgramFiles%\MuseScore 3\sound\MuseScore_General.sf3 -
Windows(64位):
%ProgramFiles(x86)%\MuseScore 3\sound\MuseScore_General.sf3 -
macOS:
/Applications/MuseScore 3.app/Contents/Resources/sound/MuseScore_General.sf3 -
Linux(Ubuntu):
/usr/share/mscore-xxx/sounds/MuseScore_General.sf3(当中的xxx是MuseScore的版本)
卸载
要卸载音色,只需打开音色的安装文件夹,并将其删除。
SFZ
SFZ是WAV或FLAC格式的文件和目录、SFZ文件和一堆实际声音文件的集合。其中SFZ文件是一个文本文件,基本描述了相关音色样本文件的位置以及用于什么乐器和音高范围。
装载SFZ
在下载一个SFZ文件之后(见下文),您需要手动解压属于SFZ的所有文件 (包括SFZ文件本身及所有子目录)并放入上文列出来的目录。请保持子目录及其内容的原样。
卸载
要卸载SFZ,只需打开音色的安装文件夹,并将其悉数删除。
合成器
合成器 是MuseScore音频输出的中控台。只要音色被装载,就需要加载入合成器以使MuseScore播放。要默认设置不同的音色,在合成器中加载并单击设为默认。
要显示合成器,请前往视图 → 合成器。欲知详情,请参阅合成器。
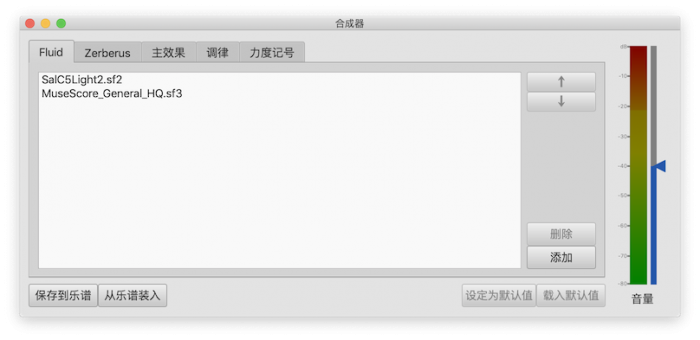
可下载的音色列表
GM 音色
下列音色库使用了General MIDI (GM2) 标准。该规格使您拥有一套128种虚拟乐器,外加打击乐器组合。
- GeneralUser GS(29.8 MB ,未经压缩)
蒙S. Christian Collins之允。 - Magic Sound Font,2.0版(67.8 MB,未经压缩)
- Arachno SoundFont,1.0版(148MB,未经压缩)
蒙Maxime Abbey之允。 - MuseScore 1附带TimGM6mb(5.7 MB,未经压缩)
许可:GNU GPL第二版
蒙Tim Brechbill之允。 - MuseScore 2(最高版本2.1)附带
FluidR3Mono_GM.sf3(13.8 MB). - MuseScore 2(截至2.2版)和3附带
MuseScore_General.sf3(35.9 MB) (SF2版本 (208 MB)).
许可:依照[MIT许可]发布。(https://github.com/musescore/MuseScore/blob/master/share/sound/FluidR3M…)
蒙S. Christian Collins之允。 - Timbres of Heaven, version 3.2(369 MB,未经压缩)
蒙Don Allen之允。
管弦乐团音色
- Sonatina Symphonic Orchestra(503MB,未经压缩)
下载地址:SoundFont | SFZ format
许可:Creative Commons Sampling Plus 1.0 - Aegean Symphonic Orchestra
蒙Ziya Mete Demircan(352 MB ,未经压缩)之允。
钢琴音色
SF2钢琴音色
- Acoustic三角钢琴,发布于2016-08-04
详情:Yamaha Disklavier Pro三角钢琴、sf2格式、压缩后36MiB、解压后113MiB、121个采样、5力度层
详情见:http://freepats.zenvoid.org/ 包含其他音色。
许可:知识共享署名3.0
蒙Roberto Gordo Saez之允 - Salamander C5 Light
蒙Ziya Mete Demircan之允(24.5 MB,未经压缩)
SFZ钢琴音色
- Salamander三角钢琴
下载地址:第二版 | 第三版
详情:Yamaha C5、48kHz、24bit、16力度层、80 MB ~ 1.9 GB (未经压缩)
许可:知识共享署名3.0
蒙Alexander Holm之允 - Detuned Piano(未压缩时244 MB)
许可:Creative Commons Attribution-ShareAlike 3.0 - Plucked Piano Strings
详情:44.1kHz、16bit、双声道、168MB、未经压缩
许可:Creative Commons Attribution-ShareAlike 3.0 - The City Piano
详情:Baldwin Baby Grand、4力度层,696MB,未经压缩
许可:公共领域
蒙Big Cat Instruments之允 - Kawai立式钢琴,发布于2017-01-28
详情:68个样本、44KHz、24bit、双声道、2力度层、58MiB、未经压缩
许可:GNU通用公开许可第三版或更新版,附带一个特殊例外
蒙Gonzalo and Roberto之允
解压下载的音色
由于音色文件较大,他们通常都是一些压缩文件的格式,包括.zip、.sfArk、以及.ta您需要在使用前解压这些文件。
-
ZIP是一种受大多数操作系统支持的压缩文件格式。
-
sfArk是一种压缩格式,专为压缩SoundFont文件而设计。要解压缩它,请使用跨平台软件Polyphone或此在线服务:https://cloudconvert.com/sfark-to-sf2
-
.tar.gz是Linux上普遍使用的压缩文件格式。Windows用户可使用7-Zip; Mac用户可使用 The Unarchiver或macOS内置的归档实用工具。请注意,若您使用7-Zip,您将解压两次——一次解压GZip,一次解压TAR。
疑难杂症
若工具栏的播放面板为灰色,或者不见了,请按照下列指令来恢复声音的播放:
- 右键单击菜单栏,并确保播放设置菜单项旁有一个勾号。若本步骤无法解决您的问题,请前往第2步。
- 若在更改音色后,播放面板消失,请前往编辑 → 偏好设置... → I/O标签页,然后不要做任何改动,直接点OK。 重启MuseScore后,播放面板应该会重新出现。
若您是首次配置音色库,请使用以上列出的任意一个SoundFont。
若播放卡顿,那么您的电脑可能无法很好的处理所使用的音色库。下列建议可能对您有裨益:
* 通过使用体积更小的音色库来减少MuseScore对运存的使用量。见上方的列表。
* 退出除了MuseScore之外的应用程序,以为MuseScore增加可用的运存数量。若依旧存在问题同时又有必要使用大型音色库,请考虑为您的计算机添加更多RAM内存。
参阅
外链
力度记号
力度记号是指示音符或乐句相对强弱的符号。它们可以在基础或高级工作区的力度记号面板中找到。
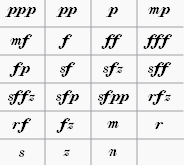
其他力度记号可在符号主面板中获取(快捷键Shift+F9)。
注意:如果你想调整乐谱的总体播放音量,请使用播放面板中的音量滑块,或使用合成器。
添加力度记号
要将力度记号应用到乐谱中,请使用下列任一方法:
- 选中一个音符,然后单击(3.4版本前双击)符号面板中的力度记号。
- 将力度记号从符号面板拖到音符上。
要创建渐强或渐弱,请参阅渐变记号。
调整属性
乐谱的默认力度是mf(mezzoforte,次强)——MIDI力度80(峰值127)。根据控制乐谱特定部分的力度记号,力度(以及由此产生的响度)可能小于或大于此值。
编辑力度记号的响度
调整范围
注:范围所指的是受力度记号影响的总谱中的谱表。
- 选择动态,在检视器的力度记号栏中,从“力度范围”中选择一个选项。默认为“分谱”,这意味着单个特定乐器的所有谱表(如钢琴谱的两个谱表)会受到影响。“谱表”将效果限制在力度记号所附的单个谱表上。“总谱”表示总谱中的所有谱表都将受到力度记号的影响。
更改位置(谱表上方或下方)
- 对于单个力度记号:选中力度记号后,键入X翻转位置或使用检视器,请参阅下文。
- 对于一个谱表上的全部力度记号:
- 右键单击一个力度记号,然后点 选择 > 同一谱表上全部相似元素;
- 在检视器的力度记号栏中的“位置”选择所需的选项上或下。
- 对于乐谱中的所有力度标记:
见上文,然后使用计算器的“设为样式”按钮。
自定力度记号
力度记号可以像任何其他文本对象一样编辑。特殊字符快捷键可用于添加以下符号:
| 力度记号 | 中文 | Windows与Linux快捷键 | Mac快捷键 |
|---|---|---|---|
| Piano p | 弱 | Ctrl+Shift+P | Cmd+Shift+P |
| Forte f | 强 | Ctrl+Shift+F | Cmd+Shift+F |
| Mezzo m | 一半的 | Ctrl+Shift+M | Cmd+Shift+M |
| Rinforzando r | 加强(每一个音) | Ctrl+Shift+R | Cmd+Shift+R |
| Sforzando s | 加强(一个音或一个和弦) | Ctrl+Shift+S | |
| Niente n | 无;无物 | Ctrl+Shift+N | Cmd+Shift+N |
| Z z | Ctrl+Shift+Z | Cmd+Shift+Z |
您还可以编辑力度和变化范围等(见上文)。若有需要,您可以将结果保存在自定面板中。
单音符力度
从3.1版本开始,MuseScore支持单音符力度。除了编辑力度之外,您还可以在检视器中编辑力度变化。 在播放初始力度后,在此字段中输入数字将使音符的力度大约更改为该值。负数可用于降低初始音符后的音量,正数将使音符在初始音量后播放得更响。有关更多详细信息,请参阅链接(见下文)。
外部链接
- Video tutorial: Lesson 10 - Articulations, Dynamics and Text
- 使用单音符力度(MuseScore指南)
- 如何在一个导入的MIDI文件中恢复力度记号和渐变记号的正确播放 (MuseScore指南)
- Dynamics(维基百科)
变调夹播放
MuseScore使您可以将一个谱表上的回放进行移调,且不影响原先记谱。此功能模拟了乐器上变调夹的效果。
将变调夹添加到单个谱表中
- 在您希望变调夹生效的地方,向音符/休止符添加谱表文本;
- 右键单击谱表文本,在菜单中点击谱表文本属性...,接着点击变调夹设置标签页;
- 勾选“变调夹设置”,并设定根据您希望变调夹应用的品格来设定变调夹品格 (品格号每增加1,就升高一个半音);
- 点击Ok来应用改动;
- 按需编辑谱表文本。
将变调夹添加到关联谱表/指法谱
- 方法基本同上,但在第一步,请只向音符谱添加谱表文本。
将变调夹添加到独立谱表/指法谱
- 方法基本同上,但请同时为音符谱和指法谱添加谱表文本。
注:变调夹回放将会从谱表文本所依附的那个音符/休止符处开始生效,直到有下一个生效的“变调夹设置”文本出现或到乐谱结尾结束。
移除变调夹
要从谱表中删除变调夹播放,以将乐器恢复到其正常调性:
- 添加带有“变调夹品格”设定的“无变调夹”字样。