进阶
Fonts
To change the appearance of Musescore user interface, see Preferences instead.
To edit sound samples, see SoundFonts and SFZ files instead.
Overview
A computer font (font family, font face, typeface) is a digital data file containing a set of characters or symbols. This chapter discusses score object's font assignment method and option and others. Usage of font data depends on,
- object type (see "Text" and "Non-Text" sections, and Notation types and Text types chapters); and
- character type (see "Text" section).
Font file cannot be embedded into a score file.
Formatting of Text
Musescore Text object contains individual characters that can be entered and removed by using (typing on) a computer keyboard. Some subtypes have specialized automatic formatting feature eg chord symbol rendering style and Roman Numeral Analysis auto formatting.
Characters in a Text object are either plain or special characters.
Plain characters
Plain characters, entered using a computer keyboard.
Special characters
Musical text and symbols (special characters, professional glyphs) that are not on computer keyboard should be added from Symbols and special characters → Common Symbols and Musical Symbols tabs in Text editing mode, or using Keyboard shortcuts. eg Segno, Coda, ottavas, dynamics etc among other pre-configured Palette items. They are not unicode characters. Special internal encodings such as <sym> are used to provide
- musically coherent impact eg the special augmentation dot is required to use Tempo marking's "Follow text" function; and
- global "Musical text" font switching.
Advanced users can add plain characters that look like special characters but do not have these program features. They are under unicode Private Use Area (PUA) and can be added from Symbols and special characters →Unicode tab in Text editing mode, and under Master palette → Symbol category.
Formatting of Non-Text
Score objects are not Musescore Text if they cannot be edited using (typing on) a computer keyboard.
Font assignment and option
Plain characters inside Text
Font assignment in Inspector (musescore 3), Properties panel (musescore 4), Format → Style → [item] and Format → Style → Text Styles → [item]. See the Layout and formatting and Text styles and properties chapters.
Font options can use
- fonts already built into Musescore program, and
- fonts installed on the operating system(OS).
Special characters inside Text; Non-Text
Fonts designed specifically for musical notation are required to display them.
Font assignments of Text's special characters portions and Non-Text are a global setting. Special characters ignore inspector fontface assignment.
- Under Format → Style,
- Musical symbol font: used by notes, rest symbols, accidentals etc. Font compatible often does not have wording "...Text" in its name, eg "MuseJazz". (6 options in musescore 3; 8 options in musescore 4)
- Musical text font: used by special characters. Font compatible often has wording "...Text" in its name, eg "MuseJazzText". (6 options in musescore 3; 8 options in musescore 4)
- For Tablature, under Staff / Part properties : Advanced Style Properties: settings for tablature staff,
- "Fret Marks" tab: used by fret marks. (8 options) .
- "Note Values" tab: used by "Note symbols" (5 options) .
- Figured bass (1 option, the MuseScore Figured Bass).
Font options can use
- fonts already built into Musescore program, and
- a more updated version of those files installed on the OS (sharing the same file name. See below),
- but not new fonts installed on the OS directly.
Using updated font version is covered in https://johngrren007.blogspot.com/2018/04/musejazz-customised-font.html, and https://musescore.org/en/node/299448#comment-1171159. Score files (*.mscz) using them may render poorly on other machines, because the modified font files are not embedded into the score file. To install a new font file onto an OS, refer to the instructions written for that OS.
Valid for Musescore 3.6.2 only. How can I add third party SMuFL Fonts? covers how to use a 3.7 fork to use fonts installed on the OS directly.
Default font
- Default Chord symbols font is Edwin, except on score created with any of the Jazz templates (eg Jazz Lead Sheet) where the default is MuseJazzText instead.
- Default Roman Numeral Analysis font is Campania . Musescore relies on OpenType formatting functionailty provided by Campania for correct RNA foramtting.
- Default "Musical symbol font" is Leland (musescore 3.6.2)
- Default "Musical text font" is Leland Text
Fonts shipped with Musescore
Musescore create in-app user interface, and musical symbols and notation on score, with data content from font files. Some fonts are invented by Musescore project development team for Musescore and maintained by the team. Some fonts are from other companies, the team does not edit their content at all. Read the readme file https://github.com/musescore/MuseScore/blob/master/fonts/README.md . Musescore software development focuses on engraving creation, based on real world notation popularity and significance, it does not aim to create support for every symbols included in any one particular font.
Musescore program is shipped with a limited set of font due to licensing reason.
Emmentaler has been renamed as "mscore" after musescore 3.6.2
Standard Music Font Layout (SMuFL)
Standard Music Font Layout (SMuFL) is a standard way of mapping the thousands of musical symbols required by conventional music notation, to the code-points of Private Use Area (PUA, wikipedia) in Unicode's Basic Multilingual Plane. It improves font format independence. The SMuFL standard itself is not managed by the Musescore project development team.
"Musical text" is a component of Musescore's implementation, the internal encoding schema does not conform to any standard, research the musescore 3.6.2 archived source code
Other useful methods to create desired engraving
- Noteheads and notehead schemes
- Staff / Part properties for Tablature elements
- Plugins that analyze notes and add musical symbols such as fingering diagrams are available at https://musescore.org/plugins .
- The MuseScore Drumline extension also contains extra pictograms, to download see Language, translations, and extensions.
See also
- Instruments, staff setup and templates
- Layout and formatting : styles and reuse
- Master palette
- How can I add third party SMuFL Fonts?
- https://github.com/fp22june/MuseScoreTag362/tree/master/fonts
- The numeric glyphs used on multimeasure rests (see Measure rests chapter) when Format > Style > Musical symbol font set to "MuseJazz" is not used on numbers (0-9) entered into Musescore Text objects with Font family set to "MuseJazz Text", see workaround by worldwideweary using "Lily Jazz" font on Font Question
MIDI输入
MuseScore可以导入文件格式文件(.mid/.midi/.kar)并将其转换为音符。
- 要导入MIDI文件,使用标准的打开/保存/导出/打印指令。这将MIDI文件转换为MuseScore文件(.mscz),并应用默认量化设置。
MIDI导入面板出现在屏幕底部:您可以通过向上拖动带有文档窗口的界面来展开。面板显示文件中的所有轨道(仅显示带有音符事件的轨道),并允许您调整影响转换过程的参数。 若有多个轨道,那么会在列表顶部再添加一个轨道,以便一次选择所有轨道。

-
要接受默认转换:只需按导入面板左上角的“X”符号即可关闭。可通过按下文档窗口底部的“显示MIDI导入面板”以在会话期间的随时重新打开面板。
-
要重新导入文件:在导入面板中调整所需的参数(参见下文)并单击应用。若您对导入面板进行了更改,但希望撤销更改,请按取消。要关闭导入面板,请按面板左上角的“X”符号。
如果您在更改临时生成的结果乐谱后重新导入文件,MuseScore将提示您如何处理修改后的乐谱:将其保存在某个地方,丢弃或取消。保存 选项将修改后的分数保存到\bin目录中的Musescore文件,而不修改原始MIDI文件。然后,它将重新导入原始MIDI文件并应用导入面板设定。导入面板设置不应用于已经保存的文件。丢弃选项将撤销您对Musecore文件的更改,然后重新导入原始MIDI文件并应用新设置。取消选项将在第一个标签页中重新导入原始MIDI文件并应用任何导入面板设置,然后使用修改后的乐谱创建一个新标签页,但不应用任何导入面板设置。 第二个选项卡与点击保存,然后打开保存的文件相同。因此,您无法将导入面板设置应用于用户修改后的乐谱。您必须首先应用导入面板设置,对乐谱进行任意更改,然后使用标准打开/保存/导出/打印 命令来保存乐谱。
鼠标滚轮滚动(MIDI导入面板):默认垂直滚动。要水平滚动,请在滚动滚轮时按下Shift或Ctrl 。
可用操作
- MuseScore乐器
- 分配定义名称、谱号、移调、奏法等的MuseScore乐器(于instruments.xml 或“偏好设置”中的指定自定xml文件中列出)
- 量化
-
用一些常规网格量化MIDI音符。网格最大分辨率可以通过下拉菜单设置:
- 来自首选项的值(默认)——量化值取自MuseScore的偏好设置对话框(在“导入”选项卡中)
- 四分、八分、16分、32分、64分、128分——用户定义的值
-
然而,实际量化网格大小是自适应的,当音符时值小时会减少,因此每个音符的量化值都不同。但量化值有一个上限,该值可以由用户设置为“最大量化”。
例如,如果某个音符时值很长——拿八分音符而言,而最大量化被设为“八分音符”,那么这个音符将用八分音符的网格量化,而不是算法应该用的二分音符或四分音符网格量化。
这种量化方案允许充分量化分数中的所有 (不同时值的)音符。 - 最大声部
- 设置允许的音乐声部的最大计数。
- 搜索连音
- 启用后,此选项尝试检测连音,并将相应的量化网格应用于连音和弦。
- 真人演奏
- 如果启用,此选项将降低MIDI到乐谱转换的准确性,但有利于可读性。在不提供常规量化网格的情况下,它适用于未对齐的MIDI文件。对于此类文件,使用自动节拍跟踪算法,该算法会试图检测乐曲中小节的位置。
- 小节数对半
- 该选项对未对齐的MIDI文件激活(默认情况下勾选“真人演奏”)。它将内部节拍跟踪操作中获得的小节数减半。当节拍跟踪提供比必要多2倍的采样时,可能会很方便。
- 拍号
- 对于未对齐的MIDI文件,该选项激活。若默认检测值有误,用户可以为整个乐曲选择合适的拍号。该选项很有用,因为它与符号面板中的直接拍号设置不同,可以正确处理导入的连音。
- 分割谱表
- 此选项主要适用于钢琴曲——将音符分配给表演者的左/右手。它使用恒定音高分离(用户可以通过子选项选择音高)或浮动音高分离(取决于手的跨度——从程序角度来看有点猜测的意味)。
对于鼓乐轨道(轨道列表中的“打击乐”声音)它把棍子分成多个谱表,每个谱表只有一个鼓声。还有一个子选项允许/不允许为新创建的鼓轨道集应用方括号。 - 谱号变更
- 小谱号可以插入谱表内部,使和弦更接近5条谱线。谱号的变化取决于和弦的平均音高。延音线连接的音符组不会被插入谱号断开(倘若发生此情况,您可以报告在
importmidi_clef.cpp中的算法错误)。此选项仅适用于非鼓乐轨道。 - 简化时值
- 减少休止符,以形成更“简单”的音符时值。对于鼓轨道,此选项还可以删除休止符及延长音符。
- 显示断奏符号
- 选择在乐谱中显示/隐藏断奏符号。
- 附点音符
- 控制MuseScore是否会使用附点音符或延音线。
- 显示速度文本
- 在乐谱中显示/隐藏速度文本标记。
- 显示和弦名称
- 在XF MIDI文件格式的乐谱中显示/隐藏和弦名称(若有)。
- 识别弱起小节
- 启用后,此选项不会更改第一小节(小于第二个小节)的拍号。它也被称为不完整小节。此选项仅适用于所有轨道一次。
- 检测摇摆节奏swing
- MuseScore会尝试检测摇摆节拍,并自动将三连音组中的第4分+8分音符(对于最常见的摇摆感觉,2:1)或附点的8分+16分音符(对于shuffle,3:1)替换为两个正常的八分音符以及在开头加上“Swing”或“Shuffle”。
Tuning systems, microtonal notation system, and playback
To setup a transposing instrument, visit Staff / Part properties instead.
Musical tuning systems and notation systems
Default tuning
The default tuning is equal temperament (12-EDO/12-TET), and the default concert pitch setting is A4 = 440Hz. Concert pitch is configurable in synthesizer.
Other tuning systems
MuseScore supports tuning systems such as Just intonation, Pythagorean tuning, and Scordatura etc. indirectly, see create desired playback below.
Default notation
Default notation uses 7 accidentals: ♭ (flat), ♮ (natural), ♯ (sharp), 𝄪 (double sharp), 𝄫 (double flat), ♯𝄪 (triple sharp), ♭𝄫 (triple flat), see source code.
You can add these 7 accidentals using any of the following:
- Shortcut keys: e.g. keyboard up/down keys ( these can be assigned in Preferences: Shortcuts: "Pitch up", "Pitch down", "Diatonic pitch up", "Diatonic pitch down", "Change enharmonic spelling"), or
- Toolbar buttons, or
- Palette : Accidentals section (a sidebar), or
- Master palette : Accidentals category (a popup window). Do not add from Symbols category, they are non-functional visual symbols, see Notation types.
See the main chapter Accidentals for more information.
Microtonal notation systems
MuseScore supports microtonal notation systems such as Helmstolk Ellis notation, Johnston notation etc., so that tuning systems such as Just intonation, Pythagorean tuning etc can be notated precisely. MuseScore development focuses on engraving support, rather than playback support, see create desired playback below.
Professional glyphs of some SMuFL (Wikipedia) symbols are shipped with Musescore, add them by using any of the following:
- Palette : inside the More button of the Accidental section (a sidebar), or
- Master palette : Accidentals category and Symbols category (a popup window), or
- A Plugin.
Note: Adding symbols other than the 7 accidentals used in the default notation system may damage compatibility with plugins such as Chord Identifier (Pop Jazz), because of the implicit change explained in microtonal playback below.
Creating the desired playback
To create desired playback for a custom tuning or notation system, use one of the following methods:
With default notation
With some tweaking, you can create desired playback on a whole score or a phrase to:
- emulate a performer's decision to play different pitches: for example, on the same sheet music, a violinist plays Pythagorean, a pianist plays Equal Temperament, or
- emulate an instrument tuned to a custom tuning system.
To create the desired playback, use:
- Cent adjustment of notes with the Tuning property in Inspector: Note. To get a sensible result, you need to work out tables of cent values based on the tuning system and fundamental frequency beforehand, and may need to apply different tables to different sections; or
- A plugin that automates this process, such as:
- Tunings and Temperaments (as of Jan 2023, this plugin does not differentiate between enharmonic notes, i.e. Ab=G#), the workaround is to manually select and use separate values.)
- Scordatura
With microtonal notation systems
Direct playback of microtonal notation is not supported, create desired playback by using:
- Cent adjustment of notes with the Tuning property in Inspector, pay attention to points listed below.
- A plugin that automates this process such as one of these suggested in a forum discussion.
Points to consider when adjusting Tuning property.
- Many SMuFL symbols provide visual / engraving purpose only and do not affect playback.
- When applying some symbols to an existing accidental-marked note, Musescore automatically and implicitly change the note's internal / playback pitch to its "accidental-less" version, see Nominal-accidental chain—Xenharmonic WIKI, this discussion, and source code. Purpose of this design is to allow implementation of different tuning systems.
- For example, adding a quarter-tone sharp symbol (small upward arrow with sharp sign, 𝄲) to F# changes its playback to F in pitch inside Musescore, and the quarter-tonesSharp symbol itself does not affect playback inside Musescore.
Alternatively, use a software in microtonal composition and playback such as Mus2, see a list on Xenharmonic Wiki.
Keywords for search engine
Tuning, Temperament, Intonation, Notation, EDO (Equal Division of the Octave), TET (Tone Equal Temperament), HEJI (Helmholtz-Ellis Just Intonation), HEWM (Helmholtz-Ellis-Wolf-Monzo), Sagittal notation system, Stein, Dicot, Porcupine, Meantone, Superpyth, Well-tempered.
See also
- About the 7 accidentals: Source code accidental.cpp at github
专辑
概览
警告:此特性在本手册对应版本中被移除,或许在 5.x 版本回归。
专辑管理器允许您准备多个乐谱的列表,并将列表保存为相册文件(“*.album”), 将所有乐谱打印为一个页面编号一致的长打印作业,甚至将乐谱合并到一个新的MSCZ乐谱中。这是准备练习册或结合编排的多个乐章的理想选择。
要打开专辑管理器,请前往文件 → 专辑...

创建专辑
1.要创建一份新专辑,单击新建按钮。在"专辑名称:" 输入框填写标题。
2. 要往专辑内加入乐谱,单击添加乐谱。将会弹出一个文件选择对话框并让您从您的文件系统选择一份或多份乐谱。单击OK。
3. 您添加的乐谱将显示于专辑管理器的一个列表中。您可以选择一个乐谱后单击上或下按钮来重新排序。
载入专辑
若您之前已经创建了一个专辑,您可以通过单击专辑管理器的载入 按钮打开专辑。之后将会弹出一个文件选择对话框以使您可以从文件系统载入.album文件。
打印专辑
要按现有顺序打印一整个专辑的所有乐谱,请单击打印专辑。打印时会忽略在样式 → 页面设置... → 首页页数设置过的除首页之外的页数偏移。可双面打印。
加入乐谱
要将多份乐谱合并入单个.mscz文件,单击加入乐谱。所选的乐谱将按照选中顺序合并入单个乐谱。如果尚未出现,则会将行节符与空位符以及分节符添加到合并文件中每个乐谱的最后一个小节或占位符 中。所有样式设置都取自首个乐谱,与后续乐谱不同的样式设置将被忽略。
在正常情况下,所有乐谱应当有相同数量的分谱和谱表,理想情况下会有同样的配器顺序。倘若乐谱有相同数量但不同种类或不同顺序的乐器,那么第一个乐谱中的乐器名称将覆盖后续乐谱中的乐器名称。 如果一些乐谱的乐器比第一个乐谱少,那么将为这些乐谱创建空五线谱。 任何不在第一份乐谱中的分谱或谱表都将在加入乐谱后丢失。
保存专辑
在单击关闭按钮后,您会被提示将您的专辑保存为一个.album文件。此文件不同于加入的乐谱,而只是简单囊括了乐谱列表。专辑文件可按照上文所述 载入专辑管理器。
| 附件 | 大小 |
|---|---|
| Album_en.png | 13.64 KB |
乐谱对比器
乐谱对比工具使您可以对比两个版本的乐谱,以找出其间的差异。
介绍
要打开乐谱对比器:
-
顶部菜单:视图→乐谱对比器。

对话框在文档窗口下部打开,由三个部分组成,从左到右依次是:
- 选择乐谱来比较: 选择您要比较的曲谱。
- 结果显示模式:选择如何查看对比结果。
- 对比结果:乐谱的逐行比较会显示出来。
选取乐谱
第一步是选取乐谱。使用“乐谱甲”旁边的下拉菜单选择当前打开的乐谱,或单击、浏览按钮来开启文件浏览器,之后从硬盘选取一份乐谱。
第二步,使用右侧的下拉菜单来选择乐谱甲的版本(当前版本/上次保存的版本)。乐谱乙会自动设为与曲谱甲相同的乐谱,但你也可以选择另一个打开的乐谱。
当您已选好乐谱与版本后,点击开始对比来进行比较。
选择视图
"智能对比"是 结果显示模式的默认选项:它以人类易读格式展示差异(例:“小节 1:音符:属性 pitch 改变 从 B4 变为 C5”)。若您偏爱以XML代码展示的对比结果,请将结果显示模式选项更改为"原始对比数据"。
查看对比结果
当您按下开始对比后差异列表将显示在右侧,乐谱视图将自动更改为“左右分割视图”。在比较结果部分,双击列表中的一个差异,两个乐谱视图都会自动平移以显示更改的元素,该元素也会突出显示。
离开对比器
要离开乐谱对比器,关闭“乐谱对比器”窗口_以及_视图菜单中的“左右分割视图”。
示例
下面您会看到两个小乐谱之间存在的一些差异。
前一次保存的乐谱:

当前乐谱:

对比的结果将如下所示:

乐谱属性
乐谱属性对话框包含文档的元标签,例如“作品标题”(workTitle)、“作曲者”(Composer)、“版权”(Copyright)等等。要查看此对话框:
- 首先请确保要应用的乐谱或分谱处于活跃状态;
- 然后在顶部菜单内点击文件 → 乐谱属性。
当您使用新谱向导创建乐谱时,有几个元标签是自动生成的,其他标签可能会在稍后被添加。若有需要,元标签也可被纳入页眉与页脚——见下文.
编辑元标签
- 首先请确保要应用的乐谱或分谱处于活跃状态;
- 在顶部菜单中点击文件 → 乐谱属性;

- 按需编辑各种元标签的文本;
- 要添加另外的元标签,单击新建 按钮。填入“新标签名称:字段,然后单击确定;

预设元标签
在乐谱属性中,每个分数都显示以下字段:
- 文件路径:乐谱文件在您计算机中的位置。
- MuseScore版本:最后一次保存时的MuseScore主程序版本。
- 修订版本:最后一次保存时的MuseScore修订版本号。
- API层级:文件格式版本。
- 编曲者:(通常为空)
- 曲作者:最初设置为与新谱向导第一页中“曲作者”相同的文本。
- 版权方:最初设置为与新谱向导第一页中“版权方”相同的文本。
- 创建日期:乐谱创建的日期。若乐谱保存在测试模式下则可能为空。(见命令行选项)。
- 词作者:最初设置为与新谱向导第一页中“词作者”相同的文本。
- 乐章序号:(空)
- 乐章标题:(空)
- 原格式:此标签存在于从第三方文件格式导入的乐谱。
- 平台:乐谱创建的计算机平台。若乐谱保存在测试模式下则可能为空。
- 诗歌:(空)
- 来源:若乐谱是从MuseScore.com下载或保存到MuseScore.com的,则可能包含URL。
- 译者:(空)
- 作品编号:(空)
- 作品标题:最初设置为与新谱向导第一页中“标题”相同的文本。
输入作品/乐章/分谱元数据
- 作品号:大型作品编号(例:8对应维瓦尔第的Op. 8《四季》)。
- 作品标题 :大型作品标题(例:“四季”)。
- 乐章号:大型作品乐章编号(例:“秋”乐章为3)。
- 乐章标题:大型作品乐章标题(例:“秋”)。
习惯上,在使用新谱向导时,以乐章标题创建作品(即使它最终出现在作品标题中),并在创建乐谱后直接在乐谱属性对话框中修改此信息。
每个分谱有以下额外的元标签,其已经在分谱创建时生成并写入数据:
- 分谱名称:分谱创建时给出的分谱名称(其亦被用于在顶部垂直占位框填写对应的分谱名称文本——请注意,之后对其中任意一个的更改不会互相影响)。
This meta tag is not present in the main score and thus is not available for use in its header/footer or in an added part name box in the top vertical frame, unless manually added as a new tag to its score properties.
页眉/页脚
要在乐谱/分谱的页眉或页脚中显示一个或多个元标签的内容:
- 确保相关乐谱或乐器分谱为活动选项卡;
- 从菜单中,选择格式 → 样式... → 页眉、页脚:

如果您将鼠标悬停在页眉或页脚文本区域上,将出现一个大型列表,显示其含义以及现有的元标签及其内容。

In this list $I and $i are only available in extracted, linked parts, because the partName score property is only defined there unless, as described above, it is manually added to the main score properties. Not shown in this tooltip, but available likewise, is the $:partName: meta tag. - 按需往合适的文本框内添加标签(例如$:workTitle:)以及宏(e.g. $M);
- 单击应用以查看乐谱中的页眉或页脚外观。若有需要,请在对话框内进行更正;
- 若一个分谱在活跃标签页内。若您欲将这些设置应用到全部分谱,请单击应用于所有分谱;
- 单击OK来确认页眉或页脚并关闭对话框。
参阅
偏好设置
您可以通过主菜单自定义MuseScore的许多默认行为: 编辑→设置...(Mac:MuseScore→设置...)。
“偏好设置”对话框有多个选项卡:

将全部偏好设置恢复默认将把所有偏好设置重置为最初安装MuseScore时的偏好设置。点击好将保存设置并关闭对话框。取消将关闭对话框而不应用更改。应用将在不关闭对话框的情况下使更改生效。
通用

您可以在此定义:
- 程序启动:指定是空启动会话还是显示乐谱。这些是以下选项之一:不打开任何文件(无乐谱)/打开上次编辑的文件/启动时新建乐谱(即新谱向导会自动打开)/启动时载入乐谱(程序默认值,或您自定义的乐谱)。
您还可以选择要显示的面板。可以是任何组合:启动画面, 播放面板, 导航器或启动中心。另请选择是否要激活导览。 - 文件夹:指定乐谱文件、样式文件、自定乐谱模版、plugins、额外的音色、images及扩展的默认文件夹。
- 语言:选择程序使用的语言。翻译也可以从这里更新。请注意,语言翻译更新也可以通过菜单完成:帮助→资源管理器。
- 遥测数据:勾选/撤选以授权MuseScore收集使用数据。遥测数据中列出了收集的数据类型,并根据需要更新。
- 外观:指定深色或浅色主题,以及图标的宽度和高度。设置显示屏“字体”和“字体大小”。
- 自动保存:程序自动保存的频率。
- OSC遥控
谱面

使用“谱面谱面偏好设置”为乐谱背景和纸张设置喜爱的颜色和壁纸。默认的“背景”是深蓝色(RGB 20, 36, 51; Alpha 255)同时默认的“纸张”为白色。
- 背景:使用此功能设置分数页面周围的颜色或背景。选择“颜色”,然后单击右侧栏,然后从颜色选择器中进行选择;或选择“壁纸”,单击文件图标并设置背景图像。
- 纸张:设置乐谱页面的颜色或背景。控件与“背景”(上文)相同。您还可以勾选/撤选“在符号面板中使用相同色彩”。
- 页面滚动方式:这定义了页面在乐谱中的布局方式。为行布局选择“水平”,为列布局选择“垂直”。要限制滚动,请勾选“限制滚动区域于页面内”。
- 杂项:“平滑绘制”(默认选项)使形状的对角线和边缘看起来更光滑。“选取元素的容错距”控制鼠标可能与物体保持作用的距离。较小的数字需要更高的精度,从而更难单击小对象。较大的数字精度较低,因此更容易误选附近的对象。请选择合适的值。
音符输入

此选项卡上有音符输入和MIDI遥控器偏好设置。可以设置以下内容:
音符输入
- 启用MIDI输入:保持勾选以允许MIDI输入音符。
- 用颜色标记超音域的音符:有关详情,请参阅 给乐器音域外的音符上色和可用音域(谱表属性:所有谱表)。
- 自动实时模式音符间延迟:请参阅 实时(自动).
- 编辑时播放音符:勾选时,MuseScore在输入或选中音符时会发出声音。如果您想在添加音符时听到和弦的所有音符,请勾选“编辑时播放整个和弦”。您还可以编辑“默认时值”。
MIDI 遥控
Midi遥控使您可以使用MIDI键盘上的某些键输入音符和休止符,并选择音符时值,而不使用计算机鼠标或(计算机)键盘。 默认设置为关闭。
为MIDI键分配命令:
- 确保已选中“MIDI遥控”,且在打开程序之前,您的MIDI键盘应该就已连接。
- 单击要分配MIDI键的选项旁边的红色按钮:红色按钮现在亮起。
- 按下MIDI键盘键。红色按钮熄灭,绿色按钮亮起。MIDI密钥现已分配给所需的选项。
- 重复“2”和“3”以分配其他键。
定义了按键设置后,您可以使用MIDI键盘控制音符输入操作。您可以在按下MIDI键时观察MuseScore的音符输入工具栏来验证您的键设置。
要暂时停用MIDI遥控:撤选“MIDI遥控”——所有MIDI输入键操作按钮现在都显示为灰色。注:您的按键分配始终保存在MuseScore会话之间,不受停用的影响。
注:(1) “清除”选项关闭了当前MuseScore会话中的所有绿色按钮,但保留了所有用户录制的MIDI键设置,并将在下一次会话中重新加载。
(2) 激活的MIDI键设置之后无法关闭,绿色按钮将始终保持亮起。然而,再次使用红色按钮,可以用不同的MIDI键覆盖它。
(3) 如果同一MIDI键意外分配给多个选项,则所有相关的绿色按钮将保持亮起,尽管只有一个按钮可以工作。要修复,请参阅“注(2)”。
乐谱

乐谱偏好设置包括
- 默认乐器列表文件(可选择两个)
- 乐谱和分谱的默认样式(请参阅加载/保存样式)
- 默认缩放
输入/输出

PortAudio(API/设备)
这使您可以设置音频接口(API)并指定用于音频播放的设备:例如内置扬声器/耳机、USB耳机、无线耳机等。
MIDI输入/输出/输出等待延迟
连接外部MIDI输入设备时,其标识名将显示在MIDI输入中。当设备首次连接时,你还需要选择正确的MIDI输出选项以启用音符输入并修正播放音频(例如,在Windows中,可能为“MMS<设备名>”);然后关闭并重新打开程序以确认更改。
Jack 音频服务器
若使用JACK音频连接套件,请根据需要检查这些选项。
音频引擎
如果您的音频设备或MIDI键盘和MuseScore之间通信丢失(无声音输出或MIDI操作),请点击重启音频和MIDI设备以恢复。
导入

以下设置决定了如何导入来自其他来源的文件:
- 使用内置的MuseScore样式或您选择的样式(请参阅加载/保存样式)
- Guitar Pro和Overture字符编码
- MusicXML布局选项
- MIDI文件中最短的音符
导出

以下设置决定了如何从MuseScore导出各种文件:
- PNG:PNG/SVG图像分辨率(DPI)以及是否使用透明背景。
- MIDI:是否在导出的MIDI文件中展开重复段。
- Audio:设置音频采样率、MP3比特率以及是否“标准化”导出的音频。
- MusicXML:是否导出布局以及如何将系统和分页符导出到MusicXML。
快捷键

此选项卡列出了MuseScore中的所有命令以及与之关联的所有键盘快捷键。首选项中列出的快捷方式也显示在主菜单中与其相关联的命令旁边。
-
搜索特定命令:在窗口底部附近的“搜索”框中输入其名称。
-
为命令创建新的快捷键:
- 在列表中选择一个现有条目。
- 点击定义...或只需双击条目。
- 使用最多四个键输入新快捷方式。如果您需要重新输入快捷键,点按 清除。
- 点按替换以更改现有快捷方式,或点按添加以保留旧快捷键并添加新的。
注:一些快捷方式,包括默认快捷方式,可能不适用于某些键盘。
-
要重置其系统默认的快捷键:在列表中选择一个命令,然后按将快捷键恢复默认。
-
保存快捷键列表:点按保存并保存到您选择的文件中。
-
加载保存的快捷键列表:点按加载。
-
清除单个条目的所有快捷键:选择条目,然后点按清除。
-
打印快捷键列表(包括导出到pdf):点按打印。
更新

这将设置MuseScore是否会在启动时检查程序及扩展更新。
更新可在帮助→检查更新中手动检查。
高级

使你您能够控制:“应用”、“导出”、“输入/输出”及“用户界面”的特定设置以及颜色设置。
另请参阅
分谱
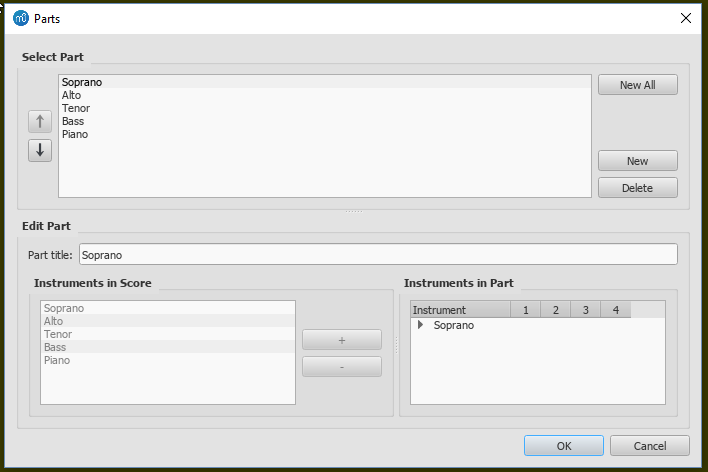
MuseScore不仅可以让你制作、打印总谱,还可以让你生成总谱中不同乐器的分谱。
你还可以在分谱中加入特定乐器的乐谱,甚至是谱中的特定声部。这可以让你在生成独自的分谱的同时把多个部分(例如:长笛1、长笛2)整合到同一行乐谱中。
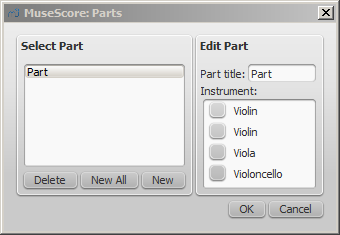
创建所有分谱
最简单直接的方法就是同时生成所有乐器的分谱。分谱依据和谱中对应乐器一对一的原则生成:
- 在菜单栏中选择 文件 → 分谱…。
- 点击 新建所有 按钮(分谱按照乐器名命名,具有相同乐器名的乐器分谱会额外添加示以区别的数字)。

- 单击OK。
该分谱现能通过单击文档窗口上端的标签页来访问。
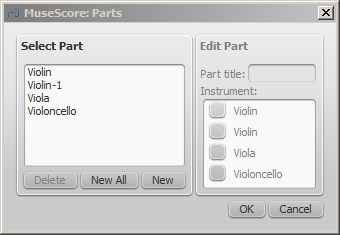
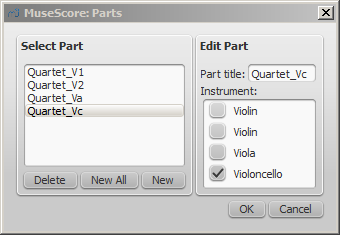
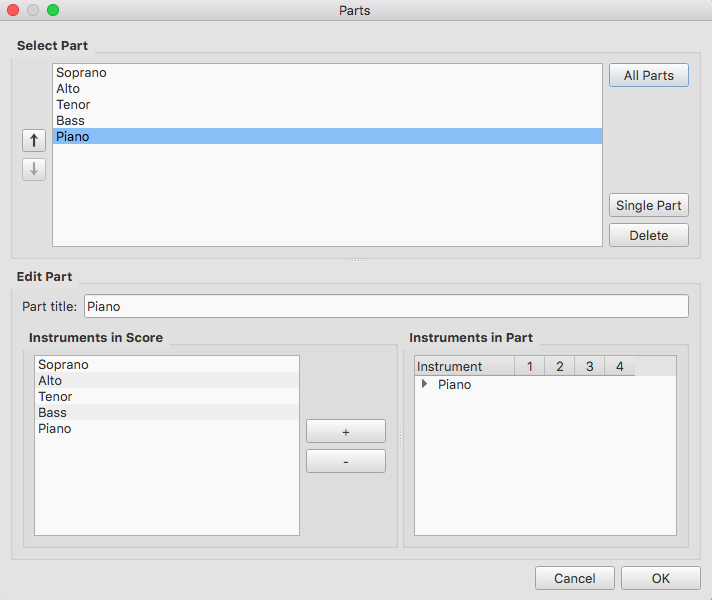
创建特定分谱
本方法允许您仅为选中的乐器生成特定的分谱(而非多合一分谱):
- 在分谱窗口中,单击 新建 来创建一个分谱;
- 在中央面板输入您想要用作字符“分谱标题”的文字(这同时也将作为导出时对应的文件名的一部分);
- 在“总谱乐器”中选择您想要添加在分谱中的乐器,并按下 + 以将其加“分谱乐器”面板。
若欲创建更多分谱,请对于每个分谱重复第1至3步。
- 单击 OK 来保存所有分谱。
您现在已经完成了对分谱的设定。如果您不打算从总谱中添加或是删除乐器,则不必重复操作上述内容。
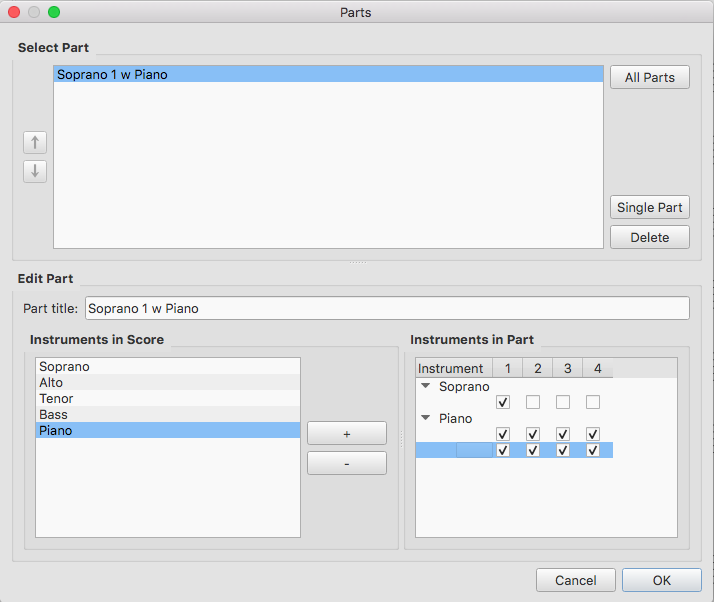
自定义分谱
一旦生成分谱之后,您就可以在分谱窗口上方选择任何分谱,并使用下方的选项来控制分谱中,甚至是这个分谱中里单个谱表和声部的的乐器。

向分谱添加乐器
要向已有分谱添加乐器:
- 选择"分谱"面板内的分谱;
- 从"分谱乐器"面板选取乐器;
- 按下 + 来添加到"分谱乐器"面板。
从分谱移除乐器
要从已有分谱移除乐器:
- 选择"分谱"面板内的已有分谱;
- 从"分谱乐器"面板选取乐器;
- 按下 - 按钮来移除乐器。
为乐器选择谱表
要选择一个乐器的谱表来纳入分谱:
- 选择"分谱"面板内的分谱;
- 单击“分谱乐器”中乐器旁的箭头来展开列表以显示所有谱表和声部的乐器。
- 选择要移除的谱表。
- 按下 - 按钮来从乐器列表中移除乐器。
为乐器选择声部
- 选择"分谱"面板内的分谱;
- 在“分谱乐器”中,单击乐器旁的箭头以展开列表显示所有谱表和声部的乐器;
- 取消勾选要移除的声部。
提示:若您仅选中所给谱表的第一声部,则只有该谱表的第一声部中的内容会被纳入分谱。故为了共享同一谱表中的两个长笛声部,您将需要将所有音符输入到各自的声部,即使在部分乐段中他们的内容相同。您不能在乐段中输入两个声部作为和弦,尽管它们共享一段旋律。
删除一个分谱
- 打开分谱对话框(文件 → 分谱...);
- 在"分谱"面板选择相应分谱;
- 按下 Delete 。
输出分谱
- 在顶部菜单中点击 文件 → 输出分谱;
- 指定文件的保存位置并选择文件格式(默认为PDF);
- 对于文件名,只需输入对于任何分谱都有效的前缀,或者保留默认乐谱文件名;
- 点击 OK 。
这将会生成名为“<标题>" + "-" + "<分谱名>.<扩展名>”的文件。此外,当导出为PDF时,也会生成"<标题>" + "-总谱与分谱.pdf".
保存分谱
分谱是与乐谱相关连的,即改变了其中的一个,另一个也会随之改变,但是这种情况不包括对版面的调整。 当您业已创建分谱,版面调整是每个乐谱单独保存的(若您打开了带有多个分谱标签页的乐谱)。
然而,若您想要单独保存分谱:
- 请确保该分谱状态为“活跃”,否则请单击该分谱的标签页;
- 在顶部菜单中选择 文件 → 另存为...。
打印一个分谱
- 请确保该分谱状态为“活跃”,否则请单击该分谱的标签页;
- 在顶部菜单中选择 文件 → 打印 以开启打印对话框。
| 附件 | 大小 |
|---|---|
| Part_Creation5_en.png | 10.48 KB |
| Part_Creation4_en.png | 11.28 KB |
| Part_Creation3_en.png | 11.06 KB |
| Part_Creation2_en.png | 10.36 KB |
| Part_Creation1_en.png | 10.01 KB |
| Parts-create-all_en.png | 18.89 KB |
| Parts-create-voices_en.png | 19.64 KB |
| Parts_create_All_Parts_en.png | 48.29 KB |
| Parts_create_Single_Part_en.png | 51.83 KB |
品格图
注:此页面仅适用于MuseScore 3.1及以上版本。3.1之前版本的用户应前往到品格图(3.1版之前)。
品格图概述
MuseScore允许使用和创建品格(或和弦)图。它们通常出现在主唱谱和钢琴谱的上方。它们通常用于吉他和弦,但MuseScore允许为任何乐器创建图表。
以下是品格图使用的简单示例。

(注:品格图是指法谱的替代品,与指法谱迥异,后者是一些弦乐演奏者更喜欢的专用符号形式。)
可以通过几种不同的方式使用品格图机制。
-
标准和弦。在高级工作区的品格图面板中可以找到一组21个吉他的常见和弦图。这些由每个全音阶音调(CDEFGAB)的大、小调和七和弦的单个示例组成。这21个和弦足以满足许多简单的流行或民间乐谱。请参阅下文的此面板概述。
-
修改后的和弦。在许多情况下,品格图面板的标准和弦被用作会被通过检视器进行修改。这项技术使和弦扩展、更改、不同的声部、不同位置等可以应用于21个标准图表。通常有数千个吉他和弦,这使得一个全面的符号面板或字典不切实际。参见如何使用品格图进行自定义/复杂和弦。
-
自绘和弦。更高级的吉他手通常更喜欢从空白和弦网格开始,然后绘制所需的特定和弦音调。有关示例,请参阅如何使用品格图进行自定义/复杂和弦。
注:音乐符号的许多方面都遵循既定的雕版标准。吉他和弦图是个例外。各出版商、教师、编曲者间使用方法有很大差异。今天,仍然存在许多不一致的习惯,不同的音乐流派和地区更喜欢的和弦符号风格各异。故MuseScore品格图界面支持各种类型的图表。用户可以自由选择他们的首选项。
标准吉他和弦面板概述
高级工作区中的品格图面板提供了21张图表,包括每个全音阶音(CDEFGAB)的单个大小调和七和弦。当光标悬停于条目上时,每个图表的名称都会显现。

Note: This range of chord diagrams, or indeed any selection of 21 chords, would not typically be sufficient for publication purposes. Arrangers must consider many other voicings, positions, and chord qualities. This palette is also an example of the diverse diagram formats in use, as discussed above. These 21 chords happen to incorporate open/mute string indicators (the X and O symbols above the diagrams). Although those symbols do often appear in published scores, their usage varies by context. For example, jazz arrangements generally omit mute string indicators, unless contextually important, and rarely use open strings.
Additional palettes that contain a broader range of standard chords are expected be available in the future. These would try to address the needs of specific musical genres and situations.
创建修改或自定义和弦的概述
从符号面板中添加创建品格图,之后编辑以修改品格图。通过修改标准和弦,可以为任何可播放和弦创建品格图,并在任何西式有品弦乐器反映指法,无论其调音、弦数或品号如何。以下大多数材料涉及修改和创建新图表的过程。
若有需要,自定品格图可保存至自定面板供将来使用。当然,修改后的品格图可以常规方式在乐谱内复制/粘贴。
添加品格图
要向乐谱添加品格图,请使用以下方法之一:
- 在声部1中选择一个音符,然后在符号面板中双击品格图。
- 将品格图从符号面板拖放到乐谱中所需的位置。
当光标悬停在符号面板中选择的图表上时,其名称将显示为弹出式提示(请参阅概述中的示例)。
与品格图相关联的和弦符号
将品格图添加到乐谱时,也会自动创建和弦符号。和弦符号通常位于图表上方,并使用和弦面板单元格中的和弦名称。图表和弦符号的自动放置和格式由样式设置控制(见下文样式设置。

由品格图生成的和弦符号可以像任何其他文本元素一样被选择、移动和修改。其通常类似于使用添加→文本→和弦符号或快捷键Ctrl+K添加的普通和弦符号。

Note 1: A field on the Chord Symbols style page (Style submenu: select Format→Style…→Chord symbols) – rather than on the Fretboard Diagrams style page – controls the chord symbol's "Distance to Fretboard Diagram". This value interacts with the Element "Minimum distance" field, within the Inspector, to control automatic placement of the chord symbol relative to the diagram. Note also that the Fretboard Diagram's "top edge" includes the blank space where open/mute string indicators would appear, even if that area is empty. This may leave a larger gap than is desired. As usual, manual placement can be used to override the automatic settings.
Note 2: Automatic chord symbols generated for Fretboard Diagrams are not completely integrated with normal Chord Symbols that may be directly associated with notes on the staff. Specifically, focus does not flow from a Fretboard Diagram's chord symbol back to the sequence of other symbols on the page when using Space to move through the chord symbols. This minor issue will be addressed in a future update.)
将和弦符号与品格图一起使用
- Add a diagram's Chord Symbol automatically simply be adding a Fretboard Diagram as described above.
- Delete a diagram's Chord Symbol by selecting the symbol and deleting it, as with any text item.
- Add a new Chord Symbol to a diagram without one by selecting the Fretboard Diagram and using 添加→文本→和弦符号或快捷键Ctrl+K。
调整品格图的属性
Fretboard Diagram的位置可在编辑模式中使用键盘箭头进行调整;或用检视器顶部“元素”部分中的纵横偏移量进行调整。
可见性、颜色以及堆叠顺序也可在“元素”栏中调节:请参阅编辑下的图表。
调整全局/默认品格图样式属性
Fretboard Diagrams的某些默认和全局属性(见下文图表)可以从样式下的子菜单进行调整:选择格式→样式…→品格图。其中一些属性可以通过检视器进行覆盖;但大多数影响乐谱中的所有品格图。

- 默认垂直位置 指定图表相对于谱表的默认位置。(可以通过检视器覆盖)。
- Scale specifies the default scale (i.e. diagram size). (Subject to override via Inspector).
- Fret number font size and ...position control placement of fret numbers on all diagrams. (Global).
- Barre line thickness controls how large a line is used to represent a barre on all diagrams. By default, this is the same thickness as the solid dots. A smaller line will allow dots to be visible under the barre, for situations where that is desirable. (Global).
- Relative dot size controls the size of dots on all diagrams, relative to the size of the scaled grid. (Global).
- String spacing controls the spacing between strings, and thus the total width of all diagrams. (Global).
- Fret spacing controls the spacing between frets, and thus the total height of all diagrams relative to the number of frets they each display. (Global).
检视器公开的大多数品格图属性都提供“重置为样式默认”和“保存为样式默认”按钮。这些值通常不会出现在样式页面上,而是通过检视器进行操作。
编辑品格图
选中品格图后,可在检视器中编辑如下:
检视器显示与品格图相关的三栏:
- An Element section that controls the Fretboard Diagram's visibility, placement, color, and other aspects that are used in common with other MuseScore elements; see adjust element properties and the Inspector for details.
- A Fretboard Diagram section, with control fields and buttons that define the appearance of this diagram.
- A magnified version of the Fretboard Diagram, showing its details and allowing editing.
Below is an example of the Inspector with a Fretboard Diagram selected.

编辑品格图属性
(请参阅上文编辑示例中的检视器属性。)
- To adjust the scale (size) of the diagram: Use Scale.
- To adjust the diagram's placement relative to the staff: Use Placement.
- To adjust the number of instrument strings: Use Strings. Strings are added/removed from the left side of the diagram.
- To adjust how many frets to display (i.e. the height of the diagram): Use Frets. Frets are added/removed from the bottom of the diagram.
- To adjust the first fret position: Use Fret number. A digit is shown next to the first visible fret.
- To specify thickening of the nut (a heavy line above the first fret): Use Show nut.
- Place the finger dots as described below.
指点编辑(基础使用)
(请参阅上文编辑示例中的检视器属性。)
- To remove all current dots, use the "Clear" button above the diagram. (Note: you could save a blank grid in a custom palette, as a starting point for custom diagrams.)
- To create a dot, click on a fret in the diagram at the bottom of the inspector; click again to remove the dot.
- To move a dot, clear its current position by clicking on it; then create the desired dot.
- To create a barre or partial barre: Click the "Barre" button above the diagram; then click at the leftmost position desired for the barre. The barre will extend to the right edge of the fretboard. Keyboard shortcut: Holding the Shift key, click on the string where you want a barre to begin.
- To end a barre before the rightmost string: Click the "Barre" button above the diagram; then click at the rightmost position desired on an existing barre. The barre will end at that string. Keyboard shortcut: Holding the Shift key, click on the string where you want a barre to end.
- To delete a barre: Click the "Barre" button above the diagram; then click at the leftmost position of the barre. It will be removed. Keyboard shortcut: Holding the Shift key, click on the leftmost position of the barre.
- To create multiple barres: Use the above steps to create one than one barre, e.g. to show the third finger covering two strings.
- To adjust the barre thickness: Use the Style options (Format->Style->Fretboard Diagrams) to adjust the barre line thickness relative to the dots. This will allow dots to be visible on the barre, for cases where that is desired.
- To Indicate open and mute strings (optional). Click just above the diagram to toggle a string between:
- Open (o)
- Mute/unplayed (x)
- No indication
Finger dot editing (advanced use)
Some arrangers and educators use a more advanced form of Fretboard Diagram that a) incorporates multiple types of "dot", and that b) allows multiple dots per string.
This technique is particularly associated with the many books and arrangements published by Ted Greene and his successors. (Note: No other notation software currently supports this diagram style.)
-
Multi-dot notation style. With this approach, the round dots are played first. Then, on successive beats, the notes represented by the other dots are then played in order. This allows a single diagram to represent several beats of music. (The usual sequence is: dot→X→square→delta. Usage varies however.) Here are two examples of multi-dot diagrams.


-
可选音符符号样式。Another use of multiple dots per string allows other symbols to show optional notes, rather than delayed notes. Typically, a related chord voicing is shown, such as an optional extension or an optional rootless chord version. Here is an example of an optional extension.

MuseScore Fretboard Diagrams allow the creation of these and other types of multi-symbol diagrams. A chord is first created and edited using the basic steps described above. Then, the multiple dot buttons above the diagram are used to add secondary notes.

- To begin adding multiple dots (i.e. symbols) to a diagram, click "Multiple dots".
- To add another dot to a string, click above or below an existing symbol. The next symbol in sequence will be placed at that position, e.g. if there is already a dot, an X will appear next.
- To remove any symbol from a diagram, click on it.
- To enter a particular symbol out of sequence, click on the button with that symbol before adding the dot; e.g. to enter an X on a string with no current dots, because that note should be played after the rest of the chord, click on the X and then place it as desired.
(Note: Experienced users of Ted Greene style diagrams will find that several secondary features from Ted's diagrams are not yet supported in MuseScore. These include: a. Displaying the fret number on a higher fret than the first visible fret. b. Allowing the note symbols to include digits, not just the four dot styles currently supported. c. Allowing the creation of annotation on and between diagrams, such as circling a particular note, or drawing lines linking notes in adjacent diagrams. However, MuseScore does provide many tools for drawing and annotation that can serve in place of these techniques.)
(Note: Because multi-note symbols are not standardized, even within the Ted Greene community, users must be careful to indicate how they are being used within a given score.)
外链
- 如何使用品格图进行自定/复杂和弦(MuseScore HowTo)
- 曼陀林品格图面板(论坛文章)
- Ukulele品格图面板(论坛文章)
3.1版本前的品格图
Note: This page applies to versions of MuseScore prior to 3.1 only. Users of MuseScore 3.1 and above should go to Fretboard diagrams.
A range of fretboard (or chord) diagrams for the guitar are provided in the Fretboard Diagrams palette in the Advanced Workspace.

You can create a chord diagram for any fretted, stringed instrument by editing an existing one. It can be saved to a custom palette for future use if required.
Add a fretboard diagram
To add a fretboard diagram to the score, use one of the following methods:
- Select a note in voice 1 and double-click a fretboard diagram from a palette.
- Drag and drop a fretboard diagram from a palette to the desired position in the score.
As the cursor hovers over the chosen diagram within the palette, its name will appear as a pop-up hint.
Edit a fretboard diagram
When a fretboard diagram is selected, it can be edited in the Inspector as follows:
- To adjust the number of instrument strings: Use Strings.
- To adjust the fret position number: Use Offset.
- To adjust how many frets to display (height-wise): Use Frets.
- To place the finger dots: Click on a fret to establish a dot; click again to remove the dot.
- To create a barre or partial barre: First make sure that the desired fret position is clear of black dots (click on a dot to remove it). Then, holding the Shift key, click on the string where you want the barre to begin. (Note: Only one barre can be applied per diagram; a partial barre must end on the first string).
- To delete a barre: Click on the black dot where the barre begins.
- To Indicate open and mute strings (if applicable): Click just above the diagram to toggle a string between:
- Open (o)
- Mute/unplayed (x)
- No indication.
- To adjust the size: Use the Scale property.
To adjust a diagram's element properties
The position of a Fretboard Diagram can be adjusted using the keyboard arrows in Edit mode; or with the X- and Y-offsets in the "Element" section at the top of the Inspector.
Visibility, Color and Stacking order can also be adjusted from the "Element" section.
To adjust a diagram's style properties
Certain default and global properties of Fretboard Diagrams (e.g. barre thickness, vertical position, scale, fret-number font-size and position) can be adjusted from the Style submenu: select Format→Style…→Fretboard Diagrams. Some of these properties are subject to override via the Inspector; but most affect all Fretboard Diagrams in the score.
图层(试验性功能)
此功能仍处于试验阶段,仅在MuseScore使用“-e”选项启动时可见,请参阅命令行参数
对于Open-Goldberg项目,需要能够创建不同版本的乐谱。其中一个版本是“Urtext”,即一个接近巴赫原始版本的乐谱。第二个版本可能是Czerny变体,除了Urtext之外,还包含了指法。
图层功能使您可以创建一个乐谱的不同版本。如果你想添加指法,你必须创建一个图层,并用图层名标记指法元素。
首先,创建图层:

其次,创建一个乐谱的变体:

向乐谱的变体版本加入可见图层,接着选择全部指法,并将它们用为变体乐谱的名称标记:

默认图层:

车尔尼图层:

另见
工具
在 工具 菜单中可以找到一些有用的命令。
移调
这将打开移调对话框,其中包含各种音乐段落的移调选项。
请参阅自动移调。
拆分谱表
选中单个谱表中的乐句以后,拆分谱表命令允许您并且拆分(split; explode)和弦。
合并谱表
合并谱表命令工作的方式与拆分谱表相反。
声部
这允许您对调所选小节系列中音符的声部。
小节
拆分与合并小节。
移除所选区域
此命令用来从乐谱中完全移除某一元素或者某个范围的元素。
欲移除小节(包括部分小节):
注意:如果所选区域包括某小节的仅仅一部分,结果将会包括时值小于拍号所示的小节。这由恰好在谱行组上方的一个小 - (减号)标明。
欲合并小节:
- 单击选中一条小节线;
- 使用以下方法之一:
- 按下 控制 + 删除 (麦金塔: 命令 + 删除)。
- 点击 工具 → 移除选区 。
下表是删除和移除选区命令应用于单个元素时的比较摘要:
| 所选元素 | 删除 | 移除选区 |
|---|---|---|
| 音符 | 替换为休止符 | 移除乐谱区域 |
| 休止符(声部 1) | 无效果 | 移除乐谱区域 |
| 休止符(声部 2~4) | 删除休止符 | 移除乐谱区域 |
| 小节线 | 无效果 | 删除小节线并合并小节 |
| 小节 | 内容替换为休止符 | 移除小节 |
注:欲插入音符,请参阅《插入》。
用斜杠填满小节节拍
此命令用斜杠来填满选区,每拍一条:
- 选中一个或者更多小节。
- 从菜单中,点击 工具 → 用斜杠填满小节节拍 。
如果小节为空,斜杠加诸声部 1,尺寸完整并且居中于谱表中线:

注意:
1. 如果选区中的小节中已有音符,该命令会将斜杠放进第一可用空声部。
2. 声部 2 的斜杠尺寸完整并且居中于谱表中线;声部 3 的斜杠缩小于谱表上方;声部 4 的斜杠缩小于谱表_下方。
3. 如果小节包含所有四个声部的音符,声部 1 将被覆盖。
4. 所有斜杠都设置为不移调且不播放。
切换节奏斜杠记号
此命令令所选音符在正常音符和节奏斜线记号之间切换:
所选符头变为既不移调也不回放的斜杠符头。

声部一或者二中的斜杠符头音符固定在谱表中线;声部三或者四中的那些缩小(“重音”记谱)并且固定在谱表上方或者下方:

在鼓组线谱中,声部 3 和 4 中的音符不切换到小斜杠而是变成谱表上方或者下方的小音符。

等音替换
重组节奏
此选项更正音符同音连线、时值,和符杠以至于它们根据标准音乐记谱实践重组。譬如:
之前:

之后:

任何延音和与附点音符时长一样的音符将变为附点音符但是伴有两个限制:
- 一组延音音符中只有最末音符将会具有单附点。使用此选项不会生产超过一个附点的音符。
- 附点音符将不从一组符杠音符持续到另一组,除非其时值与它涵盖的所有符杠组相同。附点超过一个的任何音符将会根据以上规则重组。
欲应用:
- 选中乐谱中您想要重置的部分。如果无物选中,此操作将会应用于整个乐谱。
- 选中 工具 → 重组节奏 。
注意:这是实验特性,存在已知隐错:
- 删除运音法与装饰音。
- 更改一些音高。
- 穿过小节线的延音线可能在撤销时丢失。
排练号重排序
如果排练记号由于任何原因失序,排练号重排序命令允许您重新排列其序号/音序。
展开重复记号(在版本 3.1 或者更高版本中可用)
此命令(在新标签页中)创建乐谱副本,消除反复与跳跃而完整记下重复的部分。
将唱词拷贝到剪贴板
此命令乐谱所有唱词拷贝到剪贴板:
- 从菜单中,选中 工具 → 将唱词拷贝到剪贴板 。
截图
截图拍摄文档窗口中选定部分的快照。支持 PNG、PDF,和 SVG 格式。
移除结尾空小节
这将自动删除乐谱末尾的任何空白小节。
另请参阅
外部链接
谱表的合并与拆分
拆分谱表
拆分谱表命令允许您选中单个谱表中的乐句并且将和弦按照如下方式拆分(split; explode)成其组成音符或者声部:
- 如果乐句全部在声部 1 中,和弦的最高音符留在顶部谱表上,而较低音符移到后续线谱。
- 如果乐句包含多个处理多声部,声部 1 的音符留在顶部谱表上,而其他声部移到后续线谱。所有拆出声部现在在声部 1 中。
欲拆分乐谱的一部分:
- 确保,来源谱表下方有足以接收拆出音符的线谱。如有必要,使用乐器对话框以创建额外线谱。
- 二选一:
- 点击 工具 → 拆分谱表 。
注意:
- 若选区全部在声部 1 中,MuseScore 将会丢弃任何所含音符多于该部分中线谱数目的和弦的最低(诸)音符。
- 如果选区全部在声部 1 中,并且如果给定和弦具有的音符少于目标线谱数目,那么音符将会根据需要复制,以至于每一线谱都接收到一个音符。
- 目标线谱中任何现存音乐都将被覆写。
- 如果您选中部分小节,
拆分谱表命令将会自动扩张至完整小节。
合并谱表
合并谱表命令工作的方式与拆分谱表相反:
- 选中一个谱表之时,声部 1~4 中所有音符合并到声部 1 中。
- 选中多个线谱之时,第二谱表中的音符拷贝到顶部谱表中第一可用声部,第三谱表中的音符拷贝到顶部谱表中下一可用声部,依此类推。
将合并命令应用到单个谱表
- 选中所需谱表中的一系列小节。
- 点击 工具 → 合并谱表 。
该谱表中所有所选音符现在显示在声部 1 中。
将合并命令应用到多个线谱
- 确保,每一谱表中只有一个声部。
- 选中目标谱表中一系列小节并且将此选区扩展向下以包括其余待合并线谱。
- 点击 工具 → 合并谱表 。
恢复文件
如果 MuseScore 或您的计算机发生崩溃,或者电源耗尽,重新启动 MuseScore 时的弹出式消息会询问您是否希望恢复上一个会话:

- 点击 是,从中断的会话中尝试恢复文件。 或点击 否 忽略消息。
恢复会话后保存
当 MuseScore 在崩溃后恢复文件时,它会在原始文件名前面添加完整路径名称来重命名它们。这个很长的名字将出现在当前乐谱窗口顶部标签中。
确保文件保存在原始位置。在保存文件时建议选择 "保存为..." 选项:这将打开一个窗口,允许您导航到正确的文件夹和目录。如果您改用“保存”命令,文件将保存到当前位置,而该位置不一定是原始位置。
查找已恢复的文件
得到已恢复的文件后,保存时如果出现用 "保存" 代替 "保存为..." 的情况,您务必找到文件在计算机中的实际位置。文件的实际位置会有所不同,这取决于你的操作系统以及MuseScore安装路径。
对于 Windows 7,默认将 MuseScore 安装到 x86 程序文件目录,已恢复的文件可自动保存到 C:\Program Files (x86)\MuseScore 3\bin(实为%ProgramFiles(x86)%\MuseScore 3\bin)。
对于 Windows 10,请查看 C:\Users\[User Name]\AppData\Local\VirtualStore\Program Files (x86)\MuseScore 3\bin(实为%LOCALAPPDATA%\VirtualStore\%ProgramFiles(x86):~3%\MuseScore 3\bin)。
您可能需要运行全系统搜索,以便查找会话恢复后直接保存的文件。使用原始文件名和通配符中的关键字,并指定修改日期。
另请参阅
外部链接
如何恢复乐谱的备份副本 (MuseScore 操作指南)
插件
插件是什么?
插件是微型的软件,会向MuseScore添加特定的功能。启用一个插件后,菜单栏中的插件菜单会增加新的一项。此后,当该项被选中时,插件会执行特定的功能。
MuseScore中有一些内置的插件——请看预装插件(本文下方)。你可以在插件库找到更多的插件。有些插件只支持MuseScore 3,有些只支持更低的版本,有些均可支持。它们的区别是:MuseScore 3.x和2.x的插件文件后缀名是.qml,老版本的则是.js.
警告:插件可能含有糟糕或者恶意的代码,它可能威胁到甚至损坏你的作品或系统。插件并没有经过任何的审查(除了预装插件)。你要么信任插件作者,要么自己检查代码。
安装
注:有些插件需要安装其他组件(例如字体)才能工作。查阅插件的文档以获取更多信息。
大多数插件以ZIP压缩包形式提供。下载插件的zip压缩包,解压到以下提及的某个目录(与你的操作系统有关)下。如果插件直接提供为未压缩的.qml文件,下载后直接放到那个目录下即可。
安装了插件后,需要先在插件管理器中启用才能使用它,详见启用/禁用插件。
Windows
MuseScore会在这些目录下寻找预装插件: %ProgramFiles%\MuseScore 3\Plugins (32位版本则是
%ProgramFiles(x86)%\MuseScore 3\Plugins )和 %LOCALAPPDATA%\MuseScore\MuseScore 3\plugins (对于Win7或更高)。
新插件不应被装在上述文件夹中,而且这些文件夹应该永远不被修改。请将新插件安装在
%HOMEPATH%\Documents\MuseScore3\Plugins . 如果想要更改安装新插件的文件夹,可在MuseScore的偏好中指定。
macOS
MuseScore会在这些目录下寻找预装插件: /Applications/MuseScore 3.app/Contents/Resources/plugins 处的MuseScore bundle中(右击MuseScore 3.app,选择“Show package contents显示包内容”以显示相关文件)以及 ~/Library/Application Support/MuseScore/MuseScore 3/plugins .
新插件不应被装在上述文件夹中,而且这些文件夹应该永远不被修改。请将新插件安装在
~/Documents/MuseScore3/Plugins . 如果想要更改安装新插件的文件夹,可在MuseScore的偏好中指定。
Linux
MuseScore会在这些目录下寻找预装插件: /usr/share/mscore-3.0/plugins 以及
~/.local/share/data/MuseScore/MuseScore 2/plugins .
新插件不应被装在上述文件夹中,而且这些文件夹应该永远不被修改。请将新插件安装在
~/Documents/MuseScore3/Plugins . 如果想要更改安装新插件的文件夹,可在MuseScore的偏好中指定。
启用/禁用插件
如果要使用插件,首先要在插件管理器中将插件启用:

将插件前面的勾打上,那么插件名就会出现在插件菜单中供你调用。
创建/编辑/运行插件
可以创建新的、编辑现存的插件,并通过插件创建器运行:

关于所有可用元素的文档也能在这里找到。
预装插件
有些插件被预装在MuseScore中,但它们默认并未被启用。请看启用/禁用插件(本文上方)以启用插件。
ABC Import
该插件从文件或剪贴板导入ABC文本,并将其转换为MusicXML. 联网是必要的,因为转换过程用到了外部的网络服务。
Notes → Color Notes
该插件对所选范围(或整个乐谱)中的音符依据音高进行着色。It colors the note head of all notes in all staves and voices according to the Boomwhackers convention. 每个音高有不同的颜色。C 与 C♯ 颜色不同,而 C♯ 与 D♭ 颜色相同。
如果想还原所有的音符为黑色,只需再次运行该插件(点击相同的选项)。你也可以使用移除音符颜色的插件。
Create Score
该插件会创建一篇新的乐谱。它会创建一篇新的钢琴谱,有着4个四分音符:C, D, E, F. 利用它可以学到如何通过插件创建新乐谱以及增加音符。
helloQml
This demo plugin demonstrates some basic tasks.
该插件展示一些基本的任务。
Notes → Note Names
该插件对所选范围(或整个乐谱)中的音符进行命名。它会将音符的名称显示为staff text,依据MuseScore的language settings:voices 1 and 3 notes above the staff; voices 2 and 4 notes below the staff; and chord notes in a comma separated list, starting with the top note.
Panel
该插件展示一个GUI panel.
random/random2
创建随机乐谱。
run
该插件运行一条额外的指令。也许它只在Linux上有效。
scorelist
该测试性插件会遍历乐谱列表。
ScoreView
展示ScoreView的用法的插件
Walk
该测试性插件会遍历乐谱中的所有元素。
另见
外部链接
数字低音
添加新的数字低音提示{#adding-a-new-figured-bass-indication}
- 选区要添加数字低音的音符;
- 按下 数字低音快捷键。默认快捷键为Ctrl+G(Mac: ⌘+G):若有需要,可在偏好设置:快捷键中修改;
- Enter the text in the editor 'blue box' as required (see below);
- Use one of the following options as required:
- Press Space to move to the next note ready for another figured bass indication (or click outside the editor box to exit it). The editor advances to the next note, or to the rest of the staff to which figured bass is being added. (To move to a point in between, or to extend a figured bass group for a longer duration, see Duration (below)).

- Shift+Space moves the editing box to the previous staff note or rest.
- Tab advances the editing box to the beginning of the next measure.
- Shift+Tab moves the editing box to the beginning of the previous measure.
- Press Space to move to the next note ready for another figured bass indication (or click outside the editor box to exit it). The editor advances to the next note, or to the rest of the staff to which figured bass is being added. (To move to a point in between, or to extend a figured bass group for a longer duration, see Duration (below)).
Text format
Digits
Digits are entered directly. Groups of several digits stacked one above the other are also entered directly in a single text, stacking them with Enter:

Accidentals
Accidentals can be entered using regular keys:
| 要输入: | 类型: |
|---|---|
| 重降号 | bb |
| 降号 | b |
| 还原号 | h |
| 升号 | # |
| 重升号 | ## |
These characters will automatically turn into the proper signs when you leave the editor. Accidentals can be entered before, or after a digit (and of course, in place of a digit, for altered thirds), according to the required style; both styles are properly aligned, with the accidental 'hanging' at the left, or the right.
Combined shapes
Slashed digits or digits with a cross can be entered by adding \, / or + after the digit (combining suffixes); the proper combined shape will be substituted when leaving the editor:

The built-in font can manage combination equivalence, favoring the more common substitution:
1+, 2+, 3+, 4+ result in  (or
(or  )
)
and 5\, 6\, 7\, 8\, 9\ result in  (or
(or  )
)
Please remember that / can only by combined with 5; any other 'slashed' figure is rendered with a question mark.
+ can also be used before a digit; in this case it is not combined, but it is properly aligned ('+' hanging at the left side).
Parentheses
Open and closed parentheses, both round: '(', ')' and square: '[', ']', can be inserted before and after accidentals, before and after a digit, before and after a continuation line; added parentheses will not disturb the proper alignment of the main character.
Notes: (1) The editor does not check that parentheses, open and closed, round or square, are properly balanced. (2) Several parentheses in a row are non-syntactical and prevent proper recognition of the entered text. (3) A parenthesis between a digit and a combining suffix ('+', '\', '/') is accepted, but prevents shape combination.
Continuation lines
Continuation lines are input by adding an '_' (underscore) at the end of the line. Each digit of a group can have its own continuation line:

Continuation lines are drawn for the whole duration of the figured bass group.
'Extended' continuation lines
Occasionally, a continuation line has to connect with the continuation line of a following group, when a chord degree has to be kept across two groups. Examples (both from J. Boismortier, Pièces de viole, op. 31, Paris 1730):

In the first case, each group has its own continuation line; in the second, the continuation line of the first group is carried 'into' the second.
This can be obtained by entering several (two or more) underscores "__" at the end of the text line of the first group.
Duration
Each figured bass group has a duration, which is indicated by a light gray line above it (of course, this line is for information only and it is not printed or exported to PDF).
Initially, a group has the same duration of the note to which it is attached. A different duration may be required to fit several groups under a single note or to extend a group to span several notes.
To achieve this, each key combination in the table below can be used to (1) advance the editing box by the indicated duration, and (2) set the duration of the previous group up to the new editing box position.
Pressing several of them in sequence without entering any figured bass text repeatedly extends the previous group.
| Type: | to get: |
|---|---|
| Ctrl+1 | 1/64 |
| Ctrl+2 | 1/32 |
| Ctrl+3 | 1/16 |
| Ctrl+4 | 1/8 (quaver) |
| Ctrl+5 | 1/4 (crochet) |
| Ctrl+6 | half note (minim) |
| Ctrl+7 | whole note (semibreve) |
| Ctrl+8 | 2 whole notes (breve) |
(The digits are the same as are used to set the note durations)
Setting the exact figured bass group duration is only mandatory in two cases:
- When several groups are fit under a single staff note (there is no other way).
- When continuation lines are used, as line length depends on the group duration.
However, it is a good practice to always set the duration to the intended value for the purposes of plugins and MusicXML.
Editing existing figured basses
To edit a figured bass indication already entered use one of the following options:
- Select it, or the note it belongs to and press the same Figured Bass shortcut used to create a new one.
- Double-click it.
The usual text editor box will open with the text converted back to plain characters ('b', '#' and 'h' for accidentals, separate combining suffixes, underscores, etc.) for simpler editing.
Once done, press Space to move to a next note, or click outside the editor box to exit it, as for newly created figured basses.
Style
To configure how figured bass is rendered: from the menu, select Format → Style… → Figured Bass.

- Font: The dropdown list contains all the fonts which have been configured for figured bass. A standard installation contains only one font, "MuseScore Figured Bass," which is also the default font.
- Size: Select a font-size in points. Note: This value is also modified by any change made to Scaling (Format → Page Settings…), or Scale ("Staff properties").
- Vertical Position: The distance (in spaces) from the top of the staff to the top margin of the figured bass text. Negative values go up (figured bass above the staff) and positive values go down (figured bass below the staff: a value greater than 4 is needed to step over the staff itself).
-
Line Height: The distance between the base line of each figured bass line, as a percentage of font size.
The following picture visualizes each numeric parameter:

-
Alignment: Select the vertical alignment: with Top, the top line of each group is aligned with the main vertical position and the group 'hangs' from it (this is normally used with figured bass notation and is the default); with Bottom, the bottom line is aligned with the main vertical position and the group 'sits' on it (this is sometimes used in some kinds of harmonic analysis notations):

-
Style: Chose between "Modern" or "Historic." The difference between the two styles is shown below:

Proper syntax
For the relevant substitutions and shape combinations to take effect and for proper alignment, the figured bass mechanism expects input texts to follow some rules (which are in any case, the rules for a syntactical figured bass indication):
- There can be only one accidental (before or after), or only one combining suffix per figure;
- There cannot be both an accidental and a combining suffix;
- There can be an accidental without a digit (altered third), but not a combining suffix without a digit.
- Any other character not listed above is not expected.
If a text entered does not follow these rules, it will not be processed: it will be stored and displayed as it is, without any layout.
Summary of keys
| Type: | to get: |
|---|---|
| Ctrl+G | Adds a new figured bass group to the selected note. |
| Space | Advances the editing box to the next note. |
| Shift+Space | Moves the editing box to the previous note. |
| Tab | Advances the editing box to the next measure. |
| Shift+Tab | Moves the editing box to the previous measure. |
| Ctrl+1 | Advances the editing box by 1/64, setting the duration of the previous group. |
| Ctrl+2 | Advances the editing box by 1/32, setting the duration of the previous group. |
| Ctrl+3 | Advances the editing box by 1/16, setting the duration of the previous group. |
| Ctrl+4 | Advances the editing box by 1/8 (quaver), setting the duration of the previous group. |
| Ctrl+5 | Advances the editing box by 1/4 (crochet), setting the duration of the previous group. |
| Ctrl+6 | Advances the editing box by a half note (minim), setting the duration of the previous group. |
| Ctrl+7 | Advances the editing box by a whole note (semibreve), setting the duration of the previous group. |
| Ctrl+8 | Advances the editing box by two whole notes (breve), setting the duration of the previous group. |
| Ctrl+Space | Enters an actual space; useful when figure appears "on the second line" (e.g., 5 4 -> 3). |
| BB | Enters a double flat. |
| B | Enters a flat. |
| H | Enters a natural. |
| # | Enters a sharp. |
| ## | Enters a double sharp. |
| _ | Enters a continuation line. |
| __ | Enters an extended continuation line. |
Note: For Mac commands, Ctrl is replaced with ⌘.
文件格式
MuseScore可以导入和导出各种文件格式,允许您以最符合您需求的格式共享和发布乐谱。
MuseScore原生格式
MuseScore采用以下原生格式保存文件:
- *.mscz:默认的MuseScore文件格式。压缩后,它占用的磁盘空间相对较小。
- *.mscx:未压缩的MuseScore文件格式,主要用于调试或存储在版本系统中。
- .*.mscz, / .*.mscx,:这些是备份文件。注意文件名之前添加的句点,以及添加到文件扩展名的逗号。
A note about fonts: MuseScore does not embed text fonts in saved or exported native format files. If you want your MuseScore file to be viewed by other MuseScore users, make sure you are using the built-in FreeSerif or FreeSans font families for your text, or a font that the other parties have installed too. If a system does not have the fonts specified in your original file, MuseScore will use a fallback option, which may cause your score to appear differently.
MuseScore格式 (*.mscz)
MSCZ是标准的MuseScore文件格式,推荐用于大多数用途。以这种格式保存的分数占用的磁盘空间很小,但保留了所有必要的信息。该格式是“.mscx”文件的ZIP压缩版本,包括乐谱可能包含的任何图像和缩略图。
未压缩的MuseScore格式 (*.mscx)
MSCX是MuseScore文件格式的未压缩版本。以这种格式保存的乐谱将保留除图像以外的所有信息。它可以通过文本编辑器打开,允许用户访问文件的源代码。
MuseScore备份文件 (.*.mscz,) or (.*.mscx,)
备份文件会自动创建,并保存在与普通MuseScore文件相同的文件夹中。备份副本包含之前保存的MuseScore文件版本,若您的正常副本损坏或查看旧版本的乐谱,则可能很重要。
The backup file adds a period to the beginning of the file name (.) and a comma (,) to the end (e.g. if your normal file is called "untitled.mscz", the backup copy will be ".untitled.mscz,"), and the period and comma need to be removed from the name in order to open the backup file in MuseScore. As it is stored in the same folder as your normal MuseScore file, you may also need to give it a unique name (e.g. changing ".untitled.mscz," to "untitled-backup1.mscz").
Note: In order to see the MuseScore backup files, you may need to change your system settings to "Show hidden files". See also How to recover a backup copy of a score.
Graphic files (export only)
MuseScore can export a score as a graphic file in either PDF, PNG or SVG format.
PDF (*.pdf)
PDF(便携式文档格式)文件非常适合与无需编辑内容的他人共享您的乐谱。这是一种非常广泛使用的格式,大多数用户的计算机上都会有某种类型的PDF查看器。
要设置导出的PDF的分辨率:
- 从菜单栏中,选择编辑→偏好设置...(Mac: MuseScore→偏好设置...),并选择“导出”选项卡;
2.在“PDF”栏中设置分辨率。
PNG (*.png)
PNG (Portable Network Graphics) files are based on a bitmap image format, widely supported by software on Windows, Mac OS, and Linux, and very popular on the web. MuseScore creates PNG images as they would appear if printed, one image per page.
To set the resolution of exported PNG images:
- From the menu bar, choose Edit→Preferences... (Mac: MuseScore→Preferences...), and select the "Export" tab;
- Set the resolution and transparency in the PNG/SVG section.
Note: If you want to create images that show only parts of the score (with or without screen-only items such as frame boxes, invisible notes, and out-of-range note colors), use Image capture instead.
SVG (*.svg)
SVG(可扩展矢量图形)文件可以由大多数网页浏览器(版本9之前的Internet Explorer除外)和大多数矢量图形软件打开。然而,大多数SVG软件不支持嵌入式字体,因此必须安装适当的MuseScore字体才能正确查看这些文件。SVG是当前所有存储在MuseScore.com上乐谱格式。
要设置导出的SVG文件的分辨率和透明度,请参阅PNG(上评论)的说明。请注意,MuseScore尚未支持导出时的渐变(虽然它在分数中可用于图像)。
音频文件(仅限导出)
MuseScore可以以以下任何格式创建乐谱的标准化、立体声音频:WAV、MP3、OGG VORBIS、FLAC。要导出音频文件:
- 从菜单中,选择文件 → 导出...;
- 从下拉菜单中选择所需的格式,然后按Save。
您可以按如下方式调整所有音频格式的采样率:
- 从菜单栏中,选择编辑→偏好设置...(Mac:MuseScore→偏好设置...),并单击导出选项卡;
- 在“音频”栏中设置“采样率”。
WAV音频 (*.wav)
WAV(波形音频格式)是一个未压缩的音频格式。这是由微软和IBM开发的,并受到Windows、OS X和Linux软件的广泛支持。这是创建CD时使用的理想格式,因为保持了完整的音质。要通过电子邮件或互联网共享,请使用压缩替代方案,如MP3.
MP3 (*.mp3)
MP3是一种非常广泛使用的压缩音频格式。MP3文件因其体积相对较小,非常适合通过互联网共享和下载。
设置MP3比特率:
- 从菜单栏中,选择编辑→偏好设置...(Mac:MuseScore→偏好设置...),并选择“导出”选项卡;
- 在“音频”栏中设置MP3比特率。
FLAC音频 (*.flac)
Free Lossless Audio Codec (FLAC) is compressed audio format. FLAC files are approximately half the size of uncompressed audio and just as good quality. Windows and OS X do not have built-in support for FLAC, but software such as the free and open source VLC media player can play FLAC files on any operating system.
Ogg Vorbis (*.ogg)
Ogg Vorbis is intended as a patent-free replacement for the popular MP3 audio format (which MuseScore also supports—see above). Like MP3, Ogg Vorbis files are relatively small (often a tenth of uncompressed audio), but some sound quality is lost. Windows and OS X do not have built-in support for Ogg Vorbis. However, software such as VLC media player and Firefox can play Ogg files on any operating system.
Share with other music software
MuseScore can import and export MusicXML and MIDI files; it is also able to import a variety of native format files from other music notation programs.
MusicXML (*.xml, *.musicxml)
MusicXML is the universal standard for sheet music. It is the recommended format for sharing sheet music between different scorewriters, including MuseScore, Sibelius, Finale, and more than 100 others. MuseScore imports *.xml and *.musicxml, but exports only *.musicxml. If you need *.xml (because the program you want to import it needs that), you need to rename it yourself after the export.
Compressed MusicXML (*.mxl)
Compressed MusicXML creates smaller files than regular MusicXML. This is a newer standard and isn't as widely supported by older scorewriters, but MuseScore has full import and export support.
MIDI (*.mid, *.midi, *.kar)
MIDI (Musical Instrument Digital Interface) is a format widely supported by sequencers and music notation software. For details of the protocol see the MIDI Association website.
MIDI files are very useful for playback purposes but contain little in the way of score layout information (formatting, pitch spelling, voicing, ornaments, articulations, repeats, key signatures etc.). To share files between different music notation software, MusicXML is recommended instead.
For details about how to import MIDI files see MIDI import.
MuseData (*.md)(仅导入)
MuseData是Walter B. Hewlett开发的一种格式,始于1983年,是软件之间共享音乐符号的早期手段。自那以后,它被MusicXML的光芒盖过,但这种格式的数千份乐谱仍然可以在线获得。
Capella (*.cap, *.capx)(仅导入)
CAP and CAPX files are created by the score writer, Capella. MuseScore imports version 2000 (3.0) or later fairly accurately.
Bagpipe Music Writer (*.bww) (import only)
BWW files are created by the niche score writer, Bagpipe Music Writer.
BB (*.mgu, *.sgu) (import only)
BB files are created by the music arranging software, Band-in-a-Box. MuseScore's support is currently experimental.
Overture (*.ove)(仅导入)
OVE文件由乐谱制作器Overture创建。该格式主要在中国大陆、香港和台湾等中文环境中流行。MuseScore的支持目前是实验性的。
Guitar Pro(各种——仅限导入)
MuseScore can open Guitar Pro files with the following extensions: *.gtp, *.gp3, *.gp4, *.gp5, *.gpx, and, as of version 3.5, *.gp.
Power Tab Editor (*.ptb) (import only)
PTB files are created by Power Tab Editor. MuseScore's support is currently experimental.
另请参阅
外链
- How to recover a backup copy of a score (MuseScore HowTo)
早期音乐特色功能
MuseScore 提供了几个专有功能来创建雕刻版的早期音乐(一部分是中世纪和文艺复兴期间的)akin to commercial editions from the 20th century onwards.
Unbarred (or unmetered) notation
In MuseScore, notes lasting longer than the duration of a measure are normally tied across barlines. However MuseScore has a special feature which allows it to display the note values intact, without splitting and tying them in this way. This enables you to notate music which is unbarred (i.e. not divided into measures), such as that of the renaissance:
- From the menu bar, select Format→Style...→Score.
- Tick the box labelled "Display note values across measure boundaries … ."

- Click "OK" or "Apply." The existing score is immediately updated.
Example
- The example below shows an excerpt from the original score of "De Profundis Clamavi" for 4 voices by Nicolas Champion:

- The same excerpt displayed in MuseScore:

- And after activating "Display note values across measure boundaries … ."

- To get rid of the barlines, just untick the “Show barlines” box in the Staff / Part properties dialog. See also Mensurstrich (below).
Note: The feature is still in development and may contain bugs. The longest supported note value is the longa (a dotted longa is still broken up and tied over).
Mensurstrich
Since a complete lack of barlines could make performing the music more difficult for current musicians, many modern engravers settled on a compromise called Mensurstrich, where barlines are drawn between, but not across, staves.

To place barlines between staves:
- In the staff below the proposed Mensurstriche, uncheck "Show barlines" in the Staff / Part Properties dialog;
- In the staff above where you want the Mensurstriche, right-click on one barline and chose Select→All Similar Elements in Same Staff;
- In the Barline section of the Inspector, tick the "Span to next staff" option;
- In the Barline section of the Inspector, adjust the "Span from" value so that the top of the barlines meet the bottom line of the staff;
- Repeat for other staves as required.
Ambitus
Before there was the concept of an absolute pitch, performers were required to transpose vocal music to a singable range for their ensemble "on the fly." To aid them, an ambitus was sometimes included, marking the entire range of a voice at the beginning of the piece.
To apply an ambitus, use one of the following methods:
- Drag the ambitus symbol (from the Lines palette of the Advanced workspace) onto a clef.
- Select a clef, then double-click the ambitus symbol (in the Lines palette of the Advanced workspace).

When applied, the ambitus automatically displays the note range of the score: if there is a section break then only the note range of the section is displayed. Beyond the section break a new ambitus may be applied.
The note range of the ambitus can be adjusted manually by selecting it and changing the "Top note" and "Bottom note" values in the Inspector. For automatic adjustment click the Update Range button in the inspector.
Mensural time signatures
In the mensural notation system, time signatures did not define the length of a measure, but the length of breves and semibreves. MuseScore supports mensural time symbols as a display method in the Time signature properties dialog rather than as symbols, but they are just for show, as the proportion of e.g. half notes per whole notes cannot be modified.
One way to make use of these symbols is to replicate when composers of the renaissance had multiple voices in different time signatures simultaneously without using tuplets. Edit the time signature on a per-staff basis, as long as the beginning and end of a measure in all staves match up. If they do not, then consider increasing the size of the measures to the lowest common denominator.

De Profundis Clamavi for 5 voices by Josquin Des Prez
See also
时间轴
介绍
时间轴是作为Google 编程之夏2017(GSoC2017)的一部分开发的,并首次在MuseScore 3.0中引入。
概览
时间轴是一个导航工具,来展现小节号和乐器名顺序乐谱的抽象概念。时间轴有四个部分:
元数据标签
可以在时间轴的左上角找到。 这些是元行的名称。
乐器标签
这可以在时间轴的左下角找到。这些是主网格中行的名称。
元行
可以在时间轴的右上角找到。它们保存乐谱的元值。
主网格
可以在时间轴的右下角找到。 包含多个“单元格”(以正方形表示乐谱中的特定小节和谱表)
元
元是在乐谱上发现的元素,它们不是音符,但对乐谱仍然很重要(调号、拍号、速度、排练记号、小节线、跳跃与反复记号)。

基本作用
选择一个小节
要在时间轴中选择一个小节,请在单元格上上按下鼠标左键。一个蓝色框将出现在选定的单元格周围,同时乐谱中相应的小节也被选中。乐谱视图将把选择的小节放在视图中。
选择多个小节
拖动选择
按住Shift并按住鼠标左键,在主网格上拖动鼠标将创建一个选择框。松开鼠标按键后,选择框下方的所有单元格将被选中,乐谱中对应的所有小节也将被选中。
[Shift] 选择
如果一个单元格已经被选中,按住Shift并选择时间轴上的另一个单元格,将把选区延伸到新单元格,与乐谱中的操作类似
[Ctrl] 选择
如果当前没有选择单元格,按住Ctrl并选择一个单元格将选择整个小节
清除选中
要清除选择,按住Ctrl并单击网格或元行的任何位置将清除当前的任何选择。
元值选择
选择时间轴上的元值将尝试在乐谱中选择相应的元值。
滚动
标准滚动
上下滚动鼠标滚轮会相应地上下移动网格和乐器标签。 元标签和元行不会移动。
[Shift] 滚动
按住Shift并上下滚动鼠标滚轮会相应地左右移动网格和元行。元标签和乐器标签不会移动。
[Alt]滚动
按住Alt并上下滚动鼠标滚轮会相应地左右移动网格和元行,速度比Shift滚动快。元标签和乐器标签不会移动。
拖拽
要拖动时间线的内容,请按住鼠标左键并移动鼠标。
标签作用
重新排列元标签
除了小节元之外的所有元标签可以以任何方式重新排列。将鼠标光标移动到其中一个元标签上,就会出现向上和向下的小箭头。鼠标左键单击向上箭头,元标签与上面的元标签交换。鼠标左键单击向下箭头,元标签与它下面的元标签交换。
折叠元标签
为了隐藏所有元标签,同时在时间轴上保留所有元信息,当鼠标在小节元上时,会出现一个向上箭头。鼠标左键单击向上箭头,将当前可见的所有元行折叠成一行,其中元值在该行中交错显示。鼠标左键单击向下箭头再次展开元行。

隐藏乐器
所有的仪器——隐藏或不隐藏——将显示在时间轴上。为了开始这个交互,将鼠标光标移动到一个乐器标签上。标签右侧会出现一个小眼睛,如果乐器在乐谱上可见,则标签打开,如果乐器隐藏,则标签关闭。点击鼠标左键上的眼睛,在两个选项之间进行切换。

缩放
要缩放乐谱,按住Ctrl并上/下滚动鼠标滚轮(Mac: Cmd + scroll)。
快显菜单
要调出快显菜单,右键单击时间轴。 在这些位置可以找到三个快显菜单:元标签、乐器标签和元行。
元标签快显菜单
在元标签上点击鼠标右键,会出现一个快显菜单,显示所有可能的元标签以及两个选项:“隐藏全部”和“显示全部”。 在菜单中的每个元标签旁边,有一个复选框,显示当前是否在时间轴上显示元标签。 要显示或隐藏其中一个元标签,请在快显菜单中选择元标签的框。 选择“隐藏所有”将隐藏除小节元数据之外的所有元数据标签。 选择“显示所有”将显示所有元数据标签。
元行快显菜单
在元行上单击鼠标右键,将显示与元数据标签相同的快显菜单。
乐器快显菜单
在乐器标签上点击鼠标右键,将显示一个带有“编辑乐器”选项的快显菜单。 选择这个将把您带到与 编辑 > 乐器... 相同的对话框,或者你也可以按快捷键I。
符号总面板
符号总面板包含给工作区增添的符号(基础、高级和自定义)。它也可以被用来创建新的拍号和调号。
使用下列任一方法打开它:
- 按下Shift+F9(Mac:fn+Shift+F9);
- 在顶部菜单中选择 视图 → 符号总面板。

符号总面板根据符号类型被分为若干区域。用鼠标在一个项目上停留会显示提示条(黄底黑字)。
To transfer a Master palette item to a custom palette:
- Drag the symbol from the Master Palette window into a custom palette.
注:除符号部分(见下文)外,通常不会直接将项目从符号总面板添加到乐谱中:改用工作区调色板。但是,如果需要,可以直接使用(i)拖放或(ii)通过选中一个或多个音符/休止符后双击面板中的项目来添加到乐谱。
符号
The Symbols section of the Master Palette is a large repository of hundreds of musical symbols in addition to those found in the preset 工作区。You can open it from the Master Palette,或直接使用快捷键Z。

寻找符号
The Symbols subcategories can be displayed by clicking on "Symbols". Use the font menu on the bottom right of the box to specify Emmentaler-, Gonville- or Bravura-specific symbols. You can search for a particular symbol by entering a keyword in the search box.
应用符号
要把符号总面板中的符号加入乐谱,请使用以下任意方法:
- 将符号拖拽到谱表上。
- 选中一个音符或者休止符,然后双击一个符号。
The position of the symbol can be adjusted by dragging or by changing the horizontal / vertical offsets in the Inspector. Color and visibility can also be adjusted in the Inspector.
Note: Elements from the Symbols section do not follow any positioning rules (in many cases unlike identical elements from other sections of the Master Palette), nor do they affect score playback.
连接符号
Elements from the Symbols section can be connected to each other on the score page, so that they can be moved as one unit:
- Apply first symbol to the score. Adjust position as required.
- Double click, or drag-and-drop, a second element onto the first symbol. Adjust position as required.
Drag the first element and the attached element will follow.
另请参阅
符头样式
You can choose choose any one of nine notehead schemes for a standard staff. To set a notehead scheme:
- Right-click on a staff and select Staff/Part Properties…; click on Advanced Style Properties… and choose from the "Notehead scheme" dropdown list.
The schemes are as follows:
- Normal: This is the default scheme and the one the vast majority of people will use: it is also the only scheme in MuseScore 1 and 2. It uses normal noteheads which can be changed via the Noteheads palette or the Inspector.
- Pitch name: Noteheads automatically and dynamically change to include the English pitch name in the notehead.

- German pitch name: Just like the previous one but B will be replaced by H, and Bb by B.

- Solfège Movable Do (also called Tonic Solfa): Noteheads include the solfege syllable, depending on the degree in the scale. It uses Ti and not Si.

- Solfège Fixed Do: Noteheads include the solfege syllable for the note name. As used in France, Italy, Spain, etc... It uses Si and not Ti.

- 4 Shape (Walker): Noteheads follow the four-shape system used in books such as William Walker’s Southern Harmony (1835).
")
- 7 Shape (Aikin): Noteheads follow the seven-shape system used in books such as Jesse B. Aikin’s The Christian Minstrel (1846), and books by the Ruebush & Kieffer Publishing Company. It's the most used 7-shape system.
")
- 7 Shape (Funk): Noteheads follow the seven-shape system used in books such as Joseph Funk’s Harmonia Sacra (1851).
")
- 7 Shape Walker: Noteheads follow the seven-shape system used in books such as William Walker’s Christian Harmony (1867).

(For more info about the different variant of shape notes, see the SMuFL specification)
The setting applies to a given staff and the notehead will be used when entering and editing notes. Here is an example.

符头
一系列可供更换的符头,可以通过高级工作区或者检视器(见更换符头组,见下文)的符头面板来访问。
注意:符头设计可能随所选音乐字体(是 Emmentaler、Gonville,还是 Bravura)而不同。面板中的那些在 Bravura 字体中显示为二分音符。
符头组
MuseScore 支持一系列符头样式:
- 普通:标准符头。
- 交叉符头(鬼音符):在鼓谱记谱中用来表示镲。它还诸如吉他的弦乐器中代表静音和/或敲击效果。
- 菱形:在诸如吉他和小提琴之类的乐器中用来代表和声音符。
- 斜杠:用来标记节奏(譬如吉他的拨弦)。
- 正/倒三角:用在鼓谱记谱中。
- 特型音符:Do, Re, Mi, Fa, Sol, La, Ti。
- 圆叉型:用在鼓谱记谱中。
- 带圈符头
- 斜杠符头:被斜线贯穿的符头。
- 加号符头
- 古代二全音符:用在早期音乐记谱中。
- 带括号符头(圆括号):适用于环绕现存音符(或者临时变音号)。
更换符头组
欲更改乐谱中一个或多个符头的外观,请使用下列任意办法:
- 选中一个或者更多符头然后双击面板中的符头
- 将符头从面板拖到乐谱中的音符上。
- 选中一个或者更多音符然后在检视器中使用音符→符头组(不支持鼓的线谱)下的下拉列表来变更符头。
变更符头类型
偶尔您或许需要变更符头的表面时值——即符头类型——而不变更其实际的、隐含时值:
- 选中一个或者更多音符。
- 从检视器中音符→符头类型下选中下列选项之一:
- 自动:自动地,即,表面时值=实际时值。
- 全:全音符符头,无视实际时值。
- 二分:二分符头,无视实际时值。
- 四分:四分符头,无视实际时值。
- 二全:二全符头,无视实际时值。
共享符头
当在不同 声部,但是具有相同书面音高的两个音符落在同一拍上,以下两件事情之一可能发生:
- 这些音符可能共享同一符头。
- 这些音符可能彼此偏移:即肩并肩排布。
MuseScore 遵守如下标准音乐记谱实践:
- 符干方向相同的音符不共享符头。
- 附点与无附点音符不共享符头。
- 实心与空心音符不共享符头。
- 全音符从不共享符头。
注意:如果两个同度音符出现在同一声部,它们总是彼此偏移。
将符头由偏移变为共享
偏移符头可以以两种方式之一转为共享符头:
符头共享的示例
- 在下面的第一示例中,声部 1 和 2 的音符默认共享符头,因为它们都是实心、无附点音符:

- 作为对比,在下一示例中,空心音符不能与实心的共享符头,所以向右偏移:

欲创建共享符头,令实心的八分音符不可见或者变更其符头类型以匹配空心音符者(如上文所释):

移除重叠的品格号
在某些案例中,共享的符头,在指法谱谱表之时,可能致使两个相邻弦上的品格号分开。欲更正之,则令任何无关的指法音符不可见,通过选中它们然后使用键盘快捷方式 V (或者通过取消勾选检视器中的“可见”选项)。
外部链接
注意:中国境内用户请自行设法访问维基百科。
- 英语维基百科【shape note】(在本文中中文对应词暂定为“特型音符”)。
- 中文维基百科【鬼音】。
自动布局
MuseScore最初在乐谱中根据样式中的默认属性放置元素。而如果元素 应用了自动布局,MuseScore会试图自动调整元素的位置以避免位置冲突。
初始位置
The default position for most elements is controlled by their style settings. The specific properties you can set vary by element type but may include:
- 位置: Whether the element appears above or below the staff.
- 偏移: For elements with no "Placement above/below" properties, this specifies the default position. See Offset X/Y.
- 自动布局最小间距: Minimum distance from other elements when autoplace is enabled.
For details of the settings available for each element type, see Layout and formatting: Style.
To change the default position:
Use one of the following methods:
- From the menu, select Format→Style; chose an element type and then adjust the placement/position settings.
- Select a relevant element in the score and change the placement/position settings in the Inspector; then press the Set as style" button (S) to update the Style settings.
手动调整
After an element had been automatically placed, it's position can be changed manually using one of the following methods:
- Select the element and adjust the X and Y offsets in the Inspector.
- Drag and drop the element using the mouse.
- Change to edit mode and move the element using the arrow buttons.
If the element type can be placed both above or below the staff, you can change the position by:
- Changing the "Placement" settings in the Inspector
- Using X to flip between above/below
Note: When automatic placement is enabled for an element, you cannot position it in a way that causes a collision with other elements.
取消自动布局
- Select the element and uncheck the "Automatic placement" box in the Inspector.
The element reverts to its default position. It can be repositioned as desired and is no longer avoided when placing other elements.
堆叠次序
To change the value for Stacking order:
- Select the element and change the "Stacking order" value in the Inspector.
In cases where elements are allowed to overlap, Stacking order controls the order in which they are placed on top of each other. The element with the lower value will be placed behind.
谱表/声部属性
谱表/声部属性对话框允许您修改谱表的显示、调音、移调、替换乐器等等。右击一行谱表并选择 谱表/声部属性 来打开它。

3.0版本中的“谱表/声部属性”对话框
谱表类型
出于实用所需,一共存在四种不同类型的谱表:
1a. 标准谱表 I。被大多数乐器(琴格、拨弦乐器除外)使用的音高谱。
1b. 标准谱表 II。包含一个琴格、拨弦乐器的音高谱,有可以设置乐器的弦数以及调律的选项。
2. 指法谱. 包含一个琴格、拨弦乐器的谱表,可将音乐显示为一系列在弦上的品格图。亦包含可以设置乐器的弦数以及调律的选项。
3. 打击乐谱。一种打击乐器的音高谱。
只要谱表对应着合适的乐器,它可以在“乐器”对话框被替换为另一种谱表。比如,若要把一行标准谱表替换为TAB符号谱,它必须对应着一种拨弦乐器。同样的,若要把标准谱表替换为打击乐谱,它需要对应一种合适的打击乐器,等等。
“谱表/声部属性”中的大多数选项都适用于所有谱表,但是每个类型的谱表都会有一两个特殊的选项。
谱表/声部属性: 适用于所有谱表
下列有关谱表属性的选项适用于所有谱表:
谱线
组成谱表的谱线数量。
谱线间距
两条谱线之间的间距,单位为谱线距(简称为sp.)。注意:不建议更改这项数据的默认数值。如果您想调整谱表的大小,请使用“页面设置…”对话框。
谱表上的额外间距
增加或者减少所有谱表组中选中的谱表和上方谱表的间距。注意:此设定不适用于谱表组中的第一行谱表,第一行谱表上方间距是用“最小/最大谱表组间距”来控制的(参看版面与格式:格式 → 样式… → 页面)。
或者,您可以从乐谱页面直接修改谱表上的额外间距:
1. 按住Shift键;
2. 单击谱表空白处并用鼠标向上或向下拖拽。
注意:若要只改变特定谱表组中特定谱表之间的间距,参看换行符与占位符。
缩放比例
用百分比的形式调整选中的谱表和其中的元素的大小(若要调整整体的乐谱大小,请使用 格式→页面设置…中的“缩放比例”)。
当谱表内容为空时隐藏谱表
这个选项和格式 → 样式… → 乐谱中的“隐藏谱表组中的空白谱表”设定一同决定谱表为空白时是否隐藏。
可能的值有:
- 自动(默认):当谱表为空白、“隐藏谱表组中的空白谱表”被勾选时,谱表会被隐藏。
- 总是:谱表在空白时会被隐藏,不论“隐藏谱表组中的空白谱表”有没有被勾选。
- 从不:谱表在空白时不会被隐藏。
- 乐器:对于含有多行谱表的乐器,只要乐器的所有谱表都为空白时,才会被隐藏。
显示谱号
是否显示谱表的谱号。
显示拍号
是否显示谱表的拍号。
显示小节线
是否显示谱表中的小节线。
隐藏谱表组小节线
显示/隐藏谱表最左端的小节线。
即使谱表组为空也不隐藏
这行谱表不会被隐藏,即使整个谱表组都是空的。这个选项否定格式 → 样式… → 乐谱中的任何“隐藏谱表组中的空白谱表”设定。
缩小化谱表
创建一个缩小化的谱表。您可以进入顶部菜单格式 → 样式 ... → 大小来设定缩小化的默认大小。
隐藏谱线
使谱线不可见。
谱线颜色
使用色彩选择器来改变谱线的颜色。
Ossia模式
用于创建截断的谱表(或被称作cutaway score,横断谱表)。这可以独立于各种“隐藏空谱表”的情况下使用。
乐器
使用乐器快捷键 (I)或选择乐器对话框来加载乐器。与此相关的声音可按需在混音器中更改。
分谱名称
分谱的名称。也显示在混音器和乐器对话框中(快捷键I)。
请注意:分谱名称被instruments.xml文件中的trackName元素的值所定义。若trackName 尚未被定义,将使用longName的值(即"完整乐器名"—见下文)来代替。
完整乐器名
完整乐器名称显示于第一行谱表组的左侧。可作为文本对象来直接编辑。(参见文本编辑)。
乐器名缩写
完整乐器名称显示于除第一行外的谱表组的左侧。可作为文本对象来直接编辑。(参见文本编辑)。所作的编辑影响到谱面中所有的缩写。
可用音域
- 入门级:在此音域之外的音符会以黄绿色标出。
- 专业级:在此音域之外的音符会以红色标出。
要关闭超音域音符色彩标记:在顶部菜单中选择编辑→偏好设置...(Mac: MuseScore→偏好设置...),单击“音符输入”标签页,然后取消勾选“用颜色标记超音域音符”。
移调书面音高至实际音高
此选项确保移调乐器的谱表在正确的书面音高上显示乐谱。可按照一个音程设定移调(如果必要,升/降八度)。
使用单音力度变化(3.1版之后)
勾选时,可以使单个音符(或一组延音线连结的音符)随着渐变记号而改变回放的单音力度(比如使用sfz等音色)。
导航箭头
使用位于谱表属性窗口左下角的↑及↓按钮来导航到前后的谱表。
谱表 / 分谱属性(仅拨弦乐器)
除去上文所列出的之外,有品、拨弦乐器的谱表有一些额外选项:
弦数
显示乐器上弦的数字。
编辑弦数据…
此按钮会打开一个对话框,以使您可以设定数字以及弦的调律。参见更改弦的调律.
高级样式属性
单击高级样式属性...按钮来打卡一个窗口以查看谱表的高级显示选项。其内容会依所选的谱表种类而变,请阅读下文相关章节以晓详情。
模版
在高级样式属性对话框的底部有许多按钮可以让您轻而易举地对以下内容进行更改:
- 打击乐谱的谱线数。
- 拨弦乐器的谱表种类。举个例子,您可以将标准的谱表改成指法谱,反之亦然,或者从众多指法谱选项中选择。
- 在"模版"字样旁的下拉列表中进行选择;
- 按下< 重设为模版;
- 按下OK来批准更改并关闭对话框(或者Cancel来取消操作)。
标准谱表与打击乐谱选项
显示谱号/拍号/小节线/调号/加线
切换以上元素显示状态的开关选项。
无符干
若勾选它,谱表音符的符干、符杠、尾钩将会消失。
符头体系
请参阅符头体系。
指法谱选项
颠倒
若未勾选此项,顶部的指法谱线将表示最高的弦,底部的指法谱线将表示最低的弦(这是最常见的选项)。如果勾选此项,顶部的执法谱线表示最低的琴弦,底部的琴谱线表示最高的琴弦(如意大利式鲁特琴谱)。例如:

'Upside down' 指法谱.
指法谱选项:品格号
品格号是用于指示音符在指板上位置的数字或字母。下列属性定义了品格号的外观:
字体
字体用来显示品格号。提供了8套字体以支持在8套不同样式中的所有必要符号(modern Serif, modern Sans, Renaissance, Phalèse, Bonneuil-de Visée, Bonneuil-Gaultier, Dowland, Lute Didactic)。
大小
以排印点为单位的品格号大小。内置字体通常看起来在大小为9-10pt为宜。
垂直偏移量
MuseScore尝试以合理的方式放置符号,对于内置字体,通常不需要更改此值(设为0)。若字体中存在不对齐基线的符号(或在一些MuseScore无法预测的情况下),这个属性使您可以上移品格号(负值) 或者下移(正值)来进行更好的位置调整。数值的单位是sp(谱线间距)。
品格号类型
选择数字 (‘1’, ‘2’...)或字母(‘a’, ‘b’...)作为品格号。使用字母作为品格号样式时,跳过“j”而用“k”作为第九个品。或是因为拉丁文中不存在字母j(译者注)。
品格号位置
选择将品格号的位置放在谱线上或在谱线间。例如:

在谱线见的品格字母
品格号下谱线:
连续 (谱线径直穿过品格号)或断开(当品格号显示时,谱线上出现一片小空间)。例如:

断开谱线的指法谱.
显示延音线末端品格号
若未勾选,则在一系列有延音线的音符中,仅会显示首个音符。如果勾选,所有延音线下的一系列音符都会显示出来。
在指法谱中显示指法
勾选以允许显示从符号面板内应用到谱面的指法符号。
指法谱选项:音符时值
这组属性定义了表示音符时值的符号外观。
字体
字体用于显示时值符号。目前提供的五套字体用来支持5个不同样式的必要符号显示(现代、意式执法谱、法式执法谱、法式巴洛克(无符头)、法式巴洛克)。仅与音符记号选项搭配使用。
大小
按照排版尺寸的字体大小。内置字体通常以15磅为宜。仅和 音符选项使用。
垂直偏移
仅当音符记号被选中时应用(见下文)。使用负偏移值来升高音符值符号,正值反之。
显示为:
- 无:不显示音符时值(如上例所示)
- 音符符号:谱表上方会出现音符状记号。当此选项被选中,记号仅在音符时值有变更时出现,换句话说,默认情况同一时值的音符记号不会重复显示。例:

- 符干与符杠:符干与符杠(或符尾)将会显示。每个音符都使用了与常规五线谱相同的排版机制标示了时值;所有标准的符杠属性同样能应用于这些符杠。例:

重复出现:
如果序列中的几个音符具有相同的时值,您可以指定是否、在何处重复相同的音符符号,即:
* 从不
* 在新谱表组中
* 在新小节中
* 总是
注意:此选项仅在“显示为:音符符号”被选中时可用(见上文)。
符干样式:
- 置之谱外:符干以固定高度线出现在谱表的的上/下方。符干显示为在谱表上/下方固定高度的线条。
- 贯穿谱表:符干谱表并到达品格号。
注意:此选项仅在“显示为:符干与符杠”被选中时可用(见上文)。
符干位置:
- 上方:符干与符杠显示于谱表上方。
- 下方:符干与符杠显示于谱表下方。
注意:此选项仅在“显示为:符干与符杠”和“符干样式:置之谱外”被选中时可用(见上文)。
二分音符:
- 无
- 短符干
- 带条纹符干
注意:此选项仅在“显示为:符干与符杠”和“符干样式:置之谱外”被选中时可用(见上文)。
显示休止符
决定音符记号是否被用于表示休止符;当用来表示休止符时,音符记号显示在在低一些的位置。仅与音符记号选项配合使用。
预览
以指法谱格式显示为一个短乐谱,并应用所有当前参数。
更改乐器
您可以随时把乐谱上的任何乐器换成另一种乐器。下面的方法可以一次性更新乐器音色、谱表名称以及谱表的移调。
- 右键单击小节的空白部分或者乐器名称,然后选择谱表属性...;
- 单击更改乐器...(在“分谱属性”下);
- 选取您需要的新乐器并点击OK以返回到谱表属性对话框;
- 再次单击OK来返回乐谱。
勿与中途更换乐器相混淆。
外链
谱表类型变更
You can change the appearance of a staff mid-score by adding a Staff type change element to a measure, and adjusting its properties in the Inspector.
Add a Staff Type Change
- Select a measure in the score and, in the "Text" palette, click (double-click prior to version 3.4) the "Staff type change" symbol,
 ; alternatively, drag the "Staff type change" icon onto a measure;
 - Select the symbol, and adjust its properties (see below) in the Inspector as required.
谱表类型变更属性
当您在检视器中更改谱表类型变更属性时,新值优先于全局谱表属性对话框中显示的值。只有“谱表属性”中无法在“谱表类型变更”对话框中更改的属性值才能在整个乐谱中生效。
The properties that can be altered in the Staff type change dialog in the Inspector are:
Offset
How far the changed staff shall be moved up or down: measured in spaces (abbr.: sp) .
Small
Tick the box to create a reduced-size staff.
Scale
Changes the size of the staff and all associated elements, as a percentage.
Lines
The number of lines making up the staff.
Line distance
The distance between two staff lines, measured in spaces (abbr.: sp).
Step offset
How many steps up or down the notes in the staff are offset.
Show barlines
Whether the staff barlines will be shown.
Show ledger lines
Whether ledger lines will be shown for notes above/below the staff lines.
Slash style
Whether the notes shall be shown in standard or slash style.
Notehead scheme
Allows selection of how noteheads are displayed.
Generate clefs
Whether the staff clef will be shown.
Generate time signatures
Whether the staff time signature(s) will be shown or not.
Generate key signatures
Whether the staff key signatures will be shown or not.
Example
To illustrate the use of Staff type change, the staff shown below was created using the following steps:
- Add a Staff type change to measure 2.
- Set size to "Small".
- Set "Lines" to 4.
- Add a second Staff Type Change to measure 3.
-
Change "Lines" to 7,

Afterwards the global Staff Properties are changed using Staff properties:
1 Set "Lines" to 2.
2. Change "Staff Line Color".

As can be seen, the change in "Lines" is only effective up to the first staff type change, whereas the change to "Staff Line Color" is effective throughout the score.
跨谱表记谱
在钢琴谱中,横跨两个谱表的记谱方式是非常常见的。在MuseScore也能用下列方式实现跨谱表记谱法:
-
首先在一个谱表中输入音符,例:

-
选中一个音符,然后按下Ctrl+Shift + ↓/↑ (Mac: ⌘+Shift + ↓/↑)。这会把选中的音符(和弦)下移/上移到另外一个谱表,例:

注:若您只要移动和弦中的某一个音符到另外一个谱表,请确保和弦和这个音符在不同的声部里。
-
要调整符杠,请双击符杠使之出现手柄。使用键盘上的箭头或者拖拽手柄来调整符杠位置和角度:

参阅
- 连接小节线: 如何在在不同谱表间延伸小节线。
外链
- 如何将和弦或符干跨越两个谱表 (MuseScore "Howto")
辅助功能
引言
本文档是为MuseScore 3的盲人和视障用户编写的。它不打算提供MuseScore所有功能的完整描述;您应该将此文档与MuseScore的常规文档一起阅读。
MuseScore支持免费和开源的Windows NVDA屏幕阅读器。您还可以安装一个脚本来支持JAWS,或者在Linux上为Orca安装一个脚本。MuseScore支持免费和开源的WindowsNVDA屏幕阅读器。您还可以安装一个脚本来支持JAWS,或者在Linux上为Orca安装一个脚本。
最终,我们希望支持其他屏幕阅读器,如 VoiceOver和Narrator。目前,不受支持的屏幕阅读器通常会读取菜单和对话框,但目前需要一个受支持的屏幕阅读器逐音符读取乐谱。
从MuseScore 3.3开始,MuseScore的大部分特性都是完全可访问的,它可以作为一个乐谱阅读器和编辑器。以前的版本在编辑方面比较有限。
初始设置
当你第一次运行MuseScore时,在启动时你会被问到一些问题。我们建议你接受默认值,但对关于显示导览的问题回答 "否",因为这些问题很遗憾还不能访问。
当MuseScore启动时,你通常首先看到的是启动中心窗口。这显示了一个最近的乐谱列表,您可以通过Shift+Tab,然后使用左右光标键访问。你可能会发现更容易从文件菜单直接打开乐谱,但是,如果你喜欢,你可以按 Esc 关闭启动中心。事实上,您可能想要永久禁用它。关闭 启动中心 后,打开 编辑 菜单 (Alt+E),选择 偏好设置 ,在 常规 选项卡中,撤选 显示启动中心 ,然后关闭 偏好设置 窗口。
MuseScore包括许多命令的键盘快捷键,其他没有默认快捷键的命令可以在以后的编辑、首选项和快捷键中自定义。
找到你的方式
MuseScore中的用户界面工作起来很像其他符号程序或其他面向文档的程序。它有一个单独的主文档窗口,您可以在其中处理一个乐谱。MuseScore支持此窗口内的多个文档选项卡。它还支持分屏视图,让您可以同时处理两个文档,并且每个窗口中可以有多个选项卡。
除了乐谱窗口外,MuseScore还有一个菜单栏,你可以通过各个菜单的快捷键进入:
- 文件:Alt+F
- 编辑:Alt+E
- 视图:Alt+V
- 添加:Alt+A
- 格式:Alt+O
- 工具:Alt+T
- 插件:Alt+P
- 帮助:Alt+H
提示:一旦你打开了一个菜单,可能要按几次 Up或Down 键才能正常阅读所有内容。另外,如果在任何时候读屏器停止响应,有一个有用的技巧可以再次启动它,那就是按 Alt 键将焦点移到菜单栏,然后按 Esc 键返回到乐谱。有时切换到另一个应用程序,然后再返回,也会有帮助。
除了菜单栏外,MuseScore中还有一些工具栏、面板和子窗口,你可以用 Tab 键在这些控件中循环操作(或者用 Shift+Tab 键在同样的循环中向后移动)。当你第一次启动MuseScore或加载一个乐谱时,焦点应该在主乐谱窗口。
如果未选择任何内容(按Esc清除任何选择),请按 Tab 将您带到一个工具栏,该工具栏包含一系列按钮,用于新建,打开,播放等操作。 Tab 将跳过当前不活动的任何按钮。 屏幕阅读器应读取这些按钮的名称和快捷键(适用)。
一旦你循环浏览了工具栏上的按钮,Tab将访问的下一个窗口是符号面板。这是用来给乐谱添加各种元素的(力度、奏法记号等)。
如果在乐谱中选择了一个元素,Tab访问的第一个窗口是检视器,它用于在乐谱中进行各种手动调整。其中许多功能是基于乐谱的视觉外观(尽管有几个与播放有关)。
如果你已经打开了一个额外的可选窗口,如选择过滤器,Tab键也将访问这些窗口。你可以关闭你不需要的窗口,方法是进入视图菜单,确保第一组复选框都没有被选中(出现在缩放设置之前的窗口)。默认情况下,只有符号面板和检视器应该被选中。关于禁用启动中心的说明,见 初始设置。 F9 可以用来切换符号面板, F8 可以切换检视器。
在访问了工具栏或子窗口后,要把焦点返回到乐谱窗口,请按Esc键。如果在访问其他窗口之前已经选择了一些东西,那么这些选择就会被保留下来,但是一旦焦点在乐谱窗口中,按Esc就会清除这些选择。当你开始使用下面描述的无障碍指令进行导航时,选择会自动恢复。
乐谱窗口
当您第一次启动MuseScore3时,默认情况下会加载一个空的示例乐谱。如果您希望尝试编辑功能,这将是一个很好的开始。否则,您可能需要从加载乐谱开始。MuseScore使用标准快捷方式访问系统命令,如 Ctrl+O (Mac:Cmd+O) 打开文件,Ctrl+S (Mac:Cmd+S) 保存,Ctrl+W (Mac:Cmd+W) 关闭等。
如果你按 Ctrl+O (Mac:Cmd+O) 加载乐谱,将显示一个相当标准的文件对话框。MuseScore可以以自己的格式(MSCZ或MSCX)打开乐谱,也可以以标准MusicXML格式、MIDI格式或其他一些程序(如Guitar Pro、Capella和Band-in-a-Box)导入乐谱。加载分数后,它将显示在分数窗口中的新选项卡中。你可以使用 Ctrl+Tab 在乐谱窗口中的选项卡之间移动(不适用于Mac)。提示:如果当前选项卡中的乐谱名称未被读取,请让屏幕阅读器读取标题栏。
要想逐个音符阅读乐谱,请看下面的内容,但你还可以对加载的乐谱做一些其他有趣的事情。你可以按 Space 键,让MuseScore为你播放乐谱。你可以用 文件/导出 来转换乐谱为其他格式,包括PDF、PNG、WAV、MP3、MIDI、MusicXML等。当然,你也可以通过 文件/打印 或 Ctrl+P (Mac:Cmd+P) 打印乐谱。
如果一个乐谱包含多种乐器,它可能已经生成了链接分谱。链接的分谱在乐谱标签页中以分谱标签页的形式出现,但目前还没有办法用键盘来导航这些分谱标签页。这些分谱通常不会包含与乐谱不同的信息;它们只是显示方式不同(每个分谱在自己的页面上)。如果一个乐谱还没有生成分谱,你可以通过 文件/分谱 来完成,这个对话框是可以访问的。如果你想打印分谱,你可以通过使用 文件/导出分谱 对话框来解决无法单独访问分谱标签页的问题,它可以在一个步骤中自动导出所有分谱的PDF(或其他格式)。
阅读乐谱
当您第一次加载一个分数时,分数窗口有键盘焦点,但没有选择任何内容。阅读分数的第一步是选择内容,最自然的起点是分数的第一个元素。在载入分数后, Alt+Right (Mac:Alt+Right) 将选择第一个元素,也就是标题; Ctrl+Home (Mac:Cmd+Home) 将选择第一个“音乐”元素(通常是一个谱号或一个起始的小节线)。
当您在元素之间导航时,屏幕阅读器应该给出所选元素的名称。您将听到它读取元素的名称(例如,“高音谱号”),并提供位置信息(例如,“小节1;节拍1;谱表1;小提琴”)。读取的信息量被优化为不重复未更改的信息。当前按下Shift键会中断阅读,这可能也很有用。
MuseScore中的大多数导航都是围绕着音符和休止符进行的--它将跳过谱号、调号、拍号、小节线和其他元素。因此,如果你只用标准的 Right 键和 Left 键来浏览你的乐谱,你将只听到音符和休止符(以及与之相连的元素)。然而,有两个特殊的无障碍指令,你会发现它们对获得更完整的乐谱总结很有用。:
- 下一元素:Alt+Right (Mac:Alt+Right)
- 上一元素:Alt+Left (Mac:Alt+Left
这些命令包括其他导航命令所跳过的谱号和其他元素,还可以在当前谱号内的所有声部中导航,而其他导航命令如 Right 和 Left 只能在当前选择的声部中导航,直到你明确地改变声部。例如,如果你在第1小节第1拍的四分音符上,而该小节有两个声部,那么按右键将进入声部1的下一个音符--这将是在第2拍,而按 Alt+Right (Mac:Alt+Right) 将停留在第1拍,但移动到声部2的音符。只有当你在当前谱表的当前拍子上移动了所有的音符后,该快捷键才会将你移到下一拍。这样做的目的是,如果你还不知道乐谱的内容,这个快捷键应该对浏览乐谱很有用。
当导航到元素时,屏幕阅读器应该读取有关元素的信息。对于音符和休止符,它也会读取附加到它们的元素的信息,如歌词、奏法、和弦符号等。可访问性命令也将分别导航这些元素。
一个重要的注意事项:使用Shift或Ctrl / Cmd 单独Up和Down移动都不是有用的导航快捷方式!相反,它们会改变当前选定音符的音高。注意不要无意中编辑你试图阅读的乐谱。如果您的目的只是导航,则“向上”和“向下”只能与“Alt”一起使用。请参见下面的导航快捷方式列表。
如果你失去了你在乐谱中的位置--或者你完全失去了选择--按Shift+L (“位置”)来获得当前位置。
Moving forwards or backwards in time
下面的快捷键对于“水平”移动乐谱非常有用:
- 下一元素:Alt+Right
- 上一元素:Alt+Left
- 下一和弦或休止符:Right
- 上一和弦或休止符:Left
- 下一小节:Ctrl+Right
- 上一小节:Ctrl+Left
- 前往小节:Ctrl+F
- 第一个元素:Ctrl+Home
- 最后一个元素:Ctrl+End
Moving between notes at a given point in time
下面的快捷键对于“垂直”移动乐谱非常有用:
- 下一元素:Alt+Right
- 上一元素:Alt+Left
- 声部中上方音符、前一声部,或上方谱表:Alt+Up
- 声部中下方音符、下一声部,或下方谱表:Alt+Down
- 和弦顶部音符:Ctrl+Alt+Up
- 和弦底部音符:Ctrl+Alt+Down
Alt+Up和Alt+Down命令类似于Alt+Right和Alt+Left命令,它们的设计目的是帮助您发现一个乐谱的内容。你不需要知道一个和弦中有多少个音符,一个谱表中有多少个声部,或者一个乐谱中有多少个五线谱,就可以使用这些命令在乐谱中垂直移动。
过滤乐谱阅读
通过使用选区过滤器 (F6),可以在读谱时排除某些元素,如歌词或和弦名称。撤选那些你不想读的元素。然而,这个功能目前可能还没有实现。
乐谱回放
Space 键的作用是开始和停止播放。如果选择了一个音符,播放将从当前选择的音符开始;如果没有选择音符,播放将从最后停止的地方开始;或者在第一次播放时从乐谱的开头开始。
MuseScore支持循环播放,这样你就可以重复播放一个乐曲的某个部分以达到练习的目的。通过播放面板 (F11)设置循环播放的 "入 "和 "出 "点:
- 首先在乐谱窗口中选择应该开始循环的音符;
- 进入播放面板,按下设置循环位置的切换按钮;
- 回到乐谱窗口,导航到你希望循环结束的音符;
- 再次切换到播放面板,按下设置循环出位置切换键;
- 要启用或禁用循环,请按循环播放切换按钮。
你还可以通过 视图/播放面板 (F11)来控制循环播放和控制其他播放参数,如覆盖乐谱的基本节奏。
乐谱创建和编辑
虽然一些高级的乐谱编辑技术需要查看乐谱,少量的命令可能需要使用鼠标,但在MuseScore 3.3中,大多数的乐谱编辑功能都是完全无障碍的。
你可以将音乐输入到默认的空乐谱中(使用钢琴的声音,有一个谱表的乐谱),或者编辑已经打开的现有乐谱,或者您可以使用所需的一组乐器创建新的乐谱。
创建新乐谱
要创建一个新的乐谱,使用 文件 , 新建 或 Ctrl+N。然后,向导将指导您完成乐谱创建过程。
向导的第一个屏幕有输入标题、作曲家和其他信息的字段。第二屏允许你选择一个模板(为常见的合奏如合唱SATB或爵士大乐队预定义的乐谱)或选择乐器。第三步允许你选择一个初始的调号和速度。有时这个屏幕会被跳过,所以如果发生这种情况,按 返回 按钮就可以返回。要选择一个调,可以使用Up和Down。调号控制在某些屏幕阅读器上不能很好地工作,但如果你发出 "读取当前行"(read current line)的命令(如NVDA+L),它可能会读取当前选择的调。向导的下一个也是最后一个屏幕允许你选择初始拍号、不完全小节(弱起小节)和开始的小节数。
一旦你有了一个乐谱,你可以开始编辑它。
音符输入
要输入音符,您需要进入音符输入模式。首先,导航到您想要输入音符的小节,然后按 N键。几乎所有关于音符输入的内容都是可通过键盘访问的,标准文档应该能够很好地帮助您完成这个过程。请记住,MuseScore可以是音符输入模式,也可以是普通模式,但并不总是清楚你处于哪种模式。如果不确定,按Esc键。如果你在音符输入模式,你将离开该模式。如果你处于正常模式,你将停留在那里,尽管你也会失去选区。
音符输入的基本过程是首先选择一个持续时间(例如,使用快捷键4-5-6表示八分之一、四分之一、二分之一),然后通过输入字母名称输入一个音符。一旦选择了时值,你可以输入多个相同音长的音符。按0来输入休止符。
Up 和 Down 键可以将音高提高或降低半级,必要时可以增加或删除临时记号。要改变一个音符的和声拼写,按 J。
要输入一个连结线,选择连音的时长,然后按 +。要创建三连音,选择三连音的总时长,然后按 Ctrl+3 (对四连音和其他小音也是如此)。要在一个谱表上输入多个声部的音乐,按 Ctrl+Alt 加上1到4的数字就可以切换到该声部(请记住,每个谱表的第一个声部始终是声部1)。
MuseScore中有更多值得注意的输入。参见手册中关于音符输入的章节。
选区
MuseScore支持常用的键盘快捷键进行选区。对于单个元素来说,导航和选区是一样的。要选择一个范围内的元素,可以导航到第一个元素,按住Shift,然后导航到第二个元素。 Ctrl+A 将选择整个乐谱。
符号面板
如前所述,除音符外,许多符号都是从面板窗口输入的。基本使用模型是,首先选择要应用面板项目的乐谱中的一个或多个元素,然后应用面板元素。有几种不同的方法可以选择面板元素。
一开始最简单的方法是通过键盘浏览符号面板窗口。要到达符号面板窗口,按Shift+Tab。屏幕阅读器可能不会特别提醒你在符号面板窗口中,但你会在浏览过程中发现你在这里。根据你以前是否使用过符号面板,焦点可能在你离开的地方,或者在顶部。按几下Tab键,就可以进入窗口中的第一个面板(谱号)。你可以用向上和向下的方向键浏览符号面板的列表。右边的方向键可以打开一个符号面板,然后四个方向键都可以用来浏览元素(它们被排列在一个表格中)。你也可以用Tab来浏览符号面板的名称和内容。
一旦你找到一个你想要应用的符号面板项目,按Enter将它应用到当前选择的乐谱元素,并将焦点返回到乐谱。下次按下Shift+Tab返回符号面板时,最后使用的符号面板项仍将被选中,因此Enter将再次应用它。屏幕阅读器可能会在应用一个符号面板项目后停止响应,即使焦点已经返回到乐谱,但按下Alt和Esc的技巧应该会让它再次工作。
你也可以使用符号面板搜索工具来快速找到一个符号面板项目。搜索框是符号面板顶部的第一个元素之一,所以你可以导航到它,或者你可以为 "符号面板搜索 "命令定义一个快捷键( 编辑→偏好设置→快捷键 ),这将使你直接进入搜索框。一旦你进入了搜索框,输入搜索词的前几个字符,只有符合该搜索的符号面板项目会显示出来。然后你可以浏览搜索结果,找到你想要的元素。向下的光标会直接带你到第一个搜索结果,然后你可以在这之后使用右键。(The Down cursor will take you directly to the first search result, then you can use Right after that.)不过,在某些系统上,当使用符号面板搜索功能并启用屏幕阅读器时,MuseScore可能会崩溃。
到达符号面板窗口的另一种方法是使用 F9 快捷键,它可以打开和关闭符号面板窗口。默认情况下,符号面板窗口是打开的,因此按F9将关闭它,但再次按下它将打开窗口,并将光标放在搜索框中。
还有一个有用的符号面板无障碍技术,那就是 "应用当前符号面板元素 "命令(你可以为它定义一个快捷键)。如果你在乐谱中,这将自动应用最后使用的符号面板元素(相当于 Shift+Tab 后跟 Enter )。
菜单和快捷键
有些元素可以通过菜单命令或键盘快捷键添加或编辑。 编辑 菜单有标准的复制和粘贴命令(通常的快捷键也可以使用)。 添加 菜单有添加音符、多连音、小节、占位框、文本和一些线性记号命令。 格式 菜单中的命令主要与乐谱的视觉外观有关(例如,页面和谱表尺寸,符号的位置和大小,用于文本的字体),这在生成大型打印时非常有用。"自定义五线谱记谱法"(modified stave notation)乐谱(见下文)。 工具 菜单有许多其他有用的命令,包括删除小节或其他选定范围、转换选择、连接和分割小节等。这些命令都有默认定义的快捷键,屏幕阅读器应该读取这些快捷键。你可以在 编辑→偏好设置→快捷键 中为其余大部分定义自定义快捷键。
还有许多符号面板项的快捷键,以及定义其他快捷键的可能性(尽管许多符号面板项目前不支持这种方式)。需要记住的有用的快捷键包括:
Ctrl+T: 谱表文字
Alt+Shift+T: 速度
Ctrl+L: 歌词
Ctrl+K: 和弦记号
Ctrl+M: 排练记号
S: 连句线
Shift+S: 断奏号(Staccato)
Shift+V: accent
Shift+N: 持续号(Tenuto)
Shift+O: 着重的,突出的(常带有顿音)。(marcato)
slash: 装饰音,花音(grace note)
less than: 渐强(crescendo)
greater than: 渐弱(diminuendo)
自定义
通过打开“编辑”菜单,选择“偏好设置”,然后导航到“快捷键”选项卡,可以自定义键盘快捷键。到达后,选项卡将带您进入快捷方式列表,您可以使用上下光标键直接导航该列表,但它是一个很长的列表。您可以多按几次Tab键以访问搜索框,然后键入命令的前几个字符以筛选列表,然后导航回列表。
一旦你找到了你希望自定义的命令,按Enter键。然后你可以按下你希望成为快捷键的组合键。它可以是一个单键,也可以是一个带有Shift,Ctrl和/或其他修饰符的键,甚至可以是一个序列键或连续按下的两个或多个键。在输入你想要的快捷键后,按Tab键进入Add或Replace按钮(Tab键是唯一不会被解释为快捷键序列的一部分)。如果你没有看到Add或Replace就达到了Cancel ,这意味着你选择的快捷键与其他快捷键相冲突。回到你输入快捷键的地方,它会告诉你与之冲突的命令的名称。点击Tab键进入 Clear 按钮来清除它,然后用不同的快捷键再试一次。
在某些时候,我们可能会提供一组特殊的辅助功能优化的快捷键。快捷键对话框中已经有了保存和加载自定义快捷键的功能,因此可以与其他用户分享自定义快捷键。
外部链接
- MuseScore Accessibility Demo (YouTube)
- Creating a New Score in MuseScore with NVDA (MuseScore教程)
- Inputting notes with NVDA (MuseScore教程)
- Creating Modified Stave Notation in MuseScore (MuseScore教程)
音符输入模式
MuseScore allows you to choose from any of several note input modes. Step-time (see below) is the default, but others can be accessed by clicking the small dropdown arrow next to the note entry button on the note input toolbar.

Step-time
This is the default method of note input and involves entering notes one at a time: first by selecting a note duration using the mouse or keyboard, then choosing a pitch using the mouse, keyboard, MIDI keyboard or virtual piano.
For details see Basic note entry.
Re-pitch
Re-pitch mode allows you to correct the pitches of a sequence of notes while leaving their durations unchanged (not to be confused with Accidental: Respell pitches).
- Select a note as your starting point;
- Select the Re-Pitch option from the Note input drop-down menu; or use the keyboard shortcut, Ctrl+Shift+I (Mac: Cmd+Shift+I).
- Now enter pitches using the keyboard, MIDI keyboard or virtual piano keyboard.
You can also use the Re-pitch function to create a new passage from an existing one of the same sequence of durations—by copying and pasting the latter, then applying Re-pitch.
Rhythm
Rhythm mode allows you to enter durations with a single keypress. Combining Rhythm and Re-pitch modes makes for a very efficient method of note entry.
- Select your starting point in the score and enter Rhythm mode.
- Select a duration from the note input toolbar, or press a duration shortcut (numbers 1-9) on your computer keyboard. A note will be added to the score with the selected duration. In contrast to Basic note entry, pressing the . key will toggle dotting or not dotting all subsequent durations. All following rhythms will be dotted until the . key is pressed again. Unlike Basic note entry, the dot is to be pressed prior to entering the rhythm.
- Entering rests is similar to adding dotted notes. Press the 0 key to toggle entering rests. All rhythms entered will be rests until the 0 key is pressed again. This can be used concurrently with dotted notes.
- Continue pressing duration keys to enter notes with the chosen durations.
- Now use Re-pitch mode to set the pitches of the notes you just added.
Real-time (automatic)
The Real-time modes basically allow you to perform the piece on a MIDI keyboard (or MuseScore's virtual piano keyboard) and have the notation added for you. However, you should be aware of the following limitations which currently apply:
- It is not possible to use a computer keyboard for Real-time input
- You cannot enter tuplets or notes shorter than the selected duration
- You cannot enter notes into more than one voice at a time
However, these restrictions mean that MuseScore has very little guessing to do when working out how your input should be notated, which helps to keep the Real-time modes accurate.
In the automatic version of Real-time input, you play at a fixed tempo indicated by a metronome click. You can adjust the tempo by changing the delay between clicks from the menu: Edit → Preferences... → Note Input (Mac: MuseScore → Preferences... → Note Input).
- Select your starting position in the score and enter Real-time (automatic) mode.
- Select a duration from the note input toolbar.
- Press and hold a MIDI key or virtual piano key (a note will be added to the score).
- Listen for the metronome clicks. With each click the note grows by the selected duration.
- Release the key when the note has reached the desired length.
The score stops advancing as soon as you release the key. If you want the score to continue advancing (e.g. to allow you to enter rests) then you can use the Real-time Advance shortcut to start the metronome.
Real-time (manual)
In the manual version of Real-time input, you have to indicate your input tempo by tapping on a key or pedal, but you can play at any speed you like and it doesn't have to be constant. The default key for setting the tempo (called "Real-time Advance") is Enter on the numeric keypad (Mac: Fn+Return), but it is highly recommended that you change this to a MIDI key or MIDI pedal (see below).
- Select your starting position in the score and enter Real-time (manual) mode.
- Select a duration from the note input toolbar.
- Press and hold a MIDI key or virtual piano key (a note will be added to the score).
- Press the Real-time Advance key. With each press the note grows by the selected duration.
- Release the note when it has reached the desired length.
Real-time Advance shortcut
The Real-time Advance shortcut is used to tap beats in manual Real-time mode, or to start the metronome clicks in automatic Real-time mode. It is called "Real-time Advance" because it causes the input position to move forward, or "advance", through the score.
The default key for Real-time Advance is Enter on the numeric keypad (Mac: Fn+Return), but it is highly recommended that you assign this to a MIDI key or MIDI pedal via MuseScore's MIDI remote control. The MIDI remote control is available from the menu: Edit → Preferences... → Note Input (Mac: MuseScore → Preferences... → Note Input).
Alternatively, if you have a USB footswitch or computer pedal which can simulate keyboard keys, you could set it to simulate Enter on the numeric keypad.
When the notes are entered they will be placed just before the selected starting element, which will be highlighted with a square blue marker. The start element and any subsequent notes or rests within the same measure will be shifted forward. You can move the insertion point forward and backward using the arrow keys → or ←, and the new insertion point will then be highlighted.
Insert
Insert Input mode (called Timewise in versions prior to 3.0.2) allows you to insert and delete notes and rests within measures, automatically shifting subsequent music forwards or backwards. Measure duration is automatically updated as you go.
- Make sure you are in Note input mode, and that you have the element selected where you want to start inserting notes/rests;
- Click on the arrow next to the Note input icon, and select Insert (or if Insert is the current default, just press N);
- Enter a note or rest as you would in Step-Time mode. Each note is inserted before the current cursor position;
- Move the cursor forward and backward if required (using the arrow keys), to change the insertion point.
Alternatively, if you have only one or two notes to insert, you may prefer to use a shortcut:
- Press Ctrl+Shift (Mac: Cmd+Shift) while adding the note by Mouse-click or keyboard shortcut (A-G).
If, at any time, the total duration of the notes and rests within the measure does not match the time signature, a small + or - sign will be shown above the measure.

See also: Remove selected range (Tools).
Normal mode
To leave Note Input mode, click on the Note Input tool button, press N, or press Esc. This puts you in Normal mode, in which you can change durations and delete notes or rests as follows:
- If you select a note and press Del the note will be replaced by a rest of the same duration.
- If you select a note or rest and press Ctrl+Del the note/rest will be deleted, and subsequent notes moved backward (see Remove selected range).
- If you reduce the duration of a note or rest the remaining duration will be filled with rests.
- If you increase the duration of a note or rest it will subtract duration from the subsequent notes/rests to make up the duration. If this is done on the last note/rest in the measure, a note or rest with the required duration will be inserted in the start of the following measure, and the two will be tied together.