MuseScore 4 使用手册
这本手册告诉您如何使用全球最流行的音乐记谱程序 MuseScore 4,该程序可免费在 Windows、macOS 和基于 Linux 的操作系统上使用。
关于本手册
MuseScore 版本说明
本手册适用于 MuseScore 4.0 及以上版本。
如果您使用的是程序的其他版本,请查阅相应版本的适用手册:
浏览手册
浏览章节
使用主页上的章节链接来浏览手册中每个章节的内容。
还有一个整个手册的单页视图,可以与您浏览器的搜索功能一起使用(快捷键:Ctrl+F,或 macOS 上的 Cmd+F)。
搜索手册
要搜索手册,请使用每个手册页面右上角的专用搜索字段。

如果您不确定要搜索什么,请尝试浏览 术语表。它有图片帮助您找到无法命名的事物。
您还可以尝试使用以下特殊语法进行网页搜索,以仅包括MuseScore.org的结果:
site:musescore.org 在此输入您的主题
这适用于大多数搜索引擎。例如,在 Bing 上执行搜索 "site:musescore.org 速度标记"。
如果您仍然找不到所需的信息,请到 支持论坛(英文) 寻求帮助。
阅读其他语言
该手册已翻译成多种语言,尽管翻译并不总是与英文版本同步更新。每个页面是单独翻译的,因此并非每个页面都提供所有语言版本。
要用其他语言阅读手册,请使用每个手册页面右上方显示的语言下拉菜单,直接位于搜索字段下方。如果下拉菜单中没有特定的语言,这意味着该页面尚未翻译成该语言。

如有疑问,请查阅 英文版手册,或在其中论坛中寻求帮助。如果您使用英语发帖,您可以使用 支持和错误报告论坛,否则请使用您语言的适当论坛。
下载手册
如果您想将手册复制到您的计算机以便离线阅读,您可以:
- 访问整个手册的单页视图。
- 打开您浏览器的 打印 功能(快捷键:Ctrl+P,或 macOS 上的 Cmd+P)。
- 选择标记为 打印为 PDF、保存为 PDF 或类似的选项。
- 确保您正在保存文件而不是打印实体副本。
如果您需要打印本手册,您最好按照上述步骤创建 PDF,然后在继续使用真实打印机打印之前检查 PDF 的格式是否正确。手册相当长,请仅在确实需要时打印。
为手册做贡献
该手册由 MuseScore 社区维护和翻译。如果您想帮助撰写内容,请阅读 编辑手册。
如果您想翻译页面,请阅读 如何翻译手册。
如何编写使用手册
写作指南
想要为 MuseScore 4 手册做贡献吗?太棒了!我们非常高兴您能加入。
本页面包含简要的指南,帮助你开始撰写文章。在编辑手册中的任何内容之前,请仔细阅读本页面。这些信息旨在帮助你,但如果你对任何事情感到疑惑或有任何问题,请加入文档讨论论坛进行讨论。
结构 - 总体原则
每页应该相对完整地解释一个单一主题。如果一页面感觉太长,可以尝试将其拆分成单独的页面。
虽然并非每个页面都相同,但牢记以下内容有助于你将页面内容结构化,以便读者易于理解:
从概述开始
在页面开头加上概述有助于在深入细节之前介绍主题。概述通常不需要有章节标题。
建立层次结构
思考大多数用户可能想要实现的目标,以及他们可能因为什么原因来手册查找信息。将最常见的任务解决方案放在页面顶部;较不常用的信息可以放在页面底部。
逻辑分组信息
相关概念应该一起讨论。有时,这可能需要将不常用的功能与常用的功能一起讨论,但这没关系。
注重用户任务,而不仅仅是 UI 组件
例如,关于“创建自定义调号”的部分比名为“使用主面板”的部分更好。
创建目录
请确保为所有手册页面启用“生成目录”选项。
标题
为了确保社区编写的页面风格一致,我们已经为许多页面提供了标题。请在此结构内组织你的内容。对于缺少标题的页面,请自行创建与其他地方相似风格的标题。
出于可访问性的考虑,标题绝不能以常规粗体文本格式化。所有标题都需要以具有语义含义的标签格式化。
所有页面默认都以 Heading 1 开始。因此,你输入的第一个章节标题总是 Heading 2。此外,请不要跳过标题级别(例如,在 Heading 2 后添加 Heading 4)。
| 标题级别 | 用法和 MarkDown 语法 |
|---|---|
| Heading 1 | 所有页面标题的默认值(由贡献者编辑) |
| Heading 2 | 每个章节的开始使用。MarkDown 语法:## 标题名称 |
| Heading 3 | 用于每个子章节的开始,并引入单步说明(即不需要列表的地方)。MarkDown 语法:### 标题名称 |
| Heading 4 | 如有需要,可以少量使用用于附加子章节。MarkDown 语法:#### 标题名称 |
最后,请尽量始终以动词开始你的标题。例如,“添加拍号”,而不是“拍号”
内容
MuseScore 手册大致包含两种主要类型的信息:描述性材料和目标导向的说明。
描述性材料
这用于解释程序的不同功能区域。例如,
符号面板是包含可应用于谱的音乐符号的文件夹。MuseScore 的默认符号面板包含一组相关的符号,但你可以自定义符号面板以显示几乎任何类型的符号、线条或文本。
描述性材料往往比目标导向的说明更长,更“丰富”,但我们仍然要求你尽可能使用简单明了的语言。
目标导向的说明
这些说明如何执行特定任务。说明应该尽可能简短直接,通常采用编号列表的形式。例如,
创建一个新的符号面板
- 打开符号面板选项卡
- 点击添加符号面板
- 点击创建自定义符号面板
- 给你的新符号面板命名,然后点击创建
请注意,我们使用粗体文本来表示用户界面的命名组件,包括菜单。键盘快捷键,例如 Ctrl+S,使用<kbd>标签呈现(请参阅Syntax)。
在编写目标导向的说明时,请:
- 仅使用编号列表(无点号)
- 每个编号条目以动词开头
- 每个编号条目只写一个任务/指示
例如,不要写成:
- 打开符号面板选项卡并点击添加符号面板
而应写成:
- 打开符号面板选项卡
- 点击添加符号面板
请务必在目标导向的说明中包含键盘选项,如果存在这样的选项。这对于提高程序的可访问性尤为重要。
使用多模态媒体
鼓励使用多模态媒体作为文字描述的补充。这包括:
- 动画 GIF
- 用户界面相关部分的截图
创建动画 GIF
与截图和视频相比,动画 GIF 在最短的时间内展示完成特定任务所需的操作序列方面具有许多优势。有许多可用于创建 GIF 的工具,但我们建议使用以下工作流程,以确保在保持尽可能小的文件大小的同时保持清晰的图像质量(理想情况下每个 GIF 小于 2MB)。
- 仅使用 MuseScore 4 界面,并将其外观设置为深色模式,蓝色主题色(以确保整个手册保持一致性)
- 计划并排练你将要使用的鼠标点击和键盘快捷键,旨在尽可能短的时间内演示所需步骤(理想情况下不超过 10 秒)
- 使用类似 gifcap 这样的免费工具记录你屏幕的内容
- 使用类似 KeyCastr 这样的免费工具记录按键(如果需要)
- 仅显示执行特定任务所需的面板
链接到其他页面
在手册中链接到其他页面非常有帮助。你可以在提及用户界面的不同部分时这样做,甚至可以在引用以前版本的手册时也这样做。
添加到其他手册页面的链接有特定的流程,可以确保无论阅读的语言版本如何,都可以进行准确的重定向。
使用正确的语法
[node:******,title="要链接到的页面名称"]
或者,要链接到页面内的特定标题:
[node:******,fragment="标题缩写",title="要链接到的页面名称"]
链接到页面的节点编号,而不是页面的 URL
要找到页面的节点编号:
- 在浏览器中打开所需页面
- 单击页面右上角的“三个点”图标
- 在弹出的上下文菜单中单击编辑
- 单击浏览器的搜索栏以阅读 URL
你将在此编辑屏幕上可见的 URL 地址中找到页面的节点编号(是的,它只会出现在编辑屏幕中)。它看起来可能是这样的:

使用书签工具自动生成链接
你可以使用以下代码片段,并将其添加为书签工具到你的书签中。操作方法如下:
- 选择代码片段
- 将其拖动到浏览器的书签栏中
或者,你可以在浏览器中添加一个新的书签,并将书签的 URL 替换为代码片段。如果你在手册内的页面上,想要链接到的页面,点击书签栏中的书签,并复制显示的链接。
javascript:void function(){prompt("",`[node:${drupalSettings.path.currentPath.replace("node/","")}${document.querySelector("meta[property=\"og:title\"]").content?`,title="${document.querySelector("meta[property=\"og:title\"]").content}"`:""}${window.location.hash?`,fragment="${decodeURIComponent(window.location.hash).replace("#","")}"`:""}]`)}();
来自 节点,标题,片段书签工具。
语法
手册使用 MarkDown 编写,其中包含几个允许的 HTML 标记。
如果你不熟悉 MarkDown,学习起来并不需要很长时间。首先阅读这个页面(需要 MuseScore 账户才能正确查看该页面的内容,还请注意,你不能再使用 Filtered HTML)。
超出 MarkDown 范围的示例
- 按键
<kbd><kbd>A</kbd></kbd>,看起来像 A。(参见下面的编写键盘快捷键)- 按键组合
<kbd><kbd>Shift</kbd>+<kbd>A</kbd></kbd>,看起来像 Shift+A。(参见下面的编写键盘快捷键)- 按钮
<kbd><samp class="button">高级样式属性...</samp></kbd>,看起来像 高级样式属性...,但在 MuseScore 4 手册中不使用此特定形式(而是使用粗体来表示程序中出现的文本)。- 菜单项
__文件→打开,看起来像 __文件→打开- 图片
<img src="图片 URL" alt="文件名描述" width="500px"/>,可以是内联图片的有用替代,需要指定图片宽度
编写键盘快捷键
使用上面描述的<kbd>语法,并遵循以下准则:
-
由于无障碍支持原因,请始终使用单词而不是符号来表示所有空白键、箭头键和修改键的名称。
-
好: Cmd+Space; Win+Return; Shift+Tab
-
差: ⌘+ ; ⊞+⏎; ⇧+↹
-
-
对于代表可打印字符的键,应使用适当的字符(例如,写 $ 而不是 美元)。
-
使用常见缩写,如 Ctrl、Cmd、Esc、Del、PgDn。不要缩写通常不缩写的键名。
-
除非必要,否则优先使用 Return 而不是 Enter,以及 Del 而不是 Backspace。
-
对于组合键,请按照此顺序编写:Win+Ctrl+Alt+Shift+Fn+…(Mac: Ctrl+Cmd+Option+Shift+Fn+…)。
如果有疑问,请参阅默认键盘快捷键,了解编写键名和组合键的规范方式。
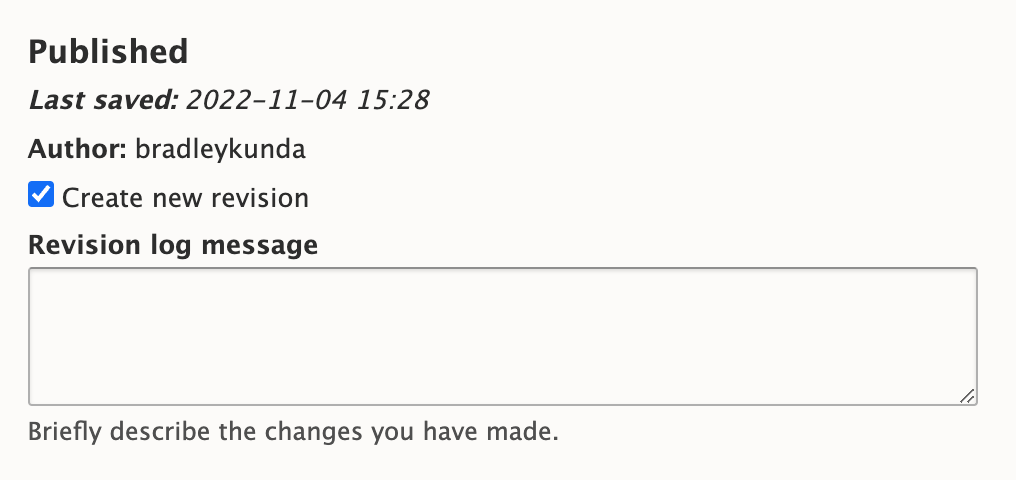
留下修订日志消息
最后,每当你对页面进行更改(无论大小!),请留下简明扼要的消息,简要描述你所做的更改。例如,
- 添加了关于 xxx 的内容
- 添加了图片
- 纠正了内容
- 添加了键盘标签
请在每个页面的编辑视图右侧面板的修订日志消息文本字段中留下这些信息:
MuseScore 4 简介
下载与安装
Windows
一些基本的计算机知识:
- 了解您的硬件
- 了解您的软件32 位或 64 位 Windows
- 学习如何在 Windows 10 上从在线来源安装程序
与 Musescore 4 相关的知识:
- 了解MuseScore,MuseScore 3,MuseScore 4
- 阅读Musescore 4 的最低系统要求并查看您的机器是否可以运行它。
- 了解 MuseGroup 开发的全新、免费、精美的适用于 Musescore 4 的音源Muse Sounds。除此之外,Musescore 4 也预装了另外两种基本的播放方法SoundFonts和VSTi。
- 了解由名为 MuseGroup 的公司开发的软件Muse Hub,并决定您是否需要。简而言之,如果您想要 Muse Sounds,您就需要 Muse Hub。
在 Windows 上下载和安装 Musescore 4 的一种方法是直接从 https://musescore.org/en/download 下载
- 下载并双击下载的文件,如有需要请参阅故障排除。
- 仔细阅读文本并按照步骤操作
Musescore 4 是免费应用,如果您想花钱支持我们,请访问 https://musescore.org/en/donate。
要卸载,请参阅在 Windows 中卸载或删除应用和程序,您可以随时在 https://musescore.org/en/forum 留言向我们反馈您遇到的问题,以便我们改进。
macOS
[此部分尚未完成,请稍等]
Linux
敬请参阅故障排除
AppImage
安装
安装程序的最简单方法是使用一个 AppImage:
- 前往 musescore.org 的 下载→软件 页面
- 在 Linux→AppImage (推荐) 下,点击 下载 (64 位) 链接
- 下载完成后,右键单击 AppImage 并选择 属性
- 切换到 权限 选项卡
- 下一步的步骤因文件管理器不同而异:
- Nautilus (Nemo, Files, Caja): 选中“允许作为程序执行文件”复选框。
- Dolphin: 选中“可执行”框。
- Thunar: 选中“允许此文件作为程序运行”框。
- PCManFM: 将下拉列表中的“执行”选项更改为“任何人”。
- 退出对话框。
- 在安装 AppImage 的目录中右键单击并选择 在终端中打开
- 在终端中键入,./[文件名] install(开始处的点和斜杠很重要!)
步骤 7–8 能确保 MuseScore 出现在系统菜单中,并链接到 AppImage 的新位置 (/home/[用户名]/.local/bin)。同时这也会正确地关联文件。
注意:除了上述步骤 7 和 8,您当然也可以使用绝对文件路径进行安装。即:
- 打开终端
- 键入 [文件路径] install
提示:如果您将 AppImage 复制并在终端中按下 Ctrl+Shift+V,这将输入刚刚“复制”的文件的绝对文件路径。
卸载
卸载已安装的 AppImage 不需要任何正式的步骤。您只需手动删除菜单条目和所有快捷方式,然后删除 App 本体及其链接(这些链接位于 ~/.local/bin 中)。
创建第一份乐谱
概览
本章是一个快速入门教程,如果您从来没使用过本软件,那么本章很适合你,因为本章节演示了 Musescore 最基本的工作流程。另外,也有许多类似的在线学习资源,请参阅获取帮助。
在本章中,我们将:
- 快速创建一个新乐谱,其中包括
- 常见的预定义乐器设置(模板),
- 不同的调号,
- 4/4的拍号,以及
- 32小节的总长度,
- 输入音符和休止符和其他记谱对象,
- 播放乐谱,
- 调整乐谱和记谱对象的属性和小节的数量,
- 以Musescore 文件格式保存乐谱文件,这样在使用 Musescore 重新打开这个乐谱的时候,乐谱仍然会保持不变,
- 导出乐谱数据到PDF、MusicXML、MIDI等非 Musescore 格式,以便其他应用程序可以利用。这不是推荐的乐谱存储方式。
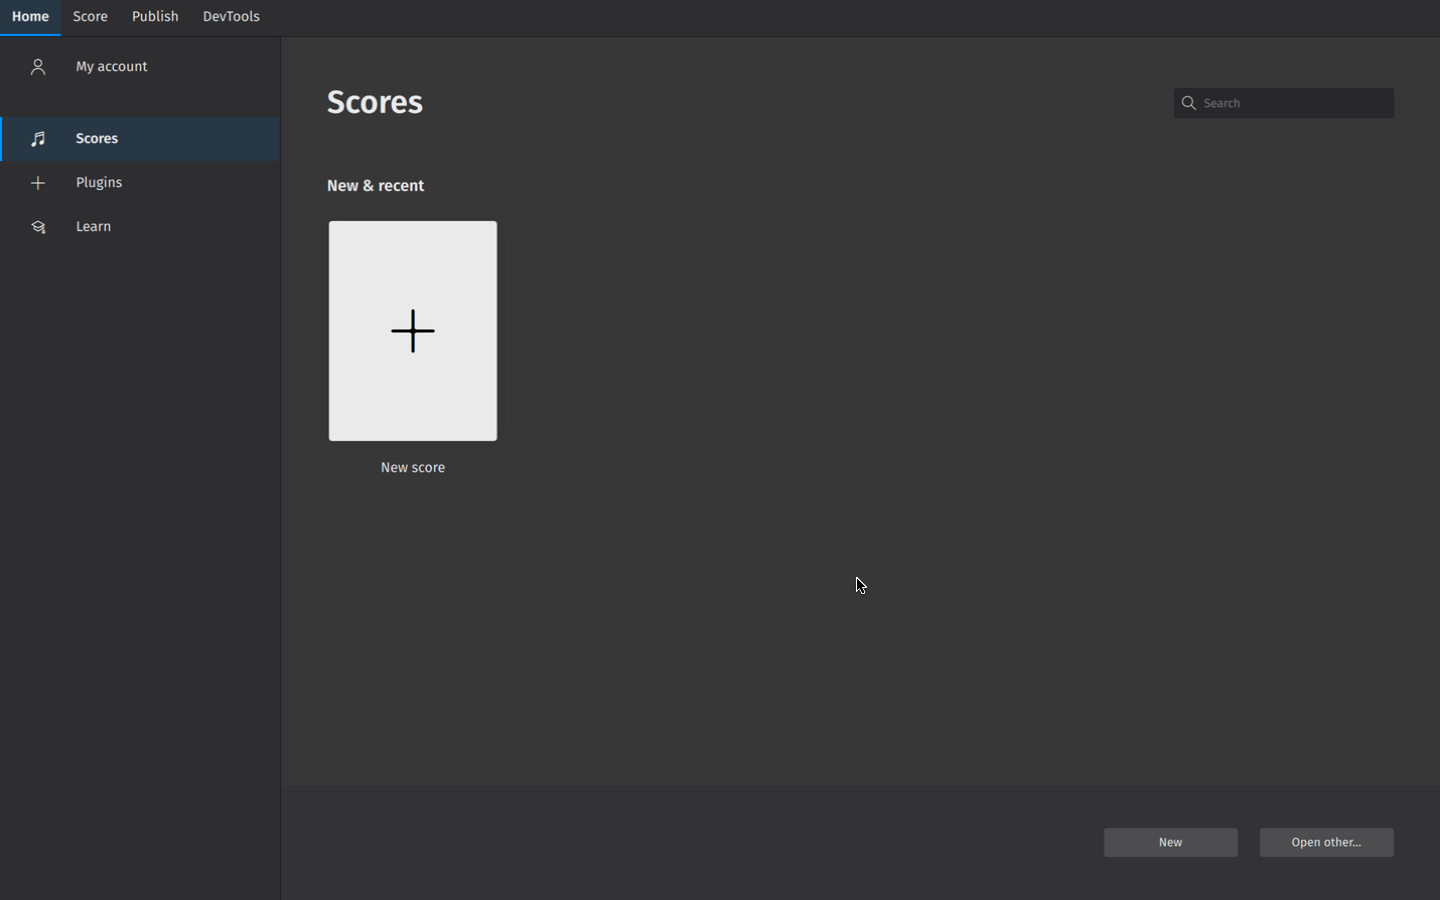
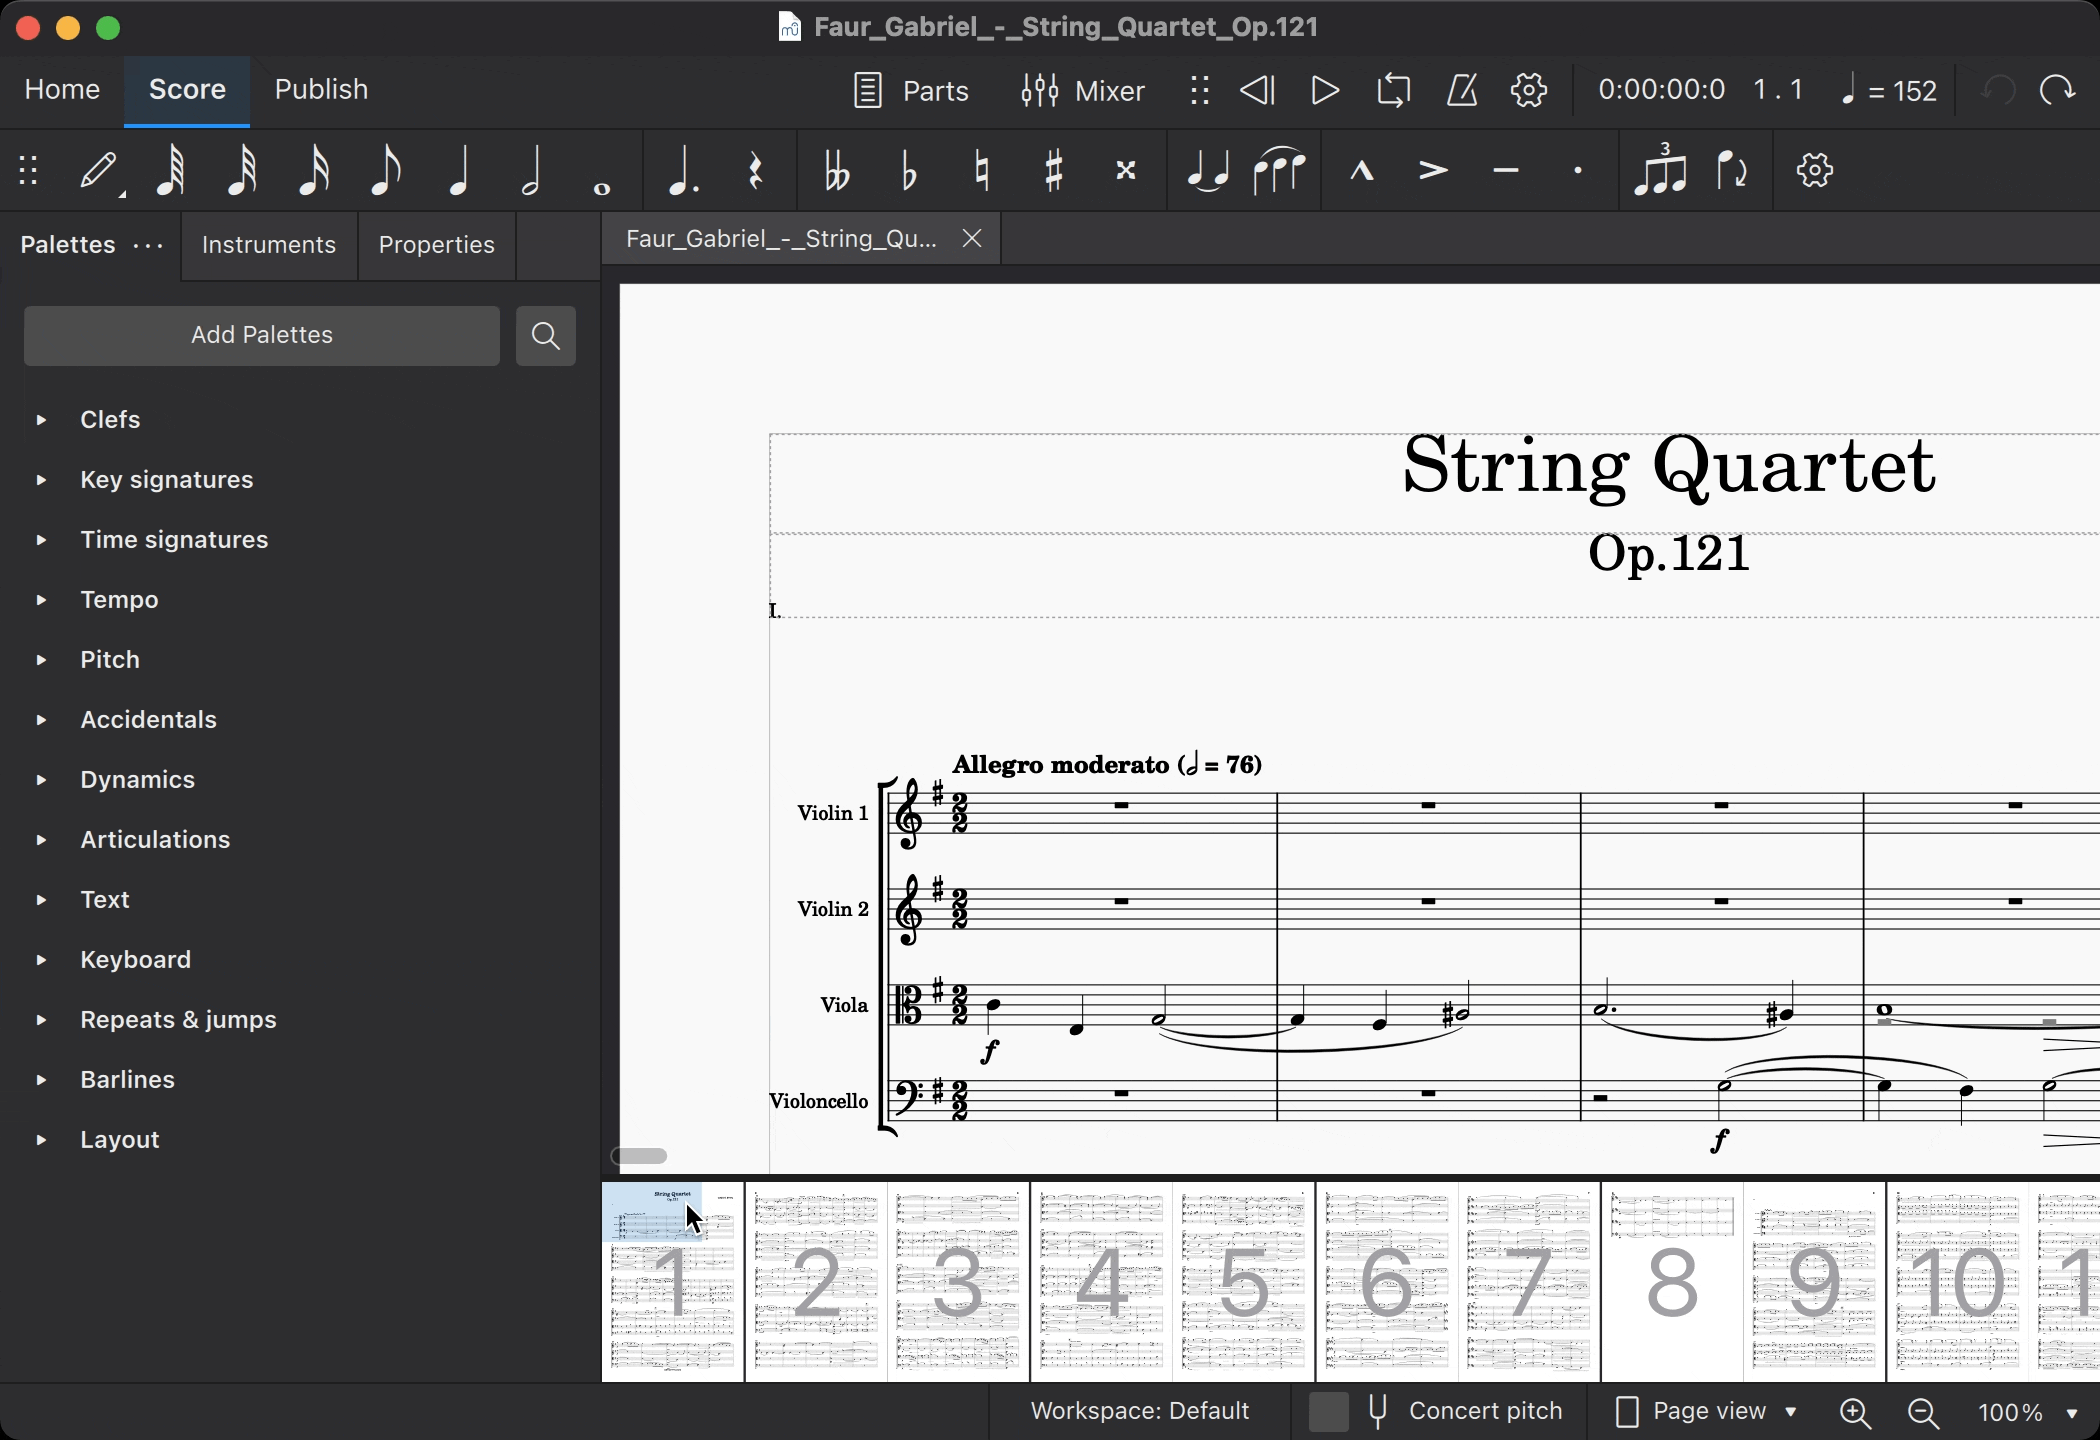
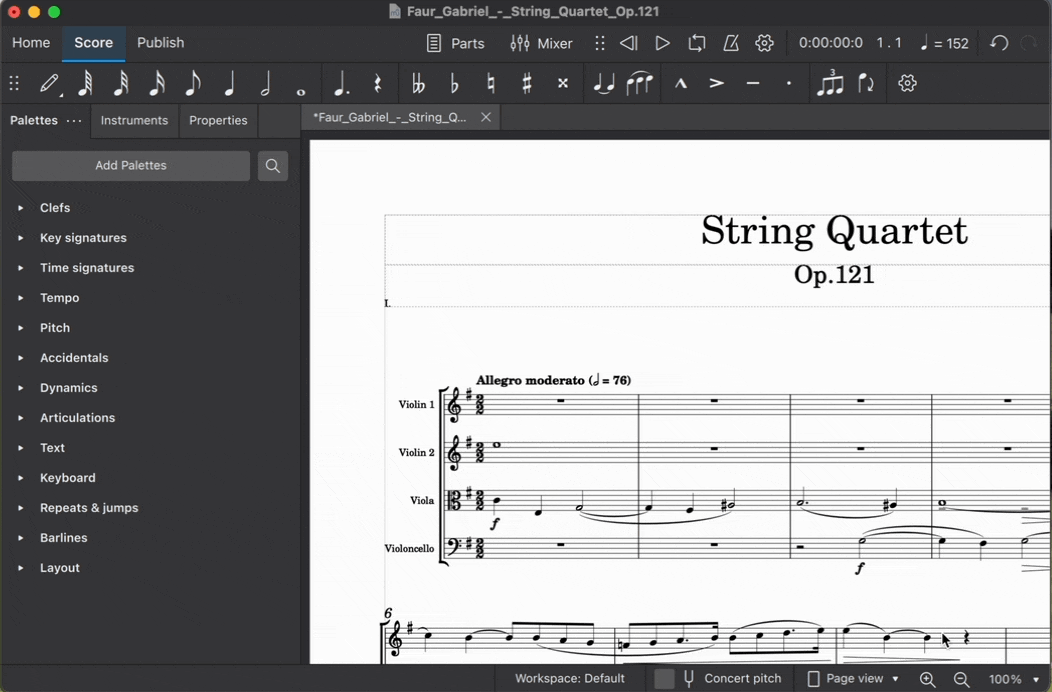
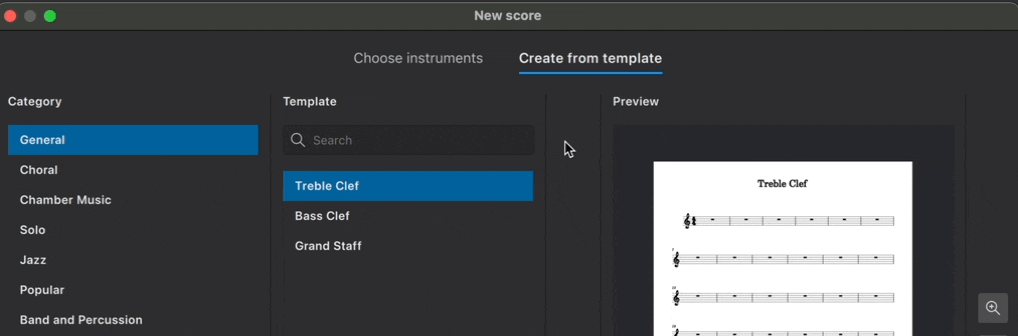
快速创建一个新乐谱
当您打开Musescore时,默认情况下不会创建或打开任何乐谱文件(除非您已更改了偏好设置:通用:程序启动中的设置)。如果您需要创建一个空白乐谱,您首先要考虑使用乐器设置添加空白谱表。最快的方法是应用预定义的模板:
- 选择以下操作之一:
- 在主页:乐谱选项卡中,选择新乐谱,或点击新建(右下角)。
- 从菜单中选择 文件→新建。
- 使用键盘快捷键Ctrl+N(Mac: Cmd+N)。
- 在出现的新乐谱对话框中,点击从模板选择,浏览模板按类别分类,或直接使用搜索栏查找模板,
- 点击完成创建新的乐谱。
在设置您的乐谱:乐器章节了解更多关于乐器及如何分别添加它们和它们的谱表。
在设置您的乐谱:从模板创建和模板和样式章节了解更多关于模板的内容。
输入乐谱信息
为了简单起见,我们将跳过这些设置,并使用前面列出的默认值,但您在这一步可以添加诸如调号、拍号、速度、弱起小节等信息:
- 在创建新乐谱时,您可以方便地在附加乐谱信息屏幕中添加信息(在新乐谱对话框中,点击下一步而不是完成),请参阅主章节设置您的乐谱:附加乐谱信息,或
- 您也可以在创建完乐谱之后随时添加信息,如键盘快捷键、使用符号面板、项目属性等章节所述。
输入音符和休止符
新乐谱会自动填充休止符。默认的音符输入模式基于以下逻辑:当用户添加新音符或休止符时,随后的音符和休止符会自动调整其持续时间(音符值或长度),而不会影响任何小节中的总拍数。在MuseScore中输入新音符和休止符的一种方法是使用计算机键盘。这个设计类似于Microsoft Word等文字处理器:
- 按下键盘上的N键进入音符输入模式。现在,一个薄而高的浅蓝色框,带有深蓝色左边框,覆盖整个谱表,表明它目前处于音符输入模式。该框位于下一个输入的音符或休止符要添加到的时间或节拍位置上。
- 输入字母名称(A,B,C,D,E,F,G),输入零(0)表示休止符。
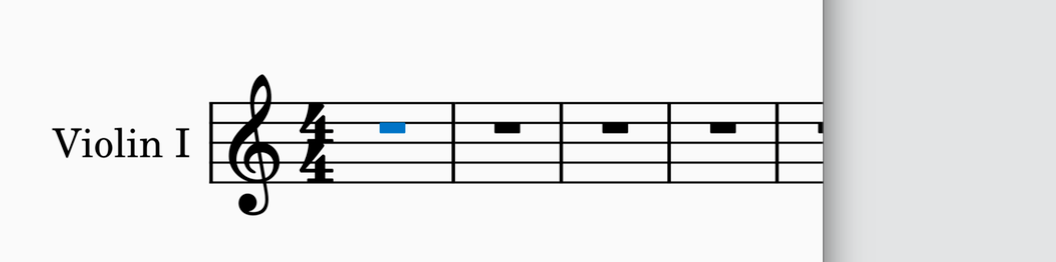
音符持续时间在输入字母名称之前指定。
- 确保它目前处于如上所述的音符输入模式。
- 在音符输入工具栏中点击所需的音符持续时间,或使用键盘数字键1到7和句号键.。
- 如上所述输入字母名称。
您现在正在使用MuseScore排版!在输入音符和休止符章节中了解更多关于此主题的内容。
从符号面板中添加项目
符号面板面板包含最常用的记谱对象。符号面板面板默认可见,如果不是这种情况,请通过勾选查看→符号面板,或先按键盘快捷键F9打开它。要显示该面板,请单击屏幕左侧的符号面板选项卡。添加符号面板项目的最简单方法是:
- 选择您的谱表中的现有对象(或对象范围)(例如音符头、谱号、小节等)。
- 在符号面板面板中,通过点击三角箭头按钮展开符号面板。
- 点击一个符号面板项目。
在符号面板章节了解更多关于此主题的内容。
播放乐谱
Musescore有一套乐谱对象解释器和音频合成器提供音频播放。要播放乐谱,只需按空格,或使用播放工具栏,参见播放控件。
表情记号根据所使用的音色库(Sound Font、Muse Sound或VSTi,请参见MuseScore 3尚未在MuseScore 4中实现的功能:速度控制)影响乐器播放。当一个乐器使用Sound Font,如MS Basic(与默认设置一样,参见混音器章节),并且乐谱上没有添加表情记号时,它的所有音符都像添加了mf(中音强音)一样响亮。
不受任何速度标记影响的乐段的播放速度使用了在一分钟内会有120拍的四分音符拍子。
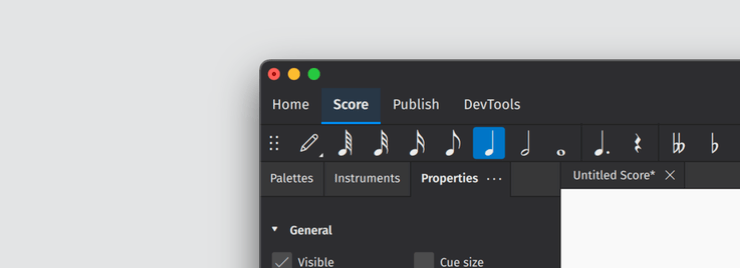
在属性面板中进行调整

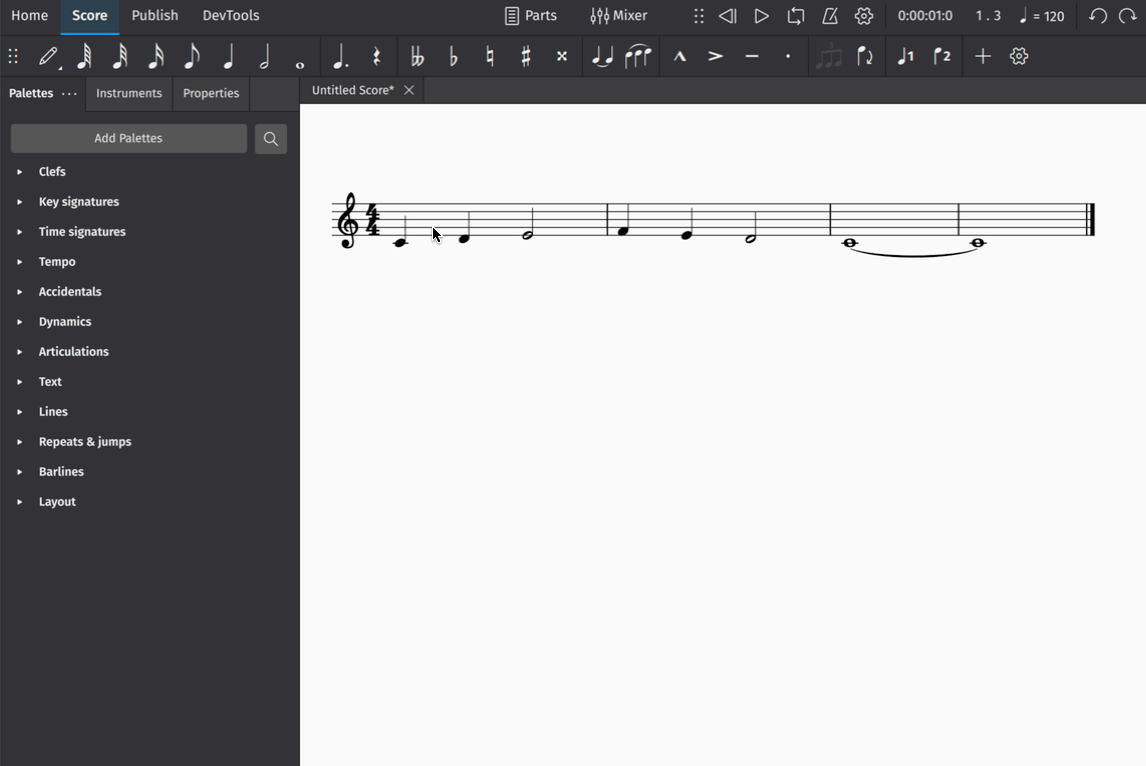
属性面板是其他Musescore版本中的检查器的升级版本。它显示所选对象或文本对象内所选字符的布局和播放属性。当没有选中任何内容时,它显示乐谱的属性。属性面板默认可见,如果不是这种情况,请通过勾选查看→属性,或先按键盘快捷键F8打开它。要显示该面板,请单击屏幕左侧的属性选项卡,参见上面的图像。
要显示和调整乐谱的属性,
- 单击乐谱上的任何空白空间,所有谱表之外。
- 属性会显示在属性面板中,根据需要进行调整。
要显示和调整元素的属性,
- 单击以选择乐谱上的元素,每个选定的元素都会以蓝色、绿色、橙色或紫色的颜色显示,具体取决于其分配给的声部。
- 属性会显示在属性面板中,根据需要进行调整。
要显示和调整文本对象内所选字符的属性,
- 单击以选择乐谱上的文本元素。
- 双击进入编辑模式。
- 拖动以选择字符,或使用键盘Shift和箭头键。
- 属性会显示在属性面板中,根据需要进行调整。
在选择元素、属性面板和输入和编辑文本章节了解更多关于此主题的内容。
插入和删除小节
要插入小节:
- 单击要选择的小节(在谱表线之间的任何空白空间)。选定的小节会用蓝色方框包围起来。
- 在属性面板:小节部分,点击插入小节。
- 选择小节数,使用下拉菜单更改插入点。
- 点击+按钮。
要删除小节:
- 选择不想要的小节。使用键盘Shift键选择范围,参见选择元素章节。
- 在属性面板:小节部分,点击垃圾桶图标。
在主章节小节了解更多关于此主题的内容。
保存您的乐谱
在Musescore 文件格式中保存的乐谱会记录其所有的编辑状态,在Musescore中重新打开时可以完全编辑。乐谱可以保存在本地,也可以保存到为每个注册用户免费提供的云存储中。您可以参见发布到musescore.com和在Audio.com上分享章节。保存乐谱的步骤:
- 选择文件→保存。
-
在出现的对话框中,选择
- 保存到计算机选项,可以将乐谱保存到任何所需的文件夹中,或
- 保存到云端选项,可以将乐谱保存在线。当保存到云端时,会自动创建一个额外的本地副本,以提供离线编辑功能。云乐谱可以在主页:乐谱选项卡内重新打开,以小预览缩略图的左上角有一个小蓝色云符号。
-
填写所需信息,如文件名,然后点击保存或确定。
在主章节打开和保存乐谱了解更多关于此主题的内容。
导出您的乐谱
导出不是存储乐谱的推荐方式,请参见"保存您的乐谱"章节。
导出是将乐谱数据保存在Musescore以外的应用程序可以利用的格式中。这些非本地格式包括PDF、MusicXML、MIDI等。要导出完整乐谱:
- 选择发布选项卡。
- 点击导出。
- 选择文件格式。
- 点击导出。
在主章节文件导出了解更多关于此主题的内容。
MuseScore 4 的新特性
如果你从旧版本更新到 Musescore 4,你会注意到不仅图形界面发生了变化,而且许多熟悉的功能和编辑的方式也发生了变化。这些更改旨在改善用户体验,以及提供更强大的功能。下面是主要变化的概述:
新的图形界面
MuseScore 4 拥有更加优美的新界面。为了方便阅读,几乎每一个窗口都经过了完全的重新设计。您可以选择浅色、深色和高对比度的主题,也可以选择你喜欢的主题色。您可以在偏好设置中更改上述选项。
乐器和分谱
一个新的乐器面板能够使你在不打开新窗口的前提下隐藏,重新排列或自定义你的乐器。
乐器面板和分谱的功能现在被紧密结合到了一起。您可以轻松地使用不同的乐器组合生成不同的分谱。工具栏上还有一个按钮可以使你方便地打开任何一个分谱。
元素检视器
MuseScore早期版本的元素检视器现在被称为属性面板。为了简化操作,面板中的每一个选项都被重新组织了。在没有选中任何元素的情况下,属性面板能够显示多个可用的选项,例如显示或隐藏空白谱表以及其他不可见元素。另外,对于以前需要选中单个类型的元素才能进行的某些操作,现在Musescore能够做到不管选中多少的元素都能分类地显示那些不同操作的选项。
新的播放和VSTi支持
Musescore 4 的最大的改进是播放功能。除了新的音色库(Muse Sounds, 可单独下载)之外,现在 Musescore 还支持VSTi,您可以使用新的混音器将VSTi效果应用到某一乐器上。混合器还可以让您轻松地在VSTi,SoundFonts和 Muse Sounds 之间切换,同时还支持VST效果。不同乐谱的声音设置现在将始终分别保存不同乐谱中,因此在 MuseScore 4 中不再需要旧版本的合成器面板(这在 MuseScore 4 中已被删除)。如果你以前在 MuseScore 3 中使用SFZ文件播放,我们现在建议你使用免费的VST采样器,例如Sfizz,或Sforzando。(两者都支持SFZ回放)
排版的改进
Musescore 4 有许多排版的改进,其中一些会对旧版本创建的文件的外观和布局产生影响。最重要的变化影响到符杠、连奏线、同音连线、垂直间距和页面布局。还有很多更改没有在这里列出来,因此那些有兴趣了解更多新特性的人可以阅读这个详细地解释和说明了所有内容的文档(即将推出)。
当你使用 Musescore 4 中打开一个旧版本创建的文档时,这种排版的改进将会不可避免地会造成乐谱看起来不和旧版本打开它看起来的完全相同。
云存储
当你第一次保存一个文档时,系统会问你是想把文件保存到本地还是保存到云端。这个新功能是我们在musescore.com上开发的新服务的一部分。您可以在打开或保存乐谱和保存乐谱到云端中了解更多信息。
其他更改
当你使用 Musescore 4 时,你会发现许多其他小但重要的变化,这些变化能够使作曲或打谱的过程更加轻松。这些包括:
浏览和导航
无障碍支持
屏幕阅读器
Musescore 4 分别在以下操作系统中支持这些屏幕阅读器:
- Windows 10 和 11: 讲述人 和 NVDA
- macOS: 旁白
- Linux: Orca
大部分时候,基于JAWS的屏幕阅读器能够工作,但是朗读的结果不像使用旁白或NVDA那样完整。
在Windows系统中使用屏幕阅读器
如果屏幕阅读器的语音输出突然停止工作,您可以尝试按Alt+F来选中文件菜单,然后按Esc两次以返回你原来在应用程序中的位置,此时,屏幕阅读器理应能够正常工作。如果你想要先运行 Musescore,再启动屏幕阅读器,您就必须这么做。
在Mac系统中使用屏幕阅读器
在使用 Musescore 4 时,“旁白”的旁白快速导览必须被关闭。您可以通过在“旁白”运行时同时按下左和右箭头键来打开或关闭快速导览,或者你可以从“旁白实用工具>管理”关闭旁白快速导览。
MuseScore 的界面既可以用 Tab 跳转,又可以用“旁白”自己的光标跳转。一般来说,最好使用 Tab,因为这既与其他平台上的界面相匹配,又是大多数文档和教程中讲述的内容。“旁白”的光标可以用来到达应用程序中不能通过 Tab 光标访问的区域。当使用 Tab 时,记得配合使用方向键(参见在用户界面中跳转)。
在Linux系统中使用屏幕阅读器
在 Linux 上,在启动 MuseScore 之前必须启动屏幕阅读器,否则辅助功能将被禁用以节省系统资源。如果您忘记这样做,只需退出 MuseScore 并再次启动它。所有构建在 Qt 框架上的 Linux 应用程序也是如此。
Orca 是 Linux 上功能最齐全的屏幕阅读器。Orca 内置于 GNOME 桌面环境中,因此建议有无障碍需求的 Linux 用户使用基于 GNOME 或其衍生产品的发行版。
键盘控制
在用户界面中跳转
MuseScore 4 用户界面(UI)中的键盘跳转既依赖于 Tab 键又依赖于方向键。您可以使用 Tab 键循环遍历每个控件组,然后使用方向键跳转到组内的各个控件。在其他应用程序(包括以前版本的 MuseScore)中通常是用 Tab 键访问每个单独的控件。但是 Musescore 4 的全新的跳转系统允许你用更少的按键跳转到界面中的任何地方。新的跳转系统仍在改进中,欢迎在开发论坛提出反馈意见。
除了方向键和 Tab 键,您可以使用F6键在程序中的不同面板之间切换。下面是如何使用各个快捷键来跳转的方法:
-
上、下、左、右箭头:将光标从控件组中的一个控件移动到下一个控件(例如在工具栏中的按钮之间切换)。
-
Tab和Shift+Tab:将光标从一个控件组移到下一个控件组(例如在工具栏之间切换)。
-
F6和Shift+F6:在面板和其他大块的UI之间移动光标(例如从工具栏切换到符号面板或乐谱中)。
默认情况下,重音符`(有时被称为反撇号)可以用来代替F6来在面板和其他大块的UI之间移动光标。在大部分QWERTY的键盘上,重音符在Tab的上方。如果你的键盘上那个键不是重音符,你可以考虑在偏好设置里把快捷键修改到那个在Tab上方的按键,因为这个位置使得所有的跳转快捷键被排在一起方便使用。
一旦你的光标已经移动到某个控件,在大多数情况下,你可以通过按Spacebar、Enter或Return键进行操作。在列表或其他某些杂项中,空格键通常用于选择项目而不是激活它们。某些项目一旦被选中就会被激活,于是就可以通过按Delete键删除,或可以通过按Tab键移动到其他UI控件来修改。例如,您可以在乐器面板中使用此方法删除之前添加到乐谱中的乐器。
在乐谱中跳转
在乐谱中(即在记谱视图中)跳转的方式与 MuseScore 3 基本相同。以下快捷方式可能对无障碍用户特别有用:
| 快捷键 | 操作 |
|---|---|
| Alt+右和Alt+左 | 移动到下一个或上一个元素。这些快捷键使您能够访问各种符号元素,而不仅仅是音符和休止符。 |
| Alt+上和Alt+下 | 移动到上面或下面的音符。这些快捷键使您可以在和弦中的单个音符之间移动,也可以移动到其他声部和五线谱的音符和休止符中。 |
| F2或Alt+Shift+E | 编辑所选元素。这相当于用鼠标双击一个元素。它使您能够编辑文本对象,包括歌词、力度和节奏标记。它还允许您调整线元素的长度,如渐强渐弱记号,连奏线和跳跃号(使用Tab键在左端和右端之间切换)。完成编辑后,您需要按下Esc键以回到正常模式。 |
键盘导航的其他操作在这本手册的各个页面上都有描述。
视频教程
下面的无障碍教程旨在让您使用键盘和屏幕阅读器启动和运行MuseScore。它们并没有涵盖程序的每一个方面,但它们应该会为你充分理解和运用本手册的其余部分打下一个坚实的基础。
| 视频 | 描述 |
|---|---|
| 安装 MuseScore | 本视频介绍了 MuseScore 在 Windows 上的安装过程,包括 Muse Hub 和 Muse Sounds。这个过程在 macOS 和 Linux 上是相似的,尽管在 Linux 上你需要分别安装 Muse Hub 和 MuseScore。 |
| 初始化乐谱 | 本视频介绍了乐谱的初始设置,包括选择乐器和选择键和拍号以及其他设置。 |
| 输入音符 | 此视频介绍了基本的音符输入。 |
| 添加标记 | 此视频介绍如何使用符号面板向乐谱添加力度变化等标记。 |
| 用户界面 | 此视频将介绍程序的各个窗口,您可以从中了解所有不同面板、工具栏和控件的位置,以及如何通过键盘访问它们的方式。 |
用户界面
菜单栏

在 MuseScore 4 中,菜单栏 包含以下菜单:
- 文件: 创建新文件、打开和保存文件、导入和导出各种格式、创建和编辑乐器部分以及打印
- 编辑: 撤消和重做选项、复制/剪切/粘贴选项以及查找/转至功能
- 视图: 显示或隐藏各种调色板、对话框和其他工作区元素。在显示子菜单下的项目调整非打印元素的显示:
- 显示不可见: 根据它们的 属性面板: 不可见 设置显示/隐藏元素。如果选中此选项,不可见元素将在谱面窗口中以浅灰色显示。
- 显示格式: 显示/隐藏 系统和水平间距: 系统分段 或 页和垂直间距: 页分段 符号。
- 显示框架: 显示/隐藏 框架 的虚线轮廓。
- 显示页边距: 显示/隐藏 谱的尺寸和间距: 页边距。
- 显示不规则小节: 小节右上角的加号或减号表示其持续时间与拍号设置的持续时间不同。

- 添加: 添加不同种类的乐谱元素,例如音符、文本、线性记号等。
- 格式: 调整全局或部分乐谱的格式。也可以拉伸或收缩乐谱、加载或保存乐谱样式,等等。
- 工具: 这里提供许多有用的命令,包括移调、交换声部、用斜杠填充小节等。
- 插件: 管理您的插件
- 帮助: 访问在线手册、报告错误和提供反馈,并恢复出厂设置
在 Windows 和 Linux 上使用键盘的用户可以通过按住 Alt 键并按下特定的字母或数字键(称为 助记访问键 ),该键在您寻找的菜单项名称中显示有下划线来访问这些菜单。例如,按 Alt+F 来访问 文件,然后按 Alt+A 来访问 另存为。在 UI 中,字母 'F' 和 'a' 在按住 Alt 键时会被下划线标出。
在 macOS 上,MuseScore 的菜单是系统范围内的菜单栏的一部分,您可以通过按 Ctrl+F2 导航到该菜单。
主页选项卡

在主菜单下方有三个选项卡,第一个是 主页 选项卡。该选项卡包含以下部分:
我的账户
创建一个新的 MuseScore 账户,或登录到您现有的账户。有了活跃账户,您可以在 musescore.org 的论坛上获得技术支持并报告错误。您也可以将您的文件保存到 musescore.com 上的云端。
乐谱
该部分允许您设置新乐谱,或打开现有乐谱。了解有关创建新乐谱的信息,请参阅 设置您的乐谱。
插件
此窗口显示可用插件的列表。查看有关管理这些有用附加组件的章节 插件。
学习
这是视频教程的主页。单击任何视频教程都会在 官方 MuseScore YouTube 频道 上打开它。
乐谱选项卡

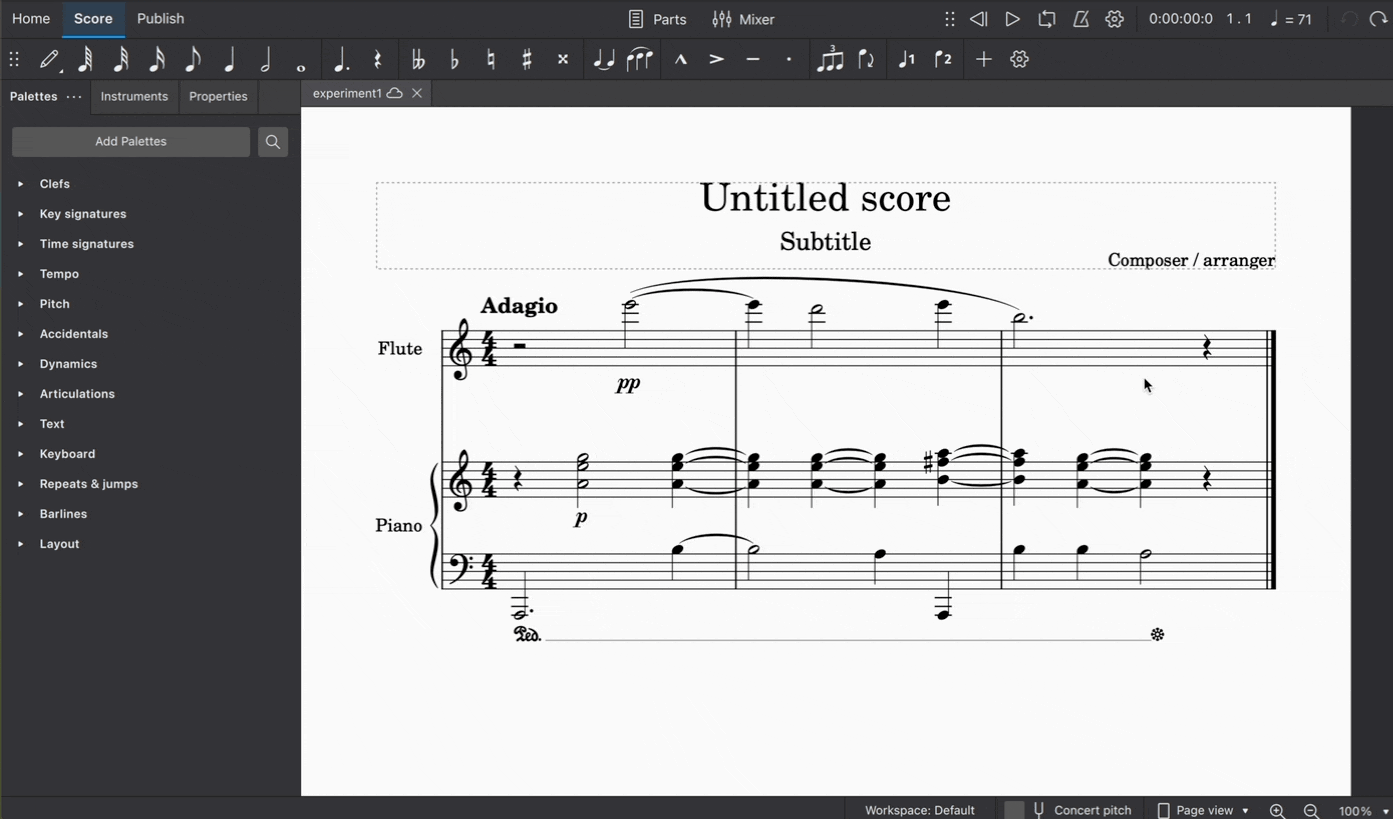
在 MuseScore 中,这个区域是您进行大部分工作的地方,包括添加音乐符号和听取谱表的播放。工作区由几个区域组成(根据下图中的标签编号):
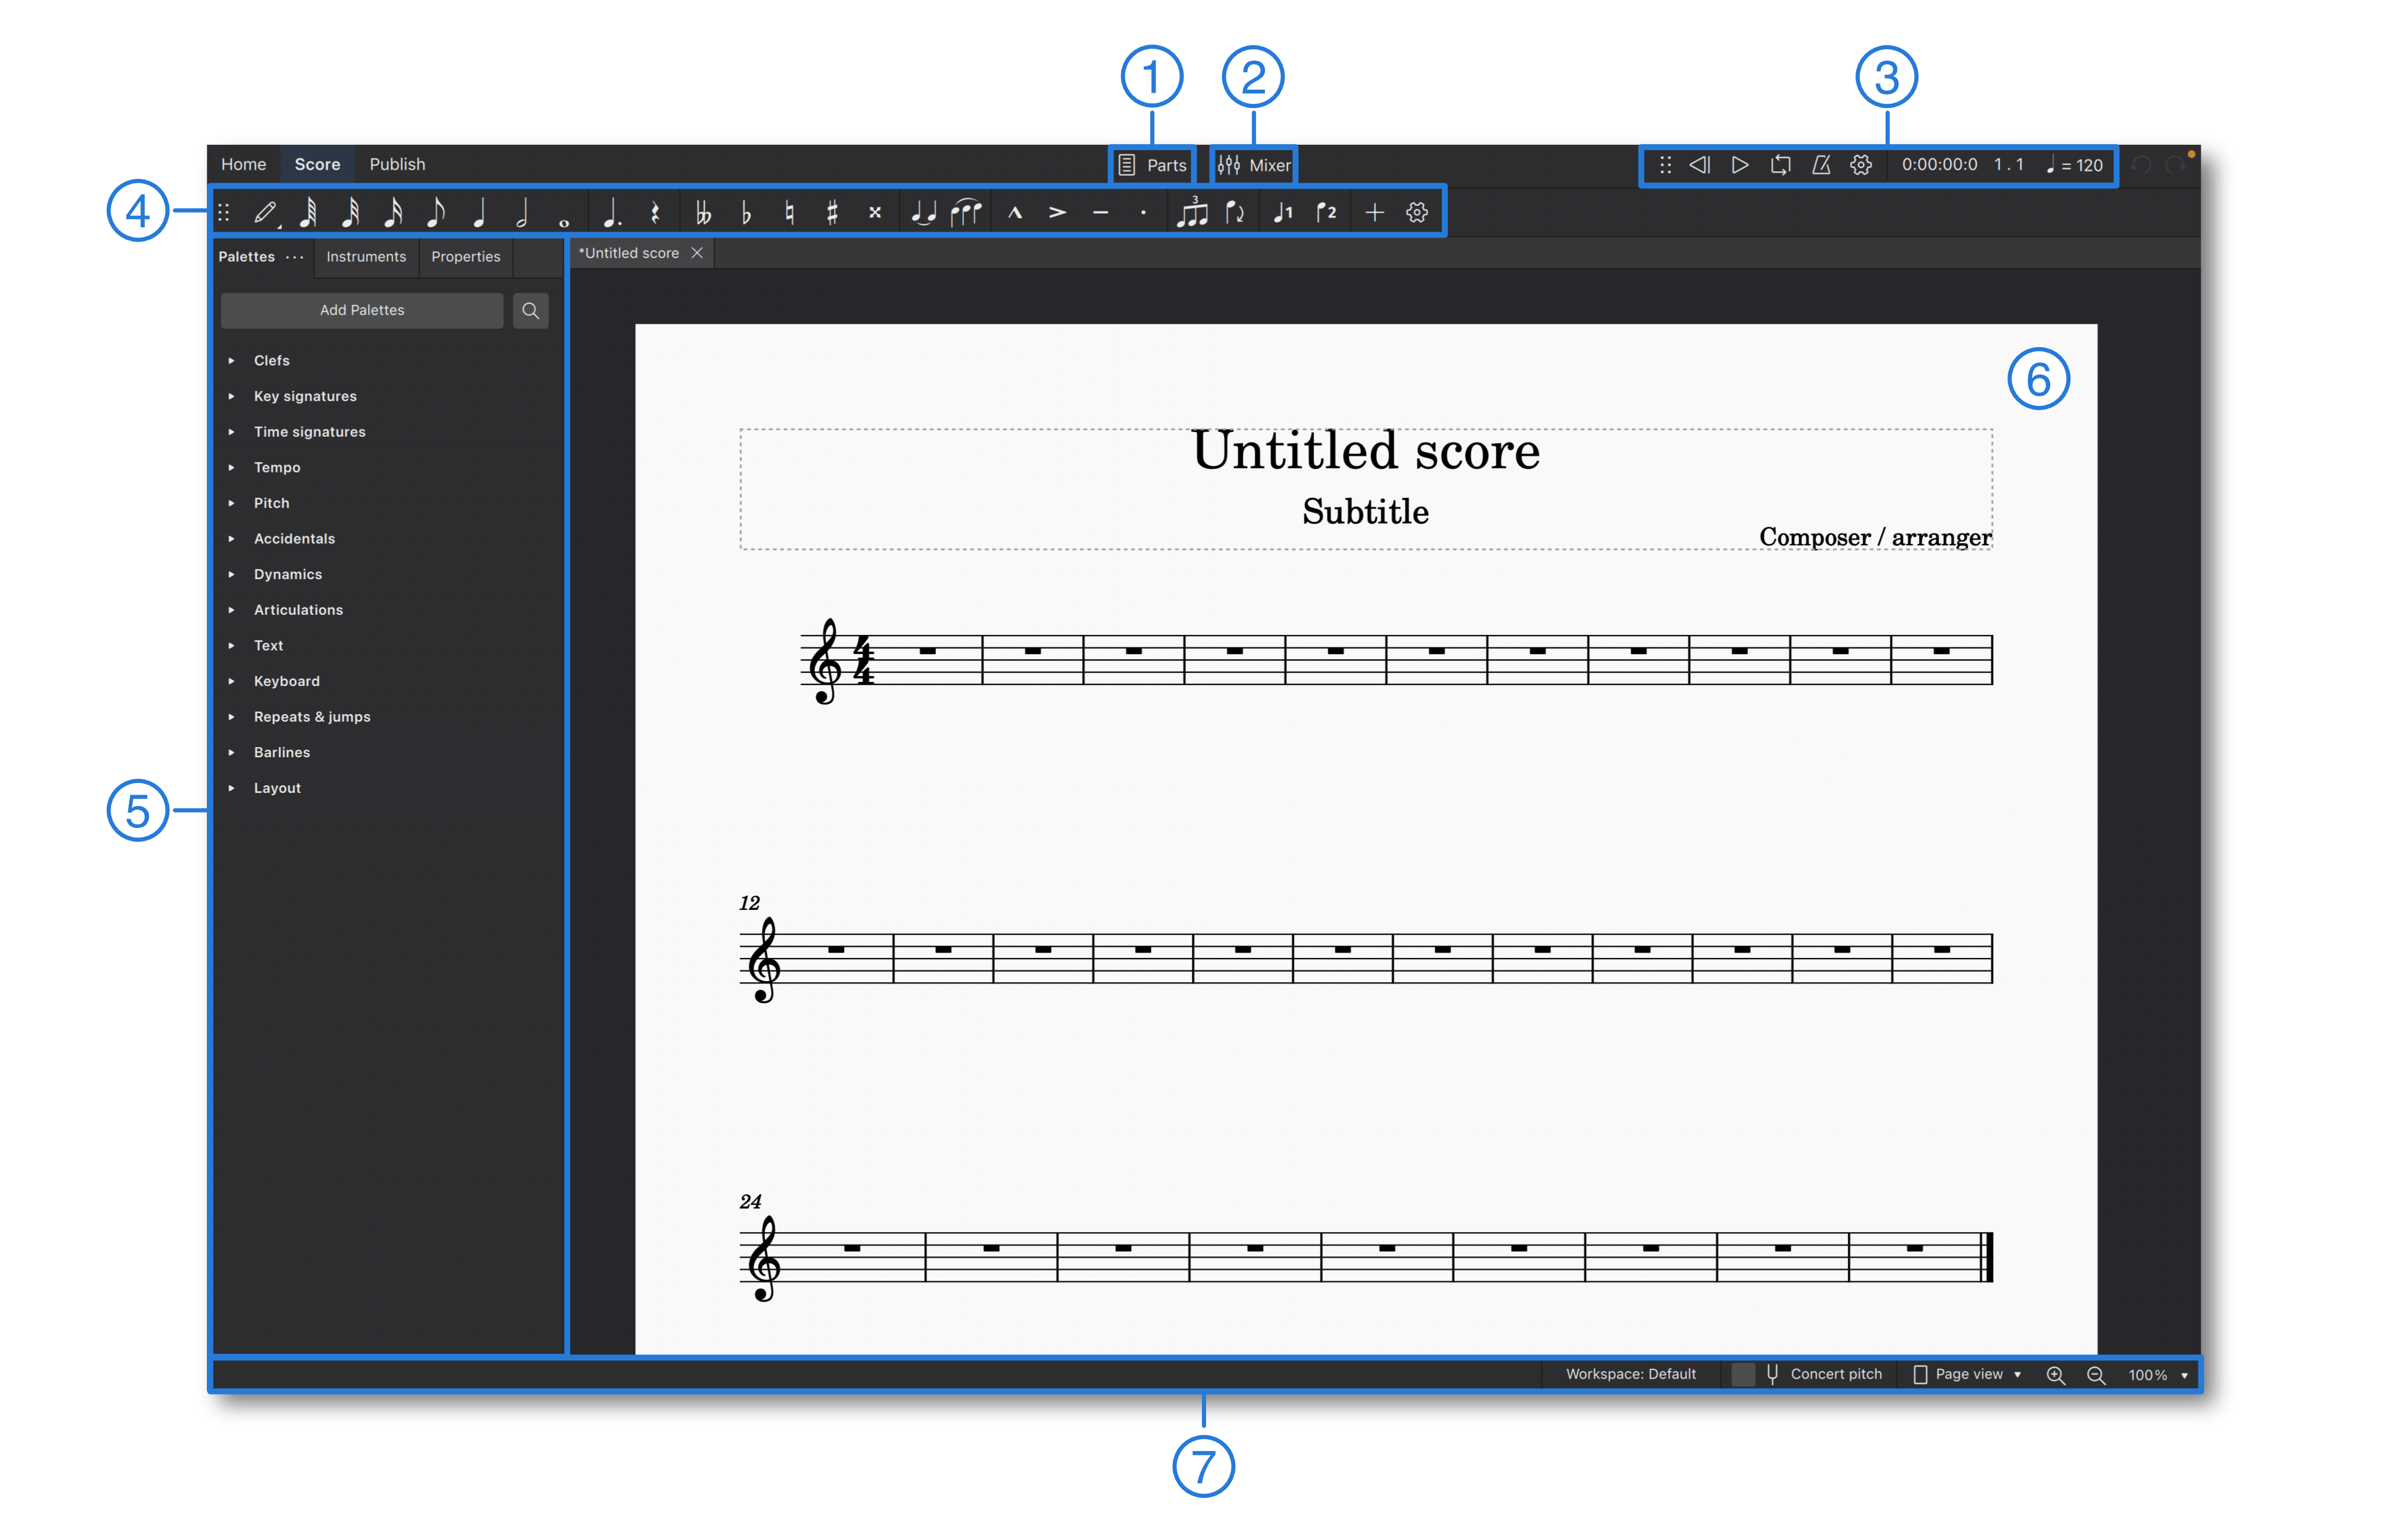
- 分谱:位于窗口顶部中心附近,在那里,您可以创建、编辑和删除分谱。
- 混音器:位于 分谱 按键的右边,可以打开 混音器 面板。
- 播放面板:位于混音器图标的右侧。
- 音符输入面板:位于整个屏幕的上部,在这里您可以找到乐谱中的基本符号。也可以在这里设置音符的时值,切换临时记号,使用常见演奏记号,输入三连音,或者切换声部。
- 侧边栏:位于窗口的左侧。您可以在这里找到符号面板、属性以及乐器。可以根据需要被隐藏或显示。
- 乐谱:程序的主要窗口,包含了您的乐谱。您可以在这里添加、编辑或删除符号元素。
- 状态栏:位于窗口的最底部。当选择一个或多个元素时,它的左侧会显示有关乐谱的相关信息。您可以在它的右侧更换工作区,选择是否使用标准音高,并指定页面显示和缩放倍率。
键盘用户可以使用Tab或F6键来在不同区域之间切换。您可以在每个区域内使用方向键和Tab键切换到不同的元素。
Musescore 4 中几乎所有的面板和工具栏都可以根据您的需求和工作区偏好设置隐藏或修改位置。了解更多信息,请参阅 工作区。
发布选项卡

此选项卡允许您查看不带音符输入工具栏或侧边栏面板的谱表。有打印谱表的选项,以及将其导出为各种图像、音频和文档格式的选项。当您完成谱表时,还可以将其发布到 musescore.com。
上下文菜单
在应用程序的某些部分,主要是在 乐谱选项卡,提供了具有额外功能的上下文菜单,例如复制、编辑、自定义、删除或查看在您打开菜单时选择的任何项目的属性。
元素上下文菜单
在乐谱中,每一个元素都有一个右键菜单。您可以通过鼠标右键单击某元素,或者按下Shift+F10(有些电脑键盘在右Ctrl键旁边还有一个菜单键)。每种元素的右键菜单里的内容都不尽相同,您可以大胆地尝试,看看不同元素的右键菜单里面有些什么。例如,当您右键单击一个小节的空白部分时,右键菜单会包括谱表/分谱属性和小节属性的选项。目前来说,这是唯一打开这些对话框的方法。
UI 上下文菜单
在乐谱之外,“右键菜单”通常是一个有一个齿轮图标或者是三个点图标的按钮。您可以按下按钮打开菜单。有时候按钮会与其他的界面相关联,例如在符号面板中每一个分类都有一个菜单。在这里,除了直接按那个有三个点图标的按钮以外,您可以右键任意一个分类,或者用键盘选中它,然后按Shift+F10或菜单快捷键打开这个菜单。
导航
滚动
鼠标滚轮
- 您能使用滚轮上下滚动界面。
- 您能使用Shift加滚轮左右滚动界面。
滚动条
在乐谱的右侧和底部有两个滚动条。拖动它们可以快速上下或左右移动乐谱。大部分时候滚动条会被隐藏,但您可以通过将鼠标悬停在乐谱的边缘来让它们显示出来。
键盘
您还可以使用键盘上的PgUp、PgDn、Home、以及End键来滚动乐谱。如果您的键盘没有这些专门的按键,大部分情况下您可以按住Fn或其他具有类似功能的按键,然后分别按下上、下、左、或右。
注意:按PgUp或PgDn键并不是一次滚动一页,而是一次滚动一个屏幕的宽度。如果您想让屏幕一次滚动一整页,您可以在按下PgUp或PgDn的同时按住Ctrl(Mac:Cmd)键。
在元素之间切换
当您在乐谱中选中一个元素的时候,您可以像操纵光标一样使用常用的键盘快捷键来更改光标的位置,从而选中其他的元素。
按下左或右键可以在相邻的音符(或休止符)之间切换。如果您想一次跳过一个小节,您可以在按下左或右键的同时按下Ctrl(Mac:Cmd键。
您可以按下Alt+Up或Alt+Down(Mac:Option+Up或Option+Down)键让光标在不同音符,声部,谱表之间纵向移动。
您也可以使用快捷键Alt+左或Alt+右(Mac:Option+左或Option+右)键来选中除了音符和休止符以外的几乎任何其他元素(包括奏法文本、小节线、渐强渐弱记号等)。
另外,您可以按下Ctrl+Home(Mac:Cmd+Home)来选中整个乐谱的第一个元素,或者按下Ctrl+End(Mac:Cmd+End)来选中整个乐谱的最后一个元素。同样地,对于有些没有直接的Home和End键的键盘,大部分系统都可以通过按Fn+Left或Fn+Right来代替。
参阅默认键盘快捷键了解更多信息。
导航视图
导航视图是一个能够展示乐谱缩略图的面板。您可以点击视图 → 导航面板打开或关闭导航面板。
导航面板里面的蓝色边框代表了当前屏幕显示的乐谱区域。您可以拖动方框来移动乐谱。
时间轴
时间轴是一个用来显示乐器和乐谱结构的辅助工具。参阅时间轴了解更多。
视图
您可以在状态栏右侧的弹出窗口中切换不同的乐谱视图。

多页视图
多页视图将乐谱按被打印或导出成 PDF 文件的样子显示(每一页单独显示,且带有页边距)。Musescore 能够根据页面设置和偏好设置中的设置自动应用换行符和分页符。另外,您还可以自己插入换行符和分页符。
单行连续视图
单行连续视图将乐谱不间断地显示在屏幕上。即便乐谱的起点不在屏幕中,小节号、乐器名称、谱号、调号和拍号也会被显示在窗口的最左侧。
垂直连续视图
乐谱被一页一页显示,页面具有页眉,但是没有页边距,并且能够垂直无限延申。Musescore 能够根据页面设置和偏好设置中的设置自动应用换行符和分页符。另外,您还可以自己插入换行符和分页符。
缩放
下面列出了一些能够缩放乐谱的方法:
放大
Ctrl++(Mac:Cmd++)
或在按下Ctrl(Mac:Cmd)的同时向上滚动鼠标滚轮。
缩小
Ctrl+-(Mac:Cmd+-)
或在按下Ctrl(Mac:Cmd)的同时向下滚动鼠标滚轮。
状态栏缩放控制
您可以通过下面方法从状态栏用鼠标放大或缩小您的乐谱:
- 点击状态栏右侧的放大镜图标。
- 单击这些图标右侧的数字,然后输入自定义缩放倍数
- 在最右边的弹出列表中选择一个预设的缩放倍数
回到100%缩放
下面操作能将缩放恢复至默认倍数(100%)。
Ctrl+0(Mac:Cmd+0)
查找/前往
查找/前往面板可以让您在乐谱中快速找到一个特定的小节,排练记号或页码。
您能够按下面操作打开查找/前往面板
- 找到编辑 → 查找/前往,或
- 按下Ctrl+F(Mac:Cmd+F)。
您能够按下面操作关闭查找/前往面板
- 单击面板左上角X(关闭)按钮,或
- 当面板被选中是按下Esc键。
跳转到特定小节号
输入小节号(从1开始计数,不包括弱起小节、中断或者手动更改小节号)。
跳转到特定页码
输入页码,格式为pXX(其中XX是页码)。
跳转到数字排练记号
输入rXX(其中XX是排练记号)。
跳转到字母排练记号
输入排演记号的名称(搜索不区分大小写)。
高级技巧:最好避免使用单个字母“R”,“r”,“P”,“p”或其中一个字母与另一个整数(例如“R1”或“p3”)来命名排练记号,因为这可能会混淆搜索算法。
时间轴
概述
时间轴能逐个小节显示乐器和乐谱中主要要素的变化情况。它显示在整个窗口的底部。您可以通过单击任何一个小节或者要素轻松地跳转乐谱到您选择的位置。
时间轴分为四个部分:
要素标签
要素标签在整个时间轴界面的左上角。每一行都展示了后续对应的要素的名称。
乐器标签
乐器标签在整个时间轴界面的左下角。这些是主网格中每一行的对应的乐器名称。
要素
乐谱中的主要要素的变化可以显示在整个时间轴界面的右上角。它们体现了整个乐谱在不同地方的元数据。
主网格
主网格在整个时间轴界面的右下角。每一个网格中的正方形都对应了一个乐谱中某一乐器的某一小节。
要素
要素是指那些虽然不是音符,但是仍然对乐谱有重要作用的元素。例如调号、拍号、速度、排练标记、小节线和反复或跳跃记号。

基础操作
选中某一小节
您可以通过单击某一单元格来选中时间轴中的某一个小节。当小节被选中后,这个单元格周围会出现一个蓝色的框,并且乐谱中的对应小节也会被同时自动选中,屏幕会自动跳转到您选择小节的位置。
选中多个小节
拖动选择
要拖动选择多个小节,您可以在按住Shift的同时按住鼠标左键并将鼠标在主网格上拖动。这会创建一个选择区域。松开鼠标后,所有在选择区域范围内的单元格以及对应乐谱中的小节都会被选中。
[Shift]选择
与在乐谱中的操作类似,如果一个单元格已经被选中,您可以按住Shift的同时单击时间轴上的另一个单元格来将选区延申至那个单元格。
[Ctrl]选择
如果当前没有选中任何单元格,按住Ctrl的同时再单击某一个单元格会选中一整列。
清除选区
您可以通过按下Ctrl的同时单击任意一个网格或要素来清除当前的选区。
选中某一特定要素
在时间轴上选中任意一个要素都会在乐谱中选中对应的要素。
滚动
鼠标滚轮
向上或向下滚动鼠标滚轮将分别向上或向下移动网格和乐器标签。要素标签和要素不会移动。
[Shift]滚动
按住Shift后,向上或向下滚动鼠标滚轮将分别向左或向右移动网格和要素。要素标签和乐器标签不会被移动。
[Alt]滚动
按住Alt后,向上或向下滚动鼠标滚轮将分别向左或向右移动网格和要素,且比按下Shift后移动的速度更快。要素标签和乐器标签不会被移动。
拖动
按住鼠标左键并移动可以拖动时间轴的内容。
标签操作
重新排列要素标签
除了小节号之外的所有要素标签都可以以任何方式被重新排列。将鼠标光标移动到某一个要素标签上后,该要素标签右侧将出现小的上下箭头。您可以用鼠标左键单击上箭头将要素标签与上面的要素标签交换,单击下箭头上的鼠标左键将要素标签与下面的要素标签交换。
折叠要素标签
您可以单击小节号的要素标签将其他所有要素折叠,这不会删除时间轴上的要素。所有其他的要素都会被折叠成一行,不同种类的要素在里面交错排列。您可以再次单击小节号的要素标签将其他所有要素展开。

隐藏乐器
不论隐藏与否,所有的乐器都会被显示在时间轴上。这个功能只能够将某一乐器从乐谱中隐藏。想要在乐谱上隐藏或显示乐器,您可以将鼠标光标移动到乐器标签上,然后单击出现在乐器标签右侧的小眼睛图标。如果乐谱上这个乐器是可见的,小眼睛图标就是睁着的,如果乐谱上这个乐器是不可见的,小眼睛图标就是闭着的。您可以单击这个小眼睛来在两个状态间切换。

缩放
要放大或缩小时间线,您可以按住Ctrl(Mac: Cmd),然后滚动鼠标滚轮。
Braille
Overview
MuseScore 4.1 added a braille panel that displays the current measure in braille music notation. The content is similar to what you get if you export braille via the File menu, but the braille panel updates live as you navigate through the score.
As of MuseScore 4.2, the braille panel can be used to enter notes and some musical symbols using Perkins-style 6-key braille input.
Output to a physical braille display
The contents of the braille panel can be displayed on a braille terminal connected to your computer (e.g. via Bluetooth or USB).
The following limitations apply when using a physical braille display:
- NVDA must be used as the screen reader.
- MuseScore’s braille panel must have keyboard focus.
- When the score has focus, the braille terminal will just show ordinary status text from the screen reader.
- Braille navigation and 6-key input must be performed with the computer keyboard.
- Physical buttons on the braille terminal are not used, except to scroll within a measure that is too long to fit on your display.
Please let us know in the Documentation forum if you discover a way to bypass any of these limitations.
Terminology: braille vs. print
On this page, we refer to MuseScore's ordinary stave notation as "print music". This is the traditional music notation that sighted musicians use on paper or electronic devices, and is displayed in the central region of MuseScore's main window, known as the score view.
Braille can also be used on paper, but it's not printed with ink. Instead, it's embossed as raised dots, which blind musicians read by touch. It is common in accessibility circles to use the word "print" to mean non-braille notation.
Viewing braille
To open or close the braille panel
- Go to Preferences > Braille.
- Check (or uncheck) the Show braille panel box.
The braille panel appears directly below the score in MuseScore’s main window.
To focus the braille panel
With the braille panel open, press the Tab key while the score has focus. A caret (text cursor) will appear in the braille at the position of whatever element was selected in the score. For example, if a note was selected in the score, the text caret will appear on that note in the braille.
Press Shift+Tab at any time to leave the braille panel and return to the score. The braille panel will remain open so you can navigate to it again with Tab.
Navigating the braille
While the braille panel has focus, you can move the text caret around using the arrow keys. As the caret moves through the braille, the element to the right of the caret becomes selected in the score. If that element is a note, MuseScore will play the sound of the note.
The braille panel only shows one measure at a time, but it shows that measure for all instruments in the score. Each line of braille corresponds to a staff in the print notation, so grand staff instruments like the piano get two lines of braille, and the organ gets three lines.
If a staff has lyrics, these are written on another line of braille immediately below the line corresponding to that staff. If there are multiple lines of lyrics (e.g. for multiple verses), each line of lyrics is written on a separate line in the braille.
Shortcuts for navigation
The following keyboard shortcuts are available for navigating the braille.
| Action | Windows/Linux | macOS |
|---|---|---|
| Go to next braille cell | Right | Right |
| Go to previous braille cell | Left | Left |
| Go to braille line above | Up | Up |
| Go to braille line below | Down | Down |
| Go to next measure | Ctrl+Right | Cmd+Right |
| Go to previous measure | Ctrl+Left | Cmd+Left |
| Go to beginning of score | Ctrl+Home | Cmd+Fn+Left |
| Go to end of score | Ctrl+Emd | Cmd+Fn+Right |
| Toggle braille input mode on/off | N | N |
Writing braille
Notes and certain musical symbols can be entered in the braille panel using a 6-key method of braille input similar to that of the Perkins Brailler.
Turn braille input mode on or off
While the braille panel has focus, press N to toggle braille input mode on or off.
Constructing a braille cell
While in braille input mode, six letter keys on the computer keyboard are used to represent the six braille dots that make up a single braille cell (⠿).
The keys used are F, D, S for dots 1, 2, 3 down the first column of the cell, and J, K, L for dots 4, 5, 6 down the second column. The Space key is used to represent an empty braille cell (⠀), sometimes referred to as dot 0.
Up to six of these keys can be pressed in combination to construct any pattern of raised dots. For example, to enter a quarter note C, which in braille is ⠹ (i.e. dots 1, 4, 5, 6), press and hold F+J+K+L, then release these keys to confirm the pattern. The keys can be pressed and released in any order, providing at least one key is held at all times, until you have completed the pattern.
When the final key is released, MuseScore reads your braille pattern. If your pattern corresponds to a recognized note or musical symbol then this element is entered directly in the score, not in the braille panel, because print notation is the "ground truth" for MuseScore. Once the element is in the score, the braille panel automatically updates to reflect this change.
Sometimes in music braille, the same information can be expressed in multiple ways. For the sake of consistency, MuseScore always picks the same way regardless of how you entered the notation. Therefore, the braille that appears in the braille panel may not exactly match the pattern(s) you entered with the six keys, though it will have the same meaning.
Entering notes
Basic notes
In braille, eighth notes (quavers) and 128th notes are written as:
| Note | Braille | Dots | Keys |
|---|---|---|---|
| C | ⠙ | 1, 4, 5 | F+J+K |
| D | ⠑ | 1, 5 | F+K |
| E | ⠋ | 1, 2, 4 | F+D+J |
| F | ⠛ | 1, 2, 4, 5 | F+D+J+K |
| G | ⠓ | 1, 2, 5 | F+D+K |
| A | ⠊ | 2, 4 | D+J |
| B | ⠚ | 2, 4, 5 | D+J+K |
Additional dots are added to the above sequences to create other durations:
| Duration | Braille | Dots added | Keys added |
|---|---|---|---|
| Quarter (crotchet) and 64th notes | ⠠ | 6 | L |
| Half (minim) and 32nd notes | ⠄ | 3 | S |
| Whole (semibreve) and 16th notes | ⠤ | 3, 6 | S+L |
Hence a quarter note C is ⠹ (dots 1, 4, 5, 6) and is entered with F+J+K+L. This pattern is also used for a 64th note C.
16th notes and smaller
As mentioned above, 16th notes and smaller use the same dot patterns as larger durations. When reading braille, you can work out whether the shorter or longer duration is being specified by looking at the time signature as well as other notes in the measure. However, when writing braille, you need to tell MuseScore which durations you want to use.
| ⠤ | ⠄ | ⠠ | ⠀ | Dots to select | Keys to select | |
|---|---|---|---|---|---|---|
| Group 1 | whole | half | quarter | eighth | 0, 1 | Space+F |
| Group 2 | 16th | 32nd | 64th | 128th | 0, 2 | Space+D |
By default, MuseScore enters group 1 durations (whole, half, quarter, eighth). To switch to group 2, enter dots 0, 2 (i.e. press Space+D). Nothing will appear in the braille panel, but any notes or rests you write from now on will be in group 2 (16th, 32nd, 64th, 128th). To switch back to group 1 durations, enter dots 0, 1 (i.e. press Space+F).
It's not currently possible to enter durations of 256th and smaller, or breve (double whole) and larger, via the braille panel.
Dotted notes
Braille uses ⠄(dot 3) to represent an augmentation dot, which is added in a new braille cell immediately following a note. No other cells are allowed to come between the note and its augmentation dot.
To create a dotted note in the braille panel, first write the main note duration using the rules above, then follow it with dot 3 (i.e. press S).
For example, a dotted quarter note C is ⠹⠄, which can be stated as dot pattern 1456-3, where the dash means to start a new cell. In terms of keys, this is F+J+K+L, S.
It's not currently possible to enter multiple dot 3s to create double and triple dotted notes via the braille panel.
Octave marks
Octave marks in braille serve a similar purpose to clefs in print music. If you see a note in print, you don't know what pitch it is until you look at the preceding clef. In braille, if you see ⠙ (dots 1, 4, 5) then you know the note is a C, but it could be a C in any octave. To determine the octave, you need to look at the preceeding octave mark (and also at any notes between that octave mark and the current note).
A standard 88-key piano has 7 complete octaves. Starting on the lowest C, which is called C1 in braille as well as in scientific pitch notation, the first complete octave of white notes is C1, D1, E1, F1, G1, A1 and B1. After B1 comes C2, which is the start of the second complete octave. This scheme continues up to the final complete octave, which starts with C7 and ends with B7.
In this system, C4 is middle C, and A4 is "concert A" (i.e. the note that the orchestra tunes to at the start of a performance). Enharmonic spelling is important, so B♯3 sounds the same as C4 despite being notated in a different octave, and C♭4 sounds the same as B3.
Even standard 88-key pianos have a few notes outside the range C1 to B7. Braille refers to the C0 octave as the "sub" octave, and the C8 octave as the "super" octave. These simply double the markings used for the first and seventh octaves.
| Octave | Marks | Dots | Keys |
|---|---|---|---|
| 0 (sub) | ⠈⠈ | 4-4 | J, J |
| 1 | ⠈ | 4 | J |
| 2 | ⠘ | 45 | J+K |
| 3 | ⠸ | 456 | J+K+L |
| 4 (middle) | ⠐ | 5 | K |
| 5 | ⠨ | 46 | J+L |
| 6 | ⠰ | 56 | K+L |
| 7 | ⠠ | 6 | L |
| 8 (super) | ⠠⠠ | 6-6 | L, L |
When specified, octave mark are placed immediately prior to a note. So a middle C quarter note is ⠐⠹, or dots 5-1456, which is entered as K, F+J+K+L. No other cells are allowed to go between the octave mark and the note it belongs to.
Octave marks don't have to be given before every note. Octave marks are only required:
- For the first note on each line of braille.
- For the first note after a double bar line, number sign, word indicator, and certain other markings.
- On the second of two notes separated by a melodic interval of a sixth or more, regardless of their octaves
- On the second of two notes separated by a melodic interval of a fourth or more, if their octave numbers are different.
基础操作
创建乐谱
概述
本章重点介绍乐器设置和基本乐谱信息设置。您应该已经熟悉了 Musescore 的基本工作流程,该工作流程在快速入门教程创建您的第一个乐谱中有所涵盖。
乐器
在 Musescore 中,一个乐器是一个抽象概念,包含了指法谱或五线谱(参见页面布局概念:谱表),记谱风格(谱号、符头等)、音乐行为(移调、演奏范围)以及为 Musescore 合成器创建的播放音频相关的设置。
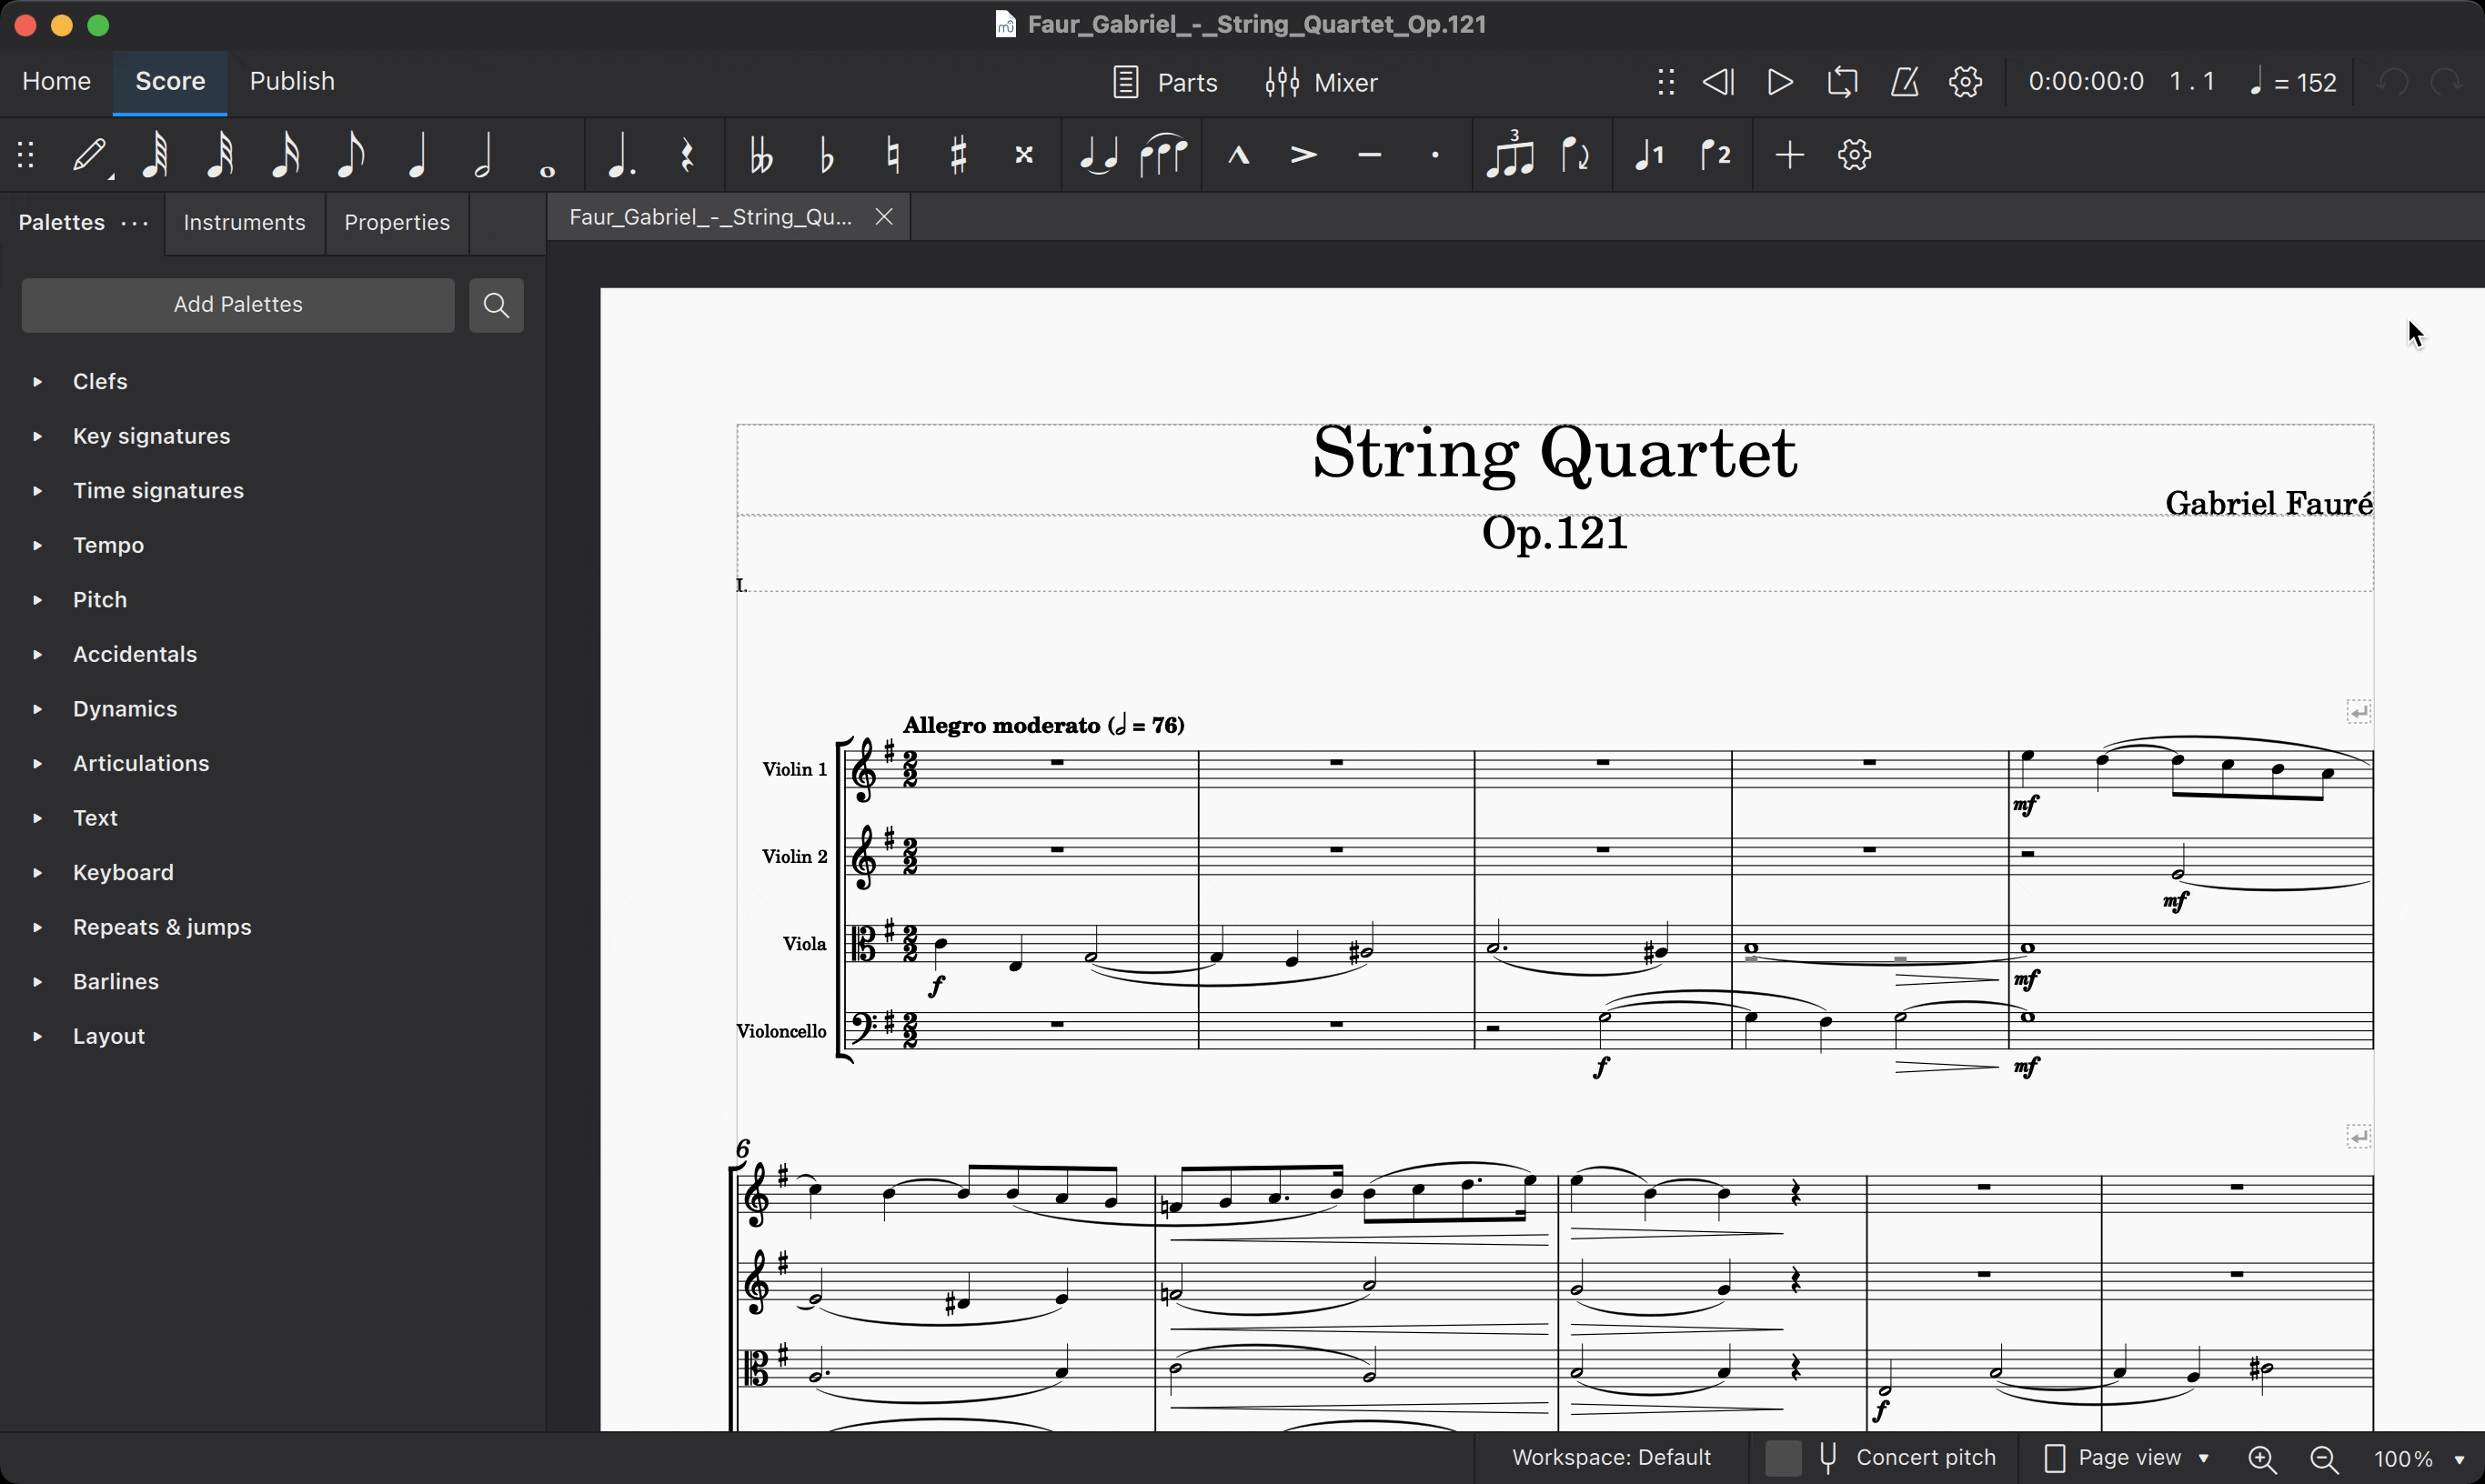
一个 Musescore 乐器包含可以代表单个或多个真实世界乐器的五线谱,例如在贝多芬的《交响曲第3号,作品55》中,由Cianchettini&Sperati出版,n.d.[1809]伦敦的第三谱表Corni 1 & 2 in Eb代表两个法国号:

要转录此内容,您应该添加一个Musescore乐器“圆号”并选择Eb调,同时将其重命名,命名不影响播放。

Musescore 支持很多真实世界的乐器、乐器组、人声和合唱,有几种方式:
- 具有相同名称的 Musescore 乐器,例如“钢琴”、“小提琴”、“小提琴组”、“弦乐”、“女高音”、“声乐”、“女声”以及一些打击乐器,如“定音鼓”、“管弦乐大鼓”、“钹”(管弦)。相似的项目可能具有不同的播放效果。
- “鼓组”,一个包含“军鼓”、“踢鼓”、“低音鼓”、“高音筒鼓”、“钹”等项目的单个谱表。这些没有单独的MuseScore乐器。参见定制鼓组
- Musescore 也提供一个短小的 用刷子演奏的军鼓音色,参见混音器。
也可以使用从模板创建新的乐谱,您还可以在任何分谱中设置乐器。
MuseScore 包含500多种乐器,请参阅 https://musescore.org/en/instruments。要向我们建议添加缺失的乐器,请参阅 https://musescore.org/en/contribute。
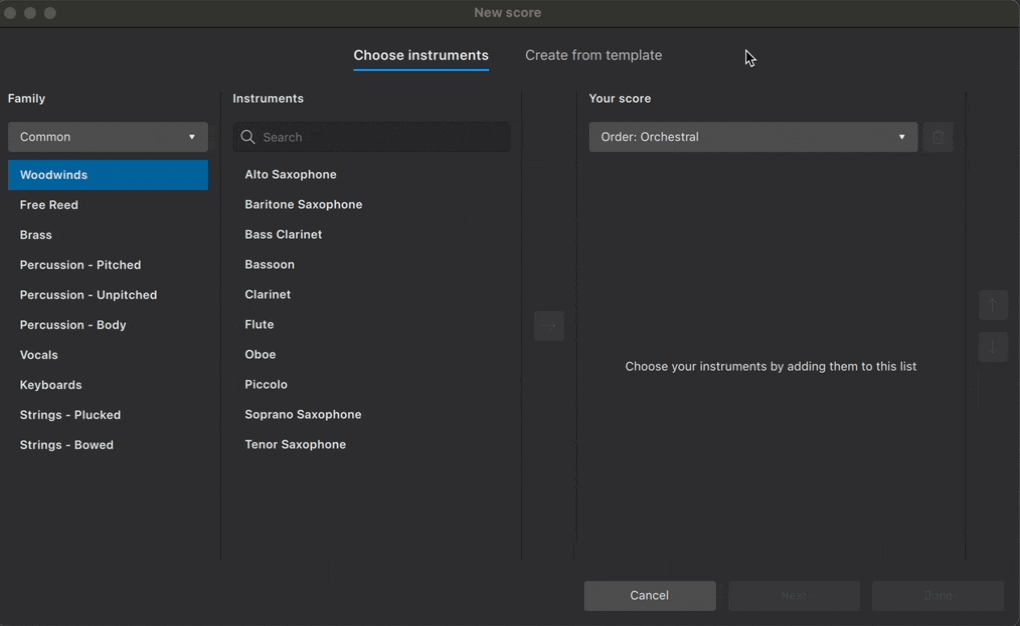
选择乐器
创建新乐谱时,您可以在新建乐谱对话框中单击打开选择乐器选项卡。在"创建乐谱后更改乐器"中提到的某些方法也会打开此窗口。
乐器按左侧乐器族标题下的下拉菜单中显示的类型/流派进行过滤。默认情况下选择“常见”,这会显示您可能需要的一些最常见的乐器或音色。注意:要显示所有可用的乐器,必须选择“全部乐器”。
乐器按其所属的乐器族分组。如果您知道您要查找的乐器/音色,只需在乐器标题下的搜索栏中输入其名称或部分名称即可。按下清除按钮(X)清除选择。
添加乐器
要向您的乐谱添加乐器:
- 双击乐器下的一个乐器
或
- 选择乐器下的一个乐器
- 单击→按钮将乐器添加到您的乐谱中(小提示:双击乐器名称也会执行相同的操作)。
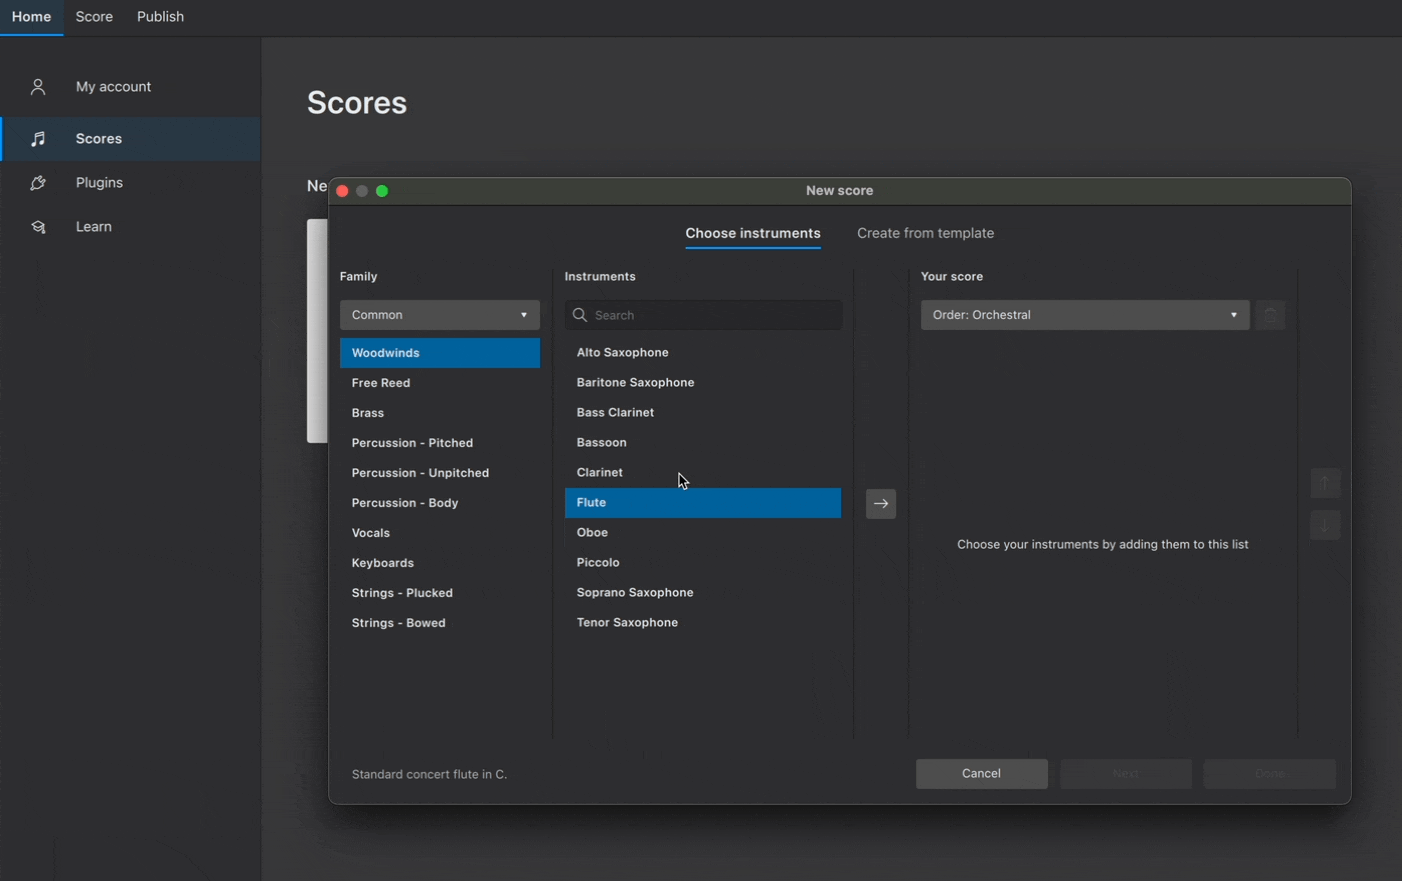
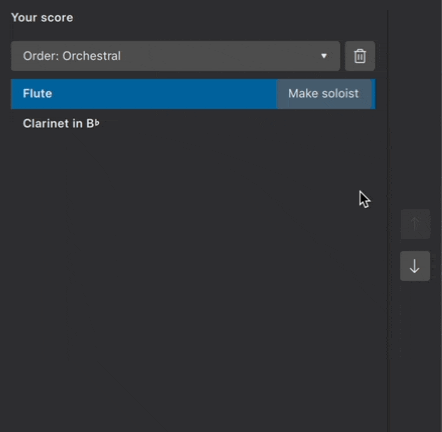
乐谱上的谱表按照右侧您的乐谱标题下显示的顺序排列。次序 … 下拉菜单会显示当前使用的谱表顺序预设。
通过使其独奏来更改乐器的顺序
独奏乐器的排序顺序在乐谱上与其他乐器是不一样的。例如,在“管弦乐队”预设中,独奏者位于弦乐之上。独奏并不意味“乐谱上只有一个”。
您可以在您的乐谱标题下的次序 …下拉列表中选择样式。
要将乐器(其所有谱表)重新排列独奏:
- 选择您的乐谱下的一个乐器
- 单击“使其独奏”按钮。
手动更改乐器顺序
要手动更改乐器的顺序:
- 选择您的乐谱面板下选择一个乐器
- 单击↑或↓以更改其位置
删除乐器
要从您的乐谱中删除乐器:
- 双击您的乐谱下的一个乐器
或
- 选择您的乐谱下的一个乐器
- 单击垃圾桶图标

您还可以通过首先按住Shift并选择多个乐器,然后单击垃圾桶图标一次删除多个乐器。
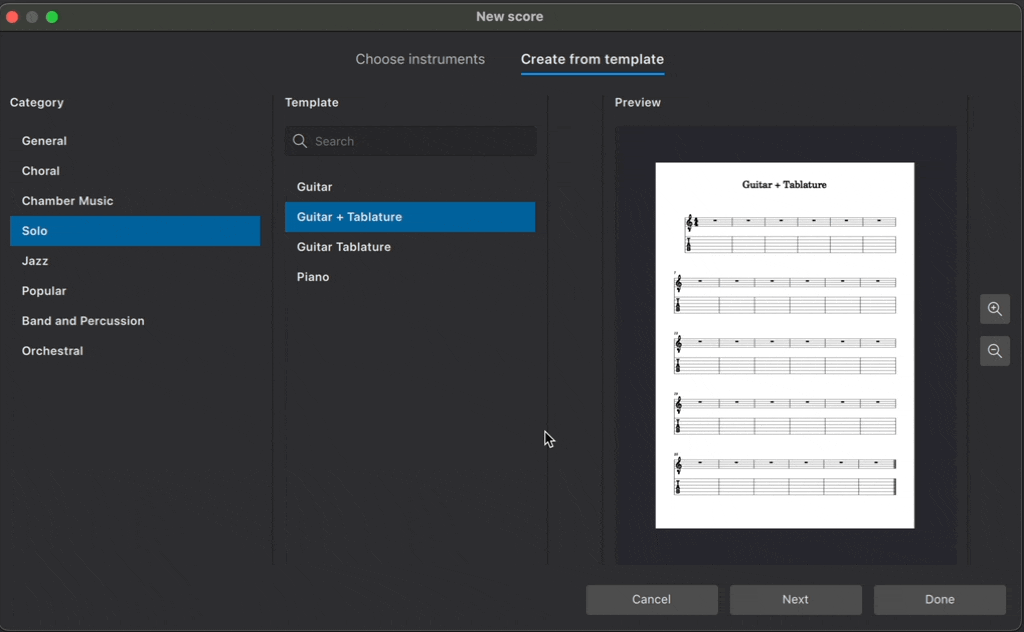
从模板创建
您也可以用预置好的模板创建乐谱。模板根据音乐风格或编制分为多个类别。模板中有这种编制通常使用的乐器,乐器的顺序和排版也符合惯例。
要从模板创建乐谱:
- 单击从模板创建
- 从类别面板中选择一类模板
- 从中间的面板中选择所需的模板
- 单击完成
您还可以在搜索栏中搜索所有可用的模板。
访问Templates and styles了解更多模板信息,包括如何创建自己的模板。
附加乐谱信息
在新建乐谱对话框中单击下一步以指定附加乐谱信息屏幕中的其他信息,例如调号、拍号、速度、起始小节(弱起小节)和小节数。
请注意,这是在创建新乐谱时添加信息的一种方便方法,但不是唯一的方法。您可以随时使用其他方法修改乐谱的附加信息,例如键盘快捷键、使用符号面板、项目属性等。
调号
默认情况下,新的乐谱创建时带有一个不带升降号的调号(C大调)。单击调号下的按钮指定不同的调号。默认显示大调,可以通过选择小调选项卡显示小调。
拍号
创建新乐谱时拍号默认为 4/4 拍。单击拍号下的按钮更改此设置。使用文本框中的箭头更改每小节的拍数,右边的下拉菜单选择以几分音符为一拍。您也可以在弹窗中选择 common(C拍号,4/4拍)和cut-common(¢拍号,2/2拍)两种拍号。
速度
默认情况下,新的乐谱将以每分钟120个四分音符的速度播放。新乐谱中不会自动包含速度记号。
要自定义起始播放速度,并在最上面的五线谱上显示速度记号:
- 单击速度下的按钮
- 勾选在我的乐谱上显示速度记号
- 选择所需的速度值
- 在文本框中输入所需的每分钟拍数(20-400),或使用上下箭头调整。
在速度记号中了解更多关于速度文本、节拍标记和播放速度的信息。
小节
新的乐谱创建时默认有32个小节且没有弱起。要更改新乐谱的起始小节数:
- 单击小节下的按钮
- 在初始小节数字段中输入所需的小节数
您可以在这里找到如何在创建乐谱之后增加或删除小节。
若要让乐谱以弱起开始:
- 单击小节下的按钮
- 勾选创建弱起小节
- 在文本框中输入弱起小节的所需拍数
- 从下拉菜单中选择弱起小节的节拍值
您随时可以创建弱起小节。你可以在这里找到如何在创建乐谱之后增加Pickup and non-metered measures。
标题和其他文本
在新建乐谱对话框底部的文本框中输入文本,MuseScore 将自动以适当的格式将其放置在您的新乐谱中。您可以为乐谱输入文本标签:
- 标题
- 作曲家
- 副标题
- 作词人
- 版权
此信息也同时成为乐谱的项目属性(文件菜单中)中的数据,您可以随时更改它。
一旦您完成乐谱信息的输入,点击完成将会保存您的输入并创建乐谱。
在创建乐谱后更改乐器
以下是三种可以在创建乐谱后修改乐器的方法:
输入音符和休止符
本章仅解释了在标准五线谱上的音乐创作,还请参阅指法谱和打击乐谱章节。
概述
通过电脑键盘输入音乐既快捷又容易。要输入音符或休止符,只需选择一个时值,然后键入音名(A - G),或为休止符键入0(零)。您还可以使用鼠标,MIDI 键盘或 MuseScore 自己的虚拟钢琴键盘输入音符(详细信息见下文)。
MuseScore 支持几乎无限的撤销,所以你不必太担心输错。要撤销输入,只需单击工具栏最右边的撤销按钮,或使用标准键盘快捷键Ctrl+Z(Mac: Cmd+Z)。
输入音符
本页的信息主要涵盖如何在标准五线谱上输入音符。其他类型乐谱的输入请参考指法谱和打击乐谱。
最常见的输入方法,也是本页面所教的方法是每次输入一个音符或休止符。在这里你可以找到其他输入音符的方法.
选择一个起点
要在乐谱中添加音符或休止符,首先你应该选择开始添加的位置。你可以使用鼠标或键盘导航指令来选中。

进入音符输入模式
接下来,您可以点击工具栏中的钢笔按钮或使用键盘快捷键N进入音符输入模式。屏幕上将会显示一个光标告诉您哪里将被插入音符。

如果您忘记在进入音符输入模式前选择一个输入起点,音符输入可能会从上一次输入音符的地方继续,或者是从一些其他的地方开始。因此在输入音符前,请确认光标在您预设的位置上。
进入音符输入模式后,您可以从前到后输入音符。首先您应该选择时值,然后输入音高或休止符。当您一个地方输完了音符,想要做一些其他的事情——例如在别的地方输入音符,添加记号,或执行其他操作(如复制或粘贴)——的时候,您可以单击音符输入按钮或者再次按N。您也可以按Esc返回到正常模式。
选择时值
在音符输入模式下,您可以按照以下几种方法为下一个被输入的音符选择时值:
- 在音符输入工具栏直接单击对应的音符图标(在乐谱的正上方)
-
使用键盘快捷键1–9选择对应的时值

使用键盘快捷键可以高效地选择时值。最常见的时值是八分音符、四分音符、和二分音符,他们对应的键盘快捷键是4、5、6(数字小键盘的中间一行)。较短的时值用较小的数字表示,较长的时值用较大的数字表示。完整快捷键列表如下:
- 六十四分音符:1
- 三十二分音符:2
- 十六分音符:3
- 八分音符:4
- 四分音符:5
- 二分音符:6
- 全音符:7
- 二全音符:8
- 四全音符:9
- 附点:. (使音符或休止符带上附点)
其他时值,例如复附点或一百二十八分音符,可以通过自定义工具栏或修改键盘快捷键输入。
注:如果您设置了对应的按键,您也可以使用 MIDI 键盘选择时值。
输入音符
在选择了一个时值之后,您可以使用电脑键盘、鼠标、MIDI 键盘或虚拟钢琴键盘输入音符。
使用电脑键盘输入音符
这几乎是 Musescore 里最高效的输入音高的方法。
只需在键盘上按下您想要输入的音的音名(A–G),您就可以轻松地输入音符。

使用这种方式输入的音符会替换掉光标处任何已有的音符或休止符。若您想要在现有音符或和弦中添加一个音,您需要在输入音符的时候按住Shift。您可以在下面的输入和弦部分学到更多信息。
当你通过音名输入音符的时候,Musescore 将自动选择最接近前一个音符的音高。如果您想要更大的跨度,您可以按Ctrl+↑或Ctrl+↓ (Mac:Cmd+↑或Cmd+↓)使刚才输入的音符升高或降低一个八度。
使用鼠标输入音符
要使用鼠标输入音符,您需要将鼠标放置在五线谱中的您想要的线或间上,然后单击。鼠标光标将显示您即将输入的音符的预览,以帮助您准确地放置它。

如果在您输入音符的位置已经有一个存在的音符,新的音符将会添加在已有音符的上方或者下方。如果想要替换现有的音符,您可以在单击鼠标的同时按下Shift。
使用这种方法很难直接输入很高的或者很低的音,因为 Musescore 可能会以为您想要在上面或下面一个谱表输入音符。您可以尝试在高八度或低八度的位置输入对应的音符,然后通过按Ctrl+↑或Ctrl+↓(Mac:Cmd+↑或Cmd+↓)使您刚才输入的音高一个八度或低一个八度。
注:虽然一般情况下,音符是从前到后被输入的,但鼠标输入实际上允许您在现有乐谱中的任何一个位置输入音符。
使用 MIDI 键盘输入音符
如果您有一台 MIDI 键盘连接到您的电脑上,您可以通过按下对应的键输入对应的音符。
当您在 MIDI 键盘上输入音符时,如果您在输入下一个音符前完全松开上一个键,音符就会被连续地输入,否则,新的音符将会被添加到原有音符的上方或下方。
使用 MIDI 键盘输入的音符可能会自动使用变音号,但是这些变音号可能不符合您的预期。您可以通过按下J改变变音号的形式。
使用虚拟钢琴键盘输入音符
您也可以通过钢琴键盘窗口输入音符。您可以在视图→钢琴键盘或按下键盘快捷键P打开或关闭这个窗口。

要输入某个音高的音符,只需用鼠标单击对应的钢琴键。
与使用电脑键盘输入音符一样,以这种方式输入的音符会自动替换掉任何现有的音符或休止符。如果您想要创建和弦,请在输入音符的同时按下Shift。
注:如果您想改变虚拟钢琴键盘的大小,您可以先选中虚拟钢琴键盘窗口,然后按住Ctrl(Mac:Cmd)同时向上或向下滚动鼠标滚轮。
输入和弦
在本节中,和弦是指在同一时间开始的多个音符的组合,且这些音符都具有相同的时值且共用一个符干。

如果您希望输入两个音,但是它们的开始时间、持续时间或是结束时间不同,或不共享同一个符干,请参见声部。形如“Dm7”的文本是一个和弦记号,参见和弦记号.
就像输入单个音符一样,和弦可以通过电脑键盘、鼠标、MIDI 键盘或虚拟钢琴键盘被输入。除了在 MIDI 键盘上您可以一次演奏多个音符以外,音符输入仍然是一次一个,你需要以某种方式告诉 MuseScore 将它们组合成一个和弦,而不是按顺序添加它们。
- 要使用电脑键盘在和弦中添加一个音符,请在输入音符时按住Shift
- 要使用鼠标在和弦中添加一个音符,请直接单击您想要添加音符的地方
- 要使用 MIDI 键盘在和弦中添加一个音符,您可以同时弹奏全部的音符,或者一次弹奏一个,但是在按下下一个音符前不要松手
- 要使用虚拟钢琴键盘在和弦中添加一个音符,请在输入音符时按住Shift
当您使用Shift+A–G往和弦中添加一个音符的时候,该音符将被添加到光标处的任何一个已经存在的音符的上方。您也可以基于音程来输入音符。
- 要在选中音符上方添加音程,你可以:
- 在菜单栏中选择添加→音程然后从列表中选择一个音程;
- 使用键盘快捷键Alt+1-9。
- 要在选中音符下方添加音程,您可能需要自定义键盘快捷键(参见偏好设置)。
输入休止符
休止符可以通过电脑键盘或鼠标被输入。选择休止符的时值的方式与选择音符的时值的方式相同(例如,您可以使用键盘快捷键1–9)。选择时值之后,您不需要像输入音符那样输入音高,而是:
- 使用电脑键盘:按下0(零)
- 使用音符输入工具栏:点击休止符按钮,然后点击乐谱上对应的位置
-
使用鼠标:在乐谱上右键

变音号

标准的变音号(还原号、升号、降号、重升号、重降号)既可以在输入音符前被选中,也可以在现有的音符上被添加。
在输入音符之前选中变音号
要想指定下一个被输入的音符的变音号,您可以点击乐谱上方的音符输入工具栏中的对应按钮或者使用对应的键盘快捷键。 这步操作既可以在选择时值之前完成,也可以在选择时值之前完成。

默认的键盘快捷键是:
- 降号:-
- 升号:+
- 还原号:=
与时值不同,变音号的选择仅对下一个被输入的音符有效。但是通常的记谱规则仍然适用,即如果你给一个音符加了降号,那么你在同一小节中输入的任何相同音高的后续音符也会被降音,即使它们没有明确的写在乐谱上的降号。
在输入音符之后添加变音号
当你升高或降低被选中音符的音高时,合适的变音号会被自动添加到乐谱中:
- ↑:使音符上升一个半音(使用升号)。
- ↓:使音符下降一个半音(使用降号)。
您也可以通过点击符号面板→变音号中的适当图标向现有音符添加一个变音号。符号面板里面还包含了大量的微分音记号或是其他特殊的变音号。
添加辅助变音号
尽管记谱规则确定同一小节内的同一个音共用变音号,下一个小节里的同一个音会回到到原来的音高,但无论如何,添加辅助 变音号可以帮助演奏者更顺畅地识谱。这不会改变音符的音高,所以它们不能够通过键盘快捷键↑和↓被添加。然而,您仍然可以使用前面所说的其他几种方法添加辅助变音号。
虽然辅助变音号不需要括号或者方括号,但是有一部分人仍然习惯给这些记号加一个括号。如果您想向一个变音号外围添加一个圆括号或者方括号,您需要暂时退出音符输入模式,然后在属性面板里面选择您想要的括号类型,或者在符号面板的变音号菜单里面的更多里面找到括号。
注:Musescore 还预装了一些插件,您可以使用它们来根据需要自动添加辅助变音号。
延音线
延音线是连接两个具有相同音高音符的曲线,表示了它们要作为一个组合音符被演奏。尽管延音线和圆滑线十分相似,但是您不应该将这两者混淆。圆滑线将不同音高的音符连接在一起,并表示不同的发音。
在 Musescore 里输入延音线十分容易,因为延音线总是出现在具有相同音高的音符之间。所以你不需要输入第二个音符的音高,只需要选择时值并输入延音线,Muesecore 会自动添加一个新的音符。要想创建一个延音线,你应该:
- 为第二个音符选择时值
-
单击工具栏上的延音线按钮或使用键盘快捷键T

延音线会自动添加第二个音符,并直接将这个音符与第一个音符绑定。如果你选中的第一个音符是一个和弦的一部分,延音线会为第二个音符创建完整的一个和弦。和弦里的每个音与前面一个和弦完全相同,且每个对应的音之间用延音线连起来。

连线位置(可选)
在 MuseScore 4.1 版本之前,默认行为是将单个音符的连线绘制到外部(连接音符头部的顶部/底部),将和弦的连线绘制到内部(连接音符头部的右侧和左侧)。从 MuseScore 4.2 开始,单个音符和和弦的连线位置现在可以配置为任何方式;新乐谱的默认设置是所有连线都绘制在外部。除了全局风格设置(在 格式 > 样式 > 圆滑线与延音线 > 延音线 中),还可以为任何特定连线使用设置(通过 属性 > 延音线位置)。
注:尽管延音线通常用来连接相同声部中的两个相邻音符,但是 MuseScore 同样支持连接两个非相邻的音符,以及连接两个不同声部的音符。参见编辑音符和休止符。
另请参阅
处理多声部
概览
MuseScore 的一个 声部 是谱表上的一行音乐,其节奏与同一谱表上的其他音乐独立。其他软件可能将其称为“层”。
“声部”在另一个意义上也可能指代声乐音乐中的音域——女高音、女中音、男高音、男低音等。重要的是不要混淆这两个含义,比如假定 SATB 合唱中的四个“声部”等同于 MuseScore 的“声部” 1–4(见下文);那就是把两者搞混了。
MuseScore 允许在一个谱表中 最多使用四个声部:声部1、声部2、声部3 和声部4。当在谱表上书写音乐时,通常从声部1开始,然后转到声部2。声部3 和声部4 较少使用。
同一谱表上的两个声部通常使用对立的符杆来表示——上声部符杆向上,下声部符杆向下:

在一个标准的 SATB 编配中,你会在上谱表上使用声部1和2,用于女高音和女中音,下谱表上使用声部1和2,用于男高音和男低音:

在多个声部输入音符和休止符
输入多个声部的第一步是确定你需要将音符作为 一个谱表 中的声部书写,还是将声部分布在 多个谱表 中,比如在钢琴的两个谱表中分布四个声部,或在 多个乐器 中分布四个声部。你应该考虑 MuseScore 的符号功能设计和你的制作需求,不要仅仅基于学术原因做出决定:
- MuseScore 根据使用的声部 以及 每个小节中使用的声部来自动设置符杆方向。在只使用声部1的小节,但没有音符或休止符写在声部2、声部3或声部4上时,音符的符杆方向由音高决定——在中线以上的音符,符杆向下,中线以下的音符,符杆向上。否则,符杆方向根据声部确定——声部1和声部3向上,声部2和声部4向下。
- 要手动分配覆盖符杆方向设置,使用工具栏上的 翻转方向 按钮,或键盘快捷键 X,也可参见 符干和符头。
- 直接在声部2上书写可能在学术上看起来是正确的,但 MuseScore 将自动创建 声部1中的休止符号,这在某些情况下可能是多余的。在这种情况下的流行选择有:之后手动隐藏休止符(这里);或者简单地使用声部1而不是声部2。
- 尚不能为各声部分配不同的音色,因此可能需要使用多个乐器。例如,你不能将女高音 VSTi 分配给声部1,将男高音 VSTi 分配给声部2,只能选择其中一个。
- 有时必须在 一个谱表中使用多个声部,以在 MuseScore 中创建特定的视觉符号结果,即使在音乐上它们并不是不同的声部。例如,在 MuseScore 中,一个和弦只能由持续时间相同的音符创建。如果一个和弦的组成音符持续时间不同,你必须使用不同的声部来书写它们。关于常见类似情况的列表可参见 Musescore 3 使用手册:声部 页。
使用多个乐器
如果你决定需要将不同的声部作为不同乐器上的音符来书写,首先创建多个乐器,使用 创建乐谱:修改乐器,然后根据需要编辑谱表上的谱号,然后在 所有这些谱表上都使用声部1进行创作。 一个常见的例子是在四个乐器的声部1上书写四声部的 SATB 乐谱。
如果您需要将不同的谱表合成同一谱表中的不同声部,或者进行相反的操作,请参见 合并或分解谱表。一个常见的例子是 SATB 开放谱 <-> 短谱的转换,
在一个谱表中输入多个声部的音符和休止符
要在一个声部中输入新的音符:
- 选择你的音乐中的起始点。
- 单击工具栏上的笔图标或按 N 进入 音符输入模式。
- 使用工具栏图标选择所需的声部,或按下键盘快捷键 Ctrl+Alt+1–Ctrl+Alt+4
- 正常输入音符和休止符,如 输入音符 中所述
你可以重复这些步骤来将音符输入到其他声部中。
注意:要输入新的音符,请确保在选择所需声部之前处于 音符输入模式,否则你将 改变当前选择元素的声部。
注意:音符工具栏默认只显示声部1和2的图标。你可以使用工具栏上点击齿轮图标时出现的控件来使所有声部图标可见。有关更多信息,请参见 自定义音符输入工具栏 部分。
编辑多个声部中的音符和休止符
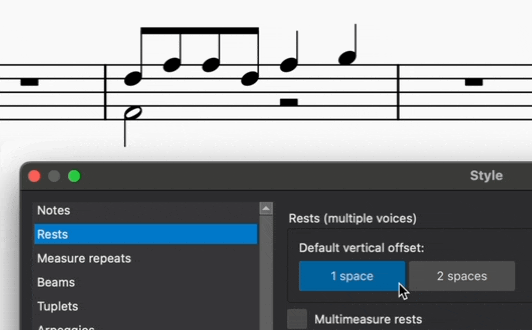
调整休止符
通常情况下,为了显示小节中的所有节拍,每个声部都包含全部的休止符。然而,这可能会导致乐谱看上去乱糟糟的。Musescore 会自动调整休止符的位置以避免休止符与其他声部中的音符发生冲突。但在某些情况下,您可能想要手动调节休止符的位置。在节拍足够清晰的情况下,您可能希望隐藏或删除一些不必要的休止符。
要隐藏、删除或调整这些休止符的位置以创建更好的布局,请使用以下方法之一:

隐藏或删除休止符
可通过选择休止符并在 属性 面板中取消选中 可见 复选框,或使用键盘快捷键 V 来隐藏休止符。
声部2-4 中的休止符也可以通过选择它们然后按下 Delete 来删除。然而,这会留下声部中的“空洞”,以后可能很难编辑。要从声部中恢复丢失的休止符,你可以使用 工具→声部 中的命令来交换声部的内容与声部1的内容,这将再次填补空洞。然后您可以使用相同的操作将两个声部对调回去。
注意:为了确保每个小节持续的时间是正确的,第一声部中的休止符可以被隐藏,但是不可以被删除。
调整休止符的位置
即使 MuseScore 会自动避免休止符与其他声部的音符发生冲突,有时候手动调整休止符的上下位置可以使得休止符到底归属于哪个声部变得更清楚。
要垂直移动休止符,您只需在选中那个休止符之后按下 Up 或 Down ,这会使休止符被移动一定的距离。
有关手动定位的更多信息,请参见 改变元素的位置。
你还可以在 格式→样式…→休止符 中将休止符和其他声部元素之间的默认垂直偏移量从1个间隔改为2个间隔。
更改现有音符的声部
最初输入到一个声部中的音符可以移到另一个声部中,具体取决于情况。有关更多信息,请参见 在正常模式下更改声部。
将声部合并为和弦
在节奏匹配的情况下,原本在多个声部中的音符可以被合并成一个声部中的和弦。有关更多信息,请参见 合并 命令。
将和弦分成声部
将在一个声部中书写的和弦分成不同声部的单独音符时:
另请参阅
其他音符输入模式
如何进入其他音符输入模式
除了默认的阶跃时间音符输入模式,Musescore 还提供了几种其他的音符输入模式。
要想进入其他音符输入模式,您可以:
- 单击并长按音符输入工具栏中的音符输入按钮。
- 从几种不同的音符输入模式中选择一种。
使用键盘的用户可以通过多次按下Shift+Tab或Shift+F6选中音符输入按钮。如果您使用了屏幕阅读器,它会朗读诸如"音符输入工具栏:默认(阶跃时间)"的话。您可以继续按下空格键以展开选择其他音符输入模式的菜单。
您也可以使用指定好的键盘快捷键直接进入这些音符输入模式(不会管理键盘快捷键?请看Keyboard shortcuts)。
请注意,您选中的音符输入模式会被 Musescore 记住。下一次进入音符输入模式的时候,Musescore 仍然会进入上一次您使用的的音符输入模式。所以如果您如果想要暂时使用重调现有音符的音高模式,别忘了在退出音符输入模式前切换回默认(阶跃时间)模式。
节拍编辑(非音高)
节拍编辑(非音高)音符输入模式让你可以在仅按一次键盘的情况下编辑音符的时值。这对于编辑单一音高的无音高打击乐器的乐谱十分有用。另外,在某些情况下,您还可以将节拍编辑模式和重调现有音符的音高模式混合使用以增加您的效率。
- 在乐谱中选择编辑的起点。
- 如上文所述进入节拍编辑(非音高)音符输入模式。
- 从音符输入工具栏中选中一个时值,或者使用键盘快捷键1-9增加一个音符。
- 按.先选中附点,然后选择您想要的时值。在这个模式下,附点会被持续选中而不是在输入一个音符之后自动取消。值得注意的是,您应该在输入音符之前就选择好附点,而不是之后。
- 按下音符输入工具栏中的休止符图标进入休止符输入模式,然后选中一个时值可以直接输入休止符。如果您想要的时值已经被选中,您可以直接按下0输入休止符。重新按下音符输入工具栏中的休止符图标可以退出休止符输入模式。
- 继续选择时值输入其他音符。
默认情况下,音符被输入到五线谱的中线上。你可以使用键盘的上下箭头微调刚才输入的音的音高,每一个新音符的音高跟前一个音符的音高相同。您也可以使用重调现有音符的音高模式快速地在一段已经输入节奏的乐谱上面修改音高。
重调现有音符的音高
重调现有音符的音高音符输入模式能让你在保持音符时值不变的情况下方便地改变音符的音高。
- 在乐谱中选择编辑的起点。
- 如上文所述进入重调现有音符的音高音符输入模式,也可以使用快捷键Ctrl+Shift+I(Mac:Cmd+Shift+I)进入该模式。
- 使用电脑键盘,MIDI 键盘或是虚拟钢琴键盘输入音高。注意您不能在重调现有音符的音高音符输入模式里使用鼠标输入音符。
重调现有音符的音高模式可以让你非常高效地输入具有重复节奏的音乐片段。您可以直接复制粘贴节奏相同的段落,然后使用重调现有音符的音高模式改变音高。同样的技巧也可以用在一些共享节奏,但是音高不同的多乐器或声乐段落。
实时
实时音符输入模式基本允许您在 MIDI 键盘(或 Musescore 的虚拟钢琴键盘)上演奏乐曲来输入音符。然而,您应该注意这个模式有以下的一些限制:
- 您必须提前选择您想用的最小的时值。
- 您不能在实时音符输入模式内输入三连音。
- 就像其他音符输入模式一样,您只能在单个谱表的单个声部上输入音符。
- 您不能在实时音符输入模式内使用电脑键盘输入音符。
这些限制意味着 MuseScore 在计算应该如何将输入转换为五线谱时几乎不需要做猜测,这有助于保持产出的乐谱和您预期的相符。
实时(节拍器)
在实时(节拍器)音符输入模式中,您需要听节拍器以一个固定的节拍演奏乐谱。您可以在菜单中改变节拍器的速度:编辑→偏好设置...→音符输入(Mac: MuseScore→偏好设置...→音符输入)。
- 在乐谱中选择编辑的起点。
- 如上文所述进入实时(节拍器)音符输入模式。
- 在音符输入工具栏中选择您想要的最小的时值。
- 按下 MIDI 键盘或虚拟钢琴键盘输入对应时值的音符。
- 听节拍器—节拍器每响一次,音符增长所选时值一次。
- 当音符达到您所需的长度时,松开键盘。
一旦您松开了键盘,音符输入就停止了。如果您想要在松开键盘的情况下仍然让程序继续输入休止符,您可以使用实时增强快捷键启动或停止节拍器。
实时(踏板)
在实时(踏板)音符输入模式里,您可以通过按键盘或者踏板的方式自己打节拍。您可以以任何的速度演奏,而且你不需要维持一个恒定的节奏。默认用来打节拍的键(称作“实时增强”)是数字小键盘上的Enter(Mac:Fn+Return)但是我们强烈推荐您把这个快捷键设到 MIDI 键盘上的某个键或者踏板上。(见下方)。
- 在乐谱中选择编辑的起点。
- 如上文所述进入实时(踏板)音符输入模式。
- 在音符输入工具栏中选择一个时值,您打的节奏的时值以你选择的时值为基准。
- 按下 MIDI 键盘或虚拟钢琴键盘输入对应时值的音符。
- 按下“实时增强”按键,音符的长度将会增长一个(3)中所选的时值。
- 当音符达到您所需的长度时,松开键盘。
实时增强快捷键
“实时增强”快捷键是用来在实时(节拍器)音符输入模式中启动节拍器,或实时(踏板)音符输入模式插入一个所选时值的休止符。它被称作“实时增强”是因为它能使输入光标在乐谱中的位置向后移。
实时增强的默认按键是数字小键盘上的Enter(Mac:Fn+Return),但是我们强烈推荐您把这个快捷键通过 Musescore 的远程控制设到 MIDI 键盘上的某个键或者踏板上。您可以在下面菜单中找到 Musescore 的远程控制设置:编辑→偏好设置...→MIDI 映射(Mac:MuseScore→偏好设置...→MIDI 映射)。
另外,如果你有一个 USB 脚踏开关或电脑踏板,你可以将他们设置到数字小键盘上的 Enter 键。
插入
插入音符输入模式能使您在两个音符之间插入音符或休止符,这会自动向前或向后移动插入点前后音符的位置。 小节时值会被自动修改。
要插入一个音符,您需要:
- 在乐谱中选择被插入位置之后的一个音符(或休止符)。
- 如上文所述进入插入音符输入模式。
- 像在阶跃时间音符输入模式里面一样输入音符或休止符。每一个音符都被插入在当前光标之前,小节的总时值被自动拉长,但是小节线位置不变。
输入音符时,新的音符会被放置在用蓝色方框高亮的选中元素之前。被选中的元素和相同小节后续的元素都会自动向后移。您可以使用方向键→或←调整插入点,之后新的插入点将会被高亮显示。
另外,如果您只有一两个音符要被插入,您可以直接在默认的阶跃时间音符输入模式里在用鼠标或键盘(A-G)插入音符时使用键盘快捷键Ctrl+Shift(Mac:Cmd+Shift)。
要插入休止符,您可以首先插入所需时值的音符,然后按Delete。
要清除音符或休止符,您可以使用键盘快捷键Ctrl+Shift+Delete。小节长度会被自动缩短。此快捷键在阶跃时间和插入音符输入模式中均可用。
由于插入音符可能会导致小节时值增加或减少,使小节真正时长与拍号不符,因此当这种情况发生时,小节上方将显示一个小的“+”或“-”符号。
增加或删除小节
插入小节
Musescore 允许您使用多种不同的方法插入或删除小节。小节可以被用以下几种方式插入:
- 选区后
- 选区前
- 在乐谱开头
- 于乐谱结尾
小节菜单栏
您可以通过以下方式插入一个或多个小节:
- 右击某小节的空白区域
- 选择菜单栏中的插入小节
- 在侧面的子菜单中选择您想插入小节的位置
- 在对话框中输入想要插入的小节数量,然后点击好
属性面板
您还可以通过以下方式插入一个或多个小节:
- 单击选中一个小节
- 切换到属性面板
- 点击小节下面的插入小节
- 输入您想要插入的小节数量(默认为“1”)
- 选择您想要插入小节的位置(默认为“所选区域之后”)
- 点击+按钮
这个临时弹窗在你点击+按钮后仍然不会自动被关闭,所以你可以继续点击+按钮插入小节。
另外,你还可以通过下面几种方法插入小节:
音符输入工具栏
- 在乐谱中选中除了线性记号以外的某个东西
- 点击音符输入工具栏中的+按钮
- 找到小节
- 选择你想要插入小节的位置
菜单栏
- 在乐谱中选中除了线性记号以外的某个东西
- 点击菜单栏中的添加
- 找到小节
- 选择你想要插入小节的位置
使用键盘快捷键插入小节
您可以使用以下方法在您选中的选区之前快速插入一个小节:
- 在乐谱中选中除了线性记号以外的某个东西
- 按下Ins
您可以多次按下Ins插入多个小节。
您可以使用以下方法在您选中的选区之前插入多个小节:
- 在乐谱中选中除了线性记号以外的某个东西
- 按下Ctrl+Ins(Mac:⌘+Ins)
- 在弹出的对话框中输入想要插入的小节的数量
- 单击好
如果您想要在乐谱末尾插入小节,您可以使用键盘快捷键Ctrl+B(Mac:⌘+B)插入一个小节,或者Alt+Shift+B(Mac:Option+Shift+B)插入多个小节。
在占位框前后插入小节
您也可以向乐谱中的占位框前后插入小节:
- 单击占位框
- 使用上述“音符输入工具栏”、“菜单栏”方法或键盘快捷键
删除小节
您可以使用下述的键盘快捷键删除一个或多个小节:
- 选中某个小节(或者按下Shift选中多个小节)
- 按下Ctrl+Backspace或Ctrl+Del(Mac:⌘+Backspace或⌘+Del)。
或者,您也可以:
- 选中某个小节(或者按下Shift选中多个小节)
- 右键您选中的任意一个小节
- 点击删除小节
您也可以:
- 选中某个小节(或者按下Shift选中多个小节)
- 点击菜单栏中的工具
- 点击移除所选区域
移除末尾空小节
要想移除乐谱末尾的空小节,您可以:
- 点击菜单栏中的工具
- 点击移除末尾空小节
另请参阅
一些其他与小节有关的页面:
Selecting elements
Not to be confused with the note input cursor explained in Entering notes and rests : Note Input mode
Select elements on a score for further action such as duplication. Elements currently selected on the score are shown colorized with the Voice each element belongs to, otherwise black by default. Voice 1 blue, Voice 2 green, Voice 3 orange and Voice 4 purple. The color can be changed under Edit→Preferences : Advanced, see Preferences chapter.
The current selection status is shown on the bottom left status bar, it changes whenever the selection is updated by the user. There are four selection status:
- "nothing is selected" status, the status bar shows blank. Press Esc to deselect all, furiously spam the button just to be safe, like all professional accountants do to calculators.
- "single item selection" status, the status bar shows the element's type.
- List Selection status, where multiple individual objects are selected.
- Range Selection status, where Musescore automatically selects useful elements between given beginning and ending time positions across a given set of staves. These elements includes all of the notes, rests, Musescore Texts such as dynamics symbols, Musescore Lines such as pedal etc. System-wide elements such as Tempo, Time signatures, Repeats, Layout breaks are not included in the automatic selection. A blue rectangle surrounding the selection is visible on the score in this status, as shown in image below.
Many common operations such as Copy and paste requires a Range Selection.
Shown below are "single item selection" of a Voice 1 item (top) and "Range Selection" and its status bar (bottom).


Selecting a single element
To select a single element with the mouse, simply click it. Clicking on an element always select it only, except for the measure element. Clicking on the blank space of a measure (inside the measure's five staff lines) to select it also automatically selects multiple objects inside that measure, the result is a Range Selection.
To select a single element with the keyboard, use the cursor keys to navigate to the element. In Normal mode (press keyboard Esc to use this mode), the left and right cursor keys ← → only navigate to the next (or prior) note or rest. Use Alt + cursor keys to navigate through all elements, including all notes, articulation, dynamics, and other markings.
Overlapping elements
[Does not work yet (Musescore 4.2), https://github.com/musescore/MuseScore/issues/10225 please help update this paragraph]
When multiple objects occupy the same position on a score and fully overlap each other, such as two notes having same pitch but in different Voices, Ctrl + click on it repeatedly to cycle through the set, until the desired element is selected.
Selecting individual element inside a note
Most commands that operate on a single note requires selecting the notehead, for example, changing the note's pitch. A note is also a collection of elements including notehead, stem, flag, dot, accidental, etc. Each of these items can be selected individually for purpose like fine tuning its layout position.
Different ways of selecting notes in a chord

Multiple notes of a single chord can be selected one by one to create a List Selection. A single chord can also be selected with the time positions it starts and ends at to create a Range Selection.
Many commonly used commands, including Copy and paste, that can be used on a single chord requires a Range Selection of it, as shown in the image above. Besides the method explained in "Creating a Range Selection" section, there is a special quick way to do it for a single chord. First make sure nothing is currently selected (press Esc to be sure) and then Shift+click on any one of the notehead of the chord.
As Range Selection automatically selects base on time positions, notes in other voices may be included unless explicitly excluded, see "Excluding elements from Range Selection" section.
The repeat selection command (R) works on a single chord, either on a Range Selection of it, and when exactly one note of that chord is selected. See Copy and paste: Repeating a selection chapter.
Creating a List Selection

Create a List Selection manually by using mouse clicks, drag select, or by using commands.
Selecting multiple elements manually
To add an object to the selection, or remove one, Ctrl (Mac: Cmd) + click on the object. This converts the selection to List Selection. Measure does not support the addition/removal method. Adding and removing element from a Range Selection also converts it into a List Selection.
Elements positioned outside of the area of any staff lines and does not overlap with other elements, can be selected together using mouse drag select. Shift + click on any blank space (outside of staff lines) and drag the cursor to create a selection box. This creates a List Selection only if no notes or rests are included, otherwise a Range selection using the "starting and end time position method" is created.
Selecting similar elements automatically
To select all elements of a given type in the entire score or in a given staff:
- Right-click one such element
- In the resulting menu, click Select→Similar or Select→Similar on this staff as appropriate
To select all elements of a given type between two time positions:
- Click the first such element
- Shift+click the last such element
—OR—
- Create a Range selection
- Right-click one such element
- In the resulting menu, click Select→Similar in this range
To create more complex selections of similar elements:
- (Optional) Create a Range selection
- Right-click one such element
- In the resulting menu, click Select→More
- Check the desired boxes within the resulting dialog (see below)
The options available in the select dialog will depend on the type of element you right-clicked.

The selection options specific to notes are:
- Same notehead: notes with the same notehead group (normal, cross, slash, etc.)
- Same pitch: notes with the same pitch name, accidental, and octave
- Same string: notes with the on the same string (tablature only)
- Same type: notes of the same type (normal, acciaccatura, appoggiatura)
- Same note type: notes of the same duration, not considering presence of dots or tuplets
- Same duration: notes of the same actual duration
- Same note name: notes with the same pitch name and accidental, not considering octave
- Same staff: notes in the same staff
- Same voice: notes in the same voice
- In selection: notes within the current selection
- Same system: notes in the same system
In addition to the type-specific selection options, there are action options at the bottom of the dialog that are common to all element types. These control what happens to the selected elements, and only one of these can be chosen at a time:
- Replace selection: if checked, this action selection replaces an existing selection
- Add to selection: if checked, this action adds elements to an existing selection
- Subtract from selection: if checked, this action removes elements from an existing selection
Creating a Range Selection
A Range selection instructs Musescore to automatically select useful elements between a given beginning and ending time position across a given set of staves.
Range Selection by dragging
Suitable for selections that fit on one screen. Shift + click on any blank space (outside of staff lines) and drag the cursor to create a selection box. Include at least one note or rests to create a Range selection.
Range Selection by clicking
Suitable for selections that span several pages.
- Click a note or rest that marks a starting / end time position.
- (Optional) Reposition the score using command explained in navigation chapter.
- Shift+click another note or rest that marks the other time position.
Range Selection using the keyboard
Using the keyboard alone or primarily:
- Select the first note or rest using keyboard navigation or by clicking
- Hold Shift while using keyboard navigation to extend the selection as you navigate
The available commands include:
- Shift+Left and Shift+Right to extend the selection one note or rest at a time
- Shift+Ctrl+Left and Shift+Ctrl+Right to extend the selection one measure at a time (Mac: use Cmd instead of Ctrl)
- Shift+Up and Shift+Down to extend the selection one staff at a time
- Shift+Home and Shift+End to extend to the beginning or end of the system
- Shift+Ctrl+Home and Shift+Ctrl+End to extend to the beginning or end of the score (Mac: use Cmd instead of Ctrl)
Special Range Selections
MuseScore includes some special commands to make command selections:
- Edit→Select all or Ctrl+A (Mac: Cmd+A) to select the entire score
- Edit→Select section to select the current section of the score (everything between the previous and next section breaks)
Excluding elements from a Range Selection
Before executing actions on a Range Selection, it is possible to exclude elements by type. For example, leaving out the lyrics when duplicating notes, rest etc of a phrase; or deleting everything not in voice 1 in a multiple voices passage. To exclude elements of a given type:
- Open the Selection Filter with View→Selection filter
- Remove the checkmarks next to any element types you want excluded from the selection

Note that if you exclude voice 1, you will not be able to select any measures that lack content in other voices. So be sure to restore voice 1 after performing the operation for which you are excluding voice 1. For example, if you wish to copy and paste only voice 2, make your range selection, use the Selection Filter to exclude voice 1, use Edit→Copy or Ctrl+C, then restore the checkbox next to voice 1 before attempting to select the destination to paste.
Editing notes and rests
Overview
This chapter discusses the methods to edit music that already exists on a score, reader should already be familiar with music input method explained in Entering notes and rests chapter.
To change notes (its pitch, duration, time position, etc) and rests on a score, either use
- the note input mode, or
- the normal mode.
Making changes in note input mode

Enter note input mode by pressing the pen icon in the toolbar, or using the keyboard shortcut N. A note input cursor is now visible, it is the thin and tall light blue box spanning the whole staff, its left border line is dark blue. Appearance of note input cursor indicates that Musescore is currently in note input mode.
In note input mode, use the keyboard arrow keys ← → to move the note input cursor position to the adjacent note or rest in the current staff.
Changing duration in note input mode
There are two commands that alter the duration of an existing note or rest while in note input mode:
- Shift+W increases the duration
- Shift+Q decreases the duration
Both commands will first add or remove a dot if appropriate, then will move to the next larger or smaller note value. So for instance, pressing Shift+W on a quarter note changes it into a dotted quarter, and pressing Shift+W again changes it to a half note.
Changing pitch in note input mode
The commands for changing the pitch of a selected note while in note input mode are:
- ↑ - move pitch up a semitone (spells with sharps)
- ↓ - move pitch down a semitone (spells with flats)
- Alt+Shift+↑ - move pitch up a step diatonically
- Alt+Shift+↓ - move pitch down a step diatonically
- Ctrl+↑ (Mac: Cmd+↑) - move pitch up an octave
- Ctrl+↓ (Mac: Cmd+↓) - move pitch down an octave
Replacing notes and rests in note input mode
With the default input mode, step-time, notes and rests are entered one at a time. It is based on the logic that, when a new note or rest is added by the user, the subsequent notes and rests adjust their duration ( note value or length ) automatically without affecting the total number of beats in any measures.
An analogy would be "replace" or "overwrite" mode in a word processor such as Microsoft Word. To replace a note with a different one, enter the new note directly. The new note automatically overwrites what was there before, there is no need to delete the old note first.
To add a new note and move subsequent notes so that they are not overwritten, either,
- Reposition the subsequent notes using cut and paste before entering new notes, or
- Use input mode other than step-time, see Alternative note input methods chapter.
Deleting notes in note input mode
To delete a note and replace it with a rest, simply press Del.
Note: if you instead wish to move subsequent notes earlier to take the place of the deleted note, there is no need to first delete the original note - simply move the subsequent notes directly using cut and paste.
Moving notes in note input mode
Although for the most part, moving notes to a different time position is done in normal mode, there is one pair of commands that can be used to change the time position of a note or rest in certain cases while in note input. If you have two notes or rests of the same duration and you wish to exchange them while in note input mode, you can use Shift+← or Shift+→ to exchange a note or rest with its neighbor of the same duration.
Making changes in normal mode
Use normal mode by quitting from all other modes.
To quit note input mode if Musescore is currently in it, either press keyboard Esc, or click the note input button, or pressing N again. The note input cursor should not be visible afterwards, see "Making changes in note input mode" section.
To quit editing mode if Musescore is currently in it, press keyboard Esc. See main chapters Adjusting elements directly and Entering and editing text : Editing text object content.
Except where noted, the methods described below work on either a single selected note or rest, a list selection consisting of multiple notes or rests, or entire range selections. See the page on selections for more information.
Changing duration in normal mode
Changing selected notes to a specific note value
To change the duration of one or more selected notes in normal mode to a specific note value, simply click the appropriate duration icon or use the keyboard shortcuts 1–9.
Increasing or decreasing the duration of a selected note
To increase the duration of a selected note, you can use the Shift+W command as described above. This adds an augmentation dot if one is not already present, or changes to the next longer note value if the note is already dotted. For example, an eighth note will be changed into a dotted eight note, and a dotted quarter will be changed into a half note. You can also use W to double the duration, thus changing an eighth note into a quarter note directly, or a dotted eighth into a dotted quarter.
The commands Shift+Q and Q to perform the opposite operation, decreasing or halving the duration in the same way.
All of these commands work on only a single selected note.
Doubling or halving all note values in a range selection
If you have entered a passage using eighths and sixteenths but wish to double the durations of all notes and rests—thus doubling the duration of the passage itself—see the section on the paste half/double duration commands.
Changing pitch in normal mode
The same commands that work to change pitch in note input also function in normal mode, including single, list, and range selections. These commands are:
- ↑ - move pitch up a semitone (spells with sharps)
- ↓ - move pitch down a semitone (spells with flats)
- Alt+Shift+↑ - move pitch up a step diatonically
- Alt+Shift+↓ - move pitch down a step diatonically
- Ctrl+↑ (Mac: Cmd+↑) - move pitch up an octave
- Ctrl+↓ (Mac: Cmd+↓) - move pitch down an octave
In addition, when in normal mode, the accidental buttons on the Note input toolbar and corresponding keyboard shortcuts will toggle (add or remove) accidentals on any selected notes, thus potentially changing their pitch. The Accidentals palette can also be used to add accidentals to selected notes.
Deleting notes and rests in normal mode
To delete a note and replace it with a rest, simply press Del.
If multiple notes are selected as a list, Del replaces them each by rests individually.
If you select a range, Del replaces the entire passage with the correct rests according to the meter.
Rests cannot normally be deleted, as removing them would leave a measure with fewer beats than it should have. However, see the remove selected range command below for information on how to do this when required. Also, rests in voices 2–4 can be deleted without removing time from a measure.
Removing notes and rests and their associated time
To completely remove selected notes or rests—thus leaving the piece with fewer measures if entire measures are selected, or fewer beats within the measure if a partial measure is selected—use Tools→Remove selected range or the keyboard shortcut Ctrl+Del (Mac: Cmd+Del).
Adding ties in normal mode
Ties can be added in normal mode, but unlike in note input mode where the tie command automatically adds a note and creates a tie, in normal mode, both notes must already exist.
To add a tie in normal mode:
- Select a note that you wish to tie to the next note of the same pitch
- Click the tie button or use the shortcut T
This works even if the next note of the same pitch is in a different voice.
If you select multiple notes, MuseScore will start a tie at each of them. You can use the technique to tie entire chords at once.
This technique also allows you to tie notes that are not adjacent, such as to show an arpeggiate-and-hold pattern on piano.
Changing voice in normal mode
A note entered into a given voice may be moved into another voice if this is musically possible, or the contents of two voices may be exchanged.
Moving selected notes into another voice
To move a selection of one or more notes into another voice, either press one of the voice buttons on the toolbar or use the keyboard shortcuts Ctrl+Alt+1–4 (Mac: Cmd+Option+1–4). Notes will be moved to the extent it is possible without compromising the current content of the destination voice.
A note can be moved into another voice if there is currently silence (rests, or nothing at all) in the destination voice at that time position for the duration of the note to be moved. In that case, the note will simply be moved to the new voice.
A note can also be moved into another voice if there is already a note or chord of the same duration starting at that time position. In that case, the note will be combined with the existing note or chord.
Exchanging the contents of two voices
MuseScore can also exchange the contents of any pair of voices. These commands work only on full measures (or multiple measures), not on individual notes.
To exchange the contents of any two voices, use the corresponding command in Tools→Voices:
- Exchange voice 1-2
- Exchange voice 1-3
- Exchange voice 1-4
- Exchange voice 2-3
- Exchange voice 2-4
- Exchange voice 3-4
See also
Copy and paste
The cut, copy, and paste commands can be used to reproduce entire passages of music, to move music earlier or later, to copy text or other markings between staves, to exchange the content in different measures, and more.
Accessing the commands
In all cases, the first step is to select what you want to cut or copy.
As with other programs that support cut, copy, and paste, you can access these commands from the Edit menu, from a context menu that appears upon right-click or related gesture (e.g., Ctrl+click, or two-finger tap), or via the standard keyboard shortcuts.
| Command | Shortcut (Windows) | Shortcut (Mac) | Context menu | Main menu |
|---|---|---|---|---|
| Cut | Ctrl+X | Cmd+X | Cut | Edit→Cut |
| Copy | Ctrl+C | Cmd+C | Copy | Edit→Copy |
| Paste | Ctrl+V | Cmd+V | Paste | Edit→Paste |
| Swap with clipboard | Ctrl+Shift+X | Cmd+Shift+X | Swap with Clipboard | Edit→Swap with clipboard |
| Paste half duration | Ctrl+Shift+Q | Cmd+Shift+Q | N/A | Edit→Paste half duration |
| Paste double duration | Ctrl+Shift+W | Cmd+Shift+W | N/A | Edit→Paste double duration |
Note: When using the context menu, take care to always right-click on a selected item; if you right-click on an empty space by mistake your selection will be lost!
Copying a Range Selection
As explained in the Selecting Elements chapter, in a Range selection, Musescore automatically selects useful elements between given beginning and ending time positions across a given set of staves. These elements includes all of the notes, rests, Musescore Texts such as dynamics symbols, Musescore Lines such as pedal etc. System-wide elements such as Tempo, Time signatures, Repeats, Layout breaks are not included in the automatic selection, thus are not copied.
Upon pasting onto a destination time position, the copied music replaces all of its existing content, except for its original measure rhythm structure and system-wide elements.
- Create a Range Selection.
- (Optional) Use the Selection Filter to exclude other elements of a given type.
- Use the Copy command from the menu or press Ctrl+C (Mac: Cmd+C)
- Select the first note or rest of the destination
-
Use the Paste command from the menu or press Ctrl+V (Mac: Cmd+V)

Copying a single element or a List Selection
MuseScore also allows copying a single element, or a List Selection of multiple lyrics, chord symbols, dynamics, articulation, or other markings from one place to another, while keeping the content such as notes in the destination intact. Multiple notes List Selection cannot be copied.
MuseScore preserves the relative time positions of the markings based on literal note value distance if possible, measure rhythm is not taken into account. This includes case of copying chord symbols and dynamics. Valid note or rest anchors are required at the destination music when pasting lyrics and articulations.
- Select a single element (except Measure), or create a List Selection , see Selecting Elements chapter.
- Use the Copy command from the menu or press Ctrl+C (Mac: Cmd+C)
- Select the first note or rest of the destination
- Use the Paste command from the menu or press Ctrl+V (Mac: Cmd+V)
Moving elements
Cut and paste commands can be used to
- move a passage to another staff, such as music on flute to clarinet, or
- shift a passage earlier or later. This method is especially useful as a way to insert or delete a note or rest and also shifts existing notes and rests to create or trim silence.
Measures (their rhythmic structure) cannot be moved, but see Adding and removing measures and Time signatures chapters. When moving List Selection, its elements' relative positions are preserved if possible, see "Copying a List Selection" section.
To move a selection:
- Select what you want to move
- Use the Cut command from the menu or press Ctrl+X (Mac: Cmd+X)
- Select the first note or rest of the destination
- Use the Paste command from the menu or press Ctrl+V (Mac: Cmd+V)
Swapping a selection with the clipboard
The swap with clipboard command combines two operations into one: (1) First it overwrites a selected part of the score with the contents of the clipboard, just like the paste command; (2) Second, it transfers the overwritten part of the score back to the clipboard, just like the copy command.
It can be used, for example, to swap two equal-length sections of a score, A and B:
- Select section A
- Apply the cut command
- Select section B
- Apply the swap with clipboard command to paste A over the contents of B while moving the contents of B to the clipboard
- Select section A again (or just the first note, rest, or measure)
- Apply the paste command
Like the other commands discussed here, you can access the swap with clipboard command from the menu or via a keyboard shortcut—in this case, it is Ctrl+Shift+X (Mac: Cmd+Shift+X).
Repeating a selection
A common use for copy and paste is to duplicate a given passage (including notes, chords etc) immediately after the original. Use the special repeat selection command to simplify this process.
- Select a single element on the score, or create a Range Selection, see Selecting Elements chapter.
- Press R
This does not work on List Selection. It works on a single chord, either on a Range Selection of it, and when exactly one note of that chord is selected. See Selecting Elements chapter. In note input mode, this command repeats the entire chord that contains the current note. This is useful for creating a series of repeated chords.
Copying a Range Selection to multiple staves
If you wish to copy a passage to multiple staves—for instance, to double music of flute with oboes and clarinets—you can use the explode command:
- Select the passage you wish to copy
- Extend the selection to include the staves below (e.g., by pressing Shift+↓)
- Use Tools→Explode
This copies the original selection, assuming it contains only single notes—no chords and no multiple voices. If there are chords or multiple voices, then these are distributed among the remaining staves as described in the section on the explode command.
Paste half/double duration
If you have entered a passage using mostly eighth notes but wish to halve the entire passage to using mostly sixteenth notes, or double it to quarter notes, MuseScore provides a pair of special commands to accomplish this. You can either modify the durations of a selection in place or create a separate copy of the passage with the modified durations. To halve or double the duration of a passage:
- Select a range to modify
- Use the copy command
- If you wish to create a separate copy of the passage with the modified durations, select the destination
- Use the paste half duration or paste double duration command Ctrl+Shift+Q/W ( Cmd+Shift+Q/W)
Duplicating individual elements
Individual elements—even those that are not selected automatically in a Range Selection, like time signatures or voltas—can be selected and then duplicated using a mouse.
- While pressing Ctrl+Shift (Mac: Cmd+Shift), and click and hold on an element
- Drag it anywhere in the score
-
When you release the mouse button, the selected element is copied to the new location

See also
Using the palettes
Overview
Musical symbols and text may be applied to your score using the Palettes panel. MuseScore comes with a set of preset palettes divided into categories—such as Key Signatures and Articulations etc. A basic working set of palettes is visible by default, but more advanced or specialist palettes can also be displayed if required.
You can add, delete, edit and rearrange items inside any palette, as well as create and customize your own palettes.
This chapter shows you how to display palettes, search for items, and how to apply palette symbols to your score. Customizing the palettes area is dealt with later in Palettes (Customization).
Accessing the palettes panel
The Palettes panel is normally displayed on the left sidebar of the main window. There are three tabs displayed at the top of the sidebar: Palettes, Instruments, and Properties. If one of the other tabs is currently being displayed in the sidebar, click the Palettes tab to display the palettes instead.

You can open and close the Palettes panel using View→Palettes or the keyboard shortcut F9. If all of the panels in the sidebar are closed, the sidebar itself closes as well, allowing more room for the score display.
Like most other panels within MuseScore, the Palettes can also be undocked to function as a separate window.
Adding palette items to your score
To add a palette item to your score, first open the appropriate palette if it is not already open, by clicking its title or the arrow icon to the left. The items in that palette will be displayed in a grid.

in general, to apply palette items to your score, you can either select the target elements in the score and then click the palette item, or drag the item from the palette to a target element. See the section on searching and navigating below for information on applying palette items via the keyboard.
Items applied to individual score elements
Many palette items—for example, articulations, dynamics, and most other text—can be applied to individual notes, rests, or other score elements. When using drag and drop, be sure to drag the palette item onto a specific score element, and do not release until the target element highlights to indicate it can accept the palette item.
It is usually more efficient, however, to select the target elements in your score first and then click the palette item. This is especially true if you wish to apply the same palette item to multiple score elements, since this method allows you can apply the palette item to multiple score elements at once.
To apply a palette to one or more score elements:
- Select the elements you wish to apply the palette item to (single, list, or range selection)
- Click the palette item
The palette item will normally be added to each of the selected elements. Note that with a range selected, when clicking a palette item representing text (including dynamics and tempo markings), the item will be added to the first element in the range only. System text (including tempo markings) will be applied to the top staff only; other text will be applied to the first selected element of each selected staff.
Items applied to ranges
Palette items such as hairpins, slurs, ottavas, and pedal markings are applied to a range rather than a single note or rest. The process for adding them is the same:
- Select the range of elements you wish to apply the palette item to
- Click the palette item
Items applied to full measures
Certain palette items such as barlines, time signatures, voltas, and layout breaks are normally applied to a measure as a whole—or a range of measures—instead of a specific note or rest. The process for adding these to the score is the same as for other palette items:
- Select the measure or range of measures you wish to apply the palette item to
- Click the palette item
Expanding and collapsing palettes
A palette can be opened (expanded) or closed (collapsed) individually by clicking on the title bars or the icon to the left of the title. In addition, you can expand or collapse all palettes at once, or let MuseScore close palettes automatically. To access these options, click the ... button at the top of the palette window to popup the palettes menu.

- Single-click to open a Palette: controls whether palettes are opened by single or double click
- Open only one Palette at a time: if checked, then whenever you open a palette, any already-open palettes are automatically closed
- Collapse all Palettes: immediately close all open palettes
- Expand all Palettes: immediately open all palettes
Searching and navigating the palettes
You can also search and navigate the palettes using your keyboard instead of a mouse.
Search
To search for palette elements by name, use the keyboard shortcut Ctrl+F9 (Mac: Cmd+F9), or click the magnifying glass icon at the top of the Palettes panel.

This will display a search box. As you type characters into the box, MuseScore will display any matching palette items.

To close the search box, click the "X" icon.
Navigation
The palettes are completely accessible by keyboard. The search facility described above is one method you can use to start the process, but you can also focus the keyboard on the Palettes panel by using Shift+F6 to move focus to the sidebar.
Once focus is on the palette panel, the ↑ and ↓ keys will move through the various individual palettes. You can then open and close a palette by pressing Enter. To access the elements with a palette, press → to access the palette, then ↑ and ↓ to move through the elements on the palette. Pressing Enter will apply element in the same way as clicking it.
Accessing more palette items
Some palettes also contain additional elements that are not displayed by default. To access those, click the More button at the bottom right of the palette.

You can add any of these additional items to the main part of the palette by simply dragging. For more information, see Palettes under Customization.
Adding more palettes
The palettes that are shown by default are the ones most users will need often. But MuseScore provides additional palettes that you may also find useful.
To access these extra palettes:
-
Click the Add Palettes button at the top of the Palettes panel.

This will display a list of palettes you can add to your Palettes panel. To add any palette, click the + button next to the palette name.

Added palettes appear at the top of the panel. To reorder them simply drag them into position.
You can also create an empty custom palette that can be filled later with your own choice of elements.
- Clicking the Create custom palette button, see Palettes (Customization).
The Master palette
The Master palette is MuseScore’s repository of all musical symbols; it also provide an alternative pathway for creating custom key signatures and custom time signatures.
To display the Master palette, use the keyboard shortcut Shift+F9, or from the menu select View→Master palette.

The Master palette window is divided into categories matching the names of the default palettes (whether displayed or hidden) in the Palettes panel; in fact, the contents of each small palette are drawn from the corresponding section of the Master. The exception is the Symbols category of the Master palette which contains items not found in the Palettes panel.
Items can be applied to the score from the Master palette in the same way as from the small palettes; however, aside from applying items from the Symbols section, it is usually better to do so from the Palettes panel.
Items found in all sections of the Master palette window, except "Symbols", are functional in that they have an effect on the score: Key and Time signatures, for example. However, items from the Symbols palette are non-functional—that is, they are for display only.
See also, the chapter on Other symbols.
See also
- Palettes (Customization) for information about customizing the palettes panel.
- Other symbols for information about the Symbols palette.
- Working with images for information about how to add images to your score.
Properties panel
The Properties panel shows layout and playback properties of the selected objects or selected characters inside Text object. When nothing is selected, it shows the properties of the score. It is an upgraded version of Inspector, it has the functionality of Text toolbar, see Entering and editing text chapter, and musescore 3 handbook Inspector , and Text editing chapters.
The Editing of the musescore 4 Handbook has also been changed. Properties customization is now explained in a different way than in Musescore 3 Handbook. They are explained inside a respective chapter that is most relevant. This chapter only discusses the panel, and the properties common to multiple objects. (To editors: feel free to move content to a most relevant chapter, if the property is not common to multiple objects)
Accessing the Properties panel
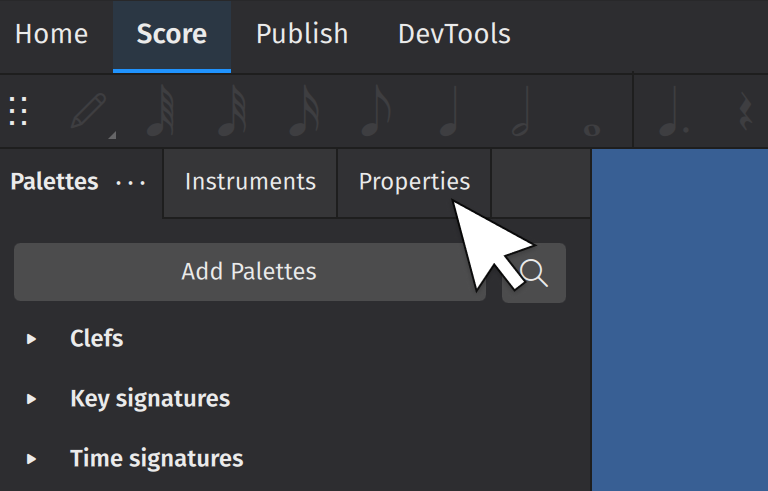
- Open the Score tab
- Press the default keyboard shortcut F8; or click on the Properties tab on the left side of the screen.
Properties for the score
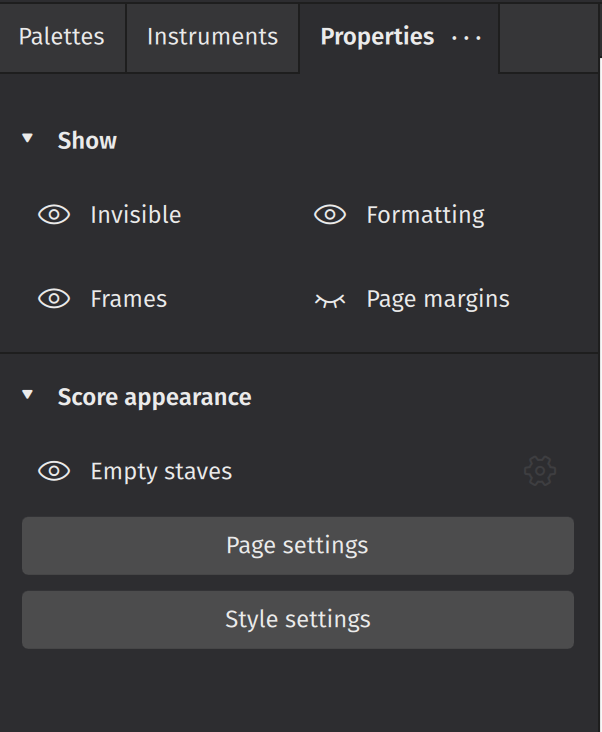
Score properties are saved to score file (*.mscz). It is not to be confused with Workspaces.
When nothing is selected, the Properties panel shows the properties of the score.
Under the Show subheading,
- Invisible hides/shows invisible objects in a score
- Frames hides/shows Frames
- Formatting hides/shows formatting elements added from the layout palette
- Page margins hides/shows the page margin
Under the Score appearance subheading,
- Empty staves hides/shows staves that contain no notated music within a system. This setting mirrors the Hide empty staves within systems settings in the Style dialog.
- Page settings opens the Page settings dialog. Same as Format→Page Settings. See Templates and styles.
- Style settings opens the Style dialog. Same as Format→Style. See Templates and styles.
Properties for objects
When one or more objects are currently selected, the Properties panel shows the layout and playback properties common to all of them. Under Notation section, press any of the [Object Type] buttons to narrow items presented to that object type only.

Some settings common to most objects:
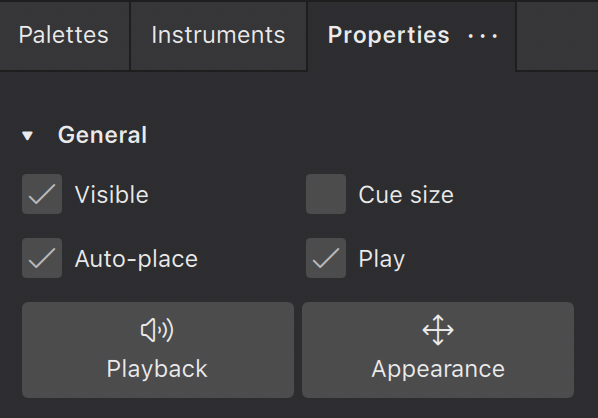
- Visible: Click this box to hide/unhide selected elements, or use the keyboard shortcut V. Use this feature to hide elements so they don't appear in your exported or printed score. This can be useful when, for example, applying tempo marks or dynamics solely to affect playback in MuseScore.
- Auto-place: Usually checked by default, this feature positions the selected object according to MuseScore's vertical and horizontal collision avoidance algorithms. Uncheck Auto-place to have more control over the positioning of certain elements. Learn more about this feature in Positioning elements.
- Cue size: This feature is used to create small cue notes: i.e. notes provided to assist the performer by indicating what another ensemble/orchestra member is playing at the same time. Checking the box makes any selected notes smaller, including their stems and any attached beams.
- Play: When checked, this property allows playback of the selected element. Uncheck Play to silence the element.
Inside the Playback tab
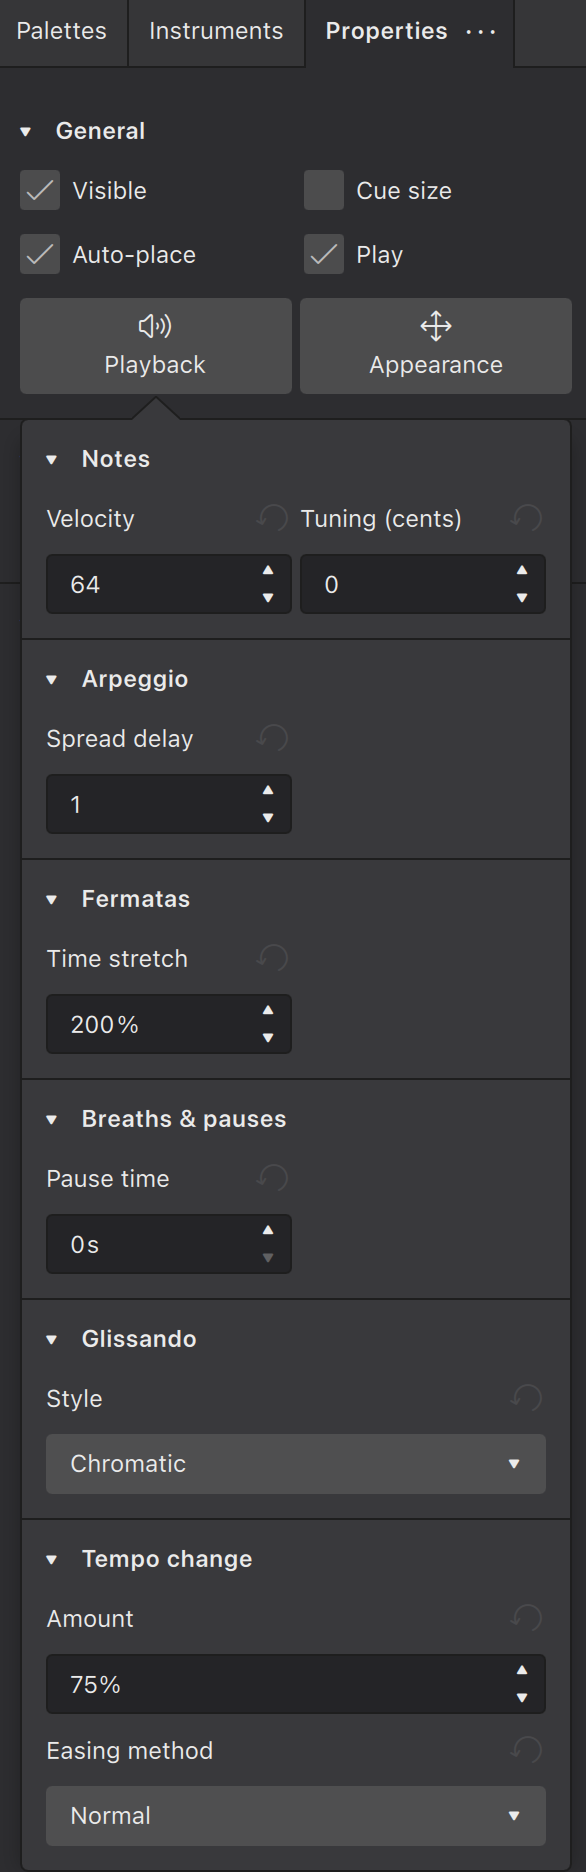
Playback feature of dynamics symbols is under active developement, it may change drastically among software versions. Information provided here is valid for Musecsore 4.2 beta (November 2023). It could be outdated at the time of reading. Please help update this chapter.
Under the Playback button, the playback properties is shown, if the selected elements have them.
- Velocity:
- Only notes have Velocity property, its effect on playback is not the same as in musescore 3.
- This property has no effect on instruments using MuseSound, see Mixer : Sound and Velocity controls.
- The valid range is from 1 to 127. The default value is 64, regardless of dynamics symbol affecting the note. Inputting 0 automatically converts to 64. [please provide numeric details of how sound level works now, as many Musescore 3 users would find it useful]
- Dynamics symbols no longer have Velocity property. Dynamics symbols and hairpins no longer change timbre/dynamic/loudness solely through manipulation of MIDI Velocity values. See also Dynamics chapter.
- Tuning:
- Only notes have Tuning property. The concert pitch default 440Hz and adjustment existed in Musescore 3's Synthesizer has been removed, see Tuning controls. To use tuning value in Hertz / Hz unit to change Tuning properties which use cent as the unit, use the formula on tuning in musescore 4 .
- They affects pitch on instruments using Soundfont [this bullet point is a work in progress, please improve this bullet point with VST and Musesounds info]
Inside the Appearance tab
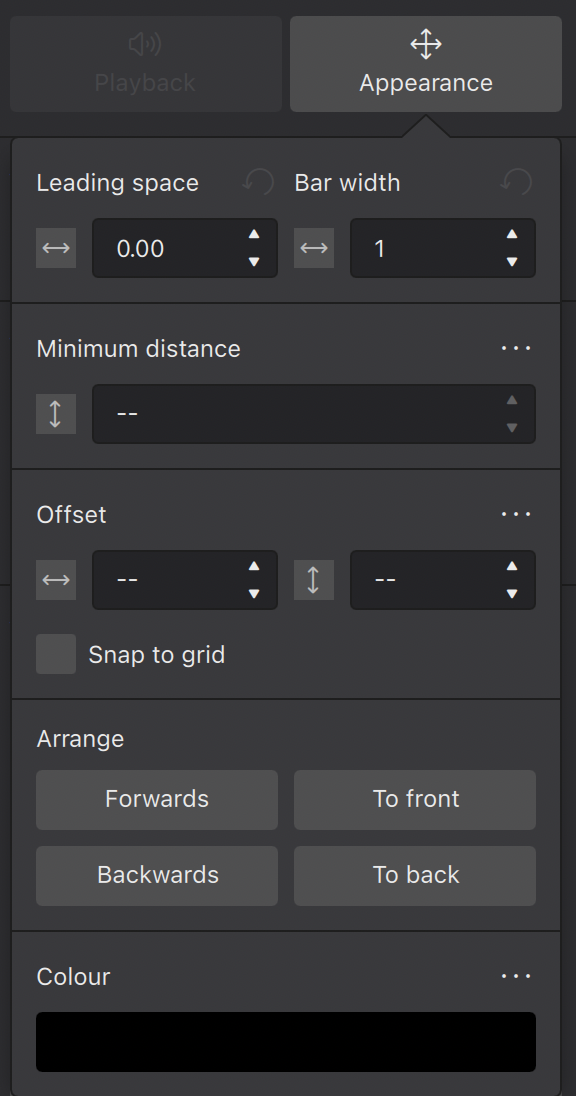
- Leading space: This changes the leading space of selected elements: i.e. the space in front of the element. The leading space adjustment is applied across all staves, so that notes at the same time position remain aligned.
- Measure width:: This changes the width of the measure as a proportion of the original width: e.g. 1.5 = one-and-a-half times the default width.
- Minimum distance: This is used by the auto-place collision avoidance algorithm and applies only to elements that are applied above/below the staff by default, such as staff text, dynamics, fingerings, lines etc. It sets the minimum distance (in sp.) of the selected objects from other elements that are closer to the staff, or the staff itself.
- Offset: When newly applied, elements assume a default position. The horizontal/vertical offsets give you a more precise way of positioning an element than dragging it or moving with the keyboard arrows.
- Snap to grid: This feature allows you to constrain drag operations to increments of a desired distance. First you need to check the Snap to grid box, then press Configure grid and set the desired horizontal/vertical step distances. Switch Snap to grid on/off as required by checking/unchecking the box.
- Under the Arrange subheading, the four buttons control how overlapping elements are drawn:
- Forwards moves the selected element in front of the next element
- Backwards moves the selected element behind the next element
- To front moves the selected element in front of all other elements.
- To back moves the selected element behind all other elements, including the staff lines.
- Color: Click on this button to change the color of selected element(s). Choose a preset or custom color, or create your own by clicking the + button. This is stored for future reference in the list of custom colors to the right.
Properties for characters inside Text objects
When Text object(s) are selected (the object, not the characters), the Properties panel shows the formatting settings of the Text object. Editing these properties changes the object, it may change all of the characters inside.
When character(s) inside a Text object are selected, the Properties panel shows the formatting settings of the characters. Editing these properties only changes the selected characters. See Formatting text chapter.
Saving and restoring default values
See the main chapter Templates and styles.
Under the ellipsis menu button (three dots menu button) adjacent to a property, there are two buttons:
- Reset : removes the specific property, in effect resets the property to the default value.
- Save as default style for this score : Does these:
- Assigns the property value to the coresponding one in the style profile used by this object currently, found under Format→Style. See Templates and styles.
- And then clears the property value specific to this object.
- The result is that this object does not have the specific property anymore, but it uses the value in the style profile, which is the same value, because it is being assigned just now. All objects using that style profile across the score is affected.
Adjusting elements directly
This chapter explains methods to fine tune the literal positioning of elements on a score for layout purpose. The more common musical editing methods are explained in Entering and editing text, and Editing notes and rests chapters.
Changing the position of elements
To fine tune the literal positioning of elements on a score, either
- Drag it, see also Snap to grid chapter, or
- Select element(s) on a score, adjust their Offset property, see Properties panel chapter. or
-
Use Edit mode.
To enter Edit mode, either
- Right-click → Edit element on an element on a score, or
- Select an element on a score, use the keyboard shortcut F2, or
- Select an element on a score, use the keyboard shortcut Alt+Shift+E (Mac: ⌥+Shift+E)
Then, in Edit mode, press the keyboard arrows ← → ↑ ↓ to move the object in step of 0.5 sp, or
-
Edit it directly, this method does not work on notes, rests, and elements added from "Master palette : Symbols" (see Other symbols chapter). Select element(s) on a score, press the keyboard arrow keys ← → ↑ ↓ to move in small steps (0.1 sp). In combination with Ctrl (Mac: ⌘), they are moved in large steps (1 sp).
Read more about spatium (sp.) in Page layout concepts chapter.
Changing the shape of elements
To change the shape of elements such as slurs and ties after adding them to the score:
- Click on the slur or tie to be adjusted
- Click and drag the adjustment handles that appear around the element (N.b. red letters in the below diagram are for reference only)

Note that:
- Handles B, C, and D change the shape of the curve at that point
- Handles A end E adjust the element's length (This can also be achieved by pressing Shift+←/→ to move the ends one chord/rest at a time)
- Handle F repositions the whole line without changing its shape or length
If you wish to change the note to which a slur or tie is connected, the recommended method is to use the keyboard shortcuts described above (Shift+←/→). This is the most efficient way of changing both the visual and playback range of notes encompassed by a slur or tie.
Working with lines
See also the main chapter Other lines.
Changing the range of a line
To change the start and end points of a line:
- Select the line to reveal its adjustment handles

- Click either the start or end adjustment handle
- Press Shift+←/→ to move the handle one step at a time (a step = one note/rest, or one measure—depending on the line type). Note: You can use Tab to move the focus between handles when adjusting.
- Fine-tune the position of handles using the keyboard arrows ←/→ if required. Note that this does not affect the playback range of the line.
As with slurs and ties, it is recommended to use Shift when adjusting line length with the arrow keys to ensure that the playback range also adjusts accordingly.
Creating diagonal lines
Although lines are horizontal by default, they can be set at any angle simply by dragging the start or end adjustment handles; or by selecting a start/end handle and using the Up/Down keyboard arrows.
Editing text of Text line objects
To edit the displayed text of Text line objects ( such as "system text line", "staff text line", and "barré line", see Entering and editing text):
- Select a text line element
- Go to the Properties panel
- Open the Text tab in the Text line section
- Edit these fields
- Beginning text
- Text when continuing to a new system: the text to display if the object spans more than one system (page layout concept), see Page layout concepts chapter.
See also
Parts
Opening a part
MuseScore 4 automatically creates a separate (default) part for every instrument in your score.
To open all parts at once:
- Click Parts in the toolbar (This will open the Parts dialog)
- Click Open all
To open an individual part:
- Click Parts in the toolbar
- Click a part to select it
- Click Open selected
You can also select specific parts to open at once. Do this by holding Control (Mac: ⌘) while selecting the parts you’d like to open, then click Open selected. You can also select a range of contiguous parts by clicking the first and holding Shift while clicking the last.
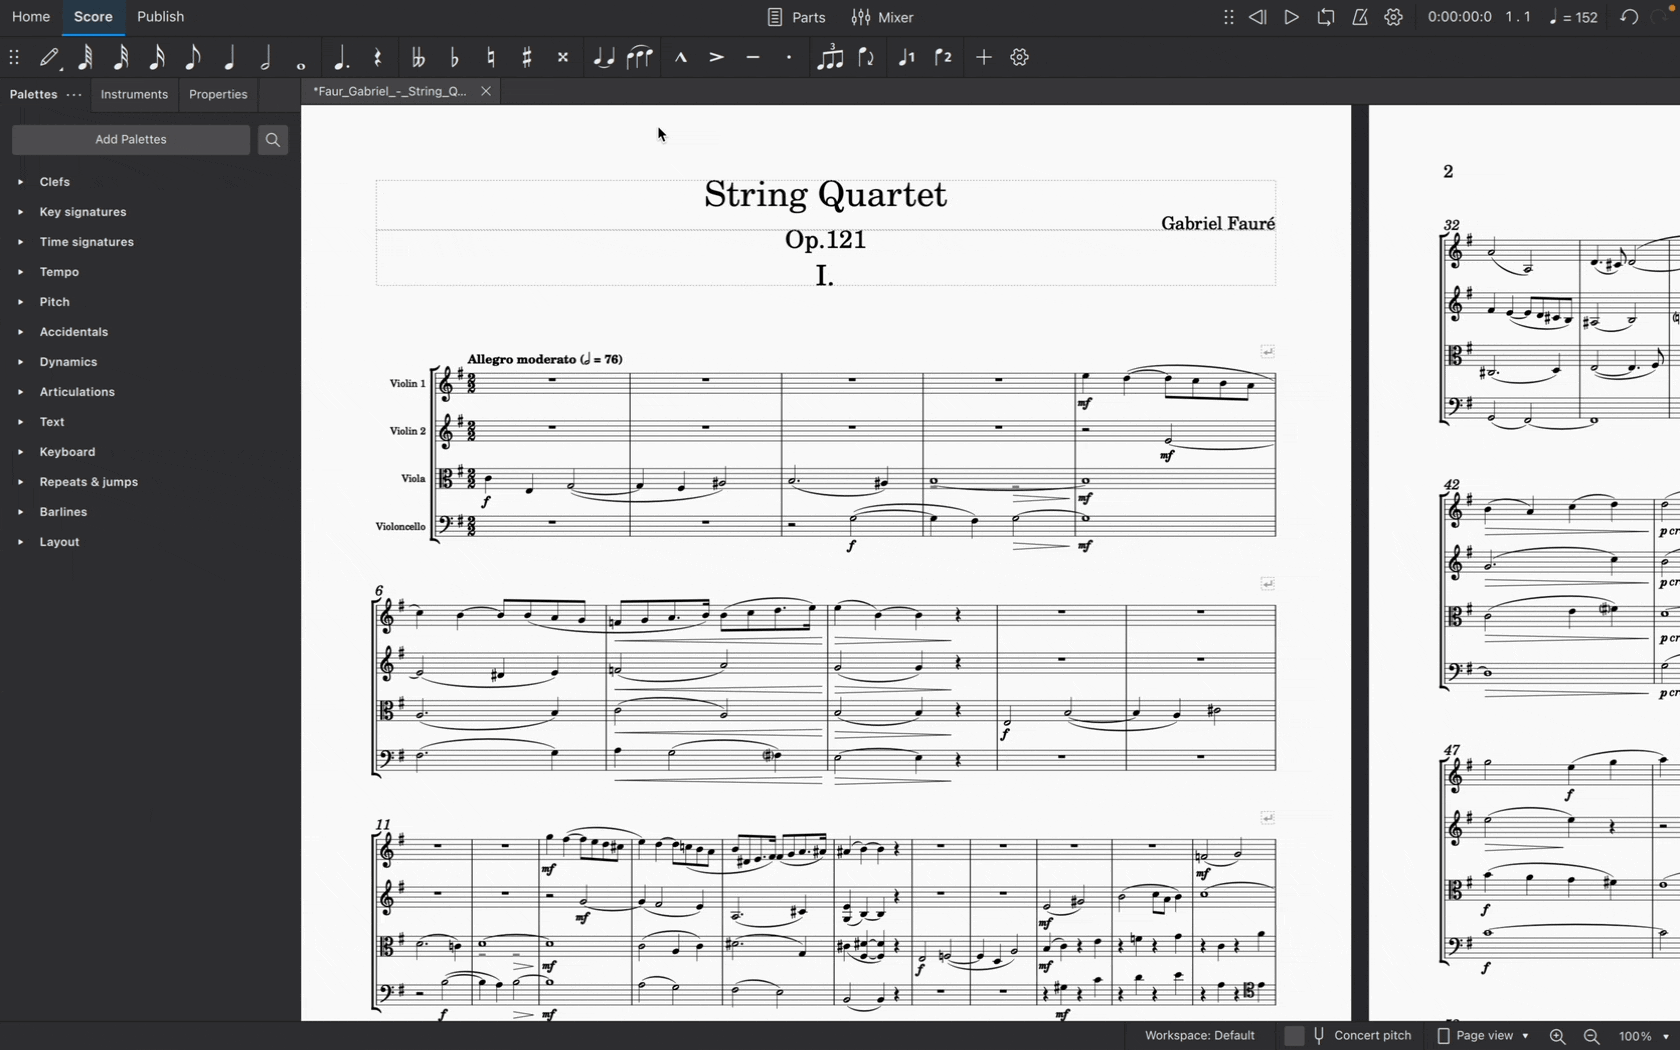
Closing a part
Click the X close button in a part tab to close a part.
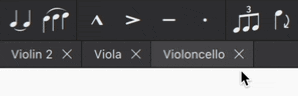
Note that changes you make to a part will be saved with that part and retrievable the next time you open it from the Parts dialog.
Creating custom parts
The Parts dialog is tightly integrated with the new Instruments panel. This integration makes it easy for you to create parts with any combination of instruments from your score.
There are two ways to customize parts in MuseScore 4: using the default (i.e. ready-made) parts to reveal other instruments, and creating entirely new parts.
Reveal instruments in default parts
As we’ve already seen, MuseScore 4 automatically creates a new (default) part for every instrument in your score. All you have to do is open the part from the Parts dialog.
In fact, each default part already contains all of the instruments in your score – they’re simply hidden from view (except, of course, the chosen part instrument).
This means you can “reveal” other instruments within any of the default parts. To do this:
- Open a part (as described above)
- Select the Instruments panel
- Click the eye icon next to another instrument
This instrument will now be visible in the chosen part.
This makes creating custom parts an incredibly flexible process. Revealing or hiding other instruments is completely non-destructive, meaning you can customize every instrument in every part, and hide or show only what you want to reveal to different players (or for different musical projects) without having to create entirely new parts each time.
Create a new part
MuseScore 4 does of course give you the option to create a completely "blank" part from scratch, allowing you complete customization control. To do this:
- Click Parts in the toolbar to open the Parts dialog
- Click Create new part
- Give your new part a name
- Click Open selected
Your new part will now be open in the Score tab, but it will appear to contain no instruments. To add instruments to this part:
- Go to the Instruments panel
- Click the "eye" icon next to each instrument you’d like to appear in your part
Choose which voices appear in each part
Sometimes it will be necessary to create individual parts from staves that contain multiple voices. You might, for example, want to extract separate parts for orchestral players who share a staff in the main score (E.g. Flute I and Flute II). Or you might wish to create individual vocal parts from choral scores where, for example, four voices are notated across two staves.
You'll need to first create (see above) or duplicate (see below) a part. To then select which voices will appear in a part:
- Open a part (see above)
- Go to the Instruments panel
- Expand an instrument by clicking on the triangular dropdown icon
- Click the settings icon next to the staff name
- Select which voice(s) you want to appear in your part by ticking/un-ticking the checkboxes under Voices visible in the score
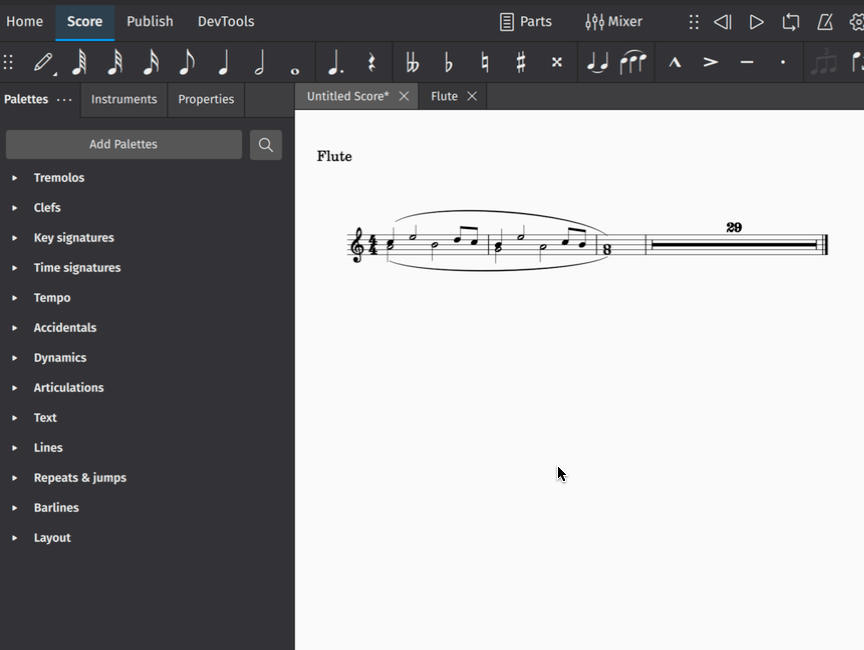
Applying styles to parts
Style settings for a wide range of engraving elements can be applied specifically to parts without affecting the main score.
To change style settings for a specific part:
- Ensure a part has been opened and is currently selected in the Score tab
- Go to Format → Style...
- Make your desired style settings changes (applicable changes will be visible in the score in real time)
- Click OK to confirm your changes
Changes you make in this dialog will affect only the part selected in the Score tab. If you want changes to affect all parts (but not the main score), select Apply to all parts before clicking OK.
Learn more about saving and loading default style settings in Templates and styles.
Managing synchronisation of score and parts
(This section describes features that are new or considerably enhanced in MuseScore 4.2.)
When you make changes to the content of the score - adding or deleting an item, or changing pitches and durations of notes, for example - these changes are always reflected in the parts, and vice versa.
However, just as you can apply different styles to score and parts, you may want the properties (position, style/appearance) of certain items to differ between score and parts. Therefore:
- When you change any property of an item in a part, that change will not be reflected in the score and the item will be marked as 'desynchronised' from the score, if it is not already;
- When you change any property of an item in the score, that change will be reflected in the part, unless that item is already desynchronised.
When an item in a part is desynchronised, its colour when selected changes to orange and, according on which properties have been changed, the toggles which appear in the Properties panel under Score and part synchronisation will switch off:
Position refers to offset, leading space, minimum distance, autoplace, direction (up/down, above/below), alignment, and a few other properties specific to certain types. Style/appearance is, essentially, all other properties.
If you have made changes to an item in the part but wish to resynchronise that item with the score, you can turn these toggles back on to reset those properties to match the score.
Text items have a third toggle, Text, which allows you to control synchronisation of the content and formatting of a text item. Unlike other properties, this must be manually switched off before you make changes to a text item in a part which you do not want to be reflected in the score.
Excluding items from parts or score
In some cases you may wish certain items to be in the score but not to appear in the parts at all, or to appear in a part but not in the score. This is not the same as simply making the item invisible, as invisible items sometimes affect the layout.
This option is available for frames, clef changes, ottava lines, staff text and system text. In the case of clefs and ottavas, excluding these items from one view will cause the notes there to be repositioned accordingly.
To exclude an item from parts:
- Select the item in the score
- Open Properties
- Under Score and part synchronisation, check Exclude from parts
To exclude an item from the score:
- Select the item in the part
- Open Properties
- Under Score and part synchronisation, check Exclude from score
Renaming, duplicating and deleting parts
This all takes place in the Parts dialog (accessible from the Parts button in the toolbar).
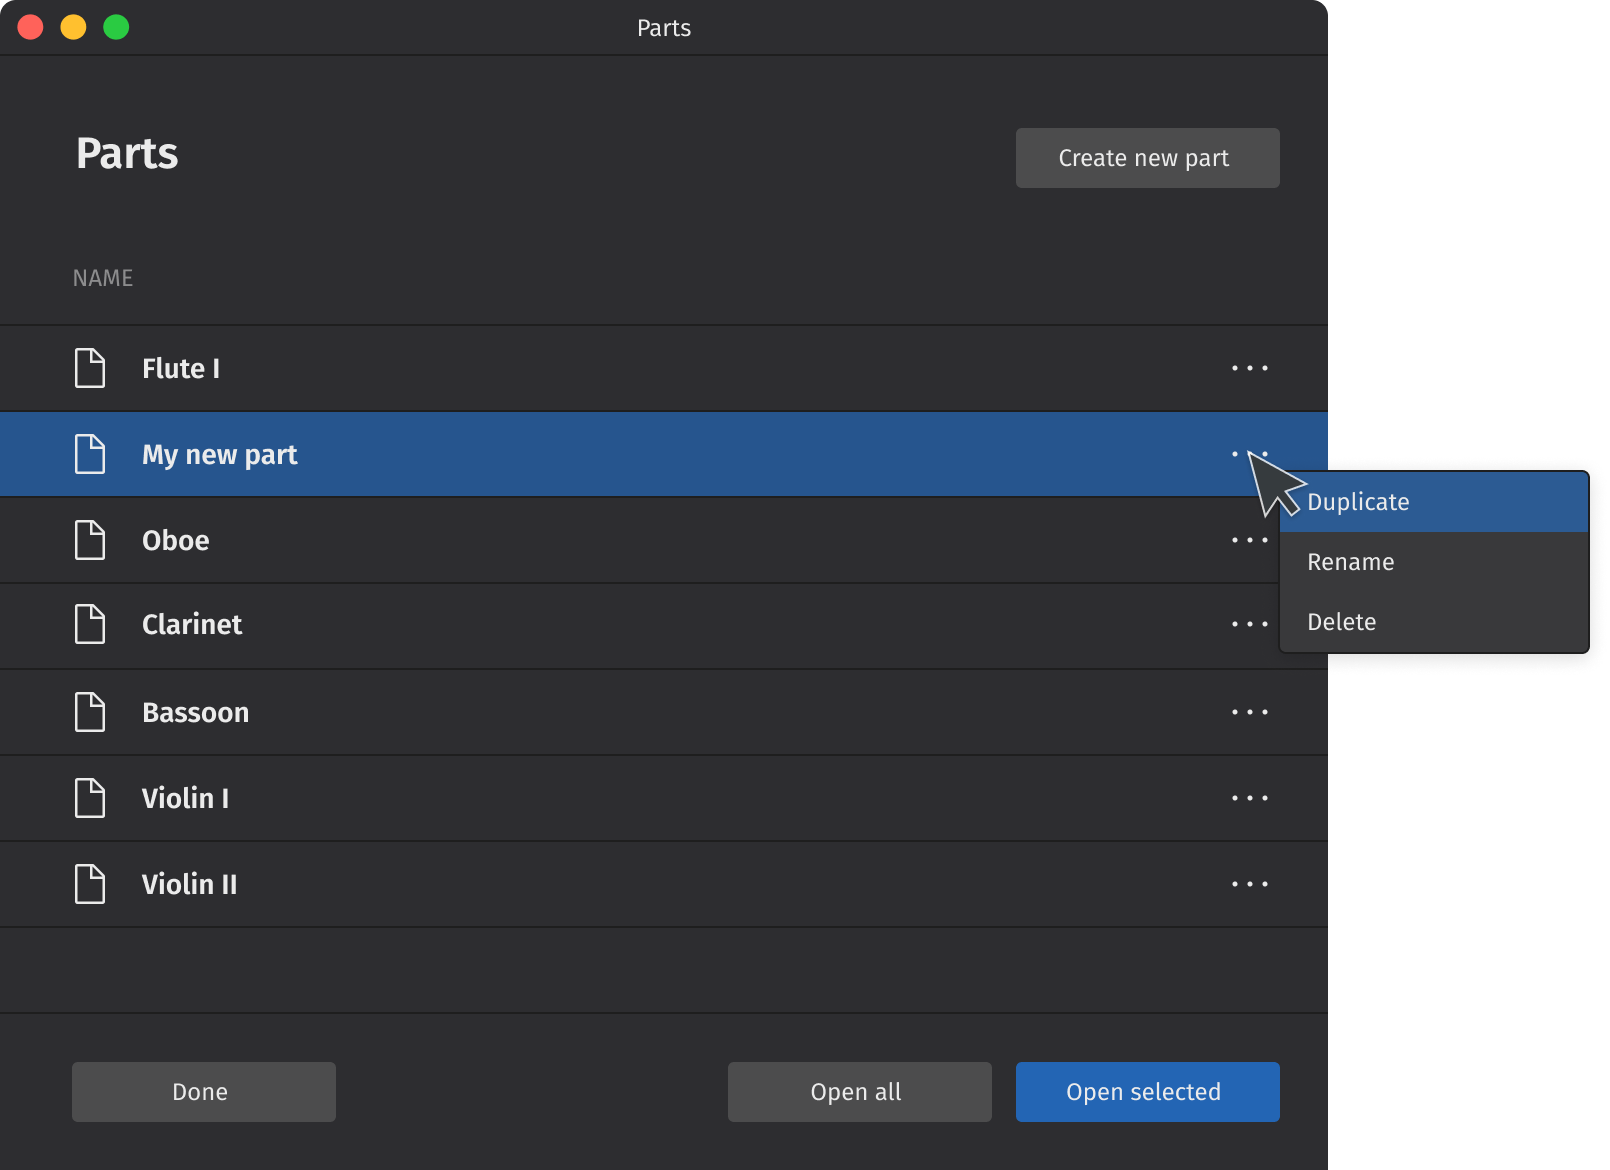
Simply click the "three dots" menu icon next to a selected part to reveal its options. Note that only newly created parts (created by clicking the Create new part button) can be deleted. All parts can be duplicated or renamed.
To duplicate any part:
- Select a part in the Parts dialog
- Click the "three dots" menu icon for the selected part
- Select Duplicate from the context menu that appears
- Enter a new name for the part (or leave the default name as is)
- Hit Enter, or click anywhere in the Parts dialog
To rename any part:
- Select a part in the Parts dialog
- Click the "three dots" menu icon for the selected part
- Select Rename from the context menu that appears
- Type your new part name
- Hit Enter to confirm the new name
Note you can also double click on any part in the Parts dialog to rename it.
To delete a newly created part:
- Select a newly created part in the Parts dialog
- Click the "three dots" menu icon for the selected part
- Select Delete from the context menu that appears
When a part is deleted, its tab in the Score tab (if already opened) will be closed. Any customizations made to that part will also be lost. The part will also no longer appear in the Parts dialog.
Exporting and printing parts
To export parts:
- Click File → Export... (alternatively, select the Publish tab and click Export...)
- Check the box next to the part(s) you want to export, or click Select all to choose all parts at once
- Select whether to export all parts combined in one file, or leave the default export setting as each part to a separate file
- Click Export...
- Select your destination file and name your score in your operating system's Export dialog
- Click Save
Parts will be exported in the PDF format by default. To change the export format, select your preferred format from the dropdown menu in Export settings. You can export your parts in a range of image and audio formats, as well as the braille format for compatible printers. For more information, see File Export.
To print parts:
- Ensure the part you wish to print is selected in the Score tab
- Click File → Print
- Use your operating system's print dialog to print the selected part
Note that parts can currently only be printed one at a time.
Default keyboard shortcuts
On macOS, make the following substitutions:
- Replace Ctrl with Cmd (or ⌘)
- Replace Alt with Option (or ⌥)
- Replace Home with Fn+Left
- Replace End with Fn+Right
- Replace PgUp with Fn+Up
- Replace PgDn with Fn+Down
- Add Fn with function keys
Navigation
Page navigation
| Action | Windows/Linux | macOS |
|---|---|---|
| Zoom in | Ctrl+= | Cmd+= |
| Zoom out | Ctrl+- | Cmd+- |
| Zoom to 100% | Ctrl+0 | Cmd+0 |
| Go to first element in score | Ctrl+Home | Cmd+Fn+Left |
| Go to last element in score | Ctrl+End | Cmd+Fn+Right |
| Jump to next screen | PgDn | Fn+Down |
| Jump to previous screen | PgUp | Fn+Up |
| Jump to top of first page | Home | Fn+Left |
| Jump to bottom of last page | End | Fn+Right |
| Jump to next page | Ctrl+PgDn | Cmd+Fn+Down |
| Jump to previous page | Ctrl+PgUp | Cmd+Fn+Up |
| Find / Go to | Ctrl+F | Cmd+F |
Score navigation
| Action | Windows/Linux | macOS |
|---|---|---|
| Select next chord | Right | Right |
| Select previous chord | Left | Left |
| Go to next measure | Ctrl+Right | Cmd+Right |
| Go to previous measure | Ctrl+Left | Cmd+Left |
| Select next element in score | Alt+Right | Option+Right |
| Select previous element in score | Alt+Left | Option+Left |
| Select note/rest above | Alt+Up | Option+Up |
| Select note/rest below | Alt+Down | Option+Down |
Note input
General
| Action | Windows/Linux | macOS |
|---|---|---|
| Note input: toggle note input mode | N | N |
| Show/hide piano keyboard | P | P |
| Use voice 1 | Ctrl+Alt+1 | Cmd+Option+1 |
| Use voice 2 | Ctrl+Alt+2 | Cmd+Option+2 |
Duration
| Action | Windows/Linux | macOS |
|---|---|---|
| Set duration | 1 – 9 | 1 – 9 |
| Set duration: 32nd note | 2 | 2 |
| Set duration: 16th note | 3 | 3 |
| Set duration: 8th note | 4 | 4 |
| Set duration: quarter note | 5 | 5 |
| Set duration: half note | 6 | 6 |
| Set duration: whole note | 7 | 7 |
| Toggle duration dot | . | . |
| Enter tuplet | Ctrl+2 – Ctrl+9 | Cmd+2 – Cmd+9 |
| Enter tuplet: duplet | Ctrl+2 | Cmd+2 |
| Enter tuplet: triplet | Ctrl+3 | Cmd+3 |
| Enter tuplet: quadruplet | Ctrl+4 | Cmd+4 |
| Add tied note | T | T |
| Halve selected duration (includes dotted values) | Shift+Q | Shift+Q |
| Double select duration (includes dotted values) | Shift+W | Shift+W |
Pitch
| Action | Windows/Linux | macOS |
|---|---|---|
| Enter note | A – G | A – G |
| Add note to chord | Shift+A – Shift+G | Shift+A – Shift+G |
| Enter interval | Alt+1 – Alt+9 | Option+1 – Option+9 |
| Toggle accidental: flat | - | - |
| Toggle accidental: natural | = | = |
| Toggle accidental: sharp | + | + |
| Enter rest | 0 | 0 |
| Add grace note: acciaccatura | / | / |
Tablature
| Action | Windows/Linux | macOS |
|---|---|---|
| Set duration (TAB) | Shift+0 – Shift+9 | Shift+0 – Shift+9 |
| Set duration: 32nd note (TAB) | Shift+2 | Shift+2 |
| Set duration: 16th note (TAB) | Shift+3 | Shift+3 |
| Set duration: 8th note (TAB) | Shift+4 | Shift+4 |
| Set duration: quarter note (TAB) | Shift+5 | Shift+5 |
| Set duration: half note (TAB) | Shift+6 | Shift+6 |
| Set duration: whole note (TAB) | Shift+7 | Shift+7 |
| Enter TAB: fret | 0 – 9 | 0 – 9 |
| Enter TAB: fret | A – K | A – K |
| Go to string above (TAB) | Up | Up |
| Go to string below (TAB) | Down | Down |
| Toggle ghost note | Shift+X | Shift+X |
Selecting
| Action | Windows/Linux | macOS |
|---|---|---|
| Select all | Ctrl+A | Cmd+A |
| Add to selection: previous note/rest | Shift+Left | Shift+Left |
| Add to selection: next note/rest | Shift+Right | Shift+Right |
| Add to selection: staff above | Shift+Up | Shift+Up |
| Add to selection: staff below | Shift+Down | Shift+Down |
| Select to beginning of measure | Ctrl+Shift+Left | Cmd+Shift+Left |
| Select to end of measure | Ctrl+Shift+Right | Cmd+Shift+Right |
| Select to beginning of score | Ctrl+Shift+Home | Cmd+Shift+Fn+Left |
| Select to end of score | Ctrl+Shift+End | Cmd+Shift+Fn+Right |
Editing
General
| Action | Windows/Linux | macOS |
|---|---|---|
| Escape | Esc | Esc |
| Undo | Ctrl+Z | Cmd+Z |
| Redo | Ctrl+Shift+Z | Cmd+Shift+Z |
| Copy | Ctrl+C | Cmd+C |
| Cut | Ctrl+X | Cmd+X |
| Paste | Ctrl+V | Cmd+V |
| Repeat selection | R | R |
| Insert one measure before selection | Ins | Ins |
| Insert measures before selection | Ctrl+Ins | Cmd+Ins |
| Insert one measure at end of score | Ctrl+B | Cmd+B |
| Insert measures at end of score | Alt+Shift+B | Option+Shift+B |
| Delete | Del | Del |
| Delete selected measures | Ctrl+Del | Cmd+Del |
| Show/hide properties | F8 | Fn+F8 |
| Edit element | F2 | Fn+F2 |
Duration
| Action | Windows/Linux | macOS |
|---|---|---|
| Set duration | 1 – 9 | 1 – 9 |
| Enter tuplet | Ctrl+2 – Ctrl+9 | Cmd+2 – Cmd+9 |
| Add tied note | T | T |
Pitch
| Action | Windows/Linux | macOS |
|---|---|---|
| Toggle accidental: flat | - | - |
| Toggle accidental: natural | = | = |
| Toggle accidental: sharp | + | + |
| Move pitch/selection up | Up | Up |
| Move pitch/selection down | Down | Down |
| Move pitch up an octave | Ctrl+Up | Cmd+Up |
| Move pitch down an octave | Ctrl+Down | Cmd+Down |
| Change enharmonic spelling (concert and written pitch) | J | J |
| Move note to higher string (TAB) | Ctrl+Up | Cmd+Up |
| Move note to lower string (TAB) | Ctrl+Down | Cmd+Down |
Notation
| Action | Windows/Linux | macOS |
|---|---|---|
| Flip direction | X | X |
| Use voice 1 | Ctrl+Alt+1 | Cmd+Option+1 |
| Use voice 2 | Ctrl+Alt+2 | Cmd+Option+2 |
Manual adjustment
| Action | Windows/Linux | macOS |
|---|---|---|
| Move text left | Left | Left |
| Move text right | Right | Right |
| Move text left quickly | Ctrl+Left | Cmd+Left |
| Move text right quickly | Ctrl+Right | Cmd+Right |
| Move selection up | Up | Up |
| Move selection down | Down | Down |
| Move selection up quickly | Ctrl+Up | Cmd+Up |
| Move selection down quickly | Ctrl+Down | Cmd+Down |
Text
General
| Action | Windows/Linux | macOS |
|---|---|---|
| Add text: staff text | Ctrl+T | Cmd+T |
| Add text: expression text | Ctrl+E | Cmd+E |
| Add text: system text | Ctrl+Shift+T | Cmd+Shift+T |
| Add text: tempo marking | Alt+Shift+T | Option+Shift+T |
| Add text: rehearsal mark | Ctrl+M | Cmd+M |
Formatting
| Action | Windows/Linux | macOS |
|---|---|---|
| Format text: bold face | Ctrl+B | Cmd+B |
| Format text: italic | Ctrl+I | Cmd+I |
| Format text: underline | Ctrl+U | Cmd+U |
Lyrics
| Action | Windows/Linux | macOS |
|---|---|---|
| Add text: lyrics | Ctrl+L | Cmd+L |
| Go to next syllable | Space | Space |
| Go to previous syllable | Shift+Space | Shift+Space |
| Lyrics: enter hyphen | - | - |
| Lyrics: enter melisma | _ | _ |
| Add lyric verse | Return | Return |
| Go to next lyric verse | Down | Down |
| Go to previous lyric verse | Up | Up |
Chord symbols, Roman numeral analysis, Nashville numbers, figured bass
| Action | Windows/Linux | macOS |
|---|---|---|
| Add text: chord symbol | Ctrl+K | Cmd+K |
| Next text element | Space | Space |
| Previous text element | Shift+Space | Shift+Space |
| Advance cursor: next beat | ; | ; |
| Advance cursor: previous beat | Shift+; | Shift+; |
| Advance cursor: duration | Ctrl+1 – Ctrl+9 | Cmd+1 – Cmd+9 |
Other score elements
| Action | Windows/Linux | macOS |
|---|---|---|
| Show/hide palettes | F9 | Fn+F9 |
| Search palettes | Ctrl+F9 | Cmd+Fn+F9 |
| Add slur | S | S |
| Add articulation: accent | Shift+V | Shift+V |
| Add articulation: marcato | Shift+O | Shift+O |
| Add articulation: staccato | Shift+S | Shift+S |
| Add articulation: tenuto | Shift+N | Shift+N |
| Add hairpin: crescendo | < | < |
| Add hairpin: decrescendo | > | > |
Score setup and formatting
| Action | Windows/Linux | macOS |
|---|---|---|
| Add/remove instruments | I | I |
| Open instruments dialog | F7 | Fn+F7 |
| Toggle visibility of elements | V | V |
| Decrease layout stretch | { | { |
| Increase layout stretch | } | } |
| Add/remove system break | Return | Return |
| Add/remove page break | Ctrl+Return | Cmd+Return |
| Reset shapes and positions | Ctrl+R | Cmd+R |
File Operations
| Action | Windows/Linux | macOS |
|---|---|---|
| New | Ctrl+N | Cmd+N |
| Open | Ctrl+O | Cmd+O |
| Close | Ctrl+W | Cmd+W |
| Save | Ctrl+S | Cmd+S |
| Ctrl+P | Cmd+P | |
| Quit | Ctrl+Q | Cmd+Q |
User interface
Playback
| Action | Windows/Linux | macOS |
|---|---|---|
| Play | Space | Space |
| Show/hide mixer | F10 | Fn+F10 |
记谱:乐器、谱表与总谱
Working with instruments
Overview
Readers should already know the concept of Musescore instrument, and usage of Add or remove Instrument window explained in Setting up score chapter. This chapter discusses the new Instruments panel feature in MuseScore 4 that manages
- instrument setup of the score file (a function that Add or remove Instrument window also offer);
- staff setup of the score file, eg. adding and configuring a new Treble staff;
- visibility and playback setting of each instrument (all of its staffs) of the the currently opened "Full score" or "Part"; and
- visibility of each staff of the the currently opened "Full score" or "Part".
Read more about "Full score" and "Part" in Parts chapter.
Adding and ordering instruments
Accessing the Instruments panel
Open the Instruments panel by clicking on the Instruments tab on the left side of the screen:
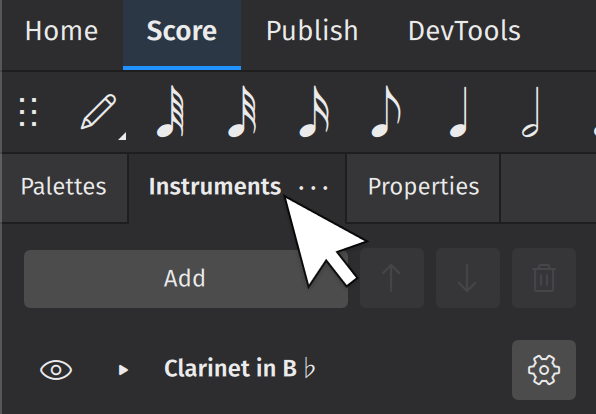
Adding instruments
Click Add (or just press i). This will open the Instruments dialog (see Choose instruments for more information).
Deleting instruments
To delete an instrument from the score, select the instrument and click the Trash can icon, or press Delete.
Changing the order of instruments
Select any instrument and use the ↑ or ↓ buttons to change its position in the score. Alternatively, you can drag the instrument up/down using the mouse.
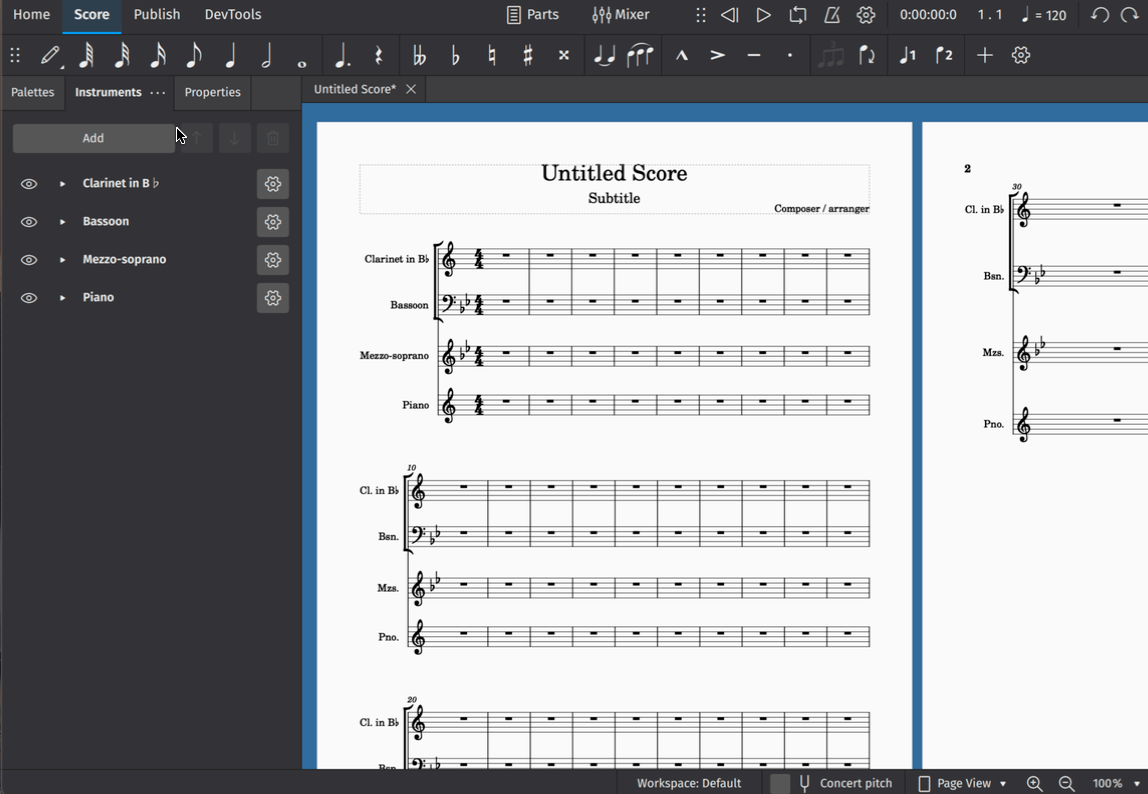
Instrument settings
Hiding/showing instruments
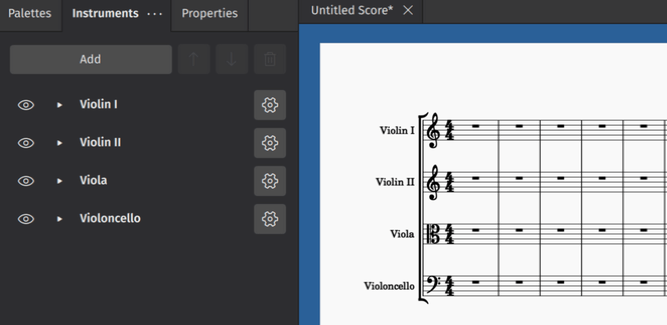
To toggle the visibility of one instrument (all of its staves)
- Open "Full score" or a "Part", see Parts chapter.
- Click the Eye icon next to an instrument label.
Hiding is not deleting. Hiding an instrument disables all its staffs' playback. This feature is useful in combination with Musescore's Part feature, see Parts chapter. This allows for example the creation of alternative instruments or different printing versions for different performers; or isolation of sections of a larger score for orchestra without deleting anything.
Renaming instruments
- Click the Cogwheel icon
- Edit the name, it is the same as editing Long instrument name in Staff/Part properties. Leave blank if required.
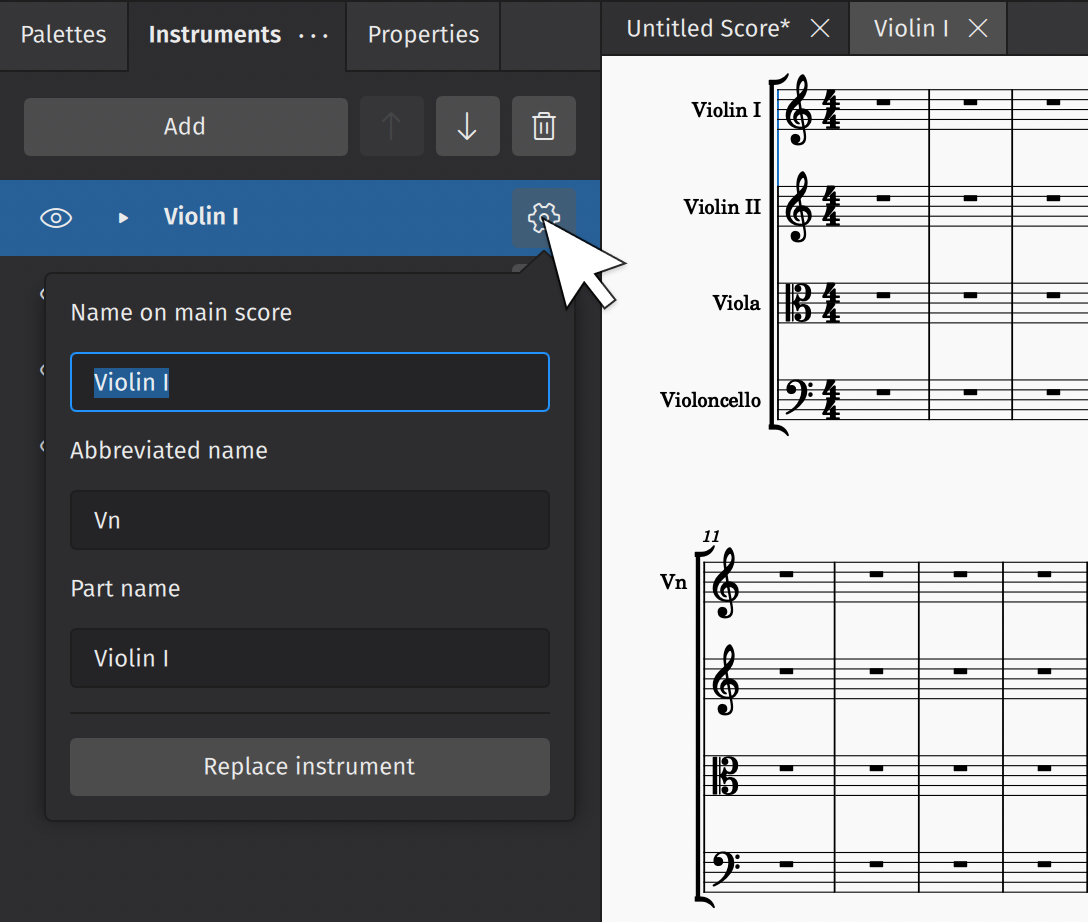
Replacing instruments
To replace an instrument in the Instruments panel:
- Click the Cogwheel icon to the right of the instrument name
- In the popup that appears, click Replace instrument
- Select your desired replacement instrument in the dialog that appears
- Click OK
Adding and configuring staves
The Instruments panel can also be used to add staves to an existing instrument and configure some of their basic properties.
To add a staff to an existing instrument
- If there are no staves visible under the instrument label, click the small black triangle to the left of the label to reveal them
- Click Add staff
- Click the Cogwheel icon of the newly-added staff, and adjust "Staff type", if required. More on Staff type, see the Staff type template in Staff/Part properties chapter.
Added staves share the same instrument but their notation can be edited independently. Amongst other things, they can be used to create staff/tablature for stringed-instrument players (e.g. guitar, banjo, ukulele etc.).
To add a linked staff to an existing instrument
Certain notational objects on one staff can be made to automatically appear on other staves if they are linked together. Linked staves can be used to create staff/tablature for stringed-instrument players (guitar, banjo, ukulele etc.).
To create a linked staff:
- If there are no staves visible under the instrument label, click the triangular "show more" icon next to the label
- Click the Cogwheel icon next to the staff label (E.g. "Treble clef")
- Click Create a linked staff
- Click the Cogwheel icon of the newly-added staff, and adjust Staff type, if required. More on Staff type, see the Staff type template in Staff/Part properties chapter.
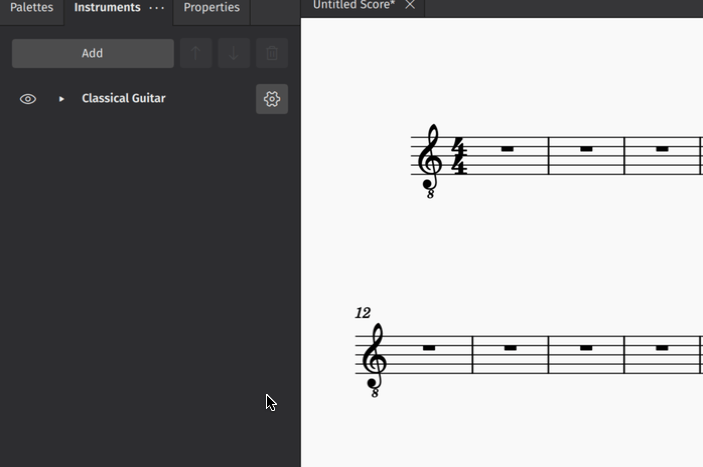
Configuring a staff
- Click on the Cogwheel icon next to a staff label (E.g. "Treble clef")
- Change as required:
- Staff type: See Staff type template in Staff/Part properties chapter.
- Small staff: Reduce the size of the staff. Adjust size setting in Format→Style…→Sizes.
- Hide any measures that do not contain notation: See Cutaway in Showing staves only where needed chapter.

Learn more about staff customization in Staff/part properties.
Hiding a staff but keeping its playback
- (Mandatory) Click on a staff label (E.g. "Treble clef"), but not its instrument.
- Click its Eye icon.
Hiding is not deleting.
See also "Hiding/showing instruments" section that explains how to hide an instrument, hiding an instrument disables all its staffs' playback.
Deleting instruments and staves
Note: On score that uses Musescore's Parts feature, deleting a staff deletes it in "Full score" and all "Part" that features it. See also the alternative "hide" commands in "Hiding/showing instruments" and "Hiding a staff but keeping its playback" sections.
To delete an instrument and all of its staffs:
- Click on the instrument label
- Click the Trash can icon at the top of the instruments panel, or press Delete.
To delete a staff from an instrument:
- If there are no staves visible under the instrument label, click the small black triangle to the left of the label to reveal them
- Click on the staff label
- Click the Trash can icon at the top of the instruments panel, or press Delete.
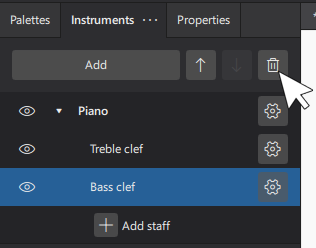
Showing staves only where needed
By default, a score will show all measures of all staves on all pages throughout the score, whether they contain notes or not. However, you may wish to have certain staves appear only on systems where they are needed. You may even wish to have a staff appear or disappear mid-system. MuseScore provides a number of controls for this purpose, this chapter explains them.
To hide certain instrument everywhere on a score, use Choose instruments dialog (shortcut key i), Instruments panel on the left (a new feature in MuseScore 4), and the Parts toolbar button on the top instead.
Hiding empty staff along one system (all its measures along that system)
Omission of empty staves is a common practice found in printed ensemble scores. When a staff along one system (the page layout concept) contains no notations, the staff (all its bars along that system) are hidden.

Hiding all empty staves
To configure the current score to automatically hide any of its staves on systems where the staff is empty:
- Ensure that nothing in your score is selected (press Esc if necessary).
- Go to the Properties panel.
- Click the icon next to Empty staves.

Alternatively, you can enable the Hide empty staves within systems option in Format→Style→Score.

MuseScore will normally continue to show all staves on the first system, in accordance with common convention. If you would like to force MuseScore to hide empty staves on the first system as well, disable the Don't hide empty staves in first system option in the dialog. You can also control whether or not brackets are shown if, for example, only a single instrument from a section is playing, via the Show brackets when spanning a single staff option.
Excluding specific staves from being hidden
The score-wide setting explained above affects all staffs on a score. There is also an individual setting for each staff (that contains a clef) that overrides the score-wide setting:
- Right-click a staff.
- Click Staff/Part properties.
- In the resulting dialog, set Hide when empty option
In a score where score-wide setting Hide empty staves within systems option is enabled,
- To specify that one staff should not be hidden when empty, set its Hide when empty option to Never.
- The default hiding behavior treat each staff independently. For instruments that use two or more staves (like piano, organ, and harp), you may wish to specify that a staff should be shown even if it is empty. For example, in a piano concerto score's piano solo passage where only the piano treble clef staff has notes, it is common to show the bass clef staff even if it is empty. To do this, set the Hide when empty option to Instrument for each of the staves. For the above example, set the option of the bass clef staff.
- To remove individual staff setting and revert to use score-wide setting, set its Hide when empty option to Auto.
Temporary staves
The score-wide setting explained above affects all staffs on a score. There is also an individual setting for each staff (that contains a clef) that overrides the score-wide setting:
- Right-click a staff.
- Click Staff/Part properties.
- In the resulting dialog, set Hide when empty option
In a score where all staffs are shown everywhere (score-wide setting Hide empty staves within systems option is disabled), there may nonetheless be one or two special staves that you wish to only show where needed. For example, this might be a solo part in an ensemble score, or a bass staff in a lead sheet. To set one staff to hide when empty without assigning a score-wide staff hiding setting, set its Hide when empty option to Always.
Choosing the staff to show when all staffs in a system are empty
In a score that contains a system where all staffs of all visible instruments are completely empty, the top staff is shown by default. To specify the staff to display:
- Right-click a staff.
- Click Staff/Part properties.
- In the resulting dialog, enable the "Do not hide if system is empty" option.
This setting may be useful when using Musescore Parts function. This setting is unrelated to all other staff hiding settings covered in this chapter.
Hiding empty measure
Cutaway staves
Film scores and other contemporary scores often use a style of notation where individual measures are hidden when empty. These are sometimes called cutaway scores.

To use this style on one staff in MuseScore:
- Right-click a staff.
- Select Staff/Part properties.
- In the resulting dialog, set Hide when empty to Always.
- Enable the Cutaway option.
The Cutaway option alone does not change vertical layout, the staff's vertical space is reserved in all systems as if invisible.
If you wish all staves to be displayed in cutaway score style, you can replace step 3 with score-wide setting explained above. However, you still need to set the Cutaway option for each staff individually. You can speed up this process by using the arrow buttons in the Staff/Part Properties dialog:
- Set the Cutaway option for the top staff.
- Press the Apply button.
- Press the ↓ button to move to the next staff.
- Repeat steps 1-3 until you have gone through all staves.
Ossia
An ossia is a special type of cutaway staff in which a given musical passage is notated using a small staff above the normal staff, such as to show an alternate interpretation.

These can be created in MuseScore using a combination of features:
- Add a staff as described in Adding and configuring staves.
- Select and delete or otherwise adjust any automatically added bracket.
- Enter the desired notation.
- Right-click the staff.
- Select Staff/Part properties.
- In the resulting dialog, set Hide when empty to Always.
- Enable the Cutaway and Small options.
- Press OK.
If you wish to hear the ossia playback instead of the normal staff, select the corresponding measures on the normal staff and uncheck the Play setting on the Properties panel. Do the same for the ossia staff if you would rather hear the normal staff playback.
Depending on the look you desire, you might also want to hide the initial or final barline for the passage. To do this, select the barline and press V or uncheck the Visible option in the Properties panel.
You may also wish to decrease the distance between the ossia and the normal staff. To do this, use a Staff spacer fixed down from the Layout palette.
Other invisible measures
MuseScore also allows you to make individual measures invisible on any given staff, whether empty or not.
To set a measure to be invisible on a given staff:
- Right-click the measure.
- Select Measure properties.
- Disable the Visible checkbox for the staff or staves in which you wish the measure to be set invisible.
Note: you cannot make a measure invisible on all staves—it must remain visible on at least one.
Implode and explode
Implode
The Implode command allows you to do either of the following:
- Combine the notation of several voices in the same staff into one voice
- Combine notation from several staves into separate voices in one staff.
Combine notes from multiple voices in a single staff into one voice
- Select a range of measures in a single staff.
- From the menu bar, select Tools→Implode.
All selected notes in the staff are now displayed in voice 1.
Combine notes from multiple staves into multiple voices on a single staff
- Ensure that there is only one voice in each staff to be imploded;
- Select a range of measures in the top staff and extend this selection downwards to include up to 4 staffs.
- From the menu bar, select Tools→Implode.
The notation initially in the upper staff will now be in voice 1, that from the staff below in voice 2, and so on.
Explode
Explode allows you to do either of the following:
- Copy a passage of single notes, in a single staff, into one or more staves below.
- Transform the chords of a selected passage of music, in a single staff, into their constituent notes on one or more staves below.
Copy passage of single notes to multiple staves
- Ensure that the passage is in voice 1 (there should be no notes or rests in other voices).
- Select the desired range of measures
- Extend the selection downwards through as many staves as you wish to copy to.
- From the menu bar, select Tools→Explode.
The passage in the top staff is copied to each of the selected staves below.
Separate a passage of chords into its constituent notes
In this case the chords in a selected passage of music are separated into their constituent notes as follows:
- If the passage is all in voice 1, the top note of the chord is retained on the top staff, while the lower notes are moved to subsequent staves.
- If the passage contains multiple voices, voice 1 notes are retained on the top staff, while other voices are moved to subsequent staves.
- All exploded notes end up in voice 1.
- Ensure that there are enough empty staves underneath the source staff to receive the exploded notes. Create extra staves if necessary using the Instruments panel.
- Choose one of two options:
- Select a range of measures in the source staff: this allows all notes to be exploded if there are enough staves available.
- Select a range of measures that includes both the source staff and also extends downwards to include one or more destination staves: This limits the number of exploded notes/voices to the number of selected staves.
- From the menu bar, select Tools→Explode.
Notes: (1) If the selection is all in voice 1, MuseScore will discard the lowest note(s) of any chord that contains more notes than the number of staves in the selection. (2) If the selection is all in voice 1, and If a given chord has fewer notes than the number of destination staves, then notes will be duplicated as needed so that every staff receives a note. (3) Any existing music in the destination staves is overwritten. (4) If you select a partial measure, the explode command will automatically expand it to a full measure.
Mid-score instrument changes
Adding an instrument change
When a musician is required to double on a different instrument for a section of a piece, the instruction to switch instruments is generally placed above the staff at the beginning of that section. A return to the primary instrument is handled in the same manner.
In MuseScore, the instruction to change to a different instrument is handled by the Change Instrument text element, which is found in the Text Palette. This text element is different from Staff Text, System Text and Expression Text in that it is linked to playback, allowing for a change in sound to the new instrument.
To add an instrument change:
- Click on a note or rest to select the start point for the change
- Click on the Change instr. palette item in the Text Palette
- Choose which instrument you wish to change to in the Select instrument dialog that appears
- Click OK
The instruction to change to the new instrument will appear above the selected insertion point in the score.
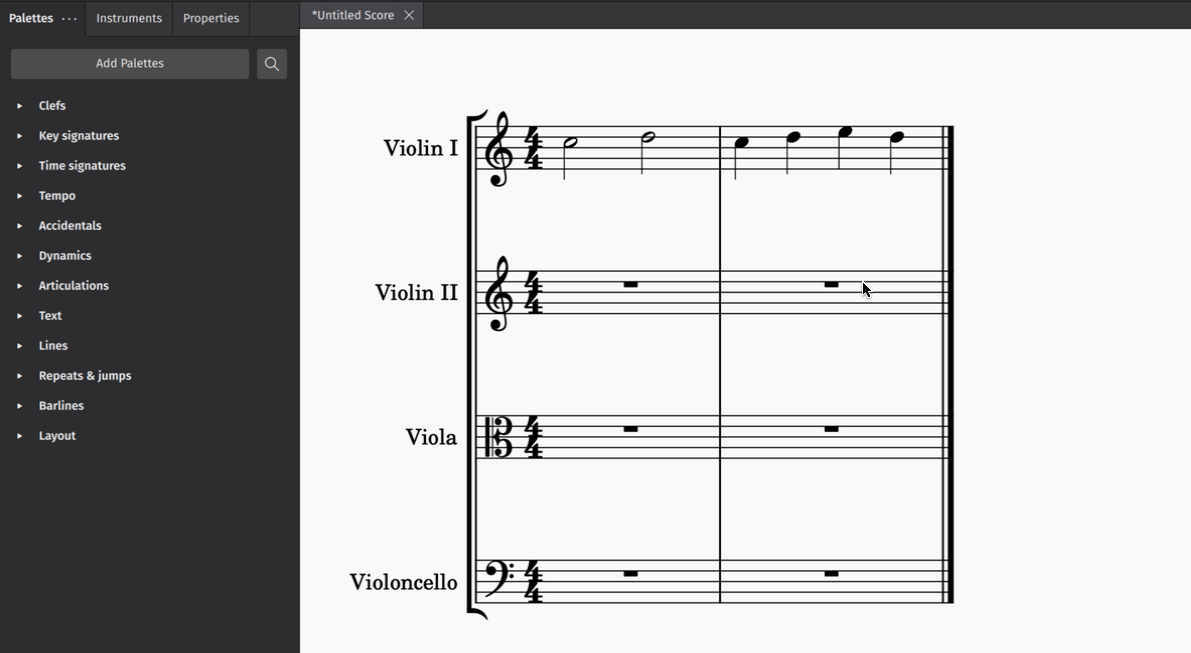
Working with instrument changes
Removing an instrument change
To remove an instrument change, click once on a Change instrument text element to select it, and press either Del or Backspace.
Re-labelling an instrument change
You can re-label any Change instrument text element in the score by double-clicking on it and entering new text. This will not affect the playback sound of the new instrument.
Instrument changes in the mixer
Playback sounds for instrument changes are reflected in the Mixer as separate channel strips stacked to the right of the primary instrument channel strip. These instruments are labelled in parentheses. You can change the assigned playback library, apply effects, adjust the volume, and mute, solo, and pan these channel strips just as you would any other instrument channel strip. For more information, see the Mixer.
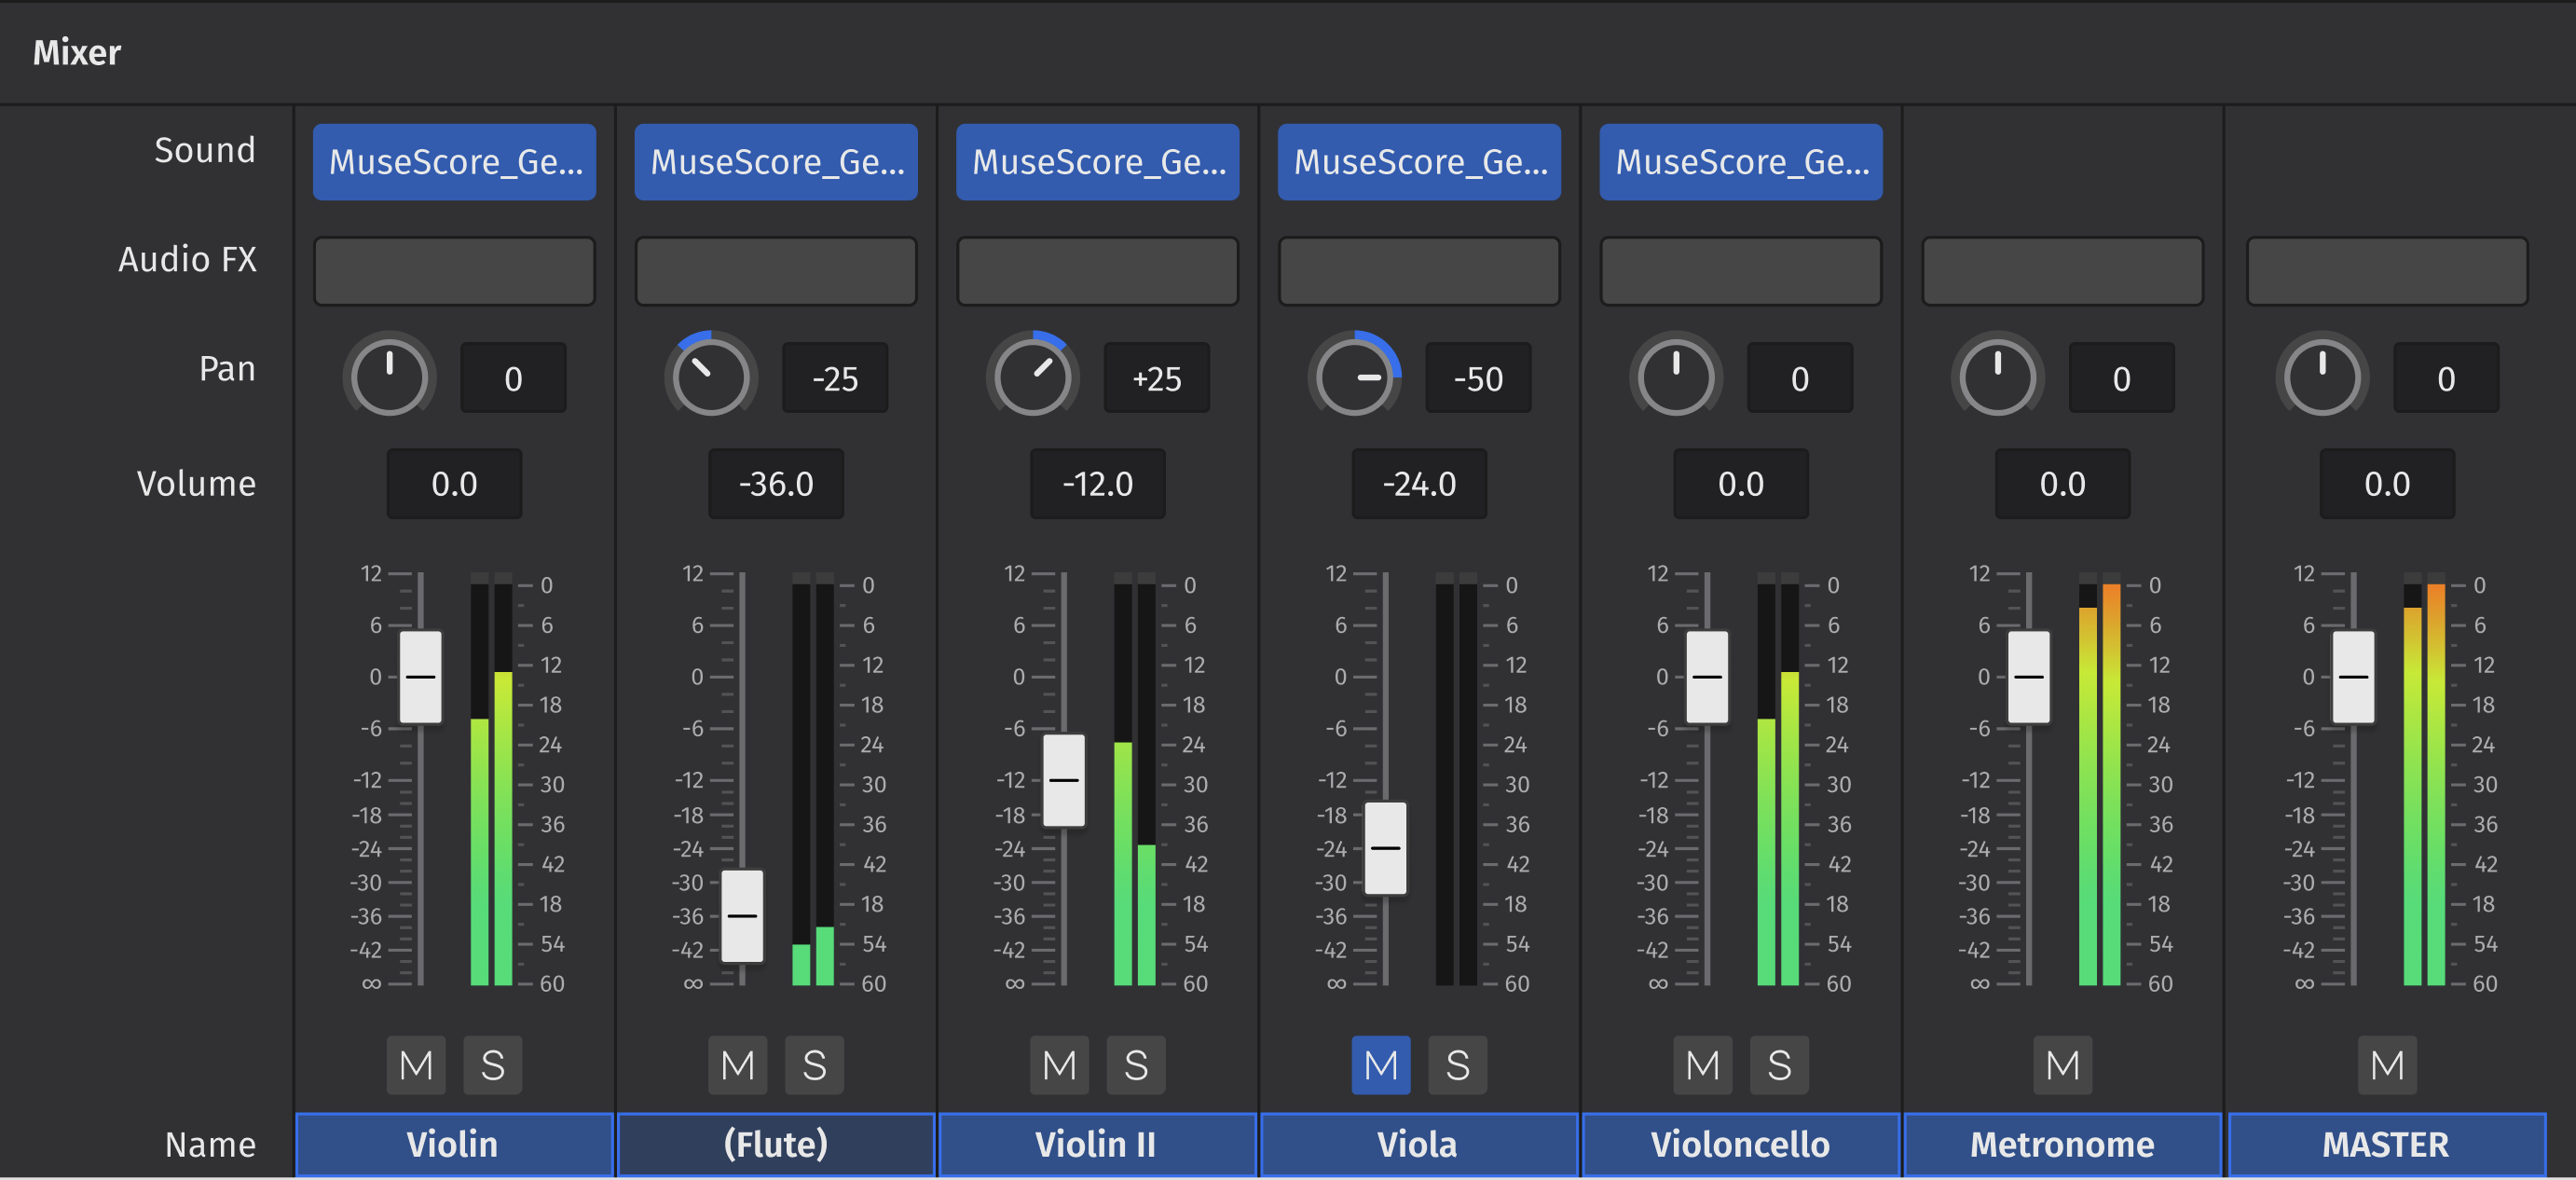
Changing staff type
Changing to a different instrument may necessitate the use of different key signatures, clefs, and even staff type. Learn more about changing staff type in Staff type change.
Staff type change
To change one staff everywhere on a score change Staff type or template instead. Staff types and templates supported by Musescore are covered in Staff/Part properties chapter.
You can change the appearance of a staff starting from certain point on a score by adding a "Staff type change" element to a measure, and adjusting its properties in the Properties panel. This can be used when changing between pitched and unpitched staves or for various experimental notation effects.

Adding a staff type change
- Select a measure in the score and, in the Layout palette
- Click the "Staff type change" symbol to add it to your score

Alternatively, you can drag the symbol from the palette to a measure in your score.
Setting staff properties
When you alter a "Staff type change" property in the Properties panel, the new value takes precedence over the value shown in the global Staff/Part properties dialog. Only those property values in Staff/Part properties that cannot be changed for the "Staff type change" will be valid throughout the score.
The properties that can be altered for the "Staff type change" in the Properties panel are:
Cue size
Use the Small staff size that is defined for the score
Offset
Displace the staff vertically
Scale
Change the size of the staff using a custom percentage
Number of lines
Change the number of lines making up the staff
Line distance
Change the distance between two staff lines
Step offset
Offset the notes on the staff relative
Invisible staff lines
Toggle visibility of the staff lines
Staff line color
Set the color of the staff lines
Notehead scheme
Specify alternate noteheads such as pitch names or shape note
Stemless
Toggle display of note stems
Show barlines
Toggle display of barlines
Show ledger lines
Toggle display of ledger lines
Generate clefs
Toggle display of clefs
Generate time signatures
Toggle display of time signatures
Generate key signatures
Toggle display of key signatures
Staff/Part properties
Overview
Warning: the word "Part" mentioned in this chapter and the window heading is is currently a wrong use of wording in Musescore 4 due to be updated (a outdated data from Musescore 3). Inside this chapter, the word means Musescore Instrument, but note that everywhere else inside this handbook and Musescore 4, it means Parts (the feature to create different versions of the same score)
The Staff / Part Properties dialog allows you to change display properties of one Staff and the properties of the Musescore Instrument it belongs to. To open the dialog:
- Right-click onto either an empty area in a staff, or the instrument name, and select Staff / Part Properties….
Clicking on Navigation arrows ↑ and ↓ buttons at the bottom left will cancel any unsaved changes and switch to edit the previous or next staff.

There are four different types of staff:
1a. Standard staff I. A pitched staff used for most instruments except fretted, plucked-string ones.
1b. Standard staff II. A pitched staff containing a fretted, plucked-string instrument, with options to set the number of instrument strings and tuning.
2. Tablature staff. A staff containing a fretted, plucked-string instrument, which displays music as a series of fret-marks on strings. Also contains options to set the number of instrument strings and tuning.
3. Percussion staff. A pitched staff for percussion instruments.

four instruments shown above are examples of the four staff types respectively. Download this testing score file MS4-1-1 Staffstypes.mscz
For each type, there are pre-defined Template to choose from in the Advanced Style Properties (Edit Staff Type) window
Replacing an instrument also changes staff types but may create unreasonable result and wrong playback. For example, replacing Piano (a standard staff, type 1a) with Drumset (percussion staff, type 3).
Staff properties
The top section of the dialog allows you to adjust many aspects of the appearance of an individual staff. The following options are common to all types of staves:
First column:
- Style group: Display the staff Types. Type 1a and type 1b as Standard , type 2 as Tablature , type 3 as Percussion.
- Lines: The number of lines making up the staff. For tablature, this number usually matches the number of strings in the String Data dialog (exceptions being the Baroque Lute, Theorbo etc. which have more strings than lines).
- Line Distance: The distance between two staff lines of the current staff. Changes rarely needed. See how to change the scaling of all staffs in Page layout concepts chapter.
- Extra distance above staff: Increases or decreases the distance between the selected staff and the one above in all systems.
Note: (1) This setting does not apply to the top staff of a system, which is controlled by the minimum/maximum system distance (see Formatting). (2) To adjust the spacing above just one staff line in a particular system, see Fitting systems on a page: Spacers. - Scale: Changes the size of the current staff and all associated elements as a percentage. See how to change the scaling of all staffs in Page layout concepts chapter.
Second column:
- Hide when empty: Staff level setting for empty staff hiding along one system, see Showing staves only where needed chapter.
- Show clef: Whether the staff clef will be shown.
- Show time signature: Whether the staff time signature(s) will be shown or not.
- Show barlines: Whether the staff barlines will be shown.
- Hide system barline: Show/hide barline at left-hand edge of the staff.
- Merge matching rests: Check if you want matching rests in different voices to be merged rather than separate.
Third column:
- Do not hide if system is empty: Designate as the staff to show when all staffs in a system are empty, see Showing staves only where needed : Choosing the staff to show when all staffs in a system are empty chapter.
- Small staff: Create a reduced-size staff. You can set the default from the menu in Format→Style…→Sizes.
- Invisible staff lines: Make staff lines invisible.
- Staff line color: Use a color picker to change the color of the staff lines.
- Cutaway: Setting for hiding empty measures, see Showing staves only where needed : Hiding empty measure chapter.
- Advanced style properties: (see below)
Advanced style properties

Clicking on Advanced Style Properties… opens the Edit Staff Type window, the properties available vary depending on staff type.
Advanced Style Properties: common to all four staff types
First row: Lines, Line Distance: duplicated UI for the exact same property as above
Second row: Show clef, Show time signature, Show barlines: duplicated UI for the exact same property as above
At the bottom of the window:
- Template dropbox
Assigning a template changes the number of lines (type 3 percussion staff) or switch staff types altogether (type 1a, type 1b and type 2). To apply a template:
1. Make a selection from the drop-down list labeled “Template”;
2. Press < Reset to Template;
3. Press OK to accept the changes and exit the dialog (or Cancel to cancel the operation).
Advanced Style Properties: settings for standard and percussion staff (Type 1a, type 1b and type 3)
Third row:
- Show key signature, Show ledger lines: Option to turn the display of these elements ON or OFF.
- Stemless: If checked, staff notes will have no stem, hook or beam.
Advanced Style Properties: settings for standard staff (Type 1a, type 1b)
- Notehead scheme: See Notehead scheme.
Advanced Style Properties: settings for tablature staff (Type 2)

- Upside down: If not checked, the top tablature line will refer to the highest string, and the bottom tablature line to the lowest string (this is the most common option). If checked, the top tablature line refers to the lowest string, and the bottom tablature line to the highest line (e.g. Italian-style lute tablatures).
- Preview: A window at the bottom displays a short section of a specimen score as it would look with the current properties applied.
Under Fret Marks tab:

Fret marks are the numbers or letters used to indicate the location of notes on the fingerboard. The following group of properties define the appearance of fret marks:
- Font: The font used to draw fret marks. A selection of eight fonts are provided supporting all the necessary symbols in 8 different styles—both modern and historic..
- Size: Font size of fret marks in typographic points. Built-in fonts usually look good at a size of 9-10pt.
- Vertical offset: MuseScore tries to place symbols in a sensible way and you do not usually need to alter this value (set to 0) for built-in fonts. If the font has symbols not aligned on the base line (or in some other way MuseScore does not expect), this property allows you to move fret-marks up (negative offsets) or down (positive offsets) for better vertical positioning. Values are in sp.
- Marks are: Select from using Numbers (“1”, “2”…) or Letters (“a”, “b”…) as fret marks. When letters are used, the letter “j” is skipped and “k” is used for the 9th fret.
- Marks are drawn: Choice of placing fretmarks On lines or Above lines.
- Lines are: Choice of Continuous (lines pass through fret marks) or Broken (a small space appears in the line where the fretmark is displayed).
- Show back-tied fret marks: If unchecked, only the first note in a series of tied notes is displayed. If ticked, all notes in the tied series are displayed.
- Show fingering in tablature: Check to allow the display of fingering symbols applied from a palette.
Under Note Values tab: properties define the appearance of the symbols indicating note values

- Font: The font used to draw the value symbols. Currently 5 fonts are provided supporting all the necessary symbols in 5 different styles (modern, Italian tablature, French tablature, French baroque (headless), French baroque). Used only with the Note symbols option.
- Size: Font size, in typographic points. Built-in fonts usually look good at a size of 15pt. Used only with the Note symbols option.
- Vertical offset: Applies only when Note symbols is selected (see below). Use negative offset values to raise the note value symbols, positive values to lower them.
- Shown as:
- None: No note value will be drawn (as in the examples above)
- Note symbols: Symbols in the shape of notes will be drawn above the staff. When this option is selected, symbols are drawn only when the note value changes, without being repeated (by default) for a sequence of notes all of the same value.
- Stems and beams: Note stems and beams (or hooks) will be drawn. Values are indicated for each note, using the same typographic mechanics as for a regular staff; all commands of the standard Beam Palette can be applied to these beams too.
- Repeat: If several notes in sequence have the same duration, you can specify if and where to repeat the same note symbol. i.e. Never / At new system / At new measure /Always.
Note: This option is only available if “Shown as: Note symbols” is selected (see above). - Stem style:
- Beside staff: Stems are drawn as fixed height lines above/below the staff.
- Through staff: Stems run through the staff to reach the fret marks.
Note: This option is only available when “Shown as: Stems and Beams” is selected (see above).
- Stem position:
- Above: Stems and beams are drawn above the staff.
- Below: Stems and beams are drawn below the staff.
Note: This option is only available when “Shown as: Stems and Beams” and “Stem style: Beside staff” is selected (see above).
- Half notes: None / As short stems / As slashed stems.
Note: This option is only available when “Shown as: Stems and Beams and “Stem style: Beside staff” is selected (see above). - Show rests; Whether note symbols should be used to indicate also the rests; when used for rests, note symbols are drawn at a slightly lower position. Used only with the Note symbols option.
Part properties
Warning: The wording "Part" used in the heading is a misnomer as of Musescore 4.1.1
Instrument
The name of the instrument is shown here. To change the instrument,
- Click on Replace instrument and make a choice from the "Select Instrument" dialog. This replaces the instrument that this staff belongs to and changes all staffs this instrument has. It changes playback, staff name, and staff transposition etc. The Staff Type change may be unreasonable and create wrong playback.
Names
- Long instrument name: Name displayed to the left of the staff in the first system of the score or section.
- Short instrument name: Name displayed to the left of the staff in subsequent systems of the score.
Usable pitch range
- Amateur: Notes outside the amateur range are colored olive green / dark yellow in the score.
- Professional: Notes outside the professional range are colored red in the score.
Note: To disable out-of-range coloration of notes, from the menu, select Edit→Preferences… (Mac: MuseScore→Preferences…), click on the “Note Input” tab, and uncheck “Color notes outside of usable pitch range.”
Transposition
Set the octave, and up/down interval to ensure that transposing instruments are notated correctly. This is automatically done by the program for most instruments.
For transposing instruments an additional option is shown: "Prefer sharps or flats for transposed key signatures". There are three options:
- Default: Let MuseScore decide
- Flats: Prefer flats
- Sharps: Prefer sharps
Part Properties: settings for plucked strings only (Type 1b and type 2)
In addition to those listed above, staves of fretted, plucked-string instruments (Type 1b and type 2) have a few extra options at the bottom part of the window,
- Number of strings: Displays the number of instrument strings.
- Edit String Data…: This button opens a dialog box which allows you to set the number and tuning of strings. See Change tuning.
Brackets
Brackets/braces are used to connect multiple staves of one instrument (e.g. a piano's grand staff) or of a group of instruments (e.g. 2 x violins, viola and cello in string section) within a system. See Page layout concepts : system chapter.
Brackets/braces are automatically applied when a score is created in the New Score dialog. You can easily change them if the default is not what you want (see below).
To add brackets and curly braces, use Brackets palette.
Adding brackets
To add a bracket or brace to all systems:
- Click on the first measure of the staff where you want the bracket/brace to start, hold Shift and click on the measure where you want the bracket/brace to end.
- Click the desired bracket icon in the "Brackets" palette.
Alternatively:
- Select the start measure, and click the bracket into place from the "Brackets" palette.
- Select the bracket, click on the adjustment handle and drag it down to the desired position. It will snap into place.
Nested brackets can also be applied using these methods, applying the innermost first and ending with the outermost. The order can be edited subsequently using the "Column" property (see below)
Editing brackets
If you select a bracket/brace, you can edit its properties in the Properties panel (sidebar).
- Column: Moves the bracket inwards/outwards.
- Span: Extends or retracts the end of the bracket/brace.
Changing bracket type
- Select the bracket/brace in the score to be changed, then click on a new bracket/brace from the "Brackets" palette.
Changing bracket span
Use one of the following methods:
- Select the bracket, click on the adjustment handle, and drag it to the desired position.
- Select the bracket, click on the adjustment handle, and press Shift+↑/↓ to move it from staff to staff.
- Alter "Span" in the Properties panel.
Deleting brackets
- To delete a bracket/brace, select it and press Del.
Customizing bracket appearance
Brackets/Braces also have a few global properties which can be adjusted from the Style menu:
- Adjust thickness and distance from the staff in Format→Style→System.
- Adjust distance above/below in Format→Style→Page→Enable vertical justification of staves.
Notation: Rhythm, meter, and measures
Time signatures
Overview
Time signatures are applied to the score from the "Time Signatures" palette.

Setting the initial time signature for your score
This is done from page 2 of the New Score dialog.
Adding a time signature change to your score
Use any of the following methods:
- Select an existing time signature, measure, note or rest in the score, and click a time signature in a palette.
- Drag and drop a time signature from a palette onto a space in a measure, or onto an existing time signature.
Deleting a time signature
- To delete a time signature in the score, select it and press Del.
Controlling the visibility of time signatures
To hide/show time signatures on a particular staff:
- Right-click on the staff and choose "Staff/Part properties";
- Uncheck/Check "Show time signature".
To disable/enable all courtesy time signatures (at the end of systems):
- From the menu bar, select Format→Style→Page.
- Uncheck/Check "Create courtesy time signatures".
To hide or show an individual courtesy time signature:
- Select the parent time signature;
- In the Time signature section of the Properties panel, uncheck/check "Show courtesy time signature".
Creating a custom time signature
- In the Time Signatures palette, click on More, then, in the supplementary palette, click on the “Create Time Signature” button;
- In Value enter the Numerator, Denominator, and Text (the latter is optional, when you need the display to be different from the actual time signature);
- Adjust the note beaming in the Beam Groups section (see Beam groups (below)
- Press Add to transfer the newly-created time signature to the Time Signatures palette.
You can also do the same thing from the Master Palette (Shift+F9).
Adding a local time signature for a single staff
In certain cases a score may show staves with different time signatures running at the same time. For example, in the following (J. S. Bach’s Goldberg Variation no. 26):

The global time signature is 3/4, but the time signature of the upper staff has been set independently to 18/16.
To set a local time signature for just one staff:
- Hold down Ctrl (Mac: Cmd) and drag and drop a time signature from a palette onto an empty measure.
Resizing a time signature
- Select a time signature
- In the Time signature section of the Properties panel, adjust the horizontal and vertical Scale values.
Time signature properties
To open the Time signature properties dialog use one of the following:
- Right-click on a time signature and from the context menu select "Time signature properties".
- Select a time signature, then click on Time signature properties in the "Time signature" section of the Properties panel.

Appearance
This part of the dialog allows you to adjust the nominal appearance of the signature without affecting its underlying rhythmic value.
- Text: Insert the nominal numerator and denominator that you wish to appear on the score.
Alternatively, you can make a selection from a range of time signature symbols below.
Beam Groups
This section allows you to adjust the beaming patterns of notes occurring in the section controlled by the time signature.
- Click on a note to break the beam in front of it. Click again to reform the beam.
- Alternatively you can drag and drop a "beam selector" icon to the note after the beam you want to make or break.
- Click Reset to remove all changes made since this window is opened this time only, and revert to settings used last time. This button does not reset settings back to the way it was when the time signature is added from the palette. To do so, replace this time signature object with a new one.
Check the "Also change shorter notes" box if you want changes to apply to beam groups below as well.
For more information on beams, see Beams.
Time signature style
There are a few global style properties for time signatures (see Format→Style).
- Create courtesy time signatures: Found in the Page section. Check or uncheck to turn on or off.
- Clef to time signature / Key signature to time signature / Barline to time signature / Time signature to barline / Time signature to first note: Found in the Measure section. Allows you to set spacing for various aspects of time signature layout.
Stems and flags
Stem direction
Default stem direction
MuseScore aligns the stems of voice 1 notes according to the conventions of music theory. By contrast, voice 2 and voice 4 stems point downwards by default, while voice 3 stems point upwards. Voice 1 stems automatically flip upwards in the presence of voice 2 or 4 notes.
Flipping stem direction
- Select either the notehead, stem or attached beam (if any)
- Use any of the following methods:
- Press X
- Click on the "Flip direction" icon in the Note input toolbar
- Select a stem direction from the Stem tab in the Properties panel
This action will flip any attached beam as well.
Changing stem length
- Select the stem
- Use one of the following methods:
- Press ↑/↓ to extend or shorten the stem
- Change Length in the Properties panel
Creating stemless notes
To hide the stems of individual notes:
- Select one or more noteheads
- Go to the Properties panel
- Select the Stem tab
- Select the checkbox next to Stemless
To hide all stems in an instrument part:
- Right-click on the staff and select Staff/Part properties
- Click on Advanced style properties
- Select the checkbox next to Stemless
Stem and flag properties
Properties specific to stems and flags can be edited from the Stem tab in the Note section of the Properties panel:
- Stemless removes the stem (and associated beams) from the selected note(s)
- Stem direction:
- Auto determines the direction of the stem according to the voice of the selected note(s)
- Up and Down override the default stem direction
- Flag style sets the appearance of flags for the entire score to either traditional (default) or straight
- Thickness determines the stem's width
- Length determines the stem's length
- Stem offset can be used to move the stem in a horizontal and/or vertical direction
Stem and flag style
Global settings for Stem thickness and Flag style may also be set in Format→Style→Notes.
See also
Beams
Overview
MuseScore beams notes according to the beaming setting assigned in the time signature symbol used by the note and the beaming property of the note. By default, notes do not have any specific beaming property. If a property is assigned to a note, it is always used.
Controlling which notes are beamed
Changing the beaming setting inside a time signature
See the main chapter Time signatures
- Select the time signature object used by the note(s)
- Click Properties panel : Time Signature : Properties button, to open the Time Signature Properties dialog
- Edit the Beam Groups section
or
- Right click the time signature object used by the note(s)
- Choose "Time Signature Properties", to open the Time Signature Properties dialog
- Edit the Beam Groups section
Changing the beaming for selected notes
These items are in the Beam Properties palette, see Using the palettes chapter.

Note property items:
This item removes the specific beaming property of a note. Notes without specific beaming property use the setting of time signatures, see overview:

The following items assign rules. Dismissive rules override permissive rules.
This item creates a dismissive rule on beam creation connecting the selected note and both of the two adjacent notes. It forces Musescore to use flags rather than beams.

These three items create dismissive rules on beam creation connecting the selected note and the previous note:
- This item prevents Musescore from creating a beam to the previous note:

- This item prevents Musescore from creating more than one beam to the previous note:

- This item prevents Musescore from creating more than two beams to the previous note:

This item creates a permissive rule on beam creation connecting the selected note and both of the two adjacent notes:

Applying note property items
- Select note(s) and/or rest(s) and click an item in the Beam Properties palette; or
- Select note(s) and/or rest(s) and click an item under "Beam types" (Beam tab of the Properties panel); or
- Drag and drop an item from the Beam Properties palette onto a note or rest in the score.
Controlling the appearance of beams
These items are in the Beam Properties palette, see Using the palettes chapter.
Beam property items:
- Use feathered beam to indicate gradually slower tempo. This item is named "Add feathered beam: decelerate":

- Use feathered beam to indicate gradually faster tempo. This item is named "Add feathered beam: accelerate":

Creating a feathered beam
To create feathered beams use one of the following methods:
- Select one or more beams, notes or rests in the score and click the desired symbol in the Beam Properties palette.
- Select one or more beams, notes or rests in the score and click on a symbol under "Beam types" (Beam tab of the Properties panel).
- Drag and drop a beam symbol from the Beam Properties palette onto a beam in the score.
Please note that only beams with two or more components (i.e. 16th notes or shorter) can become feathered.
See the table above for a description of the beam symbol effects.
Changing the angle of a selected beam
- Click on the beam you wish to adjust;
- Click on the left/right adjustment handle and adjust the height using one of the following methods:
- Drag the handle.
- Move the handle using ↑/↓.
- In the Beam section of the Properties panel, adjust the "Beam height" properties.
- Use the center adjustment handle to set the overall height of the beam.
Beam properties
Properties specific to beams can be edited from the Beam tab of the Note section in the Properties panel:
Beam types: Alter the beaming pattern at selected notes.
Feather beams: Ditto.
Force horizontal: Make beams of selected notes horizontal.
Beam height: Adjust height and angle of beams.
Editing of these properties is covered in the sections above.
Beam style
A few global properties of beams can be set from Format→Style→Beams:
Beam distance: The vertical distance from one beam to the next.
Beam thickness
Broken beam minimum length
Flatten all beams: Check to make all note beams horizontal, regardless of context.
See also
Regroup rhythms
Overview
Standard music notation normally follows a set of conventions designed to facilitate the reading of rhythm. The basic idea is to group notes in ways that clarify which notes belong to which beat. Rules include:
- sixteenth notes should be beamed in a way that clarifies each beat
- eighth notes should be beamed in a way that clarifies each group of two beats
- longer notes that start off the beat should be broken up with ties to clarify each beat or group of two beats
A full discussion of this topic is beyond the scope of this Handbook, but for more information, see this handout.
Here is an example of a rhythm written incorrectly and then correctly:

MuseScore can correct many of these cases automatically.
Regrouping rhythms
To regroup rhythms according to the common conventions of standard music notation:
- Select the passage you wish to regroup.
- From the main menu, select Tools→Regroup rhythms.
The rhythm itself is not changed—only the notation of it.
See also
连音
创建连音
连音是以一种不同于拍号通常所允许的方式划分节拍的音符组。一拍中由三个八分音符组成的三连音是最常见的连音。

简单连音
如上图显示,三连音这样的简单连音可在音符输入模式或常规模式下输入。
音符输入模式中
- 导航到您想要创建连音位置的音符/休止符(或空白小节)。
- 为整个连音组选择一个时值 (如一组八分三连音占一个四分音符——快捷键 5).
- 使用以下任一命令:
- 按下键盘快捷键输入所需的连音:即Ctrl+3输入三连音、Ctrl+4四连音……Ctrl+9九连音封顶(Mac:Cmd+3……Cmd+9)。
- 从主菜单中选择添加→连音…,然后选取所需连音。
- 从音符输入工具栏中,单击连音图标并从下拉菜单中进行选择。
将自动为您划分音符或休止符,并应用适当的记谱法。
- 输入所需的一系列音符/休止符。
常规模式中
- 选中一个音符或休止符,指定连音组所需的完整时值。你可能需要先行在乐谱中将其创建。因此,若您想要一个八分音符三连音,需要先选中一个四分音符/休止符。
- 使用以下任一命令:
- 按下键盘快捷键输入所需的连音:即Ctrl+3输入三连音、Ctrl+4四连音……最高Ctrl+9九连音封顶(Mac:Cmd+3……Cmd+9)。
- 从主菜单中选择添加→连音…,然后选取所需连音。
- 从音符输入工具栏中,单击连音图标,并从下拉菜单中进行选择。
音符或休止符会自动为您划分,并应用适当的记谱法。
- 输入所需的一系列音符/休止符。
连续连音
若您需要输入一连串的连音,且不想重复连音命令,您可选中首个连音的首音符按照所需次数按下 R键(重复);然后使用键盘箭头来移动后续音符、重新输入或其他音符输入模式。
自定连音
更复杂的连音组可以创建如下:
- 在音符输入模式中,选中一个和连音总时值等值的音符,或在常规模式中选中一个所需整体时值的音符或休止符。
- 从主菜单中打开创建连音对话框(添加→连音…→ 其他…),或在音符输入工具栏中单击连音图标。

- 在比率字段中,指定连音所需的比率数字。
- 设置数字及括号以获得所需的连音显示。
- 按下 OK 以关闭对话框。
- 输入所需的一系列音符和休止符。
嵌套连音
连音可嵌套于其他连音内部。

要创建嵌套连音 :
- 按上述方法创建外部连音。
- 在输入单个音符时,再以此方式创建内连音(为内连音选择时值,然后使用任一连音命令对其进行适当划分)。
更改连音的显示
可以选择显示或隐藏连音数字或连音括号及更改其方向或调整括号线条粗细。详请参阅连音属性(下文)。
连音属性
所选连音的显示可在属性面板的连音栏更改。
方向:决定连音记号出现在谱表的上方还是下方。可用选项有“自动”、“上方”(↑)或“下方(↓)。
数字类型:影响数字显示。选项有“数字”、“比率”、“无”。
括号类型:设置括号显示。选项有“自动”、“括号”、“无”。
线条粗细:可见状态下的连音括号粗细。
连音样式
参阅模板和样式
"连音样式"的值可在格式→样式→连音中编辑。
"连音内样式"的值可在格式→样式→文本样式→连音中编辑。
"连音样式"包含

设置项包括:
- 属性
- 方向
- 数字类型
- 括号类型
- 连音括号
- 连音括号粗细
- 括号折钩高度
- 与音符的垂距
- 最大斜度
- 符干垂距
- 符头垂距
- 避开谱表
- 与音符的水平距离
- 与首音符符干的间距
- 与首音符符头的间距
- 与末音符符干的间距
- 与末音符符头的间距
Barlines
A full range of common barlines is contained in the Barlines palette.

Adding double and other special barlines
Changing barline type for all staves
- Select one or more barlines in a staff ;
- Click on the desired barline in the palette.
Alternatively, you can drag a barline from the palette onto a barline in the score.
Changes are applied automatically to all barlines at the same point in the score.
Changing barline type for a single staff
- Select one or more barlines in the score;
- Hold Ctrl then click on the desired barline in the palette.
Alternatively, you can hold Ctrl and drag a barline from the palette onto a barline in the score.
Only barlines in the one staff are affected.
Adding mid-measure barlines
- Select one or more notes.
- Click on a barline in the palette.
This will add a "barline" in front of each selected note. The barline is for visual purposes and does not factor into any measure operations.
If you wish to divide a measure, inserting a real barline in the process, see Splitting a measure.
Changing barline length
Here we are concerned with the vertical extension of barlines in order to link staves together, or their reduction to create partial barlines.
Extending all barlines in a staff
- Select a barline on the "start" staff;
- Use either of the following:
- Drag the end handle downwards until it meets the destination staff. This method is the best for extending barlines through multiple staves.
- Select the edit handle and press ↓.
- Check the "Span to next staff" in the Barlines section of the Properties panel; then click Set as staff default
- Repeat if required for subsequent staves.
The barline snaps into place, and all other barlines in that staff follow.

Extending selected barlines in a staff
- Select one or more barlines (and their counterparts in the staves below if there are more than two staffs to join).
- Check the "Span to next staff" in the Barlines section of the Properties panel.
Creating partial barlines
Partial barlines can be easily created by adjusting "Span from" and "Span to" in the Barlines section of the Properties panel.
Creating barlines between staves only (Mensurstrich)
See Working with Mensurstrich.
Barline properties
You can edit properties specific to barlines in the Barlines section of the Properties panel:
Style: Used to change selected barlines to one in the dropdown list.
Span to next staff: Check this to make selected barlines extend to the staff beneath.
Span from/to: used to set the vertical start and end points of one or more selected barlines.
Set as staff default: Applies the changes made in Span to next staff and Span from/to to all barlines in the staff.
Span presets: Applies the selected preset to one or more selected barlines in the score.
Barline style
Selected properties for all barlines in the score can be changed in Format→Style→Barlines:

See also
- Fixed Measure Widths for a workaround to ensure barlines are aligned vertically between systems.
- Repeat signs
Measure numbering
Showing and hiding measure numbers
Showing measure numbers automatically
By default, MuseScore shows measure numbers at the start of each system except the first one in a section. Numbering starts at the first complete measure in a section.
if you wish to change measure numbering:
- From the menu bar, select Format→Style→Measure numbers.
- Edit the following properties as required:
- Measure numbers: This is ON by default. Uncheck to turn off measure numbering.
- Show first: Check to show measure number on the first system of a section.
- All staves: Check to show measure numbers on every staff.
- Every system / Interval: If "Every system" is selected, measure numbers are shown at the start of each system. If "Interval" is selected, you can choose a measure interval at which to display measures.
- Make changes to positioning using the controls on the right.
- Edit the display of multimeasure numbers in the section below:
- Show measure number range at multimeasure rests. If checked, you can also customize the appearance and position of the numbering. Unchecked (the default setting), only the count of multimeasure rests is displayed.
Showing measure numbers manually
To always show the number of a particular measure, regardless of style settings, open Measure properties and select "Always show" from the Measure number mode dropdown.
Hiding measure numbers
To hide all measure numbers, uncheck "Measure numbers" in Format→Style→Measure numbers.
To hide the number of a particular measure, regardless of style settings, open Measure properties and select "Always hide" from the Measure number mode dropdown.
Changing the measure number sequence
Excluding a measure from the count
In Measure properties, check "Exclude from measure count" (in the Other pane).
Altering the numbering of a measure
In Measure properties, edit "Add to measure number". Both positive and negative numbers are accepted.
Resetting measure numbering for a new section
By default, numbering of measures always restarts at the beginning of a new section. To prevent this, and make numbering continuous, select the break and in the Properties panel uncheck "Reset measure numbers for new section".
Changing the position of measure numbers
To adjust the position of all measure numbers, edit the X and Y offsets of "Position above" and "Position below" in Format→Style→Measure numbers.
Measure number properties
Note that any changes made to a measure number in the Properties panel may be lost if the layout changes.
Measure number style
Values of the "Style for Measure number" can be edited in Format→Style→Measure number.
Values of the "Style for text inside Measure number" can be edited in Format→Style→Text styles→Measure number.

See also
Other measure-related pages:
Measure rests and multimeasure rests
Measure rest
A measure rest looks like a whole rest, but is centered within a measure and indicates that the entire measure (or a voice within it) is silent:

It is commonly used in all meters (except 4/2 and 8/4).
To create one or more full measure rests
Use the following method if all selected measures are "standard"—i.e. with no custom durations:
1 Select a measure, or range of measures.
2. Press Del (Mac: Backspace).
If one or more of the measures contains a custom duration, use the following method instead:
To create a full measure rest in a particular voice
- In the appropriate voice, enter a rest that extends for the full measure.
- Make sure the rest is selected, then press Ctrl+Shift+Del (Mac: Cmd+Shift+Backspace).
If the voice contains only rests you can select the first rest and invoke the conversion keystroke.
Multimeasure rest
A multimeasure rest is used to indicate a run of empty measures, the number of measures being shown by a figure above/below the staff.

Enabling and disabling multimeasure rests
Multimeasure rests can be turned on/off with the shortcut M, or by checking "Multimeasure Rests" in Format→Style…→Rests.
By default, if multimeasure rests are enabled, any sequence of two or more empty measures is automatically converted to multimeasure rests.
To change the minimum number of empty measures needed to trigger multimeasure rests:
- From the menu, choose Format→Style…→Rests.
- Check "Multimeasure rests" (if the option is not already enabled).
- Edit "Minimum number of empty measures".
Multimeasure rests can be turned on/off independently in the score and instrument parts.
Breaking multimeasure rests
Multimeasure rests are automatically broken at important points, such as double barlines, rehearsal marks, key signature or time signature changes, section breaks etc.
However, you can opt to break a multimeasure rest elsewhere as follows.
- Disable multimeasure rests;
- Right-click on the measure at which you want the multimeasure rest to break, and select Measure properties.
- In the dialog, check "Break multimeasure rest".
- Click OK.
- Re-enable multimeasure rests.
Multimeasure rest properties
You can edit properties specific to multimeasure rests in the Multimeasure rest section of the Properties panel:
Show number: This box is checked by default. Uncheck it to hide the multimeasure number.
Number position: Adjust the vertical position of the multimeasure number, above or below the rest.
Multimeasure rest style
Values of the "Style for text inside Multimeasure rest range" can be edited in Format→Style→Text styles→Multimeasure rest range .
Values of the "Style for Measure numbers" can be set in Format→Style…→Measure numbers:

Others from Format→Style…→Rests:

See also
Other measure-related pages:
Pickup and non-metered measures
Creating a pickup measure
A pickup measure, also known as an upbeat or anacrusis, is a partial, or incomplete, measure at the beginning of a score or section.
Note: By convention, measure numbering starts at the first complete measure.
Specifying the pickup duration during score creation
- Click on Measures in the "Additional score information" page (page 2) of the New Score dialog;
- Check "Create pickup measure";
- Choose an underlying time signature using the spin controls below.
Converting a measure into a pickup
- Right-click on the measure and choose Measure properties;
- In the Measure duration section, next to "Actual", choose an underlying "time signature";
- Click OK; or click Apply and then ← or → if you want to configure an adjacent partial measure.
It is accepted musical practice to omit the same duration as the pickup from the final measure of the piece or of the same repeat section. The same method of shortening the measure applies here.
Creating non-metered measures
A non-metered measure is one which is less or greater in duration than the indicated time signature.
A measures of less duration than the indicated signature may be created in exactly the same way as a pickup measure (see above).
Other ways of creating non-metered measures are described below:
Inserting notes and rests
Extra notes/rests can be inserted in a measure with the help of either a keyboard shortcut, or by using a special mode of entry called Insert mode:
Using a keyboard shortcut
- Select the note or rest in the score before which you want to insert notes/rests;
- Enter note-input mode;
- Select a duration;
- Press Ctrl+Shift (Mac: Cmd+Shift) while adding the note/rest from the keyboard or mouse.
Using Insert mode
- Make sure you have the element selected where you want to start inserting notes/rests;
- Click and hold the Note input icon, and select Insert (or if Insert is the current default, just press N);
- Enter a note or rest as you would in step-time mode. Each note is inserted before the current cursor position;
- Move the cursor forward and backward if required (using the arrow keys), to change the insertion point.
If, at any time, the total duration of the notes and rests within the measure does not match the time signature, a small + or - sign will be shown above the measure.
Joining measures
This command joins selected measures into one measure.
Method A. To join two measures only:
- Select the barline between the two measures;
- Press Ctrl+Del; or select Tools→Remove selected range.
Method B. To join any number of measures:
- Select the measures you want to join;
- From the menu bar, select Tools→Measures→Join selected measures.
Notes:
1. If you select measures on only one staff in a score with multiple staves, the same measures will be joined in each staff of the system.
2. Beaming may be automatically modified.
Splitting a measure
This command inserts a barline before a selected note, splitting the measure into two.
Use one of the following methods:
- Select a note; then hold Ctrl and click a barline in a palette.
- Hold Ctrl and drag a barline (from a palette) to a note.
- Select a note; then, from the menu bar, select Tools→Measures→Split Measure Before Selected Note/Rest.
See also
Other measure-related pages:
Measure properties
Opening and using the dialog
The Measure properties dialog allows you to adjust various properties of an individual measure—such as visibility, duration, numbering and width ("Stretch"). To change all measures on the score, use Format → Style window : Score, Page, Measure numbers, and Measure categories. To change all measures of one staff on the whole score, change the staff Staff / Part properties.
-
To open Measure properties, right-click on a measure and select "Measure properties".

If you only want to adjust one measure, click OK to make the changes permanent. However, if you also want to adjust adjacent measures there is no need to close the dialog; simply click Apply, then use the arrows on the bottom left of the window to move the dialog to the new measure. The new measure number appears both at the top of the dialog and in the status bar.
Staves
Visible : Uncheck/check the boxes to hide/show the selected measure.
Stemless: Check/uncheck the box to hide/show stems.
Measure duration
Nominal: This is the time signature set in the score.
Actual: Adjust these figures to increase or decrease the duration of a measure.
Other
Exclude from measure count: Check to make the count skip the selected measure.
Break multimeasure rest: See Measure rests and multimeasure rests.
Measure number mode: Allows you to display/hide measure number for the selected measure irrespective of style settings.
Add to measure number: Changes numbering from this measure onwards in the score.
Layout stretch: This property is normally adjusted first with a shortcut (see Stretch); use "Measure properties" for fine adjustment.
Play count: This only appears if the measure is before an end repeat barline. It indicates the number of times the repeat section is played.
The play count of the measure with the end repeat barline must be set one higher than the number of times you want the measure to play (this is usually equal to the number of entries in that volta repeat list + 1).
Take the following score:
 m3 | m4 :| (volta 2,5) m5 | m6 :| (volta 6) m7 | m8 | m9 ||")
Measure 4 should have play count set to 4
Measure 6 should have play count set to 3
See also
- Fixed Measure Widths for a workaround to ensure barlines are aligned vertically between systems.
Other measure-related pages:
记谱:音高
Clefs
Clefs are applied to the score from the "Clefs" palette.
Setting the initial clef for a staff
MuseScore automatically applies the most appropriate clef(s) for the instrument when creating a new score. You can easily change this from the score window if needed.
Adding or changing a clef
Add/Change a start clef
To change a clef at the start of a system, use one of the following:
- Select the first measure in the system and click a clef symbol in the palette.
- Drag a clef from the palette onto the first system measure.
- Select the clef and click a clef in the palette.
- Drag a new clef from the palette onto the clef.
Add/Change a mid-measure clef
To add/change a mid-measure clef before a note, use one of the following:
- Click on the note, then click a clef in the palette.
- Drag a clef from a palette onto the note
To add/change a mid-measure clef in front of a barline, use one of the following:
- Select the following measure and click a palette clef.
- Drag a clef from a palette onto the following measure.
Notes: (1) “Mid-staff” clefs are always smaller than the main system clef. (2) Notes after a clef change are automatically repositioned so that they continue to sound at the original pitch.
Delete
To delete a clef, just select it and press Del. Note that clefs at the beginning of systems cannot be deleted.
Controlling the visibility of clefs
Standard clefs
To hide/show clefs at the beginning of all systems except the first:
- From the menu bar, select Format→Style→Page;
- Uncheck/check Create clef for all systems.
Mid-measure clefs are unaffected.
To hide/show all clefs on a selected staff:
- Right-click on a measure;
- Choose "Staff/Part properties";
- In the dialog, uncheck "Show clef".
This affects clefs at the start of a system and mid-measure.
Courtesy clefs
To hide/show courtesy clefs:
- From the menu bar, select Format→Style→Page;
- Uncheck/Check the Create courtesy clefs.
If courtesy clefs are enabled, you can still hide an individual courtesy clef as follows:
- Select the relevant standard clef;
- In the Properties panel, uncheck/check Show courtesy clef on previous system.
Clefs and transposition
Using octave clefs
[To be added]
Using different clefs for transposed and concert pitch
[To be added]
Clef properties
See Courtesy clefs (above).
Clefs applied to an entire measure or the first note in a measure are shown before the barline.
To move the clef after the barline:
1. Select the clef
2. Open the Properties panel
3. Under Position relative to barline, choose After
To replace the first clef in a score, see Add/Change a start clef.
Clef style
Tablature users can select the type of TAB clef displayed:
- From the menu, select Format→Style→Clefs
- Set the default TAB clef to "Standard" or "Serif" as required.
Other style properties are available in Format→Style→Page, namely:
Create clef for all systems
Create courtesy clefs
For details, see Controlling the visibility of clefs (above).
Key signatures
Overview
Key signatures are applied to the score from the "Key signatures" palette.
Setting the initial key signature for your score
The initial key signature is set from page 2 of the New Score dialog.
Adding a key signature change to your score
Use one of the following methods:
- Select a measure and click a key signature in the palette.
- Drag a key signature from the palette onto an empty part of a measure.
Note: It is also possible, though uncommon, to add a key-signature mid measure by selecting a note then clicking a palette key signature, or dragging the key signature to a note.
Adding a local key signature for a single staff
If you wish to add a key signature to only one staff, leaving others unchanged, apply one of the following methods:
- Select the measure from which you want the new key signature to apply, then press and hold Ctrl (Mac: Cmd) and click on a key signature in the (Key signatures) palette.
- Press and hold Ctrl (Mac: Cmd), then drag a key signature from a palette on to a measure.
Selecting a key signature for a single staff
If you wish to select a key signature for a single staff only, press and hold Ctrl (Mac: Cmd), then click on the key signature.
Replacing an existing key signature
Use any of the following methods:
- Select the key signature to be replaced, and click a new key signature in a palette.
- Drag a key signature from the palette onto the key signature to be replaced (or onto the measure containing the key signature).
To replace the key signature on a single staff only, press and hold Ctrl (Mac: Cmd) before carrying out the above operations.
Deleting a key signature
- To delete a key signature in the score, select it and press Del.
- To delete a key signature from single staff only, hold Ctrl (Mac: Cmd) while selecting it, then press Del.
Controlling the visibility of key signatures
To show key signatures only at the beginning of a score, and at a key change:
- From the menu bar, select Format→Style→Page;
- Uncheck/Check "Create key signature for all systems".
To hide/show all courtesy key signatures (at the end of systems):
- From the menu bar, elect Format→Style→Page;
- Uncheck/Check "Create courtesy key signatures".
To hide/show a particular courtesy key signature:
- Select the parent key signature;
- In the Properties panel, uncheck/check "Show courtesy key signature on previous system".
Key signatures and transposing instruments
Care needs to be taken when working in written pitch and applying a key signature directly to a transposing instrument. For example, a Bb clarinet is written a tone higher than it sounds; so, to get the clarinet to display in G major, you need to apply a key signature of F major from the palette. And so on.

Open/Atonal key signature
Some instruments (e.g. French horn) are conventionally written with no key signature. To achieve this, you need to add an open/atonal local key signature to the staff (this is already done in scores created from templates).
An open/atonal key signature looks similar to a 'C major/A minor' key signature. However, unlike standard key signatures, an open key signature always remains the same, regardless of key changes to the rest of the score.
Creating a custom key signature
To create a custom signature:
- In the "Key signatures" palette, click More, then Create key signature

-
Drag accidentals onto the staff image as required. Note: Accidentals are horizontally aligned by default. If you want to an accidental in a custom position, hold Ctrl (Mac: Cmd) while dragging it.

-
To remove an accidental select it and press Del. Note: The Clear button deletes all added accidentals.
- To add the completed signature to the main palette, click Add.
Note: Custom key signatures are adapted to transposing instruments automatically. If You want transposing instrument to use custom key signature exactly the same, as it is in palette, You need to transpose it back. Select measure where key signature is placed and use Tools→Transpose.

Key signature properties
You can edit properties specific to key signatures in the Key signature section of the Properties panel:
Show courtesy key signature on previous system: See Controlling the visibility of key signatures (above).
Mode: You can select a mode for the key signature if required—major, minor, dorian etc. The default is "unknown".
Key signature style
Various style properties affect key signature display.
Format→Style→Page
Create key signature for all systems
Create courtesy signatures
The use of these properties is discussed in Controlling the visibility of key signatures (above).
Format→Style→Accidentals

Here you can change the way accidentals are displayed in key signature changes in the score.
Format→Style→Measure
Clef to key signature
Key signature to time signature
Barline to key signature
Key signature to barline
Key signature to first note
These properties control the various distances before and after key signatures in the score.
See also
Transposition
Overview
Transposition is the act of raising or lowering the pitch of a selection of notes by the same interval.
In MuseScore, you can transpose your music using keyboard shortcuts, or via the Transpose dialog.
Transposing with keyboard shortcuts
To transpose with keyboard shortcuts, first select a range of notes (See Selecting elements). Then use one of the following options, depending on how you need to transpose your music:
Transpose chromatically
Press ↑ or ↓ to move the selection up/down in semitone steps
Transpose diatonically
Press Alt+Shift+↑/↓ to move the selection up/down in scale degrees (Mac: ⌥+Shift+↑/↓).
Transpose by an octave
Press Ctrl+↑/↓ to move the selection up/down in octave steps (Mac: ⌘+↑/↓).
Using the transpose dialog
The Transpose dialog gives you more control over transposition, with options to transpose to selected keys or by specific intervals.
First select a range of notes you wish to transpose. (See Selecting elements). If no selection is made, the whole score is automatically selected for transposition.
Then open the dialog by selecting Tools → Transpose...
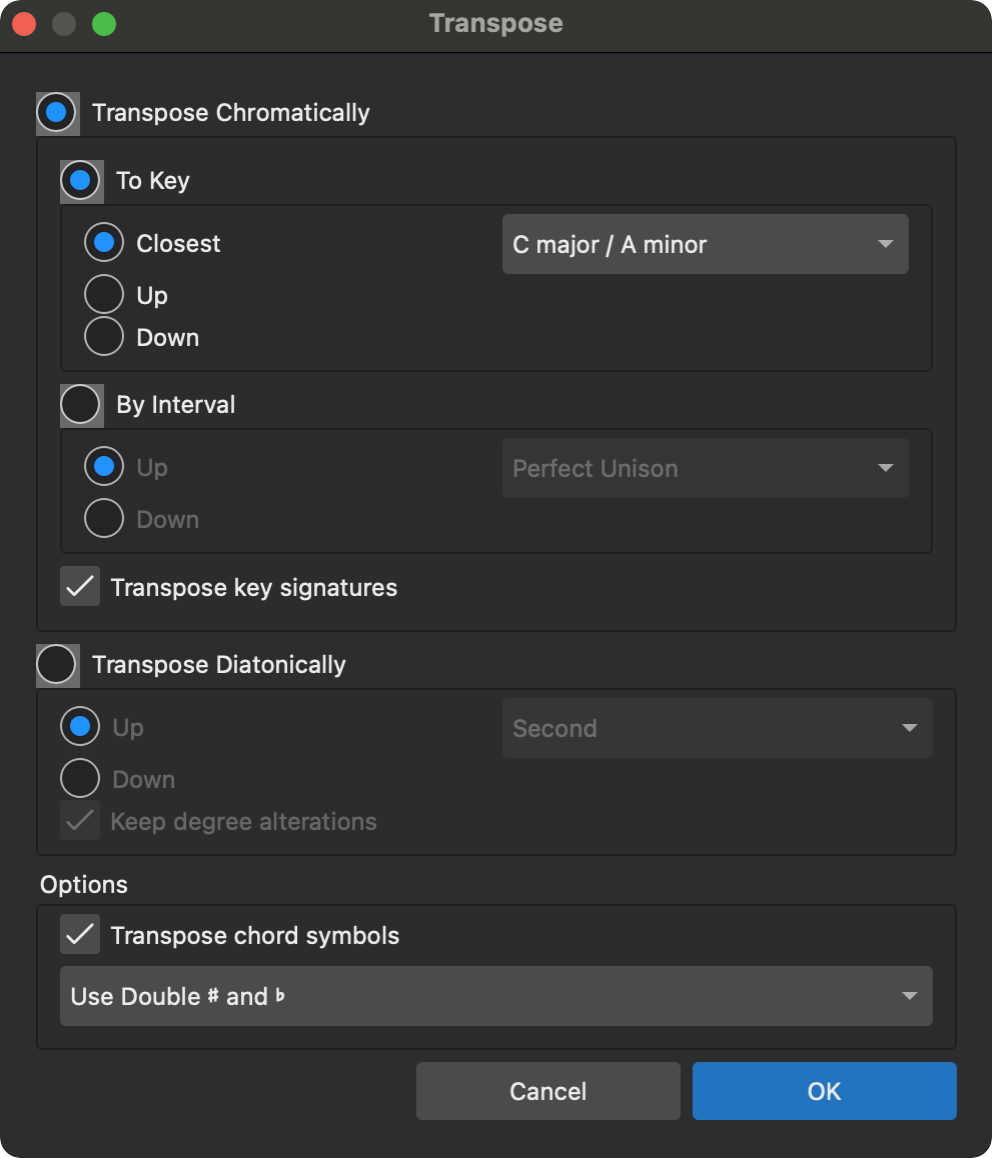
Transpose Chromatically
When this is selected, you can choose to transpose to a specific key, or by specified interval.
To transpose chromatically to a specific key:
- Select To key
- Select whether to transpose to the Closest key (relative to the current key signature of the selection), or Up or Down to the destination key signature
- Choose your destination key signature from the drop down menu
- Leave Transpose key signatures selected to transpose any existing key signatures in your selection (deselecting this will leave any existing key signatures unchanged)
- Leave Transpose chord symbols selected to transpose any existing chord symbols in your selection (deselecting this will leave any existing chord symbols unchanged)
- Click OK
To transpose chromatically by interval
To transpose selected notes up or down in semitone increments:
- Select By interval
- Select whether to transpose your selection Up or Down by the specified interval
- Select the transposition interval from the drop down menu
- Select options for Transpose key signatures and Transpose chord symbols as required (see above)
- Click OK
Transpose Diatonically
Select this to transpose the selection by a specified interval without changing the existing key signature(s). Note: the intervallic relationships between pitches in your selection will change as a result!
- Select Transpose Diatonically
- Select whether to transpose your selection Up or Down by the specified interval
- Leave Keep degree alterations selected to retain any accidentals in the selection (Note: accidentals will be modified relative to the existing key signature. Note also: Deselecting this will remove any existing accidentals upon transposition)
- Leave Transpose chord symbols selected to transpose any existing chord symbols in your selection (see above)
- Click OK
Working with transposing instruments
Transposed and concert pitch
Transposing instruments (such as the clarinet, French horn, trumpet etc.) are notated at a different pitch (and key signature) to how they sound. The notated pitch is called the written pitch, while the actual pitch is called concert or sounding pitch.
By default MuseScore displays all staves at written pitch. However, if you wish to view the score at concert pitch go to the Status Bar (located in the bottom right of MuseScore's main window) and check the "Concert pitch" toggle, which includes a tuning fork icon.

Setting the interval of transposition
When you set up a score in the New Score, or Add or remove instruments dialogs, transposed key signatures are automatically applied to any transposing instruments. However if for any reason you need to set up the staff transposition manually, this is how to do it.
- Right-click on the instrument staff and select Staff/Part properties;
- Next to "Transpose" in the lower part of the dialog, select the interval that the instrument sounds above/below concert pitch. (Music for the Bb clarinet, for example, is written a tone above its sounding pitch and the transpose setting is therefore a major second down.)

- Click OK.
The correct transposed key signature will now appear on the staff.
Controlling enharmonic spelling
The enharmonic spelling of the transposed key signature, whether in sharps or flats, is set in Staff/Part properties (see Setting the interval of transposition ).
To change the enharmonic spelling of pitches in the score, see Change spelling.
Octave lines
Overview
Octave (Ottava) lines are used to indicate that a section of music is to be played one or more octaves above or below written pitch. 8va alta/bassa lines are particularly common in piano scores, though they are sometimes used in other instrumental music. 15ma alta (2 octaves above) and 15ma bassa (2 octaves below) are also occasionally used. MuseScore creates playback for ottava. The line may be styled as solid or dotted:
8--------┐or 8va--------┐: Play one octave above written pitch.
8--------┘or 8va--------┘: Play one octave below written pitch.
Adding an octave line to your score
Ottava lines can be found in the Pitch and Lines Palette. To add one to note(s) or measure, and adjust its time range, see Using the palette and Other lines : Apply line chapters. To fine tune layout position, see Adjusting elements directly.
Octave line properties
Properties specific to the selected ottava(s) can be adjusted in the Ottava section of the Properties panel, namely:
Style tab
Type: Specifies whether the Ottava line is 8va, 8vb etc.
Show number only: Hides any text (such as “va”).
Show line: Makes the line visible / invisible. Text is unaffected.
Allow diagonal: Allow line to slope if required.
For other properties in this tab, see Line properties.
Text tab
This has a similar user interface to general lines (see Line properties), but uses special code to specify the ottava text.
Octave line style
See the main chapter Templates and styles
- Values of the "Musical symbols font" can be edited in Format→Style→Score. The va and ve characters are glyphs that can be added from the special character window . They use "Musical symbols font" only, see Musescore 3 handbook Fonts chapter.
- Values of the "Style for Ottavas" can be edited in Format→Style→Ottavas.
-
Values of the "Style for text inside Ottavas" can be edited in Format→Style→Text Style→Ottavas.

Noteheads
Overview
This chapter discusses the appearance of notehead in Musescore.
Notehead schemes
One aspect of music notation systems is notehead scheme. A scheme is a set of rules used to decide notehead shape's meaning, some of them are supported in Musescore. Supported schemes relate notehead meaning to a note's:
- duration: as in the most widely used scheme.
- pitch (using movable-do or absolute pitch solfege): literally written on it, and
- pitch (relative pitch using shape note solfege): as in "shape note notation" (see reference under External links).
The most widely used scheme is very likely the only one known to many musicians. It is referred to as "Normal" in Musescore and is the default settings for new staff. Details of the nine schemes available in Musescore are covered in Custom staff types:Notehead scheme.
These two-way relationships are usually strictly one-to-one, but could also be loosely one-to-many. Shape note solfege is like a variant of movable-do solfege. For example, in one type of "shape note notation", a triangle must be used to notate a relatively pitched "C4", but triangles are also read as relatively pitched "C"s or "F"s only, and triangles must sing "Fa" or a syllable agree upon by singers on-site. The loosely related shape note solfege notates interval perception way better than "Normal".
Notehead shape

Shown above, the diamond notehead can be used for harmonic notes in guitar, violin etc; and slash notehead for guitar strums etc. The cross is also known as crosshead, ghost note, or dead note.
Final display of notehead shape in Musescore is determined by three factors: the notehead type factor, the pitch factor, and the duration factor (or note-value, rhythm).
Pitch factor
Note pitch may affect affect notehead shape, depending on the scheme. But it only happens on note(s) that do not use an overriding Notehead type property, see "Notehead type factor" section. "Normal" notehead scheme does not use pitch to determine notehead shape.
Duration factor
The duration factor is determined by note's duration, to edit duration see Entering notes and rests and Editing notes and rests chapters. It also can be visually overridden for individual note, while keeping the real value and playback intact.
Notehead type factor
Options available for notehead type factor depends on staff type:
- On Standard staffs (type 1a, type 1b), there are three level:
- Level 1 Notehead scheme of a staff : Default is "Normal".
- Level 2 Notehead scheme of a note (option named "Notehead System" in Musescore 4.1.1):
- The default option "Auto" means "ignore this level".
- Other options: scheme to use on this note, overrides Level 1.
- Level 3 Notehead type property of a note. Affects notehead shape if and only if the result scheme of Level 1 and Level 2 is "Normal".
- Tablatures (type 2) do not use notes. To change selected fret number(s) into crosshead, click the cross item in the Noteheads palettes. To enclose selected fret number(s) with brackets (parentheses, dead note or ghost note), use Shift+X. Only the first two items of Noteheads palettes works on Tablatures.
- On percussion staffs (type 3), instrument (like snare or hi-hat, not the "drumset" Musescore Instrument) determines the notehead type factor. See Drumset customization. Only some Noteheads palettes work on percussion staffs.
Notehead scheme is used to determine notehead shape unless overridden by individual note's Notehead type property. When notehead scheme is not overridden, note pitch may affect notehead shape, depending on the scheme. "Normal" notehead scheme does not use pitch to determine notehead shape. When a note use an overriding Notehead type property, note pitch information does not affect notehead shape at all.
On standard staffs (type 1a, type 1b), when "Normal" notehead scheme is used, Musescore assigns the first (circle) option (named "normal") to the note's notehead type property automatically by default.
On percussion staffs (type 3), when "Normal" notehead scheme is used, depending on the instrument (like snare or hi-hat, not the "drumset" Musescore Instrument), Musescore assigns one of the four options automatically to the note's notehead type property by default. They are boxed with pink rectangles in the images below, the four Properties panel: notehead type options, correspond to the four items in Notehead palettes.
Do not confuse the first (circle) option named "normal" with the "Normal" notehead schemes. The circle option will not be discussed anywhere else inside this chapter to avoid confusion.


Changing notehead shape
In Musescore, you can assign custom noteheads onto notes on Standard staffs and Percussion staffs but not on Tablature. There are six methods to change the notehead type factor and duration factor.
These three methods changes notehead type factor of notes on standard staffs, and only works when each other are properly configured, read and understand the three level in the overview first.
- To change level 1 notehead scheme of a single staff, affecting all notes:
- Right click on an empty part of the desired staff and select Staff/Part properties.
- Click on the Advanced style properties button (opens Edit Staff Type window).
- Select an option in Notehead scheme dropdown.
- To change level 2 notehead scheme of note(s):
- Select note(s) on a score.
- In the Properties panel, open Note: Head tab.
- select an option from the Notehead system dropdown (you may need to click "Show more" at the bottom of the panel to reveal it): the default "Auto" means "ignore this level".
- To change level 3 notehead type property:
- Select note(s) on a score.
- Use one of the following:
- In Properties panel, open Note: Head tab, select a Notehead type, or
- Click on an item in the Noteheads palettes, or drag it onto a notehead in the score.
To change notehead type factor on percussion staffs, see Drumset customization. Only some items in Noteheads palette work on percussion staff.
To change a note's duration factor:
- To change note duration, see Entering notes and rests and Editing notes and rests.
- To change the apparent duration without altering real value so that playback is not affected:
- Select note(s) on a score.
- In the Properties panel, open Note: Head tab.
- Select the desired option from the Override visual duration (you may need to click "Show more" at the bottom of the panel to reveal it): the default "Auto" means "no override"
Adding pitch information to notes
")
shown above 7 Shape (Aikin), a "shape note notation"
There are six methods to change "pitch".
"Normal" and some notehead scheme (see Overview) relates vertical position to pitch:
- To change note pitch, see Entering notes and rests and Editing notes and rests.
- To modify the playback pitch of note(s) on score without altering notation: In Properties panel, click General: Playback , edit Tuning (cents). This is useful for reasons explained in Musescore 3 Handbook's Tuning systems, microtonal notation system, and playback. Does not work on instruments using Muse sounds (yet) on Musescore 4.1.1
Some notehead scheme (see Overview) relates notehead shape to pitch information, and loosen the relationship between note vertical position and pitch.
- [copied from ms3 handbook, but cannot figure out on all staff types ms 4.1.1, please add missing info / change/ remove, also see https://github.com/musescore/MuseScore/issues/16500 ] The brackets (parentheses, dead note or ghost note) item in Noteheads palettes can be added to a note or accidental.
- To change selected fret number(s) into crosshead, click the cross item in the Noteheads palettes. To enclose selected fret number(s) with brackets (parentheses, dead note or ghost note), use Shift+X.
- To use custom notehead shape for visual pitch representation:
- Change level 1 setting as required for the staff.
- Use level 2 "Normal" to override level 1 notehead scheme for selected note(s), but do not change level 1 setting:
- Select note(s) on a score.
- In the Properties panel, open Note: Head tab.
- Select an "Normal" from the Notehead system dropdown (you may need to click "Show more" at the bottom of the panel to reveal it).
- Assign level 3 notehead type property. Use either one of the following:
- In Properties panel, open Note: Head tab, select a Notehead type, or
- Click on an item in the Noteheads palettes, or drag it onto a notehead in the score.
- These note(s) will be always use this item, regardless of any future pitch change by user unlike other notes on this staff.
- Change duration factor as required.
- To loosen the relationship between note vertical position and pitch so that all notes on a staff create desired playback, take advantage of 'Transposing instruments' feature.
Changing notehead direction
To move notehead(s) horizontally to the other side of stem, use one of the following:
- Press Shift+X, or
- In Properties panel, open Note: Head tab, select a Notehead direction (you may need to click "Show more" at the bottom of the panel to reveal it).

(Note: Contrast this command with X which move notehead horizontally and vertically to other side the stem and beam)
Notehead properties
Selecting a note(s) on score, in the Properties panel Note: Head tab :
- Notehead parentheses: Add or remove parentheses.
- Notehead type: See overview and changing notehead shape.
- Hide notehead: Makes notehead invisible, see Properties: visibility.
- Small notehead
- Duration dot position: This provides an alternative vertical offset for the duration dot.
- Show more / Show less button
- Notehead system: level 2 Notehead scheme, see Overview. The default "Auto" means "ignore this level".
- Override visual duration: change duration factor, see Overview. "Auto" means "no override".
- Note direction: See Changing notehead direction (above).
- Notehead offset: This changes the offset of the notehead only (to change the offset of the complete note, use "Offset" in Properties: Appearance instead).
Notehead style and font
There are 8 font options (two new options compared to Musescore 3) for notehead set in Format→Style→Score. Notehead does not use style profiles (Templates and styles).
Noteheads palette is displayed with Bravura font.
Sharing noteheads between voices
When two notes in different voices coincide on the same beat, they can either share a single notehead, or else be offset to allow the display of both noteheads. This is done automatically by MuseScore according to certain rules (see below).
To force two offset noteheads in different voices to share a single notehead, use one of the following methods:
- Make the smaller-value notehead invisible. This works for the majority of cases.
- Select the smaller value notehead and in the Note section of the Properties toolbar change "Head type (visual only)" to that of the higher value note.
Rules for automatically sharing or offsetting noteheads:
- Notes with stems in the same direction do not share noteheads.
- Dotted notes do not share noteheads with undotted notes.
- Black notes do not share noteheads with white notes.
- Whole notes never share noteheads.
Remove duplicate fretmarks in tablature
If you are using paired standard and tablature staves you will come across situations where a shared notehead in the standard staff generates two fretmarks in tablature. In this case simply hide one of the fretmarks by making it invisible.
See also
External links
Ambitus
An ambitus indicates the range of notes included within a stave. It is used to indicate the appropriate voice for a particular part. See Wikipedia: Ambitus.
Adding an ambitus to your score
To create an ambitus choose one of the following methods:
- Select the desired start clef and click on the ambitus symbol in either the Pitch or Lines palette.
- Drag the ambitus symbol from either the Pitch or Lines palette and drop it onto the desired start clef.
Changing the range of an ambitus
The top and bottom notes of the range can be manually adjusted via Properties.
Ambitus properties
Four different properties of the ambitus can be manually altered:
1. style: vertical or diagonal
2. notehead type
3. notehead duration
4. line thickness of the line joining the two noteheads
Respell pitches
Manually changing the enharmonic spelling of notes
To change the enharmonic spelling of a note, or notes, in both written and concert pitch views:
- Select a note, or group of notes;
- Press J;
- Continue pressing J to cycle through the enharmonic equivalents.
To change the enharmonic spelling in the written pitch view, without affecting the concert pitch view, or vice versa:
- Select a note, or group of notes;
- Press Ctrl+J (Mac: Cmd+J);
- Continue pressing the same combination of keys to cycle through the enharmonic equivalents.
Note: If the pitches of selected notes are not all the same, the effect may be unpredictable.
Automatically respelling all notes in a selection
Respell pitches
- From the menu, select Tools→Respell Pitches.
记谱:表情记号
Articulations
This chapter discusses articulation symbols available in the Articulations palette (accents, staccato, vibrato markings etc).
To add verbal articulation objects available in the Text palette (legato, pizz. , arco, tremolo etc) to a score, see Entering and editing text chapter. Guitar articulation is covered in chapters under Idiomatic notation: Guitar. Brass or woodwind articulation (Fall, Doit, Plop, Scoop) is covered in Arpeggios and glissandi.
Adding articulations to a score
Keyboard shortcuts
To add an articulation with a keyboard shortcut:
- Select one or more notes;
- Apply the relevant shortcut from the list below:
- Marcato: Shift+O
- Accent: Shift+V
- Tenuto: Shift+N
- Staccato: Shift+S
Toolbar

Certain articulations (accent, marcato, staccato, and tenuto) can be added from the note input toolbar (above the document pane).
- Select one or more notes;
- Click on the desired icon in the articulations toolbar area.
Articulations palette

To add an item to a score:
- Select one or more notes;
- Click on the desired articulation in the Articulations palette;
Alternatively, drag and drop an articulation symbol from the palette to a notehead.
Articulations playback
Certain articulations affect note playback—such as staccato, staccatissimo, louré (tenuto + staccato), and accents. This is handled automatically by the program.
Articulation properties
Editable properties of selected articulation(s) on the score are shown in the Properties Panel.

- Placement: This alters the position of the symbol above or below the note.
Articulation style
See the main chapter Templates and styles
- Values of the "Style for Articulations & Ornaments" can be edited in Format → Style → Articulations & Ornaments.
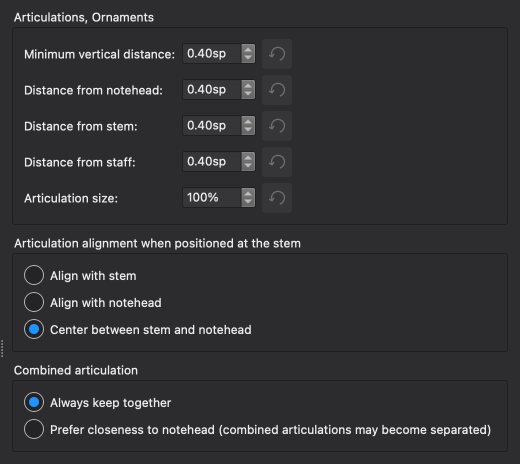
Shown below are the result of some options on the score.
Alignment options
-
Align with stem
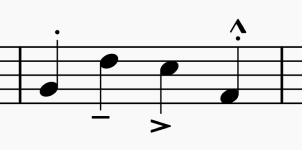
-
Align with notehead
-
Center between stem and notehead
Combined articulation options
-
Always keep together

-
Prefer closeness to notehead (combined articulations may become separated)

Dynamics
In music, the dynamics of a piece are the variation in loudness between notes or phrases (wikipedia. In Musescore, dynamics symbol objects should be used to indicate dynamics. They are Text objects. Musescore understands them to create appropriate playback.
Adding a dynamics symbol to a score
Using the palette

All dynamics symbol objects are in the Dynamics palette. To add a dynamics symbol to the score, use either one of the following methods:
- Select one or more notes, and then click an item in a palette; or
- Drag an item from a palette onto a note.
To add a dynamic symbol that is not present in the Dynamics palette, for example poco f, follow these steps:
- Choose one symbol that is musically closest to the desired symbol. For the example above, it is reasonable to add a f symbol.
- Add it onto the score and then modify it.
Using a keyboard shortcuts
There is no shortcut assignment options for adding any dynamics symbols onto a score yet.
Changing appearance of a dynamics symbol
Depending on software version, changing appearance of dynamics symbol on a score may or may not change its playback, refer to "Changing playback" section below.
Adding plain characters
Plain characters are characters entered using (typing on) a computer keyboard, their formatting behavior is different from that of professional glyphs. See musescore 3 handbook Fonts chapter.
- Select a dynamics symbol.
- Enter edit mode (double click).
- Type text before or after the dynamics text.
Adding profession glyphs
Profession glyphs are not plain characters, their formatting behavior is different. They are not italic plain characters. They are only created using keyboard shortcut shown below, but not copied from other programs or the internet, as they are not exactly raw unicode characters. See musescore 3 handbook Fonts chapter.
- Select a dynamics symbol.
- Enter edit mode (double click).
- Use the following keyboard shortcuts:
| Glyph | Windows & Linux Shortcut | Mac Shortcut |
|---|---|---|
| Piano p | Ctrl+Shift+P | Cmd+Shift+P |
| Forte f | Ctrl+Shift+F | Cmd+Shift+F |
| Mezzo m | Ctrl+Shift+M | Cmd+Shift+M |
| Rinforzando r | Ctrl+Shift+R | Cmd+Shift+R |
| Sforzando s | Ctrl+Shift+S | Cmd+Shift+S |
| Niente n | Ctrl+Shift+N | Cmd+Shift+N |
| Z z | Ctrl+Shift+Z | Cmd+Shift+Z |
Combining dynamics with Expression Text
An Expression Text object can be added beside a dynamic symbol object to indicate dynamics. To add one to the right of a dynamics symbol:
- Select a note that has a dynamics symbol attached, or select the dynamics symbol.
- Click on the expression item in the Text palette.
Snap to (An automatic layout feature)
When an Expression Text object is added to a note that is already attached to a dynamics symbol (or vice versa), the two items align automatically. Dragging and moving either one of them moves both. Changing the Position property of either one changes both. This behavior is called "Snap to", and can be changed with the Expression Text object's Properties panel: Snap to dynamic property, see also the main chapter for Expression Text object. source https://musescore.org/en/node/351407.
Changing formatting of characters inside a dynamics symbol
Explained in Dynamics symbols properties and "Dynamics symbols style" section below.
Changing playback of a dynamics symbol
Playback feature of dynamics symbols is under vigorous developement, it may change drastically among software versions. Information provided here is valid for Musescore 4.2 beta (November 2023). It could be outdated at the time of reading. Please help update this chapter.
To summarize the difference from musescore 3,
- Dynamics symbols work regardless of instrument's Sound, see Mixer chapter.
- Muse sounds understand dynamics symbols but the effect is not adjustable.
- The Velocity property is only available in individual notes (but not of dynamic symbols), it is functional when Soundfont is used, 64 is the default value, see Properties panel. Volume does not depend alone on Velocity property.
The followings are details of changes, it is also suitable to read for users not familiar with musescore 3:
Same as MuseScore 3, when a Standard dynamics symbols, such as p and ff etc. is added to the score, it affects playback from the parent note onward until the next dynamic symbol. Final barlines or rests do not reset the loudness to default. Single-note dynamics symbols, such as sfz only affect the playback of the particular note they are attached to.
Playback depends on each affected instrument's Sound setting, selected in the Mixer. See MuseScore 3 features not implemented in MuseScore 4: Velocity controls.
Playback is pre-configured and does not change with text content. This allows a f symbol to be modified into poco f, by adding plain characters, while keeping the playback effect the same as the original f symbol. This is true, however, even if new and correct profession glyphs are used. For example, a ppp symbol created by replacing the content inside a f symbol (added from palette) with three p glyphs, looks exactly like the ppp in the palette, but it creates f playback.
Playback settings of dynamics symbol , the Property Panel: Playback tab , present in MuseScore 4.0, has been removed. See https://github.com/musescore/MuseScore/issues/13858.
Velocity property of dynamics symbol existed in MuseScore 3 is removed. The Velocity property is only available in individual notes, see Properties panel, its effect on playback also depends on Sound setting, see Mixer chapter.
Dynamics symbols properties
Selected dynamics symbol(s)' can be edited in Properties panel. Under Properties : Dynamics:
- Scale: Size of professional glyphs inside. Plain characters are not affected.
- Avoid barlines: By default, dynamics markings avoid colliding with barlines, but this can be turned off.
- Position: Choose whether a dynamics sits above or below the stave
- Alignment with notehead (under Show more) : For dynamics symbols with plain characters added. Align the attached note vertically with the professional glyphs only, or align it with the entire object including plain characters.
- Frame (under Show more): Add a square or circular frame to the dynamics marking and customize its styling
Dynamics symbol objects are Text objects, character formatting using Properties : Text is covered in the Formatting text chapter. The Font property affects plain characters, but not the professional glyphs. Professional glyphs use "Musical symbols font", see "Dynamics symbol style" section. Dynamics symbol objects differ from other Text objects in that they do not have the overriding Text Style property (under Show More) used by plain characters inside. They always use the "Style for text inside Expression" profile.
To edit the score-wide settings, see "Dynamics symbol style" section.
Dynamics symbols style
See the main chapter Templates and styles
- Values of the "Musical symbols font" can be edited in Format→Style→Score.
- Values of the "Style for Dynamics" can be edited in Format→Style→Dynamics. Settings of "Style for Dynamics" affect professional glyphs only, plain characters do not use them.
- Values of the "Style for Expression text" can be edited in Format→Style→Expression text.
- Values of the "Style for text inside Expression" can be edited in Format→Style→Text Style→Expression.
- "Style for text inside Dynamics" existed in Musescore 3 is removed. Plain characters inside dynamics symbols uses "Style for text inside Expression". Professional glyphs inside dynamics symbols uses "Musical symbols font", it can be overidden with "Style for Dynamics" : "Override score font" setting. See musescore 3 handbook Fonts chapter.

Hairpins
Types of hairpin
Hairpins are symbols used to indicate gradual changes of volume in the score. There are two kinds: crescendo (getting louder) and decrescendo (getting quieter).

There are also crescendo and diminuendo lines which do the same thing:

All can be found in the Lines or Dynamics palettes.
Adding a hairpin to your score
Lines palette
To enter a hairpin from a palette use one of the following options:
- Select a range of notes or measures, then click on a hairpin in the palette.
- Drag and drop a hairpin onto a notehead. The hairpin will extend to the end of the measure.
Keyboard shortcuts
To enter a hairpin using a keyboard shortcut:
- Select a range of notes or measures;
- Use one of the following options:
- For a crescendo hairpin press < ("less than" sign).
- For a diminuendo hairpin press > ("greater than" sign).
Changing appearance of hairpins
Range
To extend or contract the range of a hairpin, see Changing range of a line.
Height
To change the height, select the height adjustment handle (shaded in the image below) …

… then use keyboard arrows, offsets (Properties panel), or dragging, to move the handle into the desired position. (See Basics: Adjusting elements directly.)
Alternatively you can adjust the "Height" in the Hairpin: Style section of the Properties panel.
Set at angle
To allow the hairpin to slope at a diagonal, check the "Allow diagonal" box in Hairpin: Style in the Properties panel. Then move the start/end adjustment handles to get the desired slope.
Other adjustments
See Hairpin properties.
Changing playback of hairpins
[To be added]
Hairpin properties
You can edit properties specific to hairpins in the Hairpins section of the Properties panel.
Style tab
Niente circle: Places a small circle at the point of the hairpin.
Allow diagonal: Allows the hairpin to be set at an angle; see Changing appearance of hairpins (above).
Line style: Choose solid, dashed or dotted lines.
Thickness / Height:
Height (new system): Specify the height of subsequent hairpins if the first one spans a system.
Position: Above or Below.
Text tab
Properties here allow you to specify beginning, end, and continuation texts and their vertical offsets.
Hairpin style
Values of the "Style for Dynamics and Hairpin" can be edited in Format→Style→Dynamics & Hairpin.
Values of the "Style for text inside Hairpin" can be edited in Format→Style→Text styles→Hairpin
In Musescore 4.1.1, the "Style for Dynamics and Hairpin" : "Override score font" option does not affect haripin text, use "Style for text inside Hairpin" : "fontface".

Slurs
A slur is a curved line between notes of different pitches indicating legato phrasing; exact interpretation depends on the instrument.
Slurs should not be confused with (note) ties which connect notes of the same pitch and extend the duration of the first note to encompass the connected notes.
Adding a slur to your score
After selecting a note, a slur can be created using any of the following:
- A keyboard shortcut, S. This option is both convenient and fast.
- The menu option, Add→Line→Slur
- A slur from the lines palette.
The exact method of applications depends on whether you are in note input or normal modes of operation. The keyboard shortcut method will be used as an example.
Adding slurs in normal mode
Method 1
- Select the note where you want the slur to start:

- Press S to add a slur extending to the next note:

- To extend the slur to the next note, hold Shift and press → (right arrow). Repeat as required:

- To flip the slur direction, press X:

- Press Esc to exit edit mode:

Method 2
- Select the note where you want the slur to start;
- Choose one of the following options:
- To add a single slur: Hold down Ctrl (Mac: Cmd) and select the last note that you want the slur to cover.
- To add slurs to all voices: Hold down Shift and select the last note that you want the slurs to cover.
- Press S.
Adding slurs in note input mode
- Enter the first note in the slurred section;
- Press S to begin the slurred section;
- Type in the remaining notes in the slurred section;
- Press S again to end the slurred section.
Multi-voice and cross-staff slurs
Using method 2 (above) you can create a slur between notes in the same or different voices. Cross staff slurs can be created in exactly the same way. e.g.

You can also adjust the start/end handles of an existing slur to move the start or end to a note of a different voice:
- Click on the start/end handle of the slur.;
- Press Shift+↑/↓ to move the start/end between voices, and from staff to staff.
Changing appearance of slurs
To adjust the shape of a slur or its range, see Adjusting elements directly.
Slur properties
The following properties specific to slurs can be adjusted in the Properties panel.
Style: Solid, dashed or dotted line.
Position: Above or below.
Slur style
Some default properties for all slurs in the score can be adjusted in Format→Style→Slurs/Ties:

Breaths and pauses
Breaths and pause symbols may be found in the Breaths & pauses palette.

These symbols also have an adjustable playback effect.
Types of pauses
Fermata
A fermata, or pause appears above/below a note, and extends its written duration, indicating a pause in the music.

It may also be written above a rest, or a barline, indicating the end of a piece or section of music.

Breath mark
A breath mark is placed just above the staff, and tells a wind instrument performer or singer to take a breath here, or other instruments to pause slightly. It may occur between two notes or at the end of a measure.
Caesura
The caesura also indicates a pause, slightly longer than a breath mark but less so than a fermata. It may occur between two notes or at the end of a measure.
Adding a pause to your score
To add a fermata:
- Select a note, rest or barline;
- Click on a fermata symbol in the Breaths & pauses palette
Alternatively drag a fermata symbol onto a note.
To add a breath mark or caesura:
- Select a note;
- Click on a breath mark/pause symbol in the Breaths & pauses palette.
Alternatively drag a breath mark/caesura symbol onto a note.
MuseScore automatically places the breath mark/caesura in the correct position, just above the staff and after the selected note.
Changing pause playback
Pause symbols have a playback effect in the score. To adjust the pause length, click on Playback in the Properties panel and adjust "Time stretch".
Pause properties
The position of selected pauses can be altered by clicking on Appearance in the Properties panel and adjusting the offsets. Alternatively you can drag a symbol, or enter Edit mode and use the keyboard arrows to move it.
In addition you can position a fermata above or below the staff by selecting the desired option in "Placement on staff" in the Fermata section of the Properties panel.
Pause style
You can specify default positional properties for all fermatas in Format→Style→Fermatas.

Ornaments
Ornaments and ornament lines can be applied from the Ornaments palette.
If the it is not already displayed in the palettes area, see Adding more palettes. Available ornaments include turns, (short) trills, and mordents, are discussed here. See Other lines for ornament lines available including (long) trill lines, upprall, downprall, prallprall.

Adding an ornament to your score
Add an ornament
To add an ornament to the score:
- Select one or more notes;
- Click on the desired ornament in the Ornaments palette;
For a trill only, it is possible to use a custom shortcut instead at step 2.
Add an ornament line
See main chapter of ornament lines Other lines.
The procedure for applying ornament lines is just like any other line, i.e.
- Select a start note;
- Press Shift and click on an end note;
- Click on an ornament line in the Ornaments palette
If you subsequently need to adjust the ornament's length, see Changing the range of a line.
Changing ornament intervals (adding accidentals)
Ornaments are aware of the key signature and of other accidentals in the bar. By default, trills, turns, mordents and other ornaments will display and play diatonic intervals. Use the Properties panel to change the interval, displaying the appropriate accidentals in the score and changing playback.
To change the interval of an ornament:
- Select an ornament
- Open the Properties panel
- Use the interval selectors to choose the desired interval. The score will display the appropriate accidentals for the chosen interval.
Trills can be customized by quality (major, minor, augmented, etc.) and interval number from unison to octave. The appropriate accidental or upper auxiliary note will display in the score above or below the ornament. For intervals larger than a second, consider using a tremolo.

Both the upper and lower interval can be set for turns.
Short trill and mordent intervals can be set to the minor or major second.

Any accidentals introduced only by an ornament must be confirmed or cancelled later in the measure for clarity, meaning it is not possible to delete accidentals where the note:
- is after AND in the same measure as an ornament with accidentals
- as the same pitch class as a note with an accidental specified by the ornament (excluding the base note)
For example, in a measure starting with a chromatic turn on A as seen below, all Gs and Bs later in the measure will have an accidental, even if it is the same as what appears in the ornament.

While these accidentals cannot be deleted, their visibility can be turned off. To do so:
- Select the accidental
- Open the Properties panel
- Uncheck Visible
Ornament properties
The following properties of selected ornaments can be edited from the Ornament section of the Properties panel:
Accidental visibility
- Default only shows accidentals that have not shown up yet in the measure.
- Show any alteration shows accidentals again even if they appear earlier in the measure.
- Always display an accidental shows accidentals even for diatonic notes.
Placement
Use the placement controls to either let MuseScore automatically choose the standard placement, or manually select above or below.
Accidental properties
When selected, accidentals, including those linked to ornaments, have the following options in the Properties panel:
- Add parentheses or brackets
- Toggle small accidental
Ornament style
Default sizing and spacing properties for ornaments can be edited in Format→Style…→Articulations, Ornaments.

Ornaments can be individually repositioned by clicking and dragging in the score or via the Appearance dialog in the Properties panel.
Arpeggios and glissandi
Arpeggios, strum arrows, glissandi (slide), portamento (glide), brass or woodwind instrument bends and Guitar techniques: Slide in and slide out can be applied from the Arpeggios & Glissandi palette:

Many have an adjustable playback effect (see below).
Arpeggios
Adding an arpeggio/strum to your score
To add an arpeggio/strum to a score:
- Click on any note in a chord (multiple selection is possible)';
- Click on an arpeggio/strum symbol in the palette.
Alternatively you can drag an arpeggio/strum symbol from a palette onto a notehead.
Adjusting the height of an arpeggio/strum
Click on an arpeggio and two adjustment handles will appear at the top and bottom of the symbol. You can move either up or down by dragging, or by selecting a handle and using the up/down keyboard arrows.
Creating multi-voice or cross-staff arpeggios
Arpeggios only span the voice to which they are input initially, but then can then be adjusted to span multiple voices in the same instrument, even across multiple staves.
To adjust an arpeggio to span multiple voices:
- Select either the top or bottom handle of the arpeggio
- Press Shift+↑ or Shift+↓ to move the handle up or down to the next adjacent voice
The handle will jump to the next voice above or below that has any notes at that point. This includes voices on staves above or below, in the case of multi-staff instruments.
The arpeggio is considered to 'belong' to the uppermost voice that it spans, and will be coloured accordingly.
(Prior to MuseScore 4.2, only the bottom handle could be used, to extend an arpeggio to a voice of the same numberr in the stave(s) below. Any other adjustments had to be made manually.)
Changing playback of arpeggios
To change the speed of a selected arpeggio, press Playback in the Properties panel, and adjust "Spread delay".
If you want to turn off playback altogether, untick the "Play" box in the General section of the Properties panel.
Arpeggio style
Default properties for all arpeggios in the score can be adjusted from the style menu at Format→Style→Arpeggios:

Portamento
To add a slide or "portamento" between two notes, add a glissando symbol and change its appearance and playback setting.
To add a slide or portamento before or after a note before a note (a string instrument or guitar technique), add either one of the four brass or woodwind instrument bends or a Guitar techniques: Slide in and slide out, see also Guitar techniques. Alternative wavy symbols are found in the Symbols category in Master palette, those do not affect playback.
Glissandi
Note: Guitar slides are covered in Guitar techniques.
Adding a glissando to your score
- Select one or more start notes;
- Click on the desired glissando icon in the palette. A glissando is created extending to the next note in the same voice:

Alternatively you can drag a glissando symbol from the palette onto a notehead.
Glissandi can cross staves if needs be:

Editing range of a glissando
If required, you can change the start or end position of a glissando as follows:
- Select the edit handle whose position you want to change;
- Press Shift+↑/↓/←/→, to move the handle in the specified direction, one note at a time.
This method can also be used to move the edit handle between voices and across staves.
Changing appearance of glissandi
The line type of a selected glissando—whether straight or wavy—and any text associated with it, can be changed in the Glissando section of the Properties panel. You can also turn off text by unchecking the "Show text" box.
Changing playback of glissandi
To change the playback effect, click on Playback and select an option from the dropdown list: chromatic, white keys, black keys, diatonic, portamento (this option for glissando symbol creates a portamento between two notes, to add other types see portamento).
You can also choose to turn off the playback effect by unchecking "Play" in the General section of the Properties panel.
Glissando properties
The following properties are available in the Glissando section of the Properties panel.
Glissando line: Choose from "Straight" or "wavy".
Show text: Uncheck/Check this box to turn off/on the display of the glissando text.
Text: Specify any text to appear with the glissando.
The default style of all glissando text is determined by the settings of "Glissando" in Format→Style→Text styles.
Bends
Not to be confused with Guitar techniques: Bends.
The Arpeggios & glissandi palette also contains bend symbols for brass or woodwind instruments:

These have a playback effect on the score.
Types of bends
Fall:
Doit:
Plop:
Scoop:
if you are not sure what's what, mousing over the palette icon will display the name of the symbol in a tooltip.
Adding a bend to your score
- Select a notehead;
- Click on the desired bend symbol in the palette.
Alternatively, drag a bend symbol onto a notehead in the score;
Changing appearance of bends
To change the shape of the bend, click on it and four adjustment handles become visible. Drag the handles, or click on them and press the keyboard arrows, until you get the shape you want.
Grace notes
Grace notes can be applied to the score from the Grace notes palette.

For bagpipe players there is a comprehensive range of grace notes in the Bagpipe embellishments palette.
Types of grace notes
Grace notes are small (cue-size) notes which ornament a previous or following note. They take their value from this parent note but do not themselves count towards the measure duration.
There are several kinds:
-
Acciaccatura():
 Usually written with an oblique stroke through the note flag, or through the beam, if there is a beamed series.
 -
Appoggiatura:
 A stressed note which takes half the value from the parent note.
 -
Grace note after (trill endings):
Adding a grace note to your score
Note: For standard staves and tablature, the following instructions for adding grace notes work in both note input and normal modes.
Add grace note with keyboard shortcut
- Ensure that the "parent" note is selected (multiple selection is possible in normal mode).
- To apply an acciaccatura, press / (slash). For other grace notes use a custom shortcut (see Preferences: Shortcuts).
Add grace note from palette
- Ensure that the "parent" note is selected (multiple selection is possible in normal mode).
- Click on the desired symbol in the Grace notes palette.
Alternatively, you can drag and drop a grace note from the palette onto a note in the score.
Multiple grace notes
Sequential grace notes
You can add a run of grace notes to a selected note by repeatedly applying any of the following:
- pressing the relevant keyboard shortcut (see above).
- clicking on a grace note icon in a palette.
- dragging and dropping a grace note from a palette onto a note.
Grace note chords
To apply a chord of grace notes:
- Add a single grace note (as described above).
- For standard staves use one of the following methods:
- Press Shift and a note letter, A to G. This will add the corresponding note above.
- Press Alt+1–9; or from the menu bar, select Add→Intervals and choose an interval from the list. This will add a note at the indicated interval above the selected note.
- You can add intervals below in the same way, but using a custom shortcut (see Preferences: Shortcuts).
- For tablature, select the grace note in normal mode, then add further chord notes using the method of adding intervals in step 2.
Editing grace notes
Change duration
To edit the visual duration, click on the grace note in normal mode, and select a duration from the note input toolbar or by using a keyboard shortcut (see Selecting duration).
Change pitch
Standard staves. To change the pitch of grace notes, use one of the methods described in Editing notes and rests.
Tablature. To change the pitch of grace notes, use one of the methods described in Changing the pitch in normal mode (tablature).
Changing playback of grace notes
[To be added?]
Grace note style
You can adjust the default size for all grace notes in Format→Styles→Sizes.
Tremolo and rolls
Types of tremolo and rolls
A Tremolo is the rapid repetition of one note or chord, or a rapid alternation between two notes or chords. The placement of tremolos is handled automatically by the program.
Single note tremolo
For stemmed notes, the rhythmic value of the tremolo is indicated by the number of diagonal strokes through the stem. One stroke indicates that the original note is divided into eighth notes. e.g.

Two strokes divides the note into sixteenth notes, and three strokes into thirty-second notes. On whole notes the tremolo symbol is placed above the note.
Tremolo between notes
In traditional two-note or two-chord tremolos, incomplete beams are drawn between the notes to indicate the rhythmic value of the tremolo (to change the style see below). One beam indicates eight notes, two beams sixteenth notes, and three beams thirty-second notes. e.g.

Buzz roll
A buzz roll symbol is also available from the Tremolos palette. However, it is notational only and currently has no playback properties.
Adding a tremolo to a single note
- Click on a notehead in the score.
- Click on the desired tremolo symbol in the Tremolos palette.
Adding a tremolo between notes/chords
- Enter the notes at half the desired final duration of the tremolo.
- Select a note in the first chord.
- Click on the desired tremolo symbol in the Tremolos palette (it has to be one of the tremolo symbols without a stem).
Tremolo beams appear between the notes/chords and the appearance of the noteheads is adjusted accordingly.
Example: To enter a two-note tremolo with the duration of a half note (minim), enter two normal quarter notes (crotchets). After applying a tremolo symbol to the first note, the note values automatically double to half notes.
Changing appearance of tremolos
Three styles of tremolos between notes/chords are supported in MuseScore; the default is traditional. To change the style:
- Click on the (between notes) tremolo symbol.
- In the Tremolos section of the Properties panel, click on the desired style icon under “Style (between notes)”.
Other lines
Overview
Musescore Line is a type of object capable of attaching (anchoring) to a horizontal continuous range of more than two notes or rests, or vertical collection of notes (chord). A Musescore Line object contains a length of string or arc, and optionally a text. These objects can functionally affect the score, and share similar configurable line properties, text properties, and styles.
Musescore Line objects include these subtypes, follow the hyperlink on text to read their dedicated main chapters, or "jump to section" on this chapter:
- Standard line or Plain line (a simple general purpose, straight line) (jump to section)
- Slurs
- Staff text lines and System text lines (jump to section)
- Hairpins and crescendo, decrescendo lines
- Tempo lines such as rit --- (jump to section)
- Voltas (repeat section brackets on top)
- Idiomatic notation: Keyboard: Pedal markings
- Octave lines (8ve etc)
- (Long) Trill lines (jump to section)
- Arpeggios
- Glissandi (slides) and portamento between two notes
- Upprall, Downprall, Prallprall, affects playback
- Guitar-related lines (jump to section): including Barre line, "let ring" line, P.M. --- (palm mute), Vibrato line, and the custom Fingering/String number-line.
- vibrato sawtooth, tremolo sawtooth, does not affect playback
- Ambitus (an early music feature)
These markings contain length of string or arc, but do not belong to Musescore Line objects because they cannot attach (anchor) to a continuous range:
- Bends (brass or guitar articulations)
- Ties
- Tremolo and rolls
- Single note Ornaments such as turns, (short) trills and mordents
- (Staff) Brackets and curly braces
- Barlines
- Staff line (To change global staff line thickness, see Page layout concepts: Staff. Other related settings see Staff/Part properties chapter.)
Note: The following description of actions and general behaviors applies to Line objects discussed here (those do not have a dedicated handbook chapter), for Line objects having dedicated handbook chapters, refer to those chapters for more accurate info.
Adding a line to your score
The commonest way to add a new Musescore Line is to use either:
- a predefined keyboard shortcut, for example S to add slurs (see the respective chapter above), or
- the Lines palette and the Guitar palette
To apply a line to a selected range:
- Select a range of notes,
- Click on a line in a palette;
Or
- Drag a line from a palette to the starting note,
- Adjust the end handle to extend the range (see Changing range of a line).
To apply a line to a single note:
- Select a note and click on the desired palette line.
- Drag a palette line to the desired start note.
Adjusting a line
To adjust the range of a line, see Changing range of a line.
Types of lines
Standard lines
Plain lines are applied from the Lines palette. They can be purposed to anything you like such as to create guitar fingering/string number lines. They can be adjusted to be diagonal or vertical.
Staff and System Text lines
A staff text line, like staff text, is affixed to one staff in a system, and is indicative only for that staff. It appears only in the part featuring that staff.
A system text line, like system text, is affixed to one staff but is indicative for all the staffs in the system. It appears in all instrument parts.
Tempo lines
Tempo markings such as rit --- are new in Musescore 4, they affect playback tempo.
Guitar-related lines
- Barre lines in Guitar palette: Used to indicate fret positions, see Guitar techniques: Adding a barre line to your score.
- To create a Fingering/String number-line:
- add a Fingering from Fingerings palette,
- add a Standard lines from Lines palette,
- adjust the length as required.
- Vibrato in the Guitar palette. You can change the shape of the line in the Vibrato section of the Properties panel.
- Palm mute in the Guitar palette: Changes playback sound to that of a clean muted electric guitar.
- Let ring in the Guitar palette: Affect playback, acts like the sustain pedal on a keyboard.
Trill lines
Not to be confused with (short) trills Ornaments.
Trill lines are upgraded in Musescore 4, their have lots of new engraving settings such as showing a bracketed small note and accidentals to notate trill note pitch, these settings are explained in Ornaments.
They still create playback with SoundFonts instruments like in previous Musescore versions. If the instrument use Muse Sounds and the sound sample exists, a trill line will utilize the beautifully recorded trill audio for playback, for example in case of a perfect fifth trill line.

Line properties
The Properties panel allows you to view and edit General, Appearance, and Playback settings.
The name of the section below varies depending on the type of line. But it will have two tabs marked Style and Text:
Style tab
Clicking on the Style tab allows you to set the properties of the line itself:
Line type: A choice of straight, hooked, angle-hooked, or double-hooked.
Thickness / Hook height:
Style: Choice of solid, dashed or dotted line.
Dash / Gap: Adjust the appearance if "Dashed" is selected.
Text tab
Clicking on the Text tab allows you to apply and position any text associated with the line:
Beginning text: Enter the text, if any, to appear at the beginning of the line.
Vertical offset: Allows you to move the text vertically in relation to the line (in sp.).
Text when continuing to a new system: If the line spans a system, this is the text that will appear before the line in the next system.
Vertical offset: As above.
Line style
Values of the "Style for Text line" can be edited in Format→Style→Text line.
Values of the "Style for System text line" can be edited in Format→Style→System text line.
Values of the "Style for text inside Text line" can be edited in Format→Style→Text styles→Text line

Other symbols
The Symbols palette is a category within the Master palette and houses all symbols and text from all built-in music fonts.

Unlike other categories in the Master palette, items in the Symbols palette are non-functional: they are for display purposes only and have no other effect on the score.
You should find most symbols and text items you need for scoring in the Palettes panel—use of the Symbols palette should be reserved for specialist items not available in the small palettes, or on those occasions when you really do need a non-functional element.
The Symbols palette
View
To view the Symbols palette, select View→Master Palette, or use the shortcut Shift+F9.
Selecting “Symbols” in the list of headings reveals all symbols under all subcategories. Selecting one subcategory to focus on a specific set.

Search
You can search for a symbol by entering a term in the Search box at the top of the Symbols section. Specify the musical font you want in the dropdown at the bottom right.
Adding symbols to your score
Symbols added from the Symbols palette scale in line with the score (see Staff size), but their font-size is fixed.
If you need a symbol with an adjustable font-size, you should consider adding it instead from the Special characters palette as staff text.
Add a symbol
Use one of the following methods:
- Select one or more score elements (notes, rests, barlines) then click on the desired symbol in the Symbols palette.
- Drag the desired symbol from the Symbols palette onto a score element (note, rest, barline).
Add to other symbols
After adding a symbol, you can, if required, add an additional symbol to the existing one. Use one of the following:
- Select a symbol (previously added to the score from the Symbols palette), then click on the desired symbol in the Symbols palette.
- Drag the desired symbol onto the existing symbol in the score.
Reposition symbols
To reposition, you can drag the symbol, or edit the offsets in the Apprearance section of the Properties panel. You can also move the symbol using the keyboard arrows—after selecting it and entering edit mode by pressing Alt+Shift+E or F2.
If two symbols have been joined together (see Add to other symbols, above), moving the first-added symbol moves both. However you can still move the second symbol in relation to the first.
See also
- Using the palettes for information about how to search for and apply palette items to the score.
- Working with images for how to apply images to your score.
记谱:反复
Repeat signs
A repeat sign looks like a double barline with a dot above and below the center line of the staff (see image below). It is used to enclose repeated sections of the score.
Adding repeat signs to your score
Simple repeats
Place a start repeat barline at the beginning of the repeated section and an end repeat barline at the end.

If the start of the repeat section coincides with the beginning of the piece there is no need for a start repeat barline.
Multiple ending repeats
See Voltas, for repeat sections with multiple endings.
Changing playback of repeat signs
To change the number of times the repeat section is played, adjust the Play count of the final measure in the Measure properties dialog.
Ignore Repeat barlines, Jumps, Markers playback by unchecking Play toolbar : Cogwheel → Play repeats, see Playback controls chapter.
Changing appearance of repeat signs
- Select a barline on a score
-
Do any of these as required
- Edit values in Properties panel.
- Drag the square handle (see image below) to extent vertically all barlines across the score.
- Ctrl + drag the square handle to extent vertically the selected barline only.

Repeat properties

- Select a barline on a score
- UnderProperties panel : Barline:
Style: leave it as "--", do not edit.
Repeat style: winged tip.
Other items: see Barlines chapter.
Repeat style
See the main chapter Templates and styles
-
Values of the "Style for Barlines" can be edited in Format→Style→Barlines. Specify thickness, distance etc.

Voltas
Volta brackets are lines above the staff used to mark different endings for a repeat section. Musescore creates correct playback. Shown below is an example, the repeat section is played once through with the ending marked "1", then a second time with the ending marked "2".

Adding voltas to your score
- Make sure that repeat barlines are in the correct position;
- To apply the Volta bracket use one of the following:
- Select a measure and click on the desired line in the Lines palette, or
- Drag a line from a palette onto a measure
Changing appearance of voltas
- Selected a volta in the score
- Under Properties panel Volta section,
- Open the Style tab, edit the line appearance, see Other lines : Line properties chapter.
- Open the Text tab, edit the text appearance, see Entering and editing text and Formatting text chapters. Text is for indication only and does not affect playback.
To change the time range covered, see Changing range of a line chapter.
Changing playback of voltas
- Selected a volta in the score
- Under Properties panel Volta section, open the Style tab, enable playback of music passage under this volta by editing Repeat list.
For example, enter "1" to enable playback of this music passage only for the first time, it is skipped during the repeat; enter "2" to enable playback of this music passage only for the repeat.
A series of numbers joined with commas can be used, such as "1,2,3" . - Remember to edit Measure properties : Play count accordingly. Measure with the end repeat barline must have a Play count value that is equal to, the total number of times of playback of this measure + 1 or more. The total number of times of playback of a measure is usually the amount of Repeat list entries. See example below. For example, if Repeat list is "1,7,9", then Play count should be "4".
The End hook property affects playback.
To change the time range covered, see Changing range of a line chapter.
Ignore Repeat barlines, Jumps, Markers playback by unchecking Play toolbar : Cogwheel → Play repeats, see Playback controls chapter.
Example of a complex Volta setting
Download example mscz file:
 m3 :| (volta 2,5) m4 | m5 :| (volta 6) m6 | m7 | m8 ||")
Measure 3 should have play count set to 4
Measure 5 should have play count set to 3
This example plays back as: 1-3, 1-2,4-5, 1-3, 1-3, 1-2,4-5, 1-2,6-8
Volta properties
- Selected a volta in the score
- Under Properties panel Volta section, there are two tabs, Style tab and Text tab, their usage are covered in the sections above. The End hook property affects playback.
Voltas style
See the main chapter Templates and styles
- Values of the "Style for Volta" can be edited in Format→Style→Voltat.
-
Values of the "Style for text inside Volta" can be edited in Format→Style→Text Style→Volta.

Jumps and markers
Jumps and markers are used to create repeated sections in a score.
Types of jumps and markers
Jump object that act as a jumping point:
- D.C. (Da Capo): Repeat from the beginning.
- D.S. (Dal segno): Repeat from Segno marker.
- D.C. al Fine : Repeat from the beginning up to Fine.
- D.S. al Fine : Repeat from Segno marker up to Fine.
- D.C. al Coda : Repeat from the beginning up to To Code, then continue at Coda.
- D.S. al Coda : Repeat from Segno marker up to To Code, then continue at Coda.
Marker object that act as both a jumping point, and a labelled time position:
- To Coda: To used as jumping point to Coda marker, it must be used together with D.C. al Coda or D.S. al Coda. Its default label property is "coda".
Marker object that act as a labelled time position only:
- Fine: To indicate the end, it must be used with D.C. al Fine or D.S. al Fine .
- Coda:
 . Its default label property is "codab".
 - Segno:
 .
.
Adding a jump or marker to your score
Use one of the following methods
- Select a measure, then click the desired repeat symbol in the Repeats and jumps palette.
- Drag and drop a repeat symbol from the palette onto the desired measure.
Changing appearance of jumps and markers
Jumps and markers are Text objects. To edit text see Entering and editing text and Formatting text chapter. Segno, Capo symbols are glyphs that can be added from the special character window. Segno, Capo glyphs use Format → Score : Musical symbols font, see Musescore 3 handbook Fonts chapter.
Changing playback of jumps and markers
Ignore Repeat barlines, Jumps, Markers playback by unchecking Play toolbar : Cogwheel → Play repeats, see Playback controls chapter.
Jump and marker properties

- Select Jump(s) or Marker(s) on a score.
- Under the Properties panel Jump and Marker sections:
Label: internal program text used for jumping, make sure it matches with the text in the jump starting object. Not to be confused with appearance text, see "Changing appearance of jumps and markers" section.
Jump to: enter a target label
Play until: enter a target label
Continue at: enter a target label
Play repeats: play with Repeat signs after jumping.
Jump and marker style
See the main chapter Templates and styles
- Values of the "Musical symbols font" can be edited in Format→Style→Score.
- Values of the "Style for text inside Repeat text left" can be edited in Format→Style→Text Style→Repeat text left. Use by Segno, Capo.
- Values of the "Style for text inside Repeat text right" can be edited in Format→Style→Text Style→Repeat text right. Use by others.
Measure and multi-measure repeats
A measure repeat symbol indicates that the previous measure is to be repeated. Two- and four-measure repeat symbols indicate the repetition of the previous two or four measures.
Adding a measure or multi-measure repeat to your score
To apply a measure repeat symbol, select a measure in the score and click on the measure repeat icon in the Repeats & Jumps palette. Or drag the symbol on to a measure.

To apply a two- or four-measure repeat symbol, select the first blank measure following the section you want repeated, then click on the applicable measure repeat icon in the Repeats & Jumps palette. Alternatively, drag the repeat icon from the palette onto the same blank measure instead.

Note: You may need to click the More icon in the palette to reveal the two- and four-measure repeat symbols.
In the case of multiple-measure repeats a "Group measures" symbol appears above and between measures. This keeps the measures together on the same system, where possible, in case of any automatic layout changes in the score. This symbol can be deleted if desired.
Measure repeat properties
Number position in the Measure repeat section of the Properties panel, allows you to edit the vertical offset of the number above the measure.
Measure repeat style
Properties of all measure repeats in the score can be set from Format→Style…→Measure repeats:

Repeat playback
Turning repeat playback on and off
By default, repeats are always played. If you want to turn off repeat playback,
- Click on the Cog button in the Play toolbar

- Uncheck "Play repeats".
惯用记谱:键盘乐器
Pedal
For Harp Pedal see Idiomatic notation: Harp instead.
Types of pedal markings
This chapter focuses on the types of piano pedal engraving available, for knowledge of various piano pedals see wikipedia article.
In terms of visual representation
Supported engravings including:
- Line at either or both ends, have no hook or hooks at angles of either 45 or 90 degrees, or "T" end;
- Ped. followed by such a line, or a rosette symbol (*): The line from the built-in Ped. * palette item is invisible and non-printing. Adjust on-screen display with View menu > Show > Show invisible setting accordingly, see The user interface. To convert the line to visible in printing, or style it as dashed, see properties.

- Other related symbols and pictogram can be found under Symbols category in Master palette window, see Other symbols. Sost. (sostenuto pedal) marking should not be confused with sost.-- Tempo markings, see also discussion on steinberg.net.

- Create custom sim. or pedal ad lib marking with Staff text.
- Full pedal is implied for playback, embed images to add pedal strength symbols for engraving need.
In terms of function inside Musescore
There are three different subtypes:
Type 1 includes:

- Line with 45 degree angled End hook or no End hook, with or without Ped. beginning text.
- Ped. followed by a rosette symbol (*)
Visually, the line or symbol only extends horizontally to the notehead attached to the end anchor.
Functionally, if that note is attached to another marking's start anchor, the following marking will automatically connect and make a shape resembling "-^-", which is indicative of the piano technique "pedal released and pressed again without releasing this note".

shown above is the auto connect, their playback are also in line with the piano technique
If the instrument use SoundFonts such as "MS Basic", or when exported as MIDI file, sustain (MIDI CC 64) is created. When consecutive type 1 markings create a "-^-", playback matches the piano technique, the first marking is interpreted by synthesizer as released at the note attached to the end anchor. Single or trailing type 1 markings creates playback like type 2: sustain until the note attached to the end anchor ends.

The last two type 1 markings shown above are single or trailing, they create the same playback as type 2
Type 2 includes:

- Line other than described in Type 1, with or without Ped. beginning text.
Visually, the line extends horizontally to an aprpopiate length spanning the full duration of note attached to the end anchor.
Functionally, if the instrument use SoundFonts such as "MS Basic", or when exported as MIDI file, sustain (MIDI CC 64) is created. Type 2 always sustain until the note attached to the end anchor ends.
Type 1 and 2 are interchangable by adjusting properties.
Type 3 includes the sostenuto pedal marking and custom Staff texts, they are for engraving purpose only and are non-functional.
Adding pedal markings to your score

shown above a type 2 marking on score
Add pedal markings from Lines palette, see Other lines:Adding a line to your score.
Adjust with Shift+←/→, switch handle with Tab, see Adjusting elements directly: Changing the range of a line.
Unfortunately, you might need to make compromise with engraving style or not notate at all if you must create a desired playback, because of the functional limitation of Type 1 and Type 2 explained. As of Musescore 4.1.1, pedal marking always create sustain playback only (cannot be turned off), making it impossible to use "add redundant symbol, make it invisible" trick.
To create shape resembling "-^-" with consecutive Type 1 markings, make sure the end anchor is attached correctly, which is usually to the first note of the next measure instead of the last note of the previous measure. This big picture shows the correct end anchor result.

MuseScore 4.1.1 does not offer keyboard shortcut bindings to palette items, the keyboard shortcut key available in Musescore 3 that you can use to re-apply the same (last used) palette item is removed (not reimplemented yet).
Creating pedal changes
Not to be confused with Harp pedal change
Use type 1 markings, explained in "adding marking" section.
For issues related to MusicXML direction import / export, there are upcoming changes in Musescore 4.2, see forum discussion https://musescore.org/en/node/356899 [please feel free to update info here]
Pedal properties
Select pedal marking(s), in Properties panel Pedal section, Line properties can be set, the extra option available to pedal marking is "Show line with rosette" checkbox under Style tab, tick it to make the default line visible in printing and exporting.

Pedal style
Values of the "Style for Pedal" can be edited in Format→Style→Pedal.
Values of the "Style for text inside Pedal" can be edited in Format→Style→Text styles→Pedal
See also Line style.

Cross-staff notation
Creating cross-staff notation
- First of all, enter the notation on one staff only.
-
Select a note in the voice that you wish to move up or down to the other staff. e.g.

-
Press Ctrl+Shift+↓/↑ (Mac: Cmd+Shift+↓/↑), to move the voice up or down to the other staff. Alternatively, you can click on the cross-staff icon in the note input toolbar and choose the same options from the context menu.

Note: This operation works on a voice basis, rather than on individual notes. It follows that if you want to ensure that notes remain on the same staff during the operation, they should be in a different voice to the one selected above. Be aware that notes which have been moved to a different staff still belong logically to the staff of origin. This is why no rest is shown in the place where the moved notes originated.
Changing appearance of cross-staff notation
To adjust the beam angle and height, click on the beam, then click on an adjustment handle and use the keyboard arrows, or drag the handle with a mouse. e.g.

Alternatively you can make more precise adjustments from the beam section of the Properties panel.
See also

Accordion notation
[work in progress, please add missing info]
See Accordion notation and playback tutorial.
- accordion symbols are literally just symbol from the Symbols, but there is a dedicated palette for them
- we could consider eliminating this page
- we could also consider adding one for harp
Adding accordion symbols to your score
惯用记谱:吉他
Fretboard diagrams
Fretboard (or Chord) diagrams usually appear above the staff on lead sheets and piano scores:

They are commonly used for guitar chords, but MuseScore allows you to create diagrams for any stringed instrument.
A library of common guitar chord diagrams (major, minor and 7th) is provided in the Fretboard Diagrams palette.
To reveal the chord name of any diagram in the palette, hover the cursor over it.
Adding a fretboard diagram to your score
Use one of the following methods:
- Select one or more notes, then click a fretboard diagram in the palette.
- Drag and drop a fretboard diagram from a palette on to a note.
Chord symbols linked to fretboard diagrams
When any of the preset diagrams is applied to the score, a chord symbol is automatically placed above it. This linked chord symbol has the same properties as a stand-alone chord symbol and can be edited and moved as such.
The default placement of a chord symbol in relation to its parent diagram is controlled by the “Distance to Fretboard Diagram” property (set in Format→Style…→Chord Symbols→Positioning). This value interacts with the chord symbol Minimum distance (to view, press Appearance in the Properties panel). Adjust the diagram’s position manually if you need to override this.
A linked chord symbol can be deleted independently of its parent diagram. You can also add a new linked chord symbol to a fretboard diagram: see Entering a chord symbol.
Note: Neither fretboard diagrams nor their linked chord symbols are affected by transposition commands.
Creating a custom fretboard diagram
- Select an existing fretboard diagram in the score; or add one from the Fretboard diagrams palette.
- Ensure that the Properties panel is open (toggle F8).
- Edit the properties in the Settings tab as required.
- In the General tab, apply the following instructions to the fretboard image, as required:
- Remove all dots: Click the Clear button above the diagram.
- Add a finger dot: Click on a fret. The shape of the dot is determined by the Marker type setting. If Multiple dots is checked you can add more than one dot per string.
- Delete dot: Click on an existing dot.
- Add barre / partial barre: If "Barre" is unchecked, press Shift and click on the string fret where you want the barre to begin. If Barre is checked simply click on the fret. e.g.

- Add partial barre ending before first string: Create a standard barre first (see previous instruction). Then shorten it by Shift clicking (if Barre is disabled); or clicking (if Barre is enabled) the fret where you want the barre to end. e.g.

- Delete a barre: With Barre disabled, Shift click on the "top" of the barre. With Barre enabled, just click on the "top".
- Create multiple barres: Repeat the above steps at different fret positions.
- Open / Mute strings: Click just above the diagram to toggle a string between:
- No symbol
- Open (o)
- Mute/Unplayed (X)
Note: See also Fretboard diagram properties (below).
Finger markers
The default finger marker is a round black dot, which suffices for standard chord (and scale) diagrams. However a number of other shapes are provided—cross, square and triangle—to enable other notation styles.
Alternative notation styles
Some arrangers and educators have extended the basic form of the fretboard diagram, incorporating finger dots of various shapes, and allowing multiple dots per string. Jazz guitarist Ted Greene and his successors are notable examples.
Multi-dot notation style. With this approach, the chord signified by round dots on the fretboard diagram is played first (see image below). Then, on successive beats marked by chord symbols, the chord fingering is modified to incorporate other shapes on the same diagram; the usual playing order is: dot → X → square → delta, but this can vary.

Optional-note notation style. Another use of multiple dots per string allows other symbols to show optional notes, rather than delayed notes:

Fretboard diagram appearance
- Select a chord diagram and click on Appearance in the Properties sidebar.
Edit the following properties as desired:
- Leading: The leading space.
- Measure width:
- Min distance: Minimum distance from the staff.
- Offset: Move the diagram horizontally or vertically.
- Snap to grid:
- Arrange: Backward or forward.
- Color: Click on this button to change the color of a selected chord diagram.
Fretboard diagram properties

When a fretboard diagram is selected, its properties are viewable in the Properties tab of the sidebar as follows:
General (tab)
- Barre: Check if you want to add or delete finger barres with one click on the fretboard image below. If unchecked, barres are added by Shift clicking instead.
- Multiple dots: If unchecked you can only add one finger dot per string. If checked you can add multiple dots per string.
- Marker type: When you click on the fretboard image the shape of the dot added is determined by this property. This allows you to add a variety of shapes if desired.
- Clear: Clears everything leaving an empty fretboard.
Settings (tab)
- Scale: Allows you to make the fingerboard larger or smaller.
- Strings: The number of strings to be displayed.
- Visible frets: Specifies the number of displayed frets: these are added, or removed, from the bottom of the diagram.
- Fret number: Specifies the fret number to be displayed at the top left/right of the diagram.
- Placement on staff: Positions the diagram above or below the staff.
- Show nut: Check the box to embolden the nut. Applies to first position diagrams only.
At the bottom of the Fretboard diagram section of the sidebar is an image of the selected fretboard diagram. Any changes made to this image are automatically applied to the fretboard diagram in the score as well.
Fretboard diagram style
Global fretboard diagram properties can be set in Format→Style…→Fretboard Diagrams:

See also
Guitar techniques
Adding a bend symbol to your score
Not to be confused with brass or woodwind instrument bends.
Bends are created with the Bend Tool located in the Guitar palette.
Apply a bend
To apply one or more bends to the score, use one of the following options:
- Select one or more notes and click the bend symbol in the palette.
- Drag the bend symbol from the palette on to a note.
A default bend is created in the score. You can modify this bend or choose from a range of alternatives using “Bend type” in the Bends section of the Properties panel.
Edit a bend
Bend shape and length can be edited in the graphical display in the Bends section of the Properties panel:

Each red line segment between blue nodes represents one step in the bend, and each step extends horizontally for 1 sp. in the score. The slope of any line shows whether it is an up-bend, a down-bend or a hold. So the above graph describes an up bend, then a hold—total length 2sp.
The vertical axis of the graph represents the amount by which the pitch is bent up or down: one unit (the side of a small square) equals a quarter-tone, 2 units a semitone, 4 units a whole-tone, and so on.
To add another step to a bend
- add another node by clicking on the appropriate line intersection.
To delete a bend step
- click on the relevant node to remove it.
Adjust bend height
The height of the bend is automatically adjusted so that any text appears just above the staff. This height can be adjusted, if necessary, with a workaround:
- Create another note vertically above the note (shortening the height) or below the note (extending the height) at which you want the bend to start.
- Apply the bend to the new note.
- To adjust the height of the bend move this created note vertically so that the bend symbol gets the desired height.
- Drag the bend symbol to the correct position (to the original note).
- Mark the created note invisible and silent (using the Properties panel).
Reposition bend
Bends can be freely repositioned using the methods shown in Changing position of elements.
Adding a tremolo bar symbol to your score
Tremolo bar symbols are available from the Guitar palette (look for the oversized "V") and are applied and adjusted in a similar way to bend symbols (above)—with a similar graphical interface in the "Tremolo" bar section of Properties.
You can choose from a range of presets in "Tremolo bar type", or create your own custom one.
Adding a slide to your score
Slides can be found in the Arpeggios and glissandi palette. They are of two types:
- Glissando-type slides: these run from one note or chord to the next.

- In / Out slides: played before or after a note; these can be slide-up or slide down.

By default, slides have a playback effect on the score. You can turn this off by unchecking "Play" in the General section of the Properties panel.
Add a slide
Use one of the following methods:
- Select one or more notes as start points, then click the desired slide icon in the palette.
- Drag the desired slide from the palette onto a note.
In the case of in-between slides going from one chord to the next, the program will attempt to link the correct notes where possible. If further adjustment is required, see below.
Edit properties
For in-between slides, the following properties can be adjusted in the Glissando section of the Properties panel.
- Type: Choose between Straight or Wavy.
- Show text: Tick this box to display text. Note: If there isn't enough room between notes, the text is not displayed.
- Text: The wording displayed above the slide (if any).
Adjust start and end points of a slide
In-between slides:
To move an end handle vertically or horizontally, from one note to the next:
- Select the slide.
- Click on the start or end handle:
- Use Shift+↑↓ to move the handle up or down, from note to note.
- Use Shift+←→ moves the handle horizontally, from note to note.
Slides in/out:
To adjust the position of the end handle:
- Select the slide.
- Click on the adjustment handle.
- Drag the handle, or use the keyboard arrows.
Adding a barre line to your score
A Barre lines is a text-line drawn above a guitar staff to indicate that the passage requires a full or half barre. Symbols such as the following are commonly found in guitar music:
Full bar (2nd fret):

Half barre (2nd fret):

The C before the roman numerals can be omitted and other variations in line style and text are possible—according to the publisher.
To apply a barre:
- Click on the start note for the barre, then shift click on the end note to establish the range.
- Click on the "Capo Line" symbol in the Guitar palette.
- Customize the line and text as required. See Line properties (Other lines).
To adjust the length of a line, see Changing range of a line.
Adding hammer-on and pull-off symbols to your score
Hammer-ons and pull-offs are notated by slurs. If you need text annotations as well, create them using staff text; they can be saved to a palette for future use (see Adding elements from your score).
Notating harmonics
Standard staff
A natural harmonic can be notated in one of three ways:
- At the pitch of the open string on which it is produced. For example, harmonics on the third string appear as:

- At the pitch of the string fret at which it is produced. The same harmonics now appear as:

- At concert pitch. The same harmonics now appear as:

An annotation, such as "Nat. Har.", "N.H.", "Har.", is usually attached, as well as string and fret numbers; the notehead may be standard or diamond-shaped, and rendered clear rather than black; fret numbers may be Arabic or Roman, and so on.
Fixing Playback: If harmonics do not play back at the correct pitch, mute them and create a hidden voice containing the harmonics at concert pitch.
See also, How to Read Harmonic Notation on the Classical Guitar (douglasniedt.com).
Tablature
A natural harmonic in tablature may be rendered simply as a fretmark, or may be followed by a dot, or enclosed in a diamond, or a pair of angled brackets. e.g.

To create a pair of angled brackets:
- Select a harmonic and add staff text.
- Enter a "single left-pointing angle quotation mark" (U2039), then a space, then a "single right-pointing angle quotation mark" (U203A).
- Move the text so it sits over the fretmark;
- Adjust the font size of the staff text and the space inside it to just enclose the harmonic.
- Save it to a palette for future use.
Staff/Tablature pairs
You should ensure that the staff/tab pairs are not linked, since you need to be able to edit each staff independently of the other.
Notating guitar fingering
The types of guitar fingering and how to apply them are explained in Fingering.
Creating a tablature staff
Overview
Music for fretted, stringed instruments is commonly notated using tablature (often abbreviated as tab); this gives a visual representation of the strings and fret numbers. Tablature is frequently found in combination with traditional staff notation.

Types of tablature staves
A variety of tablature templates for common instruments are supplied. If this isn't quite what you're looking for, you can easily change the template (see Changing tablature staff type), and/or customize the staff (see Tablature: customization).
Adding a tablature staff to your score
There are three possibilities:
- Create tablature as part of a new score.
- Add tablature to an existing score.
- Change an existing staff from standard to tablature.
Add tablature using the New Score dialog
To create tablature as part of a new score:
- Open the New Score dialog.
- Select the required tablature from either the Choose Instruments or Create from template tabs.
- Complete the rest of the New Score dialog.
Add tablature using the "Add or remove Instruments" dialog
To create a tablature staff in an existing score:
- In the Instruments panel, click on the Add button; or press the shortcut key, I. This brings up the Add or remove instruments dialog.
- Click on the Strings – Plucked family and choose the desired tablature from the Instruments column.
- Press OK.
Change an existing staff from standard to tablature
- Make sure that the standard staff contains a plucked string instrument;
- Use one of the methods described under Changing tablature staff type.
Creating paired standard and tablature staves
Music for the guitar (and other plucked-string instruments) is often notated using paired standard and tablature staves. In MuseScore, the staves can be either linked or unlinked.
-
Linked: Any change you make to the notation in one staff automatically updates the other.
-
Unlinked: Each staff is edited independently. To update the other staff, copy and paste the relevant music notation.
Note : In both cases, the staff/tablature pair shares the same instrument.
Create paired standard/tab staves using the New Score Wizard
There are two ways to do this when creating a new score (A or B):
A. For linked staves only:
- Open the New Score Wizard.
- In the "Create from template" tab, click on the "Solo" category and choose the "Guitar + Tablature" .
- Complete the rest of the New Score wizard.
- Change the instrument type, if required, in Staff / Part properties.
- Change the tablature type, if required (see Changing tablature staff type).
B. For linked or unlinked staves:
- Open the New Score Wizard.
- In the "Choose instruments" tab, click on the "Strings – Plucked" family, and select a staff option from the "Instruments" column.
- Complete the rest of the wizard.
- Add the desired staff using the Instruments panel.
Create paired standard/tab staves using the Instruments dialog
Use this method when you want to add to an existing score:
- Open the Add or remove instruments dialog: press I; or, alternatively, the Add button in the Instruments sidebar
- Click on the Strings – Plucked family and choose the desired staff from the Instruments column.
- Press OK.
- Add the desired tablature from the Instruments panel.
Note: If you already have one staff of a standard/tab pair in your score, you can simply add the missing staff from the Instruments panel. See Adding and configuring staves.
Entering and editing tablature notation
Computer keyboard entry
- In normal mode, select a measure, or note/rest.
- Switch to note input mode: the cursor appears as a small “blue rectangle” on the currently "active" string.
- Select the duration (see below) of the note or rest to be entered.
- Press the up/down arrow keys to move the cursor between strings. Use the left/right arrow keys to navigate through the score.
- Press a number from 0 to 9 to enter a fret mark from 0 to 9. To enter double digit numbers press each digit in sequence (Note: You cannot enter a number higher than the “Number of frets” value set in the Edit String Data dialog).
- Press ; (semicolon) to enter a rest of the selected duration.
- To enter grace notes, see Grace notes.
- You can enter notes in different voices if required—just as you would in a standard staff.
Note for period instrument tablature: A to K (skipping I) can also be used to enter numbers 0 to 9. In French tablature the corresponding letters appear instead; for L, M, N, you need to type respectively 10, 11, 12.
See also, Editing notes and rests" (below).
Mouse entry
- Enter note input mode and select the note or rest duration (see below).
- Click on a string and MuseScore will enter a 0 which means "open string." (For French tablatures MuseScore enters an a. )
You can immediately type a single or double digit number to replace the 0. (Note: You cannot enter a number higher than the “Number of frets” value set in the Edit String Data dialog). - You can also increase/decrease the fret mark using Alt+Shift+↑; or, Alt+Shift+↓.
- You can enter notes in different voices if required—just as you would in a standard staff.
See also, Editing notes and rests" (below).
Selecting note duration
Whether you are using a keyboard or mouse, you can set note duration using one of the following:
- Press Shift+0 up to Shift+9: to set duration from a 128th note to a longa (availability of these shortcuts may depend on the platform and/or keyboard layout);
- Press NumPad 0 to 9: to set duration from a 128th note to a longa (if a numeric keypad exists and NumLock is on);
- Click on the desired note duration icon in the Note Input toolbar above the document window;
- Press Q to decrease the selected duration and W to increase it.
Note: This applies to note input mode only. If you want to change the duration of a selected note in normal mode see Changing duration in normal mode.
Period tablature notation
MuseScore also supports tablature notation for period instruments such as the renaissance and baroque lutes, Theorbo etc. There are a number of notation systems in use (French, Italian, German, Spanish), but the most common is French.
French tablature features 6 lines representing the top 6 courses. Instead of numbers, fretmarks are indicated by letters—as explained above. Any notes on bass courses below the 6th string (fretted or unfretted) are represented by symbols in the space underneath the 6th line of tablature.
To enter symbols below the 6th course:
- In note input mode, move the cursor until it is in the space below the 6th line. Press ↓ to move the cursor to the next lowest course and so on. As you do so a "cue mark" appears at the left side of the cursor to show you which course is active:
| Cue mark | Number of course | Fretmark entered automatically for unstopped course |
|---|---|---|
| no cue | 7 | a |
| / | 8 | /a |
| // | 9 | //a |
| /// | 10 | ///a |
| 4 | 11 | 4 |
| 5 | 12 | 5 |
| 6 | 13 | 6 |
| 7 | 14 | 7 |
Conversely you can return to a higher course by pressing ↑, and the cue mark changes accordingly.
2. If the selected course is fretted simply enter a fretmark in note input mode (as shown above). If the selected course is unstopped press any note key in note input mode and MuseScore will automatically enter the correct zero fretmark (see table above).
Editing tablature notation
Changing the pitch
In note input mode:
- Position the cursor over the fret mark and type the desired number.
- Increment or decrement the fret mark using Alt+Shift+↑; or, Alt+Shift+↓ (The fret mark automatically changes strings, if necessary, to achieve the lowest possible fret position).
In normal mode:
- Select one or more fret marks.
- Use any of the following commands:
- To increment or decrement, without changing the string: Press ↑/↓.
- To increment or decrement, changing strings, when possible, to minimize the fret number: Press Alt+Shift+↑/↓.
Note: The fret mark cannot be higher than the “Number of frets” value set in the Edit String Data dialog.
Moving the fretmark to a different string
To move the fret mark to an adjacent string without changing the pitch:
In note input mode:
- Position the cursor over a fret mark, and press Ctrl+↑/↓ (Mac: Cmd+↑/↓).
In normal mode:
Use one of the following methods:
- Select one or more fret marks, and press Ctrl+↑/↓ (Mac: Cmd+↑/↓).
- Drag a fret mark up or down to an adjacent string.
Note: This operation can only proceed if the relevant string is free and can produce that note.
Changing the duration
See Changing duration in normal mode.
Crosshead/Ghost notes
To change a fret mark to a crosshead/ghost note:
- Select one or more fret marks (in normal mode).
- Press Shift+X to toggles ghost noteheads on/off.
Customizing a tablature staff
Changing tuning
- Right-click on the staff and select Staff/Part Properties…
- Press the Edit String Data… button at the bottom of the dialog box. This opens the String Data dialog:

- Under Strings tuning, click on a string pitch and select Edit String…; Alternatively, just double-click the string pitch.
- Select a new pitch in the Note Selection box and click OK. Alternatively, just double-click the new pitch.
- Click OK to close the “String Data” dialog box.
- Click OK to close the Staff/Part Properties dialog.
Notes: (1) If the tuning is changed on a tab staff that already contains some notes, fret marks will be adjusted automatically (if possible); (2) Any change of tuning to a particular instrument applies only to the score at hand, and does not change any program default settings.
Adding or removing strings
Add a string
- Right-click on the staff and select Staff/Part Properties…
- Click on Edit String Data…
- Click on a string pitch and select New String…
- Select the new pitch and press OK; alternatively, just double-click the new pitch.
The new string is inserted below the selected string. You will also need to adjust the number of lines in Staff/Part properties→Advanced style properties.
Delete a string
- Right-click on the staff, select Staff/Part Properties…
- Click on Edit String Data…
- Click on a string pitch and press Delete String.
Note: After deleting a tablature string you will also need to adjust the number of lines in Staff/Part properties→Advanced style properties.
Mark unfretted string “open”
For an instrument such as the Baroque lute, this feature is used to mark a bass course as unstopped—i.e. always played open like a harp string. This means that only a fret mark indicating a zero fret can be displayed.
To mark a bass course as unstopped:
- Right-click on the staff, and select Staff/Part Properties...
- Click on Edit String Data…
- Check the required boxes in the Open column.
See also Period tablature notation.
Change number of instrument frets
This property defines the maximum fret number which can be entered on a tablature staff.
- Right-click on the staff, and select Staff/Part Properties…
- Click on Edit String Data…
- Select or enter a new number using the “Number of frets” spinner.
Changing tablature staff type
MuseScore provides a range of common tablature types. If you want to change the tablature type, choose one of two options:
Change staff type from Instruments panel
- Ensure that the Instruments panel is visible (toggle F7).

- Click on the arrow next to the instrument name to reveal the staves.
- Click on the edit cog next to the desired staff and choose an option from the "Staff type" dropdown.
- To close, press Esc, or click outside the dialog.
Change staff type from Staff/Part properties
- Right-click onto an empty area of the staff and select Staff/Part Properties….
- Click on Advanced Style properties, select the desired option from "Template", then press < Reset to Template. You can fine tune the display if necessary using the "Fret Marks" and "Note Values" tabs.
- Click OK twice to exit.
Note: For customization options in detail, see Customizing appearance of tablature (below).
You will find the terms "simple", "common" and "full" in the tablature type names:
- Simple: Displays just fretmarks.
- Common: Displays fretmarks, rests, stems and beams.
- Full: Displays fretmarks; rests, stems and beams, half-note stems.
Customizing appearance of tablature
Tablature staff properties
- Right click on the staff and select Staff/Part Properties…
- Click on Advanced Style Properties….
This gives you access to a full range of tablature customization options. See Staff properties: Tablature options.
Tablature staff style
Global settings are set in Format→Style→Tablature styles.

Applying capos
Overview
A capo is a device that can be clamped onto the fretboard of a fretted stringed instrument, such as the guitar. The capo effectively shortens the strings, which makes the instrument play in a higher key than it normally would.
MuseScore allows you to emulate this effect by adding a Capo marking to an instrument staff (or staves). This automatically transposes playback to the desired pitch while keeping the notes, or fretmarks, unchanged. Partial capos, where only some strings are shortened, are also possible (see below).
Applying a capo to your score
The capo element is available in the Guitar palette, which is hidden by default.
To find the capo element:
- Click the Search Palettes button at the top of the palettes, or use the shortcut Ctrl+F9 (macOS: Cmd+F9).
- Type "capo".
Alternatively, to permanently reveal the Guitar palette:
- Click Add palettes
- Click the Add button next to Guitar
Note: The Add palettes dialog is not currently accessible to screen readers, so blind users must use the first method (via search).
To apply a capo to a staff:
- In the score, select the note or rest where you want to add a capo marking.
- In the Guitar palette, select the Capo element.
- “Capo 1” text is added to the score, and a Capo settings popup dialog appears next to it.
- Adjust the capo's settings in the popup dialog (see below).
Adjusting capo settings
The Capo settings popup dialog appears when you add a new capo marking or select an existing capo marking in the score.
Note: Keyboard users can press Tab to focus the Capo settings popup after it has appeared, and then use the arrow keys to navigate the available settings. If you press Tab a second time the popup will disappear. To get it back, simply deselect the capo marking with Alt+Left, reselect it with Alt+Right, and then press Tab to focus the popup.
Turning capo on or off
- Select On at the top of the Capo settings dialog to indicate that a capo should be added to the instrument.
- Select Off to indicate that the capo should be removed from the instrument and return playback to the original key.
By default, if you select Off the text in the score will change to read "No capo".
Setting capo fret position
The number in the Fret spinner refers to the fret where the capo should be applied. For example, fret 1 transposes the key up by a semitone, fret 2 by a whole tone, and so on. The text label in the score will update automatically.
For example, if you choose fret 4, the text in the score will say "Capo 4".
Note: Keyboard focus can get stuck in the fret edit control. If this happens, press Up and Down to change the value of the spinner, then press Right to move to the Apply to string checkboxes below.
Specifying partial capo placement
The checkbox switches in the Apply to section let you specify that a capo should be applied only on certain strings. When at least one string is turned off, the text in the score will change to indicate a partial capo.
For example, if you choose fret 4 and then turn off strings 1 and 2, the text in the score would say "Partial capo: Fret 4 on strings 3, 4, 5, 6".
Customizing capo text appearance
To change the wording of the Capo text:
- Check the Manually specify instruction text box in the popup dialog.
- Type the text you want to appear in the score.
To place the capo text beneath the staff:
- Under Position, select Below.
Changing capo setting mid-score
Using the steps above, you can, if desired, vary the capo setting at different points in the score. Each capo instance will affect the transposition of all music that follows it, up until the next capo mark.
Note: It is not possible to apply more than one capo at the same time. This feature is planned for a later release.
Alternate string tunings
This page describes features added in MuseScore 4.2. For string tuning in older versions of MuseScore 4, see Customizing a tablature staff.
Applying string tuning instructions
To apply a string tuning instruction to a stave:
- Go to the Guitar palette
- Click and drag the String tunings element to a measure
A tuning fork icon will appear above your stave.
Alternatively, first select a measure, then select the String tunings element in the Guitar palette.
String tuning instructions are added to measures, and affect only the stave to which they have been applied (including any linked staves). You can apply multiple string tunings at different measures in your score. Each string tuning will apply from the start of the measure to which it has been added, up until the next string tuning element.
Specifying string tunings
Once you've added a string tuning element to a stave, you can specify the tuning you want for your instrument.
- Select the tuning fork icon (outlined in the steps above)
- In the widget that appears, choose from the many common tunings in the Preset dropdown
The tuning fork icon will be replaced with the conventional tuning text instruction, comprising encircled numbers for each of the instrument's strings, and text designations showing the new pitch of each string.
You can customise the string tuning text to display any number of strings, as well as any pitch you like:
- Click on the string tuning text
- In the widget that appears, toggle on or off the 'eye' icon to show or hide instrument strings
- Adjust the pitch of each string using up and down arrows in the text boxes alongside each string
Note that the 'eye' icons merely show or hide the text instruction on the score. The actual tuning of each string, insofar as it affects playback and tablature fret positions (see more below), is determined by the pitch indicated in the text field alongside each string – regardless of whether that string's tuning instruction is shown or hidden in the score.
Alternate tunings affect tablature fret positions
When an alternate tuning element is applied to a stave, the pitch specified for each string will be shown as an open position ("0") in the tablature stave.
During playback, the pitch of all fret positions along each string remains relative to the pitch of the open string: For example,
- If the sixth string is tuned to E, the open position will sound like an E during playback, and the first fret will sound like an F;
- If the sixth string is tuned down to a D, the open position will sound like a D during playback, and the first fret will sound like an E-flat.
The notation on any linked standard stave remains unaffected by the presence of alternate string tunings. This allows the player to continue reading the sounding pitches of each string.
Reading transposed pitches on the standard stave
Sometimes, especially in cases where every string on the instrument has been uniformly tuned down, it will be preferable for the player to read the standard notation at the ‘regular‘ (i.e. pre-tuned) pitch rather than the sounding pitch. In order to achieve this, the standard stave can be transposed.
- Right-click on a measure in the standard stave
- Select Stave/Part properties...
- In the Transposition dropdown menu, select your desired transposition amount.
A common example is to want to tune the guitar down a half-step without affecting the standard notation. To achieve this:
- Apply an alternate string tuning element to your stave (see steps above)
- Select the Tune down 1/2 step preset
- Where required, add a key signature that corresponds to the pitch of the song/work (I.e. its concert pitch)
- Right-click on a measure and choose Stave/Part properties...
- From the Transposition dropdown menu, select 1 – Minor second
- Select the Down radio button
- Finally, if you are using a linked tablature stave and wish for the tablature fret positions to continue showing the expected standard fingering, select the Don't reflect transposition in linked tablature staves checkbox
- When you're done, click OK.
Both the standard stave and any linked tablature stave (where applicable) will show the fret positions and standard notation at the standard playing pitch (as if no alternate tuning had been specified). Playback will, however, reflect the alternate tuning.
Toggling on Concert pitch will show the sounding pitches notated on the standard stave.
[Draft only: more content forthcoming]
Guitar bends
This page describes features added in MuseScore 4.2. For older versions of MuseScore 4, see Guitar techniques.
For other types of bends, see brass or woodwind instrument bends.
Adding bends to your score
From MuseScore 4.2 onwards, four types of guitar bends can be added to your score:
- Standard bend
- Pre-bend
- Grace note bend
- Slight bend
These bends can be found in the Guitar palette
General points about bends in MuseScore
In general, bends in MuseScore connect two notes together: a ‘starting note’ and an ‘arrival note’.
Bends are contextual, meaning if the arrival note is higher than the starting note, an upward bend will be created. Conversely, if the arrival note is lower than the starting note, a release will be drawn.
Whenever a bend is added to a tablature stave, both the starting and arrival notes will be entered as a fret positions. The arrival note, however, will be hidden by default. This allows you to create sequences of multiple bends (such as bend-release combinations) using only the tablature stave, without needing to input notes in the standard stave. If you're working mainly in the standard stave, you may find it more convenient to hide these fret positions via the Invisible setting in the Properties panel.
In all cases, the bend amount, being the intervallic distance between the starting and arrival notes, is reflected by the notated pitches on the standard stave, allowing you to see the shape of a melodic line, as it is affected by the presence of bent notes. On the tablature stave, the bend amount is given by a numerical indicator: "1" for a whole tone, "1/2" for a half-tone (semitone), "1/4" for a quarter-tone, etc.
Applying a bend
To apply any type of bend to your score:
- Select one or more notes and click the desired bend symbol in the Guitar palette
- Drag the bend symbol from the Guitar palette on to a note
- Select one or more notes, and enter the required keyboard shortcut (see details below)
Standard bends
Windows Alt+B | macOS ⌥+B
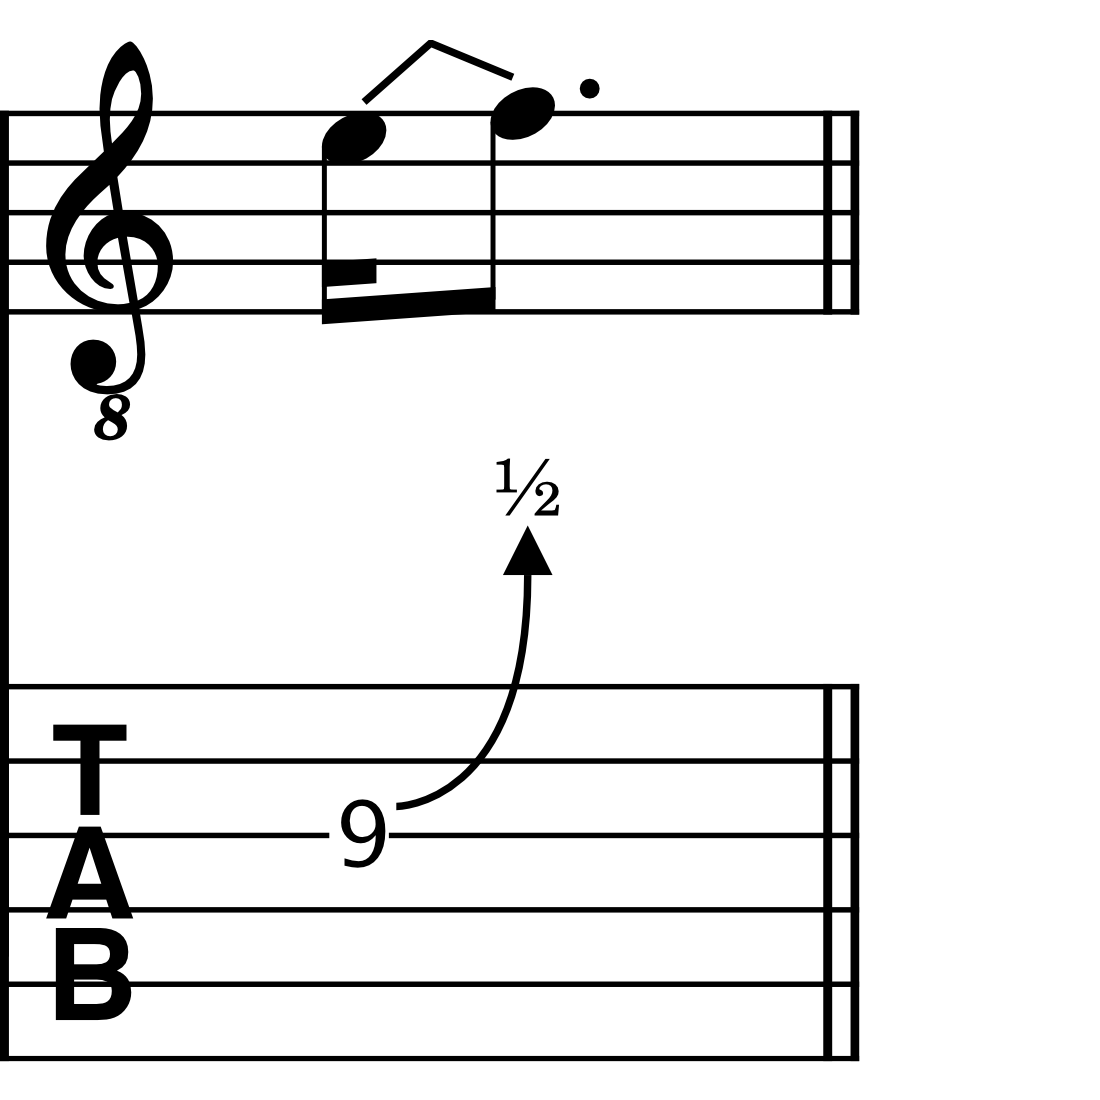
A standard bend connects two notes together: a ‘starting note’ and an ‘arrival note’. Standard bends are mostly used when it is desired to clearly specify the rhythm of the bend pattern.
When a bend is added to a note, it will automatically be drawn to the next note in the score (the arrival note). If a rest follows the starting note, MuseScore will replace the rest so that the bend has an arrival note to connect to.
Grace note bends
Windows Ctrl+Alt+B | macOS ⌘+⌥+B
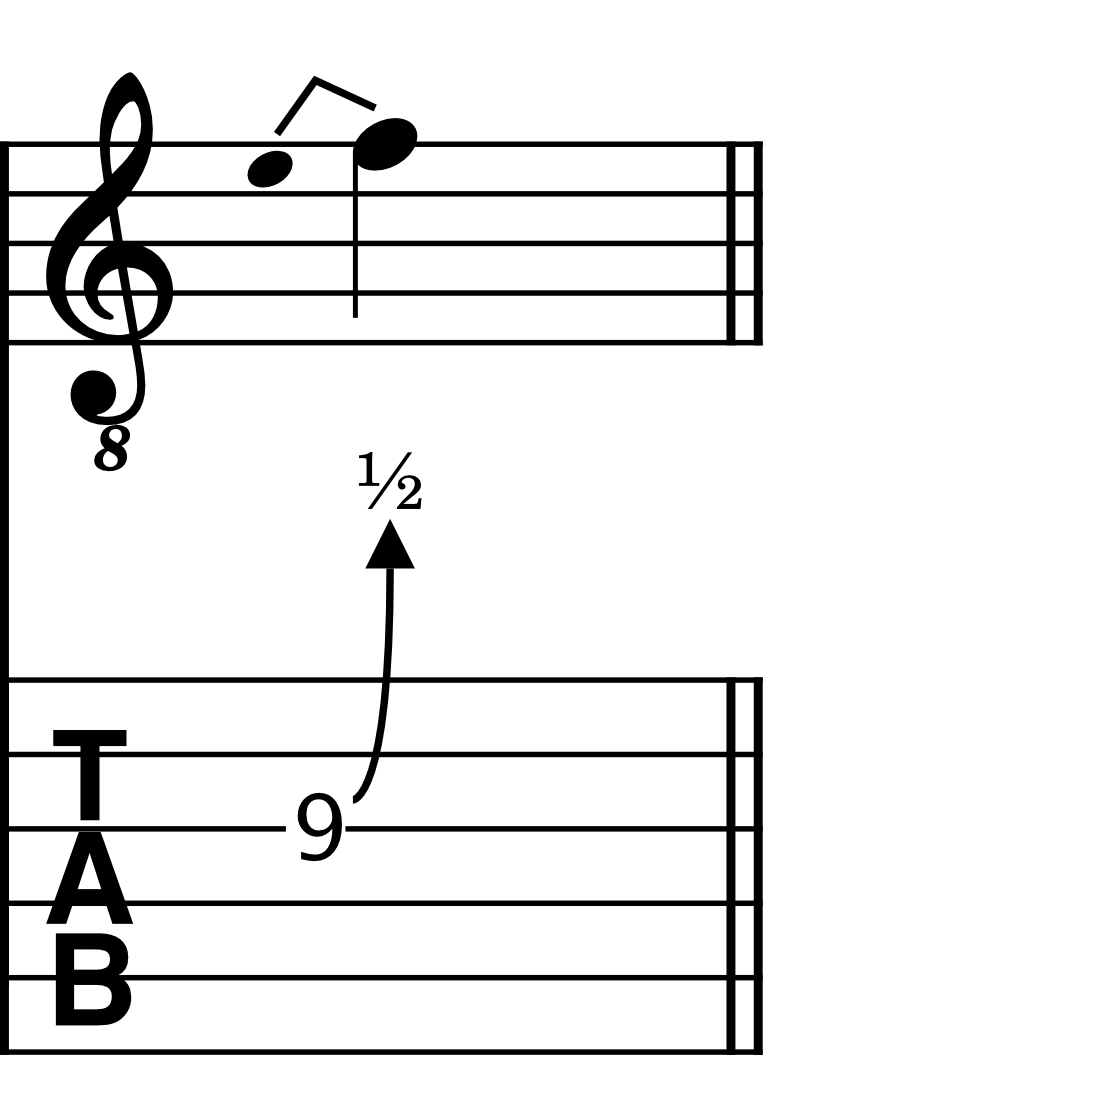
Grace note bends can be used to indicate bends that don’t have a defined rhythmic duration; they are generally played quite quickly before the beat.
When you apply a grace note bend to a note, it will automatically be entered one diatonic step lower than the note it precedes.
Pre-bends
No default keyboard shortcut: set your own shortcut in Preferences
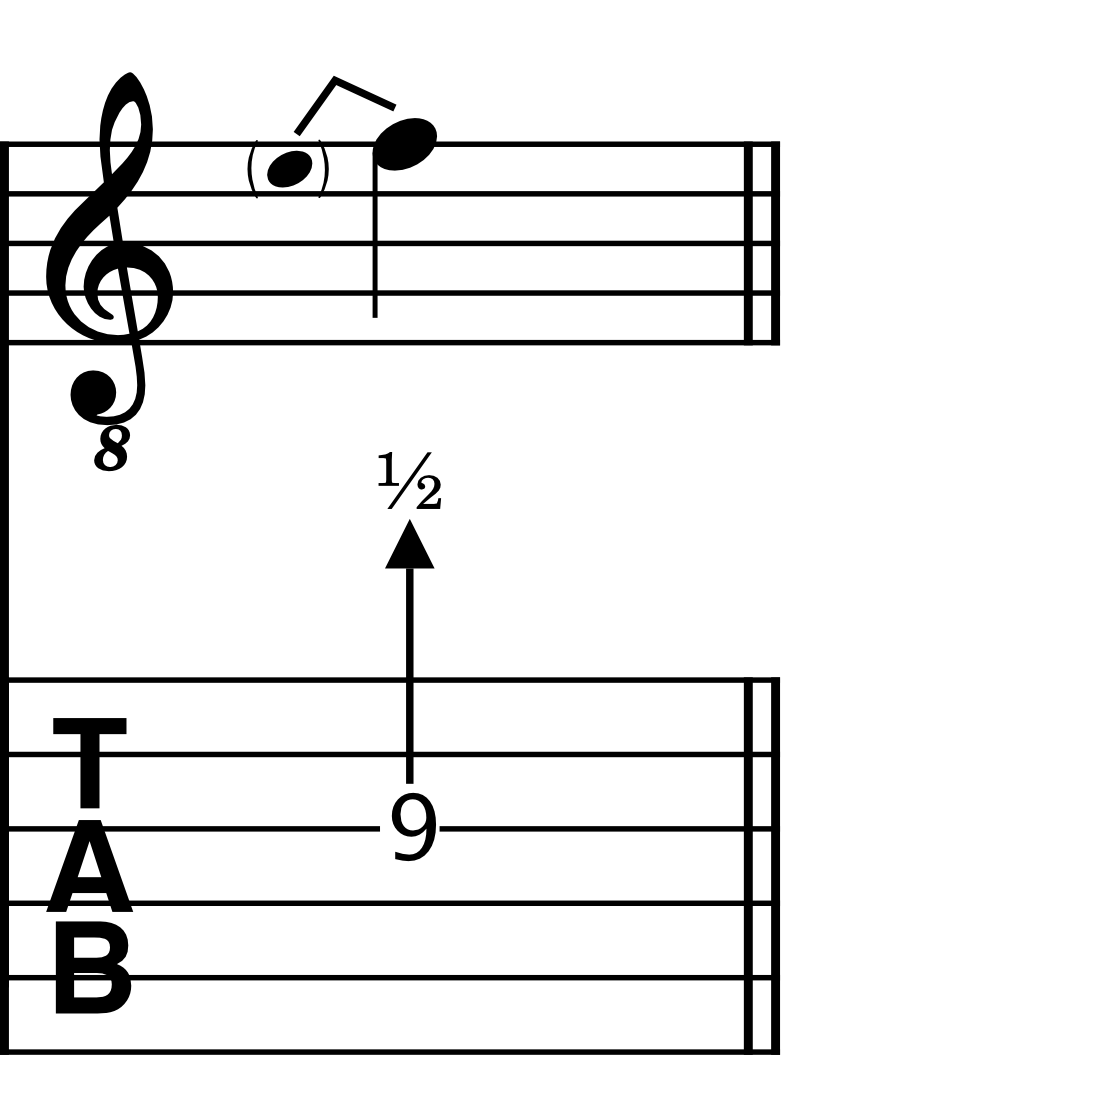
Pre-bends indicate a string that has been bent prior to being struck. On the standard stave, it is represented as a stemless, parenthesised grace note. On the tablature stave, it is illustrated with a straight, rather than curved arrow.
Slight bends
No default keyboard shortcut: set your own shortcut in Preferences
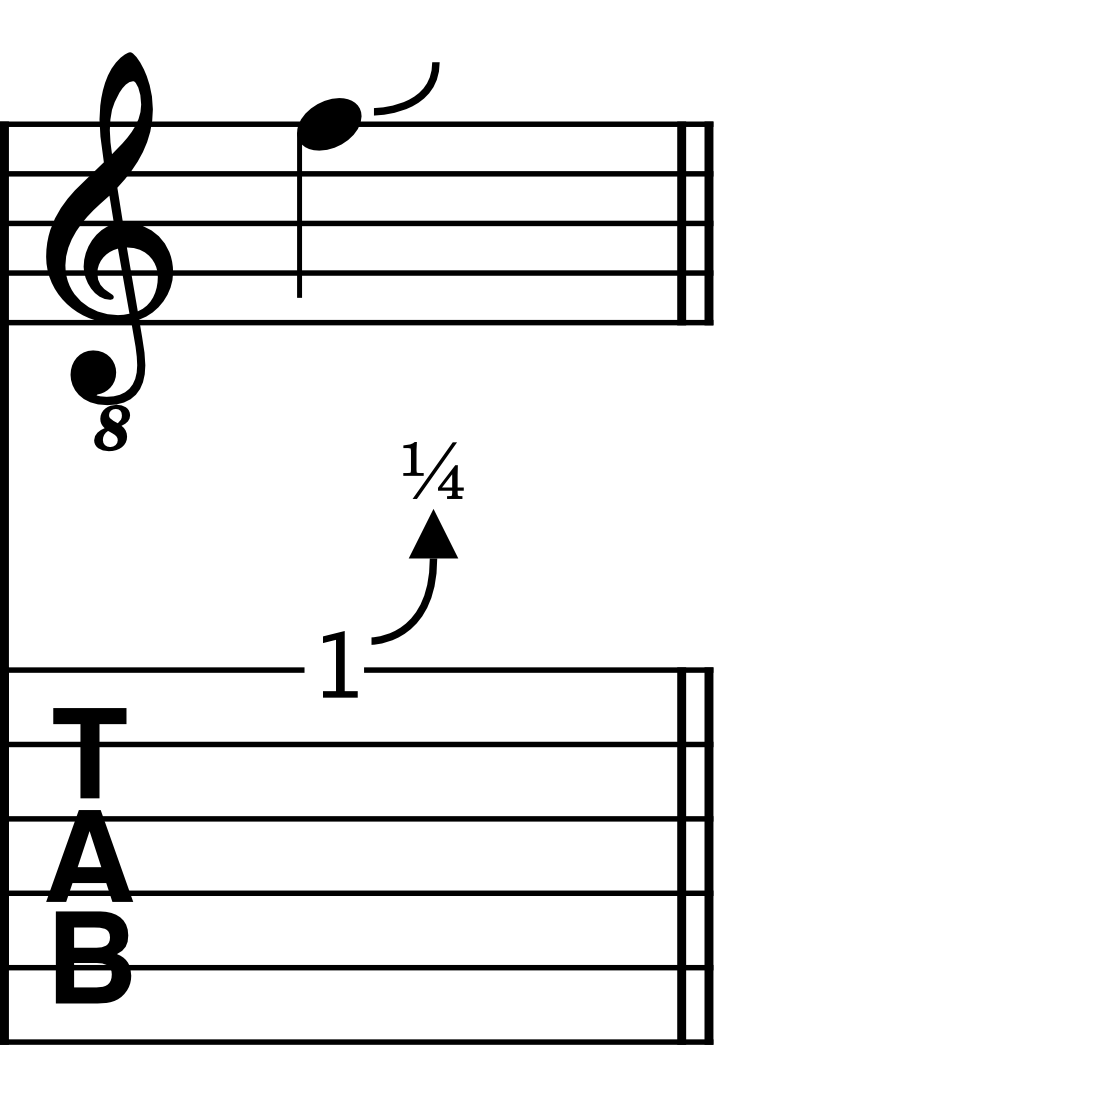
Slight bends are the only bend type in MuseScore that do not connect to an arrival note.
They are always set to a pre-defined amount of a ¼ of a tone, and always bend upwards from the starting note.
Holds
A hold is indicated by a dashed horizontal line between two bends. It is only ever shown in the tablature stave.
Hold lines are drawn automatically where a bent note is subsequently tied to one or more notes.
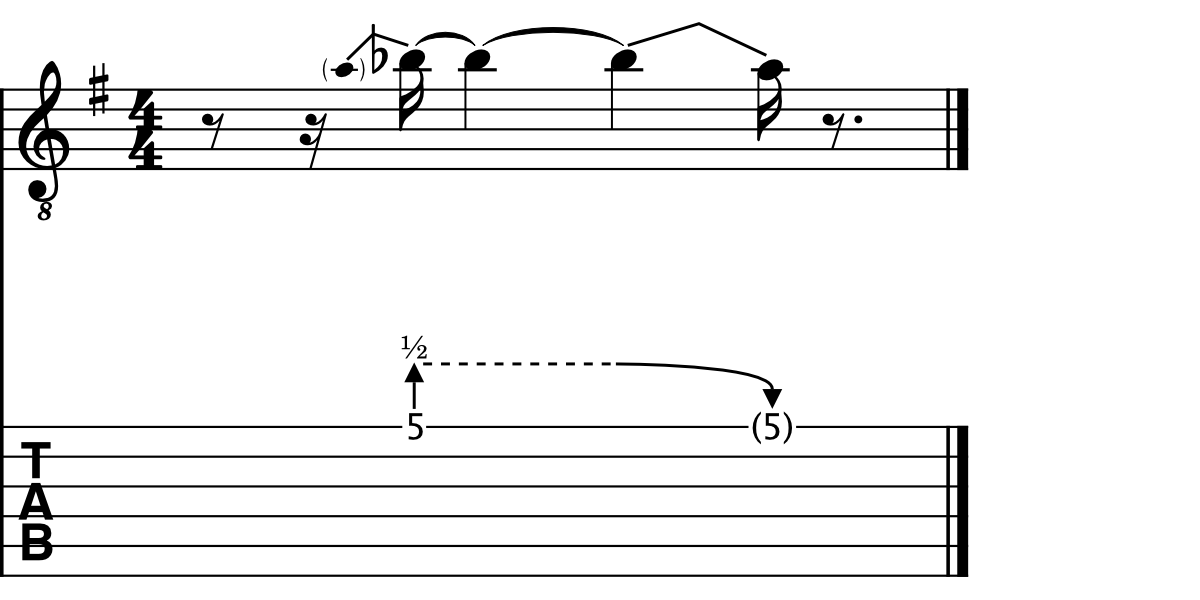
In addition, you can manually show or hide hold lines where it makes sense to do so.
- Select a bend in your score
- Open the Properties panel
- Under Hold line, select either Show or Hide to force a hold line to be drawn, or to be hidden, respectively
Modifying bends
Both the intervallic amount and playback speed of bends can be adjusted in MuseScore, either by modifying the pitch of bent notes on the standard stave, or adjusting the bend curve in the Properties panel.
Modifying bends in the standard stave
To change the bend amount of a standard bend, grace note bend, or pre-bend in the standard stave, simply raise or lower the pitch of either the starting or arrival note in your score. The fractional indicator in any linked tablature stave will be adjusted automatically.
Modifying bends in the Properties panel
Both the bend amount and its playback speed can be adjusted via the Properties panel.
To adjust the bend amount:
- Apply a bend to your score, using any of the methods outlined above
- Select the bend
- Open the Properties panel
- In the Customize bend graph, click and drag the end point of the curve up or down
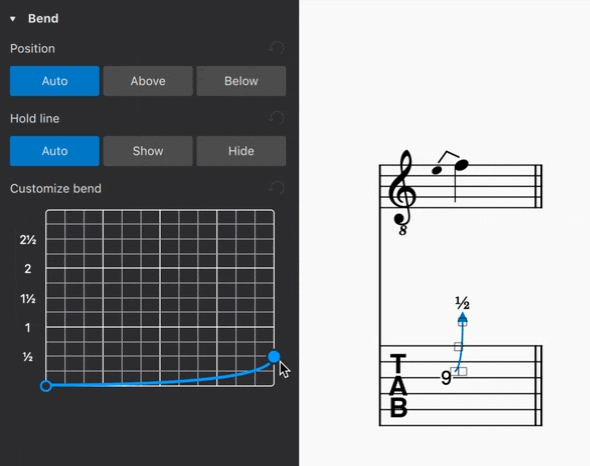
The left-most point of the bend curve corresponds to the starting note in a bend. The right-most point corresponds to the arrival note.
Dragging the right-most (end point) of the curve upwards raises the arrival note in ¼-tone steps. In the same way, dragging the end point downwards lowers the pitch of the arrival note. The fractional indicator in the tablature stave, and the notated pitch in the standard stave, will be updated accordingly.
To adjust the playback speed of a bend:
- Select a bend in your score
- Open the Properties panel
- In the Customize bend graph, click and drag the start and end points of the curve left or right
Dragging a curve point horizontally changes only its playback speed, including the duration for which the starting and arrival notes are held (indicated with a horizontal line). It does not affect rhythmic notation in your score.
Adding bends to chords
MuseScore also makes it possible to apply bends to chords, and to create unison bends.
To apply bends to chords:
- Create a chord of two or more notes
- Select the note(s) to which you want to apply a bend
- Add the desired bend (see steps above)
To create a unison bend:
- Create a chord containing two notes in unison (Add a unison interval to an existing note using Alt+1 on Windows, or ⌥+1 on macOS)
- Select the note to which you wish a bend to apply
- Add the desired bend (see steps above)
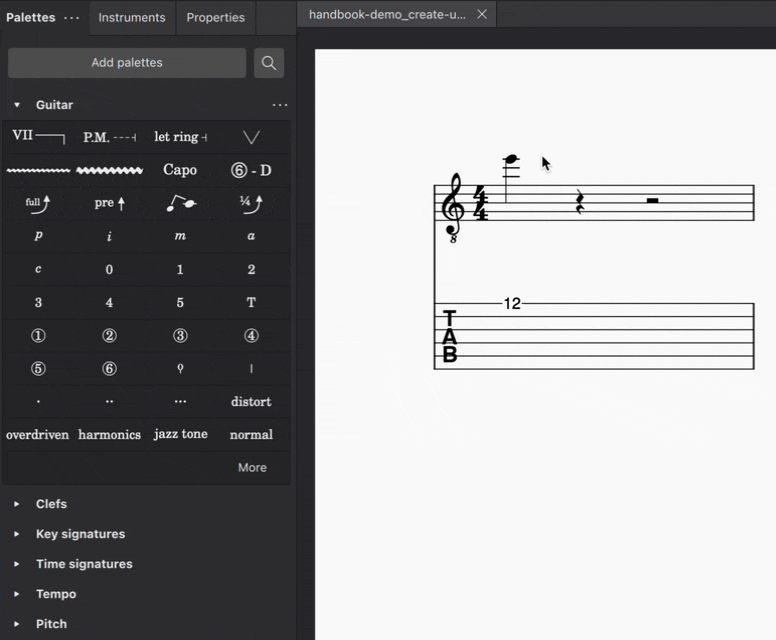
In the case of unison bends, it can be helpful to apply the bend in the tablature stave, where it can be easier to see which string exactly is being bent.
Customising bends styles
To customize the appearance of bends across an entire score:
- Go to Format in the menu bar
- Select Style...
- In the dialog that appears, choose Bends from the list of categories on the left
In this dialog, you can modify:
- Line thickness: the thickness of all bend lines in both standard and tablature staves
- Arrow width and Arrow height: the width and height of the arrow heads on bend curves in tablature staves
- Label for full bends: choose from displaying "1" or the word "full" to indicate a whole-tone bend in the tablature stave
- Tablature fret numbers: selecting the checkbox in this section makes all fret positions for grace note bends in tablature staves appear as cue sized numbers (by default, fret position numbers for grace note bends are the same size as fret position numbers for other types of bends).
Idiomatic notation: Harp
Overview
Harps typically have seven strings per octave, with one string per pitch-class from C to B. Modern harps also have seven pedals, each of which has three positions: middle (natural), highest (flattened), and lowest (sharpened). Raising the pedal from middle position loosens the tension of one pitch-class of strings in every octave, lowering the notes by a half step, and lowering the pedal results in notes a half step higher. For example, moving the C pedal to the lowest position will make all C strings play C#.
In notated music for pedal harps, diagrams or text markings in the score indicate when to change pedal positions to change playable notes.
Adding a harp pedal diagram to your score
As of MuseScore 4.1 the harp pedal diagram element is available in the Harp notation palette.
To apply a harp pedal diagram to a staff:
- Click in the score where you want to add a harp pedal diagram.
- Click the Harp pedal diagram element in the Harp notation palette.
- Choose the tuning in the popup dialog.
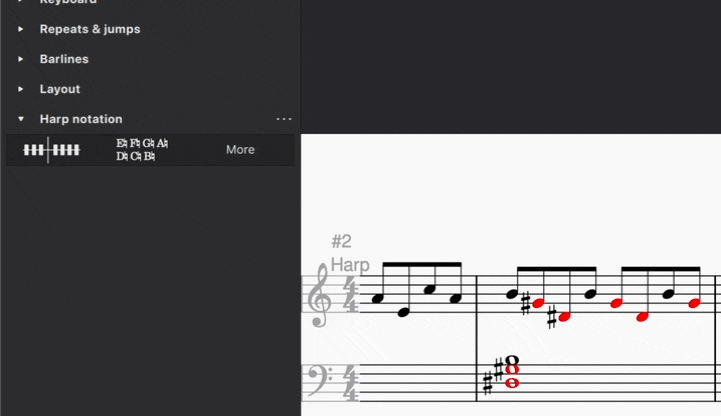
Notes that cannot be played with the selected pedal configuration will turn red.
The diagram view shows every pedal, while the text view shows only the notes that need to change since the last pedal marking.
By default, diagrams appear above the staves and text markings appear between them.
To change a diagram, select it in the score to reopen the popup dialog.
Reading harp pedal diagrams
Visual diagram
The diagram corresponds visually to the seven harp pedals. The three to the left of the vertical line are the left foot pedals; the four on the right correspond to the right foot. From left to right, the notes the pedals control are:
- Left foot: D, C, B
- Right foot: E, F, G, A
A bar on the line indicates the middle position, which plays a natural note. A bar above the line tells the player to raise the pedal, flattening the note, and a bar below indicates lowering the pedal, sharpening the note.
For example, the playable notes indicated by the diagram below are C#, D, E, F#, G#, A, and B.

Text diagram
The upper line of notes refers to the pedals controlled by the right foot, and the bottom line to the left foot pedals.
The first instance of a harp pedal text diagram in the score will always show the positions of all seven pedals. The text view shows only the notes that need to change since the last pedal marking.
Text diagrams appear between the staves by default, but can be manually repositioned.
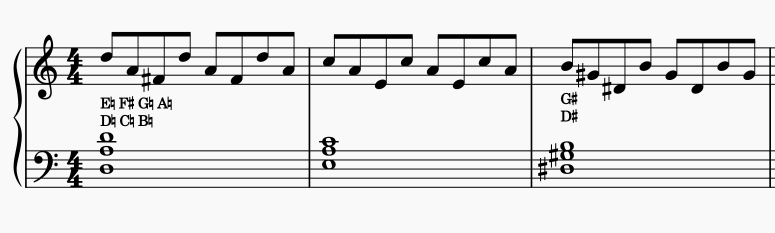
惯用记谱:打击乐器
Entering and editing percussion notation
Overview
In percussion notation, the lines and spaces of the music staff are allocated to different instruments—rather than different pitches—and a range of different notehead shapes is used.
The example below shows a simple drumkit beat on a five-line music staff. By convention, the bass drum rhythm is written on the lowest space of the staff, the snare drum on the third space, and the closed hihat, using crosshead notes, on the space above the staff.

Stem direction usually describes whether an instrument is hit with a hand-stick or with a foot-pedal. Musescore use the Musescore Voices feature to help create notes that have different stem direction.
Types of percussion staves
Percussion music is usually written on a 5-line, 3-line, or 1-line staff—depending on the instrument. When a percussion instrument is created using the New Score dialog, MuseScore automatically chooses the most appropriate staff type. This can be changed later, if necessary, using the "Staff type" column in the Instruments panel. You can also create a Custom staff types.
Adding a percussion staff to your score
See Setting up your score and/or Instruments panel.
Entering notes and rests in percussion staves
There are several ways of entering music on a percussion staff:
- Using a Mouse (and the Drum Input Palette).
- Via keyboard shortcuts.
- Using an external MIDI keyboard.
- Using the virtual piano.
After each note or rest is entered, the cursor automatically advances so that it is in the correct position for subsequent entry.
Mouse entry using the Drum input palette
- Select a start location in the percussion staff.
- Enter note Input mode (shortcut N). The Drum input palette (DIP) appears at the bottom of the window:

This displays a range of percussion instruments and how they will appear on the staff. If any instrument has a keyboard shortcut this is shown above the staff.
Click on an instrument in the DIP, and its name appears on the left-hand side of the palette. The color of the note shows the voice pre-allocated to that instrument: blue for voice 1, green for voice 2 etc. - Use one of the following methods:
- Click on an instrument in the DIP; select the desired note duration, then, click on the staff at the desired location.
- Select a note duration, then double-click the desired instrument in the DIP. The note is entered at the cursor position.
Note: Any existing notes in that voice are overwritten.
- To enter another instrument in the same voice at a location, press Shift, then double-click the instrument in the DIP.
- To enter a rest of the selected duration, press 0 (zero).
Using keyboard shortcuts
This method is suitable for adding instruments which have a keyboard shortcut displayed in the Drum Input palette.
- Select a note, rest or measure in the percussion staff as a start point.
- Enter note Input mode (shortcut N). The Drum input palette (DIP) appears at the bottom of the window (as above).
- Choose a note duration.
- Type the keyboard shortcut for the desired instrument; this is shown above the staff in the DIP. The note is entered at the cursor position.
Note: Any existing notes in that voice are overwritten. - To enter another instrument in the same voice, hold Shift, while entering the shortcut.
- To enter a rest of the selected duration, press 0 (zero).
Note: Shortcuts can be changed in the Edit drumset dialog.
Using a MIDI controller
To add notes to a percussion staff from a MIDI keyboard:
- Ensure that the MIDI keyboard is connected to your computer before launching MuseScore. Check that it is functioning correctly.
Note: If you click on the percussion staff in normal mode, you can "preview" the sound of the percussion instruments from the MIDI keyboard. - Click on the note or rest where you want to start.
- Enter note input mode.
- Select the voice in which you wish to enter notes.
- Select a note duration.
- Press an instrument key to add a note to the score. To add another instrument in the same voice, keep the first key held down while pressing the second key.
- To enter a rest of the selected duration, press 0 (zero).
Note: Refer to a GM2 drum map for details about which MIDI keyboard key corresponds to which percussion instrument.
Using the on-screen piano keyboard
To add notes to a percussion staff from the virtual Piano Keyboard:
- Ensure that the Piano keyboard is displayed. Press P (or select it from the menu, View → Piano keyboard).
Note: If you click on the percussion staff without entering note input mode, you can demo the percussion instruments from the Piano keyboard. - Click on the note or rest where you want to start.
- Enter note input mode.
- Select the voice in which you wish to enter notes.
- Select a note duration.
- Click on a (virtual piano) key to add a note to the score. To add another note to an existing one, press Shift and hold it while pressing the new note.
- To enter a rest of the selected duration, press 0 (zero).
Note: Refer to a GM2 drum map for details about which piano key corresponds to which percussion instrument.
Drumset customization
Introduction
You can customize the notation of instruments inside the "drumset" Musescore Instrument using the Edit drumset dialog and
To customize percussion staff, see Staff/Part properties and chapters under Idiomatic notation: Percussion.
Edit drumset dialog can be opened in note input mode from the Drum input palette by clicking on the Edit drumset button (bottom left of the program window). Alternatively, in normal mode, right-click on the percussion staff and select Edit drumset...

On the left is a list of available percussion instruments. You can put these in MIDI number order by clicking on the "No." heading; this automatically shows them in note order as well. Clicking again puts the list in reverse order.
The right of the dialog shows you how the selected instrument is displayed on the percussion staff: its name, position, notehead type and note-stem direction.
Any changes made here are automatically saved in the parent MuseScore file (after pressing OK). You can also save the drumset independently as a drumset file.
[the following is a work in progress, "major percussion overhaul" is upcoming https://musescore.org/en/node/354177 , in the meantime see Musescore 3 handbook Drum notation, feature is still identical in Musescore 4.1.1 ]
Customizing a drumset definition
Selecting a sound
- info on GM drum sounds
- how much of this is relevant for VST?
Defining the note
Name
Noteheads
Other properties
Saving and loading drumset definitions
Other percussion notation
Diddles
Diddles can be added by using an eighth-note Tremolo.

Pedal lines
To add a vibraphone pedal line, see Pedal.
Rolls
To add a drumroll to your score, see Tremolo.

Sticking
To enter sticking symbols (R, L):
- Select a start note;
- From the menu, select Add→Text→Sticking (alternatively, set up a keyboard shortcut to do the same
thing). The cursor positions itself ready to accept your keyboard input; - Input the letter just as you would normal text. To move forward or backwards to the next note, see Keyboard commands (chord symbols).
- To exit, press Esc, or click on a blank section of the score.
Alternative notation
Mensural notation and Mensurstrich
Adding a mensural time signature to your score
To apply mensural signs to a score you need to add a conventional time signature first, then modify its display by substituting with the appropriate mensural symbol in the Time signature properties dialog. Note that these signs are for show only; it is not possible to modify the duration ratio between different note values, and the actual underlying time signature remains unchanged.
Using mensural note symbols
[To be added]
- add from symbols palette, hide
Working with non-metered music
Early music, such as renaissance choral music, may be written without barlines or a time signature. This can be achieved in MuseScore as follows:
- Set up the instruments or voices of the score in the usual way (See Setting up your score);
- Hide the time signature;
- in Format→Style→Score, check the box titled "Display note values across measure boundaries";
- Right-click on a measure in the top staff and select Staff/Part properties;
- Uncheck "Show barlines"; repeat this for each applicable staff (see note);
- Click OK.
Note: In step 4 you can make the barlines invisible instead by selecting all and pressing V.
Note that the score still behaves as if measures are present. Measure properties can be applied if required.
Working with Mensurstrich
Mensurstrich is a form of modern notation of early music in which barlines are drawn between staves rather than across them:

Adding barlines between staves
- Right click on the bottom staff of the intended mensurstrich system, and select Staff/Part properties. Uncheck "Show barlines".
- Select the first (not the start!) barline for each of the remaining staves;
- Check the "Span to next staff" box in the Barline section of the Properties panel;
- Adjust "Span from" to set the position of the top of each barline;
- Press Set as staff default;
Displaying note values across measure boundaries
- From the menu bar, select Format→Style→Score;
- Check "Display note values across measure boundaries".
See also
Slash notation
Filling a range with beat slashes
To indicate that a range of measures is to be strummed—but without indicating the exact rhythm:
- Select the desired range of blank measures
- From the menu, select Tools→Fill with slashes
-
Apply chord symbols in the usual way to the slashes.

Using beat slashes is a quick and convenient way of indicating strumming. The exact rhythm is left to the player and only the chord symbols play back.
To notate the chord slashes with the correct duration:
- Fill the applicable measures with beat slashes, as shown in steps 1 and 2 (above)
- Select the slashes and in the Properties panel, uncheck “Stemless” in the Note: Stem section.
- Change the duration of slashes, as required
- To change a rest to a slash, copy and paste a slash to it of the same duration
- To indicate a mute strum, select the slash and click the cross notehead in the Noteheads palette (or in the Note: Notehead section of the Properties panel).
- To ensure the correct note beaming pattern, select the range of measures and apply “Auto” from the Beam properties palette.
- Apply chord symbols in the usual way to the slashes.
Creating rhythmic slash notation
To notate the strum rhythm, with the option to include correct playback, you need to use rhythmic slash notation.
Accompaniment rhythms on the staff
- Add the chords, in full, in standard notation on the staff
- Select the range of chords
- From the menu bar, select Tools→Toggle rhythmic slash notation
- To unmute the slash notation, select the applicable range of chords and check “Play” in the Properties: General panel.
Accent rhythms above or below the staff
Custom staff types
Overview
Musescore has four staff types, each of them has different build-in templates, see Staff/Part properties.
To create a custom staff used on whole score :
- Use this step common to all four staff types: find and add an instrument similar to the target staff type by Setting up your score or in Instruments panel, then change its Staff properties and Advanced style properties, notehead scheme is also customized there.
- For percussion staff (type 3, see Staff/Part properties), in addition to the above, use Edit drumset window for notehead related settings, see Drumset customization.
To create a custom staff to be used on one section of score:
- Use the Staff type change element.
- The Change Instrument text element also change staff type by changing the instrument, see Mid-score instrument changes.
Modified Stave Notation (MSN) is a formatting common used in large print. To use MSN see MuseScore 3 tutorial page Creating Modified Stave Notation in MuseScore, it works similarly inside Musescore 4.
Customizing appearance of staff lines
[this section is a work in progress, please add missing info]
- Number
- Color
- Visibility
- Line distance
Customizing appearance of generated elements
[this section is a work in progress, please add missing info]
- Clef
- Key signature
- Time signature
- Barlines
Customizing appearance of notes
- Ledger lines [ a work in progress, please add missing info]
- Stems [ a work in progress, please add missing info]
Notehead schemes

Download this testing score file MS4 Noteheadschemes.mscz
'Notehead schemes' are used by musicians to designate notehead shape meaning. In Musescore 4.1.1, schemes for a staff is named "Notehead Scheme", same options for a note is named "Notehead System", see Noteheads.
Musescore has nine of them. Five of them are directly fully supported, notes written create correct playback. Four "shape note notations" are supported in terms of notehead engraving, users need to take advantage of 'Transposing instruments' feature to create desired playback, see Noteheads.
To create custom "shape note notations", see Noteheads.
The nine supported by Musescore are:
- Normal: The default scheme used by vast majority of musicians.
4 solfege related notations:
- Pitch name: Noteheads automatically and dynamically change to include the English pitch name in the notehead.
- German pitch name: similar to Pitch name but B replaced with H, and B♭ with B.
- Solfège Movable Do (also called Tonic Solfa): Noteheads with solfege literally written. It uses Ti and not Si.
- Solfège Fixed Do: Noteheads with solfege literally written. Used in France, Italy, Spain, etc. It uses Si and not Ti.
4 shape note notations, need further config if you wish to create desired playback:
- 4 Shape (Walker): used in books such as William Walker’s Southern Harmony (1835).
- 7 Shape (Aikin): used in books such as Jesse B. Aikin’s The Christian Minstrel (1846), and books by the Ruebush & Kieffer Publishing Company. It's the most used 7-shape system.
- 7 Shape (Funk): used in books such as Joseph Funk’s Harmonia Sacra (1851).
- 7 Shape (Walker): used in books such as William Walker’s Christian Harmony (1867).
Changing staff type mid-score
See Overview
[this section is a work in progress, please add missing info]
- Most of the above plus line & step offset
External links
For Notehead scheme:
文本
Entering and editing text
Overview
Musescore has different text editing functionalities. This chapter and other chapters under handbook Text section focus on the Musescore Text objects, individual objects that can be placed on a score, and objects containing it. There are also score settings that add text onto pages automatically.
Types of text
Musescore Text object
A Musescore Text object is an object on a score that contains individual characters that can be entered and removed by using (typing on) a computer keyboard. It is usually attached to a note or a rest, some of them attach to another object.
- Staff Text can be attached to a staff;
- Jumps and Markers are attached to measures;
- Some types (Title, Subtitle etc.) must be attached to a frame, see Frame, and Text blocks chapters.
Different types of Text object are not interchangeable. They have distinct property fields that affect how Musescore functions. For example, a Staff Text object styled as a metronome mark can never be configured to change playback tempo inside Musescore. The Tempo object should be used to change playback tempo inside Musescore.
To check the object type, select an object on a score, its type is displayed on the status bar.

| Text object type | Uses |
|---|---|
| Staff Text | Can be configured to apply swing playback, also for general purpose text. For one Musescore Instrument. See Setting up your score and Staff Text, System Text and Expression Text chapter. |
| System Text | Similar to Staff Text, but for all instruments in the system (page layout concept). See Page layout concepts and Staff Text, System Text and Expression Text chapter. |
| Expression Text | The expression item in the Text Palette. A new type introduced in Musescore 4. Does not affect Musescore playback as of Musescore 4.2. See Staff Text, System Text and Expression Text chapter. |
| Instrument change | The Change instr. item in the Text Palette. Change the Musescore Instrument after the anchored note or rest. See Setting up your score and Mid-score instrument changes chapters. |
| Dynamic | Such as p and mf, are Text that affects Musescore playback dynamics. See Dynamics chapter. |
| Hairpin | Such as crese. and dim., are Text line that affects Musescore playback dynamics. See Hairpins chapter. |
| Playing technique annotation | The legato. pizz. etc items in the Text Palette. [This info is a work in progress, the software function is under active dev, pls see and update Staff Text, System Text and Expression Text, and Dynamics, and Mixer, and Glossary and Articulations chapters] |
| Tempo | Numerical metronome mark, verbal direction. A Text type that specifies Musescore playback tempo. See Tempo marks chapter. |
| Gradual Tempo Change | Such as accel.. A new Text line type introduced in Musescore 4 that affects Musescore playback tempo. See Tempo marks chapter. |
| Swing and Straight item in the Tempo Palette | A pre-configured System Text. See Swing playback and Staff Text, System Text and Expression Text chapters. |
| Lyrics | Ctrl+V keyboard shortcut breaks up words stored in clipboard, paste and then jump to next anchor conveniently. See Lyrics chapter. |
| Jump | Such as "D.C."(Da Capo), "D.S. al Coda" etc found in the Repeats & Jumps Palette. See Jumps and markers chapter. |
| Marker | The Capo symbol, Segno symbol, "Fine", "To Coda" etc found in the Repeats & Jumps Palette. See Jumps and markers chapter. |
| Rehearsal mark | The boxed B1 item in the Text Palette. Facilitate rehearsals, divide score into sections, bookmark passages etc. See Rehearsal marks chapter. |
| Chord symbol | Has playback, notes automatically decided. See Chord symbol chapter. |
| Nashville number | Has playback, similar to Chord symbol. See Chord symbol:NNS chapter. |
| Roman Numeral | No playback. See Chord symbol:RNA chapter. |
| Figured bass | A period keyboard notation. No playback. See Figured bass chapter. |
| Sticking | Letters (L and R) attached to (drum) notes showing which hand or foot to use. See Sticking chapter. |
| Fingering | Numbers or letters attached to notes showing which fingers to use. See Fingering chapter. |
| Title, Subtitle, Composer, Lyricist, and Text (text block type) | They are Text types designed to be added into a frame. See Text blocks and Frame chapters. They are not the placeholder text used in the header and footer, see "Score setting" section. |
| Text line, including Volta, Pedal etc types | Volta etc found in Repeats & Jumps Palette. Pedal found in Keyboard Palette. Ottava (8--, 8ve, 8va, 15--) etc found in Pitch Palette. Guitar Barre lines etc. See Other lines chapter. |
Score settings
Long and short name of Musescore Instrument (see Setting up your score chapter) is automatically added to the left of staff in each system (page layout concept, see Page layout concepts chapter). Names can be changed direcly on a score using text edit mode, or using Staff/Part property window, see Staff/Part properties chapter. They are, by default, only added when there are more than one instrument. To change this default behavior, change the setting under Format → Style → Score.
Measure numbers can be added automatically. Configure it at Format → Style → Measure nubmers, see Measure numbering chapter.
Musescore's header and footer functionality adds text to every pages automatically. Configure it at Format → Style → Header & footer. Placeholder text (special symbols) can be used to add information like the current page number, copyright claim etc. Placeholder text is also used to add metadata tags, the digital data of a score file, onto the score dynamically. See Header and footer chapter.
Adding text object to a score
Different types of Text object are not interchangeable, decide on the suitable object type before adding it. Use the chart under "Musescore Text object" section. For general engraving or visual display purpose, it is recommended to use a Staff text or System text.
The following explains how to add text to a note or a rest or a valid anchor outside frames. Adding text to a frame is covered in the Text blocks chapter.
From a palette
To add a text element to your score from a Palette, either select one or more notes/rests and click on the desired palette item; or drag the text from the palette onto a note/rest. e.g.

From the menu
If the text object is associated with a staff you can add it by selecting a note, then choosing a text option from Add→Text.
Using a keyboard shortcut
Many text types can be entered using keyboard shortcuts. Shortcuts are shown to the right of items in Add→Text.
To create a text object, select a note, then enter the required shortcut.
Deleting text object on a score
To edit *text automatically added by score settings*, see "Score setting" section.
To delete object(s) on a score, select the objects then press Delete.
Editing text object content
To edit *text automatically added by score settings*, see "Score setting" section.
Text and text line objects are edited with two different methods, depending on the object type:
- edit directly in text edit mode, as explained below; or
- edit properties in the Properties panel, see the text object's specific chapter.
To enter text edit mode use one of the following methods:
- Double click on the text object, or
- Select the text object and press Return, or
- Select the text object and press F2 or Alt+Shift+E, or
- Right-click on the text object and select "Edit element."
To leave text edit mode either press Escape or click on a part of the score outside the edit area.
Keyboard shortcuts available inside text edit mode
The following keyboard shortcuts are available in text edit mode:
| Function | Windows & Linux | Mac |
|---|---|---|
| Bold (toggle) | Ctrl+B | Cmd+B |
| Italic (toggle) | Ctrl+I | Cmd+I |
| Underline (toggle) | Ctrl+U | Cmd+U |
| Move cursor | Home, End, ←, →, ↑, ↓ | (Alt+) ←, →, ↑, ↓ |
| Remove character to the left of the cursor | Backspace | Delete |
| Remove character to the right of the cursor | Del | → Delete or Fn+Del |
| Start new line | ↵ | return |
| Insert special characters (see below) | Shift+F2 | Fn+F2 |
Special characters
Characters not available from the standard keyboard may be accessed using the Special Characters window.

To open Special Characters, in text edit mode (see "Editing text object content" section), press Shift+F2; or click on Insert special characters in the Text section of the Properties panel.
The dialog is divided into 3 tabs: Common symbols, musical symbols and unicode symbols. The musical and unicode tabs are further subdivided into alphabetically-arranged categories. It is preferable to use items in Common symbols tab as they are functional, see Musescore 3 handbook Fonts chapter.
Clicking an item in the Special Characters dialog immediately adds it to the text where the cursor is positioned. Multiple items can be applied without closing the dialog box, and the user can even continue to type normally, delete characters, enter numerical character codes etc., with it open.
In text edit mode, the following keyboard shortcuts add a functional version of special characters (whenever possible) into the current Text object, see Musescore 3 handbook Fonts chapter.
| Character | Windows & Linux | Mac | Note |
|---|---|---|---|
| Sharp ♯ | Ctrl+Shift+# | Cmd+Shift+# | May not work on some keyboard layouts |
| Flat ♭ | Ctrl+Shift+B | Cmd+Shift+B | |
| Natural ♮ | Ctrl+Shift+H | Cmd+Shift+H | |
| Piano p | Ctrl+Shift+P | Cmd+Shift+P | |
| Forte f | Ctrl+Shift+F | Cmd+Shift+F | |
| Mezzo m | Ctrl+Shift+M | Cmd+Shift+M | |
| Rinforzando r | Ctrl+Shift+R | Cmd+Shift+R | |
| Sforzando s | Ctrl+Shift+S | Cmd+Shift+S | |
| Niente n | Ctrl+Shift+N | Cmd+Shift+N | |
| Z z | Ctrl+Shift+Z | Cmd+Shift+Z | |
| Elision ‿ | Ctrl+Alt+- | Cmd+Alt+- |
Formatting text
Overview
Levels of formatting
Layout and formatting in Musescore has 2 main levels, read Templates and styles first. Text objects have finer levels:
- Level 1: Properties of each individual text object in a score file:
- Formatting of individual characters within a text object;
- Formatting of the object that contains all the characters.
- Level 2
- "style for certain type of object": you can change their values in 'Style' window: left pane
- "style for text inside certain type of object": you can change their values inside items under 'Style' window: left pane 'Text style'
Appearance and function of Text objects
The final visual and function of most object in a score file is determined by:
- Characters do not have any specific formatting. When formatting are added to them, they will always be used. See Changing characters below.
- Text objects do not have any specific properties. When properties are Properties panel, they will always be used except for characters that already have their own formatting. see details in "Text properties" below.
- functional settings: all object on a score uses values in "style for certain type of object", this behavior cannot be changed, but you can edit values in them.
- visual settings:
- an object on a score uses values in appropriate "style for text inside certain type of object", such as "Style for text inside Chord symbols", "Style for text inside Lyrics Odd Lines" automatically. This behavior can be changed with the More... > Text Style property in Properties panel. You can also utilize the 12 custom style.
- "Style for text inside Staff Text" is special. Every Text-related object on a score uses its values unless overridden, this behavior cannot be changed, but you can edit values inside.
- A subset of characters always use font settings in 'Style' window > Score : "Musical symbol font" (8 options): musical glyphs such as Segno, Coda, ottavas, dynamics glyphs such as mf and some Special characters. See Musescore 3 handbook Fonts (mostly the same as in musescore 4.1.1 but upgraded and added 2 options).
Options in Properties panel behave differently depending on the current selection.
"Font", "Style", "Size", "Subscript and superscript" are both object properties, and individual character formatting options. When you change an object using the Properties panel, incompatible formatting on individual characters are removed.
"Alignment", "Frame", "Text style" are object properties. When you select individual characters and change these options in the Properties panel, the object properties are changed instead.
Changing formatting of characters
To edit text content, see Entering and editing text instead.
Use the Properties panel to change formatting of individual characters. Musescore 4 updated the Inspector present in Musescore 2 and Musescore 3 and integrated the function of Text Toolbar (Text editing) into the Properties panel.
- enter text edit mode using one of the following methods:
- Double-click on the text object.
- Select the object and press F2 or Alt+Shift+E
- Right-click on the element and select Edit element
- highlighted characters
- apply formatting in Text section of the Properties panel, and/or use keyboard shortcuts (see Editing text).
Changing formatting of a text object

Click More to see:

To edit text content, see Entering and editing text instead.
Use the Properties panel to change formatting of the Text object, which may change all of the characters inside:
- Select text object(s) on a score
- Edit settings in the Text section of the Properties panel.
Options are self-explanatory, these special settings are shown after clicking More:
Match staff size: whether text size changes proportionally, see Page layout concepts.
Text style : Changes which style a text object on a score uses, see below
Position : Above or below the staff, see below
Changing which style a text object on a score uses
In the Properties panel, use Text style property under More. Concept of formatting is explained in the overview. Only the "style for text inside certain type of object" a text object on a score uses can be changed, they includes the "User-1" ... "User-12", see below. See Templates and styles.
Position
The Properties panel is used for assigning formatting to the Text object(s). When a Text object is changed, all of the characters inside it may change. The Properties panel also is used for assigning formatting to individual characters inside a Text object, when characters are selected.
It is important to know that, even when characters inside a Text object are selected, some properties shown on the Properties panel are still the Text object's setting, but not the character property. They includes the Position property.
In the Properties panel, Use Position property under More to change layout of the Text object. If a overriding option exists for this type of object, is in "style for certain type of object", but not in "style for text inside certain type of object", see "Changing the values inside a style" section below. See also the main chapter Templates and styles.
Changing the values inside a style
Concept of formatting is explained in the overview.
Understand Templates and styles first. To change values inside a style, use the "Style" window: Format→Style.
- "style for certain type of object": you can change their values in 'Style' window: left pane"
- "style for text inside certain type of object": you can change their values inside items under 'Style' window: left pane 'Text style', or
- Use the more efficient way from the Properties panel:
- Select a score object that use the style;
- Edit a property;
- Click on the ellipsis (…) above the property and select "Save as default style for this score".
- Repeat for other properties as required.
- Use the more efficient way from the Properties panel:
Changing the values inside a User-1 to User-12 style
To assign visual settings values to a custom style: "User-1" to "User-12", use the "Style" window: Format→Style > Text Style > User-1 ... User-12
Staff Text, System Text and Expression Text
Overview
Staff Text objects and System Text objects are for indicative purposes listed right below. They can optionally affect Musescore playback, only the section after the attached note or rest is affected.
- Applying swing and straight time (Staff Text and System Text).
- Applying score and movement titles.
- Capo playback for guitarists (Staff Text, for Musescore 4.0.2 and below only. For Musescore 4.1.0 and above use the new Applying capos chapter instead.)
- Other general purpose not covered by other text types only. Different types of text-based objects are not interchangeable, see Text types.
Expression text objects indicate musical expressions and performance indications. They do not affect Musescore playback. To indicate dynamics and create playback at the same time, use Dynamics symbol object. To indicate and affect tempo at the same time, use Tempo markings.
Similarity and difference between Staff Text and System Text
Staff Text and System Text are similar in behavior and function.
- Both of them attaches to a note or rest.
- Both of them can be set-up to have effect on audio created by Musescore's Synthesizer, a Staff Text only affects the Musescore Instrument that that note belongs to, a System Text affects all Musescore Instruments on a score.
- Staff Texts are hidden along with "Hide empty staves within systems" option (and the sub-option "Don't hide empty staves in first system") under "Style" window : "Score", see Templates and styles.
- A Staff Text only appears in the Musescore Part(s) that features the Musescore Instrument. A System Text appears on all Musescore Parts.
- New System Text is positioned above the top staff of each system (layout concept).
Adding Staff Text to your score
- Select a note
- Use one of the following methods:
- Press Ctrl+T.
- From the menu, select Add→Text→Staff Text.
- Click on the "Staff Text" icon in the Text palette
- Enter the desired text in the bounding box.
Alternatively, drag the "Staff Text" icon onto a note in the score before entering the desired text.
Adding expression text to your score
- Select a note
- Use one of the following methods:
- Press Ctrl+E.
- From the menu, select Add→Text→Expression text.
- Click on the "Expression text" icon in the Text palette
- Enter the desired text in the bounding box.
Alternatively, drag the "Expression text" icon onto a note in the score before entering the desired text.
Adding System Text to your score
- Select a note
- Use one of the following methods:
- Press Ctrl+Shift+T.
- From the menu, select Add→Text→System Text.
- Click on the "System Text" icon in the Text palette
- Enter the desired text in the bounding box.
Alternatively, drag the "System Text" icon onto a note in the score before entering the desired text.
Repeating System Text on other staves
New System Text is positioned above the top staff of each system (layout concept). If you need a similar indication on a lower staff, add it to that staff using Staff Text.
Some templates have an additional feature. When you create a System Text, it is automatically duplicated and shown just above another lower staff. If either instance of the object is edited the content of both is updated. If either one is removed, both are removed. These templates includes:
- Symphony Orchestra : duplicated and shown above violin.
- Classical Orchestra : duplicated and shown above violin.
- SATB + Piano : duplicated and shown above piano.
- SATB + Organ : duplicated and shown above organ.
- SATB Closed Score + Piano : duplicated and shown above piano.
- SATB Closed Score + Organ : duplicated and shown above organ.
Properties
Edit properties of selected Staff Text, System Text, and Expression Text object(s) in the Properties panel. Text related settings are covered in Formatting text chapter.
Staff Text and System Text can optionally affect playback. Playback related settings are edited in "Staff Text properties" and "System Text properties" window. When a Staff Text or System Text is duplicated, or reused through customized palette, the playback settings are reused.
An Expression Text can be added to a note that already has a Dynamics symbol attached. Doing so snaps it to the dynamics symbols, this behavior and the Properties : Expression: Snap to dynamic property is explained in Dynamics chapter.
"Staff Text properties" window
Staff Text properties, for swing and capo settings, can be accessed as follows:
- Right-click on the text object
- Select Staff Text properties
- Choose one of the following tabs:
- Swing settings
- Capo settings : for Musescore 4.0.2 and below only. For Musescore 4.1.0 and above use the new Applying capos chapter instead.
"System Text properties" window
"System Text properties" window only has one tab, the Swing settings.
Style
See main chapter Templates and styles.
"Style for text inside Staff Text" is special, see Formatting text.
- Values of the "Style for Staff Text" can be edited in Format→Style→Staff Text.
- Values of the "Style for Expression text" can be edited in Format→Style→Expression text
- Values of the "Style for text inside Staff Text" can be edited in Format→Style→Text styles→Staff
- Values of the "Style for text inside System Text" can be edited in Format→Style→Text styles→System
-
Values of the "Style for text inside Expression" can be edited in Format→Style→Text styles→Expression

Tempo markings
Overview
The musical terminology tempo means the speed or pace of a composition. Musicians use tempo markings/marks to indicate tempo. Supported tempo markings include:
- Metronome marks: Consists of a note, an equals sign, and a whole number.
 indicates 80 minims (half note) per minute.
  indicates 80 quarter notes (crotchets) per minute.
 - Verbal tempo indications: Andante, Allegro, "a tempo", "tempo primo" etc.
- Tempo change lines: Consists of a text and a dashed line. Includes "accel.", "allarg.", "rall.", and "rit.".
- Metric modulations:

Musescore's synthesizer paces based on two settings:
- The real, written tempo of score. It is only determined by tempo markings on the score. Section breaks and barlines do not reset anything. If no tempo marking is present on a score, it plays as if ♩ = 120 is used (120 crotchets or quarter notes in one minute).
- The control slider that change pace temporarily, intended for monitoring purpose. See Playback panel chapter.
Musicians use tempo markings to indicate the value of one beat, but Musescore does not use the beat information inside tempo markings. Beat information is obtained from Time signatures only.
Tempo markings are Musescore Text, except tempo change lines are Musescore Line that contains Text, see Text and Other lines chapter.
The Properties palette and Playback panel use a special unit "BPM". "BPM" is the amount of quarter notes would have been within one minute in decimal number. It is not related to the musical beat. It is not the whole number used in metronome marks conventionally, or on the score.
Using Metronome marks and Metric modulations
Playback follows written content by default. Editing the number changes playback too. This behavior is changable, see "Changing playback of tempo markings" section. If the note and augmentation dot is accidentally removed or another note value is required, professional glyphs must be used, see "Changing appearance" section.
Using Tempo change lines
The tempo changes along the object's anchored range, see Other lines chapter.
Musescore does not understand the written content. These items have pre-defined tempo setting. In Musescore 4.2 beta's Tempo palette, by default:
- accel.: Gradually speeds up to 133% of the original tempo
- allarg.: Gradually slows down to 75% of the original tempo. The italian allargando means widen.
- rall.: Gradually slows down to 75% of the original tempo
- rit.: Gradually slows down to 75% of the original tempo
The setting is changable, see "Changing playback" section.
Using Verbal tempo indications
Musescore does not understand the written content. In Musescore 4.2 beta's Tempo palette, by default:
- "a tempo" item: Changes tempo back the latest tempo before any change by tempo change lines.
- tempo primo item: Changes tempo back to that indicated by the first valid marking.
- Other verbal tempo indication items have pre-defined tempo setting.
All of these settings are changable, see "Changing playback" section.
Adding tempo marks to your score
All markings are found in the Tempo palette, see Using the palettes chapter.
New tempo markings (except Tempo change line) are positioned at the top of system (a layout term, see Page layout concepts chapter), this behavior is similar to "System Text" or "System Text Line", see Staff Text, System Text and Expression Text chapter. Tempo change line is special, it still affects all instrument's playback like "System Text" does, but it is positioned on top of the staff (not system) by default, and only appears in "FullScore" and "Part" the feature the staff that line is attached to, like "Staff Text" does.
To add a Metronome mark, Verbal tempo indication, or Metric modulation onto the score, use one of the following methods:
- Select a note/rest and click an item in a palette.
- Drag the item from a palette onto a note/rest.
- From the menu bar, select Add→Text, and click on Tempo marking.
- See also External links for alternative method utilizing a 3rd-party font.
To add a Metronome mark that use a suitable note value by using the beat information from the time signature:
- Select a note/rest and press the keyboard shortcut Alt+Shift+T.
To add a Tempo change line, use the methods explained in the Other lines: apply line chapter. One common method is to add it to a selected range:
- Either
- Select a note or rest, for creation of Tempo object with "Staff Text Line" behavior, or
- Select a measure for creation of Tempo object with "System Text Line" behavior;
- Shift+Click the last.
- Click an item in the palette.
Changing appearance
Playback can be configure to follow written content of Metronome mark and Metric modulation. Musescore only understand note and augmentation dot professional glyphs. The augmentation dot is not a "Full stop / period" on the computer keyboard. Do not copy from other programs or the internet, as they are not exactly raw unicode characters.
Other characters and numbers are plain characters, entered using (typing on) a computer keyboard. They have different formatting behaviors, for example changing the Properties panel:Font does not affect glyphs, see musescore 3 handbook Fonts chapter. See also Entering and editing text chapter.
Adding plain characters
- Select an object.
- Enter edit mode (double click)
- Type text.
Adding profession glyphs
- Select an object.
- Enter edit mode (double click).
- Use Special characters window: Common symbols tab, one way to open the window is Shift+F2
Tempo change lines
Tempo change lines are Musescore Line. To change appearence of the dashed line, see Other lines: line properties and Adjusting elements directly: Changing the range of a line chapters.
Changing playback
Metronome mark, Metric modulation, and Verbal tempo indication
To change the predefined tempo setting:
- Select object(s)
- Open the Properties palette
- Under Tempo section
- Enter a value in Override written tempo, this value use the special BPM unit, see Overview.
To assign a manual / overriding tempo setting:
- Select object(s)
- Open the Properties palette
- Under Tempo or A Tempo or Tempo primo section, click to change:
- Follow written tempo : uncheck to ignore written content on the score
- Set specific tempo : check to ignore written content on the score
- Enter a value in Override written tempo, this value use the special BPM unit, see Overview.
Tempo change line

To change the manual tempo setting:
- Select object(s)
- Open the Properties palette
- Click Playback, change any if required:
- Amount: Target tempo as a percentage of original tempo. 100% means no change.
- Easing Methods: Rate of tempo change, options are
- Normal : a linear transition effect with the same rate of change from start to end
- Ease in : a transition effect with a slow change rate at the start but a quicker change rate at the end
- Ease out : a transition effect with a quick change rate at the start but a slow change rate at the end
Tempo change lines are Musescore Line. The tempo changes along the object's anchored range. To change the range, see Other lines: line properties and Adjusting elements directly: Changing the range of a line chapters.
Repeating tempo markings on other staves
A tempo marking's layout and default positioning depends on how it is added, see "Adding tempo marks to your score" section.
For tempo markings that behave like "System Text" or "System Text Line", there is a special method to mirror the object, see Staff Text, System Text and Expression Text: Repeating System Text on other staves chapter.
Tempo properties
Selected tempo markings(s) on a score can be edited with Properties panel, settings are already covered in other sections of this chapter. The Properties panel: Font property affects plain characters, but not the professional glyphs. Professional glyphs use "Musical symbols font", see "Tempo style" section. Text related settings are covered in Formatting text chapter. Line related settings are covered in Other lines chapter.
To edit the score-wide settings, see "Tempo style" section.
Tempo style
See main chapter Templates and styles
- Values of the "Musical symbols font" can be edited in Format→Style→Score.
- Values of the "Style for Tempo text" can be edited in Format→Style→Tempo text.
- Values of the "Style for text inside Tempo" can be edited in Format→Style→Text styles→Tempo
- Values of the "Style for text inside Gradual Tempo Change" can be edited in Format→Style→Text styles→Gradual Tempo Change
-
Values of the "Style for text Metronome" can be edited in Format→Style→Text styles→Metronome. No object uses this profile by default, its purpose is for styling Tempo markings which have both a verbal indication part and a metronome mark part. Often the metronome mark part is non-bold and a little smaller. Source: https://github.com/musescore/MuseScore/issues/13377#issuecomment-147399…

External links
- github "a tempo" https://github.com/musescore/MuseScore/pull/15563
- create advanced metric modulation text with "Metrico" font by Florian Kretlow, PSA: If you want to write complex metric modulations, check out this awesome font Florian Kretlow made!
Lyrics
Overview
Lyrics are a form of text associated with melody lines on staves. e.g.

As you can see in the example above, lyrics are entered syllable by syllable, those within words being connected by hyphens. Underscore lines or hyphens (depending on the context) are used to indicate melismas, where a syllable extends over several notes (see below).
Lyrics are organized into verses, with verse 1 at the top and subsequent verses in order below.

Adding lyrics to your score
In order to enter new lyrics, or to edit/format existing ones, you need to be in lyrics mode.
There are two ways to enter lyrics mode:
- Start from a selected note—see Entering syllables (below).
- Start from an existing lyric syllable—see Editing existing lyrics.
Entering syllables
- Select the desired start note, and enter lyrics mode by pressing the keyboard shortcut Ctrl+L (Mac & Linux: Cmd+L). This will create a bounding box ready for text input.
- Type the syllable;
- To enter a connected syllable, press - (hyphen), then enter the new syllable.
- To move forward to a new word (from any point in a syllable), press Space, Alternatively, and only if you are at the end of a word, press → (right arrow).
- To enter a non-breaking space, type Ctrl+Space.
- To enter a melisma, see below.
- To move forward or backwards one character at a time, jumping between syllables, press →/← (right/left arrows).
- To move backwards one syllable, press Shift+Space.
Entering a melisma
A melisma is a syllable that extends over more than one note.

If the melisma is at the end of a word it should be notated by an underscore line:
- Starting from the end of the previous syllable, press _ (underscore) for as many notes as the melisma extends.
If a melisma occurs in the middle of a word it may be notated by hyphens instead:
- Starting from the end of the previous syllable press - (hyphen) for as many notes as the melisma extends.
- For long melismata, instead of repeated typing of hyphens, select the last note in the melisma and press - (hyphen). The intermediate hyphens will automatically be inserted between the previous typed syllable and that final note.
Entering multiple verses
To enter subsequent verses, simply repeat the steps shown under Entering syllables. Lyrics entry automatically starts in the space beneath the last entered verse.
In lyrics mode you can move up and down between verses using the keyboard arrows, ↑ and ↓.
Entering lyrics onto rests
By default, the cursor skips over rests in lyrics mode. However, It is possible to enter a syllable on a rest by selecting the rest, (re-)entering lyrics mode and typing the syllable. Then you can continue entering lyrics as above.
Special characters within lyrics
Characters not available from the computer keyboard may be entered in lyrics mode using the Special characters palette. A special case is highlighted below:
Elision slur
An Elision slur (lyric slur or synalepha) is a symbol used to join two syllables together under one note.
For example, to create the lyrics text below, starting with the syllable text "te":

- Type te;
- Open the Special Characters palette;
- Click one of the elision slurs in the "Common Symbols" tab
- Type A.
Entering reserved characters
For the most part, lyrics can be edited like normal text. However, as noted above, keys like - (hyphen) and _ (underscore) have a special meaning during lyrics entry. If you want to enter one of these characters as itself then an escape modifier (i.e. a shortcut) must be pressed to avoid triggering the special meaning.
| Character | Windows/Linux | macOS |
|---|---|---|
| Space ( ) | Ctrl+Space | Alt+Space |
| Hyphen (-) | Ctrl+- | Alt+- |
| Underscore (_) | Ctrl+Shift+_ | Alt+Shift+_ |
| Line feed (↵) | Ctrl+Return (or Enter on the numeric keypad) | Alt+Return (or Enter on the numeric keypad) |
Editing existing lyrics
To make additions or changes to existing lyrics, click on a syllable and use a text edit mode shortcut to enter lyrics mode.
Delete lyrics
Lyrics are automatically deleted with their parent notes. You can also delete lyrics while leaving the notes intact, by selecting the lyrics and pressing Delete.
Entering lyrics above the staff
If you wish to position all lyrics above, instead of below, the staff:
- From the menu bar, select Format→Style→Lyrics;
- Set Placement to "Above".
You can of course do the same thing by selecting all lyrics in the score and changing Position to "Above" in the text section of the Properties panel.
Changing verse number of lyrics
Each verse attached to the staff is allocated a verse number—with the lowest positioned at the top and highest at the bottom. (You can of course prepend a number to the beginning of each verse, but this is a visual indication only.)
To change the verse number, select the verse and adjust "Set to verse" in the Lyrics section of the Properties panel.
Copying lyrics
Copying lyrics within MuseScore
Lyrics are automatically copied with their parent notes, but you can also copy lyrics on their own without the notes.
Copy to the same verse
- Select a range or list of lyrics syllables;
- Apply cut/copy;
- Select a destination note in the same verse
- Paste the lyrics.
Note that the destination range should be clear of existing lyrics, otherwise the clipboard contents will be pasted on top of them.
Copy to a different verse
- Copy the entire lyrics to a text editor (e.g. Notepad in Windows). Remember to insert hyphens as well as spaces.
- Copy the entire lyrics into the clipboard.
- Position the cursor on the first lyric of the previous verse and press Enter. This will move the cursor ready for input at the start of the next verse.
- Using Ctrl+V repeatedly, paste in the lyrics syllable by syllable.
Copying lyrics to other programs
All lyrics attached to staves can be copied to the clipboard from the menu using Tools→Copy lyrics to clipboard.
Lyrics properties
See Changing verse number of lyrics.
Lyrics style
Values of the "Style for Lyrics" can be edited in Format→Style→Lyrics.
Values of the "Style for text inside Lyrics odd lines" can be edited in Format→Style→Text styles→Lyrics odd lines
Values of the "Style for text inside Lyrics even lines" can be edited in Format→Style→Text styles→Lyrics even lines

Lyrics text
- Placement / Position above / Position below: Sets the default positioning of lyrics in relation to the music staff.
- Line height: The space between verse lines.
- Min top/bottom margin: The distance above and below the lyrics block to the staves above and below.
Min. distance: The minimum distance allowed between syllables. Increase this if the lyrics are too squashed. - Align verse number:
Lyrics dash
Here you will find a number pf properties which allow you to control how hyphens between syllables are displayed:
- Min./Max. dash length: Sets the minimum and maximum length of inter-syllable dashes.
- Max. dash distance: Maximum distance allowed between dashes. Reducing this value allows more dashes to form between syllables where possible—and vice versa.
- Dash thickness: The (vertical) thickness of the dash.
- Dash pad: The distance between the - and the syllable
- Dash Y position ratio: Affects the vertical placement of the dash.
- Always force dash: Tick to ensure that a dash is always visible between syllables.
Lyrics melisma
- Melisma thickness: The (vertical) thickness of the melisma.
- Melisma pad: The distance between the melisma and the syllable
- Align:
Fingering
Types of fingering
Fingering symbols for various instruments are found in the Fingerings palette; some of these are duplicated in the Guitar palette.

Mouse over the palette icons to reveal the names of the symbols.
The different types of fingerings are as follows:
- Fingering; In keyboard notation, used to indicate left and right hand fingering. Also used in guitar music for left hand fingering.
- LH guitar fingering: In guitar notation, 1–4, indicates the left-hand fingers. 0 (zero), an open string. T, the left hand thumb. Can also be used in keyboard music.
- RH guitar fingering: In guitar notation, used to indicate the right hand fingers, namely: p = thumb, i = index, m = middle, a = ring/annular, c = little.
- String number (circled): In guitar notation, used to indicate the strings (1–6, top to bottom). 0 (zero) is used for the open string.
- Other fingering: Lute fingerings may be found by clicking "More" in the Fingerings palette.
Adding fingering to your score
Note: If you want fingering to be displayed in tablature, right-click on the TAB, and select Staff/Part Properties…→Advanced Style Properties; then check the box labelled "Show fingering in tablature"
Adding fingering from a palette
To add fingering to a selection of notes:
- Select one or more notes;
- Click on the desired fingering symbol in a palette.
Alternatively, you can drag and drop a fingering symbol from a palette onto a single note.
When fingering is added to a note, the focus immediately shifts to the symbol, so you can adjust it right away.

Adding fingering using a keyboard shortcut
- Select a start note;
- Choose one of the following options:
- (for any fingering) Add the desired fingering symbol from a palette (as shown above);
- (for Fingering only) Enter the custom keyboard shortcut for "Add Fingering," then type the desired number.
(Note: you can create this shortcut from the menu Edit→Preferences→Shortcuts
- Choose one of the following options:
- To move the cursor to the next note: Press Space, or Alt+→;
- To move the cursor to the previous note: Shift+Space, or Alt+←;
- Type the desired number; a fingering is added of the same type as the initial one .
- Repeat steps 3 and 4 as required;
- Press Esc, or click on an empty space in the document window, to exit.

Adding fingering using the menu
- Select the start note;
- From the menu bar, select Add→Text→Fingering;
- Type the fingering number of the first note;
- Press space to move to the next note; and so on.
Adjusting position
To edit fingering position, see Changing position of elements.
Some fingerings can be flipped to the other side of the staff using the X shortcut, or the Flip direction icon on the note input toolbar.
Changing the appearance of fingering
The text formatting of fingering elements can be adjusted in the Text section of the Properties panel. See Formatting text for details.
Fingering properties
General and text properties for fingering can be edited from the Properties panel.
For General properties see General settings.
For Text properties, see Formatting text.
Fingering style
Each of the different classes of fingering have their own text style. These can be viewed and edited from the menu: Format→Style→Text styles.
See also
Chord symbols
Overview
A chord symbol is an abbreviated way of representing a musical chord and its harmony.
MuseScore supports the following notations:
- Chord symbol: Alphabetical chord name plus chord quality. e.g.
Am, - Nashville Number System (NNS): Arabic numeral plus chord quality. e.g.
6m, - Roman Numeral Analysis (RNA): Roman numeral plus chord quality. e.g.
vi.
Adding chord symbols to a score
Entering a chord symbol
- Select a start note, note slash, or rest;
- Press Ctrl+K (Mac: Cmd+K). The cursor is now positioned above the staff ready for input.
- Enter the chord symbol using the following characters:
- Root note: a, b, c, d, e, f, g. (the lower case will automatically change to upper-case when you exit the chord symbol)
- Sharp: # (hash).
- Flat: b (small letter "b").
- Double sharp: x (small letter "x") or ## (two hash symbols).
- Double flat: bb (small letter "b" twice).
- Natural: Ctrl+Shift+H.
- Space: Ctrl+Space (Mac: Alt+Space);
- For other symbols, see Chord symbol syntax (below).
- To move the cursor forward to the next chord/rest/beat, press Space. For other ways of moving the cursor, see navigation commands (below);
- Exit chord symbol mode by pressing Esc.
Chord names, accidentals and formatting
After you exit Edit Mode, any characters entered are automatically converted to the correct format. A root note typed in lower case turns into upper case (for alternative options, see Automatic Capitalization). And characters entered for accidentals are automatically converted into professional glyphs. For example, a "#" (hash character) automatically becomes a sharp sign (♯). Don't input, or copy and paste, unicode characters, such as U+266F (sharp sign, ♯), or U+266D (flat sign, ♭) etc, as MuseScore will not render them correctly in chord notation.
Navigation commands
The following is a summary of keyboard shortcuts used to move the cursor in chord symbol entry mode:
| Action | Command (Windows) | Command (macOS) |
|---|---|---|
| Move cursor to next note, rest, or beat | Space | Space |
| Move cursor to next beat | ; (semicolon) | ; |
| Move cursor to previous note, rest, or beat | Shift+Space | |
| Move cursor to previous beat | : (colon) | : |
| Move cursor to next measure | Ctrl+→ | Cmd+→ |
| Move cursor to previous measure | Ctrl+← | Cmd+← |
| Move cursor by duration number | Ctrl+1-9 | Cmd+1-9 |
| Exit chord symbol entry | Esc | Esc |
Chord symbol syntax
MuseScore understands most of the abbreviations used in chord symbols:
- Major: M, Ma, Maj, ma, maj, Δ (type t or ˆ for the triangle)
- Minor: m, mi, min, -
- Diminished: dim, ° (entered with lowercase letter o, shows as ° if using the Jazz style, as o, the Greek omicron, otherwise)
- Half-diminished: ø (entered with 0, number zero, shows as ø if using the Jazz style, as 0 (zero) otherwise). Alternatively, you can, of course, choose abbreviations such as mi7b5 etc. Note: to get Dø, type "D0", not "Dm70" or "Dm0"
- Augmented: aug, +
- The following abbreviations are also valid: extensions and alterations like b9 or #5, sus, alt, and no3; inversions and slash chords, such as C7/E; commas; parentheses, which can enclose part, or even all, of a chord symbol.
Editing a chord symbol
Chord symbols are Text. Double-click on a chord symbol to enter Edit Mode, see Text editing. Use methods described above to create special characters. After you exit Edit Mode, they are automatically converted to the correct formatting.
Entering Roman numeral analysis
Not to be confused with Figured bass.
- Select a start note;
- From the menu, select Add→Text→Roman Numeral Analysis. Alternatively, set up a keyboard shortcut to do the same thing in Preferences;
- Input the RNA symbols for the chord just like normal text, as follows;
- Major chord: Upper case roman numerals
- Minor chord: Lower case roman numerals
- Diminished chord: o (lower case)
- Half-diminished chord: 0 (zero)
- Augmented chord: +
- Chord inversions: Enter up to 3 single-digit numbers, top note first
- Accidentals: enter # for a sharp, b for a flat or h for natural. These turn into a proper (and superscripted) ♯ , ♭ or ♮ right away, see entering accidentals above.
- To prevent any character from being interpreted or superscripted, prefix the character with a backslash, "\". This could be used, for example, to add a literal letter "b", "h", a hash symbol "#", or a non-superscripted number etc.
- Inversion notation using alphabet a,b,c,d can be created with the method described above.
- Inversion notation using vertically aligned arabic numerals without accidentals such as 64 can be created with the method described below.
- Inversion notation using vertically aligned arabic numerals with accidentals such as 6#3, ie altered chord, is unsupported, workaround : create Figured bass text instead; or create separate text objects and manually nudge them into place.
- For other symbols, see the images below.
- Move the cursor forward or backwards to continue entering or editing symbols for other chords;
- When RNA is completed, exit by pressing Esc, or by clicking on a blank section of the score.
RNA input offers the same keyboard shortcuts for navigation as in chord symbols (see above ).
RNA accidentals and formatting
Upon each computer keyboard input, characters are automatically converted to the correct format. MuseScore uses a specialist font, Campania, to provide the correct formatting for RNA.
Examples of RNA
Type this:

To get:

Entering a Nashville number
The Nashville Number System (NNS), is a shorthand way of representing chords based on scale degrees rather than chord letters. This allows an accompaniment to be played in any key from the same chord chart.
To start entering Nashville notation:
- Select a start note;
- From the menu, select Add→Text→Nashville Number.
Just as with standard chord symbols, you can type Nashville notation normally and MuseScore will do its best to recognize and format the symbols appropriately. The same shortcuts used for navigation when entering standard chord symbols (e.g. Space, see above) are available for Nashville notation as well.

Appearance and function overview
See also the main chapter Templates and styles.
The final visual and function of a chord symbol, Nashville Number, or Roman Numeral Analysis in a score file is determined by:
- Properties of each individual symbol on a score, By default, objects do not have any specific properties. When properties are assigned in the Properties panel, they will always be used; and
- The global profiles (per each Musescore Part and the "Full Score").
- Chord symbols, NNS, RNA use corresponding compatible values in "Style for Chord symbols" defined in Format → Style → Chord Symbols, this behavior cannot be changed. For example, Chord symbols and NNS (but not RNA) are affected by Jazz rendering style.
- Chord symbols, NNS, RNA use their respective "Style for text inside certain type" by default.Format → Style → Text Styles → Chord Symbol, Roman numeral analysis, Nashville number. This behavior can be changed in each individual object's Properties panel: More... button → Text Style dropbox option. For example, Chord symbols use "Style for text inside Chord symbol", you can switch to use the profile "Style for text inside Chord symbol (Alternate)", or any other profile. This allows two separate sets of formatting for easier editing in a reharmonization scores.
Aligning chord symbols
See main chapter Formatting text, also "Appearance and function" section above.
Using the Style menu
"Style for Chord Symbols"
The default vertical alignment of all Chord Symbols, NNS and RNA are defined in "Style for Chord symbols" Format→ Style→Chord Symbol: Positioning.
- Distance to fretboard diagram: Affects the distance between fretboard diagrams and any chord symbols above.
- Minimum chord spacing: The minimum distance allowed between chords.
- Maximum barline distance:
- Maximum shift above/below: This is used to line up chord symbols whose vertical alignment is irregular. Experiment until you get the apperance you want.
"Style for text inside certain object"
The default alignment of objects also depends on the profile used, see "Chord symbol style" section. Effect of values in style profiles are cumulative.
Using the Properties panel
To align object(s):
- Select object(s), see Selecting elements chapter.
- In Properties panel
- Under Text section, change Text style, see "Style for text inside certain object" section. Adjust Alignment, Position.
- Press Appearance button, adjust Offset. Effects are cumulative.
Transposition of chord symbols
Transposing instruments
Upon switching "concert pitch" score viewing mode, chord symbols of transposing instrument adjust themselves automatically. When chord symbols are copied and pasted, they are transposed accordingly. See also Transposition chapter.
Chords associated with guitar fretboard diagrams are not transposed automatically, see Fretboard diagrams chapter.
Transpose dialog
The Transpose dialog transposes all selected objects except NNS and RNA, see Transposition: Using Transpose dialog chapter. To disable transposing selected chord symbols, uncheck Transpose chord symbols.
Enabling automatic creation of extra chord symbols (not NNS or RNA) with capo
Musescore can be configured to create an extra bracketed chord symbol with capo next to each chord symbol (not NNS or RNA) on the score automatically. The bracketed symbol, when played using that capo, sounds identical to the unbracketed one. To enable this feature:
- In Format → Style → Chord Symbols: Capo fret position.
- Assign the capo position for the appended extra chord symbol. Default value 0 does not create extra chord symbols.
Changing Spelling of Chord Symbols (not NNS or RNA)
For chord symbols only (not NNS or RNA).
MuseScore uses letter names (A-G) by default, but you can switch the spelling system. MuseScore also automatically capitalizes, regardless of whether you entered them in upper or lower case, you can change this behavior.
Chord Spelling Systems
From the main menu, choose Format→ Style→Chord symbols. Then choose one of the following radio buttons in the spelling section:
- Standard: A, B♭, B, C, C♯,…
- German: A, B♭, H, C, C♯,…
- Full German: A, B, H, C, Cis,…
- Solfeggio: Do, Do♯, Re♭, Re,…
- French: Do, Do♯, Ré♭, Ré,...
Automatic Capitalization
From the main menu, choose Format→ Style→Chord symbols. Then choose from of the following options:
- Lower case minor chords: c, cm, cm7,...
- Lower case bass notes: C/e,...
- All caps note names: DO, RE, MI,...
You can also turn off the automatic capitalization completely, in which case note names are simply rendered the way you type them.
Changing appearance
Shown below are results of different Font face and Rendering style settings. In the third exmaple, individual objects' Font property are ignored because the Jazz rendering style is used.


Font
Font (font face, typeface, or font family) is not to be confused with Rendering style. See also Fonts.
To assign font and formatting to individual symbol on a score, use Properties panel. To assign default font, use global style profiles "style for text inside certain type". For chord symbols and NNS (but not RNA), individual object's Font property is ignored when the Jazz rendering style is used.
Rendering style of chord symbols and NNS (but not RNA)
Rendering style is not to be confused with Font option.
Rendering style is the MuseScore feature that uses extra formatting to improve engraving. It is defined in the global style profile "Style for Chord Symbol" in Format → Style → Chord Symbols . All Chord symbols are affected by the chosen rendering style, there is no individual property option. An appropriate default setting is used automatically, based on the template selected to create the score. For Jazz templates the Jazz rendering style is used, for other templates the Standard rendering style is used. The three options available are:
- Standard rendering style: chords are rendered simply with the font, no extra formatting is used.
- Jazz rendering style: MuseJazz font is used for a handwritten look, with distinctive superscript and other formatting characteristics.
- Custom rendering style: allows you to customize the look of chord symbols (and also ensures compatibility with older scores) with a Chord symbols style file (*.xml) . These files are found under installation's "styles" folder. In Windows 10, that would be C:\Program Files\MuseScore 4\styles\ . Documentation can be found in the same folder. This is for advanced users only, see external links below.
Musescore uses the following terminology:

Extension part and modifier part can use extra formatting:
- Extension scaling and Modifier scaling: This affects the size of the chord extension or of the modifier.
- Extension vertical offset and Modified vertical offset: This affects the vertical position of the chord symbol extension or of the modifier.
Changing Playback of Chord Symbols
Enabling and disabling playback
Only chord symbols and NNS create playback, RNA does not create playback.
To disable/enable playback of these objects of the Musescore program:
- Click the cog icon to the right of the playback controls
- Deselect/select Play chord symbols.
To disable/enable playback of selected object(s) on score:
- Uncheck/check Properties panel: General section : Play checkbox .
Customizing playback
")
To edit selected chord symbols edit settings under Properties panel: Chord symbol section. To edit the global settings for all chord symbols and NNS (but not RNA) in a score, edit settings under Format→ Style→Chord symbols : Playback section.
- Interpretation: Literal or Jazz.
- Voicing: Automatic, Root Only, Close, Drop two, Six note, Four note, three note. See details on musescore 3 handbook Playback: Chord symbols / Nashville numbers chapter.
- Duration: Until next chord symbol, Until end of measure, Chord/rest duration
Note: The triangle symbol Δ in Musescore creates a Major triad only.
Generating chord voicings onto a staff
MuseScore allows you to generate notes from selected chord symbols and NNS (but not RNA) . The voicing depends on the playback settings explained.
To realize a selection of chord symbols:
- Make a selection of chord symbols;
- Right click on any chord in the selection;
- Click Realize chord symbols;
- Optional. Check "Override with custom options" and set the options as required;
- Click OK.
Note: The triangle symbol Δ in Musescore creates a Major triad only. To change chord quality afterwards, see "External links" section.
Chord symbol properties
Chord symbol(s) on a score can be edited with Properties panel. Text related settings are covered in Text. Playback related settings are covered in Changing Playback of Chord Symbols section above.
Chord symbol style
See main chapter Templates and styles, and Appearance and function section above.
Values of the "Style for chord symbols" can be edited in Format→Style→Chord symbols.
Values of the "Style for text inside Chord Symbol" can be edited in Format→Style→Text styles→Chord Symbol
Values of the "Style for text inside Chord Symbol (Alternate)" can be edited in Format→Style→Text styles→Chord Symbol (Alternate).
Values of the "Style for text inside Nashville Number" can be edited in Format→Style→Text styles→Nashville Number
Values of the "Style for text inside Roman Numeral Analysis" can be edited in Format→Style→Text styles→Roman Numeral Analysis
External links
To change chord quality after Generating chord voicings onto a staff, use a plugin such as:
- Chord Level Selector
- Next inversion: replaces all chord(s) in (keyboard) selection with their next inversion
To identify harmony or chord, use a plugin such as:
- Chord Identifier (Pop & Jazz) for music that features harmonic chromaticism heavily, as the RNA created has jazz influence.
- Chord ID and Roman numeral analysis for music that features stable tonality, as conventional RNA are created.
Chord symbols style file (*.xml):
- chords.xml with sub/superscript and stacked chord alterations shared by RunasSudo
- github issue Support for chords with stacked extensions #16241 workaround by MarcSabatella
Figured bass
Overview
Figured bass is a shorthand notation for representing chords on a continuo instrument (such as a keyboard), using a series of numbers and other symbols written underneath the notes of the bass line.
Adding figured bass to your score
Entering a figure
- Select the note to which the figured bass applies;
- Press the Figured Bass shortcut. The default is Ctrl+G (Mac: Cmd+G); this can be changed in Preferences: Shortcuts if desired;
- Enter the text in the "edit box" which appears.
Text format
For the relevant substitutions and shape combinations to take effect and for proper alignment, the figured bass mechanism expects input texts to follow some rules (which are in any case, the rules for a syntactical figured bass indication):
- There can be only one accidental (before or after), or only one combining suffix per figure;
- There cannot be both an accidental and a combining suffix;
- There can be an accidental without a digit (altered third), but not a combining suffix without a digit.
- Any other character not listed above is not expected.
If a text entered does not follow these rules, it will not be processed: it will be stored and displayed as it is, without any layout.
Digits
Digits are entered directly. Groups of several digits stacked one above the other are also entered directly in a single text, stacking them with Enter:

Accidentals
Accidentals can be entered using regular keys:
| To enter: | type: |
|---|---|
| double flat | bb |
| flat | b |
| natural | h |
| sharp | # |
| double sharp | ## |
These characters will automatically turn into the proper signs when you leave the editor. Accidentals can be entered before, or after a digit (and of course, in place of a digit, for altered thirds), according to the required style; both styles are properly aligned, with the accidental 'hanging' at the left, or the right.
Combined shapes
Slashed digits or digits with a cross can be entered by adding \, / or + after the digit (combining suffixes); the proper combined shape will be substituted when leaving the editor:

The built-in font can manage combination equivalence, favoring the more common substitution:
1+, 2+, 3+, 4+ result in  (or
(or  )
)
and 5\, 6\, 7\, 8\, 9\ result in  (or
(or  )
)
Please remember that / can only by combined with 5; any other 'slashed' figure is rendered with a question mark.
+ can also be used before a digit; in this case it is not combined, but it is properly aligned ('+' hanging at the left side).
Parentheses
Open and closed parentheses, both round: '(', ')' and square: '[', ']', can be inserted before and after accidentals, before and after a digit, before and after a continuation line; added parentheses will not disturb the proper alignment of the main character.
Notes: (1) The editor does not check that parentheses, open and closed, round or square, are properly balanced. (2) Several parentheses in a row are non-syntactical and prevent proper recognition of the entered text. (3) A parenthesis between a digit and a combining suffix ('+', '\', '/') is accepted, but prevents shape combination.
Editing existing figured basses
To edit a figured bass indication already entered use one of the following options:
- Select it, or the note it belongs to and press the same Figured Bass shortcut used to create a new one.
- Double-click it.
The usual text editor box will open with the text converted back to plain characters ('b', '#' and 'h' for accidentals, separate combining suffixes, underscores, etc.) for simpler editing.
Once done, press Space to move to a next note, or click outside the editor box to exit it, as for newly created figured basses.
Navigating by note, beat, or measure
The duration of a Figured Bass indication often lasts until the next bass note or the end of a bar. Such Figured Bass can be entered consecutively using the keyboard. (To move to a point in between, or to extend a figured bass group for a longer duration, see Duration).
- Press Space to move to the next note ready for another figured bass indication (or click outside the editor box to exit it). The editor advances to the next note, or to the rest of the staff to which figured bass is being added.

- Shift+Space moves the editing box to the previous staff note or rest.
- Tab advances the editing box to the beginning of the next measure.
- Shift+Tab moves the editing box to the beginning of the previous measure.
Duration
Each figured bass group has a duration, which is indicated by a light gray line above it (of course, this line is for information only and it is not printed or exported to PDF).
Initially, a group has the same duration of the note to which it is attached. A different duration may be required to fit several groups under a single note or to extend a group to span several notes.
To achieve this, each key combination in the table below can be used to (1) advance the editing box by the indicated duration, and (2) set the duration of the previous group up to the new editing box position.
Pressing several of them in sequence without entering any figured bass text repeatedly extends the previous group.
| Type: | to get: |
|---|---|
| Ctrl+1 | 1/64 |
| Ctrl+2 | 1/32 |
| Ctrl+3 | 1/16 |
| Ctrl+4 | 1/8 (quaver) |
| Ctrl+5 | 1/4 (crochet) |
| Ctrl+6 | half note (minim) |
| Ctrl+7 | whole note (semibreve) |
| Ctrl+8 | 2 whole notes (breve) |
(The digits are the same as are used to set the note durations)
Setting the exact figured bass group duration is only mandatory in two cases:
- When several groups are fit under a single staff note (there is no other way).
- When continuation lines are used, as line length depends on the group duration.
However, it is a good practice to always set the duration to the intended value for the purposes of plugins and MusicXML.
Entering continuation lines
Continuation lines are input by adding an '_' (underscore) at the end of the line, then pressing the keyboard combination for the required duration of the continuation line to exit the editing box. Each digit of a group can have its own continuation line. To write the continuation lines in the following example:
- Select the note to which the figured bass applies;
- Press the Figured Bass shortcut Ctrl+G (Mac: Cmd+G) to enter the editing box;
- Type 6_Enter;
- Type 4_Enter;
- Type Ctrl+6 to edit the editing box and advance the cursor.

Continuation lines are drawn for the whole duration of the figured bass group.
'Extended' continuation lines
Occasionally, a continuation line has to connect with the continuation line of a following group, when a chord degree has to be kept across two groups. Examples (both from J. Boismortier, Pièces de viole, op. 31, Paris 1730):

In the# first case, each group has its own continuation line; in the second, the continuation line of the first group is carried 'into' the second.
This can be obtained by entering several (two or more) underscores "__" at the end of the text line of the first group.
Figured bass properties
The text formatting of figured bass symbols is handled automatically by the program, based on style settings (see below). Only General and Appearance properties can be adjusted from the Properties panel..
Figured bass style
Properties of all figured bass symbols in the score can be set from Format→Style…→Figured Bass.

- Font: This is the preset "MuseScore Figured Bass," which is specially designed to realize figured bass notation.
- Size: Select a font-size in points.
- Vertical Position: The distance (in spaces) from the top of the staff to the top margin of the figured bass text. Negative values go up (figured bass above the staff) and positive values go down (figured bass below the staff: a value greater than 4 is needed to step over the staff itself).
-
Line Height: The distance between the base line of each figured bass line, as a percentage of font size.
The following picture visualizes each numeric parameter:

-
Alignment: Select the vertical alignment: with Top, the top line of each group is aligned with the main vertical position and the group 'hangs' from it (this is normally used with figured bass notation and is the default); with Bottom, the bottom line is aligned with the main vertical position and the group 'sits' on it (this is sometimes used in some kinds of harmonic analysis notations):

-
Style: Choose between "Modern" or "Historic." The difference between the two styles is shown below:

Figured bass keyboard shortcuts
| Type: | to get: |
|---|---|
| Ctrl+G | Adds a new figured bass group to the selected note. |
| Space | Advances the editing box to the next note. |
| Shift+Space | Moves the editing box to the previous note. |
| Tab | Advances the editing box to the next measure. |
| Shift+Tab | Moves the editing box to the previous measure. |
| Ctrl+1 | Advances the editing box by 1/64, setting the duration of the previous group. |
| Ctrl+2 | Advances the editing box by 1/32, setting the duration of the previous group. |
| Ctrl+3 | Advances the editing box by 1/16, setting the duration of the previous group. |
| Ctrl+4 | Advances the editing box by 1/8 (quaver), setting the duration of the previous group. |
| Ctrl+5 | Advances the editing box by 1/4 (crochet), setting the duration of the previous group. |
| Ctrl+6 | Advances the editing box by a half note (minim), setting the duration of the previous group. |
| Ctrl+7 | Advances the editing box by a whole note (semibreve), setting the duration of the previous group. |
| Ctrl+8 | Advances the editing box by two whole notes (breve), setting the duration of the previous group. |
| Ctrl+Space | Enters an actual space; useful when figure appears "on the second line" (e.g., 5 4 -> 3). |
| BB | Enters a double flat. |
| B | Enters a flat. |
| H | Enters a natural. |
| # | Enters a sharp. |
| ## | Enters a double sharp. |
| _ | Enters a continuation line. |
| __ | Enters an extended continuation line. |
Note: For Mac commands, Ctrl is replaced with Cmd.
Rehearsal marks
Overview
Rehearsal marks (sometimes called Rehearsal Letters) can be used in a number of ways. e.g.
- To identify specific points in a score to facilitate rehearsing.
- As bookmarks in the score to which you can instantly navigate—using the Find/Search command.
- To mark the various sections in the score.
Rehearsal marks are a type of system text. In a full score they show only above the top staff of a system, but appear in all instrument parts.
Rehearsal marks can be added to the score in two ways: (1) manually, allowing you to name them as you wish, or (2) automatically, which ensures that they are named in sequence
Adding a rehearsal mark to your score
Manual placement and naming
To create a rehearsal mark manually and give it a name of your own choosing:
- Click on a note (or rest) at the desired location;
- Select one of the following options:
- Press Ctrl+M (Mac: Cmd+M);
- From the menu, choose Add→Text →Rehearsal Mark;
- Enter the desired text.
Automatic placement and naming
MuseScore can name the Rehearsal Marks automatically. Do either:
- Click on a note (or rest) at the desired location, then click the [B1] rehearsal mark icon in the "Text" palette
- Drag and drop the rehearsal mark from the "Text" palette onto the score.
Notes: (1) By default, marks are added in the sequence, A, B, C etc. (2) To change the format of subsequently-added marks (to lower case letters, or numbers), edit the previous rehearsal mark accordingly. (3) Marks added between existing rehearsal marks append a number or letter to the previous mark: it is a good idea to apply the Resequence command afterwards (see below).
Using measure numbers in rehearsal marks
If you want the rehearsal marks to be displayed as measure numbers:
- Add the first rehearsal mark, then edit it to read the same as the number of the measure it is attached to;
- Add subsequent marks as shown in Automatic placement and naming (above). They will automatically adopt the measure-number format.
Resequencing rehearsal marks
MuseScore allows the user to automatically re-order a series of rehearsal marks if they have got out of sequence for any reason. Use the following method:
- Before making a selection, you can, if desired, establish a new format for the rehearsal marks (lower/upper case, number, or measure number) by manually altering the first mark in the range accordingly.
- Select the range of measures you wish to apply the Resequence command to (if there is no selection then the program assumes you wish to resequence all measures).
- From the menu, select Tools→Resequence Rehearsal Marks.
MuseScore automatically detects the sequence based on the first rehearsal mark in the selection—all rehearsal marks in the selection are then altered accordingly. The following sequences are possible:
- A, B, C etc.
- a, b, c etc.
- Numerical: 1, 2, 3 etc.
- Numerical: according to measure numbers.
Finding rehearsal marks
See Find / Go to (Navigating your score).
Repeating rehearsal marks on other staves
In most full scores any Rehearsal marks are shown only above the topmost staff of a system, but appear in all the generated instrument parts. If duplicate marks are required on lower staves they should be added as staff text.
Some templates have an additional feature, e.g. Symphony Orchestra or Classical Orchestra, see the list of templates in Staff Text and System Text chapter. On a new score created using either of the two templates listed abve, when you create a rehearsal mark above the top staff, an identical one is automatically added just above the string section. If either instance of the mark is edited the content of both is updated. If either one is removed, both are removed.
Changing appearance of rehearsal marks
By default, rehearsal marks appear in a large bold font, enclosed in frames, and aligned to the center of the start barline of the measure. You can edit the default text properties from Format→Style→Text style.
Rehearsal mark properties
The properties of selected rehearsal marks can be changed in the Properties Panel.
Rehearsal mark style
See Templates and styles.
Values of the "Style for Rehearsal marks" can be edited in Format→Style→Rehearsal marks.
Values of the "Style for text inside Rehearsal mark" can be edited in Format→Style→Text styles→Rehearsal mark

External links
- Rehearsal letter (Wikipedia article)
Header and footer
Not to be confused with the top vertical frame and text added to the first page, when a new score is created from certain templates, see Create your first score and Using frames for additional content chapters.
Overview
The header and footer are text automatically added to the top and the bottom area of each page respectively. To add text to certain page(s) only, use frame and Musescore Text objects instead, see Entering and editing text chapter.
Adding a header or footer to your score

- From the main menu, select Format→Style→Header & Footer.
- Check the "Header Text" and "Footer Text" boxes as required.
Note: To create a header or footer for a Part, open and view that Part first.
Entering information

- From the main menu, select Format→Style→Header & Footer:
- The area on the top is for headers, area below it is for footers.
- Both of them are divided into two rows, labelled Odd, and Even, for content on odd and even pages respectively.
- They are also divided into three columns, labelled Left, Middle, and Right, representing the corresponding areas.
- There are three kinds of valid input:
- plain text,
- placeholder text, or special symbols, that converts into information automatically, they include
- read-only information such as the current page number, and
- editable metadata, see "Using metadata" section.
- To see a list of available placeholder text or special symbols, hover the mouse cursor over any text input area and wait for a popup box to appear. Shown below is the list for Musescore 4.2.
- Placeholder text or special symbols are case-sensitive, they must be entered letter-for-letter with the correct case. For example
- $d converts into current date
- $D converts into creation date
- $:movementNumber: converts into "Moverment number" metadata
- $:movementnumber: is invalid because of the wrong lower case 'n'
-
Part name placeholder text is only available in a Part, but not the "Full Score". Its placeholder text is $I, $i, or $:partName: . To rename a Part's name, see Parts: Renaming chapter.

Using metadata
Metadata are digital information, or tags, assigned in File→Project properties, use $:[metadata tag]: syntax to add them to header and footer. See the example in "Entering information" section, and the main chapter Project properties.
Changing the appearance of headers and footers
- From the main menu, select Format→Style→Header & Footer:
- Show on first page
- Different odd/even pages: Use different content on odd pages and even pages.
Header and footer respect page margins configured in Format→Page Settings (see the main chapter Score size and spacing). Page margins are always left blank, Musescore resizes the staffs area to show content of header and footer. Additional margin can be achieved by adjusting the Offset in style profiles, font options are also available there, see "Header and footer Style" section.
Header and footer Properties
Header and footer are not Musescore Text objects, it is not possible to select and use Properties panel to change properties of a header or footer on a particular page separately. To settings for all headers and footers, change values in the style profiles, see "Header and footer Style" section below.
To add text to certain page(s) only, use frame and Musescore Text objects instead, see Entering and editing text chapter.
Header and footer Style
See the main chapter Templates and styles
- Values of the "Style for text inside Header" can be edited in Format→Style→Text Style→Header.
-
Values of the "Style for text inside Footer" can be edited in Format→Style→Text Style→Footer.

See also
- Specify a custom starting page in Format→Page Settings : First page number. See also the main chapter Score size and spacing.
Text blocks
Not to be confused with header, see Header and footer chapter.
Overview
A text block is a Text object in frame. Used together with a vertical frame that spans whole width of a page, they are designed to elegantly:
- Display the title, subtitle composer, arranger, lyricist etc at the beginning of a score.
- Display details of individual pieces within a suite.
- Display lyrics at the end of a song/hymn.
Score created from certain template contains a top vertical frame with Text objects on the first page. They are automatically assigned with information provided by user in the New Score dialog, see Setting up score : Additional score information . They are not header, header is the functionality to add text to every pages, see Header and footer chapter.
Adding text blocks to your score
Add an appropriate frame first if there is none, see Using frames for additional content.
To add a text block to a frame, either:
- Right-click on the frame and select Add , then select Text, Title, Subtitle, Composer, Lyricist, or Part name, or
- Select the frame, then from the menu bar select Add→Text → Title, Subtitle, Composer, Lyricist, or Part name . This method does not have Text option.
Every option explained above adds a blank object, regardless of information provided in New Score dialog or metadata tags (see Project properties chapter. Content entered into the said object also does not change the metadata tags. The main difference between these options is the default alignment positioning and font size, see "Text block text style" section.
Changing the appearance of text blocks
- Select a Text object.
- In the Properties panel, edit the desired property. Some useful properties are:
- Alignment under Text section.
- Offset in the window appeared after clicking on Appearance button, see also Adjusting elements directly chapter.
- Match staff size checkbox under Text section. It is collapsed inside Show more button. See Score size and spacing : Page Settings window chapter.
To save settings into a style profile, click on the ellipsis (three dots) icon to the right of a property and select “”Save as default style for this score”, see Templates and styles chapter.
Text block text Properties
The text properties of a selected text block can be changed in the Text section of the Properties panel.
Alternatively you may wish to choose a different text style altogether from the dropdown list under “Text style” (in Properties: Text→More)
Text block text Style
See the main chapter Templates and styles
- Values of the "Style for text inside Part name" can be edited in Format→Style→Text Style→Instrument Name (Part).
- Values of the "Style for text inside Text (text object type)" can be edited in Format→Style→Text Style→Frame.
- Values of the "Style for text inside Title" can be edited in Format→Style→Text Style→Title.
- Values of the "Style for text inside Subtitle" can be edited in Format→Style→Text Style→Subtitle.
- Values of the "Style for text inside Composer" can be edited in Format→Style→Text Style→Composer.
- Values of the "Style for text inside Lyricist" can be edited in Format→Style→Text Style→Lyricist.
See also
排版
Page layout concepts
MuseScore generally does an excellent job of arranging music and text on the page, but there are situations where you may need to adjust things—to make music larger or smaller, to add space between staves, to change the number of measures on a page, to move text closer to or further away from the staff, etc. In order to make these types of changes, it helps to understand how MuseScore works with respect to page layout.
Definitions
There are a number of terms used throughout this chapter that you will need to be familiar with.
Spatium (plural: Spatia) / Space / Staff Space / sp.

The size of everything on a score, such as staff, note heads, note stems, accidentals, clefs etc., uses a basic unit of measurement called "staff space" or "sp." to maintains correct proportions.
One sp is defined as the standard vertical distance between the midpoints of two lines of a music staff (or one quarter of vertical dimension of a full five-line staff, assuming a hypothetical staff line thickness of 0).
When you create a new score, MuseScore tries to adjust the staff space automatically so that the staves all fit on the page initially.
This usually leads to 1 sp = 1.75 mm, which results in a staff height of around 7 mm (more details explained in "Final absolute staff height" section), which is a good staff height for most solo music, choral music, small ensemble scores, and individual parts. Lead sheets and children's music may benefit from a larger staff size. Large ensemble scores may often require a smaller staff size in order to fit all instruments on the page.
You may need to adjust this value further as you add music, if auto-place results in additional space being added between staves in order to avoid collisions.
Modify the definition of "staff space" itself in the "Page settings" window. See Score size and spacing chapter, the overriding options are also explained there.
Staff
Not to be confused with concept of Musescore instrument.
A staff is the set of lines and spaces on which notes are written. When the term is used in MuseScore, it refers to that set of lines and spaces for a given instrument throughout an entire score. In the following score for voice and piano, everything marked in yellow constitutes a single staff—the staff for the voice:

Final absolute staff height
Staff line thickness is set in Format→Style...→Measure. Its default value is 0.11sp, and the default value of sp is 1.75mm, so the default staff line thickness 0.1925mm. The 'absolute' height of default 5-line stave, measuring from the top edge of the top line to the bottom edge of the bottom line, is 0.5x0.11sp + 4sp + 0.5x0.11sp = 0.5x0.1925mm + 4x1.75mm + 0.5x0.1925mm = 7.1925mm. source: https://musescore.org/en/node/362733
Grand staff
In music for piano and certain other instruments, two staves are used—one primarily for the right hand, the other for the left. This set of two staves is normally connected by curly braces and is referred to as a grand staff. In the following excerpt, the portion marked in yellow is a grand staff:

System
Like text, music is read left to right, top to bottom. Each line of music read across the page is called a system, and it contains the staves and grand staves for all instruments. In the following example, the yellow highlighted region represents a single system:

Even if a score has only a single staff for a single instrument, we still refer to a line of music read across the page as a system. In the following lead sheet, there is only a single staff but three systems:

Frame
Most text in notated music is associated with specific notes or measures. However, you may also need to place text that is not associated with a specific note or measure—the title at the beginning of a score, lyric verses placed at the end of a score, explanatory information placed between systems or even between measures. MuseScore uses elements called frames for this. There are vertical, text, and horizontal frames—each optimized for a particular type of use. Horizontal frames can also be used to create separation between measures on a system, with or without associated text.

Margin
A margin is an area in which MuseScore will not normally place music or other elements. The page margin is the area around all four edges of the page where no elements are placed. The music margin is the area between the top and bottom margin and the first and last staff. The staves themselves will not be placed in those margins, but notes and other markings above or below the staves may be.

Positioning of elements
MuseScore places elements in your score automatically according to a set of rules and style settings. These are designed to produce excellent results by default in most cases‐elements positioned according to standard engraving practices while avoiding collisions between elements. MuseScore also provides the ability to customize these defaults and also to override the defaults for any given element.
Default position
Most elements in MuseScore have a default position that is determined by a style setting that can be customized via the Properties panel or the Format→Style dialog. For elements that are placed above the staff, the position is specified as an offset from the top line of the staff; for elements that are placed below the staff, the position is specified as an offset from the bottom line of the staff. These offsets, like most measurements in MuseScore, are expressed in staff spaces—abbreviated sp. For many element types, you can specify an offset to be used when placed above as well as a separate offset to be used when placed below, and also which of these placements should be applied by default.
For more info, see Templates and styles chapter.
For example, for dynamics, the default placement is below the staff, and the default offset below the bottom staff line is 2.5 sp. If you flip a dynamic marking above the staff, it defaults to 1.5 sp above the top staff line staff (expressed as a negative offset: -1.5 sp). These settings are all found in Format→Style→Dynamics.

Note that the default offset is larger for dynamics placed below the staff than above only because the offset is measured from the baseline of the text.

Auto-place
Auto-place is the term MuseScore uses for a set of algorithms used to avoid collisions as well as to align certain elements automatically. A basic understanding of how auto-place works can be useful when making adjustments.
Vertical collision avoidance
For most elements placed above or below the staff, collision avoidance works vertically. When an element is being positioned, MuseScore first tries to place it according to the default offset for that element type. If that would result in a collision with another element, then one of the two elements will be moved further from the staff to avoid the overlap. MuseScore follows standard engraving rules in determining which elements to move. For example, tempo markings will be moved further above the staff to trill lines, rather than vice versa.

The Minimum distance style setting found determines how much distance MuseScore places between elements when avoiding collisions in this manner. The corresponding setting in the Properties panel allows you to override this for individual elements where necessary. But MuseScore adjusts this value automatically when positioning elements manually, as seen below in the section on manual adjustment.
Horizontal collision avoidance
For certain elements such as lyrics or chord symbols, MuseScore will widen measures to avoid collisions rather than displace these elements vertically.

Vertical alignment
MuseScore will also try to align certain elements vertically, so that if one element of that type needs to be adjusted vertically to avoid a collision, other elements of that same type on the same system will automatically be adjusted as well. Elements that are always aligned vertically include lyrics and pedal markings. Dynamics and hairpins will be aligned if they are directly adjacent, as will pedal markings.

Chord symbols can also be aligned vertically if you enable this in the chord symbol style settings, by setting a Maximum shift value. See Chord symbols for more information.
Disabling auto-place
Auto-place normally does a good job of avoiding collisions and of aligning elements. And in cases where you wish to position an element manually, you can normally do so directly, without the need to disable auto-place (see manual adjustment below). However, there can be some situations in which you may still wish to disable auto-place. For example, rehearsal markings default to displaying above voltas, but you may wish to reverse this for some specific case where the volta was already displaced higher and there is then room for the rehearsal mark underneath.

In this case, disabling auto-place for the rehearsal mark allows it to display underneath the volta, while still allowing the volta to automatically avoid collisions with the notes.
To disable auto-place for an element, select it and then disable the Auto-place setting in the Properties panel.

The element will be returned to its default position (as determined by its style settings) and it will not be included in the detection of collisions with other elements. Disabling auto-place for an element also causes it to be excluded from any vertical alignment that would otherwise have applied.
Manual adjustment
Whether auto-place has displayed an element from its default or not, the position of elements can be adjusted manually, such as by dragging, using the cursor keys, or the Offset fields in the Properties panel. See Adjusting elements directly for more information.
MuseScore even allows you to perform manual adjustments that would result in collisions. In the example above, if you drag the rehearsal letter below the volta, MuseScore will allow this and will automatically set the Minimum distance for that element to a negative value, thus effectively allowing the collision without disabling auto-place.
Manual alignment
Elements of the same type will normally be aligned by default simply because they have the same style settings and therefore the same offset. However, auto-place can result in some of the elements being moved further from the staff than others. As described above under Vertical alignment, MuseScore will automatically align some types of elements. For other elements types, you can align them manually by assigning them the same vertical offset.
To do this, simply select the elements you wish to align (e.g., click the first, Shift+click the last), then gradually increase or decrease the vertical offset in the Properties panel. For example, to align a series of tempo markings above the staff, you will need to set their vertical offsets to the same value. To make sure they are aligned and also avoid the collisions that cause auto-place to display one or more of them to begin with, you will need to set the offset to a sufficiently large negative value.

Score size and spacing
MuseScore provides a number of score-wide settings to control the overall size and spacing of music.
Below we will cover these settings and Musescore's algorithm. These settings are in the "Page settings" window, and in the items around the top of "Style" window left pane: Format → Style → Score, Page, Size, System, Bars etc.
There are also a variety of ways to override these defaults to change the horizontal or vertical spacing of individual systems pages, and these are covered in Systems and horizontal spacing and Pages and vertical spacing chapters.
See also Templates and styles if you are using Musescore Part feature.
Page settings
The settings that control the overall size of your music are found in Format→Page Settings.

Note that units in this dialog default to millimeters, but you can change to inches using the control provided.
Page and margin sizes
- Page Size: select from predefined pages sizes
- Width: set a custom width
- Height: set a custom height
- Portrait / Landscape: set the page orientation
- Two sided: determines whether margins as well as Header and footer can be set independently for odd and even pages
The default page size is Letter in North and Central America, and A4 in most of the rest of the world.
- Odd Page Margins: set the top, bottom, left, and right page margins for odd-numbered pages
- Even Page Margins: set the top, bottom, left, and right page margins for even-numbered pages
The margins default to 15 mm regardless of the page size. If Two sided is not enabled, then only the Odd Page Margins settings are applicable.
Scaling
Staff space (sp) : changes the definition of staff space (sp) itself. See Page layout concepts chapter.
See overview above for info on other overall size and spacing options and the two chapters detailing individual systems pages specific options.
Overriding options for individual object on a score are available:
- Each Text object on a score has a "Follow staff" size checkbox property set in Properties panel, see Formatting text chapter.
- Various profiles "style for text inside certain type of object" have "Follow staff size" checkboxes set in Format → Style → Text Styles → (middle pane items), see Templates and styles and Formatting text chapter.
- Each Image on a score has a Size in staff space units checkbox property set in Properties panel, see Working with images.
- [Please add missing options if you find them]
Other settings
- First page number: Set the number on which page numbering starts (useful if your score has a title page, for example)
- Unit: select between inches and millimeters for values in this dialog
Actions
In addition to the standard OK and Cancel buttons, this dialog also contains:
- Reset All Page Settings to Default: reset all settings in this dialog to their default values
- Apply to all Parts: apply the current page settings to all individual parts
Note that in large ensemble scores where MuseScore has automatically reduced the staff size in order to fit all instruments on a single page, resetting page settings will revert to the standard staff space default of 1.75 mm.
Style settings
The horizontal spacing of notes and the vertical spacing of staves and systems are controlled by style settings.
Horizontal spacing
This section contains overview, see Systems and horizontal spacing for details.
MuseScore determines an initial width for each measure based on the music it contains, then calculates how many measures can fit on each system, and then stretches those measures out so that all systems (except the last if desired) are filled to the right margin. You cannot change this behavior, but see overriding options in Systems and horizontal spacing.

Shown above is an analogy to horizontal spacing in Musescore: it is like being restricted to the "justified" option in a word processor software. UI of Libre Office Writer, not Musescore.
The initial width for a measure is determined by the music within it as well as a group of style settings that control the spacing between notes and other symbols. Most of the settings affecting the horizontal spacing for a score are found in Format→Style→Bars. The most important are:
- Minimum measure width: set the minimum width for a measure
- Spacing ratio: set the ratio of space allocated for one note value compared to the next shorter value
- Minimum note distance: set the minimum distance between two notes
The default spacing ratio value of 1.5 means that each note value takes 1.5 times as much space as the next shorter value. So, a half note takes 1.5 times as much space as a quarter note, etc. The minimum note distance specifies the smallest distance MuseScore will allow between two notes, and this sets the initial distance for the shortest note values. Longer note values will always receive more space as per the spacing ratio, and by the time measures are stretched to fill the page width, it is likely that even the shortest notes will not actually be as close as the minimum. The minimum note distance and spacing ratio settings together determine how tight or loose the spacing is.
Note: a value of 1.0 for Spacing ratio will result in all notes taking equal space. A ratio of 2.0 will result in direct proportional spacing, where a half note takes twice as much space as a quarter. Either of these extreme values can be useful in certain types of scores, but values closer to the default of 1.5 are best for most cases. To achieve tighter spacing, a slightly smaller value such as 1.4 can be used, or 1.6 for looser spacing. Decreasing or increasing the minimum note distance will also result in tighter or looser spacing.
If the spacing calculation results in some measures (those containing relatively few notes) working out to less than the minimum measure width, extra space is added to enforce the minimum.
There are also many individual settings in this same dialog to control specific details such as the padding from Clef to time signature or Barline to grace note. More such settings are added over time, and these are meant to be self-explanatory.
Additional relevant style settings can be found in :
- Format→Style→Score
- Enable indentation on first system: set to indent the first system of the score
- First system indentation: set the amount of indentation
- Format→Style→Page
- Last system fill threshold: determines whether to fill the last system of the score to the right margin
Vertical spacing
This section contains overview, see Pages and vertical spacing for details.
MuseScore provides a choice of two different vertical spacing algorithms.
In both algorithms, MuseScore fills pages with systems in a similar manner to how it fills systems with measures. First, it determines an initial size for each system, then it determines how many systems can fit on each page, and then it spreads those systems out so that all pages are filled well. Depending on your style settings, MuseScore may literally fill each page to the bottom margin, or it may leave additional space on the bottom of some pages if trying to fill the page completely would spread things out too widely.
The difference between the two algorithms has to do with how the spreading to fill the page occurs.
If you select Disable vertical justification of staves, the distance between the staves within a system is fixed, unless that would result in collisions. In this algorithm, if MuseScore needs to spread systems to fill a page, it will always do so by adding space between systems rather than within systems. This yields consistent spacing between staves from one system to the next, but it can result in spacing between systems being much larger than spacing within them, and it will usually result in ragged bottom margins on pages with only a single system (since the staves within the system won't be spread to fill the page).
The default, however, is to Enable vertical justification of staves. With this method selected, the distance between staves within systems is also subject to spreading. This results in more even spacing overall—the spacing between systems will still be larger than the spacing within them but not to the same extreme—and it mostly avoids ragged bottom margins on pages with only a single system (since the staves within the system can be spread to fill the page).
Most of the settings controlling the vertical spacing for a score are found in Format→Style→Page. There is, however, one relevant setting in Format→Style→Score.
- Minimum vertical distance: set the minimum amount of space that MuseScore will allow between symbols below one staff or system and symbols above the next staff or system below
Music margins
Regardless of whether vertical justification is enabled or disabled, MuseScore will add space above the top staff and below the bottom staff of each page:
- Music top margin: set the minimum amount of space between the page top margin and the top staff
- Music bottom margin: set the minimum amount of space between the page bottom margin and the bottom staff
Distance between staves within systems
If you select DIsable vertical justification of staves, then there are two settings that control spacing within systems:
- Staff distance: set the distance between the staves of adjacent instruments
- Grand staff distance: set the distance between the staves of a grand staff (e.g., for piano)
Note: even with DIsable vertical justification of staves selected, MuseScore will still add more space between staves as necessary to avoid collisions. To force a completely consistent distance between staves (and accept the resulting collisions), set the Minimum vertical distance to a large negative number.
If you select Enable vertical justification within staves, then there is not a single setting for staff or grand staff distance. Instead, you select a range of acceptable distances and values that control how much of the available space MuseScore will fill by spreading systems versus spreading staves (and how much extra space to add between bracketed and braced groups of staves). The relevant settings include:
- Minimum staff distance: set the minimum distance between adjacent staves
- Maximum staff distance: set the maximum distance between adjacent staves
- Maximum grand staff distance: set the maximum distance between adjacent staves of a grand staff
- Factor for distance above/below bracket: set the extra amount to spread between bracketed staff groups
- Factor for distance above/below brace: set the extra amount to spread between braced staff groups
Distance between systems
Whether vertical justifications of staves is enabled or disabled, you specify the distance between systems as a range:
- Minimum system distance: set the minimum distance between adjacent systems
- Maximum system distance: set the maximum distance between adjacent systems
In addition, if you select Enable vertical justification of staves, there are two more settings:
- Factor for distance between systems: set the extra amount to spread between systems
- Maximum page fill distance: the total maximum amount of spread
Staff/part properties
See Staff/Part properties main chapter.
There are also a couple of staff-specific settings that affect size and spacing. To access these, right-click (Ctrl+click) a staff and then select Staff/Part properties. The relevant settings are:
- Small staff: set staff size to percentage specified in Format→Style→Sizes
- Scaling: set staff size to a custom percentage
- Extra distance above staff: set an extra distance between this staff and the staff above
Systems and horizontal spacing
The horizontal spacing algorithm in MuseScore determines the width of each measure, which in turn determines how many measures will fit on each system. While this will produce good results in many cases, there are also situations where you may wish to override this and have fewer or more measures on a system, or to have them spaced differently within the system.
Features
The main tools used to control systems and horizontal spacing are described below.
System breaks
A system break causes MuseScore to end a system after a specific measure or horizontal frame, even if more measures would fit. To add a system break, select a measure (or any element within it) or a frame, and then click the System break icon in the Layout palette:

You can also use the keyboard shortcut Enter. Both methods of adding breaks also work while in note input mode.
After adding a break, the icon will appear above the measure you added it to:

As with other formatting elements, system breaks appear in gray and will not print, and their on-screen display can be disabled via the Properties panel.
Layout stretch
You can increase or decrease the width of measures, and their contents will stretch accordingly. The calculated width of a measure is multiplied by a layout stretch factor that you can set numerically for selected measures, but you can also use commands to increase or decrease the stretch of selected measures directly without needing to set a specific number.
To change the layout stretch directly, you can select one or more measures, then use one of the commands in Format→Stretch:
- Increase layout stretch: increase the width of the measure (shortcut })
- Decrease layout stretch: decrease the width of the measure (shortcut {)
- Reset layout stretch: reset the width of the measure
To set the layout stretch value numerically, you can select one or more measures and then set the Measure width in the Appearance section of the Properties panel.

As you can see if you watch this setting, each press of } or { increments or decrements this value by 0.1.
You can also set this value for a single measure by right-clicking it, selecting Measure properties, and setting Layout stretch in the resulting dialog.
Horizontal frames
A horizontal frame is a container for empty space, text, or images, that can be placed between measures in a score. Although you can place text or images within horizontal frames (see Using frames for additional content), one of their main purposes is to create empty space within systems, as shown below.
To add a horizontal frame to your score, select a measure and then click the Insert horizontal frame icon in the Layout palette:

The frame will be inserted in front of the selected measure. If the measure is at the beginning of a system, the frame may actually appear at the end of the previous system, if there is room.
You can also use the commands in the Add→Frames menu.
You can then change the width of the frame using the Width setting in the Properties panel, or by selecting the frame and dragging its handle or using the Left and Right cursor keys to change the width. Keyboard adjustment occurs in steps of 0.5 sp, or 1.0 sp if you hold Ctrl (Cmd on Mac).
- Insert horizontal frame: insert a horizontal frame before the selected measure
- Append horizontal frame: append a horizontal frame to the end of the score
Keep measures on the same system
To keep measures together for the purpose of determining if they fit on a given system or not, you can select them and then click the Keep measures on the same system icon on the Layout palette:

When MuseScore is deciding how measures to place on a given system, and it encounters such a group and determines that they do not all fit, MuseScore will move the entire group to the next system.
Tasks
These features can be used in a variety of ways, but there are a handful of tasks that are especially common.
Placing fewer measures on a system
It is always possible to get fewer measures on a system than what MuseScore places by default. To end a system on a particular measure or horizontal frame, select it and add a system break.
Placing more measures on a system
While it is not always physically possible to fit more measures onto a given system at the current page and staff size and spacing settings—there may simply be “too many notes” to fit without overlapping—you can reduce the widths of selected measures.
To place more measures on a system:
- Select and delete any system break that might be present already
- Select the measures you wish to combine onto one system
- Reduce stretch for the selected measures until they fit (e.g., by pressing {)
Depending on how close it was to fitting before, it might take multiple Decrease layout stretch operations before the stretch is reduced enough for them all to fit. But it may also be the case that it just is not possible without reducing your overall page or staff size, or spacing settings. See Score size and spacing for more information.
Changing the relative spacing of measures within a system
The default spacing is designed to make sure that all notes of a given duration on the same system take the same amount of space, unless more space is required to make room for markings between specific notes. But there can be cases where it might make sense to increase the spacing in one or more measures, thus correspondingly decreasing the spacing in the others (or vice versa).
To change the spacing in one or more measure, simply select them and increase or decrease the layout stretch as described above.
Creating space between measures
To create space between two measures, select the second measure, then insert and adjust a horizontal frame as described above.
Creating space at the beginning or end of a system
To create extra space at the beginning or end of an individual system, add horizontal frame. For the first system of a score, the First system indent style setting (in Format→Style→Score) automatically creates space. See Score size and spacing for more information. You may want to create separate sections with a "Section Break" instead, when you think of extra space at the end of an individual system, see Using sections for multiple movements or songs chapter.
To add space at the beginning of a system, select the first measure of the system then insert and adjust a horizontal frame as described above. You may also need to place a system break on the last measure of the previous system to ensure that the horizontal frame does not appear there instead.
To add space at the end of a system, first make sure there is no system break on the last measure, then select the next measure and insert a horizontal frame. Then add a system break to the horizontal frame itself if needed.
Adjusting the width of the final system
The last system of a score will normally be right-justified (stretched to fill the width of the page) if its default width exceeds the Last system fill threshold as set in Format→Style→Page. See Score size and spacing for more information. This normally produces good results, but there may be cases where the last system is filled but would look better if it were not, or vice versa.
For cases where the system is filled but you would prefer it not to be, you can increase the threshold. A value of 100% will mean the last system is never filled (since its width will never exceed that threshold). Conversely, if the last system is not filled but you want it to be, then decrease the threshold. A value of 0% will mean the last system will always stretch (because its width will always exceed that threshold).
Normally, however, you should select a threshold value that will accommodate future changes to the score that might result in more or fewer measures ending up on the last system. For instance, if your last system currently has several measures and you force it to be filled by setting the threshold to 0%, this might look bad if the layout changes in the future and the last system has only one measure. Or if the last system has only one measure and you force it not to be filled by setting the threshold to 100%, this might look bad if the layout changes in the future and the last system ends up with several measures. This is why a more middle-of-the-road value usually makes sense.
It is usually even better, however, to plan system breaks to avoid having the last system being less full than others.
Grouping measures
As discussed in Score size and spacing, MuseScore normally fits as many measures as it can on each system. This can sometimes result in two or more musically-related measures being split across a system break, when it might be easier to read if they were kept together on the next system. While you could add a system break to the measure before the group, this could easily turn out to be counterproductive if the layout changes later and all the measures could have fitted on that system. What you really want is to be able to specify that a group of measures should be kept together if possible, whether that means keeping them on the original system or moving them all together to the next.
In a word processor, a “non-breaking space” character can be used to keep two words together. If the words both fit on the current line, then the non-breaking space acts like a regular space. But if the two words cannot both fit on a line, word wrap will move them both together to the next line rather than split them apart at the non-breaking space.
In MuseScore, you can use the Keep measures on the same system icon in the Layout palette to group selected measures in the same way. These measures will be treated as a single block for the purpose of deciding whether to place them on one system or the next.
Note that this will not allow you to fit more measures on a system than your current settings would normally allow. It simply tells MuseScore that it should keep them all together if possible.
Pages and vertical spacing
Features
As described in Vertical spacing, MuseScore fills each page with as many systems as can fit given the current score settings, and then adjusts the spacing within each page according to one of two different algorithms. You can also adjust the number of systems on a page, or the spacing between specific staves or systems, manually.
Page breaks
A page break causes MuseScore to end a page after a given system, even if more systems would fit. To add a page break, select a measure or frame and then either press Ctrl+Enter (Cmd+Enter on Mac) or click the Page break icon in the Layout palette:
![]()
Spacers
A spacer is a formatting element you can add to a measure to control the amount of space above or below that particular staff. Spacers can work to either add or remove space, and they can operate either within or between systems.

To add a spacer to your score, select a measure and then click the appropriate icon in the Layout palette:
![]()
You can also drag and drop a spacer from the palette to a measure in your score.
Once you have added a spacer, you can adjust its height by selecting it and dragging its handle, or by using the Height setting in the Properties panel. There are three different types of spacers, and the height setting affects the score differently according to the spacer type:
- Staff spacer down: ensure there is at least the specified given amount of space below this staff
- Staff spacer up: ensure there is at least the specified amount of space above this staff
- Staff spacer fixed down: ensure there is exactly the specified amount of space below this staff
In all cases, the spacer works within a system when added between staves of a system. In addition, a Staff spacer down or Staff spacer fixed down works between systems when added to the bottom staff of a system, and a Staff spacer up works between systems when added to the top staff of a system.
Vertical frames
A vertical frame is a container for empty space, text, or images, that can be placed between systems in a score. Although vertical frames can be left empty and thus function in a manner similar to spacers, the primary purpose of vertical frames is to add text or images. For more information, see Using frames for additional content.

System dividers
In ensemble music in which multiple systems fit on a single page of music, it is common to use a pair of diagonal strokes to help clarify the division between the systems.

MuseScore can add these automatically via the settings in Format→Style→System. You can enable Left and Right dividers independently. For each, you can customize a number of settings:
- Symbol: select between System divider, Long system divider, or Extra long system divider
- Horizontal offset: distance from default position (aligned with the page margin)
- Vertical offset: distance from default position (midway between systems)
Tasks
The feature listed above can be used to achieve a number of common tasks.
Placing fewer systems on a page
To place fewer systems on a page, simply add a page break to the system or frame you wish to appear last on the page.
Placing more systems on a page
As with horizontal spacing, in some cases it might not be possible to fit more systems onto a page than your current settings permit. So you may also want to consider a smaller staff size, or reducing the minimum system distance score-wide, or other style changes. However, in some cases you may be able to fit more systems on a page by manually reducing the distance between specific systems.
To reduce the distance between two specific systems, add a Staff spacer fixed down to the bottom staff of the upper system, then set its height as desired. If this reduction allows another system to fit on the page, then it will happen automatically.
Adjusting the spacing on sparse pages
MuseScore normally spreads systems and staves out to fill a page (see Vertical spacing for more information). Whether you enable or disable vertical justification, however, pages that are especially sparse may still look awkward. This is especially common for the last page of a score, where it is possible more systems could have fit.
In many cases, the best results would be obtained by planning the system and/or page breaks throughout the score to avoid these overly sparse pages. But in cases where this is unavoidable, you will need to decide where you want the extra space—all at the bottom of the page, equally divided between the top and bottom, dispersed between systems, or dispersed between staves within systems as well as between systems.
To force all extra space to the bottom of the page, once solution is to add a Staff spacer down below the last system, and adjust its height as appropriate to take the space you wish to leave below. Another is to reduce either the Maximum system distance or Maximum page fill distance (see Vertical spacing). These settings may affect other pages as well, but in most cases, they will only be relevant for especially sparse pages.
To force some space at the top of the page, you can add a Staff spacer up above the first system.
To change the distribution of space between systems and staves within systems, be sure Enable vertical justification of staves is enabled in Format→Style→Page, then adjust Factor for distance between systems. A value of 1.0 means that space is equally distributed within and between systems. Larger values mean that more of the available space will be allocated between systems as opposed to within them.
Adjusting space between specific systems
To add space between two specific systems, add a Staff spacer down to the bottom staff of the upper system, or a Staff spacer up to the top staff of the lower system.
Adjusting space between specific staves
To add space between specific staves within a single system, add a Staff spacer down to the upper staff, or a Staff spacer up to the lower staff.
To add space between specific staves across all systems—such as to separate piano accompaniment from the vocal staves in a choral score—right-click the lower staff, select Staff/Part properties, and increase the Extra distance above staff setting.
Using frames for additional content
Overview
A frame is a rectangular space in the score into which one or more text objects or images may be inserted. In the score window the sides of the frame are marked by dotted lines (these do not show up in the printed score).
A frame may be one of three types:
- Vertical frame: A full-width rectangle inserted before the first system, after the last system, or between systems. It may contain several text objects and/or images.
- Text frame: A full-width rectangle inserted before the first system, after the last system, or between systems. It may contain one text object only.
- Horizontal frame: A rectangle between two measures which may contain several text objects and/or images.
Note: Although you can use frames to create extra space between systems, it is best to use spacers for this purpose.
Uses of frames
Frames may be used to
- Display the title, subtitle, composer, arranger, lyricist etc., at the top of a score. This is done automatically for new scores if you have completed the relevant details on page 2 of the New Score dialog.
- Display details of movements within a score.
- Display lyrics at the end of a song.
- Create a blank space before a coda
and so on.
Adding frames between or before/after systems
Text frames
A text frame is a full-width rectangle placed either before the first system or after the last one, or between systems. One text block (only) may be added to the frame. The height of the frame is automatically adjusted to the height of any text block contained within it.
Adding a text frame
- Select a measure, or a frame
- Apply one of the following methods:
- From the menu bar select Add→Frames→Insert text frame
- In the Layout palette click on the “Insert text frame” icon
- Use an “Insert text frame” custom keyboard shortcut (you can set this up in the Preferences: Shortcuts dialog).
If the measure selected is the first one in the system, the frame will simply be inserted above the system. If the selected measure is any one but the first, it will start a new system and the frame will appear above it.
Adding text
To add a text block to the text frame:
- Double-click the frame; or right-click on the frame and choose Edit element; or select the frame and use the shortcut F2, or Alt+Shift+E.
- Type the desired text.
The text has the “Frame” style by default but you can change this using “Text style” in the Text tab of the Properties panel. You can also apply character formatting in the usual way.
Vertical frames
A vertical frame is a full-width rectangle placed either before the first system or after the last one, or between systems. Several text blocks and/or images may be added to the frame.
Adding a vertical frame
- Select a measure, or a frame
- Apply one of the following methods:
- From the menu bar select Add→Frames→Insert vertical frame
- In the Layout palette click on the “Insert vertical frame” icon
- Use an “Insert vertical frame” custom keyboard shortcut (you can set this up in the Preferences: Shortcuts dialog).
If the measure selected is the first one in the system, the frame will simply be inserted above the system. If the selected measure is any one but the first, it will start a new system and the frame will appear above it.
Adding text
To add a text block to the vertical frame apply one of the following methods:
- Right-click on the frame, select Add, then choose one of the options (Text, Title, Subtitle, Composer, Lyricist, Part name).
- Select the frame, and from the menu bar choose Add→Text. Then choose one of the first five options (Title, Subtitle, Composer, Lyricist, Part name).
- Select the frame and use keyboard shortcuts to add applicable text blocks (you can set these up in the Preferences: Shortcuts dialog).
Adding an image
- Right-click on the vertical frame
- Select Add→Image
- Search for and add the image from the “Insert image” window.
Size
The height of the vertical frame is automatically adjusted to the height of any text block contained within it. But you can override this using “Height” in the Vertical frame tab of the Properties toolbar.
Position and alignment of content
The position of a text object which abuts directly onto the border of a vertical/text frame can be altered by adjusting the relevant margin (Top/Bottom/Left/Right) in the Vertical frame tab of the Properties panel.
For example, a left- and top-aligned text object will be pushed away from the respective border by increasing the “Left margin” and/or “Top margin”, and so on.
Spacing
In the Vertical frame or Text frame tab of the Properties panel, adjust “Gap above” and “Gap below” to create extra space above/below the frame.
Adding frames between measures
Horizontal frames
A horizontal frame is used to create space between the measures of a particular system with optional text and/or image content.
Adding a horizontal frame
- Select a measure.
- Apply one of the following methods:
- From the menu bar select Add→Frames→Insert horizontal frame
- In the Layout palette click on the “Insert horizontal frame” icon
- Use an “Insert horizontal frame” keyboard shortcut (you can set this up in the Preferences: Shortcuts dialog).
The frame is inserted between the selected measure and the following one.
Adding text
To add a text block to a horizontal frame, right-click on the frame and select Add→Text.
Adding an image
- Right-click on the horizontal frame
- Select Add→Image
- Search for and add the image from the “Insert image” window.
Size
You can adjust the width of the frame in the Horizontal frame tab of the Properties panel.
Spacing
You can adjust the space on either side of the horizontal frame using “Left gap” and “Right gap” in the Horizontal frame tab of the Properties panel.
Other horizontal frame properties
- Display brackets, clefs and key signatures in the next measure
See also
Working with images
Images may be inserted into scores by attaching them to score objects or to frames.
The following image formats are supported: SVG (*.svg), PNG (*.png), JPEG (*.jpg and *.jpeg), Bitmap (*.bmp), and TIFF (*.tif and *.tiff).
Notes: (1) SVG is the recommended image format as it allows you to adjust the image size without any loss of definition. Note that shading, blurring, clipping or masking is not supported. (2) PNG supports transparency. (3) GIF (*.gif), WebP (*.webp) and X PixMap (*.xpm) formats are not supported.
Importing images
To add an image to a Vertical or Horizontal frame:
- Right-click on the frame
- Select Add→Image
- Search for and add the image from the “Insert image” window.
Note: That method currently doesn't allow for Bitmap (*.bmp), and TIFF (*.tif and *.tiff), but see below.
To attach an image to a score object:
- Drag the image file from outside MuseScore and drop it either into a vertical or horizontal frame, or onto a note, rest, or measure.
Note: Use the latter method for small images associated with music staves, such as symbols.
Saving images to palettes
To save an imported image to a palette, see Adding elements from the score.
Copying imported images
Once an image has been imported into the score it can be copied/cut and pasted to another location, such as a frame, note or rest, using the standard commands and procedure (see Copy and paste).
Adjusting images
Change image height/width
Select the image and use either of the following methods:
- Drag either of the image adjustment handles.
- Edit the “Image height/width” in the Image section of the Properties panel.
As long as the padlock symbol is active (colored blue in Properties: Image) the aspect ratio (height/width) of the image will be maintained throughout. If you want to adjust a side independently of the other, click on the padlock to break it (colored grey).
Scale image
To scale an image to the height of the containing frame:
- Adjust the frame to the desired height
- Check “Scale to frame size” in the Image section of the Properties panel.
As long as “Scale to frame size” remains checked the image size will follow the frame height.
Adjust image position
The image can be repositioned by dragging, or adjusting the horizontal/vertical offsets in the Appearance section of the Properties panel. Ctrl+R restores the image to its default position.
Image properties
The image properties of a selected image can be adjusted in the Image section of the Properties panel.
- Image height / Padock / Image width: Adjust dimensions of image. The padlock, which is active by default, ensures that the desired aspect ratio (height/width) is maintained.
- Scale to frame size: See Scale image (above).
-
Use staff space units: When checked (the default setting), the image automatically scales proportionally with the Scaling setting in Format→Page Settings, and uses the staff space unit, sp. If unchecked, the image uses mm and does not scale proportionally. See Page layout concepts.

This symbol is 4sp in height so it fits perfectly into the space between the top and bottom line of a 5-line staff. Its "Use staff space units" option is checked so it scales proportionally.
See also
- Using the palettes for info on how apply palette items.
Using sections for multiple movements or songs
Overview
A section break is used to divide a score into separate sections, such as might be required in a musical suite, for example.
In the following score example, there is a section break at the end of the first system, followed by a text frame providing the title of the next movement.

Features
A section break has the following features:
- The measure after the point of application is forced to start a new system (like a system break)
- An adjustable playback pause between movements
- An option to restart measure numbering
- An option to display long instrument names (as you might at the start of a piece).
These options are detailed in Section break properties (below).
Time and key signatures
If the beginning of a new section is accompanied by a change of time or key signatures, there will be no courtesy signature at the end of the previous section.
Adding section breaks
To add a section break, select a measure, barline (or any element within the measure), then click the Section break icon in the Layout palette. You can substitute the latter action with a custom shortcut if desired (see Preferences: Shortcuts).
Section break properties
The following properties of section breaks are adjustable from the Section break part of the Properties panel:
Pause
To adjust the playback pause after a section break: select the break and edit “Pause before new section starts”.
Instrument names
To display the long intrument names on the first system after a section break: select the break and make sure that “Start new section with long instrument names” is checked.
Bar numbers
To restart measure numbering after a section break: select the break and make sure that “Reset bar numbers for new section” is checked.
Additional settings for measure number display are available in the Measure properties dialog.
声音和播放
Playback controls
Overview

Basic playback functions are accessed from the Play toolbar at the top right of the program window, the icons from left to right, the icons are:
- Rewind to start position: Playback returns to the beginning of the score, or to the start of the loop (if one is set).
- Start or stop playback: See Start/stop playback.
- Toggle loop playback: See Loop playback.
- Play metronome: Toggles metronome tick sound playback ON and OFF.
- Playback settings: Opens the playback settings dialog (see below).
- Time elapsed from the start of score to the cursor position.
- Bar number and beat at the cursor position.
- Monitoring tempo, see "Playback position and monitoring tempo" section.
Undock the toolbar to reveal the Playback Panel for additional controls. See "Playback position and monitoring tempo" section.
Playback commands
Start/stop
To play back all the instrument parts
- Click on a note or rest to establish the starting point.
- Press the Play button, or press Space.
To play back selected instrument parts only
- Select a measure that you want to start from (by clicking on a blank space within that measure);
- To play back more than one instrument part, extend the selection up or down as required.
- Press the Play button, or press Space.
Notes: (1) If no selection is made before activating Play, playback returns to the place it stopped at previously; or, if no previous playback, to the start of the score. (2) The Play button changes to a "stop" icon while music is playing.
To stop playback
- Press the Play button; or press Space.
Rewind
To rewind playback click on the Rewind icon on the Play toolbar. Rewind returns the playback to the beginning of the score or, if a loop is set, to the beginning of the loop.
Loop
To loop playback over a section of music:
- Stop playback (if it is on);
- Ensure that the loop playback button is "off" (i.e. not colored blue);
- Select a range in the score, encompassing the instrument staves you want to play back;
- Click on the loop playback button in the Play toolbar. Flags will appear around the selection and the button change color.
- Click on the Play button.
In the example below, playback will cycle over the selected two bars of Violin 2 and Viola, the region marked by the blue flags. Use the "Loop playback" button to toggle the loop on or off.

Metronome
To automatically add metronome ticks sound to playback, use the metronome button.
The number of ticks added onto each measure is determined by
- the beat. Number of beats per measure is dictated by the time signature only, it does not depend on the beaming style, or the note value (duration) used on metronome markings. Both crotchet ♩ = 60 and quaver ♪ = 120 markings create identical result; and
- the written tempo on the score; and
- the current slider setting of Monitoring tempo, see "Playback position and monitoring tempo" section.
The following logic is used,
- For simple meters, the top number of the time signature is the number of beats in each measure. 2 = duple, 3 = triple, 4 = quadruple. A tick is added to each beat.
-
For compound meters (6/8, 9/8, etc), the top number of the time signature divided by three, is the number of beats in each measure. 6 = duple, 9 = triple, 12 = quadruple. A tick is added to each beat. Two additional ticks per beat are added to passages where the resultant Monitoring tempo of the measure is below 60 beats per minute. The 60 is not referring to Play Toolbar / Play Panel's top right corner metronome symbol.

Shown above is a demo of compound meters metronome handling, the demo score file is available under the External links section. To a measure using 9/8 where there is a written tempo marking dotted crotchet ♩ . = 59, and the monitoring tempo slider is at 100%, nine ticks are added. Using a quaver ♪ = 179 marking creates identical result. Whereas, to a measure using 9/8 where there is a written tempo marking dotted crotchet ♩ . = 60, and the monitoring tempo slider is at 100%, three ticks are added. Using a quaver ♪ = 180 marking creates identical result. Lowering the monitoring tempo slider to 90% creates nine ticks in that measure.
The default Metronome uses MS Basic. It has two tick sound clips, a high pitched ticks (T1) and a low pitched ticks (T2). T1 is used on the very first tick of each measure, T2 is used on all other places. Alternative sound source can be selected in the Mixer, T1 play note E5, and T2 play note F5.
These ticks are added to any exported audio files. For more control of the ticks in the audio file, or during playback, try these:
- Add a percussion staff, fill the first measure with the desired rhythm and the rest with measure repeats, then hide that staff, source,
- Metronome SoundFont (CC0) provided by mirabilos,
- Add metronome part plugin by sal.vador.
Playback position and monitoring tempo
The current playback position is shown by two counters to the right of the playback controls. One shows the position in terms of time elapsed, the other in measures and beats (see image in overview). To jump to a timestamp or measure or beat manually, click a counter and enter a number.
The item at the very right end is monitoring tempo. It shows the tempo would have been in the unit of crotchet (quarter notes) within one minute at the current cursor position. It is not exact mirror appearance of any particular written tempo marking on the score. Its crotchet is not related to the musical beat of the score.
To reveal additional controls, undock the toolbar. Click and hold down the "6 dots", then drag away from the top right of the MuseScore screen and release, see Toolbars and windows:Docking and undocking panels chapter. Undocked toolbar automatically expands into a small Playback Panel that has two sliders. The slider on top shows the current playback position . the slider below shows monitoring tempo . Monitoring tempo overrides score tempo temporarily, the setting of each written tempo markings on the score remains unchanged. Returning the slider to default position, 100%, restores tempo to that as written on score.

In the example screen capture shown above. The knob on the top current playback position slider is at one third from the left, suggesting it is currently about one third of the way through the score. The knob on the lower monitoring tempo slider is adjusted slightly to the right of the default position. It reads 130%, suggesting the tempo of playback is currently speeded up to 130% of written tempo. The written tempo is crotchet = 60, it is designated by a Tempo marking not shown in the picture. The top right corner metronome symbol shows crotchet = 78, meaning there would have been 78 crotchet (quarter notes) within one minute at the current cursor position.
To change the playback tempo temporarily, either:
- Left click, hold and drag the monitoring tempo slider left or right. This will adjust the playback tempo in 5% increments; or
- Left click on the Playback tempo percentage number. This will highlight the number
-
Edit the Playback tempo. It can be adjusted in 1% increments. In the image below the tempo will playback at 96% of the current metronome speed

Other commands
Click the settings button (cogged gear) on the Play toolbar to show the following controls:

You can uncheck or check these options as desired.
Enable MIDI input
Enable MIDI input to write music to your score with a linked MIDI device (such as a keyboard or drum machine) during playback. See Working with Midi for details.
Play repeats
Uncheck this option if you want playback to ignore any repeat indications in the score.
Play chord symbols
Uncheck this option if you want playback to ignore chord symbols in the score.
Pan score automatically
When checked, this option pans the score during playback; uncheck if you want the view to remain stationary.
External links
Metronome tick demo score file https://musescore.org/en/node/357722#comment-1220561
Mixer
Overview
The mixer allows you to
- change instrument sounds (without affecting the staff notation).
- load virtual instruments and effects.
-
adjust volume and panning, and make other adjustments to the playback for each stave.

The mixer is divided into a number of color-coded channel strips:
- Instrument: Each staff instrument in the score has its own channel, with the name of the instrument, labelled blue, at the bottom. An instrument channel is also created for each mid-score instrument change applied to a staff.
- Metronome: This channel, also labelled blue, allows control of metronome volume and panning.
- Aux 1/Aux 2: These are the auxiliary channels, labelled green, and may be used to house VST effects units. Aux 1 by default contains Muse Reverb (see below).
- Master: The master fader, labelled red.
Opening the mixer
You can display/hide the mixer by:
- Clicking on the Mixer button in the Note input toolbar.
- Clicking View→Mixer.
- Using the shortcut F10.
Note: If the instrument channel strips are not in the same order as the instruments in the score, try closing and reopening the Mixer again.
Mixer controls
A channel strip contains the following controls (from top to bottom):

- Sound: See below.
- Audio FX: See below.
- Aux sends: See below.
- Pan: Click and drag on the Pan knob to move the audio track to the left or right in the stereo sound field. Double click on the knob to return Pan to the center position.
- Volume: Click and drag the fader to increase or decrease playback volume. Double click on the fader to return it to the default level, 0 dB.
- Mute and Solo: Click on the Mute button to silence the track; click again to unmute it—and so on. The Solo button silences all other tracks allowing you to hear only the soloed track. Multiple selection of Solo and Mute buttons is possible, allowing you to conveniently isolate any combination of instruments.
- Name: Note that this name is not affected by any changes made to the instrument name in the score.
Click the three dot icon in the upper right corner of the Mixer panel to show / hide a control. For example, you can hide the Volume faders to save up vertical screen space for score viewing.
Sound
The row labelled Sound shows the virtual instrument set used in each track. This can be either a SoundFont (.sf2,.sf3) such as MS Basic, a VST instruments (VSTi), or a Muse Sound. If you have selected a particular sound from within that instrument set then the sound's name will be displayed instead of the set's name.
To change an instrument's sound
- Mouse over the name of the virtual instrument set (in the row marked “Sound”)
- Click the dropdown button that appears
- Locate and click on an item from the dropdown menu.
Note: This changes the instrument's sound, but has no effect on instrument's notation. If you want the staff to be updated as well, say, with correct transposition and clef changes, see Choose instruments.
Starting with MuseScore 4.2, it is now possible to use this method to choose individual sound from within a SoundFont. If you're using an older version of MuseScore 4, use the workaround detailed in SoundFonts.
SFZ files are supported but only by using a VST sampler; see SoundFonts.
Audio FX
Each row (slot) under the Audio FX allows you to add an extra VST effect or Muse Reverb (a native effect). Audio is processed through the Audio FX from top to bottom.
- Find VSTi inside Sound drop-downs, and find VST effects inside Audio FX drop-downs.
- To apply Audio FX(s) to one instrument, add Audio FX to the corresponding instrument strip.
- To easily apply the same Audio FX(s) to multiple instruments, use Aux sends.
To add an Audio FX plugin
- Hover over an empty Audio FX slot
- Click the dropdown button that appears
- Locate and click on a plugin from the dropdown menu .
- The plugin will load as a separate window on top of the Musescore window.
- When you add one effect, a new empty row (slot) is created automatically to allow adding further effect. Repeat these steps to add more effect.
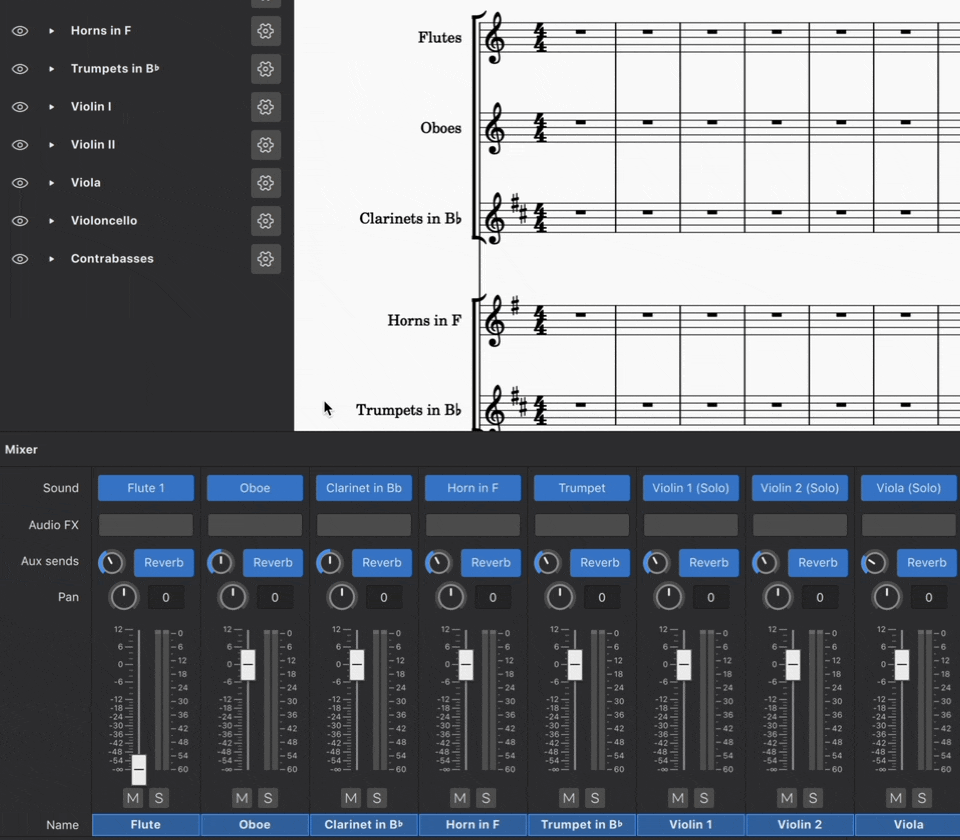
To disable an Audio FX plugin
- Hover over an Audio FX slot
- Click on the power icon that appears.
This deactivates the plugin without removing it from the mixer.
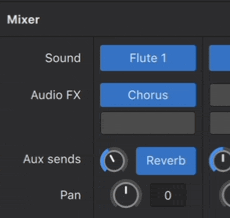
To remove an Audio FX plugin
- Hover over an Audio FX slot
- Click the dropdown button that appears
- Click No effect.
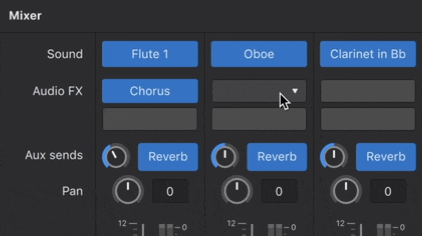
Muse Reverb
Muse Reverb is MuseScore’s native reverb unit. A fixed amount of reverb is added by default to each instrument—you can adjust the amount for each channel using the Aux send knobs next to the blue buttons labelled "Reverb". The effect can be toggled on/off for each channel by clicking on the same buttons. You can also adjust the Muse Reverb output volume using the Aux 1 fader.
Aux sends
Each row (slot) under the Aux sends adjusts how much of a corresponding Aux channel effect(s) is added to the audio created for an instrument.
There are two Aux sends, corresponding to the two aux channels:
- The first row adjusts how much of Aux channel 1 Aux 1 is added onto the current instrument, it is shown as Reverb by default, because Aux 1 contains Muse Reverb by default.
- The second row adjusts how much of Aux channel 2 Aux 2 is added onto the current instrument, Aux 2 does not contain any Audio FX by default.
- Both of the two aux sends are enabled by default for each instrument, and can be disabled individually. Audio is processed with Aux 1 then Aux 2.
- You can also apply audio effect(s) to one instrument only by adding Audio FX.
To show/hide an Aux send row (slot)
- Click the three dot icon in the upper right corner of the Mixer panel
- Hover over View
- Click Aux send 1 and/or Aux send 2.
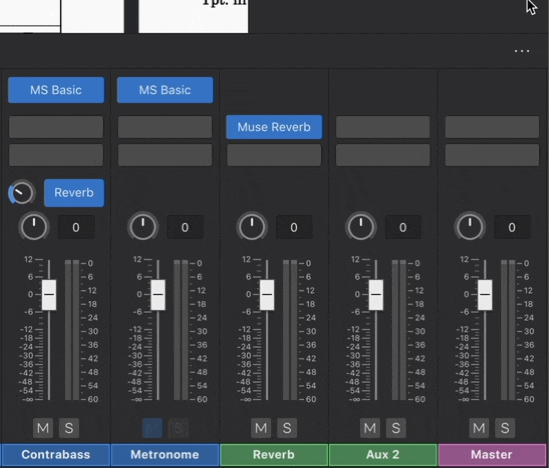
To disable an Aux send row (slot)
- Make sure the Aux send is visible
- Click Reverb to turn off Aux send 1 OR Click Aux 2 to turn off Aux send 2.

Aux channels
Aux channels are special channels to simplify audio FX application. You can set up audio FX(s) in one Aux channel and then apply them to multiple instruments.
There are up to two Aux channels in each score:
- Aux 1: contains the Muse Reverb by default, but you can remove this and replace it with any Audio FX(s) you like.
- Aux 2: is empty by default.
To show/hide Aux channels
By default, aux channels are hidden. To show/hide a aux channel:
- Click the three dot icon in the upper right corner of the Mixer panel
- Hover over View
- Click Aux channel 1 and/or Aux channel 2.
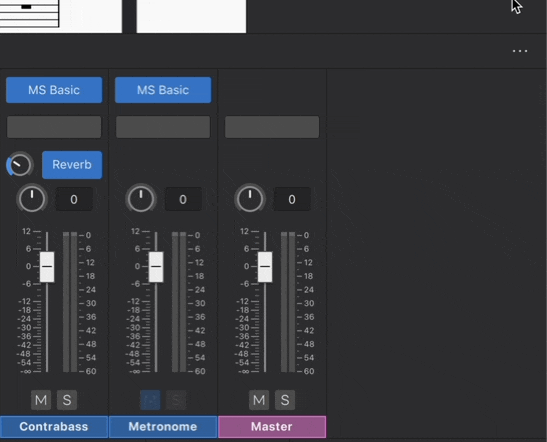
To add Audio FX to an Aux channel
The process is the same as adding Audio FX(s) to an instrument channel, see To add an Audio FX.
If there is only one Audio FXin an Aux Channel, the channel strip and its corresponding aux send are labelled by the name of the Audio FX. If there is more than one, they are labelled Aux 1 and Aux 2. You may need to save and reopen the score to see the labels update.
To adjust an Aux channel's level
Aux channel strips have volume faders. This changes the volume of the effect across all channel strips with the corresponding aux send turned on. Think of this as setting the maximum volume of the effect(s) that an instrument channel can receive.
To apply the effect(s) of an Aux channel to an instrument
To adjust how much effect of an Aux channel come through on each instrument, use the knob in the corresponding Aux sends row (slot) on that instrument channel strip, see Aux Sends.
See also
SoundFonts
MuseScore uses virtual instruments to create audio for playback. SoundFont files (.sf2, .sf3) are one of the supported formats . An sf2 or sf3 file contains all the audio data for one or more virtual instruments.
MuseScore comes packaged with its own native SoundFont, MS Basic, which contains most of the instrument sounds you need for score playback.
You can also add and use custom SoundFonts—many are available free online. See also the list in SoundFonts and SFZ files (MS3 handbook).
Install a SoundFont
Once you’ve downloaded a SoundFont to your computer, there are two ways to install a SoundFont in MuseScore 4:
- Drag and drop the SoundFont file into MuseScore 4.
- Place the SoundFont file in the MS4 user directory named "SoundFonts".
Drag and drop installation
- Open MuseScore
- Open your OS file manager (Windows: File Explorer, macOS: Finder)
- Locate the SoundFont file
- Left-click and hold on the SoundFont file in the file manager window
- Drag the file over to MuseScore's window
- If MuseScore's window isn't visible, drag the file over MuseScore's icon in the system bar to reveal MuseScore's window
- Release the mouse button to "drop" the file on MuseScore
A dialog should appear offering to install the SoundFont file to the correct location.
File directory installation
It's also possible to manually install SoundFont files to the correct location. By default, this location is ~/Documents/MuseScore4/SoundFonts, where ~ (tilde) represents your home directory. The full path to this location is:
- Windows:
C:\Users\USERNAME\Documents\MuseScore4\SoundFonts - macOS:
/Users/USERNAME/Documents/MuseScore4/SoundFonts - Linux:
/home/USERNAME/Documents/MuseScore4/SoundFonts
SoundFont files placed in this folder will automatically become available for use in MuseScore.
Add or change SoundFont directory
It's also possible to specify alternate location(s) to store SoundFont files instead of—or in addition to—the default location mentioned above. SoundFont files placed at any specified location will be available in MuseScore.
To specify an alternate SoundFont location:
- Open Preferences (Mac: MuseScore > Preferences or shortcut Cmd+;. Windows: Edit > Preferences)
- Select Folders (prior to MuseScore 4.2 this was under the General category)
- Click the SoundFonts folder icon
- Click Add directory in the dialog that appears
- Choose and Open the folder location where you want MuseScore to look for SoundFont files
- Repeat steps 1-5 to add further directories (optional)
- Click OK to finish. The specified directory (or directories) will appear in the SoundFonts text field.
- Click OK in the Preferences dialog to confirm your selection.
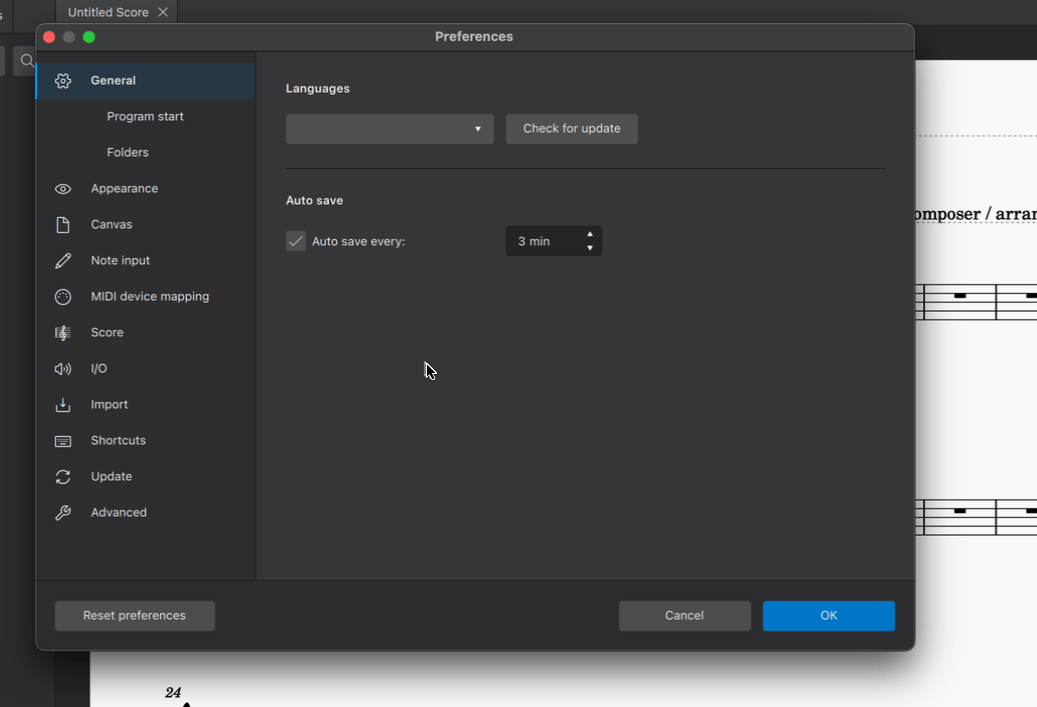
Using sounds from a SoundFont
Once a SoundFont is installed, here's how to use it in MuseScore:
- Open the Mixer (shortcut: F10)
- Locate the column for the instrument that you want to change the sound of
- Mouse over this instrument's plugin slot in the row marked Sound (screen reader users: tab until you hear "sound menu")
- Click the dropdown arrow that appears
- Hover over SoundFonts
- Select the SoundFont you wish to assign to that particular instrument
As of MuseScore 4.2, it possible to choose a specific sound within the SoundFont. The default setting Choose automatically instructs MuseScore to use sound(s) that matches the instrument in the score.
On some instruments (such as Violin) using MS Basic, verbal articulation text items (such as legato, pizz. arco) create proper playback only if Choose automatically is selected, see musescore at github. Therefore it is preferable to change the Musescore Instrument, see Setting up your score : Changing instruments after score creation chapter. Choose automatically only works with SoundFonts that obey the General MIDI standard, see Musescore 3 handbook SoundFonts and SFZ files: soundfonts chapter.
Shown below is soundfont selection in MuseScore 4.1.1.
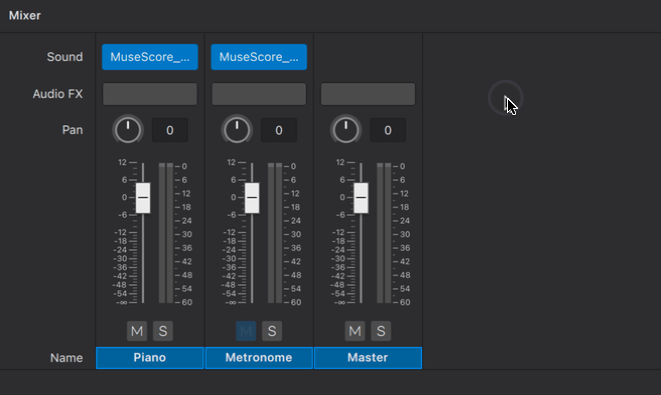
Selecting individual sounds
As mentioned above, MuseScore 4.2 reintroduced the ability to choose individual sounds within a SoundFont.
Prior to MuseScore 4.2, you had to make do with the automatic choice, or employ a workaround where each individual sound was packaged into a separate SoundFont file. A special version of MS Basic was created for this purpose. For other SoundFonts, you could split them into individual sound files using a free tool such as sf2-split or SF2 Splitter. For VSTs you could use a VST sampler such as Sforzando, FluidSynthVST, or juicysfplugin.
Editing Soundfonts
This is possible using 3rd party software such as Polyphone. For more information, see also Soundfont, MIDI velocity and instruments.xml (Developer’s Handbook).
Uninstall a SoundFont
To uninstall a SoundFont, simply open the folder where its file is installed and delete it.
A note on the Zerberus player and SFZs
Users of MuseScore 3.6 and earlier may be accustomed to using the Zerberus player, which supports the .sfz file format. In building a new system that now supports VST instruments, changes were required that necessitated the removal of the Zerberus player, as well as the 合成器 found in previous versions of MuseScore. Consequently, some functionality has been lost in this process, including the ability to map specific instrument sounds like pizzicato and tremolo to specific MIDI channels. Our highest priority in future releases of MuseScore 4 is to again support this functionality for VST, SoundFont and the Muse Sounds libraries. Users who rely extensively on mapping .sfz sounds to specific performance directions are advised to continue using earlier versions of MuseScore until we re-enable this capability in MuseScore 4. It is worth mentioning that the new systems we are planning will be much more flexible, easy to use and powerful than those found in MuseScore 3.
For those who wish to still use SFZ sounds in MuseScore 4, good alternatives for Windows and macOs would be the open source VST samplers Sfizz or Sforzando, both of which support SFZ playback. Currently, the use of SFZ is not possible in MuseScore4 for Linux.
See also
- SoundFonts and SFZ files (MS3 handbook)
Alternatives to soundfonts:
Installing Muse Sounds
Muse Sounds is a library of sophisticated plugins that provide realistic playback for MuseScore.
Installation
Via Muse Hub (Windows and macOS)
On Windows and macOS, Muse Sounds are installed using the Muse Hub application, which can also be used to install MuseScore 4. If you don't have Muse Hub yet you can download it for free from musehub.com.
Once installed, Muse Hub is found in the Windows system tray (shortcut Win+B to focus), or the macOS menu bar (press VO+M twice to focus while VoiceOver is running).
When Muse Hub is open, click Get under any sound you’d like to have in your library, and it will begin downloading and installing right away.
Muse Hub also contains a range of effects plugins. Download and install these from the Effects tab.
Once a plugin is fully downloaded, it will appear in the Mixer the next time you launch MuseScore.
Via Muse Sounds Manager (Linux only)
On Linux, Muse Sounds are installed using Muse Sounds Manager, which you can download from musescore.org as a DEB or RPM package for 64-bit Intel/AMD architectures (not ARM currently).
When Muse Sounds Manager is open, click Get under any sound you’d like to have in your library, and it will begin downloading and installing right away.
Once a plugin is fully downloaded, it will appear in the Mixer the next time you launch MuseScore.
Using Muse Sounds in MuseScore
Any Muse Sounds plugins you’ve downloaded will be automatically assigned to the appropriate instruments in your score.
You can tell MuseScore to always use available Muse Sounds plugins via the Playback Setup dialog.
- Go to view → Playback setup
- Select Muse Sounds in the Profiles section
- Leave Set as default for new scores checked if you want all future scores to also use Muse Sounds
- Click OK
The Muse Sounds playback profile will ensure that all Muse Sounds plugins will be assigned to every available instrument in your score. You can also manually assign a Muse Sounds plugin to a single instrument via the Mixer. This can be helpful for scores with more than one instrument, where you may wish to combine Muse Sounds plugins with other VSTs or Soundfonts.
- Go to View → Mixer to show the Mixer (Shortcut: F10)
- Hover over a plugin slot next to Sound
- Click the dropdown button that appears
- Navigate to Muse Sounds and select a sound from the desired library
Available sounds in Muse Sounds
Muse Sounds currently supports the following instruments:
Choir
- Sopranos
- Altos
- Tenors
- Basses
Strings
- Violins 1
- Violin 1 (Solo)
- Violins 2
- Violin 2 (Solo)
- Violas
- Viola (Solo)
- Violoncellos
- Violoncello (Solo)
- Contrabasses
Woodwinds
- Alto Flute
- Alto Sax
- Baritone Sax
- Bass Clarinet
- Bass Flute
- Bassoon
- Clarinet in Bb
- Clarinet in Eb
- Contrabass Flute
- Contrabassoon
- English Horn
- Flute 1
- Flute 2
- Oboe
- Piccolo
- Soprano Sax
- Tenor Sax
Brass
- French Horns a6
- French Horn
- Trumpets a4
- Trumpet
- Trombones a3
- Trombone
- Bass Trombone
- Cimbasso
- Tuba
Percussion
- Bass Drum
- Bell Tree
- Bongos
- Cabasa
- Castanets
- Claves
- Cowbell
- Crotales
- Field Drum
- Glockenspiel
- Gong
- Marimba
- Mark Tree
- Piatti
- Shaker
- Sleigh Bells
- Snare Drum
- Suspended Cymbal
- Taikos
- Tam-Tam
- Tambourine
- Timbales
- Timpani
- Toms
- Triangle
- Tubular Bells
- Vibraphone
- Wood Blocks
- Xylophone
- Metronome
Keys
- Celesta
- Grand Piano
- Harpsichord
- Soft Piano
- Upright Piano
- Hammond Organ
- Suitcase Piano
- Wurly 200A
- Dream Piano
Harp
- Harp
Guitars
- Acoustic Nylon
- Acoustic Steel Picked
- Acoustic Steel Plucked
- Electric Bass
- Electric LP - Clean
- Electric LP - Heavy
- Electric LP - Lead
- Electric SC - Clean
- Electric SC - Heavy
- Electric SC - Lead
Any instruments not supported by Muse Sounds will remain assigned to MS Basic by default.
Capo playback (MS 4.0.2 and before)
This page shows you how to apply Capo markings in MuseScore versions prior to MuseScore 4.1. See Applying capos for the new method of applying capos in MuseScore 4.1 and above.
Adding a capo marking to your score (before MuseScore 4.1)
MuseScore allows you to transpose the playback of a staff without changing the music notation (written pitch). This simulates the effect of a capo on a guitar (or other stringed instrument).
Adding a capo to a single staff
- Add staff text to the note/rest from which you want capo playback to start;
- Open the Staff text properties dialog.
- Click on the Capo Settings tab;
- Check the “Capo Settings” checkbox, and set "Capo fret" to the fret number you wish to apply the capo at (each fret increases the pitch by a semitone);
- Click OK to apply your changes;
- Edit the wording of the text as desired.
Adding a capo to a staff / tablature pair
Use one of the following:
- If linked, add the capo to the standard staff—not the tablature.
- If unlinked, add the capo to both staves.
Note: Any capo playback settings apply until overridden by a subsequent Staff text with “Capo Settings” enabled.
See also
Swing playback
Overview
Music in “straight” time is performed strictly as written in the score. By contrast, music in swing time interpets straight eigth and sixteenth notes as triplet pairs, with the first of the pair being roughly twice as long as the second. This gives the rhythm a characteristic bouncy feel—often asssociated with Jazz music. e.g.
Swung eighths:

Swung sixteenths:

Rather than notate swung music exactly as performed, it is accepted convention to write it in straight time and simply provide the written indications “Swing and “Straight” at appropriate points in the score.
Swing markings have a playback effect on the score. The default swing ratio is 60% (3:2) but you can vary this to suit the feel of the piece if required.
Adding a swing or straight marking to your score
To add a swing marking
- Click on the destination note or rest
- Click on the Swing text in the Tempo palette.
Alternatively, you can drag and drop the Swing text from the palette onto the note or rest in question.
You can, if desired, add a visual swing marking as well.
To add a straight marking
- Click on the destination note or rest
- Click on the Straight text in the Tempo palette.
Note that the above markings are a form of System text and therefore the playback effect is applied to all staves in the system. If you want swing to apply to only one staff you can use Staff text instead: see below.
Changing swing playback
Adjust the type and degree of swing
- Right-click on the Swing text in the score and select System text properties.
-
In the Swing settings tab edit the “Swing” and “Swing ratio” as required.

Note: Swing settings are found in both system and staff text.
Apply swing to one staff only
If you want swing to apply to only one staff in the system, use staff text instead:
- Select the destination note or rest.
- Click on the Staff text indication in the Text palette.
- Edit the text to create the desired performance indication
- Right-click on the text and select Staff text properties. Alternatively select the text object and in the Properties panel, click on the Staff text properties button.
- In the Swing settings tab edit the “Swing” and “Swing ratio” as required.
Working with MIDI
This section needs to be organized / written by someone with an understanding of how to use MIDI input/output in MuseScore 4. If JACK is still supported, it could be discussed here too, or in a new page.
Working with VST and VSTi
Introduction to VST
Virtual Studio Technology (VST) is an audio plug-in software interface licensed under Steinberg that integrates software synthesizers and effects units into digital audio workstations. Most VST plugins are either instruments (VSTi) or effects (VSTfx); VSTi includes software simulation emulations of well-known hardware synthesizers and samplers.
Installing VSTs
In MuseScore 4, any compatible VST plugins installed on a Windows or MacOS computer will automatically be made available in the Mixer, where you can easily configure playback settings for all instruments in a score. Note that Linux is not yet supported (but see Linux VST3).
After installing new VSTs on your computer, you may have to restart Musescore 4 to make them visible in the mixer. If this doesn't work, you can force a re-scan of VSTs by deleting previous cache settings before restarting. On Windows 10 the relevant file can be found at
C:\Users\ [your user] \AppData\Local\MuseScore\MuseScore4\known_audio_plugins.json
MuseScore 4 directly supports VST3 plugins only (not VST1 or VST2) because of licensing restrictions. If you are using VST1 or VST2, see How to use older, non-VST3 plugins in MuseScore 4.
Note: Sound settings in the Mixer are saved with the score, but not to the program.
Enabling, disabling, removing and replacing VST plugins
See Mixer: Sounds and Audio FX.
See also
Alternatives to VST instruments:
文件管理
Opening and saving scores
Overview
You can store your files either locally on your computer, or online (“in the cloud”) to your musescore.com account. If you don’t have an account yet, you can create one for free here.
In the case of scores saved online, MuseScore also keeps local copies on your computer, so you can work on them even without an active internet connection. Every time you save a "Cloud Score", the online copy at musescore.com is also updated. This system protects both the integrity of your local cloud scores while offering all the advantages of online storage, including backup, viewing and playback across multiple devices, ease of sharing, commenting, and much more.
Please note that, if you download one of your cloud scores from musescore.com and open it in MuseScore, the file you download and open will be a new, locally-stored file, separate from the file in the cloud.
Opening a score
There are a few ways to open a score in MuseScore 4.
File → Open
This triggers your file browser, allowing you to select and open scores stored on your computer or storage device (dialog will vary according to operating system).
Windows/Linux: Ctrl+O. MacOS: Cmd+O
File → Open recent
This option allows you to choose from a list of recently-opened scores.
Home tab → Scores
This window displays your most recently modified scores. Double-click on any score thumbnail to open it. You can also click Open other… to access locally-stored scores from your file browser.
Scores that have been saved to the cloud are indicated with a cloud icon. Unlike local scores, it is not possible to rename or otherwise modify a cloud file from your computer’s file browser. You can, however, do this from the score manager on musescore.com. Go directly to your score manager by clicking the Score manager (online) button in the Scores window.
It is possible to open multiple scores simultaneously. In this case, MuseScore opens each score in a separate window.
Import file formats
Apart from its native format files (*.mscz and *.mscx), MuseScore can also open MusicXML, compressed MusicXML and MIDI files, as well as a variety of files in other formats. You can customize various import settings by going to Preferences → Import.
Saving a score
To save a score:
1. Go to File
2. Choose any of the following options:
| Option | What it does | Shortcut |
|---|---|---|
| Save | Saves current score to new file, or saves changes to a previously saved file | Windows/Linux: Ctrl+S, MacOS: Cmd+S |
| Save As... | Saves current score to new file | Windows/Linux: Shift+Ctrl+S, MacOS: Shift+Cmd+S |
| Save a copy... | Saves current score to new file, but allows you to continue editing the original file | None |
| Save selection... | Saves selected measures to new file | None |
| Save to cloud... | Saves score as a new file on musescore.com | None |
The first time you use any of the above save options, a dialog opens asking you “How would you like to save”, then offering you the options of “Save to the cloud” or “Save to computer”.
To disable this window, click Don't show again to ensure you only see your operating system's native save dialog for future saves.
Save to computer
The Save to computer option triggers your operating system’s “Save” dialog, allowing you to save the score as a (compressed) MuseScore file, .mscx.
There is also an option in your “Save” dialog to save files in an uncompressed format (“Uncompressed MuseScore folder”). This option creates a new folder on your computer that contains a MuseScore (.mscx) file, as well as a thumbnail image file (.png) and any relevant .json, .mss, and .xml files.
Save to the cloud
Scores saved online (to the cloud) appear in the program’s Home: Scores tab with a cloud symbol at the corner of the file icon. A local copy is also automatically saved on your computer.
To save a score to the cloud, choose Save to the cloud. This triggers a dialog with the following options:
Name
This is the name under which your score will be identifiable on musescore.com
Visibility
- Private allows you to save changes to your score without others seeing your work online.
- Public makes your score visible to everyone on musescore.com.
When you’re ready, click Save. The first time you do this, MuseScore will ask whether you also want to upload your audio to musescore.com. You can choose from the following options:
Never
Each time you press Save, only the score itself will be uploaded to musescore.com. Online playback will use the MS Basic soundfont.
Always
Each time you press Save, MuseScore will generate an .mp3 file to upload together with your score. Score playback on musescore.com will sound the same as it does in your desktop app (including audio from the Muse Sounds library, if installed, or any VST instruments and effects you’ve added)
Every x saves
MuseScore will only generate and upload an .mp3 file at a save interval you specify.
These settings only affect your private cloud scores. You will only be asked to specify this setting once, however you can change this setting at any time by going to Preferences → Cloud. Once you click OK, MuseScore will confirm your score has been saved. Your file will be accessible from both the Home tab as well as the score manager on musescore.com.
File export
Overview
This chapter covers the saving of MuseScore scores in formats other than the native ones (*.mscz and *.mscx), such as MusicXML, MIDI, MEI, MP3, PDF, PNG etc.
Exporting your score
To export a score:
- Select File→Export
- Choose a Format from the dropdown list
- Select the parts to export by checking/unchecking the appropriate boxes on the left of the dialog
- If you want to combine all parts in one file click on the radio button titiled All parts combined in one file
- Click Export...
File formats
Graphical formats
Portable Document Format (PDF) is a universal format for text, pictures, music and so on. Use this format when you want to generate music scores for other musicians to read.
Virtually every computer will have a dedicated PDF reader; if not a PDF can also be opened using web browsers such as Firefox etc. PDF scores can also be printed to hard copy if desired.
SVG
Like PDF, Scalable Vector Graphics (SVG) enables you to zoom in and enlarge the image without loss of quality. Use SVG when you want to embed extracts of music inside another document or webpage.
All modern web browsers support SVG. However, many websites and apps do not support it, so if you try to use SVG somewhere and it doesn't work, try using PDF or PNG instead.
PNG
Portable Network Graphics (PNG) is a compressed graphical format suitable for editing or embedding in all kinds of documents. However, PNGs become pixelated if you zoom in or enlarge the image, so consider using PDF or SVG instead if your software supports it.
Audio formats
OGG
OGG files commonly contain lossy Vorbis-compressed audio, which offers higher quality than MP3 at the same file size. Use this format for personal listening, if your device supports it.
Most Android devices support OGG audio, but Windows, macOS, and iOS devices require third-party software in order to read these files. You may find MP3 easier to use.
MP3
MP3 is a lossy compression format that is universally supported. Use this format to share audio with other people for listening purposes (not for editing).
FLAC
FLAC is a lossless compression format that fully preserves audio quality, but produces larger file size than the lossy compression formats. Use FLAC when sending audio for someone else to edit, but only if you can't send them the actual MuseScore file (e.g. because they don't have the necessary instrument sounds or audio plugins installed for it to sound the way you intended).
WAV
WAV is an uncompressed format. It offers full audio quality but its files are extremely large. Use this format for audio that you plan to edit yourself in another program, such as Audacity.
Other audio formats
If you need audio in a format not mentioned above (e.g. Opus or AAC), this requires using an external audio conversion tool. Audacity is a free program that can be used for this purpose. It's developed by Muse Group, the same company that makes MuseScore.
Simply export your score from MuseScore as a WAV file, then open this file in Audacity, or whichever audio program you choose to do the conversion. Using WAV as the transition format ensures the highest quality after conversion and avoids wasting time compressing the file in MuseScore only to decompress it immediately in the other program.
Alternatively, you could use a website to do the conversion. In this case it's better to use FLAC as the transition format, as this will reduce the size of the upload while retaining maximum quality. Make sure you research any third-party software or web service carefully before using it. Some websites retain files after you have uploaded them, and some will even make the files available to other users.
Once the file has been converted to the desired format, you should listen to it to ensure the quality is acceptable and the entire file was converted.
Hybrid formats
MIDI
Musical Instrument Digital Interface (MIDI) is a well-established music industry standard for encoding all the notes and instruments in a score, but none of the visual formatting. MIDI files can be played in some media players, but only if the right software (or hardware) instruments are available to realize it. The files can be edited in a sequencer or other music notation software.
You should be aware that the sound generated by a MIDI file is dependent on the virtual instruments used to play it back, so it's likely to sound different when played outside of MuseScore. Also MIDI does not preserve visual formatting, so the file will look very different when opened in any notation program, including MuseScore, compared to the original score.
Score formats
MusicXML
MusicXML is a universal standard which aims to preserve as much of the original score formatting as possible. It can be opened in any modern score writer. MuseScore 4 uses MusicXML 4.0, although some features have yet to be implemented.
Braille
Braille Ready Format (BRF) is a plain text format that can store written text or music documents intended for use by people who are blind. These files can be opened in third-party software for reading with an electronic braille display or embossing onto paper as raised dots.
MuseScore's braille files use bar-over-bar formatting, which means there is a separate line of braille for each staff, and measures are vertically aligned between staves like in the print music. (An alternative would be bar-by-bar or section-by-section formatting, where one or more measures are written for the first staff, followed by those same measures for the next staff, and so on, all on a single line of braille. MuseScore does not support these types of formatting currently.) MuseScore's braille files use ASCII rather than Unicode character encoding, so sighted users who open these files in a text editor will just see random letters and punctuation characters; you would need to install a special braille font in order to see the braille as dots.
MuseScore's braille conforms to the Braille Authority of North America's Music Braille Code 2015, but many of its features have yet to be implemented. At present, you may get better results if you export scores as MusicXML, and then use a third-party MusicXML to braille conversion tool, such as the free web-based tool SM Music Braille.
MEI
Music Encoding Initiative (MEI) is an open XML format that represents the semantic structure of music notation documents and is developed as a community-driven effort. The MEI support in MuseScore focuses on MEI Basic, a subset of MEI that facilitates the use of MEI for data exchange and improves interoperability. The MEI support in MuseScore is available as of version 4.2 and is documented here.
Customizing export settings
[To be added]
MIDI import
- MIDI import panel not currently implemented, making this section largely moot
Working with MusicXML files
Overview
MusicXML is a universal file format that allows music scores to be shared between different music notation programs. For example, you can convert a MuseScore .mscz file to a MusicXML file and it will open in Sibelius, Finale, or any other compatible scorewriter; and vice versa.
MusicXML faithfully reproduces the notes and instrumentation, but, nevertheless, it is usually necessary to do some clean-up work to make the transferred score look exactly the same as the original.
Opening a MusicXML file
When a MusicXML file is first opened in MuseScore, the positions and custom properties of text objects are preserved as far as possible. There may also be other customizations visible in the score which you may or may not wish to keep.
Cleaning up an imported score
Restoring stems
To reset the stems of all notes to their default positions and orientations:
- Right-click on a note and choose Select→Similar
- Press Ctrl+R.
Restoring default leading spaces
To reset the leading space of all notes to the score default:
- Right-click on a note and choose Select→Similar
- Click on the Appearance button in the Properties panel
- If the Leading space reset button (circular arrow) is active, click on it to reset to the score default; otherwise no further action is required.
Removing breaks
To remove all breaks—system, page and section:
1. Right-click on a break and choose Select→Similar
2. Press Delete.
To remove just system breaks (leaving section and page breaks in place):
- From the main menu, select Format→Add/Remove system breaks.
- Select Remove current system breaks
- Click OK to close the dialog.
Restoring default text styles
To reset all text objects in the score, and in frames, to their default styles:
- From the main menu, choose Format→Style
- Click on the button marked Reset all styles to default
- Click OK to close the dialog.
See Format→Style→Text styles to view the list of styles, and property values.
Resetting default text positions
Frame
To reset the positions of all text objects in frames:
- Right-click on a text object in a frame
- Choose Select→Similar
- Press Ctrl+R.
Score text
You can apply the same method for text objects in the score, as for frames. However you will need to repeat this for each individual class of object—all tempo texts, all staff texts and so on.
Preparing a score for export
To export a score as a MusicXML file see File export.
Export settings
When exporting a score to MusicXML, you can choose from a compressed (the default option) or uncompressed format; and whether to export all breaks or not, or to allow only manually-added breaks to appear in the file.
[To be added:
- gotchas - manual adjustments, misuse of element types, images, ...
- export settings]
Backup and recovered files
- TBD
Project properties
Overview
The Project Properties dialog contains metadata tags, editable descriptive digital data of the file. Every score created with Musescore 4 contains the following predefined metadata tags. Some of them are automatically assigned with information provided by user in the New Score dialog, see Setting up your score chapter.
| Property | Details |
|---|---|
| Work title | Assigned with "Title" provided in New Score dialog. |
| Subtitle | Assigned with "Subtitle" provided in New Score dialog. |
| Composer | Assigned with "Composer" provided in New Score dialog. |
| Arranger | |
| Lyricist | Assigned with "Lyricist" provided in New Score dialog. |
| Translator | |
| Copyright | Assigned with "Copyright" provided in New Score dialog. Feel free to copy and use this copyright symbol literally: © |
| Work number | |
| Movement title | |
| Movement number | |
| Creation Date | Date of the score creation. This could be empty, if the score was saved in test mode (see Command line usage). Edit manually if you are Beethoven's ghost. |
| Platform | The computing platform the score was created on. This might be empty if the score was saved in test mode. |
| Source | May contain a URL if the score was downloaded from or Publish to MuseScore.com. |
| Audio.com URL | |
| Musescore Version | Not editable. The version of MuseScore the score was last saved with |
| File Path | Not editable. The score file's location on the Computer. |
Note:
- Score created from certain template contains a top vertical frame and Musescore Text objects on the first page. These objects, such as Title, Subtitle etc, are also automatically assigned with information provided by user in the New Score dialog, but they are not related to metadata tags, see Entering and editing text chapter.
- The originalFormat, and poet metadata tags are automatically created in score created with previous versions of Musescore, but no longer so in Musescore 4.
- Project Properties is formerly Score properties.
Changing Project properties
To change a Project property (metadata tag),
- From the menu, choose File→Project Properties...
- Edit the desired tag
Adding and deleting new project properties

To add a new custom metadata tag, click on the New button. Fill in the "New tag name" field and press OK;
To delete a tag click on the trashcan symbol. Predefined metadata tags cannot be deleted.
Accessing project properties in a score
The only place to add project properties (metadata tags) on to a score is by referring them in header or footer, see Header and footer chapter.
Score comparison
- not currently implemented
Publish to musescore.com
Overview
Understand that these are separate entities before we begin this chapter:
- Musescore is a free and open source desktop (Windows, macOS, Linux) music notation software project.
- musescore.org gathers volunteers around the world contributing to the project.
- musescore.com is a separate, commercial business - a "sheet music-sharing social platform" that allows you to save and publish your scores online.
You can publish to musescore.com either directly, or from within Musescore, but note that musescore.org volunteers are not capable of handling any issues related to musescore.com such as payment, refund, ownership, copyright, licensing, piracy etc, see How and where to ask for support.
You may elect to keep your scores private or to allow others to read or download them. To use its service you need to open a musescore.com account, which can be either free or subscription (see also Opening and saving scores).
Publishing cost and profit
musescore.com seems to prioritize providing virtually free of charge score hosting service, rather than helping self-publishers generate income. Nevertheless, it has generous terms on how hosted scores are used. The platform has not been openly, directly working with or sharing revenue with self publishers / individual composers yet. It has begun collaborating with publishers in response to complaints about copyright protection. For musicians aiming for profit, try alternative methods such as listed on https://music.stackexchange.com/questions/696/sites-with-a-good-selecti…
Publishing rights
Respect copyright. Just as you own the copyright for music you create, others own the copyright for music they create. You may transcribe other people’s copyrighted music using Musescore, but you do not necessarily own the copyright for the resulting Sheet music.
A broad definition of "publish" is used in this chapter to avoid confusion only - the act of uploading/saving content to an online server is considered "publishing". You should pay attention to the definition of "publish" used in any legally binding licenses. From https://www.copyright.gov/help/faq-definitions.html ... Publication is the distribution of copies or phonorecords of a work to the public ... A score can be uploaded "unlisted", meaning it is not publicly searchable or shown inside a public systematic catalog, but the said score may arguably still be considered public.
From the forum post Copyright Infringement
... for a cover song you'd need the copyright holder's permission (maybe the author, the publisher, the heirs, etc) ...
... you cannot upload a piece even with a licence from the original author, unless said licence also includes the specific rights grant to MuseScore BVBA which the ToS require, but which are not necessary to obtain if (also) another suitable licence, such as any and all Open Source / Open Knowledge licences, are present. The ToS also (part of the same bug) require the uploader to waive certain moral rights of the artist ...
From the forum post Would somebody tell me what is original music?
... If you haven't deliberately based your score on another composition then upload it as an original. If it turns out to be similar to a known composition then someone will point it out. If it's close to a copyrighted score then it may get taken down, (made private), but without causing you any trouble ...
From https://bernardgreenberg.com/MuseScore.html (by Bernie/BSG, a long time volunteer music mentor on musescore.org and musescore.com) 29 June 2021
... the CPO (Chief Product Officer) of MuseScore.com, David Mandelstam, posted, in public discussion with me, that the site (musescore.com) is the world's largest free sheet music catalog. It is not a social media, and not a score hosting site ...
Last but not least, from https://musescore.com/community-guidelines
... Treat people the way you would like to be treated ...
Creating a MuseScore account
- Go to www.musescore.com
- Click "Log in" - it's at the top right of the window
- On the dialog that pops up click "Create an account" - it's at the bottom right of the dialog that popped up
- If your browser is already logged in to a Google, Facebook or Apple account you can sign up with any of those services by clicking on the appropriate button
- If you prefer to sign in with your email address, fill in the remaining fields, check "I'm not a robot"
- Click "Create new account"
Saving only to Musescore.com
The first time you save a score you will be asked if you want to publish the score to Musescore.com.

If you are not already logged in to Musescore.com, or you do not have an account, you will need to login.

You will be asked if the score should be Public, Unlisted, or Private.
- Public scores are visible to everyone on the internet.
- Unlisted scores are visible to everyone on the internet, but do not show up in search results. Only people with the link will be able to find an unlisted score.
- Private scores are visible only to you. You must be logged in to your musescore.com account to view.
If you’re publishing a score that you’ve already published at least once, you can choose to replace the existing online score or to publish as a new online score.

You will be asked whether you also want to upload your audio to musescore.com. See Managing publishing preferences

Musescore will tell you when it is ready. Large scores may take some time to generate the MP3 file.

Publish locally saved scores
Scores saved on your computer can also be published at Musescore.com but are not automatically updated.
To publish a score at Musescore.com
- Click the Publish Tab (below the menu bar)
- Click Publish to Musescore.com

Visibility in score manager
Scores published only at Musescore.com are marked with a "cloud" symbol in the Musescore score manager.
MuseScore also keeps local copies on your computer, so you can work on them even without an active internet connection.

Manage generation of mp3 during upload
When saving online Musescore creates an MP3 file of the audio of your score. Depending on the score length, and number of instruments in the score, this might take a long time. To control when this happens:
- From the menu, choose Edit→Preferences...→Cloud
-
Under "Generate MP3 audio for private cloud scores" choose Never, Always, or Every (X saves)
Never
Each time you press Save, only the score itself will be uploaded to musescore.com. Online playback will use the MS Basic soundfont.
Always
Each time you press Save, MuseScore will generate an .mp3 file to upload together with your score. Score playback on musescore.com will sound the same as it does in your desktop app (including audio from the Muse Sounds library, if installed, or any VST instruments and effects you’ve added)
Every x saves
MuseScore will only generate and upload an .mp3 file at a save interval you specify.
- If you chose "Every X saves" choose the number of saves

Share on Audio.com
Overview
In addition to publishing your score on MuseScore.com, you can share the MP3 audio generated by MuseScore to Audio.com, a free service from Muse Group. On Audio.com, you can share your tracks publicly, make them available to download, and upload unlisted audio.
To share audio from your score on Audio.com:
MuseScore 4.1 and above
- Open the Publish tab
- Click the Share on Audio.com… button in the toolbar
- If you’re not already signed in to an audio.com account, you will be prompted to do so or create an account
- Enter a title, choose whether the score should be Public or Unlisted, then click Share
- If you've already shared audio from the score, you can replace the existing audio or upload it as a new audio file
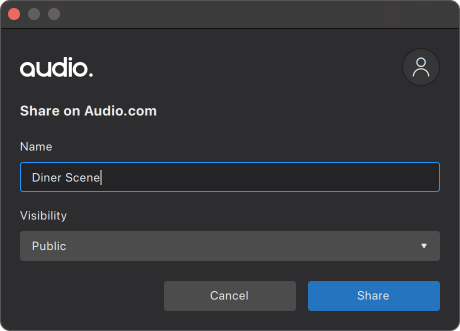
- If you've already shared audio from the score, you can replace the existing audio or upload it as a new audio file
- Audio.com will open in your browser to upload the track
- From here, you can set the title, URL, category, tags, description, sharing permissions, and downloading permissions of your track
To share on Audio.com every time you publish a score:
MuseScore 4.2 and above
The first time you publish a score, you will be prompted to share on Audio.com. You can choose to be prompted every time you publish, and this can be controlled in Preferences.
- Open Preferences
- Go to the Save & publish tab
- Check on Always prompt to share on Audio.com after publishing to MuseScore.com
个性化
Language
Overview
MuseScore works with your "System" language (the one used for most programs, and generally depending on your country and the language settings of the PC, or account).
Change language
- From the menu, select Edit→Preferences... (Mac: MuseScore→Preferences...);
-
In the General tab, select the desired language from the drop-down list in the Language section:

Update translations
To update translation(s):
- From the menu, select Edit→Preferences... (Mac: MuseScore→Preferences...);
- In the General tab, click on the Check for language updates button;
A message which displayed if the version of your language is already up to date, if not then the update will be downloaded.
To complete this step, a restart of the application is required.
See also
Appearance
Overview
To change the appearance of MuseScore
- From the menu, select Edit→Preferences... (Mac: MuseScore→Preferences...);
-
In the Appearance tab, select the desired option described below.

Theme and Colors
The following options are available to change the colors of MuseScore. The display changes immediately so options can be tested without closing the dialog. The changes apply to all open instances of MuseScore (see Windows)
- Light or Dark Theme
- Select "Follow system theme" if you want MuseScore to change themes from light to dark, or dark to light, when the system theme changes
- Enable high-contrast
- Accent color options
- Background - the color behind the score (not the color of palettes and other program items) can be changed to a solid color or a Wallpaper image.
- Paper - the color of the score itself can be changed to a solid color or a Wallpaper image.
- Invert Score - swaps the color of score elements with the Paper color
Fonts
To change the font face and text size for Menu and Palette elements:
- From the menu, select Edit→Preferences... (Mac: MuseScore→Preferences...);
- In the Appearance tab, select the font options.
This does not affect and text elements in the score.
Toolbars and windows
Overview
Windows, toolbars and panels within MuseScore can be repositioned, and you can choose which elements you want to see displayed in them.
The default appearance of MuseScore is shown below:

- The Menu bar
- Toolbars
- Palette, Property and Instrument Panels
- The Score Window
- The Status Bar
Toolbars
Showing and hiding toolbars
To show or hide the playback controls, note input toolbar, or the status bar:
- Select View→Toolbars... and check/uncheck the applicable element.
Rearranging toolbars
To change the position of either the note input or playback toolbars, click on and hold the six dots at the left of the toolbar, then drag and drop it to the desired location. The toolbar can be left free floating, but in the case of the note input toolbar, you can also drag and drop it either to the left or the bottom edge of the program window—a blue rectange then appears to show you that you can drop the toolbar at that location to redock it. The playback toolbar can only be redocked in its default position.
Customizing contents of toolbars
To select the icons that you want on view in the note input or playback toolbars, click on the gear icon to the right of the toolbar:
![]()
In the case of the note input toolbar, this reveals a dropdown list from which you can hide or display the various icons by clicking on the eye symbol to the left of each one (closed=hidden, open=displayed).
In the case of the playback toolbar, uncheck or check the various options in the gear menu to hide or display the corresponding elements.
Windows and Panels
Docking and undocking panels
To undock and move one of the side panels (Palette, Instruments, Properties, or Selection filter), click on the three dots on the tab, select the Undock option, then drag the undocked panel to the desired position.
You can leave the panel free-standing but there are also dock positions at the top and right hand edges of the document window—a blue rectangle appears to show that you can drop the panel to redock it at that location.
In a similar way, you can redock the free panel back to the sidebar:
- To display half-length at the top of the sidebar, drag and drop the free panel to the top left of the sidebar.
- To display half-length at the bottom of the sidebar, drag and drop the free panel to the bottom left of the sidebar.
- To display full-length in the sidebar, drag and drop the free panel to the center left of the side.
You can also redock the free panel in its original position by clicking on the three dots on the tab, and selecting Dock.
Panels such as the Mixer or virtual Piano can be undocked if desired, by dragging them into position or clicking on the three dots icon and selecting Undock. To redock, click on the three dots icon and select Dock.
The undocked mixer can be resized by dragging the edges inwards or outwards.
Customizing contents of panels
To choose which elements to display within the mixer or the virtual Piano, click on the three dots, select View and uncheck or check the applicable options.
To customize the palettes area, see Customization: Palettes.
Templates and styles
This chapter contains incomplete information and does not reflect the current status of Musescore 4. Please consult third party professionals listed on Getting help instead.
useful info for editing:
- structure proposed for this page https://musescore.org/en/node/330540/revisions/510458/view , see changes and reason below,

- changes of structure and reason: Concept and usage of template and style are quite different. To avoid confusion, the overview focuses on what style is, as it is not explained inside handbook yet. Explanation of template is moved to the Template section.
- ms3 layout overview, style, format>style https://musescore.org/en/handbook/3/layout-and-formatting
- ms3 template https://musescore.org/en/handbook/3/instruments-staff-setup-and-templat…
- ms3 .mss save load https://musescore.org/en/handbook/3/layout-and-formatting#save-and-load…
- ms3 Edit > Preferences > Score https://musescore.org/en/handbook/3/preferences#default-files
- ms4 Edit > Preferences > Score https://musescore.org/en/handbook/4/preferences
- ms4 related chapters https://musescore.org/en/handbook/4/formatting
TODO testing
- example score file B
- Part B1 (the full score)
- format > page settings
- format > style
- view > show >show invisible, concert pitch etc
- individual item properties
- Part B2 (built-in part, user clicked the part button, add)
- format > page settings
- format > style
- view > show >show invisible, concert pitch etc
- individual item properties
- Part B3 (newly-created part, user clicked the part button, add)
- format > page settings
- format > style
- view > show >show invisible, concert pitch etc
- individual item properties
- Part B1 (the full score)
- move B.mscz to the custom template folder, then create score C with the template
- create C1, C2 using B1, B2 CONFIRMED
- create C3 using B3 (to be tested)
- C1 (full score)
- format > page settings (to be tested)
- format > style (to be tested)
- view > show > show invisible, concert pitch etc (to be tested)
- individual item properties : ALL ITEMS for example staff text ARE REMOVED
- a new title text and frame is added "Untitled" MS4 NEW
- C2 (Part)
- format > page settings (to be tested)
- format > style (to be tested)
- view > show > show invisible, concert pitch etc (to be tested)
- individual item properties: ALL ITEMS EXCEPT STAFF ARE REMOVED title text and frame , staff text
- C3 (Part)
- format > page settings (to be tested)
- format > style (to be tested)
- view > show > show invisible, concert pitch etc (to be tested)
- individual item properties (to be tested)
Overview
Style
Styles in Musescore are profiles that contains settings, rather than being the settings themselves. The visual setting for text and musical symbol in musescore some users mistaken for style is called Font.
All styles are built-in, they contain visual and functional settings default values. Each object type, eg Chord Symbol object, Accidental object, has a corresponding style of the same name built-in: "Style for Chord Symbols", "Style for Accidentals". Each Text object, eg Chord Symbol object, Lyrics object, also has one or more corresponding style(s) built-in: "Style for text inside Chord Symbols", "Style for text inside Chord Symbols (Alternative)", "Style for text inside Lyrics Even Lines", "Style for text inside Lyrics Odd Lines". Style is not the object type.
You cannot create a new style, but you can edit the settings values in each style. Use the "Style" window: Format → Style , or Properties panel: 'three dots' button : Save as default style for this score.
After you created an object, you cannot change its object type. The same is almost true for style: an accidental object on a score must use values in "Style for Accidentals", it cannot use values in "Style for Staff Text" or "Style for Chord Symbols". You cannot change which style (the named profile) an object on a score uses unless the object is a Text object or it contains a Text object within. A Lyrics object on a score, if desired, can use the compatible values in "Style for text inside Chord symbols" or "Style for text inside Staff Text" rather than the values in "Style for text inside Lyrics Odd Lines" or "Style for text inside Lyrics Even Lines", for more see Formatting text chapter.
Read on to see the final visual and function of objects are determined.
Layout and formatting in Musescore
Layout and formatting in Musescore consists of two main levels, Text objects and objects containing them have more levels, see Formatting text. The final visual and function of most object in a score file is determined by:
- Level 1: Properties of each individual object in a score file, such as note, text, or symbol on a score file. By default, objects do not have any specific properties. When properties are assigned in Properties panel, they will always be used.
- Level 2: Includes
- the layout and formatting settings related to whole page,
- which corresponds to the items around the top of the left pane of the "Style" window: Format → Style → Score, Page, Size, System, Measure etc, and
- the settings in Format → Page settings (see Score size and spacing).
- Additionally, it includes all the styles. Settings values in styles have less priority than properties mentioned above. Styles includes:
- "style for certain type of object": such as "Style for Chord symbols", "Style for Dynamics symbols", which correspond to the items in the left pane of the "Style" window, and
- "style for text inside certain type of object", such as "Style for text inside Chord symbols", "Style text inside Lyrics Odd Lines" etc, which correspond to items inside the "Style" window: left pane item "Text Style", see Formatting text
- the layout and formatting settings related to whole page,
Every score file has a "Full Score" layout. It also contains "Parts" when you use Musescore Part feature to generate different versions of the same score. Each "Part" and the "Full Score" has their own separate complete set of layout and formatting information.
Reusing Layout and formatting information
- When create a new score file using a template,... [This bullet point is a work in progress, please add missing info, see TODO above, and https://musescore.org/en/handbook/3/layout-and-formatting#concept3]
- "Level 2 information" of the "Part" (but not the "Full Score") you are currently editing can be easily applied to all other "Parts" with the Format → Style → Apply to all parts button.
- "Level 2 information" of the "Part" or "Full Score" you are currently editing can be saved as a separate .mss file (also known as a style file) and re-used on the another score (its "Full Score" or any "Part"). Reusing on a "Full Score" does not affect Parts.
- Default "level 2 information" for new score file and Musescore Part see below.
Visit https://musescore.org/en/node/355981 for .mss files shared by other musicians.
Style files
The concepts and layout logic are explained in the overview. .mss file contains "level 2 information" and can be stored in any folder, Musescore does not automatically use any specific folder. The default folder for easier file management can be set-up in Edit → Preferences.
Saving settings of all styles of "Full score" or "Part" you are currently editing to a separate .mss file
- Open the 'Full score' or 'Part' desired.
- Select Format → Save style, save it to any folder you like.
Loading from .mss file into "Full score" or "Part" you are currently editing
- Load or create a score, open the 'Full score' or 'Part' desired.
- Select Format → Load style.
Default "level 2 information" for new score file and Musescore Part
Open Preferences → Score tab
- Style: Browse and set the .mss file Musescore uses as "level 2 information" when creating a new score file. When creating a new score file from a template, the information present in the template is used instead.
- Style for part: Similar to the above but for new Musescore Part.
Templates
Not to be confused with Staff/Part properties: staff type template.
Usage of template is covered in chapters Create your first score, and Setting up your score. Score template can be used to quickly set up a new score. A template contains:
[This item list is a work in progress, please add missing info, see TODO above, and
https://musescore.org/en/handbook/3/instruments-staff-setup-and-templat…
- itemX
- itemY
- itemZ
]
A template file is a score file under certain directory that Musescore uses. You can create a score from scratch and save it as template, or copy any existing .mscz file to that directory to use it as template. There are two kinds of templates:
- Pre-defined System templates shipped with MuseScore, sorted into categories in New Score: Create from Template tab, see Create your first score.
- Custom templates: Custom templates must be stored inside the templates folder "Documents/MuseScore4/Templates" (can be set-up in Edit → Preferences) . When you create a new score, they are in New Score: Create from template tab: My Templates category, see set up a new score.
Save a score as a custom template
Click File → Save as and save the score file as .mscz format into the template directory Musescore uses. Content of the last added Title text is used as the template name (not the content of File → Project Properties → Work Title field; also not the file name as Musescore 3).
Creating a score from a custom template
- Make sure the custom template file is in the correct folder.
- Click File → New to open the New Score dialog
- Choose a template in Create from template tab: My Templates category. In Musescore 4.1.1, the preview window shows what the template file looks like when opened as a score, it is not the preview of what a new score looks like when created from this template.
- Complete the rest of the New Score dialog and exit.
Palettes
This chapter shows you how to customize the palettes and their contents; the application of palette items is already covered in Using the palettes (Basics).
Adding palettes
To add a preset or a custom palette, see Using the palettes: Adding more palettes.
Hiding and deleting palettes
To hide a preset palette, right click on it and select Hide palette. The palette is returned to the Add Palettes list (see above). Note that preset palettes cannot be deleted.
To hide or delete a custom palette you have created earlier, right click on it and select Hide/Delete palette. Then follow the instructions in the dialog.
Changing the order of palettes
To change the order of a palette simply drag it up or down and drop it onto the desired position in the palettes list.
Customizing palette contents
Palettes can be populated with items from the Master Palette (Shift+F9 or View→Master palette), or from an opened score.
Score items, when added to a palette, are saved with their custom properties.
To enable/disable editing for a particular palette:
- Right-click on the palette name; or click on the ellipsis symbol (three dots) to the right of the palette name
- Check/uncheck Enable editing.
Adding elements from the Master Palette window
To add a symbol from the Master Palette to a palette in the Palettes panel:
- Open the desired palette, make sure editing is enabled (see Customizing palette contents).
- Open the Master Palette (Shift+F9 or View→Master palette)
- Drag and drop symbols from the relevant section(s) of the Master palette to the ordinary palette as required.
If you have created a custom palette, there is another way to access the Master Palette:
- Open the custom palette
- Click on the More button
- Use the arrow buttons to navigate through the various sections of the Master Palette window
- Select on a symbol
- Press Add to my custom to add it to the custom palette
- To exit the dialog, click once more on the More button, or press Escape, or click outside the More section.
Adding elements from the score
To add score elements to a palette:
- Open the desired palette
- Press Ctrl+Shift (Mac: Cmd+Shift), then drag and drop the score element to the open palette.
Moving elements between palettes
Symbols can be moved from one open palette to another simply by dragging and dropping them.
Deleting elements from palettes
To delete an element in a palette, right-click on it and select Delete. In the case of preset palettes, the element will be moved to the More section. For custom palettes you are offered a choice of Hide (send element to the More section) or Delete permanently.
Resetting a palette
To reset a palette to its default state, right-click on the palette name, or click on the ellipsis symbol (three dots) to the right of the palette name; then select Reset palette.
Note: A custom palette will be reset to an empty palette when this function is applied.
Saving and loading palettes
To save a palette, right-click on the palette name, or click on the ellipsis symbol (three dots) to the right of the palette name; then select Save palette.
To load a previously-saved palette, right-click on a palette name, or click on the ellipsis symbol (three dots) to the right of the palette name; then select Load palette and navigate to the desired palette, select it and click Open.
Palettes menu
To access display options for the palettes area, click on the ellipsis symbol (three dots) to the right of the Palettes title at the top of the palettes area.

- Single-click to open a Palette: Uncheck this if you want to open a palette by double-clicking.
- Open only one Palette at a time: if this option is checked, when you open a palette other palettes automatically close.
- Collapse all Palettes: Closes all open palettes.
- Expand all Palettes: Opens all palettes.
- Close: Palettes panel closes.
- Undock: Undocks the palettes panel. See also Windows and panels.
Palette properties
To access Palette properties for individual palettes, right-click on the palette name, or click on the ellipsis symbol (three dots) to the right of the palette name; then select Palette properties.
This allows you to rename the palette, create a visible grid to separate elements, adjust width and height of cells, and change the scale and offset of the symbols.
See also
- Using the palettes for info about how to apply palette items.
- Other symbols for more info about the Symbols palette.
Workspaces
Overview
Workspace is the visual settings, also known as graphical user interface (GUI), of the Musescore program itself. An analogy to the position of the pen, ruler etc on a composer's desk. It includes the content, docked/undocked status and positions of palettes, toolbars and assorted open panels. Changes made to the current workspace are automatically saved, no further action is required. You can create custom workspaces to quickly change all these settings with a mouse click.
Note that the following settings do not count as workspace. View→Show→ Show visible, Show Invisible, Show formatting, Show Frames, Show Page Margins, Mark irregular measures, and status bar's Concert Pitch, Zoom level, and Page View/Continuous View option. These settings, covered in The user interface chapter, are score data. They are saved to and loaded from each score file. Templates contain these settings and will be used when you create a new score from a template, see Setting up your score.
Creating a new workspace
To create a new workspace:
- Click on the current workspace name in the status bar below the document window. Alternatively, select View→Workspaces→Configure workspace
- Click on Create new workspace
- Fill in the name of the workspace, choose the options it contains so that only these options are loaded and saved when the workspace is used.
- Click Select to close the dialog.
To customize the palettes display and contents, see palettes.
To customize the display of toolbars and panels, see Toolbars and panels.
Deleting a workspace
- Click on the current workspace name in the status bar below the document window. Alternatively, select View→Workspaces→Configure workspace
- Select the workspace to be deleted
- Click on the trash icon at the top of the dialog.
Switching between workspaces
- Click on the current workspace name in the status bar below the document window.
- In the resulting dialog box, click on the desired workspace
- Press Select.
Alternatively
- Select View→Workspaces→Configure workspace
- Click on the desired workspace in the menu.
Keyboard shortcuts
Overview
MuseScore commands can be accessed via the main menus, toolbars, Properties panel or context menus, or by using keyboard shortcuts.
Pre-existing keyboard shortcut are shown alongside the commands in the main menus or context (right-click) menus, or by hovering the mouse pointer over an icon in a toolbar.
Alternatively, you can view a list of commands and their shortcuts in Edit→Preferences→Shortcuts. This is also the place where you can create a shortcut or change an existing one. To locate a command in the list either scroll down the alphabetical order, or enter an appropriate keyword in the “Search shortcut” box.
Defining a shortcut
To define a new shortcut, or change an existing one:
- From the menu bar, select Edit→Preferences→Shortcuts
- Find the relevant command in the alphabetical list; use the Search box if needed.
- Either double-click the relevant entry, or select the entry and click Define…
- With the Enter shortcut sequence dialog open, press and hold the sequence of keys on your keyboard to use as the new shortcut.
- Press Save (or Cancel to exit the dialog without changing anything).
Resetting and clearing shortcuts
To reset a shortcut to its default:
- From the menu bar, select Edit→Preferences→Shortcuts
- Find the relevant command in the alphabetical list; use the Search box if needed.
- Select the entry and press Reset to default.
To clear (i.e. delete) a shortcut:
- From the menu bar, select Edit→Preferences→Shortcuts
- Find the relevant command in the alphabetical list; use the Search box if needed.
- Select the entry and press Clear.
Note: You can select more than one shortcut if needed. Press the Shift key to establish a continuous range, or the Ctrl key for a list.
Importing and exporting shortcuts
To save the existing shortcuts or import a list of your own:
- From the menu bar, select Edit→Preferences→Shortcuts
- Press Export to save the list; or Import to load a new shortcut list.
Preferences
To edit Preferences (the appearance and general behavior of MuseScore), go to Edit→Preferences.
These are divided logically into sections (see below); notice also the three buttons at the bottom of the window:
- Reset preferences: Click on this to reset all preferences to their default values.
- Cancel: Exit preferences without changing anything.
- OK: Exit preferences and apply any user changes.
General
You can specify your language, and autosave interval in “General”. See also Language.
“Program start” allow you to choose what, if any, score you want displayed in the edit window after launching.
“Folders” allows you to customize locations for any user folders (though it’s a good idea to leave them at default to start with if you are a new user).
Appearance
Choose between light and dark options, and specify the accent color; there is also a high contrast option for visually impaired users.
The system font is also the default for the MuseScore UI, but you can alter this if desired—and the font-size.
You can set the score paper/color option and the background. For visually impaired there is an “Invert score” option which inverts the score colors (white to black and vice versa)
Canvas
Specify the default zoom level of the score, and the mouse zoom precision. Also how you want your score pages to scroll, and the degree of precision of mouse selection.
Note input
Here you can choose how MuseScore sounds when you click on or advance to a note. And whether you want notes outside the playback range of an instrument to be colored.
MIDI device mapping
Here you can map certain keys of your external MIDI keyboard to certain actions. For example to start or stops score playback, set note-entry duration, and so on.
Score
Customize the default order of instruments in your score.
I/O
Specify your audio and MIDI input devices.
Import
Specify the way that MuseScore handles the import of MusicXML and MIDI files. You can supply a style file covering every aspect of the score.
Shortcuts
See Keyboard shortcuts for more information.
Update
By default MuseScore automatically checks for updates when online. You can turn this off by unchecking the box.
Advanced
A number of specialized options can be accessed here, such as voice color, and palette behavior.
Plugins
Not to be confused with VST and VSTi.
Overview
A MuseScore plugin is a small piece of software that adds extra functionality to the program. A plugin need to be enabled first, and then executed by using the Plugins menu. Some plugins come pre-installed, they are disabled by default. There are also plugins created and shared by other musicians, anyone can download and use them.
Managing plugins
Installing a new plugin
- Search for available plugins at, for example:
- https://musescore.org/plugins [musescore.org→Download→Plugins]
Warning: Plugins can potentially contain bad or malicious code, which compromise the machine and damage the scores. All plugins shared on musescore.org's plugin repository are unvetted. No warranty of any kind is provided. Users should download from a trusted author or double-check the code themselves. Seek advice on the Plugins forum. - https://github.com/topics/musescore-plugin
- https://github.com/topics/musescore-plugins
- https://musescore.org/plugins [musescore.org→Download→Plugins]
- Make sure it is compatible with Musescore version.

- Download the file:
- for musescore.org hosted .qml files, sometimes a web browser open it as plain text and refuses to download it as file. In that case, right click on a link and select Save link as...
- for github.com unpackaged code, download the project as a zip file by clicking Code: Download ZIP

- for github.com packaged release, click on an appropriate item under Assets

- (If it is a zip file) Extract it using an archive extraction software.
- Move the files to MuseScore's plugins folder, configurable at Preferences:General:Folders. The default directories are
- Windows: C:\Users\[Your User Name]\Documents\MuseScore4\Plugins\
- macOS: ~/Documents/MuseScore4/Plugins/
- Linux: ~/Documents/MuseScore4/Plugins


Updating an existing plugins
Updating works the same way as installing, but remember to remove the files from the previous version to avoid duplicate plugins!
Enabling and disabling plugins
- Click Home: Plugins or Plugins: Manage plugins...
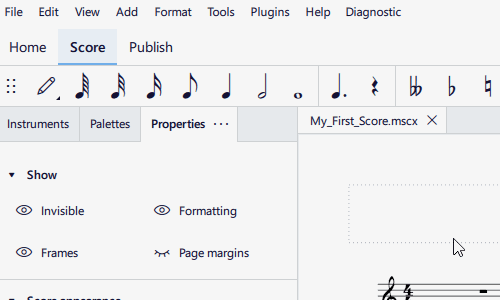

- Select a plugin and click Enable or Disable
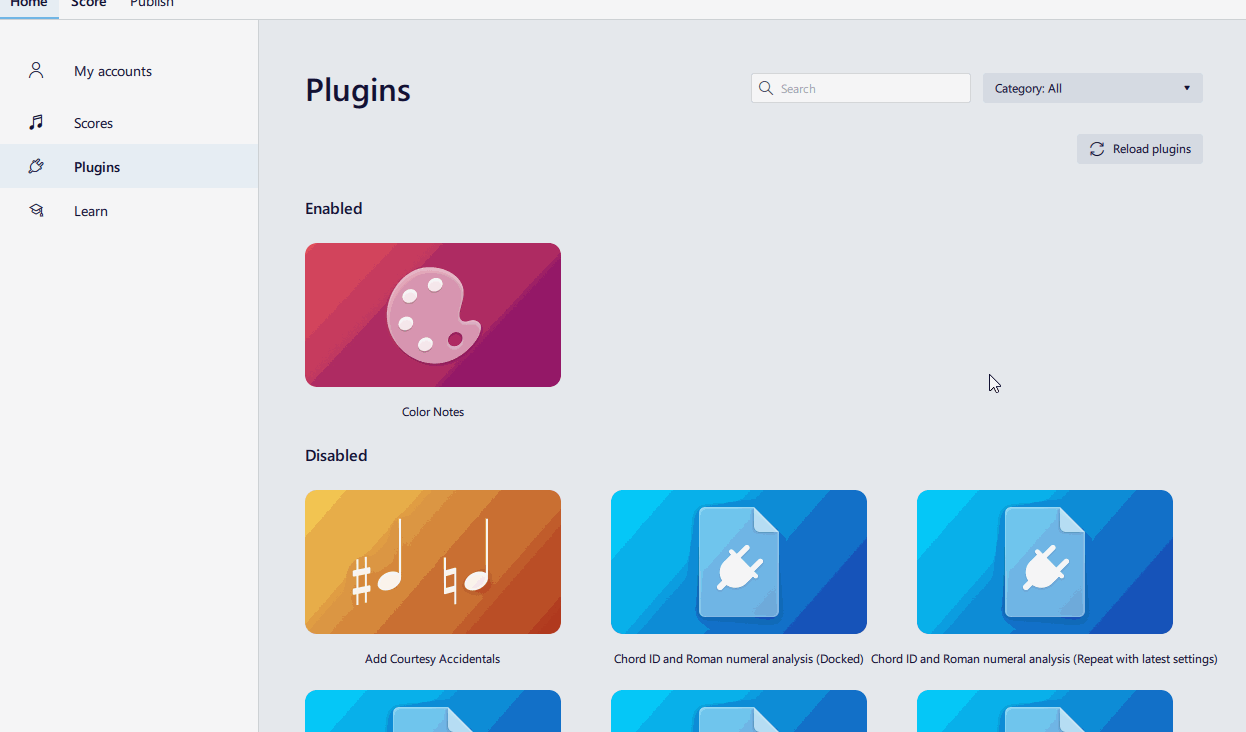
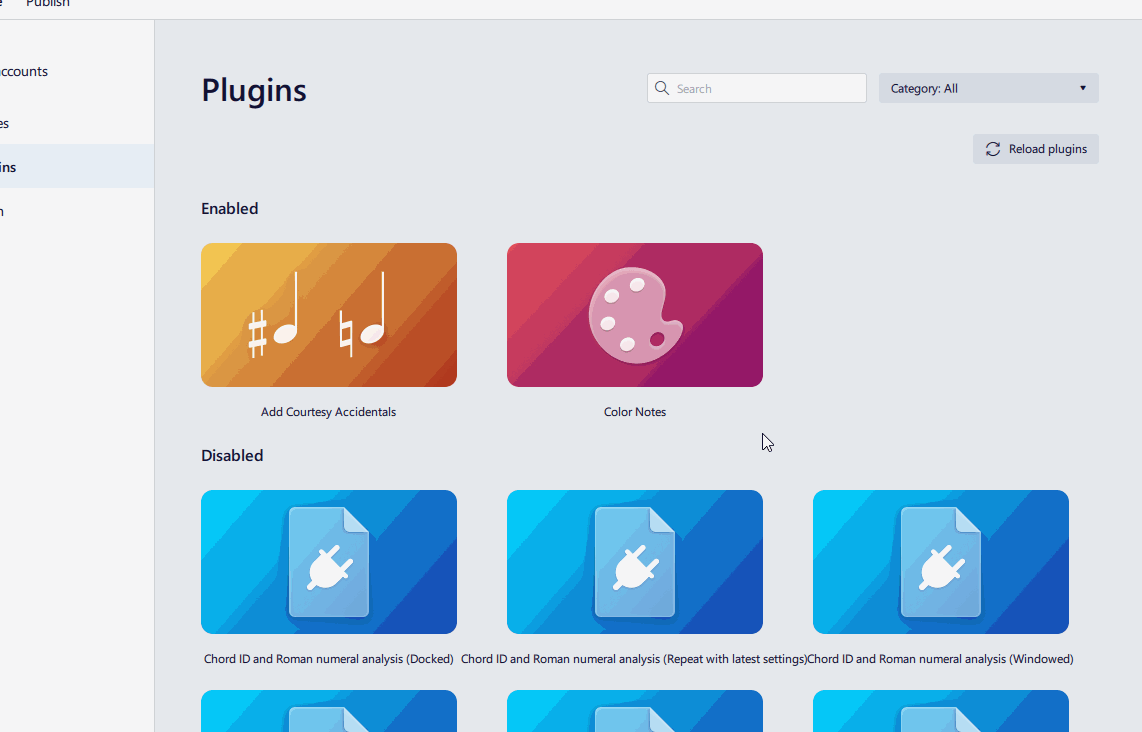
Running a plugin
- Make sure the Score tab is currently opened.
- Select Plugins → [The plugin name]
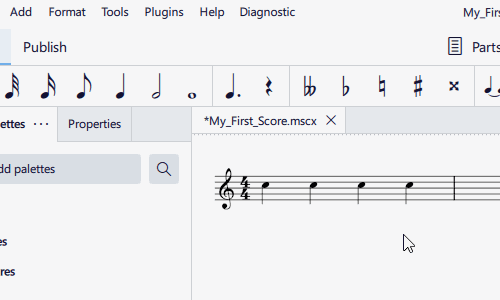
To assign a keyboard shortcut a plugin, use Home: Plugins or Plugins: Manage plugins....
Pre-installed plugins
[work in progress, please provide missing info, write brief info on each]
See https://github.com/musescore/MuseScore/tree/master/share/plugins
- Add Courtesy Accidentals
- Color Notes
- Lilypond Lyrics
- Mirror Intervals
- Modal Temperaments
- Modal Tuning
- New Retrograde
- Note Names
- Remove Courtesy Accidentals
- Tuning
Create a plugin
The plugin system of Musescore 4 is currently being redesigned and reimplemented.
As of October 2023, Musescore 4.1.1 plugin system is mostly a somewhat restricted version of the Musescore 3 plugin system. Visit Developers' Handbook Plugins for 3.x Chapter for fundamentals, and Plugins for 4.x Chapter for info on the new parameters and porting a Musescore 3 plugin to MuseScore 4.
See also
支持
Getting help
Overview
The official, up-to-date support info is posted at https://musescore.org/support, visit that page and read it first.
In addition to tutorial material promoted inside Musescore, MuseGroup, the managing company of the MuseScore project maintains an online server https://musescore.org for the musician community free of charge. The community volunteers to maintain written handbooks and a collection of help pages collaboratively. To ask for help, use https://musescore.org/en/forum
Everyone are invited to join the community and encouraged to contribute, see https://musescore.org/en/donate and https://musescore.org/en/contribute . Report bugs of Musescore 4 the windows, macOS and linux software at https://github.com/musescore/MuseScore/issues
There are other really good quality third party tutorial materials, video streams and communities for different level of Musescore users online, most notably https://school.masteringmusescore.com/ created by Mr. Marc Sabatella. While Marc Sabatella has been contributing heavily to MuseScore codebase and official tutorial materials and diligently helping the community for an extended period of time, that site is not affiliated with Muse Group or any of its subsidiary companies.
[the following is a work in progress, please add missing info]
Learn
- tutorials
- classes
Forums
Issue tracker
- ?
GitHub
- ?
Mastering MuseScore
Revert to factory settings
Overview
Resetting Musescore app preferences may be necessary if your app's preferences are corrupted. This deletes custom palettes and custom keyboard shortcuts, and clears out links to recent scores under File menu and Home tab : Scores but will not delete any score files.
Feel free to consult volunteers at https://musescore.org/en/forum before committing. Proceed at your own discretion, Muse Group and the online community are not responsible for any data loss.
Reverting to factory settings from the menu
- Select Help→Revert to factory settings.
- Select Revert to reset.
- Select Restart to restart the application.
Reverting to factory settings from the command line
If MuseScore does not start, you must run this process via the Command line.
Windows
source: https://musescore.org/en/node/342982
- If you have MuseScore open, you need to close it first (File→Quit)
- Type ⊞ Win+R to open the Run dialog. Alternatively select "Start" using your mouse and type "run," then click the "Run" program.
- Click Browse...
- Look for MuseScore4.exe on your computer. The location may vary depending on your installation, but it is probably something similar to My Computer → Local Disk → Program Files → MuseScore 4 → bin → MuseScore4.exe
- Click Open to leave the Browse dialog and return to the Run dialog. The following text (or something similar) should display in the Run dialog
C:\Program Files\MuseScore 4\bin\MuseScore4.exe
or
%ProgramFiles%\MuseScore 4\bin\MuseScore4.exe
For the Windows Store version (Windows 10), it is pretty well hidden, search for it via Windows Explorer
- Click after the quote and add a space followed by a hyphen and a capital F: -F
- Press OK
After a few seconds, MuseScore should start and all the settings reverted to "factory settings".
For advanced users,
The main preference file is located at:
C:\Users\[USERNAME]\AppData\Roaming\MuseScore\MuseScore4.ini
or
%APPDATA%\MuseScore\MuseScore4.ini
The recent list is located at:
C:\Users\[USERNAME]\AppData\Local\MuseScore\MuseScore4\recent_files.json
or
%LOCALAPPDATA%\MuseScore\MuseScore4\recent_files.json
The other preferences (palettes, session, shortcuts, workspaces...) are in:
C:\Users\[USERNAME]\AppData\Local\MuseScore\MuseScore4\
or
%LOCALAPPDATA%\MuseScore\MuseScore4\
For the Windows Store version (Windows 10), these are pretty well hidden, search for them via Windows Explorer
macOS
Instruction written under this section (macOS) is not tested and no Musescore 4 specific macOS test result found online yet (October 2023), the following is adapated from Musescore 3 https://musescore.org/en/handbook/3/revert-factory-settings. Please test it, correct errors, and remove this paragraph.
- If you have MuseScore open, you need to quit the application first (MuseScore→Quit)
- Open Terminal (in Applications/Utilities, or via Spotlight search) and a session window should appear
- Type (or copy/paste) the following command into your terminal line (include the '/' at the front):
/Applications/MuseScore\ 4.app/Contents/MacOS/mscore -F
This resets all MuseScore preferences to factory settings and immediately launches the MuseScore application. Note that you cannot quit the Terminal without quitting MuseScore. You can safely quit MuseScore, quit the Terminal, and then reopen MuseScore in the normal fashion, ready to continue using.
For advanced users, the main MuseScore preference file is located at ~/Library/Preferences/org.musescore.MuseScore4.plist. Often, deleting this file has no effect: macOS stores a cached copy of the settings in some unknown location. The correct way to delete this file, is by running the following command in the Terminal app:
defaults delete org.musescore.MuseScore4
The other preferences (palettes, session, shortcuts, workspaces...) (Those are not cached by macOS.) are in
~/Library/Application\ Support/MuseScore/MuseScore4/
Linux
source : https://musescore.org/en/node/345932
The following is true for Ubuntu, and most likely all other Linux distributions and UNIX-style operating systems.
- If you have MuseScore open, you need to quit the application first (File→Quit)
- From the Ubuntu main menu, choose Applications→Accessories→Terminal. A Terminal session window should appear
- Type, (or copy/paste) the following command into your terminal line (Ctrl+Shift+V to paste in Terminal):
mscore -F
Or
musescore -F
Or
mscore4portable -F
Or, if you are using the AppImage version, use the cd command to change directory to wherever you saved the AppImage. For example, if you saved it to your Desktop (and there is only one):
cd ~/Desktop
./MuseScore*.AppImage -F
This resets all MuseScore preferences to factory settings and immediately launches the MuseScore application. You can now quit Terminal, and continue using MuseScore.
For advanced users,
the main MuseScore preference file is located at
${XDG_CONFIG_HOME:-~/.config}/MuseScore/MuseScore4.ini
The other preferences (palettes, session, shortcuts, workspaces, …) are in
${XDG_DATA_HOME:-~/.local/share}/MuseScore/MuseScore4/
Troubleshooting
Browse the How-to's first
Installation issues
- "This file came from another computer ..." message see microsoft.com support
- Muse Hub on Fedora (Nobara) and/or other Linux distros
Score issues
The most useful pages from How to:
- How to fix MuseScore 4 corrupted files
- How to fix a score that contains corruptions
- How to recover a backup copy of a score
Display issues
Sound issues
Printing issues
Known incompatibilities
附录
Command line usage
PLEASE NOTE: This page was copied from the equivalent page in the MuseScore 3 Handbook. If you find an option that no longer works in MuseScore 4, please report it on GitHub and add a note next to that option on this page. If the option was intentionally removed from MuseScore 4 then please delete it from this page.
MSCORE(1) — General Commands Manual Page
NAME
mscore, MuseScore4 — MuseScore 4 sheet music editor
SYNOPSIS
You can launch MuseScore from the command line by typing
- mscore [options] [filename …] (Mac and Linux/BSD/Unix)
- musescore [options] [filename …] (Linux/BSD/Unix)
- mscore4portable [options] [filename …] (Linux AppImage)
- MuseScore4.exe [options] [filename …] (Windows)
[options] and [filename] are optional. For this to work the MuseScore executable must be in %PATH% (Windows) resp. $PATH (Mac and Linux). If it is not, see Revert to factory settings for detailed instructions on how and where to find and execute the MuseScore executable from the command line on the various supported platforms.
A more detailed synopsis follows:
mscore [-deFfhIiLmnOPRstvw]
[-b | --bitrate bitrate]
[-c | --config-folder pathname]
[-D | --monitor-resolution DPI]
[-d | --debug]
[-E | --install-extension extension file]
[-e | --experimental]
[-F | --factory-settings]
[-f | --force]
[-h | -? | --help]
[-I | --dump-midi-in]
[-i | --load-icons]
[-j | --job file.json]
[-L | --layout-debug]
[-M | --midi-operations file]
[-m | --no-midi]
[-n | --new-score]
[-O | --dump-midi-out]
[-o | --export-to file]
[-P | --export-score-parts]
[-p | --plugin name]
[-R | --revert-settings]
[-r | --image-resolution DPI]
[-S | --style style]
[-s | --no-synthesizer]
[-T | --trim-image margin]
[-t | --test-mode]
[-v | --version]
[-w | --no-webview]
[-x | --gui-scaling factor]
[--diff]
[--long-version]
[--no-fallback-font]
[--raw-diff]
[--run-test-script]
[--score-media]
[--score-meta]
[--highlight-config]
[--score-parts]
[--score-parts-pdf]
[--score-transpose]
[--sound-profile]
[--source-update]
[--template-mode]
[file ...]
DESCRIPTION
MuseScore is a Free and Open Source WYSIWYG cross-platform multi-lingual music composition and notation software, released under the GNU General Public Licence (GPLv3).
Running mscore without any extra options launches the full graphical MuseScore program and opens any files specified on the command line.
The options are as follows:
- -b | --bitrate bitrate
-
Set MP3 output bitrate in kbit/s
- -c | --config-folder pathname
-
Override configuration and settings directory
- -D | --monitor-resolution DPI
-
Specify monitor resolution (override autodetection)
- -d | --debug
-
Start MuseScore in debug mode
- -E | --install-extension extension file
-
Install an extension file; soundfonts are loaded by default unless -e is also specified
- -e | --experimental
-
Enable experimental features, such as layers
- -F | --factory-settings
-
Use only the standard built-in presets (“factory settings”) and delete user preferences; compare with the -R option (see also Revert to factory settings)
- -f | --force
-
Ignore score corruption and version mismatch warnings in “converter mode”
- -h | -? | --help
-
Display an overview of invocation instructions (doesn’t work on Windows)
- -I | --dump-midi-in
-
Display all MIDI input on the console
- -i | --load-icons
-
Load icons from the filesystem; useful if you want to edit the MuseScore icons and preview the changes
- -j | --job file.json
-
Process a conversion job (see EXAMPLES below)
- -L | --layout-debug
-
Start MuseScore in layout debug mode
- -M | --midi-operations file
-
Specify MIDI import operations file (see EXAMPLES below)
- -m | --no-midi
-
Disable MIDI input
- -n | --new-score
-
Start with the New Score wizard regardless whether it’s enabled or disabled in the user preferences
- -O | --dump-midi-out
-
Display all MIDI output on the console
- -o | --export-to file
-
Export the given (or currently opened) file to the specified output file. The file type depends on the extension of the filename given. This option switches to “converter mode” and avoids the graphical user interface.
- -P | --export-score-parts
-
When converting to PDF with the -o option, append each part’s pages to the created PDF file. If the score has no parts, all default parts will temporarily be generated automatically.
- -p | --plugin name
-
Execute the named plugin
- -R | --revert-settings
-
Use only the standard built-in presets (“factory settings”) but do not delete user preferences; compare with the -F option
- -r | --image-resolution DPI
-
Set image resolution for conversion to PNG files. Default: 300 DPI (actually, the value of “Resolution” of the PNG option group in the Export tab of the preferences)
- -S | --style style
-
Load a style file first; useful for use with the -o option
- -s | --no-synthesizer
-
Disable the integrated software synthesizer
- -T | --trim-image margin
-
Trim exported PNG and SVG images to remove whitespace surrounding the score. The specified margin, in pixels, will be retained (use
0for a tightly cropped image). When exporting to SVG, this option only works with single-page scores. - -t | --test-mode
-
Set test mode flag for all files, includes --template-mode
- -v | --version
-
Display the name and version of the application without starting the graphical user interface (doesn’t work on Windows)
- -w | --no-webview
-
Disable the web view component in the Start Center
- -x | --gui-scaling factor
-
Scale the score display and other GUI elements by the specified factor; intended for use with high-resolution displays
- --diff
-
Print a conditioned diff between the given scores
- --long-version
-
Display the full name, version and git revision of the application without starting the graphical user interface (doesn’t work on Windows)
- --no-fallback-font
-
Don’t use Bravura as fallback musical font
- --raw-diff
-
Print a raw diff between the given scores
- --run-test-script
-
Run script tests listed in the command line arguments
- --score-media
-
Export all media (except MP3) for a given score as a single JSON document to stdout
- --highlight-config
-
Set highlight to svg, generated from a given score
- --score-meta
-
Export score metadata to JSON document and print it to stdout
- --score-parts
-
Generate parts data for the given score and save them to separate mscz files
- --score-parts-pdf
-
Generate parts data for the given score and export it as a single JSON document to stdout
- --score-transpose
-
Transpose the given score and export the data to a single JSON file, print it to stdout
- --sound-profile sound-profile
-
Use with '-o .mp3' or with '-j ', override the sound profile in the given score(s).
Possible values: "MuseScore Basic", "Muse Sounds" - --source-update
-
Update the source in the given score
- --template-mode
-
Save files in template mode (e.g. without page sizes)
MuseScore also supports the automatic Qt command line options.
Batch conversion job JSON format
The argument to the -j option must be the pathname of a file comprised of a valid JSON document honoring the following specification:
-
The top-level element must be a JSONArray, which may be empty.
-
Each array element must be a JSONObject with the following keys:
in: Value is the name of the input file (score to convert), as JSONString.plugin: Value is the filename of a plugin (with the.qmlextension), which will be read from either the global or per-user plugin path and executed before the conversion output happens, as JSONString. Optional, but at least one ofpluginandoutmust be given.out: Value is the conversion output target, as defined below. Optional, but at least one ofpluginandoutmust be given.
-
The conversion output target may be a filename (with extension, which decided the format to convert to), as JSONString.
-
The conversion output target may be a JSONArray of filenames as JSONString, as above, which will cause the score to be written to multiple output files (in multiple output formats) sequentially, without being closed, re-opened and re-processed in between.
-
If the conversion output target is a JSONArray, one or more of its elements may also be, each, a JSONArray of two JSONStrings (called first and second half in the following description). This will cause part extraction: for each such two-tuple, all extant parts of the score will be saved individually, with filenames being composed by concatenating the first half, the name (title) of the part, and the second half. The resulting string must be a valid filename (with extension, determining the output format). If a score has no parts (excerpts) defined, this will be silently ignored without error.
-
Valid file extensions for output are:
flac- Free Lossless Audio Codec (compressed audio)
metajson- various score metadata (JSON)
mid- standard MIDI file
midi- standard MIDI file
mlog- internal file sanity check log (JSON)
mp3- MPEG Layer III (lossy compressed audio)
mpos- measure positions (XML)
mscx- uncompressed MuseScore file
mscz- compressed MuseScore file
musicxml- uncompressed MusicXML file
mxl- compressed MusicXML file
ogg- OGG Vorbis (lossy compressed audio)
pdf- portable document file (print)
png- portable network graphics (image) — Individual files, one per score page, with a hyphen-minus followed by the page number placed before the file extension, will be generated.
spos- segment positions (XML)
svg- scalable vector graphics (image)
wav- RIFF Waveform (uncompressed audio)
xml- uncompressed MusicXML file
See below for an example.
ENVIRONMENT
SKIP_LIBJACK- Set this (the value does not matter) to skip initialization of the JACK Audio Connection Kit library, in case it causes trouble.
XDG_CONFIG_HOME- User configuration location; defaults to
~/.configif unset. XDG_DATA_HOME- User data location; defaults to
~/.local/shareif unset.
Note that MuseScore also supports the normal Qt environment variables such as QT_QPA_GENERIC_PLUGINS, QT_QPA_PLATFORM, QT_QPA_PLATFORMTHEME, QT_QPA_PLATFORM_PLUGIN_PATH, QT_STYLE_OVERRIDE, DISPLAY, etc.
FILES
/usr/share/mscore-4.0/ contains the application support data (demos, instruments, localization, system-wide plugins, soundfonts, styles, chords, templates and wallpapers). In the Debian packages, system-wide soundfonts are installed into /usr/share/sounds/sf2/, /usr/share/sounds/sf3/ or /usr/share/sounds/sfz/, respectively, instead.
The per-user data (extensions, plugins, soundfonts, styles, templates) and files (images, scores) are normally installed into subdirectories under ~/MuseScore4/ but may be changed in the configuration. Note that snapshot, alpha and beta versions use MuseScore4Development instead of MuseScore4 in all of these paths.
$XDG_CONFIG_HOME/MuseScore/MuseScore4.ini contains the user preferences, list of recently used files and their locations, window sizes and positions, etc. See above for development version paths.
$XDG_DATA_HOME/data/MuseScore/MuseScore4/ contains updated localization files downloaded from within the program, plugin information, cached scores, credentials for the musescore.com community site, session information, synthesizer settings, custom key and time signatures and shortcuts. See above for development version paths.
EXAMPLES
Convert a score to PDF from the command line
mscore -o 'My Score.pdf' 'My Score.mscz'
Run a batch job converting multiple documents
mscore -j job.json
This requires assumes a file job.json exists in the current working directory with content similar to the following:
[
    {
        "in": "MyScore1.mscz",
        "out": "MyScore1.pdf"
    },
    {
        "in": "MyScore2.mscz",
        "plugin": "colornotes.qml",
        "out": [
            "MyScore2-notecolors.pdf",
            "MyScore2-notecolors.svg"
        ]
    },
    {
        "in": "MyScore3.mscz",
        "out": [
            "MyScore3.pdf",
            "MyScore3.musicxml",
            "MyScore3.mid",
            [
                "MyScore3 (",
                " part).pdf"
            ]
        ]
    }
]
If MyScore3.mscz contains excerpts (instrumental parts) then the syntax above would cause files like “MyScore3 (Violin part).pdf” to be generated alongside the conductor’s PDF and MusicXML files, as well as a MIDI file with the full orchestral sound. If MyScore3.mscz has no excerpts defined then only the conductor’s PDF, MusicXML, and orchestral MIDI files will be generated, while the request for part PDFs is silently ignored.
MIDI import operations
The attached midi_import_options.xml is a sample MIDI import operations file for the -M option.
DIAGNOSTICS
The mscore utility exits 0 on success, and >0 if an error occurs.
SEE ALSO
fluidsynth(1), midicsv(1), timidity(1), qtoptions(7)
- https://musescore.org/handbook
-
Online Handbook, full user manual
- https://musescore.org/forum
-
Support Forum
- https://musescore.org/en/node/278582
-
Reverting to factory settings (troubleshooting)
- https://github.com/musescore/MuseScore/issues
-
Project Issue Tracker — Please check first to if the bug you’re encountering has already been reported. If you just need help with something, then please use the support forum instead.
- http://doc.qt.io/qt-5/qguiapplication.html#supported-command-line-optio…
-
Documentation of automatic Qt command line options
STANDARDS
MuseScore attempts to implement the following standards:
- MusicXML 3.1 (score interchange format)
- SF2 (SoundFont 2.01)
- SF3 (SoundFont with OGG Vorbis-compressed samples)
- SFZ (Sforzato soundfont)
- SMuFL (Standard Music Font Layout 1.20)
HISTORY
MuseScore was split off the MusE sequencer in 2002 and has since become the foremost Open Source notation software.
AUTHORS
MuseScore is developed by MuseScore BVBA and others.
This manual page was written by mirabilos <tg@debian.org>.
CAVEATS
The automatic Qt command line options are removed from the argument vector before the application has a chance at option processing; this means that an invocation like mscore -S -reverse has no chance at working because the -reverse is removed by Qt first.
BUGS
-
MuseScore does not honor /etc/papersize.
-
Probably some more; check the project’s bug tracker (cf. SEE ALSO).
All keyboard shortcuts
On macOS, make the following substitutions:
- Replace Ctrl with Cmd (or ⌘)
- Replace Alt with Option (or ⌥)
- Replace Home with Fn+Left
- Replace End with Fn+Right
- Replace PgUp with Fn+Up
- Replace PgDn with Fn+Down
- Add Fn with function keys
Keyboard Map
Click on image for full resolution. Or use this Print Friendly PDF version
Navigation
Page navigation
| Action | Windows/Linux | macOS |
|---|---|---|
| Zoom in | Ctrl+= | Cmd+= |
| Zoom out | Ctrl+- | Cmd+- |
| Zoom to 100% | Ctrl+0 | Cmd+0 |
| Go to first element in score | Ctrl+Home | Cmd+Fn+Left |
| Go to last element in score | Ctrl+End | Cmd+Fn+Right |
| Jump to next screen | PgUp | Fn+Up |
| Jump to previous screen | PgDn | Fn+Down |
| Jump to top of first page | Home | Fn+Left |
| Jump to bottom of last page | End | Fn+Right |
| Jump to next page | Ctrl+PgUp | Cmd+Fn+Up |
| Jump to previous page | Ctrl+PgDn | Cmd+Fn+Down |
| Find / Go to | Ctrl+F | Cmd+F |
| Accessibility: get location | Shift+L | Shift+L |
| Show/hide timeline | F12 | Fn+F12 |
Score navigation
| Action | Windows/Linux | macOS |
|---|---|---|
| Select next chord | Right | Right |
| Select previous chord | Left | Left |
| Go to next measure | Ctrl+Right | Cmd+Right |
| Go to previous measure | Ctrl+Left | Cmd+Left |
| Select next element in score | Alt+Right | Option+Right |
| Select previous element in score | Alt+Left | Option+Left |
| Select next in-staff element | Ctrl+Alt+Shift+Right | Cmd+Option+Shift+Right |
| Select previous in-staff element | Ctrl+Alt+Shift+Left | Cmd+Option+Shift+Left |
| Select note/rest above | Alt+Up | Option+Up |
| Select note/rest below | Alt+Down | Option+Down |
| Select top note in chord | Ctrl+Alt+Up | Cmd+Option+Up |
| Select bottom note in chord | Ctrl+Alt+Down | Cmd+Option+Down |
Note input
General
| Action | Windows/Linux | macOS |
|---|---|---|
| Note input: toggle note input mode | N | N |
| Note input: toggle 're-pitch existing notes' mode | Ctrl+Shift+I | Cmd+Shift+I |
| Note input: toggle 'insert' mode | Ctrl+I | Cmd+I |
| Show/hide piano keyboard | P | P |
| Use voice 1 | Ctrl+Alt+1 | Cmd+Option+1 |
| Use voice 2 | Ctrl+Alt+2 | Cmd+Option+2 |
| Use voice 3 | Ctrl+Alt+3 | Cmd+Option+3 |
| Use voice 4 | Ctrl+Alt+4 | Cmd+Option+4 |
Duration
| Action | Windows/Linux | macOS |
|---|---|---|
| Set duration | 1 – 9 | 1 – 9 |
| Set duration: 64th note | 1 | 1 |
| Set duration: 32nd note | 2 | 2 |
| Set duration: 16th note | 3 | 3 |
| Set duration: 8th note | 4 | 4 |
| Set duration: quarter note | 5 | 5 |
| Set duration: half note | 6 | 6 |
| Set duration: whole note | 7 | 7 |
| Set duration: double whole note | 8 | 8 |
| Set duration: longa | 9 | 9 |
| Toggle duration dot | . | . |
| Enter tuplet | Ctrl+2 – Ctrl+9 | Cmd+2 – Cmd+9 |
| Enter tuplet: duplet | Ctrl+2 | Cmd+2 |
| Enter tuplet: triplet | Ctrl+3 | Cmd+3 |
| Enter tuplet: quadruplet | Ctrl+4 | Cmd+4 |
| Enter tuplet: quintuplet | Ctrl+5 | Cmd+5 |
| Enter tuplet: sextuplet | Ctrl+6 | Cmd+6 |
| Enter tuplet: septuplet | Ctrl+7 | Cmd+7 |
| Enter tuplet: octuplet | Ctrl+8 | Cmd+8 |
| Enter tuplet: nonuplet | Ctrl+9 | Cmd+9 |
| Add tied note | T | T |
| Halve selected duration | Q | Q |
| Double selected duration | W | W |
| Halve selected duration (includes dotted values) | Shift+Q | Shift+Q |
| Double select duration (includes dotted values) | Shift+W | Shift+W |
| Insert full measure rest | Ctrl+Shift+Del | Cmd+Shift+Del |
Pitch
| Action | Windows/Linux | macOS |
|---|---|---|
| Enter note | A – G | A – G |
| Enter note A | A | A |
| Enter note B | B | B |
| Enter note C | C | C |
| Enter note D | D | D |
| Enter note E | E | E |
| Enter note F | F | F |
| Enter note G | G | G |
| Add note to chord | Shift+A – Shift+G | Shift+A – Shift+G |
| Add note A to chord | Shift+A | Shift+A |
| Add note B to chord | Shift+B | Shift+B |
| Add note C to chord | Shift+C | Shift+C |
| Add note D to chord | Shift+D | Shift+D |
| Add note E to chord | Shift+E | Shift+E |
| Add note F to chord | Shift+F | Shift+F |
| Add note G to chord | Shift+G | Shift+G |
| Enter interval | Alt+1 – Alt+9 | Option+1 – Option+9 |
| Enter interval: unison | Alt+1 | Option+1 |
| Enter interval: second above | Alt+2 | Option+2 |
| Enter interval: third above | Alt+3 | Option+3 |
| Enter interval: fourth above | Alt+4 | Option+4 |
| Enter interval: fifth above | Alt+5 | Option+5 |
| Enter interval: sixth above | Alt+6 | Option+6 |
| Enter interval: seventh above | Alt+7 | Option+7 |
| Enter interval: octave above | Alt+8 | Option+8 |
| Enter interval: ninth above | Alt+9 | Option+9 |
| Toggle accidental: flat | - | - |
| Toggle accidental: natural | = | = |
| Toggle accidental: sharp | + | + |
| Enter rest | 0 | 0 |
| Add grace note: acciaccatura | / | / |
Tablature
| Action | Windows/Linux | macOS |
|---|---|---|
| Set duration (TAB) | Shift+0 – Shift+9 | Shift+0 – Shift+9 |
| Set duration: 128th note (TAB) | Shift+0 | Shift+0 |
| Set duration: 64th note (TAB) | Shift+1 | Shift+1 |
| Set duration: 32nd note (TAB) | Shift+2 | Shift+2 |
| Set duration: 16th note (TAB) | Shift+3 | Shift+3 |
| Set duration: 8th note (TAB) | Shift+4 | Shift+4 |
| Set duration: quarter note (TAB) | Shift+5 | Shift+5 |
| Set duration: half note (TAB) | Shift+6 | Shift+6 |
| Set duration: whole note (TAB) | Shift+7 | Shift+7 |
| Enter TAB: fret | 0 – 9 | 0 – 9 |
| Enter TAB: fret | A – K | A – K |
| Enter TAB: fret 0 | 0 | 0 |
| Enter TAB: fret 1 | 1 | 1 |
| Enter TAB: fret 2 | 2 | 2 |
| Enter TAB: fret 3 | 3 | 3 |
| Enter TAB: fret 4 | 4 | 4 |
| Enter TAB: fret 5 | 5 | 5 |
| Enter TAB: fret 6 | 6 | 6 |
| Enter TAB: fret 7 | 7 | 7 |
| Enter TAB: fret 8 | 8 | 8 |
| Enter TAB: fret 9 | 9 | 9 |
| Enter TAB: fret 0 | A | A |
| Enter TAB: fret 1 | B | B |
| Enter TAB: fret 2 | C | C |
| Enter TAB: fret 3 | D | D |
| Enter TAB: fret 4 | E | E |
| Enter TAB: fret 5 | F | F |
| Enter TAB: fret 6 | G | G |
| Enter TAB: fret 7 | H | H |
| Enter TAB: fret 8 | J | J |
| Enter TAB: fret 9 | K | K |
| Go to string above (TAB) | Up | Up |
| Go to string below (TAB) | Down | Down |
| Toggle ghost note | Shift+X | Shift+X |
Selecting
| Action | Windows/Linux | macOS |
|---|---|---|
| Select all | Ctrl+A | Cmd+A |
| Add to selection: previous note/rest | Shift+Left | Shift+Left |
| Add to selection: next note/rest | Shift+Right | Shift+Right |
| Add to selection: staff above | Shift+Up | Shift+Up |
| Add to selection: staff below | Shift+Down | Shift+Down |
| Select to beginning of measure | Ctrl+Shift+Left | Cmd+Shift+Left |
| Select to end of measure | Ctrl+Shift+Right | Cmd+Shift+Right |
| Select to beginning of line | Shift+Home | Shift+Fn+Left |
| Select to end of line | Shift+End | Shift+Fn+Right |
| Select to beginning of score | Ctrl+Shift+Home | Cmd+Shift+Fn+Left |
| Select to end of score | Ctrl+Shift+End | Cmd+Shift+Fn+Right |
Editing
General
| Action | Windows/Linux | macOS |
|---|---|---|
| Escape | Esc | Esc |
| Undo | Ctrl+Z | Cmd+Z |
| Redo | Ctrl+Shift+Z | Cmd+Shift+Z |
| Copy | Ctrl+C | Cmd+C |
| Cut | Ctrl+X | Cmd+X |
| Paste | Ctrl+V | Cmd+V |
| Copy/paste: swap with clipboard | Ctrl+Shift+X | Cmd+Shift+X |
| Repeat selection | R | R |
| Insert one measure before selection | Ins | Ins |
| Insert measures before selection | Ctrl+Ins | Cmd+Ins |
| Insert one measure at end of score | Ctrl+B | Cmd+B |
| Insert measures at end of score | Alt+Shift+B | Option+Shift+B |
| Delete | Del | Del |
| Delete selected measures | Ctrl+Del | Cmd+Del |
| Show/hide properties | F8 | Fn+F8 |
| Edit element | F2 | Fn+F2 |
| Move chord/rest left | Shift+Left | Shift+Left |
| Move chord/rest right | Shift+Right | Shift+Right |
Duration
| Action | Windows/Linux | macOS |
|---|---|---|
| Set duration | 1 – 9 | 1 – 9 |
| Enter tuplet | Ctrl+2 – Ctrl+9 | Cmd+2 – Cmd+9 |
| Add tied note | T | T |
| Halve selected duration | Q | Q |
| Double select duration | W | W |
| Halve selected duration (includes dotted values) | Shift+Q | Shift+Q |
| Double selected duration (includes dotted values) | Shift+W | Shift+W |
| Paste half duration | Ctrl+Shift+Q | Cmd+Shift+Q |
| Paste double duration | Ctrl+Shift+W | Cmd+Shift+W |
| Insert full measure rest | Ctrl+Shift+Del | Cmd+Shift+Del |
Pitch
| Action | Windows/Linux | macOS |
|---|---|---|
| Toggle accidental: flat | - | - |
| Toggle accidental: natural | = | = |
| Toggle accidental: sharp | + | + |
| Move pitch/selection up | Up | Up |
| Move pitch/selection down | Down | Down |
| Move pitch up an octave | Ctrl+Up | Cmd+Up |
| Move pitch down an octave | Ctrl+Down | Cmd+Down |
| Move pitch up diatonically | Alt+Shift+Up | Option+Shift+Up |
| Move pitch down diatonically | Alt+Shift+Down | Option+Shift+Down |
| Change enharmonic spelling (concert and written pitch) | J | J |
| Change enharmonic spelling (current pitch only) | Ctrl+J | Cmd+J |
| Move note to higher string (TAB) | Ctrl+Up | Cmd+Up |
| Move note to lower string (TAB) | Ctrl+Down | Cmd+Down |
| Toggle ghost note (TAB) | Shift+X | Shift+X |
Notation
| Action | Windows/Linux | macOS |
|---|---|---|
| Flip direction | X | X |
| Mirror notehead | Shift+X | Shift+X |
| Use voice 1 | Ctrl+Alt+1 | Cmd+Option+1 |
| Use voice 2 | Ctrl+Alt+2 | Cmd+Option+2 |
| Use voice 3 | Ctrl+Alt+3 | Cmd+Option+3 |
| Use voice 4 | Ctrl+Alt+4 | Cmd+Option+4 |
| Move selected note/rest to staff above | Ctrl+Shift+Up | Cmd+Shift+Up |
| Move selected note/rest to staff below | Ctrl+Shift+Down | Cmd+Shift+Down |
| Toggle multimeasure rest | M | M |
Manual adjustment
| Action | Windows/Linux | macOS |
|---|---|---|
| Move text left | Left | Left |
| Move text right | Right | Right |
| Move text left quickly | Ctrl+Left | Cmd+Left |
| Move text right quickly | Ctrl+Right | Cmd+Right |
| Move selection up | Up | Up |
| Move selection down | Down | Down |
| Move selection up quickly | Ctrl+Up | Cmd+Up |
| Move selection down quickly | Ctrl+Down | Cmd+Down |
Text
General
| Action | Windows/Linux | macOS |
|---|---|---|
| Add text: staff text | Ctrl+T | Cmd+T |
| Add text: expression text | Ctrl+E | Cmd+E |
| Add text: system text | Ctrl+Shift+T | Cmd+Shift+T |
| Add text: tempo marking | Alt+Shift+T | Option+Shift+T |
| Add text: rehearsal mark | Ctrl+M | Cmd+M |
| Insert special characters | Shift+F2 | Shift+Fn+F2 |
Formatting
| Action | Windows/Linux | macOS |
|---|---|---|
| Format text: bold face | Ctrl+B | Cmd+B |
| Format text: italic | Ctrl+I | Cmd+I |
| Format text: underline | Ctrl+U | Cmd+U |
| Insert flat | Ctrl+Shift+B | Cmd+Shift+B |
| Insert natural | Ctrl+Shift+H | Cmd+Shift+H |
| Insert sharp | Ctrl+Shift+# | Cmd+Shift+# |
| Insert dynamics p | Ctrl+Shift+P | Cmd+Shift+P |
| Insert dynamics m | Ctrl+Shift+M | Cmd+Shift+M |
| Insert dynamics f | Ctrl+Shift+F | Cmd+Shift+F |
| Insert dynamics n | Ctrl+Shift+N | Cmd+Shift+N |
| Insert dynamics r | Ctrl+Shift+R | Cmd+Shift+R |
| Insert dynamics s | Ctrl+Shift+S | Cmd+Shift+S |
| Insert dynamics z | Ctrl+Shift+Z | Cmd+Shift+Z |
Lyrics
| Action | Windows/Linux | macOS |
|---|---|---|
| Add text: lyrics | Ctrl+L | Cmd+L |
| Go to next syllable | Space | Space |
| Go to previous syllable | Shift+Space | Shift+Space |
| Lyrics: enter hyphen | - | - |
| Lyrics: enter melisma | _ | _ |
| Add lyric verse | Return | Return |
| Go to next lyric verse | Down | Down |
| Go to previous lyric verse | Up | Up |
Chord symbols, Roman numeral analysis, Nashville numbers, figured bass
| Action | Windows/Linux | macOS |
|---|---|---|
| Add text: chord symbol | Ctrl+K | Cmd+K |
| Add text: figured bass | Ctrl+G | Cmd+G |
| Next text element | Space | Space |
| Previous text element | Shift+Space | Shift+Space |
| Advance cursor: next beat | ; | ; |
| Advance cursor: previous beat | Shift+; | Shift+; |
| Advance cursor: duration | Ctrl+1 – Ctrl+9 | Cmd+1 – Cmd+9 |
Other score elements
| Action | Windows/Linux | macOS |
|---|---|---|
| Show/hide palettes | F9 | Fn+F9 |
| Search palettes | Ctrl+F9 | Cmd+Fn+F9 |
| Open master palette | Shift+F9 | Shift+Fn+F9 |
| Add slur | S | S |
| Add articulation: accent | Shift+V | Shift+V |
| Add articulation: marcato | Shift+O | Shift+O |
| Add articulation: staccato | Shift+S | Shift+S |
| Add articulation: tenuto | Shift+N | Shift+N |
| Add hairpin: crescendo | < | < |
| Add hairpin: decrescendo | > | > |
| Add parentheses to element | ( | ( |
Score setup and formatting
| Action | Windows/Linux | macOS |
|---|---|---|
| Add/remove instruments | I | I |
| Open instruments dialog | F7 | Fn+F7 |
| Toggle visibility of elements | V | V |
| Decrease layout stretch | { | { |
| Increase layout stretch | } | } |
| Add/remove system break | Return | Return |
| Add/remove page break | Ctrl+Return | Cmd+Return |
| Reset shapes and positions | Ctrl+R | Cmd+R |
File Operations
| Action | Windows/Linux | macOS |
|---|---|---|
| New | Ctrl+N | Cmd+N |
| Open | Ctrl+O | Cmd+O |
| Close | Ctrl+W | Cmd+W |
| Save | Ctrl+S | Cmd+S |
| Save as | Ctrl+Shift+S | Cmd+Shift+S |
| Ctrl+P | Cmd+P | |
| Quit | Ctrl+Q | Cmd+Q |
User interface
Playback
| Action | Windows/Linux | macOS |
|---|---|---|
| Play | Space | Space |
| Show/hide mixer | F10 | Fn+F10 |
Accessibility
| Action | Windows/Linux | macOS |
|---|---|---|
| Next UI group | Tab | Tab |
| Previous UI group | Shift+Tab | Shift+Tab |
| Next UI pane/window | F6 | Fn+F6 |
| Previous UI pane/window | Shift+F6 | Shift+Fn+F6 |
Other
| Action | Windows/Linux | macOS |
|---|---|---|
| Multiinstances | Ctrl+F3 | Cmd+Fn+F3 |
| Full screen | F11 | Fn+F11 |
Known incompatibilities
Upgrade from MuseScore 3.x
Overview
Keyboard Shortcuts
See All keyboard shortcuts for MuseScore 4. Here are the common ones that have changed or are entirely new:
| Action | MuseScore 3 | MuseScore 4 |
|---|---|---|
| Add tied note | + | T |
| Next Measure (Chord Symbol Entry) | Tab | Ctrl/Cmd+→ |
| Previous Measure (Chord Symbol Entry) | Shift+Tab | Ctrl/Cmd+← |
| Toggle accidental: flat | None | - |
| Toggle accidental: natural | None | = |
| Toggle accidental: sharp | None | + |
| Edit element | Alt+Shift+E | F2 or Alt+Shift+E |
| Insert special characters... | F2 | Shift+F2 |
| Jump to next UI pane | None | F6 or ` (backtick / grave accent) |
| Jump to previous UI pane | None | Shift+F6 or Shift+` |
| Show / hide selection filter | F6 | None |
Other changes
- What used to be the Inspector in MuseScore 3 is the Properties tab in MuseScore 4.
- The tool to switch between page view and continuous view is now at the bottom right of the MuseScore window.
- Same for the Zoom control.
- Same for the Concert pitch toggle.
- To (temporarily) change the playback speed you now need to undock the Play Panel.
- The "Toggle MIDI" button now is behind the Play Panel's cog wheel.
- Fermata is now in the Breaths & Pauses palette
- Hiding an instrument now mutes it by default. However, you can now hide the individual staves of the instrument, which is more flexible.
- The Text tool is now in the Text Properties, partly 'hidden' behind the __More__ botton.
Missing Features
Due to the nature of the upgrade some features previously present in MuseScore 3 have not (yet) been included. See this page in the developers' handbook for a listing of those items.
Upgrade from MuseScore 2.x or 1.x
Handbook for MuseScore 3.x
Handbook for MuseScore 2.x
Handbook for MuseScore 1.x
Glossary
Listed below are technicial terms and musical terms, which are frequently used in MuseScore or in the Handbook. Links to relevant handbook chapter are provided. To help musicians who are capable of reading a notation but do not know its proper name, image is provided. This chapter does not aim to be a dictionary of all musical notations, see External links.
The differences between American English and British English are marked with "(AE)" and "(BE)", respectively. Editors and translators of this chapter should add the individual entry for each term.
A
- Acciaccatura
 A short grace note which appears as a small note with a stroke through the stem. Musescore creates a quick playback, the playback duration is not affected by duration of the parent note.
- Accidental
- An accidental is a sign appearing in front of a note that raises or lowers its pitch. See Entering notes and rests:Accidentals. chapter. Musescore creates playback for common accidentals only, they includes sharps, flats, naturals, double sharps, double flats, and triple flats. To create microtonal accidentals such as quarter tone, see Tuning systems, microtonal notation system, and playback Chapter.
- Ambitus
- Note (or vocal) range used in a staff. Used particularly in early music. See Ambitus chapter.
- Anacrusis (mostly BE)
- See Pickup measure.
- Anchor
- The point of attachment to the score of objects such as Text and Lines: When the object is dragged, the anchor appears as small brown circle connected to the object by a dotted line. Depending on the object selected, its anchor may be attached to either (a) a note (e.g. fingering), (b) a staff line (e.g. staff text), or (c) a barline (e.g. repeats).
- Appoggiatura
- A long grace note which takes value from its associated note. Musescore creates playback as such. It is acceptable to execute written appoggiatura as acciaccatura nowadays but Musescore does not create such playback. Appoggiatura's functions include: passing tone, anticipation, struck suspension, and escape tone.

- Arpeggio
- An arpeggio tells the performer to break up the chord into the constituent notes, playing them separately and one after the other. The arrow arpeggio symbol indicates the direction in which the player should play the notes of the chord. See Arpeggios and glissandi chapter.

- Articulation
- A marking or symbol indicating how a note should be played, usually by altering the length of a note or shaping its attack and decay. See Articulation chapter.
B
- Bar (BE)
- See measure.
- Barline
- Vertical line through a staff, staves, or a full system that separates measures. See Barline chapter.
- Beam
- Notes with a duration of an eighth or shorter either carry a flag or a beam. Beams are used for grouping notes. See also French Beam. See Beam chapter.
- BPM
- A tempo displaying unit only used inside Musescore's Play toolbar. BPM is the amount of quarter notes would have been within one minute. It is not the number used in metronome tempo markings on a score. See Playback controls chapter.
- Breve, or Brevis
- A double whole note or breve is a note that has the duration of two whole notes.
C
- Caesura
- A caesura (//) is a brief, silent pause. Time is not counted for this period, and music resumes when the director signals. See Breaths and pauses chapter.

- Capo (text)
- A text to indicate the setting of the transposing device used on an instrument. See Capo playback (MS 4.0.2 and before) and Applying capos chapter. Not to be confused with Da capo (D.C.).
- Cent
- An interval equal to one hundredth of a semitone, used by Tuning property of a note. See Properties panel chapter.
- Chord
- 1. A group of two or more notes sounding together.
- 2. In Musescore, only notes sounding together that have same duration inside one Musescore Voice constitute a chord. To select a chord in MuseScore, press Shift and click on a note. See Working with multiple voices chapter.
- 3. In Musescore, a chord symbol. See Chord symbols chapter.
- Clef
- A musical symbol used to indicate which notes are represented by the lines and spaces on a →staff. See Clefs chapter. See also courtesy clef.
- Coda
- 1. A passage that brings a piece (or a movement) to an end.
- 2. The navigation marker which resembles a set of crosshairs. It is used where the exit from a repeated section is within that section rather than at the end. See also segno sign. See Jumps and markers chapter.

- Concert pitch
- 1. The sounding, or real pitch of a note—as opposed to the written pitch. See Working with transposing instruments chapter.
- 2. A score viewing mode in Musescore, see Concert pitch box in the status bar chapter.
- 3. The frequency of A4.
- Courtesy clef
- A reduced-size clef applied to the end of a system indicating a clef change at the start of the next system. See Clefs chapter.
- Cross-staff notation
- A musical phrase extending across two neighboring staffs: e.g. bass staff and treble staff.

- To create notation where the two stems are at opposite sides of the beam, as shown above, see Cross-staff notation chapter.

- To create notation where the stems are on the same side of the beam, as shown above, see How to span a chord or stem over two staves chapter.
- Crotchet (BE)
- See Quarter note.
D
- Da capo (D.C.)
- A directive to repeat the previous part of music. See Jumps and markers chapter. Not to be confused with capo (text).
- Dead note
- See ghost note.
- Demisemiquaver (BE)
- A thirty-second note.
- Double Flat
- A double flat (♭♭ or 𝄫) is a sign that indicates that the pitch of a note has to be lowered two semitones.
- Double Sharp
- A double sharp (♯♯ or 𝄪) is a sign that indicates that the pitch of a note has to be raised two semitones.
- Duplet
- See tuplet.
- Dynamic, dynamics, dynamic symbol, dynamics symbol
- A symbol indicating the relative loudness of a note or phrase of music—such as mf (mezzoforte), p (piano), f (forte) etc., starting at that note. See Dynamic chapter.
E
- Edit mode, text edit mode
- Used to edit adjust literal layout position and content of Text, contrast with normal mode and note input mode. See Adjusting elements directly and Entering and editing text : Editing text object content chapters.
- Eighth note
- A note whose duration is an eighth of a whole note (semibreve). Same as a quaver (BE).
- Endecalineo

- Endecalineo or endecagram, the stave for Solfège. See Solmisation (tutorial for MuseScore 3, pending update)
- Endings
- See volta.
- Enharmonic notes
- Notes that sound the same pitch but are written differently. Example: G♯ and A♭ are enharmonic notes. To quickly switch between enharmonic spellings, press J. See Entering notes and rests chapter.
- Explode

- A feature that allows the user to split (or explode) the chords in a passage of music in a single staff into their constituent notes or voices. See Implode and explode chapter. See also implode.
F
- Flag
- See beam.
- Flat
- Sign (♭) that indicates that the pitch of a note has to be lowered one semitone, see accidentals and key signature.
- French Beam

- Beams where the stems only extend to the first beam, but don't intersect all the way through. To create use the French Beams plugin.
G
- Ghost note
- In music, notably in jazz, a ghost note (or a dead, muted, silenced or false note) is a musical note with a rhythmic value, but no discernible pitch when played. Musescore supports crosshead (cross notehead), diamond notehead(the small diamond same as musescore 3), slash/diamond notehead (new in musescore 4), and adding brackets (parentheses) to a note, see Noteheads chapter.


- Grace note
- Grace notes appear as small notes in front of a normal-sized main note. See acciaccatura and appoggiatura. See Grace note chapter.
- Grand Staff (AE)
- Great Stave (BE)
- An instrument with two or more staves, featuring treble and bass clefs, used to notate music for keyboard instruments and the harp.
H
- Half Note
- A note whose duration is half of a whole note (semibreve). Same as a minim (BE).
- Hemidemisemiquaver (BE)
- A sixty-fourth note.
I
- Implode

- A feature allowing the user to combine voices from separate staves onto one staff. See Implode and explode chapter. This is similar to, but not exactly, score reduction (wikipedia). See also explode.
- Interval
- The difference in pitch between two notes, expressed in terms of the scale degree (e.g. major second, minor third, perfect fifth etc.). See Degree (Music) (Wikipedia).
- Interleaved

- A term used to describe two interlocking, oppositely-beamed sets of notes. To create, use the voice function and the beam palette. See Interleaved beam directions
- Instrument
- 1. Musescore Instrument, see Setting up your score chapter.
- 2. Real world instrument
- Irregular measure marker

- A plus sign or minus sign at the top right of a measure indicates that its duration differs from that set by the time signature. See The user interface and Measure properties chapters.
J
- Jump
- Jump objects are notations such as "D.S. al Coda", found in the "Repeats & Jumps" palette. See Jumps and markers chapter.
K
- Key Signature
- Set of sharps or flats at the beginning of the staves. It gives an idea about the tonality and avoids repeating those signs all along the staff. A key signature with B flat means F major or D minor tonality. See Key Signature chapter.
L
- Legato
- Legato is a play style which involves playing the notes in a slurred manner. Legato may be written as text or shown through the use of slurs.
- Local time signature

The time signature on a single staff when different from the overall score time signature. See Adding a local time signature for a single staff.- Longa
- A longa is a quadruple whole note.
- Ledger Line (AE)
- Leger Line (BE)
- Line(s) that are added with and for notes above or below the staff.
- Line
- Musescore Lines, a type of objects capable of attaching (anchoring) to a horizontal continuous range of more than two notes or rests, or vertical collection of notes (chord). See Other lines chapter.
M
- Measure (AE)
- A segment of time defined by a given number of beats. Dividing music into measures provides regular reference points to pinpoint locations within a piece of music. Same as bar (BE).
- Measure repeat sign
- A measure repeat sign looks like a "percentage" symbol having the two circles filled, or a slash with a dot at each side. See Measure and multi-measure repeats chapter.

- Metronome mark
- A kind of tempo marking. See Tempo markings.
- Minim (BE)
- See Half note.
- Multimeasure rest
- See Measure rests and multimeasure rests chapter.

N
- Natural
- A natural (♮) is a sign that cancels a previous alteration on notes of the same pitch, see →accidentals and →key signature.
- Normal mode
- The operating mode of MuseScore outside note input mode or edit mode: press Esc to enter it. In Normal mode you can navigate through the score, select and move elements, adjust Inspector properties, and alter the pitches of existing notes.
- Note input mode
- The program mode used for entering music notation, contrast with normal mode and edit mode. Enter it by pressing N or clicking on the pen icon in the note input toolbar. See Entering notes and rests chapter.
O
- Operating System (OS)
- Underlying software that controls and manages the hardware and other software on a computer. Popular OSes are Microsoft Windows, macOS, and GNU/Linux.
- Ossia

- An alternative passage which may be played instead of the original passage (from the Italian for "alternatively", meaning "or be it"). See Ossia chapter.
P
- Part
- 1. Musescore's automatic staff extraction function, see Parts.
- 2. A single melody line in a polyphonic musical composition. MuseScore 4 never uses this definition, but there is a similar feature Voice.
- 3. Instrument(s) or their staves. MuseScore 4.1.1 uses this definition only on the window title and one subheading in "Staff/Part Properties".
- Pickup Measure (mostly AE, also known as an Anacrusis (mostly BE) or Upbeat)
- Incomplete first measure of a piece or a section of a piece of music. See Measure duration, Create new score: Pickup measure, and Measure properties:Exclude from measure count chapters. May or may not be compensated for at the end of the score or section.
- Properties
- 1. Settings of an individual object on a score in Musescore, contrast with style (profile).
- 2. Musescore's panel, see Properties panel chapter.
Q
- Quadruplet
- See tuplet.
- Quarter note
- A note whose duration is a quarter of a whole note (semibreve). Same as a crotchet (BE).
- Quaver (BE)
- See eighth note.
- Quintuplet
- See tuplet.
R
- Respell Pitches
- Change accidental used on a note but keep note's pitch. See Entering notes and rests:Accidentals chapter.
- Rest
- A musical symbol that indicates silence. See Entering notes and rests chapter.
- Re-pitch mode
- One of the note input modes. Alternative note input methods: Re-pitch mode
S
- Score
- 1. In MuseScore support forums and the MuseScore Handbook, score generally refers to a computer file with the suffix .mscz - and to its visual representation on a computer screen as well as its audio playback.
- 2. In some chapters of the MuseScore Handbook, score means the layout and formatting of "Full score" or one particular Musescore part. See Musescore Part.
- 3. In other contexts (for example the IMSLP score-sharing website at https://imslp.org), a score generally refers either to a PDF file of the sheet music for a specific work or to an actual paper copy of the sheet music.
- Section
- In MuseScore, a region of the score between section breaks; also from the start of a score to the first section break, and from the last section break to the end of the score.
- Segno
 A navigation marker. See Jumps and markers chapter.
- Semibreve (BE)
- A whole note (AE). It lasts a whole measure in 4/4 time.
- Semiquaver (BE)
- A sixteenth note.
- Semihemidemisemiquaver (Quasihemidemisemiquaver) (BE)
- A hundred and twenty eighth note.
- Sextuplet
- See tuplet.
- SF2
- A virtual instrument format developed by E-mu Systems and Creative Labs. See SoundFonts.
- SF3
- An invention of Werner Schweer, the Musescore developer (source). This format supports sound sample compression. See SoundFonts.
- Shared note head
 A single notehead with two beams—one up, one down. Especially common in guitar music, for example. See Noteheads
- Sharp
- Sign (♯) that indicates that the pitch of a note has to be raised one semitone , see accidentals and key signature.
- Slash (slash chord, slash notehead)
- Indicates strum. See Slash chord (Wikipedia).
- Slash notation
- A form of music notation using slash marks placed on or above/below the staff to indicate the rhythm of an accompaniment: often found in association with chord symbols. There are two types: (1) Slash notation consists of a rhythm slash on each beat: the exact interpretation is left to the player (see Fill with slashes); (2) Rhythmic slash notation indicates the precise rhythm for the accompaniment (see Toggle rhythmic slash notation).
- Slur
- A curved line over or under two or more notes, meaning that the notes will be played smooth and connected (legato). See Slur chapter. A slur is not a tie.
- Solmisation
- see Endecalineo
- SoundFont
- A virtual instrument format supported by MuseScore. A SoundFont is a special type of file (extension .sf2, or .sf3 if compressed) containing sound samples of one or more musical instruments. In effect, a virtual synthesizer which acts as a sound source for MIDI files. MuseScore 4 comes with its own native soundfont, MS Basic. See SoundFont chapter.
- Spatium (plural: Spatia) / Space / Staff Space / sp. (abbr./unit)
- A unit of measurement, see Page layout concepts.
- Staff / Staffs
- A set of lines and spaces, each representing a pitch, on which music is written. In period music notation (before 11th century) the staff may have any number of lines.
- Staff Space
- See Spatium (above).
- Stave / Staves (BE)
- See Staff (above).
- Step-time input
- MuseScore's default note input mode. See Entering notes and rests chapter.
- Style
- The profile that contains settings in MuseScore, contrast with Properties. See Templates and styles chapter.
- System
- Set of staves to be read simultaneously in a score. See Page layout concepts chapter.
See also Operating System (OS). - System divider
- Separates systems on the same page. Can be switched on for the score in Format→Style→System, see Formatting chapter. Also available in master palette, see Other symbols chapter.

T
- Text
- A Musescore Text object is an object that contains individual characters that can be entered and removed by using (typing on) a computer keyboard. See Entering and editing text chapter.
- Tie
-
A curved line between two adjacent notes of the same pitch to indicate a single note of combined duration. See Tie chapter. A tie is not a slur.
- Quarter note + Tie + Quarter note = Half note
- Quarter note + Tie + Eighth note = Dotted Quarter note
- Quarter note + Tie + Eighth note + Tie + 16th note = Double Dotted Quarter note
- Transposition
-
The act of moving the pitches of one or more notes up or down by a constant interval. See Transposition chapter. There may be several reasons for transposing a piece, for example:
- The tune is too low or too high for a singer. In this case the whole orchestra will have to be transposed as well—easily done using MuseScore.
- The part is written for a particular instrument but needs to be played by a different one.
- The score is written for an orchestra and you want to hear what the individual instruments sound like. This requires changing the transposing instrument parts to concert pitch.
- A darker or a more brilliant sound is desired.
- Triplet
- See tuplet.
- Tuplet
- A tuplet divides its next higher note value by a number of notes other than given by the time signature. See Tuplet chapter. For example a triplet divides the next higher note value into three parts, rather than two. Tuplets may be: triplets, duplets, quintuplets, and other.
U
- Upbeat
- See pickup measure.
V
- Velocity
- A property of objects inside Musescore that controls how loudly note(s) are played, see musescore 3 handbook Loudness of a note chapter. Velocity property of notes are edited using Properties panel: Playback tab, see Properties panel chapter.
- Voice
- 1. In Musescore, voice is a software feature, you can use up to 4 voices per staff, see Working with multiple voices, also see staff.
- 2. The musical term "voice" refers to a musical line or part which can have its own rhythm. MuseScore does not have a feature to implement the exact same idea, if the voice feature does not suit your need, try adding separate instruments instead.
- Volta
- In a repeated section of music, it is common for the last few measures of the section to differ. Markings called voltas are used to indicate how the section is to be ended each time. These markings are often referred to simply as endings. See Volta chapter.
W
- Written pitch
- Transposing instruments (such as the clarinet, French horn, trumpet etc.) are notated at a different pitch (and key signature) to how they sound. The notated pitch is called the written pitch. Contrast with concert pitch. See Staff / Part properties chapter.
External links
目录
Editing the Handbook
Introduction to MuseScore
Download and installation
Windows
macOS
Linux
- AppImage
New features in MuseScore 4
New user interface
Instruments and parts
Inspector
New playback and VSTi support
Engraving improvements
Cloud storage
Other changes
Create your first score
Entering score information
Entering notes
Adding items from the palettes
Making adjustments in Properties
Inserting and deleting measures
Exporting your score
Saving your score
Viewing and navigation
Accessibility
Setup
- Windows
- NVDA
- JAWS
- Narrator
- macOS
- Linux
Working with the user interface
Working with your score
The user interface
Menu bar
Home tab
- My account
- Scores
- Plugins
- Learn
Score tab
Publish tab
Navigating your score
Scrolling
- Mouse wheel
- Scrollbars
- Keyboard
Element navigation
Navigator
Timeline
Views
- Page view
- Continuous view (horizontal)
- Continuous view (vertical)
Zoom
- Zoom in
- Zoom out
- Status bar zoom controls
- Restoring 100% zoom
Find/Go to
- Navigating to a numbered measure
- Navigating to a numbered page
- Navigating to a numerical rehearsal mark
- Navigating to an alphabetic rehearsal mark
Timeline
Overview
- Meta labels
- Instrument labels
- Meta rows
- Main grid
Meta elements
Basic interactions
- Selecting a measure
- Selecting multiple measures
- Drag selection
- [Shift] selection
- [Ctrl] selection
- Clearing a selection
- Meta values selection
Scrolling
- Standard scrolling
- [Shift] scrolling
- [Alt] scrolling
- Dragging
Labels interaction
- Rearranging meta labels
- Collapsing the meta labels
- Hiding instruments
Zooming
Context menus
- Meta labels context menu
- Meta rows context menu
- Instrument context menu
Basics
Setting up your score
Overview
Instruments
- Choose instruments
- Adding instruments
- Changing order of instruments
- Removing instruments
- Create from template
Additional score information
- Key signature
- Time signature
- Tempo
- Measures
- Title and other text
Changing instruments after score creation
Entering notes and rests
Overview
Entering notes
- Selecting a start point
- Entering note input mode
- Selecting duration
- Selecting pitch
- Selecting pitch using the computer keyboard
- Selecting pitch using the mouse
- Selecting pitch using a MIDI keyboard
- Selecting pitch using the virtual piano keyboard
Entering chords
Entering rests
Accidentals
- Selecting an accidental before entering a pitch
- Adding an accidental after entering a pitch
- Adding courtesy/cautionary accidentals
Ties
See also
Working with multiple voices
Overview
Entering notes and rests in multiple voices
Editing notes and rests in multiple voices
- Adjusting rests
- Hiding or deleting rests
- Positioning rests
- Changing voice of existing notes
- Combining voices into chords
See also
Alternative note input methods
Accessing alternative note input methods
Rhythm only
Re-pitch
Real-time
- Real-time (metronome)
- Real-time (foot pedal)
- Real-time Advance shortcut
Insert
Adding and removing measures
Inserting measures
- The Properties panel
- Note input toolbar
- Menu bar
- Inserting measures with keyboard shortcuts
Deleting measures
- Remove empty trailing measures
See also
Selecting elements
Selecting a single element
- Notes
- Chords
- Overlapping elements
Selecting a list of individual elements
- Selecting multiple elements manually
- Selecting similar elements automatically
Selecting a range of measures and staves
- Selecting a range by dragging
- Selecting a range by clicking
- Selecting a range using the keyboard
- Special range selections
Excluding elements from a range selection
Editing notes and rests
Overview
Making changes in note input mode
- Changing duration in note input mode
- Changing pitch in note input mode
- Replacing notes and rests in note input mode
- Deleting notes in note input mode
- Moving notes in note input mode
Making changes in normal mode
- Changing duration in normal mode
- Changing selected notes to a specific note value
- Increasing or decreasing the duration of a selected note
- Doubling or halving all note values in a range selection
- Changing pitch in normal mode
- Deleting notes and rests in normal mode
- Removing notes and rests and their associated time
- Adding ties in normal mode
- Changing voice in normal mode
- Moving selected notes into another voice
- Exchanging the contents of two voices
See also
Copy and paste
Accessing the commands
Copying a range
Copying a single element or list of elements
Moving elements
Swapping a selection with the clipboard
Repeating a selection
Copying a selection to multiple staves
Paste half/double duration
Duplicating individual elements
See also
Using the palettes
Overview
Accessing the palettes panel
Adding palette items to your score
- Items applied to individual score elements
- Items applied to ranges
- Items applied to full measures
Expanding and collapsing palettes
Searching and navigating the palettes
- Search
- Navigation
Accessing more palette items
Adding more palettes
See also
Properties panel
Accessing the Properties panel
Global settings
- Show
- Score appearance
General settings
- Visible
- Auto-place
- Cue size
Playback settings
Appearance settings
- Leading space
- Measure width
- Minimum distance
- Offset
- Snap to grid
- Arrange
- Color
Saving and restoring default settings
Adjusting elements directly
Changing the position of elements
Changing the shape of elements
Working with lines
- Changing the range of a line
- Creating diagonal lines
- Editing line text
See also
Parts
Opening a part
Closing a part
Creating custom parts
- Reveal instruments in default parts
- Create a new part
- Choose which voices appear in each part
Applying styles to parts
Renaming, duplicating and deleting parts
Exporting and printing parts
Default keyboard shortcuts
Navigation
- Page navigation
- Score navigation
Note input
- General
- Duration
- Pitch
- Tablature
Selecting
Editing
- General
- Duration
- Pitch
- Notation
- Manual adjustment
Text
- General
- Formatting
- Lyrics
- Chord symbols, Roman numeral analysis, Nashville numbers, figured bass
Other score elements
Score setup and formatting
File Operations
User interface
- Playback
Notation: Instruments, staves, and systems
Working with instruments
Overview
- Accessing the panel
- Adding instruments
- Deleting instruments
- Changing the order of instruments
Instrument settings
- Hiding/showing instruments
- Renaming instruments
- Replacing instruments
Adding and configuring staves
- To add a staff to an existing instrument
- To add a linked staff to an existing instrument
- Configuring a staff
Showing staves only where needed
Hiding empty staves
- Hiding all empty staves
- Excluding specific staves from being hidden
Temporary staves
Cutaway staves
Ossia
Other invisible measures
Implode and explode
Implode
- Combine notes from multiple voices in a single staff into one voice
- Combine notes from multiple staves into multiple voices on a single staff
Explode
- Copy passage of single notes to multiple staves
- Separate passage of chords into constituent notes
Mid-score instrument changes
Adding an instrument change
Working with instrument changes
- Removing an instrument change
- Re-labelling an instrument change
- Instrument changes in the mixer
- Changing staff type
Staff type change
Adding a staff type change
Setting staff properties
Staff/Part properties
Overview
Staff properties
Advanced style properties
- Template (all staves)
- Standard and Percussion staff options only
- Tablature options only
- Fret Marks tab
- Note Values tab
Part properties
- Instrument
- Names
- Usable pitch range
- Transposition
- Strings and frets
Brackets
Adding brackets
Editing brackets
- Changing bracket type
- Changing bracket span
Deleting brackets
Customizing bracket appearance
Notation: Rhythm, meter, and measures
Time signatures
Overview
Setting the initial time signature for your score
Adding a time signature change to your score
Deleting a time signature
Controlling the visibility of time signatures
Creating a custom time signature
Adding a local time signature for a single staff
Time signature properties
- Appearance
- Beam Groups
Time signature style
Stems and flags
Stem direction
- Default stem direction
- Flipping stem direction
Changing stem length
Creating stemless notes
Stem and flag properties
Stem and flag style
See also
Beams
Controlling which notes are beamed
- Setting the default beaming for a time signature
- Changing the beaming for selected notes
Controlling the appearance of beams
- Changing the angle of a selected beam
- Creating a feathered beam
Beam properties
Beam style
Regroup rhythms
Overview
Regrouping rhythms
See also
Tuplets
Creating tuplets
- Simple tuplets
- In note input mode
- In normal mode
- Consecutive tuplets
- Custom tuplets
- Nested tuplets
Changing the display of tuplets
Tuplet properties
Tuplet style
Barlines
Adding double and other special barlines
- Changing barline type for all staves
- Changing barline type for a single staff
- Adding mid-measure barlines
Changing barline length
- Extending all barlines in a staff
- Extending selected barlines in a staff
- Creating partial barlines
- Creating barlines between staves only (Mensurstrich)
Barline properties
Barline style
See also
Measure numbering
Showing and hiding measure numbers
- Showing measure numbers automatically
- Showing measure numbers manually
- Hiding measure numbers
Changing the measure number sequence
- Excluding a measure from the count
- Altering the numbering of a measure
- Resetting measure numbering for a new section
Changing the position of measure numbers
Measure number properties
Measure number style
See also
Measure rests and multimeasure rests
Measure rest
Multimeasure rest
- Enabling and disabling multimeasure rests
- Breaking multimeasure rests
- Multimeasure rest properties
- Multimeasure rest style
See also
Pickup and non-metered measures
Creating a pickup measure
- Specifying the pickup duration during score creation
- Converting a measure into a pickup
Creating non-metered measures
- Inserting notes and rests
- Using a keyboard shortcut
- Using Insert mode
- Joining measures
- Splitting a measure
See also
Measure properties
Opening and using the dialog
Staves
Measure duration
Other
See also
Notation: Pitch
Clefs
Setting the initial clef for a staff
Adding or changing a clef
- Add/Change a start clef
- Add/Change a mid-measure clef
Delete
Controlling the visibility of clefs
- Standard clefs
- Courtesy clefs
Clefs and transposition
- Using octave clefs
- Using different clefs for transposed and concert pitch
Clef properties
Clef style
Key signatures
Overview
Setting the initial key signature for your score
Adding a key signature change to your score
Adding a local key signature for a single staff
Selecting a key signature for a single staff
Replacing an existing key signature
Deleting a key signature
Controlling the visibility of key signatures
Key signatures and transposing instruments
- Open/Atonal key signature
Creating a custom key signature
Key signature properties
Key signature style
- Format→Style→Page
- Format→Style→Accidentals
- Format→Style→Measure
See also
Transposition
Overview
Transposing with keyboard shortcuts
- Transpose chromatically
- Transpose diatonically
- Transpose by an octave
Using the transpose dialog
- Transpose Chromatically
- To transpose chromatically to a specific key:
- To transpose chromatically by interval
- Transpose Diatonically
Working with transposing instruments
- Transposed and concert pitch
- Setting the interval of transposition
- Controlling enharmonic spelling
Octave lines
Overview
Adding an octave line to your score
Octave line properties
- Style tab
- Text tab
Octave line style
Noteheads
Changing notehead direction
Changing notehead shape
Sharing noteheads between voices
- Notehead sharing rules
- Change offset noteheads to a shared notehead
- Shared noteheads in tablature
Alternative notehead systems
Adding pitch and velocity information to notes
Notehead properties
Ambitus
Adding an ambitus to your score
Changing the range of an ambitus
Ambitus properties
Respell pitches
Manually changing the enharmonic spelling of notes
Automatically respelling all notes in a selection
- Respell pitches
Notation: Expressive markings
Articulations
Adding articulations to your score
- Toolbar
- Articulations palette
- Keyboard shortcuts
Articulations playback
Articulation properties
Articulation style
Dynamics
Adding dynamics to your score
- Dynamics palette
- Custom dynamics
Changing playback of dynamics
Dynamics properties
Dynamics style
Hairpins
Types of hairpin
Adding a hairpin to your score
- Lines palette
- Keyboard shortcuts
Changing appearance of hairpins
- Range
- Height
- Set at angle
- Other adjustments
Changing playback of hairpins
Hairpin properties
- Style tab
- Text tab
Hairpin style
Slurs
Adding a slur to your score
- Adding slurs in normal mode
- Method 1
- Method 2
- Adding slurs in note input mode
Multi-voice and cross-staff slurs
Changing appearance of slurs
Slur properties
Slur style
Breaths and pauses
Types of pauses
- Fermata
- Breath mark
- Caesura
Adding a pause to your score
Changing pause playback
Pause properties
Pause style
Ornaments
Adding an ornament to your score
- Add an ordinary ornament
- Add an ornament line
Adding accidentals to ornaments
Ornament properties
Ornament style
Arpeggios and glissandi
Arpeggios
- Adding an arpeggio/strum to your score
- Adjusting the height of an arpeggio/strum
- Creating multi-voice or cross-staff arpeggios
- Multi-voice arpeggios
- Cross-staff arpeggios
- Changing playback of arpeggios
- Arpeggio style
Glissandi
- Adding a glissando to your score
- Editing range of a glissando
- Changing appearance of glissandi
- Changing playback of glissandi
- Glissando properties
Bends
- Types of bends
- Adding a bend to your score
- Changing appearance of bends
Grace notes
Types of grace notes
Adding a grace note to your score
- Add grace note with keyboard shortcut
- Add grace note from palette
Multiple grace notes
- Sequential grace notes
- Grace note chords
Editing grace notes
- Change duration
- Change pitch
Changing playback of grace notes
Grace note style
Tremolo and rolls
Types of tremolo and rolls
- Single note tremolo
- Tremolo between notes
- Buzz roll
Adding a tremolo to a single note
Adding a tremolo between notes/chords
Changing appearance of tremolos
Other lines
Overview
Adding a line to your score
Adjusting a line
Types of lines
- Guitar-related lines
- Tempo lines
- Staff and System Text lines
- Trill lines
- Standard lines
Line properties
- Style tab
- Text tab
Line style
Other symbols
The Symbols palette
- View
- Search
Adding symbols to your score
- Add a symbol
- Add to other symbols
- Reposition symbols
Notation: Repeats
Repeat signs
Adding repeat signs to your score
- Simple repeats
- Multiple ending repeats
Changing playback of repeat signs
Changing appearance of repeat signs
Repeat properties
Repeat style
Voltas
Adding voltas to your score
Changing appearance of voltas
Changing playback of voltas
Volta properties
Voltas style
Jumps and markers
Types of jumps and markers
Adding a jump or marker to your score
Changing appearance of jumps and markers
Changing playback of jumps and markers
Jump and marker properties
Jump and marker style
Measure and multi-measure repeats
Adding a measure or multi-measure repeat to your score
Measure repeat properties
Measure repeat style
Repeat playback
Turning repeat playback on and off
Unrolling repeats
Idiomatic notation: Keyboard
Pedal
Types of pedal markings
Adding pedal markings to your score
Creating pedal changes
Pedal properties
Pedal style
Cross-staff notation
Creating cross-staff notation
Changing appearance of cross-staff notation
Accordion notation
Adding accordion symbols to your score
Idiomatic notation: Guitar
Fretboard diagrams
Adding a fretboard diagram to your score
- Chord symbols linked to fretboard diagrams
Creating a custom fretboard diagram
- Finger markers
- Alternative notation styles
Fretboard diagram appearance
Fretboard diagram properties
- General (tab)
- Settings (tab)
Fretboard diagram style
See also
Guitar techniques
Adding a bend symbol to your score
- Apply a bend
- Edit bend
- Adjust bend height
- Reposition bend
Adding a tremolo bar symbol to your score
Adding a slide to your score
- Add a slide
- Edit properties
- Adjust start and end points of a slide
Adding a barre line to your score
Adding hammer-on and pull-off symbols to your score
Notating harmonics
- Standard staff
- Tablature
- Staff/Tablature pairs
Notating guitar fingering
Creating a tablature staff
Overview
Types of tablature staves
Adding a tablature staff to your score
- Add tablature using the New Score dialog
- Add tablature using the "Add or remove Instruments" dialog
- Change an existing staff from standard to tablature
Creating paired standard and tablature staves
- Create paired standard/tab staves using the New Score Wizard
- Create paired standard/tab staves using the Instruments dialog
Entering and editing tablature notation
Computer keyboard entry
Mouse entry
Selecting note duration
Period tablature notation
Editing tablature notation
- Changing the pitch
- Moving the fretmark to a different string
- Changing the duration
- Crosshead/Ghost notes
Customizing a tablature staff
Changing tuning
Adding or removing strings
- Add a string
- Delete a string
Mark unfretted string “open”
Change number of instrument frets
Changing tablature staff type
- Change staff type from Instruments panel
- Change staff type from Staff/Part properties
Customizing appearance of tablature
Idiomatic notation: Percussion
Entering and editing percussion notation
Overview
- Types of percussion staves
- Adding a percussion staff to your score
Entering notes and rests in percussion staves
- Mouse entry using the Drum input palette
- Using keyboard shortcuts
- Using a MIDI controller
- Using the on-screen piano keyboard
Drumset customization
Introduction
Customizing a drumset definition
- Selecting a sound
- Defining the note
- Name
- Noteheads
- Other properties
Saving and loading drumset definitions
Other percussion notation
Diddles
Pedal lines
Rolls
Sticking
Alternative notation
Mensural notation and Mensurstrich
Adding a mensural time signature to your score
Using mensural note symbols
Working with non-metered music
Working with Mensurstrich
- Adding barlines between staves
Displaying note values across measure boundaries
See also
Slash notation
Filling a range with beat slashes
Creating rhythmic slash notation
- Accompaniment rhythms on the staff
- Accent rhythms above or below the staff
Custom staff types
Customizing appearance of staff lines
Customizing appearance of generated elements
Customizing appearance of notes
Changing staff type mid-score
Text
Entering and editing text
Overview
Adding text to your score
- Add text from a palette
- Add text from a menu
- Add text using a shortcut
Editing text
- Keyboard shortcuts
- Special characters
Types of text
Formatting text
Overview—levels of formatting
- Text style
- Text object properties
- Character formatting
- Formatting hierarchy
Applying text properties
- Apply to a text object
- Apply to characters
Setting style defaults
Selecting different text styles
Position
Staff and system text
Overview
Adding staff text to your score
Adding expression text to your score
Adding system text to your score
Repeating system text on other staves
Staff and system text properties
Staff and system text style
Tempo markings
Overview
Adding a tempo mark to your score
- Using metronome markings
- Using text markings
Changing appearance of tempo markings
Changing playback of tempo markings
- Metronome marks
- Tempo text
- Tempo change lines
Repeating tempo markings on other staves
Tempo properties
Tempo style
Lyrics
Overview
Adding lyrics to your score
- Entering syllables
- Entering a melisma
- Entering multiple verses
- Entering lyrics onto rests
- Special characters within lyrics
- Elision slur
- Escaping characters (that cannot be normally typed while entering Lyrics)
Editing existing lyrics
Delete lyrics
Entering lyrics above the staff
Changing verse number of lyrics
Copying lyrics
- Copying lyrics within MuseScore
- Copy to the same verse
- Copy to a different verse
- Copying lyrics to other programs
Lyrics properties
Lyrics style
Fingering
Types of fingering
Adding fingering to your score
- Adding fingering from a palette
- Adding fingering using a keyboard shortcut
- Adding fingering using the menu
Adjusting position
Changing the appearance of fingering
Fingering properties
Fingering style
See also
Chord symbols
Overview
Adding chord symbols to your score
- Entering a chord symbol
- Navigation commands
- Chord symbol syntax
- Editing a chord symbol
- Entering Roman numeral analysis
- Enter RNA
- Examples of RNA
- Entering a Nashville number
Aligning chord symbols
- Using the Style menu
- Using the Properties panel
Transposition of chord symbols
- Transposing instruments
- Transpose dialog
- Capo fret position
Changing Spelling of Chord Symbols
- Chord Spelling Systems
- Automatic Capitalization
Changing appearance of chord symbols
Changing Playback of Chord Symbols
- Enabling and disabling playback
- Customizing playback
- Generating chord voicings onto a staff
Chord symbol properties
Chord symbol style
- Appearance
- Spelling
- Positioning
- Playback
Figured bass
Overview
Adding figured bass to your score
- Entering a figure
- Text format
- Digits
- Accidentals
- Combined shapes
- Parentheses
- Editing existing figured basses
- Navigating by note, beat, or measure
- Duration
- Entering continuation lines
Figured bass properties
Figured bass style
Figured bass keyboard shortcuts
Rehearsal marks
Overview
Adding a rehearsal mark to your score
- Manual placement and naming
- Automatic placement and naming
Using measure numbers in rehearsal marks
Resequencing rehearsal marks
Finding rehearsal marks
Repeating rehearsal marks on other staves
Changing appearance of rehearsal marks
Rehearsal mark properties
Rehearsal mark style
External links
Header and footer
Overview
Adding a header or footer to your score
Using metadata
Changing how headers and footers are displayed
Header and footer properties
Header and footer style
Text blocks
Overview
Adding text blocks to your score
Changing the appearance of text blocks
Text block text properties
Text block text style
Formatting
Page layout concepts
Definitions
- Staff
- Grand staff
- System
- Frame
- Margin
Positioning of elements
Default position
Auto-place
- Vertical collision avoidance
- Horizontal collision avoidance
- Vertical alignment
- Disabling auto-place
Manual adjustment
Manual alignment
Score size and spacing
Page settings
- Page and margin sizes
- Staff size
- Other settings
- Actions
Style settings
- Horizontal spacing
- Vertical spacing
- Music margins
- Distance between staves within systems
- Distance between systems
Staff/part properties
Systems and horizontal spacing
Features
- System breaks
- Layout stretch
- Horizontal frames
- Keep measures on the same system
Tasks
- Placing fewer measures on a system
- Placing more measures on a system
- Changing the relative spacing of measures within a system
- Creating space between measures
- Creating space at the beginning or end of a system
- Adjusting the width of the final system
- Group measures
Pages and vertical spacing
Features
- Page breaks
- Spacers
- Vertical frames
- System dividers
Tasks
- Placing fewer systems on a page
- Placing more systems on a page
- Adjusting the spacing on sparse pages
- Adjusting space between specific systems
- Adjusting space between specific staves
Using frames for additional content
Adding frames between or after systems
- Text frames
- Adding text
- Vertical frames
- Adding text
- Adding images
- Size
- Position and alignment of content
- Spacing
Adding frames between measures
- Adding text
- Adding images
- Size
- Spacing
- Other frame properties
See also
Working with images
Adding images
- Frames
- Other elements
Image properties
Using sections for multiple movements or songs
Overview
- Features
- Time and key signatures
Adding section breaks
Section break properties
- Pause
- Instrument names
- Bar numbers
Sound and playback
Playback controls
Overview
Playback commands
- Start/stop
- To play back all the instrument parts
- To play back selected instrument parts only
- To stop playback
- Rewind
- Loop
- Metronome
- Play position and tempo
Other commands
- Enable MIDI input
- Play repeats
- Pan score automatically
- Enable count-in
Mixer
Opening the mixer
Mixer controls
Audio FX and sounds
- To load a VST plugin
- To disable a VST plugin
- To remove a VST Audio FX plugin
- To replace a sound plugin
See also
SoundFonts
Install a SoundFont
- Drag and drop installation
- File directory installation
Uninstall a SoundFont
A note on the Zerberus player and SFZs
Installing Muse Sounds
Installation via Muse Hub
Using Muse Sounds in MuseScore
Available sounds in Muse Sounds
- Choir
- Strings
- Brass
- Percussion
- Keys
- Harp
Piano roll editor
Capo playback
Overview
Adding a capo marking to your score
- To a single staff
- To a staff / tablature pair
See also
Swing playback
Overview
Adding a swing or straight marking to your score
Changing swing playback
Working with MIDI
Working with VSTi
Introduction to VSTi Plugins
Enabling, disabling, removing and replacing VST plugins
File management
Opening and saving scores
Overview
Opening a score
- File → Open
- File → Open recent
- Home tab → Scores
Import file formats
Saving a score
- Save to your computer
- Save to the cloud
- Name
- Visibility
- Never
- Always
- Every x saves
File export
Overview
Exporting your score
File formats
- Graphical formats
- Audio formats
- MIDI format
- Score formats
- Customizing export settings
MIDI import
Working with MusicXML files
Overview
Cleaning up an imported score
Preparing a score for export
Backup and recovered files
Project properties
Overview
Changing score properties
Adding new properties
Accessing project properties in your score
Score comparison
Publish to musescore.com
Overview
Creating a MuseScore account
Saving only to Musescore.com
Publish locally saved scores
Visibility in score manager
Customization
Language
Overview
- Change language
- Update translations
- See also
Appearance
Overview
Theme and Colors
Fonts
Toolbars and windows
Overview
Toolbars
- Showing and hiding toolbars
- Rearranging toolbars
- The Play toolbar
- The Note input toolbar
- The Status Bar
Windows and Panels
- The Score Window
- Docking and undocking Property, Instrument and Palette panels
- Customizing contents of panels
Templates and styles
Overview
Templates
- Saving your score as a template
- Creating a score from your template
Style files
- Saving style settings for your score to a file
- Loading style settings into your score from a file
- Setting a default style for your score
Palettes
Adding palettes
Hiding and deleting palettes
Changing the order of palettes
Customizing palette contents
- Adding elements from the master palette
- Adding elements from your score
- Moving elements between palettes
- Deleting elements from palettes
- Resetting palettes
Saving and loading palettes
Palettes menu
Palette properties
Workspaces
Overview
Creating a new workspace
Deleting a workspace
Switching between workspaces
Changing workspace settings
Sharing workspaces
Keyboard shortcuts
Overview
Defining a shortcut
Resetting and clearing shortcuts
Importing and exporting shortcuts
Preferences
General
Appearance
Canvas
Note input
MIDI device mapping
Score
I/O
Import
Shortcuts
Update
Advanced
Plugins
Overview
Managing plugins
- Installing a new plugin
- Enabling and disabling plugins
Running a plugin
Pre-installed plugins
Support
Getting help
Overview
Learn
Forums
Issue tracker
GitHub
Mastering MuseScore
Revert to factory settings
Overview
Reverting to factory settings from the menu
Reverting to factory settings from the command line
- Windows
- macOS
- Linux
Troubleshooting
Installation issues
Score issues
Display issues
Sound issues
Printing issues
Known incompatibilities
Appendix
Command line usage
All keyboard shortcuts
Keyboard Map
Navigation
- Page navigation
- Score navigation
Note input
- General
- Duration
- Pitch
- Tablature
Selecting
Editing
- General
- Duration
- Pitch
- Notation
- Manual adjustment
Text
- General
- Formatting
- Lyrics
- Chord symbols, Roman numeral analysis, Nashville numbers, figured bass
Other score elements
Score setup and formatting
File Operations
User interface
- Playback
- Accessibility
- Other
Known incompatibilities
Upgrade from MuseScore 3.x
Upgrade from MuseScore 2.x or 1.x
Handbook for MuseScore 3.x
Handbook for MuseScore 2.x
Handbook for MuseScore 1.x
Glossary
- A
- B
- C
- D
- E
- F
- G
- H
- I
- J
- K
- L
- M
- N
- O
- P
- Q
- R
- S
- T
- U
- V
- External links